Metro: Last Light – Faction Pack DLC Walkthrough
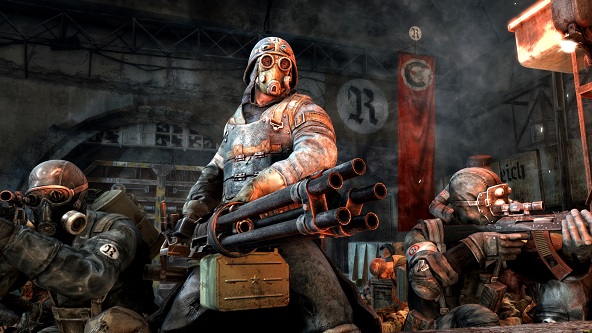
Learn how to sneak or shoot through all three new singleplayer missions in the Faction Pack for Metro: Last Light. The expansion adds missions putting players in the boots of a trainee Ranger, a communist sniper, and a heavy fascist gunner armed with a minigun.
Experience a variety of different gameplay options, with the sniper focusing on stealth, the trooper leading an armed defense, and the Ranger exploring a lost facility in search of artifacts. If you’re ever stuck, get step-by-step instructions for all three missions in the text walkthrough below.
If you’re looking for help or entertainment, check out the vanilla Metro: Last Light video walkthrough. For tons of secrets, collectibles, and extras, browse the Metro: Last Light cheats for everything Game Front has to offer on this survival-horror FPS.
Part 1: Sniper Team
Follow your sniping partner up the grimy staircase. He’ll open a red door and promptly take out a guard with his back turned from the door. Move up to the opening in the wall, overlooking a building, two towers, and patrolling guards below.
Set yourself up to get a good position on the targets. Look in the far distance. You’ll see a blue light. Take out the guard on the rooftop. Now look down and spot the guards in the towers. Silently take out the guard on the left tower first, then the right.
When the guards split up down below, take them out one by one, once they separate themselves. This will clear the area below. Your current objective is to infiltrate the building ahead, where you took out the guard on the rooftop.
Follow your partner through the red door. Move toward the light across the room. Press “E” to hook up to the zipline, where you’ll head toward the next building. You’ll see two guards. Wait until they stop talking. One of the guards will enter the room you’re in. Wait for him to look out the window, then take him out. Loot the body.
Move into the next room with a burning fire in the barrel. Eliminate the guard that’s also looking out the window. Loot his corpse, then open the safe to grab a filter. Now look out the window. Across the way, you’ll see the building where you took out the guard on the rooftop, from another angle.
It’s time to snipe. Focus on the guards on higher levels first. There are two guards on the rooftop where the windmill is. Wait for them to separate, then give them both bullets to the head. Shoot the enemy on the guard tower, then the heavy that patrols by the hole in the wall.
Now focus on the group at the bottom. Look left to where the plants are. Take out the guard that patrols all the way to the left, then scan to the right, taking out two more guards, ending with the poor fellow looking at the generator.
With the enemies taken out, head through the red door behind you. Drop down to loot the body, then keep dropping down until you slide down a dirt path. You’ll reach an area made up of metal and wooden planks that’s elevated above the water. Take out the patrolling guard closest to you, then turn right, over the pipe.
Walk across the beam, then drop down to the ground near the water. Head for the wooden ramp. Loot the corpse before you head up the ramp. Take cover on the right side. There are two enemies ahead. When they stop talking they’ll separate. Wait for the patrolling guard to move away, then neutralize the other guard. Finish off the patrolling guard.
Loot their corpses, then head up the ladder on the right side with the white/greenish light behind it. When you reach the top there’s a cargo container in front of you. Enter the container, cut the tripwire, then open the box for a filter and health kit.
When you leave and head across the foliage, past the towers, to the building, the wind will kick up, drastically lowering the time on your filter. You’ll need to move quickly out of the storm. Run forward with the building on your left side. You’ll see a ramp, that leads into a window. Head inside.
Open the light blue door. To the right you’ll hear guards talking. As soon as they stop, they’ll head back to their posts. Before heading to the right down the hallway, head left.
Down the hallway, there will be a room on the left with a guard inside. Take him out, loot his body, grab the filter inside the cabinet, and take the bullet on the table next to the door.
Exit the room, then head down the hallway with the sandbags on the left. Enter the room, right before you reach the sandbags. Grab the filter and the mask on the table next to the lit up lamp.
Take out the guard near the vicinity of the sandbags. Continue down the hallway. The first door on the left contains two enemies. Knife the one on the left standing by the desk, then slice the one sitting down by the communications console. Grab a filter on the console.
Now from here, it’s time to head up. Let’s head through the blue door across from the sandbags. You’ll come upon a staircase. Move up to the top, a level above the blue door on the next floor.
Head left into the hallway, then cut the tripwire. Keep moving through the hallway. Take the last room on the right. Before heading up the concrete ramp, search the corpse underneath the ramp to grab a filter.
When you reach the top, head toward the windwill, next to the post with the blue light above. The post has a zipline attached to a platform above the area below. Don’t go down the zipline yet, there’s sniping to be had!
Below are three towers and a slew of enemies in the junkyard. First take out the three guards in the tower. You’ll notice below that there are two guards talking to each other by a fire, one next to a generator and another that will patrol and talk to the guard on the left most side. There’s also one more guard that patrols by the enemy near the generator.
When one of guards, heads toward the two talking guards, eliminate the two lone enemies on the left most side in quick succession. One of the enemies will head down the stairs. Take out the two guards who are now carrying boxes, then shoot the one next to the generator.
The guard who went down the stairs will run up. Take him out, then zipline down the platform. With the area cleared, head down the stairway. You’ll meet your partner and the mission ends.
Part 2: Kshatriya
This faction mission is different compared to the other two because you scavenge the surrounding area around you to look for lost artifacts, and you also have a home base to manually save your progress.
It’s also interesting because you actually gear up before each venture out into the ruins to look for said artifacts. So this is essentially how this mission goes: search for artifacts until your backpack fills up, return to base to sell artifacts for money, use money to replenish supplies and buy new gear, then keep searching for artifacts as you delve deeper into the Great Library.
Each new “section” you explore includes a shortcut that returns you to your home base. Once it’s opened, you can go back the same way to continue exploring a newly found area. Oh, and you can also place light bulbs in sockets as well as light torches, which essentially helps you figure out if you’ve been in an area before. Plus it makes things nice and cozy.
When you begin, you’ll meet Kuzmich, the merchant, and Shaman, who looks like a Russian Walter White. He’ll be the one you’ll turn in your artifacts to. For now, check out the selection. You don’t need to grab ammo yet, but definitely grab some first aid kits and possibly a filter.
When you’re ready head to the double doors, you’ll meet two more scavengers and they’ll give you some advice. Grab the light bulbs in the basket on top of the desk on the right side. Pull the lever on the right side to open another set of double doors. You’ll begin in the sewers.
Whip out your pistol and head right, up the wooden staircase. You may or may not get attacked. It seems random. If you do get attacked remember to carve up the monsters for salvage. Move through the tunnel, inserting light bulbs as you go along.
Move through the cobwebs until you reach a dead end. Grab the gear from the corpses, then head back down into the tunnel. When you reach the end, climb the ladder, then put your gas mask on by pressing “G”. You’ll be in an office building. The red door for now will be locked. You can scavenge shelves and cabinets for extra ammo. Grab the monitor on the desk, then head into the hallway. You’ll see rain coming down outside through the windows.
Move down the hallway, then light the lamp on the right. Grab the book on the table next to the dead monster. Cut the tripwire. Turn the switch on the wall, then turn on the generator. Continue heading down the hallway into the next room.
The room will turn right. Now move down the room, grab the gasoline canister and the phone. Your backpack will be full here. Light the lamp. You’ll need to come back here to get the keyboard.
It’s time to turn in your artifacts. Turn around and keep the windows on your right side. Head back down the room. Look to your left and open the gated door with a white arrow pointing at the door on the wall. This is your first shortcut. Open it, head down the stairway, make a right down the familiar wooden staircase, then immediately head to the safe zone. There will be a fight outside with the two other scavengers you met.
Once inside, turn in your gear: the gas can, a book, a phone, a monitor and a teddy bear. Head toward the gate that says “Polis” on the far wall. This will save your progress. When you wake, gear up with med-kits, filters, and ammo, but keep in mind to save some bullets for the two suits, which will be helpful for later.
Through the Rain
Head back up to the office area. After you pass by the door gate, grab the keyboard, then look for the white arrows next to the door frame by the windows. It will lead outside. Ahead is a manhole you’ll need to jump down to.
One side, where the wooden planks are, will lead to a shortcut. The other side continues your journey up a ladder. At the top, you’ll reach the library. Careful for the little monsters that appear through the thick foliage. Scavenge as you make your way up the grand staircase.
When you reach the top of the staircase, take note of the hole in the wall on the left. You’ll head there later, but for now, turn around and move past the swinging vines on the right side. You’ll pass by a body. Grab the spare parts, then move through the archway. Grab the tricycle. Once you do, you’ll be attacked and your backpack will be full. Take care of the monsters, then head toward the right side with the windows on your right side. You’ll pass by a box of books. Your backpack is full, so you’ll need to come back for this later.
Head back down the way you came, then sprint toward the safe zone by opening the gate through the sewers. Turn in your artifacts: keyboard, painting, clock, weapon parts, and tricycle. You should have enough money now to grab one of the suits. At this point, I would suggest grabbing the irradiation suit, especially for the part coming up.
Save your game, then gear up as you head back toward the Great Library. Move back up the staircase to return for the box of books, then head into the hole through the wall by using the bookshelf as a ramp. Grab the glasses on the shelf, then open the door. You’ll be in a room with a piano.
Take the painting directly in front of you, then scavenge the room. You’ll also find a red poster on the wall. After a little while, you’ll be attacked, but your duo of friends will come to help. One of them will also play the piano.
After the attack a set of double doors will open, leading up to a staircase. To the left of the staircase is a blue container. Your backpack will be full. Now don’t head up the stairs yet. Look toward the window. There’s a ladder outside, a shortcut. Access the ladder to lower it. Quickly drop down, head into the office, then back to the safe zone. Turn in your things: pack of books, glasses, icon, poster, and tools (blue container). You should have a lot of bullets. Save your game.
Deeper into the Library
After gearing up (I’d recommend grabbing the double barreled shotgun), head back up the ladder, outside, past the office. Walk up the staircase, then open the doors. This area is highly irradiated, so grabbing the irradiation suit here is a good idea. There’s also a demon that will constantly be flying around here.
Scavenge as quickly as you can, while avoiding the demon. Head toward the left side, you’ll find some blueprints on the ground. Now move right toward the staircase, then up the rubble into the door to temporarily leave the irradiated area.
Look down on the left side from the door frame. There’s a suitcase by the windows. Quickly grab it, then head back into the hallway for a brief respite. From the doorway again, head right. You’ll spot two bodies and another artifact. Sprint back to the hallway, then follow it down as you move past the wheelchair.
Head down the staircase avoiding the vines, until you reach the bottom. The room contains tipped over metal bookshelves and pillars. There’s also a librarian in here you’ll need to contend with. To make him go away temporarily, simply stare at it until it does so. Don’t get too close though, or it will attack. If it does attack, kite it, until it’s dead, through you’ll expend a lot of ammo.
Exit the room into the hallway. The first room on the left contains a welding helmet. The first room on the right contains a cube made up of toy molecules. This will make your backpack full. Head back into the hallway. There will be white arrows on the right side.
There’s a ramp that will lead down. Head inside the building, cut the tripwire, then open the red door. You’re in the office again! Take the ladder down to the safe zone. Turn in your artifacts: suitcase, medical supplies, drawings, space lattice model, and welding helmet. Save the game, then gear up once again. Head back up the ramp to where you faced the librarian.
Keep moving through the offices. There’s a room with a dead body leaning over an artifact. Head to the room opposite this room. Move through the hole in the wall. You’ll see a bathroom. You can grab a pneumatic gun where the toilets are. Now grab the musical instrument. You’ll get attacked by a librarian, but it’s scripted, so you’ll be fine.
Head for the hallway on the side where the librarian grabbed you, then turn right. You’ll see a staircase. Head down. Use the breaker to turn on the lights in the room ahead. The wall opposite you is a dead body holding some night vision goggles. Move past the metal bookshelves on the right into the hole in the wall. Cut the tripwire.
Make your way down the elevator shaft, scavenging bodies and lighting up bulbs as you descend. Head into the sewage area with elevated concrete blocks. There will be a librarian in here. On the right side will be two sets of ladders. Climb up the first ladder then grab the artifact by the door. A console of sorts. Climb up the second ladder to skulk through the vents.
Drop down and open the metal door on the right. This leads to the hallway where you got the console-like artifact. Take the ladder down by the dead bodies. Head down the hallway, lit up by the green mushrooms. Open the door, then head up the ladder to open the manhole. This is a shortcut to the safe zone. Head inside, and unload your artifacts: technical notes, instrument, and terminal.
Archives
Head back down the manhole from the left side of the tunnel. Follow the path past the pipes. When you head to the doorway on the left, there will be two sleeping librarians. Avoid them, then head up the ladder. Move through the area until you drop down. Ahead, you’ll see a sleeping librarian next to the door you have to go past.
Run by it, then head up the ladder into the vault. You’ll have to contend with two librarians, but one at a time. Kite them until they are both dead. Search the archives to grab a secret metro map and a speaker.
Head into the room past the red telephone. Climb up the elevator shaft using the staircase. Keep moving up. Open the red door, and you’ll find another shortcut to the safe zone. Once you turn in the secret metro map, this will end the mission.
Part 3: Heavy Squad
Check back for updates




 Get Started Making Virtual Reality Games in Unity 5 for Free
 All Nine Special Hunter Tools Location in PS4 Bloodborne to get the Hunters Craft Trophy
 Battlefield 3: Top 10 Things People Hate About BF3s Multiplayer
 Dynasty Warriors 7 unlockable characters guide
 Splinter Cell: Conviction Walkthrough Video Guide in HD