So here we are, CoD: Black Ops 2 has only 1 and a half month to go until the release. The players are warming up their skills and reflexes using Black Ops 1, to get ready for Black Ops 2 Zombies. I’ve noticed a lot more activity on Black Ops recently. Especially a the zombie mode lobbies. Players arrive a lot faster into the lobby. And it’s always full.

By looking at the new zombie trailer, I’ve noticed several narrow areas and dead ends. In order to survive, practicing on Kino der Toten is not enough. You should try out FIVE. FIVE is full of narrow, challenging areas, and that’s why newer or less skilled players hate it. FIVE need 4 things: Strategy, Juggernog, an Escape route, and a way to kill the Pentagon Thief. In this article, I’m going to cover the unwritten rules of surviving FIVE.
1: Solo Strategy.
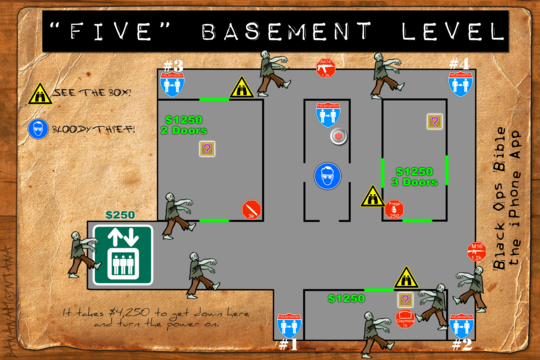
Some of you might not know how the map looks like from above, so here’s a map.

Round 1: Stay upstairs. Don’t open any doors. Get the M14 and the Quick Revive (optional). Use knife only.
Round 2: Shoot zombies with the pistol 8 times, then knife them. If you’re out, you can kill the with your M14, or kill them with your knife, which needs 2 stabs.
Round 3: Get your M14 and use it.
Round 4: Open a door leading to the elevator, and open the elevator barrier. Try to rack up some points here, using both windows near the elevator. Once they keep coming from the hallway, and you can’t keep up, just use the elevator and finish the round at the war room’s topside.
Round 5: Open the barrier at the stairs and go left. Try to survive here as long as possible. I advise to buy the MP5k.
Round 6-8: Try to survive at the war room. Open the 2 other barriers. One by the stair, and one at the other side of the room. If you have these barriers removed, you can train them (run around to form a horde), so you’ll have better chances to survive. You should also get the Stakeout. DO NOT GO UP THE STAIRS.
Round 9: Get a crawler at the end of the round (using grenades on hordes), and head down to the lab area to activate the power. Once it’s on, you should go get the Juggernog immediately. You should have a try with the mystery box, too.
Round 10-12: Do the same. Train them, kill them. You should rack up as many points as possible.
Round 13: This is where it gets tricky. The Stakeout stopped killing the zombies in one shot. Now you need 2 shots to finish them off. Get a crawler, go down to the labs and get a good gun from the mystery box. Once you have a better gun, kill the crawler and advance to the next round.
Round 15: This is the point where you’re likely to run out of ammo. Pack-A-Punch should help you out. Activate all the defcon switches in the war room (2 downstairs, 2 upstairs), and step into a teleporter. You will get to the PaP room, so you’ll only have a limited amount of time before the zombies will breach the room (don’t let them!). Upgrade your weapon then leave the room using the teleporter behind you, or if you feel like Chuck Norris, face the entrance and shoot the horde.
Round 15-20: Train them, kill them. Get a crawler after each round to fill up your ammo or to buy some perks.
Round 20-: This is the point where the game is likely to get extremely unfair since the zombies are more powerful, and there’s more of them after each round. Train them, kill them, and pray to God to not get cornered.

Juggernog: YOU MUST HAVE IT. It’s your number one objective.
Escape route: This one is pretty tricky and works well. Activate all the defcon switches excluding the one near the Juggernog. Have a weapon which is not Pack-A-Punched. Once you ran out of ammo, and you cannot go anywhere, just activate the last switch, jump into the teleporter, upgrade your gun, and wait for them by the door. Take them out, or escape using the teleporter behind you.
Thief strategy: Get the Mule Kick perk, and buy the cheapest possible gun that you can reach for that slot. You should have a powerful automatic gun in another slot, to take him out. Once he comes, put down some claymores (optional), and equip your crappy gun. He’ll take that, and teleport you to the lab area. Shoot him, but don’t get in his way. If you succeed: Congratulations! If you don’t kill him: Nothing bad happened! Why? He took a gun that you don’t need and you still have the other 2 that you need. Plus, you’ve got ammo, if you pick it up. Keep in mind that you cannot have bonfire sale using this technique.
I hope I’ve helped out a lot of you with this strategy. Using this I’ve got to round 29 on solo. I could’ve done more but, I’ve got cornered.
-Greg Butcher
Credits for the pictures go for their authors. That means they’re not mine, and I haven’t stole them. Alright? Good.


 The Elder Scrolls V: Skyrim - Dawnguard Guide
 Black Ops 2 Walkthrough
 Rocket League Guide: How to Play Like a Pro and Score Easy Goals
 MGS V: Ground Zeroes To The Phantom Pain Save Transfer Guide: S Rank Missions, Costumes, Prisoners & More
 Gears of War: Ultimate Edition Xbox One Achievements List