The Saboteur is an action/RPG game set in Nazi-occupied Paris that mixes elements of Crackdown and Splinter Cell, with some leveling up of your character and lots of sneaking around with a disguise on to avoid a shootout. You play Sean Devlin, an Irishman with a need for revenge against the Nazis and the abilities to climb like a monkey, fight like Mike Tyson, sprint for miles and swear like a sailor. As the story unfolds, you learn why he is motivated to join the fledgling Paris resistance three months after the German invasion. The game is full of movie references, word play and double entendre, as well as tips of the hat to other video games. The music is great, including songs from Ella Fitzgerald and Nina Simone, as well as original music in the style of the period and an OST that does a great job of setting the mood. There is also a lot of humor, coming mostly from the main character. Veteran video game voice actor Robin Aktin Downes does a fantastic job as Sean Devlin, and though his Irish accent comes and goes, he delivers some hilarious dialogue beautifully. Overall the game is very enjoyable for the variety of missions, music and good game controls, and in spite of some curious AI behavior, some odd character animations, and how several of the main questions posed during the story go completely forgotten.
You spend most of your time disguised among Nazi soldiers performing tasks for the French resistance just after the Nazi invasion of Paris in1940. The game offers some amusing alternatives to fighting when you’re being chased by Nazis. Various characters send Sean on missions of various types, such as sabotage, assassination, theft, rescue and sometimes just giving someone a ride somewhere. At any point between missions you are free to attack the hundreds of Freeplay targets to earn credits on the black market, where you buy ammo, weapons and support from the Resistance.
Northern France, from the west coast to the German border, has been compressed in the game to an area you can drive across in a matter of minutes. Even some points of interest from the Loire Valley have been smushed up into play so that you can visit the chateaux of Chambord and Chenonceau. Most of the game’s action takes place in Paris, and as you destroy the Nazis’ strength in a given area, the local people recover the Will To Fight, making the grey, depressed look of heavily occupied Nazi areas return to their former color. A complicated main plot is supported by various side missions that take you to many parts of the famous city, each one earning you credit and offering opportunities to earn various Perks which increase your skills and abilities in the game. When the main story is finished, you return to Paris to continue the fight by taking down as many Freeplay targets as you wish.
Preface: The Saboteur is an M rated game containing profanity, violence, sexual situations and nudity with The Midnight Show upgrade active. The videos on this guide may contain profanity. The videos were made while playing on Normal difficulty on an Xbox 360.
THE GUIDE WILL FOLLOW HERE SHORTLY.
The game world is divided up into regions, only some of which are available to you at the beginning of the game. As the story progresses, you earn papers to pass through various security checkpoints. Trying to pass without those papers will attract undesirable attention from the border guards.
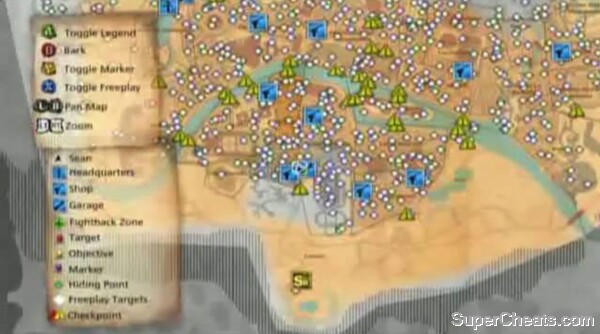
The Map
The map screen shows the entire game world and offers several useful functions, such as your location as a black arrow, the locations of various points of interest, (Headquarters, garages, weapons dealers) and the initials of characters who have missions for you. Main story missions show up with gold initials, initials in black and white represent optional missions. On the black market you can buy information on Freeplay locations by region.
You can have the map's GPS plot a route for you by dropping a pin where you want to go. Some missions have you driving long distances into the countryside so this is a welcome feature. However, the GPS doesn't know what papers you hold, and it may route you through a checkpoint that could cause trouble. So see what it comes up with before you take off for a trip that will end at Stalag 13.
GPS wasn't perfect in 1940 either.
The map is dynamic and changes according to your condition, so that when you are being chased, hiding spots and fight back zones appear. You can zoom in and out and scroll to find what you're looking for, as well as toggle on and off free play targets, markers and the legend.
Gold Lanterns show the way to Scenic Views, as shown in the example of climbing to the top of Sacre Coeur.
The Paris region is divided up into Zones 1, 2 and 3. As you progress through the story you earn papers that will let you pass through the Nazi checkpoints that separate the zones. Also, freeplay targets in zone 2 are worth 10 points more than those same target types in Zone 1, and Zone 3 targets are worth 20 points more. Red warning icons on the map are zones for which you do not yet have papers to pass through.
Ve have vays of knowing if you have ze correct papers.
Outside Paris are various countryside regions and some smaller towns. Once you are outside the Nazi checkpoints, you can travel anywhere until you reach Germany in the northeast. When you've completed the main storyline, you can still go to Saarbrucken, but the main gate is guarded and your papers will not allow you to pass. You need to eliminate the guards, or wear a disguise to approach the door and open it as you do any other door in the game. (A trapped car sent speeding toward the gate will clear all the guards so you can walk up and open the gate without any trouble.) This is the only region that retains The Saboteur's trademark gray, rainy Nazi occupation once the main story has been completed.
On your HUD is a minimap surrounded by a ring that shows your Suspicion Meter. If any Nazis are suspicious of Sean it will show as a yellow portion of the circle, either increasing toward full or decreasing in white once Sean has stopped whatever was causing the suspicion to rise. If the Suspicion Meter reaches a full circle, a Nazi will attempt to sound an alarm unless you can stop him from blowing his whistle. An exclamation point in the circle below the meter means Sean is visible to a Nazi. When that circle is empty, no Nazi can see what you're doing.
If an alarm sounds, Nazis nearby will try to kill you. A red circle will appear on the map, its size determined by the size of the Alarm, from 1, which is a fairly small region around your current location, up to 5, which covers the entire map. If you can move out of the red circle, the alarm ends. You can also use a hiding spot, or a fight back zone to end an alarm.
If you can reach an escape point without being seen, duck in to wait out the alarm.
Managing this meter is a large part of game play. Your actions and where you choose to move may draw suspicion. Walking into a restricted zone (indicated by barbed wire on your map), carrying a weapon, climbing or sneaking will all draw attention. But wearing a Nazi uniform will allow you to do many things you can't do dressed in Sean's clothes.
Once an alarm has started, try to escape without killing more Nazis. Doing so will increase the level, which broadens the red circle of alert Nazis and brings more in to try to kill you. If you keep killing Nazis the circle will continue to grow until it covers the entire map at Level 5, and with each level the responding vehicles become more formidable. A fast car will help and make escaping Level 1 alarms a piece of cake in most locations. You earn the Altair racecar with your first car hijack, and it's pretty good for escaping alarms until you unlock something faster. Don't be afraid to take off on foot, either, since the Nazis respond differently to a foot chase. If you're on a rooftop, stay hidden and try to make your way to a hiding spot. As soon as a Nazi sees you, the red circle recenters on your position.
Sean is a one-man army in that he is an effective brawler, expert demolitions man, and can use a variety of weapons, from pistols to rifles to flamethrowers and launchers. That said, you can usually get a lot more accomplished by sneaking than you can by shooting. Once an alarm starts it will continue until you have stopped it by escaping the alarm zone, finding a hiding spot, or shutting off the alarm at an alarm box. Having a bunch of Nazis chasing you is generally not productive to your in-game goals.
Watch your suspicion meter carefully to avoid alarms, and beware of guards who can survive being half-buried in concrete.
Sneaking is much more effective than shooting and if you played any of the Splinter Cell games you'll have a head start in this respect. Sean can sneak in just about anywhere by donning a disguise and paying close attention to when he is arousing suspicion. Sneaking does require patience, however, and not all players care to take this route. If you prefer to go in guns blazing, make sure you are well equipped before you leave by visiting the black market arms dealers. Don't overlook the silenced weapons, as with them you can get a lot done without being detected as long as no one sees you shooting.
If you're quick with a silenced weapon and can avoid a blown whistle, you can get away with a lot as long as you aren't seen.
There are times when you want to raise an alarm, possibly even to the highest level. In this case you may want to sneak into an advantageous position, but when you get there, you'll want to kill as manly Nazis in as loud a fashion as possible. For example, if you're trying to earn the Paint The Town Red perk, you want to get up to a Level 5 alarm to attract a Wulf tank so you can destroy it.
After completing the early missions for Santos, you may buy items on the black market. As you destroy enemy installations, kill generals, save citizens from harassment, open crates, etc., you earn contraband items of varying black market value. Your contraband balance should add up quickly if you're keeping busy with the dynamite and RDX. If you have some spare time and want to build you account up, take over a rooftop anti-aircraft gun and blow up some blimps for a while.
Where do all these Zeppelins come from, and why are they attracted to AA fire?
As you progress in the story new items will become available. Some perks also unlock black market items. (Don't forget to use the Luck of the Irish and St. Paddy's Day Upgrades to unlock one silver and one gold perk if you're having trouble.) Black market vendors will not sell to you if the Nazis are chasing you. New locations to buy open up as you progress through the game, so look for the blue pistol icon in new areas.
Watch for the Resistance's symbol to find their locations.
It takes a while to unlock the best weapons, but you start off with some decent gear: a throwable grenade, dynamite, Kruger and Silenced Pistols, MP40 SMG and MP44 MG, Double Shotgun and Trenchgun, and Hunting and Carbine Rifles. The silenced pistol is very handy for stealth work, and even though you can't buy a sniper rifle until later, you can pick one up from dead snipers, often found atop sniper towers around the city. When you begin the Buried Secrets mission, check with the arms dealer on the way out of the church as he has some new kit for you: the Raum Pistol, Steiner Rifle and Scoped Carbine. After the Whisper and Roar mission you unlock the Tommy Machine Gun, Siegfaust rocket launcher, and Scoped Steiner Rifle. You unlock the Bridge Killer kit after the Rolling Thunder mission, and the Viper SMG silenced SMG after South of the Seine. The Terror MP60 and Terror Shotgun arrive after Boiling Point, and the MP60 has the biggest capacity of any of the automatic weapons so it comes in handy for the fighting-heavy missions to come. After C'est Ici L'Empire De La Mort you unlock the Terror Flamethrower.
Certain Perks unlock other weapons:
Angel of Death: Executioner Pistol
War of Terror: .44 Pistol
Mad Bomber: RDX
Block Buster: Super RDX
Longshot: Terror Sniper Rifle
Paint The Town Red: Panzershrek
Game Saves
You can save your progress at any time, with a couple of qualificatons to this statement. You cannot save mission progress until that mission is complete. And you cannot save your location at a given spot on the map. But you can save any progress you've made toward earning Perks, any Nazi items destroyed, cigarettes smoked, etc. So when you load a game you will spawn at a headquarters, not where you were when you saved, and be sure to complete a mission before you quit the game or you'll have to start the mission from the beginning next time you play. Each game save tells you the last mission completed.
You have 15 save slots, plus an AUTO save. Beware of the auto save if you go back and play a previous mission for some reason. Be sure to put your progress in one of the 15 slots before you do this, or you will lose anything you've done that is stored in the Auto save at your first checkpoint. When working on Perk counts especially, save frequently to your most recent save slot.
Use the Rooftops and the Countryside to Escape
Staying out of line of sight is a great benefit when escaping an alarm. There are lots of places to hide on the rooftops, and tree lines and houses in the countryside are good as well.
Drain pipes are MUCH faster than jumping from window to window, so use them whenever possible.
When you're spotted, the red alarm circle re-centers on your location, so try to stay hidden when escaping. Also, bring a fast car to outrun small alarms, especially when you're on the edge of occupied territory. Alarms are easier to outrun if you can get out of the black and white areas or out into the country where there are fewer Nazis to spot you.
Use the GPS
Have the GPS plot a route for you by dropping a pin as your destination. This is particularly useful for long drive away from town, but also for finding locations not automatically plotted when on a mission, or when you want to remember a location on the map. When someone gives you a mission, a yellow route will show on the GPS if you're in a car, but not if you're on foot, so to see where you're supposed to go, hop in a vehicle. (See above video The Map and Game Areas section about GPS correction.)
Non-Stealthy Stealth Kills
Beware of sudden yellow alerts caused by the discovery of a Nazi dead body you left behind. You may have gotten away with a stealth kill, but if another soldier finds the dead body, you may find yourself in an unanticipated situation.
Music on the Radio
When driving, you can change the song by hitting Right on the d-pad (Xbox 360).
Fast Travel
There is no Fast Travel feature, but there is a way around a long drive back to HQ after a mission. Once you have the Mission Complete screen, save progress into one of the 15 slots, then load that save. This will respawn you back at a HQ and save you the drive. It may not be the HQ you want, but in most cases this will be faster than driving back to Paris if you're far away.
Saving citizens from Nazi Harassment
There are two types of harassment to stop: the firing squad and the truck collection. Sometimes you will see a few citizens lined up against a wall with one or more Nazis preparing to shoot them. Most of the time you will see a single Nazi with a gun on a citizen, sometimes with a second Nazi cheering him on. Both cases count if you kill the threatening Nazis so the citizens can escape.
Try to get the accusing Nazi without being seen so you can slip away without an alarm.
However, if you come across a case of the truck harassment, in which the threatened citizen will be put in a Nazi truck and taken away instead of shot on the spot, you must kill the Nazi before the animation related to the truck starts. Sometimes you may think you've done it, only to have the truck arrive and the citizen get in the back in spite of the fact that the Nazi who phoned it in is lying dead on the sidewalk. The citizen will not flee to save his life if you wait too long to save him.
If you wait too long and the collection truck arrives, the citizen will not flee.
If you are trying to get this achievement, drive around in black and white zones where there are lots of Nazis; they are more aggressive about harassment here than they are in colorful, strong Will To Fight areas. Look for soldiers suddenly running, because these are probably entering the harassment routine. With some effort you can find areas where Nazis spawn right before you come around the corner, and before long one or more will start a harassment you can stop.
Most of the early missions, especially those of the Prologue, are straightforward and are a matter of following simple on screen directions. When missions get more complex, look for the videos included in this guide for help with the tricky sections.
Before going back three months to learn why you are in Paris, accompany Luc on your first sabotage mission at the fuel station by Gare de L'Est. The acquisition of explosives is mainly a training section on the game's fundamental elements. Once you arrive at the station, you must wait for Luc to blow up the truck before you jump on the rope, and you must take him with you when you leave to complete the mission.
Blow the fuel tanks, then don't forget to get Luc before you leave.
Now you get some back story about why Sean is so unhappy in Paris. This mission is a simple matter of driving the truck to Germany.
This mission gives you some more fighting practice.
Nothing like a bar fight in Germany to get you in the mood to race.
Your intimate introduction to Skylar, but first you must outrun the Nazis who respond to the bar fight. This mission is mainly so you can see how moving outside the red circle on your minimap ends an alarm.
The German team gets off to a fast start, but don't stop and retry just because you're far behind. Go as fast as you can, keep the Aurora on the track, and if you're at all close on the second lap you will finish strong and get a cut scene that sets the Paris plot in motion.
Do they run low on fuel, have to conserve tires, or what?
Now it's time to let your inner four-year-old get you in serious trouble. Follow Dierker up to Doppelsieg and destroy his car. Don't wait too long to bail out—it takes Sean a while to get clear of the car—or you'll go sailing over the cliff, too.
You're tearing me apart!!!
Ok, The Saboteur has begun in earnest after the colorful flashback section. You must now escape from the holding cell where your best friend lies dead, and the world around you has turned all grayscale except for certain areas that glow red with evil Nazi intensity. This mission shows many of the elements of game play you'll be using from now on.
The path out of the Doppelsieg Factory
Notice that when you are climbing, ledges available to grab on to brighten when you get close so you know where you can go. Also, use this opportunity to learn how the cover system works—later on this will come in very handy.
And now here's you training section for how to outrun an alarm in a vehicle, although this time you have a path on your GPS, whereas later it will be up to you to find a good route away from trouble. Don't slow down for the gate as you leave the factory, and on your way down the hill, don't let Nazi pedestrians slow you down. As Sean would say, “That'll teach you to watch where you're going!”
The path to Morini Farm
Stop short of the gate when you arrive back at the farm and circle around to your right to find and rescue Vittore. Follow his directions to find Veronique in the burning building, and shoot her captors before they can execute her.
Save Vittore and Dominique.
Once you complete the prologue, many missions can be completed in any order you choose, though some do not activate until others are completed. The order below is only one that you may follow if you wish. You may in general want to do all side missions that are active before moving on to the main story mission indicated by the Gold character initials on your map.
Back in Paris, Luc has a new mission for you as you begin your ever-growing involvement with the Parisian Resistance.
Drive Luc to the canal, then cross the bridge and grab a guard's uniform before heading into the facility. Once inside, practice the skills you will need for the rest of the game. When your yellow suspicion ring gets too close to full, back off and let it settle down to white, then to empty. Work your way to the lone guard with the cell keys and stealth kill him to keep things quiet. Open the cell doors, and find that Luc has been injured. You must all head to the basement to survive the bombing, so move quickly into what will be your first resistance headquarters.
Santos wants a bottle of champagne in exchange for the medicine Luc needs. When you reach the location, a disguise will help but isn't necessary. As usual, you have several ways to approach the goal, by being very sneaky or by shooting, waiting out the alarm, then grabbing the target when the fuss has died down. If you do set off an alarm, look for a skylight escape space above the bottle area. When you have the bottle, return it to Santos, then talk to Veronique.
Santos will offer his services to you for a favor. This is you introduction to Nazi generals, who will be part of a useful perk later. But first you must sabotage a tower above the black market location. Place dynamite on the ladder and get to a safe distance before it blows. The Nazi general will show on your map as a pulsing yellow halo, because he and certain other Nazi officers have higher detection abilities. No need to be stealthy in this case if you wan to shoot 'em up. Once the general is dead, blow up the armored car and make your escape. The black market is now open for business, so check out what it has to offer before your next mission.
Santos wants just one more thing, for now. He wants to claim a limo from a general, which is a simple grab and run job. Approach from above and drop down on the right side of the car. Hop in a take off, blasting through the gate. Return the car to La Villette to unlock the first garage around town.
A simple mission to follow General Kleib and find the traitor who ratted Vittore out. Be careful of the general's high suspicion ability, then kill the traitor once he has met with the general. For fun you can stealth kill the general and put his clothes on to give the traitor a nasty surprise when he shows up for his meeting.
This is the first challenging mission, if you try to sneak. But as soon as you let the first prisoner out of his cell, the alarm goes off and you're on the run. If you shoot, the alarm goes up higher, so the best thing to do is let the prisoners out as quickly as you can and run from the alarm. The prisoners will find their own ways out of danger without your help, so all you need to do is let them out and escape.
Sneaking around just slows you down on this mission.
When you complete this level you unlock the Backup Strike function. When you call a Backup Strike, members of the Resistance come to your aid to fight the Nazis. You can upgrade their weapons and health on the black market.
It would be easy enough to kill Colonel Gower if you didn't have to deliver Le Crochet's message, too. Have a getaway car ready nearby and find Gower in the Red Light district by Gare De L'Est. Wait until Gower leaves his guards and kill them first so you can get close to Gower to deliver Le Crochet's regards. Escape the alarm and you're done with this mission.
This one is up close and personal.
A simple delivery mission with Veronique, the only small trick being to escape an alarm after her package explodes.
How often does a priest ask you to assassinate someone? Use the ladder in the scaffolding on the side of the church to reach the top, taking care of a sniper on the way who'll give up his scoped rifle if you didn't bring your own.
Getting into position.
Don't shoot the target too early or the game will say you scared him away.
He's dead, isn't he?
After you make the shot, there shouldn't be an alarm if you can wait out the suspicion zone.
oving targets are harder to hit.
While you're up there, take a side trip to a couple of the scenic views and collect a postcard:
There are two scenic views and a postcard to collect nearby.
Look for the ambassador with the red armband when all four figures meet in the middle of the square. If you leave a fast car close by, escaping the alarm should be no problem.
Why go to all that trouble and then wear an armband?
Another delivery mission like Special Delivery, simply drive Father Denis to deliver a bomb of his own.
This mission seems complex at first but it's actually a piece of cake if you're a bit patient and bring the right gear. As usual, bring a full load of dynamite and RDX, but also bring a silenced pistol with the clip upgrade for extra ammo, and make sure it's full. Uniform up and walk right in the front door. Do the rocket first by placing a charge on its fin, then work your way around the area, making sure to be clear of the suspicion radius when you blow the RDX or when the dynamite goes off. Use the silenced pistol to take down the smaller Zeppelins from a discreet location. The large Zeppelin will catch fire from a large explosion beneath it. Piece of cake.
This is one of several missions with multiple targets that list your progress on the bottom of the first Stats page.
Patience, Grasshopper.
It's useful here to have upgraded your grenade capacity with the Cheap Thrill perk if you haven't already done so. A machine gun with lots of rounds is good, too, because you'll be facing a lot of enemies. Bring a fast car to the wedding and leave it facing away from the bridge.
There are several options for hiding spots, but behind the wedding ceremony works well to eliminate the primary target. From then on you need to kill all the Nazis without killing any civilians. Once that's done, a lot of soldiers will arrive to block your only exit. This is where those extra grenades come in handy. Use a few on the first wave of soldiers to thin them out, but save a couple for the end of the bridge when you get there because more vehicles may arrive to block your way. If you're getting low on ammo, pick up a Nazi weapon, which should also have plenty of ammo on the ground for resupply. When you get to your car, take off to escape the alarm.
It's a nice day for a red wedding.
You're now done with the local missions, so head to Le Havre to find Skylar and begin the plot line that moves you to Act II. You can save having to check the map often by dropping a marker in Le Havre and following the purple line on your GPS.
After meeting with Skylar and Bishop, drive all the way back to the cemetery to begin a pretty long mission. After talking to Skylar, enter the tunnel and either wait for the conversation about you to end before stealth killing the Nazi who stays when his conversation is done, or pick up a uniform on the next level from the lone guard. No you can take a slow, careful walk up the path to the mausoleum, but there's a short cut by going directly to your left and climbing up a series of steps in the terrain. Watch your stealth meter and get as close to the mausoleum entrance as you can. At the entrance, you'll see that you've missed the show, and that there are some heavyweight Nazis still inside. You're going to raise the alarm here, nothing you can do about it. Your path to the next section is inside the mausoleum. To the left is a ladder that leads down below where the Nazis are standing and you just need to reach it and descend before they can kill you; they won't follow you down the ladder. Make a run for it and hop down.
Head up and to your left for the direct route to the mausoleum.
Follow the path down to the box location, and when you reach the Nazis in the basement, watch out for a flamethrower soldier. Shoot the tanks on his back if you can, but avoid getting torched. Once the enemies are dead, approach the box for a cut scene. Don't get your hopes up about finding out what's in the box, by the way.
Now you need to get the box out of there, and Skylar has found a truck for you. Leave the cemetery and make it fast because you have a Truck Health progress bar, so if the truck takes too much abuse it'll fail, as will the mission. Head for the fight back zone, which can be hard to find as the GPS's yellow route may be difficult to see behind the red Alarm overlay. So use the video to see where you're supposed to go. If you haven't used a fight back zone yet to escape an alarm, here's your chance to see how it works. You'll have a Kills progress bar and when you've filled it up, the alarm ends for some unexplainable reason. So stick to cover, be patient so you don't die, and keep shooting until you reach your kill goal. Then drive the truck back to an Underground garage.
Piece of… uh, cake.
A simple delivery mission, just drive Skylar and the box back to Le Havre.
The finale to Act I, you will chase Dierker onto a Zeppelin to try to kill him. Once you take control of the truck, you're all set with papers and a uniform to get past the checkpoint and up to the front gate of the citadel. It's locked, so you'll need to blow it open with some explosives. Wait for the zone to settle, then stroll in the front gate.
The Nazis in this game really aren't very bright.
When you enter the citadel and make it past the first guards, you'll see your destination marker on the other side of a locked gate. You can't blow this one up, so head to the right and up the stairs. Watch your sneak meter as you follow directions along the up and over route. Climb the tower and then begin down interior staircase. The last two guards are too close together to pass without resetting your meter, so pause on the landing between them, then head down to the next checkpoint at the bottom of the stairs, where you'll see the destination marker to your right.
It's a long path you take to get about 20 yards.
Ok, here's where it gets tricky. Keep sneaking past the guards until you reach the metal stairs that lead up to the Zeppelin platform. There will be a sniper at the first turn of the stairs, and he's no problem. But the officer at the next landing may be. If he has spawned in the middle of the walkway, there is just no way around him and you'll have to fight the rest of the way. This is no big deal as the section ends as soon as you enter the Zeppelin, and no one will chase you from the platform. Just get past the flamethrower and up the stairs alive.
He is on ze zeppelin, he is not our problem!
Once you're in the Zeppelin, there are several cut scenes in between your action, and you just follow the ladders and jumps to the final scene where Dierker escapes with a parachute. You don't need one, though, you're SEAN DEVLIN!!
Who thought an enormous balloon of flammable gas was a good idea?
When you wake up on the beach, swim to the dock and sneak past the guards back to HQ. Don't worry if you get killed, the game will take you to HQ rather than make you try again.
Since you are at Le Havre, you might as well get Wilcox's missions out of the way. They involve a lot of driving, which really points out one of this game's weak points: no Fast Travel option.
Wilcox's two missions involve a lot of patient sneaking and blowing things up. The first one is at L'Ossuaire, where the Nazis are messing around with some newfangled thingy called radar. There is a sniper at the entrance who will donate his uniform to your cause, and from there, work your way around blowing up various installations. When you're ready to head inside, a grenade should take care of the Nazi general, and once he's dead, you've got a little fight on your hands. This section is complicated by machine gun turrets, so take cover behind a crate and lob a grenade, or snipe the gunner if you want. Blow up each terminal, and don't forget to collect the post card on the floor behind the right side machine gun before you blow that radio station. Head back to Wilcox for some more charming Scottish attitude.
This is another mission that will test your patience. First, it's a long drive to the chemical factory so get your fastest car and head out after stocking up on dynamite, RDX, grenades and a silenced pistol. Make sure to slow and stop for checkpoints. Easy Nazi uniforms are scarce around the factory, so hope out of the car when you get close, around Place de la Bastille, and pick one up. Enter the chemical factory, either through the main gate or by hopping a low point in the wall. Slowly move from target to target destroying them. When you have to enter the main building, you can pass the sand bags on the right side as you approach, though one entrance is blocked by a barrel. Shoot a barrel by a machine gunner with your silenced pistol and wait to settle the alarm. Come back and walk past the gunner into the factory. Just as you did when approaching the zeppelin a few missions ago, move slowly, watching guard patterns, and don't be afraid of a certain amount of detection. Inside the main building, RDX on one of the corner tanks will take out multiple targets with one blast, even on the outside of the building. Be patient and blow everything up. If you make a mistake, be ready for a big alarm. If you run out of RDX, there is an arms dealer not far away, so you can go out and come back in if you must. This one takes quite a while if you sneak, so here is a video of a portion of the mission.
Sneaky sneaky boom boom.
To destroy all three trucks in the convoy, you can either climb up to the roof opposite the fueling station as shown in the cut scene and use the big guns to shoot the trucks, or sneak in and plant explosives on the fuel tanks. The latter is safer as the trucks will try to escape once you start shooting. One RDX on the fuel tanks takes out all three trucks at once, and this is a great way to get the A Real Hellion perk if you don't already have it.
This isn't a mission per se, just a chat with Vittore about what Sean is doing.
After the first three missions, this is the only active one, so take a long drive to a new part of town to find a new contact, Margot. She wants you to break her guy out of jail. Once you're at the location, find a disguise and approach the front entrance to find a locked gate. RDX it and walk back outside to trigger the bomb. Watch out for the general across from the entrance. Once the alarm has passed, walk into the now open cell area and stealth kill a flamethrower guard, then kill the other. Make sure you do this in the shadows near the entrance, or a tower guard may see you and blow the whistle. Let Bryman out of the cell and he will follow you. Watch your suspicion meter and stroll right out the front door to your car, then drive him back to see Margot.
A general who has been burning books must die! Pick up a disguise and head toward the voice of the psycho Nazi art-hater. There are a ton of soldiers at the front and the general is in a tank, but he's vulnerable from behind. Have a fast car ready to bail, then snipe the loudmouth and take off to escape the alarm.
Another general who has left his rear vulnerable.
Drive to the GPS marker and collect a uniform from the guard in the tower at the corner. Then collect the postcard in the grass before heading to the elevator. Ambush the guard on the roof, use the radio, pick up the launcher and blow the armored car back whence it came. Run around to the right toward the green Alarm box to cancel the alarm, then escape.
Bulletproof, but not Panzershrekproof.
To cross the Louvre complex after getting a disguise, you could walk, but why not take the tank as far is it will go? That's about 3/4 of the distance. Hop out and continue on foot through the archway. Once there, it's a simple matter of blowing up the tower. When you do that and return through the arches, your tank should be waiting for the drive back to the main gate. That's it for Margot's missions. Let's go racing!
Skylar leaves you a note about a street race, which starts just in front of the Western HQ. Talk to Horst, then get your fastest car. Race through the city slowing for no one. When you beat the time, you get the Leadfoot perk and unlock some more racing events. To find the next race, look for the checkered flag icon on the map.
The course is a bit tricky, so you may have to try it a few times to get a winning time.
A two-lap country race that earns you Skylar's car in the garage as the Speed Demon perk. You need to get a good start and on the second lap be close behind the first one or two cars. If you get too far behind they're gone and you'll have a hard time catching up.
Don't be afraid to race dirty to win.
Now for Luc's note: he has chosen a tough place to meet, crawling with soldiers, so don't go disguised. He sends you off to see Bryman, who will give you RDX if you haven't earned it yet. In a nice change, you don't have to travel half way across the map; the entrance is right there. Bad news is that this is a very challenging mission, especially at the end. Head in and pick up a uniform from the first guard. Put it on and move as quickly as you can around to the left to avoid the guard who will come find the dead body. He will raise a local alert, so you want to be far away. For a while you can follow the pathway, always watching your yellow circle to make sure it doesn't max. When you find a spot out of sight to let your suspicion drop, do so at every opportunity. Time is less an issue than it seems here, the trick is not raising the alarm. You might also get unlucky with a guard's pattern from one try to the next.
Eventually you will come to a corridor with a machine gunner at the end. You can get past him, but not the second gunner around the corner. So before you head down toward the first, hop up to a landing to the left and make your way from there along the rooftops. Kept left as much as possible and when you get to the corner of the block, follow it to the right, but still stay to the left edge of the roofs. When you can go no further, you'll be below a large red Nazi flag draped on the side of a building and can hop down to a large platform with a general and a flamethrower. Stay to the left as you head for the stairs.
Here's where it gets tricky. You can only get so far up the stairs before the alarm triggers and you have to fight your way to the gun, then blow it up, then escape. Bring a shotgun or machine gun for close up work and a rifle for the various snipers. If a Zeppelin arrives, pick up the panzershrek on the lower platform and blow it up. Then do your best to escape the alarm. Make sure you blow up the gun to get the Mission Complete. Then if you don't escape the alarm, you can respawn at HQ.
Some missions are a cakewalk, this one is not.
This is an even more complicated mission that once again, you can't sneak your way out of. First go to the bridge with Skylar and plant the charges. This is pretty easy once you grab a uniform from the first guard you find beneath the tracks. Then go with Skylar to meet Wilcox.
It takes a lot of explosive to make a bridge go boom.
Getting on the train is easy with a guard's uniform, but once you're on, it's a heck of a ride. Move forward on top of the train to plant the explosive, then keep going, minding your sneak meter as best you can. Eventually there will be too many Nazis all around and the alarm will go up. Shoot as many as you can to fight your way forward, past Kessler's car, to the engine. You must jam the throttle to keep the train going by reaching the engine and moving the green lever. Then go back to Kesslser's car, where a cut scene takes over. Once done, drive Kessler and Skylar back to HQ at La Villette.
The fight as you move up the train can be tricky.
Not much of a mission, just find Santos and pay him 500 for new papers.
Take Luc to a meeting with the new underground leader, Mingo. The meeting is an ambush, and after a moment of fighting, get all three members into a car. If you brought a 2-seater, a sedan will be waiting for you. Escape the alarm and drive the trio to your new HQ. The best thing about this mission is that completing it unlocks the Viper SMG, a silenced SMG: all the stealth of the silenced pistol with plenty of punch and a 240-round capacity.
What starts out as a simple ride for a brainwashed Nazi turns into a short fire fight. Bring a machine gun and rifle and fight into Bauer's hideout once Kwong's plan fails.
Have a dirty brain? Try Dr. Kwong's brainwashing services.
At some point you'll have to make one last long drive out to see Wilcox at Le Havre. Chateau Chambord is being used for bad science and has 12 power stations and a rocket to be destroyed. This mission is very similar to the chemical factory, same strategy. Be patient and blow up the targets.
The rocket is off by itself, so it doesn't matter if you do it first or last.
Access to the interior of the castle is at the rear via metal stairs that lead first up and then back down to the lower interior. In the front corners are spiral staircases leading to the top targets.
Climbing around the top of the castle is slow-going.
Of the castle targets, finish with the one on the upper level, front and center, and take the cable down to the ground.
To visit Chambord today you'd never guess it once had all this Nazi equipment in place.
Since we're tying up loose ends, let's get rid of, or take care of, rather, Dr. Kwong. At St. Sulpice, reach the sniper's nest by starting up the scaffolding at the back of the church. Note the alarm box on the sniping level, where two Nazi snipers patrol. Climb the final scaffolding to the top for a scenic view. Cover Kwong from the rooftop so he can escape in the car.
Now that's what I call sniping!
After an amusing talk from Kwong, head to the nearby Pantheon to see the big gun. Get a uniform and head straight in the front door. There is an elevator on the left behind some explosive barrels, and start there on a trip that involves ladders and more elevators, all the way to the top.
Apparently if you have a uniform on you can go pretty much anywhere you want to in the Third Reich.
Sometimes you will have to watch your sneak meter to get by the guards.
Are the Nazis compensating for something?
Go past the gun for a scenic view if you want, then put RDX anywhere on the gun or its support and blow it. Either rope down the front to the lower building, or fight your way down the ladders, whichever is more fun. If you take the rope and find yourself at the front of the large building, follow the yellow lanterns back down to ground level.
Yeah, great view, now how do I get back down?
Now for Duval's missions. The first is a sad tale of lost love involving a charming double entendre in the title. You must find his former fiancée and recover her locket after killing her. You can walk to this mission, and you need a uniform anyway, so forget the car. If you walk in the front, the time taken by the cut scene will result in am alarm unless your turn around right away. Once you're clear, walk back in and go to the back of the stage. There are two ladders leading up to an area with two patrolling soldiers. Take each out, then take out the sniper in the tower behind the stage. Snipe your target while she sings on stage and then use one of the alarm boxes to cancel the alarm. You can now go collect the locket and return to Duval. He's no longer at HQ, by the way, so look for his yellow pin on your map.
Wow, this is a tough room.
As soon as you rendezvous with the contact, the alarm goes off and you're in a fire fight. Hope you brought a sniper rifle, because your job is to eliminate snipers on the rooftops so your colleagues can approach. Once you have the three on the main street, move up to take down any more snipers you see inside the courtyard area. Move in through the arch and climb a pipe to the rooftop. Move along the left side and climb around a building with a red banner. Climb to its roof and keep moving forward until you have a clear shot of the Wolf. Backtrack to the green hatch marker to clear the alarm. Only Vittore has a mission for you at this point and he's back at The Belle.
The members of this wolf's pack have big guns.
Vittore sends you to collect his car, the Aurora. Try to pick up a uniform before you arrive if you can, the guards outside are seldom alone. Work your way to the cut scene of Franziska that reveals the entrance to the garage. Sneak up and take out the two guards, then RDX the entrance. Move in when clear and sneak as far as you can. When you're close to the Aurora, you'll have to fight it out from there. Once clear, lower the lift and get in the Aurora. Crash through the tunnel, and when you're outside use the car's speed to outrun the chase. If you've taken care of the Road Rage Perk to unlock the Aurora's Nitrous, this will give you a nice speed boost to outrun the alarm.
Hey, you don't make the payments, you don't keep the car.
A note from Bryman leads you to the Gestapo HQ at the Hotel de Ville to see about Kessler's daughter. This is a long, complicated mission. First, walk around the Hotel until you see the cut scene for the phone wire approach. A series of wires drops you off right where you want to enter the building, but if you want to catch the scenic view at the top, climb up before you head inside.
Marching into the detention area wasn't what I had in mind.
Enter through the window and kill the SS man on the radio. Work your way down stairs toward the library getting as far as you can before having to shoot. From then on in it's a firefight to the end. In the Library pull the book to open the passage. Shoot your way through to the cells and release Luc's man. This is tricky because the place is full of Terror soldiers who take a lot of bullets before going down.
This is probably the toughest set of enemies you've faced yet.
Blow up the boiler to open the thick door, then fight through the fire and smoke to the elevator.
Luckily, the Terror soldiers stay where they are instead of rushing you.
Once outside, fight the Terror guards until they're dead. The elevator you came up will spawn regular soldiers who bring you ammo when you kill them. Take Maria outside and then find a car to drive her to La Villette.
Amazing that you can still walk with all those bullet holes in you.
You have a big fight on your hands as the Nazis attack La Villette, so before you leave the HQ, hit the weapons seller and stock up on everything. You should have the Terror machine gun unlocked now, so buy it if you have the cash and don't forget ammo.
Head upstairs and to the back of the building first. A kind of soldier will arrive called sappers, they show with a red marker, and you need to get them before they reach the building. The best way is to get on the machine gun and fire tons of lead into the engines of the approaching vehicles, making them blow up. You can do the same at the front when the attack shifts to that direction: head up the ladder and get busy. At the side, there is no turret, so use the Terror machine gun to light up the vehicles. When the tank arrives, clear out some soldiers, then blow it up with dynamite or RDX.
Why shooting a vehicle's engine makes it explode, we can't say, but it is effective.
To finish the mission, drive Skylar and the Kesslers to the Catacombs HQ.
Bryman will help you find Veronique even if Luc won't. First, go back in the HQ and stock up on ammo, you're probably pretty low after the last mission. Head back outside and wait for Bryman's note to be delivered. Next up is a rooftop race to plant 7 bugs on radio devices. The silenced machine gun works great here for keeping a relatively low profile. There's no time to be sneaky, and a loud gun will draw much unwanted attention. Look for an escape box across the street to sit out the alarm.
Try to clear your path with the Viper before you arrive.
Byman sends a note about where to meet him next, so head to his yellow pin on your map. This is a heck of a mission ahead. Bryman has arrange a zeppelin ride, so head through the closest checkpoint and find a uniform, then take a short swim to the zeppelin docking station. Sneak up to the top and find the radio. When the zeppelin arrives, climb on board and take a ride to Norte Dame.
Please keep your hands and feet inside the vehicle at all times.
Get out there and make your way down to the overlook of the execution area, but check out the scenic view first. Stop the execution of Veronique by sniping the Terror guard on the gallows, then cover her from up top. When the fighting slows a bit, jump on to the cable and move down to ground level.
Don't snipe too long—the sooner you get down there and get Veronique in the truck the better.
Jump in the back of Bryman's stolen truck to man the machine gun. Protect the truck's health as you drive, watch for airplanes as well as vehicles. Destroy the roadblock, then keep trying to protect the truck; if it blows up the mission is over. When you escape the alarm, take Veronique back to HQ.
I sure hope this truck is reliable.
The race around Paris ends with the planned big explosion—if you fall behind, don't give up. You just might find the leading group has waited for you so you can win. Don't forget to use the boost on the straight sections. But the Nazis aren't happy about losing the race, and you'll have to escape the alarm. You can jump in a German race car, but outrunning a Stage 4 alarm is tough. So make it to the Fight Back zone and be patient while you rack up enough kills to end the alarm.
When you win the race, jump in the Silver Claw II and take off to find the Fight Back Zone.
Act 3 is a long finale with the odd insertion of another country race which really belongs in Act II instead of III, and which interrupts the progress toward the showdown with Dierker. And even that isn't much of a showdown. But getting to the anticlimactic scene atop the Tour Eiffel involves a lot of bullets and very little sneaking. So get ready to fire away.
You must find the resistance via a new entrance to the Catacombs, and it's paved with Nazis and very old bones. Fight your way carefully, no sneaking here, until you make it to the big cavern. Watch for Terror flamethrowers and shotguns.
It's a long way past a lot of old bones.
When you reach the cavern, fight your war around to the left, following the glowing blue Resistance symbols until you can jump across to join the others.
Nice of the Resistance to take the time to mark the way with that cool glowing blue paint.
Once you've joined your friends, defend that space until the cut scene. Make sure to kill Santos, the traitor, on the other side along with the other key enemies marked with red triangles, and hope you're not too attached to Luc.
Luc, that has GOT to hurt.
The Kesslers are captured, Luc is dead, Vittore is dead, the world is crumbling and it's up to you to save it. But how about another car race first? Look for the checkered flag on your map and head north. Far north: once again you've got a long trip to get to a mission. The Western HQ garage is still in business, so you can pick up an Aurora there if you wish, but an Altair is waiting if you take a slower car to the race spot. The Aurora makes this race a piece of cake though. Use the Nitrous to get to first place at the start, then keep her there. There's not much of a straight for the boost, but if you hit it right before the start/finish line, it should be effective. After the race, SAVE after the Mission Complete, then load to respawn at Le Havre. You can then take your new toy, the Silver Claw Mk II for the LONG drive down to the very bottom of the map.
I've got to win this race, the fate of the free world depends on it! Oh wait, no it doesn't.
This is your last big shooting match, and it's a doozey. Skylar drops you and Veronique off at the base of Doppelsieg. Grab one of the German vehicles and make a run for it up to the top: there are too many soldiers to fight your way up there and it's far away. Plus, in typical style for characters like this, Veronique is a complete twit in a fight and much more of a liability than a help. So just get her in the car and save her from herself.
It's déjà boom all over again.
Once there, go inside the complex and begin fighting your way backward along the same path you used at the beginning of the game to escape Doppelsieg. You have lots of Terror guards to deal with, so take cover when you need to. Finding Kessler's daughter gets a cut scene, and you continue on alone.
Oh no, flashback!
Find Kessler and let him out. He insists on destroying the cyclotron. Help him flip the switches and then follow his instructions to blow up the power coils in opposing corners. Watch for guards as you move around. When the core is exposed, the Terror machine gun makes quick work of destroying it, no need for grenades.
The first cyclotron had a fairly short period of service.
On the way out, you must protect Kessler by clearing a path. He won't leave the main room until all guards are dead. Then follow him to the exit for the end of he mission.
This is it, the last mission, sort of. Drive Veronique to the Eiffel Tower, which isn't easy as Paris is in chaos. Don't bother stopping to have your papers checked. When you drop her off, run straight to the tower and take two elevators and some stairs to the top to find Dierker. There's no boss battle, just a single shot to the head after some chatting.
After the credits roll, freeplay continues. As Sean says at the end, he's just getting started. You get your last Mission Complete and are free to continue working on your perks and achievements. HQs are restored, even La Villette and The Belle, and Paris is still occupied by the Nazis. The entire city is in color, though. The only game area blanketed in Nazi doom and gloom is Saarbrucken, which is guarded with a large indestructible gate. The guards are destructible, however, and a trapped car will make short work of them. You can then walk up, hit the button to open the gate, and stroll right into enemy territory.
There are ten Perk categories, each with three slots for Bronze, Silver and Gold levels. The bronze perks are pretty easy, and some of the gold very challenging. As you'd expect, the reward for each level is generally proportional to the difficulty of achieving it. Some happen when you aren't trying, and others seem intended to require specific attempts to accomplish. You can track your progress on several of the perks, such as War on Terror and Road Rage in the Stats menus as you are chasing them.
Don't forget the Luck of the Irish and St. Paddy's Day upgrades in the black market to unlock one silver and one gold perk if you're having trouble.
Brawling I: Fightin' Irish
This is the only brawling perk that involves brawling, and it should happen within the first moments of the game. Knocking out two Nazis earns the Haymaker reward, which gives Sean a serious punch in his brawling skills.
Brawling II: Sucker Punch
Complete your first ten stealth kills from behind and you earn the Sucker Punch attack, which lets you deal a surprise knock out blow when facing an enemy.
Brawling III: Grim Reaper
One of the more challenging perks, it rewards you with a skill you'll use all the time, so if you can accomplish this early in the game you'll be glad. You need to find and stealth kill five Nazi generals. Finding them is pretty easy: they show on your map with pulsing yellow suspicion halos. Finding generals who are good targets for stealth kills is more difficult; each one has two bodyguards, and the generals' expanded suspicion zone makes them hard to sneak up on unless they're alone and you have a clear path to their blind spots.
One way to kill a Nazi general.
Look for generals who are in confined spaces so their bodyguards can't easily be replaced after you've eliminated them. (There are two good candidates in courtyards northeast of La Villette, and another in Sacre Coeur.) Distract and draw away a guard or two, as shown here, or snipe the guards to isolate the general, then sneak up and get him with a stealth kill. You'll unlock Touch of Death, and never go back to twisting necks.
Hardware I: Gunslinger
Probably the easiest perk to get, just kill five Nazis with bullets and earn Gunslinger, which grants reduced recoil with the automatic weapons.
Hardware II: War On Terror
It will be a while before you see any Terror Nazis unless you find yourself in a Level 4 alarm, but when you kill five Terror Nazis, you unlock the .44 cal pistol from arms dealers.
Hardware III: Paint The Town Red
To unlock the Panzershrek bazooka, you need to destroy a Zepplin and a Wulf tank during the same alarm. Use the Siegfaust Mk2 launcher, but it only holds 3 shells with the upgrade you can buy on the black market, so you don't get many chances to miss. Wulfs don't come out until a Level 5 alarm, so bring lots of ammo; use the Terror sniper rifle if you've completed the Longshot perk as it holds a whopping 200 rounds. You can try this perk from a Nazi tower in Paris that has an anti-aircraft gun mounted on it. Use the big gun to shoot the Zepplins, then the Siegfaust to destroy a Wulf.
Sniper I: Marksman
Similar to Gunslinger, just kill five Nazis while aiming through a sniper scope. It's a while before you unlock scoped weapons to buy, so climb Nazi sniper towers and take them off Nazi snipers. Grants reduced drift while looking through a scope.
Sniper II: Eagle Eye
Fifteen headshots while aiming through a scope earns you reduced recoil when sniping. This is another perk that can be sped up by finding a good spot, getting a few headshots, then coming back to take down guards that respawn.
Why do they keep coming back? They're following orders.
Sniper III: Longshot
Ten double-kills through a scope unlocks the Terror sniper rifle on the black market. This is a pretty easy Gold perk to get, as shown below, and a sniper rifle on demand is very useful, so a little time invested pays of until you've unlocked the other scoped rifles. The trick is to find a place where two guards will respawn after you've killed them, and there are many places around Paris where this happens. Just make sure you aren't seen when you fire, get your double kill, escape the suspicion zone, go back a minute later when the guards have been replaced, and repeat.
For a while this is a very dangerous post for Nazi guards.
Demolitions I: A Nasty Surprise
Blow up three Nazi vehicles to unlock the trap ability to plant explosives in a car. Plant the trap, drive at your target, bail out before it gets there, and it will explode when it hits something. Quite effective!
Demolitions II: Mad Bomber
This one seems tricky but five minutes in plenty of time to blow up five Nazi vehicles. It helps to plan a route by scouting the target vehicles ahead of time, then making a run to blow them all up. Save you game before you try and if you run out of time or get caught in an alarm, load the game without saving and try again. It's worth spending some time getting the perk because it unlocks RDX, an explosive you can detonate remotely. You'll want to do this one early in the game to unlock RDX, and when there are still lots of vehicles around to blow up.
You have plenty of time if you work out a route.
Demolitions III: Block Buster
Destroy three Wulf tanks using RDX or dynamite and earn a more powerful RDX package. The hardest part about this is finding three Wulf tanks. There are some scattered around the countryside and they can be identified by the big barrel on the back.
There's no mistaking a Wulf for any other vehicle.
Sabotage I: Short Fuse
Destroy two Nazi installations such as a guard tower or fueling station and earn speedier planting of dynamite and RDX.
Sabotage II: I Fell Towers
Similar to above but specializing in guard or sniper towers. Just plant your explosive at the bottom of the ladder and get out of the blast radius. This one is definitely worth doing early as it allows you to carry more explosives with you for the rest of the game.
Sabotage III-Urban Renewal
You must blow up 4 train bridges, and you get the first one in the Rolling Thunder mission in Act II. After that mission, the Bridge Kit is available on the black market. There are several bridges to blow up around the map, and bringing them down is not very tricky as long as you patently remove the guard towers and some/most of the guards patrolling the target bridge. When you do all four, planting explosives while disguised in not suspicious. Doing this perk right after Rolling Thunder will save lots of time—kind of funny how you can then walk right up to a tank with Nazis watching you and strap RDX to the side, they don't bat an eye.
Mayhem I: Throwing a Party
Throw five Nazis to their deaths and unlock the Crowd Clearer throw.
Mayhem II: Road Rage
Run over 20 Nazis to unlock the Aurora's Nitrous upgrade.
Mayhem III: The Right of Way
Destroy 20 Nazi vehicles with a single vehicle. This one is pretty easy when you know how to do it. Don't waste time trying to use a passenger car. Find a Nazi APC with a gun and go shootin'. There are several vehicles you can use, but an AR 33 is waiting right behind Sacre Coeur and does the job nicely.
The roads are dangerous for Nazi vehicles.
These perks are all accomplished via in-game missions and are described or shown in the Act II and Act III sections.
Racing I: Lead Foot
For the On You Marks… Get Set… mission, Skylar will tip you off via a note about some street racing in town. Bring your fastest car and beat the time trial time to earn the Silver Claw in your garage.
Racing II: Speed Demon
Winning the first country race in the Back In The Saddle mission, unlocks Skylar's car, the Drake Custom, in the garage.
Racing I: Godspeed
Winning the second country race in Act III unlocks the Silver Claw Mk. II in the garage.
Mechanics I: Joy Rider
Hijack a car and return it to the garage to unlock the Altair racecar.
Mechanics II: Hijacker
Collect all twelve Nazi vehicles in your garage to earn free repairs. This perk is an excellent choice for the Luck o' The Irish upgrade as the required vehicles include two Gestapo cars that are a challenge to collect.
Mechanics III: Wheelman
Collect ALL vehicles in the game and you can store tanks and Armored Personnel Carriers in your garage. A great candidate for the St. Paddy's Day upgrade because in addition to the Gestapo vehicles, you need to find all tanks and APCs with open hatches so you can get in and drive them away, or hijack them during alarms, which can be a challenge.
Evasion I: Fugitive
Escape Level 2 alarms five times to unlock the Getaway Strike, which allows you to have a getaway car delivered on command.
Set the green circle where you want your getaway car to be delivered.
Evasion II: Escape Artist
Escape a Level 3 alarm and earn the ability to choose which model in the garage is delivered as a getaway car.
Evasion III: Europe's Most Wanted
Escape a Level 5 alarm, wherein the entire map is red, and earn the ability to use hiding spots on subsequent Level 4 alarms. Getting this perk is easier than it sounds: there are only two escape spots that work for a Level 5 alarm. The first is out at the abandoned Morini farm, and the second, better choice is in the bar at the top of the Eiffel Tower. To get this perk, bring a sniper rifle and a launcher to the first level of the tower and start sniping. Gradually build up the alarm levels by killing more Nazis, and use the launcher to shoot down the first three Zeppelins that come to bother you. No Nazis will come up the elevator for some reason, they just get really angry on the street below. When you're up to Level 5, continue up to the bar and use the escape option there.

 Destiny Wanted Bounty Location Guide For Week (Aug 11 to Aug 17): Map Location & More
 Which Is The Best iOS Browser For You? Here Are 8 Options
 FFXIV: How to Obtain the Pegasus Mount
 Breaking Down the Inquisition - The Mage
 Here are the Top Xbox Exclusive Games to Watch Out for in 2015