Unofficial Dragon Quest IX Guide by swaggers for
Welcome to our complete Dragon Quest IX: Sentinels of the Starry Skies walkthrough. When you first start the game you need to create your hero. Man, woman, tall, short, spiked hair, whatever you want. These choices are purely cosmetic and do not affect the gameplay in any way. After creating you hero you will name yourself and then be placed in the opening cutscene. Dragon Quest IX starts out showing you as a Celestrian Hero. You have just taken over as guardian of a small village called Angel Falls. The previous guardian Aquilla is showing you the ropes. As you look over the village you'll see two villagers about to be ambushed and the two of your will spring into action. Because of your Celestrian powers this won't be much of a battle and simply serves to show you the basics of combat. Just keep attacking and they will go down. The villagers will say a prayer for you which will provide you with Benevolessence. This is the manifestation of the people's appreciation for your deeds. You and Aquilla will then fly up to the Observatory. The Observatory serves as the Celestrians home base. Feel free to wonder around and talk to the other Celestrians. The Celestrian to the bottom left with give you a free healing and you can read a book in the library to the left if you want. There is also a minor chest in the room to the right. The prayer room to the far middle contains a priest who you can talk to when you want to save your game. When you are ready talk to Apus Major via the first stairs at the front of the map. He'll tell you to take your Benevolessence to the Great World Tree. Exit via the south doors on this floor and the guard will let you head up the stairs. Climb the top the top of the area to see the Great World Tree. Approach the tree and give your Benevolessence to get a short cutscene. Afterwards talk to Aquilla and then back down and inside to talk to Apus Major. He'll tell you to return to Angel Falls to do some good. When you are ready head to the opening on the bottom of the map and talk to the Celestrian there and she'll send you down.

Learning The Ropes
There are a few minor items to pickup if you are interested. There is one down the well, one in the item shop, and one to the house to the far right. After you get those it's time to do a few minor quests to help out the citizens of Angel Falls.
THE MISSING RING
Interact with the dog that is by the item shop. The dog will run over to a spot and dig up a keepsake ring. That this ring to the Church on the left side of town and give the ring to the woman who is praying. 1 Benevolessence.
STABLES
Next head to the far left to the Stables. Inside is a very tired man who simply can't stay away. Let's let him sleep and clean up the Stables for him. You need to pick up all the horse manure. FUN! Afterwards he'll wake up and 1 Benevolessence.
HELPING THE DEAD
After you complete both of those tasks it will be night time. I guess it takes a long time to clean up manure. Head to the center of town and Aquilla will be there. He'll tell you that a ghost in town needs your help going to the other side. Head over to the right side of town and search for the ghost. All you need to do is talk to him and he'll realize what's up. After that its back to the Observatory after another hard day of work.
Not much to do but you can talk to everyone if you want. The main goal is to head up to the Great World Tree and give it your Benevolessence. A big cutscene comes and I don't think everything really goes as planned. Once the scene is done you'll find yourself back in Angel Falls.
Angel Falls
Angel Falls Item Shop
Medicinal Herb - Restore 30 HP to 1 ally - 8G
Antidotal Herb - Heals poison from 1 ally - 10G
Chimaera Wing - Teleporter to towns you've been to - 25G
Copper Sword - Att 7 - 150G
Soldier's Sword - Att 13 - 240G
Leather Whip - Att 4 - 95G
Feather Fan - Att 9 - 110G
Pot Lid - Def 1 - 40G
Leather Shield - Def 3 - 90G
Bandana - Def 1 MagMen 2 - 45G
Plain Clothes - Def 2 - 30G
Wayfarer's Clothes - Def 4 - 70G
Leather Armor - Def 6 - 180G
Cotton Gloves - Def 5 - 50G
Boxer Shorts - Def 2 - 30G
Cotton Trousers - Def 2 - 80G
Sandals - Evas 0.5% - 18G
Leather Shoes - Evas 1.0% - 40G
You've lost your halo and most of your power and everyone can see you but you don't really know what's happened. You'll get a cutscene to welcome you to the land of mortals. Once that is done your only real goal is to to the Mayor's house on at the far upper left to listen in on his conversation with Ivor. Then to Errin's house in the far upper right to go to sleep and end the day.
The next day Ivor comes and convinces you to go with him to the Mountain Pass to see if you two can clear it up and save the day. Ivor joins your party but at this point you are only controlling yourself. Let's head out of Angel Falls to the south and check out the great outdoors.
Map of Angel Falls
1 - Tangleweb
2 - Antidotal Herb
3 - Medicinal Herb
Monsters in this area
001 - Slime
002 - Cruelcumber
003 - Teeny Sanguini
004 - Sacksquatch
005 - Batterfly
006 - Dracky
007 - Bodkin Archer
Your first taste of combat. Enemies are visible in Dragon Quest so you know what your getting into and for the most part you can avoid as many or as few as you want. I suggest you get to level 3 during this first time out. There isn't much to combat at this time. Mostly just attack. But that will change quickly. If you get low on health you can return to Erinn's house and at any time for a full heal.
There are three sections on the map that contain free items to pick up. You can get Tangelweb, Antidotal Herb, and Medicinal Herb at the locations provided. Look for these freebies in all the area of the game.
Once you feel like moving on head to the upper right of the map. That's the Mountain Pass. Once there head down the right path first to find a treasure chest with a Gold Ring in it. Equip it to your Hero to get Defense 2. Now work your way down the left side and get a new cutscene. It's seems the soldiers of Stornway are already on the case. They do mention a missing girl named Patty but there isn't anything we can do about that now so let's head back to Angel Falls.
Save your game at the Church and then head to the Mayor's house to return Ivor to his dad. No more hero-ing for him. Erinn seems worried about Patty but won't actually ask you directly for help. No problem, that's why we are a Hero. To do hero type stuff. So sleep the night at Erinn's house and then lets get some gear from the shop. I suggest the Soldier Sword and some Cotton Gloves. Don't bother with a shield because [Spoiler Alert!] we find one in just a few minutes.
The Mountain Pass
Head back to the outdoors Angel Falls area and we are going to the middle right. You'll see it as a large white dot.
Hexagon
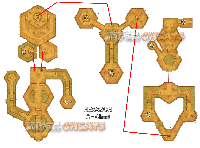
Map of the Hexagon
Monsters in this area
006 - Dracky
008 - Bag O' Laughs
009 - Mecha-Mynah
010 - Firespirit
011 - Spirit
When you first get inside there will be a large stone block that is in the way. As you approach it a ghost will appear. Follow him around to the left side and he'll point out a switch for you. It's on the back side of the statue. Press it move the block. Thanks Ghost dude! Before going up the stairs search the right side for a chest with a Leather Shield. Go ahead and equip it for a nice Def boost.
First take the stairs down to the left for a chest with a minor item. Then take the right stairs. Enemies will start appearing and they are all new. As long as you have the Soldier Sword and the 2 Def upgrades [Shield and Gloves] you should be fine.
Descend yet again to the next lower floor and get a Feather Fan from a chest. There is also a chest on the lower section with 210 Gold. Both are definitely worth getting.
Now take the stairs in the upper right and work your way around to a chest with Strong Medicine. Now go through the door at the top. Get the Seed of Deftness on the left. Get everything you want before approaching Patty at the top of the area. Because after talking to her its Boss Time.
BOSS: Hexagoon

BOSS: Hexagoon
Hexagoon is really just a view of things to come. You really should have no problems if you've leveled at all and gotten the items suggested from town.
Hexagoon as two attacks. A standard melee and a stomp. Both of these do similar damage and don't pose much of a threat. Use Heal (if you've leveled enough to get it) or the Herbs you've picked up along the way to heal if you get low.
You'll automatically escort Patty out of the dungeon after your victory.
Hexagoon
Back to Angel Falls...Again
So with Patty free and the Hexagoon dead its time to clean up some loose ends in Angel Falls. First you need to listen to the conversation between Erinn and Patty at the Inn. Quite the long conversation as its nighttime when you get out. Head to Erinn's house to talk to the ghost of Erinn's father. Talk to him and he's going to lead you to a small hill behind the house by the waterfall. This will also introduce Stella. A faerie that is the conductor of the Starflight Express. She wants your help getting it going again. Check the bushes and you'll find The Inny. Quite the prestigious award and something I'm sure Erinn will want to see right away. So let's take it to her. After seeing it she will agree to go to Stornway. And thats where we will be heading also.
Through the Mountain Pass
Head back to the Mountain Pass and into the Starflight Express. Nothing doing. Its still not working. Might as well head to Stornway ourselves and see whats going on over there. Continue through the Pass. (The soldiers work fast) and you'll come out in Western Stornway.

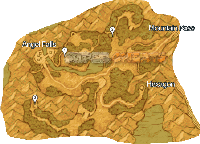
Map of Stornway
1 - Coagulant
2 - Fisticup
3 - Seashell
Monsters in this area
012 - Winkster
013 - Hammerhood
014 - She-Slime
015 - Funghoul
016 - Bubble Slime
Stornway is the big castle in the middle. There are more items to get but since you can't alcemize them yet it serves no purpose. If you really want them check the map for their locations. You can find Coagulant, Fisticup, and Seashell. It's a good idea to try out all the new enemies in the area to get them into your Battle Records and also to gain a few levels. You can also head into the Hexagon from the the Western Stornway side and get yourself a Suit of Scale Armour. I was at 8 when I got to Stornway with not much time really put into battling.
Stornway
Stornway Item Shop
Medicinal Herb - Restore 30 HP to 1 ally - 8G
Antidotal Herb - Heals poison from 1 ally - 10G
Chimaera Wing - Teleporter to towns you've been to - 25G
Evac-U-Bell - Instantly escape tower, cave or dungeon - 28G
Holy Water - Keep weaker monsters away - 40G
Gold Ring - Def 2 - 220G
Stornway Weapon Shop
Copper Sword - Att 7 - 150G
Soldier's Sword - Att 13 - 240G
Rapier - Att 19 - 480G
Bamboo Lance - Att 6 - 85G
Iron Lance - Att 17 - 450G
Paring Knife - Att 4 - 70G
Bronze Knife - Att 10 - 200G
Divine Dagger - Att 18- 640G
Oak Staff - Att 3, MPA 1.0% - 120G
Wizard's Staff - Att 7, MPA 1.5% - 840G
Leather Whip - Att 4 - 95G
Thorn Whip - Att 11 - 350G
Laundry Pole - Att 5 - 40G
Carrying Pole - Att 15 - 530G
Stone Claws - Att 7 - 100G
Iron Claws - Att 17 - 620G
Feather Fan - Att 9 - 110G
Iron Fan - Att 14 - 300G
Stornway Armour Shop
Leather Shield - Def 3 - 90G
Scale Shield - Def 5 - 150G
Bandana - Def 1, MagMen 2 - 45G
Hairband - Def 2, MagMen 2 - 60G
Leather Hat - Def 3, MagMen 2 - 65G
Wayfarer's Clothes - Def 4 - 70G
Leather Armour - Def 6 - 180G
Scale Armour - Def 9 - 350G
Chain Mail - Def 11 - 540G
Leather Dress - Def 6, MagMen 3 - 290G
Training Top - Def 7 - 250G
Silk Robe - Def 3, MagMig 3 - 210G
Leather Gauntlets - Def 2 - 60G
Cotton Gloves - Dfs 5 - 50G
Cotton Trousers - Def 2 - 80G
Training Trousers - Def 4 - 170G
Leather Shoes - Evas 1.0% - 40G
High Heels - Evas 1.0% - 220G
Head first to the Inn and talk to Erinn and Patty. They will give you the rundown on the Inn and how things are going. Then you need to leave. Head to the center of town and read the message board. This will tell you the King is in need of some Hero type help. As long as it's daytime we can head into the Castle. Talk to the guard on the right.
Quick note that there are a TON of optional sides quests in this game that are quick and easy. These are called Challenge Quests. The first ones you can do area in Stornway Castle. I'm not going to run over all of these in the main walkthrough but they are noted on the map if you want to check them out. We also have a full extra section to this guide that only covers Challenge Quests.
When you are ready head to the second floor and talk to the King. He seems to be having a little trouble with a fellow called the Wight Knight. We agree to help him out and it's off to more adventure. The King's daughter will stop and have a little chat with you as you leave.
Next stop back at the Inn. It's time to grow this party. You have the option of adding 3 pre-defined characters or making your own. It's up to you. I just took the 3 pre-made because I am MAJORLY lazy. Priest, Mage & Martial Artist. More direct damage, some spells, and some healing. Sounded fine to me. Choose whatever want.
Recruiting
Note that they all do start on level 1 so spend some time on the enemies around the Castle to level them up to 8 or so because the Wight Knight is right in the next area.
When you feel ready and have saves at the Church and bought any weapons, armor and whatnot that you want lets get the Wight Knight.
You get to the Zere region by heading North from Western Stornway. Then it's directy to the right as you enter the region. I mean right in front of you.
BOSS: Wight Knight

Map of Zere
1 - Chimera Wing
2 - Cowpat
3 - Antidotal Herb
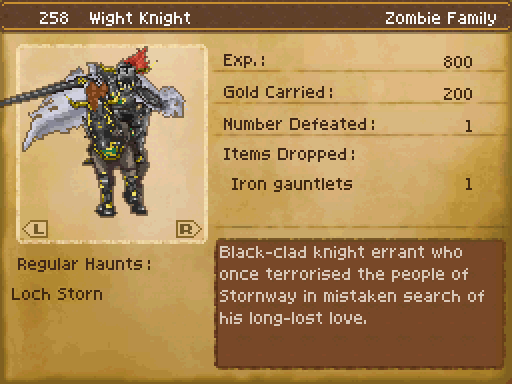
BOSS: White Knight
Quick cutscene and you're into it.
Basic boss strategy from on out is to have your Mage (you have one don't you?) cast Sap the first 2 rounds to weaken them up and then an Accelerate to give you initiative advantage. It really helps to make sure your Healer casts first.
The Wight Knight has 3 basic attacks he'll try to use on you. First is a straight on attack for pretty good damage to one character. Second he has an AOE attack that hits everyone in the party but it's just for a few HP each. Finally he'll heal for 40 HP. This is the best for you since your party should easily outpace 40 HP in a single round.
Once the battle is over you'll get his Iron Gauntlets.
Wight Knight
Another scene where you learn he's not that bad a dude. Quick trip the the Castle and the King tells us to learn some more. The Princess will stop you again after your conversation with the King and she wants you to follow her to her room. There is 4 of us but if that's what shes into the ok. She lets you know that a former employee of hers is in Zere which is where we just were so time to go back.
Zere
Monsters in this area
014 - She-Slime
016 - Bubble Slime
017 - Wooper Trooper
019 - Meowgician
020 - Ragged Reaper
023 - Boppin' Badger
Zere Item Shop
Medicinal Herb - Restore 30 HP to 1 ally - 8G
Antidotal Herb - Heals poison from 1 ally - 10G
Chimaera Wing - Teleporter to towns you've been to - 25G
Holy Water - Keep weaker monsters away - 40G
Scale Shield - Def 5 - 150G
Bronze Shield - Def 6, Blc 0.5% - 370G
Leather Hat - Def 3, MagMen 2 - 65G
Hardwood Headwear - Def 4, MagMen 2 - 120G
Leather Dress - Def 6, MagMen 3 - 290G
Leather Cape - Def 8 - 320G
Silk Robe - Def 3, MagMig 3 - 210G
Leather Gauntlets - Def 2 - 60G
Linen Gloves - Dfs 10 - 90G
Leather Kilt - Def 5 - 110G
Blue Knickers - Def 5 - 260G
Leather Boots - Def 2 - 70G
Clogs - Evas 1.5% - 160G
Bunny Tail - Agi 5 - 240G
This time we are going to the town of Zere which is just above where we fought the Wight Knight. It's a pretty small town but there are a few things we're going to want to do. First head into the big tree in the middle of the town. Inside is a SAD SAD woman and she needs cheering up. You will get the Cheer Party Trick.
Your actual goal is to meet Alanna and she's in her friend's house in the upper right part of the town. Talk to the two women there and they will sing you a song. Then it's time to leave Zere. You'll get a cutscene as you leave and learn you need to go to Bridadoom which is to the north in Doomingale Forest. So let's head up there.
Monsters in this area
020 - Ragged Reaper
022 - Brownie
024 - Drackmage
025 - Bodkin Fletcher
026 - Ram Rainder
027 - Cumaulus
028 - Skeleton
The enemies are all lot stronger here then you've encountered before. The Forest is located in the upper left of Zere. The Ram Raiders are particularly dangerous and should be eliminated ASAP. Your destination, Brigadoom, is in the middle of the map. Also be careful of the purple liquid goo on the ground. It will damage your party if you step in it so work your way around this Forest carefully.
Helping the Wight Knight
Map of the Brigadoom
Monsters in this area
024 - Drackmage
025 - Bodkin Fletcher
027 - Cumaulus
028 - Skeleton
029 - Healslime
030 - Blinkster
031 - Leery Lout
032 - Lunatick
The direct way to the end of the dungeon is currently blocked until you get there from inside the dungeon. Before heading into the dungeon fully climb the tower on the right side of the map. At the top you'll find a Trailblazing Bandana. It's a nice item for Healer such as a Priest to have. The entrance to the actual dungeon is at the top of the map and to the left. This leads you to the first basement. Just go up and around to get to the next set of stairs. Look at the map and the path is pretty clear. Make sure to get the Pair of Clogs and the Mini Medal before moving on.
Continue up until you get to the Red Door. Make sure to unlock this and it's a quick way in and out of the last part of the dungeon. If you need an healing feel free to leave Brigadoom and make a quick stop back in Zere. With the Red Door unlocked you'll be able to start right back where you left off.
Continue through to the second floor and take the immediate stairs to your right to get a Gold Bracer. Get that and then come back up and work your way to the front door of the throne room. Make sure to Heal and get ready and then go inside and talk to the woman.
BOSS: Morag

BOSS: Morag
Morag can be a pretty heavy hitter. I typically take control of my main and the Mage so the right spells are cast. If you put your Priest on Healing then they typically do a pretty good job. It's up to you, some people like to control everything. So first off you want to Sap the first two rounds with your Mage while everyone else gets in as much damage as they can. Then start to Accelerate your own team after that. Going first with your whole team help rack up damage bonuses and makes sure Heals go off before more damage is stacked on.
After the battle is over you get her High Heels and a thanks from the Wight Knight. Time for a quick trip back to Stornway.
Morag
Once you get back. (Probably by Chimera Wing) talk to the King a final time. He'll give you full access to the treasury as thanks! Go up the stairs behind the King and it's to the right. You'll get Phial of Aggressence, 1,000 Gold & a Gold Rosary. I think he might of taken some stuff out before we got there or else this is a pretty poor country.
After all of that make a quick trip to the Starflight Express in the Mountain Pass to see if you've done enough to get it up and running. Doesn't seem like it's working yet so let's move on. Next destination Coffinwell. We get there by heading East from Stornway to the upper right.
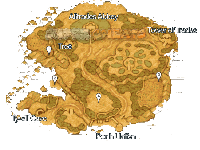
Map of Coffinwell
1 - Lava Lump
2 - Crimson Coral
3 - Iron Ore
4 - Royal Soil
Monsters in this area
028 - Skeleton
030 - Blinkster
033 - Leafy Larrikin
034 - Clockwork Cuckoo
035 - Slugger
036 - Chariot Chappie
037 - Morphean Mushroom
038 - Lost Soul
As usual there are plenty of Alchemy items to get that we can't even use now so I personally skip those by. Our real target is the town in the middle right. That's Coffinwell and they need our help.
Coffinwell Item Shop
Medicinal Herb - Restore 30 HP to 1 ally - 8G
Antidotal Herb - Heals poison from 1 ally - 10G
Moonwort Bulb - Cures Paralysis - 30G
Chimaera Wing - Teleporter to towns you've been to - 25G
Evac-U-Bell - Instantly escape tower, cave or dungeon - 28G
Holy Water - Keep weaker monsters away - 40G
Coffinwell Weapon Shop
Rapier - Att 19 - 480G
Iron Broadsword - Att 27 - 1000G
Iron Lance - Att 17 - 450G
Long Spear - Att 29 - 1400G
Bronze Knife - Att 10 - 200G
Divine Dagger - Att 18- 640G
Poison Moth Knife - Att 24 - 1250G
Oak Staff - Att 3, MPA 1.0% - 120G
Wizard's Staff - Att 7, MPA 1.5% - 840G
Staff of Sentencing - Att 11, MPA 2.0% - 1600G
Thorn Whip - Att 11 - 350G
Battle Whip - Att 17 - 960G
Carrying Pole - Att 15 - 530G
Oaken Pole - Att 22 - 780G
Iron Claws - Att 17 - 620G
Razor Claws - Att 28 - 1750G
Iron Fan - Att 14 - 300G
War Fan - Att 24 - 920G
Coffinwell Armour Shop
Bronze Shield - Def 6, Blc 0.5% - 370G
Shell Shield - Def 8, Blc 0.5% - 600G
Hardwood Headwear - Def 4, MagMen 2 - 120G
Turban - Def 7, MagMig 3, MagMen 3 - 310G
Chain Mail - Def 11 - 540G
Bronze Armour - Def 14 - 720G
Iron Cuirass - Def 16 - 100G
Garish Garb - Def 12 - 660G
White T-Shirt - Def 11 - 520G
Leather Gauntlets - Def 2 - 60G
Iron Gauntlets - Def 5 - 450G
Leather Gloves - Dfs 16 - 190G
Leather Kilt - Def 5 - 110G
Red Shirt - Def 5, MagMig 3 - 340G
Iron Kneecaps - Def 9 - 640G
Leather Boots - Def 2 - 70G
Iron Sabatons - Def 7 - 580G
Clogs - Evas 1.5% - 160G
Heal at the Inn and save at the Church and then we have a lot of people to see. First we need to talk to Mayor Laria at the top mansion of the map. He's upstairs and to the right in the Library. Then head to the upper left house right next door and talk to Catarrhina. She'll tell you her hubby Dr Phegmy is in his lab and she'll meet us there. It's like 2 doors away so she can't just come with us? Head outside and down the stairs and its the door tucked against the back wall. Go inside talk to the Dr, then his wife, then back to the Mayor. He'll give you a key to the Quarantomb dungeon and you need to take that back to the Doc. Finally the Doc will take off for the dungeon and we need to get after him.
Coffinwell
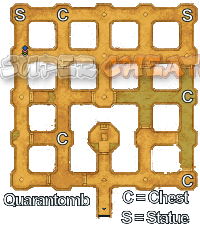
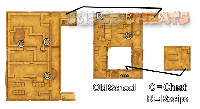
Map of the Quarantomb
Monsters in this area
038 - Lost Soul
042 - Mean Spirit
043 - Magus
044 - Mummy Boy
045 - Earthenwarrior
046 - Metal Slime
Let's leave Coffinwell and then head West to West Coffinwell. The dungeon is the in the upper middle of the map.
BIG EXP POSSIBLE:
Quarantomb has Metal Slimes running around it. These guys do little damage to you and only have 4 HP. The deal is you need something that can hit metal so hopefully you've upgraded your sword with Metal Slash. Why are these guys so awesome? They give out 4,000 exp. That's 1,000 per character. So knowing that make sure to attack every and all metal slime you see. This is good exp for many levels so its up to you if you want to boost some levels or not.
Anyway once Phemy lets us inside it's a pretty straightforward dungeon. We need to activate the 2 statues that is in both top corners. That's really it. Big dungeon for a simple solution. There are also 4 chests. One over and up for a blue random and then top of that same column and finally 2 on the far right column. Once you've gotten all of those head back to the middle and into the main chamber.
BOSS: Ragin' Contagion
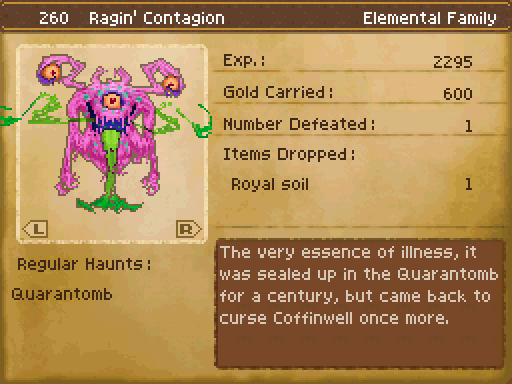
BOSS: Ragin' Contagion
Once you activate the 2 statues you can leave and go back to town and heal. Phemy will complain when you get back but he's really just a big whiner. Ragin' Contagion gets 2 actions and he only does 2 things. Direct damage to 1 character or Deaccelerate you. So start with the Sap and then Accelerate every 2nd or 3rd turn to counteract Contagion's Deaccelerate. You don't have to do it every turn because his spell doesn't hit everyone every time. Keep up the pressure and it's the end of that.
Ragin' Contagion
First off head back to the Phlemgy's house and talk to his wife. Then head up and talk to the Mayor who is outside his house. Next we have to rest at the Inn until evening. When you wake at night head to the grave in the lower left and talk to the woman there. Then go back to the Docs lab and knock on the door. After this you have to take the Doc to 3 buildings.
1) Immediately below the Doc's house is a door. Talk to the old man in this house who is in bed.
2) In the Inn talk to the girl in the Bunny Outfit standing by the bed.
3) At the house on the right side in the middle talk to the Dad downstairs and then the daughter upstairs.
When you leave the 3rd house the Doc will leave the group. Now talk to the Mayor to get your prize.
[video6012 title=Checking on the Sick]
Head back to the Starflight Express in the Mountain Pass one more time. Probably faster to teleport to Stornway. This time the train works and you finally get to go back to the Observatory. Once the conversation with Major is done work your way back up to the Tree for another scene. You'll talk to Apus Major after that scene automatically and then get back in the Starflight. It's directly to your back left at the top tree area.
The Staflight LIVES
Monsters in this area
001 - Slime
043 - Magus
047 - Bodkin Bowyer
048 - Slime Knight
049 - Cyclown
050 - Badboon
051 - Slime Stack
052 - Mudraker
054 - Drackyma
055 - Walking Corpse
You have a lot more freedom of movement now. These large blue glowing trees are landing points for the Starflight Express so if you want to get somewhere new come to the Blue Trees. Stella suggests checking out the Abbey so let's go ahead and do that. It's the building in the middle of the map right by the Blue Tree we landed at.
Alltrades Abbey
Alltrades Abbey Item Shop
Medicinal Herb - Restore 30 HP to 1 ally - 8G
Antidotal Herb - Heals poison from 1 ally - 10G
Chimaera Wing - Teleporter to towns you've been to - 25G
Iron Broadsword - Att 27 - 1000G
Long Spear - Att 29 - 1400G
Poison Moth Knife - Att 24 - 1250G
Staff of Sentencing - Att 11, MPA 2.0% - 1600G
Battle Whip - Att 17 - 960G
Oaken Pole - Att 22 - 780G
Razor Claws - Att 28 - 1750G
War Fan - Att 24 - 920G
Iron Shield - Def 10, Blc 1.0% - 900G
Iron Helmet - Def 11 - 1100G
Iron Armour - Def 18 - 1200G
White T-Shirt - Def 11 - 520G
Robe of Serenity - Def 9, ManMig 5, MagMen 5 - 950G
Iron Kneecaps - Def 9 - 640G
Springtime Skirt - Def 6, MagMen 2 - 440G
As you head inside the Abbey you'll come across a conversation that the the Abbot isn't available. After that head to the top and talk to the minister again, saying No to his question, and learn that the Abbot is missing. Then head downstairs and talk to the Maid in the dining room to the left. After that you need to find the Martial Artist who is wandering the downstairs. Rest at the Inn if need be and then head back upstairs. Stella will have a scene and then back to the Minister. He'll teach you the Bow party trick which you will need. (Misc - Assign Party Trick) Then it's off to the Tower of Trades.
The Abbot Is Missing
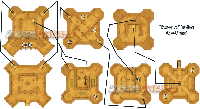
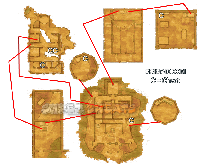
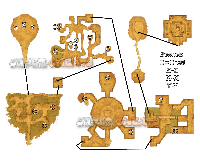
Map of the Tower of Trades
Monsters in this area
001 - Slime
048 - Slime Knight
050 - Badboon
053 - Mushroom Mage
054 - Drackyma
055 - Walking Corpse
056 - Jinkster
057 - Restless Armour
The Tower of Trades is in the far upper right portion of the map. When you get there do your Bow Party Trick for the doors to open and then head inside. This dungeon consists of 7 floors and they are tight. If you have your Mage on Tactics you may want to move them to No MP to converse MP.
2F - There are 3 blue chests along the bottom row.
3F - There is a red chest in the bottom right with a Mini Medal.
4F - Top right is 1,200 Gold. Bottom left Lump of Iron Ore. Bottom right is blue chest.
5F - Chest in the top right open area.
6F - Empty.
7F - Mini Medal & Phial of Magic Water.
BOSS: Master of Nu'un
Another double actioner. His one on one melee attack isn't that hot so no worries there. He does do a hardcore area-of-effect on everyone for around 20 HP. The Master will also Drain Magic on one of your casters but that only take like 5-8 MP. He'll also cast Woosh hitting everyone and Call Lightning which is a single target spell.
After the battle you'll get a Lava Lump. Yeah! The Abbot will apologize and run back to the Abbey. So let's Ecav and then Zoom back to the Alltrades Abbey.
Master of Nu'un
Alltrades Abbey Is Open For Business
You can now use the Abbot to change vocations. There are a few things to understand. When changing vocations you keep all the skills you have earned but you get the attributes of the new vocation. Meaning if you change to something that is level 1 you will have level one strength. There is a nice bonus to changing vocations. Say you are a Minstrel. Change to Thief and go 9 levels of quick leveling for the skill points. Pop them all into Sword and you get a boost. Then change back. That's what I did.
Jona Needs Daddy
Porth Llaffan Item Shop
Medicinal Herb - Restore 30 HP to 1 ally - 8G
Antidotal Herb - Heals poison from 1 ally - 10G
Moonwort Bulb - Cures Paralysis - 30G
Chimaera Wing - Teleporter to towns you've been to - 25G
Evac-U-Bell - Instantly escape tower, cave or dungeon - 28G
Holy Water - Keep weaker monsters away - 40G
Angel Bell - Cures Confusion - 90G
Magic Water - Restore 50 MP to 1 ally - 500G
Bunny Tail - Agi 5 - 240G
Slime Earrings - Def 4 - 400G
Gold Bracer - Def 3 - 350G
Gold Ring - Def 2 - 220G
Porth Llaffan Weapon/Armour Shop
Iron Axe - Att 30 - 1800G
Sledgehammer - Att 28 - 1300G
Boomerang - Att 13 - 750G
Short Bow - Att 20 - 1150G
Iron Shield - Def 10, Blc 1.0% - 900G
Iron Helmet - Def 11 - 1100G
Feathered Cap - Def 7, MagMig 5, MagMen 5 - 620G
Silver Tiara - Def 6, MagMig 8 - 670G
Iron Armour - Def 18 - 1200G
Tortoiseshell - Def 22 - 1550G
Cloak of Evasion - Def 13, Evas 3.0% - 1000G
Dancer's Costume - Def 13 - 740G
Iron Gauntlets - Def 5 - 450G
Rubber Gloves - Dfs 23 - 270G
Boomer Briefs - Def 8, MagMig 4, MagMen 4 - 420G
Pop Socks - Def 7 - 680G
Iron Sabatons - Def 7 - 580G
Wellington Boots - Def 5 - 330G
They don't really give you a place to specifically go so let's head to the port at the bottom of the map and see what is going on there. When you enter town head immediately down to the beach and talk to the woman at the bottom right. The villagers will tell you to back off so just move a bit away from here and watch the scene. After that head to the Inn and rest till evening. Let's go talk to Jona and see what's going on. Her house is the TINY little shack in the bottom right. She'll get taken to see the Mayor so let's find out what he wants. His house is the big one on the top left. After that conversation you'll automatically go to sleep for the night. When you wake up its time for business. Head to the exit above the Mayor's house to the upper left. His son will let you know his dad took Jona to Tywill Cave.
Jona

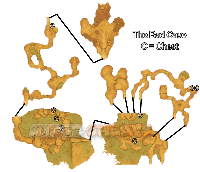
Map of the Tywill Cave
Monsters in this area
041 - Crabid
052 - Mudraker
058 - Knocktopus
059 - Chimaera
060 - Salamarauder
061 - Man O'War
062 - Mortoad
This is a pretty small dungeon that is fairly straightforward. The only turns involve going out of your way to get treasure. Like right when you get there. There is a chest in the far right corner and also the lower left. Check the map for many chests all of which are off the beaten path. This dungeon has you walking over small rock steps in the water to get from one area to the next.
BOSS: Lleviathan
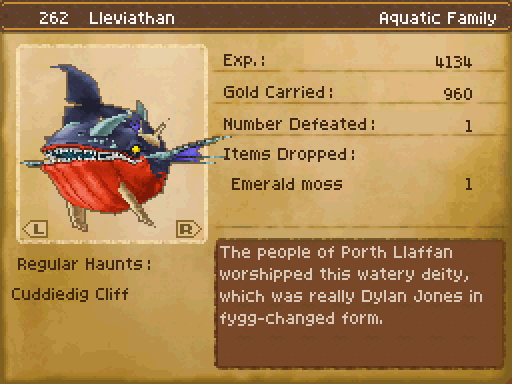
BOSS: Lleviathan
When you get to the cliff you'll see a brief cutscene and then it's boss time. It's not that tough a fight with Lleviathan's only meaty attack being Tidal Wave which will hit your entire team for some good damage. Other then that its just a race between if Lleviathan kills you or you kill him. My 1 Priest on Auto Heal kept up fine. Lleviathan does resist debuffs but not 100%. Just keep on the Sap and it WILL stick.
Lleviathan
Afterwards you'll get the fygg and everyone will return to town. You can now get on the ferry at the docks of Porth Llaffan to Slurry Quay.
Stone Work Is Hard Work

Map of Slurry Quay
1 - Fresh Water
2 - Corundum
3 - Softwort
Monsters in this area
058 - Knocktopus
059 - Chimaera
062 - Mortoad
063 - Dread Admiral
064 - Zumeanie
065 - Bud Brother
066 - Spinchilla
107 - Crabber Dabber Doo
Slurry Quay Item Shop
Medicinal Herb - Restore 30 HP to 1 ally - 8G
Antidotal Herb - Heals poison from 1 ally - 10G
Moonwort Bulb - Cures Paralysis - 30G
Chimaera Wing - Teleporter to towns you've been to - 25G
Evac-U-Bell - Instantly escape tower, cave or dungeon - 28G
Holy Water - Keep weaker monsters away - 40G
Magic Water - Restore 50 MP to 1 ally - 500G
Fur Hood - Def 8, MagMig 3, MagMen 5 - 550G
Pointy Hat - Def 9, MagMig 6, MagMen 4 - 840G
Tortoiseshell - Def 22 - 1550G
Robe of Serenity - Def 9, ManMig 5, MagMen 5 - 950G
Silver Bracelets - Def 7 - 540G
Rubber Gloves - Dfs 23 - 270G
Boomer Briefs - Def 8, MagMig 4, MagMen 4 - 420G
Fishnet Stockings - Def 9 - 800G
Wellington Boots - Def 5 - 330G
Galvanised Geta - Def 6, Evas 1.5% - 560G
Bow Tie - Def 3 - 1600G
Not much to do in the town of Slurry Quay so let's just travel into the middle of Slurry Quay then area to the middle bridge area which is the town of Dourbridge.
NOTE: As of now you can go back to the Inn at Stornway to unlock the Krok Pot and start your alchemy career.
Dourbridge Item Shop - NOTE HUGE PRICE HIKE DON'T SHOP HERE
Medicinal Herb - Restore 30 HP to 1 ally - 40G
Antidotal Herb - Heals poison from 1 ally - 50G
Moonwort Bulb - Cures Paralysis - 150G
Chimaera Wing - Teleporter to towns you've been to - 125G
Holy Water - Keep weaker monsters away - 200G
Angel Bell - Cures Confusion - 450G
Magic Water - Restore 50 MP to 1 ally - 2500G
Slime Earrings - Def 4 - 2000G
Gold Bracer - Def 3 - 1750G
Gold Ring - Def 2 - 1100G
Pink Pearl - Def 3 - 7500G
Bow Tie - Def 3 - 8000G
Dourbridge Weapon/Armour Shop
Cautery Sword - Att 42 - 3000G
Holy Lance - Att 39 - 2700G
Poison Needle - Att 1 - 1900G
Stolos' Staff - Att 18, MPA 2.5% - 3150G
Snakeskin Whip - Att 23 - 2500G
Iron Bar - Att 36 - 2300G
Sacred Claws - Att 43 - 3100G
Foehn Fan - Att 40 - 3200G
Light Shield - Def 10, Blc 1.5% - 1250G
Iron Helmet - Def 11 - 1100G
Thief's Turban - Def 13 - 1500G
Heavy Armour - Def 35 - 3600G
Plain Dress - Def 15 - 1600G
Wayfarer's Gloves - Dfs 30 - 660G
Lockpicker's Mitts - Dfs 52 - 800G
Blue Jeans - Def 12 - 1350G
Denim Skirt - Def 12 - 1380G
Bandit Boots - Def 9, Agi 5 - 1200G
Dourbridge Secret Shop
You can't get into the Secret Shop at this time.
So it's time to cash in all those Mini Medals we've been collecting. Head to the tent in the upper right and talk to Cap'N. He'll hook you up with free stuff just for bringing him those Mini Medals that are all over the place.
Next let's find out about the next fygg. Head into the building on the lower river section. It's in the top of the right side just below you from the Tent. The guy inside tells you to Old Man Mason in The Lonely Plains.
Before we leave go to the middle of the bridge for another scene with the ghost who is looking for someone.
After that let's head out once you've bought everything you need, saved, and rested up.
Monsters in this area
057 - Restless Armour
063 - Dread Admiral
064 - Zumeanie
066 - Spincilla
067 - Bewarewolf
068 - Clawcerer
069 - Rampage
074 - Toxic Zombie
Just head through the outdoor Dourbridge to the south to get to the Lonely Plains.

Map of The Lonely Coast
Monsters in this area
057 - Restless Armour
068 - Clawcerer
069 - Rampage
070 - Beakon
071 - Mad Moai
074 - Toxic Zombie
Simply head through this section to the right around the small lake. Talk to the main who is waiting here to find out the Mason is gone. Let's just go inside his house and read his personal diary and we find out he's gone and not coming back. Leave through the top of the area to go to The Heights of Loneliness.
Old Man Mason
Map of The Height of Loneliness
Monsters in this area
071 - Mad Moai
073 - Grinade
074 - Toxic Zombie
075 - Metal Slime Knight
076 - Hocus Chimaera
077 - Treeface
078 - Stone Golem
Start by going up the left side for a chest. Then around the right to the next area. This dungeon uses walking ropes and climbing ropes. First go left and climb to the chest, then to the back right for another chest. Now climb the left side and follow the ropes around. These areas are narrow and you'll probably get into a lot of battles. Don't worry we'll get a chance to heal up near the end. Head into the cave and follow it around to another chest, then back the way you came and finish the climb. Now take the bridge and come back across the rope. Then just follow the path until you get to Zere Rock. This counts as a town so feel free to Zoom out for a quick heal at a real town and then Zoom back.
Zere Rock
Head around to the back right house and talk to the Slime that is in there. When we leave we're going to get attacked so be prepared.
BOSS: Garth Goyle

BOSS: Garth Goyle
Garth is a strong high damage boss. Keep on the heals because he can do some major damage very quickly. Garth Goyle likes to stomp his big stone foot right down on someone for some big time damage. He also like to cast Magic Barrier to keep your spells off him. He does have an area of effect called Ground Pound but it doesn't do much damage wise.
Afterwards you'll follow a ghost to the basement at the side of the house to get the fygg.
Garth Goyle
I Need A Boat Because My Flying Train Is Too Much Work

Map of Bloomingdale
1 - Nectar
2 - Plantinum Ore
3 - Flurry Feather
4 - Wakerobin
5 - Sleeping Hibiscus
Monsters in this area
001 - Slime
072 - Trigertaur
078 - Stone Golem
079 - Gum Shield
080 - Pink Sanguini
081 - Scarewolf
082 - Bad Badboon
090 - King Slime
093 - Axolhotl
Time for a new area. We need to head south from the Lonely Coast to get to Bloomingale and head into town on the left side of the map.
Bloomingdale Item Shop
Sleeping Hibiscus - Group of enemies to sleep - 68G
Wakerobin - Wake an ally from sleep - 66G
Medicinal Herb - Restore 30 HP to 1 ally - 8G
Superior Medicine - Restore 60 HP to 1 ally - 50G
Antidotal Herb - Heals poison from 1 ally - 10G
Moonwort Bulb - Cures Paralysis - 30G
Softwort - heals paralysis and 60 HP - 95G
Chimaera Wing - Teleporter to towns you've been to - 25G
Evac-U-Bell - Instantly escape tower, cave or dungeon - 28G
Holy Water - Keep weaker monsters away - 40G
Angel Bell - Cures Confusion - 90G
Magic Water - Restore 50 MP to 1 ally - 500G
Bloomingdale Weapon Shop
Cautery Sword - Att 42 - 3000G
Platinum Sword - Att 51 - 4500G
Holy Lance - Att 39 - 2700G
Battle Fork - Att 47 - 3900G
Poison Needle - Att 1 - 1900G
Deadly Nightblade - Att 42 - 2900G
Falcon Knife Earring - Att 1 - 15800G
Stolos' Staff - Att 18 MPA 2.5% - 3150G
Watermaul Wand - Att 25 MPA 5.0% - 4700G
Snakeskin Whip - Att 23 - 2500G
Chain Whip - Att 28 - 3700G
Iron Bar - Att 36 - 2300G
Pillar of Strength - Att 47 - 3400G
Sacred Claws - Att 43 - 3100G
Crow's Claws - Att 51 Agi 10 - 4800G
Foehn Fan - Att 40 - 3200G
Tortoiseshell Fan - Att 50 - 4900G
Edged Bommerang - Att 22 - 2750G
Bloomingdale Indoor Armour Shop
Warrior's Boots - Def 11 - 1300G
Femiscyran Footwear - Def 11 - 1400G
Frugal Footwear - Def 9 MagMen 5 - 1500G
Wizard Wellies - Def 9 MagMig 5 - 1380G
Acroboots - Def 9 Agi 8 - 1600G
Cowboy Boots - Def 13 - 2150
Hip Boots - Def 14 - 2300G
Saintly Sollerets - Def 16 - 2600G
Sheepskin Shoes - Evas 3.0% MagMen 10 - 1250G
Sire Sandals - Evas 3.0% MagMig 8 - 1300G
Starlet Sandals - Evas 3.0% - 1450G
Kung Fu Shoes - Evas 3.0% - 1550G
Bloomingdale Outdoor Armour Shop
Light Shield - Def 10 Blk 1.5% - 1250G
Platinum Shield - Def 15 Bkl 2.0% - 3200G
Iron Mask - Def 14 - 2100G
Warrior's Helm - Def 18 - 3000G
Feather Headband - Def 12, MagMen 5 MagMig 5 - 1450G
Circlet - Def 9 MagMig 8 MagMen 6 - 980G
Cat Ears - Def 10 MagMig 8 MagMen 5 - 1150G
Heavy Armour - Def 35 - 3600G
Silver Mail - Def 31 - 4000G
Tussler's Top - Def 31 - 3400G
Smart Suit - Def 18 - 2300G
Spangled Dress - Def 18 - 2500G
Best Vest - Def 12 MagMig 8 MagMen 8 - 2000G
Warrior's Gloves - Def 6 Dfs 43 - 950G
Snazzy Skirt - Def 10 MagMen 6 - 1200G
Loud Trousers - Def 12 - 1480G
Warrior's Trousers - Def 14 - 1550G
Tussler's Trousers - Def 13 - 1500G
There is a lot to do. Or more importantly a lot of people to talk to. First off the city has a boat! We need a boat to get places. You say we have the Starflight? Just forget about a magical flying train, real people travel by boat.
As soon as you enter the town talk to the lady hanging out right at the enterance. Then head to the docks in the far upper right and talk to the warden in front of the dock. Next talk to the doorman at the big mansion in the upper middle. He'll let you in. Go to the left room and talk to Marion. She'll get mad and storm off. Next do right next door to the left and talk to Marion's nanny. She tells you to talk to the toymaker. He is right inside the INSIDE armour shop. Once you talk to him you'll auto go back to the mansion where you find out Marion has been kidnapped. Once Randolph leaves interact with the ghost on the left side of Marion's room and follow her outside. Read all 3 tombstones and you'll make a discovery.
Time to go to the Bad Cave and get the girl back. It's in the middle north of the map.
Ms Bloom
Map of The Bad Cave
Monsters in this area
083 - Medislime
084 - Shaman
085 - Weaken Beakon
086 - Raving Lunatick
087 - Hunter Mech
088 - Riptide
089 - Metal Medley
Head in the left side entrance and you'll overhear the kidnappers talking. Continue around to the top and read the sign, then sit on the chair. The kidnappers will come talk to you before discovering that they've lost the girl. Take the new ladder down and go in the right entrance. Just continue through this very linear dungeon getting chests as you go. This dungeon does have Metal Medleys. These babies have 6 HP and give 12k EXP. IF you can kill them before they flee. Feel free to spend some time at the end of B1 taking on these EXP machines.
BOSS: Tyrantual
When you get to the final room you'll go after the boss of the area, Tyrantual. Double actioner who does some good damage. Two area of effects. Wind Sickles which does just damage and Venomissle which has the added effect of possible poison. This can be a tough battle since Tyrantual LOVES the area of effects. You would do good to spend a little time of Metals and get to 24ish before starting this boss. My Mage went down right before the end and my Priest was at 0 MP and I had level 23s.
Afterwards head back to town and go back to the garden behind Marion's room to get the fygg. The nanny will come out and tell you you now get access to the ship so let's head to the docks and move on!
Tyrantual
It Has An Extra S Because You Want More Of It

Map of Djust Dessert
1 - Brighten Lock
2 - Glassfrit
3 - Evencloth
4 - Resurrock
5 - Belle Cap
6 - Kitty Litter
Monsters in this area
076 - Hocus Chimarea
093 - Axolhotl
094 - Parched Peckerel
095 - Power Hammer
096 - Gold Golem
097 - Expload
098 - Mummy
So we can pretty much go anywhere but Djust Dessert and the city of Gleeba is the island that is just to the north and east so we'll head there next. If you want to make some money the Gold Golems in the small depressed area at the bottom of the map have 500G for each one but they do hit hard. When you are ready to do some work head into the town.
Gleeba Item Shop
Medicinal Herb - Restore 30 HP to 1 ally - 8G
Strong Medicine - Restore 40 HP to 1 ally - 36G
Antidotal Herb - Heals poison from 1 ally - 10G
Strong Antidote - Heals poison and 40 HP - 38G
Moonwort Bulb - Cures Paralysis - 30G
Chimaera Wing - Teleporter to towns you've been to - 25G
Evac-U-Bell - Instantly escape tower, cave or dungeon - 28G
Holy Water - Keep weaker monsters away - 40G
Angel Bell - Cures Confusion - 90G
Magic Water - Restore 50 MP to 1 ally - 500G
Pink Pearl - Def 3 - 1500G
Bow Tie - Def 3 - 1600G
Gleeba Weapon Shop
Platinum Sword - Att 51 - 4500G
Bandit Blade - Att 58 - 6300G
Battle Fork - Att 47 - 3900G
Sandstorm Spear - Att 54 - 6600G
Assassin's Dagger - Att 54 - 7000G
Falcon Knife Earring - Att 1 - 15800G
Watermaul Wand - Att 25 MPA 5.0% - 4700G
Lightning Staff - Att 28 MPA 3.5% - 8100G
Chain Whip - Att 28 - 3700G
Iron Whip - Att 38 - 6000G
Pillar of Strength - Att 47 - 3400G
Driller Pillar - Att 60 - 5300G
Crow's Claws - Att 51 Agi 10 - 4800G
Handrills - Att 61 - 7600G
Fowl Fan - Att 52 - 5000G
Battle-Axe - Att 52 - 3900G
War Hammer - Att 55 - 4600G
Crucerang - Att 30 - 4300G
Gleeba Armour Shop
Magic Shield - Def 17 Blk 2.5% MagMig 8 MagMen 8 - 4000G
Platinum Headgear - Def 19 - 5500G
Holy Hat - Def 11 MagMen 18 - 2600G
Tricky Turban - Def 11 MagMig 18 - 2680G
Disturbin' Turban - Def 16 - 2900G
Musketeer Hat - Def 12 MagMig 18 - 4200G
Magic Armour - Def 37 MagMig 4 MagMen 4 - 5800G
Summer Dress - Def 24 - 4800G
Velvet Cape - Def 20 - 3000G
Magic Robes - Def 15 MagMig 12 MagMen 12 - 3600G
Magic Mittens - Def 9 MagMig 4 MagMen 4 - 2400G
Fingerless Gauntlets - Dft 58 - 1050G
Gorgeous Gloves - Dft 45 - 900G
Wizard's Trousers - Def 10 MagMig 12 - 1700G
Nicker's Knickers - Def 12 Agi 10 - 1820G
Swordman's Slacks - Def 16 - 2700G
Red Tights - Def 13 - 2400G
Sneakers - Def 13 Agi 10 - 2400G
Just head to the Palace in the back of the town. First talk to the minister in the middle of the second floor. If you help catch the Queen's pet lizard he will get you in to see the Queen.Now llet's climb all the way to the 3rd floor and search in the tower for a Magic Key. This key lets you open locked colored doors. (Like the one in Zere behind the Inn with a Mini Medal inside.)Then climb all the way down to the first floor and talk to the woman who is patrolling the back corridors. She'll tell you to Clap if you see the lizard. Leave the palace and look at the upper left section of the map to the left of the palace. Bind Clap to a party trick and use it in this area to scare the lizard out and grab him. Then take it back to the Minister on the second floor. After your conversation with the Queen climb to the third floor and go outside and talk to the fisherman. He'll let you know how to get in by getting into the pool. After seeing the lizard again follow him to the left into the well.
Gleeba

Map of The Plumbed Depths
Monsters in this area
098 - Mummy
099 - Admirer
100 - Lesionnaire
101 - Diethon
102 - Purrestiditator
103 - Manguini
111 - Ghoul
The Plumbed Depths is another straightforward dungeon. This is one side area on B1F-B that requires the Magic Key from the 3rd floor of the Palace. But if you want everything that is behind that door you need the Ultimate Key which we don't have yet. So instead go up the ladder to the back right stairs. Then head around the top and down to the lower section getting all 4 chests.
BOSS: Grand Lizzier
The Grand Lizzier has only 1 attack with any strength. It's his melee claw attack. It can easily do 70 damage to one character. Keep your party above 100 HP as much as you can. The Grand Lizzier will also do an area of effect with Terror but since he only does a single action a turn it doesn't really do anything. Magic attacks do good damage here so I skip the Sap for once and go for direct damage.
Grand Lizzier
Hermany / Urdus Marshland / Iluugazar Plains

Map of the Iluugazar Plains
1 - Horse Manure
2 - Fisticup
3 - Gleeban Groat
Monsters in this area
110 - Treevil
112 - Robo-Robin
113 - Swinoceros
114 - Peckerel
115 - Battering Ram
116 - Rockbomb
117 - Brainy Badboon
151 - Goodybag
Back to the boat and go east to the the southeastern tip of the GIANT continent. Disembark on the beach and we have some walking to do. Follow the road to the top left to get to the Urdus Marshland. From here go northwest to get to The Iluugazar Plains. Then to the middle of the map to the town of Batsureg.
Batsureg Item Shop
Medicinal Herb - Restore 30 HP to 1 ally - 8G
Strong Medicine - Restore 40 HP to 1 ally - 36G
Antidotal Herb - Heals poison from 1 ally - 10G
Moonwort Bulb - Cures Paralysis - 30G
Chimaera Wing - Teleporter to towns you've been to - 25G
Evac-U-Bell - Instantly escape tower, cave or dungeon - 28G
Holy Water - Keep weaker monsters away - 40G
Angel Bell - Cures Confusion - 90G
Magic Water - Restore 50 MP to 1 ally - 500G
Coagulant - Gives enemy paralysis - 90G
Tangleweb - Slows enemy - 35G
Lambswool - Alchemize Item - 180G
Batsureg Weapon Shop
Bandit Blade - Att 58 - 6300G
Valkyrie Sword - Att 64 - 7700G
Sandstorm Spear - Att 54 - 6600G
Partisan - Att 61 - 7100G
Assassin's Dagger - Att 54 - 7000G
Lightning Staff - Att 28 MPA 3.5% - 8100G
Iron Whip - Att 38 - 6000G
Driller Pillar - Att 60 - 5300G
Sleepy Stick - Att 65 - 8200G
Handrills - Att 61 - 7600G
Cobra Fan - Att 56 - 5200G
Battle-Axe - Att 52 - 3900G
War Hammer - Att 55 - 4600G
Edged Bommerang - Att 22 - 2750G
Crucerang - Att 30 - 4300G
Razor-Wing Boomerang - Att 38 - 9100G
Hunter's Bow - Att 57 - 4900G
Potshot Bow - Att 70 - 9200G
Batsureg Armour Shop
Flame Shield - Def 18 Blk 2.5% - 5200G
Ice Shield - Def 18 Blk 2.5% - 5700G
Mail Coif - Def 20 MagMen 4 - 4500G
Hocus Hat - Def 12 MagMig 18 - 2800G
Hunter's Hat - Def 15 - 2200G
Ear Cosy - Def 16 - 2400G
Battler's Band - Def 21 - 4050G
Femiscyran Mail - Def 40 - 6100G
Strongsam - Def 32 - 4100G
Fur Vest - Def 36 - 5800G
Femiscyran Fingerwear - Def 11 - 1900G
Archer's Armguard - Dft 50 - 770G
Blue Skirt - Def 12 MagMig 8 - 1750G
Femiscyran Bottoms - Def 13 - 1450G
Chainmail Socks - Def 17 - 2900G
Steppe Steppers - Def 16 - 2600G
Green Tights - Def 13 - 2500G
Agiliboots - Def 13 Agi 20 - 3100G
Talk to the chief and in the top left tent.There will be a scene and then we need to leave the town and go north to the Hunter's Yurts. First go to the right one and then the left. Leave the Hunter Yurts and leave to the north. Go all the way to left and enter the samll cave in Mount Ulbaruun. There will be another scene and then after that leave for the second mountain range on the far right, Mount Ulzuun. Our goal here is to enter Gerzuun in the top of the area.

Map of Gerzuun
Monsters in this area
083 - Medislime
111 - Ghoul
120 - Sorcerer
121 - Cheeky Tiki
122 - Deadcurion
123 - Infernal Armour
124 - Troll
First go down the stairs on the left side of the circle. This takes you to the basement. There is a mini-boss Troll done here and one chest locked behind a door. There are also 2 chests behind the Troll. Then back up to the main level. There are chests on all four points of the top level. Also take the well for a chest and the yurt in the top left. Then head out the middle top. It's a straight run to the item after that.
Evac and Zoom back to Batsureg. Rest if you need and then go back to Batzorig's hut at the Hunter's Yurt. He'll take the grass (as long as you give it to him) and run off the Batsureg. Zoom over there (he still beats you. He's FAST.) and head towards the chief's hut for a scene. Time for another boss.
Batsureg
BOSS: Larstastnaras
Lots of melee damage coming your way. Lar-zaaa-zaas-whatever LOVES Magic Barrier so Sap isn't much help. Have your Priest cast Buff from the start. It will cut Lars melee attack in half. Which is HUGE. Watch your Healer/Healers to keep them in the game and work your melee damage for top output. For this battle I took control of everyone because the damage coming at you can be HIGH.
Larstastnaras
Back to Hermany where your boat is. Don't use it though, we want to head north to Snowberia and into the Swinedimples Academy.
Swinedimples Academy
Swinedimples School Shop
Medicinal Herb - Restore 30 HP to 1 ally - 8G
Antidotal Herb - Heals poison from 1 ally - 10G
Moonwort Bulb - Cures Paralysis - 30G
Chimaera Wing - Teleporter to towns you've been to - 25G
Holy Water - Keep weaker monsters away - 40G
Magic Water - Restore 50 MP to 1 ally - 500G
Partisan - Att 61 - 7100G
Magma Staff - Att 34 MPA 4.0% - 10800G
Feline Fan - Att 54 - 5100G
Thinking Cap - Def 18 MagMig 12 MagMen 12 - 12500G
X-Ray Specs - Def 13 MagMen 12 - 3400G
Swinedimple Blazer - Def 10 - 1500G
Swinedimple Slacks - Def 11 - 1000G
Swinedimple Skirt - Def 11 - 1100G
Black Knickers - Def 14 - 2880G
Magical Skirt - Def 13 MagMig 9 MagMen 9 - 4600G
White Tights - Def 13 - 2450G
Leather Shoes - Evas 1.0% - 40G
As you come to the gate the headmaster will be there waiting for you. Or at least waiting for someone. Might as well be us. Say yes you are the investigators and you'll be lead to his office as he tells you what is going on. Seems they are missing a student. Once the conversation is done head back out the way you came and go to the bottom right building. That's the dorms. Head inside and upstairs and go down the hallway to the last door on the left. You'll overhear some students talking. Afterwards go inside and continue the conversation. Then you need to exit the dorms and head to the far left of the map. The trio is there now and talk to Fred in the middle. Afterwards head back to the room you first met the boys in at the Dorm. (Since it was your room all along) and rest until evening.
Now back into the main building and take the stairs up 2 floors. Head outside and touch the statue. After the scene work your way all the way down and outside and to the right above the dorms. A tombstone will move revealing the dungeon.
Swinedimples
Map of The Old School
Monsters in this area
131 - Sootheslime
132 - Icikiller
133 - Teaky Mask
134 - Raving Reaper
135 - Wight Priest
136 - Sculpture
Very small dungeon. In the first area you need to climb the stack of books and and run over the top of the bookshelves. The second area just look out for the purple ooze and break the one pot to get to the bottom room.
BOSS: Dreadmaster

BOSS: Dreadmaster
From here on out we are on full control to get the most of our party. Auto is fine for basic fights but we are going to need more control. Dreadmaster is a multi action and the bad part is one of those could be a double melee on it's own. And still have another action. So my start is Buff from the Priests and everyone else is on DAMAGE. We want to outpace him and get the win before he starts piling on damage to multiple heroes. He does have Crackle to hit your whole party and also Zammie but he luckily doesn't use them very often.
Dreadmaster
Zoom back to Alltrades and head east to the blue tree to call the Starflight. The outcome of this section is pre-set so just go through it.
Fyggs Are Going Home
Falling From Heaven Is NOT Just A One Time Deal

Map of the Wormwood Area
1 - Wormwood Creek
2 - Hope Springs
3 - The Bowhole
Wormwood Creek
Wormwood Creek Item Shop
Medicinal Herb - Restore 30 HP to 1 ally - 8G
Strong Medicine - Restore 40 HP to 1 ally - 36G
Antidotal Herb - Heals poison from 1 ally - 10G
Strong Antidote - Heals poison and 40 HP - 38G
Moonwort Bulb - Cures Paralysis - 30G
Chimaera Wing - Teleporter to towns you've been to - 25G
Evac-U-Bell - Instantly escape tower, cave or dungeon - 28G
Holy Water - Keep weaker monsters away - 40G
Angel Bell - Cures Confusion - 90G
Magic Water - Restore 50 MP to 1 ally - 500G
Coagulant - Gives enemy paralysis - 90G
Tangleweb - Slows enemy - 35G
Wormwood Creek Weapon Shop
Valkyrie Sword - Att 64 - 7700G
Dragonsbane - Att 73 - 10000G
Sandstorm Spear - Att 54 - 6600G
Halberd - Att 75 - 6600G
Icicle Dirk - Att 62 - 9600G
Rune Staff - Att 45 MPA 6.5% MagMig 8 - 12400G
Dragontail Whip - Att 50 - 14000G
Mistick - Att 82 - 16500G
Handrills - Att 61 - 7600G
Dragon Claws - Att 78 - 14500G
Battle-Axe - Att 52 - 3900G
Moon Axe - Att 65 - 8800G
War Hammer - Att 55 - 4600G
Giant Wrench - Att 64 - 7900G
Razor-Wing Boomerang - Att 38 - 9100G
Swallowtail - Att 48 - 9600G
Potshot Bow - Att 70 - 9200G
Blowy Bow - Att 77 - 12000G
Wormwood Creek Armour Shop
Warrior's Shield - Def 21 Blk 3.5% - 6700G
Dragon Shield - Def 24 Blk 3.5% - 9800G
Raging Bull Helm - Def 22 - 10400G
Thinking Cap - Def 18 MagMig 12 MagMen 12 - 12500G
Cavalier Hat - Def 16 MagMig 21 - 7100G
Hermetic Hat - Def 14 MagMen 22 - 4000G
Dragon Mail - Def 44 - 11500G
Shipmate's Shirt - Def 25 - 5980G
Dragon Top - Def 39 - 11200G
Flowing Dress - Def 25 MagMig 18 MagMen 18 - 18000G
Bruiser's Bracers - Def 12 - 2250G
Metallic Mitts - Def 16 - 3500G
Mental Mittens - Dft 50 - 1550G
Dragon Trousers - Def 16 - 5600G
Kiltlet - Def 15 MagMig 11 - 4200G
Sorcerer's Slacks - Def 22 MagMig 14 - 2100G
Payback Pumps - Def 14 - 2950G
Safety Shoes - Def 9 Evas 2.0% - 2700G
How many times are we going to wake up in a small town? Rest until evening at the local Inn and then attend the meeting at the Church.
After that leave the town and head north along the road to the lake. There is a small cave on the bottom right. Instead you'll talk to Wallace and then leave and talk to the ghost you've seen many times. Now back to Wormwood for find Serena lost item. Search the statue near the weapon shop. Its not there so head to the church and look at the tombstone on the right. Get Serene Necklace and take it back to Serena at Hope Spings. Shes going to help you get into Bowhole which is pretty far to the east. Just follow the road.
Wormwood
Map of The Bowhole
Monsters in this area
143 - Gramarye Gruffon
144 - Skeleton Soldier
145 - Bloody Manguini
146 - Blood Mummy
147 - Harmour
148 - Python Priest
149 - Sculpture Vulture
150 - Living Statue
151 - Goodybag
152 - Drakularge
153 - Liquid Metal Slime
As you head to the front door of the dungeon Serena will let you in. There are 3 holes in the ground. Any of these three will get you to the dungeon. First talk to the ghost in the back to learn a new party trick. Then take the far right hole. It gets you the closest to the door that is locked. If you want to open it to make future trips down here head to the bottom right. Then follow the map around and get to the boss of this dungeon. If you have some good stuns and metal attacks there are liquid metal slimes in this dungeon for some mondo-crazy experience.
BOSS: Gadrongo
Gadrongo is a single action boss. He likes to cast Burning Breath which is a group paralyze. If you survive it, free damage, if more then 2 members get paralyzed, then you have some work getting people back in the fighting shape. Keep your HP high because Gadrongo will do some damage. The big damage comes from his Ground Pound which can hit from 30-40 damage each. Buff ASAP to help with the damage and attack.
Afterwards make sure to grab the bow before Evacing or your coming all the way back.
Gadrongo
Reveal The Bridge of Light

Map to Upover
Make sure you got the Wyrmlight Bow and head west to the Canyon. When you get to the Stone you'll fire the bow to make the bridge and the villagers will all run over and say how sorry they are. Then work your way through several areas until you finally arrive at Upover.
Upover Item Shop
Medicinal Herb - Restore 30 HP to 1 ally - 8G
Strong Medicine - Restore 40 HP to 1 ally - 36G
Antidotal Herb - Heals poison from 1 ally - 10G
Strong Antidote - Heals poison and 40 HP - 38G
Moonwort Bulb - Cures Paralysis - 30G
Chimaera Wing - Teleporter to towns you've been to - 25G
Evac-U-Bell - Instantly escape tower, cave or dungeon - 28G
Holy Water - Keep weaker monsters away - 40G
Angel Bell - Cures Confusion - 90G
Magic Water - Restore 50 MP to 1 ally - 500G
Coagulant - Gives enemy paralysis - 90G
Tangleweb - Slows enemy - 35G
Upover Weapon Shop
Fire Blade - Att 83 - 21500G
Lightning Lance - Att 85 - 19800G
Sword Breaker - Att 74 - 15500G
Magical Mace - Att 57 MPA 8.0% - 17000G
Dragontail Whip - Att 50 - 14000G
Mistick - Att 82 - 16500G
Sadistick - Att 90 - 26500G
Dragon Claws - Att 78 - 14500G
Fire Claws - Att 88 - 21000G
Stellar Fan - Att 77 - 12000G
Moon Axe - Att 65 - 8800G
King Axe - Att 78 - 16000G
Giant Wrench - Att 64 - 7900G
Terra Tamper - Att 75 - 15000G
Swallowtail - Att 48 - 9600G
Gusterang - Att 61 - 12000G
Blowy Bow - Att 77 - 12000G
Great Bow - Att 99 - 31500G
Upover Armour Shop
Dragon Shield - Def 24 Blk 3.5% - 9800G
Tempest Shield - Def 25 Blk 3.5% - 12500G
Power Shield - Def 27 Blk 4.0% - 17000G
Mythril Helm - Def 25 - 16800G
Steely Sweatband - Def 21 - 15500G
Magical Hat - Def 13 MagMig 16 - 6400G
Dragon Mail - Def 44 - 11500G
Mirror Armour - Def 52 - 22500G
Dark Robe - Def 37 Evas 2.0% - 13500G
Flowing Dress - Def 25 MagMig 18 MagMen 18 - 18000G
Light Gauntlets - Def 13 - 4200G
Battler's Bracers - Def 12 - 3300G
Mayoress's Mittens - Dfs 60 - 2800G
Glommer's Gloves - Dfs 76 - 3400G
Battle Britches - Def 17 - 3120G
Seabreeze Skirt - Def 17 MagMen 12 - 6800G
Hiking Boots - Def 18 Agi 20 - 4600G
She-fu Shoes - Evas 4.0% - 2050G
Talk to the Mayor in the house in the upper right. Then talk to the guard by the Magmaroo, right below the Mayor's house, who will let you in.
Upover
Monsters in this area
160 - Bagma
161 - Golem
163 - Hell Nino
164 - Corrupt Carter
165 - Live Lava
166 - Mandrake Marauder
168 - Magmalice
169 - Green Dragon
Watch the lava on the ground and work your way up to the top. It's a pretty big dungeon and even the basic enemies are starting to do some damage so don't be afraid to make it several trips. If you can reach the summit it's a Zoom spot so feel free to go back and forth to town as needed.
BOSS: Greygnarl
Grey is a single action boss and he doesn't really live up damage wise to the last few bosses. If you have Dragon Slash (Sword level 1) use it. Not much to really worry about, just keep up the damage and keep people topped off on HP.
Afterwards the old lady from town will show up and yell at you both. Grey isn't interested in helping you at this time so leave the summit and zoom back to town. Lots of dead bodies laying around but we might as well heal up first. Then its right back into battle. Talk to the middle guard for a second big battle.
Greygnarl
BOSS: Fright Knight & 2 Stenchurions
Blast the two Stenchurions first. Pile on damage to go through as many people as you can as fast as you can. Mage's Boom and similar area of effects are great early to get damage on everyone before your bigh guns start finishing people off. The Fright Knight will try to Zing the Stenchurions back to life, but luckily it will fail more often then work. Overall it's not that long of a battle.
Fright Knight
Talk to the old woman at the entrance to the Magmaroo. Then down the stairs to the inside of the mountain and get the keg of Drunken Dragon. Zoom to Stornway and drop off your entire party. Then Zoom back to the Summit and talk to Greygnarl. You'll have a 1 on 1 battle with a Aggrosculpture, then Grey will give you the Dragon Armour. You need to put all the pieces on whether they are better then wait you have or not. Then talk to Grey again for a long fun cutscene.
Greygnarl Takes Flight
Did We Just Fall From Heaven A Third Time?
Gortress Item Shop
Medicinal Herb - Restore 30 HP to 1 ally - 40G
Antidotal Herb - Heals poison from 1 ally - 50G
Chimaera Wing - Teleporter to towns you've been to - 125G
Holy Water - Keep weaker monsters away - 200G
Angel Bell - Cures Confusion - 450G
Magic Water - Restore 50 MP to 1 ally - 2500G
Try the door of your cell to end the day. The next day leave your cell and enter the center building for the stairs to the main area. Sterling from last night is up there and he'll give you the tour.
1) Far left boneyard
2) South exit talk to the left guard
3) Talk to guard at right wheel
4) One of the two shield to either side of the back
5) Gallows in middle back
Afterwards simply talk to Sterling again to continue the story and go to sleep. This time when you wake up you need to go to the gallows. This starts the revolution! Equip all your weapons and gear (why didn't we start the revolution immediately?) and run through the south exit and past the force field into the Gittish Empire. Zoom from here to Stornway and re-recruit your whole team. Then Zoom back to the Gortress. Head into the guard tower at the back tip and fight the very easy guard there before turning off the shields. Then into the basement.
Gortress
BOSS: Goreham-Hogg
At level 31 I JUST slipped by this battle by letting my worthless Mage stay dead almost the entire battle. Hogg does some HIGH damage and can easily get a 100 melee attack with critical. He also like to swing for the ropes with his ball and chain and do 60 . Keep everyone topped off with HP. If you are having problems level your Priest to 38 for Multiheal. I suggest you do that before the next set of battles anyway.
Goreham-Hogg
After the battle loot the left chest for the Ultimate Key. Every door you've passed in this game that you couldn't unlock can now be unlocked. Head downstairs and free all the Celestrians and then talk to Sterling for a scene. Before long you are back at the observatory. Go down to the second floor and talk to Apus Major, then up to the top floor left of the tree and talk to Apus again. Board the train and tell Sterling to take you to the Realm of the Almighty.
Realm of the Almighty
Talk to Apus when you get there and then enter the gate in front of you. Take a detour to the left as you rise to stop at the temple and grab some gear. Stealing from the Almighty is ok right? Head to the very top and you'll have a cutscene. Then work your way up the left side and offer up the fyggs in the light circle. After it's all over you'll take the Starflight to the Gittish Empire.
Fyggs Are Home
Gittish Empire Is Falling Down

Map of Gittingham Palace
Monsters in this area
171 - Stenchurion
173 - Dark Skeleton
176 - Lethal Armor
177 - Freezing Fog
178 - Stone Guardian
179 - Boss Troll
180 - Blastoad
181 - Fright Knight
182 - Wight King
We are heading into the end game here. Multiple enemies in a row time so this is probably the first area you are going to want to go back to previous dungeons and farm metal until about 38. Your goal is straight ahead of you, the Gittingham Palace.
BOSS: Hootingham-Gore
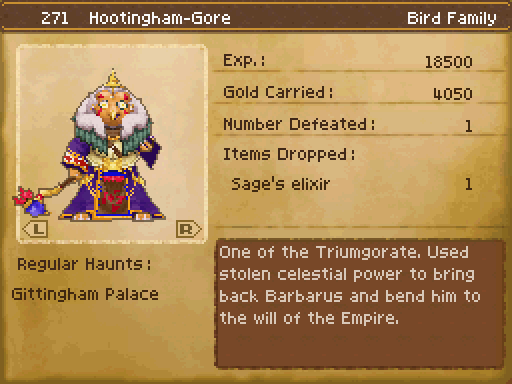
BOSS: Hootingham-Gore
Boom! Boss right off the bat. That’s how the end of the game is going to go. Bosses all over the place. Hoot has two guards that will block your attacks so might as well take them out first. Gore is big on Swoosh hitting everyone for major damage. He’ll also cast Bounce which reflects spells back at you. Also Eerie Glow which lowers your spell defense. I did this fight at less then 38 so I didn’t have Multiheal and I barely got out with just one character alive.
Hootingham-Gore
Continue through the dungeon until you get to the end of the dungeon.
BOSS: Goresby-Purrvis

BOSS: Goresby-Purrvis
Goresby is a hardcore crazy attacker with high damage. It’s all direct damage so Buffs are good. You really want your Healer to have Multheal. He has a single attack that can easily do 200 damage base and he likes to use it. Be ready to heal heal heal. He has ZERO AOEs but his direct damage is insane.
Head back to the healing spot on the first floor before going on because it’s another boss in the next room.
Goresby-Purrvis
BOSS: King Godwyn

BOSS: King Godwyn
This first battle is all set-up. Don’t waste MP you can’t get back and just work him. There isn’t much to it. Conserve MP and HP. You do NOT get a rest between now and the next fight.
Godwyn
BOSS: King Godwyn II
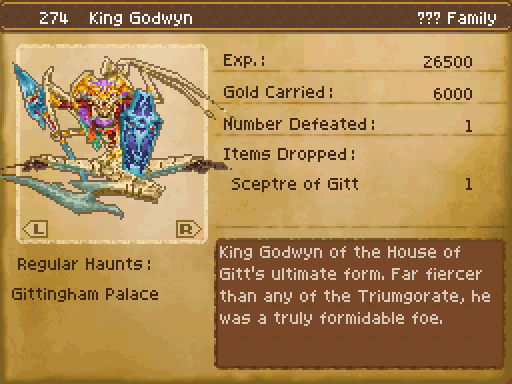
BOSS: King Godwyn II
Now he’s getting serious. We will see melee and magic in the form of Kafrizz. Also Inferno on the entire group. Don’t bother with protective spells as II also loves to throw out Disruptive Wave which strips you of ALL your buffs. He also loves to buff himself with Magic Barrier and Kabuff. Use Abilites like they are going out of style and keep your HP UP. One guy going down can throw the whole rhythm of the battle. Be careful.
Godwyn II

Map of the Oubliette
Monsters in this area
170 - Abyss Diver
178 - Stone Guardian
179 - Boss Troll
181 - Fright Knight
182 - Wight King
183 - Claws
184 - Aggrosculpture
185 - Mandrake Marshal
186 - Bad Karmour
187 - Wyrtoise
188 - King Crab
Afterwards the shielded entrance will be opened up. There is a Ghost Priest down there that can do heal, resurrect, and save like a normal Priest. Continue down to the Oubliette. Heal up but you don't have to worry about another boss, just lots and lots of enemies as this is a LONG path. Free the prisoners and make your way to the end. You'll have a brief encounter with Corvus but there is nothing you can do at this time. Pesky Celestrian laws.
Talk to Apus about Corvus. Talk to the Great Tree and she'll give you another fygg. Go to the Train and talk to Sterling.
The Realm of the Almighty
Monsters in this area
188 - King Crab
189 - Genie Sanguini
190 - Cumulus Rex
191 - Red Dragon
192 - Gigantes
193 - Belisha Beakon
194 - Charmour
195 - Cureslime
196 - Great Troll
197 - Cobra Cardinal
198 - Prism Peacock
199 - Night Knight
200 - Drakulard
201 - Barbatos
202 - Firn Fiend
203 - Sick Trigertaur
When you get to the top you fight all 3 of the previous Lieutenants. Then it's on to new bosses.
BOSS: Corvus
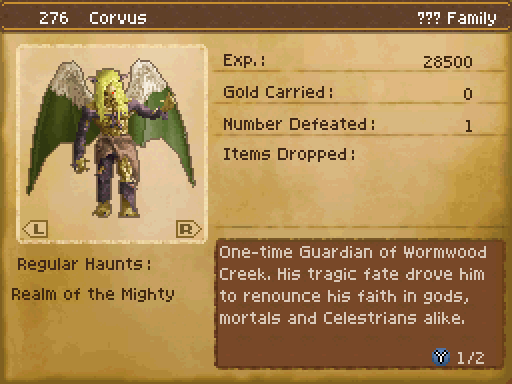
BOSS: Corvus
Stage one is pretty easy. He’ll actually take turns just laughing at you. Not to say he can’t do damage if need be. He does still have an attack that does 120. Corvus will mostly double melee. He can also Disruptive Wave and call forth Lightning but his bread and butter is definately melee. You do get a chance to rest between all 3 battles.
Corvus
BOSS: Barbarus

BOSS: Barbarus
Now this is a real battle. Lots of Fear and Wave of Panic which reduces your agility and defence. His main attack does mondo damage but he’s mostly a melee boss with some terror thrown in. You might want so healing items on everyone just in case your healer is struck with terror. Keep up with the healing. Again you can evac and rest before the final battle. It’s also a good time to turn in all your mini medals and do any shopping you want to do.
Barbarus
BOSS: Corvus
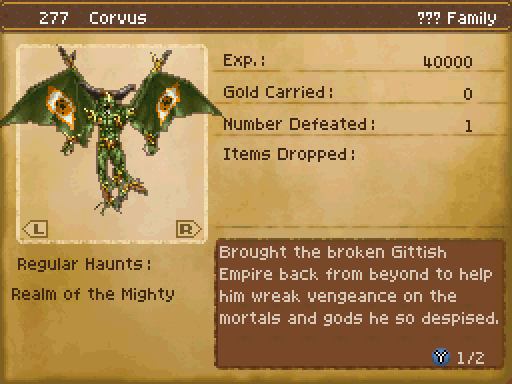
BOSS: Corvus - Part 2
Final battle. Corvus will use both Burning Breath for paralyze and Eerie Looks to put you to sleep. You should pretty much cast Multiheal every single round regardless. Corvus has a small set where he will cast Meditate, giving himself 500 HP back, afterwards he will BLAST you. A good plan is to just defend the next round and go back on the offensive the round after.
Corvus Part 2
YOU WIN!
Ending Cutscene


 Gran Turismo Sport Wiki – Everything you need to know about the game .
 Review: Dead or Alive 5
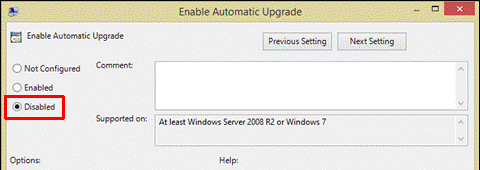 How to Downgrade from Office 2016 to Office 2013 & Block the Upgrade
 Game of Thrones Episode 2: The Lost Lords (PC) walkthrough
 Grand Theft Auto 5s Trevor is Florida Man