Surviving a full-scale futuristic war can be difficult, to say nothing of the post-traumatic stress. Vanquish, a new IP from Resident Evil creator Shinji Mikami, puts players in the malleable battle suit of super-soldier Sam Gideon, who uses a variety of cool tricks at his disposal to combat enemies of all stripes.
Much of the game takes place on an orbital Space Station, where Sam is supposed to rescue an enigmatic scientist named Francois Candide. With an epic sci-fi plot and a number of technological tricks at its disposal, Vanquish is sure to be a thrill ride.
It won’t be so thrilling, however, if you spend all your time dead or stuck. That’s why we’re providing this comprehensive walkthrough for the game — to enable you to rampage through it and have as much fun as possible while you’re doing it. You can also check out our Cheats page, which will host a variety of Vanquish-related information in addition to the trophy and achievement lists it currently houses.
Note: This walkthrough refers to the Xbox 360 version of Vanquish.
Act 1
Mission 1
After all of the cutscenes play, the only actual gameplay in this act involves the player just running down a hallway. Use your boost by holding down ”’LB”’ to make it through as fast as you can.
Mission 2
The first thing you have to do is get to the gun turret. Boost over to the open door to the left, then under the low bridge.
Get cover next to the wall on the right and inch to the end to get a shot on the enemy manning the top turret.
With him gone, you can use the turret by pressing X. Wipe out the enemies below.
Note that these turrets do have limited ammo, so don’t just hold down the fire button. If your turret does run out of ammo, you can take the ramp to the left down a level to find another one.
When you hear your team say “Move on through,” turn around and start working towards the door.
You’ll need to take out the enemy driving the walker up ahead first. Once he’s down, you can take control and use it to clear a path to the corridor up ahead.
When it’s clear, jump down from the walker and head down the corridor to complete the mission
Mission 3
Boost up the stairs and be ready for enemy resistance once you reach the top. Kill the closest enemy, then grab cover at the barricade he was standing at.
Use the barrels up ahead to blow up any nearby opposition, then head up the remaining stairs to reach the plaza.
If you climb up the stairs along the right wall, you’ll find a sniper rifle. Replace this with your shotgun for now and take out the enemies manning the walkers and turrets. Be careful for enemies sneaking up behind you as you’re sniping.
Once you’ve taken out all of the high priority targets, head back down and move with your team.
Use cover and take out the remaining enemies until more of them zap in. Don’t forget to use grenades when you see a cluster of enemies appear.
When Elena tells you of enemy reinforcements, prepare yourself by getting in one of the walker units you freed up earlier. Turn it around so that it faces the gate along the wall.
When the gates open, enemies will start rushing down the stairs, including a big mech that shoots lasers and missiles.
The mech is your top priority. Make sure to bombard him with bullets from your walker. Once it runs out of ammo, quickly boost to cover and unload on him with your Heavy Machine Gun ammo until he goes down.
His missiles and lasers can be devastating. When you see him charging his chest laser, don’t think that you’re safe in cover. Immediately boost out of the way.
A cutscene should play once its clear. After the cutscene, use the time you’re given to scout the area and pick up all of the various guns and grenades. Remember, make sure to pick up weapons even if you’re already at full ammo. Doing so will start to upgrade your weapons.
When the drop ships arrive, try to time a grenade throw so that you take out a bunch of enemies as they’re exiting the ship.
After you clear all of these enemies, you’ll get to fight your first boss.
BOSS – KNRB – 0 Argus Robot
For the first phase of this fight, keep your distance from the boss, but stay on the bottom level.
Slow down time by holding down LT and pressing A to dodge, then unload magazine after magazine of Heavy Machine Gun ammo into one of the glowing legs.
Once you take out a leg, the boss will stumble, giving you a shot at the core in its head. Keep on shooting the core until it gets back up.
From there, repeat the process, while making sure to dodge or boost whenever the Boss appears to be shooting an energy blast at you.
Once you drain all of the boss’s life, it will transform into its second form, after unleashing about a bajillion missiles into the air. Make sure you’re in cover when those missiles take flight.
For the second phase of this fight, head up the stairs to the top level and start kicking boxes open for ammo.
Use the same strategy as before, using your slow motion mode to take out the arms and legs and then attacking his core when its vulnerable, but be extra careful of the boss’s attacks this time. They can be extremely damaging and some can even kill you in one shot. If he’s charging up his chest cannon, drop what you’re doing and boost away.
After killing two of his arms, a quick time event will take place that will have you rotating the control stick. Pay extra attention to the direction of the rotation. Be prepared to do this three times.
With the arms down, head back down to the bottom area and start chopping down his legs.
Keep it up and eventually he’ll go down.
Mission 4
Before you move on, make sure to raid all of the ammo boxes to restore your ammo and get a few ranks up on your guns.
When you’re ready, follow the radar and your squadmates to the door up ahead and activate the lock at the end of the hall.
Remember to always check every ammo box and gun drop pod you see, even if you have full ammo. Doing so will give your guns extra ranks, which eventually turn into gun upgrades.
You’ll eventually see some combat as you turn the corner. Take cover and start taking down some robots.
Push forward and take out the RPG-wielding and turret manning enemies first.
When you reach a cluster of enemies across the bridge, lob a frag grenade at their feet to take them all out at once.
Eventually you’ll run into a Romanov. Get behind cover as you shoot and stop once you see it firing its head laser. When it charges up its chest beam, immediately get out of cover and boost away to another spot. After it fires its beam, you can shoot its core for some heavy damage.
With the Romanov down, continue across the bridge and fight your way to the second floor.
A cutscene will play and you’ll be tasked with rescuing three captive soliders from their containment fields. Each soldier is heavily guarded, so take caution when approaching them.
After saving the soldiers, revive them to receive a gun for your troubles.
After saving the third soldier, the gate will open and flood the area with enemy robots. Try to greet them with a grenade or EMP emitter and take them out all at once.
Mission 5
Use the console to open the door and then take cover in the next area.
Take out the Gorgie with your assault rifle first. He’s the gold-colored robot perched overhead near the right side.
You’ll start seeing ammo boxes that have different weapons from here on out. It’s good to experiment with different types of weapons, but holding on to your Heavy Machine Gun and Assault Rifle is recommended.
Around the corner you’ll run into a new enemy type known as a Chicane. These robots will transform into cover for enemies to use while also firing lasers from time to time. They are vulnerable while firing their lasers and when not in wall form.
A big fight awaits in the next area. If you have a sniper rifle, you can easily take out the blue robots and the turret in the back first. Otherwise, just work your way forward by moving from cover to cover.
Head through the next door to trigger a cutscene.
A horde of robots will climb over the far wall and attempt to push through your defenses. Use grenades liberally to turn them into scrap metal.
Another wave will follow, this time including a Romanov. You don’t have to kill everything here, just survive long enough for the next cutscene to play. Use EMP Emitters to freeze enemies in place and then take them down if they start to overwhelm.
A Lock-On Laser will be in the weapon pod behind you after the cutscene ends. Replace your secondary weapon with it and then follow your squad forward.
Use the laser to take out multiple enemies at once, including hard-to-hit enemies stationed behind turrets.
Up ahead, you’ll run into an enemy ambush, which includes a tank. Quickly get into to cover and start thinning out the number of standard enemies.
As for the tank, Take note of when the cannon is aiming at you and be ready to dodge or boost when you hear the beeping sound that indicates it’s about to fire.
Also be careful when you see sparks start flying from its sawblades. This indicates that it’s about to charge forward through your cover in an attempt to run you over. This is an instant kill, so be sure to boost out of the way.
The tank is vulnerable via its core on the back. Let your squad distract it while you boost around to the back and unload upon the core with your Heavy Machine Gun.
Mission 6
Stock up on ammo and then continue forward through the door up ahead.
Blow the barricade by pressing ”X” near it, then getting back to a safe distance before clicking both sticks in.
Head forward into the darkness to trigger a cutscene. Afterwards, continue forward to eventually run into a couple of spider robots. Pick up the LFE Gun for a nice way to clear a bunch of spiders at once.
Up ahead, you’ll spot the source of the spiders: a large enemy called a Jellyfish. Take these out from a distance with your Heavy Machine Gun. Do not let them get close to you.
After you get past the jellyfish, you’ll run into an enemy encampment that will soon be inhabited by a Romanov-F. These guys shoot flames, so getting close to them is very ill-advised. Shoot their backpack for an easy kill.
Clear a path to the explosive points and place bombs at both locations.
With both bombs planted, drop down and take cover behind the friendly APC before detonating.
Up at the end of the level there will be another two Jellyfish and a Romanov M. If there’s a Rocket Launcher in one of the ammo boxes, take it and utilize it to bring down the big enemies more easily.
Mission 7
Pick up the Rocket Launcher from the gun pod up ahead and use it to take out the Romanovs across the way. Make sure that you let your cursor sit on them long enough to lock on.
With the Romanovs down, your next targets are the turrets and then the standard enemies.
Once you take out enough enemy robots, a giant vehicle will emerge from the ground and drop off a large group of enemies. Try to throw a grenade into the narrow walkway that they come out of, killing a bunch with one attack.
Head across the bridge and be ready for another Romanov. Use cover to avoid his weak attacks and boost away to avoid his damaging attacks.
Once the area is clear, you’ll have beaten the mission.
Mission 8
There should be a ton of ammo lying around after that last battle. Use your radar and seek out all of the white and green dots to replenish your ammo and increase some ranks.
When you’re ready, return to the squad and activate the console to turn on the elevator.
The lift will rise up to your level and bring some enemies for you to kill. Take cover and just wait for them to move into your sights.
When the elevator reaches the top, head out and make a right. A fight will be just around the corner, involving a Romanov backed up by several standard enemies on the other end.
Take cover and just fire away, not letting them get close to you and your squad. Stop shooting when you see a missile or other large projectile coming your way.
Keep up the fire, even after reinforcements arrive, and you’ll trigger a cutscene that introduces the game’s main antagonist.
BOSS – Zaitzev
Like you, Zaitzev is extremely fast and packing some pretty heavy artilery. Always try to have a piece of cover between you and him, unless you need to boost away.
Use your Assault Rifle to fire away at him from a distance, and use your Heavy Machine Gun when he gets into mid/close range. It’s not worth using the Heavy Machine Gun at long range due to its inaccuracy and low ammo capacity.
If you can, search around the ammo boxes for a Lock-On Laser. This weapon is perfect for hitting Zaitzev and dealing pretty significant damage without putting yourself at much risk.
The main attacks you have to watch out for are his melee attack, his chest beam, and his grenades.
His chest beam is easily avoidable as long as you see it coming. When you see purple energy gathering in his chest, immediately boost away to a safe location.
His grenades can also be very damaging if they surround you. They’ll be highlighted by red indicators, so make sure to boost away whenever they’re dropped by your cover.
When his weapon turns into a scythe, he’s about to rush towards you for a melee attack. Wait for him to dash, then hold LT and dodge backwards with A to punish him while in slow motion with your Heavy Machine Gun
Once you bring his health down, he’ll charge towards you and initiate a quick time event. Mash X to keep the punches coming and the fight will end.
Scavenge around for ammo and upgrades then head to the elevator with Burns and the rest of the group.
Take the elevator up and then eliminate the enemies in the next area. There’s nothing you haven’t seen before here.
Restock on ammo and then continue into the next room.
Activate the console at the end of the hall and head through the door to reach the conveyor belts.
Fight your way through to the end, making sure to treat the walkers as a priority. You will usually find a rocket launcher on the way. Equip it and use it on the walkers.
Once you reach the end, ascend the stairs.
At the top, you’ll run into a bunch of Romanovs and walkers in addition to the standard enemies. Kill the enemy piloting the walker first, then boost over to it so you can take control. With the walker under your power, use its guns to take down the Romanovs.
Once the room is clear, a cutscene will play and the mission will end.
Act 2
Mission 1
Scavenge around for ammo and upgrades, then head to the elevator with Burns and the rest of the group.
Take the elevator up and then eliminate the enemies in the next area. There’s nothing you haven’t seen before here.
Restock on ammo, then continue into the next room.
Activate the console at the end of the hall and head through the door to reach the conveyor belts.
Fight your way through to the end, making sure to treat the walkers as a priority. Generally you can find a rocket launcher on the way. Equip it and use it on the walkers.
Once you reach the end, ascend the stairs
At the top you’ll run into a bunch of Romanovs and walkers in addition to the standard enemies. Kill the enemy piloting the walker first, then boost over to it so you can take control. With the walker under your power, take down the Romanovs using its guns.
Once its clear, a cutscene will play and the mission will end.
Mission 2
This next mission takes place on top of a moving train as enemies approach from behind and on the tracks to the side.
To start, man the turret at the back and shoot down the drones that approach from the rear.
Remember that these turrets have limited ammo, so don’t get too trigger-happy with them.
After the cutscene plays, you’ll have two minutes to clear the enemies on the neighboring trains before the tracks collide. This can be tricky, due to the fact that the trains will be constantly moving and even driving on the ceiling.
Use your Assault Rifle since it’s the most accurate and versatile of your arsenal. The last train will have a Romanov, so switch to your Heavy Machine Gun or use a turret to bring him down.
At the end of the train ride, after you derail, transport ships will drop enemies onto the train. Retreat back to the side opposite where the enemies appear and open fire.
Enemies will start appearing by the buildings across from your train as well; most notably a pair of walkers that will tear you up if you don’t take care of them quickly.
After you clear this wave of enemies, take cover and avoiding getting too beat up by the guns mounted on the incoming transports. You’ll have to complete a QTE at the end involving mashing the X button.
In this next segment, you’ll be aboard a gun ship with guns that will fire automatically at whatever you aim at. Just use these guns and don’t waste ammo on the upcoming enemy transports.
Mission 3
Head forward into the tunnel ahead and you’ll be met by a pair of A-2 Spheres. Wait for their heads to pop out before you open fire.
Continue down the steps and be ready for enemies around the corner, at the end of the hall. Take them out, then proceed to the open room.
It’s an ambush! A Romanov will dash in and attempt to run you over. Try to dodge and enter slow motion as he passes so you can get some quick shots in on the weakspot at his backside.
Regular soldiers will soon follow, so take them out quickly while the Romanov is still turning around, making it a one on one fight.
From here, you should be used to this by now. Use your heavy machine gun to bring down its health, take cover but make sure to run away if he uses his chest cannon that fires the giant energy ball.
With the Romanov down, continue down the hall to the next room, where you’ll be able to flip a switch and open the door leading to a battle against two Argus robots.
BOSS – Two Argus Robots
One of the robots is in its quadripedal spider form while the other is already in its bipedal form. Fortunately, you can take these on one at a time.
Start off by going after the one in spider form and using the same strategy as before. Take out a leg to bring down the core, then unload on it with your heavy machine gun.
After you deal enough damage to the core, you’ll have to complete a QTE that involves you firing at its core while it pins you down and readies to fire its main cannon. Just keep your reticle aimed on the core and open fire.
From there, Sam will run up to the top of the robot and start spinning. Follow the onscreen prompt and rotate the control stick multiple times to instantly bring down the robot.
Now it’s time to focus on number two. Once again, this is basically the same fight as before, except this time you’ll get a different quick time event after taking out enough of the arms and legs.
This time, the QTE will involve Sam running up to the Robot’s head and repeatedly smashing it until the head gets knocked clean off. The robot will still attack even after it loses its head, so don’t let up.
Continue the process of taking out a limb and then shooting the core to eventually bring it down
NOTE: If you’re willing to spare the ammo, you can defeat this robot by first killing its arms, head, and back to get the Piece by Piece achievement.
Mission 4
After you finish restoring and upgrading your weapons via the multitude of weapons lying around, head through the newly opened door and meet Burns on the elevator.
When you reach the top, head down the hallway and wait for your squad to meet up with you and open the next door.
Kill the two walker pilots first and then hijack one to clear the rest of the area.
Try to find a Sniper Rifle if you can for this next section. It’ll help you to fight your way up a steep hill with enemies and turrets waiting for you at the top, making it easy to take out the enemies manning the turrets.
When you reach the top, head inside the building and quickly get behind cover to avoid being the only target of a large group of enemy robots. Pick off the enemies one at a time, then head upstairs.
Take out the enemies near the turrets, then take control of one to eliminate the enemy forces holding back your allies.
Continue to the top and follow the path across the bridge. When you reach the area with a bunch of boxes, you’ll be ambushed by several enemy robots. Use your radar to know where they are and use slowmotion dives around corners to surprise them
Start heading up the ramps to reach another huge hill with enemies strategically placed all around.
Once again, a Sniper Rifle, Rocket Launcher, or other long range secondary weapon is a great help in this part and will enable you to save some ammo on your primary weapons.
Head inside the building at the top and get cover before opening the ammo box. Take out the enemies in the next room before you go searching for guns.
Activate the console and then head back outside. The lift will be gone allow you to head to the other side of the hill where plenty of enemies are waiting.
Clear out the enemies and then wait for the demo team to place explosive charges.
Mission 5
Get some weapons from the scattered ammo boxes, then use the elevator.
As you follow your team along the path, enemies will try to ambush you from a dropship above. You don’t need to worry about them. Save your ammo and just boost to the end of the path, where another elevator will take you down.
Once you reach the bottom, you’ll have to fight your way up another hill.
The goal is to reach the door at the top left. As soon as you step out though, a cutscene will play that will result in a building tumbling down towards you. Quickly get into cover to avoid getting smashed.
Be careful as you make your way up the hill. There are a lot more enemies here, and they can easily flank you if you rush. Ready some EMP emitters so you can get out of danger quickly if you get overwhelmed.
Once you reach the structure at the top left of the hill, head up the ramp and you’ll trigger another cutscene.
Mission 6
As soon as this mission begins you’ll be thrown into the heart of a pretty tough firefight. I would recommend starting from the left side and working your way across so that you don’t get enemies coming from both sides of you.
After you take out the first set of enemies, a Romanov will emerge from the gate. Use an EMP Emitter to stun him while he’s still inside, then throw a grenade while he’s stunned. Finish him off with your heavy machine gun.
Do the same for the second one that comes out and they won’t even get the chance to shoot a single bullet.
After you take out all of the Romanov’s you’ll be attacked by a new enemy known as a Bia.
Bias have two forms. The first is a cougar like form that is really fast and attacks with swipes and its tail mounted gun.
When it stands up, it comes equipped with a weapon that doubles as both a gun and an axe. It can also spawn several sentry turrets that will tear you to ribbons if you’re not behind some cover.
While it’s in cougar form, just boost away and unload on its face with slow motion turned on. It’s more of a threat while in bipedal mode, but it’s also less mobile
While it’s walking around on two legs, get behind cover and aim for its head. When it gets close enough to swing its axe, it’s time to boost away and look for another cover spot.
After you take the Bia down and pick up the guns lying around, meet up with Burns and take the lift up.
In the next area, several Romanov’s with flame packs will emerge from the left side. Take them out painlessly by shooting the packs from a distance.
Look up and you’ll notice a giant energy cannon. Shoot the cannon with your Heavy Machine Gun when the core is exposed and boost away when it starts gathering energy.
Each time you destroy a core, more enemies will emerge. The second wave is a group of A-2 Spheres. They can easily get behind your cover, so make use of your slowmotion to take them down efficiently.
A large wave of enemies will be dropped by two transports. Activate slow motion as the doors open and toss a grenade inside to take out at least one group instantly.
After dealing with the enemies, look around for a rocket launcher to make dealing with the core above easy.
When you kill the second core, another wave of Romanovs will arrive. Try to save your rocket launcher ammo for the core and use your HMG to take out the Romanovs.
With the Romanov’s down, you just need to bring down one more core to be finished with this mission and this act.
Act 3
Mission 1
Check your radar to pick up a couple of weapons from the drop pods and ammo boxes before heading down the stairs and into your first battle of the act.
Move up with your squad and don’t get too far ahead of them. More enemies, including a Romanov with a flame pack, will warp in at the bottom of the steps.
Eventually you’ll get attacked by rocket-powered blue gorgies. These guys are too fast and mobile for you to deal with while waiting in cover. Use your slowmotion to slow them down and then pick them apart one by one.
Re-equip yourself at the drop pods through the barricades, then follow your squad forward.
Two drop ships will swoop in with enemies on board. You can use your HMG to destroy the drop ship, or just take out the enemies on board. It’s up to you — it’s a matter of which type of ammo you’re more willing to burn through.
A new type of Romanov (with drills for arms) will enter the fray as you push forward. These guys can drill underground and re-appear right behind you if you’re not careful. You can keep track of their location by paying attention to your radar.
Be careful of their deadly charge attacks and try to aim for the weakpoint on their back whenever possible.
Mission 2
After the cutscenes end, you’ll be thrown into another battle. This time you’re going to have to protect a transport ship. Quickly take out the Romanovs so the ship can land. While it’s landing, pick up any guns from the drop pods and ammo boxes.
Cross the bridge when it goes down and get ready for an ambush as several transport drills emerge from the ground and drop off a small army of robots.
After killing several enemies, another tank will roll in. This is basically the same fight as last time.
Take out any immediate enemies, then when it’s clear, try to boost around to the back of the tank, activate slow motion, and fire away at the weakspot in the back.
Be careful not to overheat! Turn off slow motion before the overheating meter fills and find cover while you wait for your suit to cooldown.
Mission 3
Regroup with Burns and the rest of your squad and head inside the circular room up ahead.
When the doors open, follow the trail around to the next elevator and go on inside.
When you reach the top, continue forward and get ready for an enemy ambush by all of the wreckage.
There’s nothing you haven’t seen or dealt with before here. Take cover and take each enemy out one by one.
When the coast is clear, watch the cutscene
Mission 4
Regroup with Burns and the rest of your squad and head inside the circular room up ahead.
When the doors open, follow the trail around to the next elevator and go on inside.
When you reach the top continue forward and get ready for an enemy ambush by all of the wreckage.
There’s nothing you haven’t seen or dealt with before here. Take cover and take each enemy out one by one.
When the coast is clear, watch the cutscene.
During this next part, you and your squad need to hightail it across a highway as it crumbles at your feet.
When you reach the first barricade, grab some cover behind the sandbags and unload on the enemies across the way.
Once the barricade falls, quickly boost ahead and wait for the next barricade to be moved.
You’ll eventually come to a heavily guarded enemy encampment, and even though it might be against everything you’ve done in this game up to this point, you need to rush right into it in order to avoid falling to your death on the rapidly crumbling highway.
Stop moving forward once there are two Romanov’s and a giant turret in front of you. Get behind the sandbags and start firing away.
Once the two Romanovs are down, just boost forward and forget everything else until the cutscene plays.
During the most of the remainder of this mission, you will be riding stealthily on a Monorail and sniping all of the spotlights that you see.
Keep your eyes alert and check your radar to make sure that you’ve destroyed every spotlight.
There are a total of four Sniper Rifles on the monorail. Don’t pick them up all at once to increase your Sniper Rifles’ rank. You’re going to need the ammo.
The reticule on the Sniper Rifle will turn red when your shot will hit. Be warned, though, that the Monorail is constantly moving. Rather than aiming directly at the target, aim so that that the reticule will automatically move on to the target with the monorail’s movement.
Also keep an eye on your ammo count. If you only have two or three shots left, go and get a refill of ammo. You’ll get spotted if you have two shots left and all of a sudden four spotlights appear.
When you pass under the bridge, a patrol car will fly overhead. You can try to get it on the first pass, but you’re more likely to be able to damage it while it’s flying back. You’ll need to shoot it down quickly or you’ll be spotted.
As soon as you kill the patrol, turn around and take out the next group of spotlights.
Once you destroy the final group, the monorail will speed up and you’ll be home free.
Well actually, not quite yet. When the monorail reaches the station, head outside and push through the enemies to place two charges on both sides of the bridge up ahead.
Once the charges are placed, get back out of the range of the explosion, and detonate.
Get back on the monorail to continue the ride.
Your final objective is to kill the enemy aircraft before it manages to kill the monorail.
Hopefully the monorail hasn’t taken much damage up to this point. Either way, this fight is relatively easy and doesn’t require much finesse. Just get in cover, take out the Heavy Machine Gun, and start firing at the aircraft.
Mission 5
Push forward but be careful not to get incinerated by the Kreon’s gigantic beam that sweeps across the ground.
Kill the tank that emerges by boosting around to its back side and punishing its weakpoint. From there, keep on pushing forward until you’re able to get up the ramp and behind one of the turrets.
Use the turrets to protect your vehicles from the oncoming waves of enemies and tanks
You won’t be able to rely on your radar to let you know where enemies are, so use the zoom on the turret by holding down LT. When it comes to tanks, aim for the connector between the body and the turret to take down the gun, then just focus on shooting the tank.
Your next job is to bring down one of the Kreon’s legs. Head over to the leg and wait for it to lift up. Don’t get close until the flames disappear. When its clear, boost under the leg and activate slow motion as you drill the under part of the foot with Heavy Machine Gun ammo, or a Rocket Launcher if you have it.
In this next area you need to fight your way around the walkways while having to deal with your suit overheating everytime the Kreon’s engines turn on.
When you reach the top of the ramp, use the turret to take out the enemies that are lowered from the inside of the Kreon. Once they’re gone, the path should be clear to the end of the mission.
Mission 6
For the beginning of this mission, Sam will be on a slow-moving transport while similarly slow guards walk around as easy targets.
Halfway through the ride, a strange enemy will appear that shoots lasers every which way. Ignore it for now. You’ll get a crack at it soon enough.
In fact, when you reach the end of this transport ride, you’ll actually have to fight it.
BOSS – Unknown
This fight can be pretty frustrating if you go into it blind, so to save you the frustration, I’ll just say it: use your EMP Emitters.
As soon as you see the mass of robot parts dash towards you, throw an EMP Emitter to stop it dead in its tracks. From there, take out your HMG and start shooting at its red core.
Shoot the core enough and the pieces of scrap metal will burst, revealing the tiny robot inside controlling everything. Slow down time and get in as many hits as you can without overheating.
The little scamp will run off and hide while it reforms itself. Don’t chase it too much, or you’ll run into it while it’s completely reformed, which is the last thing you want to do.
Don’t rely on your radar for this fight, since your radar can’t detect this unknown robot. If you’re wondering where it is, try looking up — it has a tendency to climb the walls.
When it’s on the ceiling, watch for it to extend its core out and shoot several lasers in random directions. Use slow motion and fire away at the core to make it fall and break apart.
Keep this up and remember to NEVER get too close to the boss. It will literally eat you and kill you in one hit.
Once the boss is down, continue onward until you reach a room where a warp-in will block your progress. Several speedy blue robots will appear to make your life a little bit harder.
If you have leftover EMP Emitters, this would be a good time to use one. Freeze the blue robots in place, then use slow motion to bring them down.
In the next area, there is a ring with a stream of energy that periodically passes through it. When the energy stops flowing, head inside and turn left. Quickly go through and exit out through the opening on the right.
Head up the ramp and take out the sentries and turrets that appear along the way.
Once you reach the second ring, turn right and boost straight ahead, but hug the left so you can exit at the very first opening.
Wait for another stream of energy to pass and then head back in and continue straight ahead to the next opening
A Romanov will emerge once you arrive, along with several other enemies, so be prepared to deal with them. Just don’t accidentally back up into the ring.
Continue heading up the ramp to the top ring and simply run across. Continue following the path to the next opening, but watch out for a flying, manned turret.
Head into the ring and continue down until you reach the opening on the left. Follow the path to the bridge and you’ll get ambushed by a couple of red robots.
Take them out and then continue on to the lift. When you reach the top, cross over to the other lift and activate the console.
When you reach the end of the lift, activate the next console to bring down a bridge filled with enemies.
Defeat these enemies to trigger another warp-in, which you can meet with a well-timed frag grenade. Once your enemies are dead, proceed into the elevator to complete the mission.
Mission 7
Boost forward, ignoring all of the enemy transports overhead. When you reach a large gap with a bunch of cover spots all around, take cover and wait for a lift to bring you a group of enemies to make into scrap metal.
When the coast is clear, pick up any weapons you might want, then head into the small lift to go up.
Enemies will be waiting for you at the top. When part of the wall opens up, revealing a dark room with several enemies, lob a grenade inside to take them all out at once.
Up ahead there will be a Romanov. If you have a sniper rifle, you can take him out from a distance. Otherwise, you’re going to have to get in closer and trigger another secret door on the left side to open, hiding three more Romanovs. Quickly throw a grenade inside and retreat to cover.
Wait a bit and the Romanovs will be killed automatically by a crashing shuttle
Hop onto the lift and take it up.
Quickly boost across this next area to avoid getting smashed by the falling building.
Kill the enemies by the parked transport cars, then follow your radar to a cool little mini lift that will take you up to the next level.
Take the next lift up to the third floor and take out the hovering patrol car waiting for you.
Run to the other side of the “U” and take the lift down this time. As soon as you do, enemies will jump up to greet you and a transport will drop more robots off on the bottom floor.
Take out the two robots that are an immediate threat, then grab some guns from the drop pods.
Aim over the edge and take out as many enemies down below as possible, then activate the console near the drop pods.
A lift will come down that will take you up to an area where a group of robots are having a dance party. Unfortunately, you need to break it up.
An Unknown will drop in after you clean up the regular enemies. You’re not given much room to fight him in, so you must be more careful that he doesn’t get in your face.
Take the lift up and watch the cutscene. Kill the enemy in control of the turret, then use it for yourself to bring down the enemy transport.
With the coast clear, move next to the energy conduit and press X. Keep on mashing the X button until Sam rips it out.
Act 4
Mission 1
Push forward from rock to rock, taking out enemies as you move from cover to cover.
Once you clear out all of the enemies, the gate will open. Head on through and be ready to fight a bunch of enemies, robotic pieces of cover, and two walkers.
Kill the ground troopers first while behind cover to avoid getting blasted by the walkers.
When you have a safe path, boost over behind the walkers, turn on slow motion, kill their pilots, then hop on to commandeer them for yourself.
The walkers will help too, because two drill-equipped Romanov’s are about to make their entrance.
With the Romanov’s dead, Elena will open the door up ahead. Head on into the structure and speak with Elena for a briefing on what’s ahead.
When the door opens, head on through and get ready for a big firefight. Enemies will soon flood the top platform up ahead, and with the tall grass obscuring your view, it can be pretty hard to hit them.
Look around for a ladder; climb it to reach the top of a small tower that will give you a better shot at the enemies ahead, as well as some nice cover. Be careful, though — the cover can be shot off eventually.
Be ready for Romanovs to enter the fray as well. Try to pick up a rocket launcher if you can find one among the various guns lying around.
When its clear, head to the right side and enter through the newly unlocked door.
Follow the path until you reach a console at the end. Activate it to call the elevator and also trigger a massive attack from the enemy forces.
Take cover and focus on killing the walkers first. Remember, you just have to kill their pilots to bring them down.
Drop ships will drop off several enemies that will bum rush your platform. Keep cool and use your slow motion to take them out before they get close enough to melee attack you.
When Elena tells you that the elevator has arrived, drop what you’re doing and dash over to it. Take cover inside and destroy any enemies that try to board it as well.
When your squad joins you, hit the switch to send the elevator up.
Mission 2
You’ll be attacked by a group of view hounds when the act begins. These small, annoying flying drones will zip around while hammering you with machine gun fire. Use slow motion dodges to take them down before they transform into a tougher bipedal form.
Once it’s clear, you’ll watch a cutscene before being placed out in the open. A group of the really fast Gorgies will dash towards you while a Buzzard flies around. Try to take out the Gorgies before the Buzzard lands and dashes forward. Remember to use slow motion to slow them down.
Hopefully you can find a Rocket Launcher to more easily deal with the Buzzard. If not, it’s going to be up to the Heavy Machine Gun. The enemy’s weak spots are on its back and below its massive head.
With the Buzzard destroyed, continue down the road and enter the open door on the left side.
Activate the console and head outside. Follow the path around and be ready to fight off two Air Gatlings. Take out your HMG and fire away at the actual transport to bring them down.
Follow the walkways down the ladders and continue moving forward until you notice the screen start shaking. An Argus robot will be right on your tail, so it’s time to boost forward and get to solid ground.
Quickly get in cover and take out as many enemies in the distance as possible before the Argus arrives.
The fight against the Argus doesn’t even deserve the title “boss” anymore. Your guns should be way more powerful by now and you should be able to bring it down fairly easily.
One thing you need to watch out for this time, though, is the fact that when you kill the Argus in its Bipedal form, it will fire its chest beam right before it dies — make sure you have enough room to boost away.
Pick up the multitude of guns at the end of the fight and then head through the open door.
Head up the stairs and across the walkway, eventually reaching a large open field where you’ll be attacked by several A-2 Spheres on the ground, while turrets and Gorgies shoot at you from above.
Two Bias will join the fight once the area seems to be clear. Use your EMP emitters to freeze them, then unload with HMG ammo at their red weakspot. A rocket launcher would be a huge help here as well.
Mission 3
Head forward, activate the console, then head through the door to initiate a conversation with the rest of you squad.
Push forward through the tunnel, taking out all of the enemies that line your path. There’s nothing you haven’t seen before here, though there are small jellyfish spiders, which are something you haven’t seen for a while.
Head down the stairs and rubble. You’ll eventually come to a large open area, where two drill-equipped Romanov’s will emerge from underground. Once again, use the EMP Emitters to stop them in their tracks, giving you an opportunity to boost around them and shoot their weakspot at their backs.
After you kill the Romanovs, you’ll have to worry about a tank. You’ve fought this fight many times before though, so you should be good to go.
Once you kill the tank and the remaining Gorgie’s that are sniping at you from the perches, continue to the gate and activate the console.
Mission 4
Boost forward to the gate up ahead and reunite with your squad.
Activate the console to open the gate
Boost down the hill and fight your way along the walkway until you’re able to drop down.
As soon as you see a warp-in, get ready for a tough fight.
BOSS – Crystal Viper
The number one rule in the fight against the Crystal Viper is to stay as far away from it as possible. If it gets close, it can one-hit-kill you without much warning.
The good news is that it is easily distracted by your squadmates and moves very slowly when it’s not dashing, giving you plenty of opportunities to unload HMG ammo into its head.
Even when you’re keeping your distance, though, you’re not safe. Be on the lookout for the Viper’s lightning attacks, which will put you in danger mode if one hits.
Remember to make ample use of slow motion, but be extra careful during this fight not to overheat. Lacking boost will be the death of you, since it leaves you without a means of escaping the Viper’s dashes.
Mission 4
Follow the waypoint on your radar and activate the console at the end to open the door.
You’ll wind up in a zero gravity room — you and enemies can walk all around its cylindrical walls.
Kill the enemies and then be prepared for a Romanov to warp in. Try not to get caught in the warp after you kill all of the Gorgies.
Once you kill the Romanov, the gate will open.
Walk around the cylinder until you reach an opening.
Take out the enemies, then prepare for another warp that will bring a couple of speedy Gorgie’s into the fight.
Fight off another group of enemies, then continue forward.
An Unknown will warp in at the last section. You should know how to deal with these by now. EMP Emitter to freeze it in place, HMG on the core to make it split apart, then chase it down and keep shooting the core with the HMG until it goes down.
With the Unknown down, head through the newly opened door to return to normal gravity and complete the mission.
Act 5
Mission 1
Refill on ammo, then activate the blue console to open the door.
You’ll have another scene in first person as you talk with Elena. Keep on moving forward during the scene and activate the blue console at the end.
This next room is packed with tough enemies. One thing you might want to try is boosting to the left from the start and activating the blue console to open the door.
Inside will be several enemies guarding a turret. Take them out, then use the turret to bring down the Romanov and Buzzard.
Several warp-ins will pop up and bring in more standard gorgies. You don’t need to waste turret ammo on them.
After you kill the Drill Romanov that emerges from the ground, the area will be clear. Slide up the ramp and take cover in the next area.
Your first target should be the view hounds. Don’t let them fly over you and land on spots that are hard to hit. Try to take them all out while they’re still flying in front of you.
From there, see if you can find a sniper rifle to more easily take out the enemies from a distance. If not, a well paced Assault Rifle can do the job as well.
When the area is clear, boost across the bridge. Don’t stop or run into anything or you’ll get burned by the lasers.
Head left and run up the ramp to reach a blue console. Activate it to open the door.
Plant the first charge and be ready for a Bia to appear at the other end of the room. Get into cover and start blast away at it. If it turns into its four legged form, wait for it to get close, and then boost over to the other end of the room. There’s not much space to maneuver, so be careful not to get caught in its melee attack.
Plant the second charge, then continue heading forward to reach a console. Activate it and head into the room to reach a safe distance from the blast radius. Press in both sticks to detonate the charges.
Enemies will begin to cross the bridge. Get in the nearby turret and tear them apart. Or at least as many as you can before the turret runs out of ammo.
Clean up the remaining enemies with your own weapons, then wait for the remainder of your squad at the “V” on your minimap.
Continue forward and wait for your squad to open the door. There will only be two small enemies on the other side. It almost makes you feel bad for them.
Another Crystal Viper will warp in soon after you start to get comfortable. This time it demonstrates a tendency to warp in and out, slashing you when it reappears. Be ready to evade by pressing A as soon as you sense its presense.
Note that you can also counter the Viper’s dashing blade attack by pressing X just before it hits you when the button prompt appears. This is a risky maneuver, but if you succeed, you will stun it for a bit.
Mission 2 BOSS – Burns
You’ll be chasing Burns throughout most of this boss battle, but don’t feel like you have to put yourself in harm’s way in order to get to him. Eventually, the chase will end and it’ll turn into a standard battle. Focus primarily on surviving and pushing forward through Burns’s men, while getting a shot on Burns whenever you get the chance.
The second part of this battle takes place on two transport cars. Always have a piece of cover in between you and Burns. Pop up to take a couple of shots, and then get back down when he aims his gun at you.
When he starts ramming your transport, theres a chance he might knock you off and cause you to hang on for dear life. When this happens, rapidly rotate the control stick in the direction indicated to pull yourself back up.
When the two transports reach the station, try to get a couple of more shots on Burns while he waits for the door to open. Be on the lookout for grenades, as he will surely try to flush you out of cover.
Eventually you’ll have to get out of the transport to follow him. Push through his soldiers, using your radar to pinpoint where they all are.
In the final room, Burns will make his last stand with a huge army of enemies. If Burns has very little life left, just focus on him and finish the fight. If he’s still got a substantial portion and the fight looks like it might take a little while, focus on thinning on the numbers in the room.
Burns might shoot his arm out and grab a hold of Sam. If he does, rapidly move the control stick back and forth to break free.
Eventually, Burns will go down and you’ll complete the mission
Mission 2 BOSS – Zaitzev Bogey x2
You’ve made it to the final boss battle! Time to put your skills to the test.
You’re facing off against two extremely mobile and powerful battle suits at the same time. Try to focus on killing one at a time. Fighting one of these things is much easier than fighting two.
A big part of this fight is listening for audio cues. Their main beam attack has a very distinct audio cue that you’ll know when you hear it. When the sound ends, immediately dodge to make sure you don’t get hit by the attack.
Be aggressive, but don’t overheat your suit needlessly. You’ll need some slow motion time in case one of the suits decides to rush into melee range. When this happens, do a back dodge and activate slow motion. This will give you plenty of time to unload some HMG ammo into their head.
Never stray too far from a piece of cover so you can quickly get behind it if they launch a volley of lasers at you. However, don’t feel too safe while behind cover. Several of their attacks can go through and over cover.
Remember to use the Assault Rifle from a distance and the HMG at close range. Secondary weapons aren’t going to be much use here. They’re too fast for the rocket launcher, don’t get knocked down from the LFE Gun, and move around too much for the Lock-On Laser.
When you bring one of the suits down low enough, be ready for a QTE that will have you mashing the X button.
As the fight nears its end, Elena will disable the safety limiters on the suit, allowing you to go super fast, boost for extended periods of time, and stay in slow motion mode for longer. Use all of these advantages to their fullest to put Zaitzev away.
It isn’t over yet though after you bring down his health! You still need to complete a series of QTEs and then land three more hits while coping with shaky aim.
Once that’s done, congratulations on completing Vanquish! Enjoy the ending.


 Fallout 4 Ultimate Location Guide for Bobblehead, Magazine, Holotape, Vaults, Special Items and Many More
 Dark Souls 2 bosses walkthrough and guide
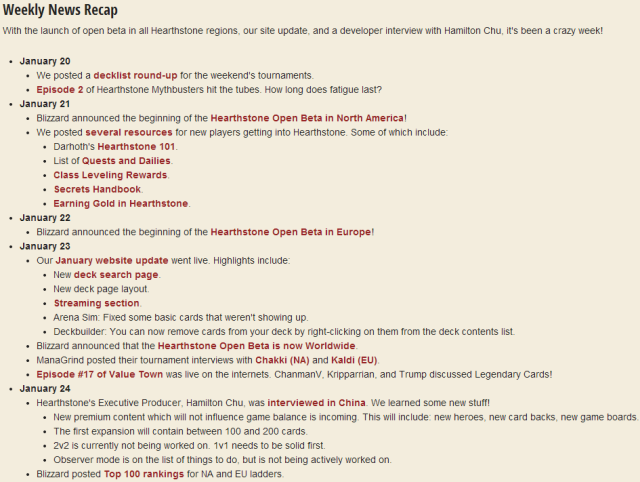 These 7 Websites Will Make You A Better Hearthstone Player
 Sequence 9 - Double Trouble and Dress to Impress: Assassin's Creed: Syndicate Walkthrough
 Halo: Combat Evolved Anniversary Guide