Reflections of Life: Dark Architect Walkthrough, Guide, & Tips
Reflections of Life: Dark Architect Walkthrough
Welcome to the Reflections of Life: Dark Architect Walkthrough
You’ve been summoned to save the Fantastic Worlds from evil!
Whether you use this document as a reference when things get difficult or as a road map to get you from beginning to end, we’re pretty sure you’ll find what you’re looking for here.
This document contains a complete Reflections of Life: Dark Architect game walkthrough featuring annotated screenshots from actual gameplay!
We hope you find this information useful as you play your way through the game. Use the walkthrough menu below to quickly jump to whatever stage of the game you need help with.
Remember to visit the Big Fish Games Forums if you find you need more help. Have fun!
This walkthrough was created by Laurie Murphy, and is protected under US Copyright laws. Any unauthorized use, including re-publication in whole or in part, without permission, is strictly prohibited.
General Tips
- This is the official guide for Reflections of Life: Dark Architect!
- This guide does not mention each time you have to zoom into a location; the screenshots show each zoom scene.
- Hidden-object puzzles are referred to as HOPs. This guide does not show screenshots of the HOPs, however, it is mentioned when a HOP is available and the inventory item collected.
- This guide gives solutions for all puzzles that are not random. Please read the instructions in the game for each puzzle.
Chapter 1: Saving the Queen

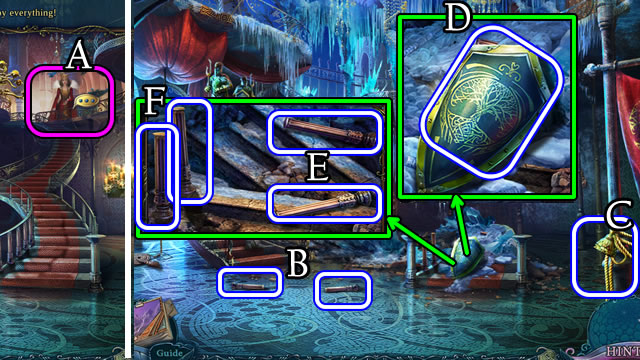
- Speak to the Queen (A).
- Grab BALUSTERS 1/6-2/6 (B).
- Grab ROPES 1/2 (C).
- Take the SHIELD (D).
- Uncover and take BALUSTERS 3/6-4/6 (E). Loosen and take BALUSTERS 5/6-6/6 (F).

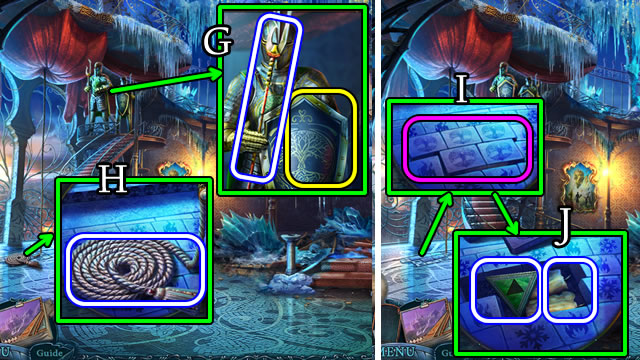
- Place the SHIELD; take the HALBERD (G).
- Use the HALBERD; take ROPES 2/2 (H).
- Select the tiles (I). Open. Take the TRIANGLE and CANDLES (J).

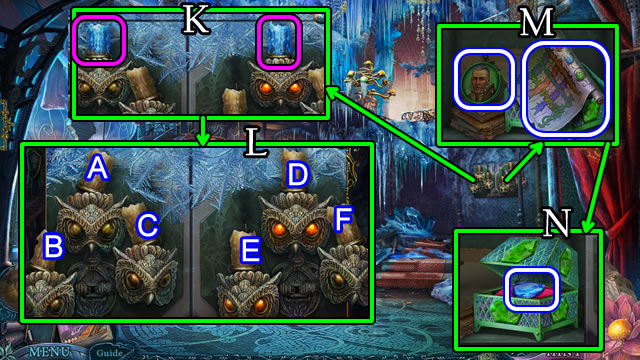
- Replace the CANDLES (K).
- Solution (L). C-B-Ax2-E-F.
- Take GABOR’S PORTRAIT and INSTRUCTIONS (M).
- Scroll each box pane to green. Take CRYSTALS 1/3 (N).
- Combine BALUSTERS 6/6 and ROPES 2/2 for a ROPE LADDER (Inventory).

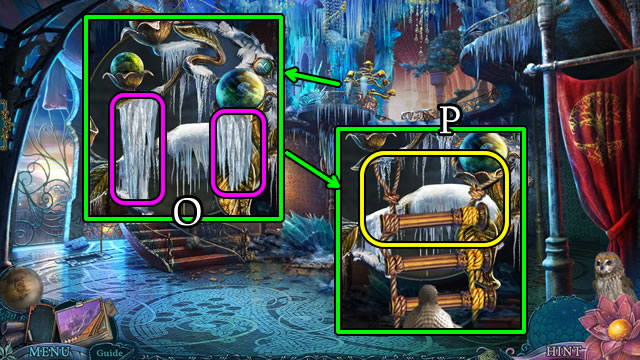
- Remove the ice (O); place the ROPE LADDER (P).
- Walk forward.

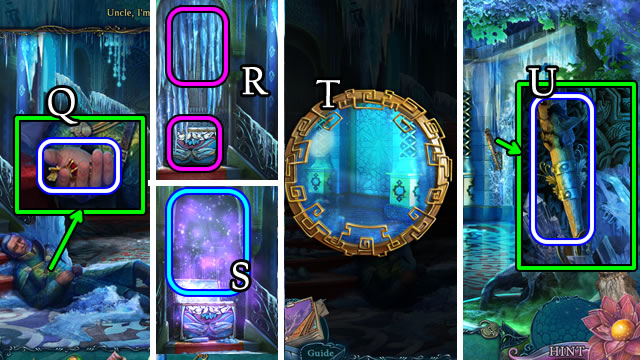
- Speak to Uncle. Take the note and KEY (Q).
- Remove the ice; open (R) to play the HOP (S). Receive a POUCH.
- Open the POUCH (Inventory). Take the LENS and TILE.
- Unwrap and select the LENS (Inventory).
- Solution (T).
- Select and take the TORCH (U).

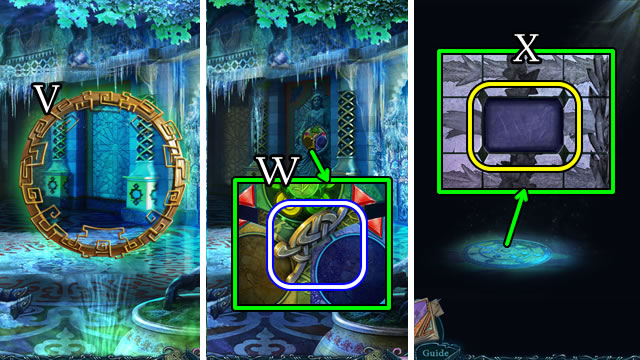
- Use the LENS (V). Take the BOOK PART (W).
- Walk left.
- Place the TILE and INSTRUCTIONS (X).

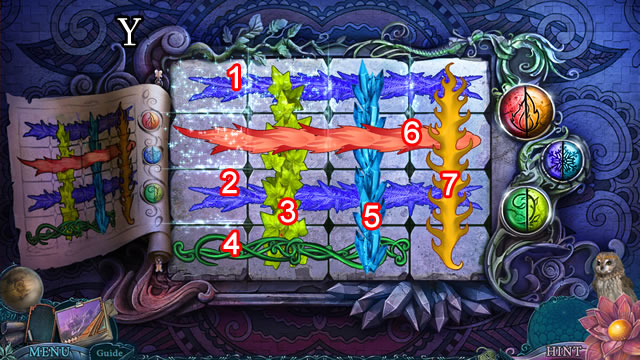

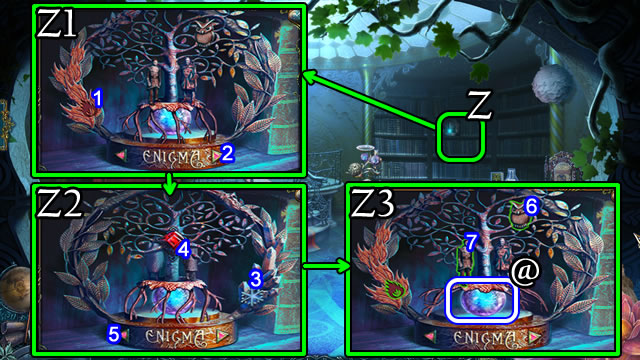
- Select (Z).
- Solution (Z1-Z3). 1-7.
- Take the SPHERE (@).

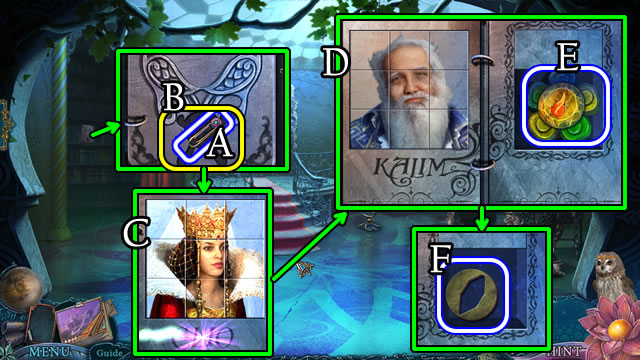
- Move the curtain. Take the PAPERCLIP (A). Place the BOOK PART (B).
- Solution (C-D).
- Take the FLOWER (E) and TOKEN (F).

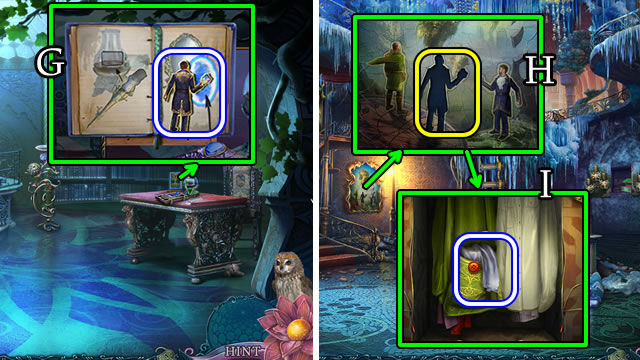
- Open the book; turn the page. Take the FIGURINE (G).
- Walk down 2x.
- Place the FIGURINE (H).
- Uncover and take the FABRIC SCROLL (I).
- Select the FABRIC SCROLL (Inventory). Take the LITTLE TRIANGLE and FABRIC.
- Combine the TORCH and FABRIC for a TORCH (Inventory).
- Walk forward and left.

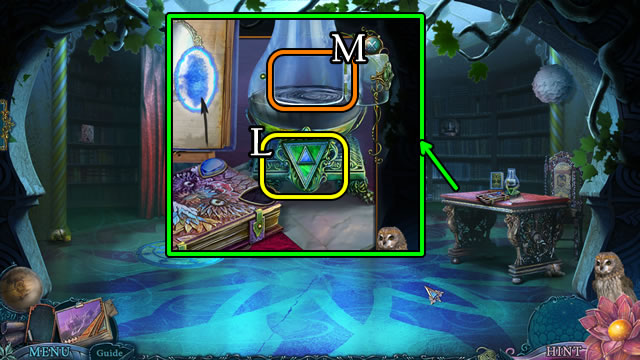
- Place the TRIANGLE and LITTLE TRIANGLE. Select the triangles (L).
- Dip the TORCH (M); receive a TORCH.

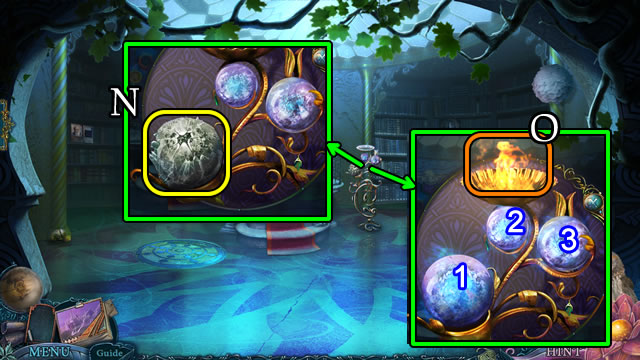
- Replace the SPHERE (N). Select 1-2-3.
- Place the TORCH (O) for TORCH FIRE.
- Walk down.

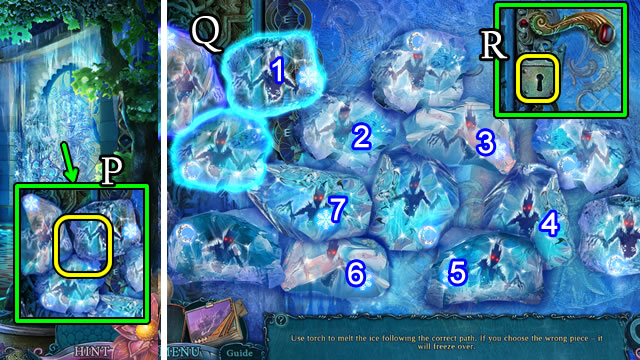
- Use the TORCH FIRE (P).
- Solution (Q). 1-7.
- Use the KEY (R).
- Walk right.

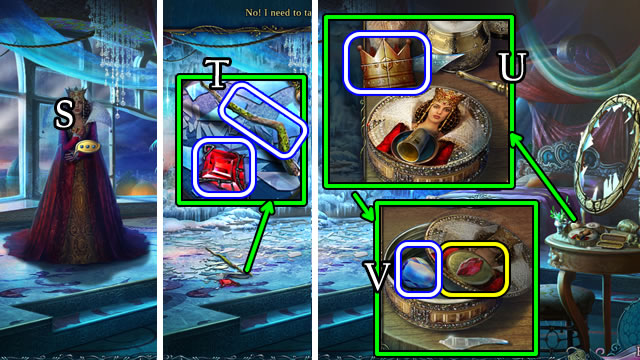
- Speak to the Queen (S).
- Puzzle solutions vary.
- Take the MONSTER’S PART and DARK RUBY (T).
- Play the mini-HOP to receive a CROWN BADGE (U).
- Place the TOKEN, take CRYSTALS 2/3 (V).

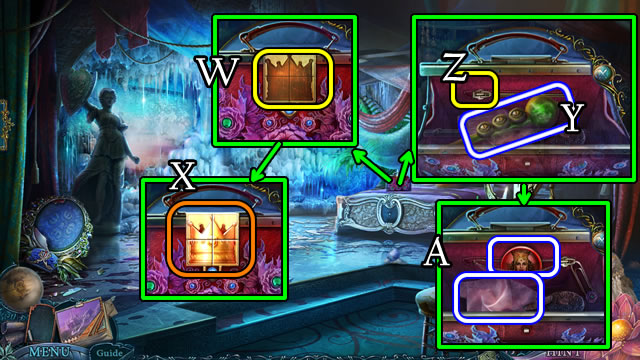
- Place the CROWN BADGE (W).
- Solution (X).
- Take the REED PIPE (Y). Use the PAPERCLIP (Z).
- Take the HANDKERCHIEF, note and CLIO’S PORTRAIT (A).

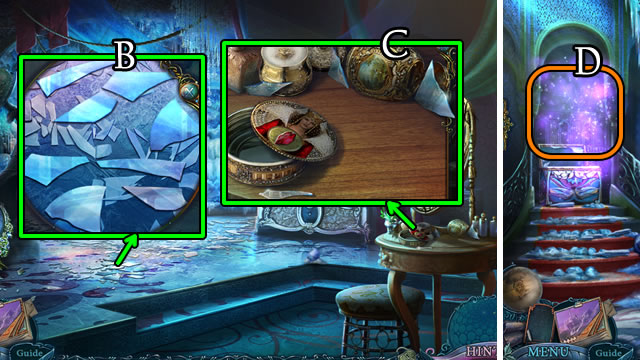
- Use the HANDKERCHIEF; receive MIRROR SHARDS 1/3 (B).
- Use the HANDKERCHIEF; receive MIRROR SHARDS 2/3 (C).
- Walk down.
- Play the HOP (D); receive MIRROR SHARDS 3/3.
- Walk left.

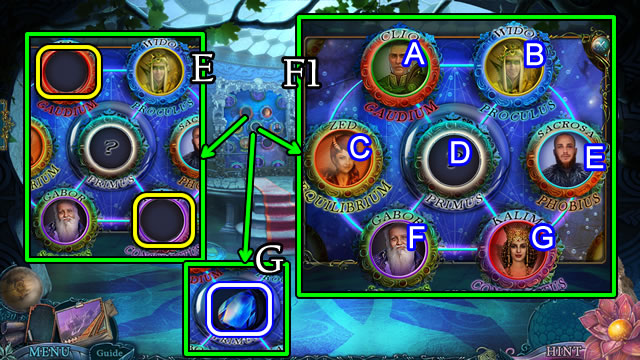
- Place GABOR’S and CLIO’S PORTRAIT (E).
- Solution (F1). G-F-C-A-B-D-G-F-C-A-B-E-G-D.
- Take CRYSTALS 3/3 (G).

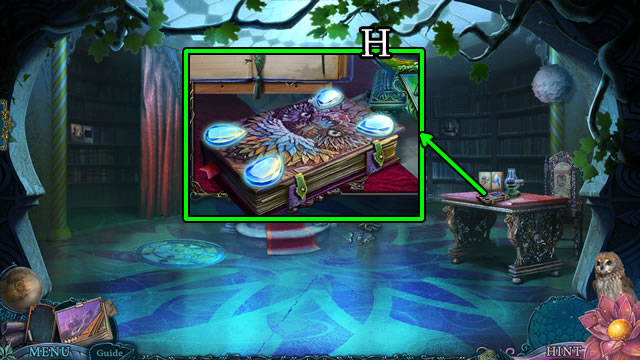
- Place CRYSTALS 3/3 (H). Open.

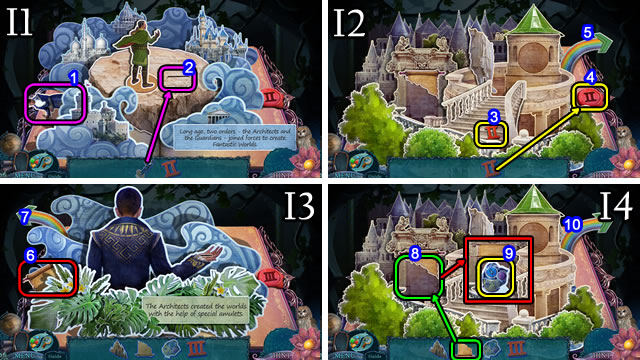

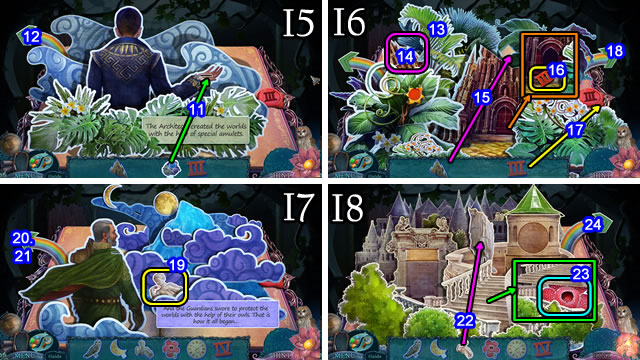

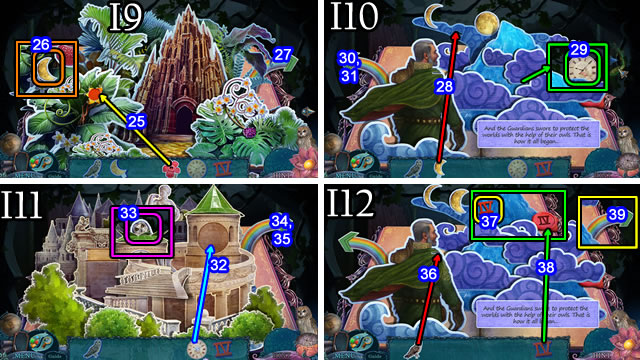
- Solution (I1-I4). 1-10.
- Solution (I5-I8). 11-24.
- Solution (I9-I12). 25-39.

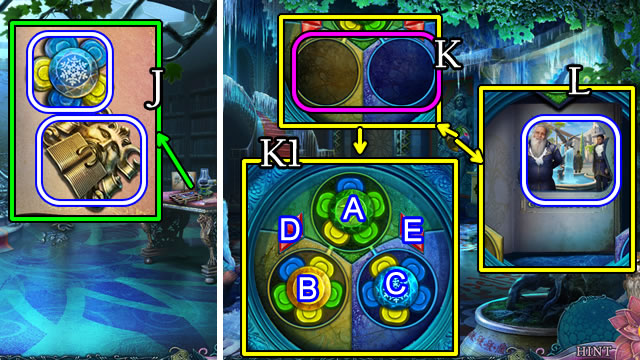
- Take the GOLD ORNAMENT and FLOWER (J).
- Walk down.
- Place the 2 FLOWERS (K).
- Solution (K1). B-D-Ax2-E-A-B-D-A-Cx2-E-A-Bx2-D.
- Open the book. Turn the pages. Take CONSTRUCTUS’ PHOTO (L).
- Walk right.

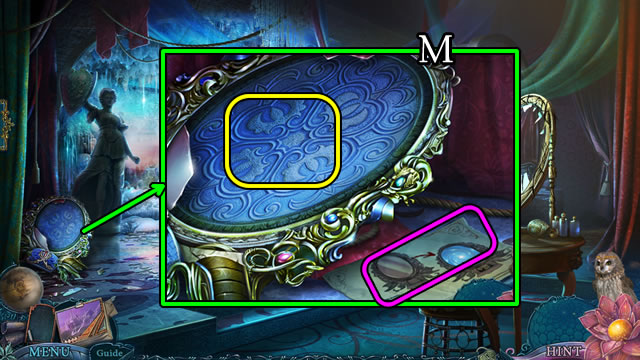
- Take the note; place the MIRROR SHARDS 3/3 (M).

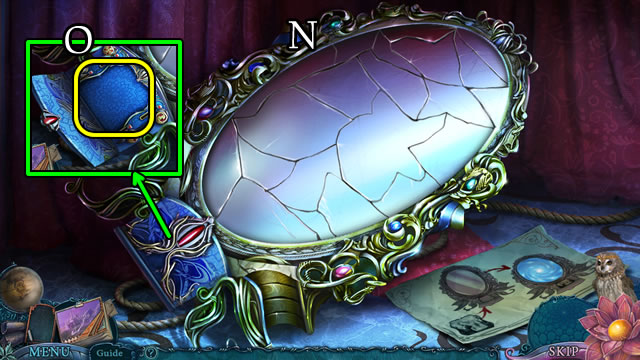
- Solution (N).
- Place CONSTRUCTUS’ PHOTO (O).

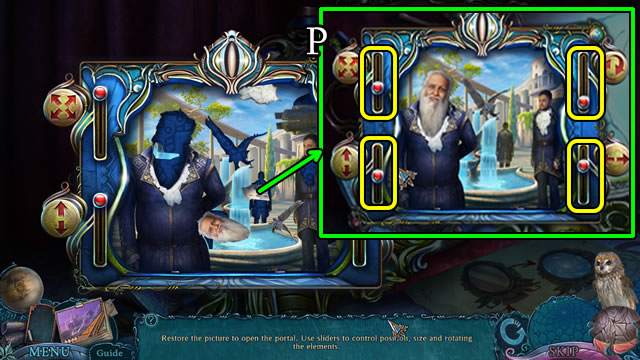
- Solution (P).
- Enter the portal.
Chapter 2: The Mansion

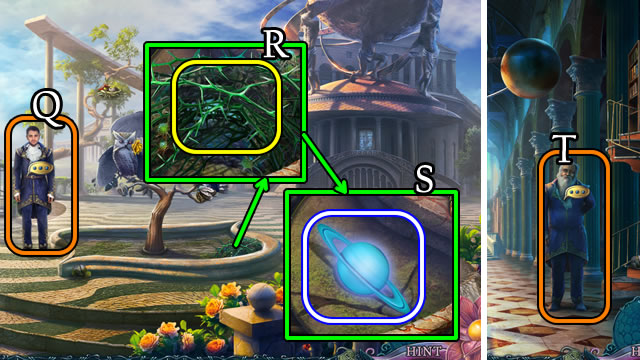
- Speak to the man (Q).
- Use the TORCH FIRE (R). Uncover, take the PLANET SOURCE (S).
- Walk forward.
- Speak to the man. Receive a Special Architects’ Amulet (T).
- Walk left.

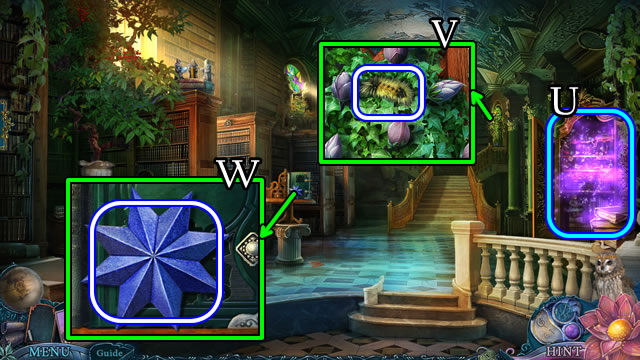
- Open the cabinet to play a HOP (U). Receive a GOLDEN TULIP.
- Take the CATERPILLAR (V).
- Take the STAR (W).
- Walk down.

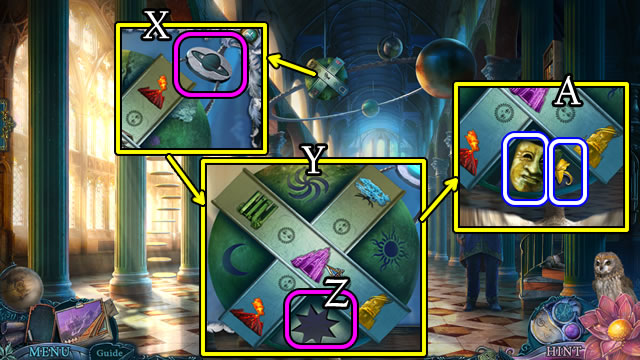
- Place the PLANET SOURCE (X).
- Solution (Y).
- Place the STAR (Z); take the CHEERFUL FACE and GOLDEN LILY (A).
- Walk down.

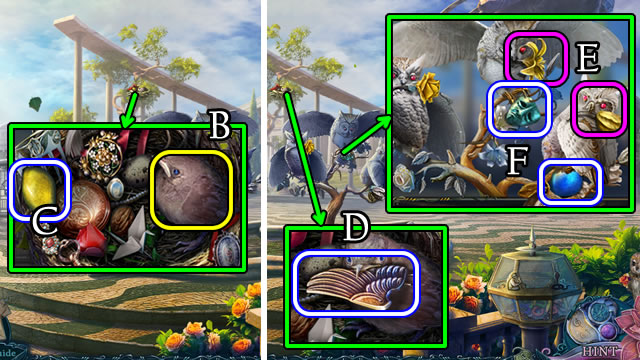
- Give the CATERPILLAR (B). Play the mini-HOP; receive DECORATIVE STONES 1/2 (C).
- Take the WING (D).
- Place the GOLDEN LILY and GOLDEN TULIP (E). Take the SAD FACE and DECORATIVE STONES 2/2 (F).
- Walk forward.

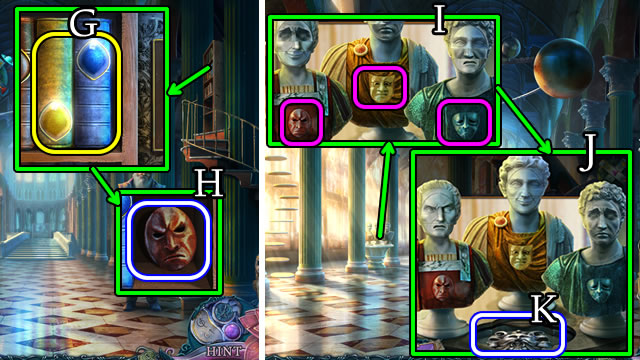
- Place DECORATIVE STONES 2/2 (G); take the ANGRY FACE (H).
- Place the HAPPY, SAD and ANGRY FACES (I).
- Solution (J).
- Take the SILVER ORNAMENT (K).
- Walk left.

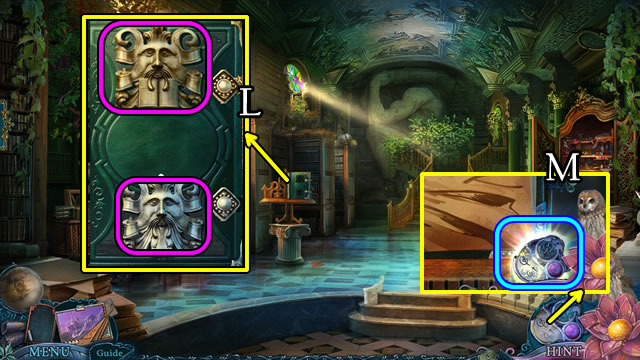
- Place the GOLD and SILVER ORNAMENTS (L).
- Select (M), then touch the glowing amulet.

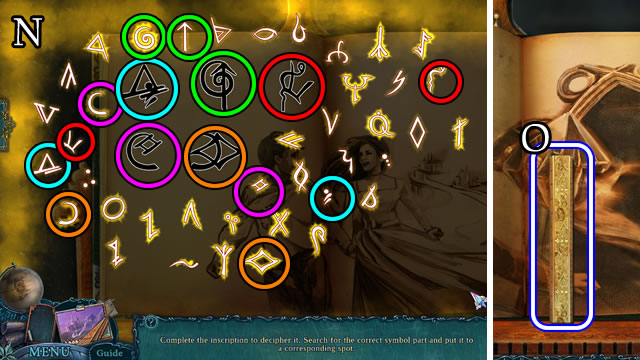
- Solution (N).
- Take the RULER (O).

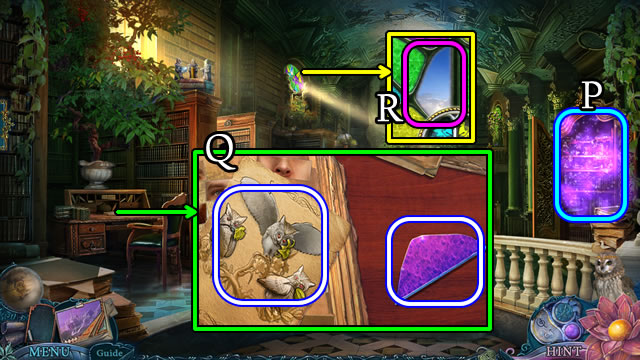
- Play the HOP (P); receive a QUEEN.
- Take the GLASS, note and FOUNTAIN PICTURE (Q).
- Place the GLASS (R).

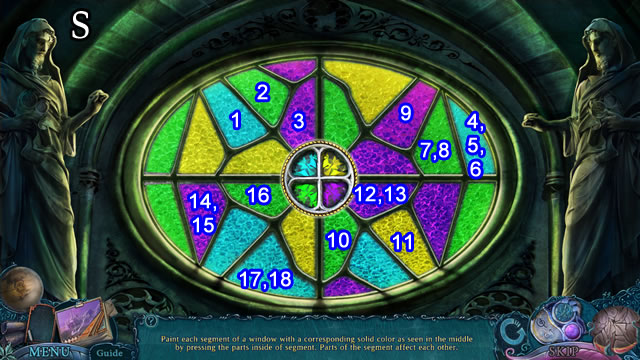

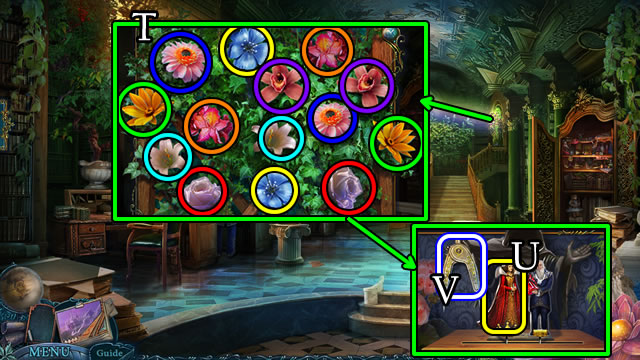
- Solution (T).
- Receive a FLOWER.
- Place the QUEEN (U). Take the BOW COMPASSES (V).

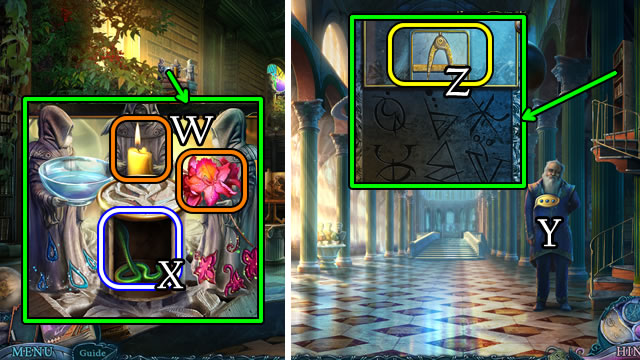
- Use the TORCH FIRE. Place the FLOWER (W).
- Take the note and COBRA CHIP (X).
- Walk down.
- Speak to Kalim (Y). Receive a MONSTER DEVICE.
- Place the BOW COMPASSES and RULER (Z).
- Select, then touch the amulet.

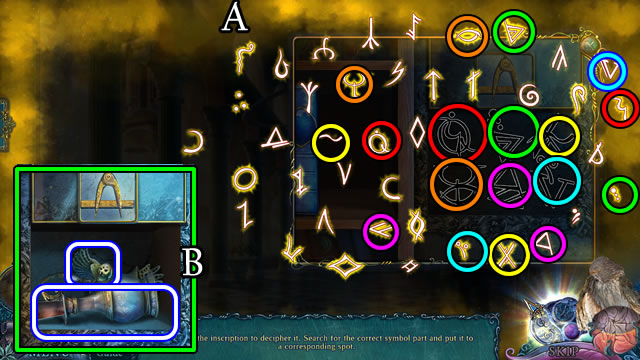
- Solution (A).
- Take the JUG and OWL EMBLEM (B).
- Open the JUG (Inventory). Take PHOTOS 1/3 and the JUG.
- Walk down.

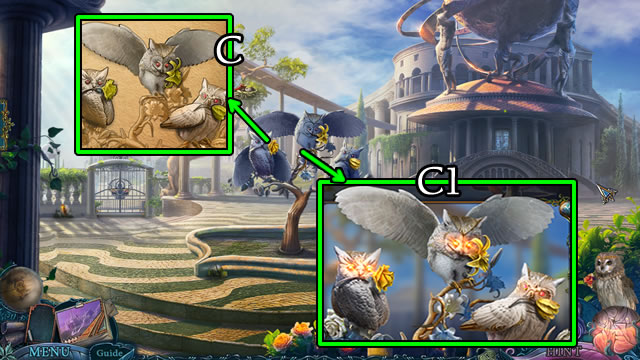
- Place the FOUNTAIN PICTURE (C).
- Solution (C1).

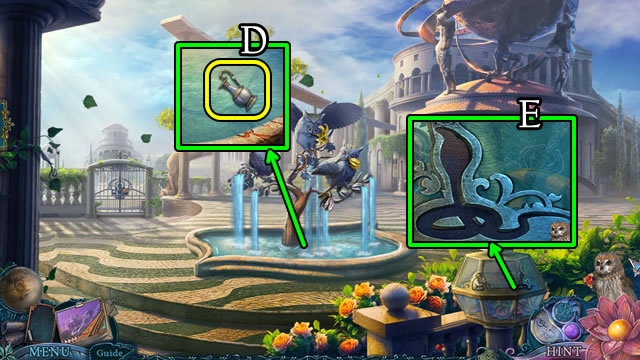
- Place the JUG. Receive a JUG OF WATER (D).
- Place the COBRA CHIP (E). Place the REED PIPE.

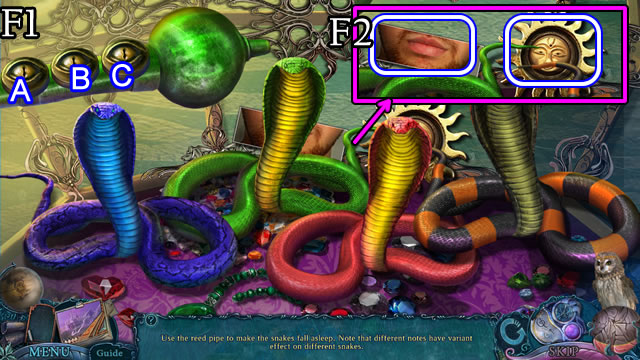
- Solution (F1). Ax3-Bx2-C-B-A-C-B-A.
- Take PHOTOS 2/3 and the SUN (F2).
- Walk forward and left.

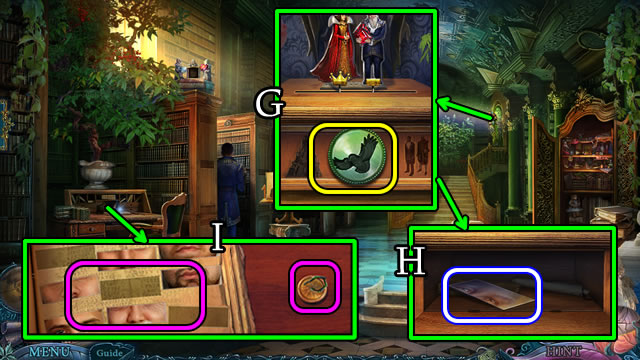
- Place the OWL EMBLEM (G).
- Take PHOTOS 3/3 (H).
- Place PHOTOS 3/3 and the MONSTER DEVICE (I).

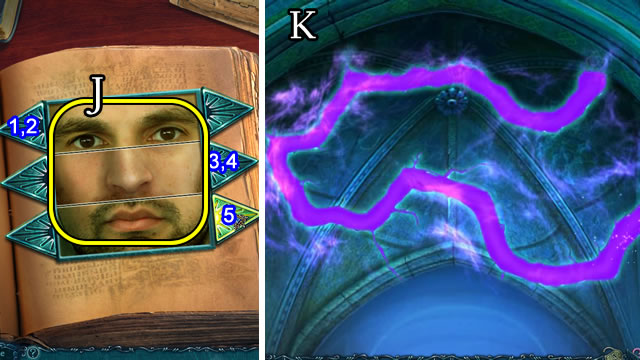
- Solution (J). 1-2-3-4-5.
- Walk down.
- Select and touch the Amulet.
- Solution (K).
- Speak to Kalim.

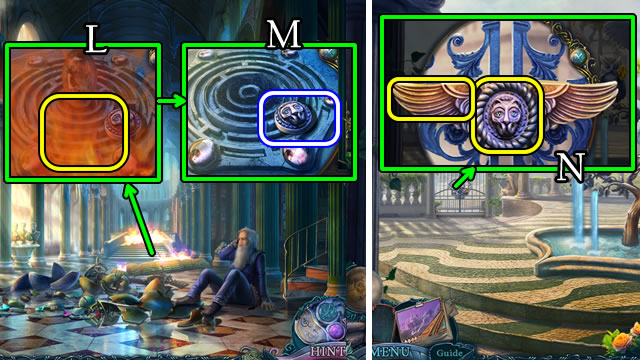
- Use the JUG OF WATER (L).
- Take the GATE STONE (M).
- Walk down.
- Place the WING and GATE STONE (N).
- Walk left.

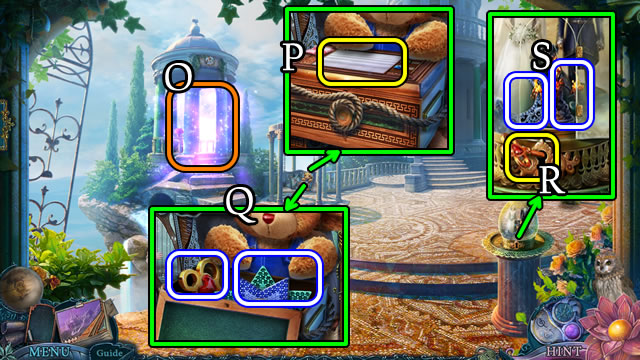
- Play the HOP (O); receive an EMBROIDERY SET.
- Place the EMBROIDERY SET (P).
- Solutions vary.
- Take the STAR and KEY (Q).
- Use the KEY (R). Take the MONSTER STATUETTE and the MOON (S).

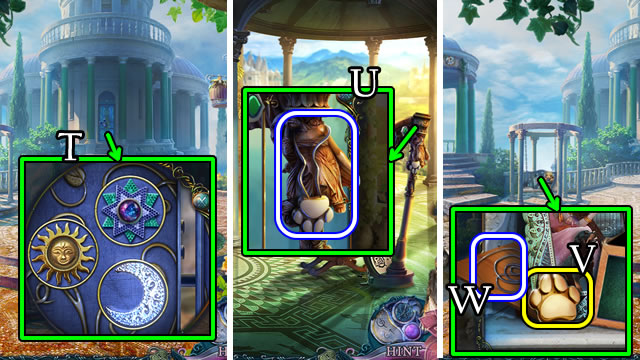
- Place the STAR, SUN and MOON (T).
- Walk forward.
- Take the PAW LOCKET (U).
- Select and touch the PAW LOCKET (Inventory). Take the STRING and PAW.
- Walk down.
- Place the PAW (V). Take the STRING (W).
- Walk forward.

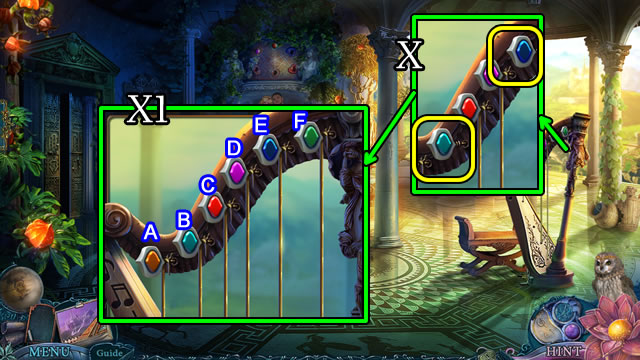
- Place the 2 STRINGS (X).
- Solutions (X1). B-F-D. A-C-B-E. C-F-A-E-B.

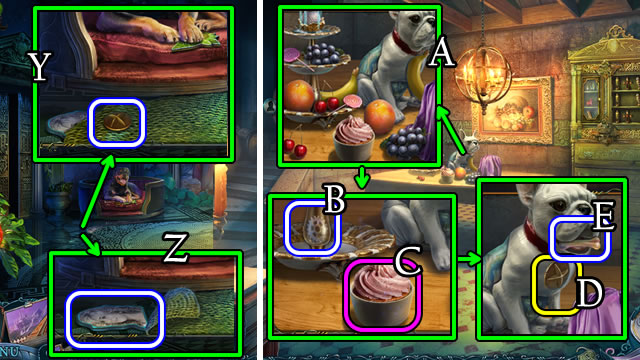
- Take the HANDLE (Y).
- Uncover and take MELITAS BADGE (Z).
- Walk left.
- Use the TORCH FIRE 2x.
- Play the mini-HOP. Receive a LOLLIPOP (A).
- Open and take the GEAR (B).
- Select the cupcake (C) take the cup for a CUP OF WATER.
- Place and select the HANDLE (D). Take the DOG COOKIE (E).
- Remove the purple cloth.
- Walk down.

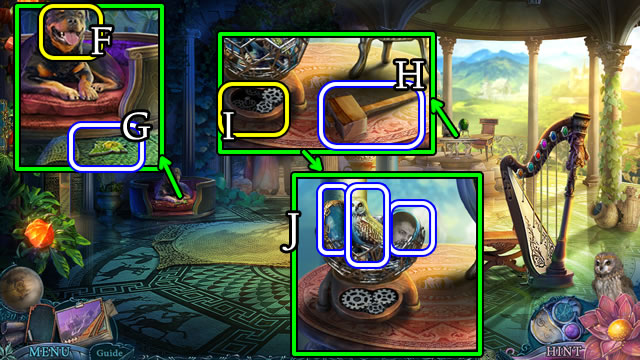
- Give the DOG COOKIE (F). Take the EARTH SYMBOL (G).
- Take the MALLET (H). Place the GEAR (I).
- Take the OWL STATUETTE, LENS and JONAS BADGE (J).
- Walk left.

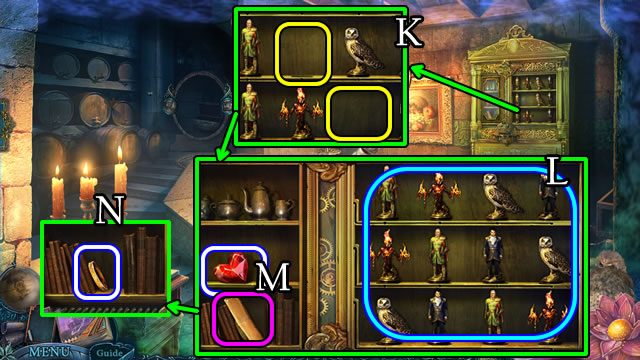
- Place the MONSTER and OWL STATUETTES (K).
- Solution (L).
- Open, take the HEART, note (M) and BRACELET 1/3 (N).
- Walk down 2x.

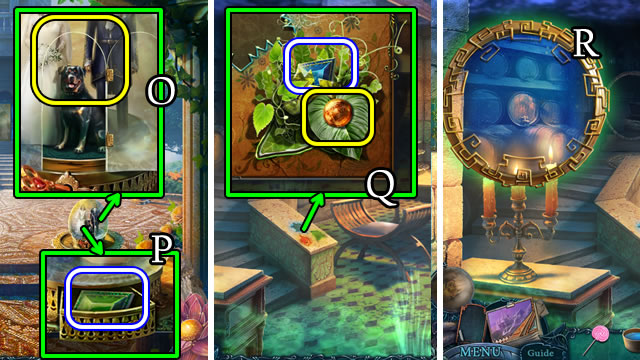
- Place the HEART (O).
- Open and take the ELEMENTAL BADGE (P).
- Walk forward and left.
- Place the EARTH SYMBOL. Take the ELEMENTAL BADGE. Uncover and take the ORANGE MARBLE BALL (Q).
- Place the LENS (R).

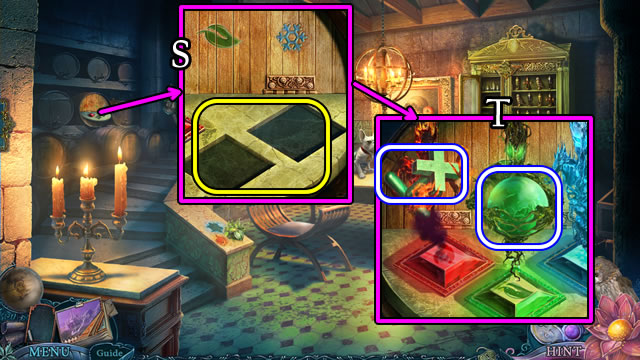
- Put the 2 ELEMENTAL BADGES (S).
- Take the T-WRENCH and GREEN MARBLE BALL (T).

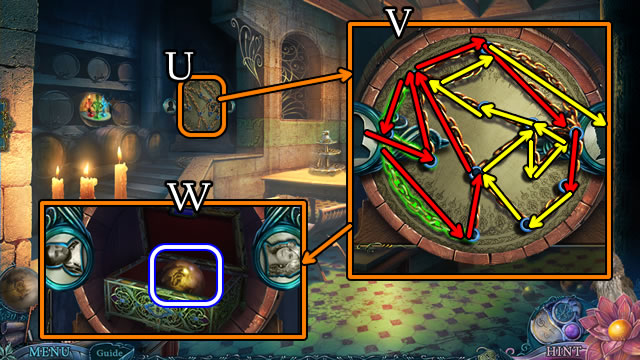
- Select (U).
- Solution (V).
- Place the MELITAS and JONAS BADGES. Open the box; take the YELLOW MARBLE BALL (W).
- Walk down.

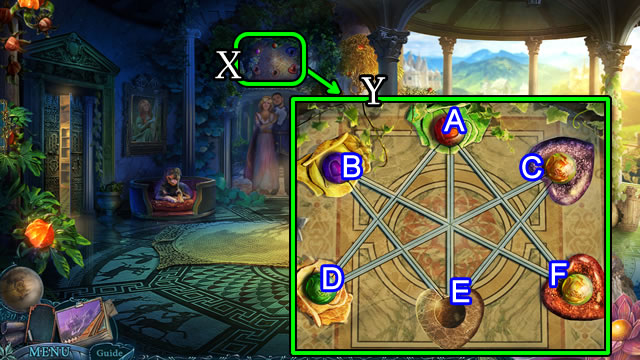
- Place the ORANGE, GREEN and YELLOW MARBLE BALLS (X).
- Solution (Y). B-F-A-D-C-E.
- Walk forward.

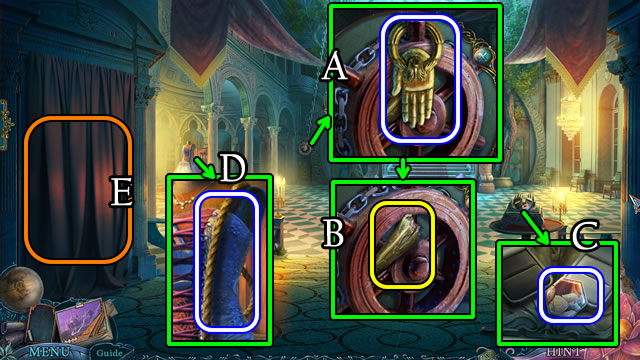
- Take the HAND (A); use the MALLET (B).
- Take the TILE 1/2 (C).
- Take the ROPE (D).
- Open the curtain (E).
- Walk left.

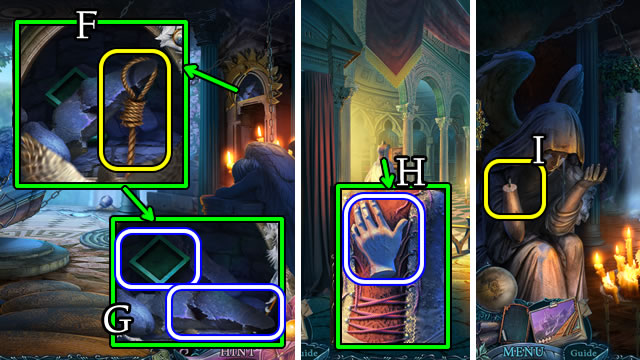
- Use the ROPE (F). Take the T-WRENCH and SHARP STONE (G).
- Walk down.
- Use the SHARP STONE. Take the STONE HAND (H).
- Walk left.
- Place the STONE HAND (I).

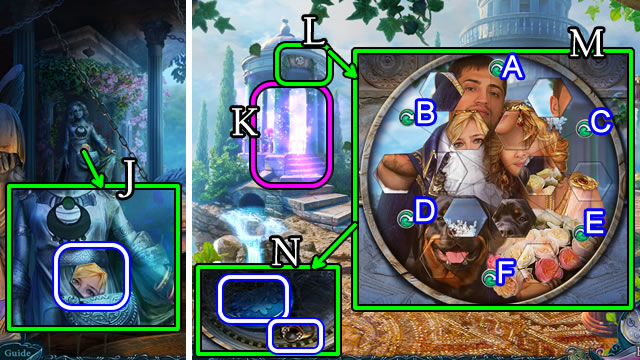
- Take the TILE 2/2 (J).
- Walk down 3x.
- Play the HOP (K); receive the BRACELET 2/3.
- Place TILES 2/2 (L).
- Solution (M). Dx3-Fx3-Ex3-Bx3-Cx3-Ax2.
- Uncover and take TOKEN PART 1/2 and a RING (N).

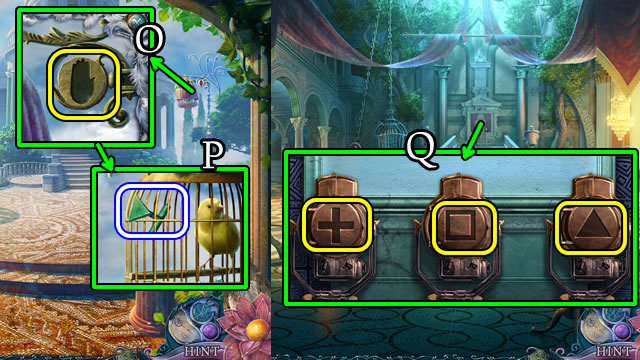
- Place the HAND (O). Take a T-WRENCH (P).
- Walk forward 2x.
- Place and select the 3 T-WRENCHES (Q).

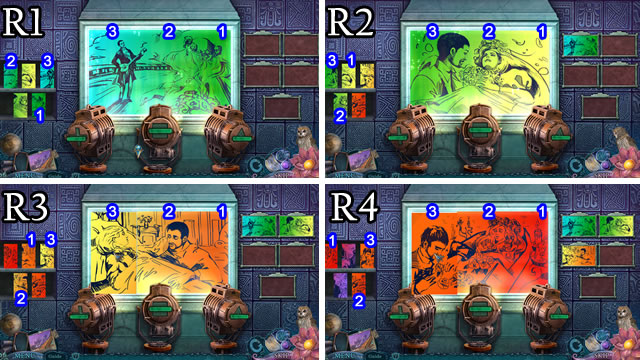

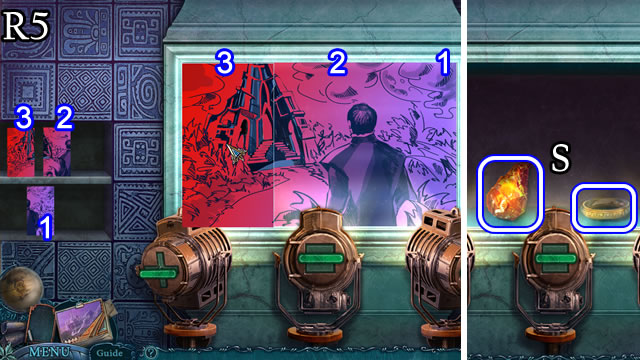
- Solutions (R1-R5).
- Take the CRYSTAL FIRE and BRACELET 3/3 (S).
- Walk left.

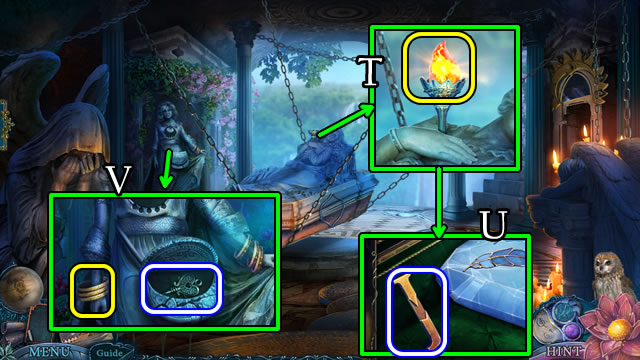
- Place the CRYSTAL FIRE (T). Take the letter J (U).
- Place the BRACELETS 3/3. Take the HEART KEY (V).
- Walk down.

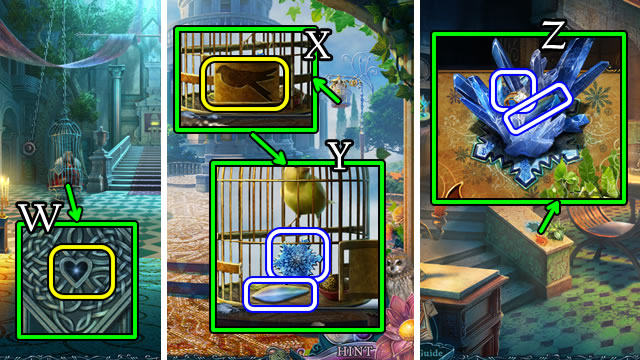
- Use the HEART KEY (W).
- Speak to the Queen; receive a CANARY BADGE.
- Walk down 2x.
- Place the CANARY BADGE (X).
- Take the ICE SYMBOL and GLASS PETALS 1/3 (Y).
- Walk forward and left.
- Place the ICE SYMBOL. Select, then take the RING and GLASS PETALS 2/3 (Z).
- Walk down, then forward.

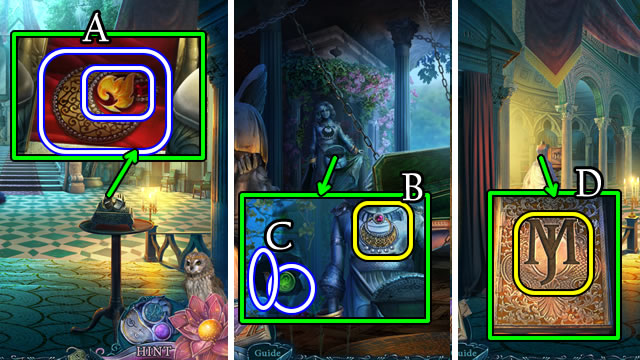
- Place the 2 RINGS. Take the NECKLACE and FIRE SYMBOL (A).
- Walk left.
- Place the NECKLACE (B). Take the EARTH TOKEN and letter M (C).
- Walk down.
- Combine the letters J and M for MJ (Inventory).
- Place MJ. Open the book (D).

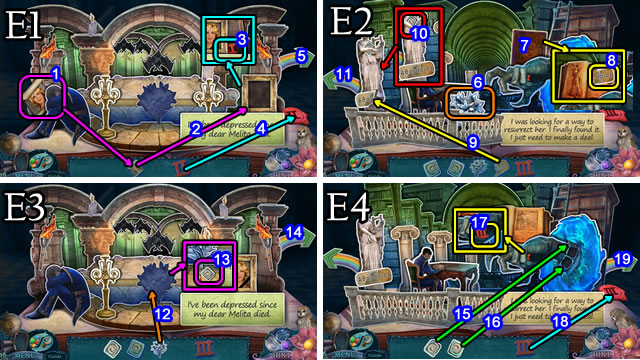

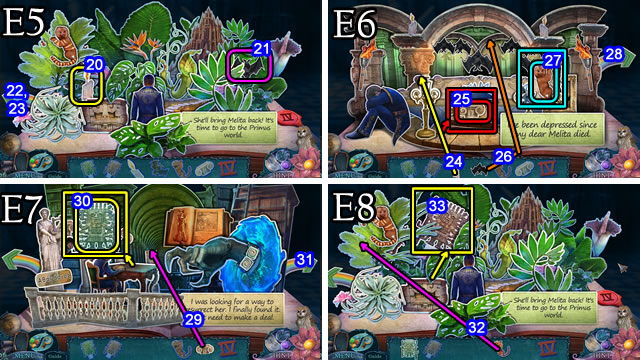

- Solution (E1-E4). 1-19.
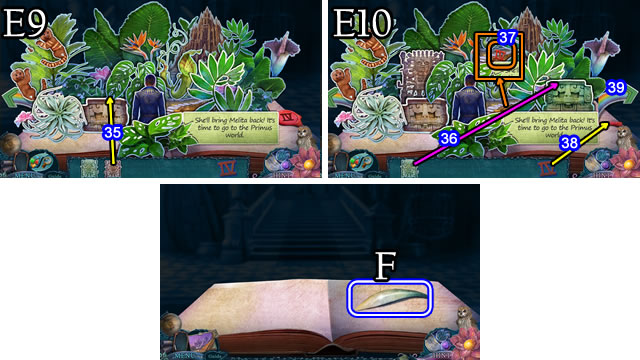
- Solution (E5-E8). 20-33.
- Solution (E9-E10). 35-39.
- Take GLASS PETALS 3/3 (F).
- Walk down.

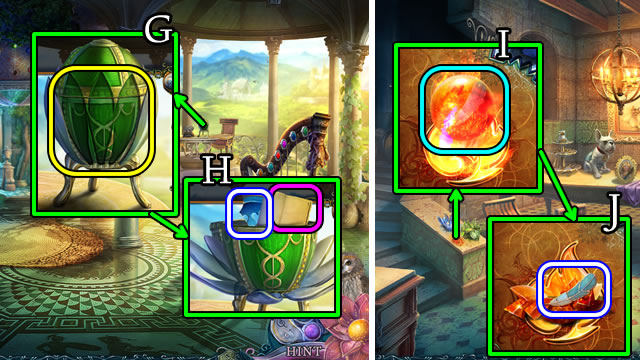
- Place GLASS PETALS 3/3 (G).
- Open; take the note and TOKEN PART (2/2) (H).
- Walk left.
- Place the FIRE SYMBOL. Use the CUP OF WATER (I). Select and take the CRYSTAL FEATHER (J).
- Walk down, forward, then left.

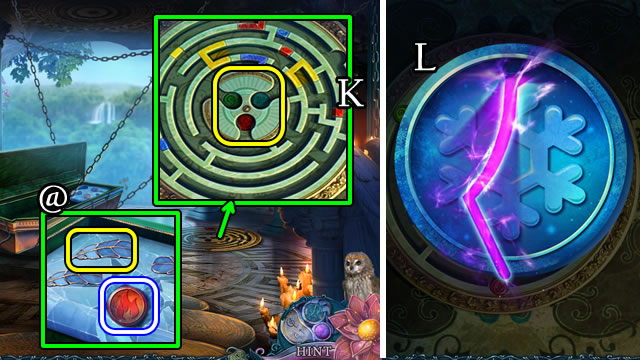
- Place the CRYSTAL FEATHER; take the FIRE TOKEN (@).
- Place the EARTH and FIRE TOKENS. Place the TOKEN PARTS (2/2) (K).
- Select and touch the Amulet.
- Solution (L).

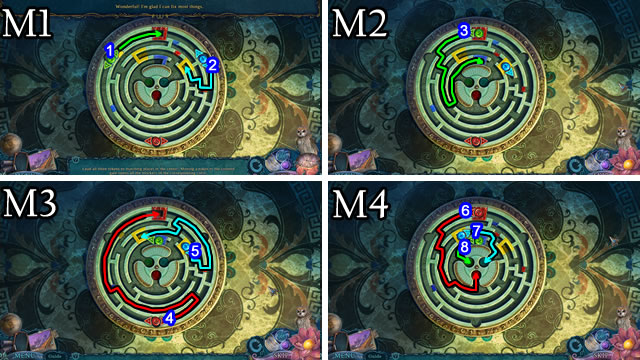
Chapter 3: To the Tower

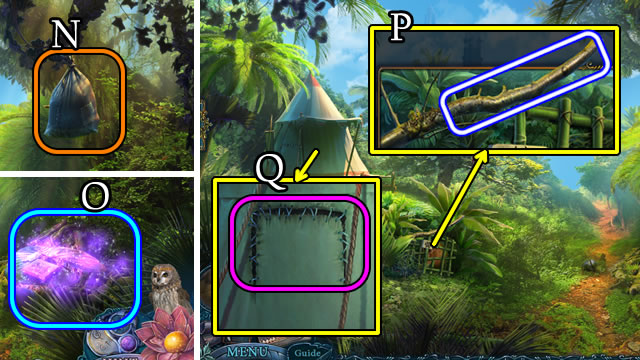
- Select (N) to play a HOP (O). Receive a POT.
- Take the STICK (P).
- Use the SHARP STONE (Q). Play the mini-HOP; receive a SNAKE HEAD.

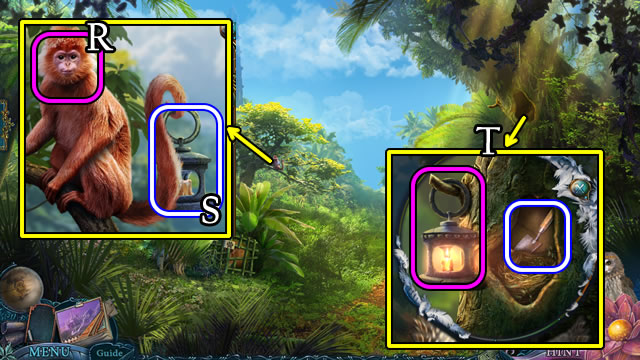
- Give the LOLLIPOP (R); receive a LANTERN (S).
- Place the LANTERN; use the TORCH FIRE. Take the TROWEL (T).
- Walk forward.

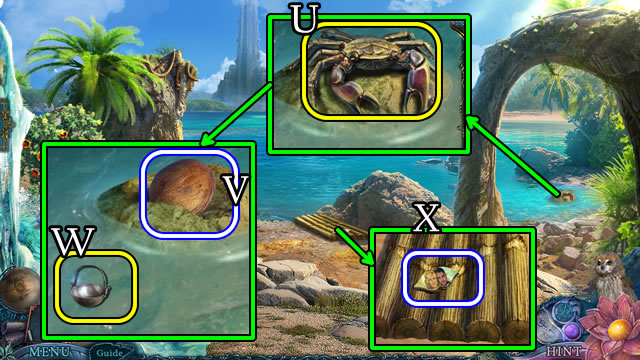
- Use the STICK (U). Use the TROWEL; take the COCONUT (V).
- Place the POT for a WATER POT (W).
- Take the LOVE BADGE (X).
- Walk down.

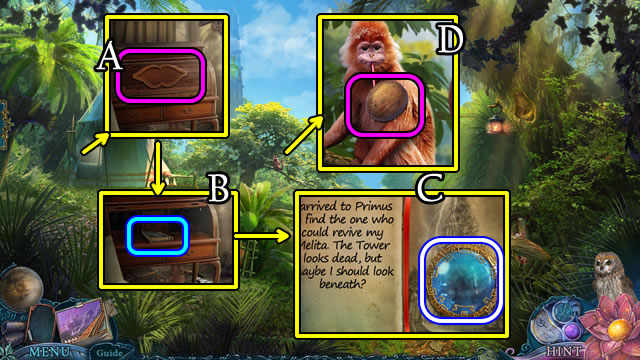
- Place the LOVE BADGE (A). Select (B) and take the book and LENS (C).
- Give the COCONUT (D). Receive a LOCK PART.

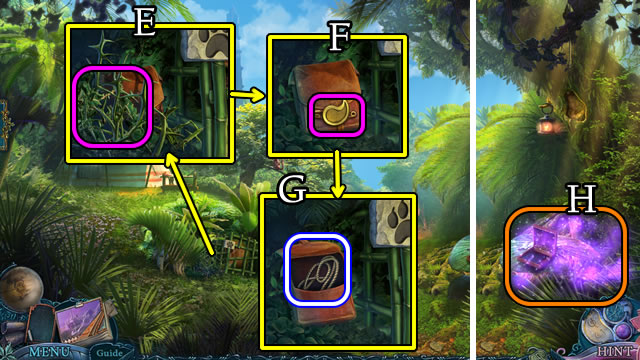
- Use the TORCH FIRE (E). Place the LOCK PART (F).
- Take the ROPE (G).
- Play the HOP (H); receive a PADDLE.
- Walk forward.

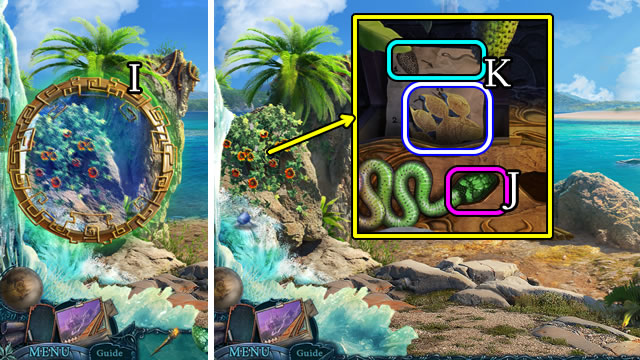
- Place the LENS (I).
- Uncover and place the SNAKE HEAD (J).
- Take the PAW BADGE and note (K).

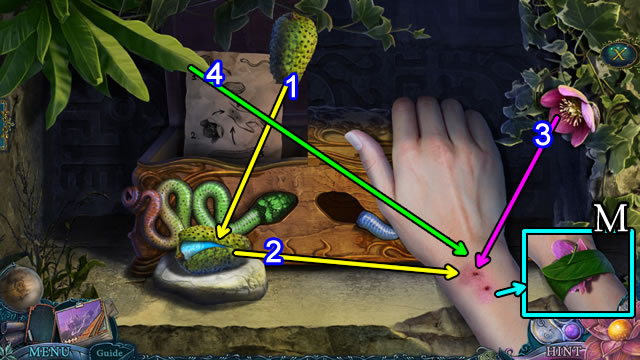
- Solution (M). 1-4.
- Walk down.

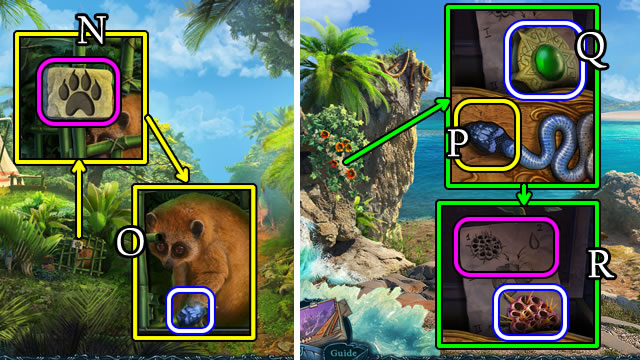
- Place the PAW BADGE (N). Take the SNAKE HEAD (O).
- Walk forward.
- Place the SNAKE HEAD (P). Take the DÉCOR ELEMENT (Q), SEED and note (R).

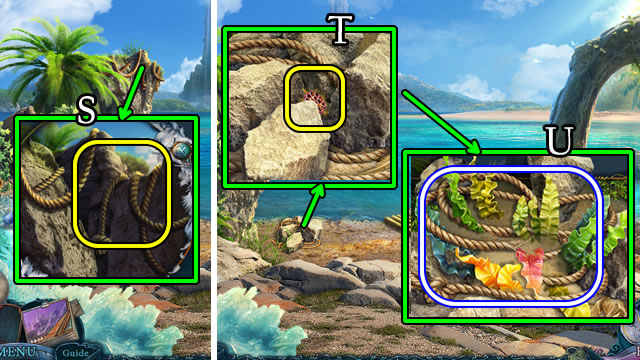
- Select the rope (S).
- Place the SEED (T). Use the WATER POT. Take the ROPE (U).
- Select the raft.
- Select and touch the Amulet.

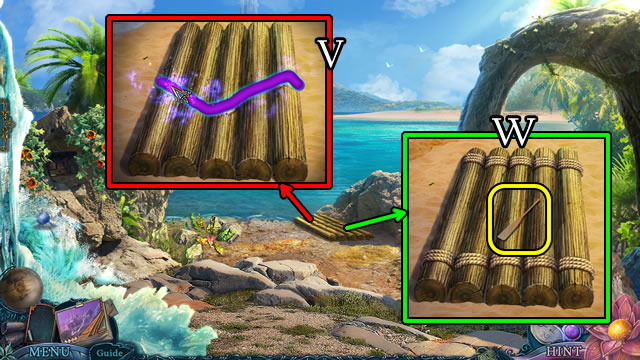
- Solution (V).
- Place the 2 ROPES and PADDLE (W).
- Remove the foliage.

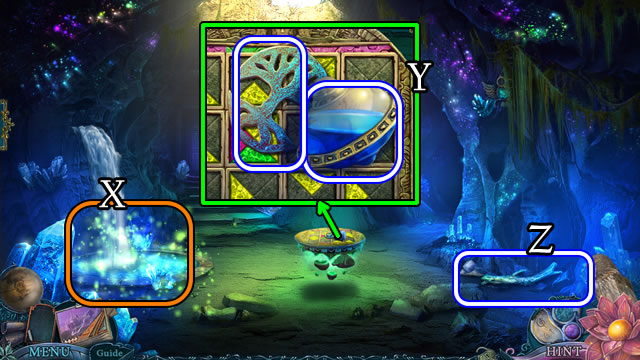
- Play the HOP (X); receive BLUE CRYSTALS.
- Take the HUMMING TOP and TREE PART 1/3 (Y).
- Take the STICK (Z).
- Walk right.

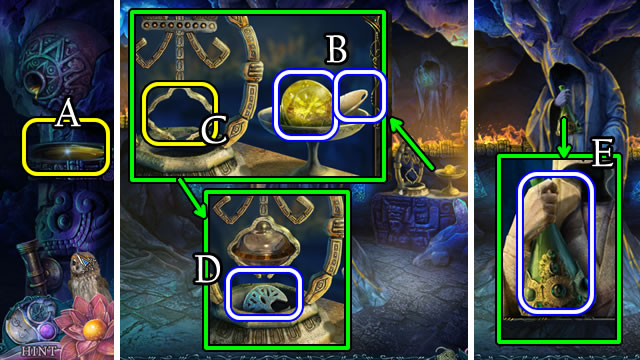
- Use the TORCH FIRE (A).
- Take the YELLOW EYE and WEIGHT (B). Place the HUMMING TOP (C).
- Take TREE PART 2/3 (D).
- Take the VIAL (E).
- Walk down.

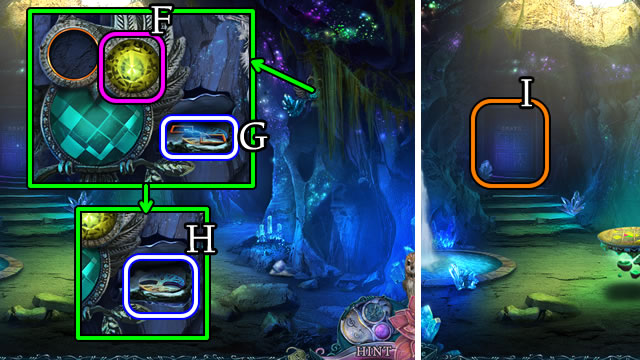
- Uncover. Place the YELLOW EYE (F).
- Open, take the ENERGY CHAIN (G) and TREE PART 3/3 (H).
- Select (I).
- Select and touch the Amulet.

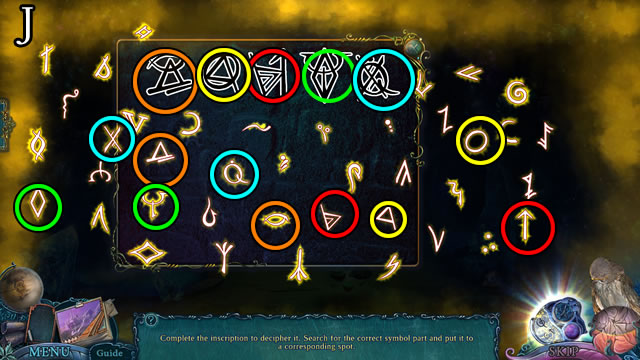

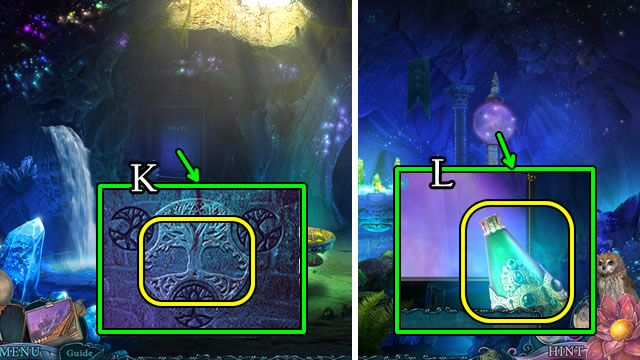
- Place TREE PARTS 3/3 (K).
- Walk forward.
- Place the VIAL (L).
- Solutions vary. Take the LUMINOUS VIAL.

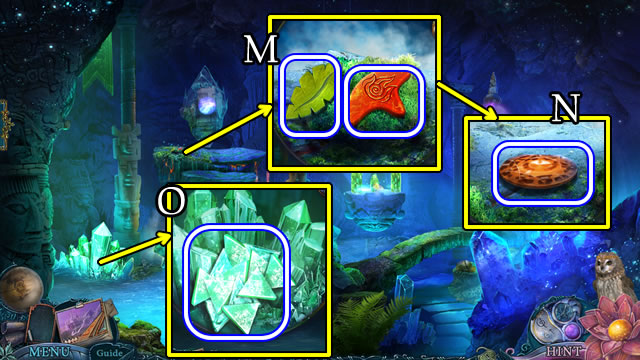
- Take the FIRE RUNE and LEAF EMBLEM (M).
- Uncover and take the ORANGE EYE (N).
- Use the STICK. Take the GREEN CRYSTALS (O).
- Walk down.

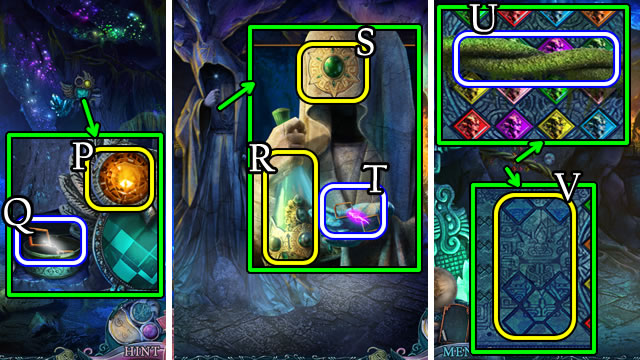
- Place the ORANGE EYE (P). Take the ENERGY CHAIN (Q).
- Walk right.
- Place the LUMINOUS VIAL (R). Place the DÉCOR ELEMENT (S). Take the ENERGY CHAIN (T).
- Take the VINE (U).
- Place the 3 ENERGY CHAINS (V).

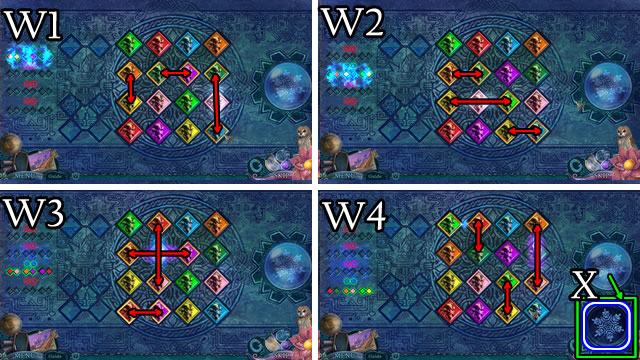
- Solution (W1-W4).
- Take the ICE RUNE (X).
- Walk down.

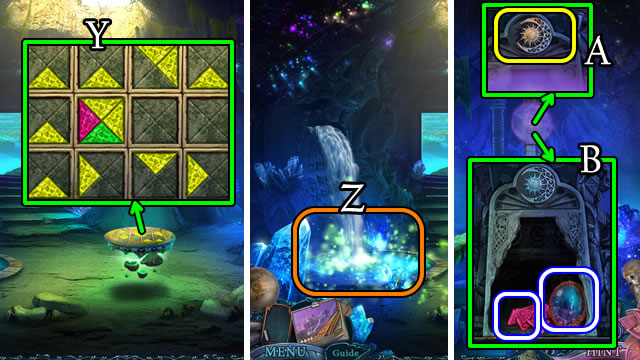
- Place the BLUE and GREEN CRYSTALS (Y).
- Play the HOP (Z); receive a NIGHT SYMBOL.
- Walk forward.
- Place the NIGHT SYMBOL (A).
- Take the LENS and PINK CRYSTALS (B).
- Walk down.

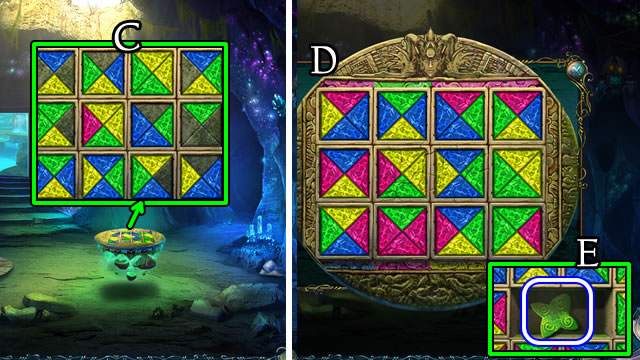
- Place the PINK CRYSTALS (C).
- Solution (D).
- Take the note and EARTH RUNE (E).
- Walk forward.

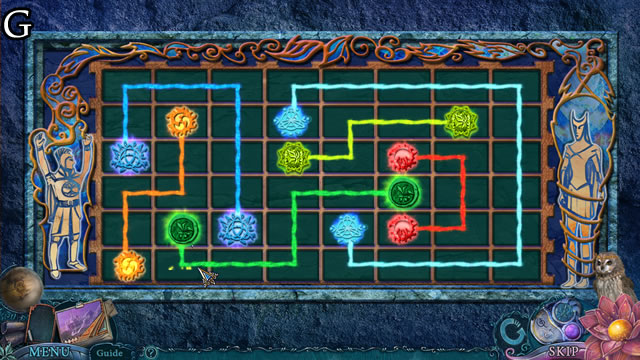
- Place the ICE, EARTH and FIRE RUNES (F).


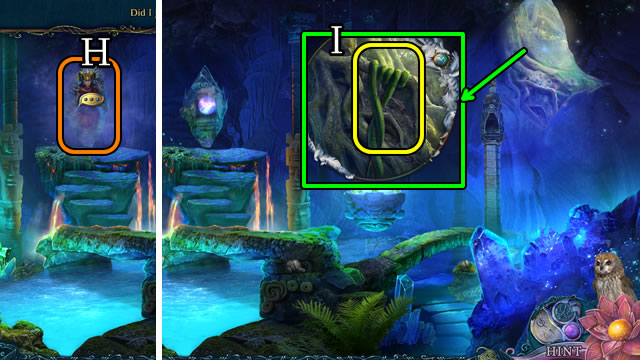
- Speak to the Deity (H).
- Place the VINE (I).
- Walk forward.
Chapter 4: Finding Jonas

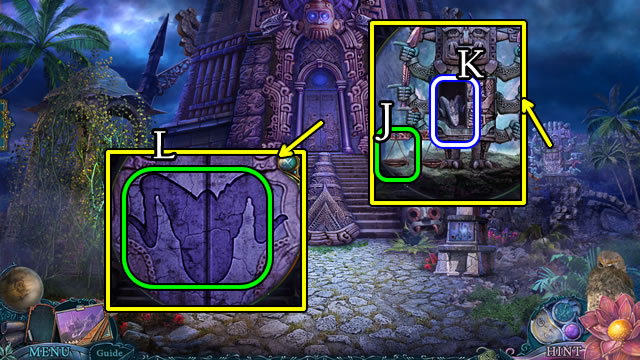
- Place the WEIGHT (J). Take the NOX FACE (K).
- Place the NOX FACE (L).
- Walk forward.

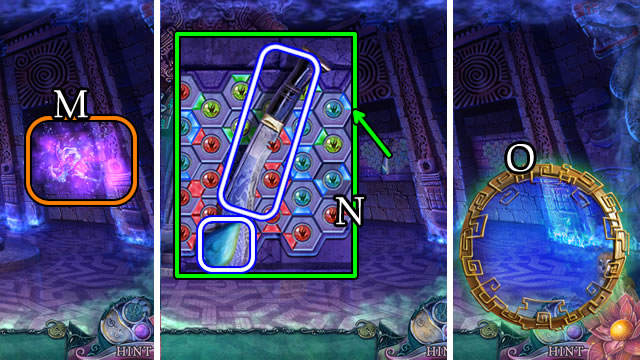
- Play the HOP (M).
- Take the WATER SYMBOL and KUKRI (N).
- Place the LENS (O).

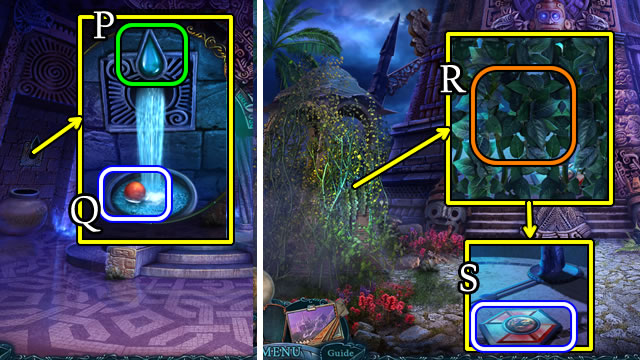
- Place the WATER SYMBOL (P). Take the RED SPHERE (Q).
- Walk down.
- Use the KUKRI (R). Take the HEX (S).
- Walk forward.

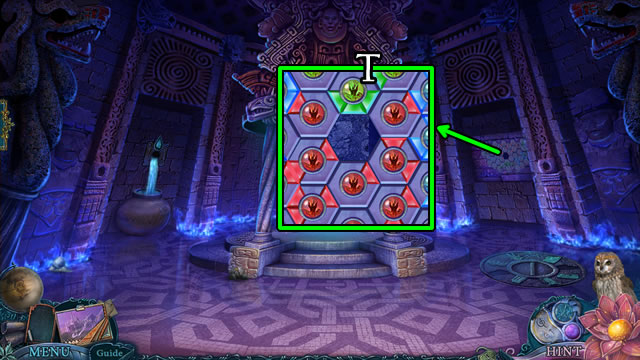

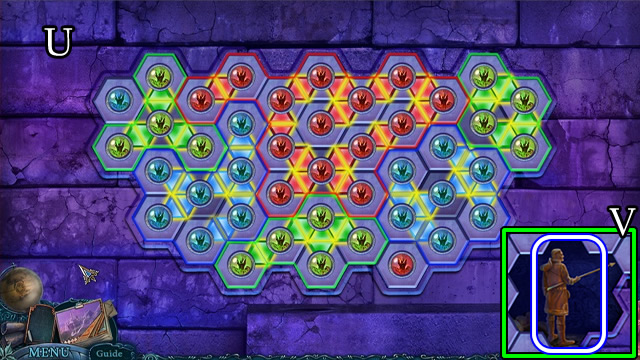
- Solution (U).
- Take the STATUETTE (V).
- Walk down.

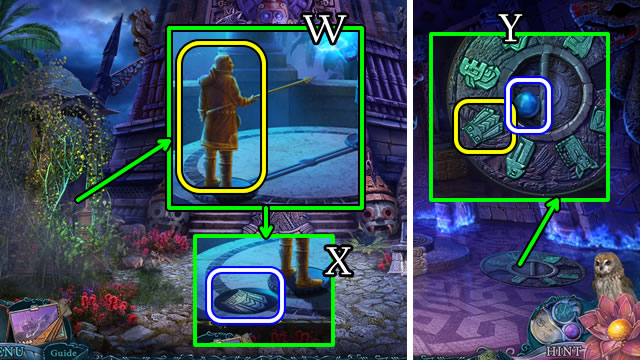
- Place the STATUETTE (W).
- Take the STONE OWL (X).
- Walk forward.
- Place the STONE OWL. Take the BLUE SPHERE (Y).
- Walk down.

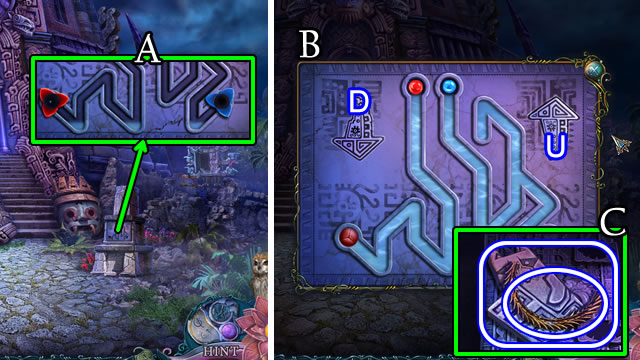
- Place the RED and BLUE SPHERES (A).
- Solution (B). Ux2-Dx2-Ux3-Dx2-Ux4.
- Take the OUROBOROS PART and STONE PANDA (C).
- Walk forward.

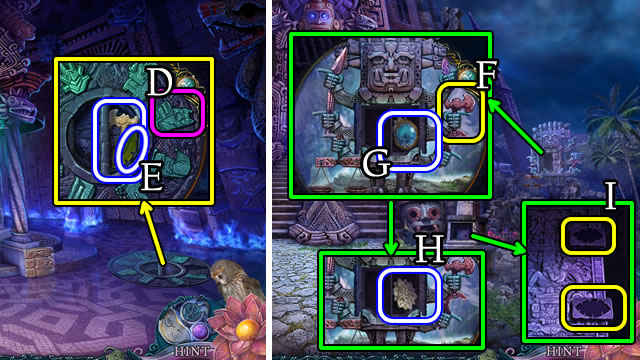
- Place the STONE PANDA (D). Take the STONE AXE and LEAF EMBLEM (E).
- Walk down.
- Place the STONE AXE (F). Take the LENS (G) and STONE SYMBOL (H).
- Place 2 LEAF EMBLEMS (I). Open.

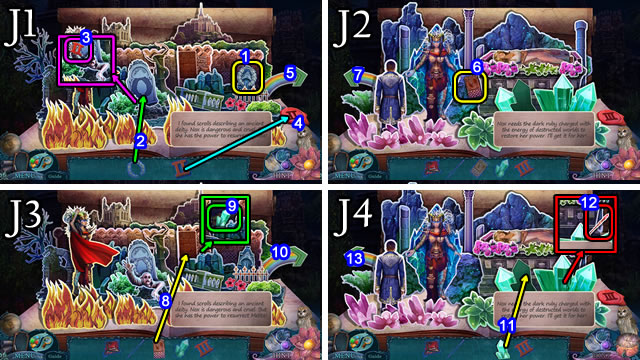

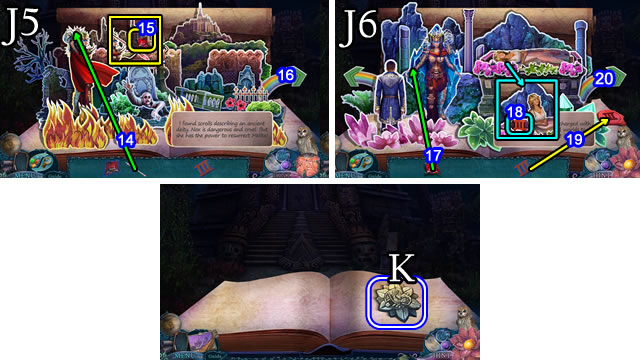
- Solution (J1-J4). 1-13.
- Solution (J5-J6). 14-20.
- Take the STONE SYMBOL (K).
- Walk forward.

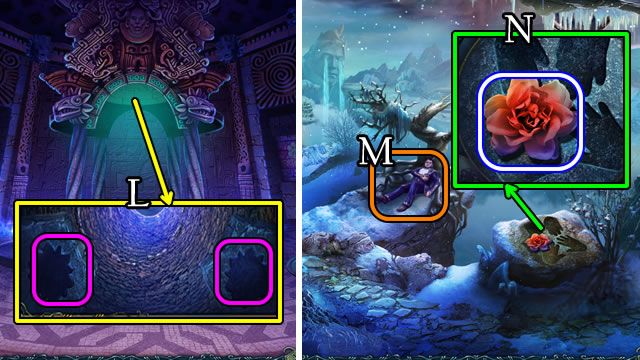
- Place the 2 STONE SYMBOLS (L).
- Walk forward.
- Speak to Jonas (M).
- Take the RED FLOWER (N).
- Walk left.

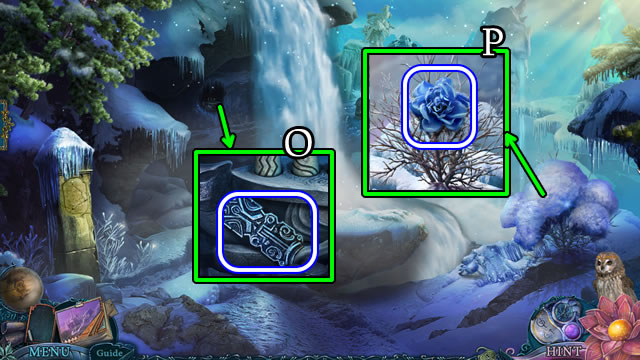
- Take the EARRING (O).
- Uncover and take the BLUE FLOWER (P).
- Walk down and right.

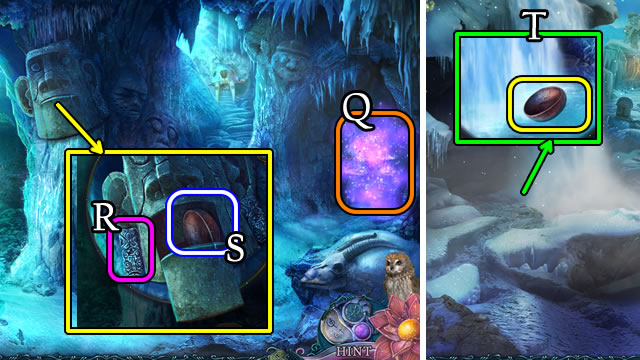
- Play the HOP (Q). Take the POUNDER.
- Place the EARRING (R). Take the BOWL (S).
- Walk down and left.
- Place the BOWL for a BOWL OF WATER (T).
- Walk down and right.

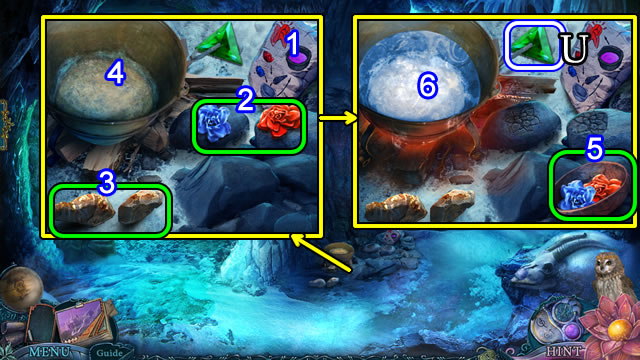
- Read the note (1). Place the RED and BLUE FLOWERS (2). Select (3). Place the BOWL OF WATER (4). Place the 2 flowers; use the POUNDER (5). Place in (6). Select the bowl; receive a CURE.
- Take the GREEN GLASS (U).
- Walk down.

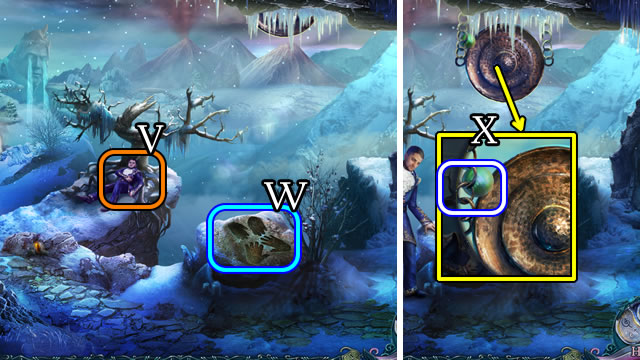
- Give the CURE (V).
- Select and touch the stone (W).
- Take the SPHERE (X).
- Walk right.

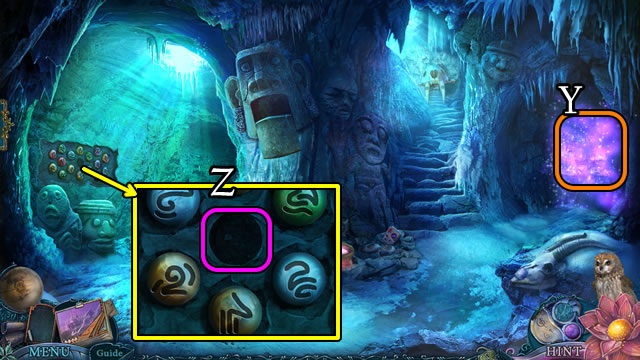
- Play the HOP (Y). Take the ARROW.
- Place the SPHERE (Z).

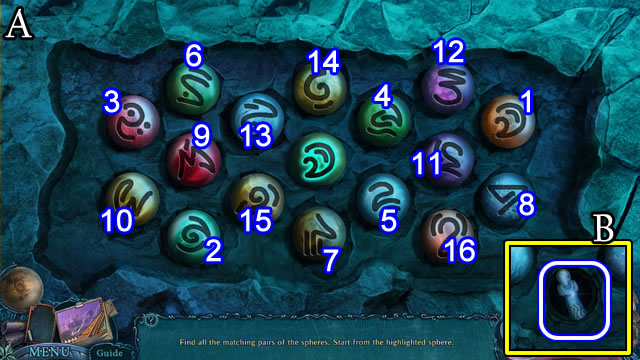
- Solution (A). 1-16.
- Take the STONE FIGURINE (B).
- Walk down and left.

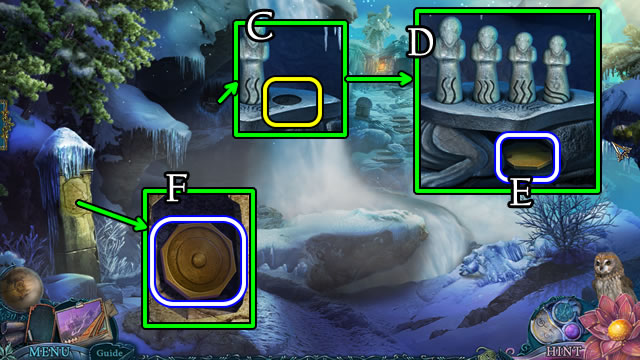
- Place the STONE FIGURINE (C).
- Solution (D).
- Take the MALLET TOKEN (E).
- Use the ARROW. Take the GONG TOKEN (F).
- Walk down and right.

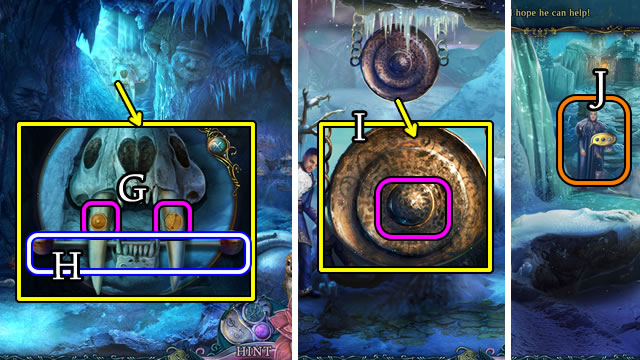
- Place the MALLET and GONG TOKENS (G). Take the MALLET (H).
- Walk down.
- Use the MALLET (I).
- Walk left. Speak to the man (J).
- Walk forward.

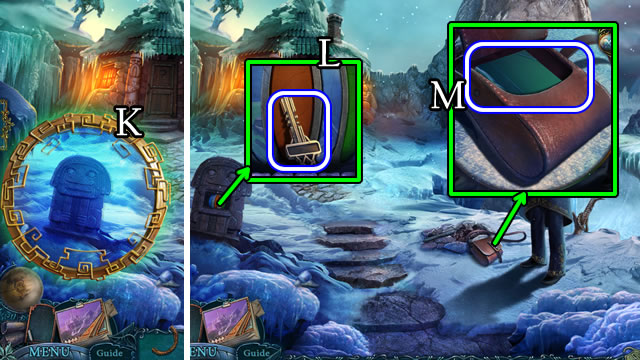
- Place the LENS (K).
- Take METAL EMBLEM 1/2 (L).
- Open. Take the HANDKERCHIEF and BOOK 1/3 (M).
- Walk forward. Speak to the man.

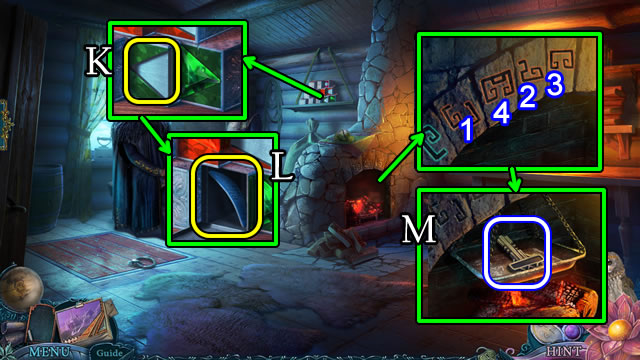
- Place the GREEN GLASS (K). Take the WATER BADGE (L).
- Select 1-4.
- Use the HANDKERCHIEF to take METAL EMBLEM 2/2 (M).

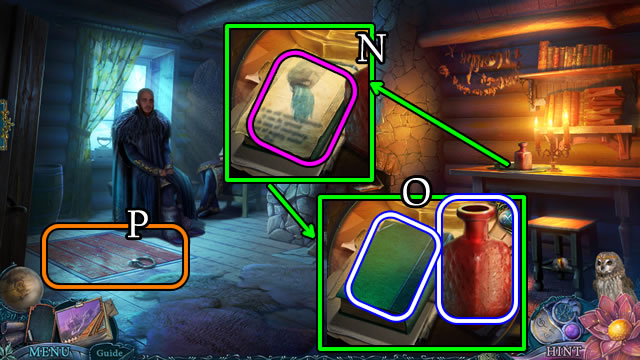
- Take the note (N), RED POTION and BOOK 2/3 (O).
- Open the hatch (P).
- Enter the Hermit’s Cellar.

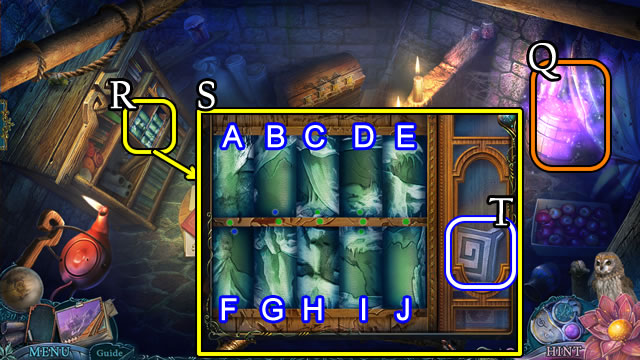
- Play the HOP (Q). Take BOOK 3/3.
- Place BOOKS 3/3 (R).
- Solution (S). (B-H)-(C-J)-(D-F)-(E-H)-(D-E)-(F-H)-(G-H)-(H-I)-(G-I)-(I-J)-(H-I).
- Take the STONE RHOMBOID 1/3 (T).

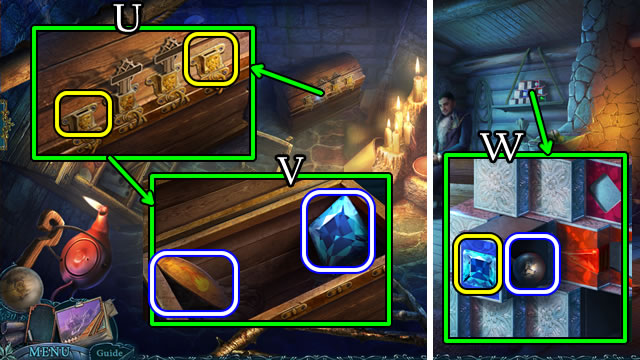
- Place the METAL EMBLEMS 2/2 (U). Take the FIRE BADGE and BLUE GLASS (V).
- Walk down.
- Place the BLUE GLASS. Take the GLOBE PART (W).
- Enter the Hermit’s Cellar.

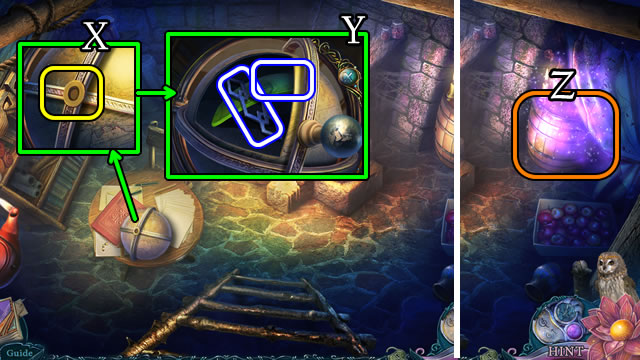
- Place the GLOBE PART (X).
- Take the EARTH BADGE and STONE ELEMENT (Y).
- Play the HOP (Z). Take the PURPLE GLASS.
- Walk down.

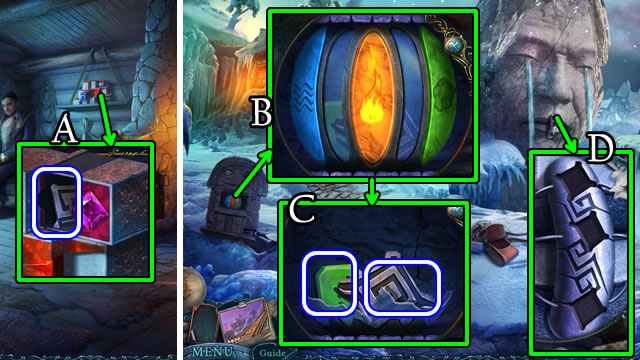
- Place the PURPLE GLASS. Take STONE RHOMBOID 2/3 (A).
- Walk down to the Hermit’s Place.
- Place the EARTH, WATER and FIRE BADGES (B).
- Take STONE RHOMBOID 3/3 and PORTAL RUNE 1/2 (C).
- Place STONE RHOMBOIDS 3/3 (D).
- Select and touch the Amulet.

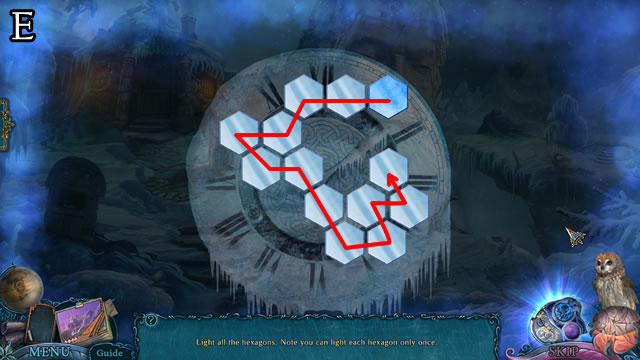
- Solution (E).
- Walk right.

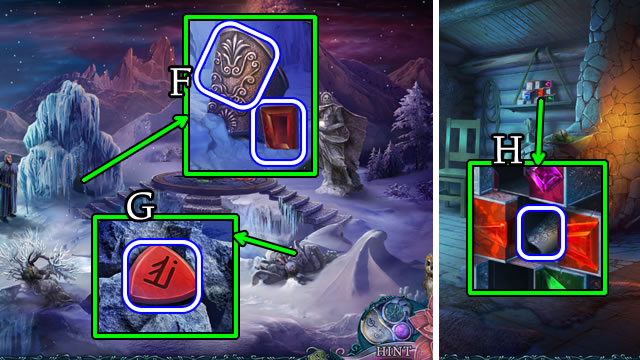
- Uncover and take the BRACER 1/2 and RED GLASS (F).
- Uncover and take PORTAL RUNE 2/2 (G).
- Walk left and forward.
- Place the RED GLASS. Take BRACER 2/2 (H).
- Return to the Volcano.

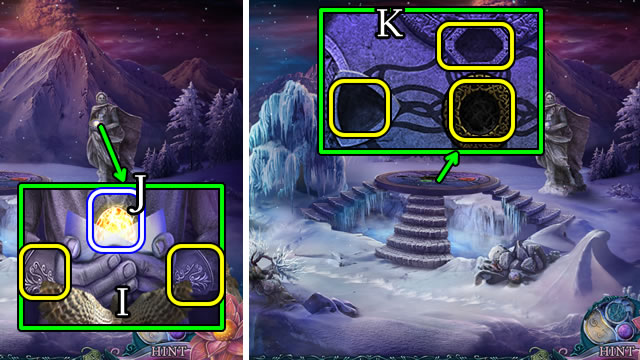
- Place BRACERS 2/2 (I). Take the PORTAL SOURCE (J).
- Place the PORTAL SOURCE and PORTAL RUNES 2/2 (K).

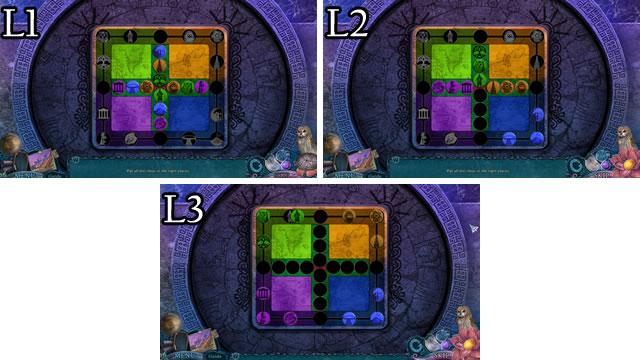
- Solution (L1-L3).
- Select and touch the Amulet.

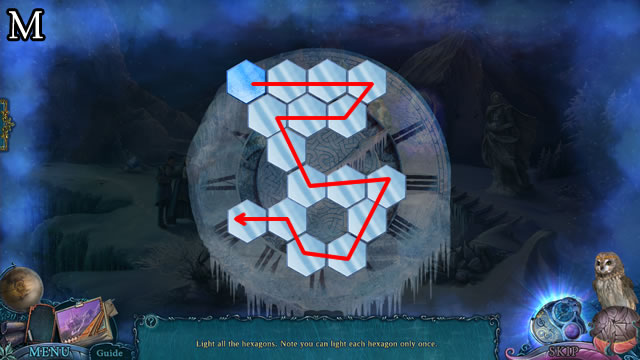
Chapter 5: The Room of Light

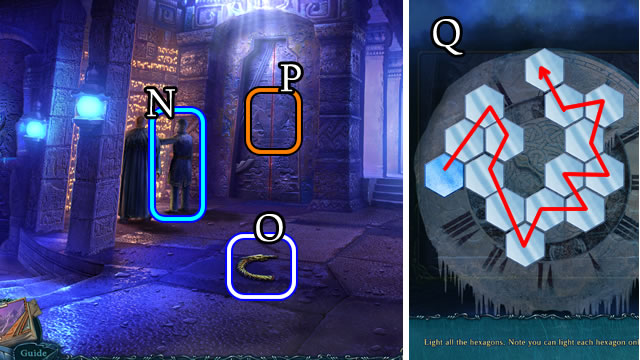
- Speak to Jonas (N).
- Grab the OUROBOROS PART (O).
- Select (P).
- Select and touch the Amulet.
- Solution (Q).
- Enter the Alchemical Lab.

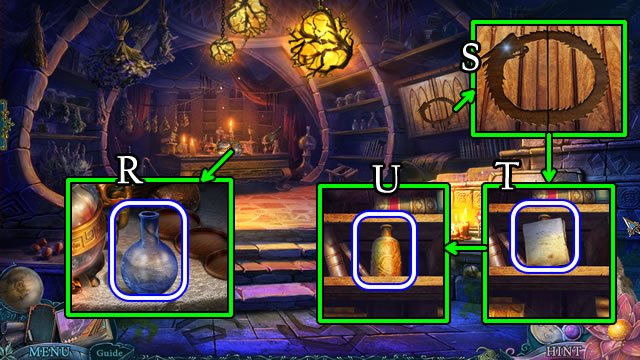
- Take the FLASK (R).
- Place the 2 OUROBOROS PARTS (S).
- Take the INSTRUCTIONS (T) and YELLOW POTION (U).
- Walk down and forward to the Balcony.

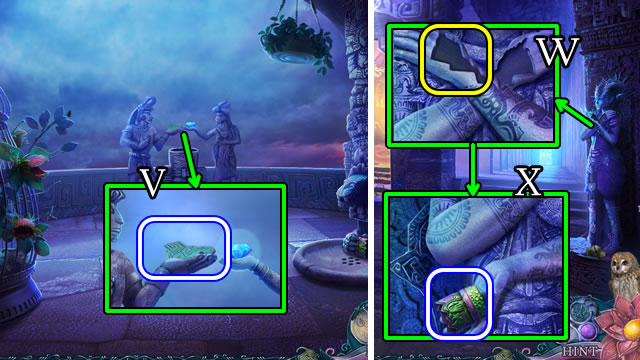
- Take the TATTOO (V).
- Walk down.
- Place the TATTOO (W). Take the FOUNTAIN PART (X).
- Return to the Balcony.

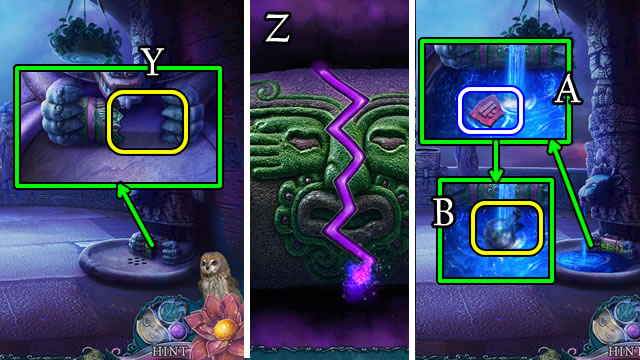
- Place the FOUNTAIN PART (Y).
- Select and touch the Amulet.
- Solution (Z).
- Take the TILE 1/3 (A). Place the FLASK for BLUE POTION (B).
- Return to the Alchemical Lab.

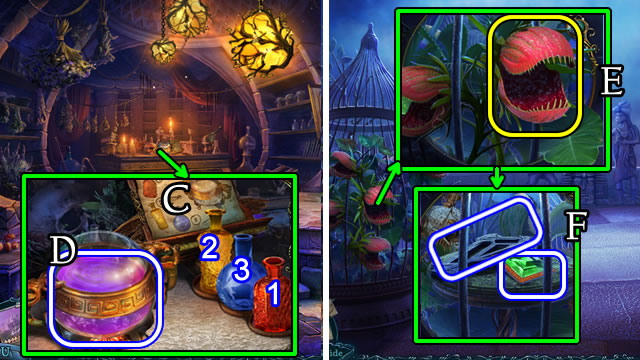
- Place the INSTRUCTIONS (C) and RED, BLUE and YELLOW POTIONS. Pour 1-2-3. Take the HERBICIDE (D).
- Return to the Balcony.
- Use the HERBICIDE (E).
- Take the EMERALD PRISM and STONE ELEMENT (F).
- Walk down.

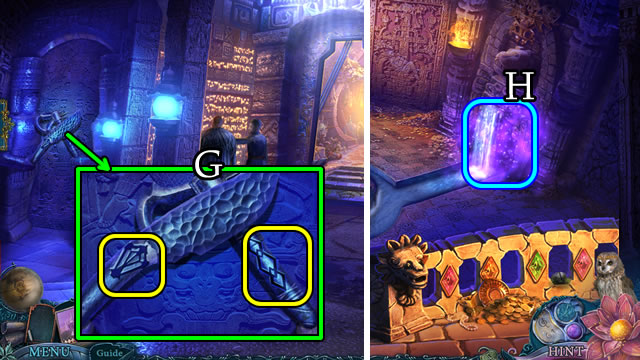
- Place the 2 STONE ELEMENTS (G).
- Enter the Treasury.
- Play the HOP (H); receive an AQUAMARINE PRISM.
- Return to the Alchemical Lab.

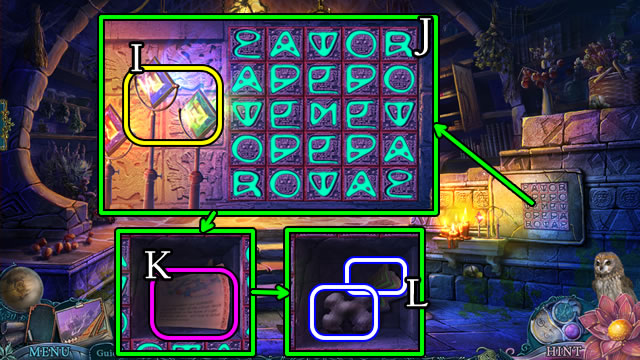
- Place the AQUAMARINE and EMERALD PRISMS (I).
- Solution (J).
- Take the note (K), BLACK SIGNET and STONE ELEMENT (L).
- Walk down.

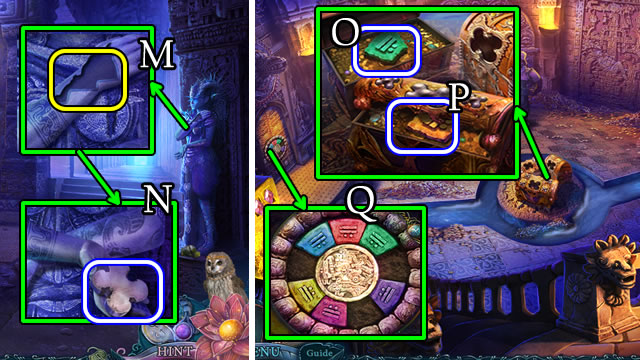
- Place the STONE ELEMENT (M). Take the WHITE SIGNET (N).
- Return to the Treasury.
- Place the BLACK SIGNET. Take TILE 2/3 (O).
- Place the WHITE SIGNET. Take TILE 3/3 (P).
- Place TILES 3/3 (Q).
- Walk left.

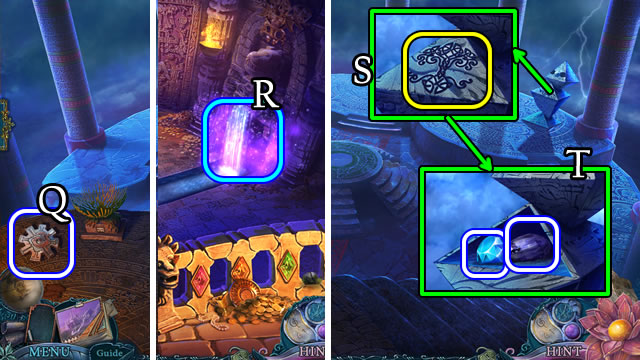
- Grab the BUCKLE (Q).
- Walk down.
- Play the HOP (R). Take the TAU SYMBOL.
- Walk left.
- Place the TAU SYMBOL (S).
- Take the DIAMOND and GEM (T).
- Walk down.

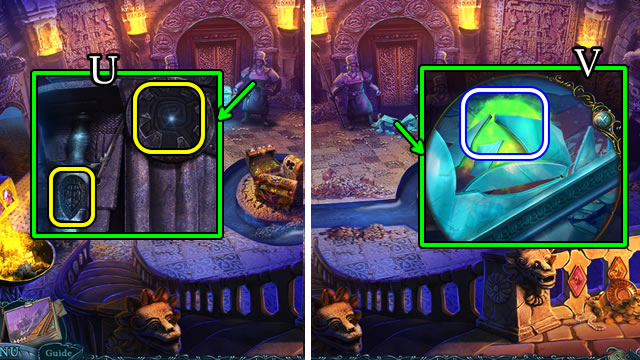
- Place the BUCKLE and GEM (U).
- Use the HANDKERCHIEF. Take the EARTH SPHERE (V).
- Return to the Balcony.

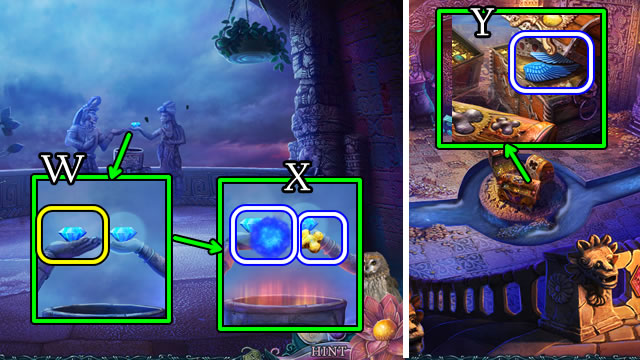
- Place the DIAMOND (W).
- Take the WATER SPHERE and YELLOW SIGNET (X).
- Return to the Treasury.
- Place the YELLOW SIGNET. Take the WINGS (Y).
- Walk left.

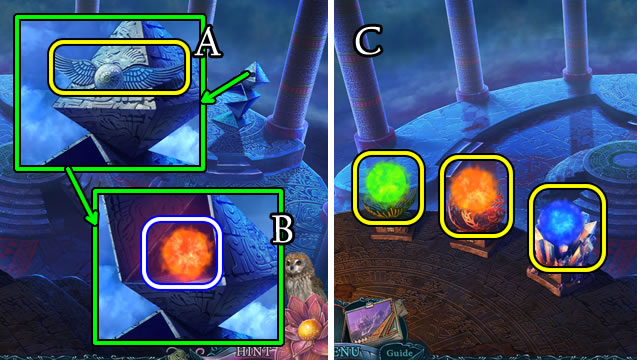
- Place the WINGS (A). Take the FIRE SPHERE (B).
- Place and select the EARTH, FIRE and WATER SPHERES (C).

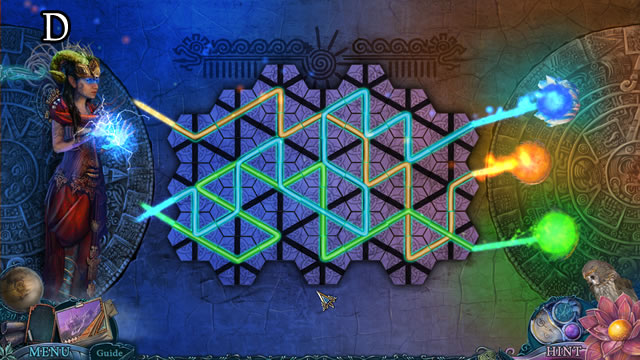
- Solution (D).
- Congratulations. You have completed playing Reflections of Life: Dark Architect.




 Riddles of Fate: Into Oblivion Walkthrough, Guide, & Tips
 Emma and the Inventor Walkthrough, Guide, & Tips
 Witches' Legacy: Lair of the Witch Queen Walkthrough, Guide, & Tips
 Nightmares from the Deep: The Cursed Heart Walkthrough, Guide, & Tips
 Love Story: Letters from the Past Walkthrough, Guide, & Tips