Million Dollar Quest Walkthrough, Guide, & Tips
Million Dollar Quest Walkthrough

Welcome to the Million Dollar Quest Walkthrough!
Travel around the world looking for clues to Sandra’s past on her quest to win a million dollars!
Whether you use this document as a reference when things get difficult or as a road map to get you from beginning to end, we’re pretty sure you’ll find what you’re looking for here.
This document contains a complete Million Dollar Quest game walkthrough featuring annotated screenshots from actual gameplay!
We hope you find this information useful as you play your way through the game. Use the walkthrough menu below to quickly jump to whatever stage of the game you need help with.
Remember to visit the Big Fish Games Forums if you find you need more help. Have fun!
This walkthrough was created by Philip J.
WALKTHROUGH MENU
- GENERAL TIPS
- CHAPTER 1
- CHAPTER 2
- CHAPTER 3
- CHAPTER 4
- CHAPTER 5
- CHAPTER 6
- CHAPTER 7
- CHAPTER 8
- CHAPTER 9
- CHAPTER 10
- CHAPTER 11
- CHAPTER 12
- CHAPTER 13
- CHAPTER 14
- CHAPTER 15
- CHAPTER 16
- CHAPTER 17
- CHAPTER 18
- CHAPTER 19
- CHAPTER 20
- CHAPTER 21
- CHAPTER 22
GENERAL TIPS
- Time limits are nonexistent in this game, so feel free to play at your pace.
- There are no penalties for randomly clicking in a scene.
- The hints are unlimited, but you will have to wait a while before it recharges again.
- Dialog scenes can be skipped by entering the menu in the top left corner of your screen, and clicking on the “skip scene” button.
- Dialog scenes can be sped up if you left-click your screen.
- Puzzles and mini-games can be skipped by clicking the skip button after it is fully charged. The skip button is identical to the hint button in the upper right corner of your screen.
- The items you find, along with the puzzles and mini-games you complete are not random. You can follow these screenshots as precisely as you please.
- You can always check your objectives by clicking on the icon in the top left corner of your screen.
- Some items will not react when you click them until a particular action is performed.
HIDDEN OBJECT SCENE

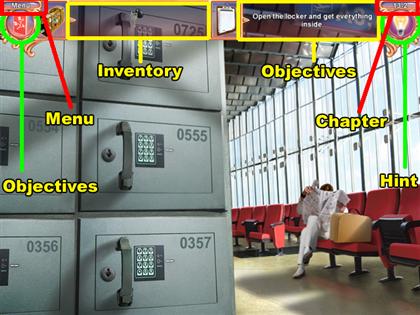
- The menu icon in the top left corner allows you to exit to the main screen, view this game’s options, and skip dialog scenes.
- The red book icon in the top left corner is your objective button. Click on this button at any time to read your current objective.
- The dark area beside the suitcase icon at the top of your screen is your inventory. Simply click on an item in your inventory when you want to use it. You can also place various items into your inventory at times.
- The dark area beside the notepad icon at the top of your screen displays your objective.
- The light bulb icon in the top right corner is your hint button. When the entire icon is fully colored, it is ready to be used.
- The small numbers above the hint icon indicate the chapter and section of the chapter you are in. For example, “9-5” really means chapter 9 and section 5.
SCREENSHOT GUIDE

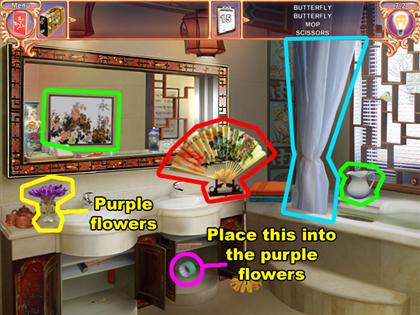
- The colors of the highlighted areas in these screenshots all have separate meanings. Read the information below to find out what each color conveys.
- Note that the colors used in the puzzle scenes do not have any special meaning.
- Green highlight: These are the items which must be collected.
- Red highlight: These items will react in a unique way to the left-click of your mouse.
- Purple highlight: These items must be moved to another location in the current scene manually.
- Yellow highlight: This color is used to bring a certain object or area of a scene into your attention.
- Blue highlight: These items have been previously moved to show you (the viewer) what was being concealing behind them. Click on these items if you want your screen to look identical to the screenshot in which you are viewing.
CHAPTER 1
1-1

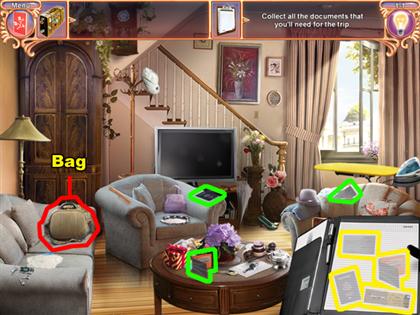
- Collect the 4 documents you will need for the trip.
- Place each of the documents you find into their matching silhouettes. The silhouettes of the documents are located in the bottom right corner of this scene.
- There is a document behind the brown bag located on the left side of this scene.
- Click on the bag to move it to another position. After the bag has been moved you will be able to see the document that was behind it.
- The other 3 documents are out in the open.
- One is in the center of this scene.
- Once is below the center of this scene.
- One is to the right of the center of this scene.

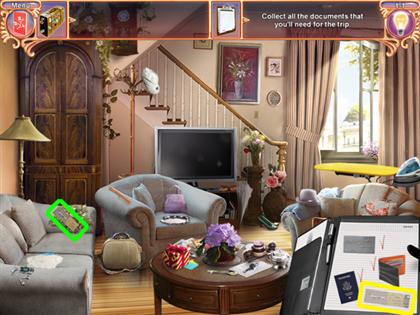
- Place the document that was concealed by the bag into its silhouette.
1-2

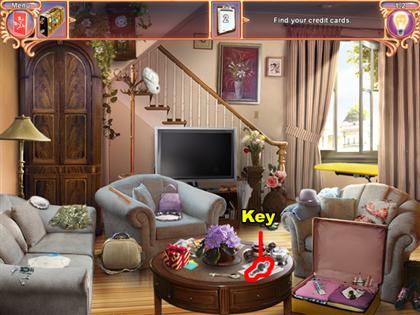
- Click on the key below the center of this scene.
- Afterwards a bird will fly through the window and pick it up.

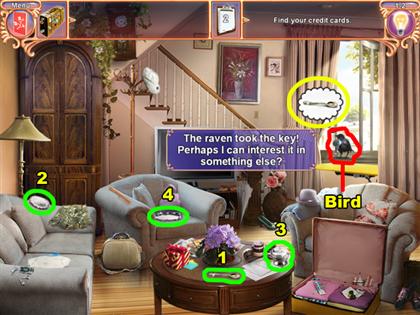
- Click on the bird and it will show you what it is interested in. The picture above the bird’s head will display which item you need to find.
- The 4 items that the bird wants have been numbered in this screenshot. Click on the items in numerical order to get the bird fly to the table.
- These 4 items are listed below in the correct order.
- The spoon is on the table in the center of the room.
- The silver plate is below the armoire in the left side of this scene.
- The silver object is located on the table in the center of the room.
- The silver platter is located on the couch near the center of this scene.
- Afterwards the bird will fly to the table in the center of the room.
- Click on the bird to make it drop the key.

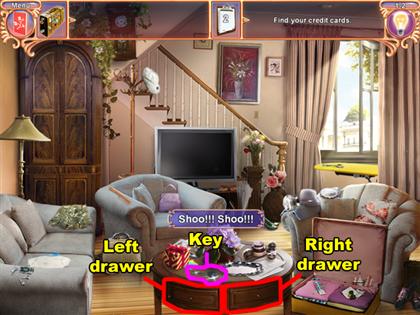
- Open both drawers of the table in the center of the room.
- The right drawer is locked, so use the key that the bird dropped to open it.
- Open the left drawer by clicking on it.

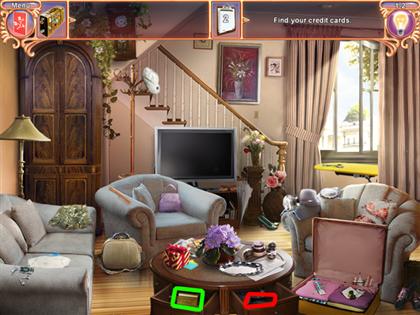
- Collect the gold card in the left drawer.
- Collect the gold card in the right drawer after removing the top 2 cards covering it.
1-3

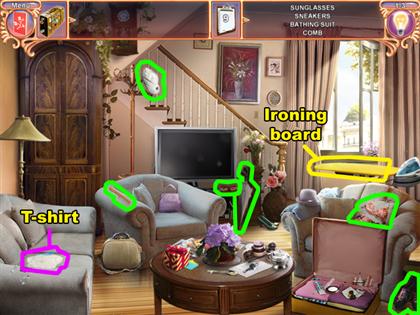
- Collect the 9 items using the item list at the top of your screen.
- The sunglasses are in the center of this scene.
- The sneakers are located in the bottom right corner of this scene.
- The bathing suit is above the bottom right corner of this scene.
- The comb is to the left of the center of this scene.
- The umbrella is in the center of this scene.
- The baseball hat is to the right of the top left corner of this scene.
- The t-shirt is located in the bottom left corner of this scene. This item has to be ironed before you can collect it.
- Place the t-shirt onto the yellow ironing board in the right side of this scene.

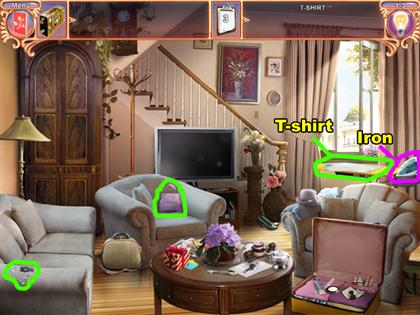
- Use the iron beside the ironing board on the wrinkled t-shirt.
- After the t-shirt has been ironed, click on it to collect it.
- The purse is located to the left of the center of this scene.
- The MP3 player is located above the bottom left corner of this scene.
CHAPTER 2
2-1

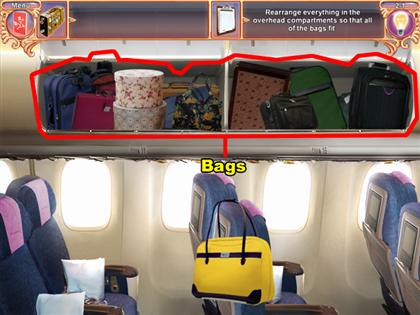
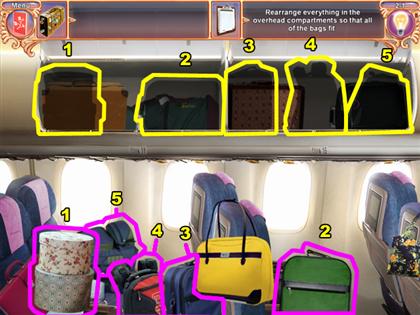
- Click on the 2 overhead compartment doors to open them.
- Remove the bags from both sides of the overhead compartments.

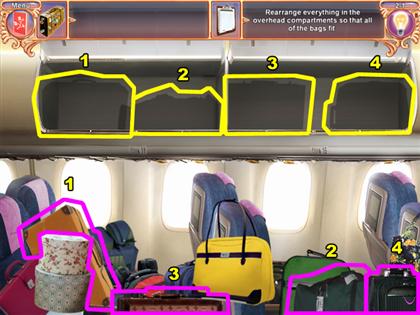
- Place the bags into their matching silhouettes in the overhead compartments.
- The silhouettes have been numbered along with the bags at the bottom of this scene in this screenshot.
- Place each numbered bag into its matching numbered silhouette.

- Continue to place the bags into the matching silhouettes.

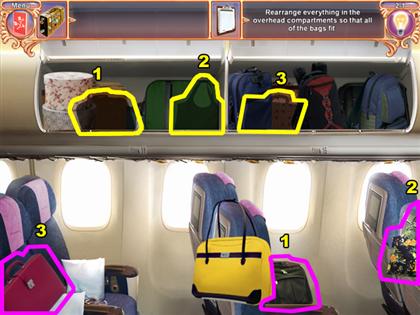
- Reposition this last set of bags into the overhead compartments.
- The yellow bag below the center of this scene is the final bag to put away.
- Place the yellow bag into its silhouette in the left compartment.
2-2

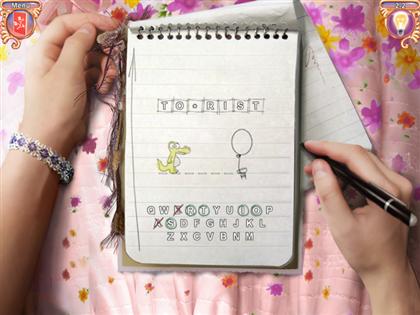
- Complete this hangman game 3 times to advance to the next scene.
- Your goal is to guess the mystery word before the dinosaur gets to the balloon.
- Use the letters at the bottom of the screen to try and spell out the mystery word.
- The dinosaur will move forward every time you select a letter that is not in the mystery word.
- The mystery words in this game given to you at random. However, words like: amnesia, tourist, vacation, travels, adventure, and millionaire appear regularly.
2-3

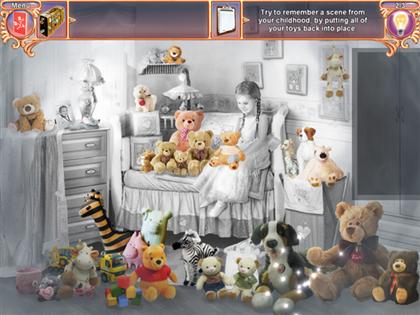
- Click on your screen once to have the toys appear on the right side of your screen.
- Place all of the toys into their proper positions to complete this picture.
- Place each toy into its matching silhouette in this scene to advance to the next chapter.
CHAPTER 3
3-1

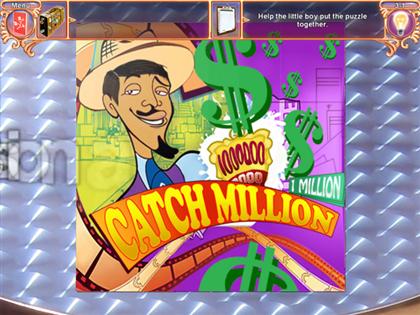
- Reconstruct this puzzle by using the puzzle pieces scattered around your screen.
- This is how your puzzle should appear upon completion.
3-2

- The red soda machine has a coin slot on its right side. Use the coin from your inventory on that coin slot.
- Collect the soda bottle that falls to the bottom of the soda machine.
- Use the bottle of cola on the base of the plant to the left of the soda machine.

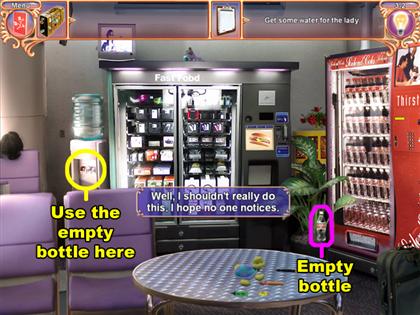
- Use the empty soda bottle on the water tap of the water dispenser. The water dispenser is located near the center of the left half of this scene.
- After the bottle of water is filled, click on it to give it to the lady.
3-3

- Find 19 differences between these 2 pictures.
- There are 9 differences in the left picture that are not in the right picture.
- One is in the upper left corner of the picture.
- One is above the lower left corner of the picture.
- Two are to the right of the bottom left corner of the picture.
- Two are below the center of this picture.
- One is to the left of the center of the picture.
- One is in the center of the picture.
- One is below the top right corner of the picture.
- The rest of the differences are located in the right picture.
- There is one in the top left corner of the picture.
- One is below the top left corner of the picture.
- One is in the upper right corner of the picture.
- One is in the center of the picture.
- Two are in the bottom right corner of the picture.
- One is below the center of the picture.
- Three are to the right of the bottom left corner of the picture.
CHAPTER 4
4-1

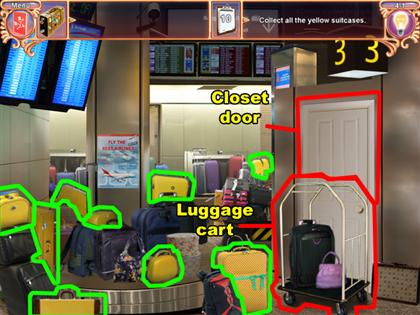
- Collect all of the 10 yellow suitcases in this scene.
- Three are above the bottom left corner of this scene.
- One is below the center of the left half of this scene.
- One is to the right of the bottom left corner of this scene.
- Two are near the center of this scene.
- Two are below the center of this scene.
- Click on the luggage cart blocking the closet door on the right side of this scene.
- After the luggage cart moves, click on the closet door to open it.
- Click anywhere inside of the closet to enter the closet room.


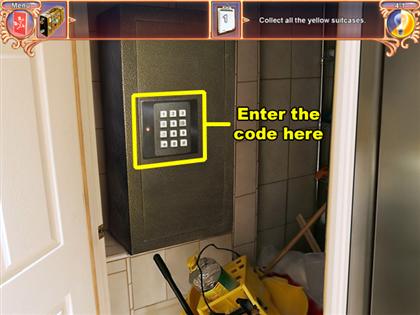
- There is a keypad near the center of this scene.
- Click on the numbers 7, 4, and 6 to open the locked compartment.

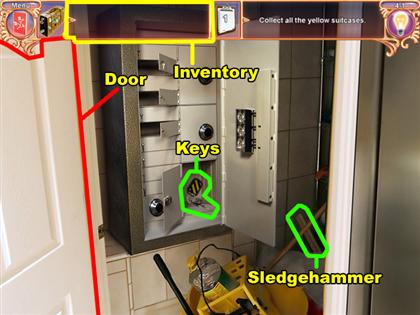
- Place the keys that are located near the bottom of the compartment into your inventory at the top of the screen.
- Collect the sledgehammer and place into your inventory. This item is located in the bottom right corner of the closet.
- Click on closet door to go back to the previous scene.

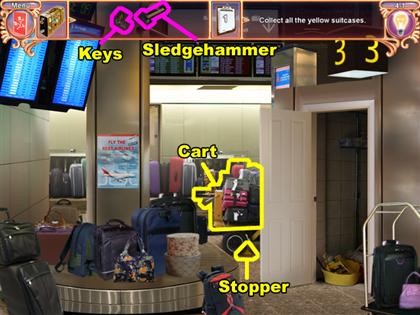
- Use the sledgehammer on the yellow stopper that is blocking the wheel of the cart. The cart is located near the center of this scene.
- Use the keys on the cart to make it drive forward.
- Collect the last yellow baggage where the cart was before it moved.
4-2


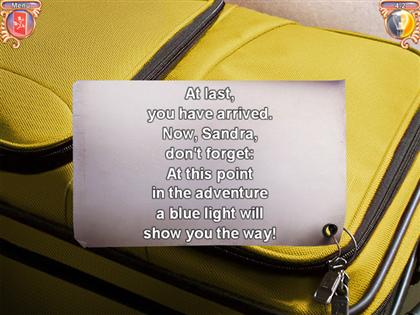
- Rearrange the words of each line in the note correctly.
- Click on any 2 words on the same line to switch their positions.
- This note will read:
“At last, you have arrived. Now, Sandra, don’t forget: At this point in the adventure a blue light will show you the way!”
4-3

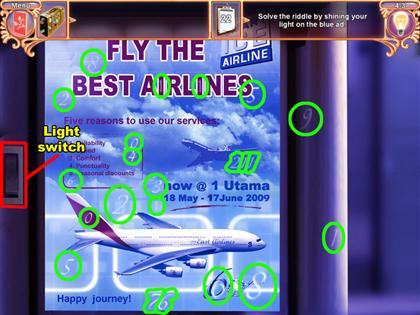
- Click the light switch on the left side of this scene to turn the light off.
- Find 22 numbers that do not belong in this blue ad.
- Two are above the bottom left corner of the ad.
- One is in the center of the left side of the ad.
- Two are near the top left corner of the ad.
- Five are near the left side of the center of the ad.
- Two are in the center of the bottom of the ad.
- Two are to the left of the bottom right corner of the ad.
- Three are near the center of the right side of the ad.
- Two are above the center the ad.
- One is below the top right corner of the ad.
- Two are next to the ad in the right half of this scene.
4-4

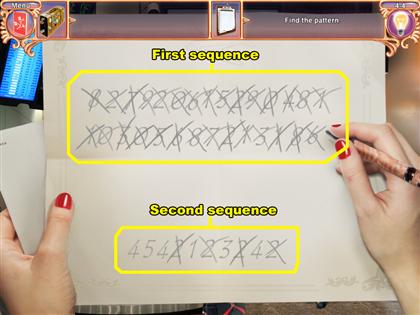
- Cross out all of the numbers in numerical order. Begin by crossing out on all of the 0’s in the sequence; then all of the 1’s, and so on.
- For every set of numbers you cross out, 1 number will be added to the bottom of the screen.
- The numbers at the bottom of your screen will form into another number sequence. You cannot cross out any numbers from the second number sequence until you are finished with the first sequence.
- For the second number sequence, cross out any number that appears more than once.
- Continue crossing out the numbers until the puzzle is complete.
CHAPTER 5
5-1

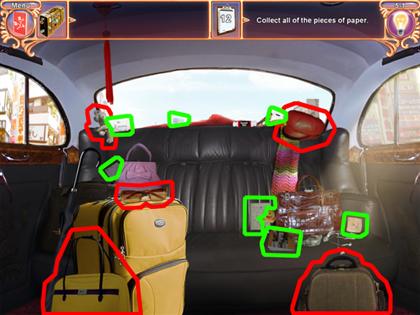
- Collect the 12 pieces of paper scattered around the taxi cab.
- Five of the pieces are hidden behind 5 movable objects in the car. After moving each of the items listed below, collect the piece of paper that it covered earlier.
- Move the teddy bear near the upper right corner of this scene.
- Move the glasses to the left of the center of this scene.
- Move the yellow purse near the bottom left corner of this scene.
- Move the brown purse near the bottom right corner of this scene.
- Move the red hat near the upper right corner of this scene.
- The other 7 pieces of paper are noticeable.
- Two are near the center of the left half of this scene.
- Two are above the center of this scene.
- Two are to the right of the center of this scene.
- One is above the bottom right corner of this scene.
5-2

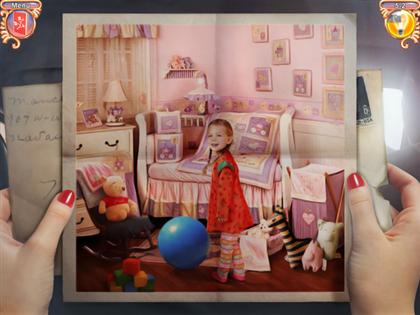
- Place the fragmented puzzle pieces together correctly until the picture is complete.
- This is how the picture will turn out.
5-3

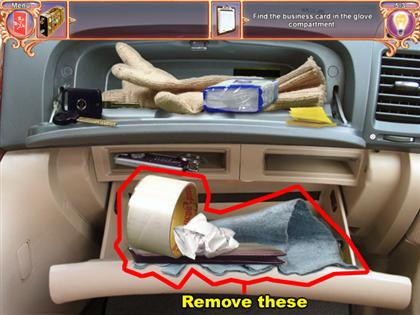
- Click on the top and bottom glove compartments to open them and see what is inside.
- Remove the items from the bottom glove compartment until you see a blue business card.
- Collect the blue business card to advance to the next scene.
CHAPTER 6
6-1

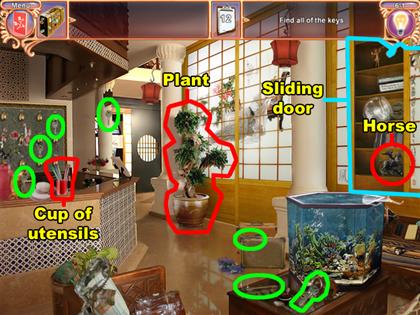
- Collect the 12 keys from around the scene.
- Only 7 of these keys are visible from the start.
- Three are near the center of the left side of this scene.
- One is in the center of the left half of this scene.
- Three are near the center of the bottom of this scene.
- The other 5 keys are concealed by other objects.
- Knock over the red cup of utensils near the center of the left half of this scene. The key will be among the utensils that spill out over the counter.
- Open the white sliding door above the fish tank on the right side of this scene.
- After opening the sliding door, move horse figure on the bottom to reveal the key behind it.
- Click on the plant in the center of this scene to inspect it.

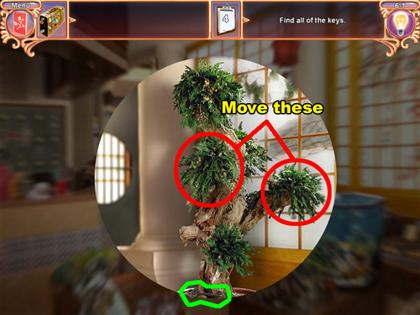
- One key is at the base of the plant.
- The other 2 keys are hidden behind 2 of this plant’s branches.
- Move the branch nearest to the center of this scene.
- Move the branch which is to the right of the center of this scene.
- Click on any part of the dark area surrounding the plant to get back to the lobby.
6-2

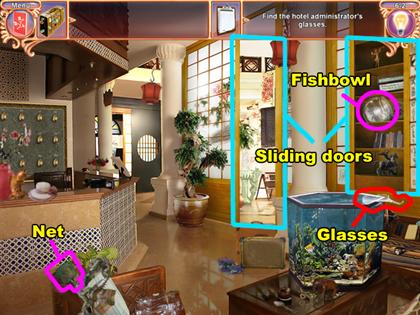
- Click on the pair of glasses positioned on top of the fish tank. Afterwards the glasses will fall into the fish tank.
- Open the sliding door above the fish tank, and the sliding door near the center of this scene.
- There is a fishbowl located on the middle shelf of the compartment above the fish tank.
- Use the fishbowl on the fish tank to fill it with water.
- There is a green fish tank net in the bottom left corner of this scene.
- Use the net on the fish tank to transfer the fish into the fishbowl.

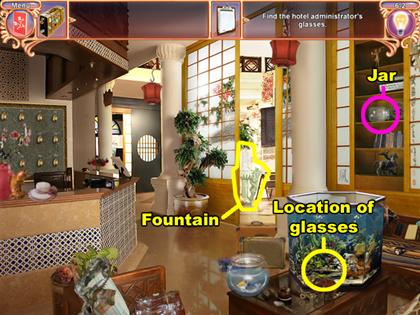
- There is an empty jar on the middle shelf where the fishbowl was.
- Use the jar on the fish tank to fill it with water.
- Use the jar on the water fountain to dispose of the water. The water fountain is located near the center of this scene.
- Repeat this process until the fish tank is empty. When tank is emptied the glasses will become visible.
- Collect the glasses from the bottom of the tank.
6-3

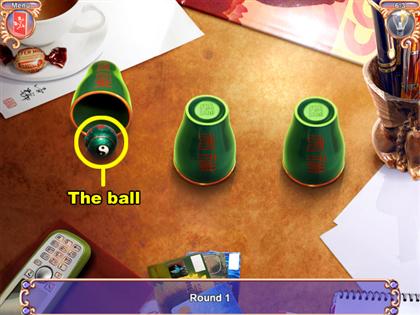
- Guess which cup the ball is under correctly 3 times. Afterwards you will advance to the next chapter.
- When the game begins, the ball will go into the middle cup, and the 3 cups will begin swapping positions.
- You will have a chance to select which cup you think the ball is under after the cups stop moving.
CHAPTER 7
7-1

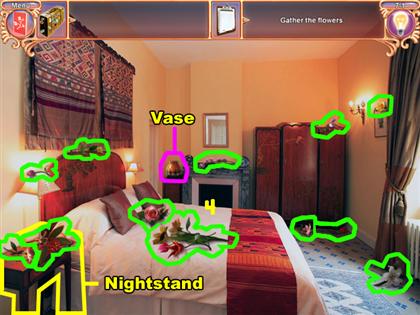
- Collect the 15 flowers around the room.
- Two flowers are above the bottom left corner of this scene.
- Two are near the center of the left side of this scene.
- Six flowers are near the center of this scene. 4 of these 6 flowers are bunched up together.
- Two flowers are below the center of the right half of this scene.
- One is in the bottom right corner of this scene.
- One is above the center of the right half of this scene.
- One is below the top right corner of this scene.
- Move the vase of flowers to the nightstand in the bottom left corner of this scene.
- Collect the piece of paper where the vase was before you move it.
7-2

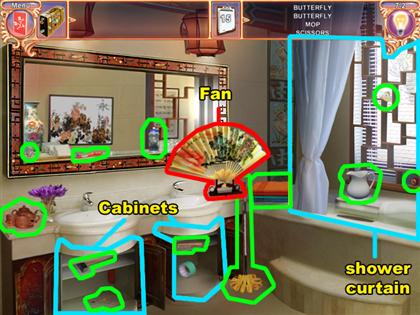
- Collect all of the 15 items listed at the top of this scene.
- Seven of these items are hidden behind some of the movable objects in this scene.
- Open the cabinet doors under the 2 sinks in this scene.
- Open the shower curtain on the right side of your screen.
- The items below have been listed in the order in which they appear on the item list.
- Move the fan in the center of this scene.
- One butterfly is in the center of this scene.
- The other butterfly is below the top right corner of this scene.
- The mop is below the center of this scene.
- The scissors are in the left cabinet.
- The bottle of water is to the left of the center of this scene.
- The apple is above the bottom right corner of this scene.
- The tooth brush is near the center of the left half of this scene.
- The comb is in the right cabinet compartment.
- The tea set is above the bottom left corner of this scene.
- The hammer is in the left cabinet compartment.
- The pitcher is in the center of the right half of this scene.
- The hourglass is where the pitcher used to be.
- The die is below the top left corner of this scene.
- The stack of towels is in the center of this scene.
- The envelope is where the stack of towels was before you collected it.
7-3

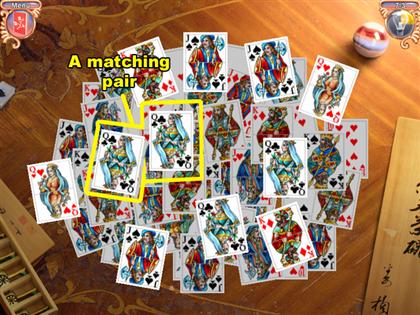
- Remove all the cards in this scene by pairing them with their matches.
- Click on 2 cards that match to pair them.
- You cannot select a card that has another card on top of it, so start with the top layer of cards and work your way downwards.
- The last pair of cards will not match but pair them up anyways. The last pair of cards will be an Ace of spades, and a joker.
CHAPTER 8
8-1

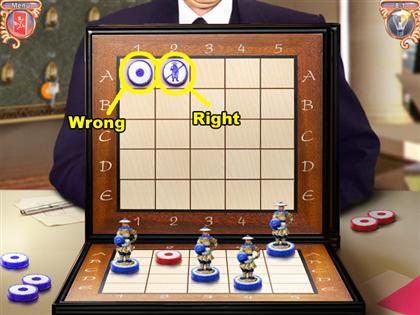
- Guess where the opponent’s pieces are before he finds all of your pieces.
- Just like you the opponent has soldier 4 pieces on his board.
- Click on a section of the chart in the center of this scene to make a guess. Each time you make a guess, a chip is placed onto the chart.
- There will be an image of a blue soldier on the chip if you guess correctly.
- You and your opponent will take turns guessing, however you can guess more than once each time you find a soldier. The same rule applies to your opponent.
8-2

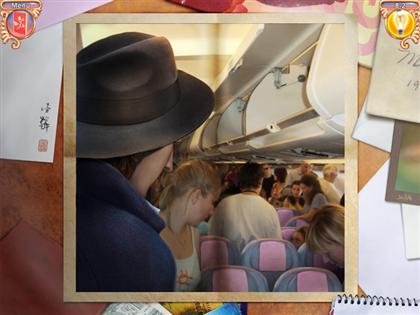
- Rearrange the fragmented puzzle pieces to complete this picture.
8-3

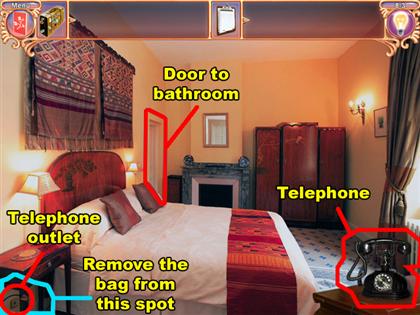
- Click on the telephone in the bottom right corner of this scene to check if it is working.
- Move the bag in the bottom left corner of this scene to reveal the telephone outlet.
- Click the phone cord beside the telephone outlet. Afterwards the phone cord will short circuit.
- Click on the bathroom door to the left of the center of this scene to enter it.

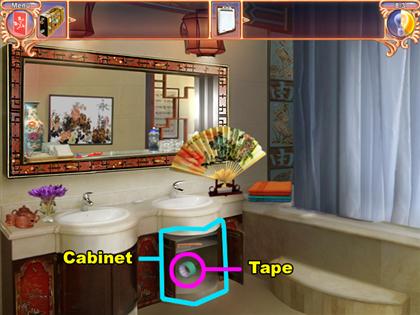
- Open the cabinet doors under the right sink of this scene, and collect the green roll of tape inside of it.
- Place the tape into your inventory and then exit the bathroom.
- Click the area close by the left side of your screen to leave the bathroom.

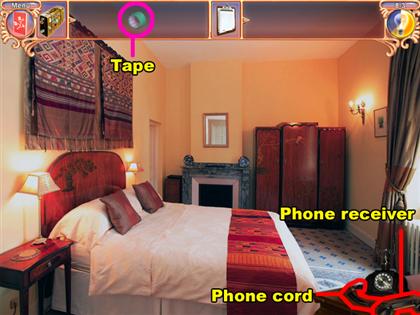
- Click on the phone cord beside the telephone to place it onto the bed. After the phone receiver is on the bed, click it once to prepare it for repairing.
- Use the tape from your inventory on the phone cord.
- Now that the phone cord has been repaired, place the phone cord back onto the telephone.
- Click on the phone receiver of the telephone to place it onto the bed.
- Place the phone receiver on the phone cord to connect it correctly.
- Click on the Telephone to check if it is working.
- Now that the phone is working, click on the phone receiver to place your call.
CHAPTER 9
9-1

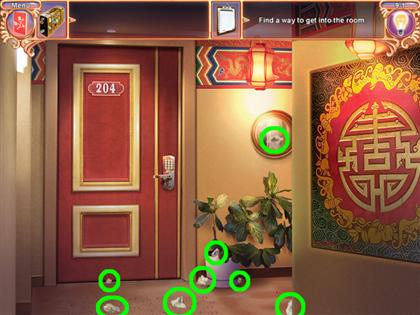
- Collect the 8 pieces of paper scattered around this scene.
- Two are to the right of the bottom left corner of this scene.
- Four are below the center of this scene.
- One is to the left of the bottom right corner of this scene.
- One is on the mirror on wall near the center of this scene.

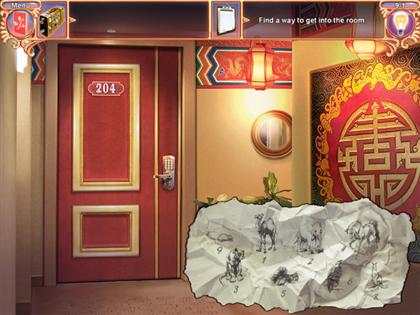
- Place the 8 pieces of paper correctly into the silhouette at the bottom of your screen.
- This is how your picture should appear once you are finished.
9-2

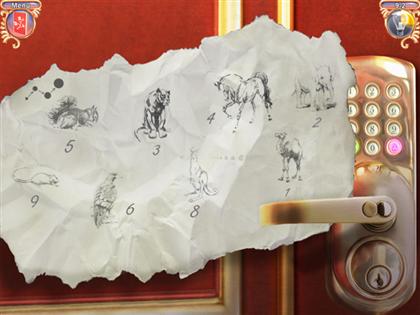
- Rearrange the symbols and numbers on paper correctly.
- Select any 2 of the symbols and numbers on this paper to swap their positions.
- The top row of numbers should be 5, 3, 4, and 2.
- The bottom row of numbers should be 9, 6, 8, and 1.
- The door will open afterwards.
9-3

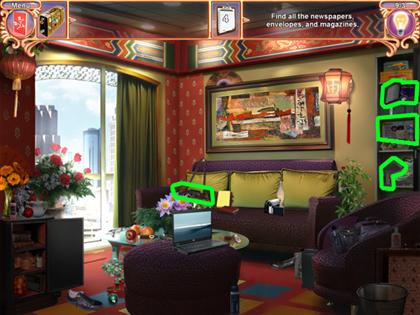
- Find the 19 items around this room.
- Before collecting any items, open the cabinet in the bottom left corner of this scene. Also open the laptop below the center of this scene.
- Four items are near the bottom left corner of this scene.
- One item is below the top left corner of this scene.
- One item is in the center of this scene.
- One item is to the left of the center of this scene.
- Five items are below the center of this scene.
- One item is to the right of the center of this scene.
- One item is above the center of this scene.
- One item is near the bottom right corner of this scene.
- Find the red paper clip in the center of this scene.
- Use the paper clip on the closet near the upper right corner of this scene to open it.
- Find the umbrella in the bottom right corner of this scene.
- Use the umbrella on the purse hanging above the center of this scene.

- Three of the items are in inside of the closet you opened.
- Click on the purse you took down earlier to find the final item. The purse is located in the center of this scene above the laptop.
9-4

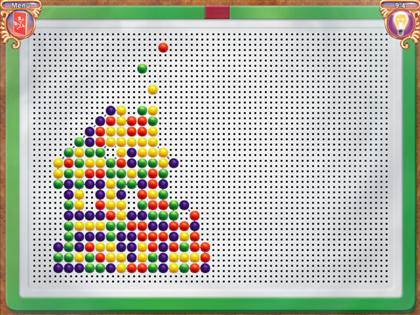
- Place the puzzle pieces together correctly to form this house.
- These pieces are very sensitive to where you place them.
- When a section the puzzle piece you are carrying turns red, it means that it will not fit in the space where it currently is.

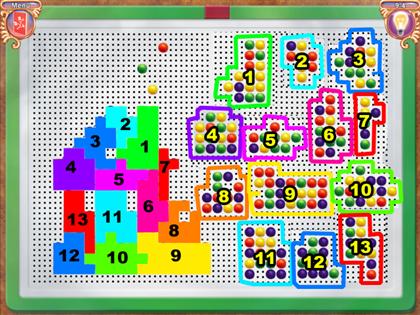
- Use this screenshot as a guide to figure out where the pieces go.
- Each of the puzzle pieces have been color coordinated and numbered to match the places in which they belong.
9-5

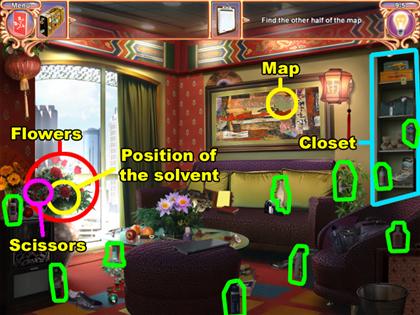
- Begin here by clicking on the map in the painting. The painting is located near the center of this scene.
- Collect the 10 liquids scattered around the room.
- Before collecting any liquids open the closet under the top right corner of this scene.
- One is above the bottom left corner of this scene.
- Two to the right of the bottom left corner of this scene.
- One is in the bottom center of this scene.
- One is to the right of the center of this scene.
- One is to the left of the bottom right corner of this scene.
- One is above the bottom right corner of this scene.
- One is below the top right corner of this scene.
- Two are near the center of the right half of this scene.
- Click on the bouquet of red flowers near the center of the left half of this scene. After the flowers are moved, click on the solvent that was behind them.
- Use solvent on map in the painting.
- Find the red scissors near the bouquet of red flowers. Use the pair of scissors on map to remove it from the painting.
- Collect the map from the right side of couch below the painting.
CHAPTER 10
10-1

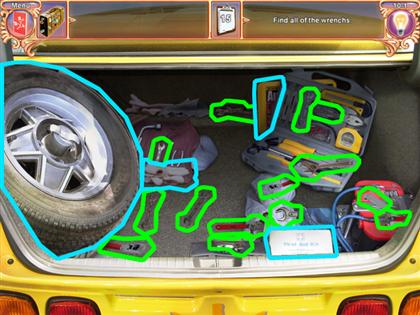
- Find all of the 15 wrenches in this scene.
- Before collecting any wrenches move the movable items first.
- Move the tire and the rag under it.
- Move the gloves located to the left of the center of this scene.
- Move the yellow container located near the top center of this scene, and the rag behind it.
- Move the white container located below the center of this scene.
- Four wrenches are to the left of the center of this scene.
- Two are below the center of this scene.
- Three are to the right of the center of this scene.
- Two are above the center of this scene.
- Two are to the left of the top right corner of this scene.
- Two are above the bottom right corner of this scene.
10-2


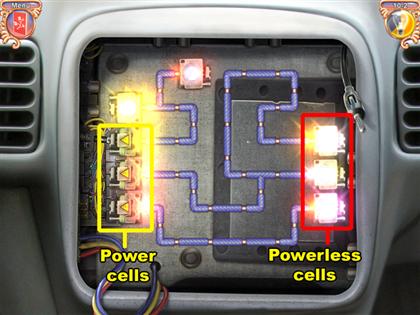
- Make a connection from the power cells to the powerless cells, using the wires in this scene.
- The power cells in this scene have a yellow triangular symbol on them.
- The powerless cells have a glass bulb on them. When a powerless cell receives energy, its bulb will begin to glow.
- Click on the wires to rotate them.
- This is how your completed puzzle will look.
10-3

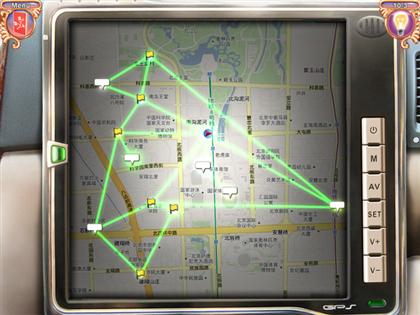
- Move the icons on the map around until the lines that connect them turn green.
- The lines will only turn green if they are not being overlapped by another line.
- You can move the icons freely to any position on the map.
- Your puzzle should look somewhat like this.
CHAPTER 11
11-1

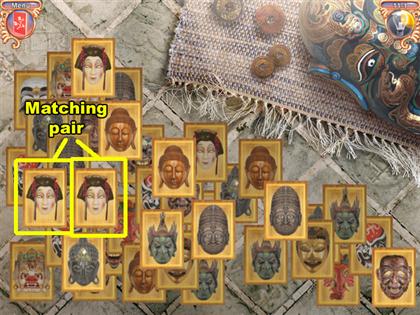
- Match the each pair of mahjong tiles to remove them from the board.
- Remove all of the mahjong tiles to advance to the next round.
- Complete the 3 rounds of this game to move on to the next game.
11-4

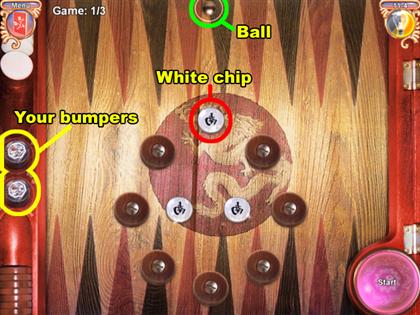
- Manipulate the movement of the silver ball enough for it to destroy the white chips on the board.
- When the ball falls below the screen, the game will reset and you will have to try again.
- Use your bumpers on the left side of the board to help you manipulate the ball’s movement. You can position your bumpers anywhere on the board that is not occupied by another object.
- Click the start button in the bottom right corner of this scene to make the ball drop.
- After the ball starts moving, you can no longer reposition your bumpers.
- After each round, you will have a choice between replaying a level and advancing to the next round. Click on the appropriate button in the bottom right corner of this scene to make your choice.
- You will have to complete 3 levels to move on to the next game.
11-5

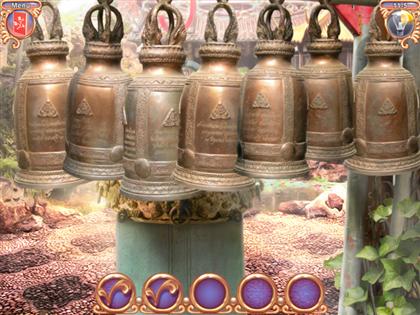
- Click on the bells in the order that they ring in.
- Each time a bell rings it will shake for a moment; use this moment to recognize which bell is ringing.
- After the bells stop ringing, it will be your turn to mimic the sequence that the bells rang in. If the order in which you ring the bells is incorrect, all of the bells will ring at once with a harsh sound.
- You will receive a checkmark at the bottom of your screen every time you ring the bells in the correct order.
- Ring the bells correctly 5 times to advance to the next chapter.
CHAPTER 12
12-1

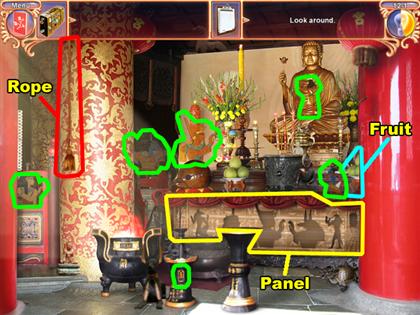
- Pull on the rope hanging near the top left corner of this scene to reveal the panel.
- Place the 6 Egyptian items into their matching silhouettes on the panel in the center of this scene.
- Before collecting any items move the bowl of green fruit. It is located to the right of the center of this scene.
- One of the items is located above the bottom left corner of this scene.
- Two of the items are to the left of the center of this scene.
- One item is near the center of the right half of this scene.
- One is above the center of the right half of this scene.
- One is below the center of this scene.
- After all of the items have been inserted into the panel, click on the panel to reveal the 3 smaller panels behind it.

- Find the crowbar located to the left of the center of this scene.
- Use the crow bar on the middle panel to reveal the safe behind it.
- Click the on the safe to move on to the next scene.
12-2

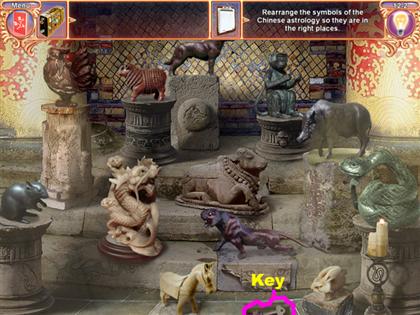
- Place the figures of the Chinese astrology onto their accurate pedestals.
- This screenshot shows where the figures belong.
- The rat item belongs near the lower left corner of this scene.
- The rooster belongs near the upper left corner of this scene.
- The dragon belongs to the left of the center of this scene.
- The goat belongs above the center of the left half of this scene.
- The dog belongs near the top center of this scene.
- The ox belongs in the middle of this scene.
- The tiger belongs below the center of this scene.
- The horse belongs at the bottom center of this scene.
- The monkey belongs above the center of this scene.
- The pig belongs to the right of the center of this scene.
- The rabbit belongs to the left of the lower right corner of this scene.
- The snake belongs above the lower right corner of this scene.
- After placing the figures onto their pedestals, a small compartment will open at the bottom of this scene.
- Place the key from the compartment into your inventory.
- Click anywhere on your screen to go back to the previous scene.

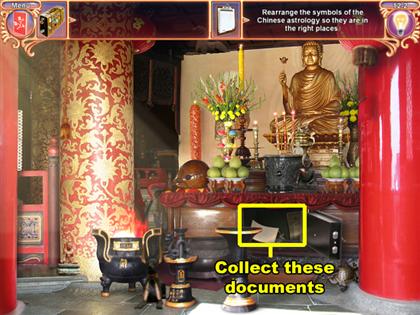
- Use the key from your inventory on the safe to open it.
- Collect the contents of the safe.
12-3

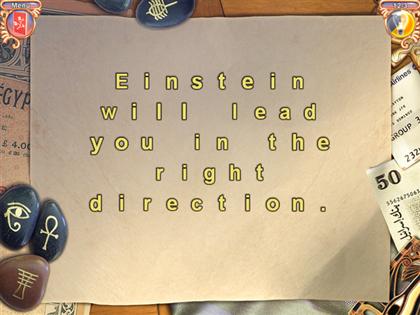
- Decrypt this note by swapping the positions of the letters until the message is complete.
- The message will say:
“Einstein will lead you in the right direction”.
CHAPTER 13
13-1

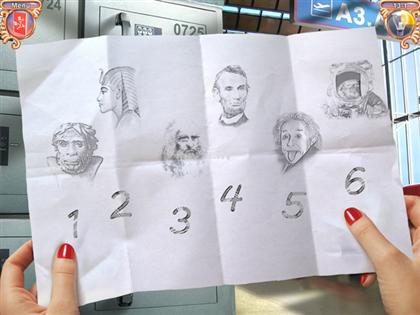
- Rearrange the historical figures in the correct order to complete this puzzle.
- Swap the positions of figures until the puzzle is complete.
- This screenshot shows where each of the figures should go.
- The figure that appears to look like a cave man should be above number 1.
- The Egyptian figure should be above number 2.
- The old man with the long beard should be above number 3.
- Abraham Lincoln should be above number 4.
- The man with his tongue sticking out should be above number 5.
- The astronaut should be above the number 6.
13-2

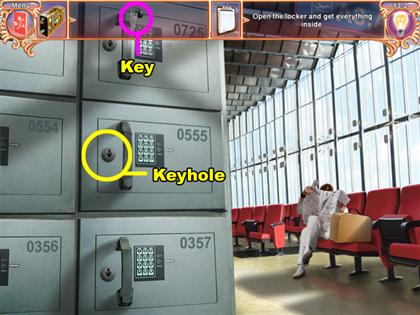
- Use the key from your inventory on the locker with the number 0555 on it.
- Collect the flashlight, envelope, and drawing inside of the locker.
13-3

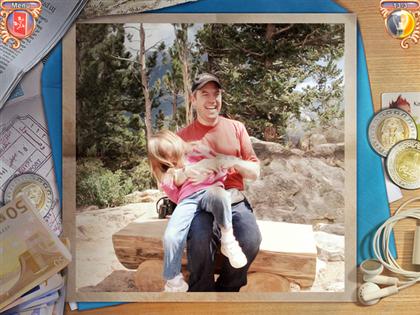
- Swap the pieces of the puzzle until the picture is reconstructed.
- Select any 2 adjacent puzzle pieces to swap their positions.
- This is how this puzzle will appear after it is completed.
13-4


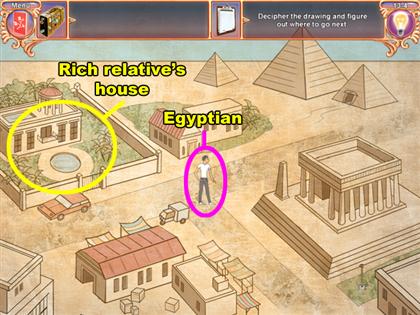
- The man in the white shirt is the Egyptian.
- Place the Egyptian on the rich relative’s house. The rich relative’s house is located near the upper left corner of this scene.
- Click on the Egyptian’s relative to receive a pot of money. The Egyptian’s relative will be wearing a yellow shirt.

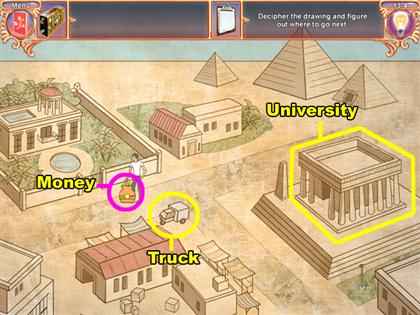
- Use the pot of money on the university. The university is the structure with the pillars on the right side of this scene.
- Place the Egyptian onto the university.
- Now the Egyptian is wearing blue clothes.
- Place the Egyptian onto the truck near the center of this scene.

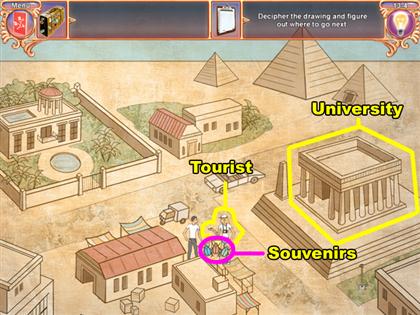
- Soon after, a tourist will appear in a car.
- Give the souvenirs on the table to the tourist. The souvenirs look like colored beetles, and they are directly below the tourist.
- Afterwards the tourist will give the Egyptian a pot of money.
- Use the money on the university.
- Place the Egyptian on the university.

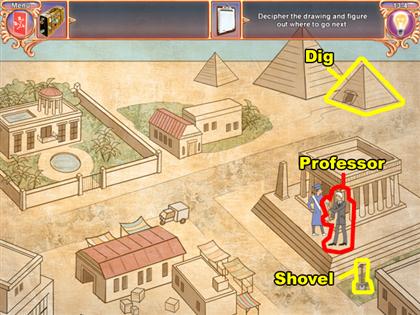
- Click on the professor standing next to the Egyptian.
- Place the Egyptian onto the shovel below the university.
- Place the Egyptian onto pyramid nearest to the upper right corner of this scene.
- The Egyptian will find a tomb in the pyramid.

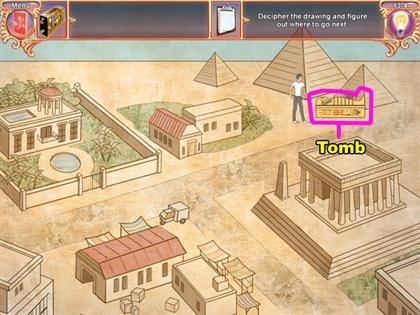
- Place the tomb onto the university.
- Place the Egyptian onto the university to complete this puzzle.
CHAPTER 14
14-1

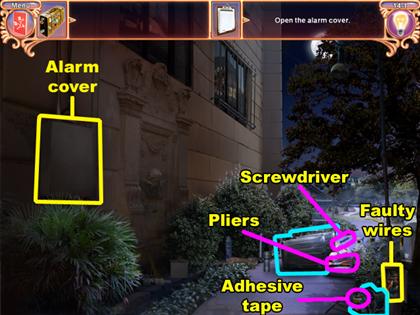
- Before collecting anything move what needs to be moved.
- Knock over both of the trashcans near the center of this scene.
- Move the small bush in the bottom right corner of this scene.
- Find the pliers on the right side of the trashcans you knocked over.
- Use the pliers on the faulty wires in the bottom right corner of this scene.
- Find the adhesive tape that was behind the bush you moved. It is in the bottom right corner of this scene.
- Use the adhesive tape on the faulty wires.
- Find the screwdriver on the right side of the trashcans.
- Use the screwdriver on the alarm cover below the top left corner of this scene.
14-2

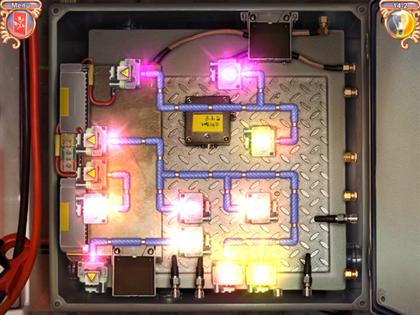
- Connect the power cells to the powerless cells just like before.
- This is how your puzzle should appear.
14-3

- Click on the unbarred window near the top center of this scene.
- Click on the dog near the bottom right corner of this scene.
- Place all 6 of the scattered bones onto the dog’s paws to make it move.
- One bone is below the top left corner of this scene.
- One is below the center of this scene.
- One is to the left of the center of this scene.
- One is to the right of bottom left corner of this scene.
- Two are above the bottom right corner of this scene.

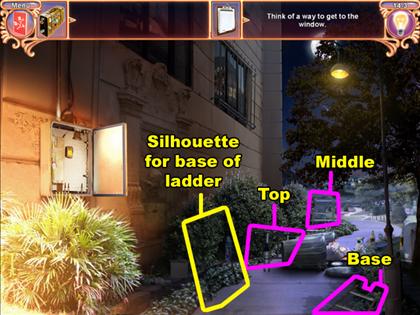
- Look for the silhouette of a ladder below the center of this scene.
- Assemble the 3 parts of the ladder and place it into the silhouette.
- First, begin with the base of the ladder located in the bottom right corner of this scene.
- Second, use the middle section of the ladder which is located above the trashcans.
- Last, use the top part of the ladder which is located to the left of the trashcans.
14-4

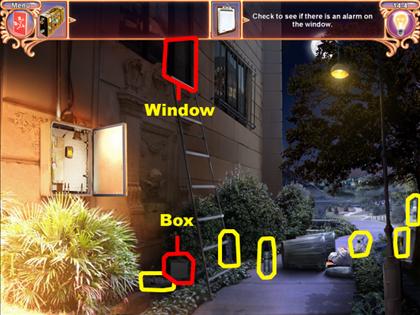
- Open the window at the top of the ladder.
- Collect the 6 spray cans from around this scene.
- Three are near the center of the bottom of this scene.
- Three are above the bottom right corner of this scene.
- Move the box that is near the center of the bottom of this scene.
- Use the spray that was hidden behind the box on the window at the top of the ladder.
- Click on the window with red lasers to enter the next scene.
14-5


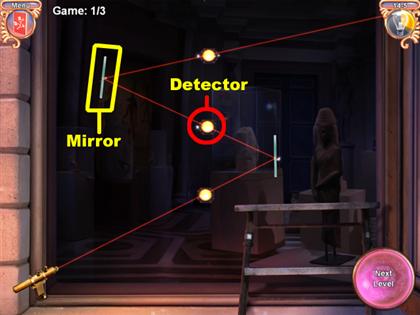
- Strategically use the mirrors to redirect the alarm beams through the detectors.
- When an alarm beam touches a mirror, it bounces off of it at a precise angle. The alarm beams will only change direction when in direct contact with a mirror.
- You can freely drag the mirrors to almost any location in this scene. After you have completed a level, click on the button in the lower right corner of this scene.
- This is how your scene should look after the beams have passed through the detectors.

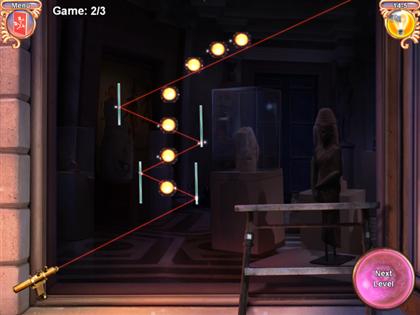
- This is the solution for round 2 of the laser puzzle.

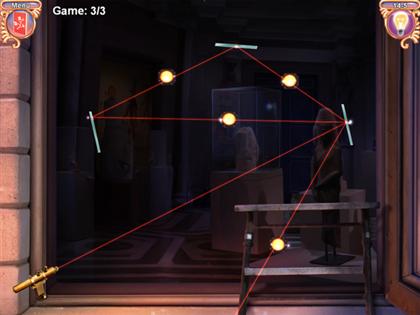
- This is the solution for the final round.
CHAPTER 15
15-1

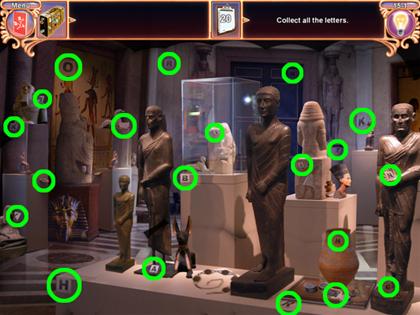
- Use your flashlight to find the 20 letters around this scene.
- Three of the letters are in the upper left corner of this scene.
- One letter is to the right of the lower left corner of this scene.
- Two letters are above the lower left corner of this scene.
- Two letters are in the center of this scene.
- One is to the left of the center of this scene.
- One is near the top center of this scene.
- One is near the bottom center of this scene.
- Four are to the left of the lower right corner of this scene.
- Four are near the center of the right half of this scene.
- One is above the center of the right half of this scene.
15-2

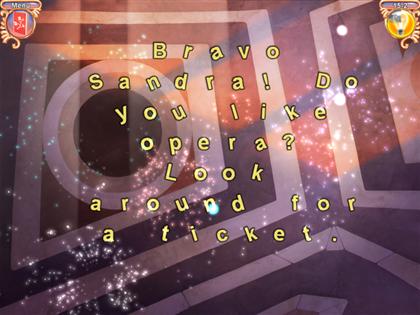
- Rearrange the letters to create this message:
“Bravo Sandra! Do you like opera? Look around for a ticket.”
15-3

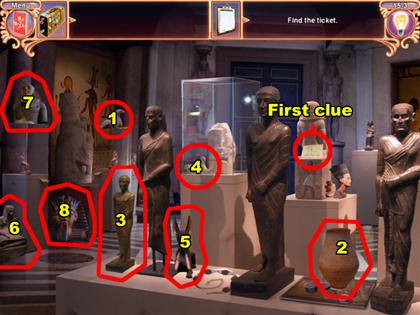
- There are 8 numbered items in this screenshot. Each of these items is concealing a paper clue.
- Move the items and collect the papers that they are concealing in a numerical order.
- Begin by clicking on the first paper clue in the center of the right half of this scene. Afterwards, click on the items listed below.
- The horse statue above the center of the left half of this scene.
- The vase near the bottom right corner of this scene.
- The statue below the center of the left half of this scene.
- The statuette in the center of this scene.
- The dog statue below the center of this scene.
- The statue in the bottom left corner of this scene. The clue behind this item must be clicked twice.
- The statue in the upper left corner of this scene.
- The head statue to the right of the lower left corner of this scene.

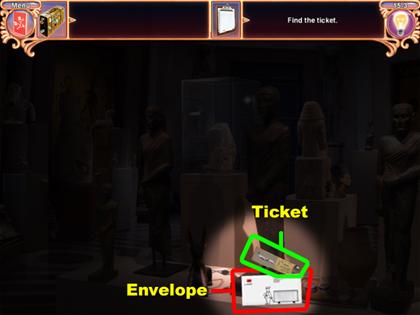
- Click on the envelope to the left of the bottom right corner of this scene.
- Click on the ticket that pops out of the envelope.
CHAPTER 16
TICKET BOOTH
16-1

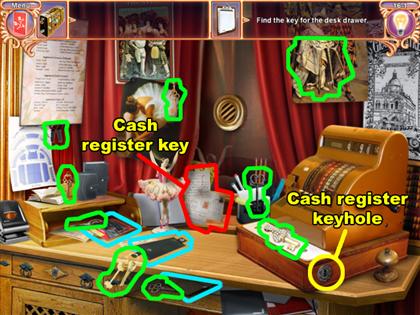
- Before collecting any keys, move the 3 movable objects listed below.
- Move the red and yellow item above the desk drawer.
- Move the black item below the center of this scene.
- Move the notebook on the left side of the desk compartment near the bottom of this scene.
- Three keys are near the center of the left half of this scene.
- Two keys are near the bottom center of this scene.
- One key is to the left of the center of this scene.
- Two keys are to the right of the center of this scene.
- One item is to the left of the upper right corner of this scene.
- Move the white postcards near the center of this scene to reveal the register key.
- Use the cash register key on the keyhole of the cash register. They keyhole is at the bottom of the cash register.

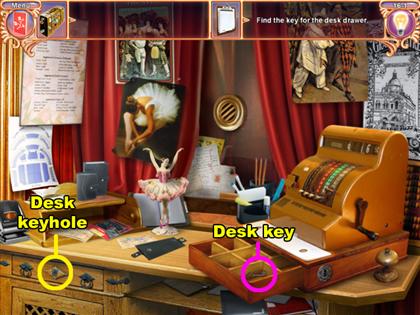
- Find the desk key in the cash register drawer.
- Use the desk key on the desk keyhole near the bottom left corner of this scene.
- Collect the pieces of paper inside the desk after it opens.
16-2

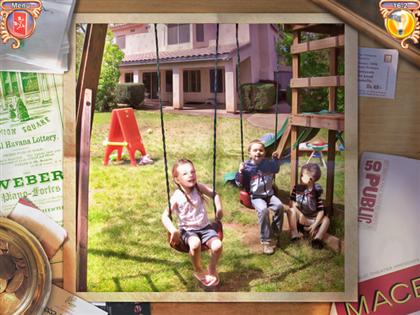
- Reconstruct this picture using the fragmented puzzle pieces.
16-3

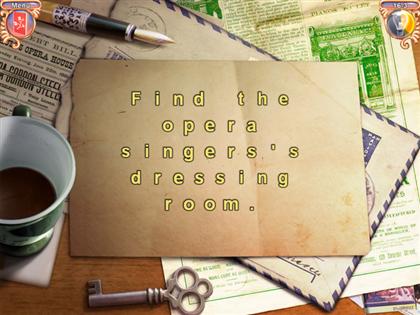
- Swap the position of letters to make this message:
“Find the opera singer’s dressing room.”
CHAPTER 17
17-1

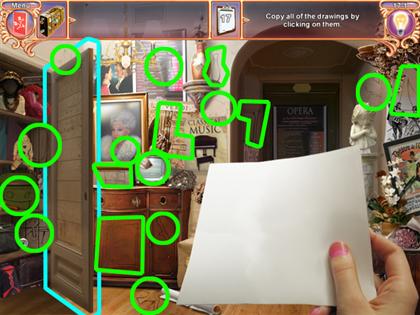
- Open the closet door below the top left corner of this scene before collecting any items.
- Find all 17 drawings.
- Three are in the closet you opened.
- One is in the upper left corner of this scene.
- Five are near the center of the left half of this scene.
- One is below the center of the left half of this scene.
- One is above the center of the left half of this scene.
- Three are above the center of this scene.
- Two are below the top right corner of this scene.
17-2

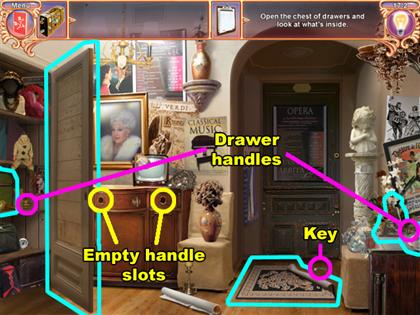
- Open the closet door first.
- Move the items on the middle shelf of the closet to reveal a drawer handle item.
- Use the drawer handle on one of the empty handle slots of the dresser. The dresser is located on the right side of the closet door.
- Move the 2 items on the table above the bottom right corner of this scene to reveal another drawer handle.
- Use the drawer handle on the dresser as you did earlier.
- Move the rug that is below the center of this scene to reveal a key.
- Place the key into your inventory.

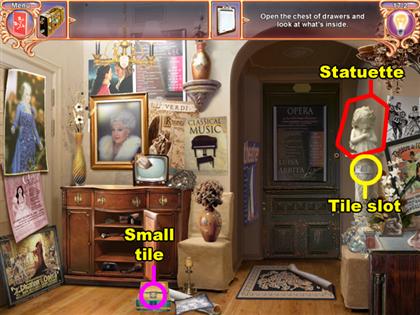
- Close the closet door.
- Turn all of the drawer handles horizontally to open the secret compartment of the dresser. If nothing happens, turn the drawer handles vertically.
- Click on the drawer handles to rotate them.
- Remove the white pillow from inside of the compartment to reveal a chest.
- Remove the chest from the compartment.
- Use the key from your inventory on the chest to open it.


- Place the small carving from inside the chest into the slot of the pillar with the statuette on it. The pillar is located near the center of the right half of this scene.
- Click on the statuette of the pillar to reveal a small tile under it.
- Click on the small tile of the statuette to examine it.
17-3

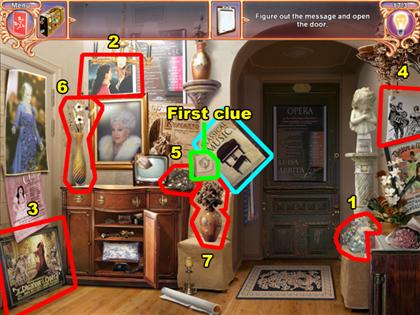
- Move the piano poster located in the center of this scene to find the clue to the next item.
- Use this screenshot to find the correct order in which to locate the items using the numbers as a guide. Remember to collect the clue behind each item before moving on.
- Below is the correct order in which to find the items.
- The mask is located above the bottom right corner of this scene.
- The picture of the man and the woman is located near the upper left corner of this scene.
- The poster of the sword fight is located in the lower left corner of this scene.
- The picture of the man and the woman is located in the upper right corner of this scene.
- The mask is located near the center of this scene.
- The flowers in the vase are located near the upper left corner of this scene.
- The flowers are located near the center of this scene. Click on the vase that these flowers were in to reveal the clue.
- Collect on the clue that fell out of the vase near the bottom center of this scene.

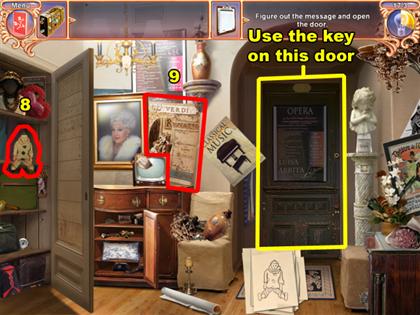
- Open the closet door before continuing.
- The clown is near the top shelf of the closet.
- The poster of the man and the woman is located near the center of this scene. Move the blue poster that is under this poster, to reveal the key to the dressing room.
- Use the key on the opera singer’s dressing room door. The door is near the center of this scene.
CHAPTER 18
18-1

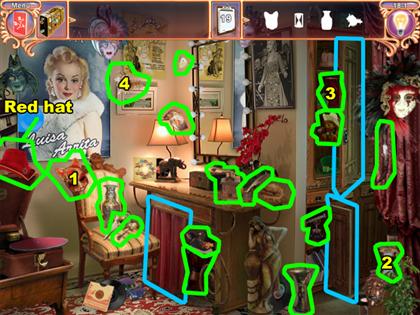
- Before collecting any items, move the items listed below.
- Move the red curtain under the desk.
- Open the 2 cabinet doors near the center of right half of this scene.
- Collect all 19 items using the silhouette at the top of the screen as a guide.
- The first 4 items on the item list have been numbered in this screenshot. The first 4 items have also been listed below.
- The first item is located near the center of the left half of this scene.
- The second item is above the bottom right corner of this scene.
- The third item is in the top cabinet in the right half of this scene.
- The forth item is above the center of left half of this scene.
- Two of the items are located near the center of the left half of this scene.
- Two items are above the center of this scene.
- Two items are below the center of this scene.
- Three of the items are in the center of this scene.
- One item is above the center of the right half of this scene.
- Two items are below the center of the right half of this scene.
- One item is below the upper right corner of this scene.
- The second to last item is the red hat below the top left corner of this scene.
- The last item is under the red hat.
18-2

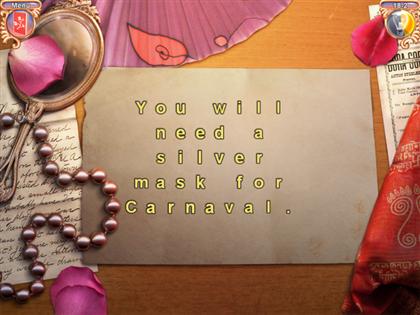
- Rearrange the letters to form this phrase:
“You will need a silver mask for carnaval.”
18-3

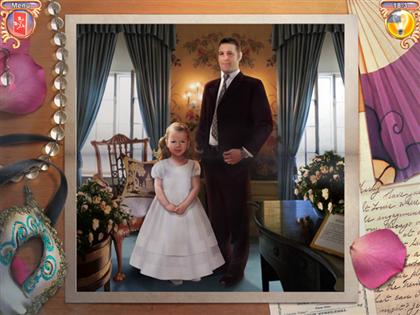
- Place the fragmented pieces together correctly to shape this picture.
18-4

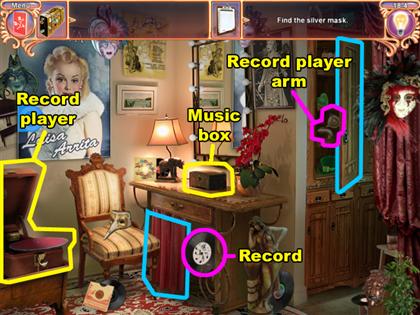
- Click on the music box in the center of this scene.
- Open the curtain below the desk to reveal a record.
- Open the top cabinet door again; inside is a record player arm.
- Use the record player arm on the record player. The record player is above the lower left side of this scene.
- Use the record on the record player.

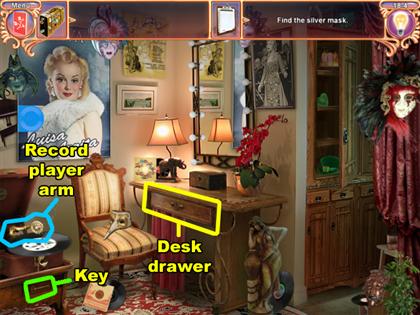
- Click on the record player arm to play the record.
- A small compartment will open at the bottom of the record player.
- Use the key from the small compartment on the desk drawer.
- Collect the silver mask from inside of the drawer.
CHAPTER 19
19-1

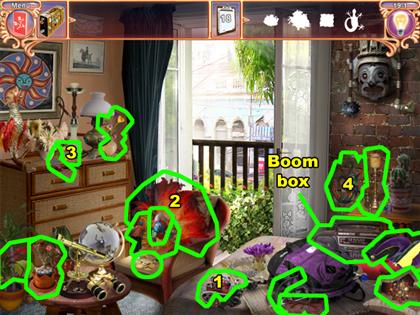
- Find all 18 items using the silhouette at the top of your screen.
- The locations of the first 4 items are numbered in this screenshot. The first 4 items have also been listed below.
- The first item on the item list is located in the center of the bottom of this scene.
- The second item is located to the left of the center of this scene.
- The third item is located near the center of the left half of this scene.
- The forth item is located near the center of the right half of this scene.
- Two of the items are in the bottom left corner of this scene.
- Two are near the center of the left half of this scene.
- Three are on the chair to the left of the center of this scene.
- Three are above the bottom right corner of this scene.
- Two are to the left of the bottom right corner of this scene.
- The boom box is the second to last item on the list. It is above the bottom right corner of this scene.
- The last item is behind the boom box.
19-2

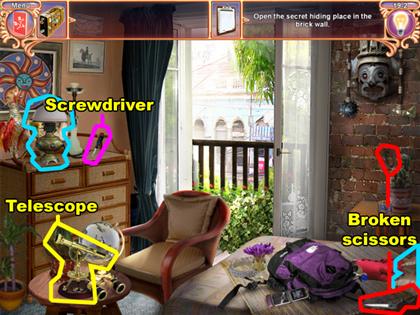
- Move the lamp on the top of the dresser to reveal a screwdriver.
- Move the pillow above the bottom right corner of this scene to reveal a scissor.
- Use the screwdriver on gold telescope to obtain a screw. The telescope is located near the lower left corner of this scene.
- Click on the scissor that was behind the pillow to place it onto the bed.
- Find the scissor that is below the top right corner of this scene. Click on it to place it onto the bed.

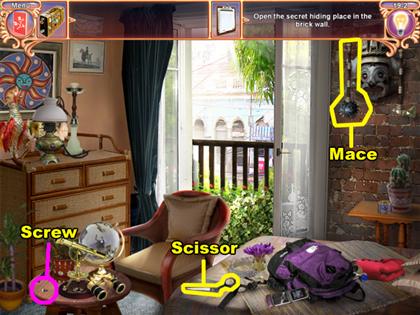
- Use the screw from the telescope on the lower half of the scissors on the bed.
- Place the scissor without the screw in it onto the other scissor.
- Use the repaired scissors on mace that is attached to the mask on the wall. The mask is located near the top right corner of this scene.
- Afterwards, the mace will drop directly downwards beside the bed.
- Click on the fallen mace to use it on the wall.
- Once a hole in the wall has been made collect the camera, watch, and note inside of the wall.
19-3

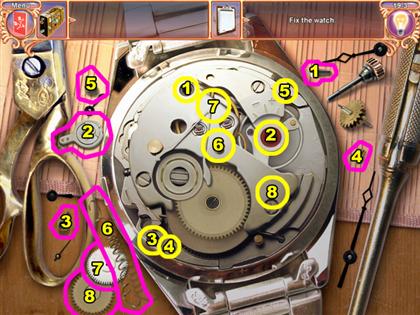
- Repair the watch by placing the scattered parts into their proper places.
- Eight of the scattered parts are numbered, as well as 8 areas of the watch in this screenshot.
- Place each part onto its corresponding area by matching the numbers together.

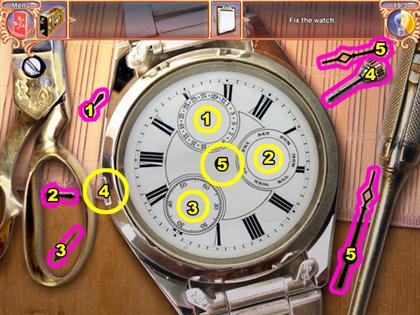
- After fixing the inner layer of the watch, you will need to fix the outer layer as well.
- Use this screenshot to figure out where the final 6 pieces belong.
- There are 2 parts that belong in the center of this watch. The longer part goes on before the shorter part does.
CHAPTER 20
20-1

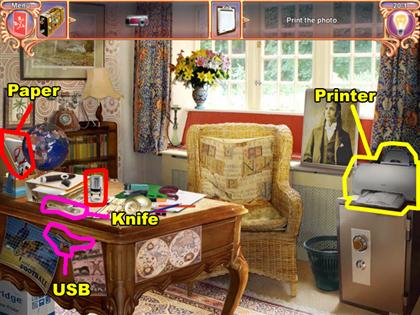
- Remove the poster on the side of the desk near the bottom left corner of this scene. After this object is removed it will reveal a USB.
- Remove the paper from under the binder on the desk. The paper is near the center of left half of this scene. After this object is removed it will reveal a knife.
- Move the silver object on the desk to reveal an ink cartridge.
- Click on the white sheet of paper on the left side of the globe on the desk. This paper will move to the center of the desk after you click it.
- Use the knife on the printer above the bottom right corner of this scene.
- Use the USB on the bottom left corner of the printer.

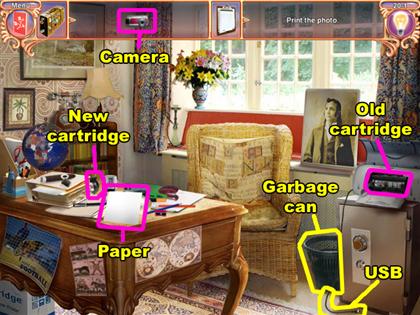
- Remove the old cartridge from the center of the printer, and place it into the garbage can. The garbage can is on the left side of the printer.
- Place the ink cartridge that you found earlier into the center of the printer.
- Click on the printer to close its lid.
- Use the white paper from the desk on the printer.
- Use the camera from your inventory on the USB.
20-2

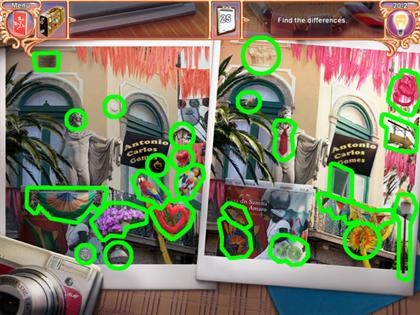
- Find the 25 differences in both pictures.
- There are 13 differences in the left picture that are not in the right picture.
- One difference is in the upper left corner of this picture.
- Two are above the center of this picture.
- Three are below the center of this picture.
- One is to the right of the center of this picture.
- Two are at the center of the bottom of this picture.
- Two are above the lower right corner of this picture.
- Two are in the center of the right side of this picture.
- There are 12 differences in the right picture that are not in the left picture.
- Two are near the upper left corner of this picture.
- Two are in the lower left corner of this picture.
- One is to the right of the lower left corner of this picture.
- One is to the left of the center of this picture.
- Two are below the center of this picture.
- Two are near the lower right corner of this picture.
- Two are below the upper right corner of this picture.
20-3

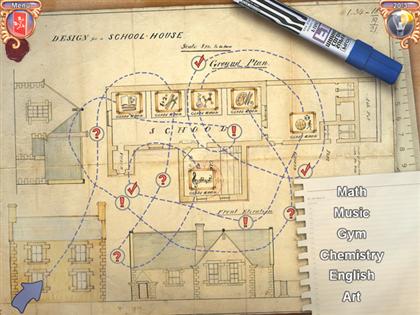
- Place the class subjects on the schedule into the correct order.
- Follow the dotted line throughout the school’s design plan. Figure out the order in which the line crosses the subjects in this scene.
- Swap the names of the subjects in the right side of this scene by selecting 2 words at a time.
- This is the correct order: math, music, gym, chemistry, English, and art.
CHAPTER 21
21-1

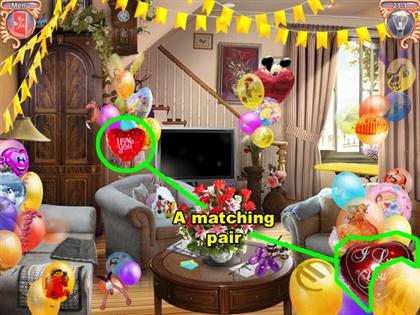
- Pair all of the balloons together.
- Some pairs of balloons only have a color, shape, or symbol in common.
- Also some pairs have matching words or matching cartoon figures drawn on them.
21-2

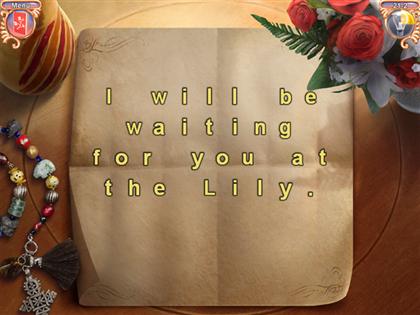
- Rearrange the letters of the words to match this phrase:
“I will be waiting for you at the Lily.”
21-3

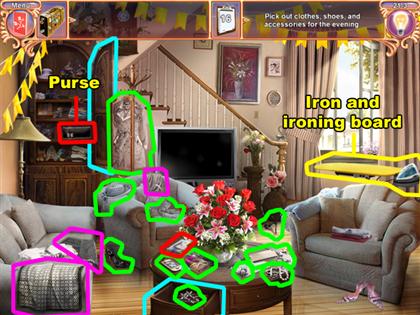
- Open the doors of the armoire near the top left corner of this scene. Click on the black purse inside.
- Open the drawer of the table in the center of this scene. Collect the earrings inside.
- Move the magazine on the left side of the flowers on the table. Collect the item that was underneath the magazine.
- 3 of her articles of her clothing must be ironed before you can collect them. Place the clothes onto the ironing board and use the iron to straighten them.
- Two of these items are near the bottom left corner of this scene.
- One is to the left of the center of this scene.
- The remaining items are normal.
- Four are near the center of the left half of this scene.
- Five are on the table in the center of this room.
- One is to the right of the center of this room.
- Collect the purse item last. The purse can be collected earlier, but you have to have found all of the accessory items already.
CHAPTER 22
22-1

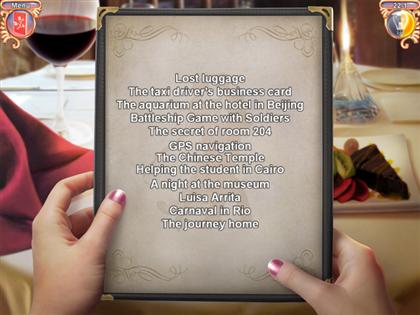
- Restructure the events of the game in the correct order.
- The events are as follows:Lost luggage
The taxi driver’s business card
The aquarium at the hotel in Beijing
Battleship Game with Soldiers
The secret of room 204
GPS navigation
The Chinese Temple
Helping the student in Cairo
A night at the museum
Luisa Arrita
Carnaval in Rio
The journey home
- Enjoy the much anticipated final dialog scene of this game.



 The Fall Trilogy Chapter 2: Reconstruction Walkthrough, Guide, & Tips
 Unfinished Tales: Illicit Love Walkthrough, Guide, & Tips
 Empress of the Deep: Legacy of the Phoenix Walkthrough, Guide, & Tips
 Vampire Saga: Break Out Walkthrough, Guide, & Tips
 Scarytales: All Hail King Mongo Walkthrough, Guide, & Tips