Lost Lagoon: The Trail of Destiny Walkthrough, Guide, & Tips
Lost Lagoon: The Trail of Destiny Walkthrough

Welcome to the Lost Lagoon: The Trail of Destiny Walkthrough!
Unveil the stunning mystery of the island!
Whether you use this document as a reference when things get difficult or as a road map to get you from beginning to end, we’re pretty sure you’ll find what you’re looking for here.
This document contains a complete Lost Lagoon: The Trail of Destiny game walkthrough featuring annotated screenshots from actual gameplay!
We hope you find this information useful as you play your way through the game. Use the walkthrough menu below to quickly jump to whatever stage of the game you need help with.
Remember to visit the Big Fish Games Forums if you find you need more help. Have fun!
This walkthrough was created by prpldva.
General Tips & Information

- From the main screen you may manage player profiles (A).
- The options menu allows for the adjustment of music and sounds volume (B).
- You may play this game in windowed or full screen mode.
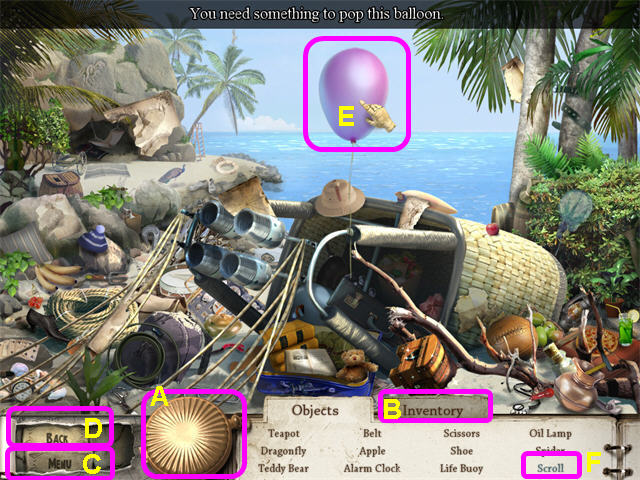
- Hints are unlimited, but you must wait for the meter to refill.
- Click on the pocket watch for a hint on a hidden object (A).
- Select the Inventory Tab to access your inventory (B).
- To access the main menu, use the Menu button in the lower left corner (C).
- Click on the back button to return to the map (D).
- The magnifying glass cursor indicates that a close-up view is available.
- The hand cursor indicates an action is required with an inventory object (E).
- Items in the hidden objects lists that are darker are hidden from view (F).
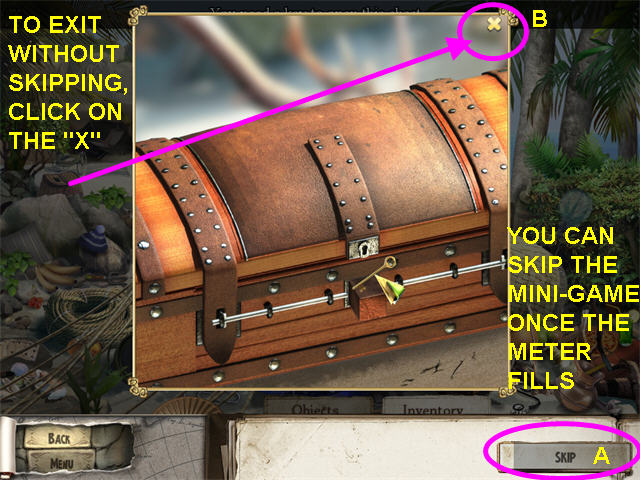
- You may skip mini-games once the meter fills (A).
- To exit the mini-game without skipping, click on the “X” in the upper right corner (B).
Chapter One: On The Beach
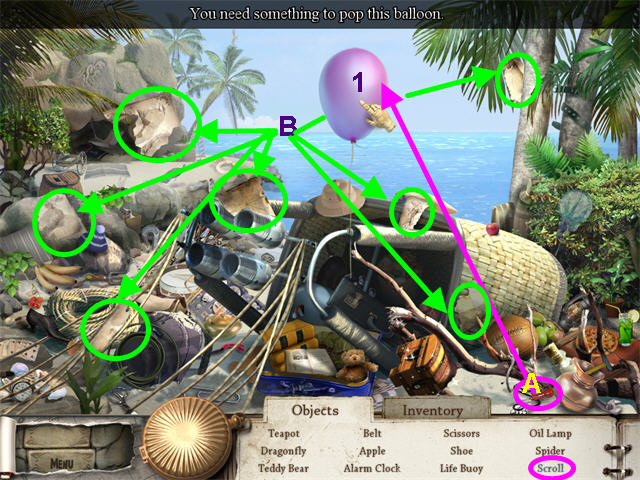
- Take the PIN (A) and pop the balloon (1) to find the scroll.
- Locate all the hidden objects.
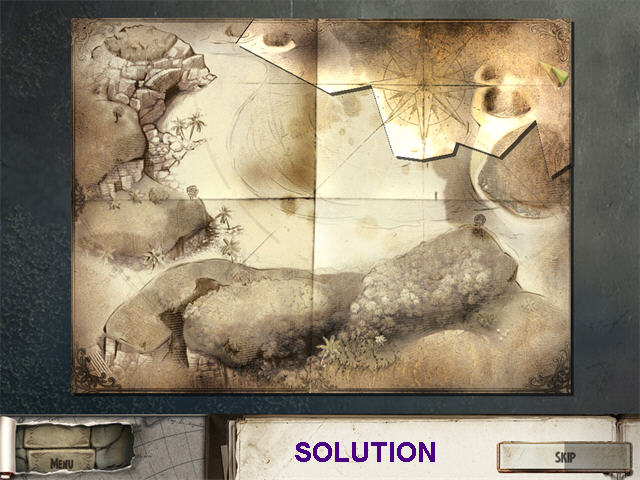
- Collect the 7 scroll pieces (B) to activate a mini-game.
- Restore the map in this jigsaw style mini-game.
- Left-click to pick up or place a piece.
- Adjacent pieces will lock together.
- From the map, select the Cave.
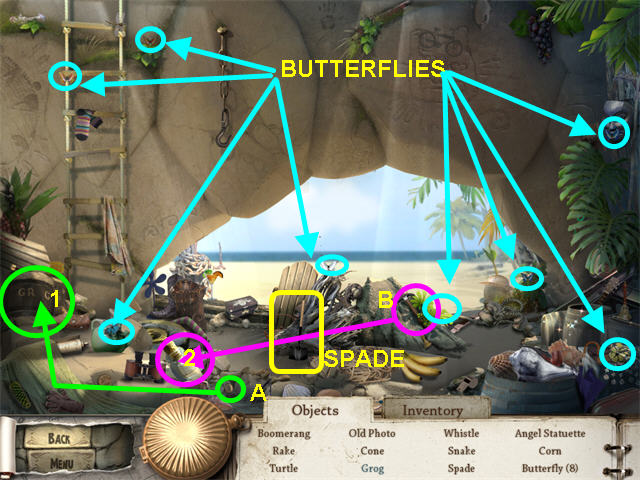
- Take the “O” (A) and place it on the grog barrel (1).
- Take the HAMMER (B) and use it to break the bottle and release the butterflies (2).
- Locate the remaining hidden objects.
- The SPADE will go automatically into your inventory.
- Press the back button to return to the map and select the Jungle.
- Select the sparkling area on the right for a hidden objects scene.
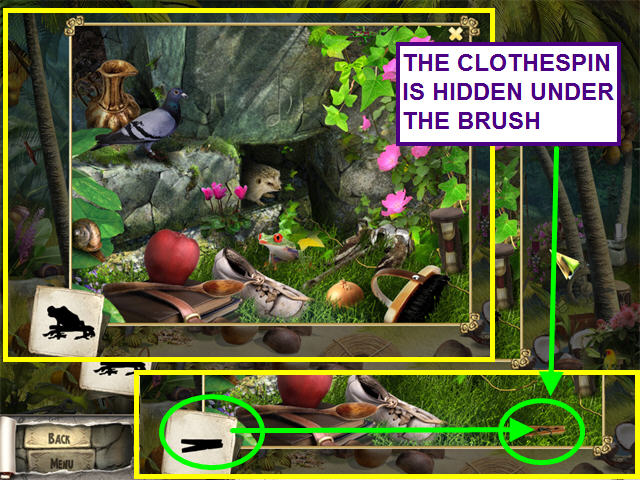
- Locate the items based on the silhouettes.
- The clothespin is hidden under the brush.

- Locate the remaining hidden objects.
- The PLIERS will go automatically into your inventory.
- Make note of the sparkling foliage blocking the path.
- Return to the Cave.
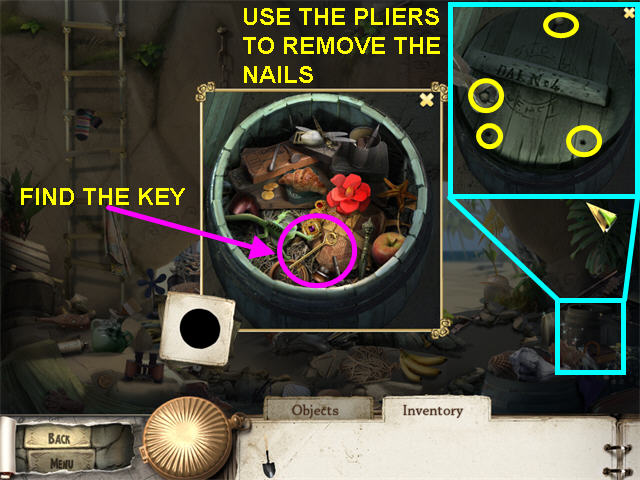
- Look at the sparkling barrel.
- Use the PLIERS to remove the nails.
- Find the hidden objects.
- Take the KEY.
- Return to the Shore.
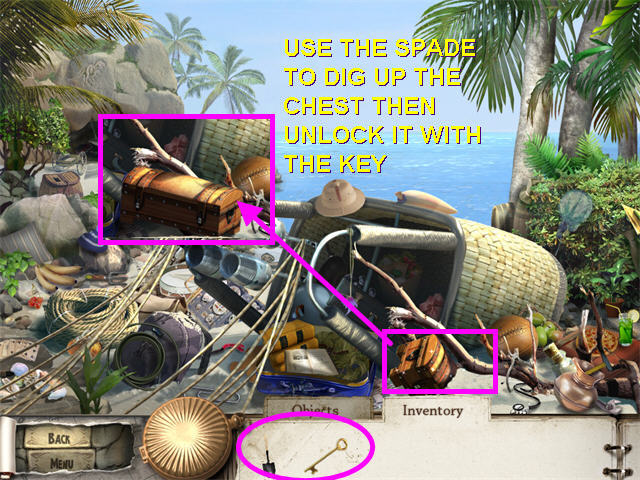
- Use the SPADE to dig up the chest.
- Use the KEY to unlock the chest and find a mini-game.
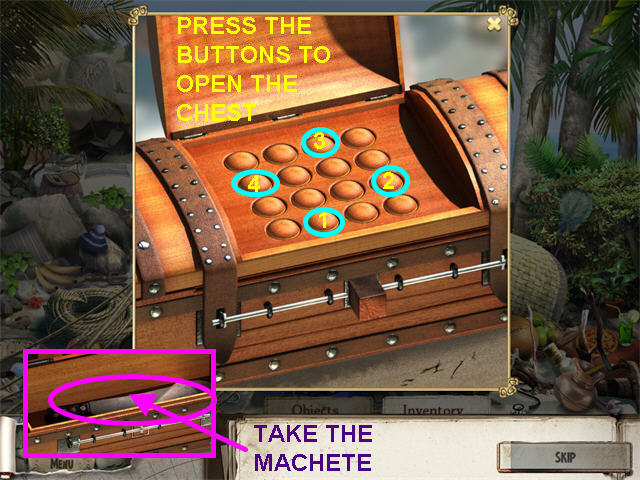
- Press the buttons so that all are pushed down.
- Click on the buttons marked (1-4) to open the chest.
- Take the MACHETE.
- Return to the Jungle.
- Use the MACHETE on the foliage blocking the path.
Chapter Two: The Village
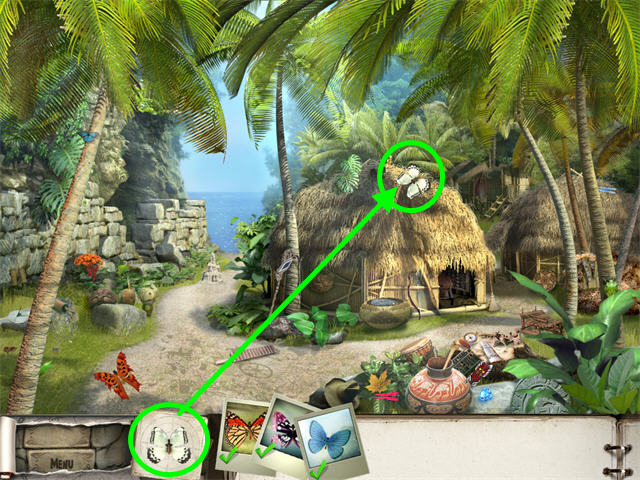
- Click on butterflies that match the picture to take a snapshot.
- There are a total of 10 photos to take.
- From the map, select the Pier.
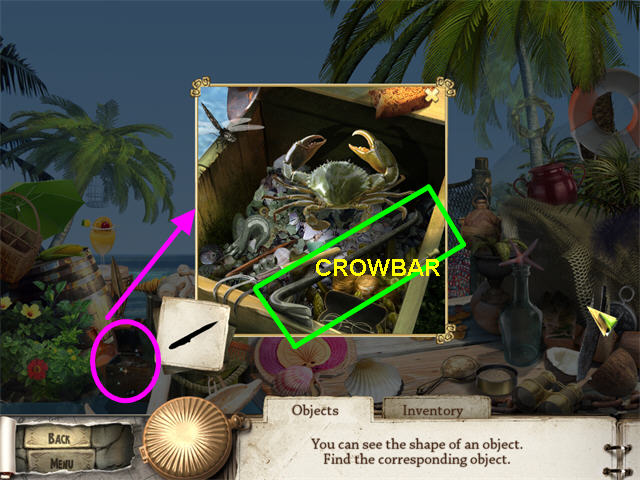
- Select the sparkling chest on the left for a hidden object area.
- Find all the items on the cards.
- Take the CROWBAR.
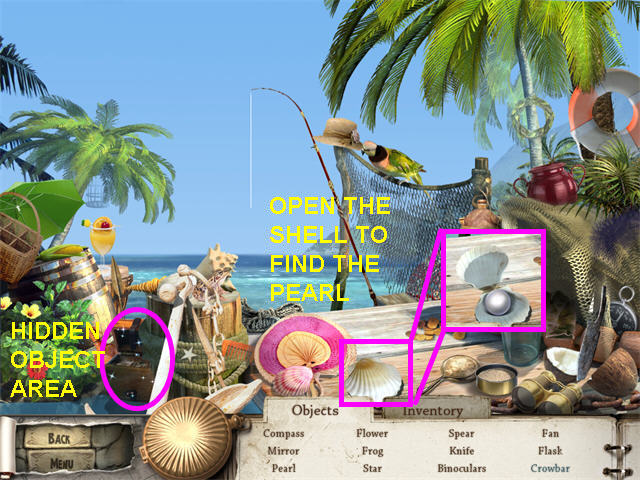
- Click on the scallop shell to find the pearl.
- Find the remaining hidden objects.
- Return to the map and select the Storage Cave.
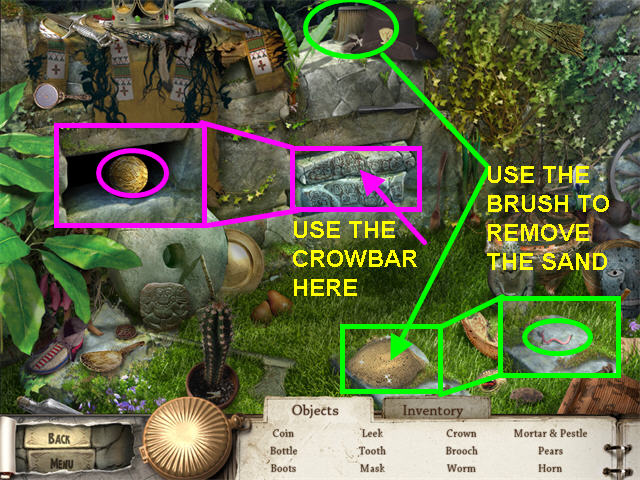
- Take the brush and sweep away the sand to find the WORM.
- Use the CROWBAR to remove the decorative bricks and find the MEDALLION.
- Locate the remainder of the hidden objects.
- From the map, select the Hut.
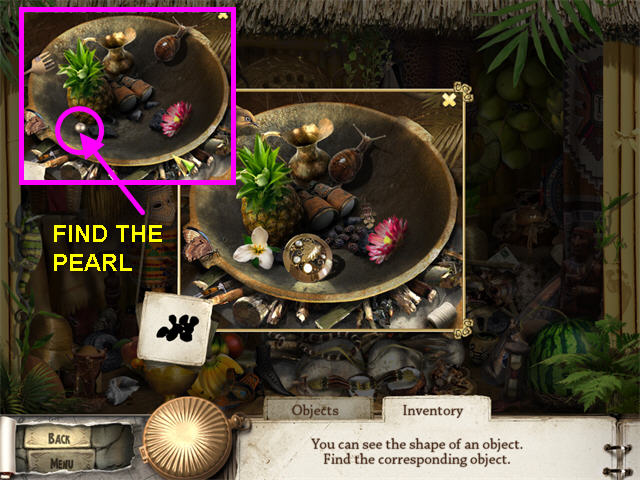
- Select the sparkling are in the bowl for a hidden object scene.
- Find all the items on the cards.
- The pearl is hidden behind the flower.
- Locate all the hidden objects on the list.
- Take the HOOK.
- Make note of the mini-game on the wall.
- Return to the Pier.
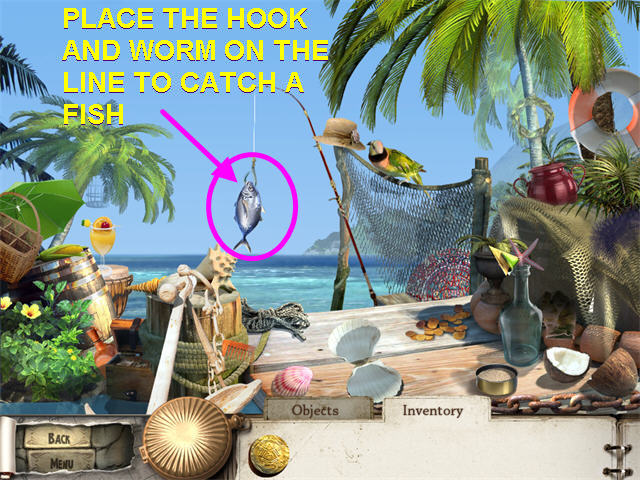
- Place the HOOK, then the WORM on the fishing line.
- Take the FISH.
- Return to the map.
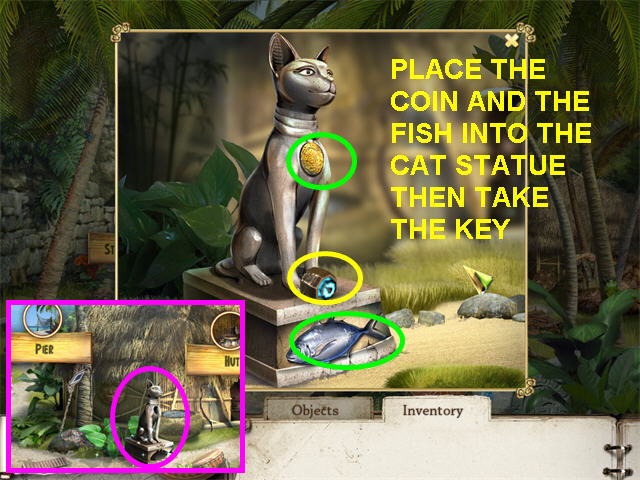
- Select the sparkling cat statue for a close-up view.
- Insert the COIN and the FISH into the statue.
- Take the KEY that appears.
- Return to the hut.
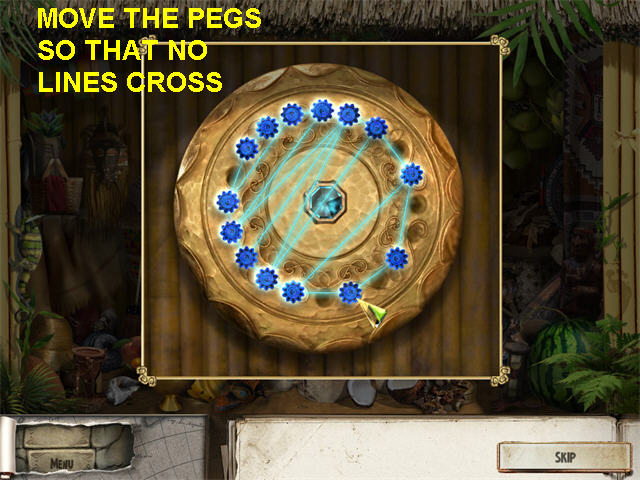
- Look at the close-up of the mini-game on the wall and insert the KEY into the center hole.
- Move the pegs around the outer circle so that no line cross.
- There are many solutions to this puzzle- yours may differ.
Chapter Three: The Dream
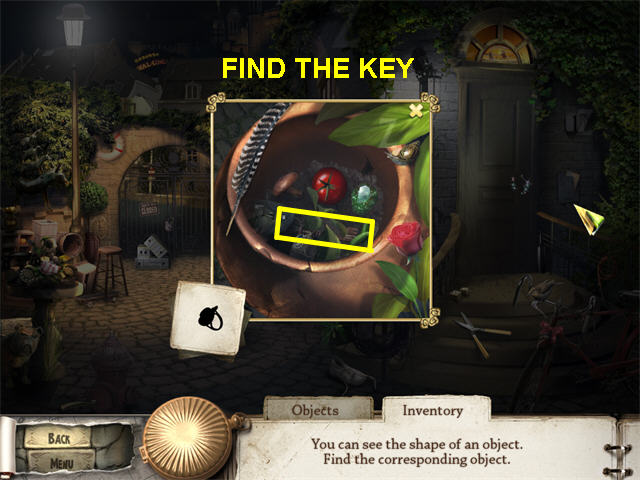
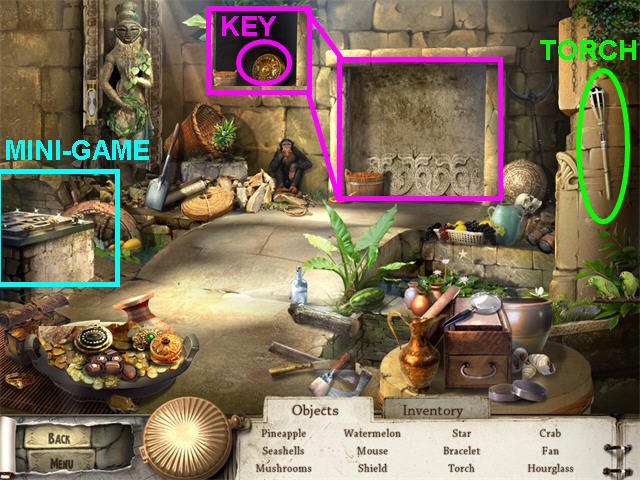
- Select the sparkling pot in the center for a hidden object area.
- Locate the KEY.
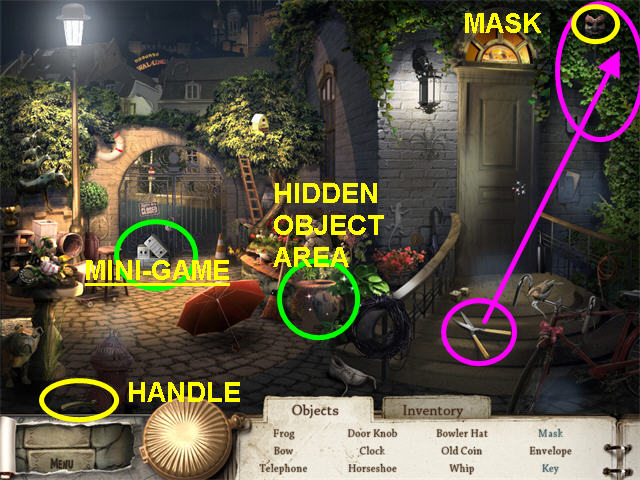
- Take the shears and cut the vines to find the mask.
- Locate the remaining hidden objects on the list.
- Take the HANDLE.
- Look at the close-up of the door lock and place the HANDLE in the upper hole.
- You cannot use the KEY because there are leaves in the keyhole.
- Exit the close-up and click on the sparkling boxes in from of the gate for a mini-game.
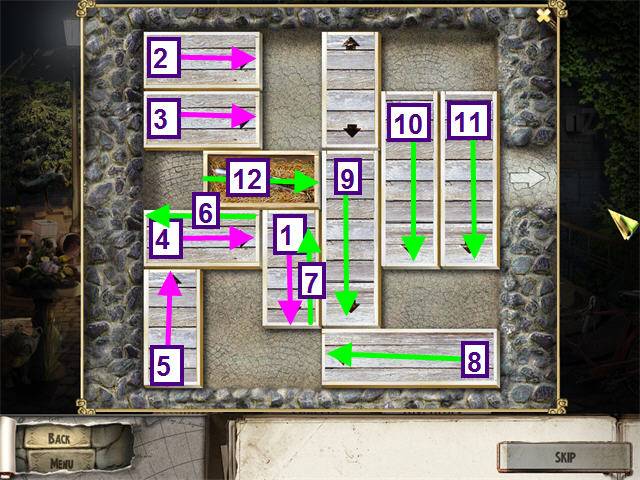
- Slide the blocks so that you can remove the TWEEZERS.
- Make the 12 moves noted.
- Return to the close-up of the door.
- Use the TWEEZERS to remove the leaves from the keyhole.
- Use the KEY to unlock the door.
Chapter Four: The Ruins
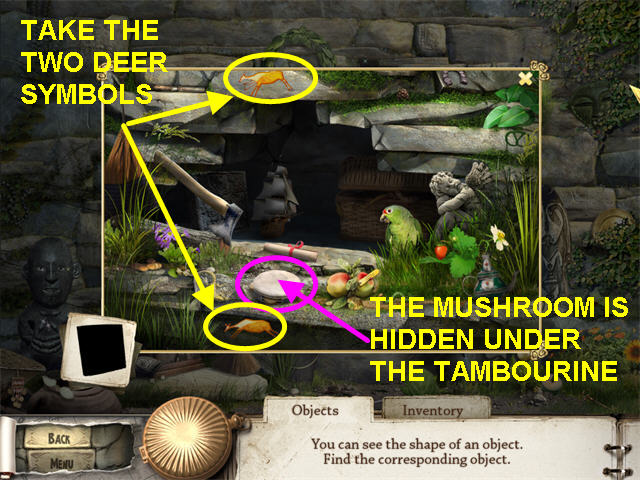
- Select the sparkling area over the door for a hidden object scene.
- Locate all the items.
- The mushroom is hidden under the tambourine.
- Take the two DEER SYMBOLS.

- Place the necklace on the idol.
- Take the stick over the door and hit the idol three times to make him move.
- Take the DEER SYMBOL that was hidden.
- Locate the hidden objects.
- Place the three DEER SYMBOLS into the door.
- Locate all the hidden objects on the list.
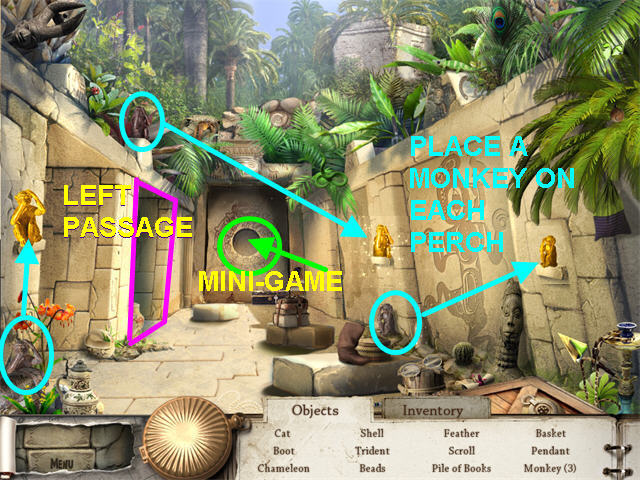
- Take the three MONKEY STATUES.
- Click on the sparkling entrance on the left to activate the pedestals.
- Place each MONKEY STATUE on the pedestal with its own silhouette.
- Make note of the mini-game on the rear door.
- Now enter the left passage.
- Locate all the hidden objects and take the TORCH.
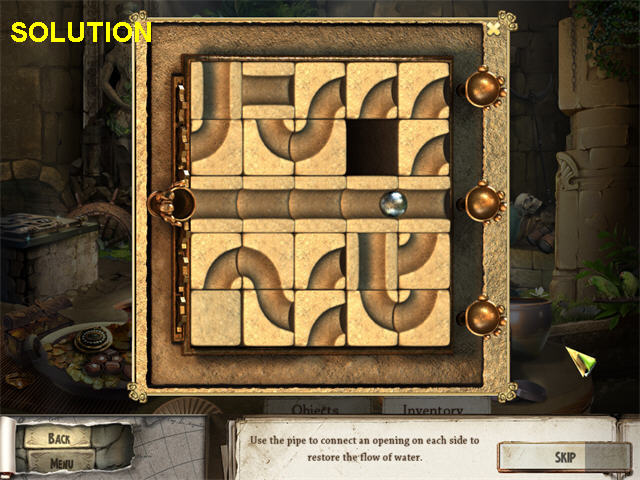
- Click on the pedestal that rises on the left for a mini-game.
- The object is to make a path for the water to flow to the right.
- Click on a pipe tile that is adjacent to the empty space to move it there.
- The tiles are shuffled differently every time.
- Once this is solved, the large stone door will open.
- Take the round KEY.
- You are automatically returned to the main hall.
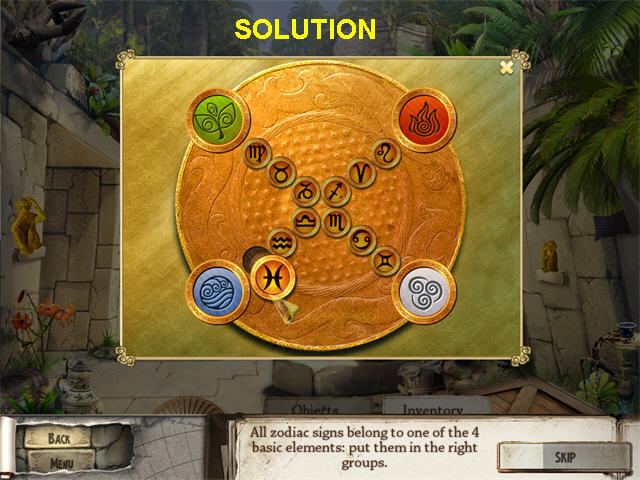
- Place the KEY into the center.
- The object is to group like signs together.
- Place the water signs on the arm with the water symbol and so on.
- The signs will lock in place when correctly placed.
Chapter Five: The Crystal Caves
- Once you enter the caves it is very dark.
- Click the TORCH anywhere to activate the crystals.
- You will automatically progress to the next scene.
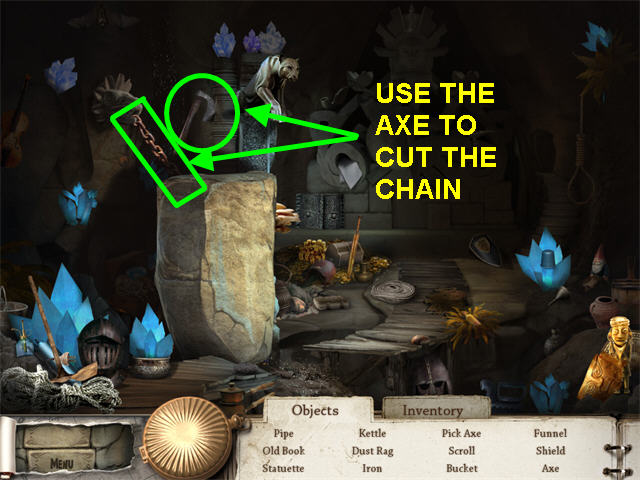
- Locate all the hidden objects on the list and find the AXE.
- Use the AXE to cut the chain on the large stone block.
- You will automatically progress to the next scene.
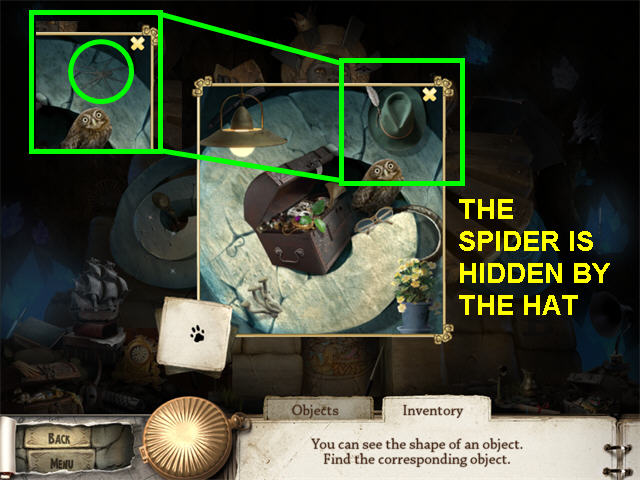
- Select the left sparkling area for a hidden objects scene.
- Find all the objects on the cards.
- The spider is hidden by the hat.
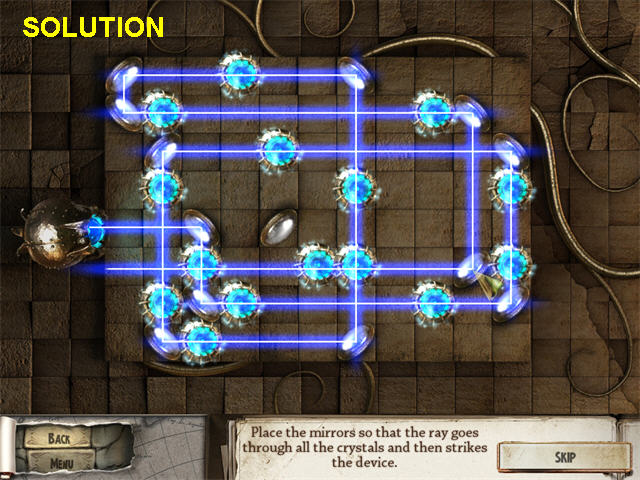
- Click on the left sparkling area for a mini-game.
- Move the mirrors around the grid to make the laser hit all the gems.
- Locate the remaining hidden objects.
Chapter Six: Dreaming Again
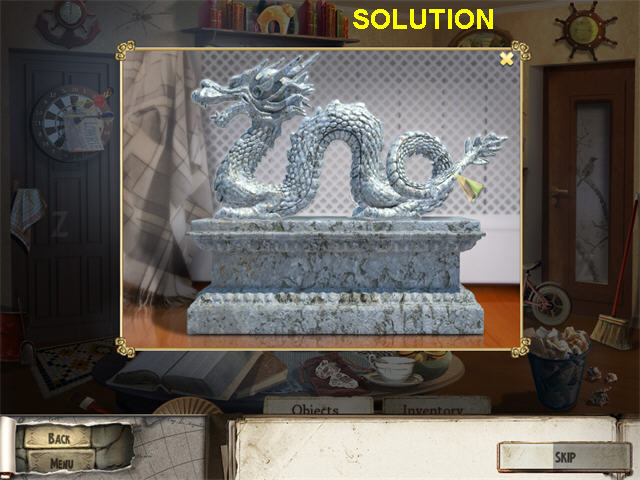
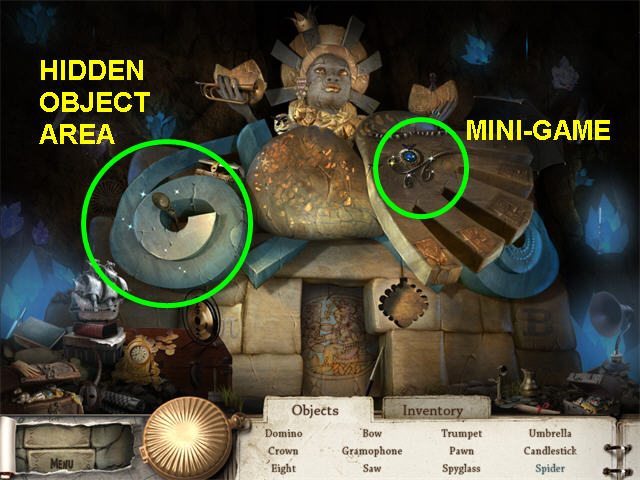
- Select the sparkling figurine in the center of the screen.
- Restore the dragon by dragging the pieces back into place.
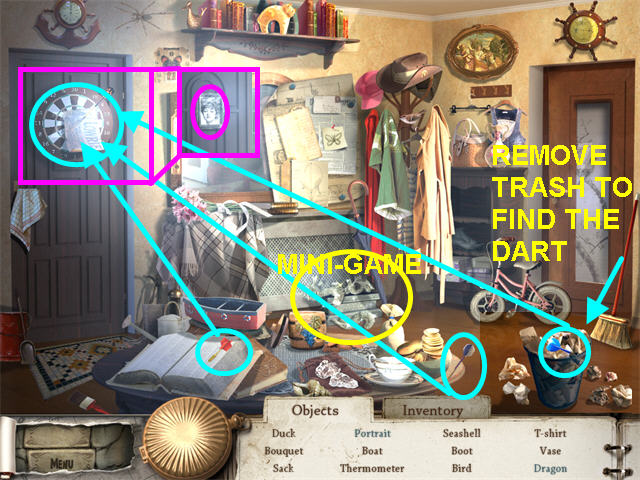
- Remove the wads of paper at the top of the garbage can.
- Take the DART and use it on the dart board.
- Find the other two DARTS and use them on the dart board to reveal the portrait.
- Locate the remaining hidden objects.
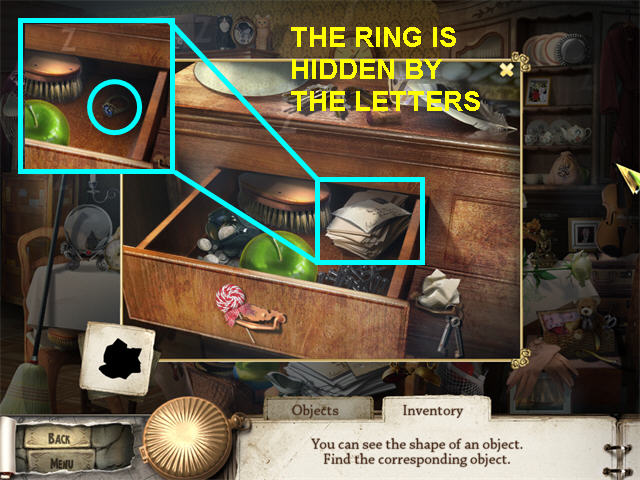
- Click on the sparkling drawer for a hidden object area.
- The ring is hidden by the letters.
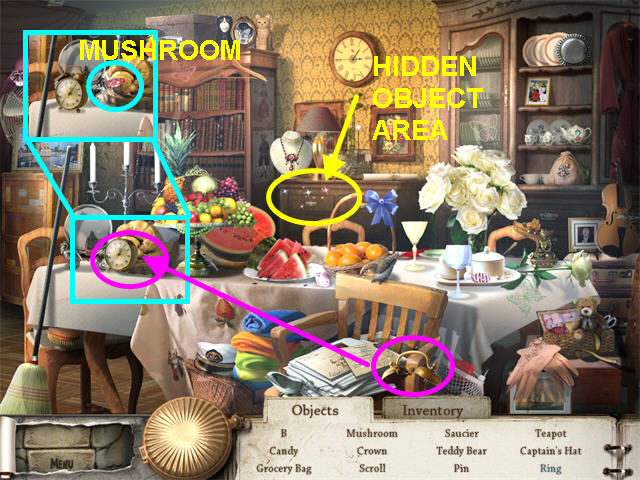
- Place the bells on the alarm clock- it is hiding the mushroom.
- Locate the remaining hidden objects.
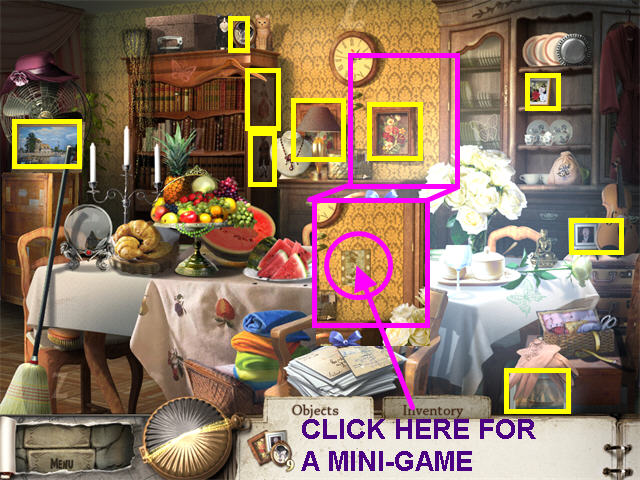
- Locate all the pictures in the room.
- Behind on of the portraits on the wall is a mini-game.
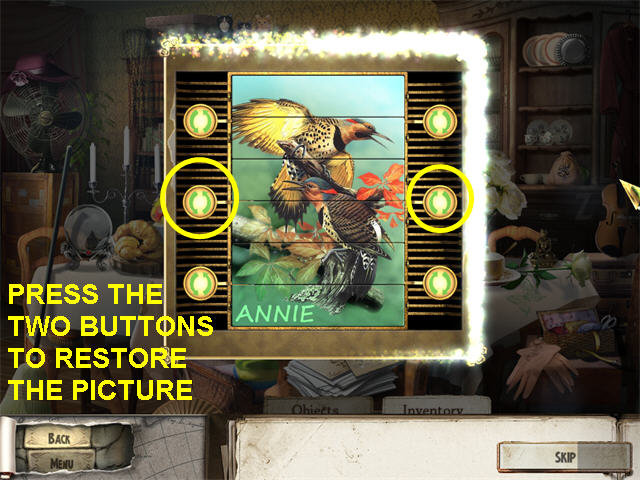
- Restore the picture by pressing the buttons.
- Press the middle button on each side.
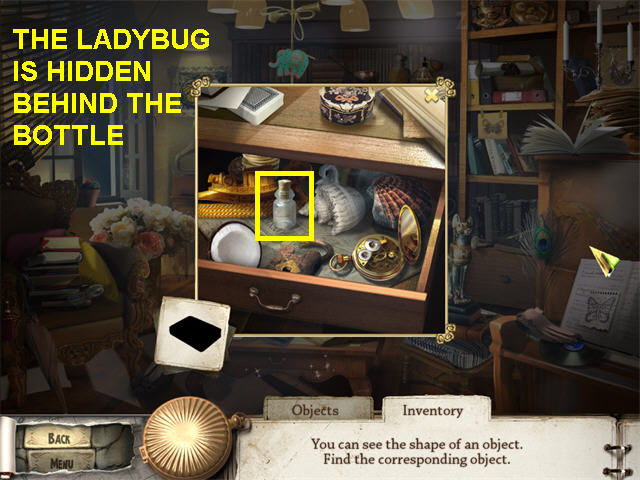
- Select the sparkling drawer for a hidden object area.
- The ladybug is hidden behind the bottle.
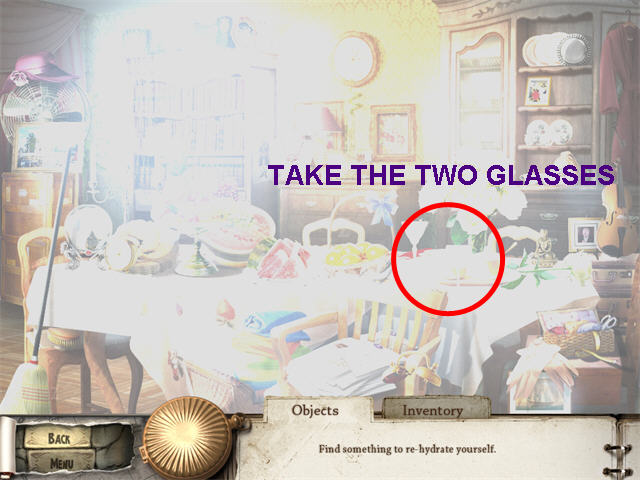
- All of a sudden you are faint and need to re-hydrate.
- Click anywhere and you will go to the map.
- Select the Dining Room.
- Take the two glasses from the table to re-hydrate.
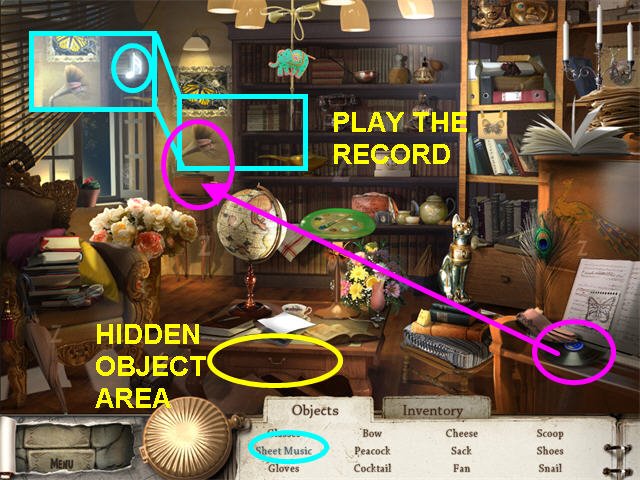
- You will automatically return to the Study.
- Place the record on the Victrola and turn the crank.
- Take the music note that appears for sheet music.
- Locate the remaining hidden objects.
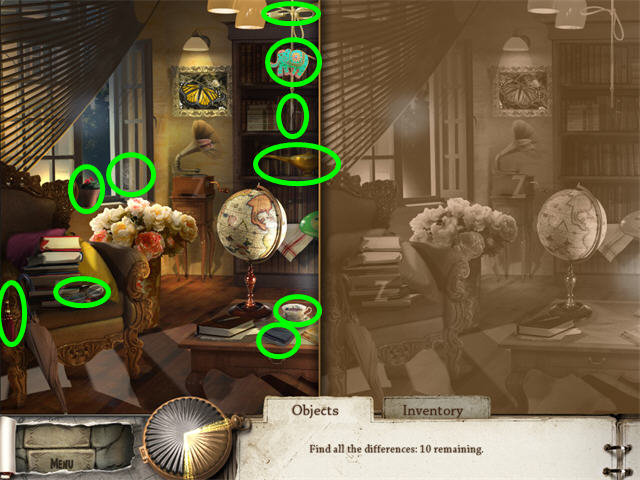
- Find the differences between the two sides.
- You must click on the left side .
- You are returned to the map.
- Select the Study and find the three butterflies.
- Select the Hall and find the three butterflies.
- Select the Dining Room and find the three butterflies.
- You are then returned to the study.
- Read the sparkling note on the low table.
Chapter Seven: The Grotto
- You return to the caves from your dream.
- Find all the hidden objects and you will go to the Grotto.
- Find all the shells and starfish at the shipwreck.
- The deck scene wants you to collect all the items that were invented after the 20th Century.

- Select the sparkling valve handle for a hidden objects area.
- Find all the items on the cards.
- The hook is hidden by the rag.
- Locate the remaining objects on the list.
- Click on the door to trigger the next collection.
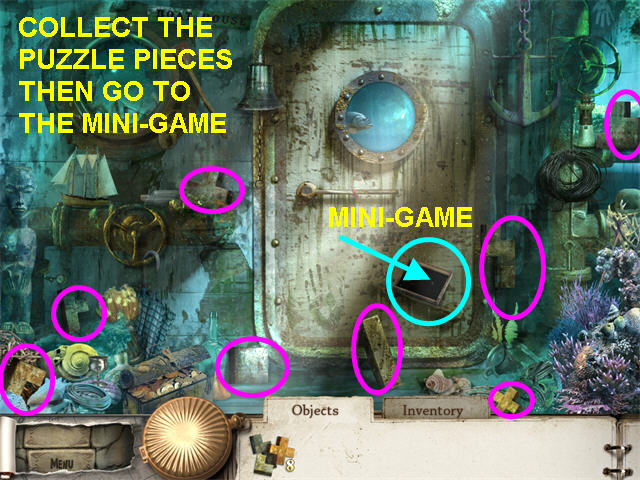
- Collect the 8 puzzle pieces the click on the mini-game.
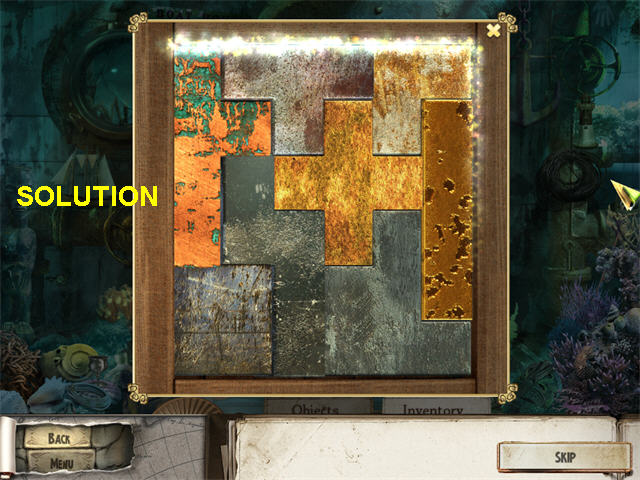
- The object of this mini-game is to fit all the pieces into the box.
- Left-click to pick-up or place.
- You will automatically go the hold.
- Locate all the hidden objects in the hold.
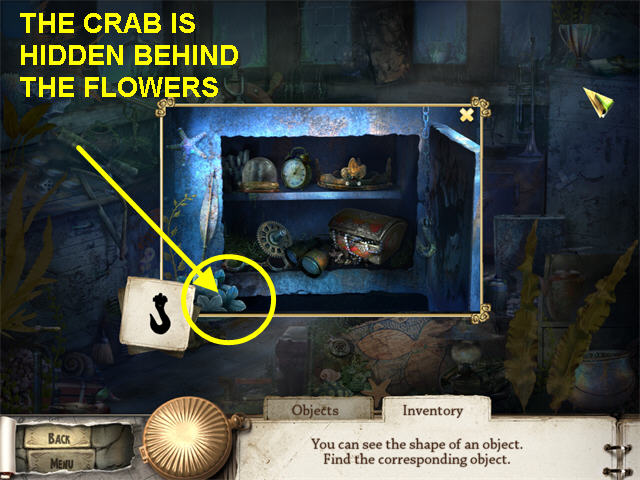
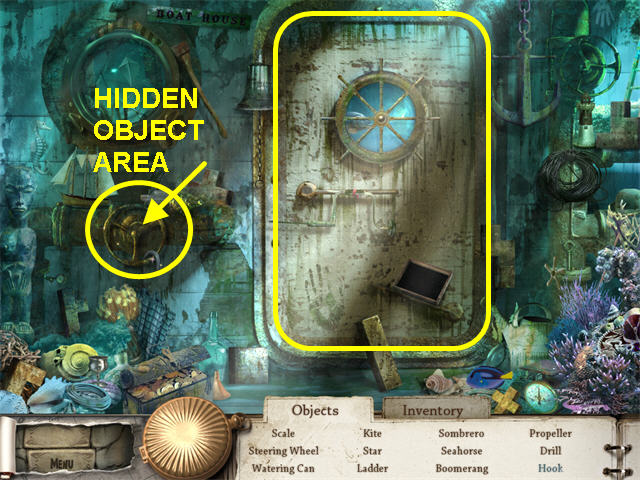
- Once in the wheelhouse, select the sparkling safe for a hidden objects area.
- The crab is hidden behind the flowers.
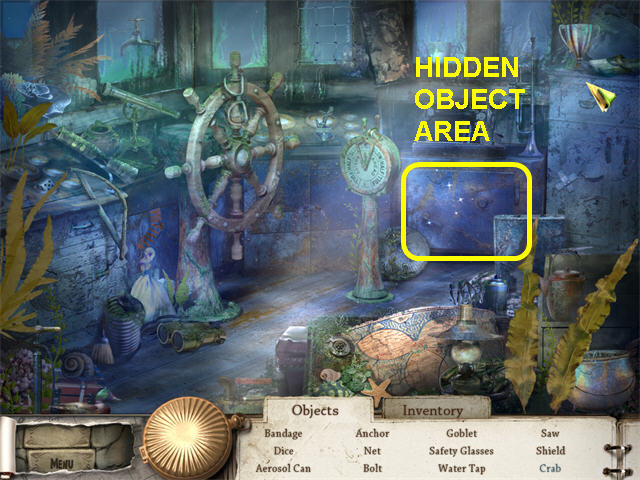
- Find the remaining items on the hidden objects list.
- You have found the amulet and are transported back to the temple.
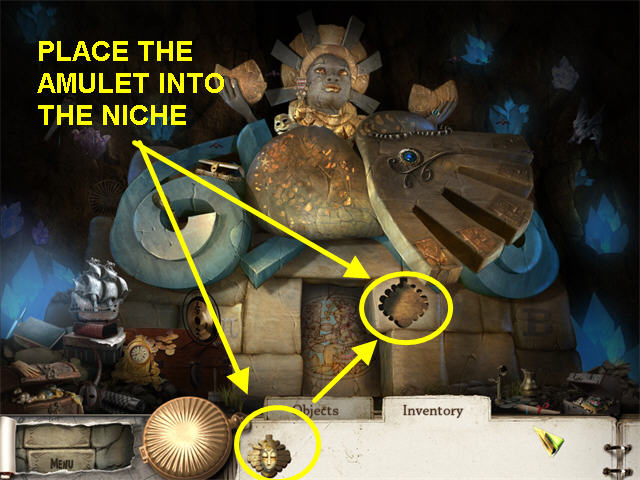
- Place the amulet into the niche.
Congratulations! You have completed Lost Lagoon: The Trail of Destiny!


 Rita James and the Race to Shangri La Walkthrough, Guide, & Tips
 Haunted Legends: The Undertaker Walkthrough, Guide, & Tips
 Mystery Murders: The Sleeping Palace Walkthrough, Guide, & Tips
 Big Fish Casino Craps Tips and Tricks, Guide, & Tips
 Dark Tales: ™ Edgar Allan Poe's The Black Cat Walkthrough, Guide, & Tips