Awakening: Moonfell Wood Walkthrough, Guide, & Tips
Awakening: Moonfell Wood Walkthrough

Welcome to the Awakening: Moonfell Wood Walkthrough!
Search gorgeous locations for helpful clues and discover Sophia’s destiny!
Whether you use this document as a reference when things get difficult or as a road map to get you from beginning to end, we’re pretty sure you’ll find what you’re looking for here.
This document contains a complete Awakening: Moonfell Wood game walkthrough featuring annotated screenshots from actual gameplay!
We hope you find this information useful as you play your way through the game. Use the walkthrough menu below to quickly jump to whatever stage of the game you need help with.
Remember to visit the Big Fish Games Forums if you find you need more help. Have fun!
This walkthrough was created by prpldva, and is protected under US Copyright laws. Any unauthorized use, including re-publication in whole or in part, without permission, is strictly prohibited.
General Tips & Information

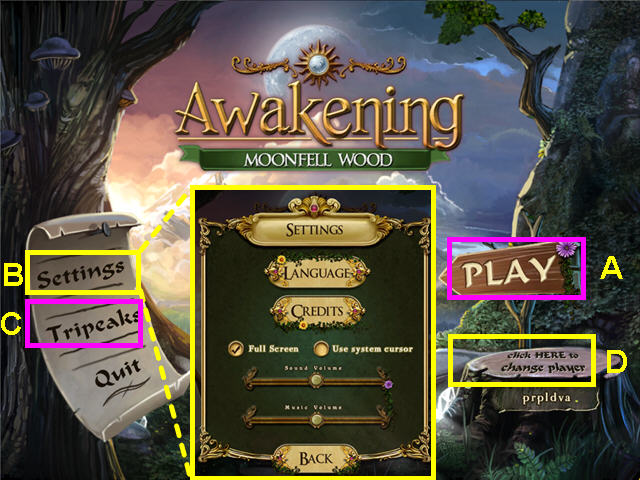
- Select profiles on the main screen to add or delete player profiles (D).
- You may play this game in full screen or windowed mode, adjust the volume of sounds and music, view credits, and enable the custom cursor in the Settings menu (B).
- The Settings menu is accessible from both the main screen and the in-game menu.
- Once you complete the game you will have access to the card game Tripeaks (C).
- Select Play to start your game (A).
- When you first start playing, you must choose between Normal or Casual difficulty levels.
- Hints, skip meters, and goals will all progress normally in the Normal Mode.
- For faster filling hints and skips, select the Casual Mode.
- Once you start the game, you will have the option of a brief tutorial.
- Hidden object lists and mini-games may be random, your solutions may vary.

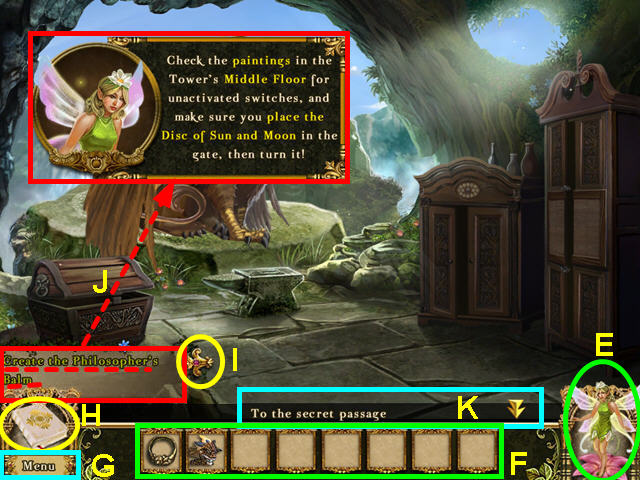
- Hints are unlimited, but you must wait for the fairy to wake.
- Click on the fairy in the lower right corner for a hint (E).
- Your inventory is located in the lower bar and will be hidden when not in use. (F).
- There are scroll buttons to move your inventory left or right.
- When playing a mini-game the Skip button will appear at the bottom of the screen.
- You may skip a mini-game once the button fills.
- Use the Menu button to access options or to return to the main menu (G).
- Above the Menu button is the journal and task list (H).
- Click on the gold arrow just above the journal to see the most immediate task if you are playing casual mode (I).
- Click on the task for instructions on how to complete the task (J).
- When you move your cursor over the path to another scene, it will display over your inventory (K).

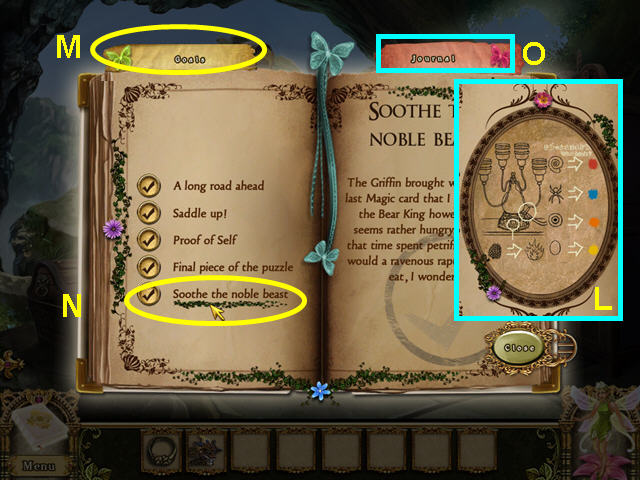
- The journal will track your journey and make note of clues you may uncover.
- Refer to the journal for clues to mini-games (L).
- Select the Goals tab to see your current tasks (M).
- Click on a goal for hints on how to proceed (N).
- Completed goals will have a check mark.
- Select Journal to return to that part of the book (O).
Part 1: Crossing the River

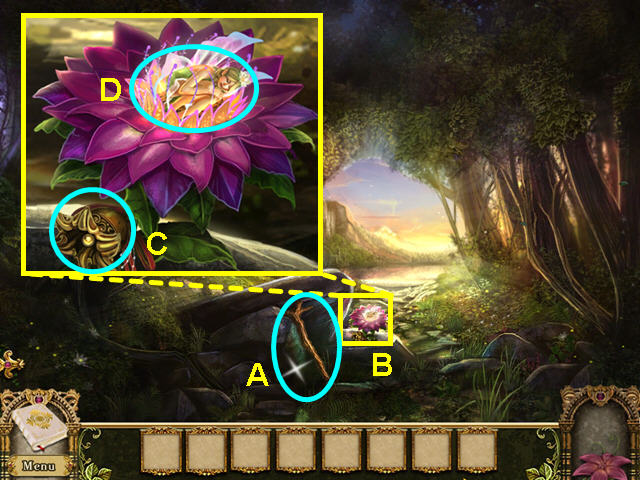
- Take the STICK (A).
- Look at the close-up of the flower (B).
- Click on the bellflower (C).
- Click on Mira (D).
- Walk forward.

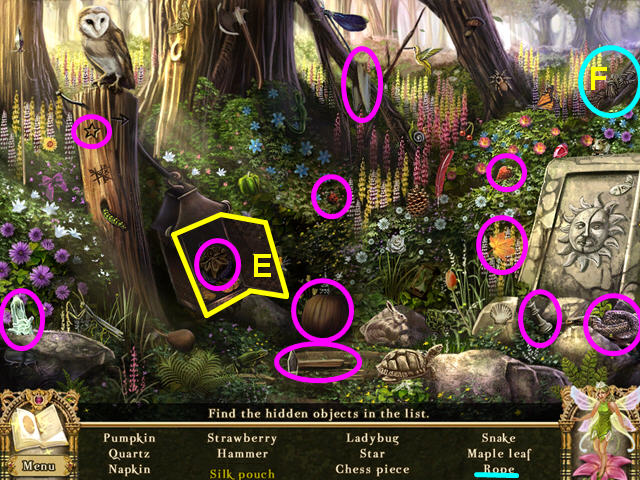
- Select the flowering bush on the right for a hidden object scene.
- Locate all the items on the list.
- Items in yellow require an additional step to be visible.
- Open the lantern door (E).
- The ROPE will be added to your inventory (F).

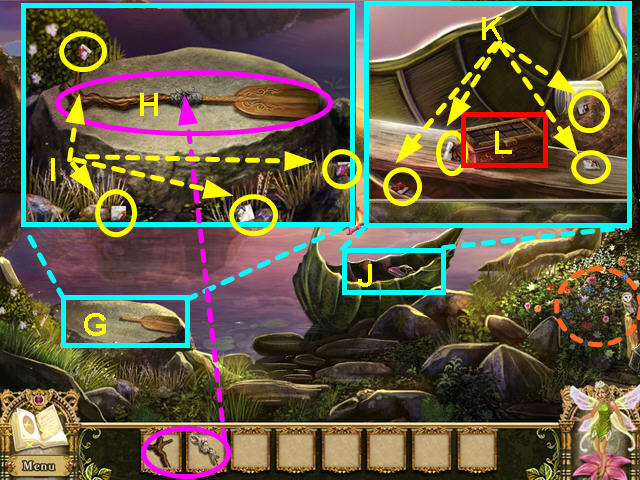
- Look at the large stone on the left (G).
- Place the STICK on the rock, then use the ROPE to make the OAR (H).
- Take the OAR.
- Take the 4 PAINTED TILES (I).
- Exit the close-up and look in the boat (J).
- Pick-up the 4 PAINTED TILES (K).
- Use the 8 PAINTED TILES on the box for a mini-game (L).

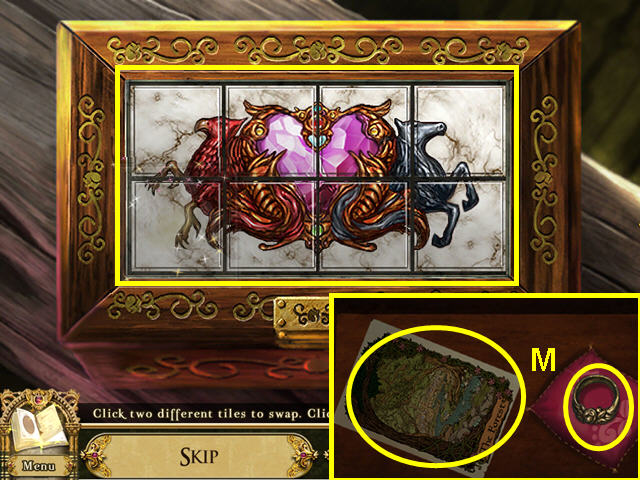
- The object is to restore the emblem on the box.
- Click on 2 tiles to swap locations.
- Click on a single tile to rotate it in place.
- Once solved, the box will open.
- Take the SIGNET RING and the MAGIC CARD: THE FOREST (M).

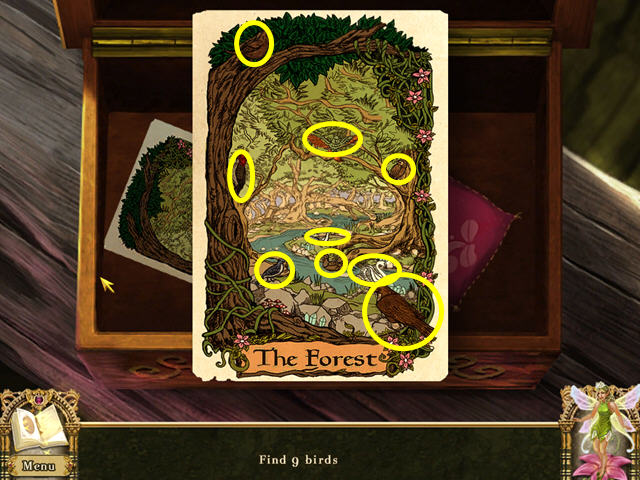
- Locate the 9 birds on the card.
- Use the OAR on the boat to leave the shore.
Part 2: Night in Moonfell Wood

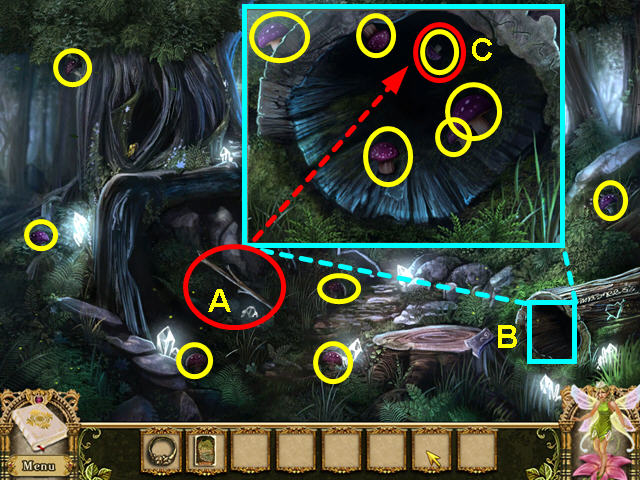
- Take the WOODEN STICK (A).
- Collect the 6 PURPLE MUSHROOMS (circled in yellow).
- Look in the hollow log (B).
- Use the stick to collect the farthest PURPLE MUSHROOM (C).
- Collect the remaining 5 PURPLE MUSHROOMS.
- Walk forward, then take the path left of the waterfall.
- Walk forward once more to arrive at the cliffside pool.

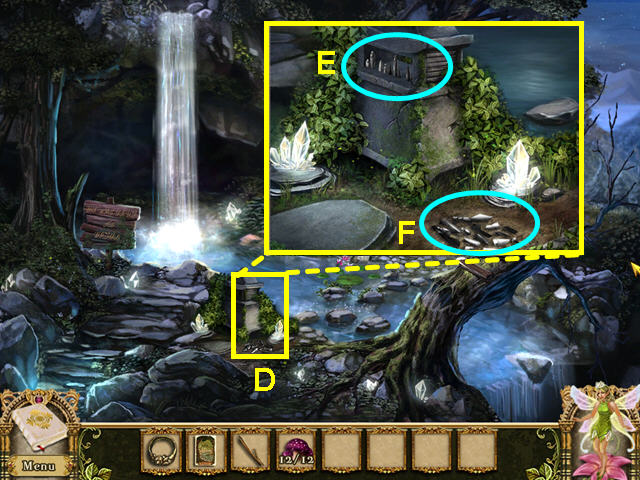
- Look at the close-up of the stone lantern (D).
- Note the figures in the opening (E).
- Take the broken figures for a mini-game (F).

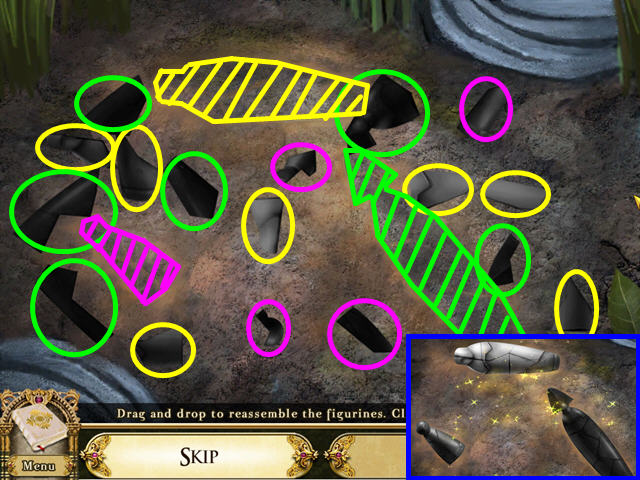
- Repair the 3 broken figurines.
- Click on a piece to take or place.
- Click again to rotate a piece.
- The fragments are color-coded to show with which figurine they belong.

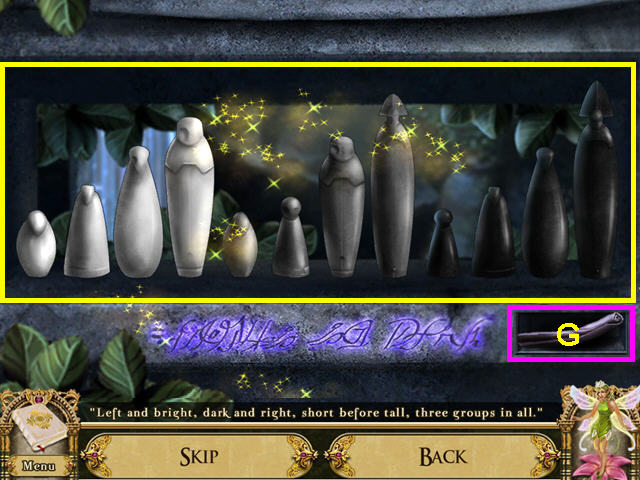
- Place the STONE LANTERN FIGURINES into the stone lantern for a mini-game.
- Hover your mouse over the engraving to learn the figurines need to be placed from light to dark, small to large, from left to right.
- Click on 2 figurines to swap positions.
- Take the scroll from the hidden compartment (G).

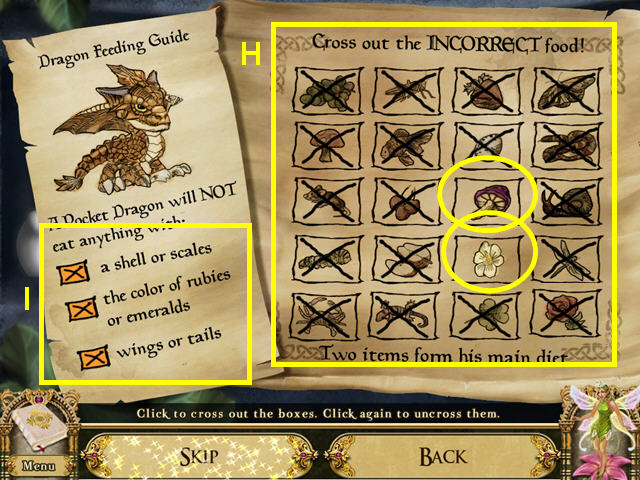
- Click on squares (H) to cross them out per the list on the left (I).
- The 2 remaining squares will be the purple mushroom and mossflower.
- Take the POTION OF MOONDEW that appears.
- Walk down to exit the cliffside pool.
- Use the POTION OF MOON DEW on the mossflowers on the right for a mini-game.

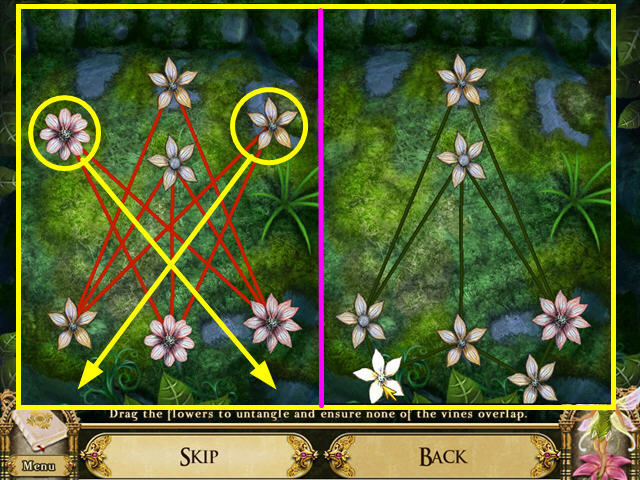
- Untangle the flowers so that no vines are crossing each other.
- Click and drag a flower to move it to another position.
- There are 5 levels to this mini-game.
- This is the solution for the first level.

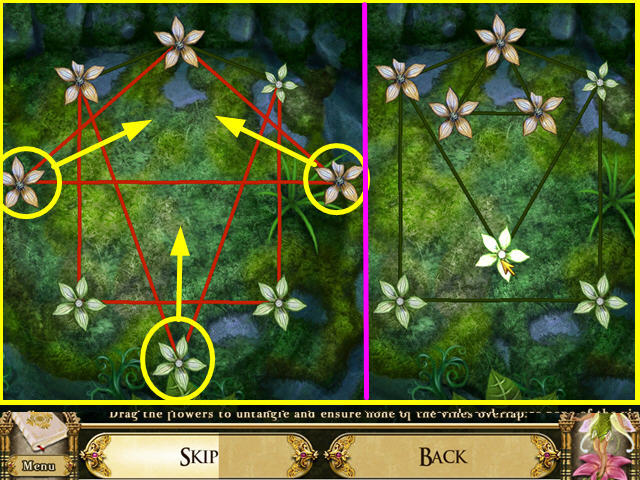
- This is the solution for the second level.

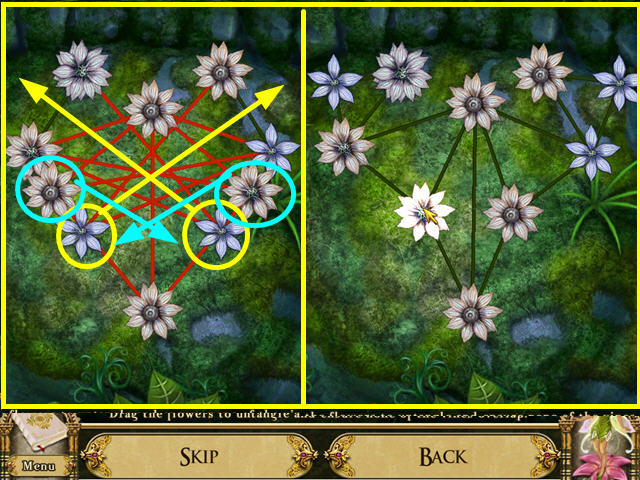
- This is the solution for the third level.

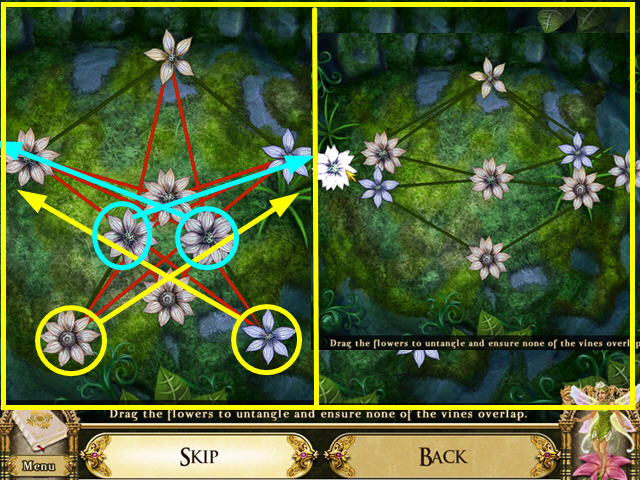
- This is the solution for the fourth level.

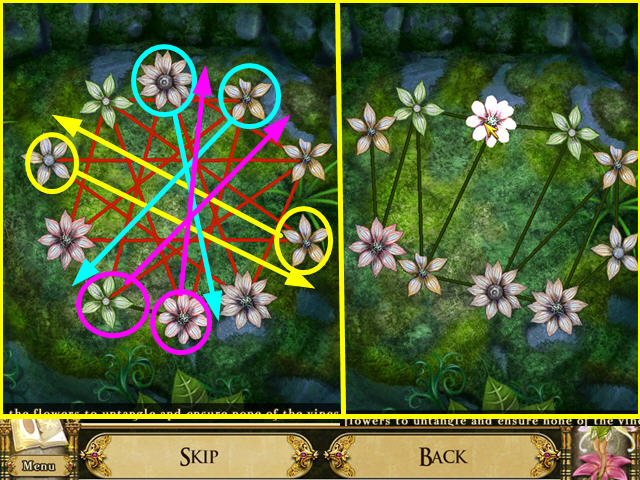
- This is the solution for the fifth level.
- Once all 5 levels are solved, the MOSSFLOWERS will be added to your inventory.

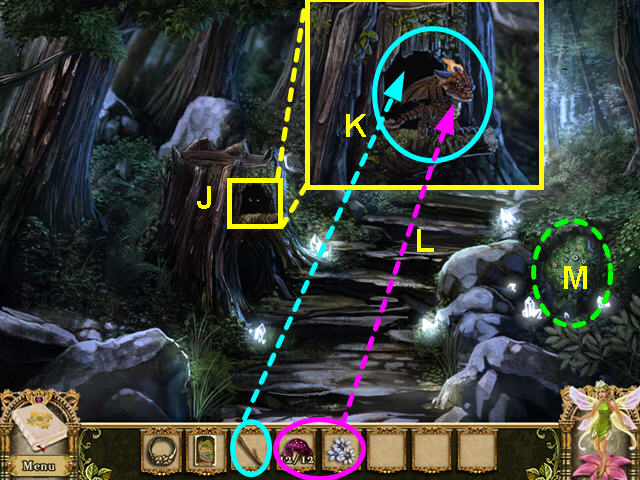
- Look at the close-up of the hole in the tree stump (J).
- Use the WOODEN BRANCH on the hole (K).
- The pocket dragon will burn the branch, creating the BURNT BRANCH.
- Once the pocket dragon appears, give him the MOSSFLOWERS and the PURPLE MUSHROOMS (L).
- The POCKET DRAGON will be added to your inventory.
- The mossflowers are on the right (M).

- Walk down once to the waterfall.
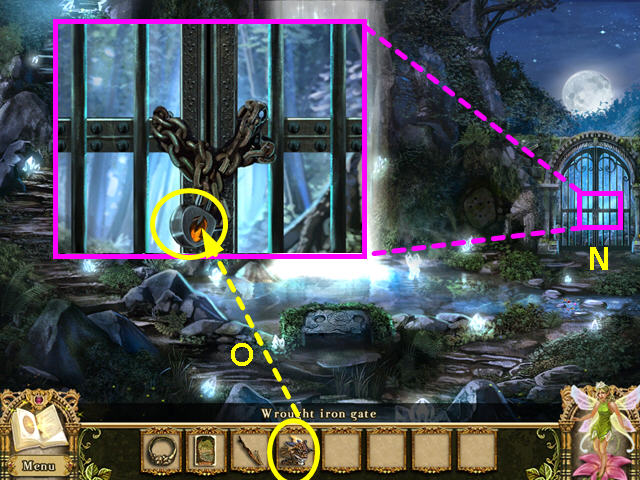
- Look at the lock on the gate (N).
- Use the POCKET DRAGON on the lock twice to break the lock and open the gate (O).
- Walk through the gate.

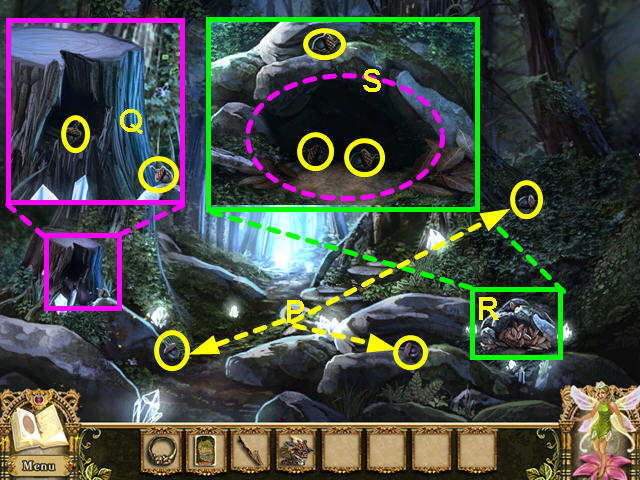
- Collect the 3 ACORNS (P).
- Look at the close-up of the stump and collect 2 more ACORNS (Q).
- Look at the close-up of the rock pile on the right (R).
- Click on the leaves to move them aside and take the 3 ACORNS (S).
- Walk forward.

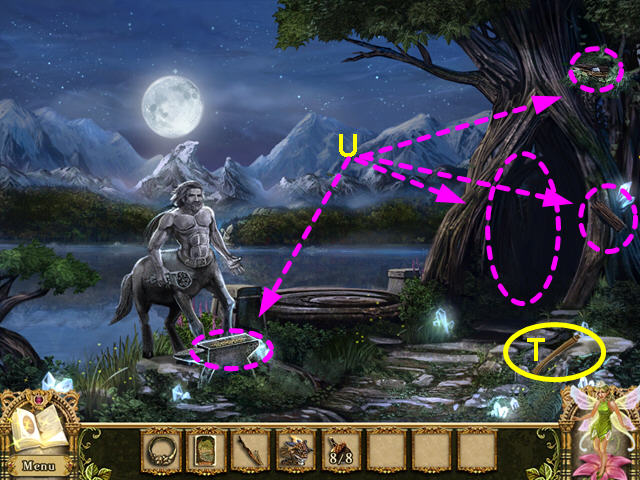
- Take the AXE HANDLE (T).
- There are other items to note, but you can’t finish them yet (U).
- Walk down 3 times to return to the path to the waterfall.

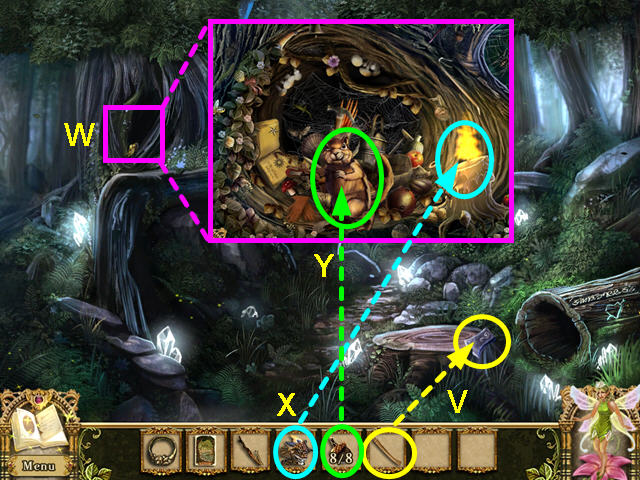
- Use the AXE HANDLE on the axe head to make the AXE (V).
- Take the AXE.
- Look at the close-up of the hole in the tree (W).
- Use the POCKET DRAGON to light the candle (X).
- Give the squirrel the 8 ACORNS to trigger a hidden object scene (Y).

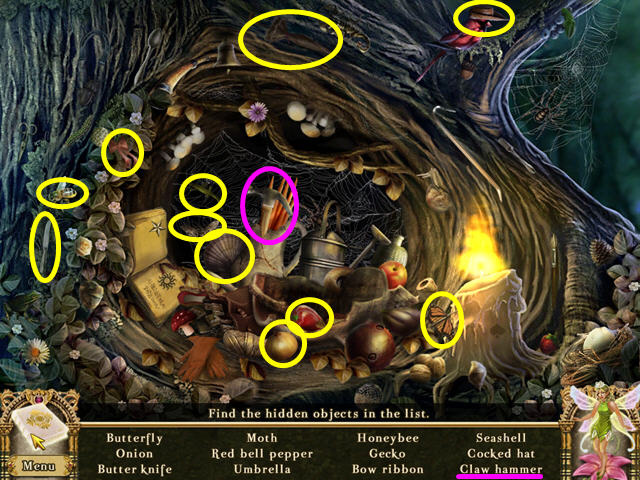
- Locate all the items on the list.
- The CLAW HAMMER will be added to your inventory.
- Walk forward, then take the left path at the waterfall.

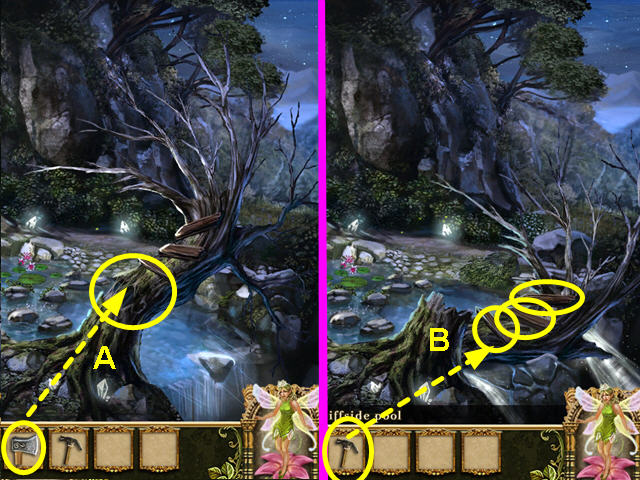
- Walk forward again to the cliffside pool.
- Use the AXE to cut down the rotten tree (A).
- Use the CLAW HAMMER on each of the 3 boards (B).
- Walk down twice to the waterfall.
- Take the right path through the gate and go forward again.

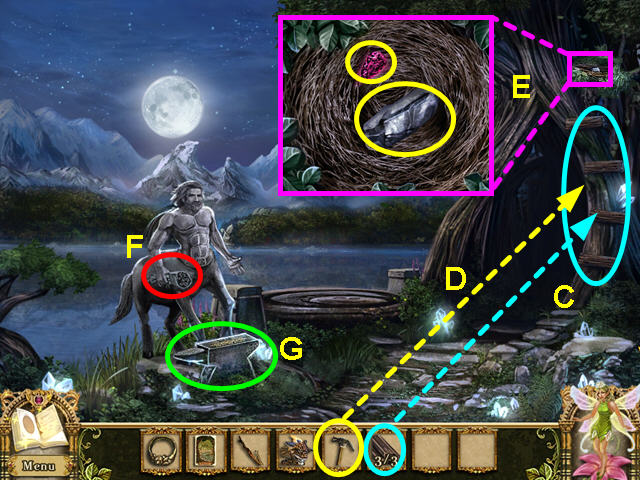
- Use the BOARDS on the right side of the tree (C).
- Use the CLAW HAMMER 4 times on the boards (D).
- Look in the nest and take the GEM KEYSTONE and the BLOCK of TIN (E).
- Note the Centaur is missing a flower from his bouquet (F).
- Look at the anvil for a mini-game (G).

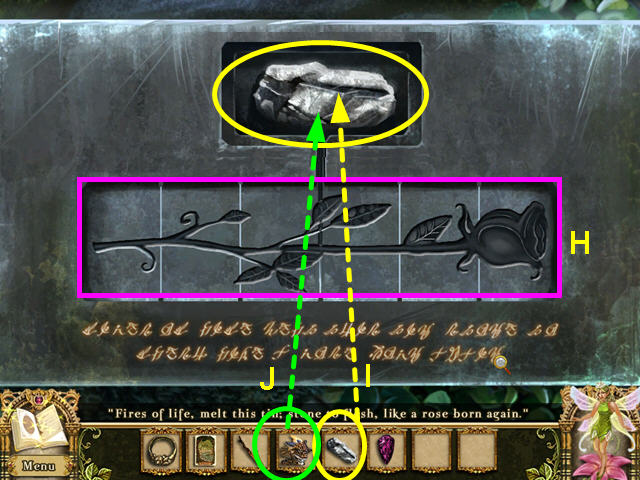
- Click on each section to find the rose pieces (H).
- Place the BLOCK of TIN in the receptacle (I).
- Use the POCKET DRAGON 4 times to melt the tin (J).
- Take the TIN ROSE.
- Give the TIN ROSE to the Centaur and he will give you the SUNSTONE.
- Walk down twice to return to the falls.

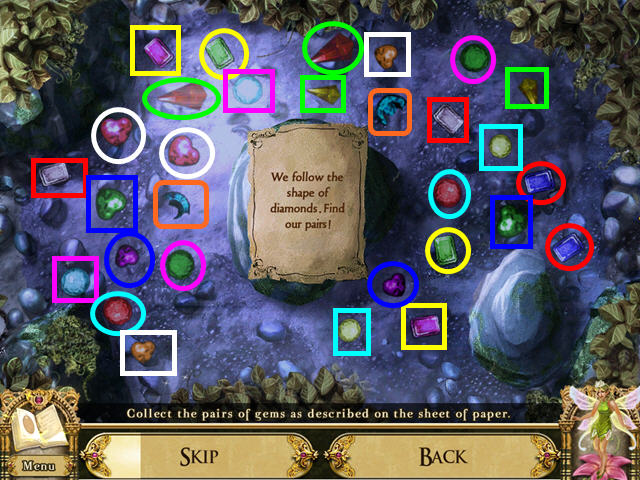
- Select the glittering pool directly in front of the gate on the right.
- Place the GEM KEYSTONE in the indentation (K).
- The object of this mini-game is to remove pairs of gems per the instructions.
- The placement of gems is random; your solution may vary.
- Pairs of diamond-shaped gems are asked for first; they are marked in green.
- Next gems that have as many sides as human limbs are needed; they are marked in yellow and red.
- The next requested pairs are whole like the sun and moon; these are marked in pink and aqua.
- Next, find the pairs shaped like hearts; they are marked in blue and white.
- Lastly, find the gem broken in half; the 2 pieces are marked in orange.
- You now have the WATERFALL MOONSTONE.

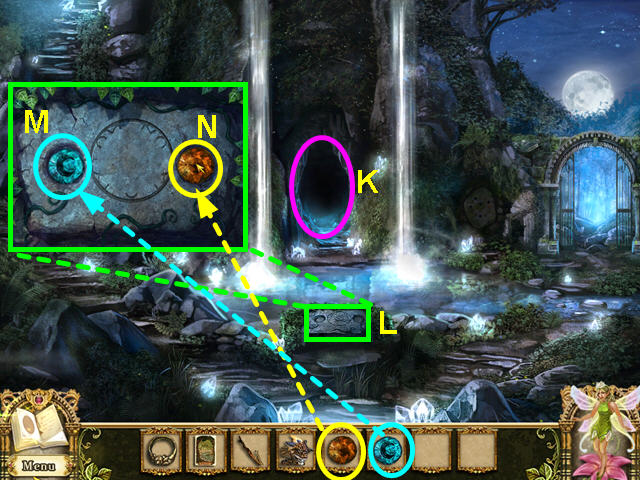
- Note the entrance under the waterfall (K).
- Look at the stone plinth (L).
- Place the WATERFALL MOONSTONE into the left indentation (M).
- Place the SUNSTONE into the right indentation (N).

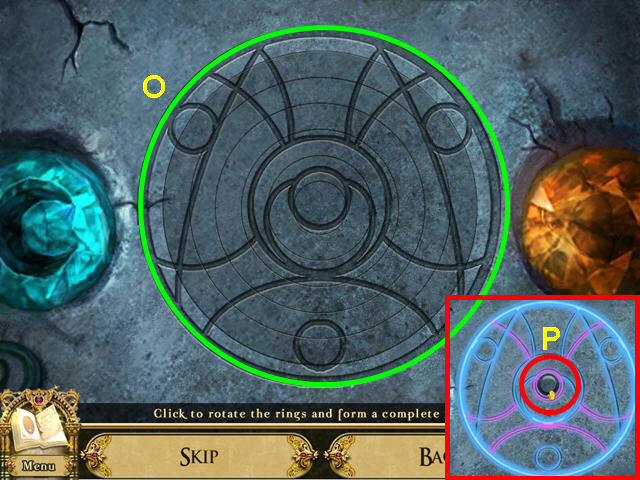
- Click on each of the rings until the pattern is formed (O).
- Once the symbol starts glowing, press the button in the center (P).
- Enter the doorway under the waterfall.

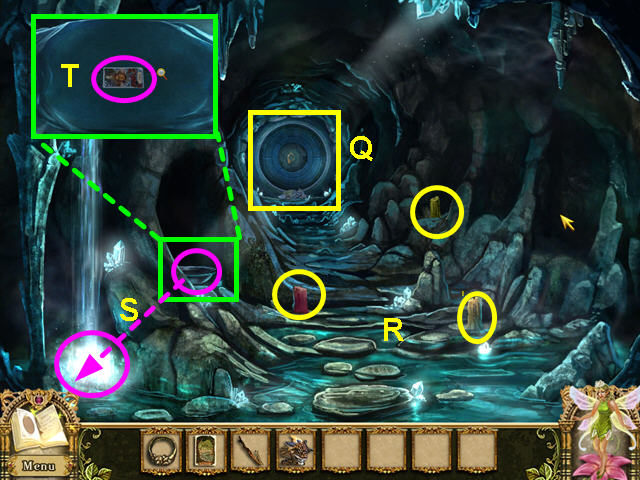
- Note the circular door in the rear of the cave (Q).
- Take the 3 CANDLES (R).
- Take the SILVER BASIN and fill it with water (S).
- Take the MAGIC CARD: THE MOON for a hidden object scene (T).

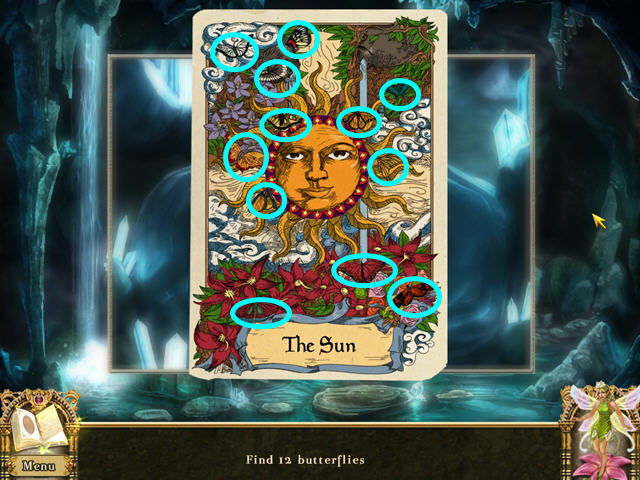

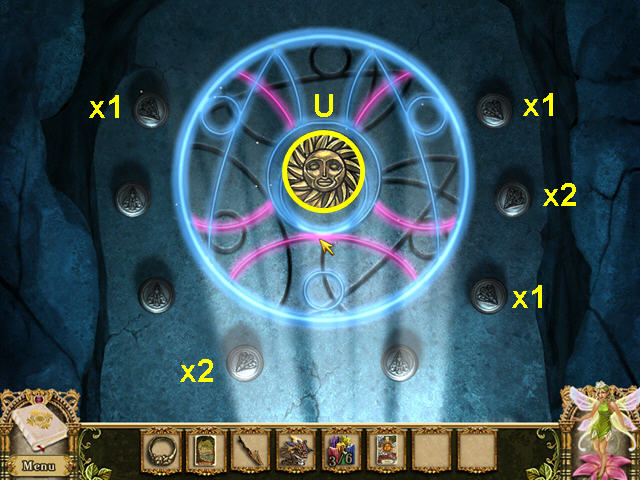
- Place the SILVER BASIN with WATER back where it once was to trigger a mini-game.
- Click on the buttons to recreate the colored pattern on the stone plinth.
- Refer to your journal for a picture.
- The first click of a button will light a part of the pattern blue.
- Click a second time to change the color to pink.
- The third click will turn off the light.
- Take the SUN MEDALLION from the center (U).

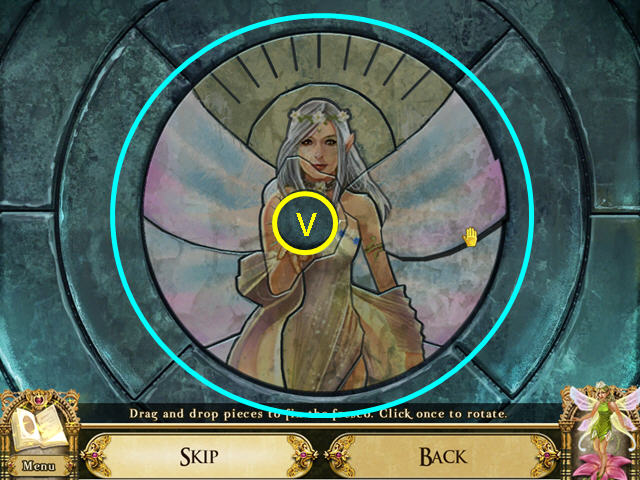
- Look at the circular portal in the rear of the cave.
- Repair the fresco by replacing the broken pieces.
- Click to take or place a piece; click again to rotate a piece.
- Place the SUN MEDALLION into the center niche (V).

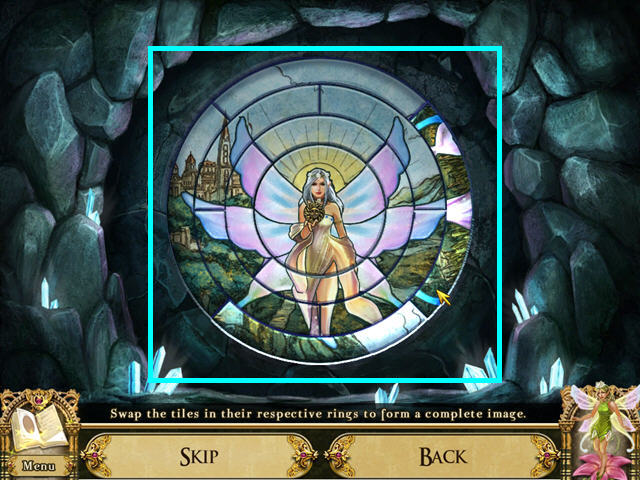
- Repair the image by swapping pieces.
- Click on 2 pieces to swap locations.

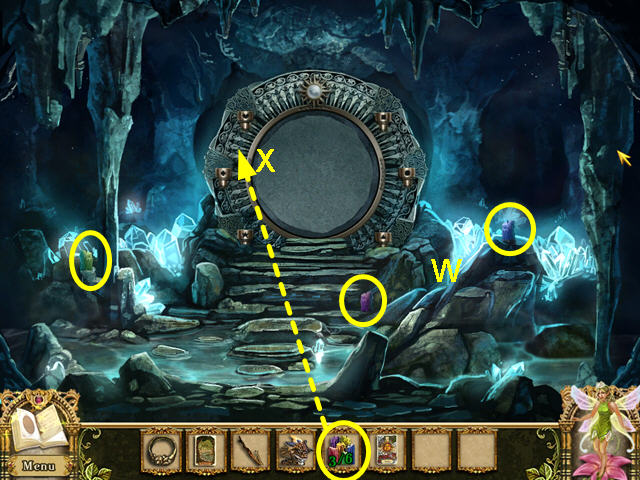
- Collect the 3 CANDLES (W).
- Use the 6 CANDLES on the gate (X).

- Light the candle according to the placement of the arrows on the rings and the directions in the center (Y).
- Light the candle to which the largest arrow in the outermost ring points.
- Next, light the candle to which the smaller arrow in the outermost ring points.
- Continue this pattern with the second and third rings.
- Use the POCKET DRAGON to light the candles in numerical order (1-6).

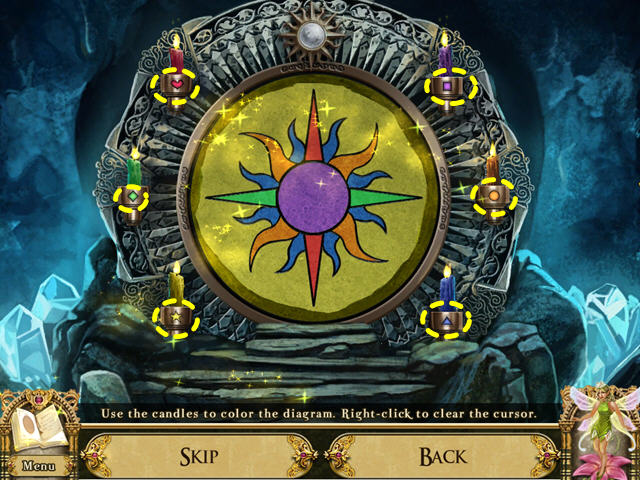
- Using the symbols on the candles and in the diagram as a guide, color the diagram.
- Click on a different candle to change colors.
- Enter the portal.
Part 3: Through the Gate of Sun and Moon


- Walk down once to the lake overlook.
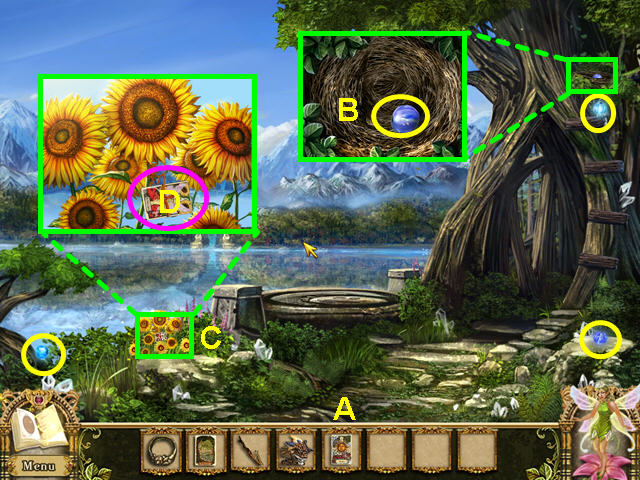
- Collect the 3 FAIRY BEADS (A).
- Look in the nest for a FAIRY BEAD (B).
- Look at the close-up of the sunflowers (C).
- Take the MAGIC CARD: THE FAIRY QUEEN for a hidden object scene (D).

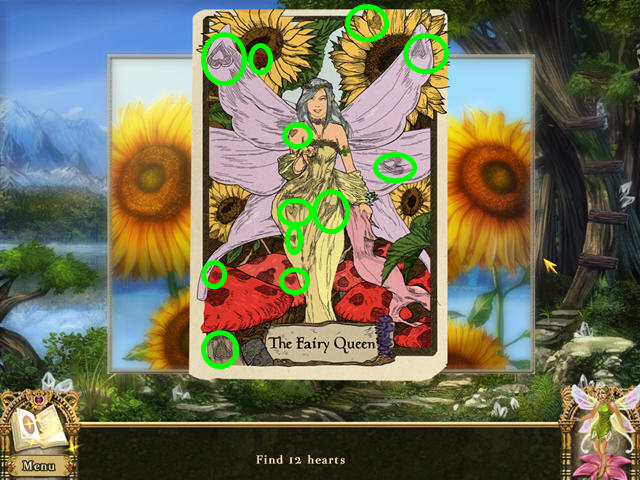
- Locate the 12 hearts.
- Walk down 3 times and talk to the goblin woodsman sitting on the tree stump.

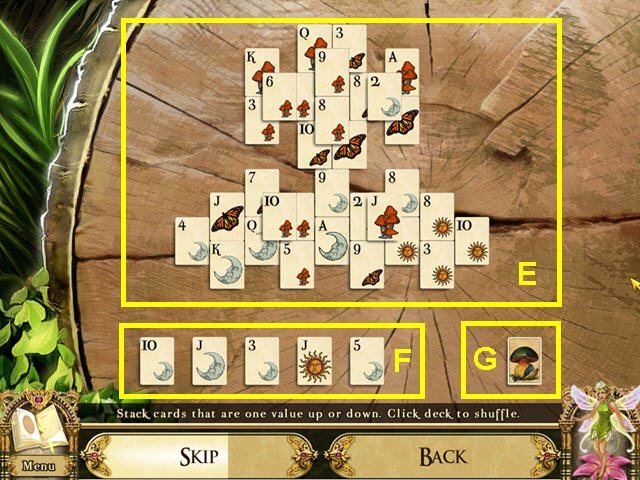
- The goblin woodsman would like to play Tripeaks.
- Click on cards in the upper tableau (E) that are one higher or lower than a card in the bottom row (F).
- Click on the deck of cards to shuffle them if you run out of moves (G).
- If you run out of cards and have not cleared the tableau, a new game will be dealt.
- The goblin will give you a CHERRY BERRY BASKET to collect some berries for him.

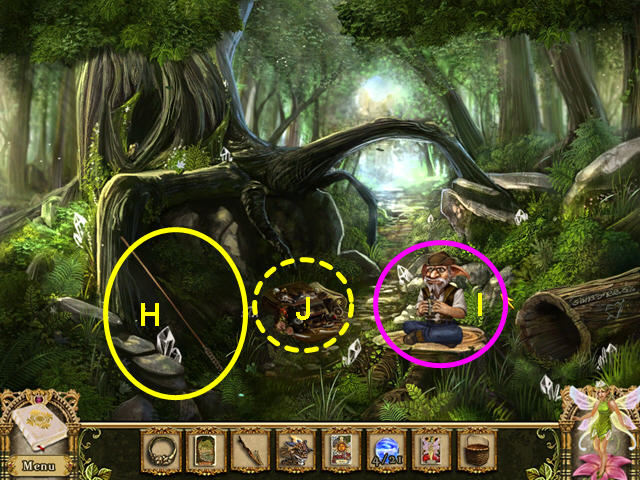
- Take the WOODEN POLE (H).
- The goblin waits for you to return with berries (I).
- Look at the backpack for a hidden object scene (J).

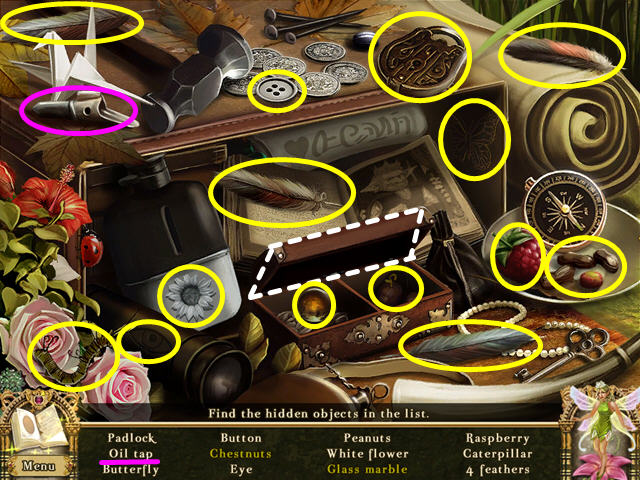
- Collect all the items on the list.
- Open the lid of the wooden box to reveal the chestnuts and the glass marble (K).
- The OIL TAP will be added to your inventory.
- Walk forward, then take the path to the left of the waterfall.

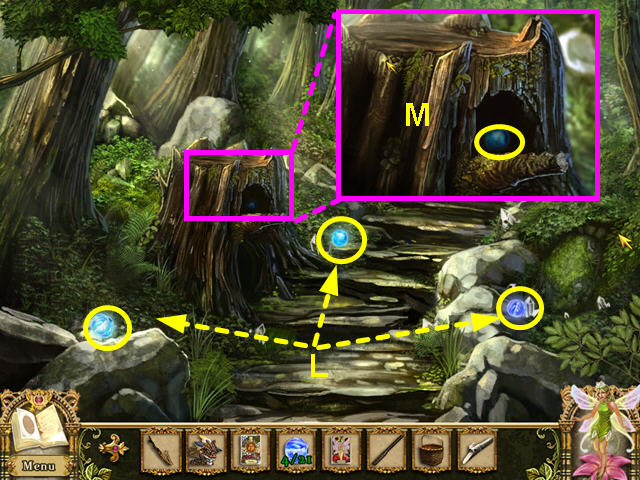
- Collect the 3 FAIRY BEADS (L).
- Look at the close-up of the stump and take the FAIRY BEAD (M).
- Walk forward.

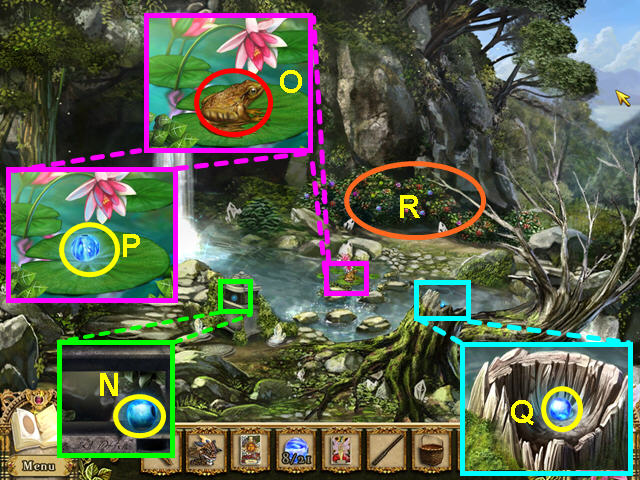
- Look at the close-up of the stone lantern and take the FAIRY BEAD (N).
- Look at the close-up of the lily pad and click on the frog (O).
- Take the FAIRY BEAD (P).
- Look at the close-up of the stump and take the FAIRY BEAD (Q).
- Look at the flower bush for a mini-game (R).

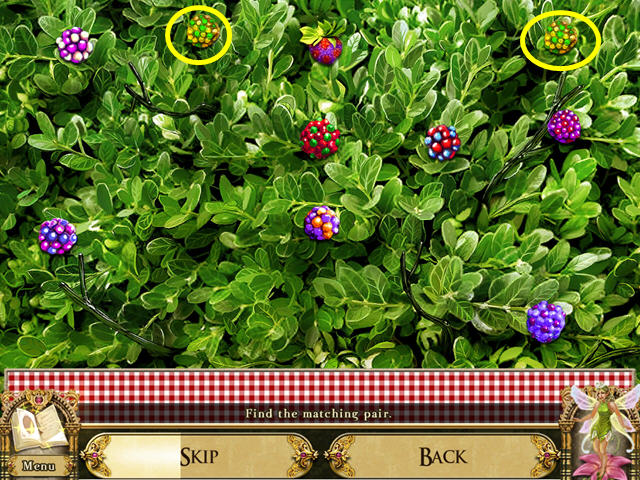
- Find the matching pairs of berries.
- Click on the 2 matching berries to progress to the next screen.
- You need to find 7 pairs of berries.
- These screens are random; your solutions may differ.
- The CHERRY BERRY BASKET is now full.
- Walk down 3 times.

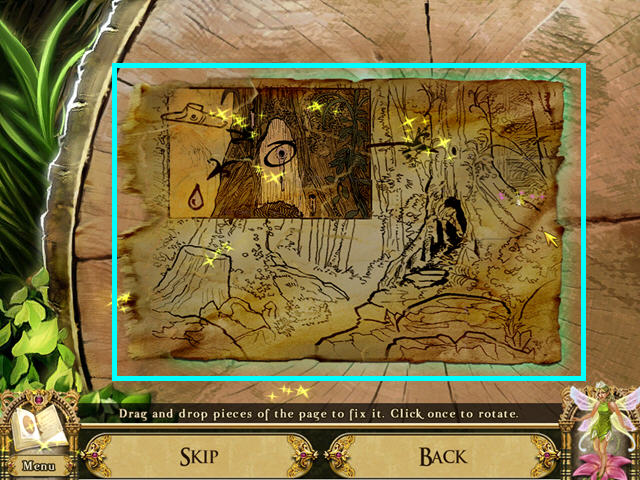
- Give the goblin woodsman the full CHERRY BERRY BASKET.
- The goblin gives you a BLANK SHEET of PAPER and some torn scraps.
- Click to take or drop a scrap.
- Click again to rotate a scrap.
- Repair the paper to learn how to collect Everlasting Oil.

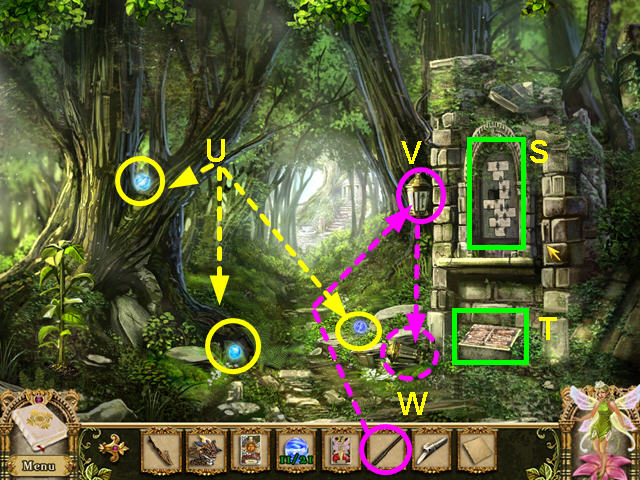
- Walk forward; take the right path through the gate.
- Walk forward to the lake; enter the path through the tree on the right.
- Note the brick alcove (S).
- Note the storage box (T).
- Take the 3 FAIRY BEADS (U).
- Use the WOODEN POLE on the oil lamp (V).
- Click on the oil lamp once it falls to the ground (W).

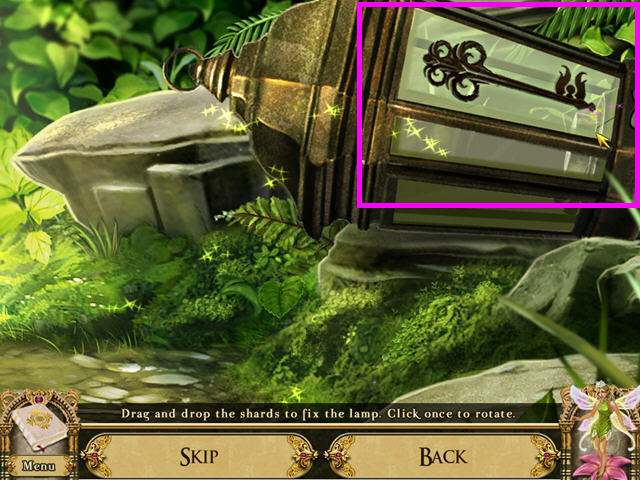
- Use the pieces of glass to repair the lamp.
- Click to take or place a glass piece.
- Click again to rotate a piece.

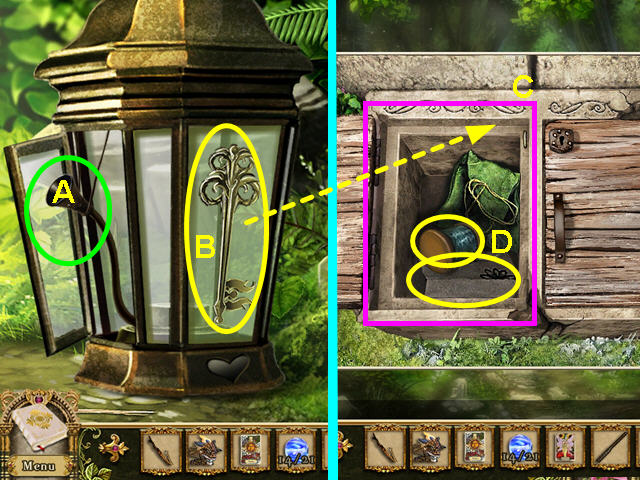
- Note the funnel to fill the lamp with oil (A).
- Take the BRASS KEY from the lamp (B).
- Look at the close-up of the storage box and use the BRASS KEY on the left compartment (C).
- Take the FISHING LINE and the DECORATIVE BRICK (D).
- The fishing line will combine with the wooden pole, creating the FLEXIBLE POLE WITH STRING.

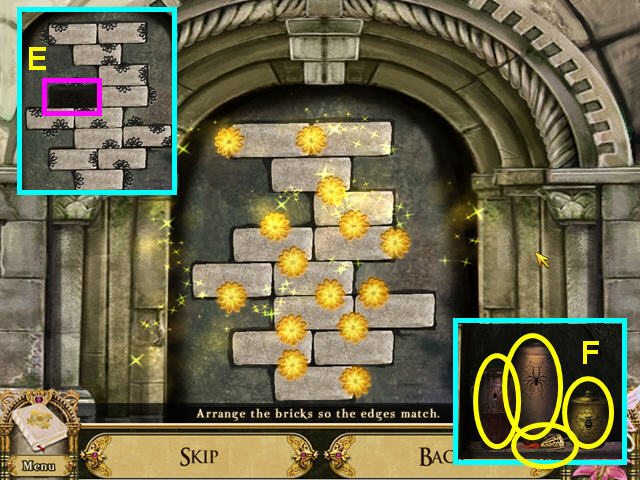
- Look at the brick alcove and place the DECORATIVE BRICK into the empty slot (E).
- Complete all the flowers.
- Click on 2 bricks to swap their positions.
- Once complete, take the EMPTY SPIDER JAR, EMPTY HONEY POT, EMPTY OIL FLASK, and FISHING LURE (F).
- The FISHING LURE will combine with the FLEXIBLE POLE WITH STRING, creating the FISHING ROD.
- Walk down twice.

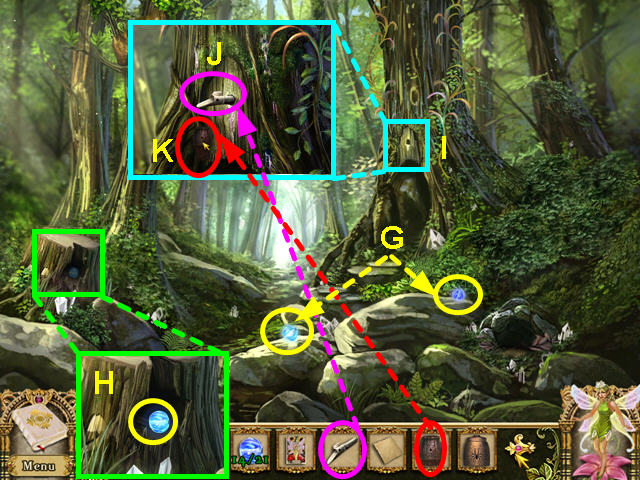
- Take the 2 FAIRY BEADS (G).
- Look at the stump and take the FAIRY BEAD (H).
- Look at the close-up of the right tree (I).
- Use the OIL TAP on the hole in the tree (J).
- Use the EMPTY OIL FLASK on the tap (K).
- Walk down to return to the waterfalls.
- Walk forward on the left path and continue forward to the cliffside pool.

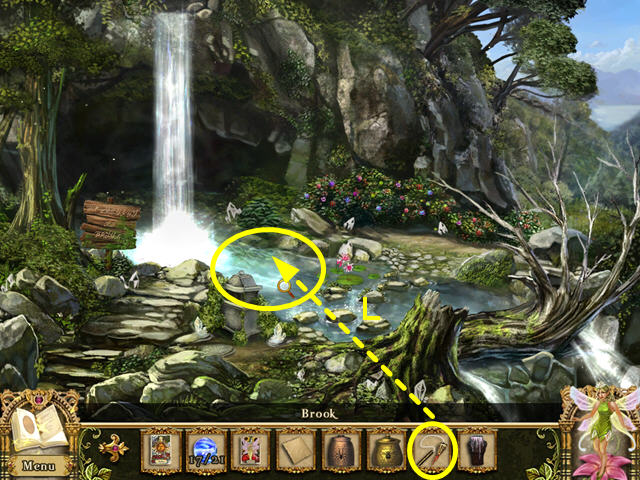
- Use the FISHING ROD on the pool to catch a FISH (L).
- Walk down twice, then right through the gate.
- Walk forward to the lake vista.
- Take the path through the tree on the right.

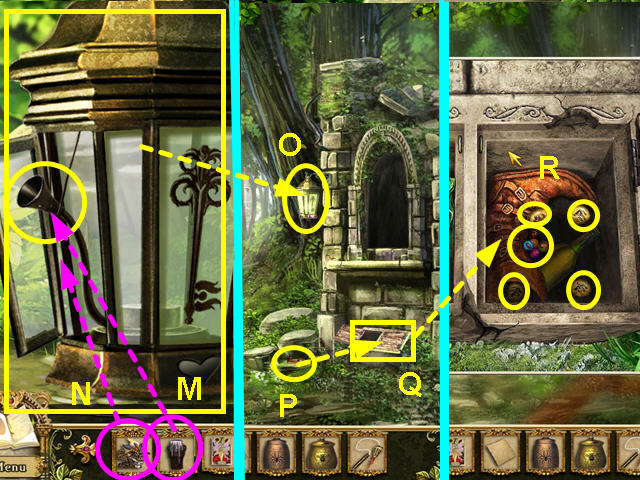
- Look at the close-up of the lamp.
- Use the OIL FLASK on the funnel (M).
- Use the POCKET DRAGON to light the lamp (N).
- Hang the LIT OIL LAMP on the hook where you first found the lamp (O).
- Take the COPPER KEY that falls to the ground (P).
- Look at the close-up of the storage box (Q).
- Unlock the right compartment with the COPPER KEY.
- Take the GLASS MARBLES and the 4 RUNES (R).
- Exit the close-up and walk forward.

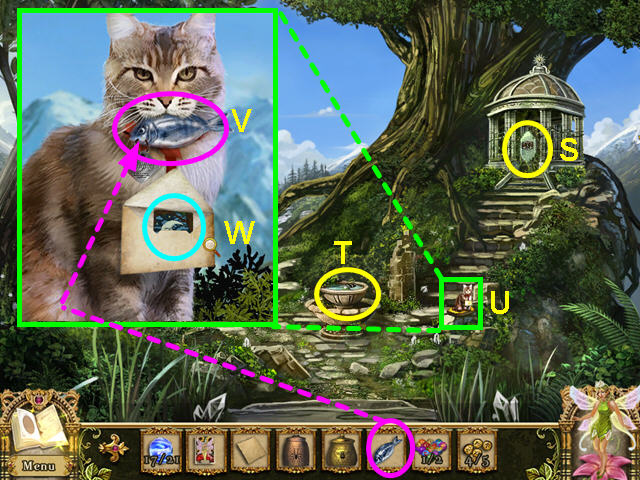
- Note the pavilion gate (S).
- Note the stone fountain (T).
- Look at the close-up of the cat (U).
- Give the FISH to the cat (V).
- Click on the envelope to open it and take the MAGIC CARD: THE MOON (W).

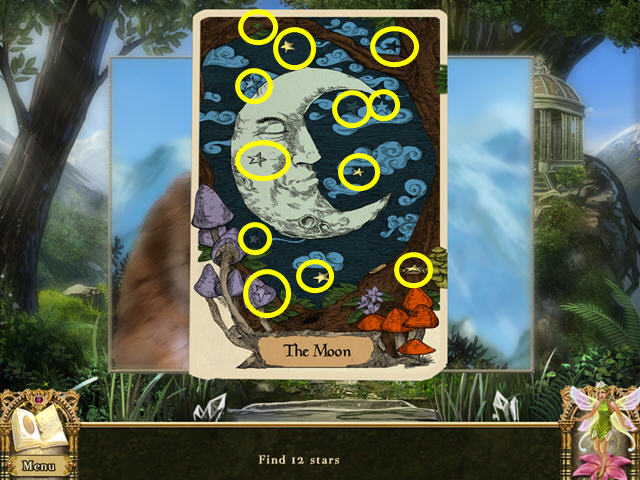
- Locate the 12 stars.
- Look at the stone fountain for a hidden object scene.

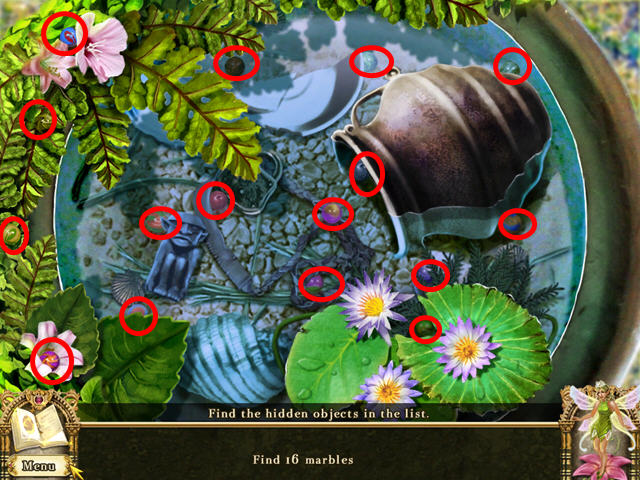
- Find the 16 marbles.
- The GLASS MARBLES will be added to your inventory.

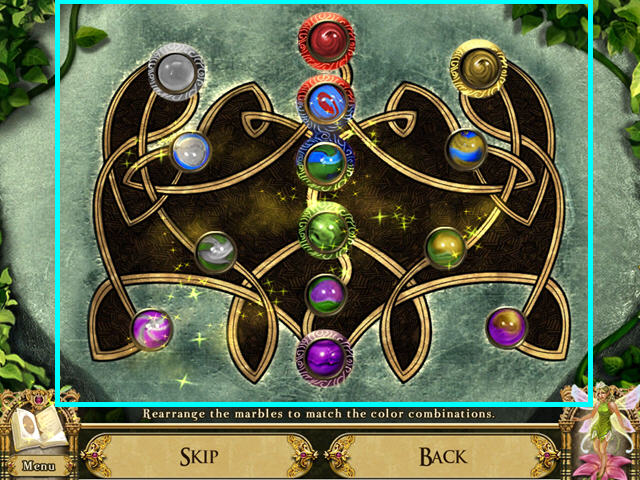
- Look at the pavilion gate.
- Use the COLLECTION of GLASS MARBLES on the diagram to start a mini-game.
- Place the marbles in the matching color slots.
- Some slots have a colored ring and some do not.
- The slot with the red and blue ring should hold the red and blue marble.
- For those slots with no rings, follow the 2 lines leaving the slot to determine which 2 colors the marble should be (i.e. the slot between the purple and the gold marble should be purple and gold).
- Click on 2 marbles to swap positions.

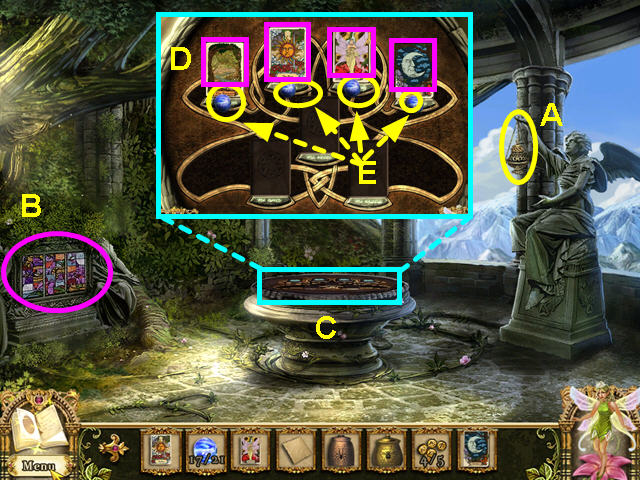
- Enter the pavilion.
- Take the INCENSE CENSER from the statue (A).
- Note the mini-game on the left (B).
- Look at the close-up of the center pedestal (C).
- Place the MAGIC CARDS into the slots (D).
- From left to right the cards are: THE FOREST, THE SUN, THE FAIRY QUEEN, and THE MOON.
- Take the 4 FAIRY BEADS that appear and exit the close-up (E).

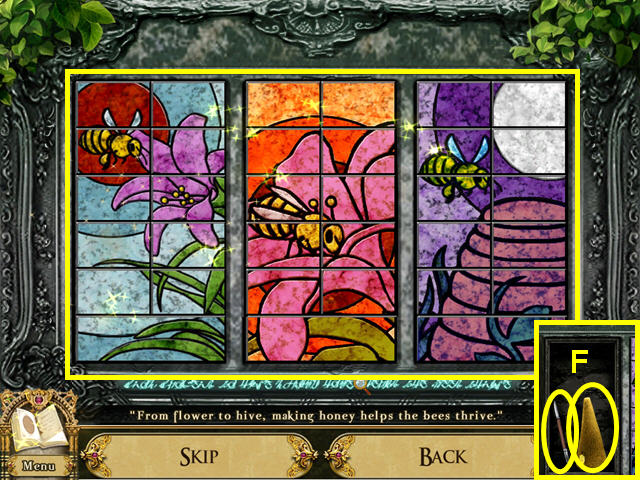
- Look at the mini-game on the left.
- Form the 3 pictures in chronological order (the bottom piece for each picture does not move).
- Click on 2 pieces to swap their positions.
- When complete, the center panel will open.
- Take the WAX KNIFE and the SMOKEY INCENSE (F).

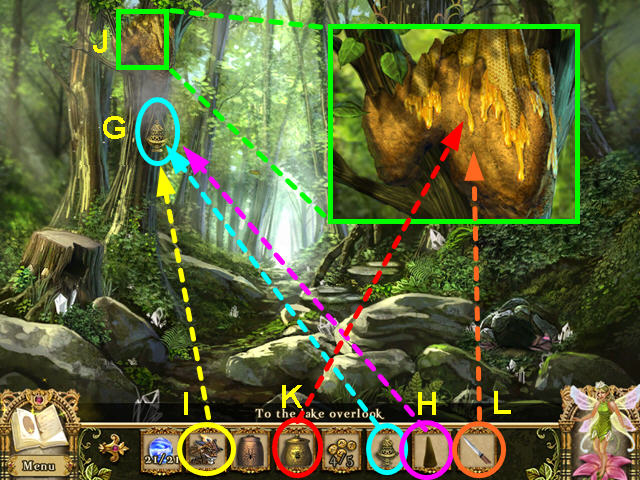
- Exit the pavilion and walk down 3 times.
- Hang the INCENSE CENSER on the hook (G).
- Place the SMOKEY INCENSE into the censer (H).
- Light the incense with the POCKET DRAGON (I).
- Look at the close-up of the hive (J).
- Use the EMPTY HONEY POT on the hive (K).
- Use the WAX KNIFE on the hive to collect some BEESWAX (L).
- Walk down to return to the falls.

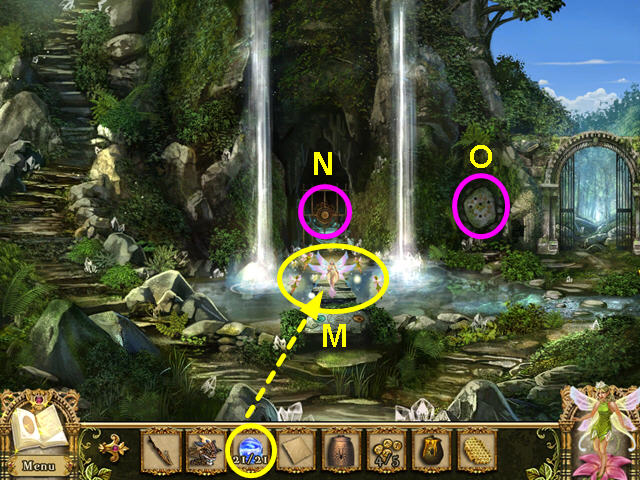
- Give the 21 FAIRY BEADS to the Fairy Queen (M).
- She will give you a LETTER TO THE WITCH.
- Note the locked gate (N).
- Note the mini-game (O).
- Walk through the right gate.
- Go forward to the lake overlook.

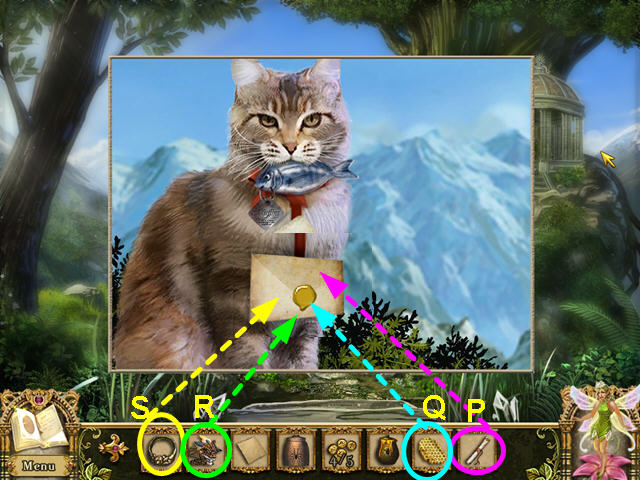
- Take the path through the tree on the right and walk forward to the pavilion area.
- Look at the close-up of the cat.
- Place the LETTER TO THE WITCH into the envelope (P).
- Use the BEESWAX on the envelope (Q).
- Use the POCKET DRAGON on the wax (R).
- Use the SIGNET RING on the heated wax (S).

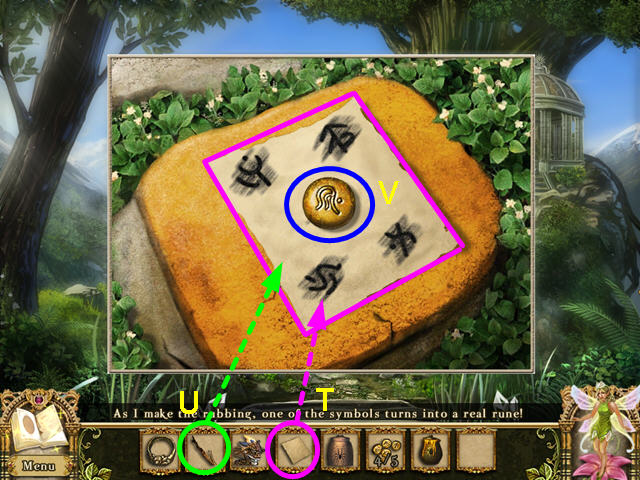
- After the cat flees, place the SHEET of PAPER onto the flat stone (T).
- Use the BURNT BRANCH to make a rubbing (U).
- Take the RUNE from the center (V).
- The symbols will be noted in your journal.
- Walk down 4times to return to the falls.
- Look at the mini-game to the left of the gate.

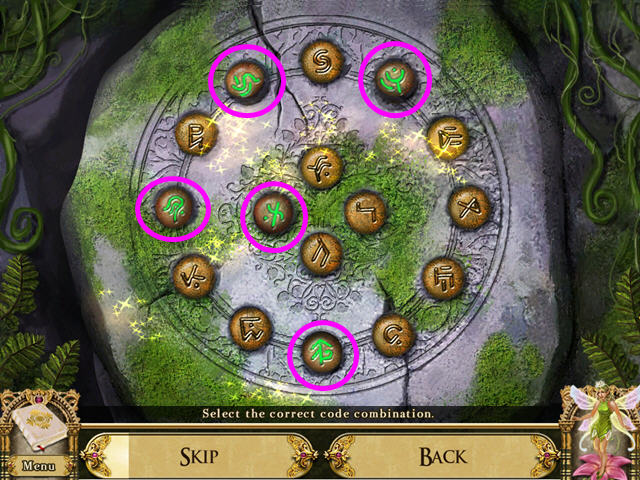
- Use the 5 RUNES on the board to start the mini-game.
- Press the runes you found on the rubbing.
- Check your journal for the correct 5 runes.
- Take the ORNATE KEY and the STONE TILE.
- Use the ORNATE KEY to open the gate beneath the water falls.
- Enter the cave.

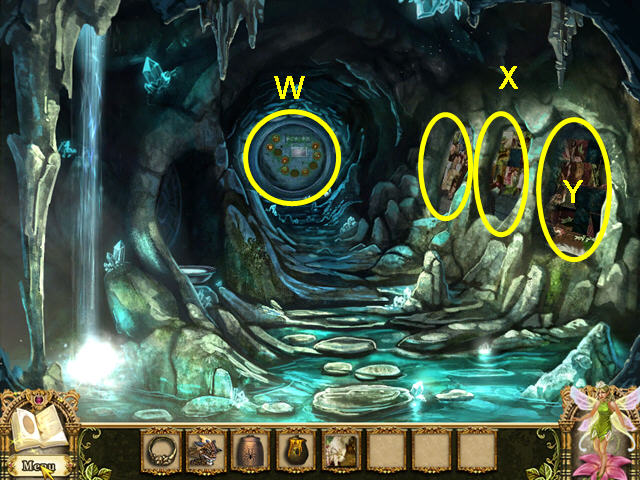
- Note the stone portal in the back of the cave (W).
- There are 3 alcoves (X).
- Start with the alcove on the right (Y).

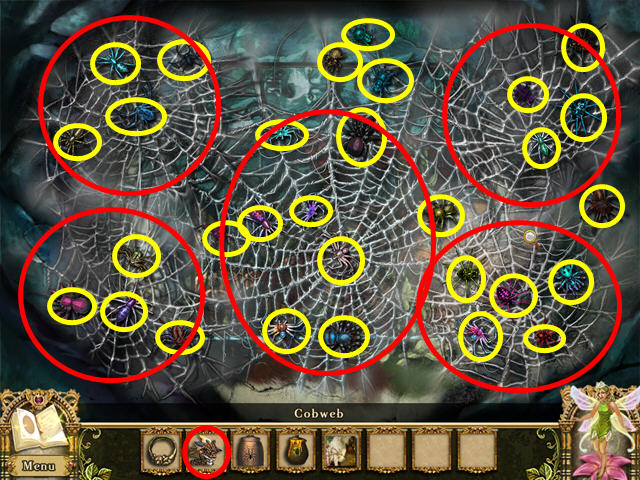
- Click on the 30 spiders marked in yellow, collecting them in the SPIDER JAR.
- Use the POCKET DRAGON on the center of each of the 5 webs marked in red.

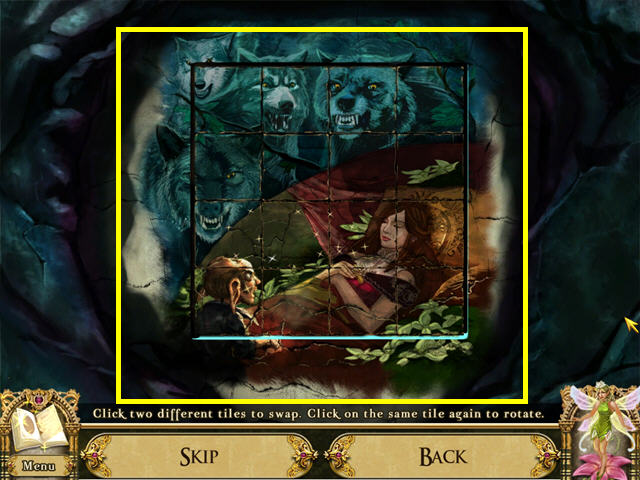
- Reform the fresco by swapping and rotating tiles.
- Click on 2 tiles to swap positions.
- Click again on a single tile to rotate it in place.
- Take the WOODEN DISC that appears.

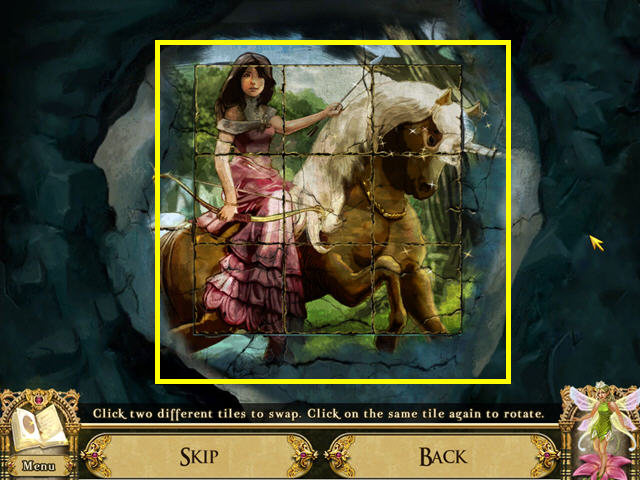
- Look at the second alcove.
- Use the STONE TILE to trigger a mini-game.
- Reform the fresco by swapping and rotating tiles.
- Click on 2 tiles to swap positions.
- Click again on a single tile to rotate it in place.
- Take the WOODEN DISC that appears.

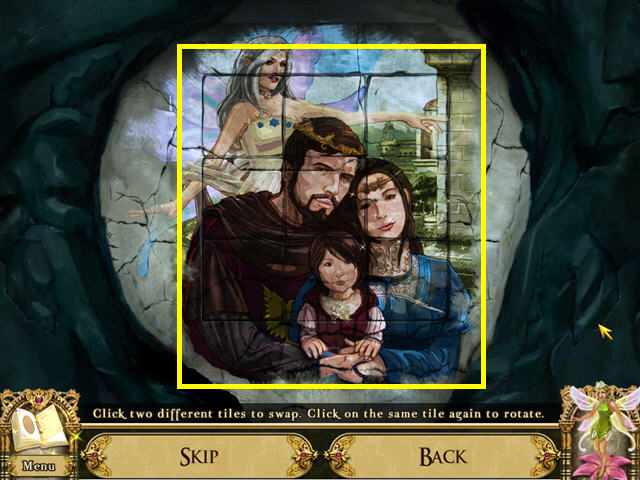
- Look at the third alcove.
- Reform the fresco by swapping and rotating tiles.
- Click on 2 tiles to swap their positions.
- Click again on a single tile to rotate it in place.
- Take the WOODEN DISC that appears.

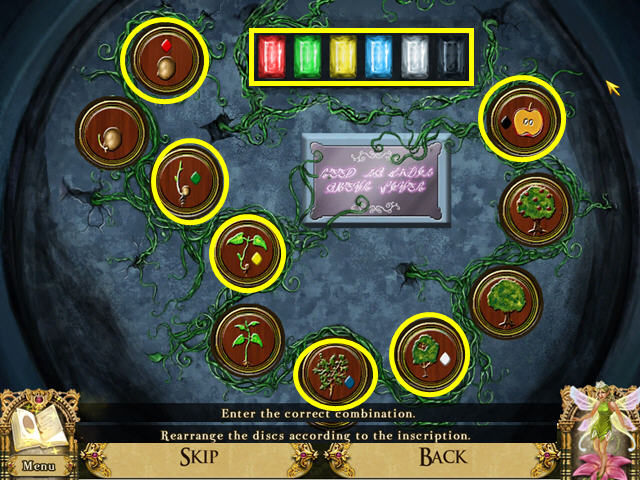
- Look at the stone portal.
- Use the 3 WOODEN DISCS on the diagram to trigger a mini-game.
- Place the discs in chronological order from seed to stem.
- Click on two discs to swap positions.
- Reading the discs from left to right, find the correct color sequence of the colored diamonds on the discs and enter it at the top.
- Click on each gem until it is the proper color.
- Enter the portal.

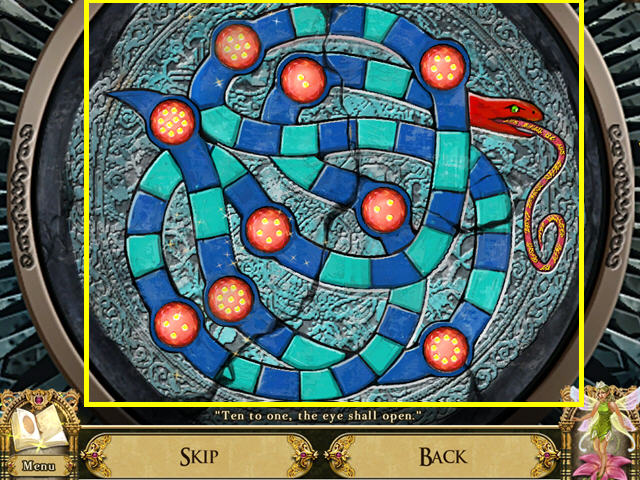
- Look at the Sun and Moon gate.
- The inscription on the snake’s tongue requests the eyes go from 10 to 1.
- Since 1 is the snake’s eye, 10 is the tail.
- Click on the red balls of eyes to swap their positions.
Part 4: Return to the Night

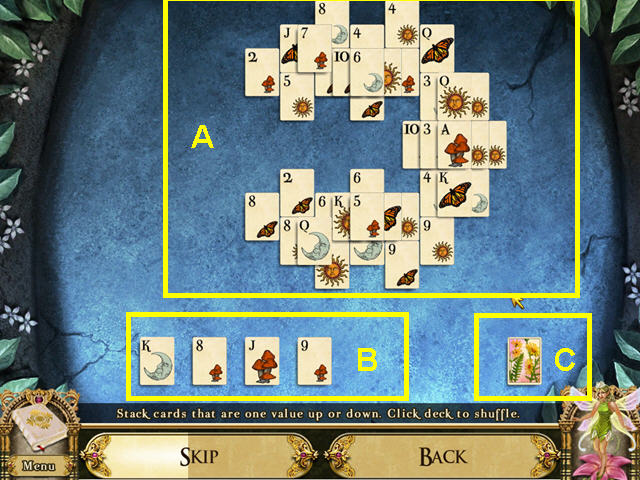
- Walk down from the vista.
- Talk to the goblin on the right to play Tripeaks.
- Click on cards in the upper tableau (A) that are one higher or lower than a card in the bottom row (B).
- Click on the deck of cards to shuffle if you run out of moves (C).
- If you run out of cards and have not cleared the tableau, a new game will be dealt.
- The goblin gives you the POTION OF RAPID GROWTH.
- Take the path through the right tree.

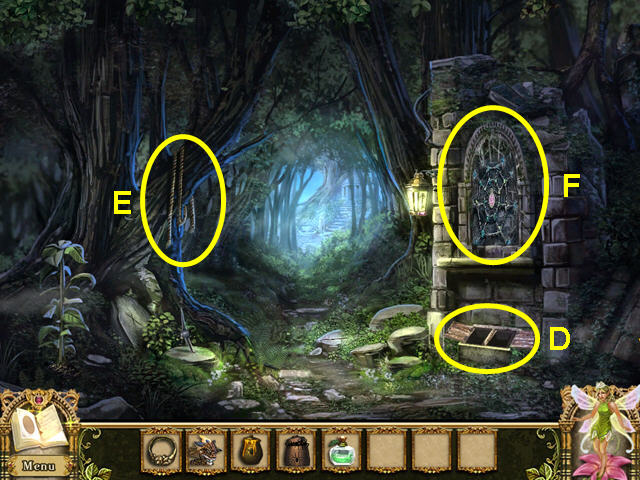
- Note the storage area near the ground (D).
- Note the rope hanging in the tree (E).
- Select the cobwebbed alcove for a mini-game (F).

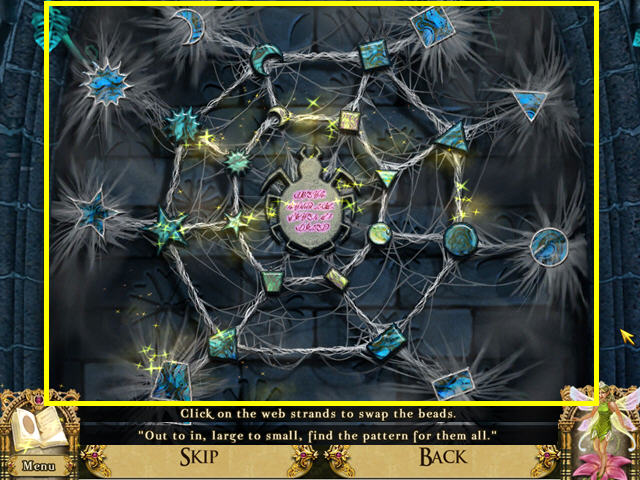
- Move the pieces so that the 3 on each ray are the same type and they get smaller towards the center.
- Click on the web between 2 pieces to swap those positions.

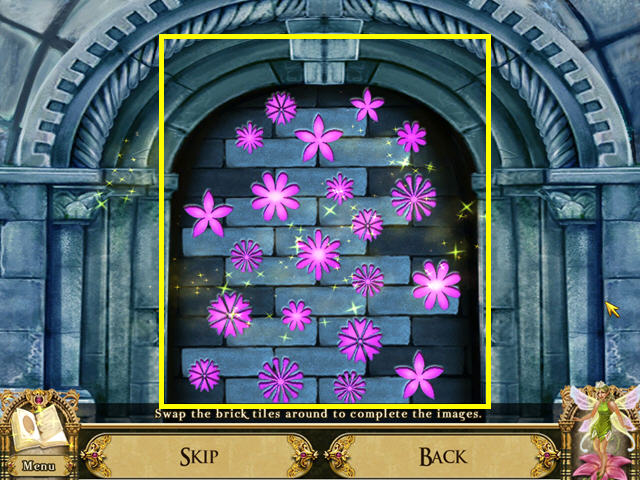
- Move the bricks around so that all the flowers are complete.
- Click on 2 bricks to swap their positions.
- When the panel opens, take the BLACK ORB and the GRAPPLING HOOK HEAD.

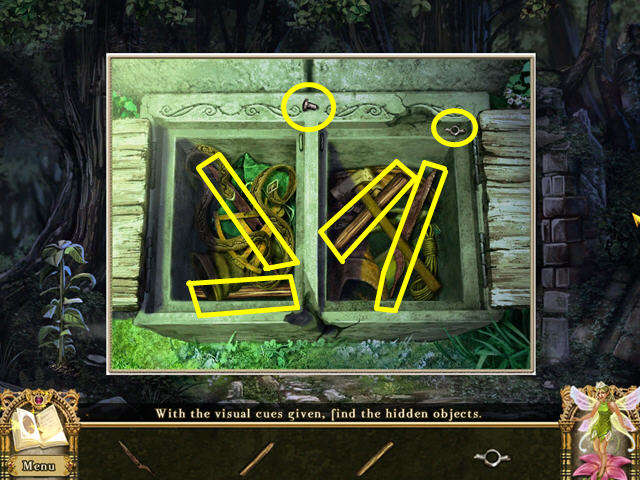
- Look at the close-up of the storage box for a hidden object scene.
- Locate all the items.

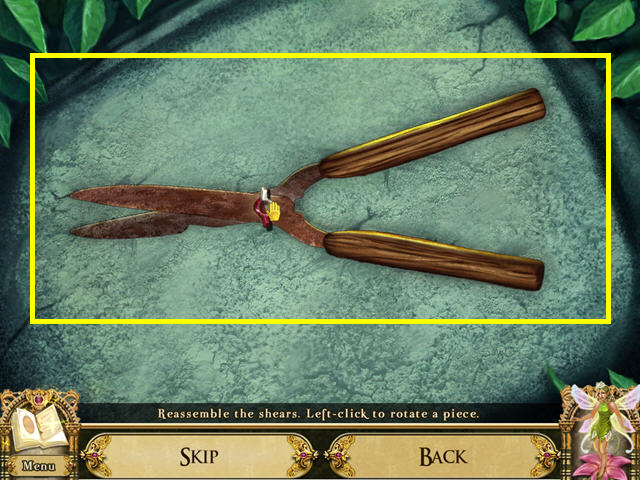
- Assemble the garden shears by placing the pieces into the outline.
- Click to take or drop, then click again to rotate.
- Note the colors on the bolt.
- Cut the ROPE from the tree with the GARDENING SHEARS.
- The ROPE will combine with the GRAPPLING HOOK HEAD.
- Walk forward.

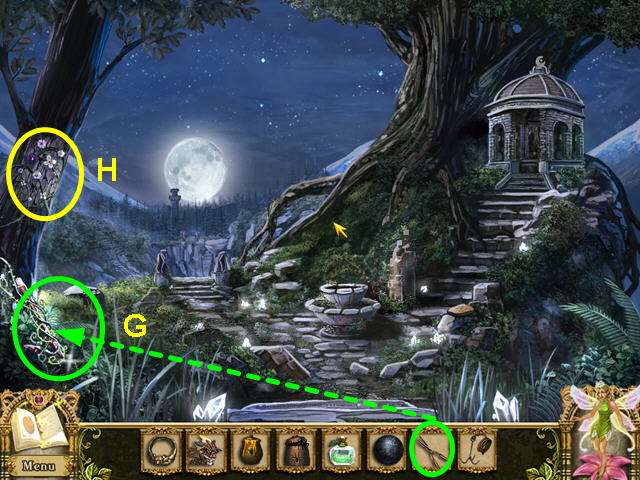
- Cut free the PICKAXE HANDLE with the GARDENING SHEARS (G).
- Select the flowering area for a mini-game (H).

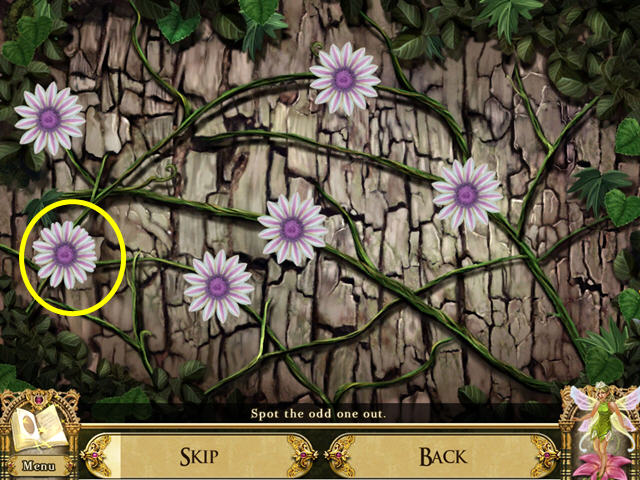
- Find the flower that is different from the others.
- You will have 7 sets of flowers.
- This mini-game is random; your solution may differ.
- You will earn a BOUQUET OF MOONFLOWERS.

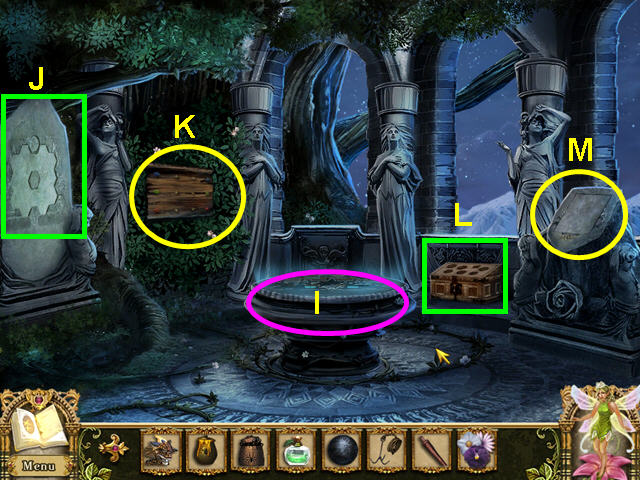
- Note the stone table where the Magic Cards are placed (I).
- Note the mini-game on the left (J).
- Remember the tangled rope board (K).
- Note the ivory chest (L).
- Select the stone slab for a mini-game (M).

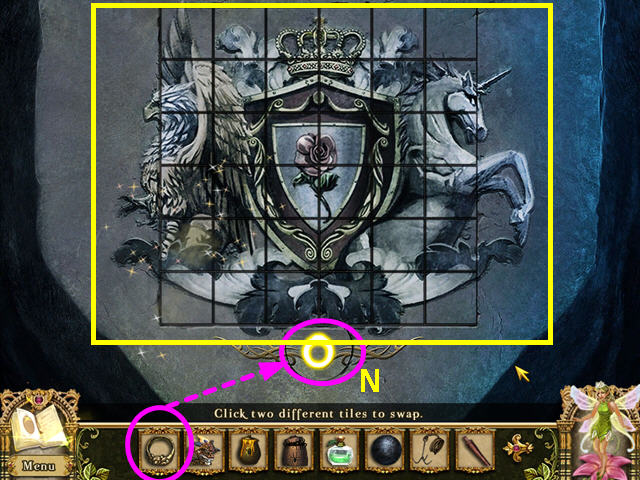
- Place the SIGNET RING into the indentation at the bottom (N).
- Restore the crest by swapping tiles.
- Click on 2 tiles to swap their positions.
- Read the treasure map hidden under the ring indentation.
- Both the crest and the map are recorded into your journal.
- Exit the close-up and select the ivory chest.

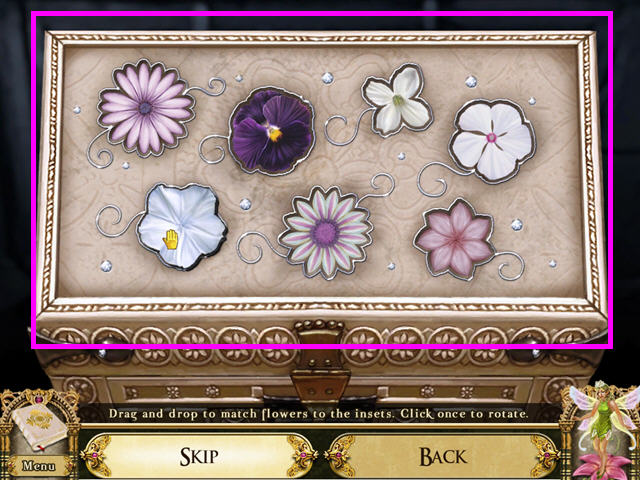
- Use the BOUQUET OF MOONFLOWERS on the chest.
- Click on a flower to rotate it to the correct position.
- Drag and drop the flowers into the matching indentations.

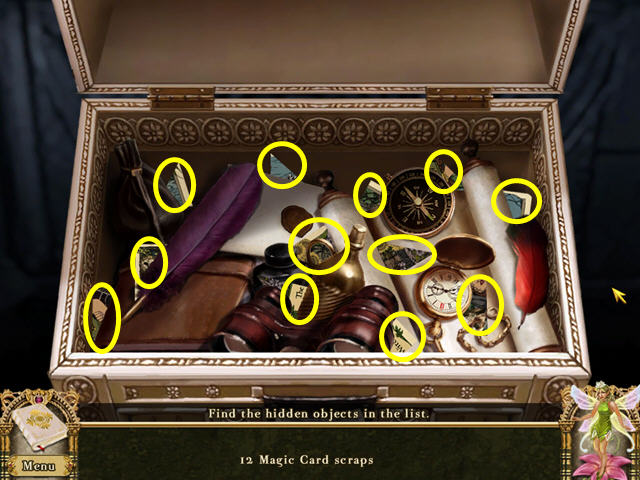
- Locate the 12 Magic Card scraps.

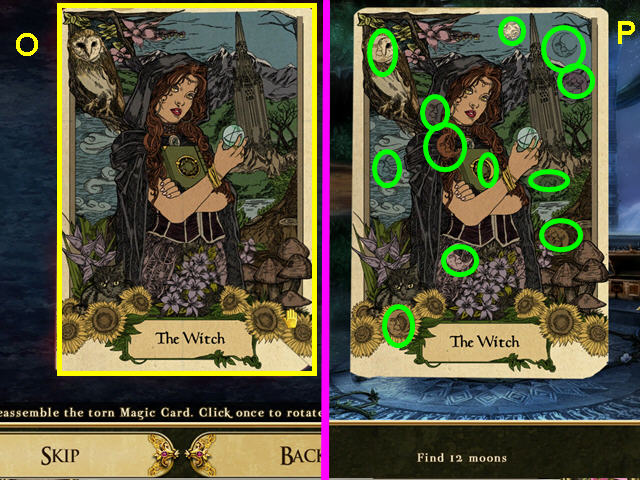
- Assemble the Magic Card (O).
- Click to take or place a piece, click again to rotate a piece.
- Locate the 12 moons (P).
- The MAGIC CARD: THE WITCH will be added to your inventory.

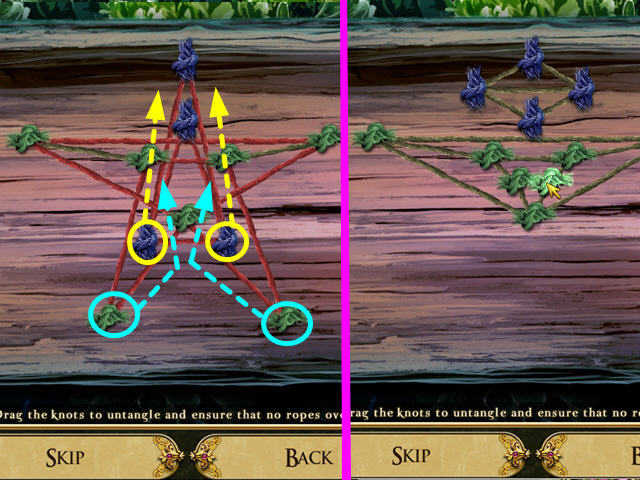
- Look at the tangled rope board for a mini-game.
- Untangle the knots so that no ropes are crossing each other.
- Click and drag a knot to move it to another position.
- There are 3 levels to this mini-game.
- This is the solution for the first level.

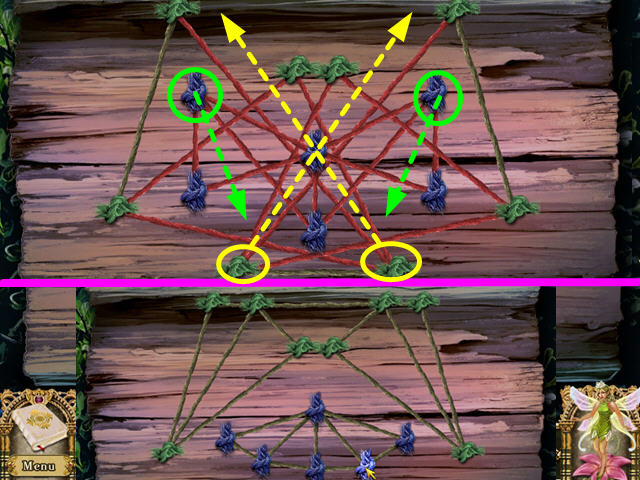
- This is the solution for the second level.

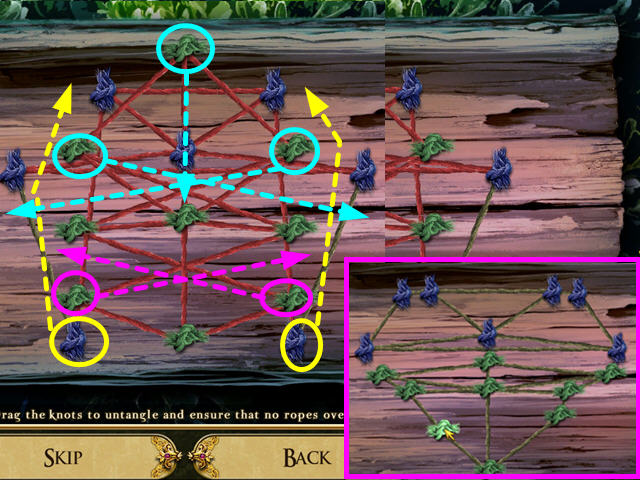
- This is the solution for the third level.
- You will earn the HEMP ROPE.
- Exit the pavilion and walk down once.

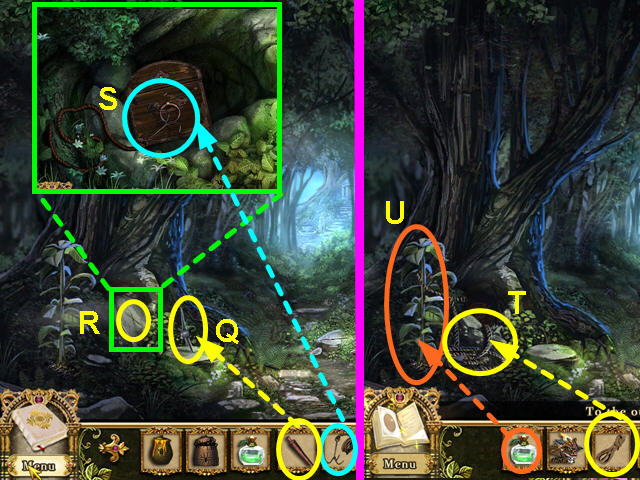
- Use the PICKAXE HANDLE on the pickaxe head (Q).
- Take the PICKAXE and use it on the “X” in the slab (R).
- Look in the hole and use the GRAPPLING HOOK on the chest. (S).
- Exit the close-up.
- Use the HEMP ROPE on the end of the grappling hook rope (T).
- Use the POTION OF RAPID GROWTH on the sapling (U).
- Look at the chest for a mini-game.

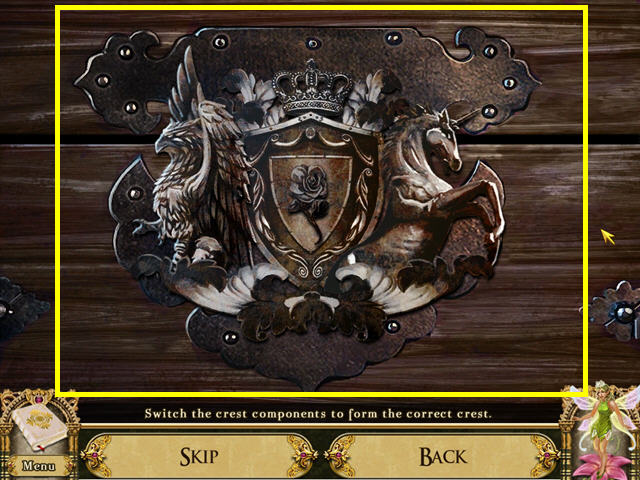
- Recreate the family coat of arms.
- Click on the different sections to change the content.
- Refer to your journal for a picture of the crest.

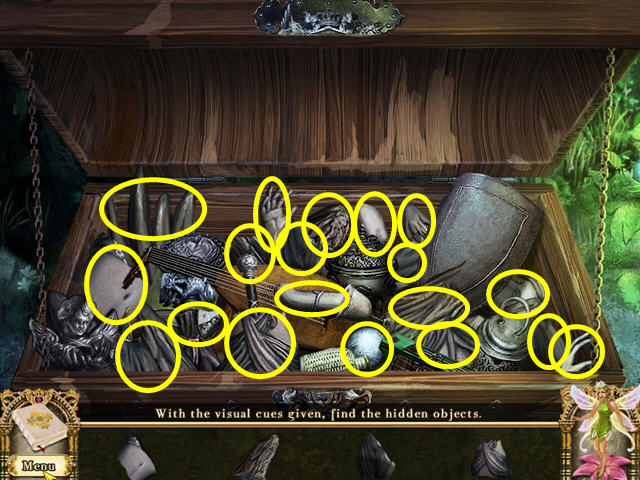
- Locate all the items.
- The WHITE ORB and STATUE FRAGMENTS will go into your inventory.
- Walk forward to the pavilion area.
- Look at the foot of the bridge, just under the moon.

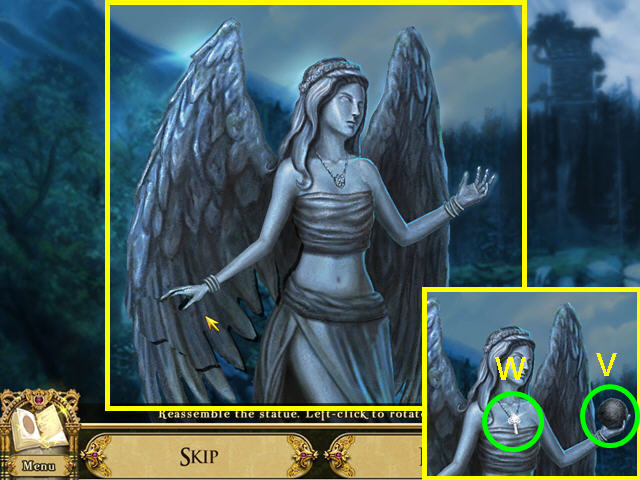
- Look at the left statue.
- Reassemble the statue.
- Click to take or place a piece, click again to rotate a piece.
- Place the BLACK ORB in the statue’s hand (V).
- Take the SMALL SILVER KEY that appears around her neck (W).

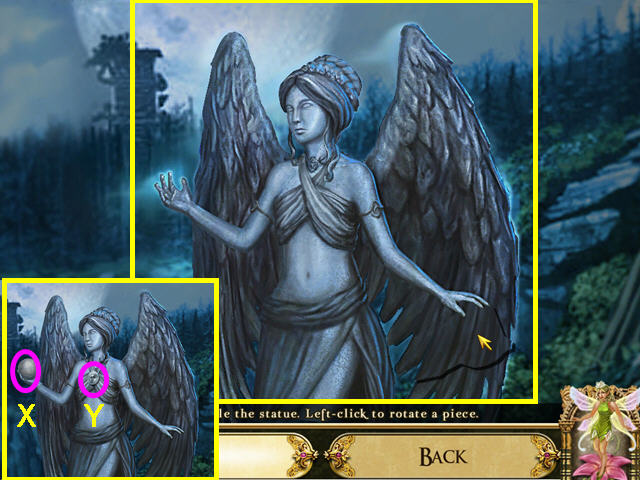
- Use the STATUE FRAGMENTS on the right statue.
- Reassemble the statue.
- Click to take or place a piece, click again to rotate a piece.
- Place the WHITE ORB in the statue’s hand (X).
- Take the MOON MEDALLION that appears around her neck (Y).
- Leave the foot of the bridge and enter the pavilion.
- Look at the mini-game on the left.

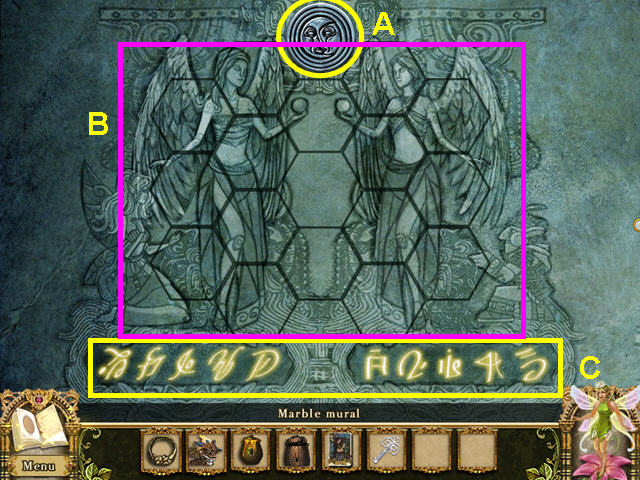
- Place the MOON MEDALLION into the upper niche to activate the mini-game (A).
- Reassemble the scene by clicking to take or place a piece, and clicking again to rotate a piece (B).
- Make note of the glyphs that appear; they will be noted in your journal (C).
- Exit the close-up.

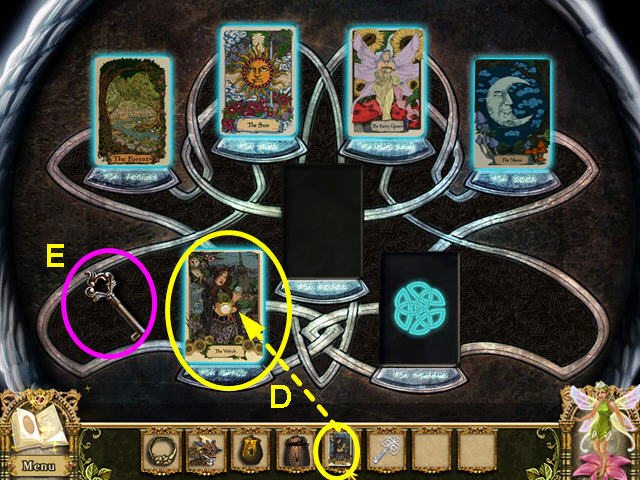
- Look at the stone table.
- Place the MAGIC CARD: THE WITCH into the lower left position (D).
- Take the SMALL GOLD KEY that appears (E).
- Exit the close-up and the pavilion.
- Return to the base of the bridge and the statues.

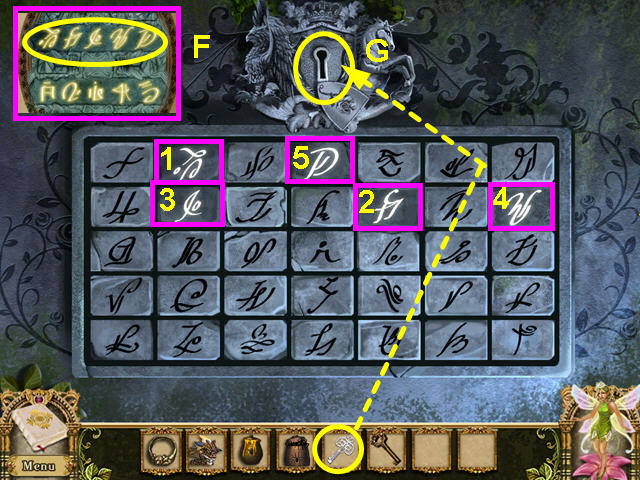
- Look at the base of the left statue.
- Using the top half of the code from your journal, enter the symbols (F).
- Press the symbols in the same order as they are written (1-5).
- Use the SMALL SILVER KEY on the lock that appears at the top (G).

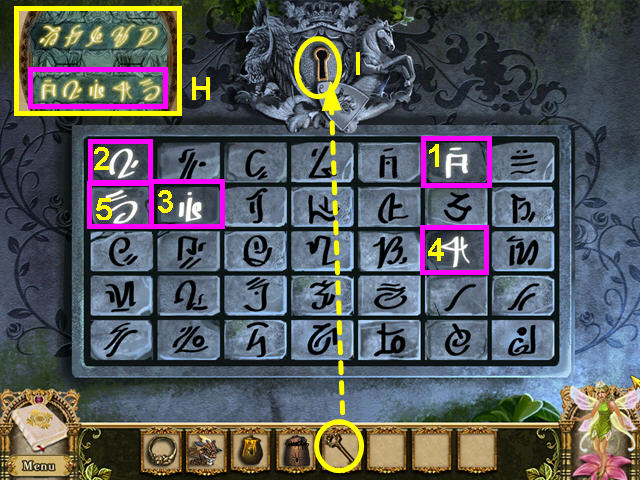
- Look at the base of the left statue.
- Using the bottom half of the code from your journal, enter the symbols (H).
- Press the symbols in the same order as they are written (1-5).
- Use the SMALL GOLD KEY on the lock that appears at the top (I).
- Walk forward across the bridge.
Part 5: Across the Moonbridge

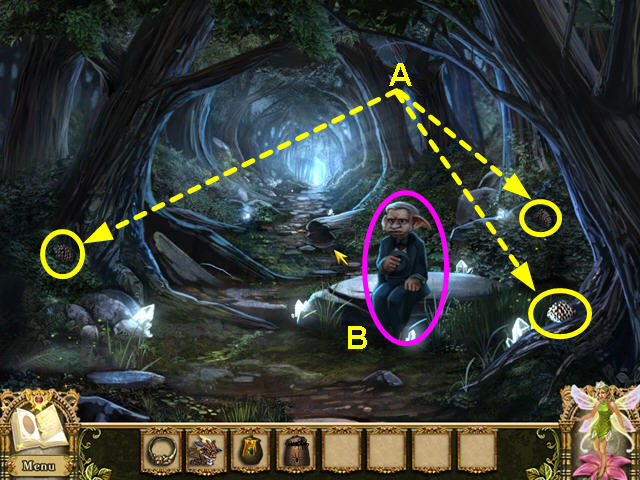
- Collect the 3 PINE CONES (A).
- Talk to the goblin for a game of Tripeaks (B).

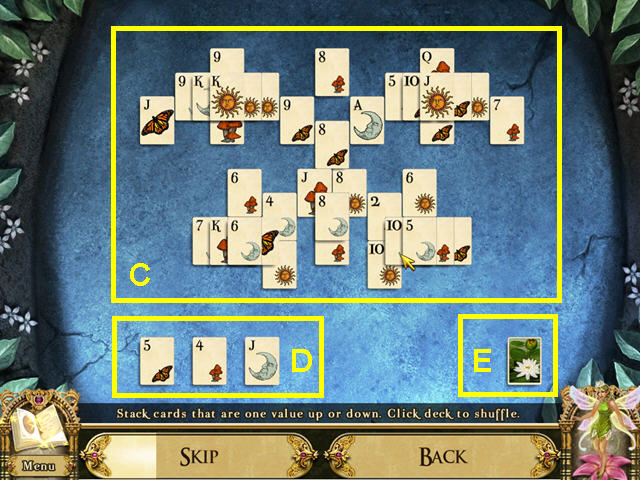
- Click on cards in the upper tableau (C) that are one higher or lower than a card in the bottom row (D).
- Click on the deck of cards to shuffle if you run out of moves (E).
- If you run out of cards and have not cleared the tableau, a new game will be dealt.
- You will earn a BUTTERFLY NET.

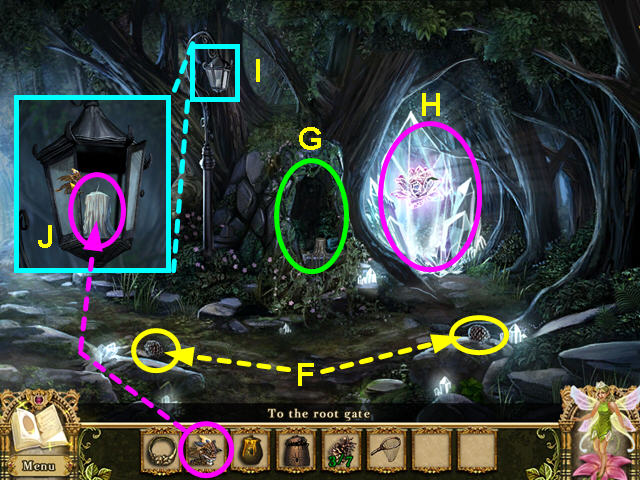
- Collect the 2 PINE CONES (F).
- Note the unlit alcove (G).
- Note the crystal barrier (H).
- Look at the unlit lamp (I).
- Open the door of the lamp.
- Light the lamp with the POCKET DRAGON (J).

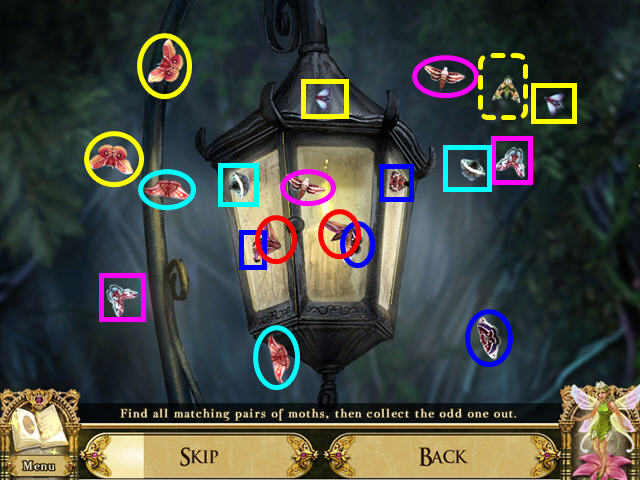
- Click on matching pairs of moths, and then collect the remaining moth.
- You now have a NET FULL OF MOTHS.

- Look at the unlit alcove.
- Light the candle with the POCKET DRAGON (K).
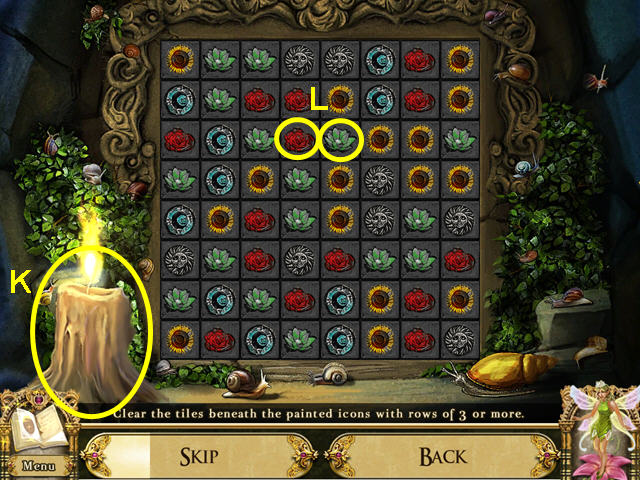
- Break all the tiles by making chains of 3 or more.
- Click on 2 adjacent tiles to swap their positions and make a chain (L).

- Take the EMPTY SNAIL POT (M).
- Collect the 12 snails.
- Take the left path.


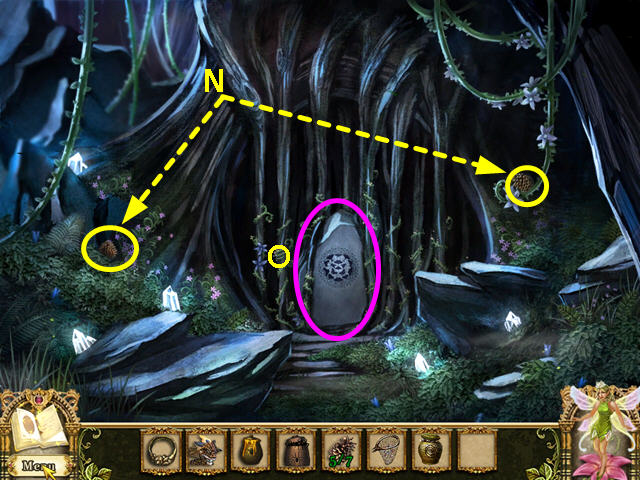
- Collect the 2 PINE CONES (N).
- Look at the stone door (O).

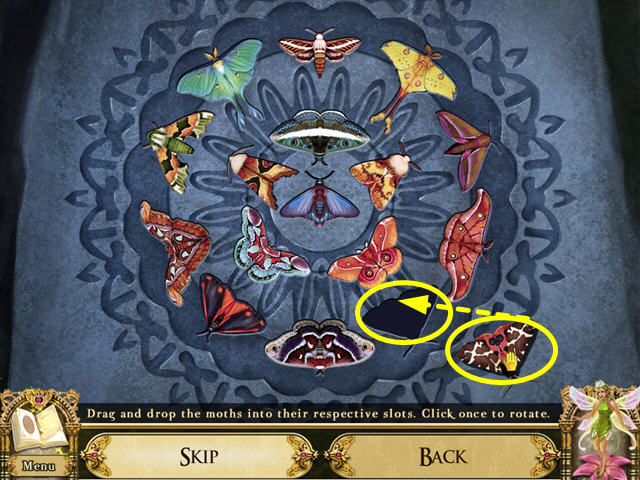
- Use the NET FULL OF MOTHS on the stone surface.
- Drag and drop the moths into the matching outlines.
- Click to rotate the moth into position.
- Walk forward to the herb garden.

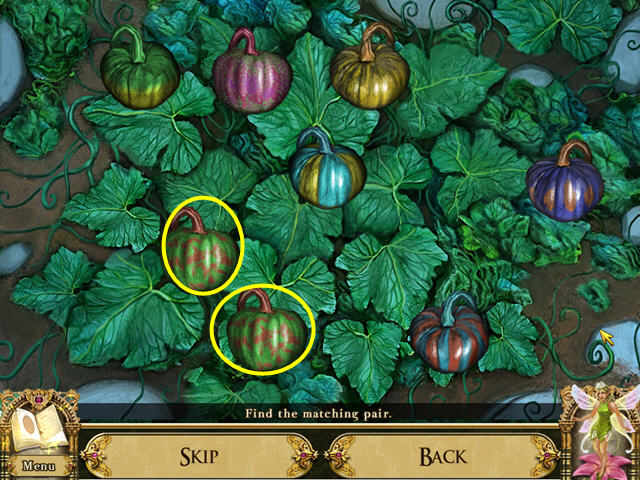
- Select the colorful patch of gourds for a mini-game.
- Find the matching pair in each group.
- You will have to find 6 pairs of gourds.
- Take the GIANT GOURD that appears.

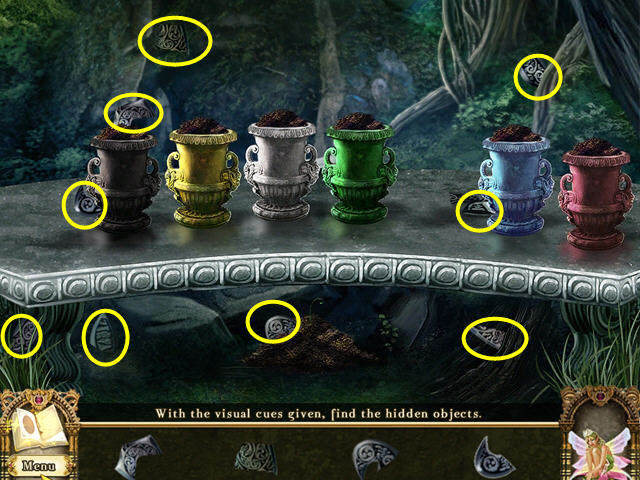
- Look at the bench with the pots on the right.
- Locate all the pieces.
- The KEY FRAGMENTS will go into your inventory.
- Exit the close-up and walk forward to the door.

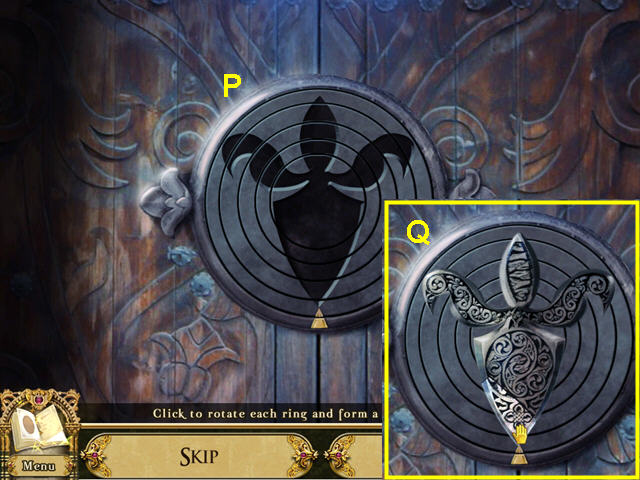
- Click on the rings to rotate them into position to form the symbol (P).
- Place the KEY FRAGMENTS on the symbol (Q).
- Drag and drop the fragments into the outline.
- Click to rotate the fragment into position.

- Walk forward and enter the tower.
- Take the GARDEN TROWEL from the edge of the well.
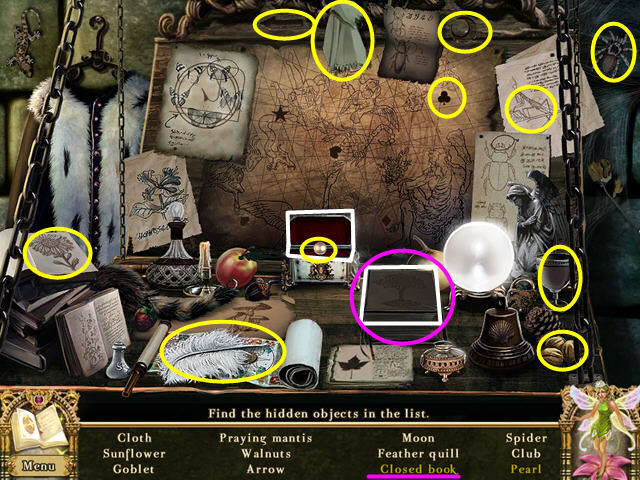
- Select the desk on the right for a hidden object game.
- Click on the book to close it.
- Click on the jewel chest to find the pearl.
- The BOTANY BOOK will go into your inventory.

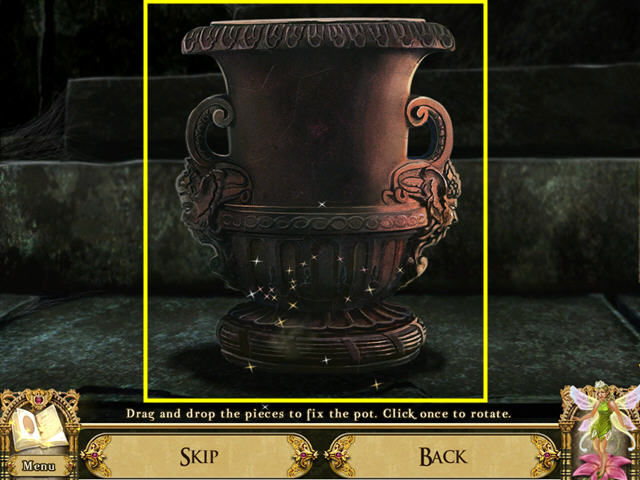
- Select the broken clay pot on the left for a mini-game.
- Drag and drop the fragments into the outline.
- Click to rotate the fragment into position.

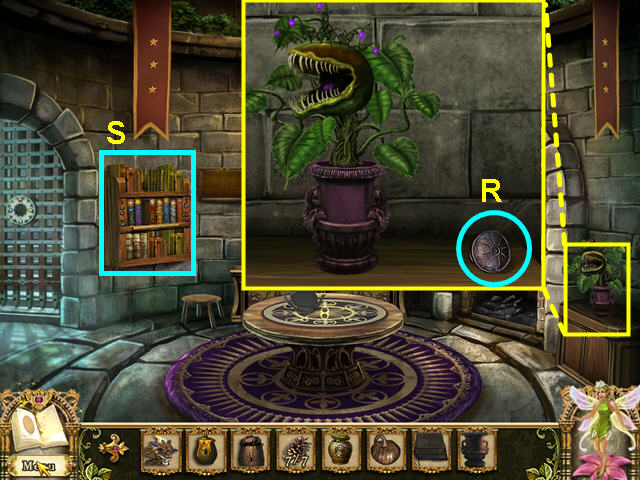
- Walk up the stairs.
- Look at the close-up of the plant on the right and take the DOORKNOB (R).
- Look at the bookcase on the right for a mini-game.

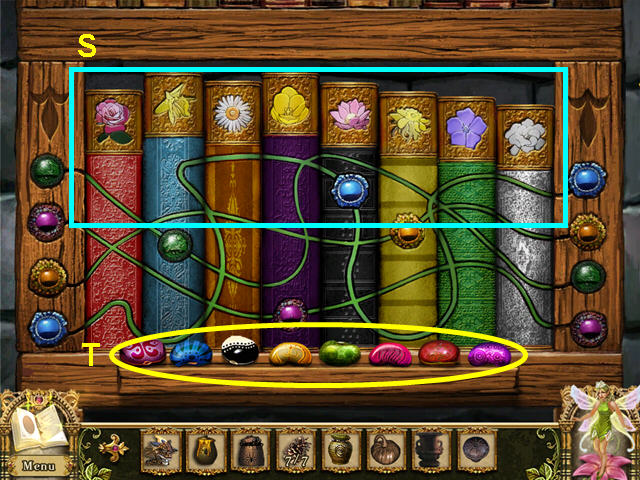
- Place the BOTANY BOOK on the shelf to trigger the mini-game.
- Swap the books until all the vines are complete.
- Click on 2 books to swap their positions.
- Note the color of the books and the flowers at the top of each (S).
- This information will be in your journal.
- Take the MAGIC BEANS (T).
- Walk downstairs and exit the tower.

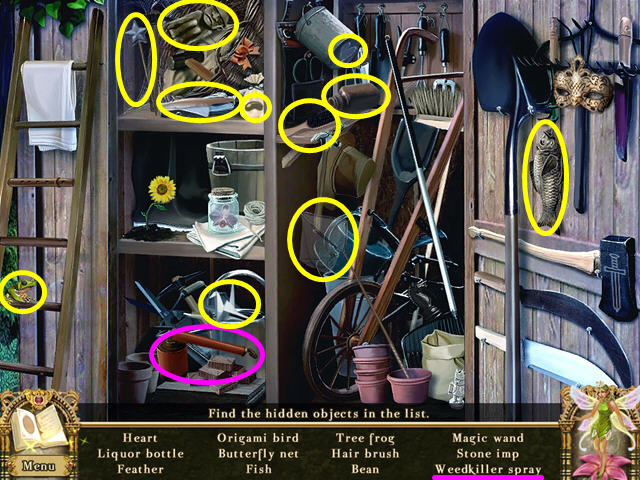
- Look at the wooden shed and use the DOORKNOB on the hole for a hidden object scene.
- Locate all the items on the list.
- The WEEDKILLER SPRAY will be added to your inventory.
- Enter the tower and go up the stairs.

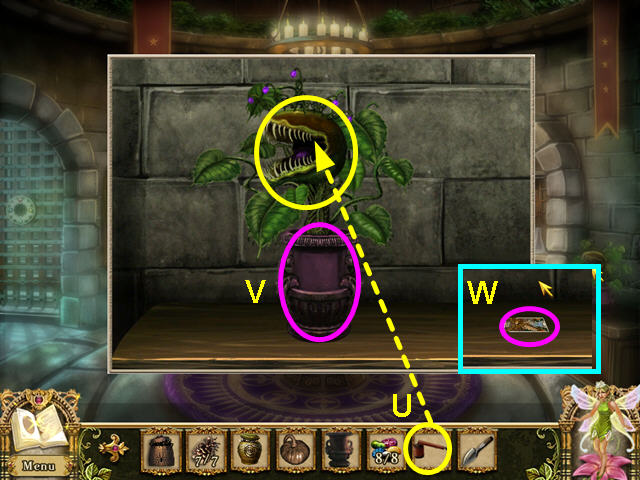
- Look at the plant on the right and use the WEEDKILLER SPRAY (U).
- Take the POT FULL OF DIRT (V).
- Take the MAGIC CARD: THE GRIFFIN (W).

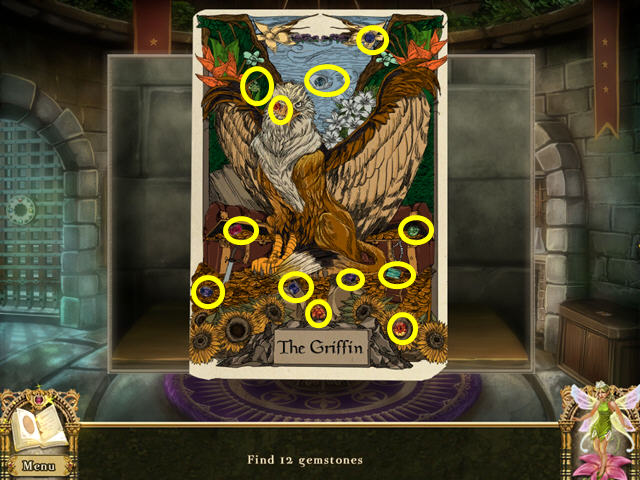
- Locate the 12 gemstones.
- Walk down the stairs and exit the tower.
- Look at the bench of pots on the right.

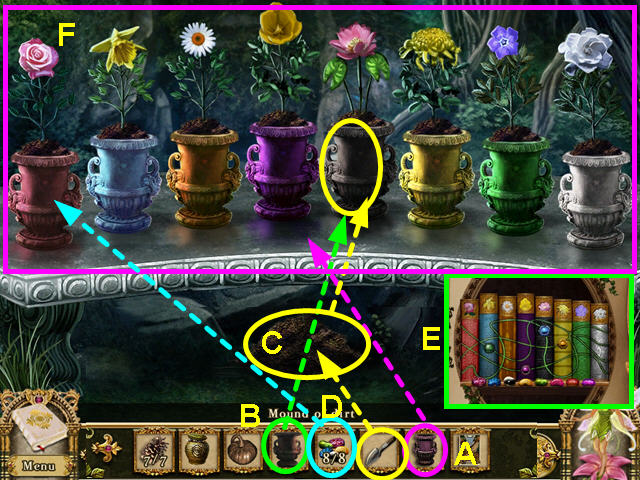
- Place the POT FULL OF DIRT on the bench (A).
- Place the EMPTY POT on the bench (B).
- Use the GARDEN TROWEL on the dirt pile and place it into the empty pot 3 times (C).
- Use the MAGIC BEANS on the pots (D).
- Using the orders from the bookshelf (E), rearrange the pots and flowers to match (F).
- Click on 2 pots or flowers to swap positions.
- Take the gems that appear on the 5 left flowers.
- Enter the tower and go up the stairs.

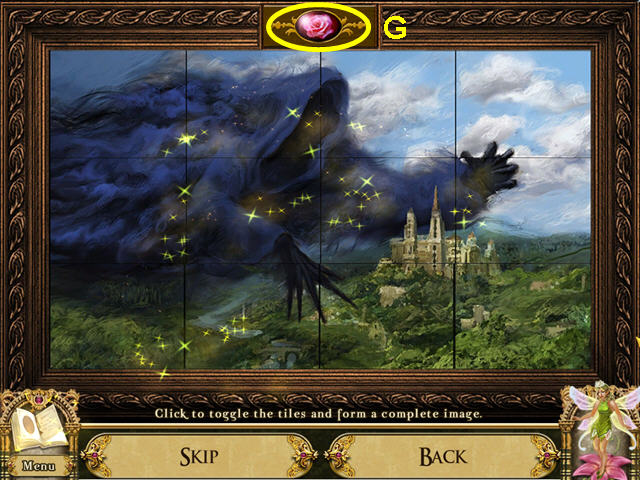
- There are 4 frames on the wall, look at the left one.
- Place the rose QUARTZ in the top niche (G).
- Click on each of the tiles to form a picture.
- Behind the picture, push the red switch and take the 2 ROTARY DIALS.
- Exit the close-up.

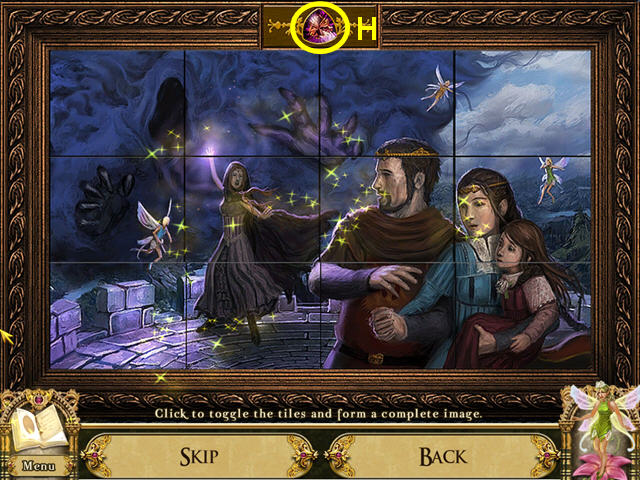
- Look at the frame second from the left.
- Place the AMETHYST in the top niche (H).
- Click on each of the tiles to form a picture.
- Behind the picture, push the blue switch and take the 2 ROTARY DIALS.
- Exit the close-up.

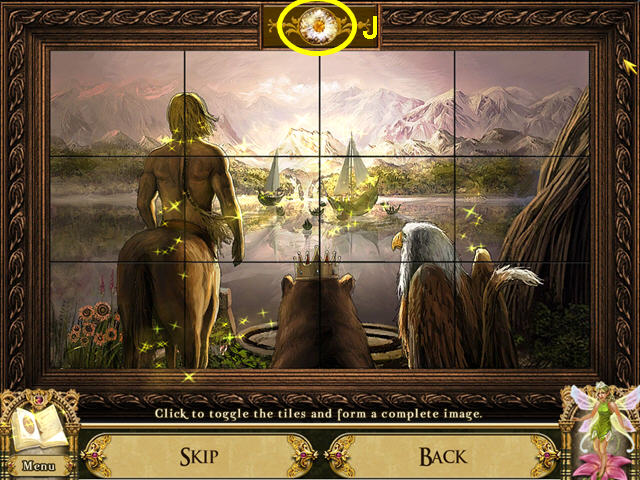
- Look at the frame second from the right.
- Place the CITRINE in the top niche (J).
- Click on each of the tiles to form a picture.
- Behind the picture, push the yellow switch and take the 2 ROTARY DIALS.
- Exit the close-up.

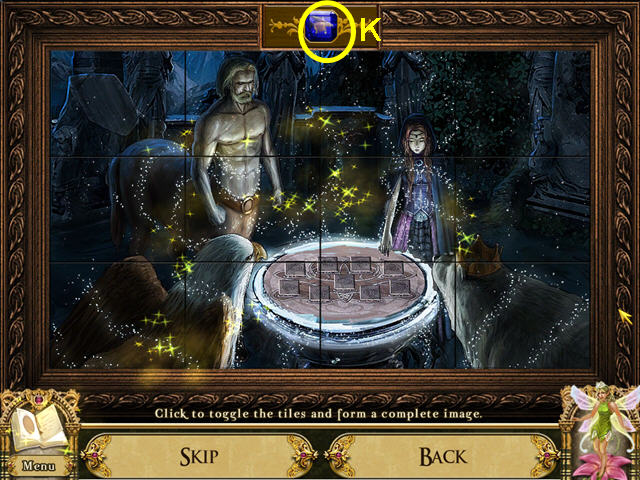
- Look at the second frame from the right.
- Place the SAPPHIRE in the top niche (K).
- Click on each of the tiles to form a picture.
- Behind the picture, push the green switch and take the 2 ROTARY DIALS.
- Exit the close-up.

- Walk down 7 times and enter the pavilion.
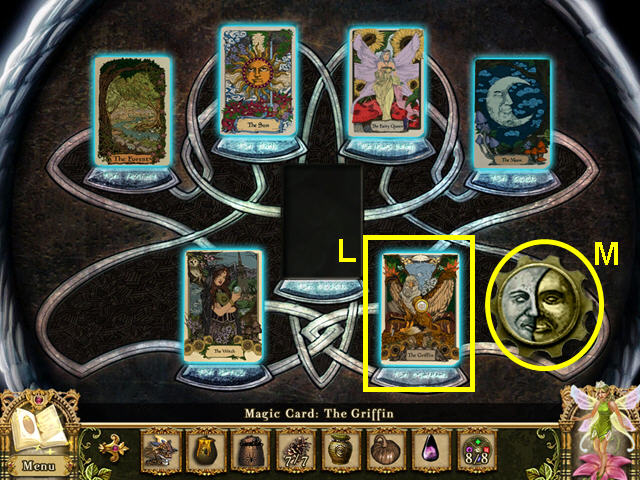
- Look at the stone table.
- Place the MAGIC CARD: THE GRIFFIN in the lower, right slot (L).
- Take the DISC OF SUN AND MOON that appears (M).
- Exit the pavilion and return to the middle floor of the witch’s tower.

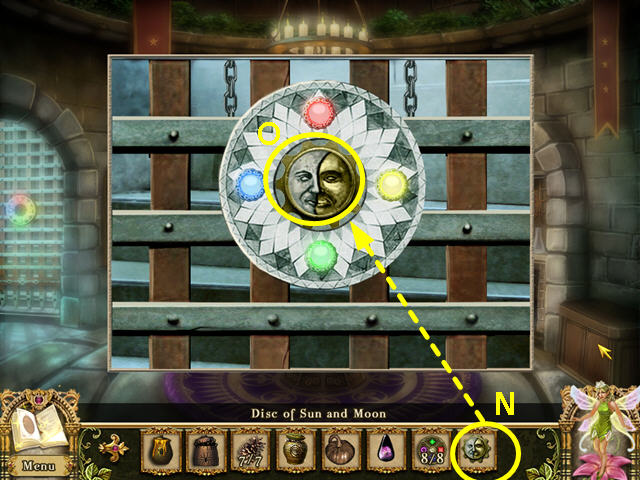
- Look at the close-up of the door on the left.
- Use the DISC OF SUN AND MOON in the center of the gems (N).
- Press on the disc to open the door (O).
- Walk up the stairs.

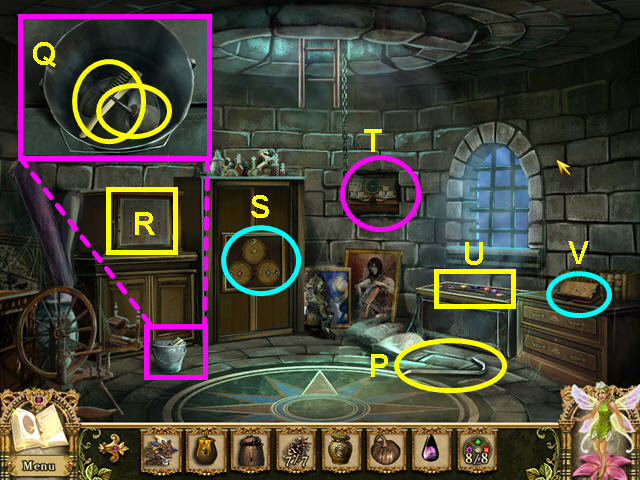
- Take the CROWBAR (P).
- Look in the bucket and take the OIL CAN and the WIRE BRUSH (Q).
- Note the cabinet mini-game (R).
- Note the utility cupboard (S).
- Note the weighing device (T).
- Note the alchemy chest (U).
- Look at the grimoire (V).

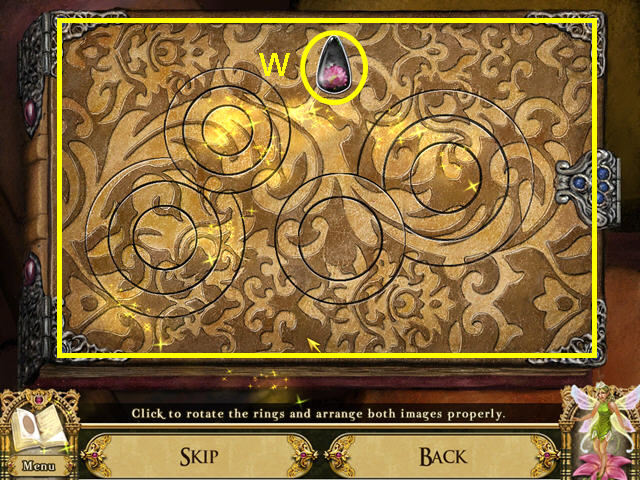
- Place the ONYX gem into the upper niche (W).
- Rotate the rings to restore the pattern on the cover.

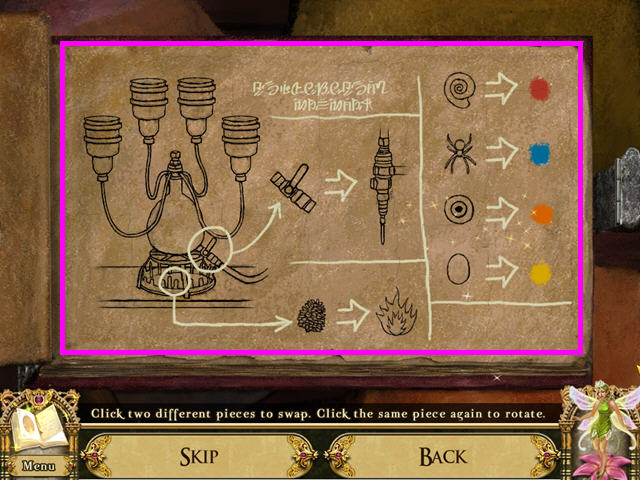
- The object of this mini-game is to restore the diagram.
- Click on two pieces of paper to swap positions; click again to rotate a paper.
- The diagram will go in your journal.

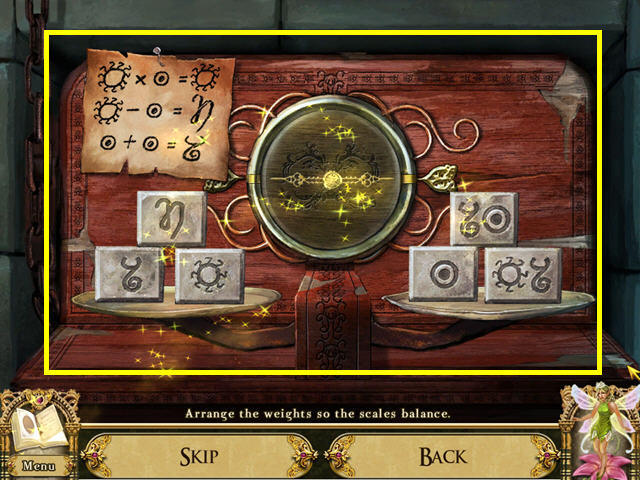
- Look at the weighing device on the back wall.
- Balance the scales.
- Click on 2 tiles to swap positions.
- This will lower the ladder to the ventilation shaft.

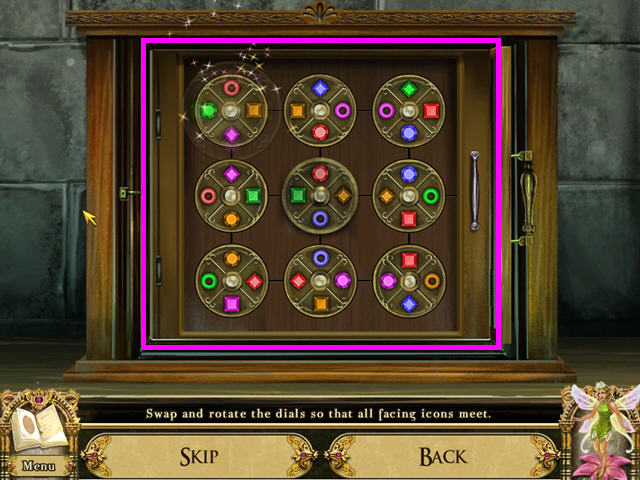
- Look at the cabinet on the left.
- Click to open the glass door.
- Use the 5 ROTARY DIALS on the device.
- The object is to arrange the dials so that all touching gems match.
- Click on 2 dials to swap positions.
- Click again on a dial to rotate it in place.
- The center dial does not move.

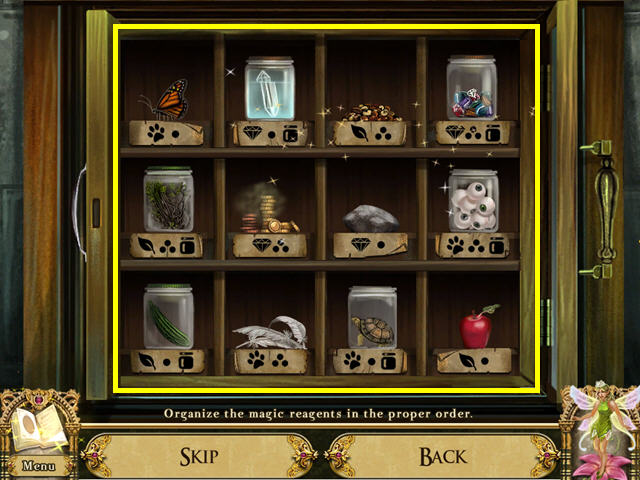
- Arrange the items according to the labels.
- The labels indicate whether an item is plant, animal, or mineral.
- One dot indicates one of the item; 3 dots means more than one.
- Some positions also require the item be in a jar.
- Click on 2 items to swap positions.
- Once an item is in the correct position, it will lock in place.
- Take the JAR OF EYEBALLS that remains.

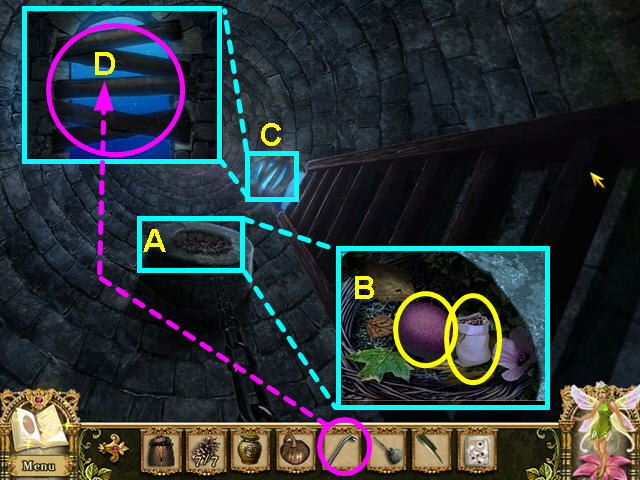
- Climb up the ladder.
- Look at the close-up of the nest (A).
- Take the BIRD’S EGG and the PACKET OF SEED (B).
- Look at the window (C).
- Use the CROWBAR 4 times to remove the boards (D).
- Climb out the window.

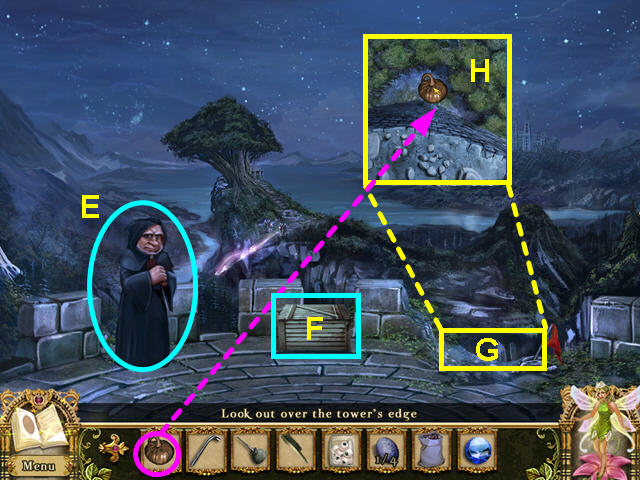
- Talk to the goblin and he will give you the TWILIGHT GEM (E).
- Note the locked box (F).
- Look over the edge of the building (G).
- Drop the GIANT GOURD over the entry stone (H).
- Exit the rooftop and go down the ladder.
- Look at the alchemy chest.

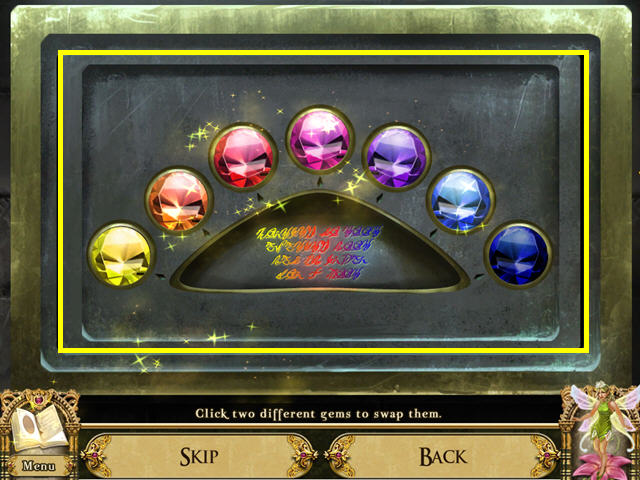
- Use the TWILIGHT GEM on the chest to trigger a mini-game.
- Arrange the gems from left to right, lightest to darkest.
- Click on 2 gems to swap their locations.
- Inside the chest, take the STEEL WEIGHT.
- Select the broken flask for a mini-game.

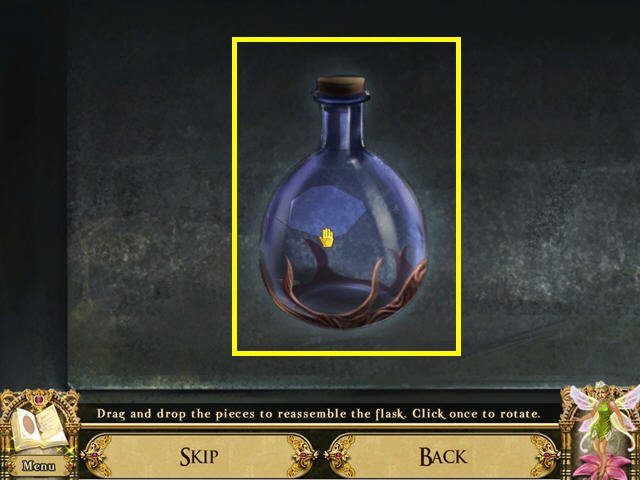
- The object of this mini-game is to restore the flask.
- Click on 2 pieces of glass to swap positions; click again to rotate a piece of glass.
- The ALCHEMICAL FLASK will go into your inventory.
- Walk down the stairs twice and exit the tower.

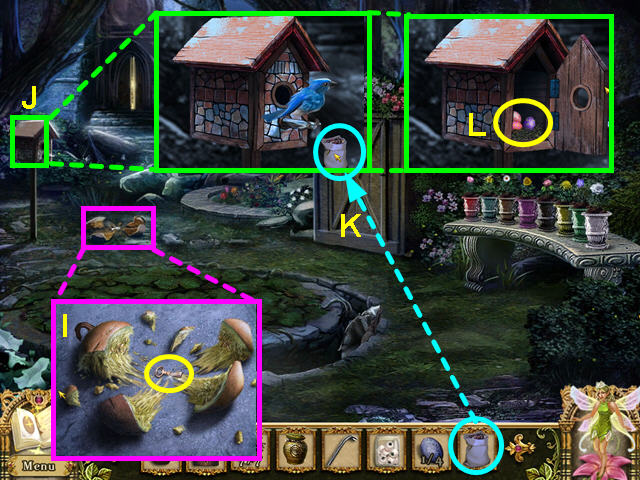
- Look at the smashed gourd and take the SMALL BRONZE KEY (I).
- Look at the birdhouse (J).
- Use the PACKET OF BIRD SEED on the bird (K).
- Once the bird flies away, open the front of the birdhouse and take the 3 BIRD’S EGGS (L).
- Enter the tower and look at the night stand.

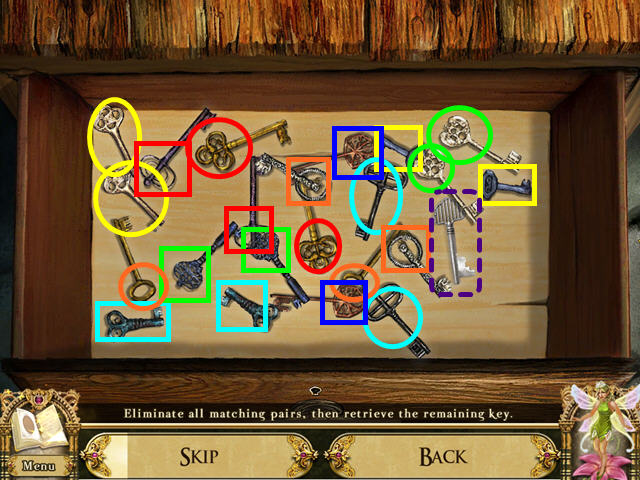
- Use the SMALL BRONZE key to unlock the nightstand drawer.
- Select matching pairs of keys until only one key remains.

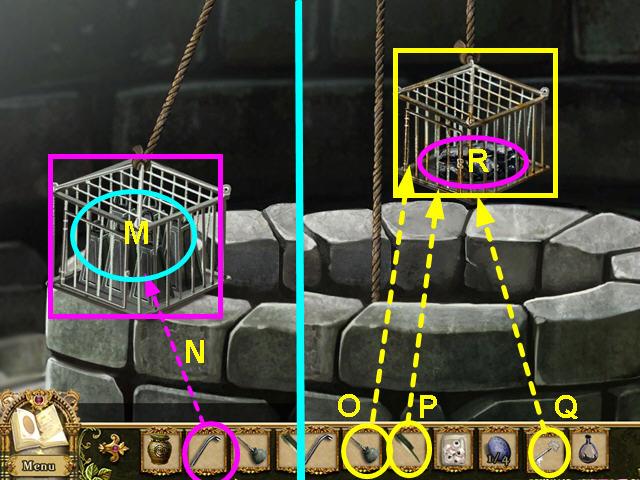
- Look at the close-up of the well.
- Place the STEEL WEIGHTS into the cage (M).
- Use the CROWBAR to tip the cage into the well (N).
- Once the other cage appears, use the OIL CAN on the hinges (O).
- Use the WIRE BRUSH to clean off the rust (P).
- Use the IRON KEY to open the cage (Q).
- Take the LEAD BLOCK (R).
- Walk up the stairs and look at the alchemy set.

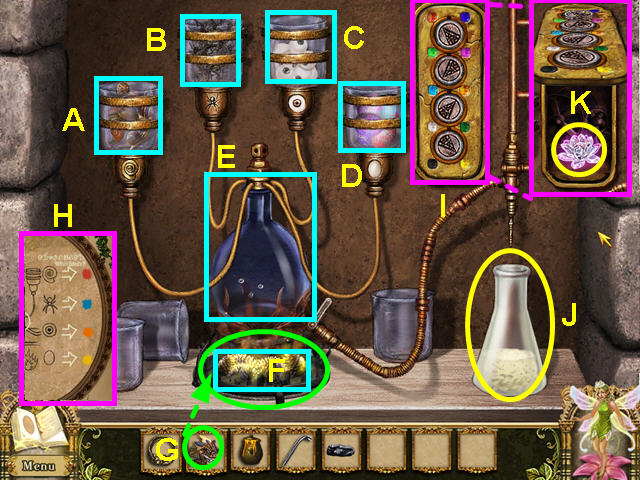
- Use the JAR OF SNAILS on the left receptacle (A).
- Use the JAR OF SPIDERS on the second from the left receptacle (B).
- Use the JAR OF EYEBALLS on the next receptacle (C).
- Place the 4 BIRD’S EGGS into the right receptacle (D).
- Place the FLASK on the burner (E).
- Put the PINE CONES below the flask (F).
- Light the pine cones with the POCKET DRAGON (G).
- Look at your journal for the correct settings (H).
- Turn the pointers to match the journal diagram (I).
- Take the PHILOSOPHER’S BALM (J).
- Take the CRYSTAL GEM (K).
- Walk down twice to exit the tower.

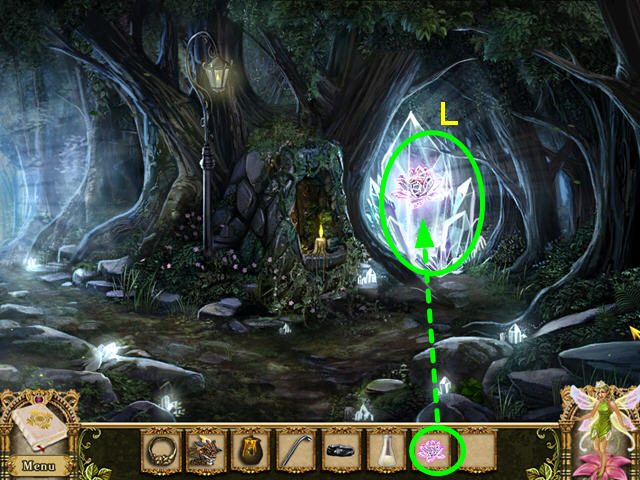
- Walk down twice to return to the crossroads.
- Use the CRYSTAL GEM on the crystal barrier (L).
- Take the right path to the Bear King’s clearing.

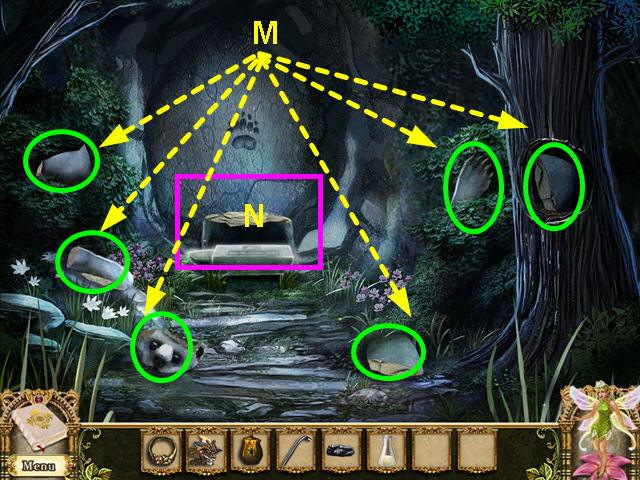
- Collect the 6 pieces of the petrified bear (M).
- Use the pieces on the pedestal for a mini-game (N).

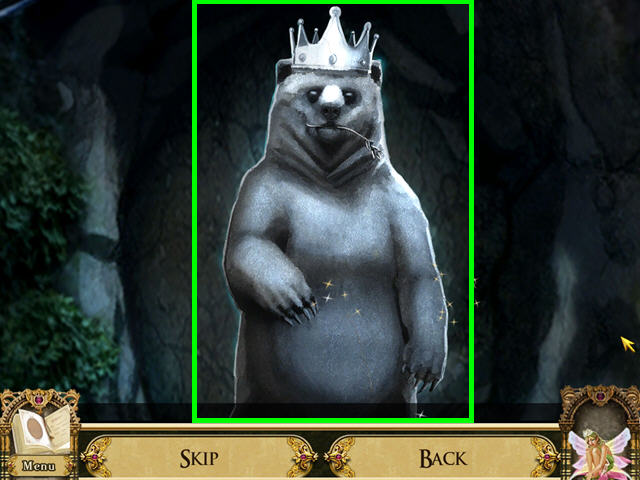
- Restore the petrified bear.
- Click on a piece of the bear to take or place it; click again to rotate the piece in place.

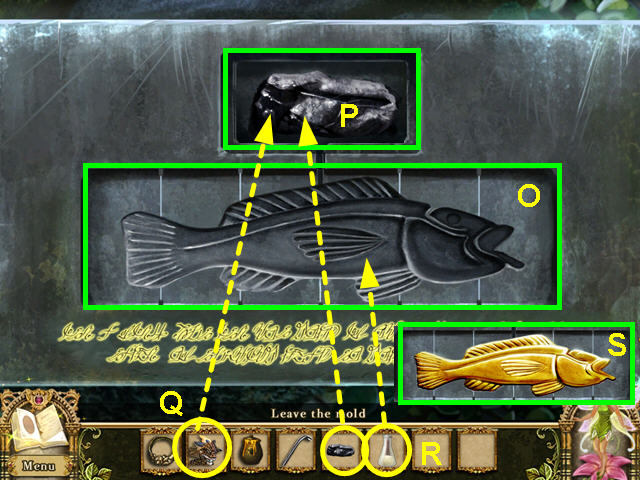
- Look at the base of the petrified bear.
- Click on the panels to restore the fish (O).
- Place the LEAD BLOCK in the upper receptacle (P).
- Use the POCKET DRAGON on the lead block 4 times to melt it into the fish mold (Q).
- Use the PHILOSOPHER’S BALM on the lead fish (R).
- Take the GOLD FISH (S).
- Use the GOLD FISH on the petrified bear.
- Give the Bear King the HONEY POT.
- The Bear King will give you his GOLDEN CROWN.
- Walk down to the crossroads.
- Take the left path and walk forward.

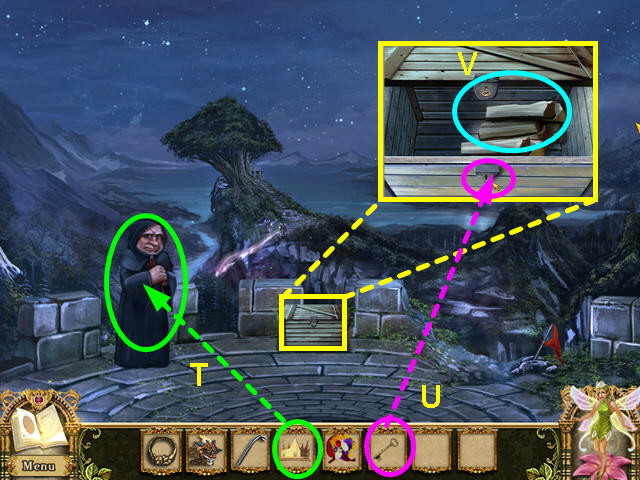
- Continue to the tower roof.
- Give the goblin the GOLDEN CROWN (T).
- The goblin will give you the FIRE WOOD BOX KEY and FLOWERS.
- Unlock the box with the FIRE WOOD BOX KEY (U).
- Take the FIREWOOD (V).
- Leave the roof and go down 3 levels to the ground floor.

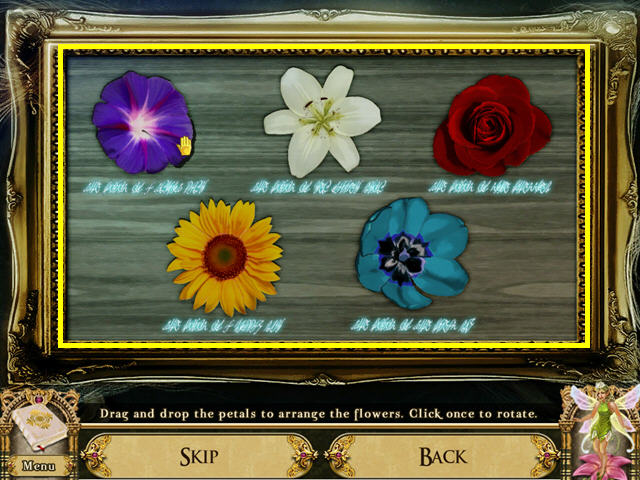
- Look at the herb chest at the foot of the stairs.
- Use the FLOWERS on the lid to trigger a mini-game.
- Restore the 5 flowers to the correct niches.
- Move your cursor over the script for clues about which flower goes where.
- Click to take or place a flower piece; click again to rotate it in place.

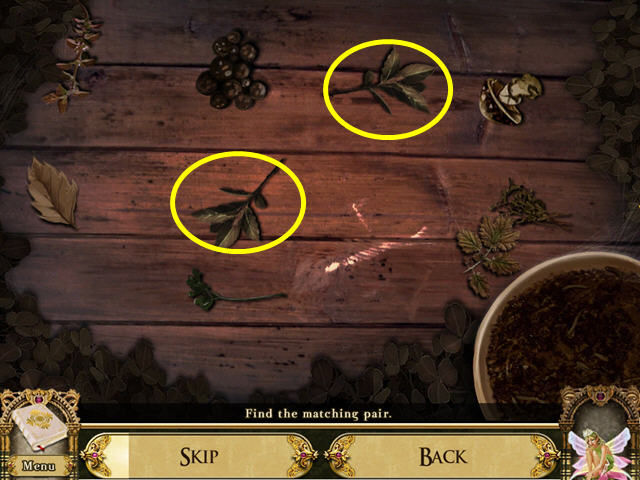
- Click the 2 matching herbs.
- You will have 7 screens with one match to find in each.
- Take the EMPTY IRON KETTLE and the HERB GUIDE.

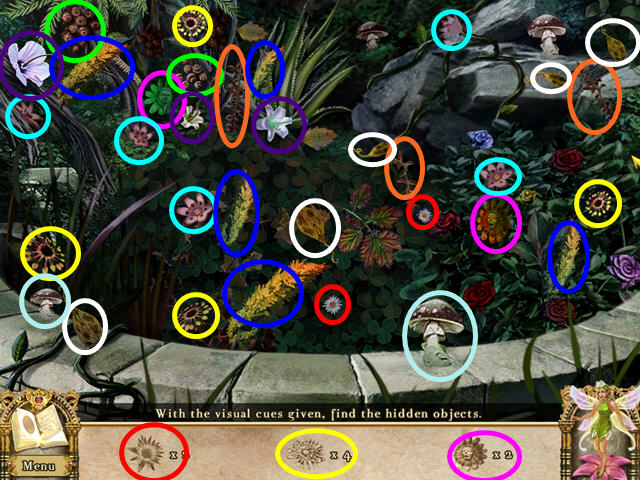
- Exit the tower and look at the herb garden left of the shed.
- Locate all the items on the list.
- The POSY OF HERBS will go into your inventory.
- Walk down 5 times and use the EMPTY IRON KETTLE on the Moon fountain to collect some water.
- Cross the Moonbridge and return to the third floor of the witch’s tower.

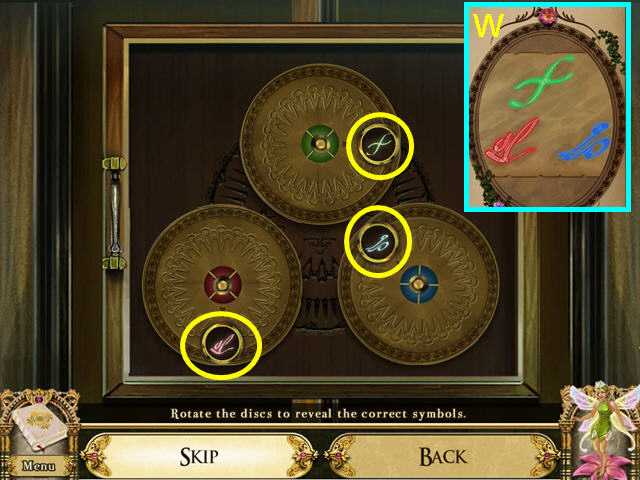
- Look at the cabinet for a mini-game.
- Refer to your journal for the combination (W).
- Click on each dial to rotate it to the correct symbol.

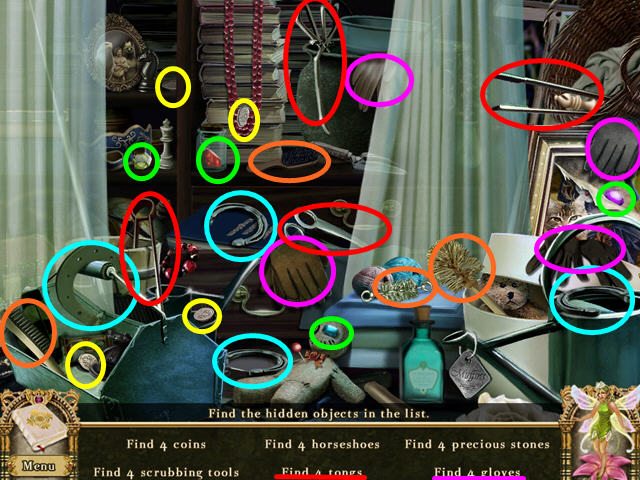
- Locate all the hidden objects on the list.
- TONGS and OVEN GLOVES will go into your inventory.
- Walk down the stairs.

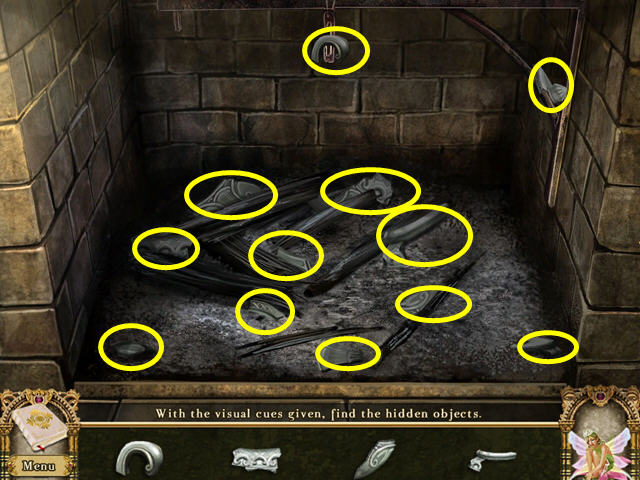
- Use the TONGS on the fireplace for a hidden object scene.
- Locate all the teapot fragments.
- The BROKEN TEAPOT FRAGMENTS will go into your inventory.

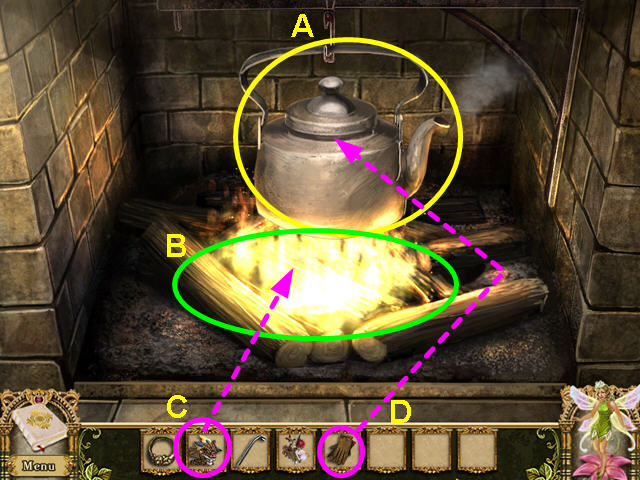
- Place the FIREWOOD in the fireplace (A).
- Hang the KETTLE on the hook (B).
- Light the fire with the POCKET DRAGON (C).
- Take the BOILED WATER KETTLE with the OVEN GLOVES (D).
- Look at the round table in the center of the room.

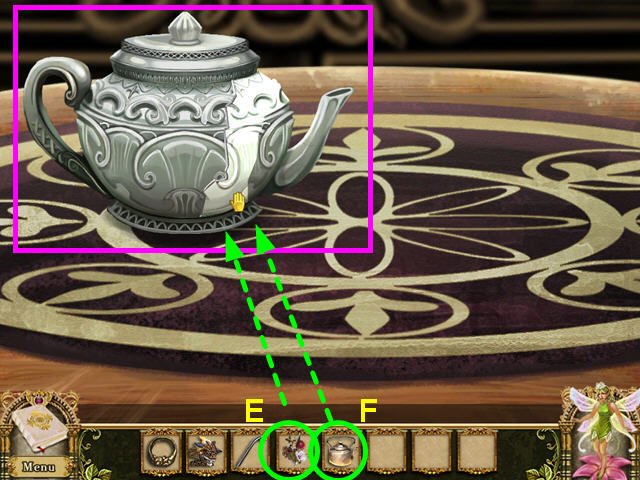
- Use the BROKEN TEAPOT FRAGMENTS on the broken teapot.
- Repair the teapot.
- Click to take or place a fragment; click again to rotate it in place.
- Use the POSY OF HERBS on the teapot (E).
- Use the BOILED WATER KETTLE on the teapot (F).
- The TEAPOT will go into your inventory.
- Walk up the stairs and continue to the roof.
- Give the TEAPOT to the goblin to play a game of Tripeaks.

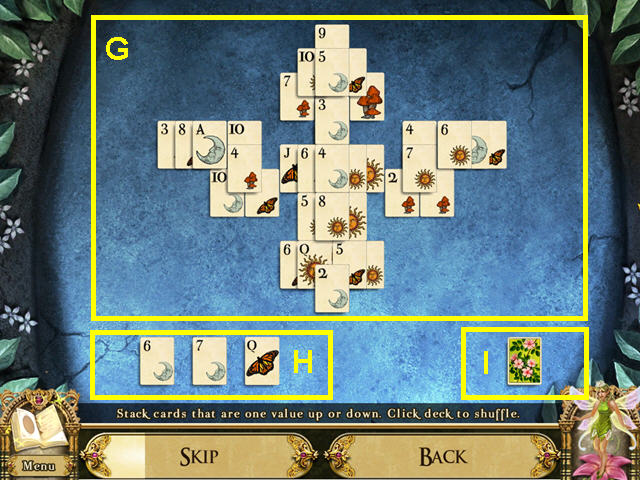
- Click on cards in the upper tableau (G) that are one higher or lower than a card in the bottom row (H).
- Click on the deck of cards to shuffle if you run out of moves (I).
- If you run out of cards and have not cleared the tableau, a new game will be dealt.
Part 6: Search for the Witch

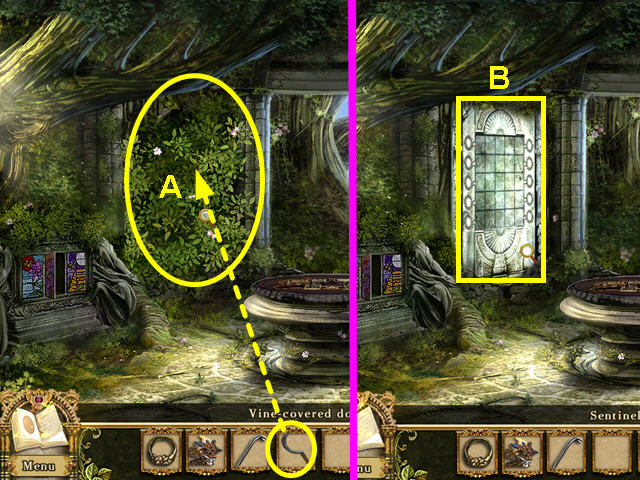
- The goblin has escorted you back to the pavilion and daylight.
- The gift of a HAND SCYTHE was given by the goblin.
- Use the HAND SCYTHE on the Vines (A).
- Select the uncovered door for a mini-game (B).

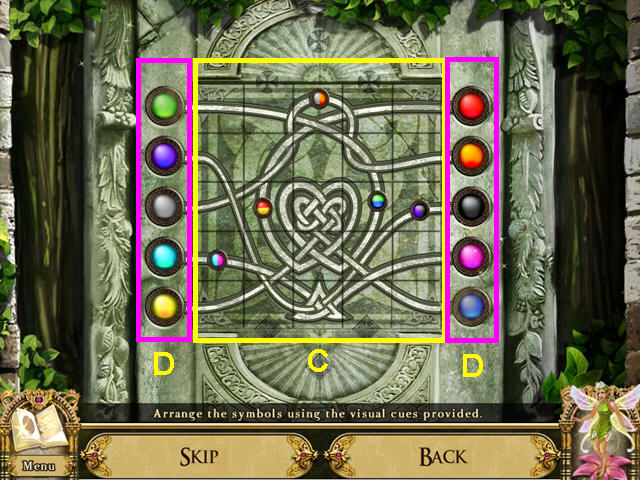
- Part one of this mini-game is restoring the center diagram (C).
- Click on 2 tiles to swap their locations; click on a single tile to rotate it in place.
- Once all the tiles are properly placed, colored marbles will appear in the 2 outer columns (D).
- Use the balls in the center diagram to show where the colored marbles should be placed.
- Click on 2 marbles to swap their positions.
- Enter the root shaft and go down the ladder.

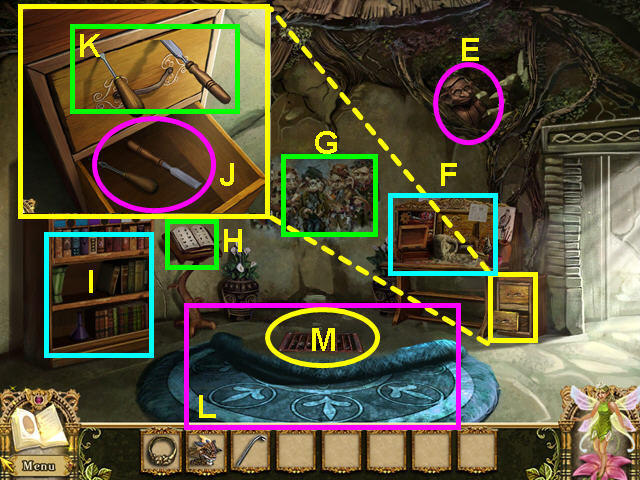
- Take the BUST of CRAFTSMAN JACQUES (E).
- Note the workbench (F).
- Note the mural (G).
- Take note of the lectern (H).
- Note the bookshelf (I).
- Open the bottom drawer; take the CHISEL and the SCREWDRIVER (J).
- Use the CHISEL and the SCREWDRIVER on the top drawer (K).
- Open the top drawer; take the HAMMER and the WOODCARVING KNIFE.
- The hammer will combine with the chisel to form the WOOD SCULPTING KIT.
- Pull back the rug (L).
- Look at the grate and use the SCREWDRIVER on the 4 screws (M).
- Open the grate with the CROWBAR to trigger a hidden object scene.

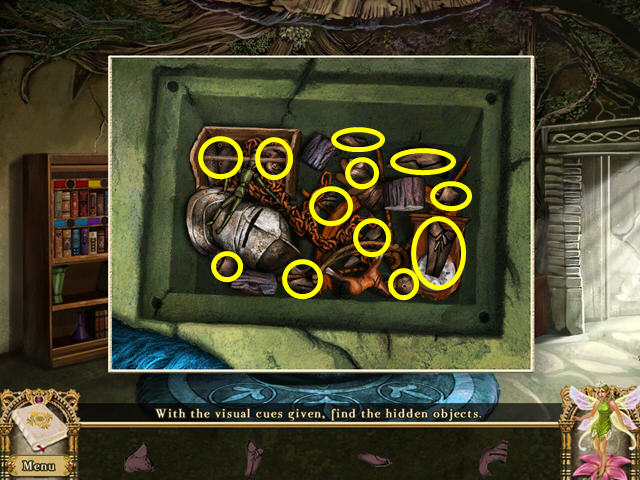
- Locate the 12 bust fragments.
- The BUST FRAGMENTS will go into your inventory.

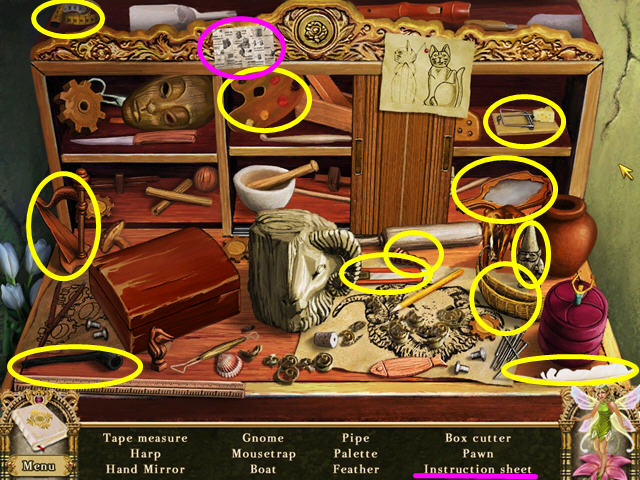
- Look at the workbench for a hidden objects scene.
- Locate all the items on the list.
- Open the 2 cabinets to reveal the hidden items.
- You will earn the WOODCARVER’S GUIDE.

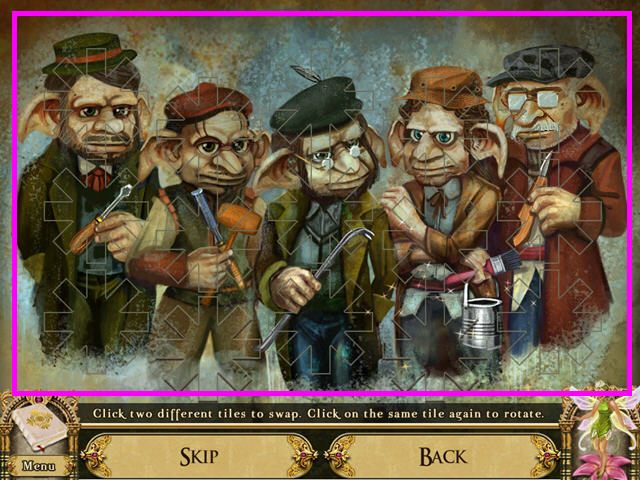
- Look at the wall mural for a mini-game.
- Restore the mural of the goblins.
- Click on 2 puzzle pieces to swap their positions; click on one piece to rotate it in place.
- A secret compartment will open; take the VARNISH KIT within.

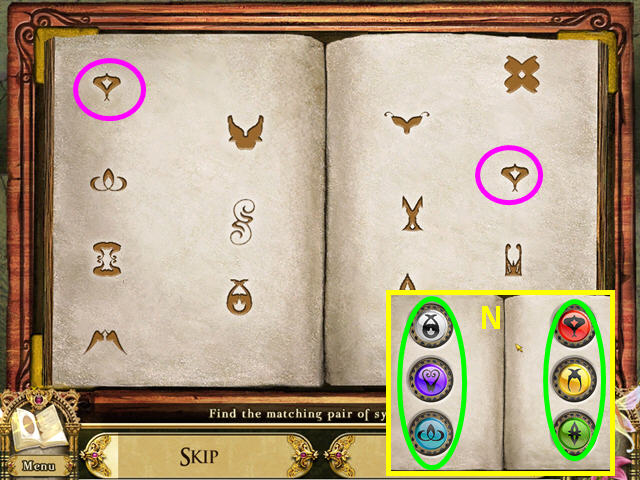
- Look at the lectern for a mini-game.
- Locate the matching pair of symbols.
- There are 7 sets of pairs.
- Take the 6 MAGIC CIRCLES (N).

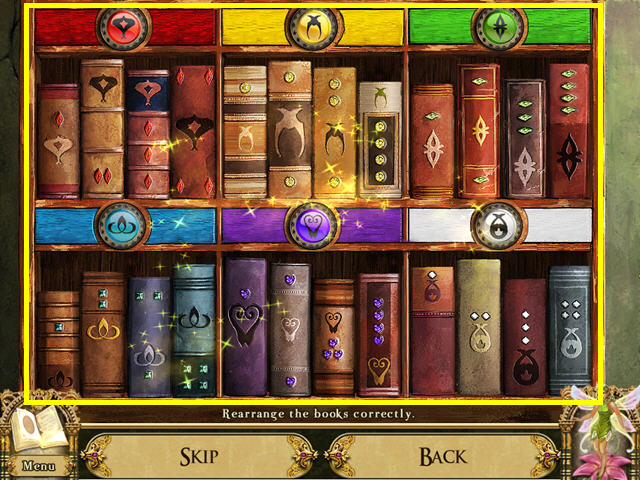
- Look at the bookshelf.
- Use the 6 MAGIC CIRCLES on the 6 round holes.
- Place the circle in the hole that has the same color on its bar.
- Now rearrange the books.
- Move all the books to the section that has the matching symbol.
- Click on 2 books to swap positions.
- Put the books in numerical order in each section.
- Each book has 1, 2, 3, or 4 gems.

- Enter the secret chamber behind the bookshelf.
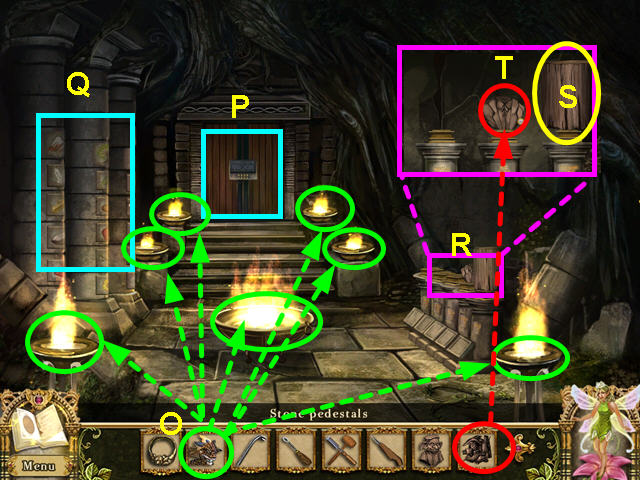
- Light the 7 braziers with the POCKET DRAGON (O).
- Note the grand doors in the rear of the chamber (P).
- Note the stone pillars on the left (Q).
- Look at the stone pedestals on the right (R).
- Take the WOOD BLOCK (S).
- Use the BUST FRAGMENTS on the broken bust (T).

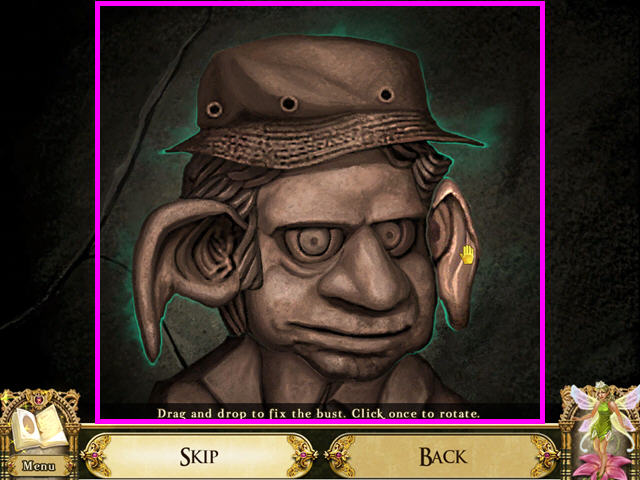
- Restore the bust head.
- Click on a piece to take or place it; click again to rotate the piece in place.

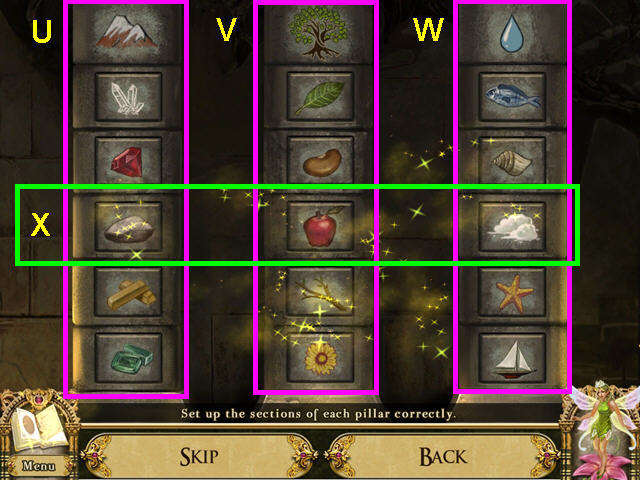
- Look at the stone pillars left of the chamber.
- Click on the tiles in each column to change each to an item that relates to the header.
- The items in the left column are all minerals found in a mountain (U).
- The middle column should have items related to a tree (V).
- The right column holds items related to water (W).
- Take the 3 BRASS PARTS that will appear in the center tile of each column (X).
- Walk down to exit the chamber.

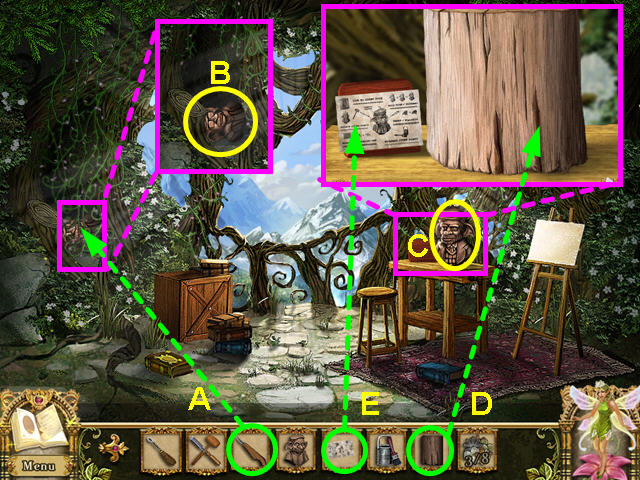
- Walk through the door on the right to the root balcony.
- Cut the vines on the left with the WOOD CARVING KNIFE (A).
- Look at the close-up and take the BUST OF CRAFTSMAN ALBERT (B).
- Look at the workbench and take the BUST OF CRAFTSMAN GREGOR (C).
- Take the SANDPAPER that was underneath the bust.
- Place the BLOCK OF WOOD on the workbench (D).
- Place the WOODCARVER’S GUIDE on the stand on the left (E).

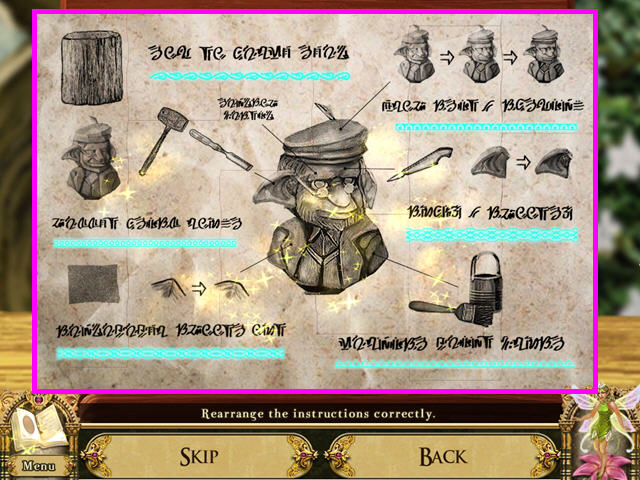
- Restore the instruction guide.
- Click on 2 pieces of paper to swap their locations.

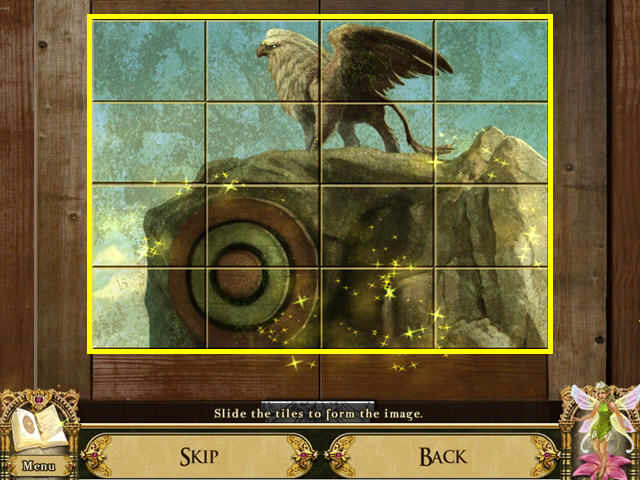
- Carve the block of wood.
- Use the WOOD SCULPTING KIT (hammer and chisel) on the block of wood 5 times (F).
- Next, use the WOOD CARVING KNIFE on the bust (G).

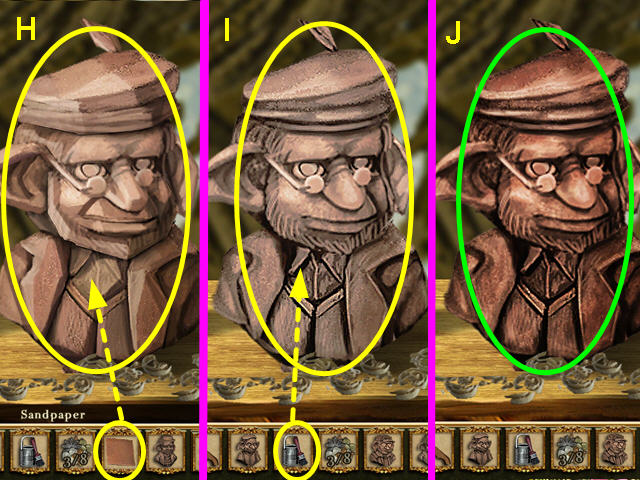
- Use the SANDPAPER on the bust (H).
- Use the VARNISH KIT on the bust (I).
- Take the BUST OF CRAFTSMAN GEORGE (J).
- Exit the room and enter the secret chamber on the left.

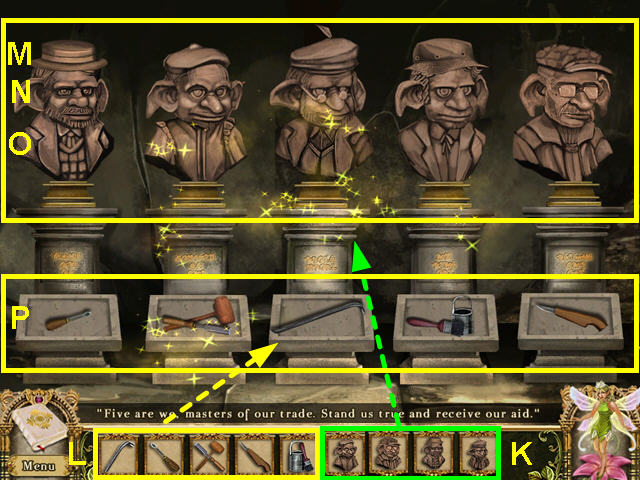
- Look at the stone pedestals on the right.
- Place the 4 BUSTS in your inventory on the pedestals (K).
- Place the SCREWDRIVER, WOOD SCULPTING KIT, WOOD CARVING KNIFE, VARNISH KIT, and CROWBAR onto the lower platforms (L).
- Using the picture of the fresco from your journal, put the hats (M), heads (N), upper torso (O), and tools (P) into the correct order.
- Click on 2 like items to swap positions.
- Once the pedestals open, take the 5 BRASS PARTS.

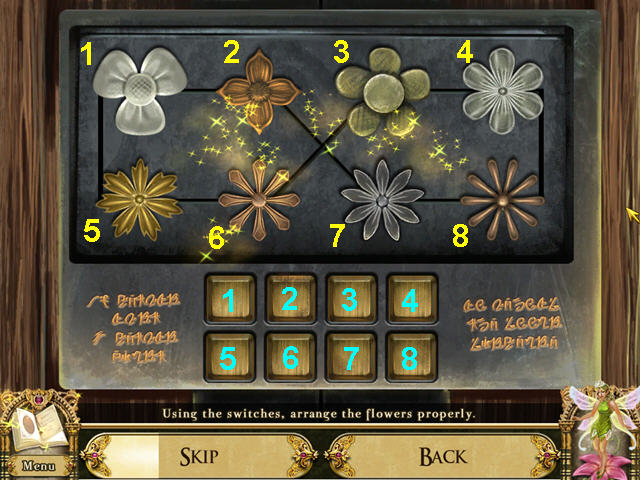
- Look at the grand doors in the rear of the chamber.
- Use the 8 BRASS PARTS on the mechanism to trigger a mini-game.
- Press the buttons to move the flowers in numerical order based on the petals.
- The upper left flower will have 3 petals, while the lower right will have 10 petals.
- This puzzle is random; your solution may vary.
- Each button swaps 2 flowers (Q).
- Button 1 swaps the flowers at the 1 and 2 positions.
- Button 2 swaps the flowers at the 2 and 6 positions.
- Button 3 swaps the flowers at the 3 and 6 positions.
- Button 4 swaps the flowers at the 3 and 4 positions.
- Button 5 swaps the flowers at the 5 and 6 positions.
- Button 6 swaps the flowers at the 2 and 7 positions.
- Button 7 swaps the flowers at the 3 and 7 positions.
- Button 8 swaps the flowers at the 7 and 8 positions.
- The sample solution was buttons: 2, 4, 8, 7, 3, 5, 3, 8, 7, 3, and 7.
- Walk forward through the doors.

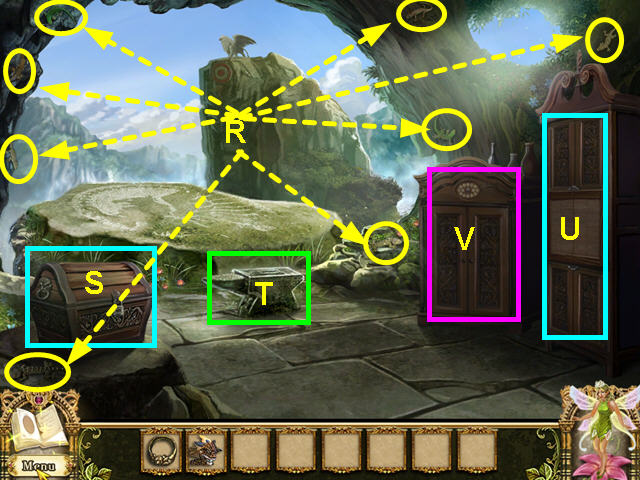
- Collect the 8 LIZARDS (R).
- Note the locked chest on the left (S).
- Make note of the griffin’s mold on the anvil (T).
- Note the armory cabinet on the right (U).
- Look at the curio cabinet for a mini-game (V).

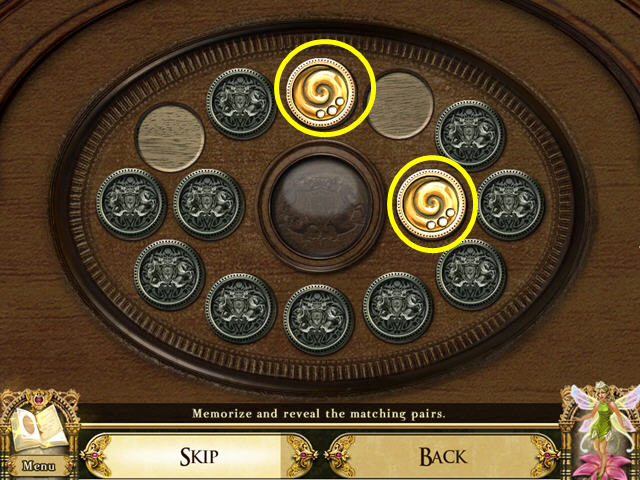
- Find all the matching pairs.
- Turn over 2 discs at a time and memorize each location.
- Turn over matching discs to clear the board.

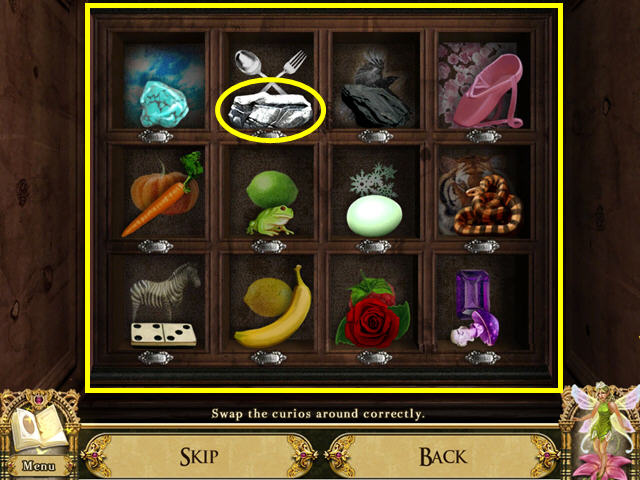
- Move the items into the correct nook.
- Match the color of the item with the picture in the nook.
- Click on 2 items to swap their positions.
- Once complete, take the SILVER INGOT.


- Look at the armory cabinet on the right.
- Slide the tiles to restore the picture.
- This puzzle is randomly generated.
- Click and drag an adjacent tile into the empty spot.

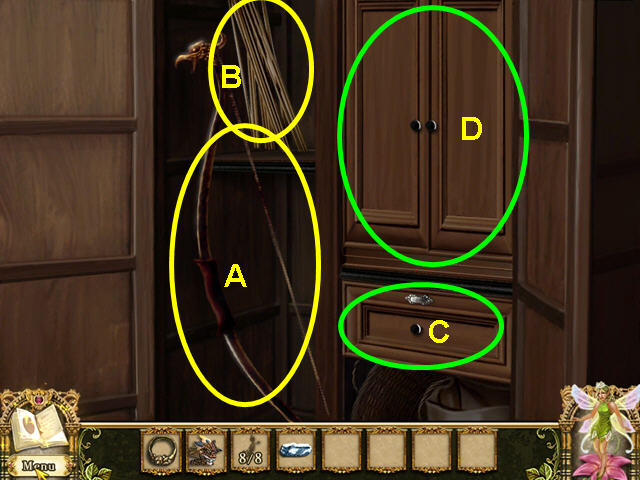
- Take the BOW (A) and the ARROW SHAFTS (B).
- Note the drawer on the right (C).
- Open the upper right cabinet (D).

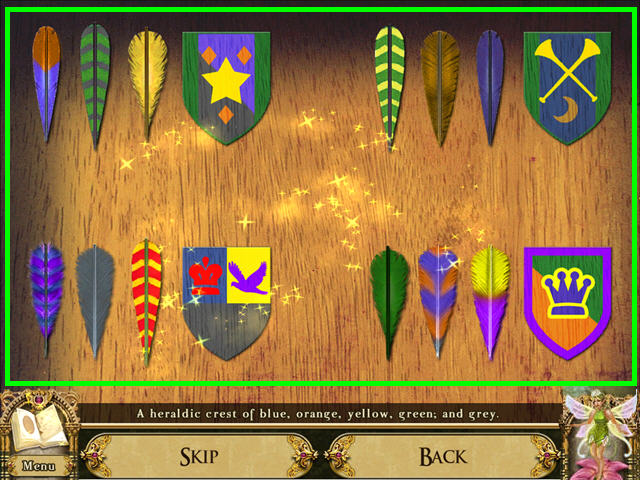
- Swap the feathers so that each color in the coat of arms is represented in the 3 feathers.
- Click on 2 feathers to swap their positions.
- You will earn FLETCHING FEATHERS.
- Click on the symbols etched in the wood to add them to your journal.

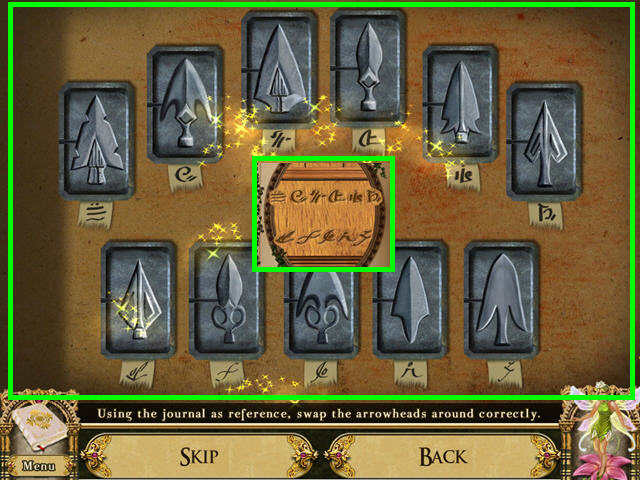
- Open the bottom drawer.
- Use the order of the symbols in your journal to arrange the arrowheads.
- Click on 2 arrowheads to swap their positions.
- You will earn the ARROWHEAD MOLD.
- Look at the griffin’s mold on the anvil.

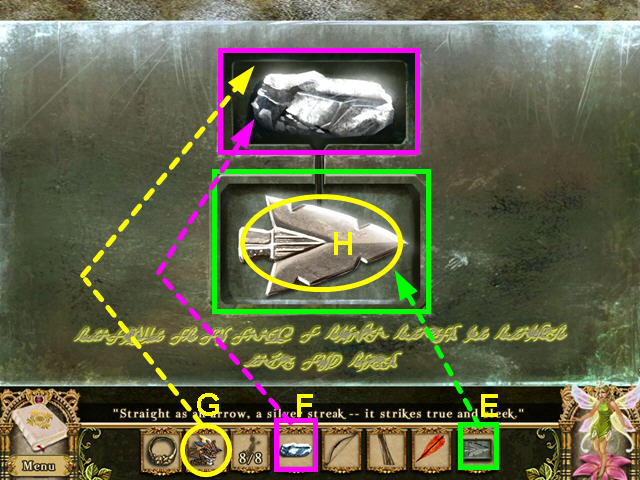
- Place the ARROWHEAD MOLD in the bottom indentation (E).
- Place the SILVER INGOT in the upper indentation (F).
- Use the POCKET DRAGON 4 times on the silver ingot (G).
- Take the SILVER ARROHEAD (H).
- The SILVER ARROWHEAD will combine with the BOW, ARROW SHAFTS, and FLETCHING FEATHERS, creating the BOW and SILVER ARROW.

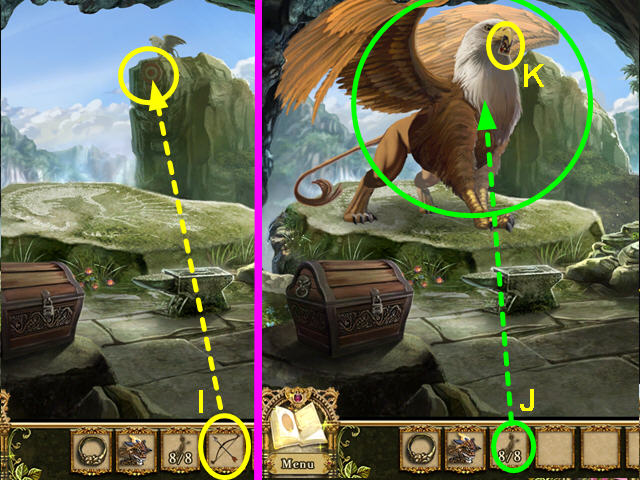
- Use the BOW and SILVER ARROW on the distant target (I).
- Give the 8 LIZARDS to the griffin (J).
- Take the MAGIC CARD: THE GOBLIN KING (K).

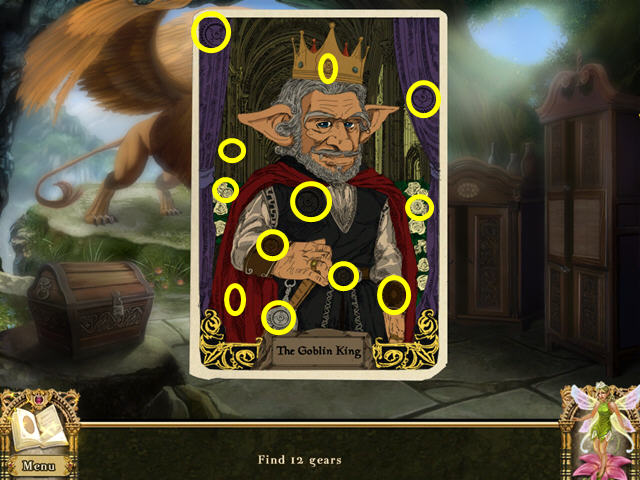
- Locate the 12 gears.
- Walk down 4 times to return to the pavilion.

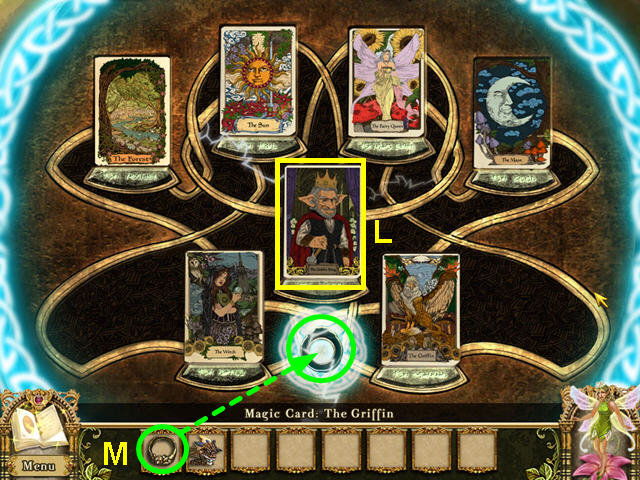
- Look at the stone table.
- Place the MAGIC CARD: THE GOBLIN KING in the center spot (L).
- Use the SIGNET RING on the niche that appears (M).
- After the witch speaks to you, she will give you the WOODEN KEY.
- Enter the root shaft and return to the griffin.
- Open the chest on the left with the WOODEN KEY.
- Take the GRIFFIN’S SADDLE.
- Take the MAP to the GOBLIN KINGDOM to trigger a mini-game.

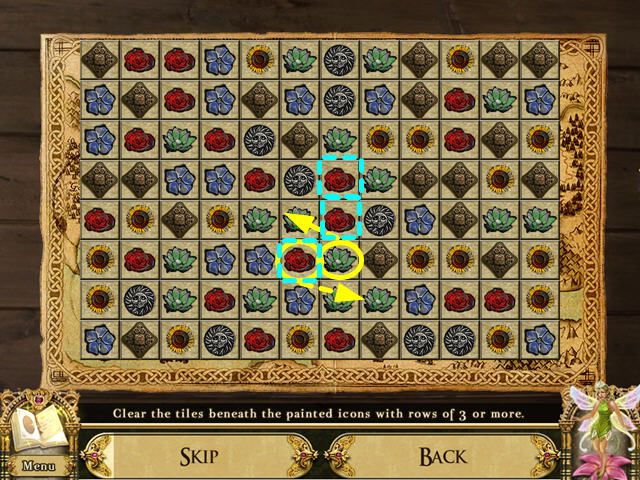
- Break all the tiles by matching 3 or more.
- Click on 2 items to swap their positions.
- Show the MAP of the GOBLIN KINGDOM to the griffin.
- Use the GRIFFIN’S SADLE on the griffin to depart.
- Congratulations! You have completed Awakening: Moonfell Wood!




 Panda PandaMonium Tips and Tricks, Guide, & Tips
 Exorcist Walkthrough, Guide, & Tips
 Sunken Secrets Tips and Tricks, Guide, & Tips
 Master Wu and the Glory of the Ten Powers Walkthrough, Guide, & Tips
 PuppetShow: Lost Town Walkthrough, Guide, & Tips