Dark Parables: The Little Mermaid and the Purple Tide Walkthrough, Guide, & Tips
Dark Parables: The Little Mermaid and the Purple Tide Walkthrough

Welcome to the Dark Parables: The Little Mermaid and the Purple Tide Walkthrough
You’ve been called to investigate a strange purple tide. And that’s when the mermaid shows up…
Whether you use this document as a reference when things get difficult or as a road map to get you from beginning to end, we’re pretty sure you’ll find what you’re looking for here.
This document contains a complete Dark Parables: The Little Mermaid and the Purple Tide game walkthrough featuring annotated screenshots from actual gameplay!
We hope you find this information useful as you play your way through the game. Use the walkthrough menu below to quickly jump to whatever stage of the game you need help with.
Remember to visit the Big Fish Games Forums if you find you need more help. Have fun!
General Tips
- This is the official guide for Dark Parables: The Little Mermaid and the Purple Tide.
- This guide does not mention each time you have to zoom into a location; the screenshots show each zoom scene.
- Hidden-object puzzles are referred to as HOPs. This guide does not show screenshots of the HOPs, however, it is mentioned when a HOP is available and the inventory item collected.
- This guide will give step-by-step solutions for all puzzles that are not random. Please read the instructions in the game for each puzzle.
- Use the map to travel quickly to a location.
Chapter 1: The Tower

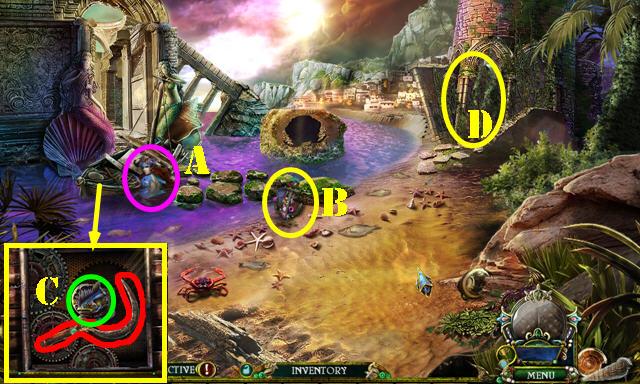
- Talk to the girl (A).
- Take the ANCHOR EMBLEM (B) and place it; take the EEL EMBLEM and SICKLE (C).
- Use the SICKLE (D); enter the Tower.

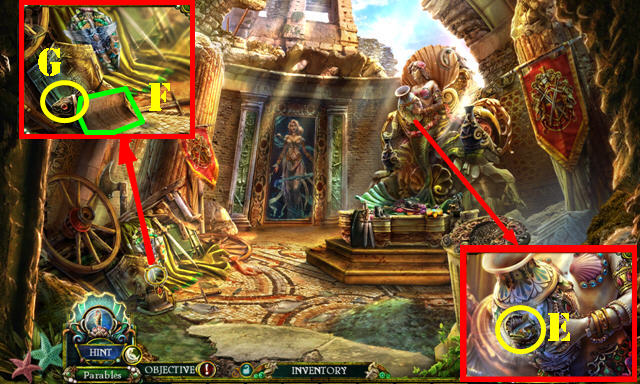
- Place the EEL EMBLEM for a HOP (E); play it to get the SAILBOAT GEAR.
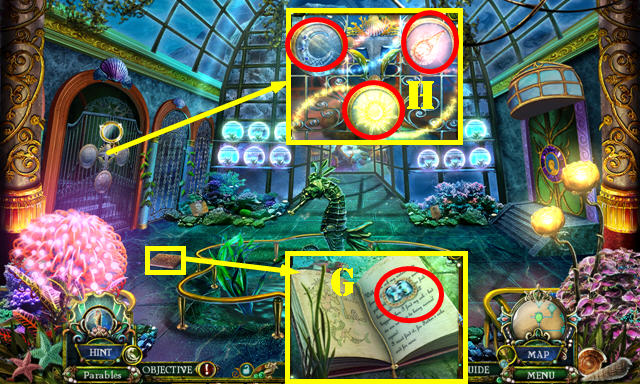
- Read the note and flip it (F); take the METAL FISH (G).
- Open the METAL FISH; take the SEA FISH (inventory).
- Walk down.

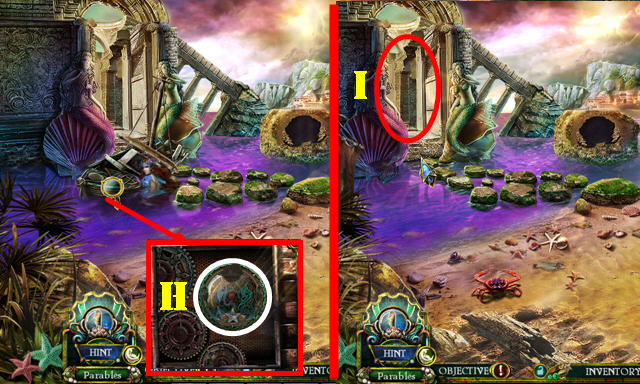
- Place the SAILBOAT GEAR (H).
- Enter the Ruined Path (I).

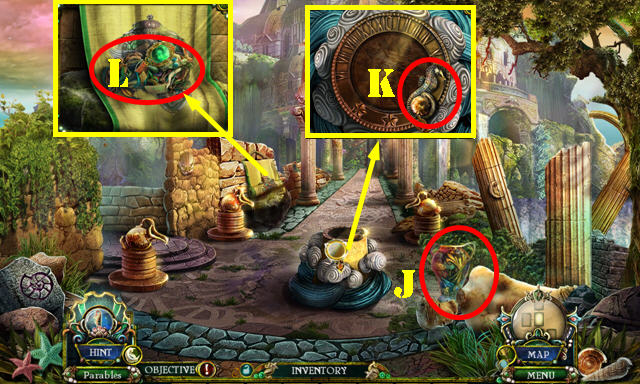
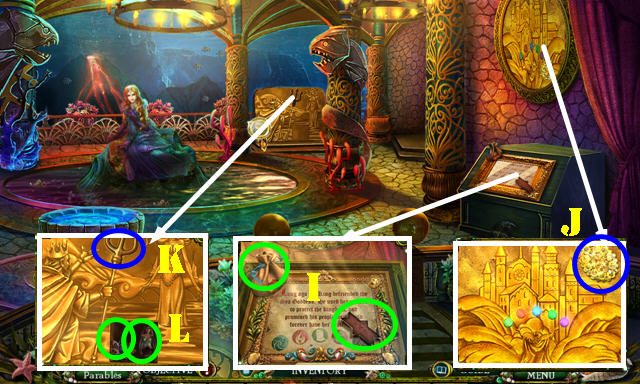
- Take the AQUATIC VASE (J).
- Take the SEA HORSE (K).
- Open the flag; take the EMERALD MERMAID (L).
- Go forward.

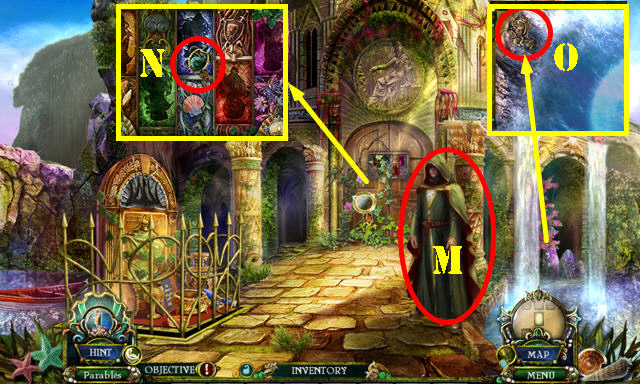
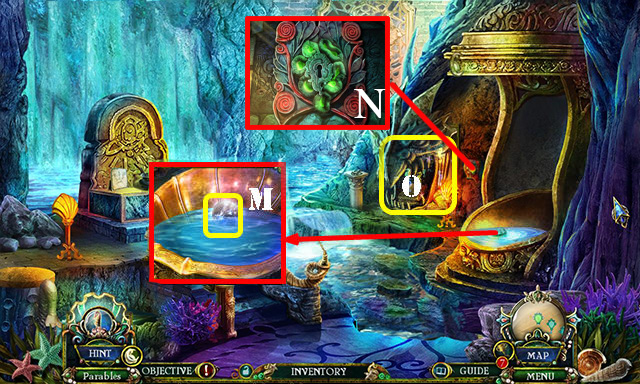
- Talk to the stranger (M).
- Use the SICKLE; take the SEA TURTLE (N).
- Take the BLOWING WIND DISK (O).
- Walk down and go left to the Outdoor Garden.

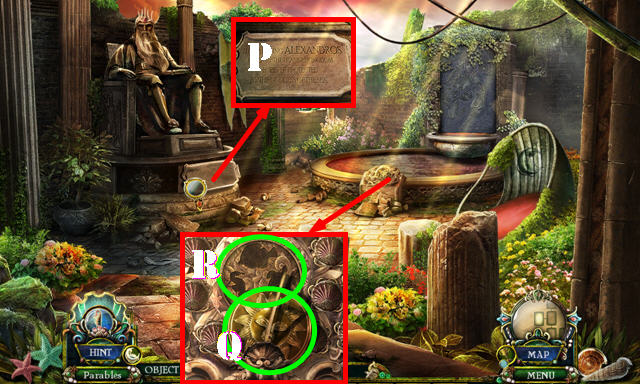

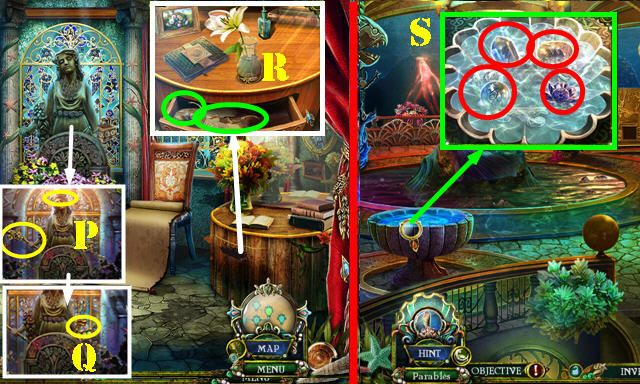
- Read the plaque (P).
- Take the SUNDIAL (Q).
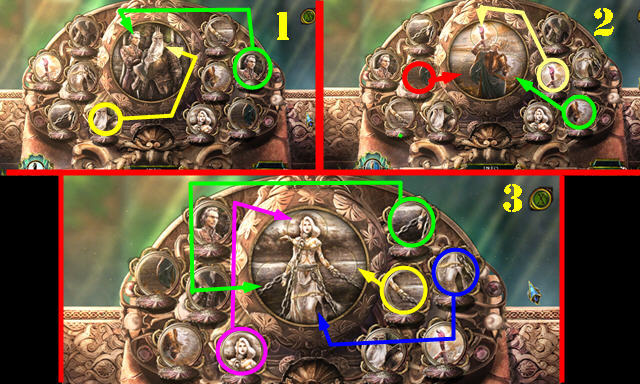
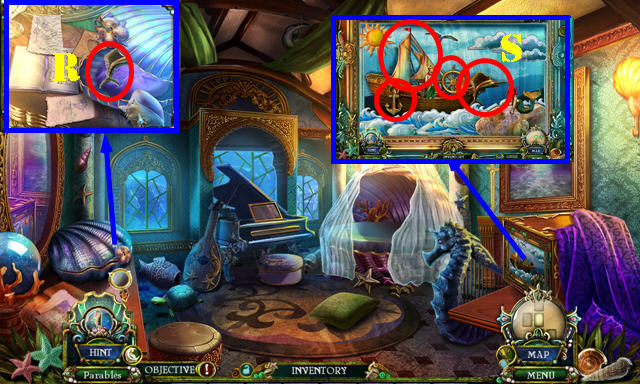
- Place the SEA TURTLE, SEA HORSE, and SEA FISH (R) for a puzzle.
- Solution (1-3). The disk placements are random, but the final image is always the same.

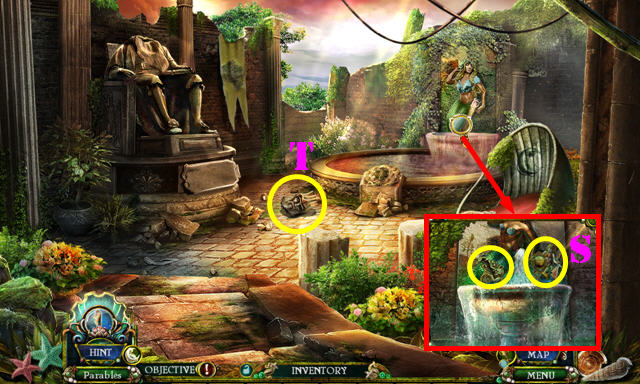
- Take the CRASHING WAVE DISK and TOPAZ MERMAID (S).
- Take the STONE KING’S HEAD (T).
- Take the IMPERIAL CROWN from the STONE KING’S HEAD (inventory).
- Walk down.

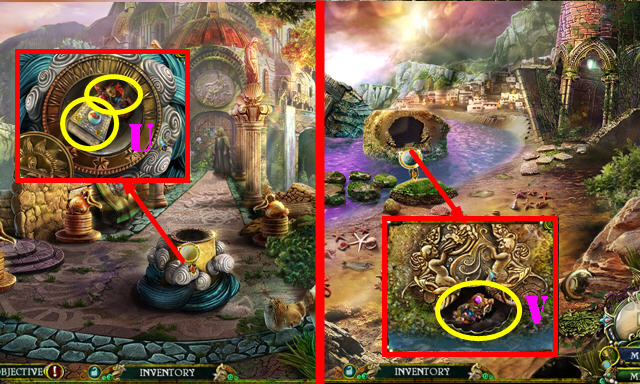
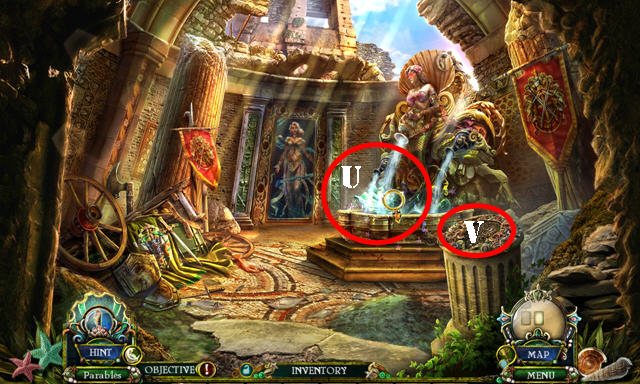
- Place the SUNDIAL and touch it; take the RUBY MERMAID and BOOK OF SEA CREATURES (U).
- Walk down.
- Place the BLOWING WIND DISK and CRASHING WAVE DISK; take the AMETHYST MERMAID and SHIELD INSIGNIA (V).
- Return to the Temple Entrance.

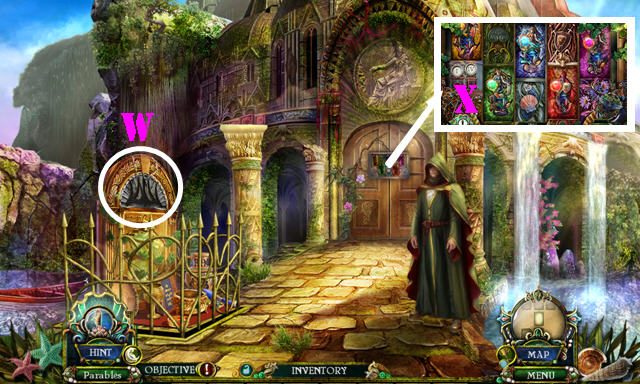
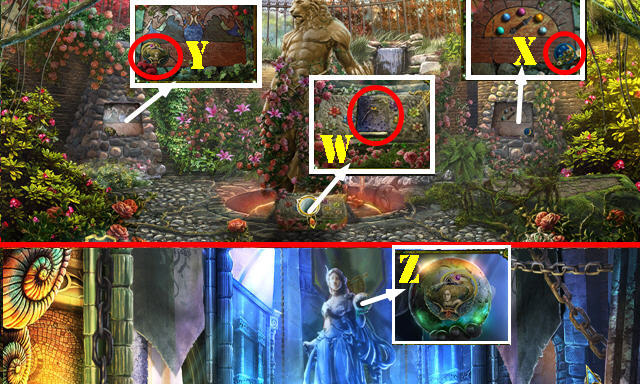
- Place the IMPERIAL CROWN (W) for a HOP; play it to get the SAPPHIRE MERMAID.
- Place the EMERALD MERMAID, TOPAZ MERMAID, SAPPHIRE MERMAID, RUBY MERMAID, and AMETHYST MERMAID for a puzzle (X).

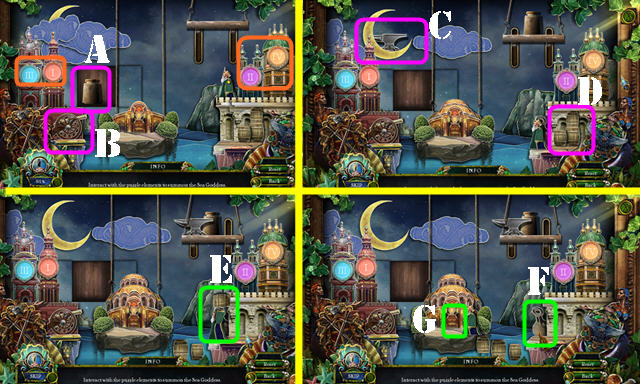
- Solution: Swap numerals and place them in order: III, I, II, IV (orange). Touch the weight (A).
- Hit the cannon 3x (B).
- Touch the 3 clouds and select the anvil (C).
- Select a barrel (D) and then the king (E) to throw it. Repeat 3x until the King goes across.
- Select the weight (F) and then the door (G).
- Enter Temple Hall.

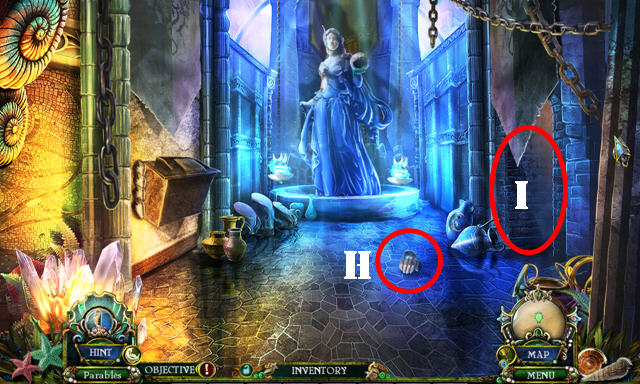
- Take the MARBLE RIGHT HAND (H).
- Go right (I).

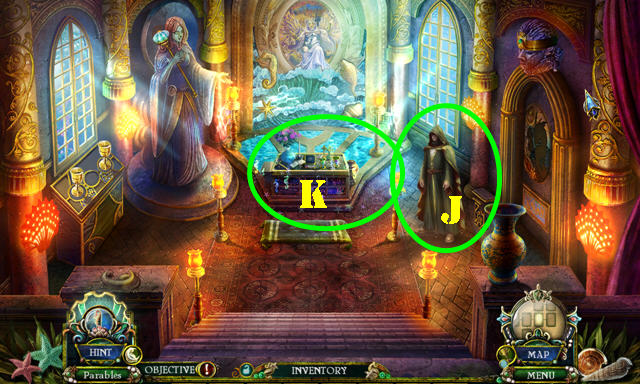
- Talk to the man to get the BOOK OF SORCERY (J).
- Play the HOP (K) to get the FISH KEY.
- Walk down.

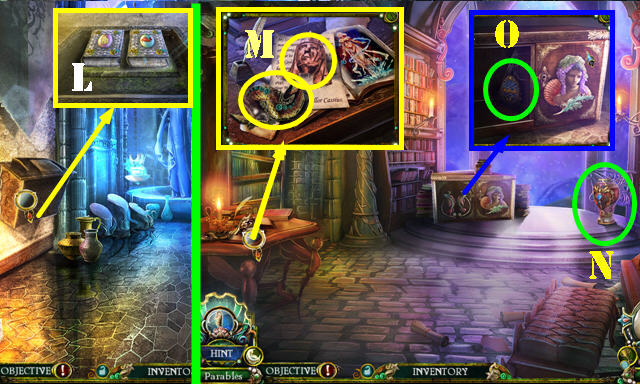
- Place the BOOK OF SEA CREATURES and BOOK OF SORCERY (L). Enter the Library.
- Take the EEL INSIGNIA and MARBLE STATUE HEAD (M).
- Take the MOLTEN VASE (N).
- Place the FISH KEY and turn it; take the WATER PENDANT (O).
- Return to the Room of Worship.

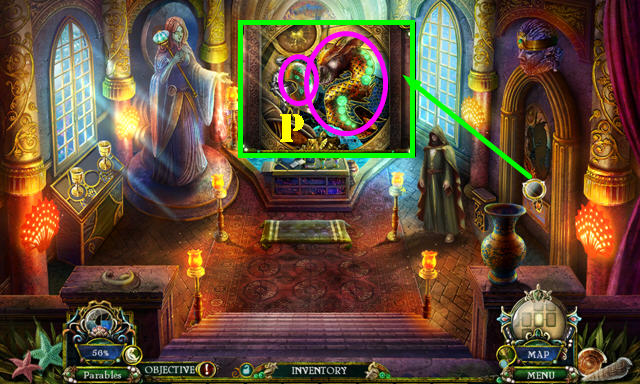
- Place the SHIELD INSIGNIA and the EEL INSIGNIA (P).
- Enter the Royal Tomb.
Chapter 2: Royal Tomb

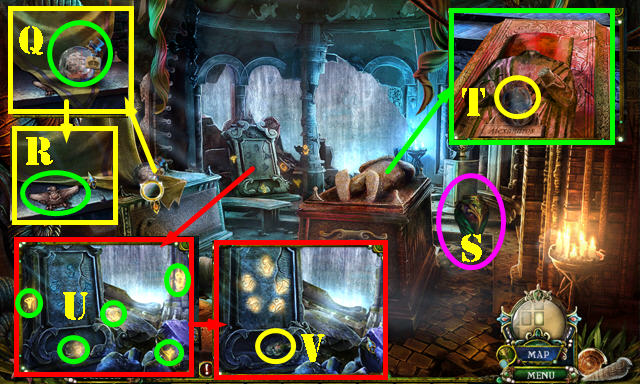
- Take the CAPTAIN SHIP BOTTLE (Q). Lift the cloth; take the PALACE EMBLEM PIECE (R).
- Take the TWIGGED VASE (S) and SEA SOUL GLOBE (T).
- Select the 5 symbols (U); take the KEY PART (V).
- Talk to the ghost.
- Walk down twice.

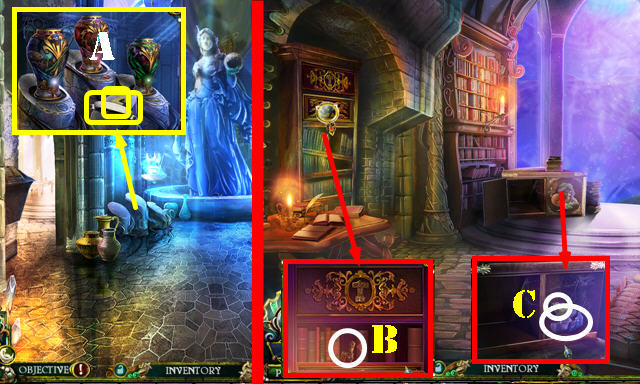
- Place the AQUATIC VASE, MOLTEN VASE and TWIGGED VASE. Take the MURAL BANNER and THUNDERBOLT EMBLEM (A).
- Go to the Library.
- Place the THUNDERBOLT EMBLEM; take the KEY PART (B).
- Place the 2 KEY PARTS together; take the MAIDEN KEY (inventory).
- Use the MAIDEN KEY and turn it; take the MARBLE LEFT HAND and FROG FIGURINE (C).
- Return to the Royal Tomb.

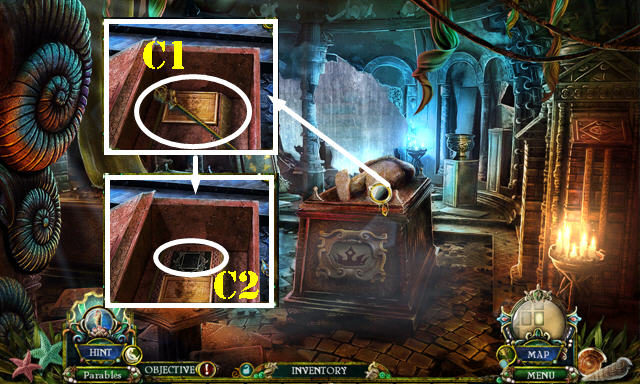
- Place the MARBLE STATUE HEAD, MARBLE RIGHT HAND, and MARBLE LEFT HAND. Take the KING’S SCEPTER (C1).
- Move the cover and select the puzzle (C2).

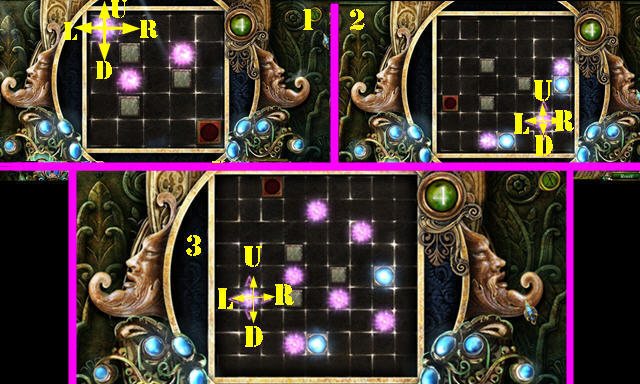
- Solution 1: Dx2-Rx2-U-Rx2-Dx3.
- Solution 2: (Ux3-R-D), (Lx3-Ux2).
- Solution 3: (R-U-Rx2-D-R-D-Rx2-Ux2), (L-R), (Ux2-Lx3-Ux2-Lx2).
- Take the CLOUDY ORB.
- Walk down.

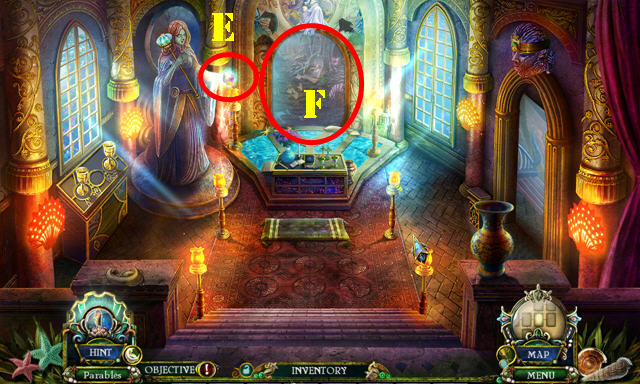
- Place the CLOUDY ORB (E).
- Go forward (F).

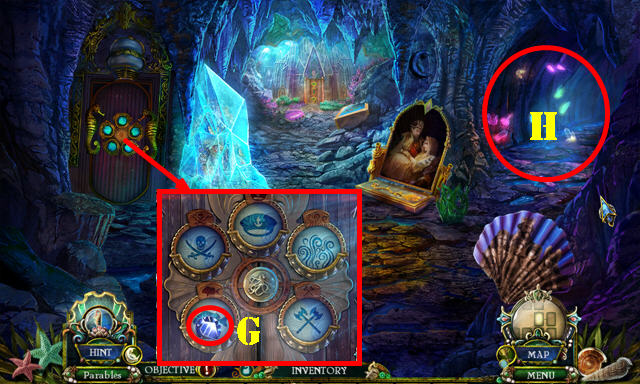
- Take the SHELL MIRROR (G).
- Go right (H).

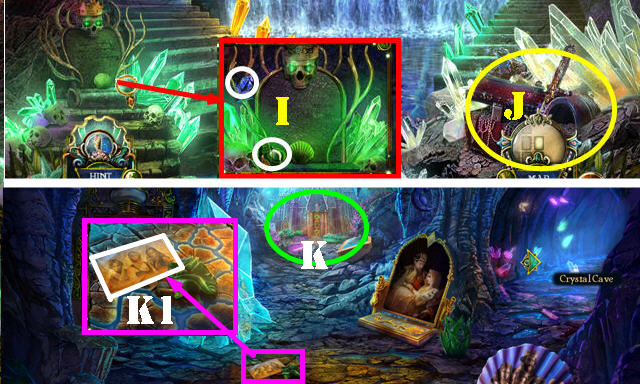
- Take the CONCH MIRROR and CRYSTAL PENDANT (I).
- Play the HOP (J) to get the HEART-SHAPED GEM.
- Walk down and try to go forward (K).
- Look at the photo (K1).
- Go forward (K).

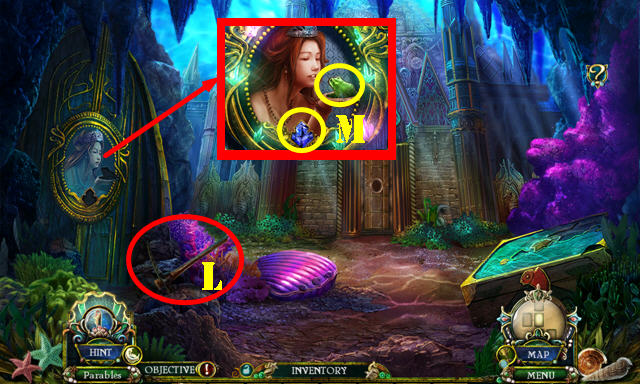
- Take the PICKAX (L).
- Place the FROG FIGURINE and CRYSTAL PENDANT (M).
- Enter Princess Naida’s Room.

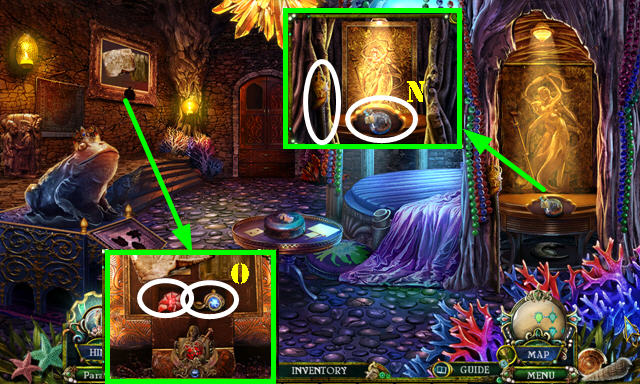
- Take the PIRATE SHIP BOTTLE and QUEEN’S SCEPTER (N).
- Place the HEART-SHAPED GEM; take the NAUTILUS MIRROR and SAPPHIRE STONE (O).
- Walk down.

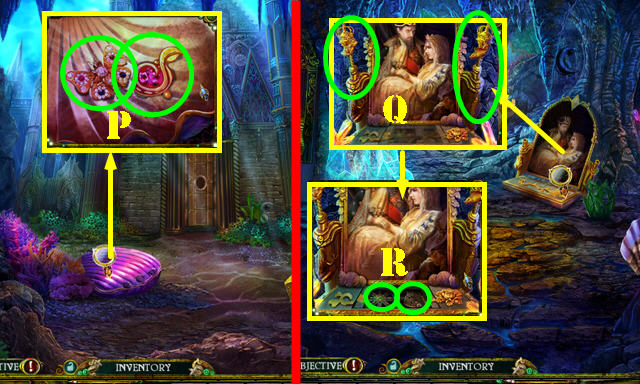
- Place the CONCH MIRROR, SHELL MIRROR, and NAUTILUS MIRROR. Take the BUTTERFLY TOKEN and RUBY STONE (P).
- Return to the Underground Tunnel.
- Place the KING’S SCEPTER and QUEEN’S SCEPTER (Q). Take the BROKEN PALACE EMBLEM and TOY SHIP WHEEL (R).
- Place the PALACE EMBLEM PIECE on the BROKEN PALACE EMBLEM to get the PALACE EMBLEM (inventory).
- Return to the Crystal Cave.

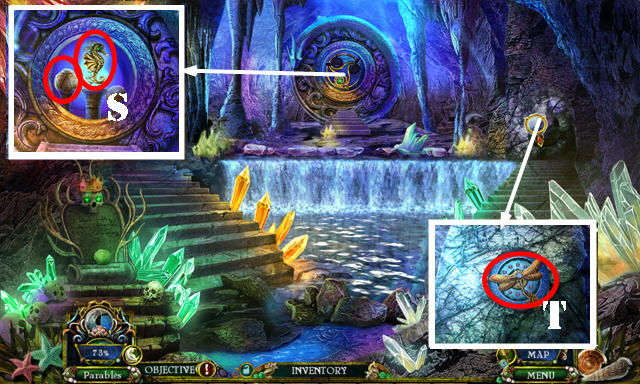
- Place the RUBY STONE, and SAPPHIRE STONE; take the BRONZE SEA HORSE and LADYBUG TOKEN (S).
- Use the PICKAX; take the DRAGONFLY TOKEN (T).
- Return to Princess Naida’s Room.

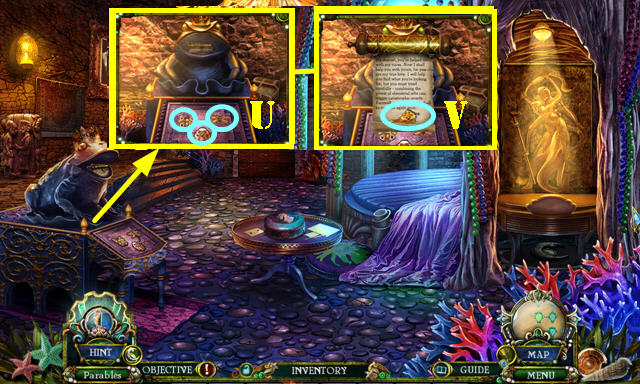
- Place the BUTTERFLY TOKEN, LADYBUG TOKEN, and DRAGONFLY TOKEN (U).
- Select the scroll twice; take the PALACE KEY (V).
- Walk down.

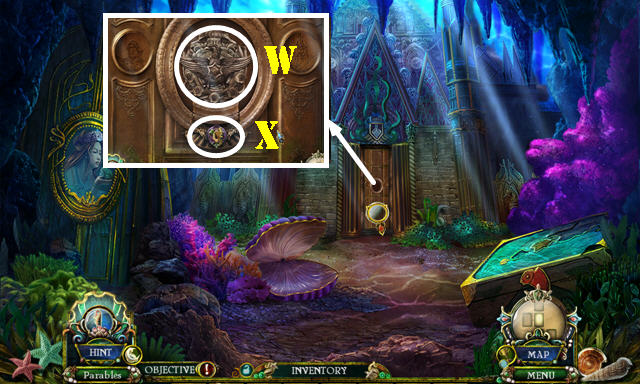

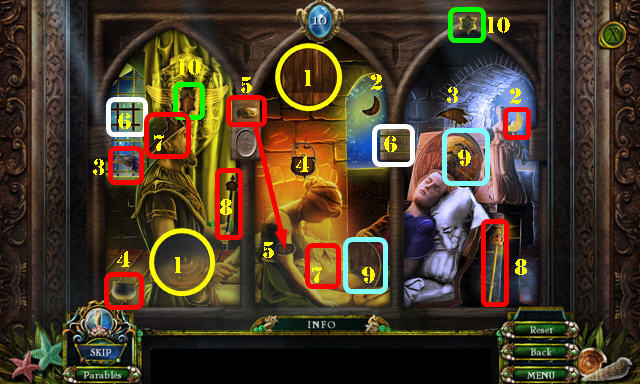
- Place the PALACE EMBLEM (W). Use the PALACE KEY (X) and turn it for a puzzle.
- Solution: 1-10; you’ll need to interact with some items to find them.
- Go forward.
Chapter 3: Palace

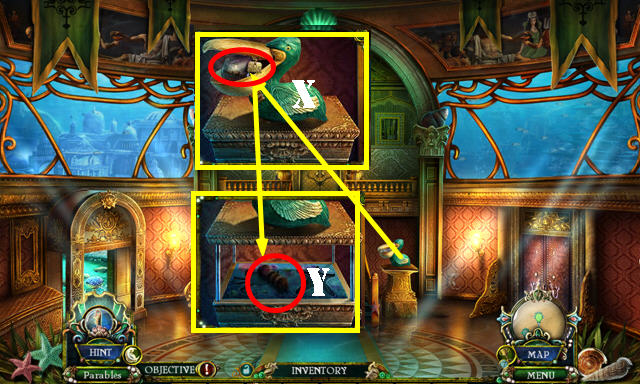
- Open the pelican’s beak; take the STEAMSHIP BOTTLE (X), then take the CONCH BRUSH (Y).
- Go forward.

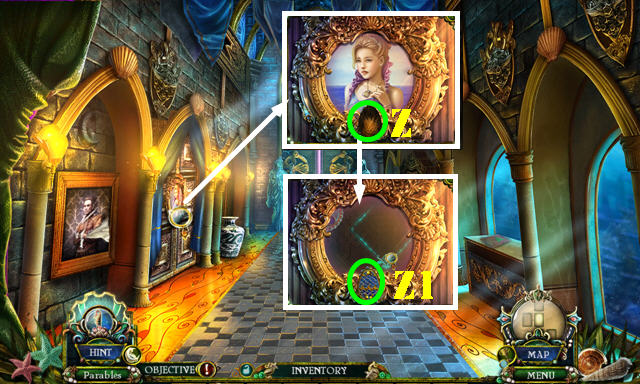
- Take the SEA ANEMONE FOSSIL (Z).
- Place the WATER PENDANT (Z1) and touch for a mini-game.

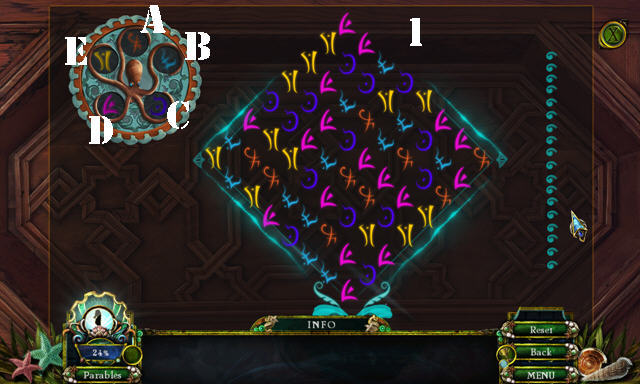

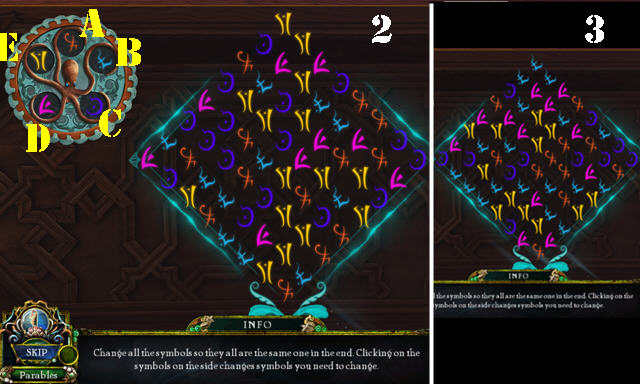
- Solution part 1: C-D-B-C-E-D-A-B-C-E-D-A-B-E-C-D-E-B (1).
- Solution part 2: E-A-B-C-E-D-B-A-C-E-D-B-C-A-E (2).
- Solution 3: E-D-B-E-B-C-A-E-B-E-D-C-A-B (3).

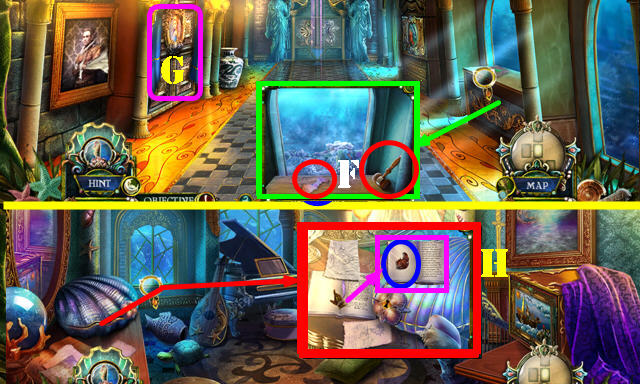
- Take the MALLET and BLUEPRINT PIECE (F).
- Enter Princess Calliope’s Room (G).
- Move all the papers; look at the book and take the RED FISH (H). Talk to the Chancellor’s Spirit.
- Walk down twice and take the left door to the Balcony.

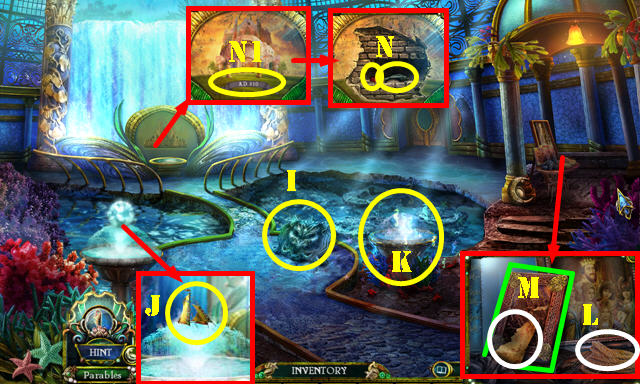
- Take the GARGOYLE HEAD (I).
- Use the MALLET; take the TOY SHIP MAINSAIL (J).
- Play the HOP (K) to get the SHELL KEY.
- Take the BLUEPRINT PIECE and ROPE (L). Open the book (M).
- Drag the CONCH BRUSH to clean the dirt; place the MURAL BANNER (N1). Take the BLUE FISH and RIGHT EYE GEM (N).
- Return to the Hallway.

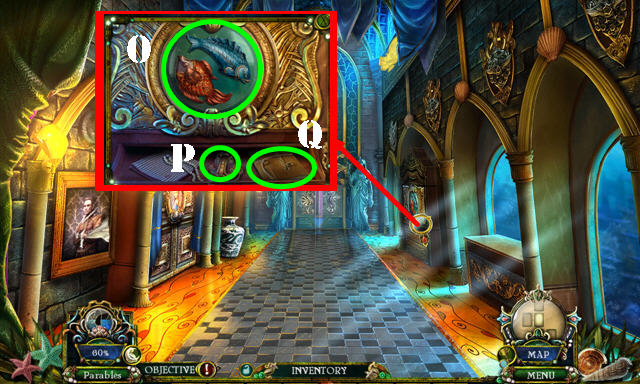
- Place the RED FISH and BLUE FISH (O). Take the TOY SHIP ANCHOR (P). Open the book (Q).
- Go to Princess Calliope’s Room.

- Use the SHELL KEY; take the TOY SHIP FIGUREHEAD (R).
- Place the TOY SHIP WHEEL, TOY SHIP MAINSAIL, TOY SHIP ANCHOR, and TOY SHIP FIGUREHEAD to activate a mini-game (S).

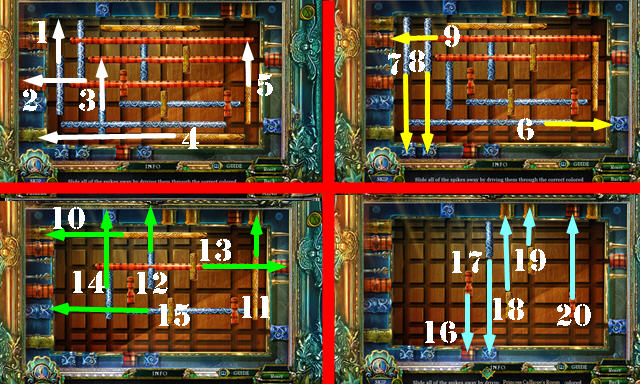
- Solution (1-20).
- Take the SILVER SEA HORSE.
- Walk down.

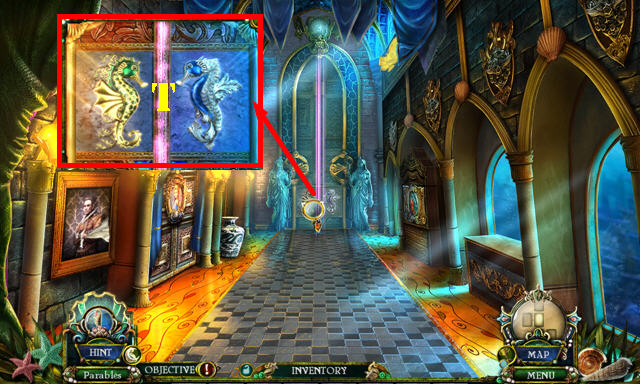
- Place the BRONZE SEA HORSE and SILVER SEA HORSE (T).
- Go forward.

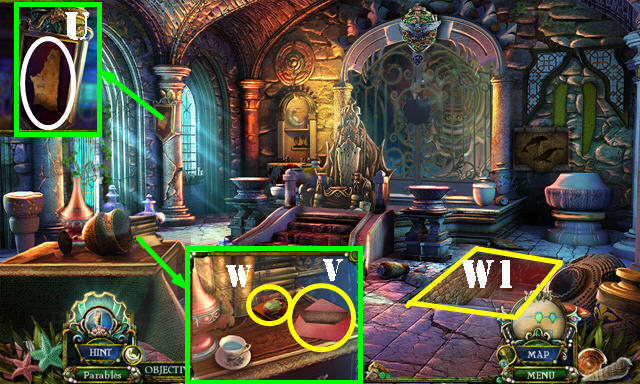
- Take the BLUEPRINT PIECE (U).
- Select the envelope twice and read the letter (V). Take the JASPER HANDLE (W).
- Go down to the Strategy Room (W1).
Chapter 4: Strategy Room

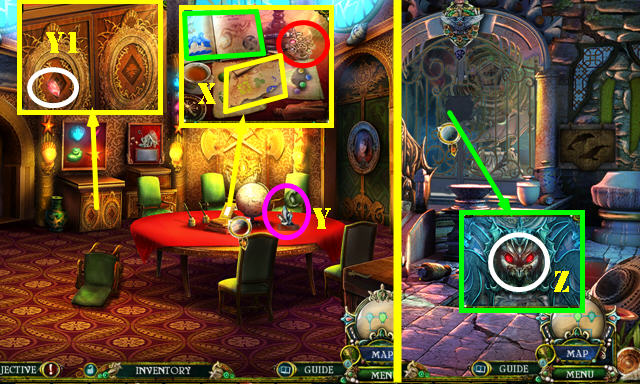
- Take the BLUEPRINT PIECE and MACHINE KEY. Look at the book (X).
- Grab the MURAL PIECE (Y) and the LEFT EYE GEM (Y1).
- Place the 3 BLUEPRINT PIECES on the BLUEPRINT PIECE; take the MACHINE BLUEPRINT (inventory).
- Walk down.
- Place the RIGHT EYE GEM and the LEFT EYE GEM on the GARGOYLE HEAD (inventory).
- Place the GARGOYLE HEAD (Z). Select the mini-game to begin.

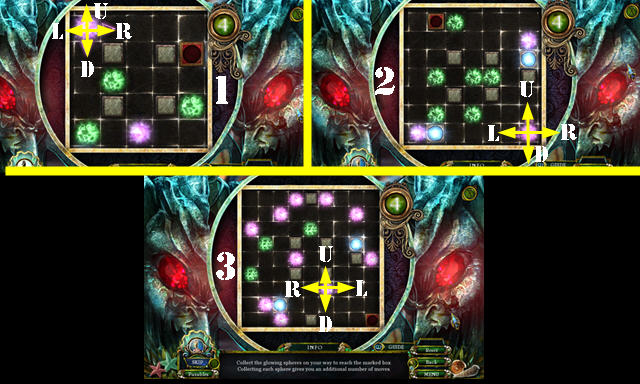
- Solution part 1: Dx2-R-L-Dx2-Rx4-Ux3.
- Solution part 2: (Lx3-U-Lx3-D-R), (U-L-Dx2-Lx4-Ux3).
- Solution part 3: (L-Ux2-Lx3-U-L-U-Rx2-U-R-U-D-R-D-R-Ux2-Rx2-Dx3), (D-L-U-R), (R-Dx5).
- Go forward.

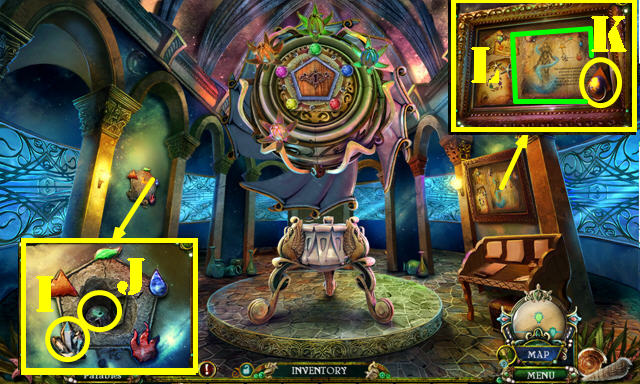
- Place the MURAL PIECE (I); take the QUARTZ JELLYFISH and CASTLE CREST (J).
- Take the AMETHYST HANDLE (K). Look at the note (L).
- Return to the Strategy Room.

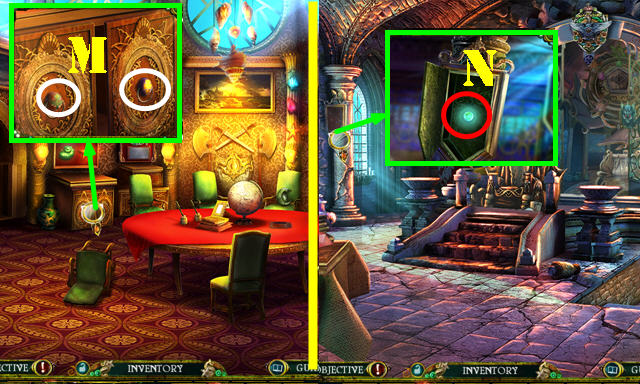
- Place the JASPER HANDLE and AMETHYST HANDLE (M) for a HOP; play it to get the GOLDEN SHIELD.
- Walk down.
- Place the CASTLE CREST and GOLDEN SHIELD; take the LUMINESCENT ORB (N).
- Return to the Strategy Room.

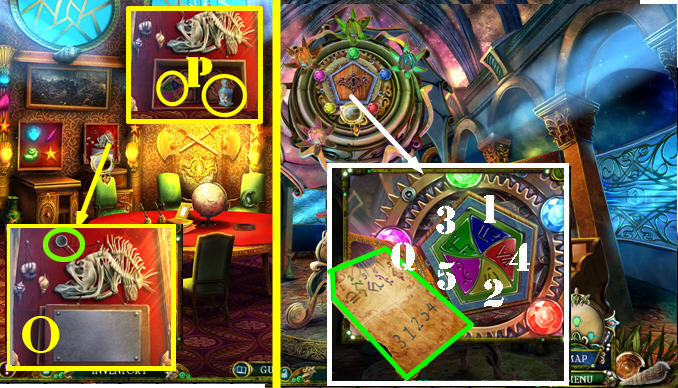
- Place the LUMINESCENT ORB (O); take the MYSTERIOUS CONTROLLER and SMALL EMPTY VIAL (P).
- Return to the Machine Room.
- Use the MACHINE KEY; place the MACHINE BLUEPRINT and MYSTERIOUS CONTROLLER for a puzzle (Q).
- Solution: 1-5. Touch the center for another puzzle.

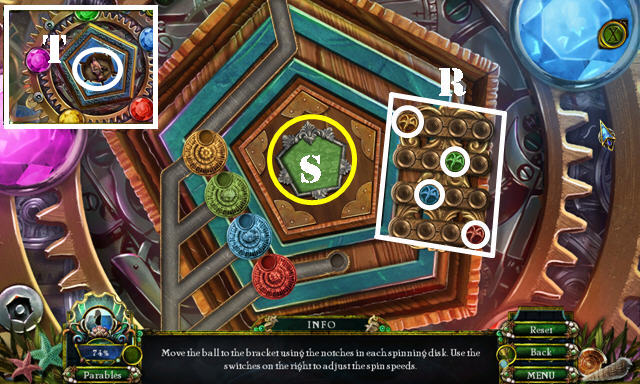
- Solution: Arrange the balls as shown (R). Touch the center (S). Take the CORAL FOSSIL.
- Zoom back in to the controller; take the KING DOLL (T).
- Walk down.

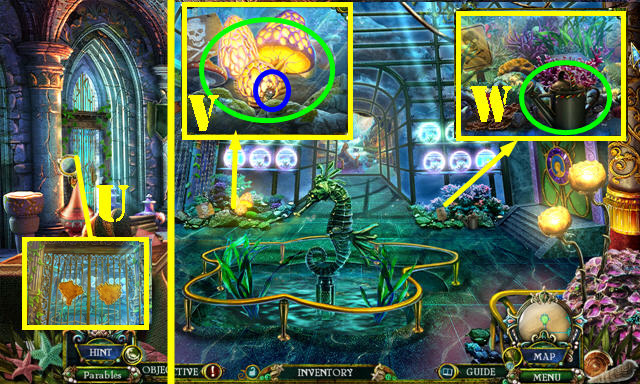
- Place the SEA ANEMONE FOSSIL and CORAL FOSSIL (U). Enter the Greenhouse.
- Take the EEL’S LONG TOOTH and the TOADSTOOL (V).
- Take the WATERING CAN (V1).
- Go forward.

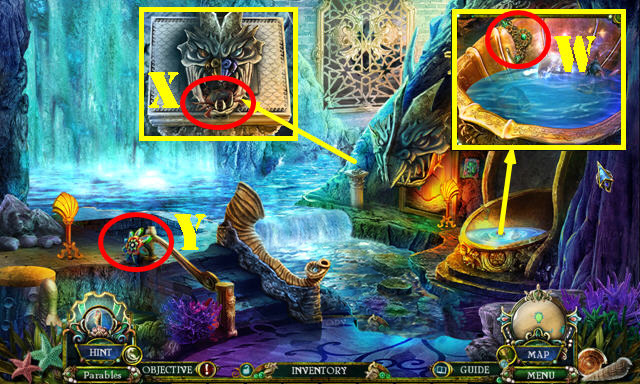
- Take the FLORAL CROWN (W), CRAB EMBLEM (X), and EARTH PENDANT (Y).
- Use the WATERING CAN (Z) to get the CAN OF WATER.
- Walk down.

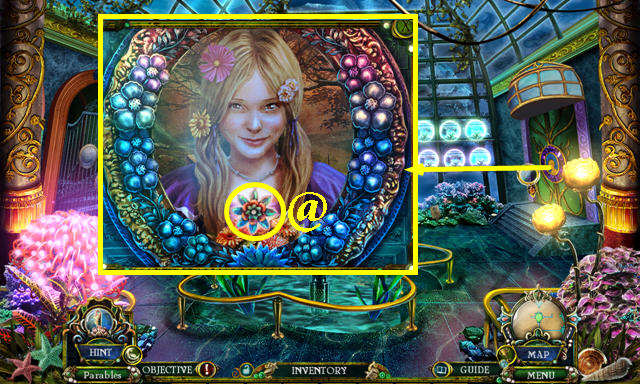

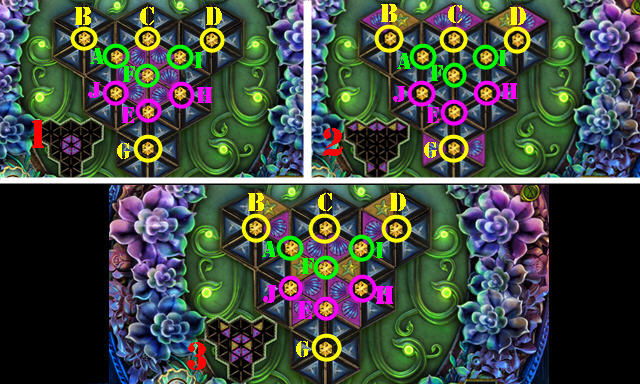
- Place the EARTH PENDANT (@); select the mini-game.
- Solution 1: Ex4, Gx5, Dx2, I, Fx2, Ex4, Ax3, Fx5, Bx3, Ax4, F, I.
- Solution 2: Cx3, Ax2, Cx3, Ix2, Dx2, Fx4, C, Ax4, Bx4, Fx2, Cx3, Ex2, Gx5, H, Ex3, Gx3, Ex3, Gx2.
- Solution 3: Bx2, Ax4, F, B, Ax2, D, Ix2, Dx2, I, Dx3, Ix4, Jx5, G, E, Hx2, Ex3, Jx2, Ex1, Hx3, Ex1, Gx3, Ex1, Gx3, E, Cx3.
- Enter Princess Daphne’s Room.

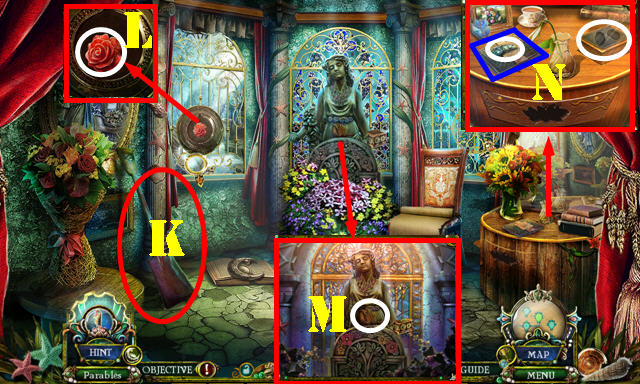
- Take the GARDEN SHOVEL (K).
- Take the ROSE TOKEN (L) and WOODEN DOLL BODY (M).
- Take the EEL’S SHORT TOOTH and WOODEN BOX (N). Open the book (blue) and read it.
- Walk down.

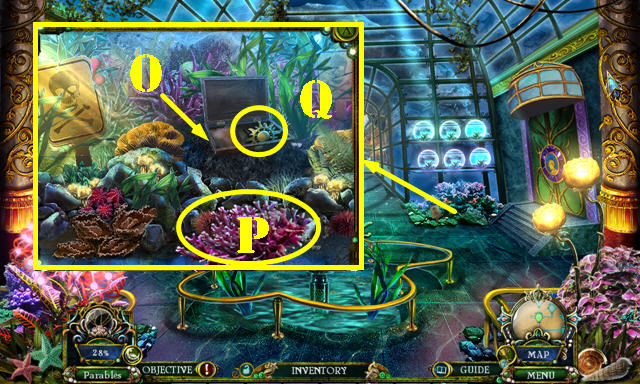
- Use the GARDEN SHOVEL 3x (O); take the PURPLE CORAL (P).
- Open the box; take the GOLDEN SUN and HORN MOUTHPIECE (Q).
- Go forward.

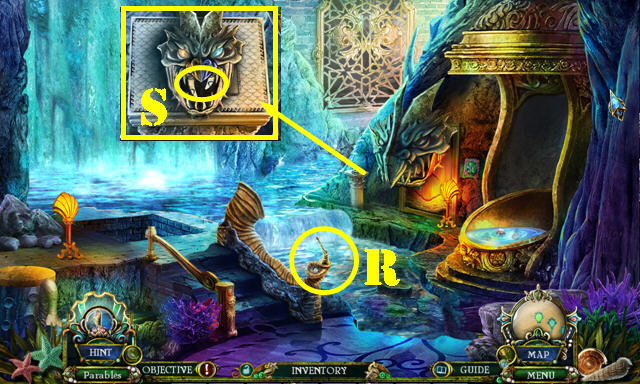
- Place the HORN MOUTHPIECE (R).
- Place the EEL’S LONG TOOTH and EEL’S SHORT TOOTH (S) for a HOP; play it to get the ROSE DIAL PLATE.
- Return to Princess Daphne’s Room.

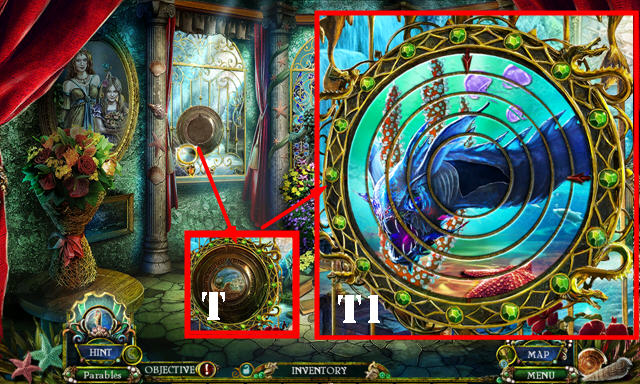
- Place the ROSE DIAL PLATE for a puzzle (T). Solution (T1).
- Return to the Waterfall.

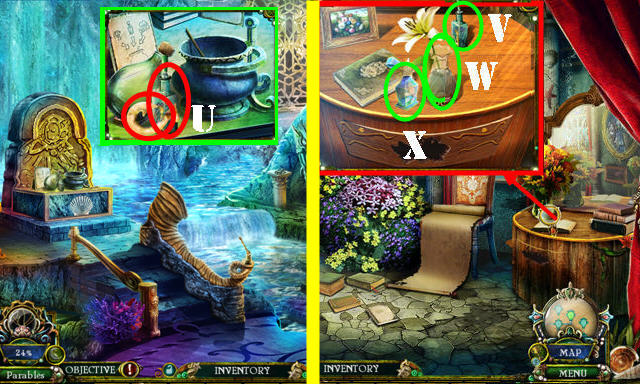
- Take the METAL HOOK and PLANT REVIVAL SOLUTION (U).
- Return to Princess Daphne’s Room.
- Put down the PLANT REVIVAL SOLUTION (V) and use the CAN OF WATER (W). Put down the SMALL EMPTY VIAL to get the SMALL FULL VIAL (X).
- Return to the Waterfall.

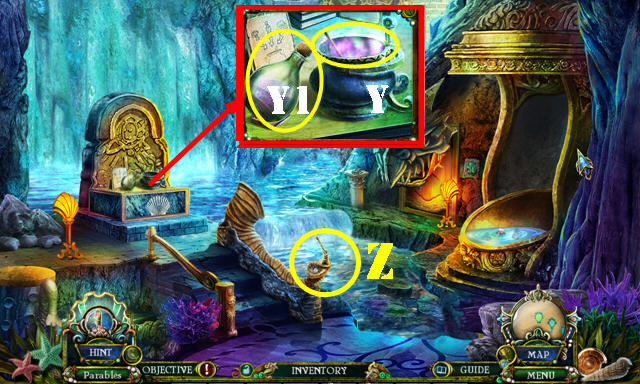
- Place the TOADSTOOL, PURPLE CORAL, and SMALL FULL VIAL (Y). Take the EEL POISON (Y1).
- Touch the horn )Z) to use the EEL POISON and get transported back to the Balcony.

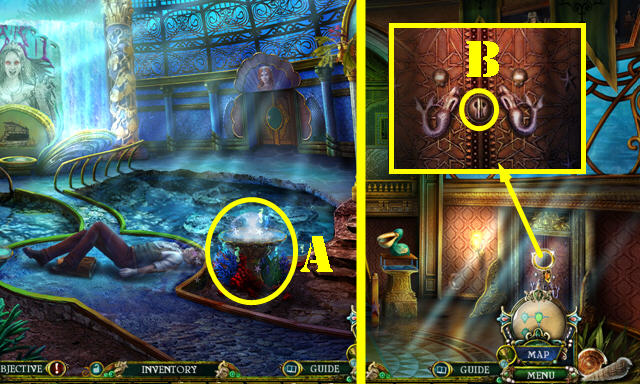
- Talk to Pinocchio.
- Play the HOP (A) to get the PHARMACY KEY.
- Walk down.
- Use the PHARMACY KEY (B); turn it and go through the door.

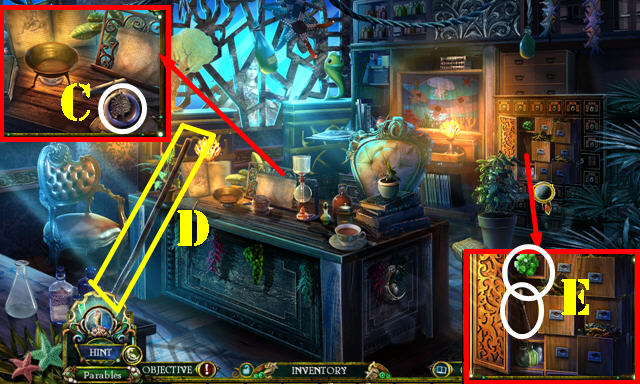
- Take the TREE ORNAMENT (C) and WOODEN SHAFT (D).
- Take the IVY TOKEN and PAINTBRUSH (E).
- Place the METAL HOOK and ROPE on the WOODEN SHAFT; take the LONG HOOK (inventory).
- Return to the Hallway.

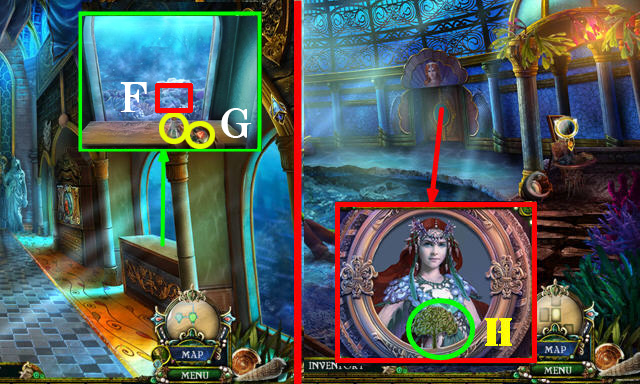
- Use the LONG HOOK (F); open the pouch; take the MAGIC INK and CITRINE JELLYFISH (G).
- Return to the Balcony.
- Place the TREE ORNAMENT (H).
- Enter Princess Althea’s Room.
Chapter 5: Princess Althea’s Room

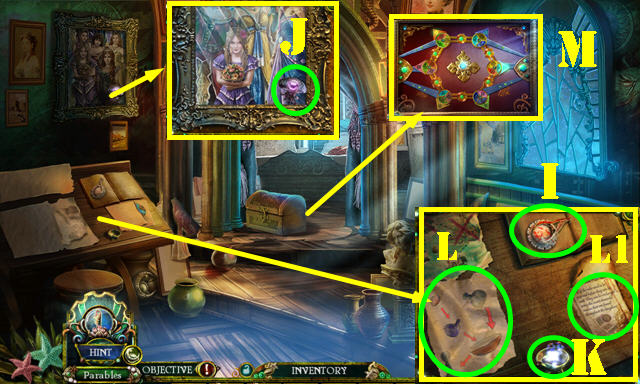

- Take the BRONZE COMET (I) and CARNELIAN JELLYFISH (J).
- Place the MAGIC INK (K) and dip the PAINTBRUSH in it; take the ANTIDOTE RECIPE (L). Read the note (L1).
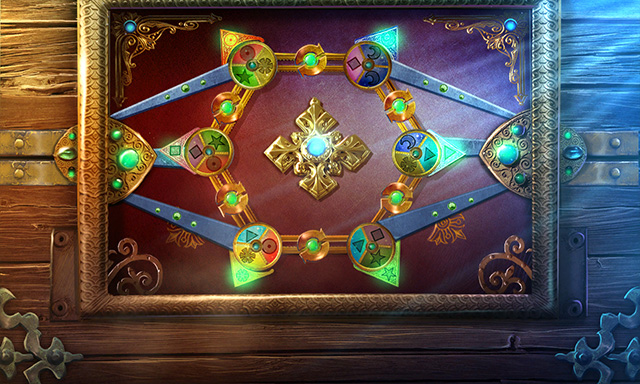
- Play the mini-game (M).
- Rotate discs with symbols on them until the green from the triangles shine. Use the switch to exchange places of discs. Solution (N).
- Take the STARFISH EMBLEM from inside the chest.
- Walk down twice.

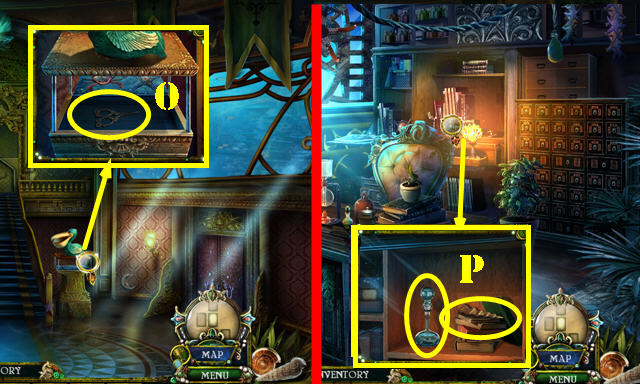
- Place the CRAB EMBLEM and STARFISH EMBLEM; take the ANTIQUE SCISSORS (O).
- Go to the Herbal Pharmacy.
- Place the QUARTZ JELLYFISH, CITRINE JELLYFISH, and CARNELIAN JELLYFISH; take the ELIXIR and UNICORN HORN (P).
- Return to Princess Naida’s Room.

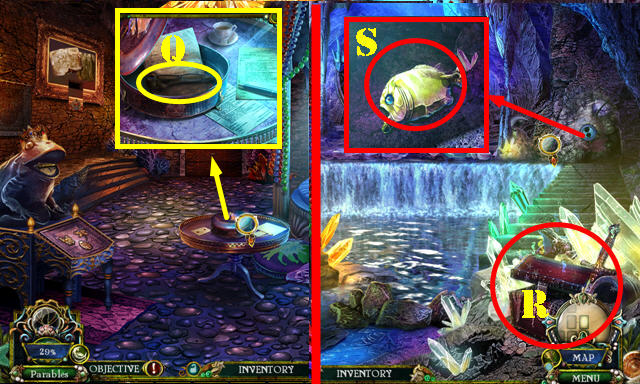
- Place the UNICORN HORN; take the WOODEN DOLL LEFT ARM (Q).
- Return to the Crystal Cave.
- Play the HOP (R) to get the DECORATIVE PLAQUE.
- Place the IVY TOKEN and ROSE TOKEN; take the BASS COIN (S).
- Return to Princess Naida’s Room.

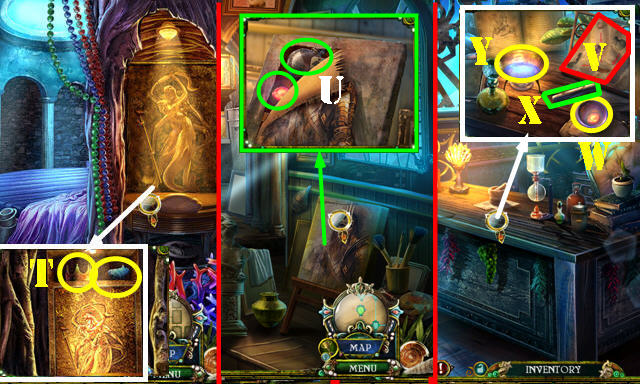
- Place the DECORATIVE PLAQUE; take the FISH CROWN and SHARK COIN (T).
- Return to Princess Althea’s Room.
- Use the ANTIQUE SCISSORS; take the SAMPAN BOTTLE and GLOWING PEARL (U).
- Return to the Herbal Pharmacy.
- Place the ANTIDOTE RECIPE (V).
- Place the GLOWING PEARL (W); use the pestle (X) on it twice. Place the ELIXIR (Y) and touch the bowl for a puzzle.

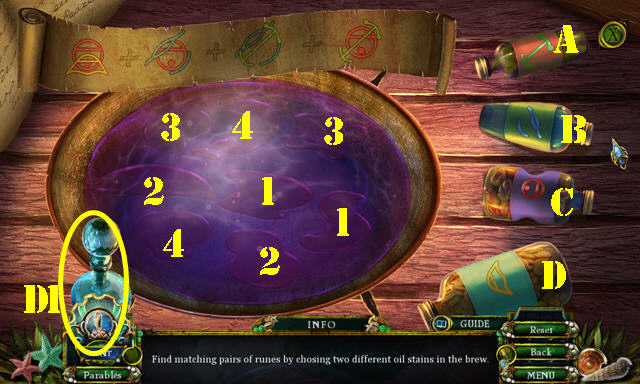
- Solution 1: C-D, B-C, A-B, A-C.
- Solution 2: 1-4.
- Take the ANTIDOTE (D1).
- Return to the Balcony.

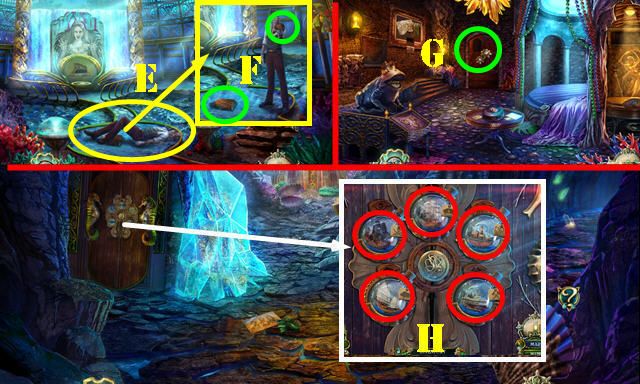
- Use the ANTIDOTE on Pinocchio (E). Talk to him; take the WOODEN ORB and WARDROBE KEY (F).
- Return to Princess Naida’s Room.
- Place the WARDROBE KEY (G) for a HOP; play it to get the BATTLESHIP BOTTLE.
- Return to the Underground Tunnel.
- Place the CAPTAIN SHIP BOTTLE, PIRATE SHIP BOTTLE, STEAMSHIP BOTTLE, SAMPAN BOTTLE, and BATTLESHIP BOTTLE (H). Enter the Forgotten Cave.

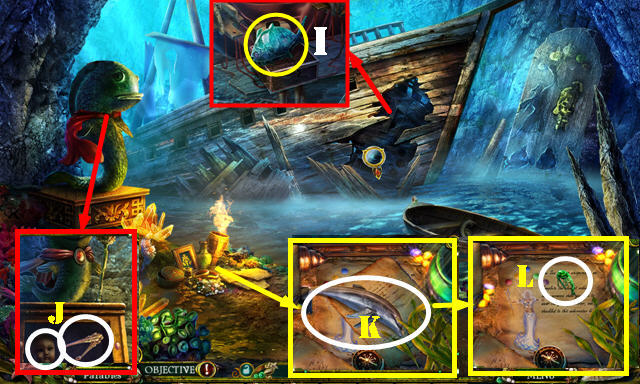
- Take the MACKEREL COIN (I).
- Place the FISH CROWN on the fish; take the WOODEN DOLL HEAD and TONGS (J).
- Move two papers; take the DOLPHIN (K); move one more paper and take the SHRIMP COIN (L).
- Return to the Palace Entrance.

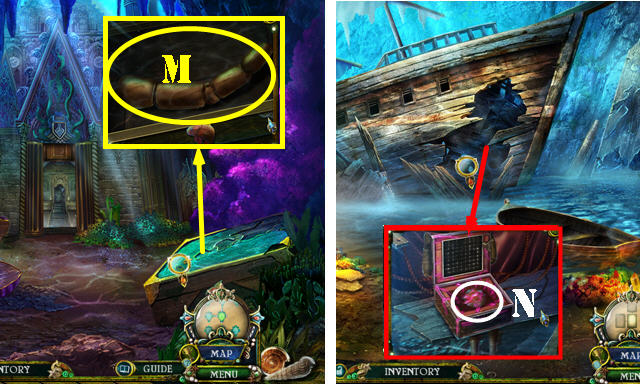
- Place the BASS COIN, SHARK COIN, MACKEREL COIN, and SHRIMP COIN. Take the WOODEN DOLL RIGHT ARM (M).
- Return to the Forgotten Cave.
- Place the WOODEN DOLL RIGHT ARM, WOODEN DOLL HEAD, WOODEN DOLL LEFT ARM. Place the WOODEN ORB (N); zoom into it for a puzzle.

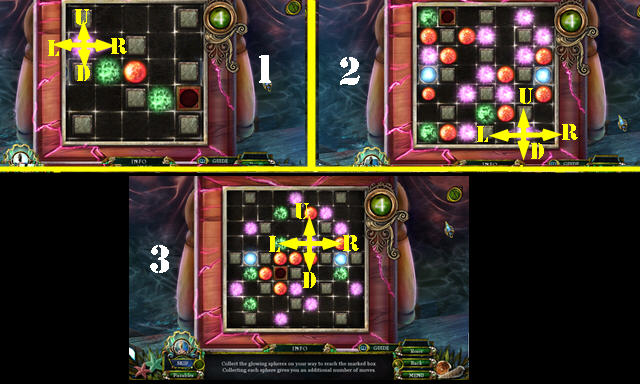
- Solution 1: R-D-Rx2-D-R.
- Solution 2: (L-U-Lx2-D-Ux3-Rx2-U-Rx2-U-Dx2), (Ux3-R).
- Solution 3: Rx2-Ux2-Lx2-U-Lx2-Dx5.
- Take the CHARGED WOODEN ORB.
- Talk to the ghost.
- Return to the Balcony.

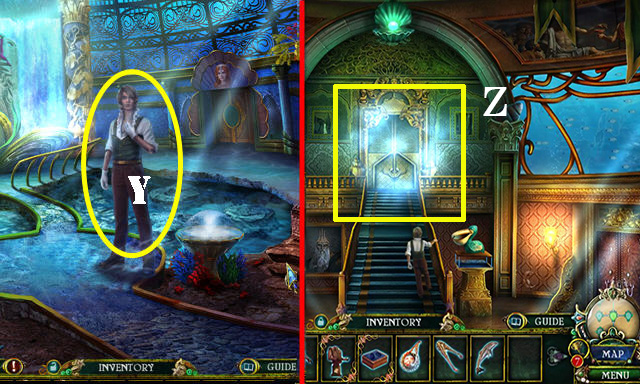
- Give the CHARGED WOODEN ORB to Pinocchio (Y).
- Talk to Pinocchio. You get transported to the Grand Hall.
- Play the mini-game (Z).

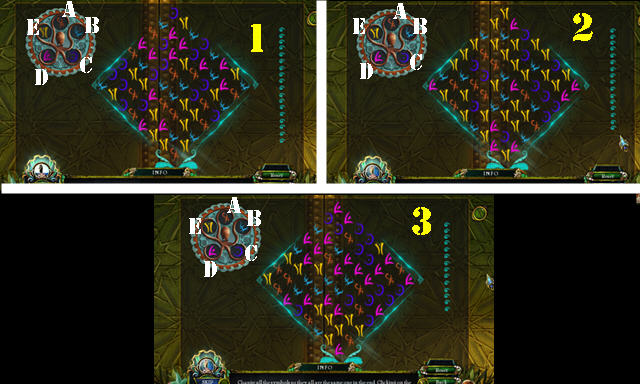
- Solution 1: E-B-E-A-C-B-D-A-E-C-D-B-E-A-C.
- Solution 2: D-B-C-E-B-A-C-E-B-A-D-C-E.
- Solution 3: E-A-C-D-B-A-C-D-E-B.
- Take the WHALE.
- Return to the Throne Room.

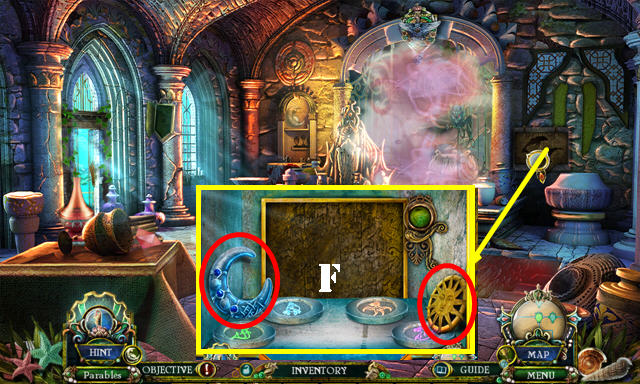
- Place the DOLPHIN and WHALE. Take the DAY MEDALLION and SILVER CRESCENT (F).
- Go to the Greenhouse.

- Open the book; take the BLUE CRYSTAL (G).
- Place the SILVER CRESCENT, GOLDEN SUN, and BRONZE COMET (H). Enter the Viewing Room.

- Talk to the princess.
- Take the METAL TILE and FISH FOOD (I).
- Take the YELLOW CRYSTAL (J).
- Place the BLUE CRYSTAL and YELLOW CRYSTAL on the WOODEN BOX; take the TRIDENT and CORAL KEY (inventory).
- Place the TRIDENT (K); take the SNOW INSIGNIA and GODDESS DOLL (L).
- Return to the Waterfall.

- Use the FISH FOOD in the water; use the TONGS to get the STORM INSIGNIA (M).
- Use the CORAL KEY and turn it; take the FLORAL BATON and HERMIT CRAB FIGURINE (N) to activate a HOP. Play the HOP (O) to get the LILY GEM.
- Return to Princess Daphne’s Room.


- Place the FLORAL CROWN and FLORAL BATON (P). Take the THUNDER INSIGNIA (Q).
- Place the LILY GEM; take the TSUNAMI INSIGNIA and GOLDEN BOW (R).
- Return to the Viewing Room.
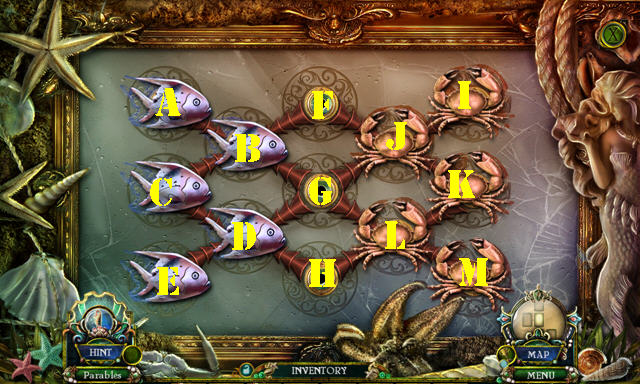
- Place the SNOW INSIGNIA, STORM INSIGNIA, THUNDER INSIGNIA, and TSUNAMI INSIGNIA (S). Play the puzzle.
- Solution: J-F, L-H, B-L, D-J, I-D, M-B, A-M, E-I, B-A, D-E, F-B, H-D, C-H, K-F, F-C, H-K.

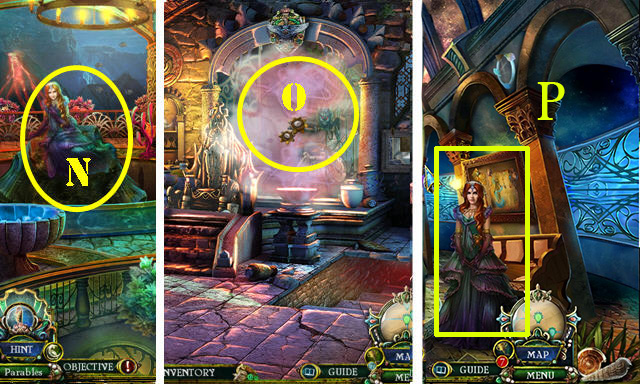
- Talk to the princess to get the STAFF GLOBE (N).
- Return to the Throne Room.
- Place the STAFF GLOBE (O).
- Talk to the princess to get the FIRE PENDANT (P).
- Return to the Strategy Room.

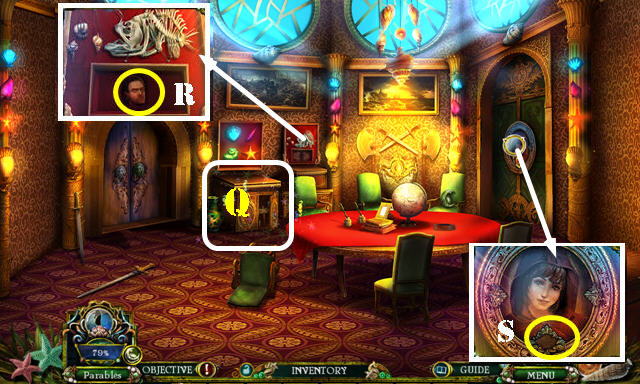
- Play the HOP (Q) to get the MACHINE INSIGNIA.
- Place the METAL TILE and press it; take the WOODEN DOLL HEAD (R).
- Place the FIRE PENDANT (S); enter Princess Theresa’s Room.
Chapter 6: Princess Theresa’s Room

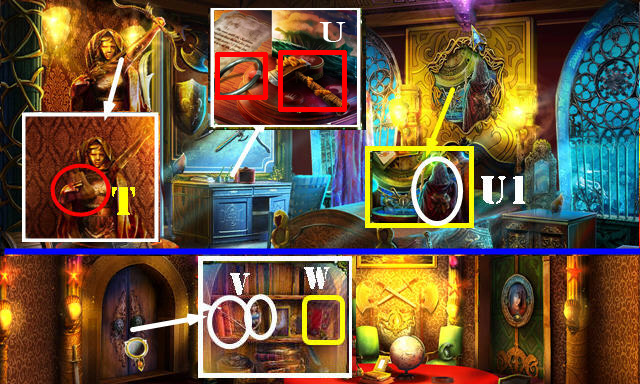
- Take the WOODEN DOLL CAPE (T).
- Take the RING HANDLE and FIRE HAMMER (U).
- Examine (U1).
- Walk down.
- Place the RING HANDLE; take GOLDEN ARROW and DAUGHTER DOLL (V).
- Open the book (W).
- Return to Princess Theresa’s Room.

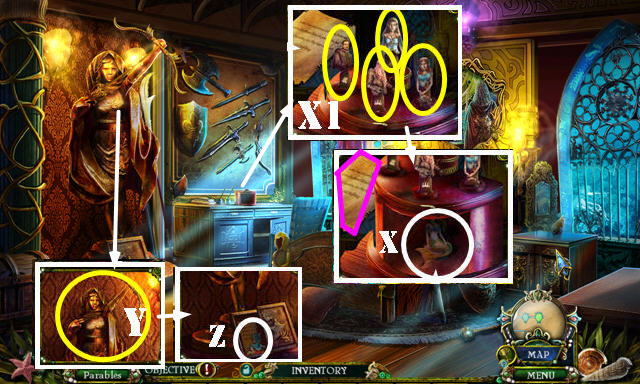
- Place the WOODEN DOLL HEAD and WOODEN DOLL CAPE on the WOODEN DOLL BODY to get the CHANCELLOR DOLL (inventory).
- Place the GODDESS DOLL, DAUGHTER DOLL, KING DOLL, and CHANCELLOR DOLL (X1). Read the note (purple).Take the MERMAID FIGURINE (X).
- Place the GOLDEN ARROW and GOLDEN BOW (Y); open the box, read the note, and take the EEL FIGURINE (Z).
- Return to the Machine Room.

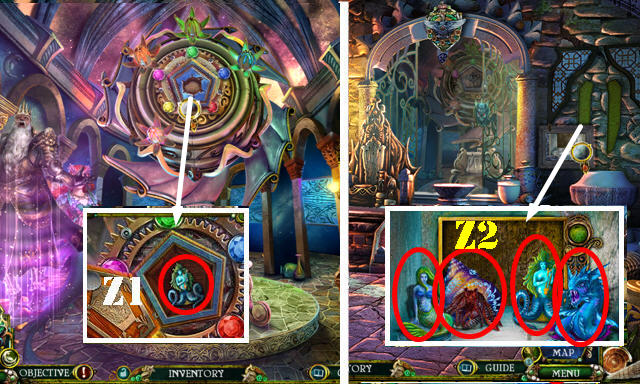
- Place the MACHINE INSIGNIA; take the SIREN FIGURINE (Z1).
- Walk down.
- Put down the MERMAID FIGURINE, SIREN FIGURINE, EEL FIGURINE, and HERMIT CRAB FIGURINE for a puzzle (Z2).

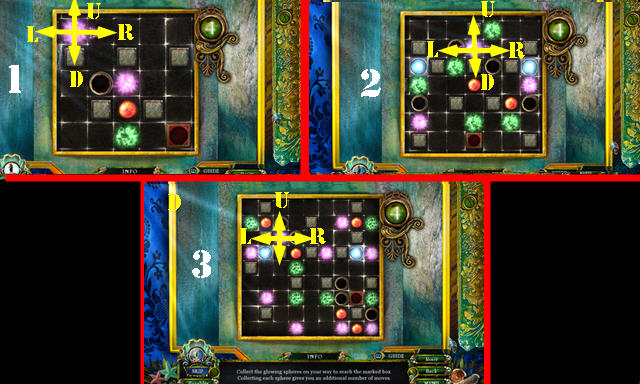
- Solution 1: R-Dx2-R-Dx2-Rx2.
- Solution 2: (L-Dx2-Lx2-U), (D-L-Dx2-Lx2-D).
- Solution 3: (U-Lx2-Dx2-R), (R-D-L-Dx2).
- Take the BROKEN ANCIENT STAFF.
- Place the STAFF GLOBE on the BROKEN ANCIENT STAFF; take the ANCIENT STAFF (inventory).
- Go forward.

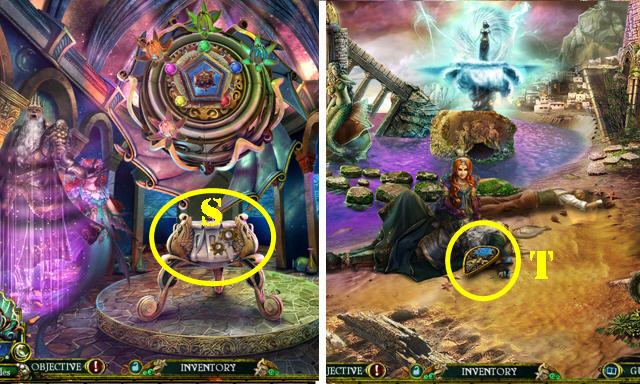
- Use the ANCIENT STAFF (S) to automatically go back to the Shoreside.
- Talk to the princess. Take the ROSE EMBLEM (T).
- Go to the Tower.

- Play the HOP to receive the WATER GOBLET (U).
- Place the ROSE EMBLEM (V).
- Go forward.

- Take the BOOK OF HATRED (W), NIGHT MEDALLION (X), and GODDESS KEY (Y).
- Return to Temple Hall.
- Place the GODDESS KEY (Z).
- Go forward.

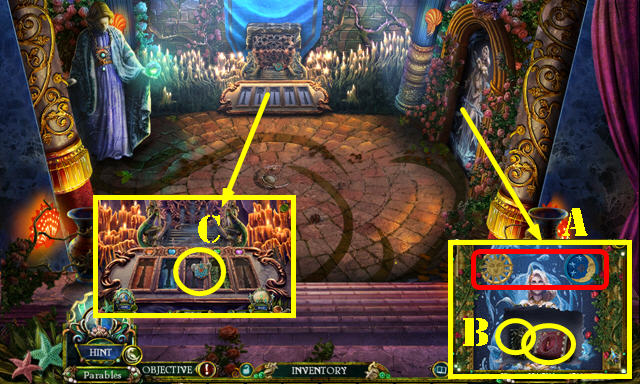
- Place the DAY MEDALLION and the NIGHT MEDALLION (A). Take the BOOK OF ANGER and LION HEAD (B).
- Take the SEA SOUL INSIGNIA (C).
- Place the SEA SOUL INSIGNIA on the SEA SOUL GLOBE (inventory).
- Return to the Room of Worship.

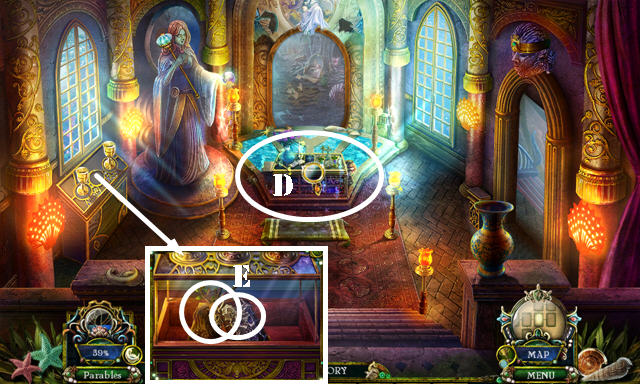
- Play the HOP (D) to get the WATER HAMMER.
- Place the WATER GOBLET; take the BOOK OF DOOM and WOODEN HAMMER (E).
- Return to the Library.

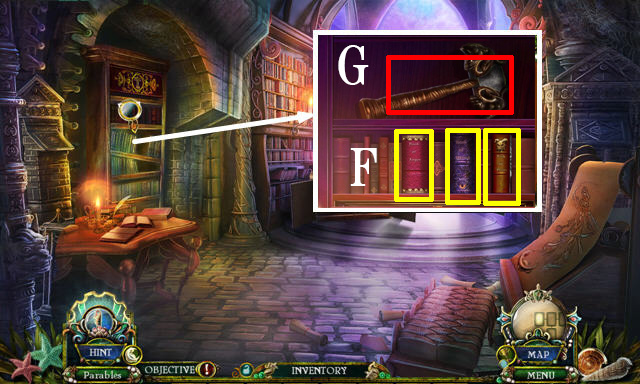
- Place the BOOK OF ANGER, BOOK OF HATRED, and BOOK OF DOOM (F); take the METAL HAMMER (G).
- Return to the Secret Garden.

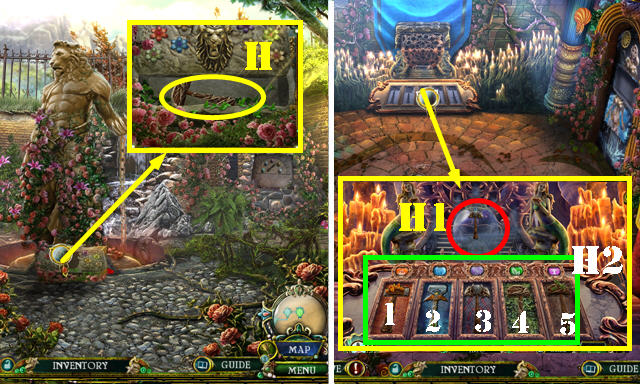
- Place the LION HEAD; press down all the flowers and take the EARTH HAMMER (H).
- Return to the Goddess Secret Chamber.
- Place the SEA SOUL GLOBE (H1).
- Place the FIRE HAMMER, WATER HAMMER, METAL HAMMER, EARTH HAMMER, and WOODEN HAMMER (H2).
- Select the hammers in this order: 2-4-3-5-1 for a puzzle to appear.

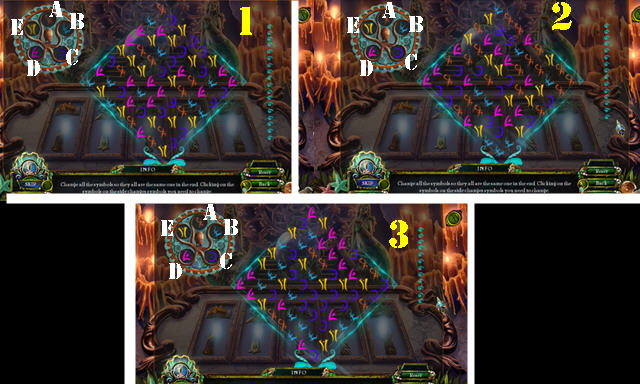

- Solution 1: C-E-A-B-C-E-D-A-C-E-D-B-C-A-B-E-D-B.
- Solution 2: C-D-E-C-A-B-D-C-A-E-D-B.
- Solution 3: E-C-B-D-E-D-C-B-A-E-C-D.
- Take the BLOOD VIAL.
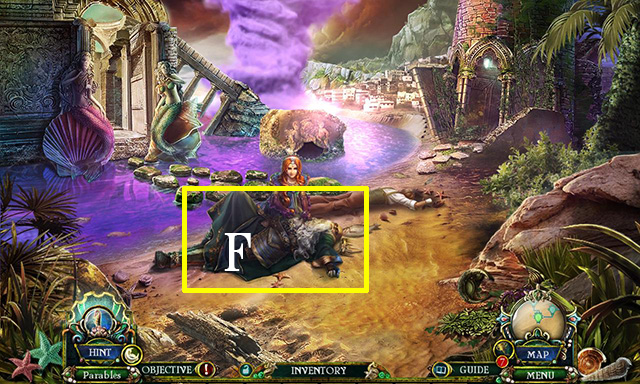
- Return to the Shoreside.
- Use the BLOOD VIAL on the king (F).
- Congratulations, you’ve completed Dark Parables: The Little Mermaid and the Purple Tide!


 Enlightenus II: The Timeless Tower Walkthrough, Guide, & Tips
 Ghost Encounters: Deadwood Walkthrough, Guide, & Tips
 Secrets of the Dark: Eclipse Mountain Walkthrough, Guide, & Tips
 Surface: Alone in the Mist Walkthrough, Guide, & Tips
 Sarah Maribu and the Lost World Walkthrough, Guide, & Tips