Dark Romance: The Swan Sonata Walkthrough, Guide, & Tips
Dark Romance: The Swan Sonata Walkthrough

Welcome to the Dark Romance: The Swan Sonata Walkthrough.
Your wedding day goes dark… and your fiancée has no idea who’s behind it all.
Whether you use this document as a reference when things get difficult or as a road map to get you from beginning to end, we’re pretty sure you’ll find what you’re looking for here.
This document contains a complete Dark Romance: The Swan Sonata game walkthrough featuring annotated screenshots from actual gameplay!
We hope you find this information useful as you play your way through the game. Use the walkthrough menu below to quickly jump to whatever stage of the game you need help with.
Remember to visit the Big Fish Games Forums if you find you need more help. Have fun!
This walkthrough was created by prpldva, and is protected under US Copyright laws. Any unauthorized use, including re-publication in whole or in part, without permission, is strictly prohibited.
General Tips
- This is the official guide for Dark Romance: The Swan Sonata.
- This guide will not mention each time you have to zoom into a location; the screenshots will show each zoom scene.
- Hidden-object puzzles are referred to as HOPs. This guide will not show HOP solutions. It will identify the location of the HOP and the inventory item acquired.
- This guide will show solutions for non-random puzzles. Please read the in-game instructions for each puzzle.
- In this game, you will sometimes have to select the new scene to trigger dialog, cut-scenes, or tasks prior to interacting with the scene.
Chapter 1: Grandma’s House

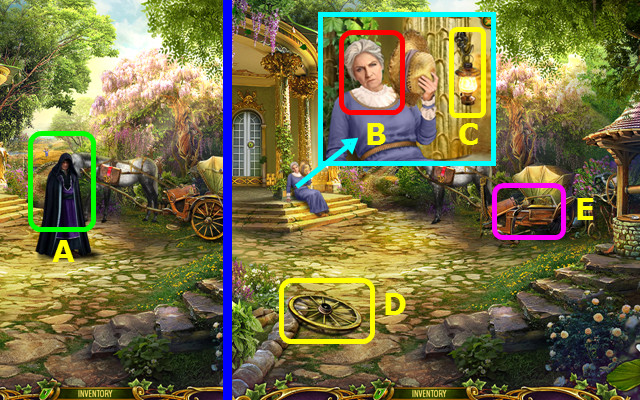
- Talk to Rothbart (A).
- Talk to Grandmother; earn the 1/2 LOCKPICK (B).
- Take the LAMP (C).
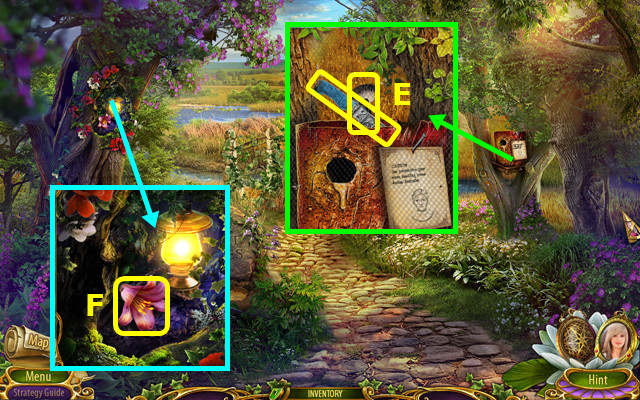
- Take the WHEEL (D); place the WHEEL (E).

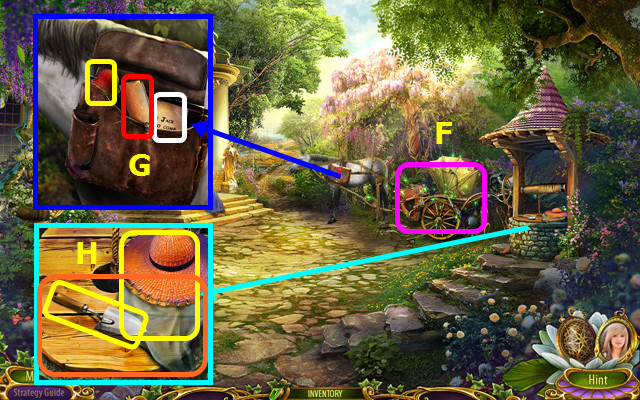
- Play the HOP; earn the HORSE AMULET (F).
- Place the HORSE AMULET; take the MAP, NOTE, and NUTCRACKER’S HEAD (G).
- Take the SCOOP and 1/2 NET; remove the cover (H).
- Go forward.

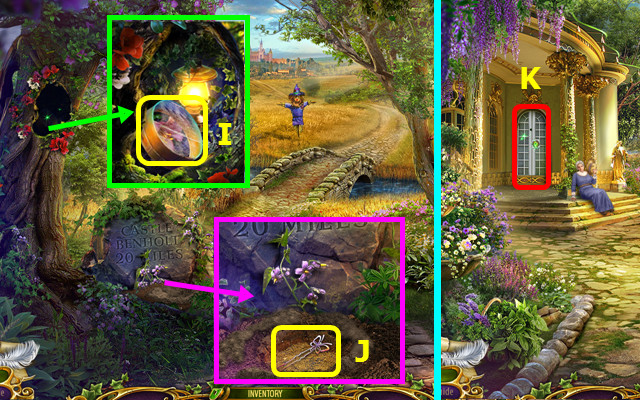
- Place the LAMP; take the SCREEN (I).
- Use the SCOOP; take the 2/2 LOCKPICK (J).
- Walk down.
- Select (K).

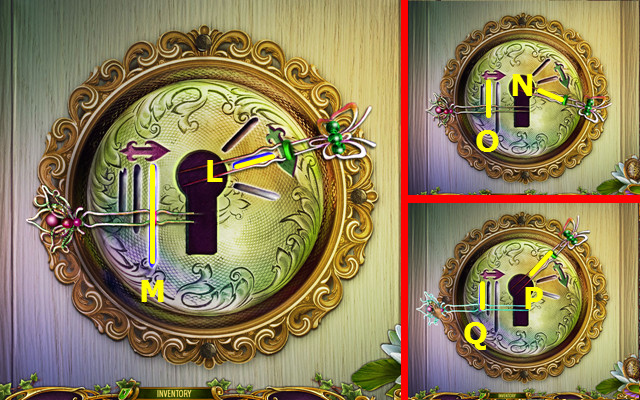
- Use the 2 LOCKPICKS in the center.
- Solution; L-M-N-O-P-Q.
- Walk left.

- Place the NUTCRACKER’S HEAD; take the CUP and read the note (A).
- Open the curtain (@).
- Take the BUCKET, 2/2 NET, and read the instructions (B).
- Walk down.

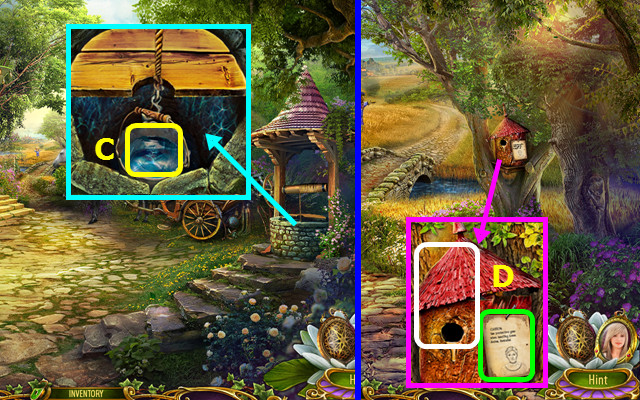
- Place the BUCKET; use the CUP to take the CUP OF WATER (C).
- Go forward.
- Read the note and use the NET (D).


- Take the KNIFE and BRUSH (E).
- Use the BRUSH to make the BRUSH WITH POLLEN (F).
- Combine the CUP OF WATER and BRUSH WITH POLLEN to make the CUP OF GROWTH POTION (inventory).
- Walk down and left.

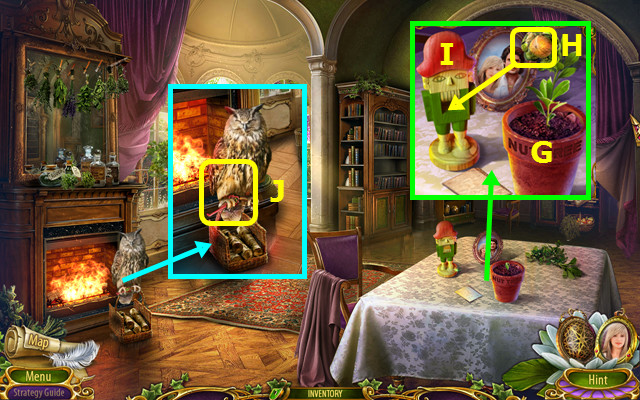
- Use the CUP OF GROWTH POTION (G); take the nut (H) and use it on the nutcracker (I) to earn the NUT.
- Talk to Fenris; give the NUT (J) and earn the CHEST KEY.

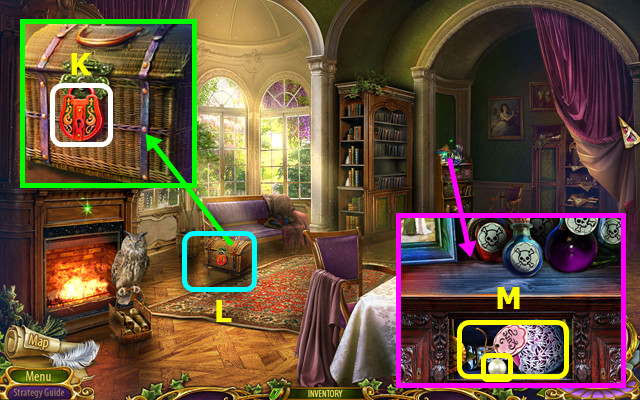
- Use the CHEST KEY (K).
- Play the HOP; earn the SMILE KEY (L).
- Place the SMILE KEY; take the 1/2 PEARL and POTION (M).
- Walk down.

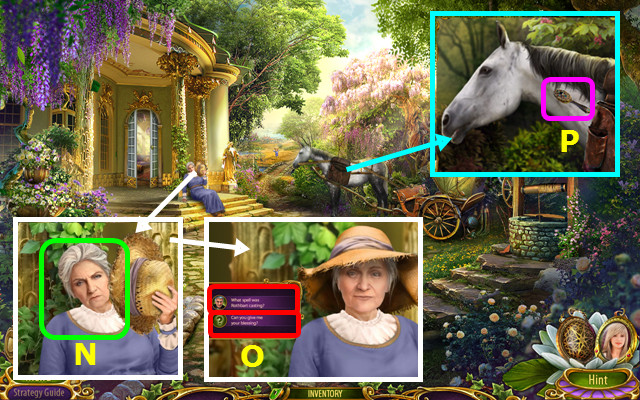
- Give the POTION (N).
- Talk to Grandma; earn the HORSE BRUSH (O).
- Use the HORSE BRUSH (P).
- Go forward.

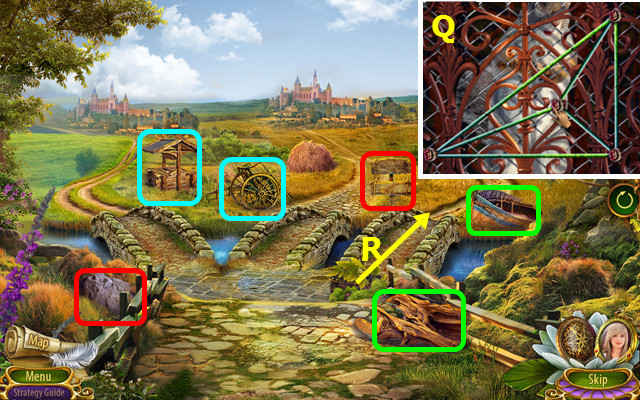
- Select pairs (color-coded).
- Untangle the ropes (Q).
- Select the right path (R).

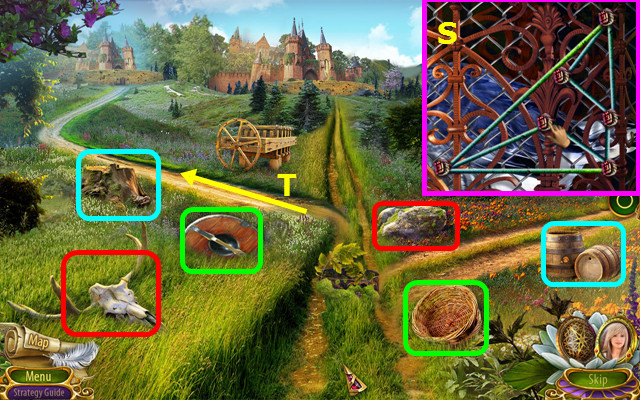
- Select pairs (color-coded).
- Untangle the ropes (S).
- Select the left path (T).

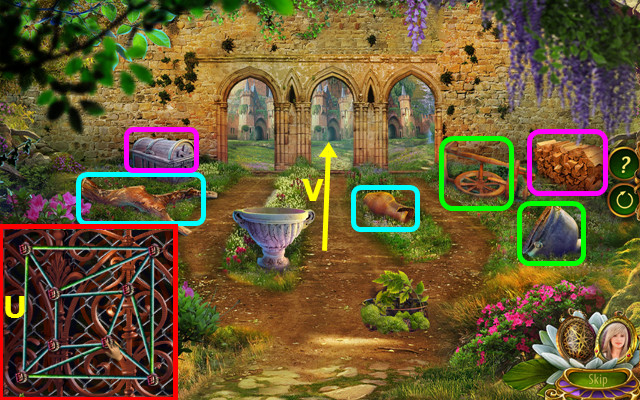
- Select pairs (color-coded).
- Untangle the ropes (U).
- Select the center path (V).

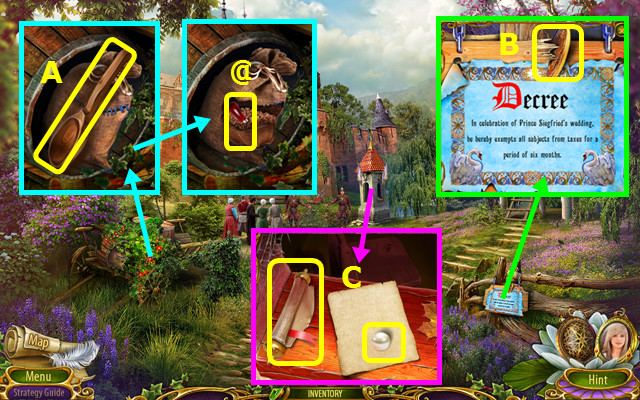
- Remove the vines 2x and take the LADLE (A).
- Use the KNIFE and take the AWL (@).
- Use the AWL to take the FEATHER COIN (B).
- Take the NOTE and 2/2 PEARL (C).
- Walk right.

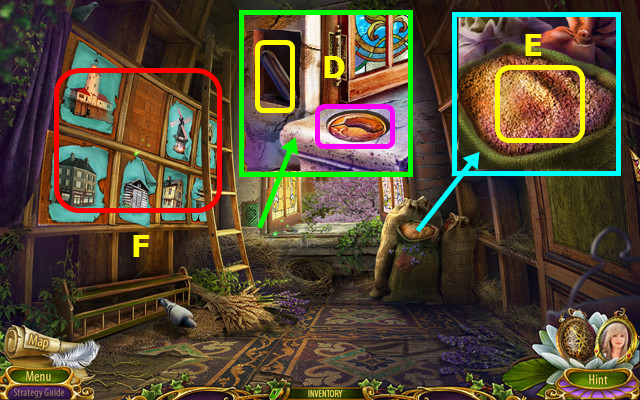
- Place the FEATHER COIN; take the PENCIL (D).
- Use the SCREEN to find the MESSAGE (E).
- Select (F).

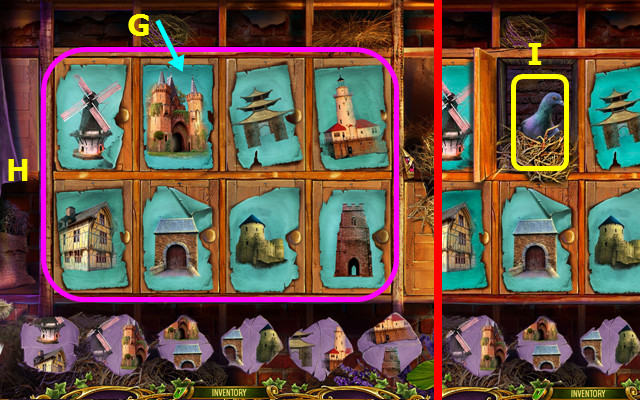
- Place the MESSAGE (G).
- Solution (H).
- Take the CARRIER PIGEON (I).
- Walk down.

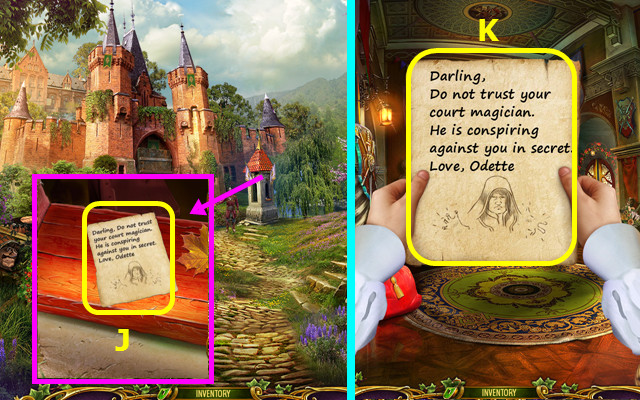
- Use the PENCIL; take the LETTER TO SIEGFRIED (J).
- Combine the CARRIER PIGEON and LETTER TO SIEGFRIED (inventory).
- You are now playing as Siegfried.
- Select the NOTE (K).
Chapter 2: The Castle

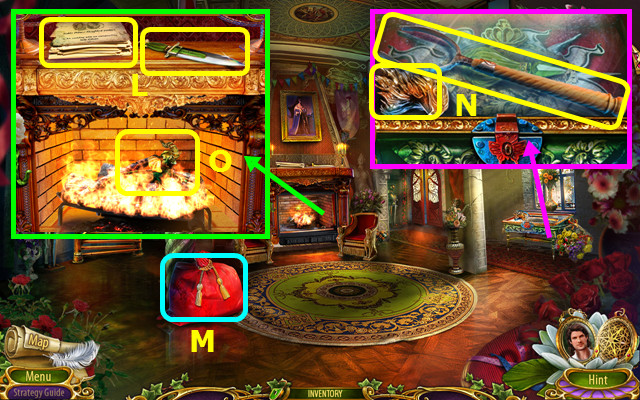
- Take the NOTE and DAGGER (L).
- Use the DAGGER; play the HOP to earn the WAX EGG (M).
- Take the TONGS and HEAD (N).
- Place the WAX EGG; use the TONGS to take the 1/3 FIGURINE (O).
- Walk forward.

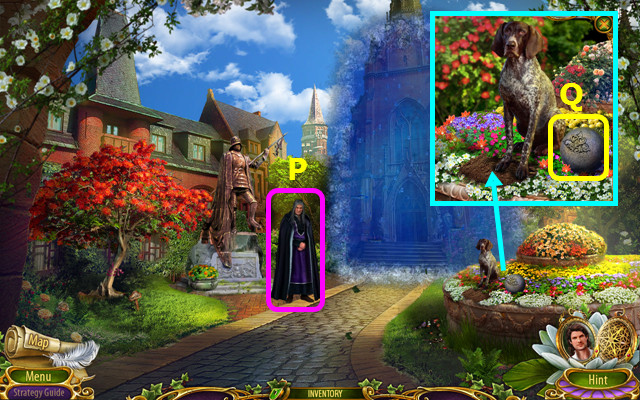
- Talk to ROTHBART; earn the DOOR CHIP (P).
- Take the STONE BALL (Q).

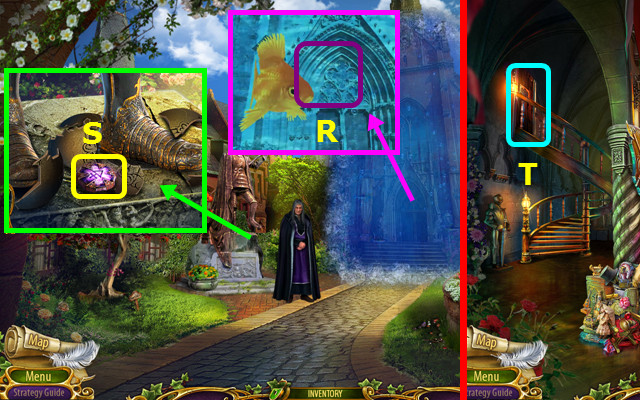
- Select (R).
- Place the STONE BALL; take the JAR TALISMAN (S).
- Walk down.
- Select (T).

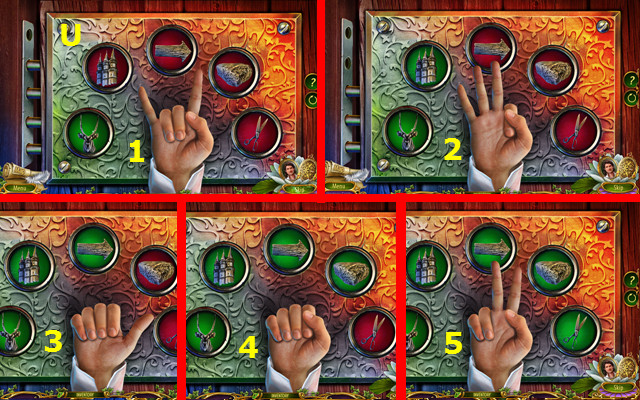
- Place the DOOR CHIP (U).
- Arrange the hand (1-5).
- Walk left.

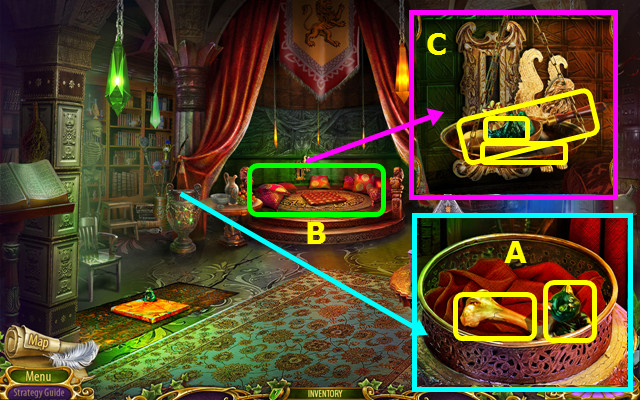
- Place the JAR TALISMAN; take the 2/3 FIGURINE and the BONE (A).
- Select (B); talk to Alana.
- Place the HEAD; take the 3/3 FIGURINES, SCOOP, and NOTE (C).

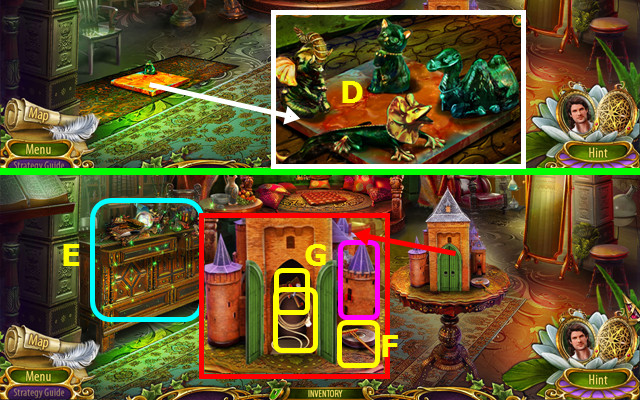
- Place the 3 FIGURINES; swap the heads as shown (D).
- Play the HOP; earn the CASTLE TOWER (E).
- Take the RAKE (F).
- Place the CASTLE TOWER; take the ROPE and CHEST KEY (G).
- Walk down.

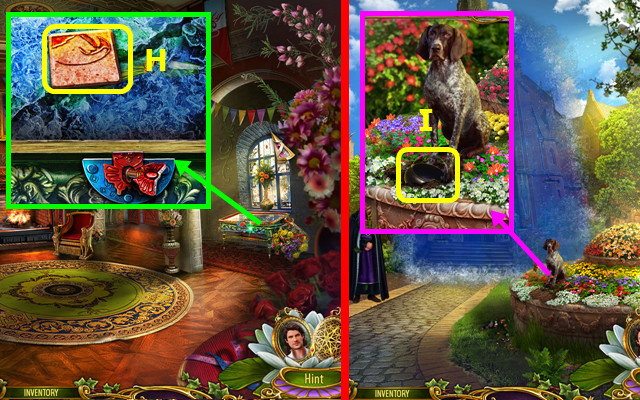
- Use the CHEST KEY; take the 1/2 PUZZLE PIECE (H).
- Walk forward.
- Give the BONE; take the POT (I).
- Walk down.

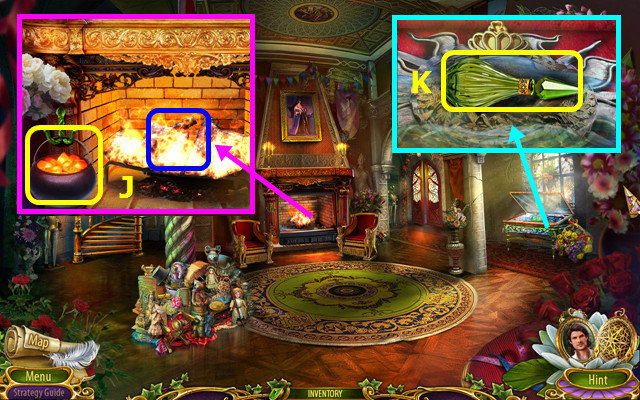
- Place the POT, use the SCOOP, and take the COALS (J).
- Use the COALS; take the FLASK WITH MAGIC POTION (K).
- Walk forward.

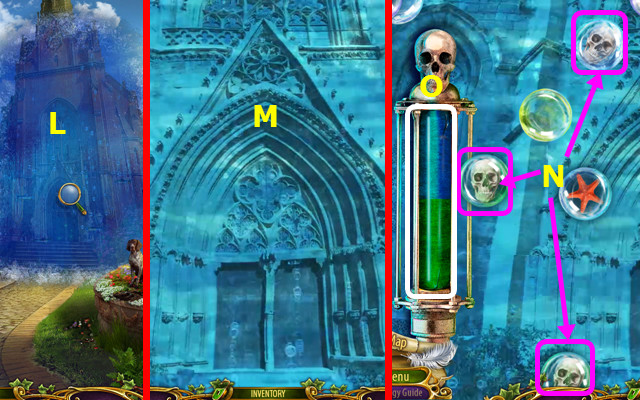
- Select (L).
- Use the FLASK WITH MAGIC POTION (M).
- Select skull bubbles (N) to fill the vial (O).

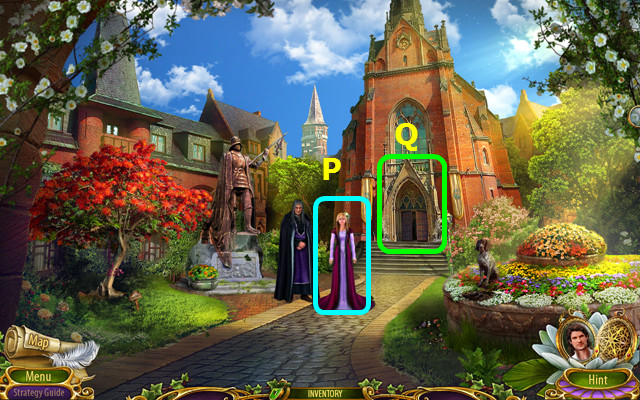
- Talk to Odette (P).
- Go forward (Q).

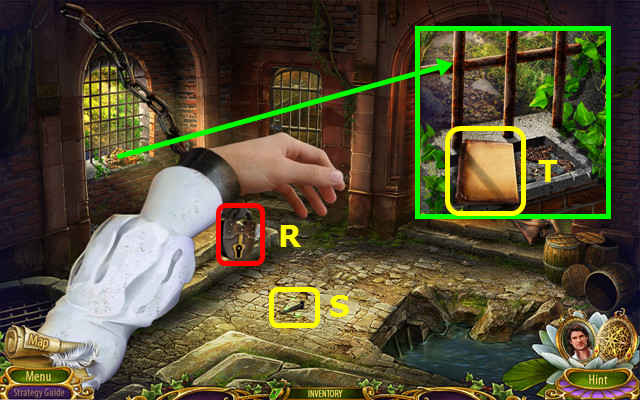
- Touch the lock (R).
- Use the ROPE to take the NAIL (S); use the NAIL on the lock (R).
- Use the RAKE; take the NOTE (T).
Chapter 3: The Lake

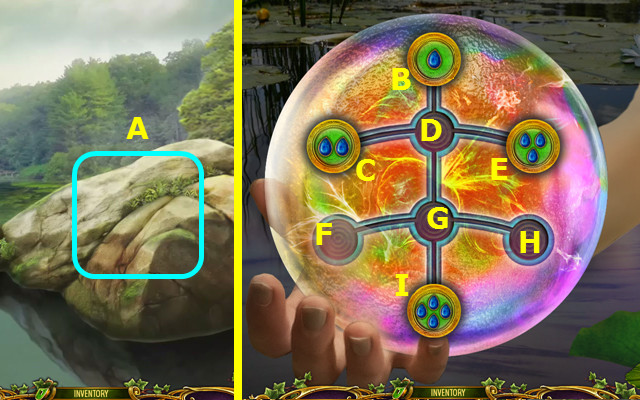
- You are playing as Odette.
- Select (A) and talk to the Mermaid.
- Solution: DC-BE-CB-GD-DC.

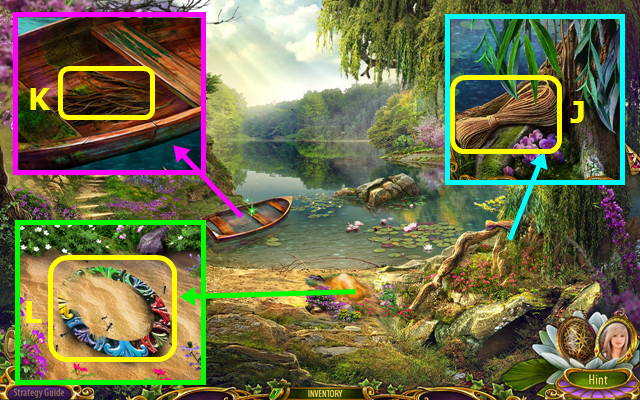
- Take the ROPE (J).
- Use the LADLE and ROPE to make the BROOM (K).
- Use the BROOM; take the RING (L).
- Walk left.

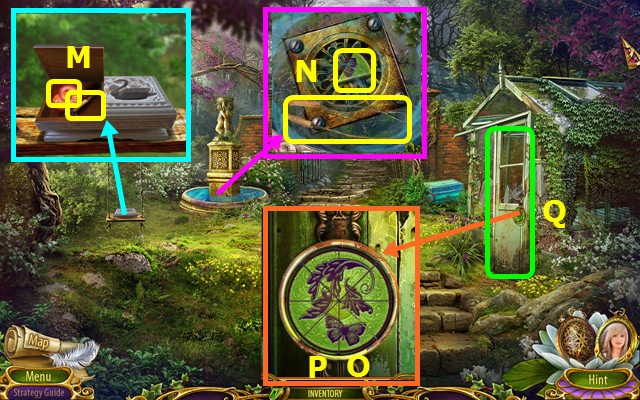
- Place the 2 PEARLS; take the BRANCH and MAGIC WATER AMULET (M).
- Use the MAGIC WATER AMULET; take the CIRCLE’S SECTOR and TONGS (N).
- Place the CIRCLE’S SECTOR; select Ox6-Px6.
- Play the HOP; earn the JAR (Q).
- Walk down.

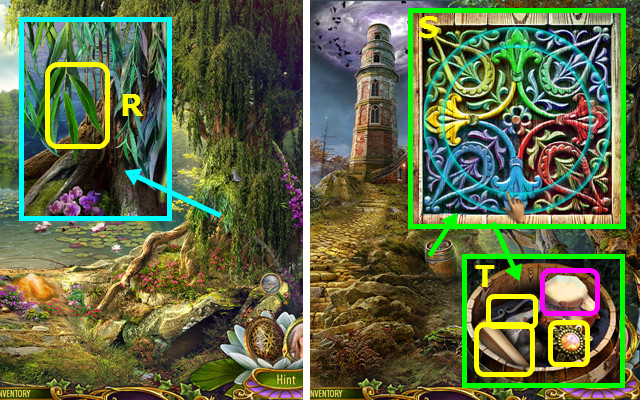
- Use the JAR to make the JAR OF WILLOW (R).
- Go forward 2x.
- Place the RING; starting with the inner ring and working out, restore the pattern (S).
- Take the FLINT, STAR, and NOTE; remove the honey lid (T).

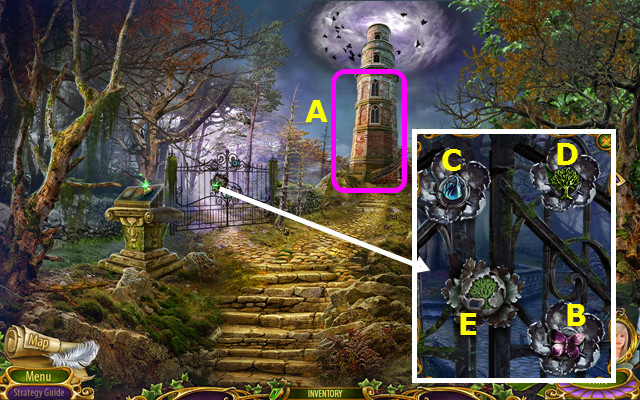
- Select (A).
- Place the STAR; take the butterfly (B).
- Place the butterfly; take the swan (C).
- Place the swan; take the tree (D).
- Place the tree (E).
- Walk left.

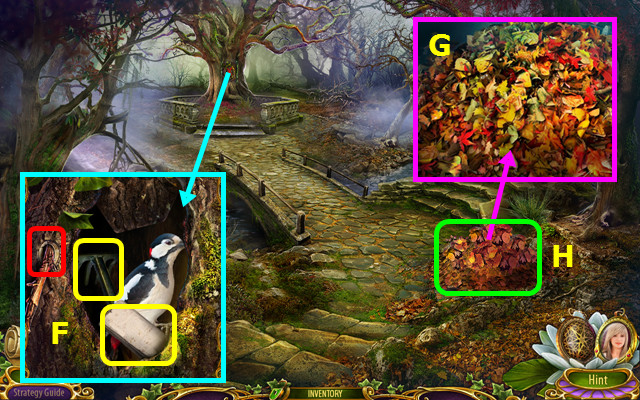
- Use the BRANCH; take the NOTE and RAKE (F).
- Use the RAKE (G).
- Play the HOP; earn the CUP (H).

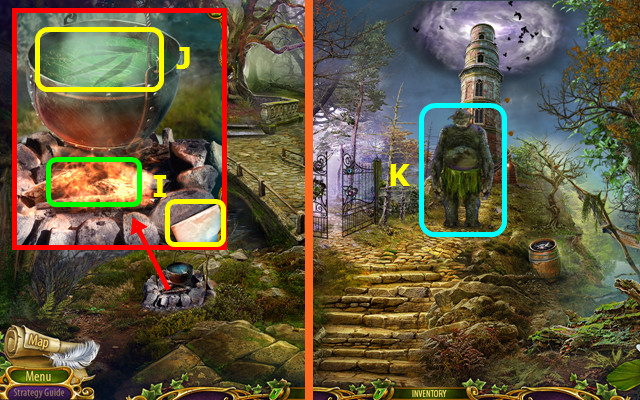
- Use the FLINT and take the NOTE (I).
- Use the JAR OF WILLOW and CUP to make the POTION CUP (J).
- Walk down.
- Use the POTION CUP (K).

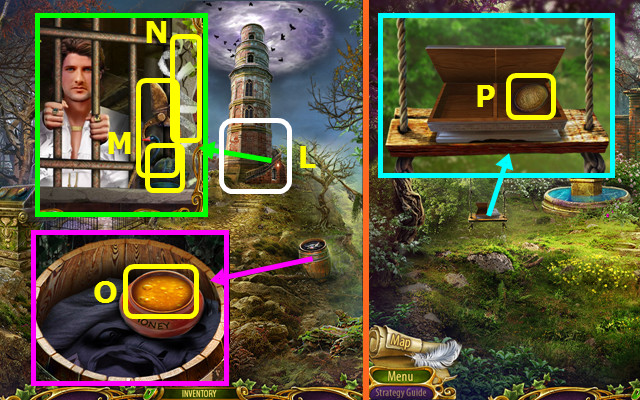
- Select (L); earn the KEY PATTERN.
- Take the BLACK SWAN, and PRUNER (M).
- Use the TONGS to take the TAPE (N).
- Use the TAPE to make the STICKY TAPE (O).
- Walk down.
- Place the BLACK SWAN; take the COIN (P).

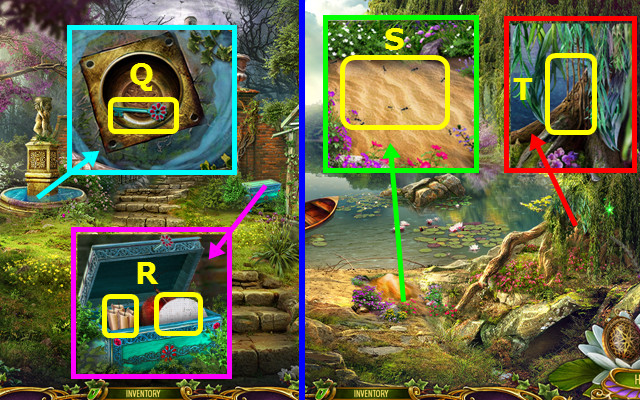
- Use the COIN; take the CHEST KEY (Q).
- Use the CHEST KEY; take the CANDLES and CLOTH (R).
- Walk down.
- Use the STICKY TAPE to take the ANTS (S).
- Use the PRUNERS to take the VINE (T).
- Walk left, forward, and left.

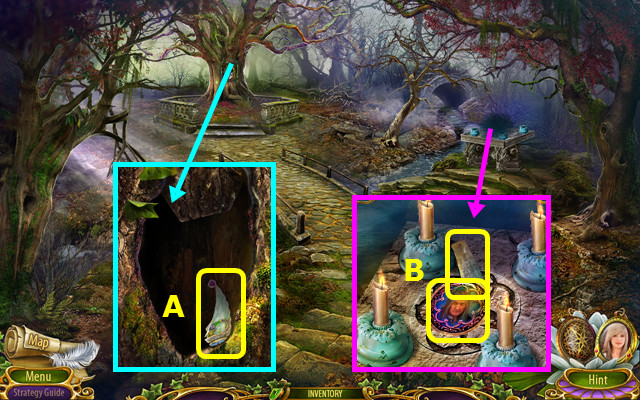
- Use the ANTS; take the 1/2 KEY PART (A).
- Place the CANDLES; take the ROTHBART AMULET and SHARP END (B).
- Walk down 2x.

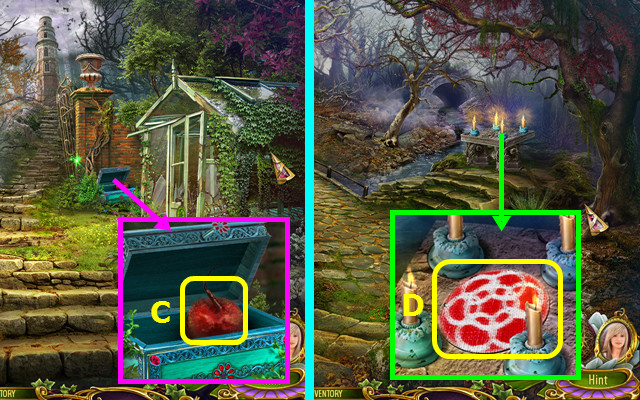
- Use the SHARP END to take the CUT BEETROOT (C).
- Go forward and left.
- Place the CLOTH and CUT BEETROOT; take the FABRIC (D).
- Combine the VINE and FABRIC to make the VINE FLOWER (inventory).

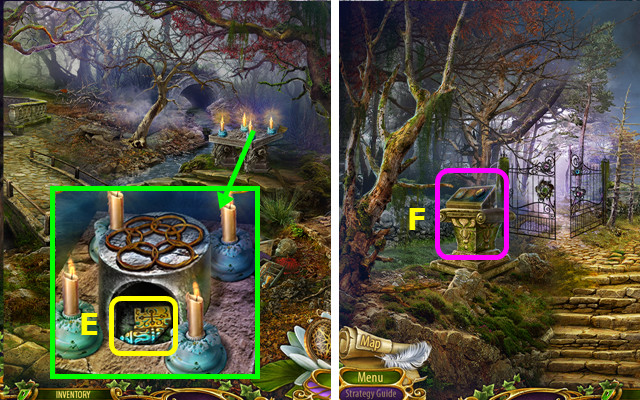
- Place the VINE FLOWER; take the 2/2 KEY PART (E).
- Walk down.
- Select (F).

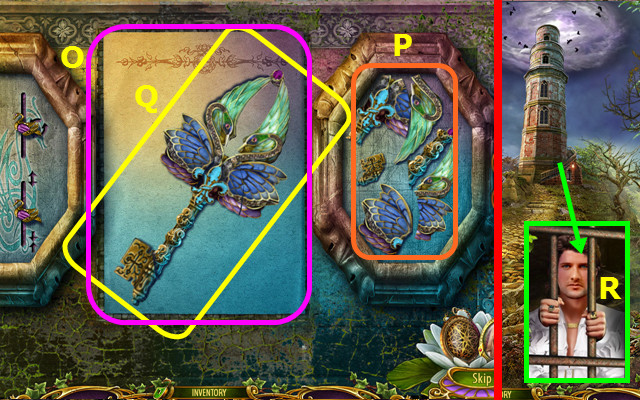
- Place the KEY PATTERN (O) and 2 KEY PARTS (P).
- Restore and take the DUNGEON KEY (Q).
- Give the DUNGEON KEY (R).
Chapter 4: The Dungeon

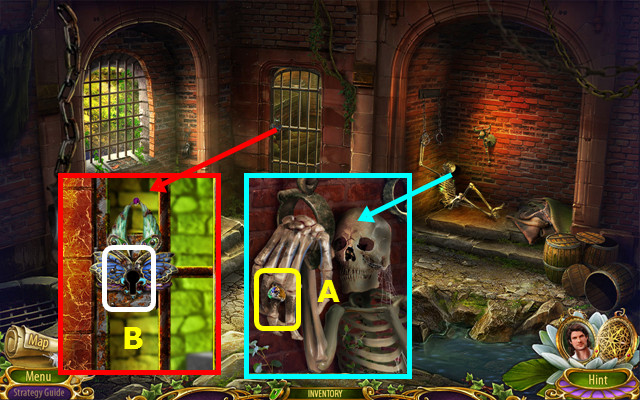
- You are playing as Siegfried; you earn the DUNGEON KEY.
- Take the RING (A).
- Use the DUNGEON KEY (B).
- Walk forward.

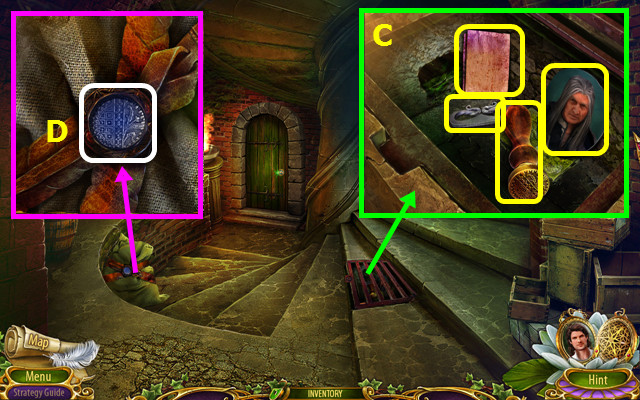
- Use the RING; take the NOTE, FIRE STEEL, STAMP, and ROTHBART PORTRAIT (C).
- Use the STAMP (D).

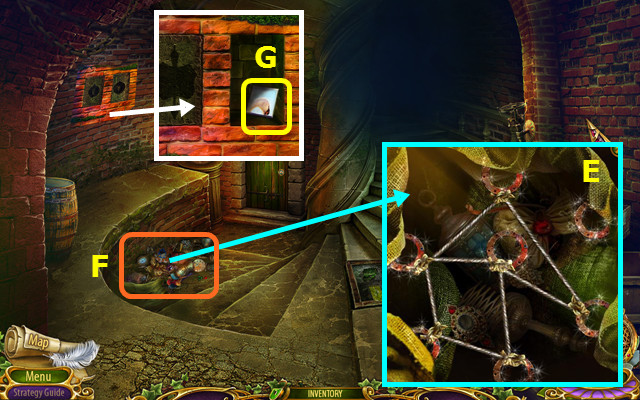
- Untangle the ropes (E).
- Play the HOP; earn the SWORD KEY (F).
- Use the SWORD KEY; take the 2/2 PUZZLE PIECE (G).
- Walk down.

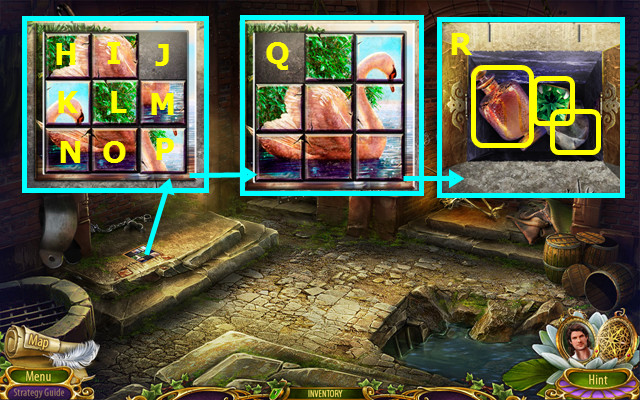
- Place the 2 PUZZLE PIECES.
- Select I-H-K-N-O-L-M-P-O-L-I-J-M-P-O-N-K-L-I-H-K-L-M-J-I-L-K-H.
- Final solution (Q).
- Take the BOTTLE with OIL, JEWEL, and FLINTSTONE (R).
- Combine the FIRE STEEL and FLINTSTONE to make the FLINT (inventory).
- Go forward.

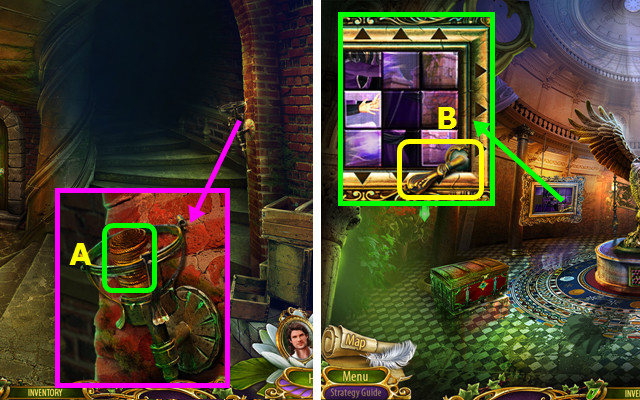
- Use the BOTTLE WITH OIL and the FLINT (A).
- Go forward.
- Take the DOOR HANDLE (B).

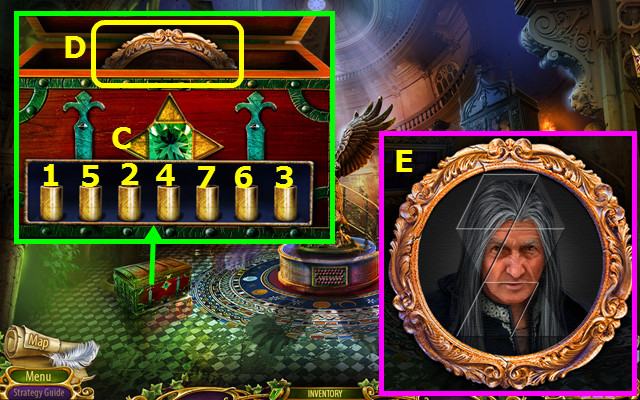
- Place the JEWEL (C); select 1-7.
- Take ROTHBART’S IMAGE (D).
- Combine ROTHBART’S IMAGE and ROTHBART’S PORTRAIT (inventory).
- Restore and take ROTHBART’S PORTRAIT (E).
- Walk down.


- Use the DOOR HANDLE (F).
- Go left.
- Place ROTHBART’S PORTRAIT; take the NOTE, BOOK, and 1/2 PATTERN PARTS (G).

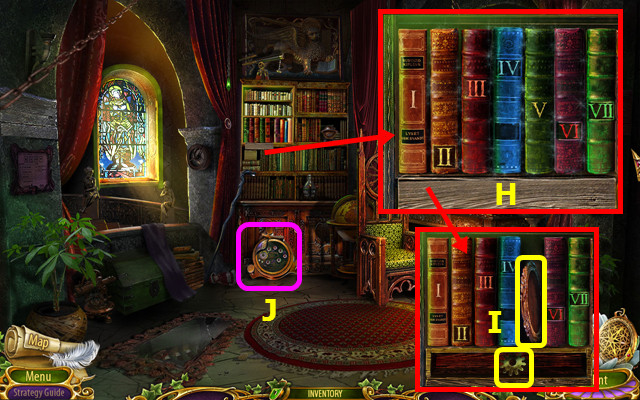
- Place the BOOK; arrange the books as shown (H).
- Take the GEAR and ALANA’S PORTRAIT FRAME (I).
- Select (J).

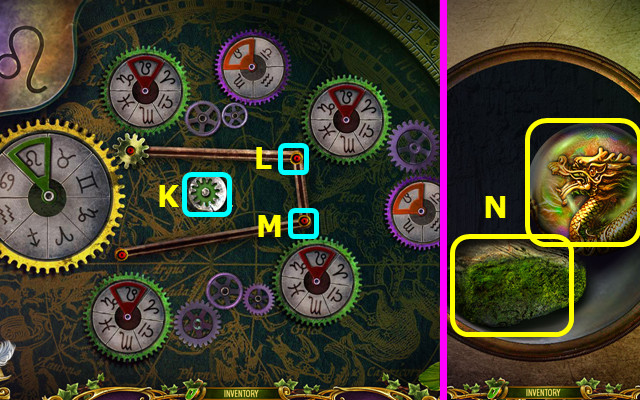
- Place the GEAR.
- Select 6x (+).
- Select (K); select 1x (+).
- Select (L); select 6x (+).
- Select (M); select 2x (+).
- Take the MOSS STONE and SPHERE PART (N).
- Walk down.

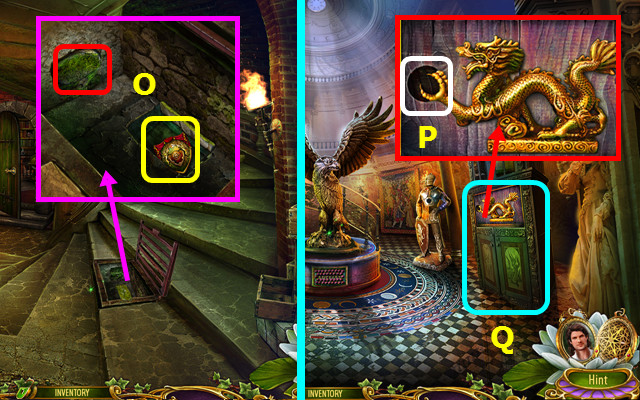
- Place the MOSS STONE; take the CREST (O).
- Go forward.
- Place the SPHERE PART (P).
- Play the HOP; earn the CROWN (Q).
- Combine the CREST and CROWN to make the CREST (inventory).

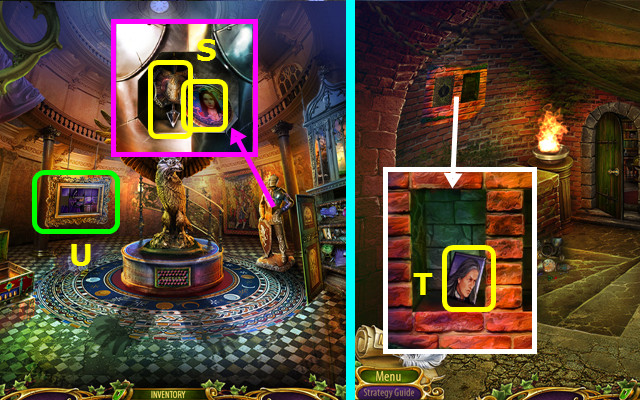
- Place the CREST; take the ARROW KEY and ALANA AMULET (S).
- Walk down.
- Use the ARROW KEY; take the PUZZLE PIECE (T).
- Go forward.
- Select (U).

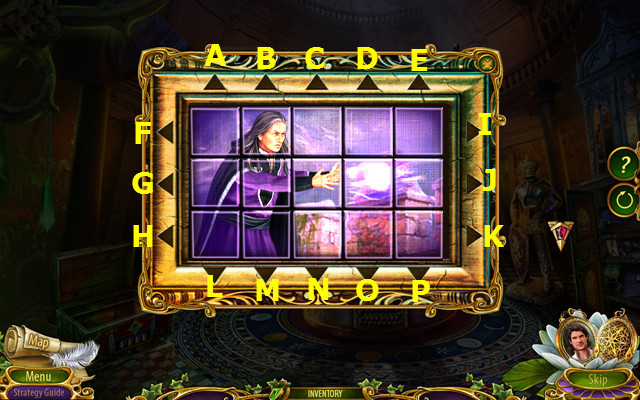
- Place the PUZZLE PIECE.
- Solution J-B-N-G-I-O-F-Kx4-Ix2-Ex2-Fx2-H-I-P-F-Kx2-E-Hx2-P-Hx2-E-K-P-K.

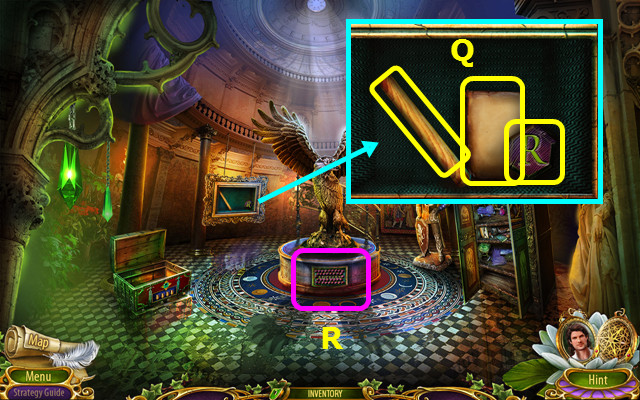
- Take the 1/3 RUNG, MOSAIC PART, and NOTE (Q).
- Select (R).

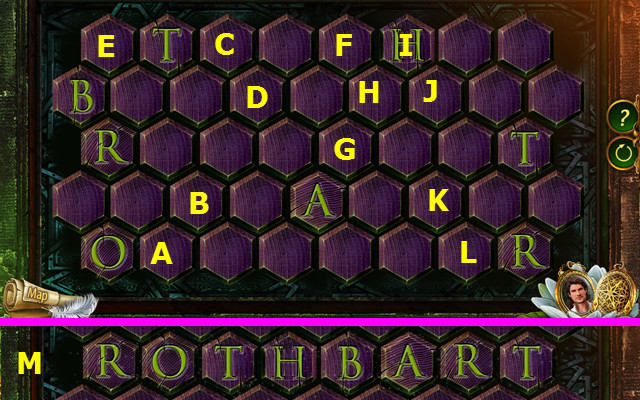
- Place the MOSAIC PART.
- Solution A-B-C-Dx3-E-C-F-Gx4-Hx3-I-Jx3-K-Lx3-Kx5.
- Final solution (M).
- Go up the stairs.

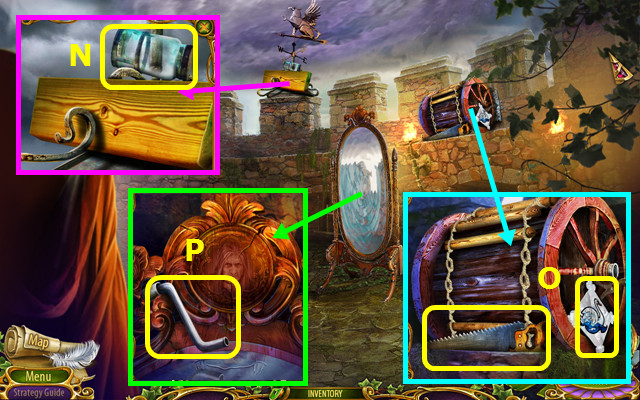
- Take the JAR (N).
- Take the STAINED-GLASS PIECE and SAW (O).
- Take the LADDER HANDLE (P).
- Walk down 2x; go left.

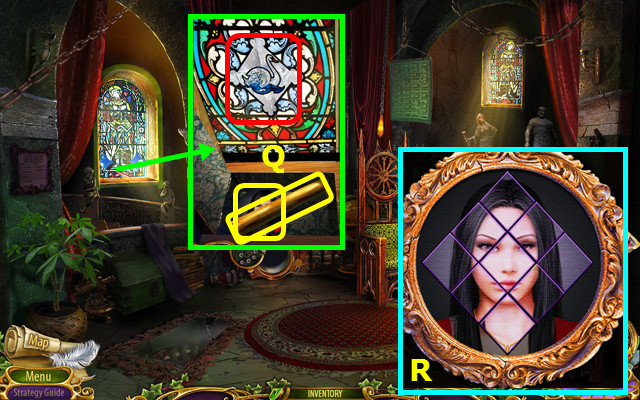
- Place the STAINED-GLASS PIECE; take the 2/3 RUNG and ALANA’S PORTRAIT (Q).
- Combine ALANA’S PORTRAIT FRAME and ALANA’S PORTRAIT; restore the picture to make ALANA’S PORTRAIT (R).

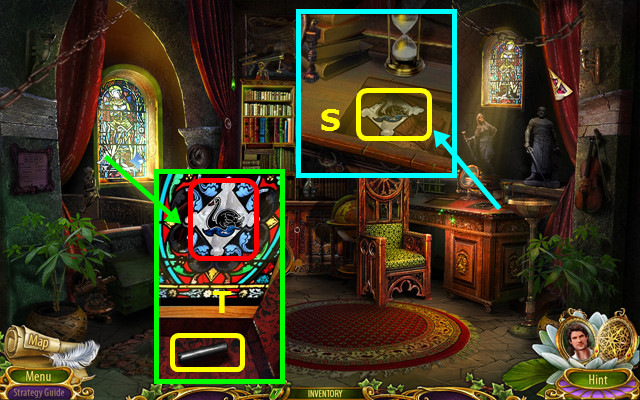
- Place ALANA’S PORTRAIT; take the STAINED-GLASS PIECE (S).
- Place the STAINED-GLASS PIECE; take the COAL (T).
- Walk down; go forward, and up.

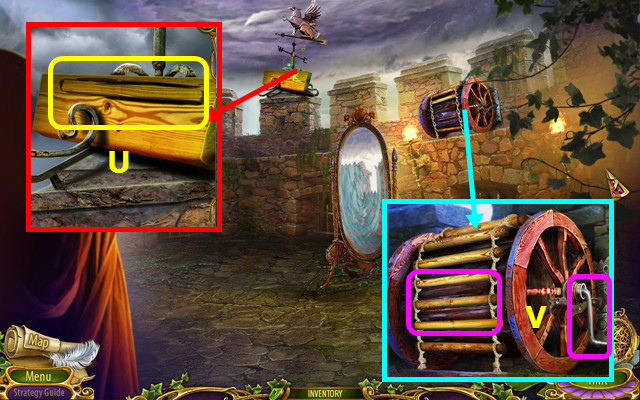
- Use the COAL and SAW to make the 3/3 RUNG (U).
- Place the LADDER HANDLE and 3 RUNGS (V).
Chapter 5: Defeating Alana

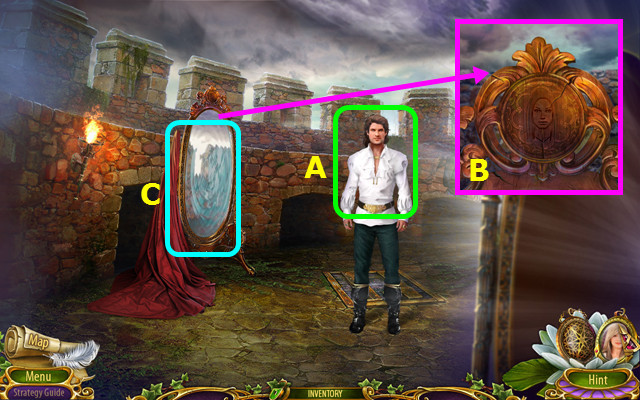
- You are playing as Odette.
- Walk forward.
- Give the ROTHBART AMULET; earn the ALANA AMULET (A).
- Use the ALANA AMULET (B).
- Enter the mirror (C).

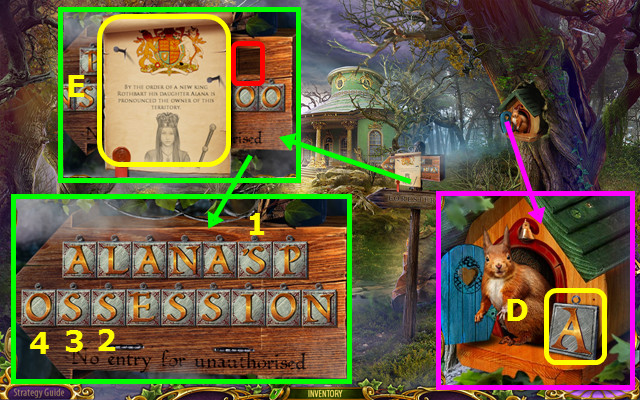
- Take the LETTER A (D).
- Take the NOTE and place the LETTER A (E).
- Select 1-4.

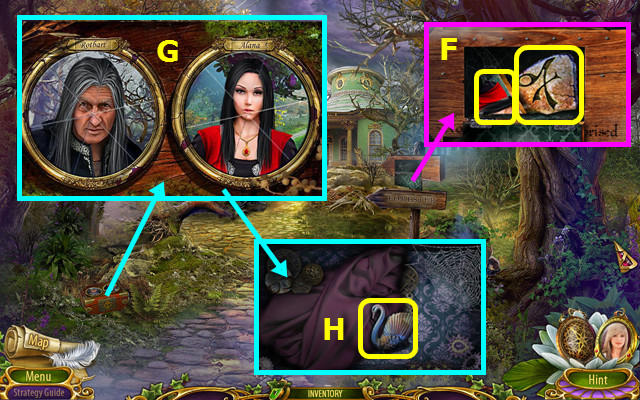
- Take the CHEST PART and STONE (F).
- Place the CHEST PART; restore the two photos (G).
- Take the 1/2 SWAN (H).
- Walk forward.

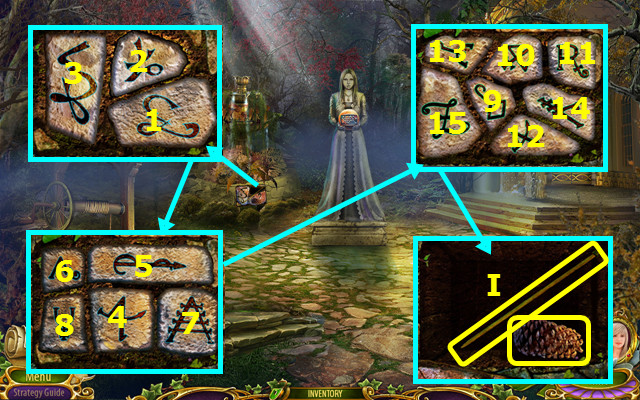
- Place the STONE; select 1-3.
- Select 4-8.
- Select 9-15.
- Take the NEEDLE and PINECONE (I).
- Walk down.

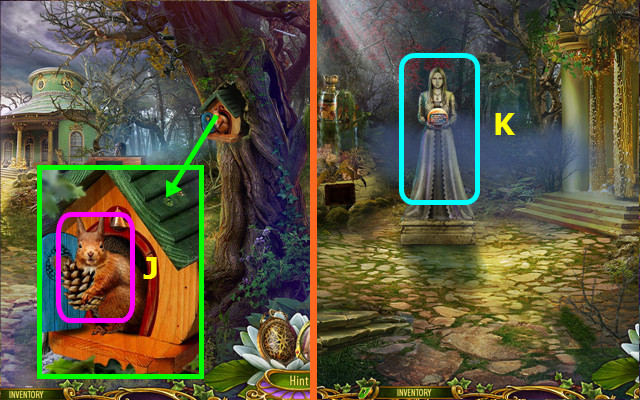
- Give the PINECONE; earn the 2/2 SWAN (J).
- Go forward.
- Select (K).

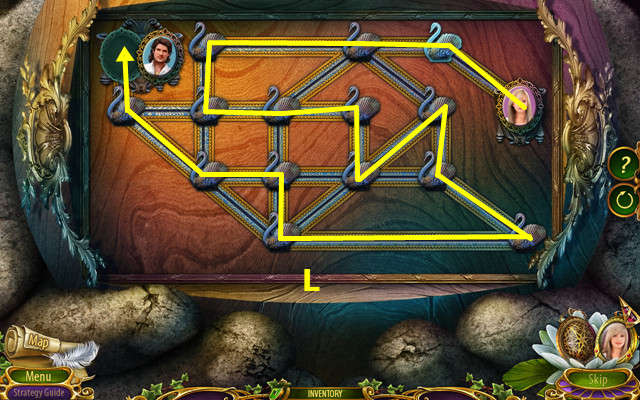
- Place the 2 SWANS.
- Solution (L).

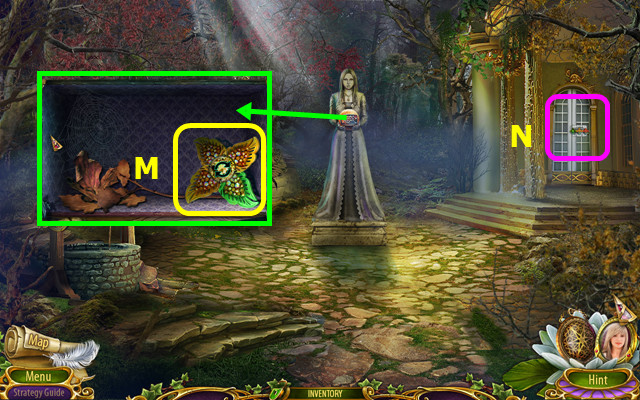
- Take the FLOWER LOCK (M).
- Select (N).

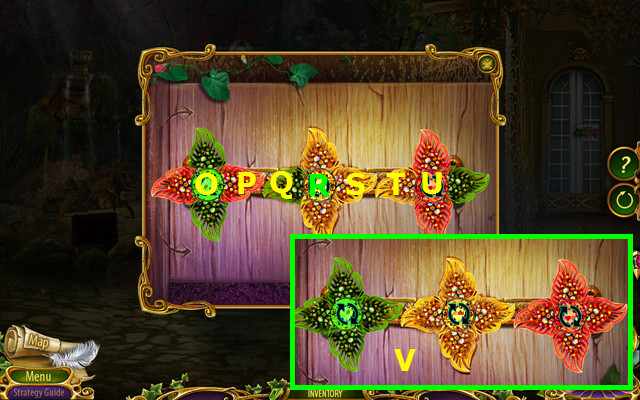
- Place the FLOWER LOCK.
- Select P-Q-Ox2-Rx2-Ux2-S-T-Rx2-P-Q-Rx2-Ux2-S-T.
- Final solution (V).
- Walk right.

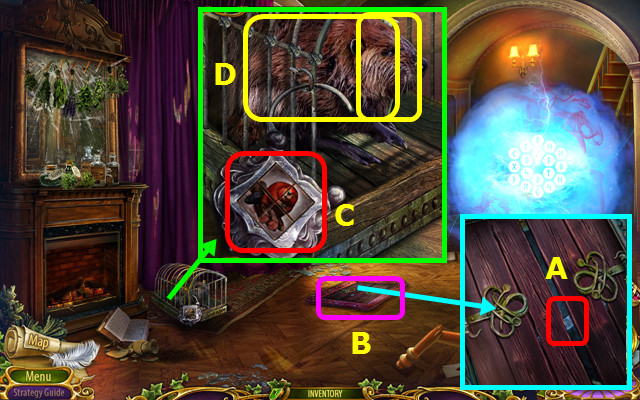
- Use the NEEDLE (A).
- Play the HOP; earn the BEAVER LOCK PART (B).
- Place the BEAVER LOCK PART; restore the picture (C).
- Take the BEAVER and GROWTH POTION (D).
- Walk down 2x.

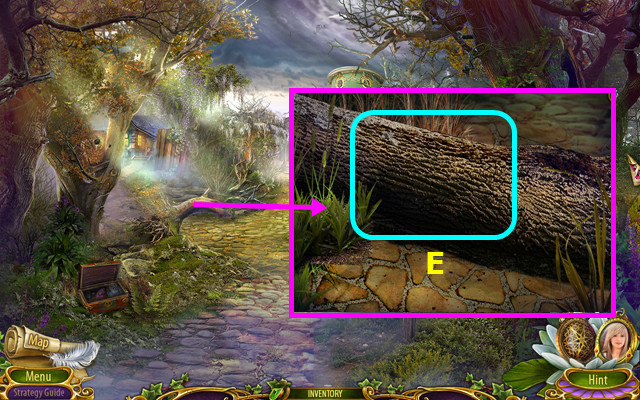
- Use the BEAVER (E).
- Walk left.

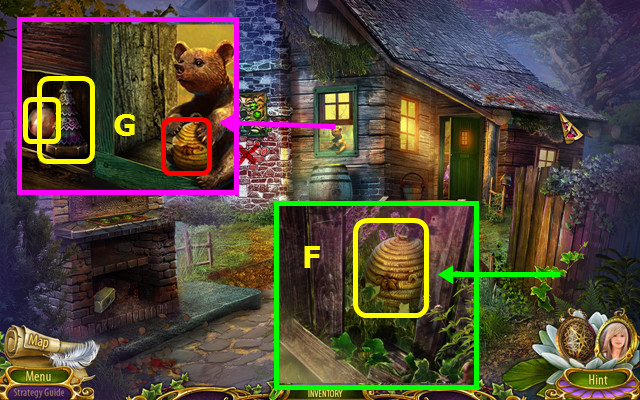
- Use the GROWTH POTION; take the BARREL OF HONEY (F).
- Place the BARREL OF HONEY; take the TREE FIGURE and 1/2 GLOBE PART (G).
- Go forward.

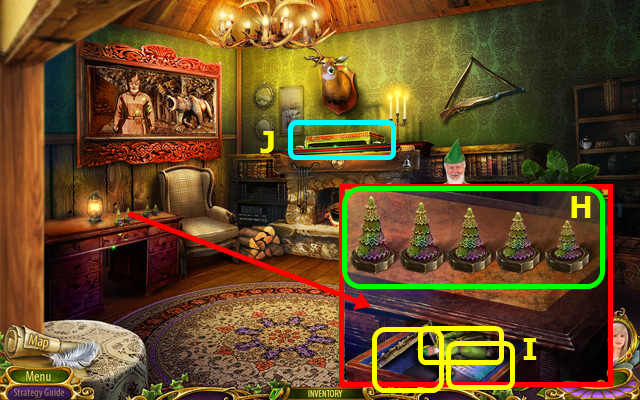
- Place the TREE FIGURE; arrange by height (H).
- Take the FORESTER FIGURINE, GRIMOIRE, and NOTE (I).
- Select (J).

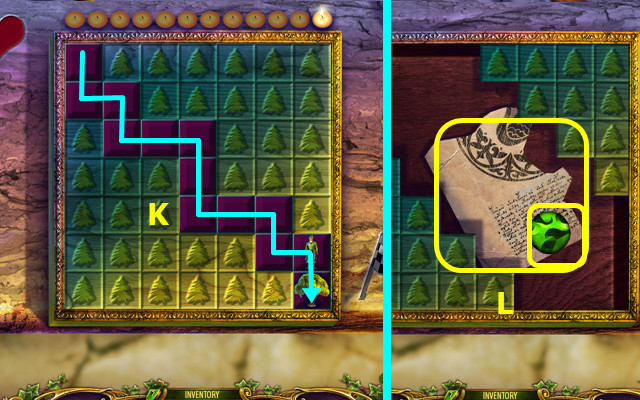
- Place the FORESTER FIGURINE.
- Select the path (K).
- Take the GRATING DISK and 1/4 GRIMOIRE PAGE PART (L).
- Walk down.

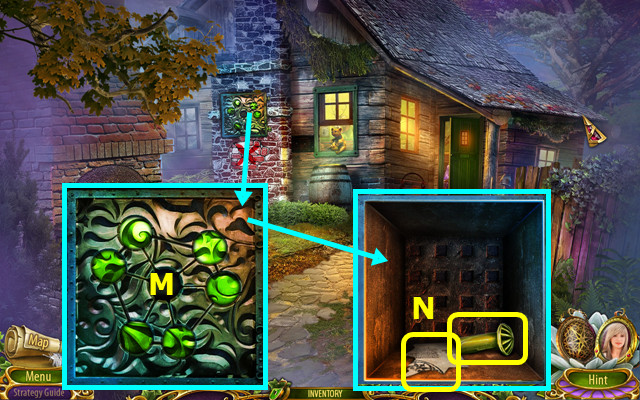
- Place the GRATING DISC; arrange as shown (M).
- Take the RIVET and 2/4 GRIMOIRE PAGE PART (N).

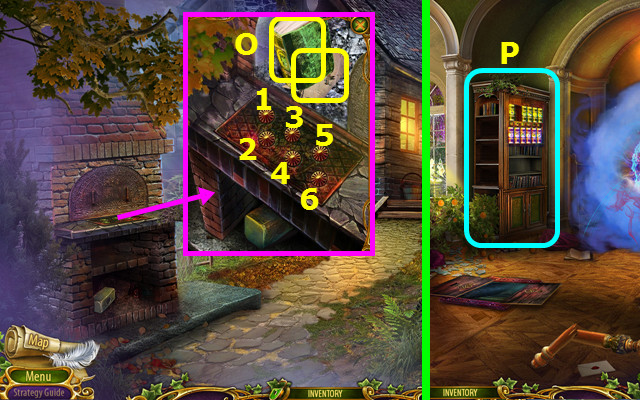
- Place the RIVET; select 6-1-4-2-5-3.
- Take the BOOK and 3/4 GRIMOIRE PAGE PART (O).
- Walk down, forward, and right.
- Select (P).

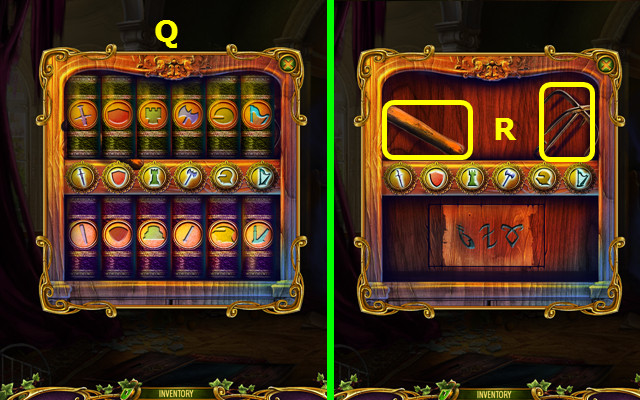
- Place the BOOK; arrange as shown (Q).
- Take the HAMMER HANDLE and HOOK (R).
- Walk down 2x; go left.

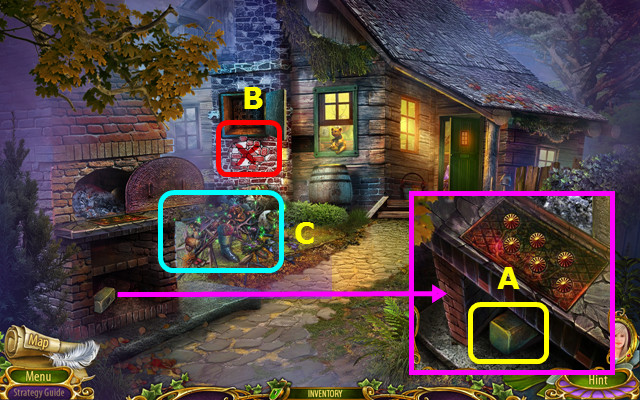
- Use the HAMMER HANDLE to take the SLEDGEHAMMER (A).
- Use the SLEDGEHAMMER (B).
- Play the HOP; earn the DEER HORN (C).
- Go forward.

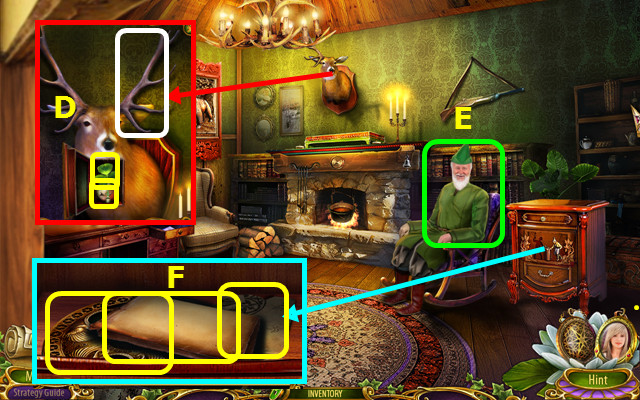
- Place the DEER HORN; take the CLOVER and 2/2 GLOBE PART (D).
- Talk to the Forester and give the CLOVER; earn the WOODCUTTER FIGURINE (E).
- Place the WOODCUTTER FIGURINE; take the NOTE, AMULET, and 4/4 GRIMOIRE PAGE PART (F).
- Combine the GRIMOIRE and 4 GRIMOIRE PAGE PARTS to make the PAGE (inventory).
- Walk down 2x; go forward and right.

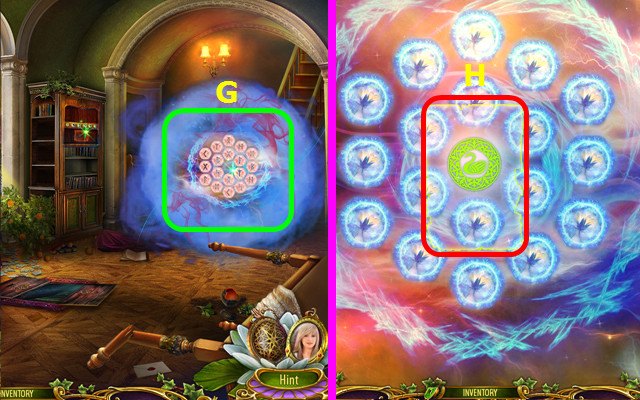
- Select (G).
- Place the PAGE (H).

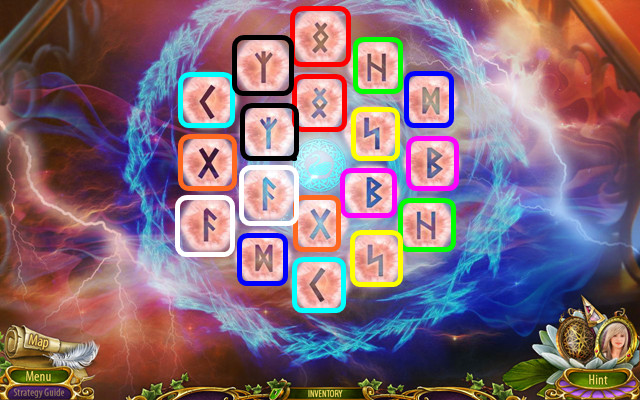
- Select the pairs (color-coded).
- Note the inner circle moves after every 2 opened.
- Go up the stairs.

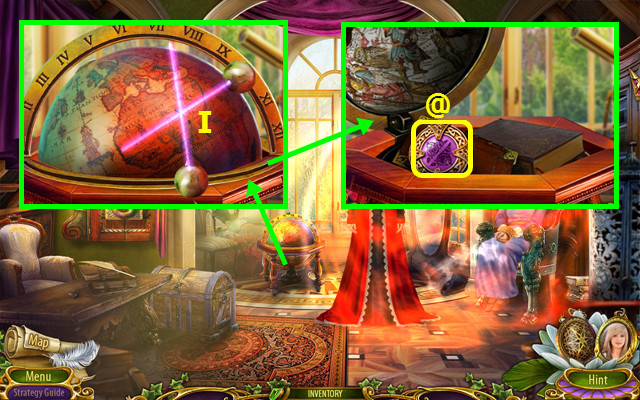
- Place the 2 GLOBE PARTS; move the beams over the X (I).
- Take the BAS-RELIEF KEY (@).

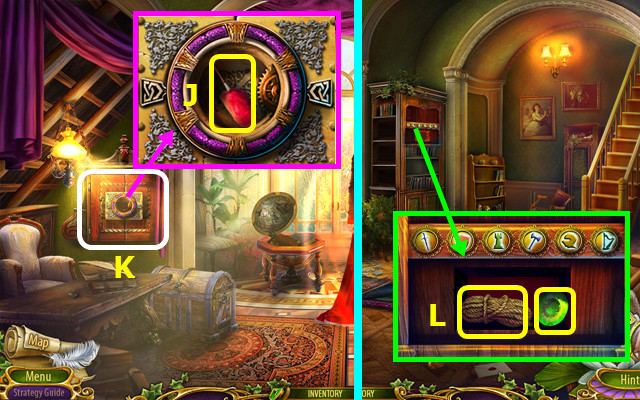
- Take the BRUSH; place the BAS-RELIEF KEY (J).
- Play the HOP; earn the MYSTERIOUS SCROLL (K).
- Walk down.
- Place the MYSTERIOUS SCROLL; take the ROPE and 1/3 MAGIC CRYSTALS (L).
- Combine the ROPE and HOOK to make the HOOK WITH ROPE (inventory).
- Walk down.

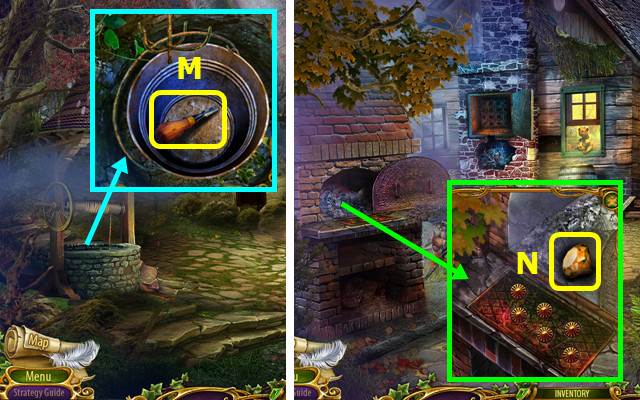
- Use the HOOK WITH ROPE; take the CHISEL (M).
- Walk down and left.
- Use the BRUSH; take the 2/3 MAGIC CRYSTALS (N).
- Go forward.

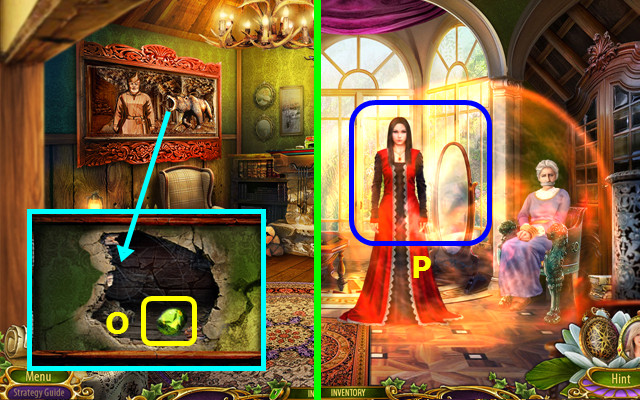
- Use the CHISEL; take the 3/3 MAGIC CRYSTALS (O).
- Combine the AMULET and 3 MAGIC CRYSTALS to make the MAGIC AMULET (inventory).
- Walk down 2x; go forward, right, and forward.
- Use the MAGIC AMULET (P).

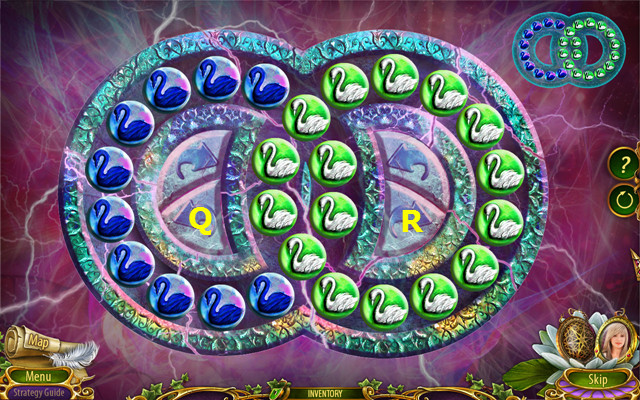
- Select Q-Rx2-Qx4-R-Qx2-Rx5-Q-Rx3-Qx2.
- You will switch to Siegfried.
Chapter 6: Defeating Rothbart

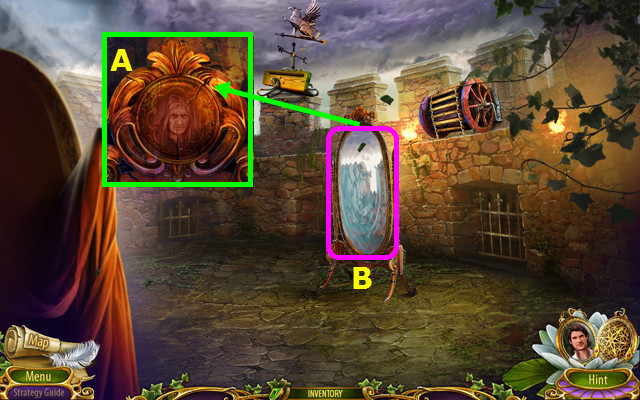
- You earn the ROTHBART AMULET.
- Use the ROTHBART AMULET (A).
- Enter the mirror (B).

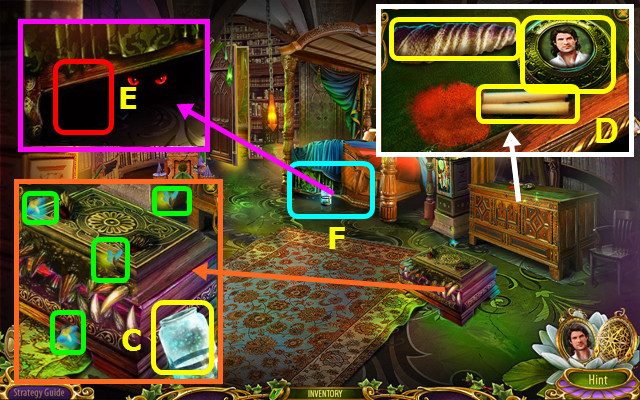
- Place the JAR and select the 4 fireflies (green); take the FIREFLIES (C).
- Take the AMULET, UNICORN HORN, and NOTE (D).
- Place the FIREFLIES (E).
- Play the HOP; earn the 2/2 PATTERN PARTS (F).

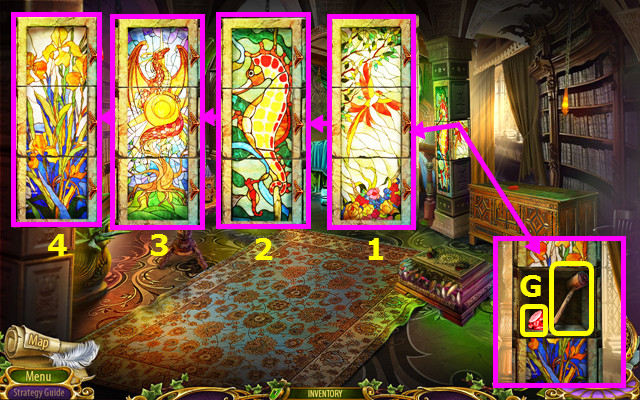
- Place the 2 PATTERN PARTS; restore the 4 images (1-4).
- Take the RUBY and 1/2 MALLET AND WEDGE (G).
- Walk forward.

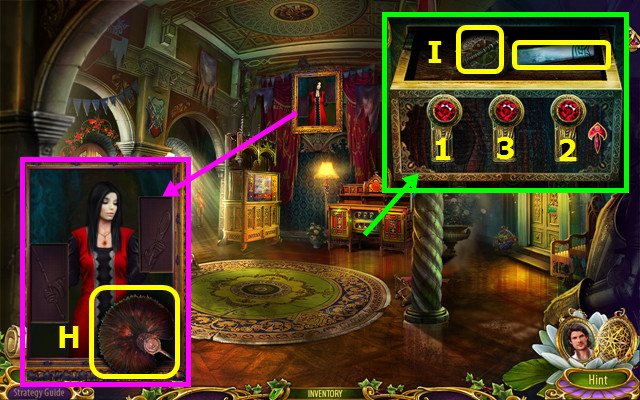
- Take the FAN (H).
- Place the RUBY; slide the handles up (1-3); take the PIANO KEY and CHEST WITH ROD (I).
- Walk down.

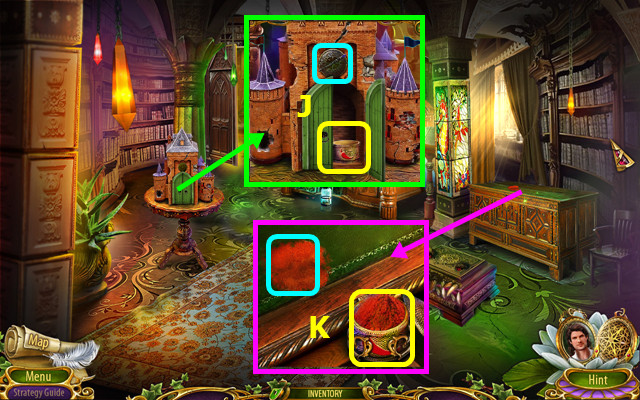
- Place the CHEST WITH ROD; take the BOX (J).
- Place the BOX, use the FAN, and take the PEPPER (K).

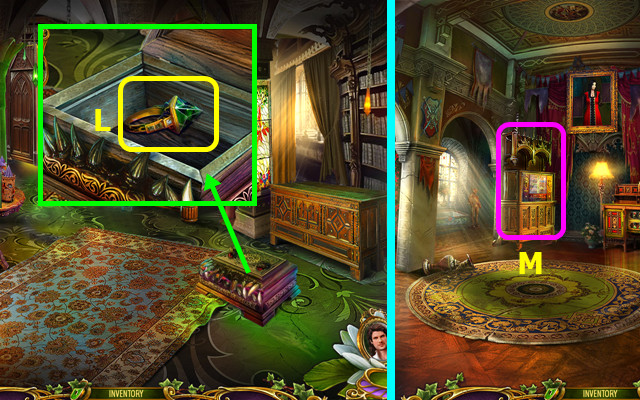
- Use the PEPPER; take the LION RING (L).
- Go forward.
- Select (M).

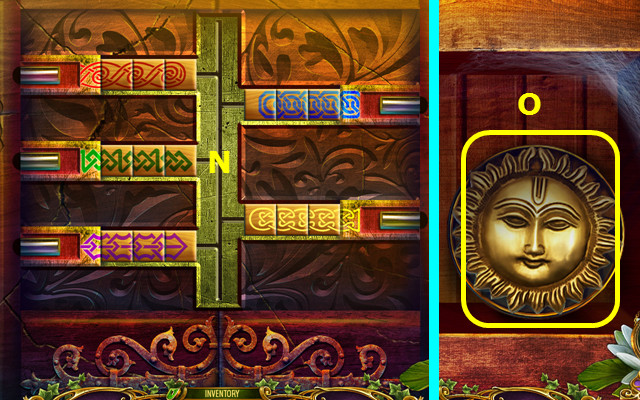
- Use the LION RING on the glass.
- Arrange the tiles as shown (N).
- Take the SUN KEY (O).

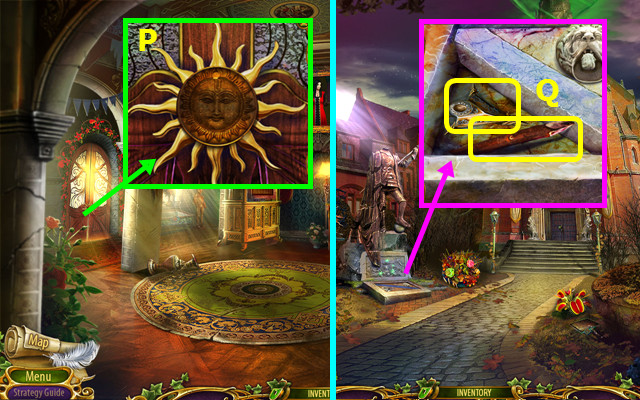
- Place the SUN KEY (P).
- Walk left.
- Place the UNICORN HORN; take the AMULET and 2/2 MALLET AND WEDGE (Q).

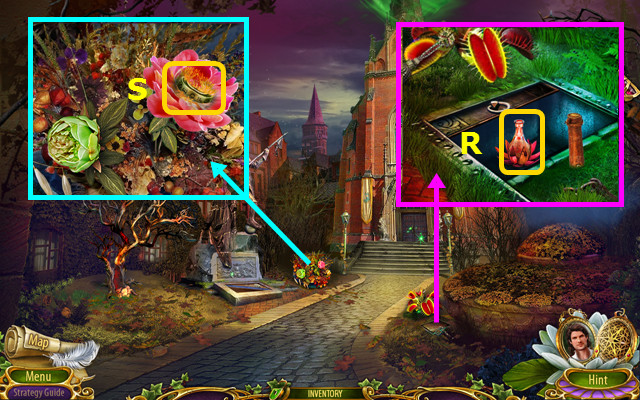
- Use the MALLET AND WEDGE; take the GROWTH POTION (R).
- Use the GROWTH POTION; take the LOCK PIECE (S).
- Walk down.

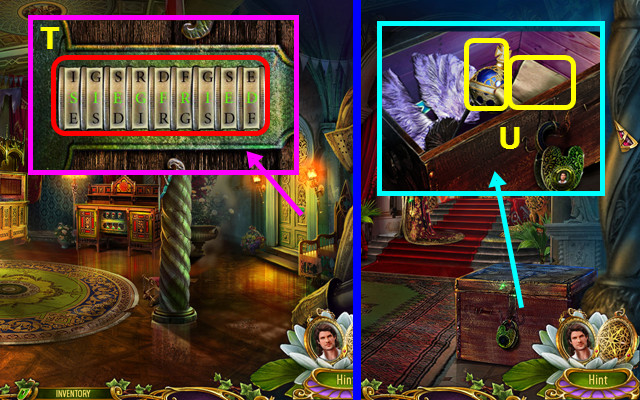
- Place the LOCK PIECE; enter SIEGFRIED (T).
- Walk right.
- Use the AMULET; take the MAGIC ORB and NOTE (U).

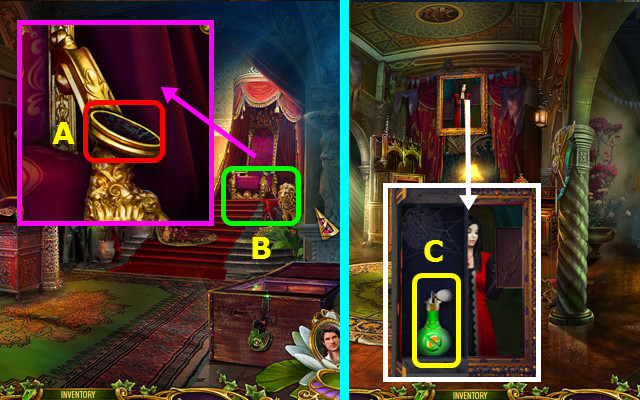
- Place the MAGIC ORB (A).
- Play the HOP; earn the PICTURE FRAGMENT (B).
- Walk down.
- Place the PICTURE FRAGMENT; take the PLANT POISON (C).
- Walk left.

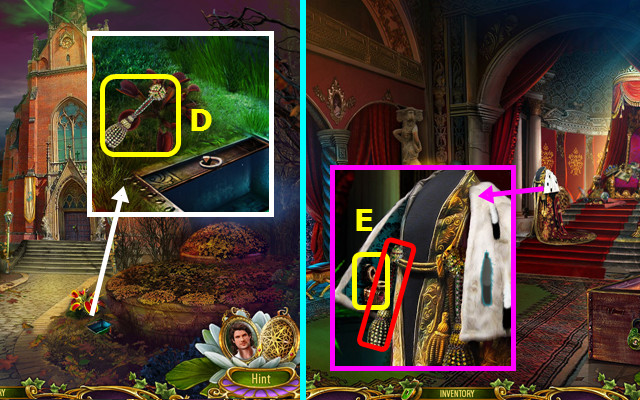
- Use the PLANT POISON; take the TASSEL (D).
- Walk down and right.
- Place the TASSEL; take the INKPOT (E).

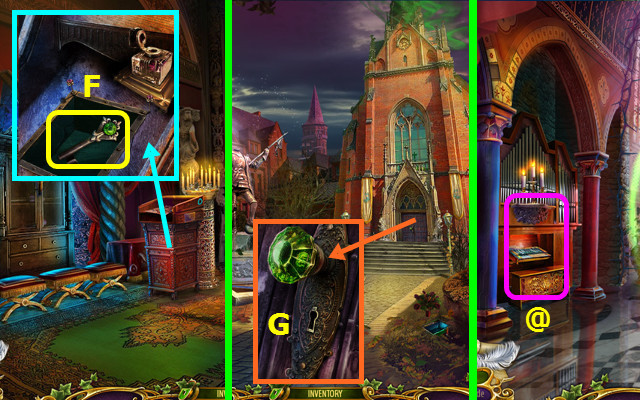
- Place the INKPOT; take the CATHEDRAL KEY (F).
- Walk down and left.
- Use the CATHEDRAL KEY (G).
- Walk forward.
- Select (@).

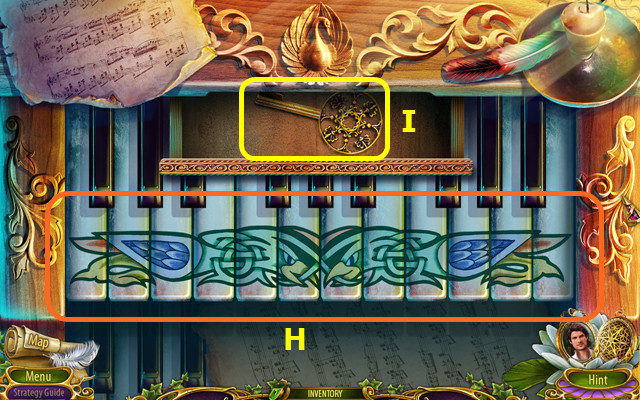
- Place the PIANO KEY; arrange the keys as shown (H).
- Take the KEY (I).

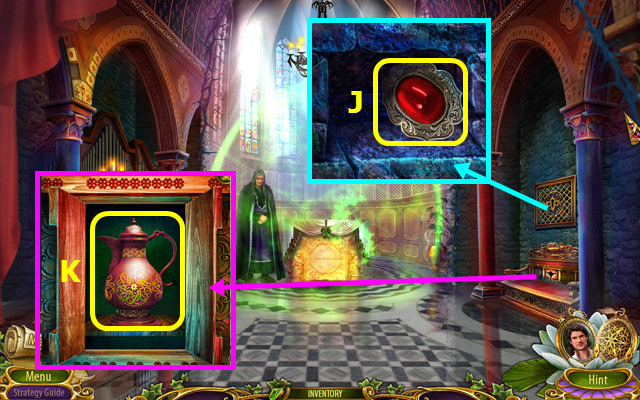
- Use the KEY; take the STONE AMULET (J).
- Combine the AMULET and STONE AMULET to make the AMULET (inventory).
- Place the AMULET; take the PITCHER WITH WATER (K).
- Walk down.

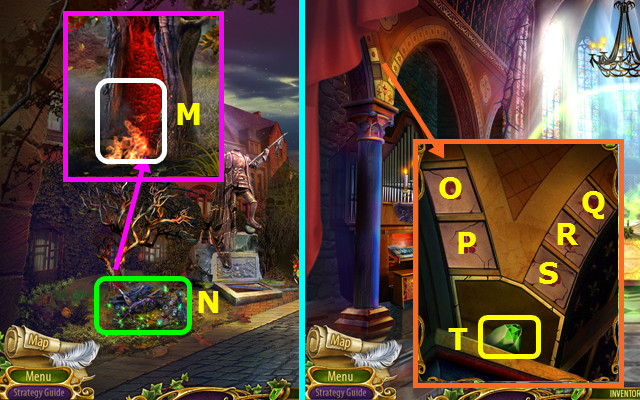
- Use the PITCHER WITH WATER (M).
- Play the HOP; earn the COLUMN PART (N).
- Go forward.
- Place the COLUMN PART; select Q-O-R-P-S-R-Q-O-P-S.
- Take the EMERALD (T).
- Walk down 2x.

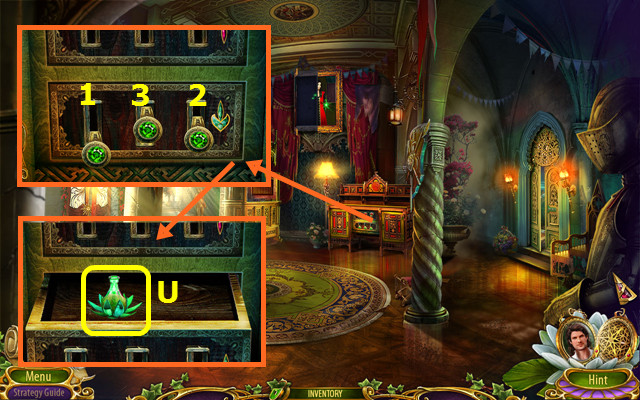
- Place the EMERALD; move the levers down (1-3).
- Take the GROWTH POTION (U).
- Go left.

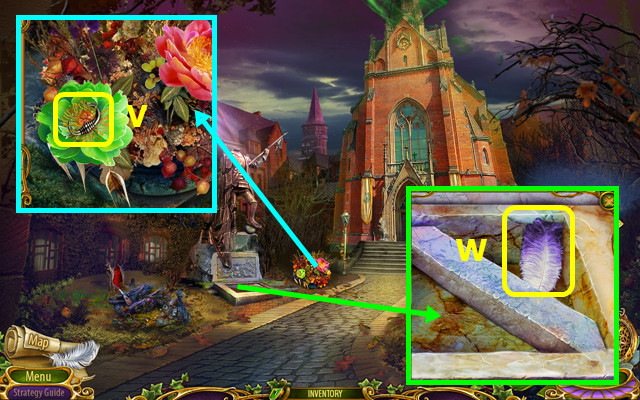
- Use the GROWTH POTION; take the RING (V).
- Place the RING; take the FAN FEATHER (W).
- Walk down and right.

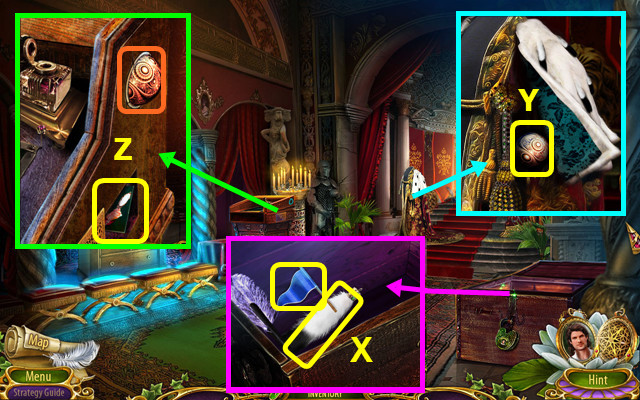
- Place the FAN FEATHER; take the 1/2 FLAGS and ERMINE TAIL (X).
- Place the ERMINE TAIL; take the SPHERE (Y).
- Place the SPHERE; take the PICTURE FRAGMENT (Z).
- Walk down.

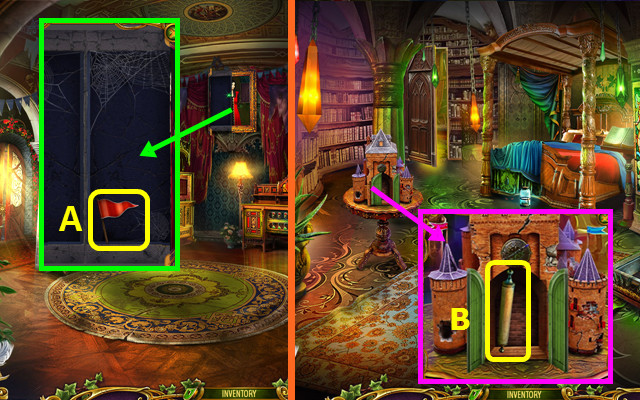
- Place the PICTURE FRAGMENT; take the 2/2 FLAGS (A).
- Walk down.
- Place the 2 FLAGS; take the SCROLL WITH SYMBOLS (B).
- Walk forward and right.

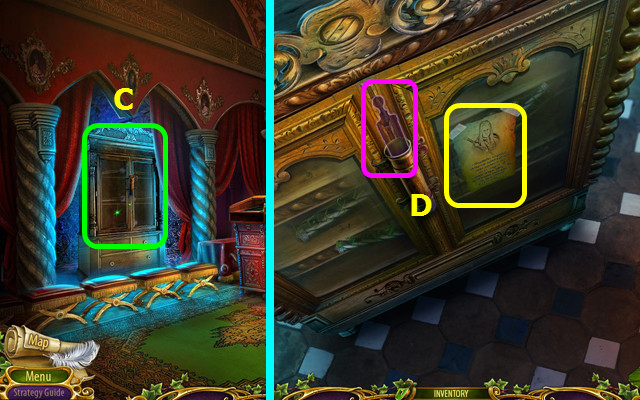
- Select (C).
- Read the NOTE and place the SCROLL (D).

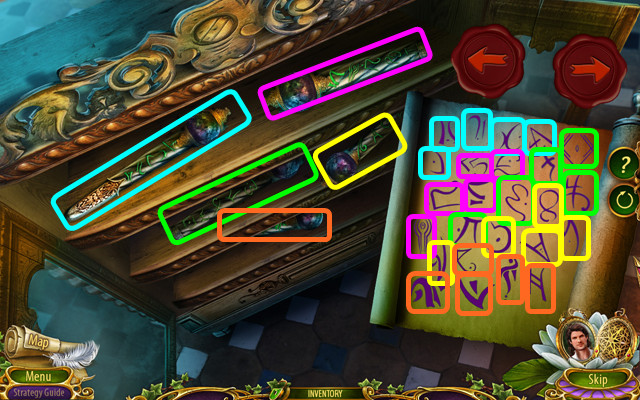
- Select a wand and the matching symbols (color-coded).
- You earn the MAGIC STAFF.

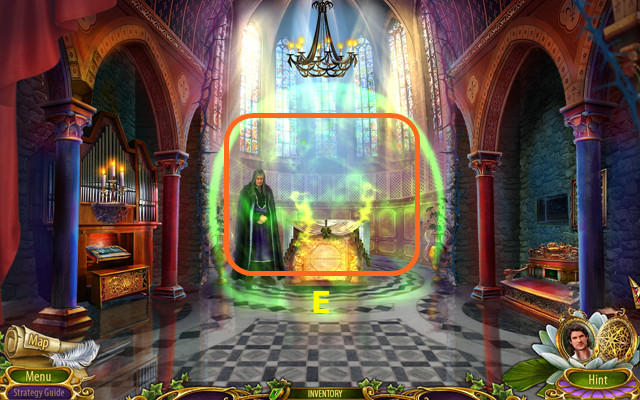
- Walk down, left, and forward.
- Use the MAGIC STAFF (E).

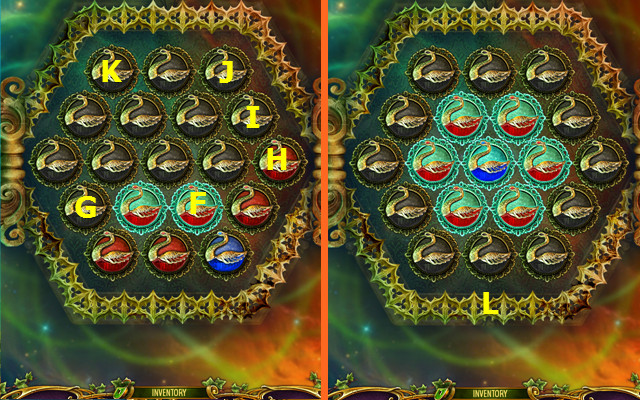
- Select Fx3-Gx3-Hx2-Ix3-Jx2-Kx2.
- Final solution (L).
- Congratulations! You have completed Dark Romance: The Swan Sonata!






 Love Story: The Way Home Walkthrough, Guide, & Tips
 Dark Parables: Curse of Briar Rose Walkthrough, Guide, & Tips
 Letters from Nowhere Walkthrough, Guide, & Tips
 Snark Busters 2: All Revved Up Walkthrough, Guide, & Tips
 Grim Facade: The Cost of Jealousy Walkthrough, Guide, & Tips