As the fleeing students basically close the shutter right in your face, you will have to find another way around. Turn to the right to see the path ahead marked by a giant floating arrow. Kick the door in and you will find a student cornered by exploding zombies. Two of the explosive zombies will hug and the wall will collapse. This will be accompanied by a convenient pole falling to the ground. Approach the pole and mount it to begin a pole dancing sequence in which you can mash the Triangle or Y button as fast as you can to eliminate more zombies. You will have to kill a total of twelve in this section. If you can mash fast enough, you should be able to get through most of the enemies before dismounting the pole. Approach the three survivors in the corner afterwards to reap healthy rewards for your pole dancing heroics.
When you’re done saving the students, approach the green shutter and saw a hole through it. You will see a student get blown up and another one get cornered in a classroom to the right. Run past the initial group of zombies crowding the left side of the hall and situate yourself between the advancing wall of zombies and the stranded student. Chop through all of the zombies and stun them to keep them from reaching the student. Speak with him afterwards to get your reward before sawing through the shutter and proceeding to the next area. A hole in the floor will open up, revealing a bunch of zombies below. When you’re ready, jump down. This will initiate a quick time event much in the vein of the one that occurred when you plopped Nick’s head on the zombie’s body earlier. If you pull this off correctly, you can kill every zombie in this area without swinging your chainsaw once.
Collect all of the coins from the back of this area before turning around and heading out into the hallway behind you. Juliet will say that she needs to find her Sensei. Curve around the hall to the right, chopping up the trash cans and lockers for coins as you go. Keep going down the hall until you reach a door that you can saw through. Chop through the door by following the onscreen motions, run down the hall, and don’t forget to chop up the two trash cans behind the door on the left for a few extra coins. Proceed through the double doors and into the locker room, where you will find a few more objects that you can chop up for coins, including more trash cans. When you reach the door you will find a note about “zombie basketball.”
Kick through the door and, sure enough, you will be on the basketball court. You will have three minutes to score over 100 points in basketball. You can do this by chopping off zombies heads. Once severed, the heads will automatically home in on the basket. Try to go for shots from behind the three point line, as these will score you the most. Just watch out for enemies attempting to guard the basket. When these enemies come out and stick too close to the basket, they should be your first priority. You may also have to watch out for zombie cheerleaders, depending on which difficulty you’re playing on. Easier difficulties won’t have to worry about these enemies yet, so just feel free to hack away. You should be able to easily surpass 100 points before the time runs out.
Once you score over 100 points, the announcer will usher you on to the next area as a door opens up ahead. Grab the copious coins that drop down from the sky, chop up the trash cans to the left in the next room, and approach the door. An explosive zombie in a wheelbarrow will be pushed through the door to the right as you approach it. You will only have a few seconds to escape the room before it all goes up in flames, so waste no time in fleeing the scene.
When you enter the next hallway, ten zombies will run out and attack as you pass the wet floor signs. If you have a full Special meter, pop the ability now and use Sparkle Hunting to rack up a few Silver medals. If you don’t have the power, just use dodges a lot to get around the weaker enemies. A named enemy will be mixed in with the randoms, so be sure to dodge his attacks and kill all of the lesser enemies before taking out the named zombie. When you’re done, search behind the white board to collect a few coins that are hiding behind a shutter. After grabbing these, proceed through the door marked by the arrow to get to the next checkpoint.
In this classroom, you will be faced with a flaming zombie teacher as well as her inflamed students. Bomb zombies will also be in this room. As you may guess, if a flame zombie touches a bomb zombie, the results will be explosive. There are a whopping fifteen zombies in this room, so it might actually be best to let a few of the zombies blow themselves up. If you find yourself to be in need of health, loot the lollipop from behind the teacher’s desk. If you really don’t want the flame zombies and the explosive zombies to touch, use your pom-poms to stun them before dealing the finishing blows. Note that the teacher will be a named zombie, and thus will be tougher than the rest of the rabble in this room. Finish her off just as you have the others, by dodging around or over her attacks and swinging away with your chainsaw when her back is to you. You should be able to finish the room off pretty quickly.
Once everyone in this room is dead, another headless body will burst in through the window to the left. Before sticking Nick’s head on the body, chop up the trash cans to the left of the body to get a few extra coins. When you’re ready for another minigame, stick Nick’s head on the body and guide it via the quick time event minigame towards the flaming wreckage against the wall. Nick will toss a propane tank and clear the way. Unfortunately, two flaming cop zombies will enter through the door once it’s cleared. Don’t let these zombies catch you in their fire. If you get caught in a chain of the fire, it’s possible to be immobilized for a while as you take consistent damage. Dodge to the side and hit the left-hand zombie from the side first. Carve through him to reach the second zombie before he can reload his weapon and begin shooting at you again. With both of them dead, smash the trash cans to the left of the door and kick the door in.
Run through the door, grab the lollipop in the middle of the hall, smash the lockers to the left, and smash the trash cans to the right. You will meet a hoard of ten zombies at the end of this hall, flanked by more lockers. This is a good opportunity to get a lot of Sparkle Hunting bonuses, if you have refilled your meter again by now. Try to get two groups of five when Sparkle Hunting. After you’re finished, eight flaming zombies will crawl in from under the shutter. If you’re quick, you can take them out while your Special meter is still draining. After these eight area dead, six more will come in from under the shutter. These will just be basic zombies, so no special strategy is needed for finishing them off. Just take them all out with your saw and pom-poms. The shutter will open yet again after this, revealing one of the hazmat zombies equipped with a propane tank. Dodge behind the hazmat zombie and hack away at his back to kill him quickly.
When you have finally finished off all of the zombies in this area, turn around and smash any lockers that you haven’t already destroyed. You will want to get all of the coins that you can, especially early on in the game, so that you can upgrade Juliet in the stores. When you have collected all of the coins that this area has to offer, approach the shutter and Juliet will slide underneath of it towards the next objective.


 Luigi's Mansion: Dark Moon Guide - Tree Topping Haunted Towers Boss Guide - GamersHeroes
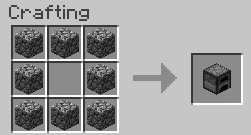 How to make a furnace in Mincraft on the PC
 Zelda OoT 3d Kokiri Forest Guide
 Floating Doom Island Minecraft Survival Island Map
 Will Star Wars Battlefront actually look as good as that trailer?