Dungeons & Dragons (D&D) has a very special place in my heart. Many years ago, back in the 1980's when I was a teenager, I played pen-and-paper D&D. I recall very clearly the three very large rulebooks I had to almost totally memorise: The Dungeon Master's Guide, The Player's Handbook, and The Monster Manual. D&D players really didn't have much choice; the game involved a very complex series of rules covering virtually any circumstance, and a D&D gaming session was often as much about debating or scrambling through pages of a manual to clarify a particular rule as it was about role playing.
Fortunately that same complex web of rules and dice rolls which made the original D&D a bit of a chore, also made it perfect for translation into the basis for computer role playing. Once the computer takes over the role of checking and implementing all the rules, the player can actually focus on the gameplay instead of dice rolls and rule checks every 2 steps. As early as 1988 the Pools of Radiance D&D computer game proved that D&D was perfect for computer gaming. Almost twenty years later, the D&D system is still thriving as the inspiration for Neverwinter Nights 2, the sequel to the very popular Neverwinter Nights.
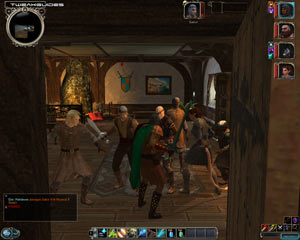
This year has seen several new fantasy role playing games released, including Gothic 3, Dark Messiah of Might & Magic and The Elder Scrolls IV: Oblivion. Although comparisons with these other fantasy RPG games is inevitable, Neverwinter Nights 2 is fairly unique. It combines both the classic elements of a D&D RPG adventure with a richer, more atmospheric 3D game world not seen in the traditionally 2D D&D computer games of old. While it's not a first person RPG, nor a genuine real-time strategy game, it allows you to customize it to suit your particular preference. You can change camera views from the more traditional RTS-like 'Top Down' to the more FPS-like 'Drive Cam'. You can have a party of characters, but you only control a single character at any one time, as in an FPS game. However you can micro-manage the party or allow the other characters to act as they see fit. There's some world freedom, but the storyline is essentially linear.
All of these features make NWN2 unique, but also potentially problematic. Neverwinter Nights fans complain of issues with the interface, bugs in the AI, and importantly a real problem with getting the game to run smoothly on their systems due to its 3D graphics and engine issues. Given my fondness for D&D, and after a fair bit of research and testing, I've compiled this guide to help NWN2 players hopefully achieve better results with the game. The guide runs through clear descriptions and comparative screenshots of all in-game settings, including the new ones added as of the latest patch, as well as all the .ini file settings which allow further customization and optimization, and of course the console commands and a few neat tips to wrap things up. I genuinely believe NWN2 players will benefit from this guide, so give it a read-through to see if it can help you.
Note: This guide refers to the latest version of Neverwinter Nights 2 Version 1.23. Make sure to refer back to this guide often for updates.
Before getting into any game-specific settings and tweaks, this section covers the obligatory system optimization information I include in all my guides. If you've followed this advice recently, you can skip this section.
Many people report problems with this game and in almost all cases these are due to general system issues and not the game itself. With that in mind I strongly urge you to take some time and follow the advice below if you truly want this game, and indeed every other game you own, to run at its fastest and most trouble-free.
The place to start is my free TweakGuides Tweaking Companion. It is the complete system optimization guide for Windows users. Designed for novice and advanced users alike, it is written in plain English to help you genuinely understand all aspects of Windows and your PC. The guide covers every major topic, from the correct installation of Windows and critical drivers and software, through to recommendations for every significant setting and feature, all the major performance and convenience tweaks and customizations, as well as detailed troubleshooting advice. There are also links to a range of reliable free applications for optimizing and maintaining your system, as well as to important resources for finding out even more about Windows and your PC. There are two separate versions: one for Vista and one for XP.
If you've ever wondered what common graphics and display settings like FPS, VSync, Refresh Rate, Antialiasing and Anisotropic Filtering are, and how they really work, then check out my Gamer's Graphics & Display Settings Guide for all the details in an easy to understand format. The guide also gives you a rundown on exactly how a game goes from a being a set of files on your hard drive to a 3D image on your screen, including relevant performance tips.
Finally, if you run an ATI or Nvidia graphics card, I have written two comprehensive guides which you should check out: the ATI Catalyst Tweak Guide and the Nvidia Forceware Tweak Guide. These guides cover absolutely everything about the latest graphics drivers, how to set them up correctly, as well as advanced tweaking, overclocking and benchmarking tips. They're a must-read for configuring your graphics card correctly.
The above information really will serve you well in the long run, not just in this game. If you don't optimize your system and keep everything updated and maintained correctly you will keep running into "mysterious" problems time and time again. Do yourself a favor and when you get a chance spend an afternoon or two optimizing your machine the right way with the guides above.
The next section goes into more detail about specific troubleshooting tips which address common performance issues with the game.

This section contains specific troubleshooting tips which address many of the common problems experienced by Neverwinter Night 2 players. I can't stress enough the importance of taking the time to go through the checklist of advice below if you're having a problem with the game.
Official Support: If you have a problem with the game, the first place to check is the Readme.rtf file found in your \Program Files\Atari\Neverwinter Nights 2\Documentation directory, paying close attention to the game's minimum hardware requirements as well as known issues. An electronic copy of the NWN2 Manual can be also be found in the same directory, as well as help documentation for the NWN2 Toolset. If none of these help, go to the Atari Support Page for NWN2. If you still can't find your issue listed, try posting on the Official Obsidian NWN2 Forums or the Official Atari NWN2 Forums. Obviously make sure to read through this page, and this guide (along with linked resources) carefully as typically a solution is almost always provided for most major issues.
Windows Vista Users: If you're having problems running this game under Windows Vista, first make sure that you're using the latest Vista graphics and audio drivers for your hardware, and the latest version of this game (see page 4 for patch details). Next, make sure you don't change your UAC settings after the game has been installed, as due to Virtualization this can change the location of the game files and settings. If you can't launch the game successfully when UAC is enabled, you will need to run the game with full Admin privileges. To do this either right-click on the launch icon and select 'Run as Administrator', or right-click on the launch icon, select Properties and under the Compatibility tab tick 'Run this program as an administrator' then click OK. I strongly recommend that you refer to the TweakGuides Tweaking Companion for Windows Vista for more information - in particular check the 'Gaming in Vista' section of the Graphics & Interface chapter; the UAC section of the PC Security chapter; and the 'Personal Folders' and 'Directory Junctions & Symbolic Links' sections of the Windows Explorer chapter. These will tell you how you can fix game-related issues and also explain the relevant differences of Vista.
SecuROM Startup Issues: The SecuROM copy protection system used for NWN2 is known to cause startup issues on some systems, so much so that many users are Petitioning Atari to remove it. For the moment however the only legal solutions for those having problems launching the game is to check the SecuROM Support Page. In particular make sure to disable any drive emulation or similar such tools as these are known to be incompatible with SecuROM. Often times removing the game disk from the drive, reinserting it and retrying to launch the game works. If or when the SecuROM disk check is removed from NWN2, I will report it on page 4 of this guide.
Update: As of the 1.23 Patch, the disc check component of SecuROM has been removed - see Page 4 for more details. This means you no longer need to keep the DVD in the drive to play, and it also resolves many SecuROM-related issues.
Lag/Framerate Issues: Most people referring to 'lag' in NWN2 actually mean low framerates. This is not a bug as such, it is simply the nature of the game and its engine. The only real solution to increasing framerates is to go through this guide and gain a clear understanding of the options, then adjust them to improve your average FPS. However importantly make sure to also read the Framerate Boost tip on the last page of this guide, and also either disable XFire if it's running in the background, or use this fix, as it is known to cause framerate problems with NWN2.
AMD AthlonXP CPU Fix: If you run an original AthlonXP CPU, then the game will use an alternate executable file called nwn2main_amdxp.exe, found under your \Program Files\Atari\Neverwinter Nights 2 directory. This is likely because the Athlon XP CPUs did not support the most recent features of modern CPUs, such as the SSE2 instruction set. You should not need to use this executable if you have a more recent AMD CPU, however some people claim that doing so provides a boost in FPS. I haven't found this to be the case, but you can try for yourself if you wish.
Dual Core CPU Issues: See the last page of this guide for full details of NWN2 and dual core CPUs. These issues should not exist in the latest versions of Windows XP and Vista.
Known Bugs & Issues: There are a wide range of known bugs, quest glitches and issues with Neverwinter Nights 2 being reported, as evident on the Official NWN2 Tech Support Forums. Most of these are being progressively patched out of the game. It is vital that you update your game to the latest official version - see page 4 for details. The latest patch fixes a range of issues, and I would recommend it to all users who are having problems with NWN2.
Patch Update Problems: If you can't use the online updater to update your game to the latest version (See page 4), there are a couple of solutions for you. Firstly, for those whose version of the game incorrectly reports as 0.95, and hence cannot be updated, you will need to edit your Registry according to the details here - note that changing the version number to 1.01 also works if using 1.00 doesn't. If you're not sure how to edit the Registry, see the Windows Registry chapter of my TweakGuides Tweaking Companion for full details. If on the other hand you want to download and install the patches manually instead of using the updater, you can download the various ones here and use the instructions here to install them.
Stuttering: Stuttering is something common to most recent games, and is simply loading pauses as new information is being loaded up from your hard drive into RAM and/or into the graphics card's Video RAM. The real solution involves general system optimization (refer to the guides on the previous page), and also reducing the Texture Resolutions in-game setting, along with checking out the MaxCachedSounds and SEFCacheSize options in the Advanced Tweaking section of this guide. Finally, make absolutely certain to defragment your hard drive regularly, especially after the installation of any patches/updates, as this has a marked impact on reducing stutter.
Background Programs: Disable all background applications - especially virus, trojan and spyware scanners and messaging utilities. These applications can and do use up valuable CPU resources, take up precious RAM, cause memory conflicts and crashes to desktop, but most importantly they interfere with read/writes to your hard drive effectively slowing it down and causing even more in-game stuttering and longer loading times. Full instructions on how to identify your startup programs and services and how to correctly disable unnecessary ones are in my TweakGuides Tweaking Companion. This is a very important step you should not miss.
Overclocking: If you've overclocked any components on your system and are having problems such as crashes, reboots and graphical anomalies, the first thing to do is set everything back to default speeds and try running the game. If you don't experience the same problems at default speed, or they're reduced in severity, then your overclock is the primary culprit. Either permanently reduce your overclock and/or increase cooling to regain stability. Don't assume that because other games run with stability, that Neverwinter Nights 2 will work fine as well.
That's just a basic rundown of troubleshooting tips. Read the remainder of this guide for more specific settings and tweaks which can help improve your performance and resolve any problems.
Official Patch
Neverwinter Nights 2 has had several patches released, the latest official version of which is Version 1.23. The latest patch contains a range of fixes, and importantly, removes the disc check component of SecuROM, meaning the game DVD does not need to remain in the drive to play. The primary (and recommended) way to update to the latest official version of the game at any time is to run its automatic updater. You can do this by clicking the Update link on the game's launcher menu, or by running the file nwupdate.exe found in your \Program Files\Atari\Neverwinter Nights 2 directory. Again it is strongly recommended that you regularly check for and update to the latest official version of the game. If you're having problems running the auto updater, check page 3 for details on how to manually download and patch to the latest version.
No-CD Patch
Neverwinter Nights 2 requires a CD Key and also uses the SecuROM copy protection system, which requires that the CD/DVD be kept in the drive while playing the game. For legal reasons I can't provide any details of a No-CD or No-DVD, or other methods of bypassing copy protection. I can however say that SecuROM can cause issues, particularly startup problems - see Page 3 for details. Hopefully Atari will listen to the various requests from legitimate purchasers of this game to at least remove the CD/DVD check component of the copy protection in a future patch, as it is annoying and only punishes paying customers.
Important: As of the 1.23 Patch, users no longer need to keep the DVD in the drive to play - the disc check component of SecuROM has been removed from the game.
Modules
The original Neverwinter Nights became extremely popular because it allowed the community to create a range of custom modifications, or more appropriately for the D&D world - Modules. Just like modules in the old pen-and-paper D&D, you can create entire new worlds and storylines to go with them. This gave the game a very powerful capability which is continued with the use of the Neverwinter Nights 2 Electron Toolset that comes with the game. The instructions for using the Toolset are in your \Program Files\Atari\Neverwinter Nights 2\Documentation directory. There are some problems with the Toolset at the moment, however you can discuss them with other modders here.
If you're not interested in making a mod for NWN2, you can read about and download free community-made modules here, here, or here among the many places which are distributing modules.
Modifications
The user interface (UI) in Neverwinter Nights 2 is scripted in XML, and found under the \Program Files\Atari\Neverwinter Nights 2\UI\default folder. As such it is highly customizeable, and considering a range of people are not happy with the default interface, this is a good thing. You can download several customized UIs for NWN2, including this Improved UI, this UI Messagebox Fix, this and this Slim Health Bars Fix. There are plenty more such mods listed here.
Aside from modding the user interface, some fans have gone further in attempting to fix up other things they see as problems in the game, such as the poor artificial intelligence (AI) of henchmen. You can download one such mod here. I'll try to keep this section updated for other substantial mods as they are released.
The next section of the guide covers the In-Game Settings for Neverwinter Nights 2.
In this section I provide full descriptions, comparitive screenshots and recommendations for NWN2's in-game settings, allowing you to determine your personal balance between image quality and performance. While I try to note the performance impact of each setting, it is impossible for me to give exact performance impacts (e.g. a 10% rise in FPS) because it all depends on your specific hardware combination and your other game and system-wide settings in combination. Each system is unique in the combination of components it has, so two people with the same graphics card but different CPUs for example may experience very different FPS results in certain scenes.
To access the in-game settings start Neverwinter Nights 2 and on the main menu screen select Options. The many settings available are covered in detail below. If you can't see certain settings make sure you've updated to the latest version of the game (See page 4 for details):
Update: As of the 1.10 Patch, the in-game options screens have had a significant number of changes - entire sections have been renamed or added, and many options within each section have been added, removed, renamed and/or shifted around. The changes won't be noted individually as there are far too many of them. I recommend you re-read this section of the guide to get across the changes.
Character Mode & Strategy Mode
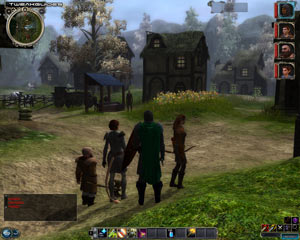
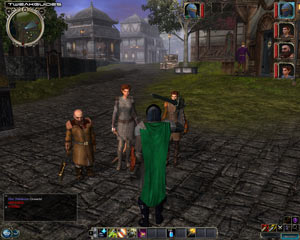
Character Mode is a 'follow behind' camera mode most suitable mode for controlling an individual character; Strategy Mode is a 'top down' camera mode more suitable for controlling the party. By default you can switch between Character and Strategy modes at any time by using the numeric keypad * key. Most of the options on these two screens are the same as each other, however obviously they will impact on your controls and camera only when in the relevant mode.
Furthermore, most of the settings in this area have a clear popup description which can be seen when you hold your mouse over the option selection box. Therefore below I only cover the settings which actually have a performance impact, or are not readily understandable. Note that as a general rule, Character Mode will result in lower FPS because it provides a greater view of your surroundings into the distance, as well as greater detail for objects and characters nearby.
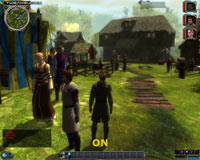
Ceilings Always On/Off: When enabled this option controls whether ceilings are visible or not in the relevant modes. When ceilings are turned off, you can move the camera beyond the ceiling, when ceilings are on the camera can move no further than the ceiling. There will be a performance impact if ceilings are turned off and the camera is moved back to show more on screen, but you should choose the option which best suits your playing style.
Object Fade: This option is essentially designed to prevent solid objects from getting in the way of your view when controlling characters. It means that various solid objects in the game world fade into near-invisibility when in the way, though they are still solid objects for movement purposes. Whether this suits your tastes or not is up to you, but in performance terms, paradoxically enabling Object Fade can actually reduce your FPS. This is because the transparency effect used for faded objects can be a bit more strenous to draw than simply drawing the solid object itself. Note that you can set the level of transparency using the ObjectFade Percentage setting in the Advanced Tweaking section.
Graphics
The options in this section have significant impact on framerate in the game.
Screen Resolution: This setting allows you to choose the resolution for the game, as shown in pixel width by pixel height. The options shown are restricted to those supported by your particular combination of monitor and graphics card. The higher the resolution chosen, the lower the performance of the game. For more details on resolution see my Gamer's Graphics & Display Settings Guide. Note that raising resolution not only lowers performance, it also reduces the size of the game's user interface elements.
Note: If you find most of your supported resolutions are missing, and you are using a refresh rate override utility like Refresh Force, disable or return the refresh rates to default to fix this.
Antialiasing Mode: This setting controls the sample rate for antialiasing, a feature which reduces the jaggedness of lines in the game. The available options here are 0x, 2x and 4x, with the higher the sample rate, the lower the performance. More details and screenshot comparisons of antialiasing are on this page of my Gamer's Graphics & Display Settings Guide. Antialiasing is one of the first things you should disable if you need extra FPS, as it can noticeably reduce performance on all but the latest high-end graphics cards.
Texture Quality: This setting controls the level of detail shown in textures, which form the surface of everything in the game world. Note that texture detail is also greatly affected by the Texure Minification, Magnification, and Texture Anisotropy settings so see those further below. To see an animated screenshot comparison click this link: NWN2_TextureResolutions.gif (585KB). Note the detailing on the ground, on the chimney and even the chairs and wall in the background are all very crisp and clear at High, but at Medium these become blurrier, and at Low even more so. Lowering texture resolution can help in both increasing performance and reducing stuttering in the game, particularly on graphics cards with only 128MB of Video RAM.
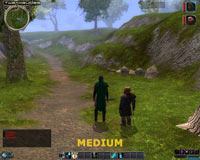
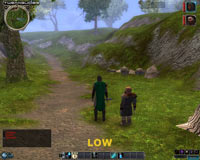
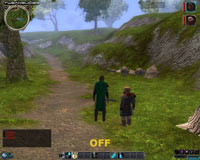
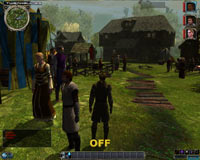
Shadow Options: This setting controls the various types of shadows cast in the game world, and is of critical importance. The game engine seems to struggle with rendering shadows, such that on most systems changing this setting will result in noticeable FPS impacts, especially when combined with the Point Light Shadows, Softer Shadows, and Shadow Quality settings covered further below. The four options here are High, Medium, Low and Off, and the screenshot comparison above details the differences. At High most items in the game world cast shadows, including the characters, as well as trees, rocks and buildings (so called 'environment shadows'). At Medium all environment shadows are disabled, leaving the character shadows as the most prominent shadows visible. At Low, all shadows are disabled, except for indistinct 'blob' shadows for characters. At Off, all shadows are disabled.
Clearly as this setting is reduced, the realism and atmosphere of the game also diminishes, but framerate can rise significantly, especially during heavy combat when multiple spell effects or light sources can cast many shadows. The important thing to note about Shadows is that its impact is greatly determined by the four other shadow and lighting-related settings mentioned above. It is quite possible to enable High Shadows for example and still have playable framerates if you lower the Shadow Quality settings, or turn off Softer Shadows, Point Light Shadows and/or Render Far Shadows to improve general shadow performance. The bottom line is you will need to experiment with this all-important setting in conjunction with the other related settings to arrive at a suitable balance of image quality and performance. You don't necessarily have to turn off shadows altogether. However on its own, turning Shadows off can double your FPS, so if you're truly struggling for performance then Low or Off is a must.
Gamma Correction: The slider controls the level of overall brightness or darkness of the game image - set to suit your taste as it has no performance impact.
Bloom Effects: Bloom effects change the quality of the lighting to create a more saturated, richer and hazier looking game world. The screenshot comparison above demonstrates the difference between enabling or disabling this option in NWN2. If bloom is not to your taste, you can disable it to gain a few FPS, however aside from making the game world seem more vibrant, it also works to reduce the appearance of aliasing (jaggedness) at far less impact than enabling Antialiasing. Note that the more advanced HDR lighting can't be enabled in NWN2; even though there is a UseHDRIfAvailable setting it does not currently work.
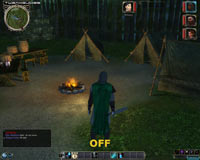
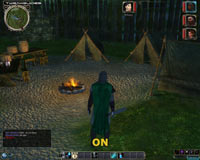
Normal Mapped Terrain: If enabled, allows the use of Normal Maps on terrain. This means that the terrain will appear more realistic in the way it reacts to lighting and have greater depth and texture. The screenshot comparison above demonstrates the difference; note the ground clearly has more depth and texture due to the light from the campfire with this option enabled. While the FPS impact may not be great on newer systems, if you have an older graphics card you can turn this option off for extra FPS.
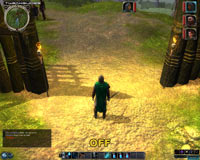
Render Grass: This option toggles whether grass is shown or not. By disabling grass you can gain a significant boost in FPS in certain outdoor areas, so untick this if required.
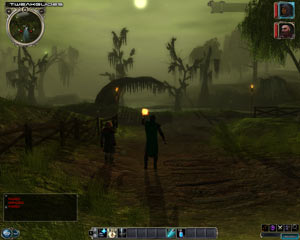
Point Light Shadows: This setting controls whether or not Point Lights - that is single points of light such as torches, as opposed to global points of light like the sun - can cause objects to cast shadows (If Shadows are enabled - see above). The screenshot comparison above demonstrates that when enabled, the two torches in the scene each cause my character to have three shadows: one from the sun, and one from each torch. There are also shadows cast by the walls due to the torches. This will reduce performance in scenes with one or more point light sources, again the amount depending on how many light sources and how many objects there are in the scene. For example a heavy combat scene with multiple characters and several torches would mean a very significant FPS drop if this setting is enabled.
Softer Shadows: If Shadows are enabled, this option reduces the sharpness of shadows as its name implies. This softening effect can reduce FPS (depending on how many shadows are being cast), and in my opinion also makes shadows look worse by blurring and removing their detail and richness.
Show Lights Carried by Companions: If enabled, party members which are not currently under your control can cast light from magic items for example. If disabled, only your currently controlled character casts light. Disabling this option can help improve performance if your other party members do indeed have items which cast light (torches aside), but only if you have any Shadow options enabled.
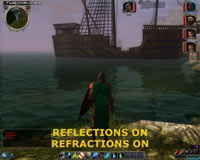
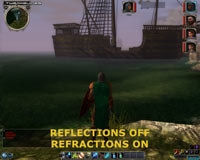
Water Reflections: This setting controls whether reflections are shown on the surface of water. In areas where water is visible, disabling this setting can noticeably improve performance at the cost of some realism. The screenshot comparison above shows the impact of this setting.
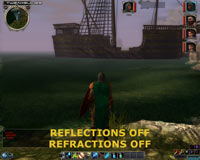
Water Refraction: This setting is supposed to control the way in which objects appear distorted when under water. However in my experimentation I found it makes little difference to distortion when enabled or disabled, and indeed the FPS impact is not major as well. The screenshot comparison above shows that with Refraction turned off (and Reflections Off to better show the impact), the only real difference is that the bottom of the ship under the water is gone. The rocks under the water still show distortion effects.
Wait for Vertical Sync: Vertical Synchronization (or VSync) is covered in plain English both here in my Gamer's Graphics & Display Settings Guide, and also on the last page of this guide. Prior to this setting being introduced to NWN2, VSync was always enabled, which can result in significantly reduced performance. Now you have the option of disabling it by unticking this box, and I generally strongly recommend that most people do just that. Alternatively, you can enable it, but you should then also enable Triple Buffering to prevent performance problems.
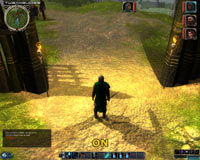
Always Draw Transitions: If enabled, the 'Area Transition' trigger icon - the world map for traveling around from area to area for example - will always be drawn. If disabled, it will only appear as you get close to it or put your mouse over it.
The next page continues our look at Neverwinter Nights 2's In-Game Settings.
Render Far Shadows: This option controls whether more distant shadows are drawn, and in outdoor areas disabling this option (if you have Shadows on) can significantly improve performance with only a relatively minor drop in image quality.
Full Screen: If enabled, runs the game in full screen mode which is recommended for maximum stability. If unticked, the game will run in a window which may improve performance if a low resolution is also chosen.
Show Weapon Trails: If enabled, weapons will show a 'trail' behind them whenever they are used. This helps to indicate which character(s) or creature(s) are attacking, though again the performance impact is such that whether you enable or disable it should solely come down to whether you like this feature or not.
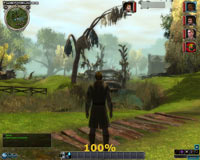
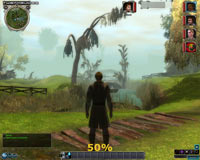
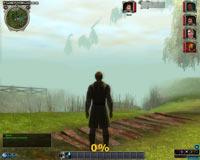
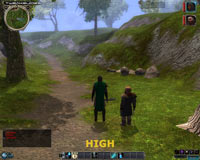
Horizon Distance: This slider controls the amount of visible detail in the game world as it recedes into the distance. By reducing the amount of visible detail you can increase performance, particularly on low-end graphics cards. The screenshot comparisons above show the impact of reducing this slider. At its maximum of Far (100%) you can see that the view distance is quite far, but not infinite. At the midpoint of the slider, the reduction in view distance becomes noticeable, with increased fogging and an increase in FPS. At Near (0%) the fogging is quite noticeable, and most objects aside from those very close to the character are no longer visible, however FPS is noticeably much higher. For those wanting to reduce slowdowns in large outdoor scenes but retain some image quality, a value of 75% or more is recommended.
Advanced Graphics
The settings in this section are important, but are also dependent on the settings further above (and vice versa), so make sure you understand those first before adjusting these. For example if you disable Shadows altogether, then adjusting the three Shadow Quality options here will have no impact.
Shadow Quality Settings: There are three boxes here which control the resolution of shadow maps used in the game if Shadows are enabled. A Shadow Map determines how shadows appear in the game. The resolution of a shadow map determines how much detail these shadows will have. An animated screenshot comparison can be seen by clicking this link: NWN2_ShadowMaps.gif (821KB). The comparison shows the four settings for Environment Shadow Quality (Near) option, as an example of the impact of changing the shadow resolution. Pay close attention to the slight changes in the details of the leaf shadows on the left side of the character. It's actually very difficult to show the true impact of these settings with screenshots, as the difference is not as noticeable until you see the actual shadows moving around in the game world: the lower the setting, the lower the resolution of the shadow map used, and hence the more jagged, blocky and shimmery these shadows will be, especially as they move about. However these settings can also have a dramatic impact on framerate if you have Shadows enabled, especially if you have Shadows set to High (see the Shadow setting further above). I strongly recommend that all but the highest-end systems set these options to the lowest settings available. Each separate setting is described below.
Character Shadow Quality: These setting controls the resolution of character shadows and point light shadows, so if the Shadows setting is on Medium or Higher and/or you have Point Light Shadows enabled, then the higher this setting, the greater the reduction in FPS in most scenes. By itself the performance impact of altering this setting is not necessarily noticeable, except in circumstances with lots of character shadows and/or light sources. So to prevent slowdowns in large combat scenes I recommend this be kept at Low.
Environment Shadow Quality (Near): This setting controls the high resolution environment shadow maps only used if you have the Shadows setting at High; if Shadows is Medium or lower this setting has no impact since there are no environment shadows. High resolution environment shadow maps are used for shadows cast by objects closer to the player. The animated comparison linked further above shows the subtle difference in detail as the setting is raised from Low to Very High. As noted above, the difference is much more noticeable in the game world when animated shadows are viewed, as a higher setting will reduce the jaggedness and shimmering of such shadows. However this can also greatly reduce FPS and make using High shadows untenable on most systems in most areas, so is best set to Medium on most systems.
Environment Shadow Quality (Far): This setting controls the low resolution environment shadow maps only used if you have the Shadows setting at High; again if Shadows is Medium or lower this setting has no impact since there are no environment shadows. Low resolution environment shadows are those used for objects in the medium to far distance, and the difference between the resolution levels is primarily in the jaggedness/blockiness of such shadows as this setting is reduced. This setting may need to be lowered to prevent the system slowing down significantly in outdoor areas with longer views.
For those who use High shadows, the framerate difference between setting the above variables to their highest as opposed to their lowest levels can be extremely large. You can more than double your FPS just by lowering these settings, even from their mid point to the lowest level, and in the process make the use of the High Shadows setting viable on many systems. Many slowdowns particularly during heavy combat are due to the use of shadows, so lowering shadow quality is the best compromise method of maintaining shadows and hence realism without sacrificing FPS too badly.
Note: Aside from the names of these options changing as of the 1.10 Patch, there also appears to be an issue with some of these settings 'sticking' at times. If this happens to you, you can try to manually adjust the shadow resolutions by changing the HiRezShadowMapSize, LowRezShadowMapSize and CharacterAndPointLightShadowMapSize settings in the nwn2.ini file - see the Advanced Tweaking section for details.
Texture Filtering: This setting determines the type of filtering used to display textures as they fade into the distance, much like the texture filtering settings in most other games. The higher the setting, the crisper and clearer the surfaces of distant objects and terrain will be. Texture filtering is explained in plain english at the bottom of this page of this page of my Gamer's Graphics & Display Settings Guide.
As a final comment about the graphics settings, any time you change a setting always make sure to click the 'Apply Changes' button first before moving on, and when completely finished then click Accept.
Gameplay/Audio
Level of Difficulty: While altering the difficulty may have some minor CPU performance impacts, for the most part you should set this to suit your tastes. A full description is already provided below this option in the game as to the gameplay impacts of each difficulty level.
Level of Violence: Controls the blood and gore in the game. At Full all violence effects are shown; at low the blood effects are removed. I'm unsure as to the difference between Low and Off as they appear similar.
Sound Provider: This setting allows you to choose the sound playback mode used for sound in NWN2. I generally recommend that Audigy/X-Fi sound card users select the EAX 3 option for optimal audio quality and performance. Those who have other sound cards or onboard sound which supports EAX are better off selecting EAX 2 or even EAX, and if your sound card has any issues or audio glitches, progressively move through the DirectSound3D modes until finally if all else fails then select the Miles Fast 2D sound which provides the most trouble-free performance at reasonable audio quality. The main difference between the sound providers is the differing level of 3D audio they provide, with EAX 3 providing the richest variety of 3D sound effects, but requiring appropriate sound hardware.
Volume Settings: These sliders control the volume levels of the background music, character voices and in-game sound effects respectively. Set them to suit your taste, as there is no performance impact; that is, setting the sliders to 0 does not remove those sounds from memory. To actually disable all sound you can use the DisableSound setting covered in Advanced Tweaking.
2D/3D Bias: This slider controls the balance between 2D sounds and 3D sounds. 2D sounds are those which aren't dynamic and don't have any specific positioning in the game world, while 3D sounds are positioned and varied. By moving this slider from left to right, you increase the richness of the sounds in the game world, adding more 3D sound effects like background environmental noises (also depending on the Sound Provider you choose - see below). Moving the slider to the left steadily reduces these 3D sounds, steadily removing even things like sword impacts, footsteps and the like. For the most part this setting doesn't appear to actually have a major impact on performance, as it only reduces the volume of these sound effects and doesn't seem to remove them entirely. On almost all systems I recommend having this slider to the far right (or close to it) to experience the full range of sound effects in the game, particularly if you have EAX enabled. To actually change the number of channels devote to 2D and 3D sounds, see the Number 2D Voices and Number 3D Voices settings under the Advanced Tweaking section.
Enable EAX: If your sound card supports EAX (Environmental Audio), then enabling this option allows you to improve the audio quality in the game with minimal to no real performance impact. I recommend enabling this option (along with the one below), and only disabling it for troubleshooting purposes. Select the exact EAX provider suitable for your sound card (See below) to ensure optimal performance.
Enable Hardware Sound: If enabled, uses your sound card's hardware to process sounds. This is recommended in providing the best performance and sound quality, and should only be disabled for troubleshooting purposes.
EAX Level: I don't know precisely what this slider does, as altering it appears to have no noticeable impact on the number of EAX effects or their quality.
Interface
These options allow you to adjust what is shown on the Heads Up Display on the main game screen. You can enable or disable the Horizontal and Vertical Hotbars, as well as the Modebar and small Minimap. Adjust these to suit your taste, altering them should have no real impact on performance.
Tooltip Delay: Tooltips are the small boxes which pop up when you hover your mouse over an item or option. They contain details and help text - such as those in the game's option menu. You can adjust the delay (in seconds) before these boxes pop up after you hold your mouse over the appropriate area. If tooltips annoy you, set this to the maximum value and you won't see them as often.
Context Menu Delay: In the game, whenever you right-click and hold your mouse over a character or object, a dropdown Context Menu appears. You can adjust the time delay (in seconds) it takes before this menu appears by using this slider.
Enable Buy/Sell Confirmation Dialog: If you find it annoying to have to click Yes or No to confirm or deny the sale of every single item you wish to sell, you can disable this option and thus double-clicking each item will automatically buy or sell it as appropriate.
Quickcast Autoclose: If enabled, as soon as you cast a spell using the Quick Cast menu, the menu will then automatically close.
Automatically Set Target When Taking Action: If enabled, as soon as you select a target for your current action, such as casting a spell on it, it will automatically become your current target for further actions.
Automatically Run Actions on Current Target: If enabled, any time you choose to cast a spell or take an action for example, your current target will automatically be the recipient of this action unless otherwise specified.
Targeting Markers: If enabled draws a target market on any character or object which is your current target for action. Once again the performance impact is negligible, so set to suit your taste.
Keymapping
This section allows you to map various keys to game controls based on your tastes. It's important to note that you can map camera movement commands to keys if you don't like using the mouse to move or adjust the camera.
The next section looks at the Advanced Tweaking possible in Neverwinter Nights 2.
Having looked at the multitude of In-Game Settings which allow you to configure Neverwinter Nights 2 to suit your needs, this section now turns our focus to the more advanced tweaking methods available to further customize and troubleshoot the game. It covers the game's initialization (.ini) files as well as the console commands you can use, but please read the descriptions and instructions very carefully before attempting these tweaks, as it's not a straightforward exercise and there are a few things which may confuse you and/or result in the tweaks not working you unless you pay close attention.
Ini Usage Instructions
An Initialization (.ini) file is a text file which holds all the various game settings. You can open and edit an .ini file with any text editing utility like Notepad or Wordpad. Of course before altering any .ini file you must first make a backup of it. Editing .ini files in Neverwinter Nights 2 is a little more complex than other games. This is because there are two main .ini files which hold your Neverwinter Nights 2 settings called nwn2.ini and nwn2player.ini, and they're found under your \Documents and Settings\[Username]\My Documents\Neverwinter Nights 2 directory. However there are also two files with exactly the same names and similar contents found under the main game directory (typically \Program Files\Atari\Neverwinter Nights 2). The way it works is this: the .ini files found under your Documents and Settings folder are specific to your profile and hold the correct values for all your current in-game options, whereas the .ini files found under the main game directory hold the default options and values. Both sets of files can be edited, and both will usually impact on the game. However importantly if the same setting exists in both sets of .ini files, the value for that setting in the .ini file under Documents and Settings overrides the one in the default .ini file in the main game directory.
Update: As of the 1.10 Patch, the .ini files have been renamed; for example nwn.ini is now nwn2.ini. This means you will lose all your previous .ini customizations, and must now reapply them to these new files. Some .ini options or sections have also been added, changed or removed. I recommend tweaking the new .ini files from scratch. You should not just rename your existing customized .ini files.
You can add settings found in the .ini files in the base game directory to the .ini files found under Documents and Settings, and they will generally work, however they must be added to the correct sub-section of the .ini file or they won't work. If the sub-section itself doesn't exist, this too can be added to the .ini file. This is the method I recommend, as it keeps all your changes in one .ini file, is likely to work the best, and means you don't mess with the default settings. So basically open and edit the .ini files found under \Documents and Settings\[Username]\My Documents\Neverwinter Nights 2, and where a setting described below doesn't exist, add it under the relevant section.
The major tweaks possible with the .ini files are covered below. Once again, some important things to note/recap:
NWN2.ini
[Sound Options]
DisableSound=0
If set to 1, this option disables all sound in the game. While this may improve performance it's obviously not recommended. The main use would be for troubleshooting, to determine if crashes or other issues are sound-related for example.
Number 2D Voices=16
Number 3D Voices=16
These settings determine the number of audio channels to allocate to 2D (non-positional) and 3D (positional/environmental) sounds. The default is 16, though most sound cards can support 32. You can reduce this value to improve performance or reduce audio glitching, or conversely you can raise the value to increase the number of sounds possible. Remember that more audio channels equals more processing power required, especially for 3D sounds, so it can affect performance particularly with lots of positional audio (e.g. in heavy combat).
Speaker Type=0
This setting controls the speaker configuration used for sound playback in the game. The default option of 0 is for 2/2.1 speakers; a value of 1 is Surround, 2 is for Headphones, 3 for 4.1 speakers, 4 for 5.1 speakers, and 5 for 7.1 speakers. Set to match your speaker system. If in doubt, leave it at the default of 0.
MaxCachedSounds=100
This setting should determine how many sounds are held in the audio cache in memory. The higher the value, the more sounds are held and hence the less loading is required to play back a sound. Raising this value to 200 or even higher can help reduce stuttering in the game.
[Graphics Options]
ATIWorkAroundForPointLightShadows=1
This setting is clearly related to issues on ATI cards with Point Light shadows. Some Nvidia users have reported an improvement in performance by setting this to =0, and it definitely can't hurt to try this if you use an Nvidia graphics card.
FarClipPlaneModifier=1.000000
This setting used to be called FarClipPlaneOverride, and is controlled by the renamed Horizon Distance option in the in-game settings. It should generally be adjusted there, though it should be noted that this since this setting has changed, you cannot set the variable below the 0.250000 minimum or above the 1.00000 maximum here, as it will have no impact.
ScreenshotFormat=jpg
Determines the format for screenshots taken in the game using the screenshot key (Default is PRINT SCREEN) saved under your \Documents and Settings\[Username]\My Documents\Neverwinter Nights 2 directory. The normal and recommended format is JPG, but you can assign a value of BMP or PNG to save in these formats instead, if you prefer higher quality screenshots, though note there may be visual glitches in other formats.
Highlight Intensity=0.250000
If you have the Cursor Highlight option enabled, then this setting controls the intensity of the highlighting applied to selected objects/characters. The higher the value, the more brightly highlighted objects/characters will shine, the closer the value to 0.0, the more subtle the highlighting.
SEFCacheTimeout=500
SEFCacheSize=20
The SEF Cache relates to special effects caching (such as spell effects). The cache holds these effects in memory so they don't need to be reloaded constantly, but the cache timeout value unloads them after a period of time to prevent memory usage for effects no longer needed. If you have 1GB or more of system RAM, you may want to raise these values to see if it reduces loading pauses/stutter. The SEFCacheSize value apparently has a useful upper limit of 50 (MB), and the CacheTimeout value is likely in seconds, but if after a while you notice no difference in raising these set them back to their default.
HiRezShadowMapSize=4096
LowRezShadowMapSize=4096
CharacterAndPointLightShadowMapSize=4096
These variables correspond with the in-game Shadow Quality settings recently added as of the 1.10 patch. The HiRezShadowMapSize variable relates to the Environment Shadow Quality (Near) setting; the LowRezShadowMapSize variable relates to the Environment Shadow Quality (Far) setting; and the CharacterAndPointLightShadowMapSize relates to Character Shadow Quality. The values for these variables are the shadow map resolutions, with valid values of 1024, 2048, 4096 and 8192 possible.
[Display Options]
Disable Intro Movies=1
Inserting this option and setting it =1 will disable all the introductory movies which play whenever Neverwinter Nights 2 starts up. See page 9 of this guide for more details.
Width=1280
Height=1024
While you can set the screen resolution in the in-game settings, these settings allow you to attempt to specify a custom resolution by entering the resolution width and height.
RefreshRate=60
If you want to specify a custom refresh rate to suit your monitor, change this value to one which is supported by your monitor at the chosen resolution. On the other hand if the game is crashing at startup, set this back to its default of 60.
If Object Fade is enabled (See In-Game Settings section), the following options will impact on precisely how it works:
ObjectFade Percentage=.15
This option determines the transparency of the objects which become faded. Ranging from .01 for totally invisible, through to .99 for completely solid (minus shadows), you can set the level of transparency here (default is .15). Note that a value of .00 simply results in the object flashing, and this option also doesn't seem to reduce the FPS hit of having Object Fade on, even if set to .01.
ObjectFade Start=0.0
This option determines the range at which object fading begins. The higher the value, the further away an object must be before it is affected by object fade.
ObjectFade Length=0.5
This option determines the length of time before object fade kicks in. The higher the value, the longer it will take for an affected object to begin fading.
NWN2Player.ini
[Game Options]
Enable FloatyTextFeedback=1
If set to =0, this option disables all the bits of 'floating text' which appear on the screen to provide information about things like the amount of damage done to a monster from a successful hit. Disabling this option can increase realism and immersion, however it requires that you then keep a close eye on the text chat area.
[Profile]
Player Name=name
Password=password
It's important to note that your online player account name and password are stored here in plain text. This means that you should never copy and paste or email, or share via P2P the contents of this .ini file with anyone else.
That covers all the important .ini file settings which I have been able to ascertain and document here. If you're aware of any settings not covered above but which have a significant use or impact, please Email Me the details so I can update this list. If you don't see a setting above, keep in mind that most of the settings in the .ini files relate to options which can be fully adjusted using the in-game settings. Furthermore several commands with tempting names are not functional at all, or have no discernable impact.
The next page looks at the in-game Console Commands for Neverwinter Nights 2.
Console Commands
The command console in Neverwinter Nights 2 allows users to apply various tweaks or changes to the game 'on the fly' while playing. To open and close the console, press the '~' key (or the key above TAB and/or below ESC) on your keyboard. To see the console text clearly you may have to disable any Antialiasing you have enabled. To implement a console command, simply type its name along with any parameters required. Importantly, for many commands to work, you will need to load up a game, and then enable debug mode by entering the following into the console then pressing ENTER:
DebugMode 1
Update: The console commands appear to no longer be case sensitive as of the 1.10 patch. The full list of updated console commands is provided further below in alphabetical order, however I provide full descriptions for the most useful commands first:
showfps - Toggles the frames per second (fps) display on/off.
trees - Toggles the rendering of all trees on/off. Useful for temporarily improving FPS in outdoor areas.
renderwater - Toggles the rendering of water on/off. Useful for temporary FPS boost in areas with water.
rain [0,1] - Toggles rain effects on if set to 1, off if set to 0.
daynight - Toggles the day/night cycle.
wireframe - Toggles wireframe mode on/off, useful for seeing the amount of detail actually being rendered/calculated in any area, even if it's not directly visible on screen.
gfxoptions - Brings up a special Graphics Options dialog box with a multitude of graphics-related settings you can change, including shadow intensity, toggling the day/night cycle, toggling rain on/off and altering the Bloom lighting parameters.
rs kr_roster_edit - Opens the NWN2 Companion Roster Editor, with a proper interface for adding, removing and altering various parameters for companions.
SetSTR, SetDEX, SetCON, SetINT, SetWIS, SetCHA [Value] - Right-click select a target, and use these commands to alter the relevant attribute to the value you wish. For example, right-click select your own character and use SetSTR 18 to give him/her 18 Strength.
givefeat [ID or all] - Select a character then use this command with the appropriate feat ID/name to give them that feat, or use 'all' to give them every feat.
giveitem [ID] [Number of items] - Select a character then use this command to give a particular item to the character, along with how many of that item to give. The list of ID tags for items can be found by launching the NWN2 Toolset, going to the Plugins menu item, selecting 'Universal Blueprint Changer', then selecting Items in the new dialog box and finding the appropriate name under the Tag column.
givespell [iD] - Select a character then use this command to give a particular spell to the character. The spell IDs can be found by launching the NWN2 Toolset, going to the View>2DA File menu option, then selecting the Spells file and using the number under the Name column.
givexp [value] - Select a character then use this command to give them the specified number of experience points.
dm_givegold [value] - Right-click select a character then use this command to give them the specified amount in gold pieces.
dm_god - Enables God mode, meaning you can't be killed.
The following are all the 207 console commands for Neverwinter Nights 2 as of the latest patch. Aside from DebugMode needing to be enabled for most of them to work, remember that many of them require you to load up a game and either be the active character, or right-click select a particular character to apply a command successfully.
aabboxes
ambient
anim_blend
animation
animglod
animlod
anims
attachcamera
auditfeats
auditspells
automemorize
axes
base
blurradius
border
bugreport
c2
c3
camera_debug
camera_debug_full
camera_debug_los
capsules
ceilingmode
clientstats
closeuiscreen
creatures
cutscene
cutscene_override
daynight
daynightscale
daytime
debugcam
debugmode
debugtext
depthbatch
depthbatchindex
diffuse
dirshadowdepthbias
dirshadowslopescaledepthbias
dm_getvarfloat
dm_getvarint
dm_getvarobject
dm_getvarstring
dm_givegold
dm_god
dm_jumptopoint
dm_modifyage
dm_setattackbase
dm_setvarint
dm_setvarobject
dm_setvarstring
dm_setfaction
dropshadows
dumpmemory
dumptextures
emo_blend
enablecombatdebugging
envshadows
exportchar
farshadows
ffxbase
flicker_lights
fog
freecam
frusta
full
gfxoptions
givefeat
giveitem
givespell
givexp
glowintens
glows
guidebug
help
hiliteintens
hilitethresh
hookpoints
irolltwenties
island
killgui
lights
loadgame
loc
loggameeffects
logrunscript
logserverai
lookat
memstats
minimapsave
mipfilter
mousepick
mousepos
netprofile
netprofilereport
normals
obb_all
obb_cdoor
obb_sdoor
obb_water
obboxes
occlusion
openuiscreen
partyadd
partyremove
paths
pbn
perception
physics
playbyname
pointshadowdepthbias
pointshadows
pointshadowslopescaledepthbias
polymorph
portraitsave
possesscompanion
printactions
printcombatdata
printcreatures
printeffects
printfactiontable
printfeats
printglobalvars
printlevelstats
printlistenexpressions
printlocalvars
printperception
printrepository
printreputation
printscripts
profiling
rain
rs
reigidpointshadowzbias
removefeat
renderpc
renderwater
resetlevels
resetpackage
resetstats
resourcestats
rigiddirshadowzbias
rosteradd
rs
runscript
savedaynightstage
savegame
sceneintens
scriptprofiling
selectionmode
selfdirshadowdepthbias
selfdirshadowslopescaledepthbias
selfpointshadowdepthbias
selfpointshadowslopescaledepthbias
serverstats
setcha
setcon
setdex
setint
setstr
setwis
setdierollmode
setnoticetext
setstatsdepth
shadowmap
shadows
showattacks
showcomments
showfps
showscriptcalls
showstats
showtriggerevents
skels
skindirshadowzbias
skinpointshadowbias
sky
snow
softshadows
solid
specular
spheres
stats
surface
surfaceonly
takedamage
terraindirshadowdepthbias
terraindirshadowslopescaledepthbias
terraindirshadowzbias
texfilter
textborder
tiles
tint
toggleserver
trees
unloaduiscreen
unpolymorph
usebehavior
usescriptset
verifymemory
voiceover
wami
waterreflections
wireframe
For most intents and purposes the majority of these commands are relatively obscure diagnostic/debugging features, act as cheats or alter functions which can easily be changed using the in-game settings. However if you find any particular commands you believe would be genuinely useful to most players, and wish to have their description added at the top of this page, please Email Me with the details.
The next section brings the guide to a conclusion with some important tips and tweaks.
This section brings the guide to a conclusion, but has some important tips and tweaks, so it should not be skipped.
Speeding Up Startup
The first step to speeding up the startup time for Neverwinter Nights 2 is to disable the introductory movies which play each time you launch the game. There are two methods, with the first being relatively straightforward - go to your \Program Files\Atari\Neverwinter Nights 2\Movies directory, and either rename all the .bik files there to something else (don't delete them), or alternatively create a new sub-directory there and move all the movie files to that folder.
However the simplest method involves opening the nwn2.ini file found under your \Documents and Settings\[Username]\My Documents\Neverwinter Nights 2 directory, and under the [Display Options] section insert the following:
Disable Intro Movies=1
This will prevent only the introductory movies from playing, and will not interfere with the in-game cutscenes or movies.
The next step to speeding up startup time is to change the shortcut you use to launch the game, so that it points to the game's main executable and not the launcher menu which loads up first. To do this, go to your \Program Files\Atari\Neverwinter Nights 2 directory, right-click on the file nwn2main.exe and select 'Send To >Desktop'. This will create a new icon which you can now use to launch the game, and which bypasses the launcher menu, thereby speeding up startup time.
Note that if you want to use the launcher at any time, either use the original launch icon for the game, or go to the \Program Files\Atari\Neverwinter Nights 2 directory and run the NWN2Launcher.exe file. If you just want to run the automatic updater, you can run the nwupdate.exe file instead.
Framerate Boost - VSync & Triple Buffering
One of the problems with Neverwinter Nights 2 is that the game has Vertical Synchronization (VSync) enabled by default, and it cannot be disabled from within the game, or even by using the relevant .ini setting. This is strange because by forcing VSync On, Obisidian has ensured that most systems will experience reduced framerates with no real increase in image quality. In fact in some cases VSync On can reduce FPS by as much as 50% (without exaggeration). The impact of VSync is very noticeable in NWN2, since if you look at your framerates in any area, you will notice it is often capped at a value like 15, 20 or 30FPS exactly. If you're not sure why VSync can not only cap framerates, but also reduce them significantly, read the plain english description of VSync on this page of my Gamer's Graphics & Display Settings Guide.
Since Obsidian have not yet incorporated a working VSync On/Off function for the game, there are two ways you can overcome the FPS reduction due to VSync. The first involves forcing VSync Off in your graphics card control panel. For ATI users, you can do this as detailed on this page of my ATI Catalyst Tweak Guide. For Nvidia users you can do this as detailed near the bottom of this page of my Nvidia Forceware Tweak Guide. If you don't want to force VSync off globally, Nvidia users can just force VSync Off for Neverwinter Nights 2 using the game profiles in the control panel, however the existing game profile for Neverwinter Nights 2 in the latest Forceware drivers incorrectly points to the game's launcher, not the main nwn2main.exe file. Create a new profile, call it something other than 'Neverwinter Nights 2' (e.g. call it NWN 2), and point it to \Program Files\Atari\Neverwinter Nights 2\nwn2main.exe.
If you don't wish to disable VSync due to tearing (again, refer to the description of tearing here), you can instead enable Triple Buffering to increase FPS in a similar manner. Triple Buffering is explained clearly on this page, and the procedure to enable it for ATI and Nvidia users is also explained on that page. It is important to note that because Triple Buffering uses additional Video RAM, it can actually cause problems for people with older/lower-end graphics cards, including slowdowns and input lag. So the first method above is the one which is the easiest and most successful to use.
The bottom line is that disabling VSync can see you increase framerates anywhere from 10-20% right up to 100% (i.e. double your existing FPS) without any noticeable decline in image quality whatsoever, so it is strongly recommended for all users.
Update: As of the 1.05 patch onwards a new 'Wait for Vertical Sync' option is available under the Graphics section of the Options menus. This option allows you to enable or disable Vertical Sync from within NWN2 - see the In-Game Settings section for more details.
Dual Core Issues
Neverwinter Nights 2's engine is not optimized ('multithreaded') for dual core CPUs. As such the game only uses the equivalent of one CPU at any time, and can't be forced to fully utilize both for better performance. Worse still, the developers have stated that the game may experience issues or reduced performance on dual core CPUs (See the game's Readme.rtf file). To prevent this, I firstly recommend that all AMD dual core CPU users install the AMD Dual Core Optimizer Utility which fixes a potential timing conflict in some games. For both AMD and Intel users who still feel like their dual core CPU could be the cause of problems in NWN2, you can run the game in single core mode by changing its affinity. Note that the game's Toolset can utilize dual cores efficiently, just not the main game engine itself.
Full details of how to do this are in the Task Manager chapter of the TweakGuides Tweaking Companion, but basically to do it temporarily (perhaps to test to see if it makes any difference), first launch the game, then ALT+TAB back to the desktop, press CTRL+ALT+DEL to open the Task Manager, go to the Processes tab and right-click on the game's process name (usually nwn2main.exe), select 'Set Affinity' and then untick CPU1, so that only CPU0 is ticked. If you want to apply this fix permanently, create a backup copy of nwn2main.exe first, then follow the instructions here.
Measuring FPS, Taking Screenshots & Capturing Movies
If you want to measure FPS or take screenshots in Neverwinter Nights 2, both functions are already built into the game. To measure your framerate, simply use the showfps console command to toggle the FPS counter on/off - see the previous page for details. To take a screenshot of the game at any time, press the PRINT SCREEN key and it will be saved in JPG format by default in your \Documents and Settings\[Username]\My Documents\Neverwinter Nights 2 directory. Note that you can change both the key used to take screenshots under the in-game options, as well as the format the screenshot is taken in as explained under the Advanced Tweaking section.
Capturing movies in Neverwinter Nights 2 requires a third party utility, and FRAPS is the one I use, as it is free (with some limitations), makes the process simple, and also has an accurate FPS counter and screen capturing functionality built in.
Conclusion
That brings this guide to a conclusion, and hopefully it contains all the information you need to get Neverwinter Nights 2 running smoothly and without any problems. Obviously since the game is relatively complex, it will require further patches to resolve issues on certain system configurations, as well as the inevitable quest and game bugs. However for the most part I found that once the game was tweaked it ran quite well, at least as of the 1.03 Patch.
If you believe there are any significant tips or tweaks missing from this guide, please Email Me with the details and I will look into it further, updating the guide as required. Unfortunately I can't provide personal tech/tweak support and I also don't provide permission for the guide to be reproduced elsewhere for several reasons.
In any case, thanks for taking the time to read the guide, and until next time take care!