The Need for Speed series is one of the classics of gaming. Starting out in 1994 with the original Need for Speed, and working through such titles as Need for Speed SE, II, III, High Stakes, Porsche Unleashed, Hot Pursuit 2 and the Underground I and II series, this game has gone from accurate simulation to arcadey racer to street racer over the years, and has now arrived at a watershed: NFS:MW takes elements from all the previous versions and blends them together to try to please both the original "purist" fans of the game, and the more recent street racing fans.

To start with, NFS:MW returns to the "Hot Pursuit" formula of incorporating wild police chases, but takes it further by giving you much more freedom to pretty much go anywhere you want to - through paddocks, motel courtyards, golf courses, petrol stations and just about anywhere else. It also has various pursuit modes, not just a straight chase down the highway. For the street racers, it includes tuning elements from Underground, and other similar themes to suit the genre. For the original NFS purists, there are lap races over set tracks, and of course thankfully there is an option to turn off that damn "Catchup mode" which drove many people crazy in previous generations of NFS.
I think fans of the game will have mixed feelings when they first play NFS:MW. Personally I think it has the best graphics I've seen in a racing game bar none, it has a lot more freedom than any previous racing-focused game (not counting games like Midtown Madness and Mafia Freeride mode of course), and it isn't too "ricey" to put off those of us who aren't as much into street racing culture. However by trying to be all things to all people, it may earn scorn for not being "pure" enough in any one particular racing genre. And of course all that fancy graphics can bring down even the highest of high-end systems, bringing with it complaints that EA focused too much on the pretty and not enough on the gritty.
Which is where this guide comes in. The guide focuses on giving you the rundown on how the various in-game settings affect image quality and performance through a series of screenshot comparisons and performance discussions. It also provides the advanced tweaking possible in the game via the Windows Registry, and it rounds these out with some troubleshooting tips and general performance optimization information which should help you squeeze the most out of the game on your machine. Give it a run-through and you'll see what I mean.
Note: This guide refers to the latest retail version of Need for Speed: Most Wanted Version 1.3. Make sure to check back regularly for updates.
Before getting into any game-specific settings and tweaks, this section covers the obligatory system optimization information I include in all my guides. If you've followed this advice recently, you can skip this section.
Many people report problems with this game and in almost all cases these are due to general system issues and not the game itself. With that in mind I strongly urge you to take some time and follow the advice below if you truly want this game, and indeed every other game you own, to run at its fastest and most trouble-free.
The place to start is my free TweakGuides Tweaking Companion. It is the complete system optimization guide for Windows users. Designed for novice and advanced users alike, it is written in plain English to help you genuinely understand all aspects of Windows and your PC. The guide covers every major topic, from the correct installation of Windows and critical drivers and software, through to recommendations for every significant setting and feature, all the major performance and convenience tweaks and customizations, as well as detailed troubleshooting advice. There are also links to a range of reliable free applications for optimizing and maintaining your system, as well as to important resources for finding out even more about Windows and your PC. There are two separate versions: one for Vista and one for XP.
If you've ever wondered what common graphics and display settings like FPS, VSync, Refresh Rate, Antialiasing and Anisotropic Filtering are, and how they really work, then check out my Gamer's Graphics & Display Settings Guide for all the details in an easy to understand format. The guide also gives you a rundown on exactly how a game goes from a being a set of files on your hard drive to a 3D image on your screen, including relevant performance tips.
Finally, if you run an ATI or Nvidia graphics card, I have written two comprehensive guides which you should check out: the ATI Catalyst Tweak Guide and the Nvidia Forceware Tweak Guide. These guides cover absolutely everything about the latest graphics drivers, how to set them up correctly, as well as advanced tweaking, overclocking and benchmarking tips. They're a must-read for configuring your graphics card correctly.
The above information really will serve you well in the long run, not just in this game. If you don't optimize your system and keep everything updated and maintained correctly you will keep running into "mysterious" problems time and time again. Do yourself a favor and when you get a chance spend an afternoon or two optimizing your machine the right way with the guides above.
The next section goes into more detail about specific troubleshooting tips which address common performance issues with the game.

This section contains specific troubleshooting tips which address many of the common problems experienced by Need for Speed: Most Wanted players. I can't stress enough the importance of taking the time to go through the checklist of advice below if you're having a problem with the game.
Official Support: The first place to look for official support details is in the Readme.txt file in your \Program Files\EA GAMES\Need for Speed Most Wanted\Support\en-us directory. Importantly, check out the minimum system requirements in that file, as well as the supported hardware list, since if any of your hardware is not supported or doesn't meet the requirements then you will experience problems with the game, or quite simply may not be able to run it. Read through the list of compatibility issues and suggested fixes as well. If you want to see further official tech support from EA Games, go to the Official EA Games Tech Support Site and the EA Games NFSMW Forums.
For unofficial support, visit the forums at fan sites such as NFSUnlimited, NFSCars and ND4SPDWorld to name a few. You can also drop into our own TweakGuides Forums to have a chat about the guide and the game. Remember however to do some basic research and run through this guide (and associated guides) before jumping on a forum and asking a question - most forum users tend to ignore (or unfortunately abuse) people who post "Help me please!!1!1" type posts which show no prior research or troubleshooting effort.
The Latest Graphic Drivers: The game's developers always recommend the latest graphics drivers for optimal performance. In this case make absolutely certain you have updated to the latest graphics card drivers. This means the ATI Catalyst 5.11 or newer; or the Nvidia Forceware 81.95 or newer. See page 4 of my ATI Catalyst Tweak Guide or Nvidia Forceware Tweak Guide for details on where to download these drivers and how to install them cleanly.
DirectX Error when Installing: When installing the game if you get an error that DirectX9.0c is not installed, even if you've installed DX9.0c already, then find the game's Autorun.exe file (in the base directory of the game CD), right-click on it, select Properties, go to the Compatibility tab, tick the 'Run this program in compatibility mode for' and select 'Windows 2000'. Then double-click on Autorun.exe to begin installation. Make sure to turn off compatibility mode after installing the game.
Windows Vista Users: If you're having problems running this game under Windows Vista, first make sure that you're using the latest Vista graphics and audio drivers for your hardware, and the latest version of this game (see page 4 for patch details). Next, make sure you don't change your UAC settings after the game has been installed, as due to Virtualization this can change the location of the game files and settings. If you can't launch the game successfully when UAC is enabled, you will need to run the game with full Admin privileges. To do this either right-click on the launch icon and select 'Run as Administrator', or right-click on the launch icon, select Properties and under the Compatibility tab tick 'Run this program as an administrator' then click OK. I strongly recommend that you refer to the TweakGuides Tweaking Companion for Windows Vista for more information - in particular check the 'Gaming in Vista' section of the Graphics & Interface chapter; the UAC section of the PC Security chapter; and the 'Personal Folders' and 'Directory Junctions & Symbolic Links' sections of the Windows Explorer chapter. These will tell you how you can fix game-related issues and also explain the relevant differences of Vista.
In-Game Lag/Freezes/Stuttering/Jerkiness: To reduce any stuttering or loading pauses in NFS:MW, make sure you have adjusted your in-game settings such that your FPS as measured by FRAPS (See In-Game Settings section) is consistently above ~25-30FPS. More importantly, make sure you reduce things like Antialiasing and/or Texture Filtering, as well as World Detail and Shadow Detail if necessary. Keep in mind that systems with 512MB of RAM or less will experience a lot more stuttering than those with more system RAM. For systems running Dual-Core CPUs and/or Pentium 4 CPUs with HyperThreading see the Conclusion section of this guide for a specific fix to jerkiness issues. If you're really desparate to fix up the stuttering, see the Audio section of the In-Game Settings section. And of course, make absolutely sure that you have run the Windows Defragmenter after installing the game, since if its files are fragmented this can greatly increase your stuttering and in-game loading pauses.
Other Need for Speed Games: Since the main executable file in NFS:MW is called speed.exe which is the same as the executable name for NFS:U and NFS:U2, you may find that setting up performance profiles can be a problem, or indeed you may find other difficulties installing and playing NFSMW. I strongly recommend that if possible you uninstall any other NFS games from your system before installing NFSMW. This will help ensure minimum problems with the game.
Antialiasing and Anisotropic Filtering: To make sure the Full-Screen Anti-Aliasing and Texture Filtering settings work properly in NFS:MW it is recommended that you first go to your graphics card's control panel, and for Nvidia cards under the Performance & Quality Settings in the Global Driver Settings section select 'Application Controlled' for Antialiasing and Anisotropic Filtering. For ATI cards go to the 3D section of the Control Panel/Control Center and select 'Application Preference' for both Antialiasing and Anisotropic Filtering. If you are unfamiliar with what Antialiasing or Anisotropic Filtering do, see my Gamer's Graphics & Display Settings Guide. Now you can adjust these in the game without any conflicts. Keep in mind that any Antialiasing and/or Texture Filtering can significantly degrade performance on older/slower graphics cards.
Virus Scan: Do a full scan of all your files using the following excellent (and free) tools: AVG Virus Cleaner for viruses, A-Squared for trojans, and Ad-Aware SE for spyware/adware. Viruses, trojans and spyware can cause unexplained behavior, general file corruption and system slowdown, and can also steal your CD Key. It's best to make sure your system isn't infected before moving on to any other optimization measures. However make sure to disable any background scanning programs once you're done (See below).
Background Programs: The game's developers specifically recommend that you disable all background applications - especially virus, trojan and spyware scanners and messaging utilities. These applications can and do use up valuable CPU resources, take up precious RAM, cause memory conflicts and crashes to desktop, but most importantly they interfere with read/writes to your hard drive effectively slowing it down and causing even more in-game freezes and stuttering. Full instructions on how to identify your startup programs and services and how to correctly disable unnecessary ones are in my TweakGuides Tweaking Companion. This is an important step you should not miss.
Overclocking: If you are experiencing graphical glitches or crashing in the game, set everything in your system back to its default speeds and see if this impacts on the problem. If you don't experience the same problems at default speed, or they're reduced in severity, then your overclock is the primary culprit. Either permanently reduce your overclock and/or increase cooling to regain stability. Don't assume that because other games run with stability at a particular speed that this game will do the same.
These are some of the more common problems for NFS:MW. If you are experiencing problems with the game, it is most likely due to some aspect of your system not being optimized or correctly set up rather than a game bug. Make sure to follow the instructions above, as well as taking the time to go through my TweakGuides Tweaking Companion to stabilize and optimize your system as much as possible.
Read the remainder of this guide to gain a better understanding of the specific NFS:MW settings which can help improve your performance and resolve any problems.
Patches
Need for Speed: Most Wanted has received its first patch, bringing it up to Version 1.3. The patch contains a range of bug fixes, and you can download it from the Need for Speed: Most Wanted sections of FileShack or FilePlanet among other places. I strongly suggest all NFSMW players apply this patch, however it doesn't appear to have any performance increases as such, it is mainly to fix a range of bugs and glitches in the game.
Note, if you use the 'imagecfg' dual core processor affinity fix (See Conclusion section), you may have to redo the fix each time you patch the game.
The 'Black Edition'
Just a note here that Need for Speed: Most Wanted comes in two versions which have minor differences. There's the regular edition which most people will buy, and a NFS:MW Black Edition. The additional features of the Black Edition are listed here, and include:
While the Black Edition is pretty cool for NFSMW fans, it's not any different to the normal NFSMW game in any way aside from the additional features listed above, so all the tweaks and tips in this guide apply equally to both editions, and both look and perform the same. In fact the Black Edition extra in-game features can all be unlocked in the regular edition using a special 'Black Edition Patch' - which for legal reasons I can't provide any more information on, sorry.
No-CD Patch
Need for Speed: Most Wanted uses the SafeDisc copy protection system, which means that not only do you have to enter a CD Key to install the game and play it online, you also need to keep your game CD in the drive while playing. If you've read my other guides, you know how I feel about this, so I won't go on about it - it sucks plain and simple. While No-CDs for this game are not available, it is possible to play the game without a CD using a fixed image, however for legal reasons I will not provide any details of this here, nor by email, so don't ask me about this. Just play with the disc in the drive and hopefully EA will release a patch which removes the CD check in the near future.
Mods
Given the numerous mods for previous games in the Need for Speed series, NFS modders will quickly come out with a range of mods which can change various game parameters, and I will report on the major ones here as I find them. For example there is this NFS:MW Windowed Mode Mod, and this Mod which unlocks some cars in the demo. For the full version, you can use this NFSMW Camera Hack. For more great mods, check out the Utils Section of NFSUnlimited.net.
Keep an eye on this section of the guide, as well as the main NFS fan sites, such as NFSCars, NFSUnlimited, and ND4SPDWorld for more mods and custom tweaks, as well as customized cars, cheats and other goodies.
The next section goes into detail on Need for Speed: Most Wanted's In-Game Settings.
The following are the main in-game settings for Need for Speed: Most Wanted which can be changed to alter image quality and performance. Each is covered in detail under the relevant section. I note the image quality and performance impacts of each setting, however keep in mind that obviously the impacts will differ depending on your particular system hardware. Make sure to view the descriptions and associated screenshot/animated comparisons carefully and find your own balance of image quality vs. performance.
The best way for you to arrive at the optimal settings on your system is to read the descriptions below, then experiment by using FRAPS, a free utility which shows the number of frames per second (FPS) in the corner of the screen. Adjust your settings and note your FPS - the higher your FPS, the smoother your gameplay will be. You'll notice in the screenshots below, you can see the FRAPS counter in the top left in yellow digits. Fraps is also handy since it allows you to take screenshots of gameplay and even record demos.
To access the main game options, scroll to the Options icon at the bottom right of the screen, and click on it or press Enter. Under the Options section, there are five sub-sections: Audio, Video, Gameplay, Player and Controls. Each is covered below:
Audio
Volume Controls: The five sliders here control the various volume levels for the main audio elements of the game. Adjust according to your tastes - none have any performance impact. Moving a slider to the far left to disable a particular element will not give you a performance boost. To turn off music completely, and not just lower its volume, see further below.
Interactive Music: This setting controls the generic game background instrumental music, not the EA Trax songs. For example, when being chased by police in the Roadblock Challenge, the background music will become more tense, but if you are evading police and in Cooldown mode, the music will ease up. There may be a slight performance impact due to the extra CPU usage when this is enabled, but it is for all intents and purposes negligible, so set to suit your taste.
EA Trax: This setting controls whether the tracks performed by various artists are played throughout the game. No performance impact as such, set to suit your tastes. See the Conclusion section to find out more about the game music.
Audio Mode: The main options here are Stereo or Mono, and although Mono may provide slightly better performance on low-end systems, there should be no reason to choose anything other than Stereo.
Turning Off Music: If you want to prevent NFSMW from loading up any music into memory, you can't just use the volume sliders. To prevent music data from loading, go to your \Program Files\EA GAMES\Need for Speed Most Wanted\SOUND\PFDATA directory and rename the files MW_Music.mus and MW_Music.mpf to something else (e.g. MW_Music.REAL_mus) - don't delete them as they are needed for installing patches. Now whenever you start up NFSMW, the game will not load up this data, and for those with lower amounts of RAM and/or who experience a lot of in-game stuttering, the stuttering should be noticeably reduced. Thanks to ashes48 for this tip.
Video
On the main Video settings screen, you will see a 'Level of Detail' slider and a Resolution setting. I strongly recommend that you ignore these and manually adjust the various Advanced elements below for optimal performance and image quality. To access the Advanced graphical menu, click the Advanced icon at the top right, or simply press the number 2 on your keyboard.
Note, as the game suggests, adjust your monitor's brightness (or use you graphics card's control panel) by looking at the twin EA Games logos in the center of the screen and following the written instructions.
Advanced
Resolution: This setting controls the pixel width by pixel height of the image on the screen. The higher the number of pixels on the screen, the more detailed the image but the lower your performance. Choose a resolution which is not too high, as resolution has a major impact on performance in the game.
Full-Screen Anti-Aliasing: Full-Screen Anti-Aliasing (FSAA, or simply AA), is a method of smoothing jagged lines on the screen. The higher the slider is taken here above the far left, the higher the sample rate of antialiasing used, and the smoother jagged lines will appear in the game. You can read more about FSAA and see examples in my Gamer's Graphics & Display Settings Guide. In NFS:MW moving the slider one notch to the right from the far left provides an instant reduction in the jaggedness of lines, however it also brings with it a major performance hit. Further moving the slider to the right doesn't noticeably improve image quality, but further reduces performance. I recommend that if you need the FPS, you set the slider to the far left (disable AA). If you really want to smooth out jagged lines, only move the slider one notch to the right, as any higher will severely drain performance for little or no visible image quality gain. Also make sure to set your Antialiasing settings in your graphics card's control panel to 'Application Preference' to minimize conflicts with this setting.
Texture Filtering: This setting affects the way textures (the 2D surfaces of all 3D objects) appear in the game. Once again refer to my Gamer's Graphics & Display Settings Guide for more details and graphical examples. This setting does not change the actual texture resolution or overall texture quality as such, it only implements texture filtering which affects the crispness of textures as they fade into the distance. For an animated screenshot comparison which demonstrates the impact of the various levels of the slider, click this link: Texture_Filtering.gif (432KB). Look closely at the cracks in the road in the far distance, the edges of the sidewalk and the white lines on the road - at higher settings they appear much sharper in the distance. However as you can see by the brick wall to the left, the actual texture quality remains the same throughout. The performance impact of Texture Filtering is not as dramatic as that of antialiasing, however at the Highest level it can reduce FPS noticeably on older/slower graphics cards. Once again, make sure to set your Anisotropic Filtering settings in your graphics card's control panel to 'Application Preference' to minimize conflicts with this setting.
VSync: Vertical Synchronization (VSync) is the synchronization of your monitor and graphics card's abilities to draw a certain number of frames per second (or FPS) on the screen. This is referred to as the Refresh Rate, and is measured in frequency per second (Hz). If this option is enabled (i.e. set to Yes), your maximum FPS cannot exceed your current refresh rate at your chosen resolution, and more importantly your overall FPS will be reduced. For this reason it is strongly recommended that you set this option to No. The only down side is that if VSync is disabled, you may notice some image 'tearing' - that is the bottom and top halves of the screen may appear to tear apart slightly at times. This causes no damage to your monitor, but if it really annoys you enable VSync. Once again, I want you to understand that with VSync enabled, not only is your maximum FPS capped, but your average FPS will also fall. For example, with VSync disabled, if you get 37FPS in a particular section, with VSync enabled you will get 30, as VSync rounds down the FPS. Verify this for yourself using FRAPS and you'll see what I mean. Once again, refer to my Gamer's Graphics & Display Settings Guide for details.
World Level of Detail: This setting controls the level of detail in the surrounding objects in the game world, such as trees, mailboxes, poles, etc. The best way to see the impact of the various levels of this slider is for you to look at this animated screenshot comparison: World_Detail.gif (438KB). Look closely at the trees in the distance, and the sign to the right. As the level of detail rises, more trees are visible, and at one notch from the far right (High) almost everything is visible, but the sign only appears at the Highest setting (slider to the far right). The performance impact of this setting is most noticeable at the Highest level, so Medium or High would be a good choice for most people. The precise impact depends to some extent on your CPU power, and to a greater extent on your graphics card to draw all those additional details. The biggest impact of this setting will be felt when going through forest areas, and also when combined with the Shadow Detail setting. At High for example there will be lots of trees as well as lots of shadows, which will slow down most systems.
Road Reflection Detail: This setting controls the level of detail given to reflections on the road's surface. I didn't find any significant performance or visual quality difference whatsoever when changing it on my machine from lowest to highest. In theory when at the lowest setting (slider to the far left), the surrounding objects will not reflect on the road's surface, and when set to the highest, all reflections will show. Set this to one notch from the left if you want a good balance of visual quality and performance, otherwise in most parts of the game there is no significant image quality or performance impact that I can see.
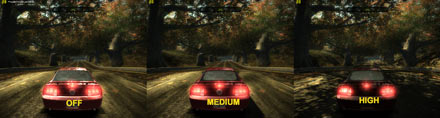
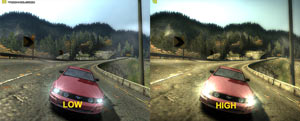
Shadow Detail: This setting controls whether shadows for various objects are shown, and to what extent. To better see what this means, look at the screenshot comparison above. With the slider to the far left (Off), virtually no shadows are visible, save for the basic car shadow. At the middle slider setting (Medium), the car casts a more accurate shadow, but still no shadows from the trees. With the slider to the far right (Highest), the trees cast detailed shadows on the car and the surrounding surfaces. The performance impact will vary by system, but in general selecting the highest setting will see lots of slowdowns in areas with lots of detailed objects, such as forests and complex city scenes and/or lots of vehicles. This is made worse if you have a high World Detail setting. The best performance is seen at the lowest setting, and since visually the Medium setting is not much better, disable shadows is highly recommended to most people for gaining a great deal of FPS and avoiding slowdowns.
Car Geometry Detail: This setting controls the number of polygons used to draw the vehicles in the game. When set to High, the car models are as detailed as possible, with lower performance compared to when set to Low. However I couldn't see any major differences between these two settings, and in general the cars still look quite good at the Low setting.
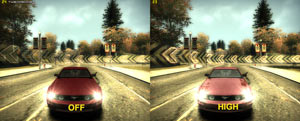
Car Reflection Detail: This setting controls the way in which vehicles reflect the surrounding objects. Look at the screenshot comparison above, noting the reflections on the hood. When set to Low, no detailed reflections are shown of the surrounding buildings, yet when set to High, these are reflected accurately in the hood, and on other parts of the car. For the most part this setting has variable impact depending on which view you use (i.e. if you can see your own car or not), and whether other vehicles are in view as well. The more vehicles are visible, the greater the impact on your FPS, which can be quite noticeable on some systems.
Car Reflection Update Rate: This setting controls the rate at which reflections are updated on the car models. That means the higher this setting, the more smoothly reflections move over the body of the car; the lower the setting, the more jerky reflections seem to be as they are reflected around the car. Firstly if you've lowered the 'Car Reflection Detail' setting above, this setting will obviously have less of an impact. However if you've left that setting at High, moving this slider further to the right will increase the realism of the reflective surfaces of vehicles in return for reduced performance, depending on how many vehicles are visible on screen. The screenshot comparison above shows the difference between the lowest and highest setting, because anything above the lowest setting looks fairly much the same in static screenshots. The best way to check for the impact of this setting is to use the Close rear view of your car, and as you drive around, note the smoothness or otherwise of how reflections move across the car's body.
Rain Effect: This setting doesn't control whether rain is visible or not. It controls whether the 'rain effect' - namely droplets of water on the screen - are visible or not. If set to On, whenever driving through rain your screen will show small droplets of water which distort anything visible through them. If set to Off the rain will still be visible, but those droplets won't appear on the screen. The performance impact is not major for most systems, however some people may simply prefer not to have distortionary droplets on the screen.
The next page continues our look at the in-game settings.
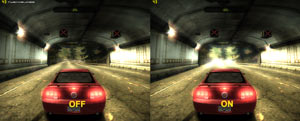
Over Bright: This setting controls the rather strong "bloom" effect shown in the sky for example. It simulates HDR (High Dynamic Range) lighting. It does not control the overall lighting quality of the game, which is controlled by the 'Visual Treatment' setting below. The screenshot comparison above shows what I mean by this - when set to On, you can see that the light at the end of the tunnel is overly bright and intentionally glary. However when set to Off, while you can see that the lighting at the end of the tunnel is not so bright, the tunnel lights and the remaining glare of the car's tail-lights etc. remain the same. The major impact of this setting is primarily in reducing or increasing road/sky glare. Performance-wise, the impact depends on your particular graphics card, and for most systems there shouldn't be a major impact, so set to suit your tastes.
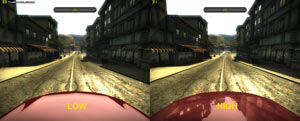
Visual Treatment: This setting controls the overall 'atmospheric' image quality of the game. It is controversial in that some people like it (like me), and some people hate it. The game developers have purposely designed the lighting and color of the game to be very rich and almost photo-realistic in places when 'Visual Treatment' is enabled. However, it is a stylized image quality which may not suit some people. Fortunately the designers have provided this setting for you to enable/disable this feature, and the concurrent image quality impacts are shown in the screenshot comparison above. As you can see, with this setting at Low the colors and lighting are much closer to that of other games, and when set to High they take on a completely different characteristic. This setting also controls the various motion blur effects as well. Choose whichever you believe is more realistic to you, and note that the performance impact will vary depending on your graphics card's age - older graphics cards may get a noticeable reduction in FPS with this enabled.
Note: If you only want to disable certain elements of the Visual Treatment (such as motion blur) but not lose all the appearance of High Visual Treatment, see the Advanced Tweaking section.
Gameplay
Autosave: When set to On, your game progress will automatically be saved as you win/lose races and challenges. If set to Off, you will be prompted to save at certain points, and you will also have to remember to save your profile regularly if you want to keep things updated.
Game Moment Camera: If set to On, particular circumstances in the game will be slowed down and played from a third-person detached camera angle. For example certain car jumps, running through certain objects, etc. may trigger this behavior. If you find this distracting or annoying, set this to Off.
Car Damage: If set to On, your vehicle will show the damage and marks from collisions throughout the game. If set to Off, no damage is shown and the car remains pristine. This can improve performance slightly, but obviously reduces realism.
Rearview Mirror: If set to On, whenever you race in Hood or Bumper view your rear view mirror will be visible at the top of the screen. There may be a slight performance impact on some systems from enabling this option.
Units: Determines whether you use the Metric or Imperial scale for gauges shown in the game (e.g Miles vs. Kilometers).
Race Map Mode: This setting determines whether the Race Map is disabled (Off), shown in the bottom left corner and rotating to always correspond with the way you're facing (Rotate), or shown but static (Static). Set to suit your taste, disabling the map may gain a small performance boost.
Player
Transmission: Determines whether you race with Automatic (Auto) or Manual transmission in the car. If set to Manual, make sure to check your key bindings under the Control section to assign a Shift Up and Shift Down function to the relevant keys.
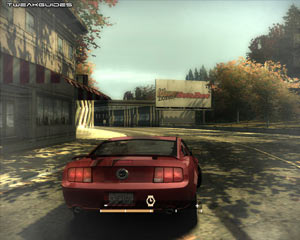
Camera: This determines by default where your viewpoint is when driving your vehicle. The options are Close, Far, Bumper and Hood. Close and Far show your car from close rear or far rear positions. Bumper shows you the street-level view devoid of any of your vehicle's details. Hood view shows only your hood. Choose one which suits your driving style, but note the performance impacts: Close provides the greatest performance hit, since your vehicle takes up a large portion of the screen, and vehicle details, reflections etc. can reduce performance. Far is next in terms of performance impact, while Hood provides moderately good performance since only the hood is visible, but if 'Car Reflection Detail' is set to High this can reduce performance. Bumper provides you with the best performance since no part of the vehicle is visible.
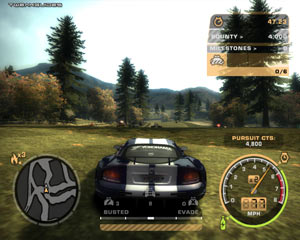
Gauges: If set to On, your speedometer/tachometer gauge is shown in the bottom right of the screen. If set to Off, this is removed and might provide a mild performance improvement. However this is an important part of the display and generally should not be disabled, particularly as it also shows your Nitrous and Speedbreaker levels (See below).
Race Information: This is the display at the top right of the screen, showing you your current race position, race time and % completed (depending on the game mode). Enable or disable to suit your tastes, has no performance impact.
Split Time: This setting controls whether a split time is shown at certain points as you race around a track. Enable or disable to suit your tastes, has no performance impact.
Score: This setting enables or disables the display of your cumulative score in modes in which you earn a score. Enable or disable to suit your tastes, has no performance impact.
Leaderboard: This setting enables or disables the leaderboard display at the top right of the screen, showing you your relative position against the other players, and their times. Enable or disable to suit your tastes, has no performance impact.
Controls
This section determines your keyboard bindings for various controls in the game. Make sure to go through carefully and adjust to suit your playing style. In particular note the following commands which you may not be familiar with:
Speedbreaker: This is a new feature to the Need for Speed series, and works much the same way as 'bullet time' in Max Payne, or the 'SlowMo' function in F.E.A.R. - it slows down time for a short period allowing you to think through your manoeuvres more carefully and with more precise control. Make sure to assign an easily-accessible key to this function. The orange Speedbreaker bar is shown at the top of your gauge and regenerates over time.
N20: This is the Nitrous Oxide key, and in many game modes this allows you to use a short burst of Nitrous to boost your speed. Bind it to a handy key and keep in mind that the green nitrous bar is shown at the bottom of your gauge, and regenerates depending on how fast you are going.
The next section provides details on the Advanced Tweaking possible in NFS:MW.
This section covers the ways in which we can adjust the image quality and performance in Need for Speed: Most Wanted outside of the In-Game Settings, as well as a couple of ways of assisting in resolving problems with the game.
Registry Editing - The Basics
The tweaking in this section involves editing values in the Windows Registry. This can be a relatively risky procedure, so if you're not familiar with Registry editing, I strongly recommend you read the Windows Registry section of my TweakGuides Tweaking Companion which covers how to edit the registry safely, as well as going over the terminology used in this section.
All of the Registry entries listed below can be found under the following key in your registry:
[HKEY_LOCAL_MACHINE\SOFTWARE\EA GAMES\Need for Speed Most Wanted\]
Note that registry entries which relate directly to a setting which can be easily and fully changed from within the game are not covered below - you should adjust these in the game and not here. The following are the major advanced settings you should experiment with:
CacheSize
This setting appears to control the amount of memory NFS:MW allocates for caching game-specific information. On my system this value is 3044530176. Since 8 bits = 1 Byte, 1024 Bytes = 1KB, and 1024KB = 1MB, dividing this number by 8388608 (1024x1024x8) should give you the amount in MB that the game is using for a cache. On my system this appears to be around 362MB (I have 2GB of RAM). Raising this value appears to slightly smooth out gameplay performance on my system. Experiment with values up to around half your system RAM to see if it helps smooth out your framerate.
CD Drive
This entry should point to the current drive you have your NFS:MW CD in. If you are having disc detection/authentication errors then change this to the correct drive letter for your CD/DVD drive.
g_MotionBlurEnable
This setting controls the motion blur effect, such as when you trigger Nitrous, as well as when you are moving at high speeds. Disabling this setting can make the image quality crisper and also improve performance particularly on older machines. To disable this setting set the value to 0, to enable it set it to 1.
g_ParticleSystemEnable
This setting controls the particle system in the game, and if set to 1 particle effects (such as smoke from spinning wheels) will be enabled. Particle effects can be particularly punishing on some systems, and if you notice that your FPS falls noticeably in situations where there is lots of visible smoke, dirt or explosions, setting this to 0 will switch off such effects in return for a performance boost.
Version
This key records the current version number of the game. You should check to see if you have the latest version (See the Patches & Mods section of the guide). If for some reason you find a patch has not installed properly, you can change the version number here so as to fool the patch into thinking it's an older version and hence reinstalling properly.
Install Dir
This should be the correct path to your current installation of NFS:MW. If you are having game errors such as "Speed.exe not found" then make sure the path shown here is correct.
SIZE
I am unsure what this setting controls. The default value on my system is 84 (Hex) / 132 (Decimal).
SwapSize
I am unsure what this setting controls. The default value on my system is 73400320, which if the value is in bits equates to around 9MB. Raising this value seemed to have no significant impact on my system, however I suggest you experiment with values of twice your current value to see if this further smooths performance.
That covers all the known advanced tweaks for NFS:MW. If you have more accurate descriptions than those listed above and/or find more ways of tweaking the game which aren't covered here or in the in-game settings section, please Email Me with the details. New tweaks will be included here for all to share, and those discovering them will be given full credit.
The next section provides some important general information about NFS:MW and brings the guide to a conclusion.
This section contains some final important details about Need for Speed: Most Wanted and my Concluding thoughts, so don't skip it.

Extracting Game Music
Most people who enjoy the NFS:MW soundtrack will want to extract the music at some point. There is a simple way to do this now, and it involves using the NFSMW Music Extractor. Follow these steps:
1. Download the extractor and extract the contents to an empty folder.
2. Go to your \Program Files\EA GAMES\Need for Speed Most Wanted\SOUND\PFDATA\ directory, and copy the MW_Music.mus file into the same directory as in step 1.
3. Run the Go!.bat file (double-click on it), and be patient.
4. The game music will slowly be converted from the music file into 26 individual .WAV tracks, which will take up almost 2GB of space for the retail version, or 350MB for the demo version.
There you go, thanks to the modding community for coming up with this extractor.
SLI Profile
If you have two graphics cards in SLI formation, and want to use them in NFS:MW, check out this post on the NVNews Forums for instructions on how to quickly create an SLI Profile for the game. Note that the profile must be for Speeddemo.exe if for the demo, and Speed.exe if for the final retail version of NFS:MW. Furthermore, see the Troubleshooting tips section for advice on issues when you have more than one Need for Speed game installed (as the most recent NFS games all use speed.exe as their executable).
Update: You won't need to do this if you download the latest Nvidia graphics drivers, so make sure you follow the instructions on page 4 of my Nvidia Forceware Tweak Guide to install the latest drivers.
Skipping Intro Movies
If you want to speed up the loading of Need for Speed: Most Wanted each time you launch the game, try this tip. Go to your \Program Files\EA GAMES\Need for Speed Most Wanted\MOVIES directory, and rename the files attract_movie_english_ntsc.vp6, ealogo_english_ntsc.vp6 and psa_english_ntsc.vp6 to something else. For example, change their extensions to .REAL_vp6, but don't delete them. Now whenever you launch the game it should arrive at the main game menu much faster. Remember to rename these files back to their original names if you're installing a patch for the game.
Taking Screenshots and Measuring Framerate
To take screenshots while playing the game, you can press the default screenshot key (F12), and the game will place all screenshots taken in your \Documents and Settings\User\My Documents\My Pictures directory in .tga format. To view or edit these files you can use Photoshop, or the free irfanview.
I personally prefer to use FRAPS, which can both measure framerates (See In-Game Settings section), and also take screenshots in much more convenient .bmp, .jpg and .png formats.
Dual-Core CPU Issues
If you run a dual core CPU, such as a Pentium D or AMD X2, or even a Pentium 4 with HyperThreading, you may notice that the game is quite jerky even at high framerates. Things seem to run fast and slow randomly - this is because the game has compatibility issues with dual core CPUs. So not only is there no performance boost with dual core CPUs, there are actually issues which require the following steps to be resolved:
Setting Processor Affinity Manually: Launch Need for Speed: Most Wanted, and as soon as the game appears to begin loading, or after it has loaded up, press CTRL+ALT+DEL to bring up the Task Manager. Under the Processes tab, find the Speed.exe process, right-click on it, select 'Set Affinity' and in the box which appears, untick 'CPU 1'.
Setting Processor Affinity Automatically: If you want to force the game to only use one of your CPUs automatically each and every time you run the game, see the instructions here for using the Imagecfg utility, a small Windows NT file you can safely copy into your \Windows\System32 directory and then use to permanently set the affinity for particular programs. I recommend you backup your speed.exe file before applying this tweak, as the only way to undo it is to restore the original .exe file. Furthermore, note that you may have to redo this tweak each time you patch the game, since the executable will change.
Both these methods basically force the system to effectively see, and use, only one of the CPU cores on your dual core CPU to run the game, thereby temporarily resolving this problem.
Update: AMD dual core CPU users should use the AMD Dual Core Optimizer utility instead of the methods above.
Cheat Commands
A full list of cheats for Need for Speed: Most Wanted can be found at NFSUnlimited. Note that I haven't tried these myself, as I can't figure out how to type them in, so don't ask me how this works.
Update: To implement the cheats, simply type the name of the cheat while on the introductory screen which says 'Click to Continue'. You will hear a sound as each letter is typed, and if the cheat is recognized you will get a message saying what has been enabled. Thanks to Kenny Thorstenson for this tip.
Conclusion
That brings this short, but hopefully somewhat helpful guide to a close. It looks to me like NFS:MW will garner a fairly passionate following given its great graphics and not-so-bad physics, and the shifting of the focus away from solely street racing. Obviously as new things are discovered for the game, and as more mods and custom cars come out I'll update the guide as much as possible to keep on top of these trends. Let me know if you have any suggestions or additions to this guide, and keep in mind that for time reasons, I can't offer any tech support. That includes general requests for help in improving performance or figuring out a complex problem - the best source of advice is in my various guides. You're welcome to drop in on the TweakGuides Forums if you want to discuss this game with fellow gamers, however please observe the Forum Rules as they are strictly enforced.
Links
If you're a fan of Need for Speed: Most Wanted, or the NFS Series in general, make sure to check out the following sites:
Official NFS Site
NFS Series History Wikipedia
NFSCars
NFSUnlimited
ND4SPDWorld
Until next time, take care!