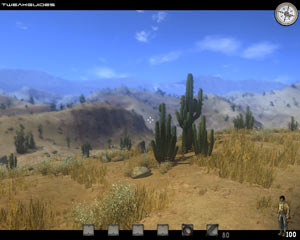
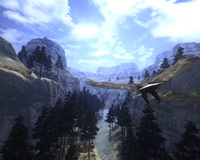
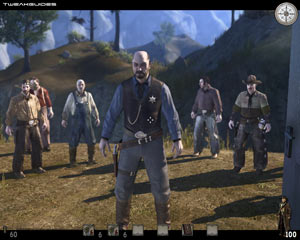
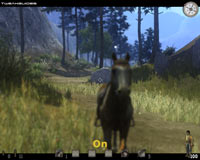
As more and more First Person Shooters are either being set in dark futuristic mutant/zombie-infested worlds, or during World War II, out of the sunset comes a pale rider bringing with him a different kind of FPS. I don't know about you, but watching the classic Sergio Leone trilogy of spaghetti westerns (A Fistful of Dollars, For a Few Dollars More and The Good, The Bad and The Ugly) really gave me the urge to step into Clint Eastwood's shoes and live out some of those gun-toting scenes against a dozen or more banditos. I'm in luck it seems - Call of Juarez allows you to do the next best thing, and it does it in style.

It's starting to become a common story for some of the best games I've ever played: Call of Juarez went almost completely unnoticed right up until the quiet release of its demo. Apparently it was initially being developed under the name 'The Lawman', but I'd never heard of it before, and I only happened by chance to notice that the demo had been released a little while ago. Knowing very little about the game, my curiosity got the better of me and I installed it. Turns out I made a very good move, it is definitely worth it.
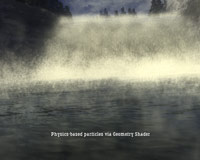
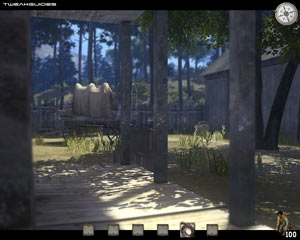
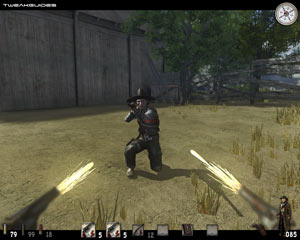
There are many layers of interest to Call of Juarez. The storyline itself, though clichd, appears well-written and intriguing; the voice acting only goes towards further enhancing the depth of the characters; and of course the icing on the cake is a fantastic game engine which allows for some excellent visual and physics effects, and generally makes the game very immersive and a real joy to play. From the lighting and glass effects, to the detail of the game world and the way it captures the dust and dirt of the Wild West, to the way in which you can actually set various objects on fire and watch the fire spread, varying in speed and intensity based on the material that's burning - all signs of a next-gen game in action.
But, as you would expect from a game which has so much to offer, it is also a bit of a beast to run on most systems. It ranks on par with games like Oblivion both for eye candy and for system requirements in getting things running smoothly. Fortunately the new version of the Chrome engine used by Techland is customizable enough for our purposes, so in this guide we examine in detail what the in-game settings actually do, the issue of game loading times, and how to further tweak and optimize the game using some advanced configuration settings. There are also a range of troubleshooting tips for common problems people experience with this game. Give the guide a read-through and you'll definitely find it easier to heed the Call of Juarez.
Note: This guide refers to Version 1.1.1.0 of Call of Juarez, including both DX9 and DX10 versions. Check back regularly for updates to the guide.
Before getting into any game-specific settings and tweaks, this section covers the obligatory system optimization information I include in all my guides. If you've followed this advice recently, you can skip this section.
Many people report problems with this game and in almost all cases these are due to general system issues and not the game itself. With that in mind I strongly urge you to take some time and follow the advice below if you truly want this game, and indeed every other game you own, to run at its fastest and most trouble-free.
The place to start is my free TweakGuides Tweaking Companion. It is the complete system optimization guide for Windows users. Designed for novice and advanced users alike, it is written in plain English to help you genuinely understand all aspects of Windows and your PC. The guide covers every major topic, from the correct installation of Windows and critical drivers and software, through to recommendations for every significant setting and feature, all the major performance and convenience tweaks and customizations, as well as detailed troubleshooting advice. There are also links to a range of reliable free applications for optimizing and maintaining your system, as well as to important resources for finding out even more about Windows and your PC. There are two separate versions: one for Vista and one for XP.
If you've ever wondered what common graphics and display settings like FPS, VSync, Refresh Rate, Antialiasing and Anisotropic Filtering are, and how they really work, then check out my Gamer's Graphics & Display Settings Guide for all the details in an easy to understand format. The guide also gives you a rundown on exactly how a game goes from a being a set of files on your hard drive to a 3D image on your screen, including relevant performance tips.
Finally, if you run an ATI or Nvidia graphics card, I have written two comprehensive guides which you should check out: the ATI Catalyst Tweak Guide and the Nvidia Forceware Tweak Guide. These guides cover absolutely everything about the latest graphics drivers, how to set them up correctly, as well as advanced tweaking, overclocking and benchmarking tips. They're a must-read for configuring your graphics card correctly.
The above information really will serve you well in the long run, not just in this game. If you don't optimize your system and keep everything updated and maintained correctly you will keep running into "mysterious" problems time and time again. Do yourself a favor and when you get a chance spend an afternoon or two optimizing your machine the right way with the guides above.
The next section goes into more detail about specific troubleshooting tips which address common performance issues with the game.

This section contains specific troubleshooting tips which address many of the common problems experienced by Call of Juarez players. I can't stress enough the importance of taking the time to go through the checklist of advice below if you're having a problem with the game.
Official Support: The first place to look for official support details is at the Offical Call of Juarez Site. You should also make a point of reading the game's Readme.txt file found in your \Program Files\Ubisoft\Techland\Call of Juarez directory. Pay particular attention to the game's minimum and recommended system requirements; specifically if your graphics card does not support SM2.0 you will not be able to play the game properly. To check to see if your system meets all the requirements, you should run the CoJ_Detection.exe file found under your \Program Files\Ubisoft\Techland\Call of Juarez\Detection directory. If you're still having problems you should visit the Official Call of Juarez Forums to look for solutions or post a question.
Windows Vista Users: If you're having problems running this game under Windows Vista, first make sure that you're using the latest Vista graphics and audio drivers for your hardware, and make absolutely sure you're using the latest version of this game (see page 4 for patch details), as the recent patches contain both Vista fixes and compatibility improvements, as well as additional DX10 functionality for non-US versions of the game.
Long Loading Times: This is the single most common complaint about Call of Juarez, and stems from a combination of factors. Each time you alter your video settings in the game, Call of Juarez has to either create or alter many files in its shader cache to drive all the special effects in the game. The location of this cache is in separate folders under your \Documents and Settings\[Username]\My Documents\call of juarez\Out\cache\Shaders directory in XP, or \Users\[Username]\Documents\call of juarez\out\cache\Shaders in Vista - note there is one folder for each Shader version you have used (the DX10 version has the name of your graphics card in front of it). This shader cache is similar to the shader optimization routine Battlefield 2 goes through for example whenever you update your graphics drivers or change a graphics setting. The important thing to note is that there are around 3,000 or more individual small files in the shader cache. When you first load up after a setting change, or when loading up new maps/levels, the simple act of creating or modifying these files is very system intensive, particularly for slower or unoptimized hard drives with longer seek times.
However even after you have settled on a stable configuration and don't change your settings, the game still can take longer to load not just due to the large number of shader files it has to load up, but also because it can load up to 600MB or more of the game into memory at the start of a level. The game does this not to bug you, but to minimize loading pauses during the game. So unlike games like Oblivion, it loads more at the start and much less during a game - hence the long loading times are actually a good thing, rather than a bad thing, as they greatly reduce in-game stuttering. However you can improve loading times: see the Memory Optimization and Drive Optimization chapters of my TweakGuides Tweaking Companion, and also refer to the topic below.
Shader Cache Issues/Optimization: This is an important topic, so it deserves to be highlighted here. After you have changed your settings several times, particularly if you've experimented a great deal with the tweaks in the Advanced Tweaking section of this guide, it is important to clear the shader cache and let the game recreate the files the next time it loads up a level. To clear the cache(s), simply go to your shader directory and delete all the sub-folders. Clearing the caches can fix several problems: it can resolve strange performance slowdowns and ensure optimal FPS; it will ensure that any setting changes you've implemented are correctly applied; and it can resolve any graphical glitches you may experience. During the course of preparing this guide, I often found that after a fair few setting changes the game would not display certain changes in settings correctly any more - so I cleared the cache, reloaded the game and everything would be fixed.
To 'optimize' the shader cache, both to improve performance and loading times, do the following: Firstly make sure you have arrived at a comfortable configuration you feel will meet your needs. Close Call of Juarez and clear your shader cache manually (see above) - permanently deleting all the sub-folders in the \Shaders\ directory. Now restart the game and load up a saved game or start a new level; it will take a while longer to load as the cache is being recreated. Now quit Call of Juarez, and defragment your entire hard drive. The next time you go to play the game, it should load faster, it should perform at its best, and you should have no graphical glitches or incorrectly applied effects. This is a necessary step, so please do not ignore it.
Game is Already Running: If you get the error 'ChromeEngine Game is Already Running' when trying to launch CoJ, this is because the game didn't close properly the last time you ran it. To fix this, open Task Manager (CTRL+AL+DEL), go to the Processes tab and look for the process CoJ.exe. Click on this process and then click the 'End Process' button at the bottom of Task Manager. You can now relaunch the game successfully.
SecuROM Issues: The Call of Juarez uses the SecuROM copy protection system. This system can cause particular problems on some systems. If you do have problems, the first thing you should do is disable or even uninstall all disc emulation/image mounting software as these typically conflict with secuROM. Also check these tips to see if they help. If they don't help, contact SecuROM Support directly to get help with your problem. The bottom line is that you may not overcome your problems with secuROM; it is a terrible copy protection method which punishes legitimate buyers of games.
The Latest Graphics Drivers: Since Call of Juarez is such a shader-dependent game, and in particular the DirectX10 mode is quite graphically intensive, make absolutely certain you have updated to the latest graphics card drivers. This means the ATI Catalyst 7.10 or newer; or the Nvidia Forceware 163.75 or newer. See page 4 of my ATI Catalyst Tweak Guide or Nvidia Forceware Tweak Guide for details on where to download the latest drivers and how to install them cleanly. For Nvidia SLI users, make sure to use the latest Nvidia drivers as these have a profile specifically for Call of Juarez.
Background Programs: The game's developers recommend that you disable all background applications - especially virus, trojan and spyware scanners and messaging utilities. These applications can and do use up valuable CPU resources, take up precious RAM, cause memory conflicts and crashes to desktop, but most importantly they interfere with read/writes to your hard drive effectively slowing it down and causing longer loading times, and in-game freezes and stuttering. Full instructions on how to identify your startup programs and services and how to correctly disable unnecessary ones are in my TweakGuides Tweaking Companion. This is an important step you should not miss.
Overclocking: Call of Juarez may be sensitive to overclocking, particularly on the graphics card. If you are experiencing graphical glitches or crashing, set everything back to its default speeds and see if this impacts on the problem. If you don't experience the same problems at default speed, or they're reduced in severity, then your overclock is the primary culprit. Either permanently reduce your overclock and/or increase cooling to regain stability. Overheating Video RAM in particular is the most common cause of crashes and graphical glitches. Don't assume that because other games run with stability at a particular speed that Call of Juarez will do the same.
These are just a few of the common problems people are having with Call of Juarez. However if you follow the advice in this guide, you should be able to play the game more smoothly. Just be realistic about balancing eye candy with performance, and focus on tightening up your system as much as possible. Read the guides I link to under Essential Optimization above for more details on how to do that. The Chrome Engine on which CoJ is based actually appears to be very solid and , so chances are the problem is with something on your end.
Read the remainder of this guide for specific settings and tweaks which can help improve your performance and resolve any problems. The next section looks at patches, maps and mods.
Official Patch
Since there are two different versions of Call of Juarez, there are two different sets of patches available:
The US Version of Call of Juarez came with DirectX10 out of the box. As such, the latest 1.1.1.0 Patch for the US Version is only for the Windows Vista (DX10) version of the game, and includes the addition of the DX10 benchmark, as well as stability and performance optimizations.
The earlier released 'International Version' of Call of Juarez has now also been patched up with a different 1.1.1.0 Patch. This is an extremely large (900MB) patch which requires that you be patched up to Version 1.1.0.0 before you can apply it. The latest patch is also known as the DX10 Enhancement pack, and this is why it is so large as it essentially transforms the DX9 version of Call of Juarez, giving it the ability to now also run in DX10 mode. Note that the patch also changes some aspects of gameplay, in particular the way some stealth missions play out.
For more details of DirectX 10 in Call of Juarez, including screenshot comparisons, see the bottom of this page.
No-CD Patch
The Call of Juarez uses the SecuROM 7 copy protection system, as well as a CD Key method and CD check. SecuROM is known to cause problems on some systems, and some basic solutions are offered in the Troubleshooting Tips section. This may influence your decision whether to purchase the game or not. For the most part, the copy protection does not hinder performance, but of course it makes things annoying. As always, I can't provide any details of NoCD/DVD solutions for Cal of Juarez for legal reasons, though they do exist.
Update: It appears that Some European Editions of Call of Juarez have the much worse StarForce copy protection system. Check the link above and then look closely at which edition you're purchasing.
Maps and Mods
The Chrome engine on which Call of Juarez is based is customizable, and given that mods have been created for previous games on the same engine (like Chrome itself), I expect there will be some interesting mods available for Call of Juarez. I will list prominent ones here once they are released.
For those of you who want to get busy creating your own custom levels for Call of Juarez, you can use the Chrome Editor which is included with the game. To open the editor, run ChromEd.exe found under your \Program Files\Ubisoft\Techland\Call of Juarez directory. There is also a tutorial and manual for the Chrome Editor under the \ChromEd Help directory.
In terms of multiplayer add-ons, Techland have released a free CoJ Map Pack (222MB) containing 8 additional multiplayer maps.
You can also create mini-mods and undertake game alterations by manipulating the game files in the .Pak archives - see the 'No Red X' mod on the last page of this guide for an example. For example, you can try this Cheat Mod for COJ. As more mods of this type appear I will also list them in the guide.
Call of Juarez DirectX 10
Call of Juarez was initially released in most countries outside the US as a DirectX9-only title. The US release was delayed for a while until Techland incorporated DirectX10 functionality into the game. Then later, a DX10 Enhancement Pack (See further above) has been released to allow the non-US versions of the game to include DX10 functionality as well.
Since I live in Australia, I don't have access to the US version of the game, so I can't provide any details of it throughout this guide. However the International Version now lets you run in either standard DX9 mode by launching the regular executable, or running in DirectX10 mode (Vista-only, and only on graphics cards which support SM4.0) by running the CoJ_DX10.exe file found under the game's main directory. There is also a DirectX10 benchmark included in the game, which you can start by running the CoJDX10_Benchmark.exe file under the game's main directory, or you can download it for free separately here. You can also view the full benchmark run on my system either in low quality YouTube Video, or download the 99MB High Quality Video version. Note that the FPS in the video is much lower than my actual run, due to the FRAPS recording overhead. Below are screenshots from the benchmark:
In general the DX10 version of the game will run with lower performance than the DX9 version of the game, however it also adds a range of effects which make the game visuals much more atmospheric, so if you have a GeForce 8 or HD2900 card or newer, give it a try to see for yourself. Below are screenshot comparisons of the same scene in DX9 vs. DX10 mode, at the same in-game settings:
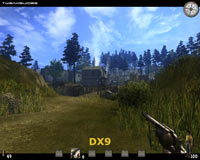
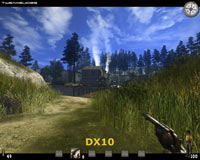
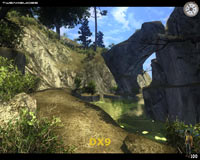
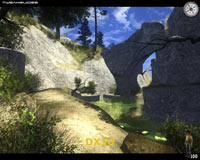
As you can see, the DX10 version looks markedly different from the DX9 version in both cases. In particular, in the second set of screenshots you can see that aside from lighting changes, there is very different detailing on surfaces in the DX10 shot vs. the DX9 shot. Which you choose is up to you.
The next section of the guide covers In-Game Settings for Call of Juarez.
In this section of the guide I provide detailed descriptions, and where possible recommendations, for all the in-game settings to allow you to achieve a good balance between image quality and performance. It is virtually impossible to provide a specific measure of the performance impact of any particular setting, as it varies significantly based on different types of hardware and their level of support for shader effects for example, or your chosen resolution and the interaction of various other settings. However a general indication of the impact is given for all settings which affect performance. Also see the Conclusion section of this guide for a general discussion about the CoJ game engine.
To access the in-game settings, start Call of Juarez and click on the Options item in the main menu, or press ESC during a game and click the Options item. Each section of the in-game settings is covered in greater detail below:
Video
Resolution: This setting controls the number of horizontal pixels by vertical pixels the game will display on screen. The higher the resolution, the greater the number of pixels, and hence the clearer the game's image appears but the more work your graphics card has to do to draw it all. I cover Resolution in detail in my Gamer's Graphics & Display Settings Guide. If altering the resolution doesn't impact significantly on your FPS, it is likely that your CPU is the bottleneck. Note that you can set a custom resolution if you can't find one to suit your needs here - see the Advanced Tweaking section.
Max Refresh Rate: This setting controls the maximum refresh rate used by Call of Juarez at your chosen resolution. For more details of refresh rate and what it does, see my Gamer's Graphics & Display Settings Guide. You should not set a refresh rate higher than your monitor can physically support at the resolution you have chosen, as this will lead to a black screen. If in doubt, leave this set to 60Hz to start with, as this will work on all monitors. Ideally you should set the highest rate supported by your monitor, but since this setting doesn't necessarily appear to detect that maximum rate correctly, and allows you to set rates higher than supported, do not alter it until you are sure that your monitor can support it. If you do set a refresh rate which is too high and can't get back into the game to change it, you can manually alter the refresh rate in your Video.scr file - see the Advanced Tweaking section.
Full Screen: This setting determines whether the game will take up the entire screen when running (On), or only run in a window on your Desktop (Off). In general, for maximum stability, Windows memory management works best when a game is running in full screen mode. However if you want to try to gain some FPS, or want to run a non-standard resolution (See Advanced Tweaking section), you can run the game in windowed mode. If using windowed mode, make sure your CoJ Resolution setting is equal to or lower than your Windows Desktop resolution otherwise portions of the game screen will not be visible on your display.
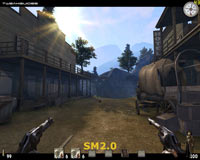
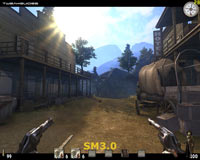
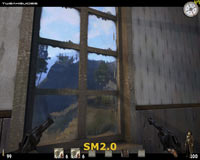
Shader Model: This setting shows the current Shader Model (SM) used for many of the special effects in the game. A Shader is an effect applied to objects in a 3D game world to give them additional properties, like shiny or warped surfaces for example, or provide more realistic lighting effects. See the Graphics Process section of my Gamer's Graphics & Display Settings Guide for more details of how a shader is commonly used. The bottom line with this setting is that typically, if you are using a graphics card with SM3.0 hardware support, such as the ATI X1000 series or newer, or the Nvidia GeForce 6600 series or above, then you should excellent image quality and performance by setting this option to SM3.0. If your graphics card does not support SM3.0, you will not be able to choose anything other than SM2.0. You may also prefer to run SM2.0 on an SM3.0 card for potential performance improvements and your personal preference for the type of lighting used. Several screenshot comparisons of the same scenes using SM2.0 vs. SM3.0 are provided below (note my personal FPS figures in the top right corner). Examine the difference in glass, lighting and surface effects in these screenshots:
Note: The DX10 version of the game will automatically run only in SM4.0 mode when launched from the CoJ_DX10.exe file. This provides the best possible visuals - see the previous page for more details and screenshots of SM3.0 DX9 vs. SM4.0 DX10.
Selecting SM3.0 or above also automatically enables High Dynamic Range (HDR) lighting, which gives the scene a glow, and also allows light to react dynamically - and some would say more realistically - depending on the environment and circumstances in which it is being viewed. However HDR lighting brings with it a performance hit, so on some systems which support SM3.0, enabling SM3.0 may give you less FPS than using SM2.0. Also note that the Depth of Field effect (see further below) can only be enabled when SM3.0 is used. In general you will have to experiment to see which you prefer overall. Also see the PostProcess setting under the Advanced Tweaking section as this provides you with even more options for altering shader effects. Note that changing the Shader Model version requires a restart of CoJ to implement.
Important: The first time you load up a level after changing the Shader version, or after changing settings like Material Quality, Shadows or Shadow Map Size, you will get noticeably longer loading times. This is because the game has to create or update a large number of custom shader files (around 2,700 - 8,000 small files) which are held in your shader cache. See the Troubleshooting Tips section for more details of the location of the shader cache and how to resolve any problems with it and optimize it, but note that this is one of the reasons why CoJ sometimes has longer loading times, especially on hard drives with slower seek times and/or which aren't defragmented often.
The next page continues the In-Game Settings descriptions.
Antialiasing: The available options are Off, 2x, 4x and 8x, with the higher the sample rate, the smoother jagged lines will appear, but the lower your FPS. More details of precisely what Antialiasing does can be found on this page of the Gamer's Graphics & Display Settings Guide. Note that you may not be able to enable Antialiasing unless you're running a GeForce 8 or ATI X1000 series card or newer. You can definitely enable AA under Windows Vista in DX10 (SM4.0) mode as all DX10-capable cards can support it combined with the other effects in CoJ.
Texture Filtering: Texture filtering affects how crisp and clear the game textures - the surfaces of all 3D objects in the game - appear, particularly when viewed at an angle and as they recede into the distance. The available options are Bilinear, Trilinear, and Anisotropic, and these are explained in more detail on this page of the Gamer's Graphics & Display Settings Guide. Note that when Anisotropic is chosen here, the sample rate applied is not specified but appears to be 8x. If you want to set a specific level of AF, set this option to Bilinear or Trilinear, and then set Anisotropic Filtering in your graphics card's control panel. Higher levels of texture filtering will reduce FPS, though the performance hit is relatively minor on newer graphics cards.
Brightness: This setting allows you to change the brightness of the game image. It has no performance impact, so set to suit your tastes. The level of brightness chosen can have a significant impact on the image quality in Call of Juarez, as too low or too high a brightness can make the western setting of the game appear unnatural. It also depends on the Shader Model and Post Processing effects you are using (See Advanced Tweaking section) as to the specific level you personally need to change this to.
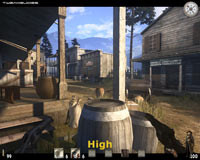
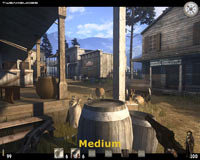
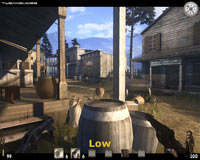
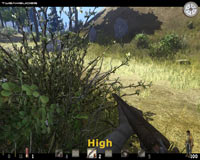
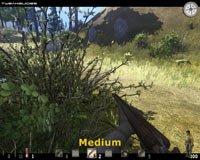
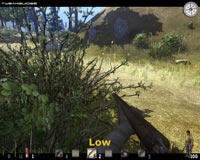
Shadows: This setting appears to have the greatest single impact on framerate in Call of Juarez. The setting controls the level of detail of the shadows cast by objects and characters in the game, and the available options here are Off, Low, Medium, and High. See an animated screenshot comparison of the different shadow settings (using both 1024 and 2048 Shadow Map Size) by clicking this link: CoJ_Shadows.gif (1.1MB). Look closely at the outlines of the shadow and how smooth/jagged they appear at each setting. The difference is more pronounced during actual animated gameplay.
At High, shadows actually have a form of soft shadow effect applied to them, giving their outlines a less jagged, smoother, blurrier appearance. While this may look more realistic, it can noticeably reduce performance, and also makes certain shadows (e.g. tree leaf shadows) look slightly less distinct. At Medium the soft shadow effect is removed, thus the edges of shadows can appear a bit more jagged (the degree to which depends on the Shadow Map Size setting), however performance is improved. The image quality difference between Medium and Low is not significant, however Low provides slightly more FPS as expected. Finally, when shadows are turned Off altogether, animated objects such as your own character, and trees/foliage, will not cast a shadow. However a range of inanimate objects such as buildings will still have some appropriate static shadows to maintain realism. For a direct comparison of a scene using High shadows versus the same scene with shadows set to Off, look at the screenshots below:
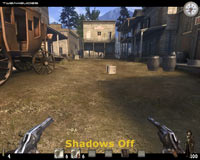
Since shadows are quite complex, they require a lot of processing power, so if you find your FPS is not sufficient to maintain smooth gameplay, reduce or turn off the Shadow setting. For most people, the Low setting should be a good balance of performance and image quality. Note that a great deal of the image quality of shadows, and to a degree their performance hit, comes from whether you set a 1024 or 2048 resolution Shadow Map Size, which is covered in the setting below.
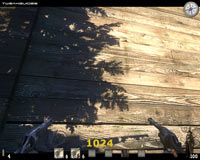
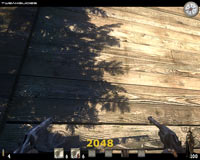
Shadow Map Size: This setting controls the resolution of the Shadow Maps used in to create the shadow effects in Call of Juarez. The available options (resolutions) are 1024 (1024x1024) and 2048 (2048x2048), and aside from the animated comparison provided in the Shadows setting further above, a more detailed screenshot comparison of the difference between 1024 and 2048 is provided above. As you can see, the higher resolution shadow map provides much sharper shadows, such that you can see the individual pine needles. However firstly your FPS may be reduced by using the 2048 option, and secondly, because higher resolution shadow maps take up more Video Memory, you may experience longer loading times and greater hitching/pauses during gameplay, especially if running on a graphics card with less than 256MB of Video RAM. Therefore in general I would recommend 1024 Shadow Map Size for most people.
Depth of Field: This effect is only available if the Shader Model option is set to 3.0 or higher, which means this effect requires a graphics card with SM3.0 or better support. When enabled, this setting simulates the way in which a human eye will sharpen an object which is in focus and generally blur any surrounding objects. A screenshot comparison of the effect is shown above. This effect is used as part of the Concentration Mode and Zoom functions in Call of Juarez. The FPS impact of this option only occurs when zoom or concentration mode are used, and for the most part the impact should be negligible. The zoom function itself does reduce FPS, but this occurs regardless of whether depth of field is enabled or disabled.
Quick Body Disappear: With this option set to On, dead bodies will disappear more quickly. If set to Off, corpses will still disappear, but it takes longer. By itself this option does not affect performance under normal circumstances, however since character models are very complex in Call of Juarez, the more characters (dead or alive) are visible on screen, the lower your performance will be. By enabling this option, you can prevent major slowdowns in larger gunfights by having dead bodies removed even more rapidly from view.
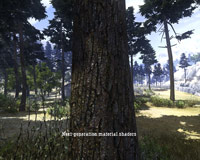
Material Quality: This setting controls some of the additional effects applied to objects in the game world to make them look more realistic, such as bump and displacement mapping and distortion effects. The available options are Very Low, Low, Medium, and High. See an animated screenshot comparison of the different material quality settings by clicking this link: CoJ_MatQuality.gif (647KB). The most obvious difference is the effect applied to the window glass, but also look closely at the window frame itself, as well as the surface of the wood on the walls and floor. Between High and Medium, some of the grain and shine to the wood is lost; between Medium and Low the window glass loses much of its warped appearance and there is additional loss in wood grain/depth. At Very Low although the image quality is quite good, all special surface effects have been removed and surfaces throughout the game world will appear very flat. The improvement in FPS from lowering this setting will depend greatly on your graphics card's level of shader support and also whether you've chosen SM2.0 or SM3.0. In general, older graphics cards will gain more FPS from reducing this setting, and newer cards running in SM3.0 will notice less of a difference in FPS.
Texture Quality: This setting controls the level of detail of the textures - the 2D images applied to create the surfaces of 3D objects in the game. The available options are Low, Normal, and High. A screenshot comparison of the texture quality differences is provided above - at lower texture quality objects such as the barrel, the basket, the wooden crates and the wooden poles become much blurrier and show much less detail. Lowering the texture quality can improve performance, especially on graphics cards with less Video RAM.
The next page concludes the In-Game Settings descriptions.
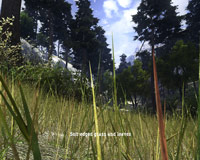
Foliage Quality: This setting purports to control the level of detail of the foliage - namely the trees, bushes and grass in outdoor areas. The available options are Low, Medium, High. A screenshot comparison of the three levels is provided above, however note that the only noticeable difference is that the grass becomes thinned out at lower levels. There is no apparent impact on the quality or quantity of bushes or trees from what I have observed throughout a range of areas. However because grass can increase polygon counts and hence can impact on performance, lowering foliage quality allows you to improve FPS slightly without any major impact on visual quality.
Enhanced Quality: This option is only available to be switched on if you're running in SM4.0 (DirectX10) mode - see page 4 for more details. When enabled under DirectX10, it adds new materials, relief mapping, more accurate bump mapping, and specular and soft-edged foliage. High Dynamic Range-correct multisample Anti-Aliasing is also used in DX10 mode. Once again, to see image quality comparisons between DX9 and DX10, see the bottom of page 4. Enabling DX10 mode will decrease performance, depending on the scene, but it is subjective as to whether you consider the change in visuals worth the performance drop.
Audio
Sound Quality: This setting determines the general clarity of sounds in the game. The available options are Low, Medium, and High. The difference between High and Medium is not significant, but the drop to Low is noticeable, as the sound goes from 44Khz to 22KHz sample rate. Lowering the sound quality can improve performance, but the FPS difference is not significant unless you're using an old sound card or onboard audio solution, so it's generally recommended that you keep a Medium or High Sound Quality.
Music, SFX, Speech Volume: These sliders control the Music, Special Effects and Speech volume levels. The further to the right the slider, the louder each audio component will be. However setting the sliders to the far left does not remove sounds from memory and hence the volume levels have no performance impact - set to suit your tastes.
Hardware Mixing: When set to On, the game will use your audio hardware to reproduce audio. This provides the best performance and sound quality on most systems. You should only set this to Off for troubleshooting purposes, or if you run a low-end onboard audio solution.
EAX: If you have an EAX (Environmental Audio)-capable sound card, such as an Audigy or X-Fi series card, you can tick this option to provide more realistic 3D sound positioning and better sound effects in CoJ. However EAX can reduce performance, and can also cause audio glitches. You should make sure that you have the latest sound drivers installed for your sound card, but if you're still having sound issues, untick this option and see further below for some other things you can try. For most people with decent sound cards, enabling EAX should be fine, and the increased 3D audio quality is usually worth it, as the performance hit is minor. Note that in Vista, for EAX to work, you will need to choose the OpenAL Sound API (See below).
Force Software EAX: This option only appears to be available if you have the OpenAL API selected (See below). When enabled, this option allows a more compatible form of EAX which can work better with non-Creative sound cards. However software EAX uses your CPU to process these effects and hence can use up more resource and result in reduced FPS, so it is generally not recommended.
Sound API: This option allows you to tell Call of Juarez to use either the Direct3D or OpenAL sound systems. Direct3D provides maximum compatibility and generally good quality and performance in Windows XP. However if you're running Call of Juarez under Windows Vista, to get full hardware acceleration it is recommended that you select the OpenAL API instead. If you experience problems with the audio in Call of Juarez, make sure that you've installed the latest sound drivers for your sound card, as this can make a significant difference. If necessary, uninstall all existing sound drivers, reboot, then install the latest driver again. Make sure that your sound settings and speaker configuration are correctly selected under the Windows Control Panel>Sounds and Audio Devices. Finally, disable EAX if you still experience sound glitches, and try turning Hardware Mixing Off. See the Advanced Tweaking section for more details of how you can manually adjust certain sound parameters to further customize or troubleshoot sound issues.
Controls
This section has a range of player control options you can change. To change the key or mouse button bound to a particular control, simply click on the box next to the control you wish to change, then press the new key/mouse button to bind it. Go through all these settings and set the controls according to your taste, none of them have any performance impacts.
Invert Mouse: If set to Off, moving your mouse back makes your character look down, moving your mouse forward makes him look up. If set to On, the opposite happens. Has no impact on performance, so set to suit your taste.
Mouse Sensitivity: This slider controls how sensitive the mouse is in the game. The further right the slider (the more boxes are highlighted), the more sensitive your mouse will be to movements while playing. Note however that mouse lag - that is, the slowing down and general 'lagginess' of you mouse or crosshair while playing the game is not affected by this setting. Mouse lag is usually caused by very low FPS in certain areas, so firstly measure your FPS (See the Conclusion section) and if it is very low you should consider reducing some of your settings to increase your average framerate. There are also details of the commonly-recommended 'Max Frames to Render Ahead' tweak on the last page of this guide which you should read.
Game
None of the settings below have any impact on performance, so set to suit your taste.
Auto Reload Weapons: If set to On, as soon as your weapon(s) run out of ammo, your character will begin reloading them the next time you click the fire button. For weapons with multiple shots like six-shooters, if at any time during reloading you wish to fire the weapon, click the fire button and your character will cease loading and immediately fire using the number of bullets already loaded.
Full Akimbo: When this option is set to On, your left and right hands are independent of each other. This means for example that when holding a pistol in each hand, if you run out of bullets in your left gun, clicking the left mouse button will reload that gun. However, if you set this option to Off, if one of your guns runs out of bullets, clicking the mouse button for that gun will fire the gun in the other hand until it too runs dry. Whether you enable this option or not is up to you, it all depends on your particular gameplay style.
Speech Language: The default for this option is English. However if you wish to select a different language for the spoken voices in the game, set this option to your chosen language. Usually you will only see one option here if you're using the English version of the game.
Subtitles: If you want all the main spoken dialog to be subtitled, set this option to On. Not all spoken words will have subtitles, but the main dialogs will.
That covers the In-Game Settings. The next section looks at some Advanced Tweaks for Call of Juarez.
Aside from the in-game settings, Call of Juarez has several files spread throughout the directories the game installs that can be manually edited to further customize the game. These files come with the file extension .scr which is usually reserved for Windows screensaver files. However these particular files can be edited using a text editor like Windows Notepad or Wordpad. You just need to open up the text editor first and then manually navigate to and open the relevant file through the text editor. Alternatively you can rename each .scr file to .txt, open it, edit it as required and the save it and rename it back to a .scr extension. Remember however that before editing any of these files, first make sure you make a backup copy of them.
The main batch of .scr configuration files we can usefully edit can be found under your \Documents and Settings\[Username]\My Documents\call of juarez\Out\Settings\ directory in XP, or \Users\[Username]\Documents\call of juarez\out\Settings in Vista. These hold your in-game settings, as well as a range of other parameters which can't be accessed from within the game. Below we discuss how to change these in each file, but options which can be fully changed using the in-game settings will not be covered below - the appropriate thing to do is to use the in-game settings to alter them.
Usage
Each .scr file has a range of settings listed at the top with a ! in front of them. These are not the settings you should alter - they are inserted by the developers to define how each command works, and what parameters it accepts. For example, the !Resolution(i,i) definition at the top of the Video.scr file tells the game engine that the Resolution variable listed further below will accept two Integers (whole numbers) to set the resolution width and height. The !Shadows(s) definition indicates that the Shadows setting at the bottom of the file accepts Strings, and the strings it can accept are listed: "None", "Low", "Normal", "High", and "VeryHigh".
So when editing .scr files, do not alter any settings with ! in front of them. Only edit the values in the lower part of the file. Note that the values show in brackets below are just indicative, not recommended values. Note that the standard .scr files are for DX9 mode, and the ones ending in _DX10 only apply in DX10 mode as you'd expect.
Video.scr
Resolution(1280,1024)
This option controls the game's Resolution, just like the in-game setting of the same name. However if you want to try setting a custom resolution, you can set it manually here by replacing the existing resolution values with a pixel width and pixel height you prefer. Make sure that the new resolution is supported by your monitor, and note that at certain resolutions you may get graphical glitches or even an entire portion of the screen being blank.
BPP(32)
This setting controls the Bits Per Pixel used, or the color depth of the image. 32 bit is the default and optimal value, but you can lower this to 24 or 16 (or even 8) bit, reducing the number of colors available to be shown, and thus images will show more visible color gradations. In return you may see a performance boost at the cost of image quality. Note, reducing BPP will only work if you set the Postprocess variable (see further below) to Simple or None, otherwise the results will be a blurry, grainy screen image.
TexBPP(32)
Similar to the BPP variable above, this option controls the Bits Per Pixel of Textures. You can lower this in isolation or in conjunction with the BPP setting, the results being that textures will show more color gradation and a purplish tinge in return for possibly improved FPS. Unlike BPP, you don't need to alter the Postprocess setting for a change in TexBPP to work. Importantly, I found that changing the BPP setting can result in problems with the Windows Desktop such as desktop icons all reverting to the default Windows .exe icon. To fix this, use the Repair>Rebuild Icons option in TweakUI. Furthermore, it seems lowering the BPP or TexBPP can result in your shaders being stuck at these levels, even if you raise these settings again. To fix this, delete your shader cache - see the Troubleshooting Tips section.
TextureQuality("Normal")
This is the same as the Texture Quality slider in the in-game settings. The only reason I raise this here is to note firstly that the in-game settings are actually incorrectly labelled. That is, although you have the option of Low, Normal or High in the in-game settings, they actually correspond to Very Low, Low and Normal here respectively. This can be verified by the fact that when you select High in the game for example, it appears as "Normal" in this variable. There doesn't appear to be a true High setting available in the final version of the game.
Filtering("Anisotropic")
This variable is the same as the Texture Filtering option in the in-game settings. It should be adjusted there, but note that there is an additional option here called "AnisotropicTrilinear". I've tried using this value and while it appears to be no different to the Anisotropic setting, you can try for yourself to see if this improves image quality for you.
Shadows("Normal")
This variable is once again the same as the in-game setting of the same name. Note that a value of "Normal" equates to Medium in the in-game settings. Further note that there is a "VeryHigh" value which cannot be used in the game. Trying to set VeryHigh here simply resets Shadows to Off when the game next starts.
FXQuality(4)
After doing careful comparisons across a range of different levels of this setting, I can see absolutely no image quality or FPS difference when this setting is changed. In theory a value of 4 provides the best quality and a value of 0 provides the worst, but this variable - as interesting as it may appear - seems to have no impact.
WaterQuality(0)
This setting allows you to independently control the quality of water in the game. Lowering the quality of water can improve FPS in such areas. The possible values for this variable range from 4 to 0, with the lower the value the better the quality. At 4, no water is visible. At values of 3 through to 0, the water quality remains almost identical for all intents and purposes.
GrassQuality(0)
This option is the same as the Foliage Quality in-game setting. The lower the value, the greater the quantity of grass shown. A value of 0 is equivalent to High Foliage Quality, 1 is Medium and 2 is Low. Values of 3 and 4 simply seem to result in High quality grass regardless.
EnvQuality("FullDynamic")
This option can be set to FullDynamic (the default), RareDynamic and Static, however I have not been able to tell what impact this has on the game. It doesn't appear to affect things like tree or grass movements, it doesn't affect the shader quality nor does it have any discernable impact on FPS. If anyone knows what this actually does, please Let Me Know.
ShaderPath(3)
This option is the same as the Shader Model in-game setting. When set to 3, it uses Shader Model 3.0 (if supported by your graphics card), and a value of 2 is Shader Model 2.0. You can attempting to use a value of 1 (Shader Model 1.4) or 0 (Shader Model 1.1), but depending on your graphics card this may cause the game to either have missing textures/objects, or simply crash the game.
PostProcess("Normal")
This important option controls the general shader effects used in the game. This includes things like the lighting, as well as surface, fire and glass effects. You can already alter certain surface shader effects using the Material Quality in-game setting. And you can disable HDR lighting by using Shader Model 2.0 in-game setting. However by using this command, you can do things like turn off HDR while still using Shader Model 3.0 for example, which results in improved FPS, so it is handy to have. The available options are None, Simple and Normal.
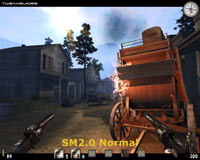
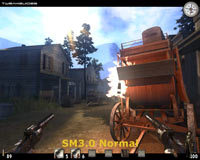
Normal provides all available shader effects, but also has the greatest performance hit. See above for a screenshot comparisons of SM3.0 and SM2.0 at Normal, and also see the Shader Model setting in the In-Game Settings section of the guide for further comparisons.
Simple mode has the following major effects under SM3.0 and SM2.0:

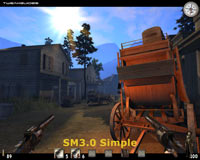
SM2.0 Simple
SM3.0 Simple
Under both SM2.0 and SM3.0 in Simple mode the distorted window glass are gone - this means that all glass will become black. The only way to resolve this under Simple mode is to set Material Quality to Very Low, which makes all glass completely transparent, but unfortunately also makes all surfaces appear very flat, as the bump and displacement mapping effects are removed.

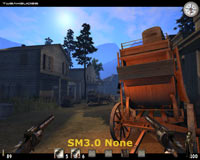
At None, all shader effects are removed for both SM2.0 and SM3.0 as shown in the screenshots above. Your gun's muzzle flash and bullets will completely disappear for example, as will any sign of bullet impacts (decals). There will be no smoke or dust effects. Fire will become invisible. The lighting will become simplified, and you can tell this by looking at the sun which is now just a small blurred disc. This mode is only for those who are really struggling for performance, however the option exists if you need to take it.
In general, SM2.0 with Simple mode is the least buggy and most acceptable compromise for those wanting to improve performance and still maintain sufficient effects to keep the game playable. Even on SM3.0 graphics cards, the possible reduction in performance from using SM2.0 will be offset by the increase in performance from losing HDR lighting and some of the more complex shader effects, so give it a try.
Important: When changing Post Processing options and/or Shader Model versions, you should make sure you clear your shader cache (See Troubleshooting Tips and Shader Model under the In-Game Settings section). I've found that often the changes in Post Processing mode are not applied correctly if the game is only modifying existing shader files in the cache - you will get better performance and less chance of glitches if you delete the shader cache directories completely and let them be recreated each time. It will take longer to load the next time, but it is necessary for correct application of PostProcess changes.
The next page continues the Advanced Tweaking.
Audio.scr
API("DS3D")
This option controls the API used for the game, as covered under the Sound API option in the In-Game Settings section. Aside from the DS3D (DirectSound 3D) and OpenAL options which are already available in-game, you can also set this to NoSound, which disables all sound. This can improve performance, however obviously it removes all sounds and thus makes gameplay very difficult. The main reason you would want to use this is to troubleshoot a crash or performance slowdown to see if your sound card or sound drivers are the culprit.
MixFrequency(44100)
This option controls the audio quality in the game, corresponding to the Sound Quality in-game setting. At 44100 (Hz sample rate), this is equivalent to either High or Medium sound quality. At 22050 (Hz sample rate), this is Low sound quality. You can try setting a custom sound sample rate here.
Channels(32)
This option sets the number of independent sound channels used in the game. Depending on your sound card, it may support more or less sound channels, so you can manually alter this setting to match your sound device's capabilities. The maximum appears to be 32, and setting a number of channels which exceeds your hardware's capabilities will result in missing sounds, so alter the setting until all the various sound effects in the game can be heard. Lowering channels can improve performance on older sound hardware or when using Software mode, so you can try a value like 16 to see if this resolves any issues or improves performance for you.
ExtraSounds01()
Inserting this line into the bottom portion of Audio.scr may enable additional sounds in the game, but after a fair bit of testing I didn't notice any new sounds being used. It appears to be harmless to use, so try it and see if you notice a difference.
Game.scr
ViewDistance(8)
Using various values for this setting has no impact whatsoever. It appears that this may be a feature in previous builds of the game which is now disabled, or the full version of the game may indeed come with a View Distance slider which works.
Console Commands
Call of Juarez has an in-game command console you can open and close by using the ~ key. Thanks to Soulman and the guys over at the Official Call of Juarez Forums, I can provide some working console commands below:
Single Player
Cheat.GiveAmmo() - Full Ammo
Cheat.GiveRifle() - Gives a Rifle
Cheat.GiveDynamite() - Gives the Dynamite
Cheat.Heal() - Fills health up to 100
Cheat.God(1) - God Mode on
Cheat.God(0) - God Mode off
Cheat.MagicAmmo(1) - 'Unlimited ammo and no reload' mode on
Cheat.MagicAmmo(0) - 'Unlimited ammo and no reload' mode off
Importantly, make sure to use the correct case for each of these commands (i.e. capitals in the appropriate places), include any periods, commas, forward or backslash characters, and also include any brackets as required (even if they're empty).
Multi Player
Multiplayer commands need to be entered in the chat area (default Y or U keys), not in the actual game console, and are also case sensitive. The following commands can be used by any players while on a multiplayer server:
/Nick [nickname] - Changes your player's nickname to the one you enter, limited to 14 characters
/PlayerList - Shows the list of all players and their IDs
/KillMe - Kills your character instantly
/Exit - Exits game
The following commands are for Server Administrators only, again to be entered in the chat area:
/AdminLogin [username] [password] - Logs you in as an admin; users and passwords are defined on the server in the ServerAdmins.scr file in the game's profile.
/AdminLogout - Logs you out as the admin
/Kick [nickname or ID] [reason] - Kicks a specified player off the server
/Ban [nickname or ID] - Bans a specified player from the server
/Kill [nickname or ID] - Kills a specified player instantly
/MapNext - Switches serverto the next map
/ServerShutDown - Shuts down server after a few seconds
I'm sure that more commands will come to light, so if you know any additional useful commands, please Email Me so I can update this section for everyone to use as a central resource.
Command Line Parameters
To use a command line parameter, go to your Call of Juarez launch icon, right-click on it and select Properties. In the Target box, at the end of the line of text after the " mark, insert a space and then the relevant command(s), e.g.:
"C:\Program Files\Ubisoft\Techland\Call of Juarez\CoJ.exe" -level saloon
SinglePlayer Commands
The following are singleplayer command line parameters (provided by Fred Tetra):
-safemode
This launches the game in Safe Mode, which means that it uses the lowest options possible for your system, and is usually used after you crashed out of CoJ the last time.
-level levelname
This option allows you to start playing at a particular level, e.g: -level mine. The levelname parameter needs to be one of the following:
home (also the home1, home2, home3, home4 sub-chapters)
murder (murder 1)
saloon (saloon1, saloon2)
scarp (scarp1, scarp2, scarp3, scarp4)
mine (mine2, mine3, mine4)
train (train1, train2)
ranch (ranch1, ranch2, ranch3)
hijack (hijack1, hijack2, hijack3, hijack4)
hunt
ride (ride1)
cemetery (cemetery1, cemetery2)
dungeons (dungeons1, dungeons2)
final (final1, final2)
-record levelname
Starts the specified level and records a demo of you playing it. The file is typically saved as demo.rec in your base \Call of Juarez game directory.
-input demoname.rec -play
Plays back a recorded demo file. Note if the filename is demo.rec, you can just use the -play command by itself to launch and play back the demo.
-notrees
Removes trees from the game, which in turn can improve performance in outdoor areas at the cost of realism.
MultiPlayer Commands
The following multiplayer command line parameters you can use:
-server [-dedicated] [-internet] [-forcemaxplayers N]
Runs the game and creates a multiplayer LAN server; use dedicated for a dedicated server or internet for an Internet server; use forcemaxplayers N to overwrite the default limit of 16 players in multiplayer.
-join address[:port]
Joins a multiplayer game at a given address and port
Once again, if you've discovered others commands please Let Me Know so I can include them here.
There are a large number of other .scr files you can find in the .pak file under the \Program Files\Ubisoft\Techland\Call of Juarez\ directory. You can open these .pak file using an archival utility WinZip or WinRAR, and the contents can be extracted and edited just like any other .scr file. However for the most part these files are not meant to be edited for normal tweaking as they contain gameplay parameters. For some things you can do with them, see the next page.
The next page covers some useful tips, tricks and mods to round out this guide.
This section brings the guide to a conclusion, but not without providing several important tips and tweaks to further improve performance.
Max Frames to Render Ahead - In Reverse
Many of you may have used the 'Max Frames to Render Ahead' tip for games like Oblivion. This tip is detailed at the top of this page of my Oblivion Tweak Guide. This makes games like Oblivion more responsive and resolves input lag problems, but also lowers FPS slightly in return.
Perhaps most of you would have likely left that setting at a value of 0 or 1 and forgotten about it. However here's the part where you can gain a few extra FPS in Call of Juarez: by reversing this tweak. The reason is that CoJ is actually very responsive even at lower framerates. Using the 'Max Frames to Render Ahead' tweak will make no real difference to CoJ in terms of responsiveness, but it does make a difference to FPS. By setting this option back to its default value of 3, you can improve your framerate by at least a couple of FPS if not more by not artificially bottlenecking your system. The actual gain will vary, but any free increase in FPS is useful to have in a game as strenuous as Call of Juarez.
Skipping the Introductory Movies
To date I still haven't found an elegant way of skipping the introductory (or exit) movies and screens for Call of Juarez. The two intro logos are found in the \Program Files\Ubisoft\Techland\Call of Juarez\ directory in the Data3.pak file, which can be opened using WinZip. However deleting the two Logo.jpg files will result in CoJ not starting up properly.
Update: Thanks to Fred Tetra, I can now provide the method for skipping the intro movies. Follow these instructions:
1. Go to the Call of Juarez launch icon, right-click on it and select Properties.
2. In the Target box for the launch icon, add the following to the end: -debugconf=DebugConf.scr so for example your Target box should look like this:
"C:\Program Files\Ubisoft\Techland\Call of Juarez\CoJ.exe" -menu -debugconf=DebugConf.scr
3. Go to your \Program Files\Ubisoft\Techland\Call of Juarez\ folder and open the DebugConf.scr file with a text editor (See Advanced Tweaking section for details).
4. Add the following two lines to the end of the file, then save it:
!NoLogos()
NoLogos()
Now whenever you launch Call of Juarez it will skip all introductory movies and go straight to the menu. Thanks again to Fred for sending me the tip.
Removing the Red X
One of the most annoying aspects of Call of Juarez is the large red 'X' which appears whenever you move your cursor over a corpse or an innocent human/animal. It is understandable that the game's developers do not want to encourage the killing of innocents or mutilation of corpses, but the giant red X ruins immersion and is excessive. Fortunately the game files can be further modified by those using the Chrome Editor or simply using DDS file convertors/editors. Providing details of how to undertake game file modification is beyond the scope of this guide, however I do have a great mod sent in by Kohan69 which removes the Red X and replaces it with no cursor at all when you aim at innocents. Installation instructions for the mod are below:
1. Download the file No-RedX_(Kohan69).zip (135KB) which contains the modified HUD.dds by Kohan69.
2. Extract the contents to your Call of Juarez game directory (typically \Program Files\Ubisoft\Techland\Call of Juarez\).
3. Check to make sure that there is now a new \Data\Menu\Hud\Textures\ series of subdirectories under the main \Call of Juarez directory, and that is where the new HUD.dds file sits.
4. The next time you launch the game, it will detect this modified file and use it instead of the normal one. If at any time you want to remove this mod, simply remove the file and all its subfolders from the CoJ game directory.
I've tested the mod and it works perfectly without any detrimental impacts on the game. Thanks again to Kohan69 for putting this together.
No HUD Mod
The No HUD Mod removes all the graphical elements of the HUD, leaving only small numbers in the bottom border. This is far less obtrusive, and is particularly designed for taking screenshots, or increased realism in gameplay. To install this mod follow these instructions:
1. Download the file No-HUD_(BurningFish).zip (4KB) which contains several modified .dds files by Burning Fish.
2. Extract the contents to your Call of Juarez game directory (typically \Program Files\Ubisoft\Techland\Call of Juarez\).
3. Check to make sure that there is now a new \Data\Menu\Hud\Textures\ series of subdirectories under the main \Call of Juarez directory, and that is where the various new .dds files sit.
4. The next time you launch the game, it will detect these modified files and use them instead of the normal ones. If at any time you want to remove this mod, simply delete all the files/folders created in the steps above.
Note: This mod also contains a modified HUD.dds file, so it can't be used at the same time as the No-RedX Mod above. This mod does also remove the Red X, but it also removes all crosshairs/cursors altogether as well as all graphical HUD elements including the compass. If you wish to have a crosshair showing with this mod, delete all the Crosshair.dds files.
Hopefully other skillful modders will create more large and small mods to make Call of Juarez even better. Check back here and on page 4 for more details, and if you have a useful mod please Email Me so I can include it in the guide.
Experimenting with Other Weapons
If you want to try a range of weapons in Call of Juarez, you can add them to your inventory at the start of each chapter by editing the relevant .scr files in the game's main Data0.pak (for the demo) or Data1.pak (for the full version) file archives. These .pak files are found under your \Program Files\Ubisoft\Demo\Techland\Call of Juarez [SP Demo]\ directory, and can be opened using a program like WinZip or WinRAR.
For the demo version, open Data0.pak and find the files saloon01_PublicDemo_StartProp.scr which is for the Ray chapter, and Ranch_PublicDemo_StartProp.scr which is for the Billy chapter. In the full version, open Data1.pak and select which map you want to alter, making sure to select a file which ends in _StartProp.scr (e.g. Hunt01_StartProp.scr).
To edit them, you can either extract them to a suitable directory and use a text editor just like a normal .scr file (See Advanced Tweaking section), or you can right-click on them while they are still in the .pak file and select 'View' or 'View with Notepad.exe' (in WinZip). Make sure to backup the contents of each before editing them. Now towards the bottom of the .scr file where it lists the various starting items (e.g. StartItem("WeaponWhip")), you can edit to add any of the following items:
StartItem("WeaponWhip") - Whip
StartItem("WeaponRifleWinchester") - Winchester Rifle
StartItem("WeaponRifleRemingtonSawOff") - Sawn Off Shotgun
StartItem("WeaponRifleRemington") - Normal Shotgun
StartItem("WeaponPistolSchofield")- Schofield Six Shooter
StartItem("WeaponPistolLemant") - LeMat Pistol
StartItem("WeaponPistolFrontier") - Pistol
StartItem("WeaponPistolDerringer") - Derringer Pistol
StartItem("WeaponHatchet") - Hatchet
StartItem("WeaponDynamiteStick") - Dynamite
StartItem("WeaponBow") - Bow
You can also start with the relevant ammo:
StartItem("AmmoPistol")
StartItem("AmmoRifle")
StartItem("BowArrow")
Add all the items you want to the file in place of the existing ones, save the file and update the archive with it. If you extracted the files to another location, make sure to add them back to the relevant .pak archive using the exact same directory path the file originally used. You should now be equipped with these items when you start that particular chapter the next time you boot up the game.
Fixing Ragdoll Physics
To fix an issue with the ragdoll physics on corpses in CoJ, check out this thread on the CoJ Forums. It provides detailed instructions on how to fix this minor - but annoying to some people - issue. Thanks to Beef for the fix.
Speeding Up Loading Times
We've already discussed ways of improving loading times in the Troubleshooting Tips section. One additional method some people are recommending to speed up loading times and perhaps boost performance is to unpack the zipped .pak files Call of Juarez has in its main directory. These .pak files contain all of the files CoJ uses to run the game, and each time you launch the game are unpacked and loaded up. If you want to try this method, extract the contents of each .pak file found under the \Program Files\Ubisoft\Techland\Call of Juarez\ directory to that same directory. Then rename the original .pak files to something else (e.g. .pack) so the game does not recognize them.
Now, make sure to defragment your hard drive as these unpacked files may be fragmented. Then the next time you launch the game, it may load up more quickly. Note however that the longer loading times in Call of Juarez are still influenced by your shader cache and other factors such as your hard drive speed, so just by unpacking these files you won't magically get a performance boost or a dramatic decrease in loading times. However it is a tip some people recommend so I've included it here for completeness.
Update: Note that some people have found that using this method gives them an error and can require reinstallation of the game to resolve, so please approach this tweak with caution.
Taking Screenshots & Measuring FPS
To take a screenshot in Call of Juarez, simply press the PRINT SCREEN key and a screenshot will be saved to your \Documents and Settings\[Username]\My Documents\call of juarez\Out\ScreenShots\ directory - this directory is created the first time you take a screenshot this way. The screenshot will be saved in .tga format, which can be read by Photoshop or the free IRFanView viewer.
If you'd prefer, you can use the Fraps utility instead to take screenshots, as it can take them in other formats and save them to the directory of your choice. Fraps is also very useful because it allows you to measure your framerate in Call of Juarez. Given I have not yet worked out how to enable the FPS counter via the game's own console, Fraps is the main alternative for FPS measurement, and an accurate one at that.
Conclusion
This brings the guide to a close for now, but of course given that Call of Juarez has piqued such interest across the web, both for presenting a rather different genre than most FPS games, and for having a demanding game engine, I expect that this guide will expand to contain much more about the game as time goes by. Check back regularly as I keep the guide updated with new information and details about the game, especially when the full version of the game is released.
If you know of any major tweaks which are missing from this guide, or if you have any constructive feedback, please Email Me. Your feedback is important in making sure that the guide contains all the information people need to tweak this great game. However bear in mind as always that I can't provide any tech support, nor can I provide personal tweaking or purchasing advice.
For now, as I have a habit of saying: until next time take care!


 inFamous: Second Son – The Visitors, Good Karma & Evil Karma, unlock Sacrifice & Ruthless trophies
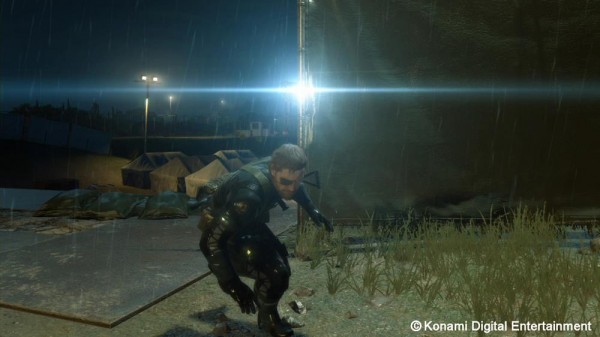 Metal Gear Solid 5: The Phantom Pain Episode 4 – C2W
 . Plays August 1, 2013
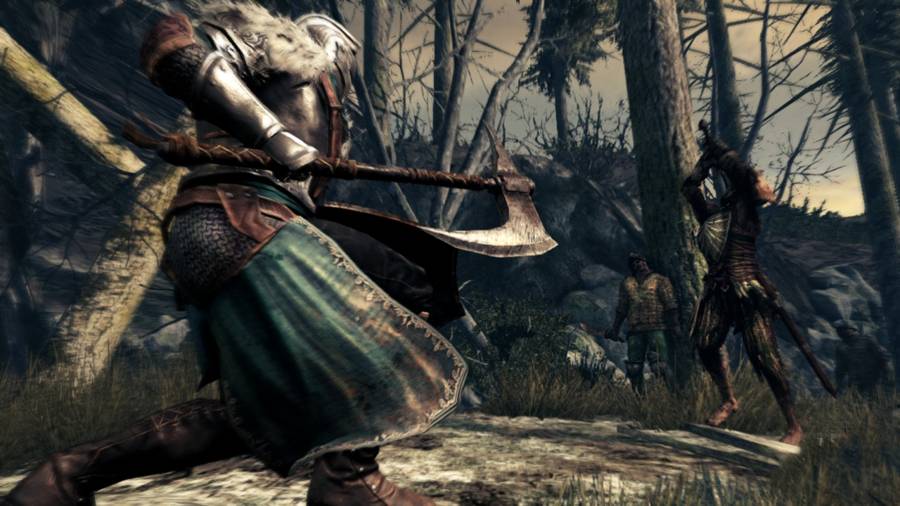 Dark Souls 2 Guide: Starter Item Guide
 Tales Of Xillia Guide: Xian Du Side Quest Guide