There have been a range of World War II shooters released in the last few years, and it is indeed a rich historical period for basing games upon. Games like Medal of Honor, Return to Castle Wolfenstein/Enemy Territory, Battlefield 1942 and Brothers in Arms spring to mind as being the latest in the genre of WWII-based first person shooters. For the most part, these games tread over the same well-worn tracks, and each time a new WWII FPS comes out, you can feel a collective cringing in the gaming world: it's like stretching a rubber band and waiting to see how long it takes before it snaps. How many WWII first person shooters can games developers make before the gaming public has had enough?
When Call of Duty came out in 2003, it seemed likely that rubber band would snap. However this was not to be the case - it somehow was fresh enough and interesting enough to garner a wide following of gamers. I can't speak from personal experience though - I never got into the first Call of Duty, I was too busy having fun in Wolfenstein and Battlefield 1942 multiplayer, and so I missed this acclaimed title. I wasn't about to make the same mistake when Call of Duty 2 was released as a demo recently, and so I quickly set about finding out what exactly I had missed. It turns out I've missed a lot - Call of Duty 2 is unmistakably a great game.
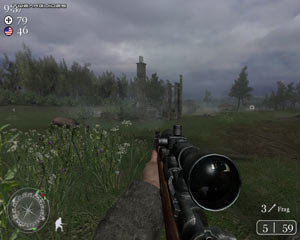
When I got my hands on the full version of Call of Duty 2, I was already expecting great things based on the demo. However I had my expectations blown away within an hour of starting the first winter mission based in the Soviet Union: there was a point at which, as part of the Soviet army, we sat in trenches preparing for an onslaught of Germans rushing over a snow-covered plaza towards us, their collective battle cries growing ever louder as they approached. The highly detailed and atmospheric graphics, the stirring musical score, the amazing sound effects and the total 'believability' of the scene actual made me feel a mixture of pride and fear - an inkling of what I imagine those poor frozen Soviet soldiers felt during the real events. This is truly one of the most immersive games I have played in recent times.
Infinity Ward have moved away from the Quake engine they used for the first Call of Duty, and have coded a new engine (borrowing a range of elements from the Doom 3 engine) for Call of Duty 2. This engine appears to deliver the goods and when run at maximum eye candy really does look as good, if not better, than the Doom 3 engine. However that in itself has become a dual-edged sword: the very source of these amazing DirectX9 graphics and effects has caused a lot of users a great deal of pain, as they find their systems unable to cope with these high-quality DX9 effects. For the most part I can assure you that the COD 2 engine is not "flawed" from what I can see - it simply uses a variety of advanced techniques which can severely drain anything but the most recent of medium to high-end graphics cards. Fortunately there are ways you can adjust these settings to improve your performance.
I've compiled this Call of Duty 2 Tweak Guide to help all COD 2 players out. The guide runs through all the in-game settings in careful detail, providing lots of screenshot comparisons of the main graphical effects to aid you in deciding on the precise balance of performance vs. visual quality on your system. It covers all the advanced tweaking possible in Call of Duty 2, and finally it provides links to a range of valuable resources to help you in troubleshooting, modifying and patching the game.
All in all, I think you'll find the guide well worth reading, so let's begin.
Note: This guide refers to the latest version of Call of Duty 2 - Version 1.3. Make sure to check back regularly for updates.
Before getting into any game-specific settings and tweaks, this section covers the obligatory system optimization information I include in all my guides. If you've followed this advice recently, you can skip this section.
Many people report problems with this game and in almost all cases these are due to general system issues and not the game itself. With that in mind I strongly urge you to take some time and follow the advice below if you truly want this game, and indeed every other game you own, to run at its fastest and most trouble-free.
The place to start is my free TweakGuides Tweaking Companion. It is the complete system optimization guide for Windows users. Designed for novice and advanced users alike, it is written in plain English to help you genuinely understand all aspects of Windows and your PC. The guide covers every major topic, from the correct installation of Windows and critical drivers and software, through to recommendations for every significant setting and feature, all the major performance and convenience tweaks and customizations, as well as detailed troubleshooting advice. There are also links to a range of reliable free applications for optimizing and maintaining your system, as well as to important resources for finding out even more about Windows and your PC. There are two separate versions: one for Vista and one for XP.
If you've ever wondered what common graphics and display settings like FPS, VSync, Refresh Rate, Antialiasing and Anisotropic Filtering are, and how they really work, then check out my Gamer's Graphics & Display Settings Guide for all the details in an easy to understand format. The guide also gives you a rundown on exactly how a game goes from a being a set of files on your hard drive to a 3D image on your screen, including relevant performance tips.
Finally, if you run an ATI or Nvidia graphics card, I have written two comprehensive guides which you should check out: the ATI Catalyst Tweak Guide and the Nvidia Forceware Tweak Guide. These guides cover absolutely everything about the latest graphics drivers, how to set them up correctly, as well as advanced tweaking, overclocking and benchmarking tips. They're a must-read for configuring your graphics card correctly.
The above information really will serve you well in the long run, not just in this game. If you don't optimize your system and keep everything updated and maintained correctly you will keep running into "mysterious" problems time and time again. Do yourself a favor and when you get a chance spend an afternoon or two optimizing your machine the right way with the guides above.
The next section goes into more detail about specific troubleshooting tips which address common performance issues with the game.

This section contains specific troubleshooting tips which address many of the common problems experienced by Call of Duty 2 players. I can't stress enough the importance of taking the time to go through the checklist of advice below if you're having a problem with the game.
Official Support: The first place to look for official support details is in the Readme.txt file in your \Program Files\Activision\Call of Duty 2\Docs\TechHelp\Readme directory. Importantly, check out the minimum system requirements in that file, as well as the supported hardware list, since if any of your hardware is not supported or doesn't meet the requirements then you will experience problems with the game, or quite simply may not be able to run it. Read through the list of compatibility issues and suggested fixes as well. If you want to read the game's manual online, there is a PDF version of the manual in your \Program Files\Activision\Call of Duty 2\Docs\TechHelp\Manual directory. If you want to see further tech support information, go to your \Program Files\Activision\Call of Duty 2\Docs\TechHelp directory and double-click on the index.htm file.
If you're still having problems you should visit the Activision Support Site, and the Official Call of Duty 2 Forums to look for solutions or post a question. If you want unofficial support, try joining one of the many forums discussing Call of Duty 2, such as the Planet CallofDuty Forums or our own TweakGuides Forums. Remember however to do some basic research and run through this guide (and associated guides) before jumping on a forum and asking a question - most forum users tend to ignore (or unfortunately abuse) people who post "Help me please!!1!1" type posts which show no prior research or troubleshooting effort.
Windows Vista Users: If you're having problems running this game under Windows Vista, first make sure that you're using the latest Vista graphics and audio drivers for your hardware, and the latest version of this game (see page 4 for patch details). Next, make sure you don't change your UAC settings after the game has been installed, as due to Virtualization this can change the location of the game files and settings. If you can't launch the game successfully when UAC is enabled, you will need to run the game with full Admin privileges. To do this either right-click on the launch icon and select 'Run as Administrator', or right-click on the launch icon, select Properties and under the Compatibility tab tick 'Run this program as an administrator' then click OK. I strongly recommend that you refer to the TweakGuides Tweaking Companion for Windows Vista for more information - in particular check the 'Gaming in Vista' section of the Graphics & Interface chapter; the UAC section of the PC Security chapter; and the 'Personal Folders' and 'Directory Junctions & Symbolic Links' sections of the Windows Explorer chapter. These will tell you how you can fix game-related issues and also explain the relevant differences of Vista.
PunkBuster Issues: As of the 1.2 Patch COD2 incorporates PunkBuster anti-cheat software. To find out more about this software, and how to fix various PunkBuster-related issues, check out the PunkBuster Call of Duty 2 Page.
Loading Issues: If you're having issues loading the game, check these answers on the Activision Support Site. I've noticed two specific loading issues which are relatively easy to fix. Firstly, on some systems when launching COD 2 Multiplayer you may find the loading screen comes up but nothing seems to happen - be patient, it can take up to a minute for it to load into MP. I don't know what is causing this issue, but hopefully it will be fixed soon. Secondly, when loading levels or maps in Singleplayer, sometimes your loading bar will stay at a particular point and no further loading will occur. To resolve this, simply press CTRL+ALT+DEL to bring up the Task Manager, click anywhere on the task manager box, then switch back to COD 2 (either by clicking on the main COD 2 screen or pressing ALT+TAB) and the loading should continue.
Lag vs. Graphical Slowdowns: While playing COD 2 online, make certain to bring up an FPS counter in your display, and whenever you notice things are getting laggy, check your FPS. If it's falling into the low double-digits then it's likely that your lag is either wholly and at least partly to blame on your graphics settings - reduce your settings accordingly. If however your FPS is relatively fine yet you find yourself warping around or there is a noticeable delay between your actions and their results, check your Ping by pressing the TAB key (default) to look at the scoreboard - the ping shown at the far right next to your name should be below around 150 for smooth gameplay.
The Latest Graphic Drivers: Since Call of Duty 2 is a new game, and is quite dependent on your graphics card for its performance (especially in DX9 mode), make absolutely certain you have updated to the latest graphics card drivers. This means the ATI Catalyst 6.5 or newer; or the Nvidia Forceware 84.21 or newer. See page 4 of my ATI Catalyst Tweak Guide or Nvidia Forceware Tweak Guide for details on where to download the latest drivers and how to install them cleanly and configure them optimally.
In-Game Lag/Freezes/Stuttering: To reduce any stuttering/loading pauses in Call of Duty 2, make sure you have made the correct Texture Settings choices under the Options>Graphics section of the game menu. Read the In-Game settings section of this guide carefully, and experiment with various levels of particularly the Texture Quality setting (which has the greatest impact on stuttering). Check the com_hunkmegs command in the Advanced Tweaking section, and also keep in mind that systems with 512MB of RAM or less will experience a lot more stuttering than those with more system RAM. And of course, make absolutely sure that you have run the Windows Defragmenter after installing COD 2, as the game is 3.5GB in size and if its files are fragmented this can greatly increase your stuttering and in-game loading pauses.
Antialiasing and Anisotropic Filtering: To make sure Antialiasing and Anisotropic Filtering work properly in Call of Duty 2 it is recommended that you first go to your graphics card's control panel, and for Nvidia cards under the Performance & Quality Settings in the Global Driver Settings section select 'Application Controlled' for Antialiasing and Anisotropic Filtering. For ATI cards go to the 3D section of the Control Panel/Control Center and select 'Application Preference' for both Antialiasing and Anisotropic Filtering. Now go into Call of Duty 2 and set the level of Antialiasing under the Options>Graphics>Antialiasing setting, to use Anisotropic Filtering first set the Options>Graphics>Texture Filter setting to Anisotropic, then see the image_anisotropy command under the Advanced Tweaking section. If you are unfamiliar with what Antialiasing or Anisotropic Filtering do, see my Gamer's Graphics & Display Settings Guide. Keep in mind that any Antialiasing can noticeably reduce performance. Also remember that COD 2 uses 8x Anisotropic Filtering automatically when the Texture Filter setting is set to Anisotropic.
Virus Scan: Do a full scan of all your files using the following excellent (and free) tools: AVG Virus Cleaner for viruses, A-Squared for trojans, and Ad-Aware SE for spyware/adware. Viruses, trojans and spyware can cause unexplained behavior, general file corruption and system slowdown, and can also steal your CD Key. It's best to make sure your system isn't infected before moving on to any other optimization measures. However make sure to disable any background scanning programs once you're done (See below).
Background Programs: The game's developers recommend that you disable all background applications - especially virus, trojan and spyware scanners and messaging utilities. These applications can and do use up valuable CPU resources, take up precious RAM, cause memory conflicts and crashes to desktop, but most importantly they interfere with read/writes to your hard drive effectively slowing it down and causing even more in-game freezes and stuttering. Full instructions on how to identify your startup programs and services and how to correctly disable unnecessary ones are in my TweakGuides Tweaking Companion. This is an important step you should not miss.
Overclocking: Call of Duty 2 can display some sensitivity to overclocking, and if you are experiencing graphical glitches or crashing in the game, set everything back to its default speeds and see if this impacts on the problem. If you don't experience the same problems at default speed, or they're reduced in severity, then your overclock is the primary culprit. Either permanently reduce your overclock and/or increase cooling to regain stability. Don't assume that because other games run with stability at a particular speed that Call of Duty 2 will do the same - it is a very demanding game.
These are some of the more common problems for Call of Duty 2. I really do urge you not to just throw up your hands and say "the game is badly coded!" if you are experiencing problems. The majority of problems I have seen from users stem from unoptimized systems, systems which are overclocked, systems which don't have the latest drivers installed, etc. It is up to you to take the time to maintain your PC, and with my guides like the TweakGuides Tweaking Companion you have detailed instructions on exactly how to do it from start to finish.
Read the remainder of this guide for more specific settings and tweaks which can help improve your performance and resolve any problems.
Official Patch
Call of Duty 2 has received a new official patch which brings the game up to Version 1.3. This patch weighs in at 37MB, and contains all the fixes from the previous patches. It is strongly recommended that all COD2 players update to this patch, as it contains a range of fixes for multiplayer. Note that as of the 1.2 Patch, support was added for PunkBuster anti-cheat software; something fans have requested for quite some time.
To make sure that you're running the latest version of Call of Duty 2 at any time, you can check the Call of Duty 2 sections of FileShack or FilePlanet for new patches and download them from there. Alternatively, when a patch becomes available for COD 2, a new 'Auto Update' option should appear on the COD 2 Multiplayer main screen - click this option to download the update.
As with all my guides, I will provide further details of any new patches here as soon as they come out, so keep an eye on this section as well for news of the latest patch.
No-CD Patch
Call of Duty 2 has a protection system based primarily on a CD Key check - you must have a valid CD Key to install and play Call of Duty 2 online. Call of Duty 2 also checks to make sure you don't have certain drive emulation or CD copying software installed. Call of Duty 2 also uses the SafeDisc copy protection system, which fortunately is not as intrusive or troublesome as the infamous secuROM system, but it still forces you to have the game CD in your CD/DVD drive to launch the game. I have repeatedly called on games manufacturers to remove this annoying aspect of all modern games, and I really hope that the CD check for Call of Duty 2 is removed in a future patch once the initial lucrative sales period is over.
For those of you who don't like CD checks, believe me I understand. But please don't email me asking for where you can find or how to use No-CDs or Fixed Images - I never respond to such emails for legal reasons.
Update: It appears that Call of Duty 2 Multiplayer doesn't use a CD/DVD check, so if you launch the game from your COD 2 MP icon, it should load without the CD/DVD in the drive.
Maps and Mods
Call of Duty 2 is proving to be very popular with both the original Call of Duty fans, as well as a range of new converts (like me!). The game definitely has enough atmosphere and charm to encourage new and experience modders alike to create new maps and modifications for the game.
You can download the official Call of Duty 2 Modding Tools which weigh in at 20MB, and begin creating new maps and editing levels. You can see current mods for COD 2 in this COD 2 Mods Database and at places like Planet CallofDuty and CallofDutyFiles.com.
As significant mods and both official and unofficial maps become available for COD 2, I will list them here, so check back regularly.
The next section of the guide covers In-Game Settings for Call of Duty 2.
This section contains full descriptions and recommendations for Call of Duty 2's in-game settings. Read these carefully to get a good balance between image quality and performance. I can't tell you what you should set these to, as that depends on your particular hardware combination, and more importantly your personal taste for the trade-off between performance and image quality. For more details of the precise performance impact of the game, see this article and this article.
To access Call of Duty 2's in-game settings, start the game and under the main menu click the Options setting. Note that you must configure the settings for Singleplayer and Multiplayer separately - the settings for one don't impact on the settings for the other. Each of the settings are covered in detail below:
Controls
Look
These options affect the way you control your character's viewpoint in the game. You can bind various keys/buttons to these options, and none have any impact on performance. Particular settings of importance are covered below:
Invert Mouse: This controls whether moving the mouse forward will make your character look down (Yes) or up (No).
Center View: This command instantly centers your view parallel to the ground. This can be handy if you often become disorientated during heavy combat for example.
Smooth Mouse: This setting if set to Yes attempts to reduce the jerkiness of mouse movements. If you find that in fact it makes your mouse seem laggier or less snappy, set this to No.
Mouse Sensitivity: This setting is very important, and depending on how far right you move the slider, the greater the responsiveness of your character's view to your mouse movements. Note that if you're experiencing a lot of mouse "lag", it is usually due to low framerates - especially when in heavy combat or smoky scenes, or large complex outdoor scenes. Raising the mouse sensitivity value can't fix that - you'll have to reduce/alter other settings to increase your average framerate.
Move
These settings control your character's movement, and should be assigned according to your tastes. None have any impact on performance. Pay attention to the following setting in particular:
Multiple Crouch and Prone options: You may notice there are several Crouch and Prone-related settings on this screen. This is not a mistake by the developers, and can be confusing since really you only need to bind one key to crouch, and one to prone. However the various options are here designed to suit different play styles, depending on how you to like to use crouch (kneeling down) and prone (lying down). The 'Toggle Crouch' and 'Toggle Prone' settings do just that - pressing the relevant key once will make you go straight into crouch or prone stance, and pressing the same key again will take you out of that stance. The 'Go to Crouch' and 'Go to Prone' commands don't work that way - pressing the key only makes you go down to crouch/prone; you must then press the Jump key (or 'Stance Up' key) to get back up again. The basic 'Crouch' and 'Prone' commands are different again - pressing these keys will make you go to prone or crouch mode and stay there only for as long as you keep holding the relevant key down; if you let go you stand back up again. Choose one which suits your needs. You might want to mix and match, selecting one type for the Crouch command, and another for Prone.
Shoot
These settings control the weapons in Call of Duty 2. None have any impact on performance, so set to suit your tastes. Check the following settings in particular as they are very important:
Throw Grenade: There are two options here for grenades, the 'Throw Frag Grenade' and 'Throw Smoke Grenade' keys. I strongly recommend that you don't forget to bind these to keys which you can access easily as they are used often in the game.
Aim Down the Sight: This setting is also commonly known as the 'Zoom' command, since it allows you to look down your weapon's sights and zoom further in for harder shots. There are two types of this setting here: the 'Toggle Down the Sight' command does exactly that - when activated you look down your sights, and to come out of sighted/zoom mode you need to press the same key again. The 'Aim Down the Sight' command is slightly different - it only stays zoomed for as long as you hold down the relevant key/button. Once again, your choice depends on your style of play.
Melee Attack and Steady Sniper Rifle: A Melee Attack is useful for hitting enemies who are extremely close, or for when you run out of ammo. The 'Steady Sniper Rifle' option allows you to hold your breath for a short period while zoomed in using the sniper rifle, and thus steadies your aim further. For the most part you can use the 'Melee/Steady Sniper Rifle' command to bind a single key to, as these commands rarely if ever conflict with each other. However if necessary, you can instead bind separate keys to these functions using the 'Melee Attack' and 'Steady Sniper Rifle' options here.
Interact
These settings control interactions, like opening/closing doors and triggering objectives. No impact on performance so set to suit your tastes. Note that the Screenshot button is shown here, so if you want to capture in-game screenshots press the appropriate key (F12 by default). Any screenshots taken are placed in your \Program Files\Activision\Call of Duty 2\Main\screenshots directory as .jpg files.
Set Default Controls
Clicking this option allows you to reset all your control commands back to their default settings. This is not something you should usually do unless you're experiencing problems with controls.
See the Advanced Tweaking section for more details of how to use the bind command to create your own custom control bindings.
Graphics
Video Mode: This setting determines the resolution of the game. The numbers shown are pixel width x pixel height. The greater the resolution, the more of a strain on your system to render the in-game scenes, and hence the lower your framerate. Also, the higher your resolution, the more chance there is that Call of Duty 2 will automatically reduce other settings to try to improve your performance.
Screen Refresh Rate: Refresh Rate, measured in frequency per second (Hz), is basically the number of times per second a screen redraws images. All reasonable monitors can do a 60Hz refresh rate at most resolutions, however many monitors can achieve higher refresh rates at various resolutions. By default Call of Duty 2 uses a 60Hz refresh rate, when in fact if your monitor supports a higher refresh rate at your chosen resolution, it will provide better image quality (less eye strain) if you can set it to that higher rate. Furthermore, if you have enabled the 'Sync Every Frame' option (See below), your refresh rate is also the highest FPS your system can achieve. Choose the highest possible refresh rate for your system - see the r_displayrefresh setting in the Advanced Tweaking section if you know your display device is capable of a refresh rate higher than 60Hz at your chosen resolution. For more details see my Gamer's Graphics & Display Settings Guide.
Aspect Ratio: The Aspect Ratio is the ratio of width to height of your in-game image. The options here are Auto, Standard, Wide (16:10) and Wide (16:9). Selecting the Auto option should provide the correct aspect ratio for your monitor. However if you see an oddly stretched image, or black bars on the sides of the image, manually set this option. Keep in mind that the normal aspect ratio for most computer monitors is 4:3, so select Standard (which is 4:3) or Auto for such displays. For widescreen monitors or HDTVs, try 16:9 to start with and if the image still appears incorrect, try 16:10, or set back to Auto. Also keep in mind that a resolution (Video Mode - see above) which corresponds closest to this aspect ratio will provide optimal image quality with minimal stretching/scaling.
Texture Filter: The options here are Bilinear, Trilinear and Anisotropic. These are filtering modes which affect the way textures (the 2D surfaces of all 3D objects) appear in the game - especially how crisp surface textures look as they fade into the distance. Read my Gamer's Graphics & Display Settings Guide for more details and graphical examples. Basically Bilinear is the simplest method of texture filtering, and provides the best performance. Trilinear improves image quality but is slightly slower. Anisotropic will have a noticeable impact on performance, but provides the best texture image quality. Note that if you select Anisotropic here, the actual level of Anisotropic Filtering (AF) is automatically set to 8x AF by the game, so it can give a noticeable performance hit, especially on lower end graphics cards. To manually adjust the level of Anisotropic Filtering, see the r_anisotropy command in the Advanced Tweaking section.
Anti-aliasing: The options here are Off, 2x and 4x. Antialiasing (AA) basically makes jagged lines appear smoother, with the higher the sample rate of AA, the smoother jagged lines become in return for slower performance. Again, see my Gamer's Graphics & Display Settings Guide for more details and examples. Enabling Antialiasing, particularly on machines with older or lower-end graphics cards, can have a significant negative impact on performance in COD2.
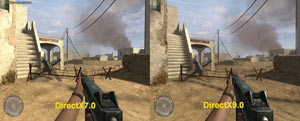
Render Method Preference: This option allows you to choose between DirectX9.0 and DirectX7.0 rendering methods in Call of Duty 2, or allow COD 2 to automatically choose one for you. For more details of DirectX see the bottom of this page of my Nvidia/ATI Tweak Guides (the information is identical in both guides). Basically selecting DirectX9.0 (DX9) gives you the highest quality images and special effects in Call of Duty 2, while selecting DirectX7.0 (DX7) reduces the quality of some of the effects in the game in return for a significant boost in performance on most systems. The effects which are altered by this setting include the glow of the sun, the overall light bloom effect, bump mapping (which gives textures depth), heat haze effects, reflections and so forth. The screenshot comparison above shows some of the differences between the two modes - note the differences in the wall to the left of screen, the stairs, and the walls of the building in the background. There are other differences based on which map you are in, but basically DX7 mode has far less of the 'atmospheric' features of DX9 mode, but still looks fine nonetheless, particularly given the performance boost it provides.
The ATI Radeon 9x00 series and above, or the GeForce 6x00 series and above should provide good hardware-level support for DirectX9.0 and hence are better suited to run in DirectX9.0 rendering mode. Older graphics cards may still support DirectX9.0 (if this option is available), however since they are not optimized to run DX9 effects, they will suffer from relatively poor performance. The GeForce FX series for example is known to be a poor performer in DX9. This is not a "flaw" in the Call of Duty 2 engine (which is actually quite a good engine), rather it is simply the richness, high quality and sheer multitude of DX9 effects which the game uses - specifically advanced particle and smoke effects for weather, smoke grenades and explosions, advanced shader effects for that "hazy" and realistic lighting look, dynamic lighting and complex shadows, high polygon objects and of course high level texture detailing. You can disable some of these effects individually by checking the Advanced Tweaking section of this guide (e.g. the r_glow setting) and by looking at the Texture Settings section below. However if after all your tweaking using this and my other guides you can't get your FPS to consistently stay above 30FPS in DX9 mode, I recommend enabling DirectX7.0 mode (or just select Auto), and then raise other settings to compensate.
Brightness: This slider controls the brightness of the in-game image. Set it to suit your tastes, it has no impact on performance.
Sync Every Frame: This option is also commonly referred to in other games as Vertical Synchronization or VSync. Vertical Synchronization is the synchronization of your monitor and graphics card's abilities to draw a certain number of frames per second (or FPS) on the screen. This is referred to as the Refresh Rate (See the Screen Refresh Rate setting above), and is measured in frequency per second (Hz). If this option is enabled (i.e. set to Yes), your maximum FPS cannot exceed your current refresh rate at your chosen resolution, and more importantly your overall FPS will be reduced. For this reason it is strongly recommended that you set this option to No. The only down side is that if VSync is disabled, you may notice some image 'tearing'. This causes no damage to your monitor, but if it really annoys you enable this option but note that your actual FPS will be reduced overall and not just capped.
Optimize for SLI: This option should be set to Yes if you have an SLI (Scalable Link Interface) system with two physical graphics cards connected and SLI enabled in your Nvidia Forceware control panel (See my Nvidia Forceware Tweak Guide for more details). In such cases the game will attempt to take advantage of both your graphics cards to improve performance by as much as an extra 50%. Some interesting things to note about this setting - originally this option was called 'Optimize for Dual Cards' (not just SLI) in the COD 2 Demo and as such this leads me to believe that this should also improve performance on Crossfire setups, although I would appreciate Crossfire users letting me know if it does indeed work for them. Furthermore, various single graphics card users have said that this option improves performance on their systems. This is likely because of an issue discovered on the NVNews Forums (See Conclusion section of this guide for discussion and links). Enable it to see if it improves your performance, however it will be set back to No on non-SLI machines after each restart. Instead I recommend you that you go to the Advanced Tweaking section and read about the r_multigpu and r_gpusync commands, as configuring those correctly provides the best framerate.
Shadows: If set to Yes, characters and some objects will cast complex shadows in the game. The performance impact of shadows can be quite significant, especially in areas with multiple character and/or multiple lights. If set to No, such shadows are removed, boosting FPS at the cost of some realism. Note that some shadows in the game - such as static shadows of buildings - are not affected by this setting and will be drawn regardless. This setting is not available in DX7 mode.
Number of Dynamic Lights: Dynamic Lights are lighting effects which interact with surrounding objects. For example, the way the muzzle flash from guns light up surrounding areas, the way in which explosions shed light, etc. The options here are Off, Low, Normal and High. In general the higher the setting, the more objects cast dynamic lights. However even at Low the most obvious dynamic lighting (muzzle flash for example) is visible, and higher settings will have a noticeable negative performance impact in areas with multiple light sources/weapons - so if you need the FPS set this to Low for a good balance of image quality and performance. This setting will also further impact on performance if Shadows is enabled (See above). This setting is not available in DX7 mode.
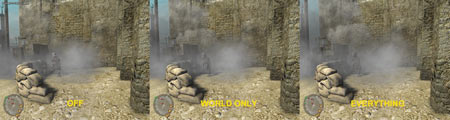
Soften Smoke Edges: This setting determines whether the 'ZFeather' smoke effect is used in Call of Duty 2. The options here are Off, World Only and Everything. Note that some graphics cards cannot use Zfeather effects due to lack of hardware support. Off should disables zfeather smoke, resulting in the edges of the smoke being more clearly defined ("clipped") against all surrounding objects, and hence much less realistic - this may provide better performance in smoky situations. 'World Only' should only allow smooth the edges of smoke against the surround terrain and buildings, but not against enemies. At the 'Everything' setting, smoke should blend smoothly with all surrounding objects seamlessly ("feathered"), which is highly realistic. This may reduce performance. A screenshot comparison is provided above - note that at Off, you can clearly see the smoke has defined edges (against the ground for example). At the 'World Only' setting, the smoke edges are smooth against the ground, but notice the defined edges of the smoke against the enemy character's arms and legs. At 'Everything', all edges are smooth and the smoke appears more realistic. If your system is slowing down when smoke is visible, set this to Off to increase performance, otherwise set it to Everything.
Number of Corpses: The options here are Tiny, Small, Medium, Large and Insane, and clearly this option relates to the number of dead bodies visible on the battlefield at any one time. The number of corpses visible at any one time are 3 for Tiny, 5 for Small, 10 for Medium, 20 for Large and 64 for Insane. You can manually specify a number between 1 and 64 for this setting by using the ai_corpsecount command (See the Advanced Tweaking section). Since characters are quite complex objects, the more corpses which are visible at any one time, the slower your performance will be.
The next page continues with the in-game settings and provides more screenshot comparisons.
[Texture Settings]
These settings control the quality of all the textures used in Call of Duty 2. Textures are the 2-dimensional images which cover all the 3D objects in the game.
Texture Quality: The options here are Automatic and Manual. If set to Automatic, the options below won't be visible - only the Texture Quality option will be shown, and COD 2 will automatically determine the appropriate texture, normal map and specular resolutions based on its approximation of your graphics card's capabilities. However if you're willing to experiment, set this option to Manual, and adjust the various settings below to improve image quality and performance. Note that the image quality comparisons are shown for each setting below, but the performance impact can vary depending on your particular graphics card.
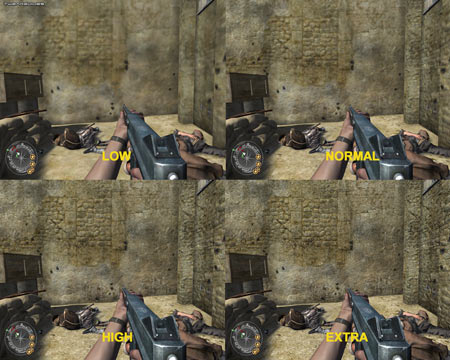
The screenshot above shows the image quality of these settings when all three are set to the same level (All to Low, All to Normal, All to High and All to Extra). An animated screenshot comparison can be seen by clicking this link: Texture_Quality.gif (658KB). The details and image quality impacts for each of these settings are provided below:
Texture Resolution: This option controls the general clarity of all textures used in the game. The available options are Low, Normal, High and Extra. An animated screenshot comparison can be seen by clicking this link: Texture_Resolution.gif (814KB). Note that there is a gradual difference visible between each level in the comparison above. You should base your texture resolution setting on the amount of Video RAM you have on your system - Extra is for 512MB and high-end 256MB graphics cards, High and Medium are suitable for 256MB - 128MB cards, and Low is suitable for those with 64MB of video RAM. Of course experiment to see what works best on your particular card, as depending on your other settings here, additional DX9 effects and/or Antialiasing for example, you may get more or less of a performance slowdown from higher texture settings.
Normal Map Resolution: This option controls the level of detail shown on textures, such as bumps and grain. The available options are Low, Normal, High and Extra. An animated screenshot comparison can be seen by clicking this link: Normal_Maps.gif (636KB). Note that as the normal map level is raised, the depth of the pitting in the wall becomes more realistic. The performance impact of this setting varies depending on your graphics card's memory bandwidth as well as its compression technique, and as such newer high-end graphics cards can render higher normal map resolutions with minimal performance impact, whereas lower end and older graphics card will require lower settings to maintain good FPS.
Specular Map Resolution: This option controls the way in which objects reflect light. The available options are Low, Normal, High and Extra. An animated screenshot comparison can be seen by clicking this link: Specular.gif (639KB) - note that as the level of the specular map is increased the reflections on the car's metal roof become more detailed and realistic. The performance impact of this setting will vary depending on the age of your graphics card.
Some final things to note above these settings:
Sound
Master Volume: This slider controls the volume level of sound effects and music in the game. Adjust to suit your taste, has no impact on performance.
Sound Quality: This option controls the sample rate of sound effects and music playback in the game. The available options here are 11KHz, 22KHz and 44Khz. The higher the sample rate, the better the audio quality in return for a slight performance hit. In general 11Khz sound quality is quite poor, and many sounds are almost AM radio quality; 22KHz is a good balance of performance and audio quality; however if you have a reasonable sound card there is no reason why you can't set this to 44KHz as the performance impact should be minimal.
Sound Provider: This setting determines the sound playback mode used by your system. The range of options from lowest to highest include Miles Fast 2D Positional Audio, Creative Labs EAX, Creative Labs EAX 2.0, and Creative Labs EAX 3.0. If you have a suitable sound card, you can choose one of the Creative Labs EAX options to provide 3D audio with a range of additional audio effects (depending on the EAX version). Almost all SoundBlaster Audigy and X-Fi sound cards should be able to select EAX 3.0 for optimal sound quality with minimal performance loss. Note, if you are using EAX mode, make sure that you update to the latest sound drivers for your card, and also make sure to disable any additional effects in your EAX Control Panel (under AudioHQ). However the higher the audio mode you choose here, the lower your FPS will may be because of the extra processing load. The impact may only be noticeable on certain onboard sound solutions and low-end Creative sound cards for the most part, however if you want to be guaranteed the fastest possible performance, opt for the base level Miles 2D mode. This mode can also fix any audio glitches you may have while using EAX.
Game Options
Subtitles: If set to Yes, text subtitles will be shown on the screen whenever there is any spoken language. Set this to No unless you require this functionality. No noticeable impact on performance.
Enable Crosshair: If set to Yes, this option enables the crosshair on the screen - very useful for aiming your weapon, and obviously it is strongly suggested that you don't disable this. The only reason you may want to disable the crosshair would be to take a "clean" screenshot.
Show Blood: If set to No, blood will not be shown whenever a soldier is shot or injured. Set to suit your level of squeamishness, has no real impact on performance.
Enable Console: If set to Yes, this allows you to access the in-game command console by pressing the ~ key (the key above ESC). It is strongly suggested you set this option to Yes so that you can use the console commands for the game - see the Advanced Tweaking section.
Optimal System Settings: If you click this option and select Yes, all your graphics and sound settings will be reset to their 'optimal' value as detected by the game. This is not recommended, as it is much better for you to take the time to manually configure each individual setting for your system. The system-detected values are usually quite conservative and certainly not optimal. However if you run into any problems, you can use this option to quickly restore all the default settings.
Multiplayer Settings
As noted further above, when you launch Call of Duty 2 Multiplayer, your settings are completely separate from COD 2 Singleplayer. As such you must go through and readjust all your settings as you'd prefer - you may want to keep them lower (and/or run in DX7 mode) to ensure consistently higher FPS in multiplayer to gain a competitive advantage. The settings below are unique to Multiplayer:
Voice Chat: If you are using Voice Chat (See Voice Chat settings below), you can press this key to talk to other people on the same channel. If you don't use voice chat in games, ignore this key and make sure to disable Voice Chat in the options further below.
Vote Yes, Vote No: At times people may start a vote in a game to do such things as kick another player, or switch to another map. These keys will allow you to vote Yes or No in such votes.
Chat, Team Chat, Quick Chat: When you press the Chat key, it opens a small prompt on the screen where you can type in text to say to everyone on the server. Team Chat is the same principle, however anything you type here will only be seen by your teammates , and will be in a blue color. Quick Chat allows you to press a particular key to bring up a sub-menu of commands, from there, you can select a range of preset voice commands to yell out in the game.
Allow Downloading: If set to Yes, this allows the server you have joined to send you any mods/maps you are missing to play on that particular server. Some servers run modifications, or custom maps, and joining these will mean you will have to first download the map/mod (very slowly) if this setting is enabled.
Draw HUD: If you want to turn off Heads Up Display (HUD) elements like your compass, ammo count, etc. while playing Multiplayer, set this to Yes. There is no major performance difference either way, so set to suit your tastes.
Connection: Since Call of Duty 2 is designed for broadband connections, the only options here are ISDN or LAN/Cable/DSL. Only choose ISDN if you have a very slow connection, or if you find that you're lagging on all the servers you play on (high ping), especially ones near to you. Otherwise select LAN/Cable/DSL.
Weapon Menu: At the start of every Multiplayer round, you have to choose a weapon to spawn with. This key will allow you to bring up the weapon menu whenever you want, so that you can respawn in the same map with a different weapon if you so choose.
Player Name: Enter your player nickname here - this is the name shown for your player when you are online.
Enter Key Code: You should only click this option if you need to change your CD Key Code. Normally, once you've installed the game your key code should work all the time, and you shouldn't need to change it again.
Voice Chat
This section is for those who use in-game voice chat, with a microphone and speakers/headphones, to communicate with other players in the game. If set to Yes here, voice chat will use Voice Over IP to transmit your voice to other players and vice versa, however it will also use some bandwidth to do so. If you don't use voice chat, set this option to No to help maintain a lower ping.
Join Game
Once you've made all the suitable adjustments to your settings, to join a multiplayer game of COD 2 on the Internet, click the Join Game option on the main menu, then in the server browser, make sure the Source option at the top is set to Internet. Now click the 'Refresh List' option at the top right and wait for the server list to be populated. Click the Ping column header at the far right to sort servers from lowest to highest ping - the lower the ping shown (hopefully in the low double-digits), the smoother your online gameplay will be. Check the figure in the '# Players' column to make sure the server isn't full (or empty), and then double-click on the server name to join.
Note: if you want to refine this server list, click the 'Filter Servers' option at the top right and select the types of servers you want to exclude from being displayed. Once done reclick the 'Refresh List' option.
Creating a Server: I don't have much experience creating game servers, so I don't usually provide detailed advice on this in my guides. It can take up quite a bit of space to go into server creation/maintenance commands and options, and it's not necessary for most players who are clients (i.e. play on other peoples' servers). I apologize for this decision, and if you want to find out more about how to set up your own server, check the game's Readme.txt file along with the game manual for detailed instructions and commands.
PunkBuster: A final note about COD 2 multiplayer: PunkBuster anti-cheat software support was added to COD2 as of the 1.2 Patch. Every time you connect to an online server which has enabled PunkBuster support - and most will - then you may have to wait as the latest version of PunkBuster is downloaded. If you would prefer to update PunkBuster manually before joining a game, and indeed this is recommended, use the PBSetup utility. It's free and easy to use.
The next page looks at advanced tweaking for Call of Duty 2.
There are three main ways in which you can apply advanced tweaks in Call of Duty 2. These are the Command Console (or simply Console for short), using Config files, or in the Target box of the Call of Duty 2 launch icon. These are each covered in detail below. Please read these instructions carefully if you want to apply COD 2's advanced tweaks. Note that where differences apply between Singleplayer and Multiplayer, they will be noted - otherwise they work the same way:
Command Console
Call of Duty 2 allows us to get into some advanced tweaking, because the game's command console is easily accessible, and a wide range of commands can be brought up and used to further refine the game. To access the console, under the Options screen go to Game Settings and make sure the 'Enable Console' setting is set to Yes. Now you can access the console at any time by pressing the '~' key (the key above ESC) to open and close it. To get the expanded console, press the SHIFT key and ~ key together (SHIFT+~). The expanded console is particularly useful for seeing the output of your commands, system warnings, errors, etc.
The console is the main place to input a range of Development Variables (dvars) as well as Commands, which do everything from change the way certain objects behave in the game, through to controlling all aspects of the game's graphics, audio and control settings. Note that although technically there is a difference between a command and a dvar, I generally refer to all of these as 'commands' in this guide for the sake of convenience. See the Commands section on the next page to see a list of useful commands along with descriptions of their functionality. If you simply type the first few characters of a command into the console, it will provide you with a list to choose from. For example, type "cg_" (without quotes) into the console and all the commands starting with cg_ will be shown. Typing further characters of a command's name will provide you with the full command and its current and default settings. Note that the default settings will differ on various systems depending on your hardware.
Multiplayer Note: To use console commands during multiplayer, you must place a "/" (without quotes) in front of the command. For example, the command cg_showfps must be typed as /cg_showfps to work in multiplayer, otherwise any text you type into the console will simply be shown as chat text on the screen and not implemented.
Config Files
Config.cfg, Config_mp.cfg
Another way of using commands is to edit the game's .cfg (config) files. The main config files for Call of Duty 2 are called config.cfg and config_mp.cfg, and are stored in your Program Files\Activision\Call of Duty 2\main\players\[Profilename] directory. These file can be opened and edited with any text editor, although it is best to use Windows Wordpad to edit these .cfg files, as they may not appear in an easy to read/edit format in other text editors such as Notepad. These files store your main game settings, such as your key configurations, graphics and audio settings, etc. Config.cfg holds your singleplayer settings, while config_mp.cfg holds your separate multiplayer settings. They are the main configuration file used by Call of Duty 2 each time it launches the game in singleplayer or multiplayer mode, so before editing either of these files make sure to create backups.
Generally, editing the config.cfg and/or config_mp.cfg file is not wise because most of the changes will be overwritten the next time the game is launched, or if you change the game's settings in the in-game menus. If necessary, you can make the config.cfg/config_mp.cfg file read-only to prevent the changes being overwritten, but this is not recommended. It is much better to store your custom commands in another .cfg file and have Call of Duty 2 execute this file each time it launches. The common filename given to this custom config file is autoexec.cfg, but you can give it any name you like as long as it ends with .cfg.
Autoexec.cfg
Create a new text file in your \Program Files\Activision\Call of Duty 2\main directory, and rename it to autoexec.cfg (not autoexec.cfg.txt). Now you can add custom commands and key bindings to this file, and they will not be overwritten or altered by the game engine. However, unlike most games using .cfg files, Call of Duty 2 doesn't automatically run the autoexec.cfg file, regardless of where it is placed in the COD 2 directory structure. So to have it run automatically each time you launch COD 2, you must place it in the directory above, and you will need to add "+exec autoexec.cfg" (without quotes) to your relevant COD 2's launch icon Target box (See Command Line/Target Box below). This works for either multiplayer or singleplayer. In fact you may want to have separate autoexec_sp.cfg and autoexec_mp.cfg files, and execute the relevant one when launching singleplayer or multiplayer.
Note that some of the commands you add to autoexec.cfg will be added to the main config.cfg/config_mp.cfg file by the game when it executes them. If you want to undo any of your custom commands, just removing them from autoexec.cfg may not work. You might have to manually reset the setting to its original or default value in the game console. To see any command's default value, just type the name of the command in the console without anything else and its current and default values will be shown.
Command Line/Target Box
Another place to enter command is in your Call of Duty 2 launch icon's Target box. You can access this by going to the desktop icon you use to launch COD2, right-clicking on it and selecting Properties, then in the properties box which opens, look at the 'Target' box. You should see something like this (the value shown below is for launching singleplayer COD2):
"C:\Program Files\Activision\Call of Duty 2\CoD2SP_s.exe"
Your path may vary, depending on where you installed the game - that's fine, don't edit the path text inside the quotes; add commands at the end of this line to force Call of Duty 2 to do various things at launch. All you need to do is insert a space to separate each command, and insert the words +set in front of the command. For example, to skip the startup movies (com_introplayed 1) and automatically execute a custom .cfg file (exec autoexec.cfg) the target box should look similar to this:
"C:\Program Files\Activision\Call of Duty 2\CoD2SP_s.exe" +set com_introplayed 1 +exec autoexec.cfg
Note that the first command lies outside the quote marks ("") and is one space away from the last " mark. For each additional command, make sure there is a single space between it and the previous character in the box. Most commands can be inserted into the Target box in this way, however this is best used for options which need to be implemented at launch time for the game, such as removing the intro movie, setting memory sizes, altering resolutions, etc. Also keep in mind that if you want to apply custom tweaks to COD 2 multiplayer, you need to do the same thing for the COD 2 Multiplayer launch icon.
Cheat Mode
Some commands are considered cheats, and as such can't be used during Multiplayer gameplay, or even in normal Singleplayer mode. Aside from the usual God and Noclip type of cheats, certain commands such as fx_enable and cg_drawgun which affect performance by removing certain special effects are also considered cheats. Therefore you should only try them in single player mode, and only after enabling cheat mode by doing the following:
Enabling Cheat Mode: Enter the game menu screen - cheat mode can't be enabled while playing. In the menu, open your console by pressing ~ (or SHIFT + ~), and then type seta thereisacow 1337 and press Return. Then type spdevmap [mapname] and press Return (e.g. spdevmap eldaba). The specified map level will load up, and you can now enter cheat commands in the console and they will work during gameplay.
I don't have a full list of mapnames you can use to jump to various levels in cheat mode, but some examples include: demolition, eldaba, elalamein, libya, moscow, rhine, and toujane. Keep in mind that commands designated with the (cheat) tag in the Command List on the next page can only be run in cheat mode, and should not be run on a Multiplayer server unless the server specifies that it is "cheat enabled".
The next page starts the listing and full descriptions of the major commands for Call of Duty 2.
Console Commands
This section covers all the major known commands (dvars and commands) for Call of Duty 2. You may notice that these commands are very similar to those of the Quake 4/Doom 3 engine. This can be readily confirmed by checking my Doom 3 Tweak Guide. Even the usage methodology is almost identical. However it's important to note that COD2 does not use a Quake or Doom 3-based engine - it actually uses a proprietary engine developed by Infinity Ward, and there are some differences, so if something works in Doom 3 or the original Call of Duty for example, don't necessarily expect it to work the same way (if at all) in COD2.
Command Usage
The correct syntax for using a command in the console, config file, or target box is shown below. E.g. if the command is r_glow, to disable glow effects you would use the command as follows:
seta r_glow "0"
However, it is also acceptable to simply use the short version of this command:
r_glow 0
And in multiplayer mode, it would be:
/r_glow 0
If you want a setting to "stick", even without your custom config file being run again, I recommend using the seta command in front of the command (e.g. seta r_glow 0). This makes the change permanent by inserting into your main config.cfg (or config_mp.cfg) file.
The rest of the advanced tweaking section covers the major commands in Call of Duty 2, describing their functionality and known values as best I know it. The list below is by no means the full list of COD2 commands - it consists of what I believe are the most important/useful commands. The list also does not include commands which can easily and thoroughly be altered using the in-game settings. If however an in-game setting can be further altered using a command, it is covered here. For a full list of Call of Duty 2's development variables and commands, download the following file: COD2Commands.zip (4KB).
The list follows, with the name of the command, its valid range of values in [ ], and a brief description. Certain commands require enabling of cheat mode (see previous page), and are denoted with (cheat) in front of their description - they won't work outside of cheat mode.
Common Commands
cg_drawFPS [0,1,2,3] - Displays the frames per second (FPS) counter at the top right of the screen. In simple mode (1) shows the average and current (low and high) FPS. In Verbose mode (2), additionally shows vertex counts. In Time mode (3) shows the time taken to draw the current frame in milliseconds (ms). Setting it to 0 turns it off.
monkeytoy [0,1] - If set to 0, enables the in-game console and if set to 1 disables the console. This seems a little contradictory, but that appears to be its function. Useful if you find that your enable console option doesn't "stick" each time you open COD2. This command is best used in the Target box of your COD2's launch icon.
com_introplayed [0,1] - If set to 1, skips the introductory Activision/Infinity Ward movies played at Call of Duty 2's launch (whether single or multiplayer). This option is best used in the COD2 icon Target box.
sv_cheats [0,1] - If set to 1, enables the use of cheat commands on a server, such as those denoted by (cheat) in this list. Best used in the Target box of the COD2 launch icon. This command doesn't appear to work for single player cheats - use the instructions for enabling cheats in the Cheat Mode section above.
Quit - Quits the game immediately back to desktop. Note, the Exit command doesn't work in place of Quit.
Bind [Key, Commandname] - Binds a particular command to the specified key. To see a list of current bindings and commands, use the Bindlist command. For example:
bind F10 cg_drawfps 1
bind F11 cg_drawfps 0
This binds the F10 key to the command cg_drawfps 1 (which turns on the FPS counter), and the next line binds the F11 key to the command cg_drawfps 0" (which turns off the FPS counter).
Unbind [Key] - Unbinds all bindings to a particular key. Use the Unbindall command if you want to unbind all currently bound keys.
Exec [Filename.cfg] - Executes the contents of the .cfg file specified. The config file must be in your \Program Files\Activision\Call of Duty 2\Main directory to be executed, otherwise the full path must also be specified.
Dvarlist - Shows a list of all the development variables (dvars) used in the game. Note that there are additional commands not in this list, for which you must use the Cmdlist command to view (see below).
Cmdlist - Shows a list of all the COD 2 commands, which are different from the development variables.
Condump [Filename] - Dumps the contents of the current console session to the specified filename. For example, type Dvarlist, then type Condump variables.txt, and the full development variables listing will be saved to the file variables.txt in your Main COD 2 directory. Use the Clear command if you want to clear existing console text.
God - (cheat) Toggles God mode, meaning you can't be killed.
Noclip - (cheat) Toggles no clipping, which means you can fly around and into/through solid objects.
Giveall - (cheat) Gives the character all available weapons, but only 2 can be carried at one time.
Giveammo - (cheat) Refills the ammo of all the guns you're currently carrying.
ScreenshotJpeg - Takes a screenshot of the current image on screen and saves it as a .jpg file in your \Program Files\Activision\Call of Duty 2\main\screenshot directory - same as the normal F12 method. However you can also use the screenshot command if you want to take a screenshot in .tga format instead.
Loadgame [name] - Loads a saved game of the name specified. Your saved games are stored in the \Program Files\Activision\Call of Duty 2\Main\players\[playername]\save directory.
Spdevmap [mapname] - Loads up the specified map/level in cheat mode (See Cheat Mode on previous page).
StartMultiplayer - Launches multiplayer mode when in singleplayer.
Demo Commands
Record [demoname] - Starts recording an in-game demo with the filename you specify. The file is saved under your \Program Files\Activision\Call of Duty 2\Main\demos directory as a .spd file.
StopRecord - Stops recording the current demo.
Demo [demoname] - Plays back the pre-recorded demo specified. Note, to play back a demo you must be in the game menus - demos can't be played back while you're in-game.
Timedemo [0,1] - If set to 1, enables timedemo mode. Once a pre-recorded demo is played, the timedemo results are shown in the extended console, and the results are saved as a .csv file in your \Program Files\Activision\Call of Duty 2\Main\demos directory.
cl_avidemo [0,1] - If set to 1, begins recording frames for a demo movie. These frames are stored in .tga format in your \Program Files\Activision\Call of Duty 2\Main\screenshots folder. Note that enabling this option can severely slow down your system, and it can be disabled at any time by setting cl_avidemo back to 0.
The next page continues the Call of Duty 2 command listing.
Graphics/Performance Commands
ai_corpseCount [0 - 64] - Determines the maximum number of corpses visible on screen at any time. Usually determined by the in-game setting Number of Corpses, you can set a specific value between 0 and 64 here, with the lower the number, the greater your FPS in heavy combat scenes. Note, setting a value of 0 will cause the game to crash.
cg_brass [0,1] - If set to 0, disables all ejecting brass, such as expended shells from your gun. This can improve FPS slightly when firing your weapon.
cg_drawGun [0,1] - (cheat) If set to 0, removes the gun model from in front of the player. In effect the gun becomes hidden, and this will improve performance by removing the complex gun model from the screen.
cg_marks [0,1] - If set to 0, disables all marks made by weapons, explosions etc - such as bullet impact marks and charring on the ground. This can improve performance in heavy combat scenes. If set to 1, you can set the maximum number of marks shown with the cg_markslimit command.
cl_mouseAccel [0 - 100] - If set to 1 or higher, accelerates your mouse movements. The higher the value used, the quicker your movements will accelerate your mouse. This can make aiming difficult, so set to 0 if you want to disable this option.
com_hunkMegs [80 - 512] - Determines the amount of memory (in MB) to allocate to the game to help smooth out in-game loading. You should not allocate any more than half your system RAM to this option (i.e. if you have 1GB of RAM, set this cvar to 512).
com_maxfps [0 - 1000] - Determines the maximum frames per second (fps) possible. If set to 0, disables the FPS cap. Any value higher than 0 caps your FPS to that level. The main reason to use this command would be to smooth framerate fluctuation, as framerate spikes can cause jerky gameplay.
developer [0,1] - If set to 1, enables developer mode, which shows the game code and allows a range of functions for testing the code.
fx_enable [0,1] - (cheat) If set to 0, disables a range of special effects in the game. This can improve performance at the cost of image quality.
r_aasamples [1-4] Determines the level of Antialiasing (AA) applied in the game. You can set this using the Anti-Aliasing option in the in-game settings. Note that a value of 1 turns AA Off.
r_anisotropy [0-16] - If Anisotropic Filtering is enabled in the in-game settings, this cvar sets the level of Anisotropic Filtering used. The default is 8x, however you can set a value between 1x and 16x, with the higher the sample rate, the better texture quality but the lower your performance. Anisotropy can have a significant impact on performance on certain systems.
r_aaAlpha [0,1,2] - This setting determines the type of alpha blending used for antialiasing (if AA is enabled). 0 is off, which gives the best performance, 1 is dither mode which is the default, and 2 is Supersampling which provides better image quality but reduces performance.
r_autopriority [0,1] - I'm not certain what this option does, it may prioritize objects in the z buffer. Regardless, when set to 1 (enabled) it seems to provide slightly better performance without a noticeable drop in image quality.
r_drawDecals [0,1] - If set to 1, disables all decals - that is, marks on the wall from gunfire, explosions, etc. Similar to the cg_marks command.
r_drawSun [0,1] - If set to 0, disables the sun effect in the sky - the sun disappears. This can improve performance slightly, and also removes the 'sunblind' effect when starting at the sky.
r_drawWater [0,1] - (cheat) If set to 0, disables water effects. This improves performance in areas with water.
r_fog [0,1] - (cheat) If set to 0, disables any visible fog. This can improve performance in such circumstances.
r_forceLod [0,1,2,3,4] - (cheat) Sets the Level of Detail (LOD). 0 is High, 1 is Medium, 2 is Low, 3 is Lowest and 4 is None.
r_fullscreen [0,1] - If set to 0, changes from fullscreen to windowed mode. This can help performance if the window is smaller than your current desktop resolution. Game must be restarted for windowed mode to come into effect.
r_gamma [0.5 - 3.0] - Sets the level of the in-game Gamma (brightness). Normal gamma has a value of 1, 3 is very bright, 0.5 is dark.
r_glow [0,1] - If set to 0, disables the in-game 'glow' which certain bright objects (such as the clouds) emit. This can noticeably improve performance, especially for lower-end graphics cards, without a major reduction in image quality. Some people actually prefer to disable the glow effect as they find it annoying.
r_lodBias [-1000 - 0] - Controls the Level of Detail (LOD) Bias. The default is 0, and values below 0 progressively make distant models (e.g. soldiers) more detailed. At -1000 the level of detail of all models is at its highest, but performance also takes a signficant negative hit.
r_lodScale [1 - 4] - Determines the rate at which the LOD Bias value comes into effect. That is, models closer to you will lose more details more quickly the higher the lodscale value.
r_dlightLimit [0 - 32] - This setting corresponds to the 'Number of Dynamic Lights' option in the in-game settings. However here you can specify a specific a limit to number of dynamic lights. By default 8 is the maximum number allowed in the game using the in-game settings (= High), however you can set it higher here if you're willing to reduce performance in certain areas, or you can set it at intermediate values such as 7 or 5 which are not possible using the in-game settings.
r_displayRefresh [0] - Provides the possible refresh rate modes at your current resolution, and is the same as the 'Screen Refresh Rate' setting in the graphics options of the game. You can't specify the actual refresh rate in Hz here, only the mode which corresponds to it. To use the maximum possible refresh rate on your system for your chosen resolution, see the 'Refresh Rate Fix' section near the bottom of page 4 of my Nvidia Forceware Tweak Guide or my ATI Catalyst Tweak Guide. Once you've overridden the default 60Hz refresh rate on your system, you should be able to choose a higher refresh setting in the in-game settings or here.
r_multigpu [0,1] - This setting is the same as the 'Optimize for SLI' option in the in-game settings. As such, you should set it there, however check to make sure it is set appropriately for your system (i.e. 0 for single graphics card users, 1 for SLI users). Also make sure to check the r_gpysync value (See below) for optimal performance. Some single graphics card users note a performance improvement when setting this option to 1, however this may induce keyboard/mouse lag. There is further discussion of these settings in the Conclusion section of the guide.
r_gpuSync [0,1,2,3] - This setting determines the synchronization of the GPU (graphics processing unit) and CPU. The values for the various modes are 0 for Off, 1 for Beginning, 2 for beforePresent, and 3 for Adaptive. Importantly, this setting currently defaults to 3 for all users which is a conscious decision by Infinity Ward to balance performance and responsiveness. This is because if set to 0, you may gain performance however your control input (keyboard and/or mouse input) may become laggy as the CPU and GPU go slightly out of sync in places (See Conclusion section). If you are desparate for extra FPS, set this to 0, however if you notice mouse/keyboard lag even at 30+ FPS, then reset to the default value 3 (Adaptive) which keeps the CPU and GPU in sync.
r_mode [0,1,2,3-] - This setting is controlled by the 'Video Mode' option in the in-game settings. As such you should set it there. However if you run into any problems with the resolution, you can manually select one of the preset modes here, with 0 being 640x480, 1 is 800x600, 2 is 1024x768, 3 is 1280x1024 and so forth depending on your monitor's maximum possible resolution in COD 2. There's no way to set custom resolutions in COD 2 - the only way is to set a custom resolutions in your graphics card control panel, and it should appear in the Video Mode in-game option for COD2.
r_showTris [0,1,2] - (cheat) If set to 1 or 2 enables simple or detailed wireframe mode.
r_skinCache [0,1] - If set to 1, caches model skins, resulting in smoother gameplay. However caching takes up some memory, so for those with very low system RAM, disabling skincaching may reduce loading times and improve performance. For most everyone else, keep this enabled, or experiment to see what performs best on your system.
r_zfeather [0,1] - If set to 0, disables zfeather smoke effects. These effects are covered in the In-Game Settings section of this guide under the 'Soften Smoke Edges' setting. Note that some graphics cards may not have sufficient hardware support for zfeather smoke, and hence can't be forced to use it.
sys_SSE [0,1] - Should be set to 1 on all systems as it enables COD 2's SSE Extension support on SSE CPUs (both Intel and AMD support SSE), which increases performance. Just check this to make sure it is set to 1, and if not set it to 1 for optimal performance.
r_fullbright [0,1] - (cheat) If set to 1, this command removes all shadowing, making everything easier to see. It is considered a cheat when used in multiplayer for precisely this reason.
r_skipbackend [0,1] - (cheat) This option appears to be for removing back-facing polygons, which would improve performance. However when enabled it appears to remove everything (the screen turns black), so it is not recommended that you use this command.
r_znear [0.001 - 16], r_zfar [0 - ?], r_znear_depthhack [0.001 - 16] - (cheat) The r_znear and r_zfar commands work together to define the distance at which objects are clipped. The r_znear_depthhack command is also involved, although I'm not sure precisely how. Altering these values typically results in objects in the near or far distance disappearing or appearing transparent. You can experiment with small alterations from the default values to fix clipping problems or to see if you can gain some performance in large open areas.
sv_framerate_smoothing [0,1] - If set to 1 this option should keep framerates smooth, however you can experiment to see if disabling it improves performance or overall framerate. I saw no difference on my system either way.
[Texture Settings]
r_picmip_manual [0,1] - Controls whether Call of Duty 2 automatically determines the texture quality parameters, or whether your manual settings will be implemented. This is the same as the Texture Quality setting in the in-game menu. If you want to adjust the settings manually, make sure this is set to 1.
r_picmip [0,1,2] - Controls the mipmap level which affects texture quality. This is the same as the Texture Resolution setting under the Texture Settings section of the graphics options. A value of 0 seems to give the best image quality, while 1 and 2 provide poorer image quality at better performance - see the screenshot comparisons in the In-Game settings section. Note, if you change this setting via the console in-game, make sure to use the r_applypicmip command to apply it to the current game.
r_picmip_bump [0,1,2] - Controls the bump mapping on textures. This command corresponds with the Normal Map Resolution setting in the Texture Settings section of the graphics options. A value of 0 seems to give the best image quality, while 1 and 2 provide poorer image quality at better performance - see the screenshot comparisons in the In-Game settings section. Note, if you change this setting via the console in-game, make sure to use the r_applypicmip command to apply it to the current game.
r_picmip_spec [0,1,2] - Controls the specular light map used for textures. This command corresponds with the Specular Map Resolution setting in the Texture Settings section of the graphics options. A value of 0 seems to give the best image quality, while 1 and 2 provide poorer image quality at better performance - see the screenshot comparisons in the In-Game settings section. Note, if you change this setting via the console in-game, make sure to use the r_applypicmip command to apply it to the current game.
r_applypicmip - This command applies any changes made to the r_picmip_spec, r_picmip_bump and r_picmip settings (see above) while in-game. Use this command each time you alter these settings while playing, and see the Conclusion section of this guide for a neat discovery which can boost your FPS when using this command.
Audio Commands
Note: Most of these commands will require the use of the snd_restart command to work after changing, or a restart of COD 2.
snd_bits [8 - 16] - Sets the bitrate of audio in the game. The default is 16-bit audio which provides best audio quality, however you can set this to 8-bit audio, which may improve performance at the cost of some loss in audio quality.
snd_enable2D [0,1] - (cheat) If set to 0, disables 2D sounds - that is, sound effects such as clicking buttons and background music.
snd_enable3D [0,1] - (cheat) If set to 0, disables 3D sounds - that is, most sound effects in the game.
snd_enableReverb [0,1] - (cheat) If set to 0, disables reverberation effects used in EAX 3D sound. This can improve performance, but lessens the reality of 3D sound.
snd_stereo [0,1] - Sets the sound to Mono mode if set to 0, 1 for normal Stereo.
snd_volume [0 - 1] - Sets the precise level of the volume, from 0.0 to 1.0.
View Commands
This section only covers some of the more useful view customization commands. There are plenty more to be found if you need to customize various aspects of the game, however remember that many of these types of customizations can be considered cheats when online.
con_minicon [0,1] - If set to 1, shows the text output of console commands and game engine functions on the main screen. You can use the con_miniconlines and con_minicontime cvars to set the number of visible lines and the amount of time text output stays visible on screen respectively.
con_typewriter_printspeed [0 - 400] - Controls the print speed of text written on the screen using the 'typewriter effect', such as objective notifications. The higher the value, the quicker text will be written to the screen.
cg_drawHealth [0,1] - (cheat) If set to 1, draws a health bar on the screen. Normally your health is not shown, since after taking any damage you can usually heal to full health if you rest for up to 5 seconds.
cg_drawMantleHint [0,1] - If set to 0, disables the grey 'press Space to Mantle' prompt when you are close to climbable objects.
cg_hintFadeTime [0 - *] - Determines the time in seconds before an onscreen hint is removed. The time can be any value 0 or higher.
g_deathDelay [0 - ?] - Determines the number of seconds before the message you get after dying fades and you can restart. The default is 3 seconds (3000), however lowering this value means you can recover from dying and start again much more quickly.
cg_cursorHints [0,1,2,3,4] - This option affects the way the various text prompts which replace your cursor appear, such as the prompt to switch weapons when standing over a weapon. When set to 0, all such "cursor hints" are not shown, at 1 the hint is shown and pulses quickly, at 2 it pulses more slowly, at 3 (the default) the hint is shown but is static, and at 4 I see no difference compared to 3.
cg_hudCompassSize [0 - ?] - This setting controls the size of the compass at the bottom left of the screen. When set to 0 the compass is not show, and at 1 it is the default size. Larger values mean the compass takes up greater screen space.
Information/Diagnostic Commands
Note: If any of the values shown in these commands are not correct, you may have to check to see if you have the latest BIOS, motherboard drivers, graphics drivers, etc. See the Essential Optimization section of this guide for more details.
sys_cpuGHz - Shows the current GHz of your CPU. Note that AMD CPUs have a "performance rating" (e.g. 3200+) which is not the same as their actual GHz speed, so don't get confused.
sys_gpu - Shows your current Graphics Processing Unit (GPU) or more commonly know as the graphics card.
sys_sysMB [*] - Shows the amount of system memory (RAM) detected by the game. For example1024 is 1024MB, which is 1GB of system RAM. Unfortunately COD 2 doesn't seem to detect system memory correctly at the moment, since many people with 2GB of RAM (including me) are having it incorrectly shown by the game as 1GB. This command doesn't seem to allow a change either, regardless of where it is used.
snd_restart - Restarts the game's sound engine. This can help resolve any audio glitches and/or apply any changes you've made to the sound commands in the console without having to restart the entire game.
vid_restart - Restarts the game's graphics engine. This can help resolve any visual anomalies or glitches and/or apply any changes you've made to graphics-based commands in the console without having to restart the entire game.
map_restart - Reloads the current map/level from the beginning.
meminfo - Displays some memory usage stats in the console.
Multiplayer Commands
Note: Server-side commands are not covered here. See the Technical Manual for the game, accessed by running Index.htm under your \Program Files\Activision\Call of Duty 2\Docs\TechHelp directory, then clicking the Technical Help>Dedicated Server Help option.
disconnect - Disconnects from the current server.
I need more help in filling in multiplayer (client, not server) commands which are of any use. Please let me know if you have any.
That covers the list of what I believe are the most useful commands I've discovered so far. While there are a wide range of other commands which can be used in the game to do everything from customize the HUD through to changing the glow intensity of the sun, these are not covered here firstly due to space reasons, and primarily due to the lack of performance impact or control over aspects of the game. Many other commands which sounded good were also tried, and ultimately not included as they had no visible impact, nor made any difference to performance. A few commands were not included simply because I had no idea what to look for in terms of their impact.
So feel free to experiment with the commands and see what you can discover. I would really appreciate any feedback you have about the commands, such as any corrections to the descriptions above, any commands not listed which have a major performance/functionality impact, and any details you can provide on making certain commands work better. Email Me with the results of your experimentation if you believe they are worth sharing with others here - people who make significant discoveries will be given full credit in this guide.
The next section has some neat tips and tweaks and wraps up the entire guide.
The guide is fast coming to an end. Read the remaining information on this page for some final things of note on Call of Duty 2 including a handy booster to your FPS, as well as my concluding thoughts.

Call of Duty 2 FPS Boost
In what happens to be an excellent (and now well-known) discovery, myshkinbob over at the NVNews Forums discovered two important facts regarding Call of Duty 2's performance under DX9. Read his thread for the full story, but basically his discovery centers around two important settings in Call of Duty 2:
Now that these issues have been identified, it should be relatively straightforward for Infinity Ward to address them in an upcoming patch. They are just a case of incorrect settings being applied at initialization of the graphics engine, and not a major bug in the course of things. However appreciation goes to myshkinbob for picking these up and letting everyone know about them, as the performance boost from these two changes can make a real difference on most peoples' machines.
Update: Earl Hammon, Jr from Infinity Ward has written to me to explain the r_gpusync issue. Basically the game's developers are aware of the additional FPS possible when r_gpusync is disabled (set to 0), however because this setting controls the synchronization of the CPU and GPU (your graphics card(s)), disabling this can also introduce input (mouse/keyboard) lag. This is because your input can at times be processed by the CPU faster than it can be drawn on screen. So on balance they chose the default of r_gpusync = 3 to maintain synchronization while still giving good performance. The same situation (input lag) can occur if the 'Optimize for SLI' or r_multigpu setting is enabled.
Update 2: The r_picmip issue discussed above has been resolved as of the 1.2 Patch, and there is no longer any need to use the manual method to fix this issue.
Call of Duty 2 and Dual Core CPUs
As with most recent games, I decided to see if Call of Duty 2 shows any practical benefits from being run on a dual core CPU (specifically an AMD X2 4400+). I opened up Task Manager, set it to the Performance tab so I could see the CPU usage history. Then I loaded up halfway through the first mission in the Train Yard, right in the midst of some action and played for a few minutes. Switching back to the Task Manager, I saw that only my CPU 2 core had been utilized at 100%, the other was sitting almost totally idle throughout.
So once again, it looks like another game has not taken advantage of dual core power as yet. Since COD 2 is optimized for dual graphics cards, it looks like your money would be better spent buying an SLI setup.
Update: As of the 1.2 Patch, Call of Duty 2 should take better advantage of Dual Core/HyperThreading systems with some performance improvements. Furthermore, this patch should also fix any issues on such systems, so it is a must-install for Dual Core/HT owners. See page 4 of this guide for details.
Disable Startup/Menu Movies
This has been covered elsewhere in the guide, but just to spell this tweak out in case you missed it - if you want to skip the introductory movies for Call of Duty 2 each time you launch it, there is a simple method for doing this. Go to the icon you use for launching Call of Duty 2 (Singleplayer and/or Multiplayer icons), right-click on it and select Properties. In the Properties box which opens, find the Target line and add a space then "+set com_introplayed 1" (without quotes) to the end of it. For example:
"C:\Program Files\Activision\Call of Duty 2\CoD2SP_s.exe" +set com_introplayed 1
Now when you launch the game with this icon, the intro movies are skipped every time. For more details see the Advanced Tweaking section.
Taking Screenshots
Taking screenshots in Call of Duty 2 is quite easy - simply press the F12 key and a screenshot is placed in your \Program Files\Activision\Call of Duty 2\main\screenshots directory in JPG format. If you want to use other methods for taking screenshots, try these:
I personally use the F12 key and Fraps as my main methods of capturing COD 2 screenshots.
Conclusion
In what has been a marathon month for me, this is the third tweak guide I have racked up in the last three weeks. I really enjoy Call of Duty 2, so I hope this guide does justice to what is a great game. I would really appreciate constructive feedback on this guide, so let me know what you think. Obviously if you have additional tips, tweaks and resources which you think will help other Call of Duty 2 players, I would really like to hear them from you so I can update this guide with them. I want to stress that for time reasons, I can't offer any tech support. That includes general requests for help in improving performance or figuring out a complex problem you have, sorry. Also keep in mind that I don't keep "secret tweaks" - if I know of something which improves performance or adjusts COD 2's functionality, I have already included it in the guide. You're welcome to drop in on the TweakGuides Forums if you want to seek some help from fellow gamers or to discuss this game futher, however please note that you should make sure to read the forum rules first before posting as it is a very strict forum.
Links and Credits
Check out the following sites if you want to do more reading on Call of Duty 2:
Call of Duty 2 Official Site
Infinity Ward Official COD 2 Site
Planet CallofDuty
CallofDutyFiles.com
Make sure to check back on this guide regularly as I will keep it updated with the latest information on Call of Duty 2.
Until next time, take care!