As a young cinemagoer I remember watching the preview of coming attractions, and I'd notice that without fail at least one preview would have a gritty voiceover saying: "If you only see one movie this year, make it this one!". Nowadays it's something you don't hear often, maybe because no recent film has been truly worthy of that level of hype, or possibly because the studios don't think we're stupid enough to buy it anymore. Either way, when I first started playing Crysis, I suddenly found myself wanting to say: If you only buy one game this year, make it Crysis!
Now before you think that I'm going to head off into a gushing fanboyesque serenade of all things Crysis, let me stop you right there. Let's be clear about some things: Crysis is not a revolution in first person shooters. It is not the greatest game ever made, nor does it change the way you will live your life forever. Marketing hype aside, it is however a landmark title, an absolutely stunning progression of video game graphics; one of the most photo-realistic and immersive first person shooters to date. For that reason alone, if no other, I urge you to consider getting Crysis. Of course before shelling out any cash to purchase it, you should first download the demo and see how it runs on your machine.

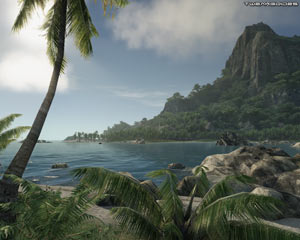
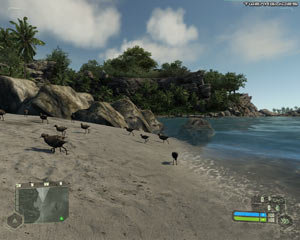
When Crytek released Far Cry back in 2004, it was hailed as an instant success. An immersive, beautiful game world filled with intelligent enemies and lots of room to explore. It was a welcome departure from many of its contemporaries - the lush tropical island setting was a world away from the cramped dungeons, dark hallways, and vast stacks of crates usually found in other video games. Gamers loved it, and as you'd expect, they wanted more. Soon after Far Cry's release, Crytek set to work in an effort to answer that call.
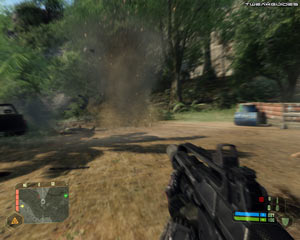
For three years now, Crytek have been busy pushing the technological boundaries of video gaming through their work on CryEngine2, the beast which powers Crysis. The results of their efforts are obvious - CryEngine2 crams virtually every type of special effect found in other games into Crysis: motion blur, depth of field, full dynamic soft shadows, soft particles, HDR lighting, destructible vegetation, detailed physics, realistic animations, and excellent artificial intelligence to name a few. The game world literally feels like it's a living, breathing environment, and that's not an exaggeration.
If there's one thing which most people will complain about, it's the amount of computing power necessary to make Crysis live up to its promise. This isn't surprising of course, as we've known for quite a while how advanced Crysis would be. While Crytek's programming skills are evident in the way the game seems to be quite optimized despite the sheer amount of work the engine is doing at any one time, there is still plenty of scope to tweak and customize the game further to suit your individual needs. This guide attempts to cut through all the conflicting information about Crysis and provide all the working tips and tweaks, along with a range of other useful information, all in one handy source. There are no quick fixes in the guide, but there's plenty of detail for those of you willing to experiment.
Note: This guide refers to the latest version of Crysis, Version 1.2.1. It also applies to Crysis Warhead and Crysis Wars when used in conjunction with the Crysis Warhead Tweak Guide. Make sure to check back regularly for updates.
Before getting into any game-specific settings and tweaks, this section covers the obligatory system optimization information I include in all my guides. If you've followed this advice recently, you can skip this section.
Many people report problems with this game and in almost all cases these are due to general system issues and not the game itself. With that in mind I strongly urge you to take some time and follow the advice below if you truly want this game, and indeed every other game you own, to run at its fastest and most trouble-free.
The place to start is with the TweakGuides Tweaking Companion. It is the complete system optimization guide for Windows users. Designed for novice and advanced users alike, it is written in plain English to help you genuinely understand all aspects of Windows and your PC. The guide covers every major topic, from the correct installation of Windows and critical drivers and software, through to recommendations for every significant setting and feature, all the major performance and convenience tweaks and customizations, as well as detailed troubleshooting advice. There are also links to a range of reliable free applications which can enhance your system and give you viable alternatives to purchasing commercial software. There are separate versions available for Windows XP, Windows Vista and Windows 7.
If you've ever wondered what common graphics and display settings like FPS, VSync, Refresh Rate, Antialiasing and Anisotropic Filtering are, and how they really work, then check out my Gamer's Graphics & Display Settings Guide for all the details in an easy to understand format. The guide also gives you a rundown on exactly how a game goes from a being a set of files on your hard drive to a 3D image on your screen, including relevant performance tips.
Finally, if you run an ATI or Nvidia graphics card, I have written two comprehensive guides which you should check out: the ATI Catalyst Tweak Guide and the Nvidia Forceware Tweak Guide. These guides cover absolutely everything about the latest graphics drivers, how to set them up correctly, as well as advanced tweaking, overclocking and benchmarking tips. They're a must-read for configuring your graphics card correctly.
The above information really will serve you well in the long run, not just in this game. If you don't optimize your system and keep everything updated and maintained correctly you will keep running into "mysterious" problems time and time again. Do yourself a favor and when you get a chance spend an afternoon or two optimizing your machine the right way with the guides above.
The next section goes into more detail about specific troubleshooting tips which address common performance issues with the game.

This section contains specific troubleshooting tips which address many of the common problems experienced by players. I can't stress enough the importance of taking the time to go through the checklist of advice below if you're having a problem with the game.
Official Support: The first place to look for official support details is in the Readme.txt file in your \Program Files\Electronic Arts\Crytek\Crysis\Support directory, as it contains important details like the minimum hardware requirements for the game, as well as known issues. Next, you should check the Official EA Support Site for more details of known issues and solutions. Finally, you can get community tech support via the Official Crysis Forums, as well as fan sites such as the InCrysis Forums.
Patch Problems: Some users are having problems installing the latest patch, such as seeing Error 1334 - this appears to be a bug in the installer. The main solutions include changing your Crysis introductory movie files back to their original names and location before patching (See Conclusion section for the intro movie file names and locations), and also uninstalling Crysis completely, rebooting and then reinstalling it again and attempting to patch. In particular see this thread for official solutions from Crytek for all patch-related problems.
The Latest Graphics Drivers: One of the easiest ways of gaining performance in Crysis, as well as resolving any problems you may be having, is to use the latest available graphics drivers for your system. See my ATI Catalyst Tweak Guide or Nvidia Forceware Tweak Guide for details on where to download the latest graphics drivers and how to install them 'cleanly'. Given the overwhelming and continuing popularity of Crysis and Crysis Warhead, major hardware manufacturers are well aware of its importance and are willing to constantly optimize their drivers to perform as well as possible in Crysis and Warhead, and quickly fix any outstanding bugs, so always grab the latest ones, even if they're beta drivers.
32-bit vs. 64-bit: Crytek have specifically mentioned that Crysis should run better under a 64-bit environment, and the streaming texture system is automatically disabled under 64-bit since it can manage larger amounts of memory. Most people and official benchmarks agree that Crysis runs at least 10-15% faster under 64-bit. Fortunately if you have a 64-bit operating system installed, such as Windows 7 64-bit, then the Crysis shortcut installed in Games Explorer will launch the 64-bit version of Crysis by default. If you attempt to manually launch Crysis64.exe directly, it won't work - the correct link to launch the 64-bit version of Crysis is the Crysis.exe file found under the \Program Files (x86)\Electronic Arts\Crytek\Crysis\Bin64\ directory. Alternatively, if you want to launch the 32-bit version instead, you can either create a new Desktop shortcut to \Program Files (x86)\Electronic Arts\Crytek\Crysis\Bin32\Crysis.exe, or edit the Games Explorer shortcut using the instructions in the TweakGuides Tweaking Companion.
SLI/Crossfire Setups: The Crysis demo does not properly support multi-GPU setups like SLI or Crossfire, but the full version of the game does as long as you use the latest graphics drivers and importantly, also use the latest patch (See page 4). You can try experimenting with the r_MultiGPU command in the Advanced Tweaking section to see if disabling or forcing multi-GPU support on your system has any benefit.
Lag: If you are getting a 'laggy' (unresponsive, or delayed reaction) feeling when playing Crysis, consider the following: in almost all cases lag is caused or exacerbated by low framerates. In either Singleplayer or Multiplayer, check your FPS using either the r_DisplayInfo 1 command, or FRAPS, and if it is often dipping below 15-20 FPS, or even more, especially during heavy combat or around certain special effects (e.g. ice), you will usually experience some lag. The only solution is to lower your settings and adjust command variables until your FPS rises. If you're experiencing lag only in online multiplayer, then press the TAB key and check your Ping value, shown in the far right column next to your player name. This value represents the total time in milliseconds for the game data to be sent to the server and back to your machine - the higher the value, the more laggy your online gameplay will be, so always choose servers with Ping times lower than around 100 if possible.
Defragmenting: Crysis is a large game, and as with most games these days, it is very important that you run a defragmentation program after installing the game (and after any patches or drivers) to reduce stuttering and loading issues. The normal Windows defragmenter is fine, however to get an even better result consider a commercial defragmentation package. More details are in the Drive Optimization chapter of the TweakGuides Tweaking Companion. Defragmenting is a critical step in reducing in-game stuttering.
Background Programs: The game's developers recommend that you disable all background applications - especially virus, trojan and spyware scanners and messaging utilities. These applications can and do use up valuable CPU resources, take up precious RAM, cause memory conflicts and crashes to desktop, but most importantly they interfere with read/writes to your hard drive effectively slowing it down and causing in-game stuttering. Full instructions on how to identify your startup programs and services and how to correctly disable unnecessary ones are in the TweakGuides Tweaking Companion. This is an important step you should not miss as it has a major impact on the smoothness and stability of the game.
Overclocking: Crysis can be sensitive to overclocking. If you've overclocked any components on your system and are having problems such as crashes, reboots and graphical anomalies, the first thing to do is set everything back to default speeds and try running the game. If you don't experience the same problems at default speed, or they're reduced in severity, then your overclock is the primary culprit. Either permanently reduce your overclock and/or increase cooling to regain stability. Don't assume that because other games run with stability at a particular speed that Crysis will do the same.
Heat Issues: Because Crysis is such a complex and stressful game, even if you don't overclock your system you will have to keep an eye on temperatures to make sure that your system doesn't crash or experience graphical anomalies through excessive heat. Most crashes that I've seen are to do with overheating systems - you will need to ensure plenty of air runs through your case so all your components can remain cool, and that any dust is cleared out regularly.
I cannot urge you strongly enough to follow the advice on this, and the previous page. Make absolutely sure that you take the time to go through the TweakGuides Tweaking Companion, because that alone will make the biggest different to the stability, performance and smoothness of Crysis. I realise most of you are after a patch or a tweak which will make all these steps unnecessary, but the reality is that Crysis is still an advanced game which is so demanding, it requires an optimized system to run smoothly and without issues. It may be boring to go through the TGTC for example, but it will give the biggest rewards to those who do, both in terms of performance and stability.
The remainder of this guide goes into more specific settings and tweaks which can help you better understand how the game works, and in turn improve your performance and customize it to suit your needs.
Official Patch
Crytek has released the 1.2 Patch for Crysis, with changes including both singleplayer and multiplayer gameplay tweaks, important fixes for a large number of issues, and a potential increase in performance in both DX9 and DX10 modes. The patch also contains all the fixes from the 1.1 patch. Note that the patch adds a 'Mods' section to the main settings screen (see further below), as well as the g_useHitSoundFeedback variable to control the new additional sound effect when enemies are hit - see page 12 for details. Also note that to get full object motion blurring in DX9 mode you now need to set r_motionblur 5 (instead of 4) - see page 10 for full details.
After installing the latest patch you may need to reload and readjust your Profile, but your custom config files and tweaks are unaffected. If you're having problems installing the patch, make sure to check the Troubleshooting Tips section.
Update: A 1.2.1 Hotfix patch has been released for Crysis. You must first install the full 1.2 patch above, then apply the hotfix to fix a security hole which can cause crashes when playing online.
Update 2: Crytek has announced that there will not be a future 1.3 Patch for Crysis, as they focused all efforts on Crysis Warhead.
Update 3: For those using Crysis Warhead and/or Crysis Wars, please check the Crysis Warhead Tweak Guide for details specific to those games.
Copy Protection
Crysis is protected by SecuROM copy protection, which requires a serial number during installation, and for online gameplay. It also contains a disk check component, which means you need to keep the DVD in the drive during play. It does not contain any activation or other online verification systems.
Mods
Given just how customizable CryEngine 2 is, and more importantly since Crytek have released the free SandBox 2 game editor, I have no doubt there will be plenty of amazing mods for Crysis. If you're interested in creating mods yourself, you can get the Sandbox 2 Editor for free by downloading the Crysis Demo, or if you already have the full version of the game, look under the Sandbox2 directory on the install DVD. If you want to get even more involved in modding Crysis, you can download the Mod SDK (Software Development Kit). Crytek has also released detailed Documentation for both the Sandbox Editor and the SDK.
To kick things off, Crytek has released an official free Crysis Tournament Map Pack which contains five new multiplayer maps for competitive or public gameplay.
If you're interested in trying out different user-made mods for Crysis, keep an eye on Crytek's official CryMod Portal which not only has tutorials and resources for modders, but also holds a mod database listing new and upcoming mods, some of which are extremely ambitious. As of the 1.2 Patch, installing mods in Crysis has become easier as there is now a built-in mod loader - the Mods section in the main settings screen - which when opened allows you to load or unload mods as necessary.
Some great user-made mods I recommend checking out:
Natural Mod - Changes the lighting and atmosphere of Crysis to make things more realistic, and can also improve performance.
Reality Enhancement Mod - Changes a wide range of features in the game, from weapons to vehicles to AI, to be more realistic.
As always, I will list more prominent/recommended mods above as I hear of them.
The next section starts our look at the Crysis In-Game settings in detail.
This section contains full descriptions and recommendations for all of Crysis' major in-game settings. You can use these to get a good balance between image quality and performance on your machine, however I can't give you precise performance impacts or specific instructions on what to turn on or off. It all depends on your particular hardware combination, and more importantly your personal taste for the trade-off between performance and image quality.
To access the in-game settings, click the Options link in the main menu, then refer to the relevant sections below. Make sure to click the Apply button each time you change any settings, and note that some settings require a restart of the game to be applied properly.
Profiles: It should be noted that any settings you change are applied to the Default profile, unless you create and load up another profile. This profile and its settings are then used for both Singleplayer and Multiplayer. You can create new profiles by clicking the Profile option, and each profile can then hold its own individual settings. This can be useful if more than one person is using the same machine, or more importantly, if you want to have different settings for singleplayer and multiplayer. Also note that your multiplayer player name is determined by your profile name - see the Name command in the Advanced Tweaking section.
Game Settings
Weapon Intertia: This setting controls the way in which your currently equipped weapon moves in your hands as you move around the game world. The further to the right the slider, the more the weapon will move side to side and up and down while you're moving around. If this bothers you, moving the slider to the left steadily reduces all such weapon movement, which may reduce realism but can also reduce distraction and may improve FPS.
Blood: If ticked, blood splatters will be shown when shooting enemy or living creatures, including splatters which may briefly stick to the screen, as though they've been sprayed onto your mask. The performance impact is usually negligible so set to suit your taste.
Subtitles: If ticked, spoken dialog will have subtitles. Has no performance impact so set to suit your taste.
Difficulty Level: There are four levels of Singleplayer difficulty: Easy, Normal, Hard and Delta. The main impact of this setting is to alter the way the artificial intelligence (the enemy) react and how effective your nanosuit will be. Specifically, at higher levels of difficulty the enemy progressively become faster at detecting you, and more of them will react with greater accuracy, and the time taken for your nanosuit to regenerate your health and its energy increases. Other important changes include the fact that at Hard and Delta you lose the ability to control mounted guns on vehicles while driving, and the enemy lose their 'red glow' effect, making them harder to spot and finish off. Additionally, at Delta difficulty you lose your crosshair, you don't get grenade warnings and the enemies speak Korean instead of English. Note that you can customize the difficulty settings by editing the relevant difficulty .cfg file - see the Advanced Tweaking section.
Multiplayer Settings:
These settings only apply to the multiplayer portion of the game and have no impact on singleplayer.
Static Display of Objective Icons: If ticked, you will see marker icons on your screen indicating the general direction of various objectives. For example in Power Struggle mode, if enabled, this option shows the direction and status of the various control points with graphical icons.
PunkBuster Protection: Crysis multiplayer is protected by PunkBuster anti-cheat software. You will need to tick this option if you wish to play on PunkBuster protected servers (which most are). If you're having problems with PunkBuster, download the PBSetup Tool and follow the instructions to manually update your PB version.
Tutorial Mode: If enabled, runs through a brief tutorial of how to use the various features of each online mode. If you've played the game modes before, you can disable this option here, or press the End key in-game to end a tutorial.
Quick Game Mode: The options in this section only apply if you choose to launch an online game via the 'Quick Game' link under the Multiplayer tab. You can set your preferences for the type of server you want to join.
Mouse & Keyboard Setup:
This section contains all your mouse and keyboard configuration options. Most are self-explanatory, and involve binding specific keys or buttons to various commands. However the following settings bear some description:
Invert Mouse: If ticked, pushing your mouse forward will make your character look down, and pulling your mouse back will make him look up. Set to suit your taste, has no impact on performance.
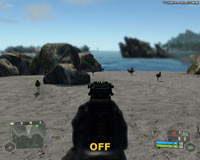
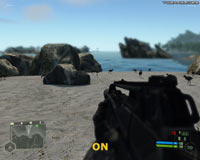
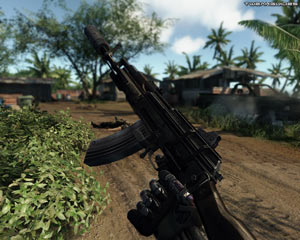
Simple Iron Sight: This setting determines how your weapons' iron sights are displayed when you bring them up for aiming (default is right-click). As the screenshot comparison above shows, when enabled, this setting effectively keeps your gun to the right, and leaves your crosshair visible for aiming. When disabled, a more realistic iron sight is shown and your character aims down it without a crosshair. In both cases if the Depth of Field effect is enabled (See Post Processing Quality below), it will still be used, and performance should be roughly the same. The main reason to change this option would be if you find it easier to aim using crosshairs rather than the 3D iron sights. If you prefer the normal iron sight, but just want to disable depth of field, see the g_dof_ironsight command in the Advanced Tweaking section.
Smooth Mouse: If ticked, this option smooths mouse movements, preventing jerkiness, especially at higher mouse sensitivity settings. Unfortunately it can also increase the feelings of 'mouse lag', so is best left disabled.
Suit Shortcuts: By default, whether this option is ticked or not, you can already access the suit menu by pressing the middle mouse button, or the V key, and either move your mouse in the direction of the suit power you wish to choose, or press a numerical key for each power. You can also press C at any time while holding a weapon to bring up the weapon customization options. However, with this option ticked, you can also activate any suit power simply by double-tapping a particular key (default keys shown):
Some people may wish to disable this option if they find they're accidentally enabling a mode when they don't wish to, e.g. activating Strength mode by accident when quickly tapping the space bar to jump around. Note that you can also adjust the double-tap time to prevent this by using the dt_time command variables - see the Advanced Tweaking section. Note further that you can also bind any key to a suit mode by editing the Actionmaps.xml file - instructions are once again in the Advanced Tweaking section at the bottom of Page 8.
Mouse Sensitivity: This slider controls the sensitivity of your in-game view to your mouse movements. The further to the right the slider, the more sensitive the reaction to movements. Importantly, if you find that your mouse is becoming less responsive at times, also known as 'mouse lag', then firstly make sure to untick the Smooth Mouse option (See further above). Also make sure that VSync is not being forced on through your graphics card's control panel. DX10 Mode may also result in more mouse lag than DX9 mode. Commonly though, mouse lag is due to low framerates. Use the r_displayinfo 1 console command, or a utility like FRAPS to measure your framerates, especially during periods of heavier lag, and if your framerate is around 20FPS or less, you will probably experience some unavoidable mouse lag; alter your settings further to raise your FPS if possible. Note that you can raise your mouse sensitivity much higher than allowed by this in-game slider, by using the cl_sensitivity command; also see the i_mouse_accel command if you wish to enable or disable mouse acceleration in the game - both are in the Advanced Tweaking section.
System Settings
Volume Sliders: These sliders control the volume level of the in-game sound effects, music and dialog, and can be adjusted to taste as they have no performance impact. On multi-speaker setups you can also adjust individual speaker volumes using the s_MusicSpeaker commands in the Advanced Tweaking section.
Suit Active Voice: This option controls the voice used to announce nanosuit configuration changes and status warnings. For example each time you select a new suit mode, the suit voice will announce your choice. You can select either a Male or Female voice, or disable the voice altogether by choosing Off. There is no significant performance impact, so set to suit your taste.
Voice Over IP: This option is only applicable to multiplayer. If the 'Enable Voice Comms' box is ticked, and you have a microphone connected to your PC, when in Multiplayer you will be able to communicate with other players using Voice over IP (VOIP). You can adjust the volume of your voice using the slider. If you are experiencing a fluctuating Ping, in-game lag, are on a slow connection, or if you don't want to use VOIP, then I recommend disabling this option.
Graphics
Brightness, Contrast, Gamma Correction: These sliders allow you to alter the overall brightness of the game image. These have no impact on performance, so set to suit your taste.
HUD Color: This area lets you select the color scheme used for your Heads Up Display (HUD), which is the information text and graphics overlaid on the screen. It has no impact on performance.
Video Mode: This option lets you choose the resolution of the game image, measured in pixels wide by pixels high. The higher the resolution, the more detailed the image on screen, and also the less jagged lines there will be (See Anti-Aliasing Quality below), but the lower your performance. In fact if all else fails to improve your FPS in Crysis, reducing resolution will probably be necessary, since it has a major impact on your performance. For more details see the Resolution section of my Gamer's Graphics & Display Settings Guide. The number of resolutions available here are limited by what both your graphics card and monitor can handle. If you wish to set a custom resolution, use the r_Height and r_Width commands, as covered in the Advanced Tweaking section.
Vertical Sync: Just a note that VSync is disabled by default in Crysis, and this provides the best performance. However if you wish to enable it, either force it via your graphics card's control panel, or use the r_Vsync console command. Note that if you do enable VSync using either method, I strongly recommend also enabling Triple Buffering using the d3d9_TripleBuffering setting, or if using DX10, via one of the tools in the Triple Buffering link just above.
Update: As of the 1.1 Patch, Crysis now has an in-game VSync option to control Vertical Sync. This controls whether VSync is enabled (ticked) or not (unticked), whether in DX9 or DX10 mode.
DirectX 9 vs. DirectX 10
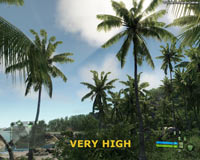
By default, when you run Crysis in Windows Vista on DX10-capable hardware, it will automatically run in DirectX10 mode, whereas Windows XP can only run in DirectX9 mode. You can see what mode the game is running in at any time by using the r_DisplayInfo 1 command. While you can't force DX10 in XP, you can force DX9 mode in Vista, and this can provide a significant performance improvement for a barely-noticeable decline in image quality. To do this, right-click on the Crysis launch icon in Vista's Games Explorer and select 'PlayDX9 ', or right-click on the game's desktop launch icon, select Properties, and in the Target box one blank space after the last character add -dx9.
Most people are wondering what the difference between DX9 and DX10 actually is. In practice the three main differences are:
1. You cannot access 'Very High' mode in DX9 by default.
2. There are more subtle shader effects in DX10 mode.
3. There are some DX10-only command variables, e.g. r_UseGSParticles, d3d10_CBUpdateMethod.
Fortunately, on the first count, you can force Very High mode in XP DX9 using some .cfg editing - see the last page of this guide for detailed instructions on how to do this. On the second count, the most obvious difference I've seen is in the way in which motion blurring is more detailed in DX10 by default - for example when throwing a grenade, or moving your rifle quickly, your arm and weapon are blurred in DX10 mode; using the exact same motion blurring setting (r_MotionBlur=3) in DX9, there is no such additional blurring. However you can use the r_MotionBlur=5 setting in DX9 mode to get a similar though slightly less subtle effect. Finally, in my testing I haven't found any DX10-specific variable that actually makes a significant difference to the game at the moment.
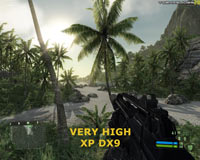
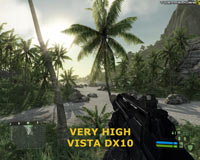
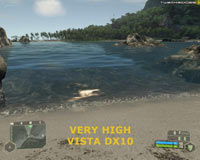
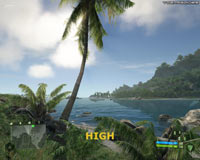
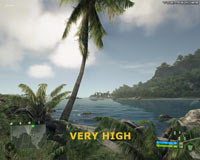
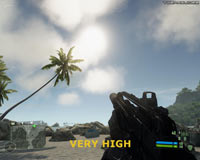
Thus for the most part the visual difference between DX10 and DX9 is not major enough to worry about, especially considering the performance hit of running in DX10 mode is quite significant. On balance, for the moment I would strongly recommend that if given the option, you run in DX9 mode given how system-intensive Crysis is, as on my 8800GTS 640MB for example, it provides a good 10-20% performance boost and feels much more responsive. Above are some screenshots taken at the same scene, with XP DX9 Very High mode vs. Vista DX10 Very High mode, and as you can see for most intents and purposes they're almost identical in appearance. Again, there appear to be subtle shader differences that no screenshot can capture, such as the difference in motion blurring and depth of field, but it's nothing of any real significance, and can be recreated using appropriate advanced tweaks.
Update: Note that in recent months, both after the release of the 1.2 Patch for Crysis, the release of Service Pack 1 for Vista, and graphics driver improvements, the performance difference between Crysis DX9 and DX10 mode is not as major as it once was.
The next page continues the In-Game Settings descriptions.
Anti-Aliasing Quality: Anti-Aliasing (AA) is a method used to smooth the appearance of jagged lines in a game; the higher the sample rate, the smoother the image. It's described in more detail on this page of the Gamer's Graphics & Display Settings Guide. This option allows you to choose whether to enable this function or not, and the sample rate of the AA if used. Note that any option ending in Q is Quality mode, which looks better but has more of a performance hit. However AA in Crysis is different in several respects:
In general I recommend that you just use r_UseEdgeAA 1 to smooth out the jagged edges, rather than enabling any AA, as this gives the best combination of performance and image quality, especially since regular Antialiasing doesn't address the jaggedness of foliage at all, which is the most common complaint people have with Crysis' appearance.
Fullscreen: If ticked, the game will run in fullscreen mode, if unticked the game will run in a small window. It is recommended that you run in fullscreen mode for optimal performance due to memory management, and the ability of Windows to automatically disable desktop effects in Vista which could otherwise reduce performance in windowed mode.
Autodetect: By default the game will try to detect your system hardware and set what it believes to be the best settings to suit that hardware. While this is a good starting point, it is not as optimal as manually configuring the advanced options (see below), as well as undertaking advanced tweaking, since no software can know what the best balance of image quality and performance is to suit your particular tastes. Only you can determine what trade-offs are acceptable to you.
Advanced
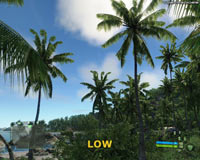
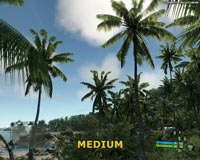
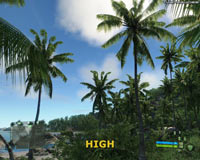
This section contains a range of advanced graphics options which can have a significant impact on performance. They can each be set to either Low, Medium, High or Very High, and you should experiment to see what mix of settings best suit you and your system, using the information provided below. By default you can't set any option to Very High in Windows XP, you can only do so when running in DX10 mode under Windows Vista. However there is a simple method of forcing Very High in XP (or Vista DX9 mode), and this is covered in detail on the last page of this guide. In general Very High in XP is identical to Very High in Vista for all intents and purposes, and indeed performs slightly better at the moment. The actual performance and image quality differences between DX9 and DX10 are discussed and demonstrated on the previous page.
For each setting I provide a general analysis and then a more detailed listing of precisely what major impacts can be felt at each level below Very High in the game in non-technical terms. If you want more details of precisely what is being changed at each level, look at the relevant .cfg file under the \Program Files\Electronic Arts\Crytek\Crysis\Game\Config\CVarGroups directory, and then look up the corresponding command variables in the Advanced Tweaking section for more details.
Texture Quality:
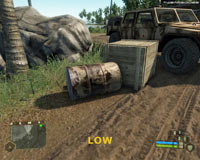
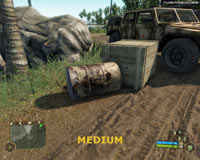
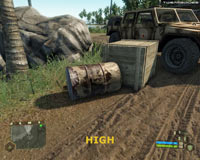
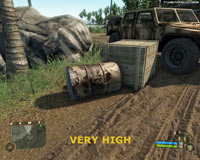
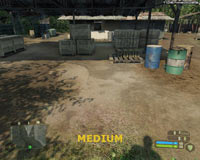
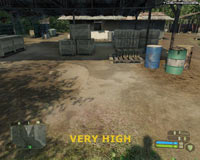
This setting controls the amount of detail visible on surfaces in the game world. The higher the setting, the more detailed surface textures will be. The screenshot comparison above shows the level of detail on the surface of objects, foliage and terrain at the various settings. To see an animated screenshot comparison which makes the differences clearer, click this link: Crysis_Textures.gif (1.3MB). Note in particular the level of surface detail on the rusty barrel, the detailing of the tyre tracks on the muddy ground, and on the rocks in the background. The performance impact is not necessarily major, the main issue with raising Texture Quality is that it increases stuttering, especially at higher resolutions on video cards with lower Video RAM.

Objects Quality:
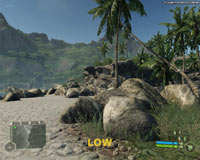
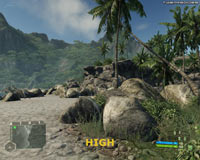
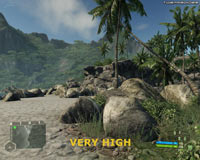
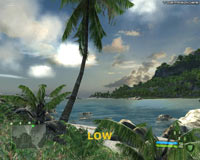
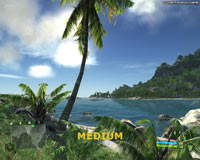
This setting controls the general level of detail in the game world, such as the complexity of the terrain, and the amount of foliage visible. Look at the screenshot comparison above to see the change in details, noting in particular the appearance of the rocks to the far right and the foliage in the distance. To see an animated screenshot comparison which makes the differences clearer, click this link: Crysis_Objects.gif (1.3MB). The performance difference is noticeable, especially when taken to Low. The most significant impacts of this setting at each level below Very High are:


Shadows Quality:
This option controls the way in which shadows appear in the game, with the higher the setting, the better the quality of shadows cast. The performance impact can be very noticeable, since shadows are quite complex in Crysis and use a variety of effects. The most significant impacts of this setting at each level below Very High are:
Physics Quality:
This setting controls the impact of physics on the game world. The higher the setting, the more interactive and realistic the game world will be, and in turn the more gameplay options you will have available to you when determining things like combat strategy. The most significant impacts of this setting at each level below Very High are:
The next section continues the In-Game settings descriptions.
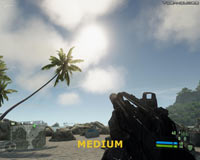
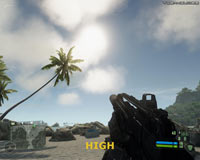
Shaders Quality:
This setting has quite possibly the most major impact on both performance and image quality in Crysis, and the screenshot comparisons above demonstrate this quite clearly. It determines the overall quality of shaders used in the game, and Crysis is heavily dependent on shader effects for virtually every visual aspect. Note that this setting must be set to High or Very High for Anti-Aliasing or Edge AA to work in the game. The most significant impacts of this setting at each level below Very High are:

Volumetric Effects Quality:
This setting basically controls the appearance of the sky, the richness and reality of it. It has a moderate impact on performance, especially noticeable at the Very High level. The most significant impacts of this setting at each level below Very High are:
Game Effects Quality:
This setting doesn't necessarily have any noticeable visual impact on the game, it mainly controls the reality of combat. Therefore the most noticeable performance and visual impacts will be felt when you are in combat situations, particularly when fighting a large number of enemy. The most significant impacts of this setting at each level below Very High are:
Post Processing Quality:
This setting controls the various post-processing effects - so called because they're applied after the image has already been composed. In other words they're additional layers of effect on top of the current image which enhance or adjust the image to look better or more stylized. This setting has a major impact on performance, especially at the higher levels. The most significant impacts of this setting at each level below Very High are:

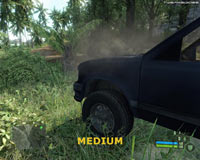
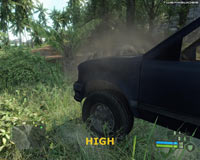
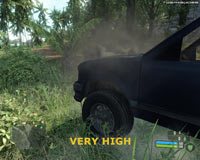
Particles Quality:
This setting controls all the particle-based effects in the game. Any time you see smoke, dirt, even heat distortion or small insects, they are dependent on the Particles Quality setting for their richness and overall effect. The screenshot comparison above demonstrates how smoke is affected at different levels of this setting. The setting can have a pronounced impact on performance in areas with lots of particle effects - such as during explosions - but at the same time, since Crysis uses a threaded particle renderer, most dual or multi-core systems will not notice as major a slowdown as would normally be expected (See e_particles_thread and gpu_particle_physics in the Advanced Tweaking section). The most significant impacts of this setting at each level below Very High are:
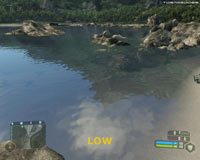
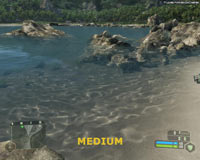
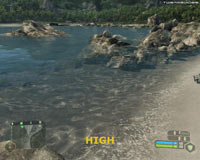
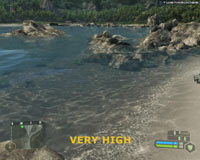
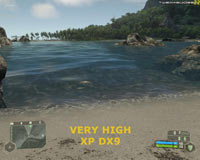
Water Quality:
As the name suggests, this setting controls the way in which bodies of water behave, such as the ocean surrounding the island. The most obvious performance and image quality impacts are therefore felt in areas where water is visible, and when under water. The most significant impacts of this setting at each level below Very High are:
Sound Quality
This controls the sound quality in the game and obviously has no impact on image quality, and indeed also has minimal impact on performance on most systems with standalone sound cards. The most significant impacts of this setting at each level below Very High are:
Update: As of the 1.1 Patch, the following settings have been added to this section:
Motion Blur
This setting independently controls the level of motion blurring used in the game. It is the same as the r_motionblur command variable (See Advanced Tweaking section), and when set to Off, disables motion blurring altogether (r_motionblur 0); when set to Medium or High r_motionblur 1 is used to provide motion blur which is mainly visible when changing your view rapidly; when set to Very High (DX10 mode only), it uses r_motionblur 3 which under DX10 mode provides full view and object motion blur. Note that you can enable full view and object motion blur in DX9 mode by using r_motionblur 5.
There is also an additional slider below this setting which controls the amount of blurring used when motion blur is enabled. This setting corresponds with the r_MotionBlurShutterSpeed command variable (again, see Advanced Tweaking). At far left the slider uses a value of 0.005 for the cvar, and when at far right the value is 0.03; the default at the middle of the slider is 0.015. The further to the right the slider is taken (the higher the value for the cvar), the more blurring you will see if motion blur is enabled, and this may reduce performance or introduce a greater feeling of 'lag'.
Now that you've got a good idea of precisely what all the in-game settings actually do, I recommend spending some time reaching a reasonable compromise of the various setting levels, such that your average framerate is typically at or above 20FPS in most circumstances. This might sound low, but firstly Crysis still feels relatively smooth even at such a low framerate, and secondly, and more importantly, you can now experiment with the commands in the Advanced Tweaking section to raise this framerate slightly, particularly during combat, to better suit your needs.
Alternatively, if you want to work backwards, you can set all your in-game settings to High or Very High, and then selectively disable features and effects you feel you can sacrifice or don't want, by working through the Advanced Tweaking section, and hence try to maximize your FPS that way. Also see the Conclusion section for one other method I propose for getting Very High effects on the cheap.
Either way, the next section covers Advanced Tweaking, and will reward patient readers who invest time in reading and experimenting with the multitude of commands that follow.
While Crysis has many in-game options for adjusting visual quality and performance, and we've covered these in detail in the In-Game Settings section, fortunately that's not where the tweaking stops. The CryEngine2 game engine powering Crysis is extremely customizable, and there are a large number of parameters which can be adjusted to further alter the image quality and performance of the game. There are three main ways to tweak Crysis variables: using the in-game command console; by editing configuration (.cfg) files; and via the command line of the Crysis launch icon. This section of the guide covers both how to use these methods correctly, and a range of the most useful variables which can help you conduct advanced tweaking to suit your needs.
I must stress that advanced tweaking requires thought, patience and effort; there are no quick fixes here so please read all the instructions on this page carefully before proceeding.
Command Console
The Crysis command console can be opened or closed at any time during the game by pressing the '~' key (the key above TAB, or below ESC). The console provides a real-time method of accessing the CryEngine2 game engine and altering command variables dynamically.
By default, you are restricted to only a handful of console commands you can use which will work; entering any other valid commands will simply receive an error message. This 'restricted mode' can be permanently lifted by either using the con_restricted 0 command in the console, or by adding con_restricted=0 to your System.cfg file (See further below). More importantly, even after removing restricted mode, some commands are still 'system' commands which can't be changed via the console, and can only be altered if inserted into System.cfg or an original system file such as diff_normal.cfg. See the Config Files section below for an explanation of this.
A full list of all the possible command variables is provided on the following pages, as well as more detailed descriptions for a range of the most useful commands. You can also list commands in the console at any time by entering the first few letters of them and pressing the TAB key. For example entering r_ and pressing TAB will list all the console commands starting with r_. To use a console command correctly, enter the command variable and then the value to assign to it. For example, to turn Motion Blur off using the command console, open the console and type the following, then press enter:
r_motionblur 0
If you just want to see what the current value is for a variable without changing it, enter only the command variable name with no attached value - e.g. just enter r_motionblur in the console to see the current status of this variable. If you want to see some explanatory text on what it does, enter the variable name followed by a question mark, e.g. r_motionblur ?.
In general using console commands is the best way to test and see the impact of certain variables on your image quality and performance before you commit them to a .cfg file. There are also several console commands which provide useful diagnostic or system information, such as r_displayinfo 1 to see your current FPS.
Config Files
Crysis has a range of configuration (.cfg) files spread throughout its directories which hold various configuration variables for the game. Most of these are generated by the game itself, or hold important presets, and are usually best left untouched. The main configuration files which are relevant to advanced tweaking by users are as follows:
Each of these files can be opened, viewed and edited using any text editor, such as Windows Wordpad or Notepad. Importantly, before making any changes to any of these files, make sure to create a backup and store it somewhere safe. Each of these files has a particular use, and the instructions for proper usage and optimal tweaking of these files is provided further below for each file.
Game.cfg
This file can be found under the \Documents and Settings\User\My Documents\My Games\Crysis directory in XP, or \Users\User\Documents\My Games\Crysis directory in Vista. Game.cfg holds all the options you've chosen in the in-game settings screens. As such, there is no reason to edit it directly, you should alter your settings from within the game to prevent any problems. The game needs to write to this file whenever your in-game settings are changed, so don't write-protect it or add additional commands to it - if you wish to alter any of the commands in this file, insert them into an autoexec.cfg file, and if you wish to add new commands to run at startup, use the System.cfg or difficulty .cfg files for that purpose. See below for an explanation.
System.cfg
This file doesn't exist by default, so you need to create it by going to your \Program Files\Electronic Arts\Crytek\Crysis directory, right-clicking on an empty spot and selecting 'New>Text Document'. Then rename this .txt file to System.cfg (not System.cfg.txt). By default Crysis looks for the presence of this file each time it starts, and if the file exists and contains valid commands, they will be automatically executed as the game loads up. As such, this file is the perfect place to store most of the commands you wish to apply to Crysis at startup, particularly low-level engine commands.
The format for entering a command in a config file is different to that of commands used in the console. If you want to disable motion blur for example, the console command is r_motionblur 0, but when entered in the config file, it needs to be r_motionblur=0, and every command needs to be on a separate line.
Autoexec.cfg - Some people recommend creating an autoexec.cfg file in the same directory, instead of, or in addition to System.cfg. This is fine, since any commands in such a file will also be executed automatically when Crysis loads up. However it appears that any commands in an autoexec.cfg file are applied after the game engine has loaded, and not necessarily during engine startup, and this may impact on whether certain low-level commands (e.g. r_Driver) are successful or not. In particular, it appears that due to the loading sequence of .cfg files, that commands held in game.cfg may override those in System.cfg during startup, so if you wish to alter any of the game.cfg commands, use autoexec.cfg specifically for those.
Importantly: Some system commands still cannot be altered by using System.cfg, autoexec.cfg or any other custom user .cfg files. It appears they can only be altered when entered in an original Crysis system file, such as one one of the difficulty .cfg files (e.g. diff_normal.cfg). These commands are denoted by (system) on the following pages, and you should see the Diff_ file section further below for more details.
So on balance I recommend using System.cfg for your custom commands, and then any commands which don't work in system.cfg, first try inserting them into an additional autoexec.cfg file, and then if they still don't work insert them into the relevant difficulty.cfg file as necessary.
Finally, you can always execute commands in any existing or custom .cfg file you place in the same directory as Game.cfg by using the exec command. E.g. create a Mytweaks.cfg file, fill it with various commands, and then within Crysis, at any time you can open the console, type exec Mytweaks.cfg and they will all be executed straight away - though clearly commands which need to be altered at startup won't work this way.
Sys_Spec_
These .cfg files can be found under the \Program Files\Electronic Arts\Crytek\Crysis\Game\Config\CVarGroups directory, and hold the specific commands to be applied at the various levels of each in-game setting. For each in-game setting there is an appropriate file of the same name. For example, to hold the variables for the Post Processing Quality setting, there is a file here called sys_spec_PostProcessing.cfg. At the top of this file are the default settings, and these correspond with the Very High value for Post Processing. The group of variables at the top are assigned a numeric equivalent of '4' for Very High, and beneath them, you'll find the [1], [2] and [3] groups, which equate to Low, Medium and High respectively. The way the files work is that the default commands defined under 4 at the top apply to each and every other level of this setting, unless otherwise specified.
For the most part it is not recommended that you alter these files directly, as the best method of changing these settings is to insert the same command variables with new values into a system.cfg file, and they will automatically load up at startup and override the existing values shown here. However, aside from seeing precisely which variables are being altered at what particular level of each setting, there is one use for these files which is very handy, and that's to force Very High mode for particular settings, something which is not normally possible in Windows XP, nor in Windows Vista DX9 mode - see the conclusion of this guide for all the details.
Diff_
There are four files starting with diff_ under your \Program Files\Electronic Arts\Crytek\Crysis\Game\Config\ directory. Each one corresponds to the in-game difficulty setting of the same name, and note that diff_bauer is the file for Delta difficulty in the game. These files hold the various parameters which are affected when you alter the game difficulty. For example if you compare diff_easy with diff_bauer, you will see the variable g_playerSuitArmorModeHealthRegenTime = 8 in the easy file, while the same variable has a value = 25 in the Delta (Bauer) file. This means that to regenerate your health back to 100% takes roughly 3 times longer when in Armor mode at Delta difficulty compared to Easy difficulty.
To begin with, find the difficulty file corresponding to your in-game difficulty setting, and then you can alter the parameters to better suit the particular challenge you're after. One particular difficulty aspect which is more related to atmosphere than difficulty in my opinion is the ai_UseAlternativeReadability variable. When set to 1, it forces the Korean soldiers to speak English, which can be quite unrealistic. You can set this to 0 to force the Koreans to speak Korean, something which normally only happens at the Delta difficulty level. Check the rest of the commands in the Advanced Tweaking section for more details of what the other settings here do. Note that some of these difficulty settings are tied to saved games. For example if you change ai_UseAlternativeReadability and then load up a saved game, it will revert back to its old value as stored in that saved game. In that case, you must alter the variable then save the game again to store the new setting.
Important: These difficulty .cfg files have another very handy use which we can take advantage of. Ordinarily if you want to override certain console commands you could insert them into your System.cfg or Autoexec.cfg file and give them the desired values. However it seems that certain commands, such as those in the difficulty files themselves, as well as a whole host of other commands, cannot be altered this way. The only way to alter them appears to be to enter them in an 'original' .cfg file, that is, a file which the game itself has created and gives special permission to load altered variables from, or which loads at a certain critical point in the startup sequence. The diff_ .cfg files are one such file, and so any commands on the following pages which are denoted by (system), or those commands you find do not change even when entered in System.cfg, should be entered at the very bottom of the relevant diff_ .cfg file which matches your current in-game difficulty setting.
For example, by default you cannot alter the command for the facial animation system (ca_UseFacialAnimation), regardless of whether you use it in the console, or in System.cfg, Autoexec.cfg, the command line, etc. However if you insert ca_UseFacialAnimation=0 at the bottom of your diff_normal.cfg file, one or two lines below the last entry, then close and save it, the next time you launch Crysis using Normal difficulty, the command will be accepted and the facial animation system will be disabled when playing.
Actionmaps.xml
This .xml file found under your \Documents and Settings\User\My Documents\My Games\Crysis\Profiles\[Profilename] in XP, or \Users\User\Documents\My Games\Crysis\Profiles\[Profilename] in Vista, is not a .cfg file strictly speaking. However it does hold the control bindings for the game, and can be edited to alter or customize the bindings, although generally speaking it's best to do this from within the game itself.
The file is organised into sections called 'actionmaps', and each actionmap is a set of key/button mappings for a particular game mode. For example there is an actionmap section for Helicopter controls called actionmap name="Helicopter", which means everything below that section up to the next actionmap is key and button bindings which only apply when flying a helicopter. To change your common in-game bindings, go to the section starting with actionmap name="default". There is also sections for multiplayer-specific bindings, and of course other vehicles and modes.
One reason you may wish to edit your bindings here is because the in-game options don't allow you to set the same key for two commands at the same time, whereas you can do so here. Importantly, you can also bind individual suit modes to particular keys (thanks to Ralf Ullrich for the info). To do this, first go to the actionmap name="player" section of the Actionmaps.xml file, and under this section make a blank line and insert the following - one set for every mode:
<action name="defensemode" onPress="1">
<key name="Z"/>
</action>
In the above example, the Z key is bound to Armor Mode, and a single press of it will activate that mode. However in place of defensemode above, you can substitute the following: speedmode for Speed Mode; strengthmode for Strength Mode; and suitcloak for Cloak Mode. And in the key name line you can substitute any key you wish.
Command Line
You can implement any console command, as well as a range of custom commands, via the command line. The way to do this is to right-click on your Crysis launch icon, select Properties, and one blank space after the last character in the Target box, add your command with a plus sign in front of it. For example, if you wish to disable motion blur via the command line, add +r_motionblur 0. You can add multiple commands, each separated by a single blank space and with a + sign in front of each of them, as shown below:
"C:\Program Files\Electronic Arts\Crytek\Crysis\Bin32\Crysis.exe" +r_motionblur 0 +r_width 800 +r_height 600
In the example above, motion blur is disabled, and the game resolution is set to 800x600 pixels at startup. It makes no real difference whether you choose to implement command variables this way, or via the regular method of using a .cfg file as covered further above, although using a .cfg is easier when setting multiple commands.
More importantly, there are several command line-specific commands which can only be used this way. They are applied the same way as above, however they differ in that they have a - sign in front of them, instead of a + sign. At the moment I'm only aware of three useful command line-specific commands: -DX9 which forces DX9 mode, -DX10 which forces DX10 mode (in Vista only), and -Devmode which forces Developer Mode. I will add more as they come to light.
Again, these command line parameters work only if applied in the Crysis launch icon, whereas the rest of the command variables listed on the following pages can work via all three of the methods on this page.
The next page starts our comprehensive look at all the major Crysis command variables.
Crysis has over 1,600 Command Variables (cvars for short) which you can use to thoroughly tweak the game. As covered on the previous page, you can alter these variables either using the game's command console, via a command line, or in .cfg files. However depending on the type of cvar you're trying to alter, you may need to use a particular approach, so make absolutely sure to read and understand all of the usage instructions provided on the previous page first before attempting to use these cvars, as otherwise they won't work.
This section lists descriptions for all the major Crysis cvars I have personally tested and found useful, grouped by general function. In particular, I have focused on commands which have noticeable visual, gameplay or performance impacts. It's impossible for me to cover every single one of the 1,600+ cvars in detail in this guide, as doing so would literally take up 20-30 or more pages. So again, the list below are the commands which my testing has revealed to be of some use to most players. If you wish to view and test all the commands in Crysis for yourself, you can download the full list here: Crysis_Commands.zip (12KB).
It's important to note that there are no magic tweaks which greatly increase performance without any sacrifice, or which make Crysis playable at High or Very High on low-end systems, so if you're after a quick fix or a minor miracle, you won't find it here. Instead, readers who take the time to go through this list, have the patience to experiment and think about what is written below, will be able to make intelligent tradeoffs that minimize image quality decline in return for extra performance and/or customize the game to better suit how they wish for it to look and play.
Some important things to remember about these command variables:
General Gameplay Commands
cl_fov [value] - Determines your Field of View (FOV) in degrees. The higher the value, the more of the screen you can see, the lower the value, the more 'zoomed in' your view appears. The default of 60 degrees should suit most people, but some people - especially those using widescreen displays and/or custom resolutions - may wish to change this to better suit their display. The FPS impact will vary depending on the scene, since both increasing FOV can lower FPS due to more things on screen at one time, and decreasing FOV can zoom in more on complex scenes, thus lowering FPS as well.
cl_hud [0,1] - If set to 0, removes the Heads Up Display (HUD), as well as your suit menu. The main use for this command would be when taking screenshots.
cl_hitblur [value] - Determines the extent to which your vision is blurred when hit. Higher values increase the blur effect, 0 disables it.
cl_hitshake [value] - Determines how much your view shakes when hit. High values increase the shaking, 0 disables it.
cl_sensitivity [value] - This command is the same as the in-game mouse sensitivity option. The difference is that here you can set it above the maximum value allowable in-game, further increasing your mouse sensitivity. Note that if you're suffering mouse lag even when using high sensitivity values, it's usually due to low framerates - see the In-Game Settings section.
i_mouse_accel [value] - Determines whether mouse acceleration - that is the way in which the mouse exponentially increases in speed as it is moved - is enabled, and to what extent. A value of 0 disables mouse acceleration, and higher values enable it to greater effect.
dt_time [seconds] - If you've enabled the 'Suit Shortcuts' option in the in-game settings, this command determines how many seconds between each keypress is considered a double-tap. For example if set to 0.40, if you press the S key twice within 0.4 seconds, it will be considered a double-tap to activate Shield Mode. Similarly, the dt_meleeTime command works the same, except it applies to detecting double-taps during combat, where you may want slightly higher times to prevent other rapid key presses from mistakenly changing your suit mode; or possibly the opposite - lower times to activate several suit modes much more rapidly in succession.
r_GetScreenshot [0,1,2] - If this command is set to 1 or 2, it immediately takes a screenshot and places it in your \My Games\Crysis\ScreenShots directory. By default the F12 key is bound to this command, so if you wish to take a screenshot just press F12.
capture_file_format [jpg,bmp,tga,hdr] - Allows you to set the format for screen captures. The default is JPG.
capture_folder [path] - Determines the path to which screen captures are made, can be specified manually, e.g. capture_folder C:\Temp. The default output folder is the \Program Files\Electronic Arts\Crytek\Crysis\CaptureOutput directory, created when you first capture something.
capture_frames [0,1] - If set to 1, this begins continuous screen captures multiple times a second in the format specified by the capture_file_format variable, to the path specified by capture_folder. If you just want to capture a single frame, use the r_GetScreenshot command instead.
e_screenshot [1,2,3] - There are a range of commands starting with e_screenshot that can be used to take a variety of types of screenshots in the game. You can use commands such as e_screenshot_file_format, e_screenshot_width and e_screenshot_height to set the parameters for the output of the screenshot. The default output folder is Screenshots found under your \Program Files\Electronic Arts\Crytek\Crysis\Game\ directory.
e_time_of_day [value] - When typed without any value, this command shows the current time of day in hours. It doesn't seem as though you can force a specific time of day using this command. The e_time_of_day_speed command seems to control the rate at which time changes, but changing it beyond the default value also seems to have no impact (system). If you just want to change the rate of time (e.g. for slow motion), use the time_scale command instead.
time_scale [value] - This setting allows you to control the rate at which time passes. Any value below 1 slows down time (0 freezes everything), and any value above 1 speeds up the passage of time. Note that the time of day doesn't seem to change no matter how high you raise this setting.
r_CustomVisions [0,1] - If set to 0, disables custom vision effects, such as the way your view looks when peering through Binoculars. Some people may prefer to disable this setting simply out of preference for the way it looks, but beware it can affect other vision modes used later in the game, such as Heat Vision.
r_DrawNearFoV [value] - Determines the Field of View (FOV) only for objects near the player; in effect this means your own arms and the gun you're carrying. By altering this value you can make your weapon and arms smaller or larger, and there may be an FPS impact associated with this as well depending on how much it changes. To change your overall FOV, see the cl_fov command.
r_NoDrawNear [0,1] - If set to 1, disables near objects, which essentially means your character's gun and arms will disappear. This may or may not improve FPS, but the main use for this cvar would be if you wish to hide your gun.
i_iceeffects [0,1] - If set to 0, disables weapon effects for ice environments, which may boost FPS in such circumstances (system).
i_rejecteffects [0,1] - If set to 0, disables things like ejecting shells from projectile weapons, which can boost performance but reduces realism to a slight extent.
System Information / Diagnostic Commands
r_DisplayInfo [0,1,2] - When set to 1, displays a set of useful information about the current scene, including your current Frames Per Second (FPS), how many triangles there are (Tris), which in turn indicates how complex the scene is, and whether the game is running in DX9 or DX10 mode among other things. Note that a value of 0 or 2 appear to disable this display, even though 2 is supposed to provide a more detailed display.
sys_enable_budgetmonitoring [0,1] - If set to 1, displays a set of sliders showing how close system resources are to their 'budgeted' maximum. The main use for this command is when testing to see the resource impacts of changing various settings and commands. You can use the various sys_budget_ commands to set the individual maximum thresholds for each budget line, and then take notice whenever a particular line gets close to being in the red for that resource, indicating it's running out of resources. However importantly, note that altering the various sys_budget commands does not alter their values for game resource usage purposes - e.g. changing sys_budget_videomem just changes the threshold for monitoring purposes (i.e. to see how close the game's usage goes to your specified threshold); it does not alter how much video memory the game actually uses.
ai_DebugDraw [0,1] - This command provides a range of information on the screen for each AI (Artificial Intelligence) unit. Note also that if you can't change an ai_ command, even after inserting it in the relevant .cfg file, make sure to set this =1 first (system).
r_PostProcessEffects [0,1,2] - If set to 0, this setting disables all the major Post Processing effects such as motion blur and depth of field. Setting this to 1 enables all relevant effects, and setting it to 2 shows the name of all the post processing effects currently being used at any time at the top of the screen.
s_SoundInfo [0,1] - If set to 1, enables a range of information on the sound system in Crysis (system).
Meminfo [0,1] - If set to 1, enables a memory information display showing allocated memory by category in KB.
MemStats [0,1] - If set to 1, enables a detailed memory information display.
Gameplay Difficulty Commands
ai_UseAlternativeReadability [0,1] - If set to 0, this forces the Korean soldiers to actually speak Korean all the time; if set to 1 they speak English (system).
ai_ROD - There are a range of settings starting with ai_ROD. These control your 'Rate of Death' (ROD), which is essentially how quickly you're likely to die when facing the enemy. For example, the main ai_RODAliveTime variable controls the base amount of time for which a player can survive under fire. Raising it will make it easier for you when fighting the enemy, as they're less likely to hit you. Similarly, the ai_RODLowHealthMercyTime controls the amount of time the enemy will not hit you while you're at very low health; raising it will increase your chances of surviving (system).
ai_SOM - The two ai_SOM variables determine the speed with which your 'Stealth-O-Meter' (SOM) rises. Basically higher values for these variables cause the enemy to detect you and react faster during combat or relaxed mode (i.e prior to combat) respectively (system).
g_playerSuit - There are a range of commands starting with g_playerSuit, and these control the parameters for your nanosuit abilities, specifically the regeneration and recharge times, both when you are motionless, and when moving. For example, by lowering the value of the g_playerSuitEnergyRechargeTime command, your suit energy will recharge much faster, which makes gameplay much easier (system).
g_suit - There are a range of commands starting with g_suit which control how your nanosuit powers affect energy consumption, and how effective the powers are (system)
g_aiSuit - There are several settings starting with g_AiSuit which control the nanosuit parameters for any AI (friendlies, enemy) wearing suits. These values do not affect your nanosuit abilities - see the g_playerSuit variables for those (system).
ai_AllowAccuracyDecrease [0,1] - If set to 1, this allows AI (enemy) accuracy to decrease when their target is moving laterally (side to side). This makes it easier for a player to avoid being hit by the enemy by constantly strafing.
ai_AllowAccuracyIncrease [0,1] - If set to1, allows the AI to improve their accuracy against stationary targets. This makes it harder for a player if they're standing still, as they're more likely to be shot by the enemy.
ai_AmbientFireQuota [value] - Determines the number of AI that can fire at the player at the same time.
ai_WaterOcclusion [value] - Determines by how much being in water will hide you from the enemy. The higher the value, the more likely the enemy will not see you while you're in the water/submerged (system).
Cheat / Fun Commands
ai_IgnorePlayer [0,1] - If set to 1, this option makes the player effectively invisible to enemy AI. Note that this doesn't disable AI processing; the sys_AI command does that (system).
sys_AI [0,1] - If set to 0, disables AI updates, which in effect makes AI unresponsive to anything. Unlike the ai_IgnorePlayer setting, the difference is that the AI are not ignoring the player, ai processing has been turned off altogether.
ai_ForceStance [-1,0,1,2,3] - Forces all AI to take a particular stance: -1 disables forced stance, 0 = Stand, 1 = Crouch, 2 = Prone, 3 = Relaxed (system).
g_godmode [0,1] - If set to 1, enables 'God' mode, which makes the player impossible to kill.
i_noweaponlimit [0,1] - If set to 1, allows you to carry as many weapons as you wish (system).
i_unlimitedammo [0,1] - If set to 1, provides you with unlimited ammunition for all your carried weapons - when firing your weapon its ammunition count will not go down (system).
The next page continues the list of command variables.
Performance / System Commands
Note: most graphics-based commands covered further below have an impact on performance, but below are the commands which primarily have an impact on general game performance, or are designed for altering general system configuration.
r_VSync [0,1] - This setting controls Vertical Synchronization, or VSync. By default VSync is disabled in Crysis for maximum performance, but if you wish to enable VSync, set this option to 1, or force it via your graphics card's control panel when using the latest drivers. If you do decide to use VSync, make sure to also enable the d3d9_TripleBuffering setting to prevent a drop in performance.
Update: As of the 1.1 Patch you can now adjust VSync directly within the in-game options by using the VSync check box - see page 5 for details.
d3d9_TripleBuffering [0,1] - If set to 1, enables Triple Buffering, which is recommended for performance reasons if you have Vertical Sync enabled. If Vsync is not enabled, there is no need to enable this option, as it uses additional Video RAM for no real benefit. Note that this only works under DX9 mode, so if using DX10 mode, see the link just above for other methods of forcing Triple Buffering.
r_Height [value] - This command controls the height of your screen resolution in pixels, and when combined with the r_width command, can be used to set a custom resolution if you wish.
e_particles_thread [0,1] - Determines whether the particle system - if enabled - is threaded or not. This should always be set to 1 on a system with a multi-core CPU to provide optimal performance, as it prevents additional slowdowns during explosions and combat. In fact this is one of the reasons why Crysis doesn't suffer from major slowdowns during the highly detailed explosions on multi-core systems (system).
e_vegetation_static_instancing [0,1] - If set to 1, this command appears to enable instancing of static vegetation by the game engine, which may improve performance on your system by reducing the work involved in rendering multiple identical objects (system).
es_OnDemandPhysics [0,1] - Appears to control the way in which entities have physics applied to them. While I saw no real impact when altering this option, I do note that the help text says the default is 1 (on), when in fact the actual value I had was 0, so enabling this may give you some performance (system).
e_hw_occlusion_culling_objects [0,1] - This option enables hardware Occlusion Culling. Occlusion testing is a way for the game to detect what is not visible to the user and hence not waste power drawing it. Enabling this option may result in a performance improvement depending on your system, as it appears to shift the occlusion testing procedure for objects entirely to your graphics card hardware. A similar explanation applies to the e_hw_occlusion_culling_water command (system).
e_precache_level [0,1] - If set to 1, each level is loaded up beforehand to a significant extent, resulting in longer level loading times and greater memory usage, in return for a potential drop in any in-level stuttering. However stuttering is generally not a major issue in Crysis due to its streaming on-demand approach, so this option shouldn't necessarily be changed. Note that if you want to disable texture streaming to prevent in-level streaming pauses, see the r_TexturesStreaming setting on the next page.
e_stream - There are several commands starting with e_stream. If set to 1, they enable the streaming system for their relevant components. It is generally not recommended that this be altered unless you're running on a low-memory system, since streaming can reduce memory usage but may increase stuttering (system). Again, see the r_TexturesStreaming setting if you just want to enable/disable texture streaming.
gpu_particle_physics [0,1] - If set to 1, appears to enable the processing of particle physics on the GPU (graphics card). Since the particle system is already threaded (see e_particles_thread), this setting will likely only improve performance on systems with single-core CPUs and fast graphics cards (system).
r_MultiGPU [0,1,2] - This option controls whether Crysis enables additional overhead for rendering on multi-GPU systems (i.e. SLI and CrossFire setups). If set to 0 - which is the optimal setting for single-GPU systems - it disables multi-GPU support; if set to 1 it enables multi-GPU support for both SLI and Crossfire; if set to 2 it attempts to auto-detect if a multi-GPU setup is present (system).
r_GeomInstancing [0,1] - This setting determines whether hardware Geometric Instancing will be used or not. All graphics cards supported by Crysis can use hardware geometric instancing, and in theory enabling it can improve performance, but in my testing I didn't find any real difference with this option enabled or disabled, so experiment to see if it makes a difference on your machine.
Graphics Commands
Note: Almost all these commands have an impact on performance, but because their main impact is on altering the graphics and visual atmosphere of the game, they're in this section. To make it easier to follow, I've also created sub-groups for particular areas of graphics which the commands affect.
Character Animation and Physics
g_joint_breaking [0,1] - If set to 1, allows players to destroy most objects in the game world, such as buildings, bottles, tables, etc. If set to 0, you cannot destroy most objects (excluding vehicles) even when using Strength Mode or with grenades for example, which while it can improve performance, is a major reduction in realism and a significant gameplay disadvantage in Crysis.
ca_UseFacialAnimation [0,1] - If set to 0, disables the facial animation system, which means that all characters will always wear the same expression. This may improve performance, but it noticeably reduces realism (system).
ca_UsePhysics [0,1] - If set to 0, disables the physics system for characters. For example when shooting the enemy they will not show physical reactions, there are no ragdoll physics when thrown, and when dead they will stand up straight. This may improve performance but there will be glitches and an obvious reduction in realism (system).
g_ragdollMinTime [value] - Determines for how many seconds ragdolls (i.e. dead characters) will remain visible before being removed. Lowering this value can improve performance by removing dead bodies more quickly. Can be used in combination with g_ragdollDistance, since lowering both will result in much quicker dead body removal.
g_ragdollDistance [value] - This setting determines the range beyond which ragdolls (i.e. dead characters) start to disappear. Lowering this value can improve performance during combat by removing more dead bodies from view at the cost of realism.
Decals
ca_UseDecals [0,1,2] - Determines whether decals (marks such as bullet holes) appear on characters. When set to 0, this is disabled, which can improve performance at a minor cost in realism. To allow decals on characters, set to 1. To use an alternate method for decals, set to 2, although this appears to cause wireframe glitches to appear (system).
e_decals [0,1] - If set to 0, disables all decals. Decals are the marks covering the surfaces of objects, such as bullet holes. Disabling this option removes both dynamic decals generated by the player, as well as pre-placed static decals such as the muddy deep tyre tracks on roads. This can improve FPS, particularly during combat, at the cost of a great deal of realism.
e_decals_allow_game_decals [0,1] - If set to 0, this option only disables dynamic decals generated by characters, not static decals. Once again this can improve FPS particular during combat at the cost of realism, but it can be a better choice than turning off all decals altogether, since it leaves things like tyre tracks visible.
e_decals_life_time_scale [value] - This setting controls how long dynamic decals like bullet holes last on surfaces before they fade away. A value of 1 = 10 seconds, 2 = 20 seconds, etc. Lowering this setting can improve FPS during heavy combat.
Blur Effects
r_MotionBlur [0,1,2,3,4,5,101,102,103,104] - This setting controls the use of Motion Blur, which is most visible when turning around in the game. Setting it to 0 disables this form of blurring and can noticeably improve FPS; 1 enables it; 3 enables it and also allows it to blur not just your view, but also blur fast moving objects in DX10; 4 enables it and allows object motion blur in DX9 mode. Each level progressively lowers FPS. Again, it should be kept in mind that to get full object motion blurring in DX9 (e.g. the blurring on the movement of your own arms), you need to set this command to 5 (which is above the Very High level), whereas it occurs at 3 in DX10 Very High mode, and you also need to also make sure q_Renderer=3 for it to work.
Update: To get motion blur in multiplayer you need to use the 101,102,103 and 104 values and insert this command into your Multiplayer.cfg file under the \Program Files\Electronic Arts\Crytek\Crysis\Game\Config directory. For example use r_motionblur=103 to get the same effect in multiplayer as r_motionblur=3 in single player.
Update 2: As of the 1.1 Patch, you can control Motion Blur using the Motion Blur setting in the in-game options. You can also control the amount of blurring - as determined by the r_MotionBlurShutterSpeed cvar below - using the slider which is below that setting in the in-game options - see the bottom of page 7 for details.
Update 3: As of the 1.2 Patch, object motion blurring has much less of a performance impact. Note also that to enable object motion blurring in DX9 mode, you need to use r_motionblur=5 now, as opposed to setting it to 4, for it to work.
r_MotionBlurShutterSpeed [value] - If motion blur is enabled, this command allows you to change the intensity of the blur effect; the higher the value, the more prominent the blurring, the lower the value, the more subtle it will be.
g_dof_ironsight [0,1] - If set to 0, disables the Depth of Field (DOF) effect which occurs when using your weapon's iron sights. This makes everything much sharper, and can improve FPS, but reduces realism for some people (system).
g_dofset_maxscale [value] - This setting, along with g_dofset_minscale, can be used to adjust the extent to which the Depth of Field effect blurs surrounding objects which are not in focus. For example setting both values =1 results in more subtle blurring around the edges, while setting both to =3 makes the blurring more prominent (system).
g_radialBlur [0,1] - If set to 0, disables the radial blur effect which occurs when objects explode near you. This can help both improve performance around explosions, and make them clearer (system).
Lighting Effects
e_dynamic_light [0,1] - If set to 0, disables dynamic lighting, which is lighting that reacts realistically with the environment. Disabling dynamic lighting has a major visual and performance impact - in effect this makes even outdoor sunny daytime scenes appear to be cloudy days, though it doesn't remove all lighting effects. The increase in FPS is significant from disabling this option (system).
e_max_entity_lights [value] - This setting controls the maximum number of lights which can affect an object at any one time. The lower the value, the less lights can illuminate an object, but the higher your FPS will be in situations where there are multiple light sources. Setting this value too low will result in visual glitches like objects appearing to flash, as multiple lights compete to illuminate an object.
r_ColorGrading [0,1] - This setting controls the special color gradation effect which is normally only implemented at the Very High Post Processing setting. It's difficult to explain in words, so you can see an animated image quality comparison of it by clicking here: Crysis_Colorgrading.gif (538KB) - note the change in color between the two shots. Importantly, this setting can noticeably affect FPS, and in fact when running at Very High, simply turning off color grading (= 0) can net a nice FPS boost without a major drop in image quality. Furthermore disabling color grading can sometimes increase general blurriness, so if you wish to sharpen things up again disable Edge AA (r_useEdgeAA=0) for both an increase in sharpness and a further boost in FPS. Finally, color grading can only be enabled properly at settings below Very High if q_Renderer=3.
r_ColorGradingDOF [0,1] - This setting appears to control the use of additional Depth of Field (DOF) effects (aside from when using iron sights) when Color Grading is enabled. Disabling this setting can improve FPS without any noticeable drop in image quality.
r_Coronas [0,1] - This setting controls the halo effect which surrounds light sources, such as torches and vehicle headlights. Disabling this setting can improve FPS in such situations, but it also noticeably diminishes the realism of the light source.
r_Flares [0,1] - If set to 0, this command disables the Lens Flare effect used in the game. However given this effect is very difficult to see in Crysis, the FPS and visual impact of this option is minimal at best.
r_Glow [0,1] - If set to 0, disables the general glow visible in areas of bright light (such as the sky), which can improve FPS. The effect is quite subtle, and the change is most noticeable when viewing bright outdoor areas from indoors. You can see an animated image quality comparison of it by clicking here: Crysis_Glow.gif (530KB).
r_HDRRendering [0,1] - This setting controls the use of High Dynamic Range (HDR) rendering. When enabled, your character's view in the game reacts more realistically to lighting, but this can also reduce FPS.
r_EyeAdaptationBase [value] - This command determines the extent to which your eyes adjust to bright light when HDR lighting is being used. The lower the value, the brighter the general surroundings will seem under bright lighting such as the sun.
r_HDRBrightOffset [value] - This setting controls the general brightness/glow of lighting in a scene when HDR is enabled. Lowering the value increases brightness, while raising it darkens the HDR effect.
r_HDRBrightThreshold [value] - Altering this command appears to change the overall glow effect of HDR lighting; lower values increase the glow.
r_HDRLevel [value] - This setting controls the overall saturation and intensity of HDR, with higher values making the HDR much more saturated and unnatural.
r_SSAO [0,1] - This setting controls Ambient Occlusion, which is an effect that can make things look more atmospheric by lighting everything more realistically, but if disabled, can noticeably improve FPS without a significant drop in image quality.
r_SSAO_amount [value] - If SSAO is enabled, then this setting controls the level of ambient occlusion - the higher the value the richer the shadowing and general atmosphere of the game world, but it may reduce FPS.
r_sunshafts [0,1] - This setting controls the additional shafts of light which appear through vegetation and any other object held up to sunlight. If set to 1, the effect will increase realism at the cost of some FPS.
r_Reflections [0,1] - This setting controls non-water reflections, such as those on glass. Setting this option to 0 will disable all such reflections, which can improve FPS at the cost of realism.
r_Refraction [0,1] - This setting controls non-water Refraction, which is the distortion effect visible when looking through certain transparent objects. Setting this option to 0 will disable refraction which can improve FPS under relevant circumstances, but may cause visual glitches on bottles for example.
q_Shader - There are a range of settings starting with q_Shader, and these can generally be altered as a group using the Shaders Quality in-game setting. However here you can alter individual shader effects using these commands, with a value of 0 = Low, 1 = Medium, 2 = High and 3 = Very High. For example, to just lower the quality of glass surfaces in the game for a potential boost in FPS, alter the q_ShaderGlass command. Note that some cvars may require that the corresponding q_shader command be set to a particular value before they can work. Typically any effects normally only visible at High or Very High may need the relevant q_shader command set to High (=2) or Very High (=3) as well before they function properly.
The next page continues the list of Crysis command variables.
Graphics Commands (Cont.)
Shadow Effects
e_shadows [0,1] - Turns all shadows on or off, and if disabled, can provide a large boost in FPS at the cost of realism.
e_shadows_cast_view_dist_ratio [value] - This setting controls the distance to which you can view shadows cast from most objects. The lower the setting, the less objects will cast shadows, which can improve performance at the cost of realism.
e_shadows_max_texture_size [value] - This setting allows you to set the resolution for the shadow maps in the game, with resolution values such as 256, 512, 1024 progressively providing sharper and more detailed shadows at the cost of a drop in FPS. If you want even better shadow quality, you can set higher values such as 2048 or 4096, but this will bring about a major drop in performance.
r_ShadowJittering [value] - This setting controls the way the edges of shadows 'jitter' in the game, effectively blurring and covering up jagged shadow edges. If set to 0, this makes shadow edges much crisper and can improve performance, but some shadows (such as your own) will appear more jagged; a value of 1 makes shadow edges more blurry.
r_ShadowsMaskResolution [0,1,2] - This setting effectively impacts on the general appearance of shadows, with values above 0 noticeably reducing the quality of more distant shadows, in return for higher FPS.
e_gsm_range [value] - In essence appears to control how dispersed shadow edges appear. Experiment with values to see what you prefer, but on my system anything other than 3 would result in an increase in blurriness as well as a drop in FPS. If you simply want to control the sharpness of shadow edges, you might prefer to use the r_ShadowJittering command instead.
e_gsm_lods_num [0-5] - Controls the number of shadow maps used, with the higher the value, the more detailed the number and type of shadows. A value of 0 removes all shadow maps, including those cast by fixed objects. Lowering or disabling this option can boost FPS noticeably, though it reduces realism as well.
General World Clarity and Detail
r_FSAA - There are three settings starting with r_FSAA which control Full Screen Anti-Aliasing (FSAA) in Crysis: r_FSAA controls whether Antialiasing is being used (= 1) or not (= 0); r_FSAA_samples determines the actual sample rate of Anti-Aliasing; r_FSAA_quality determines the quality mode, affecting the overall type of Anti-Aliasing used in conjunction with the sample rate. Ideally you should alter these settings using the in-game Anti-Aliasing Quality setting, since the sample rate and mode values differ depending on both the type of graphics hardware you're running, and whether you're using DX9 or DX10. To see the values implemented at various AA levels on your particular system, check the two FSAAProfiles.txt files found under your \Program Files\Electronic Arts\Crytek\Crysis\Game\Config directory for details. Note that this form of Antialiasing only works if Shaders Quality is High or above, and it is also incompatible with the r_UseEdgeAA command; only one or the other can be enabled.
r_UseEdgeAA [0,1,2] - This setting controls the level of edge blurring applied to reduce the impact of jagged edges in the game, particularly on foliage. A value of 1 applies some mild edge blurring, which can reduce the jaggedness and shimmering of the image, but will reduce FPS slightly; a value of 2 further blurs/thickens jagged edges for another potential drop in FPS. You can see an animated image quality comparison of it by clicking here: Crysis_EdgeAA.gif (530KB). Note this setting will only work if your Shaders Quality setting is on High or above, and can't work in conjunction with normal AA; Edge AA is automatically disabled when regular AA is enabled.
sys_flash_edgeaa [0,1] - This setting controls the use of edge anti-aliasing on any flash files used in the game. The most obvious impact of disabling this option is that it makes the HUD elements - such as your Health/Suit Energy indicators at the bottom right - more jagged. For the most part this shouldn't be disabled as the performance impact is not major.
r_TexMaxAnisotropy [1 - 16] - This setting controls the maximum amount of Anisotropic Filtering used on textures in the game. Higher sample rates will make distant textures clearer at the cost of some FPS. Note that it appears that enabling r_UsePOM=1 will cause problems with Anisotropic Filtering being applied properly.
d3d9_TextureFilter [nearest,linear,bilinear,trilinear] - This command controls the type of texture filtering used to make textures sharper. Trilinear is the default and provides the best quality, but you can gain performance at the cost of image quality by reducing it to bilinear, or even linear. Note that at nearest, the lowest value, there is noticeable color gradation and even the console text becomes blocky.
r_TexResolution [value] - This setting appears to control the resolution of textures used in the game. At 0 full resolution is used, and successively higher values reduce the resolution of textures in return for a reduction in memory usage and hence stuttering, as well as a potential increase in FPS.
r_TexturesStreaming [0,1,2] - This setting controls the streaming texture system in the game, and if set to 0, textures are not constantly streamed as you walk around, they are preloaded from a cache. If set to 1, it is enabled, and if set to 2, it uses a more aggressive form of streaming. While disabling texture streaming increases memory usage, and hence may cause additional stuttering on systems with low RAM, for the most part disabling it should cause no problems and will reduce stuttering on most systems. More importantly, disabling it also appears to improve more distant textures without any real drop in performance. You can see an animated comparison by clicking here: Crysis_TexturesStreaming.gif (818KB). As you can see, the distant mountain terrain, especially near the base of the mountain, is much clearer with this setting disabled.
Update: Disabling Texture Streaming (i.e. setting it to =0) can cause crashes and graphical corruption, particularly in Crysis Warhead. This is a known issue.
r_UsePOM [0,1] - If set to 1, enables Parallax Occlusion Mapping (POM), which makes many surface textures in the game - particularly rocky or pebbled-covered areas, such as those in forests or at the beaches - appear raised and much more realistic. You can see an animated image quality comparison of it by clicking here: Crysis_POM.gif (672KB). However this comes at the cost of some FPS, so it can be disabled without a dramatic loss of image quality. Also note that it can affect the appearance of Anisotropic Filtering, so disable it if you wish AF to be applied properly.
e_lods [0,1] - If set to 1, enables the Level of Detail (LOD) system which uses progressively less detail on objects as they recede into the distance. This reduction in detail improves FPS noticeably, so the LOD system shouldn't usually be disabled. However if you want the highest image quality, setting this command to 0 will disable the use of LODs, improving object and world detail at the cost of FPS.
e_lod_max [value] - This command, combined with the e_lod_min command, determines the number of LOD levels the game uses to strip details from objects. The higher the value for the minimum and maximum, the more details can be removed from some objects as they recede into the distance, which can improve FPS when the LOD system is enabled, at the cost of image quality (system).
e_lod_min_tris [value] - When the LOD system is enabled, this command determines the minimum number of triangles to use for any LOD. In other words, the lower this value, the less detailed distant objects are allowed to be, as less triangles will be used to construct them, and FPS will improve at the cost of some image quality (system).
e_lod_ratio [value] - Controls the overall ratio of LOD to distance. When raised, more objects will retain their detail and FPS will be lower; when lowered, objects will show less detail but FPS will rise.
e_detail_materials_view_dist_xy [value] - This setting controls the distance out to which details can be seen on the surfaces of terrain. The higher the value, the higher the image quality as more distant terrain will show more detail, but this may reduce FPS. Note that when experimenting with this command in the console, you may need to change your view to another direction briefly then back, to allow new details to update over existing ones.
e_detail_materials_view_dist_z [value] - This setting primarily controls the global amount of detail on the ground, with the lower the value the more blurry certain ground features will appear, but the higher your FPS may be.
e_terrain_texture_lod_ratio [value] - This setting controls the level of detail of terrain textures, and the higher the value, the more blurry terrain textures will be, possibly improving performance.
e_view_dist_ratio [value] - This setting controls the maximum view distance for general objects in the game - the higher the value, the more objects are visible at a distance, the lower the value, the less objects will be seen. Reducing this setting can improve FPS noticeably, especially in areas with a lot of complexity. However not all game objects are affecting by this setting - see the other e_view_dist settings for more details.
e_view_dist_custom_ratio [value] - This setting controls the maximum view distance only for 'special' game objects, which include the friendly and enemy characters, as well as vehicles. While reducing this setting will improve FPS as these are quite complex objects, it can also present a gameplay disadvantage, since you won't be able to see the enemy (or vehicles) as soon as you might otherwise (system).
e_view_dist_ratio_detail [value] - This setting controls the maximum view distance only for detail objects, and once again lowering the value will remove more of these objects and improve FPS at the cost of realism.
sys_LowSpecPak [0,1] - If set to 1, either uses a special lowspec.pak file which contains lower quality textures that can decrease loading times and improve performance on low-end machines, or it uses the r_TexResolution and r_TexBumpResolution to emulate lower quality textures for similar results.
Particle Effects
e_particles [0,1] - This setting controls the particle system, and if set to 0 disables all particle effects, such as smoke and dust. Note that disabling particles also disables particle-based distortion effects such as heat distortion. Disabling the particle system can dramatically improve FPS, especially during heavy combat and around explosions, but it also significantly reduces realism (system).
e_particles_max_emitter_draw_screen [value] - This setting controls volume of particle effects, and the higher the value, the thicker the particle effects such as smoke will be at the cost of FPS, while the lower this value the less particle effects there will be but the higher your FPS around such effects.
e_particles_lod [value] - This setting also impacts on the richness of particle effects. Higher values increase the quantity of detail of particle effects, but the lower your FPS. It also seems to effect 'particle-like' objects including flies, butterflies and ejecting shells from your gun. In general if you want to improve FPS (especially in combat) but not remove particles altogether, try a lower fractional value such as 0.5 or 0.3 to thin out particle effects without totally removing them.
i_particleeffects [0,1] - If set to 0, disables weapon-specific particle effects, which includes the muzzle flash and heat distortion around the barrel of guns for example. This can improve performance when firing a weapon at the cost of some realism.
r_UseGSParticles [0,1] - If set to 1, this option enables Geometry Shader particles. Note that this command only works under DirectX10, and in my testing it didn't appear to have a significant performance or visual impact either way (system).
r_UseParticlesRefraction [0,1] - If set to1, this command allows special particle-based refraction (distortion) effects, such as the heat distortion around your gun barrel when firing, or the heat waves around a burning object. Turning this option off can improve FPS, especially in heavy combat.
r_UseSoftParticles [0,1] - This setting controls whether soft particles are used, an effect which means that particle effects like smoke blend more smoothly with their surroundings, rather than showing pronounced edges when they meet other objects. You can see an animated image quality comparison of it by clicking here: Crysis_SoftParticles.gif (524KB). If set to 0, this disables soft particles which improves FPS around a range of particle effects.
Vegetation and Wildlife
e_vegetation_min_size [value] - This setting allows you to set the minimum size of the vegetation to be shown - the higher the value, the less vegetation/foliage there will be, which thins out foliage and boosts FPS in outdoor areas (system).
e_vegetation_sprites_distance_ratio [value] - This setting controls the distance at which vegetation is actually rendered as simple sprites rather than complex objects. The lower the value, the closer the vegetation which is turned into blocky sprites in return for higher FPS; conversely if you want better image quality at the cost of FPS, raise this value to make distance vegetation more detailed.
e_view_dist_ratio_vegetation [value] - This setting controls the maximum view distance for vegetation/foliage, and lowering the value will reduce the amount of vegetation visible, boosting performance but lowering realism.
r_VegetationSpritesTexRes [value] - Determines the resolution of sprite vegetation - the amount of sprite vegetation you will see in the distance is itself determined by the e_vegetation_sprites_distance_ratio setting. Raising this value slightly can improve the appearance of any sprite vegetation without a major drop in FPS, however raising it or lowering it significantly can dramatically reduce FPS.
e_proc_vegetation [0,1] - If set to 0, disables all procedurally drawn vegetation. In effect this seems to marginally thin out some existing vegetation and increases FPS without a dramatic reduction in image quality. Alternatively you can use the e_proc_vegetation_max_view_distance setting to determine the distance at which procedurally drawn vegetation is removed. Again, in either case, in my testing the visual impact didn't seem significant, so simply disabling procedural vegetation might be of most benefit.
e_vegetation_use_terrain_color [0,1] - If set to 1, vegetation will take on a similar color to the underlying terrain, which helps it blend better. However you can set this to 0 to see if you prefer the different look which it brings, as vegetation will have more varied color.
e_foliage_branches_damping [value] - Determines how branches and foliage leaves react to motion. The higher the value, the more stiff branches and leaves will be when shot for example; the lower the value, the more rubbery they will seem. The equivalent setting for controlling broken branches is e_foliage_broken_branches_damping. The FPS impact seems minimal.
e_phys_foliage [1,2] - This setting controls the way in which physics affects foliage in the game. A value of 1 means only dynamic objects, mainly trees, will interact realistically when brushed against or shot for example; a value of 2 means all major foliage will interact with realistic physics. Setting this to 1 may improve performance especially when walking through heavy foliage, at the cost of some realism.
e_vegetation_wind [0,1] - If set to 0, this command disables the impact of wind on vegetation. This doesn't mean vegetation/foliage will stop moving, it simply means that additional wind effects won't be displayed on the vegetation, which can improve performance at the cost of realism in certain situations (system).
e_flocks [0,1] - If set to 0, removes all bird and fish, which can boost FPS in areas with this type of wildlife at the cost of some realism.
e_flocks_hunt [0,1] - If set to 0 (and e_flocks is not disabled), whenever you shoot a bird in the sky, it will simply disappear rather than fall down. The performance benefit is minimal.
The next page brings the list of Crysis command variables to a close.
Graphics Commands (Cont.)
Sky and Weather Effects
e_clouds [0,1] - If set to 0, disables the rendering of clouds in the sky. This can noticeably improve FPS, particularly at higher levels of the Volumetric Quality in-game setting, but can reduce realism.
e_wind [0,1] - This setting controls whether the wind system is activated, and setting it to 0 disables wind impacts. Note that this does not stop things like vegetation movement, as some of that is independent of wind. It can however improve performance in windy areas at the cost of realism (system).
e_fog [0,1] - If set to 0, disables all fog globally. This means that local fog, distance fog, as well as underwater fog, is removed. The FPS result can vary - it can reduce or raise your FPS depending on the scene. The most noticeable impacts are that everything appears sharper, and the water in the ocean becomes crystal clear at all depths (system).
e_fog_volumes [0,1] - If set to 0, similar to e_fog this option disables fogging. However it only affects local fog, and not distance fogging. Once again, most noticeably it will make the water completely clear, but disabling this setting is a reasonably good compromise between completely disabling fog with e_fog, and having all fog completely enabled. Some people may even prefer the look of clear water for example (system).
e_sky_type [0,1] - If set to 0, this option turns the sky from a dynamic entity into a static background, which can improve performance at the cost of realism and atmosphere. Note that if you do set a static sky, it's best to also use the e_clouds 0 command to turn off clouds, for both extra performance and to prevent the static clouds from clashing with the dynamic clouds.
r_ImposterRatio [value] - This setting controls the resolution of imposters, which are clouds. A value of 1 equals a 1:1 resolution, but higher values can make clouds thin out but may also improve performance. You can also use the r_ImpostersDraw or e_clouds commands to enable/disable clouds.
r_Rain [0,1] - If set to 0, disables any rain effects in the game, which can improve FPS when raining at the cost of a major drop in realism. If you don't wish to disable rain altogether, use the r_RainMaxViewDist command instead to determine the distance to which rain is visible, as lowering that value will improve FPS during rain without completely removing rain effects.
Water Effects
r_WaterUpdateFactor [value] - This setting controls how often per second the images on water are updated. The higher the value, the less often things like reflections are updated on the water's surface, and this in turn improves performance. However at very high values the lack of updates can make things look quite jerky, so I recommend no higher than 0.5 for this setting.
e_water_ocean_fft [0,1] - This setting determines whether Fast Fourier Transform (FFT)-based water rendering is used. If set to 1, fft-based water increases the realism of water, including the way it undulates and reacts to other objects, but this may reduce performance. Setting this to 0 uses a calmer form of water movement simulation, which can improve performance and indeed some people may also prefer it this way.
e_water_tesselation_amount [value] - Effectively determines the underlying amount of water movement, the higher the value the greater the volume of water which appears to be moving.
r_WaterCaustics [0,1] - If set to 0, disables the wavy light effects reflecting on the bottom of the ocean when underwater, and also makes underwater scenes brighter and can increase FPS, but reduces realism.
r_WaterGodRays [0,1] - If set to 0, disables the shafts of light visible when underwater, and also removes any visual distortion when underwater, which noticeably reduces realism, but can boost FPS.
Audio Commands
i_soundeffects [0,1] - If set to 0, disables weapon-specific sound effects, such as the sound of a firing weapon.
s_SoundEnable [0,1] - If set to 0, this option disables all in-game sound. The main reason to use this command would be if you are troubleshooting a sound-related problem or slowdown for example.
s_SpeakerConfig [0-7] - This setting lets you choose the specific speaker configuration for the game. The values are 0 = Uses your Windows Control Panel setting; 1 = Mono; 2 = Stereo; 3 = Headphone; 4 = 4.1; 5 = 5.1; 6 = Prologic; 7 = 7.1.
s_FormatSampleRate [value] - Determines the sample rate in KHz of the sound output, with higher values providing better quality audio at the possible cost of performance.
s_FormatType [0-5] - This setting determines the output format type, with 0 being none; 1 = PCM 8-bit; 2 = PCM 16-bit; 3 = PCM 24-bit; 4 = PCM 32-bit; and 5 = PCM 32-bit Float. The higher the value the better the sound output quality at the potential cost of performance.
s_MaxChannels [value] - This setting determines the maximum number of channels to use for sound reproduction. It is recommended that you set this value to the maximum number of channels possible on your sound hardware for optimal performance. Almost all sound cards support at least 32 channels, many such as the Audigy series support 64 and the X-Fi series support 128 channels.
s_MusicSpeaker - There are a range of settings here which allow people with multi-speaker configurations to set up the volume levels for the in-game music for each individual speaker location.
Update: The following variable was added as of the 1.2 Patch:
g_useHitSoundFeedback [0,1] - This setting controls the new sound effect which occurs whenever your bullets hit the enemy. By default it is enabled, and any time you successfully hit an enemy target, even over a long distance, you'll hear a slight but distinctive 'thud'. If you wish to disable this and return to the way things were prior to the 1.2 patch, set this variable to =0.
Multiplayer Commands
Note: The bulk of multiplayer-related commands usually start with sv_, net_, cl_ and g_. The most important known MP commands for players (clients) are covered below:
Name [playername] - By default, your in-game multiplayer name will be that of your Profile. However if you're using the standard Default profile, the game appears to assign the generic name Nomad along with a number. If you wish to change your name, enter the Name command followed by your preferred nick in the console while on a server. Alternatively, create a new profile under the Profile item in the main in-game options, and give that profile your chosen name, then load it up and use it for Multiplayer and that name will be used.
cl_bob [0-1] - Determines the extent to which your weapon bobs and sways as you move; 1 is the highest, and fractional values down to 0 will steadily reduce it to nothing. This is the same as the in-game Weapon Inertia setting, however the command may be useful if you just wish to adjust your weapon bobbing 'on the fly' within multiplayer.
cl_bandwidth [value] - This setting determines the maximum bandwidth in bits per second to use when communicating with the game server. You can try lowering this value from the default on your system to see if it helps stabilize your Ping (system).
cl_packetRate [value] - This setting determines the number of packets per second sent from the server to your machine. You can experiment with lowering the packet rate if you find packet loss (manifesting as in-game warping) is quite high (system).
I will update this section with more multiplayer commands as I get the chance to experiment and discover what practical impacts they have.
That covers the main command variables which I found to be of most use in tweaking Crysis. I spent many days testing and going through all the cvars, however I may have missed something important, or made a mistake in my descriptions, so please Email Me if you have confirmed information on a command which you believe would benefit the guide - please no guesses though. Once again I encourage you to experiment and find how these cvars affect your system; just remember that no two systems are alike, so don't just use someone else's .cfg file. Only you know what your preferences are for the tradeoff between performance and image quality, and precisely what type of things you're willing to sacrifice or customize to suit your exact needs. If you use someone else's .cfg or command recommendations without understanding what they do, you'll only run into problems.
The next page brings the guide to a conclusion and covers some important information you shouldn't skip.
This section deals with several important performance and convenience tips and advice. Do not skip this section, as these tips are just as important as any cvar tweak.
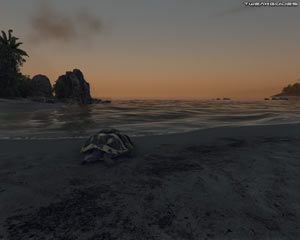
Disabling the Introductory Movies
There are a large number of introductory/promotional movies which play before you reach the main menu in Crysis. If you wish to skip these and reach the main menu much more quickly, there's a simple method to do this: go to your \Program Files\Electronic Arts\Crytek\Crysis\Game\Localized\Video directory, and rename all the .sfd files starting with Trailer_, as well as Crytek.sfd, to something else - e.g. give them all ._sfd extensions. Alternatively, create a new folder under that directory, call it whatever you wish, and move all the above .sfd files to that new directory. The game will now automatically skip all these introductory movies and get to the main menu within a shorter space of time.
Note that there is a g_SkipIntro command variable, but it doesn't appear to work in removing the startup movies, regardless of how it is implemented.
Enabling 'Very High' Settings Under Windows XP or Vista DX9
Something controversial about Crysis is that by default you can't enable the 'Very High' level for any of the in-game Advanced settings under Windows XP, nor in Vista DX9 mode, yet you can under Vista DX10 mode. Initially it was thought that this was due to Very High being DX10-exclusive. However this is not correct, it's an artificial limitation imposed by Crytek, and in fact it was during the Crysis Multiplayer Beta that it was discovered that you can indeed force Very High mode in DX9. Before we go any further however, it's important to understand that this is not a "DX10 hack", as under DX10 Crysis does indeed have some additional subtle effects which are exclusive and can't be reproduced in DX9 - see the DX9 vs. DX10 topic under the In-Game Settings section. For most intents and purposes though, Very High in XP (or Vista DX9) will look almost identical to Very High in Vista DX10, and also performs better to boot.
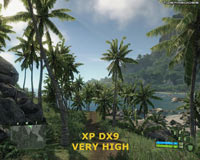
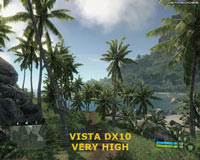
To try this out for yourself, you'll need to go to your \Program Files\Electronic Arts\Crytek\Crysis\Game\Config\CVarGroups directory and make a backup of all the files there. Next open each .cfg file (except sys_spec_Full.cfg), and copy all commands at the very top, beneath the 4 but above the [1], and paste them over all the commands under the [3] at the very bottom of the file, then save each file. If you want to understand what this does, and how these .cfg files work, see the start of the Advanced Tweaking section of this guide. Basically it just forces the game to run the Very High command variables at the in-game High setting. An alternate method which doesn't require pasting over existing settings is to copy all the commands under the '4' of each file and then paste them all into your relevant diff_ .cfg file. Remember, if you just put the commands into System.cfg or autoexec.cfg, some of them won't change since they're system variables and need to be placed in an original system file to work, as explained on page 7 of this guide.
Finally, go into the game and make sure all your Advanced options are set to High, and start up a game. There will now be a range of additional effects now visible - all of which are covered in detail in the In-Game Settings section of this guide - and your performance will also have taken a turn for the worse. To see a comparison between the Very High mode in XP, and the Very High mode in Vista, look at the In-Game Settings section, as well as the screenshots above; there really isn't any noticeable visible difference between the two, but both look noticeably better than High.
Note: There is no 'Ultra High' quality available in Crysis - Very High is the highest possible setting under both Windows XP and Vista. Any sites or custom files/mods promoting 'Ultra High' quality are simply using Very High along with a range of customized .cfg variables which may or may not improve the visuals depending on your tastes. I recommend reading the Advanced Tweaking section and creating your own custom config to better suit your tastes.
'Very High' On The Cheap
There's another thing you can try if you find Very High mode is just a bit too strenuous for your system. You can try the "cheap" version of Very High, which basically only implements the more obvious visual enhancements of Very High. To do this, instead of editing your .cfg files as covered above, all you need to do is set your in-game settings all to High as normal, then add the following commands to your System.cfg file (or just test them in the console first): r_UsePOM=1, r_sunshafts=1, e_water_ocean_fft=1, q_Renderer=3 and r_colorgrading=1. This will make High look extremely similar to Very High in most respects, but with quite a bit less of a performance hit. In a pinch, if you still need extra FPS, try disabling one of the effects, though keep in mind that q_Renderer=3 is necessary for color grading to work. You can also turn off Edge AA (r_UseEdgeAA=0) to make things look crisper and boost performance further.
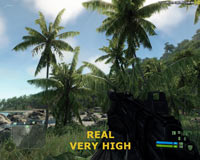
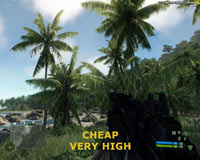
The screenshot comparison above shows that the cheap method looks very close to the real Very High, with the exception of some additional foliage, better water reflections and a few more objects visible in the distance on the left hand side. The FPS difference however is noticeable, as shown at the top right of each shot - 20FPS on the left vs. 26FPS on the right in this example. But this is just the quick way to get Very High on the cheap; obviously if you want to do things in more depth and tailor it to suit your own tastes (which I recommend), then read through the Advanced Tweaking section of this guide and put together your own custom configuration. Alternatively, you can try using the 'Natural Mod' to achieve better image quality as well as improve performance - see page 4 for details.
Measuring Framerates, Taking Screenshots & Videos
If you want to measure your FPS in Crysis, simply use the r_displayinfo 1 console command as covered in the Advanced Tweaking section. To take screenshots in Crysis, by default you can use the r_GetScreenshot console command (or just press the F12 key) and the shot will be taken in JPG format by default and stored under your \My Games\Crysis\ScreenShots directory. To make the screenshots look nicer, you can remove the HUD temporarily before taking the shot by using the cl_hud 0 command, and then cl_hud 1 to restore it again.
Another way to measure framerates, take screenshots, and capture .avi videos of gameplay in an easy manner is to use the free FRAPS utility. Measuring FPS with FRAPS provides no performance hit, but capturing videos can reduce your FPS to a noticeable extent while recording. A sample HD video of my Crysis gameplay captured with FRAPS is here: Crysis Gameplay Video.
Benchmarking
Crysis comes with two built-in benchmarking tools you can use to measure and compare your performance in the game with others. Go to your \Program Files\Electronic Arts\Crytek\Crysis\Bin32 directory (or \Bin64 for 64-bit systems), and run the Benchmark_CPU.bat file for a CPU-based benchmark, and run Benchmark_GPU.bat for a graphics-card focused benchmark. You can then share the results you get with others online, although I would be hesitant to base any purchasing decisions on these benchmark results - your best bet is to see how you perform normally in the game, and whether you get slowdowns during combat, etc. If you want a more automated way of running benchmarks, you can use the HOCBench Crysis Benchmark utility.
Update: As of the 1.1 Patch, a second CPU benchmark has been included with the game. Run the Benchmark_CPU2.bat file found under the same directory as the other benchmarks, and a custom run through the ice-based level is completed.
Conclusion
Once again we're at the end of a very long guide. The Crysis Tweak Guide has taken me a lot of time and effort to research, test and compile. I certainly hope you find it a comprehensive and useful source of information to add to your enjoyment of Crysis. As with all of my other guides, I'll be making sure to keep the guide fully updated, so make sure to check back on it regularly. I must stress that unfortunately I can't provide any tech or tweaking support/advice, and I also don't provide permission for the guide to be reproduced or translated elsewhere for several reasons. All the information you need to optimize and troubleshoot your system for Crysis is right here in this guide, and in also in my other guides like the TweakGuides Tweaking Companion. There are no quick fixes, no magic bullets, no easy ways out - it takes a bit of patience and effort to get there, but I promise you the results are worth it once you put your mind to it.
Anyway I hope you've found the guide useful, and until next time, take care!