SWTOR 3.0 Commando Gunnery and Assault Specialist DPS guide by Fascinate and Marisi.
Contents
Commando DPS has undergone some changes with the transition to 3.0 but fundamentally the two disciplines function the same as before; Gunnery is suitable for multiple targets and/or frequent target switching whereas Assault Specialist is suitable for sustained single target.
Gunnery
This discipline is optimal for fights where target switching is prevalent and/or there are periods where high burst is needed in a short amount of time. The basics of this discipline has not changed with its newest iteration; Curtain of Fire (proc for Boltstorm, which replaces Full Auto in this discipline) still procs every 8 seconds and because cell management is extremely light, it makes this discipline very forgiving. A couple of changes have been made that is of importance, Curtain of Fire now ONLY procs off of Grav Round, whereas before it procced off both Charged Bolts and Grav Round. Another change that is worth noting is the inclusion of Supercharged Cell into the rotation, where the usage of it may either accelerate or hamper your rotation due to the alacrity bonuses you gain from it. A new ability, Vortex Bolt, which was added into the newest iteration also plays a vital role, as it deals a good amount of damage, and makes the next Grav Round activate instantly.
Assault Specialist
For the most part when you want to use this discipline in operations content has not changed; if there is considerable sustained single target focus or there are multiple targets with relatively high HP pools then this is probably the more optimal spec. This discipline is currently the highest parsing discipline in the game and is thus capable of putting out very high sustained numbers.
The basics of this discipline have not changed too much with its newest iteration; the overall goal still is to proc Ionic Accelerator (IA) every 7.5 seconds (up from 6) and because the cell management is still quite tight, deviating from your rotation can lead to depleting quite quickly, and unlike Gunnery, this is still quite punishing. One of the larger quality of life changes received is that now IA has a guaranteed proc with Full Auto, Charged Bolts and Hail of Bolts instead of a pseudo guaranteed chance which frees up the rotational blocks for additional abilities and allows your periodic effects to remain on the target much more than was previously possible.
While Assault Specialist is optimal for pure single target fights, two AOE combos have been added which spread your two primary dots to all affected targets; Sticky Grenade spreads Serrated Bolt and Plasma Grenade spreads Incendiary Round, which means that in fights where there are lots of high hp targets in can be beneficial to focus on AOE instead of single target.
The bolded utilities we feel have an important use in an Operation; with Cell Capacitor, Charged Barrier, Heavy Trooper, Advance the Line, Forced March and Shock Absorbers being taken on almost all fights, if not all, with the seventh one changing depending on the fight; Concussive Force is useful in more reliably dealing with blades in Revan and Chain Gunnery is great for fights with multiple targets for the increased damage on Hail of Bolts, particularly for Gunnery, for example.
Skillful
Masterful
Heroic
While Accuracy used to be obtainable in several pieces of Commando DPS gear prior to 3.0 it now can only be found in the Chest and the Vanguard Main Hand which makes your Implants and Earpiece the primary sources of Accuracy. The accuracy Implants, however, come with crit instead of power which means you only need either a single mod or enhancement to supplement the crit from both Implants to reach the crit target.
In regards to set bonuses, the old 4 piece no longer has much benefit with Assault Specialist as Charged Bolts is no longer used as often as it used to be and High Impact Bolt is not used at all which makes replacing the old armorings a high priority particularly as you can replace several of them with non-set piece armorings, losing the old 4 piece set bonus in the process of doing so, and gain DPS from the increased Aim you get from the newer ones.
On the other hand, Gunnery still uses both Grav Round and High Impact Bolt frequently in the rotation which means that both set bonuses are still quite useful in increasing damage which puts a higher priority in obtaining the new belt and bracer set piece armorings before replacing the old set bonus.
For the most part Gunnery plays the same now as it did previously but there still are a few changes to how it plays:
 Demo Round (DR): The highest hitting ability in Gunnery and should only be used if the target is affected by the gravity vortex from your GR. 15 second cooldown, costs 15 cells.
 High Impact Bolt (HIB): Deals a large amount of damage particularly with 5 stacks of Charged Barrier, each of which increases this ability’s damage dealt by 6%. 15 second cooldown, costs 5 cells.
 Electro Net (EN): One of the highest damaging abilities per cell cost and should be used as regularly as possible. Due to its lengthy cooldown, however, delaying it for a few GCDs if higher priorities are available is not damaging. 90 second cooldown, costs 10 cells.
") Hammer Shot (HS): Cell management overall is much smoother in Gunnery now and while this still does need to be used to effectively manage your cells, it is definitely less than before.
Hammer Shot (HS): Cell management overall is much smoother in Gunnery now and while this still does need to be used to effectively manage your cells, it is definitely less than before.
 Supercharged Cell (SCC): Requires and consumes 10 stacks of Supercharged to increase armor penetration by 15%. Additionally, damage dealt by GR, DR, BS and CB temporarily increase alacrity by 2% for the duration with a maximum alacrity boost of 6%.
 Reserve Powercell (RPC): Your next ability consumes no cells. Should be used with Full Auto where possible simply because it costs the most cells. 90 second cooldown.
The rotation for Gunnery does not have a static rotation compared to Assault Specialist. However, it follows a simple priority system that should be followed for the highest possible dps. Additionally, the bonus alacrity that is given when Supercharged Cell is procced plays into the rotation and alters the timing of Curtain of Fire, depending on where you popped Supercharged Cell. Depending on the timing of when you used Supercharged Cell, either before or after Curtain of Fire was procced, the bonus alacrity may omit the usage of 1 additional GCD to proc Curtain of Fire, circumventing the non-integer 8 sec proc timer. Below is the opener where you can see that popping Supercharged Cell right after Curtain of Fire is procced gives you enough alacrity with the following skills so that the proc timer is as close to 8 seconds as possible, instead of 9 seconds. Additionally, since cell management is extremely light, the priority list can be followed for quite some time before Recharge Cells is required.
Opener
(pre-cast) GR, SCC + Adrenal + DR, EN, VB, BS, GR, BS, GR, HIB, DR, GR, BS….

From there it follows this priority list:
The key to maximizing your damage in Gunnery is following the priority system. If you have to delay the usage of such abilities like Demo Rounds or High Impact Bolt to proc Boltstorm, do so, and just use those abilities the gcd after Curtain of Fire is procced. The usage of Hammer Shots is EXTREMELY light, and the only time you will be using Hammer Shots is when the two next subsequent gcds will put you under 60 cells while maintaining the rotation, this would only truly apply for a Grav Round to a Demo Rounds because it depletes the most cells within 2 gcds in this discipline. However, with low cell costs to most abilities and the amount of talents and skills that benefit cell management, the amount of Hammer Shots you will have is minimal.
One thing to note about Vortex Bolt is that since it makes the next Grav Round cast instantly, if that Grav Round procs Curtain of Fire, you must keep in mind that the proc occurred at the START of the gcd, not at the end of it. In other words, hard casting Grav Round to proc Curtain of Fire will be at the end of that gcd, while an instant Grav Round, either instant by Vortex Bolt or by using Tech Override, will be at the start of the gcd.
Another important thing to note is that, while highly unlikely, Advanced Targeting (10% surge bonus) may fall off due to bad crits. While Assault Specialist does not suffer from this due to constant dot uptime, the single tick damage of many abilities in Gunnery may cause Advanced Targeting to not be up, or cause it fall off due to bad rng.
The last important thing is the usage of Recharge Cells in the rotation. Ideally, Recharge Cells should be popped one gcd before Curtain of Fire is procced, and/or used in conjunction with Supercharged Cell. This way, even if you emptyyourcells, using both Recharge Cells and Supercharged Cell while channeling Boltstorm would recharge nearly all your cells.
*Disclaimer: Due to neither of us having commandos, this portion is taken from the merc guide.


For this part, two parses will be analyzed due to certain inconsistencies. The main differences in these two parses is the APM for both of them. There is a difference of about 1.6 APM between both parses and it highly impacts the results of the parse. The parse that should have been higher is the one with higher APM, but due to crits, the lower APM parse was higher.
As you can see though, both parses follow the priority system for maximum damage, and minimal cell management. These numbers were achieved with a mix of 192/198 gear, and 2 186 acc/pow enhancements.
Assault Specialist has undergone a number of changes including:
 Full Auto (FA): Costs more than previously at 24 cells but also does more damage and also causes your next MB to crit automatically once every 60 seconds. 12 second cooldown.
 Charged Bolts (CB): Due to IA not requiring 2 CB or FA/CB in one block this ability is no longer used as often but due to it building stacks of Supercharged should still be used fairly regularly. No cooldown, costs 15 cells.
") Incendiary Round (IR): The weaker of the primary dots and increases all elemental and internal damage done by 7% for 45 seconds. Should be kept on the target at all times where possible. Costs 15 cells.
Incendiary Round (IR): The weaker of the primary dots and increases all elemental and internal damage done by 7% for 45 seconds. Should be kept on the target at all times where possible. Costs 15 cells.
 Assault Plastique (AP): It no longer has a dot attached but the damage has been increased accordingly. Use it as often as your cells allows as a filler. 15 second cooldown, costs 15 cells.
 Electro Net (EN): One of the highest damaging abilities per cell cost and should be used as regularly as possible. Due to its lengthy cooldown, however, delaying it for a few GCDs to fit better into the rotation or for Supercharged is not damaging. 90 second cooldown, costs 10 cells.
") Explosive Round (ER): Sub 30% this ability’s cell cost is halved and the damage increased by 75% every 15 seconds. Should be used as often as your cells allows as a filler. Costs 10 cells.
Explosive Round (ER): Sub 30% this ability’s cell cost is halved and the damage increased by 75% every 15 seconds. Should be used as often as your cells allows as a filler. Costs 10 cells.
") Hammer Shot (HS): Cell management is much more costly to manage effectively than prior to 3.0 so unlike previously where you didn’t have to auto attack much or at all to manage cells, this now needs to be used quite often when your cell management abilities are not available.
Hammer Shot (HS): Cell management is much more costly to manage effectively than prior to 3.0 so unlike previously where you didn’t have to auto attack much or at all to manage cells, this now needs to be used quite often when your cell management abilities are not available.
 Supercharged Cell (SCC): Requires and consumes 10 stacks of Supercharged and increases all dot damage for 10 seconds and applies an additional 5 second dot.
 Reserve Powercell (RPC): Your next ability consumes no cells. Should be used with Full Auto where possible simply because it costs the most cells. 90 second cooldown.
Opener
(pre-cast) SB, IR, Adrenal + MB (proc BC), FA, SCC + EN, AP, MB, CB (use BC), MB, IR, SB, CB, CB, MB (proc BC)

Heat Ramping/Cell Emptying
FA + RPC, AP, CB (use BC), MB, IR, SB, CB, CB, MB (proc BC), FA, AP, CB (use BC), MB, IR, SB + RC, CB, CB, MB (proc BC)

General
FA, EN/AP/ER/HS, CB (use BC), MB, IR, SB, CB, CB/HS, MB (proc BC)

Essentially the rotation can be outlined as:
It is possible to use Hail of Bolts on a non-target prior to entering combat to proc IA and make your first MB free and Recharge Cells but while this makes your starting cells higher, it makes no overall difference to your rotation.
The key to maximizing damage potential in Assault is making the most of your available cells through not just knowing what you can and can’t use at any given moment but also knowing how long until your cell management abilities are available again and planning around that.
If Supercharged is or will be available after the next CB then you can use an additional AP or ER in place of a HS without worrying about depleting and if RPC is coming off cooldown then you can ignore HS entirely in place of your higher priority abilities as the way the rotation is structured both RPC and RC come off cooldown right when they are needed.
The downside to this approach is that if something goes awry such as using an ability when you don’t have the cells to afford it, it can severely hamper your output as you will need to replace several abilities with HS in order to get your cells in a manageable enough state to continue with your rotation.
You can delay Electro Net to combine it with SCC to maximize its usage but you should not delay SCC unless you know there will be a change in the fight which will cause you to stop DPSing within the 10s window, i.e. Revan phase transitions, Blaster shielding. During these downtimes you should build or maintain your stacks by using Kolto Shot, which comes with the added benefit of healing your target. When SCC becomes available or can be used may differ depending on how many CB / HS you did as well as any external factors in the fight such as the previously mentioned downtimes.
Blazing Celerity should be kept on the CB in the FA block wherever possible but it is also possible that it can shift to the 1st half of the rotation because of things like messing up the rotation, getting stunned, interrupted, LoS’d etc., in which case it should be used on Serrated Bolt and then you can simply move the 4th GCD filler to anywhere from 1 to 3 and have CB as the 4th to proc IA and then continuing the FA block as normal.
Care must be taken with RC usage to ensure it is used directly before the ability you are going to use to proc IA because of the way alacrity works in that it does not adjust cooldowns retroactively and if you use it too soon the combined length of the regular rotational abilities will fall under the remaining time of your IA cooldown and you will need to use another ability to proc IA which will affect your overall cell position as well as pushing everything in the rotation by an additional GCD.
Your rotation during the final 10% of the fight can vary considerably depending on your cells going into it. If you have cells available or if you have RPC or RC coming off CD soon, but you won’t be getting 10 stacks of SCC before the target dies, you can swap out the CB from the first block with an ER to maximise both it and AP’s usages during the final portion of the fight. If SCC is nearing 10 stacks, you are better continuing to use that space for an additional CB until you reach the 10 stacks.
In order to maximise their damage, your primary dots shouldn’t be reapplied when there is less than 50k HP left on the target per as under this substituting a CB in their place is more effective. This can be extrapolated to 50k per target in an Operation’s fight although this number will vary depending on the composition of your group. EN is slightly different in that it ticks once every second instead of every three like the other two applied dots and therefore should not be applied below 25k.
*Disclaimer: Sample parse and video are created by Nepthen from Old Republic Dads
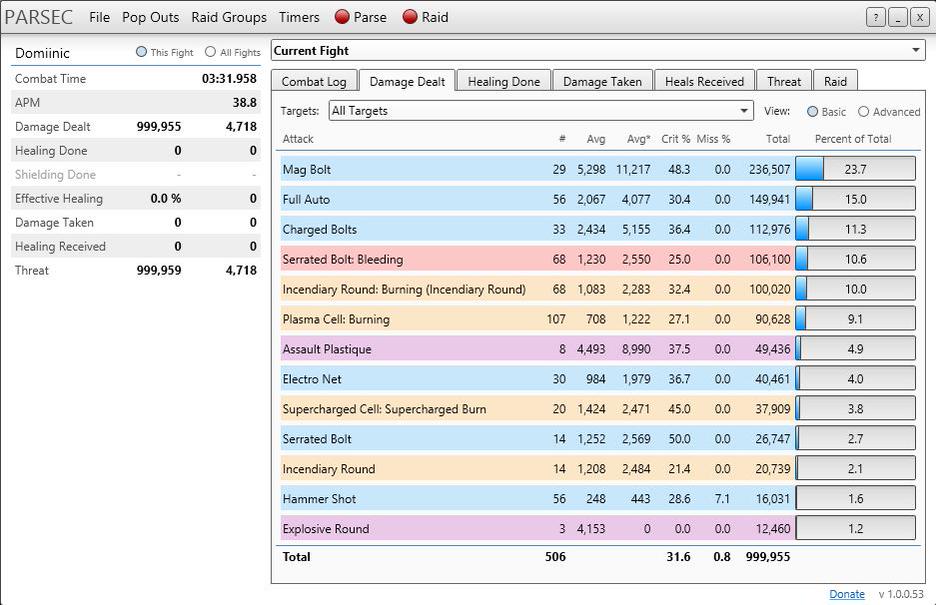
This parse was done with the exact same gear as Gunnery, mix of 192/198, and 2 186 pow/acc enhancements. As you can see, the three biggest damaging abilities are all your main weapon damaging abilities, where the next three biggest damaging abilities are all your dots. The priority for the parse is to have constant dot uptime, while proccing IA every 7.5 seconds, and remaining above 60 cells while RC is on cooldown.
Like the previous iteration of Operations content, no one Discipline is ideal for all fights and both have their places.
The Ravagers
Temple of Sacrifice
We are Fascinate and Marisi, both members of <Zorz>, an endgame progression guild that has claimed multiple world-firsts since its creation, including Nightmare Dread Fortress speed title, Nightmare Dread Palace clear and speed title, and most recently, Hard More clears of the two newest Operations: The Ravagers and Temple of Sacrifice.
We both created Mercenaries during early access and have used them as our main progression character through every tier of content and and are always looking to expand on our knowledge of the class and to find new ways of pushing its capabilities as far as they can go through experimentation.
Any comments, questions or concerns you may have about the content of this guide can be asked either here or addressed to our SWTOR forum users, BreakingNews and Kinslayer, respectively.
Thank you for reading our guide!


 SWTOR 3.0 Saboteur Gunslinger DPS Guide by CamelSWTOR 3.0 Engineering Sniper DPS Guide by Camel
 SWTOR 3.0 Mercenary Bodyguard Healing Guide by Orderken
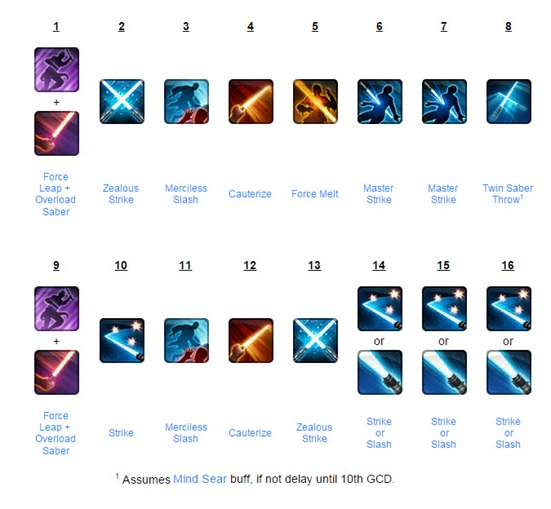 SWTOR 3.0 Sentinel Watchman DPS Guide by OofalongSWTOR 3.0 Rage Juggernaut DPS Guide by Artorias