SWTOR 3.0 Engineer Sniper DPS Guide written by Camel of Begeren Colony.
Contents
I’ve just finished updating the Gunslinger Guide, and I plan to Update this soon. For now, I’d suggest just glancing at the Republic version and try to translate it to imperial terms.
Out of the three disciplines, Engineering was changed the most, by far. EMP Discharge has been reworked, so now it deals damage, rather than reset CDs of Adrenaline Probe, Entrench, Shield Probe, and Covered Escape. Right there, you can tell that this spec lost a good chunk of its defensive power. The burst is still reliant upon Explosive Probe and Series of Shots, and that isn’t a ton. If you want burst, check out the other specs.
For those of you new to the spec, Engineering is an AoE/Dot based discipline. It relies heavily on Plasma Probe to burn up foes while poking a few people with some Explosive Probe and Series of Shots. On single target, there is a minor ramp-up time, but the results over a long duration fight are fantastic, whether or not you wish to include Covered Escape in the rotation. This discipline competes with others for the highest DPS overall.
All of this will be touched upon later in the guide, but here are a few other key things that haven’t been stated yet. The mobility of the spec is wonderful, to say the least. You no longer need to be in cover to use Explosive Probe, Series of Shots, or Snipe. However, this does NOT mean you should use the latter of the two out of cover. Remember, you don’t suffer from pushback penalties while in cover. With that in mind, based off the new(ish) rotation, you only need to be in cover for 3 seconds at a time, every 9 seconds. This is critical, since Marksmanship is entirely stationary and Virulence requires roughly 2/3 of the rotation to channel abilities, such as Cull or Series of Shots. Also, you will find energy easier to come by, thanks to the inclusion of the re-worked EMP Discharge. It gives you a free Fragmentation Grenade every 18 seconds, which is key to energy management.
This is for mostly PvE purposes only. If you want to talk PvP, go talk to someone who PvPs. I’m still a scrub at Engineering PvP. Also, to those returning to the guide, a few edits have been made to explain how to ‘sniper a little bit better.
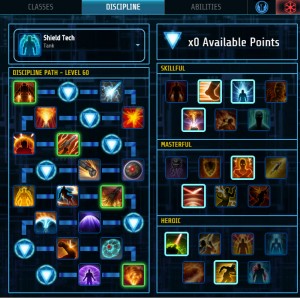
Skillful
Masterful
Heroic
100% Accuracy is a priority. To reach this, you need a minimum of 750 points into Accuracy.
Critical rating is 100% NECESSARY for this spec. Nearly every tech ability in the spec gains a +30% critical damage boost. (Exact points still to be determined.)
You should run with 1 to 2 pieces of Alacrity (between 110-220 rating), then put the remaining points (those not fitted into Accuracy or Alacrity) into Surge.
Augments: Overkill (Power) or Skill (Cunning)
Relics: Serendipitous Assault and Focused Retribution
Set Bonus: 6-piece Field Tech/Professional
 Plasma Probe: This is the most powerful DoT in the spec. While the grenade only lasts for nine seconds, and seems less damage dealing than its competitor Interrogation Probe, the grenade deals Elemental Damage rather than Energy Damage, so the damage dealt by this grenade isn’t affected negatively by armor, unlike Shock Charge. This also applies a debuff on the target that increases all AoE damage dealt to the target by 10%. It is affected by these talents:
") Interrogation Probe: Another important DoT in the spec. This lasts for 18 seconds, and can only be applied to one target at a time. However, targets taking damage from this buff are vulnerable to EMP Discharge, which will be explained shortly. It is affected by these talents:
Interrogation Probe: Another important DoT in the spec. This lasts for 18 seconds, and can only be applied to one target at a time. However, targets taking damage from this buff are vulnerable to EMP Discharge, which will be explained shortly. It is affected by these talents:
 Series of Shot: A high damage-dealing channeled attack. This ability should be used on cooldown to maximize damage output. It is also crucial for maintaining Blazing Speed, which burns the target for six-seconds. This is affected by:
") Explosive Probe: A hard hitting single target ability. In addition to its primary detonation, it drops four Cluster Bombs, which can be detonated by continuous blaster fire. Each detonation returns 5 energy. With Laze Target popped, the next Sabotage Probe will automatically crit. This ability is also enhanced by:
Explosive Probe: A hard hitting single target ability. In addition to its primary detonation, it drops four Cluster Bombs, which can be detonated by continuous blaster fire. Each detonation returns 5 energy. With Laze Target popped, the next Sabotage Probe will automatically crit. This ability is also enhanced by:
") EMP Discharge: This ability has been changed from a utility to an offensive ability. Now this deals direct damage to the target that is taking damage from Interrogation Probe. In addition, this ability makes the next Fragmantation Grenade free. This is also buffed by:
EMP Discharge: This ability has been changed from a utility to an offensive ability. Now this deals direct damage to the target that is taking damage from Interrogation Probe. In addition, this ability makes the next Fragmantation Grenade free. This is also buffed by:
 Corrosive Dart: The final DoT of the spec. (Lasts 18 seconds)This is important to apply because not only for the damage itself, but it increases all ranged damage dealt to the target by 5%. This is not a high-priority move, however, you should keep this DoT applied to your main target to maximize DPS. This DoT can be applied to multiple targets, unlike its similar counter-part.
") Fragmentation Grenade: This is a low damaging, low energy cost “single-target” ability. The AoE now only affects targets of Strong difficulty or less, so don’t use this on big trash mobs. This is mainly used as a filler, but this is key to maintaining energy in the spec. When followed by EMP Discharge, the ability costs 0 energy, and with it’s in tree buffs, it gives 5 energy after use. This also keeps the Electrified RailgunDoT applied to the target. This is affected by:
Fragmentation Grenade: This is a low damaging, low energy cost “single-target” ability. The AoE now only affects targets of Strong difficulty or less, so don’t use this on big trash mobs. This is mainly used as a filler, but this is key to maintaining energy in the spec. When followed by EMP Discharge, the ability costs 0 energy, and with it’s in tree buffs, it gives 5 energy after use. This also keeps the Electrified RailgunDoT applied to the target. This is affected by:
 Covered Escape: The most debated ability of the spec. There are two ways you can play the spec, and this ability is why. You can either use it for strictly mechanics, or for a damage boost. To maximize DPS, you should try to use this ability when you can. However, you are responsible for any risks you take with it. Now onto the damage itself: This ability drops 5 Scatter bombs dropping a bomb every three meters (starting at three meters), and each bomb has a radius of 2 meters, but only 2 out of the 5 bombs will damage any target in the path. Meaning, you have to roll into the target to deal damage. About 70% of the time, two bombs will hit a humanoid target (starting 5-10 meters away from the target), therefore it is still useful to roll onto any target. The Scatter bombs are also buffed by:
 Orbital Strike: This ability is an AoE Dot ability. Ticks 3 times (every 3 seconds) and lasts for a total of nine seconds. This can be used as a precast opener into a single target fight, but should not be used for single target fights otherwise. However, It is a great multi-target ability. This is affected by:
 Suppressive Fire: A filler AoE ability. This does cost a good chunk of energy overtime, so be sure that energy will not be an issue while using this ability. Combined with Imperial Efficiency (25% damage boost), it can help make short work of large groups.
 Takedown: The Sniper execute ability. This is a hard hitting filler only usable under 30%. Note: I would be careful when using this ability. If you are used to the 2.0 set bonus, you will find that using said ability will energy strain you.
 Snipe: For the meantime, it’s pretty much useless. It’s a good ability to use if you a) Get lost somewhere in the rotation, or b) Find an odd hole in the rotation, and your Fragmentation Grenade is on CD. But if played right, you should never need to use it. It does give a stack of Electrified Railgun, so its use will be slightly beneficial.
 Overload Shot: This is a weak damaging ability, and should only be used if Calculated Pursuit is being taken from the Utilities tree. Otherwise, use Rifle Shot where Overload Shot is normally used.
The spec is really entirely dependent on the rotation. But there are a couple things to keep in mind.
There are two different forms of the Engineeringsingle-target rotation, each with a different priority set, which may be good to know transitioning from one fight to the next.
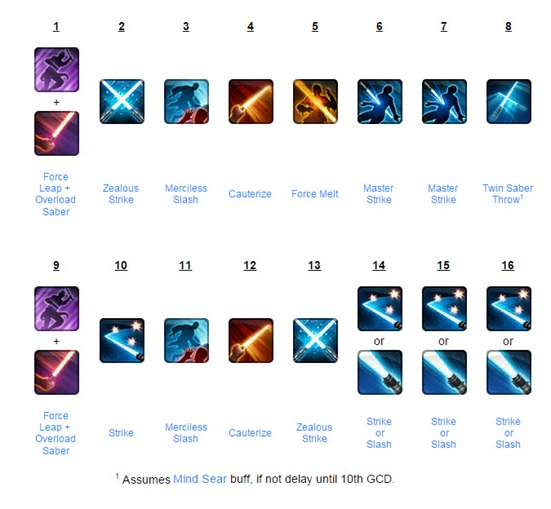
Standard Engineering: This rotation revolves around the use of Series of Shots. This ability should be used on cooldown if possible. Then the rotation is split into two GCD blocks. This is the priority list:
(Editor note: the numbered list don’t show anything beyond 9 so 0, 1, 2, 3 are actually 10, 11, 12, 13)
Quick Analysis/Pointers: Energy isn’t strenuous in this spec. However, you may wish to toss a Fragmentation Grenade before applying Corrosive Dart (for ex.) in order to maintain energy. Also be sure to use Laze Target on cooldown. Free Crits!
So how does this all fit into the rotation you ask? Simple. This is what we get (with this basic opener):
Opener: (Pre-cast) Orbital + Laze Target + Target Acquired + Adrenals + Explosive Probe + Series of Shots
Rotation: Plasma Probe + Interrogation Probe + EMP Discharge + Filler + Series of Shots + Plasma Probe + Corrosive Dart + Filler + Explosive Probe + Series of Shots

Rotation Analysis: Simple right? Let me just break down a little bit more. As you can see, Plasma Probe was used 1st during each GCD block. If you remember to apply it, your Plasma Probe will ALWAYS ware off at this stage of the rotation. (Oh look, each GCD block + SoS is nine seconds long. What a coincidence.) Then the rest of the rotation is similar. Interrogation Probe will always ware off at the 2nd GCD of the two GCD blocks. EMP Discharge will come off CD at the third… and so on. You have two places you can fiddle with the rotation, which are indicated as fillers. These fillers are indicated as priorities 6-13.
Here’s a tip: The spec is much easier on energy management than it was in 2.0, so now you can effectively use Adrenaline Probe as a mini-dps buff. Which means, if you hit a filler in the rotation, Adrenaline Probe is up, and you feel like burning some energy, you can toss in a Orbital Strike to add in a little additional damage. Doing so will most likely require you to use Adrenaline Probe.
Additional Note: Some fights, using Covered Escape can be a very sketchy DPS move (Revan, for example), so using said ability may not be possible.
Experimental Engineering: This is a rotation I’m still currently working on, but the core idea has been set in stone. The type of rotation is still the same, however the priority list is slightly different:
Then the rest…
So how does this one ability change the rotation? Covered Escape, unlike the rest of its companions, does NOT fall on a 9 or 18 second cooldown. Instead, it is 20. Therefore, abilities have to be moved around in order to use the roll on Cooldown.
The opener is still the same: (Pre-cast) Orbital + Laze Target + Target Acquired + Adrenals + Explosive Probe + Series of Shots
Rotation:
Plasma Probe + Roll + Interrogation Probe + EMP Discharge + Series of Shots + Plasma Probe + Corrosive Dart + Filler + Explosive Probe + Series of Shots

Plasma Probe + Interrogation Probe + Roll + EMP Discharge + Series of Shots + Plasma Probe + Corrosive Dart + Filler + Explsive Probe + Series of Shots

See the difference? Interrogation Probe was moved in front of Covered Escape. It does clip one tick of the dot, however, it is more beneficial later on in the rotation to clip this dot than to apply it later for the sake of simplicity. I won’t go through this whole rotation, but keep this in mind: Think about when each ability is going to be used. If Roll is going to overwrite it, try to think about what to use next.
Experimental vs. Standard:
Experimental is much more difficult than standard, but does pull about 100-150 DPS greater (186’s with 100% accuracy). However, when bringing this to boss fights, it is crucial you know what you are doing BEFORE trying this playstyle. If rolls cannot be used, then Experimental is out of the question. But if it can, and has potential to increase DPS by a large amount, then give it a shot.
AoE Rotation Priority:
Orbital still prevails over the three, even with the buffs to Suppressive Fire. It gains the AoE damage boost, and the Crit Boost from the tree, making this ability still a very powerful tool to use. Plasma Probe is a nice low cost AoE, and Covered Escape is free, however needs correct placement to be used effectively. Suppressive Fire wraps up the list here, either with or without the damage boost in the Utilities tree.

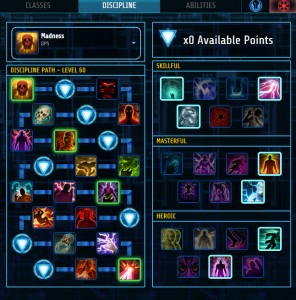
Author’s Note: I’m sorry I do not have a Sniper equivalent yet. Too busy leveling other things for Pub side progression. I will get an updated picture as soon as I can.
I’m the one known as Camel. I’m the GM of Don’t Worry Bout It on Begeren Colony (Yes it’s a RP-Server… I know), and we are among the few remaining PvE Guilds on the server. I’ve been playing Saboteur ever since I fell in love with it in 2.0, and I’ve used it in pretty much every fight where I don’t accidentally kill myself with the rolls. Even then, I sometimes do it because… why not?
Also lesser known, I’m a very experienced GSF pilot, however, “retired”. I started to re-live the space-sim age ever since I found FreeSpace on Steam, and pretty much dropped GSF after that. And I’m sorry to say that I’ll probably not fly again for a while. For those space-sim lovers out there, Elite: Dangerous releases in just a few days (12/16), so if I’m doing any flying, it will be there.
Said rotation(s) are still in its developing stages. So feel free to make adjustments as you see fit!
 SWTOR 3.0 Defense Guardian Tanking Guide by Artorias
 SWTOR Bounty Contract Week Kingpin missions guide
 SWTOR 3.0 Virulence Sniper DPS Guide by Yolo
 SWTOR 3.0 Deception Assassin DPS Guide by Artorias
 SWTOR 3.0 Mercenary DPS Guide by Marisi and Fascinate