SWTOR 3.0 Shield Specialist Vanguard Tanking Guide written by Milas of Harbinger. Updated for Patch 3.1.1
Contents
Shield Specialist is one of the three tanking classes of SWTOR. It is hands down the most sturdy of the three classes and comes with so much passive mitigation. As a player there is little active mitigation you have to account for (Energy Blast + Shield Enhancers) and the rest of your mitigation comes from shielding incoming attacks. If you couldn’t tell from the name, shield is love and life. In this guide we’ll cover everything from gearing, to highest possible DPS, proper use of cooldowns, and the most important part, killing bosses.
Introduced in game update 3.0, utilities are advanced class specific and as I like to say took everything that was “overpowered” about hybrid builds and gave them to you for free. No longer will your raid be upset at you for not being in hybrid spec… you’ll get all the goodies and full mitigation. Vanguards landed on the upside of this change and if/when utilities get nerfed, Vanguards will be one of the first ones touched.
Skillful tier
Masterful Tier
Heroic Tier
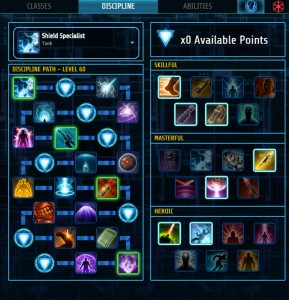
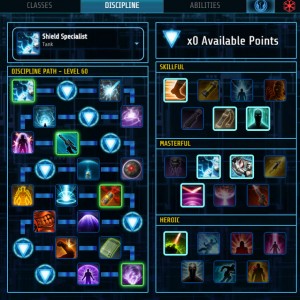
As you can see, there are lots to choose from, so I’ll generally respec for most encounters in Ravagers/ToS. Below are the load outs I use per boss fight:
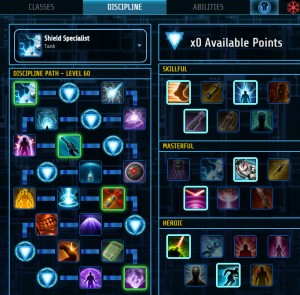
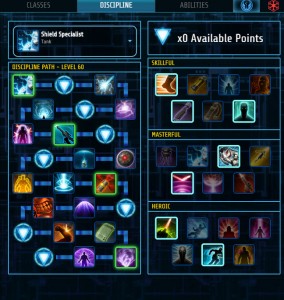
Ravagers
Temple
Scaled 1-3 for each tank class. #1 – best/easiest
Disclaimer
The way that I and the other Zorz tanks gear is opposite the widely accepted “mean mitigation” theory crafting. We and this guide value HP values more over overall mitigation as we gear for progression content and pushing for world firsts. We don’t value DTPS as others do. Our goal is surviving encounters in as little gear as possible and accounting for spikes. DTPS isn’t what kills a tank. It’s mistakes, lack of healing, and taking huge spikes so we gear for larger HP pools.
If you would like more information on “mean” mitigation and proper mods/enhancements following that gearing method, visit this post ( KBN shout out)
Accuracy: 10% given from Tank Stance + 1% Companion buff = 101% Melee Accuracy
Tank Mitigation: Shield is king, you’ll stack this until you can stack no more. If and when you can take shield you take it over absorb and defense. The foundation of Vanguard tanking is shielding attacks or getting IC procs to get 3 power screens to use energy blast. We also get the most out of passive mitigation, getting full mitigation uptime is as simple as using energy blast and ensuring you have three stacks of shield enhancers up ( High Impact Bolt + Stockstrike.)
Stat priority: Shield > Absorb > Defense
Gear:
As of 3/16/15 here are my in-game ratios with Advanced Anodyne Fortitude Stim:
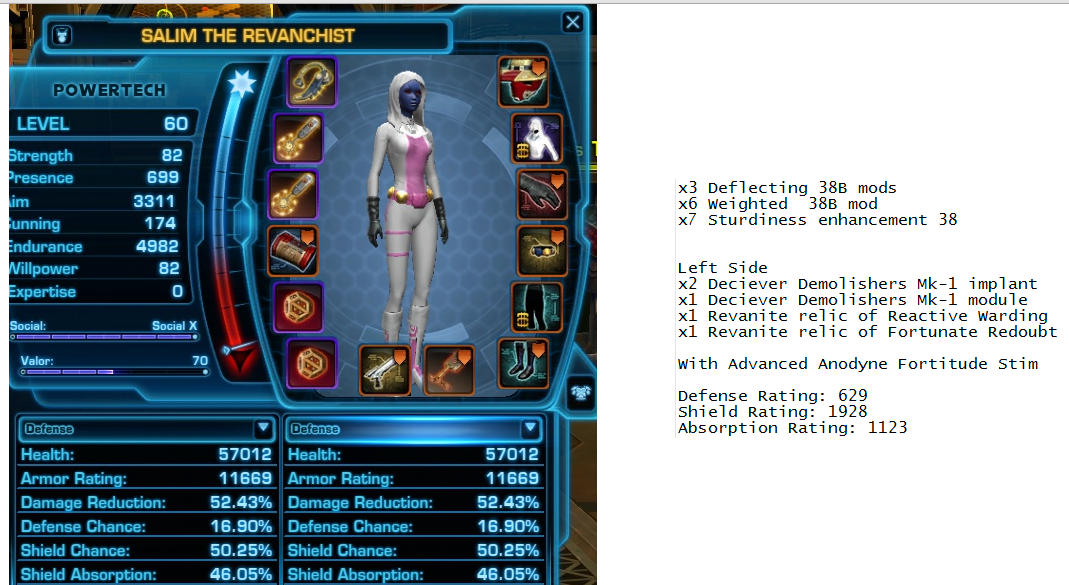
My end game goal in min/maxed 198 gear is about:
You’re also in luck. During HM content, the developers make it easy to gear the way I do. See this post.
Armorings: Commando, you dont need aim. You’re not a DPS.
Mods: B mods = best mods. You’re trading mitigation stat for endurance at a 1:1 rate. Again you don’t need aim
Enhancements: Immunity and Sturdiness are back and once I’ve reached my HP pool these will be BiS. Until I’m at the point Bulwark/Bastion enhancements are fine.
Trade off is + 26 endurance for + 29 main so not exactly 1:1. This will be your secondary stop for HP however as other conversions are much worse.
Implants/Ear piece is + 44/- 47 so Deceiver ultimate comm pieces are extremely good.
Quick gearing out of the gate
Set Bonus
You should run the new six piece in general. But until you have the 6/7 pieces required, you should run 2 piece new, four piece old.
Augments
Vanguard tanking is rather boring when it comes to managing maximum mitigation its nearly as simple as doing your rotation and using Energy Blast at proper times. As long as you are using Energy Blast fairly often (I personally use it off CD unless I know a large attack is coming) and keeping three stacks of Shield Enhancers up.
Abilities in your main rotation:
Situational abilities (out of range or AOE):
Highest opener threat-wise:
Ability Priority:
Mid Fight Rotation:
If/when 65-70 energy cells, do Hammer Shot and try to proc Pulse Engine and use Energy Blast as soon as available.
Reserve Powercell & Recharge Cells- Use your energy cells aggressively. It’s easy to push your cells to at least 30 and use Recharge Cells. You can also go into “cell regain phase” if that’s available: Energy Blast & Pulse Engine + Recharge Cells/Heat Blast, this should bring you back to nearly 100 energy cells.
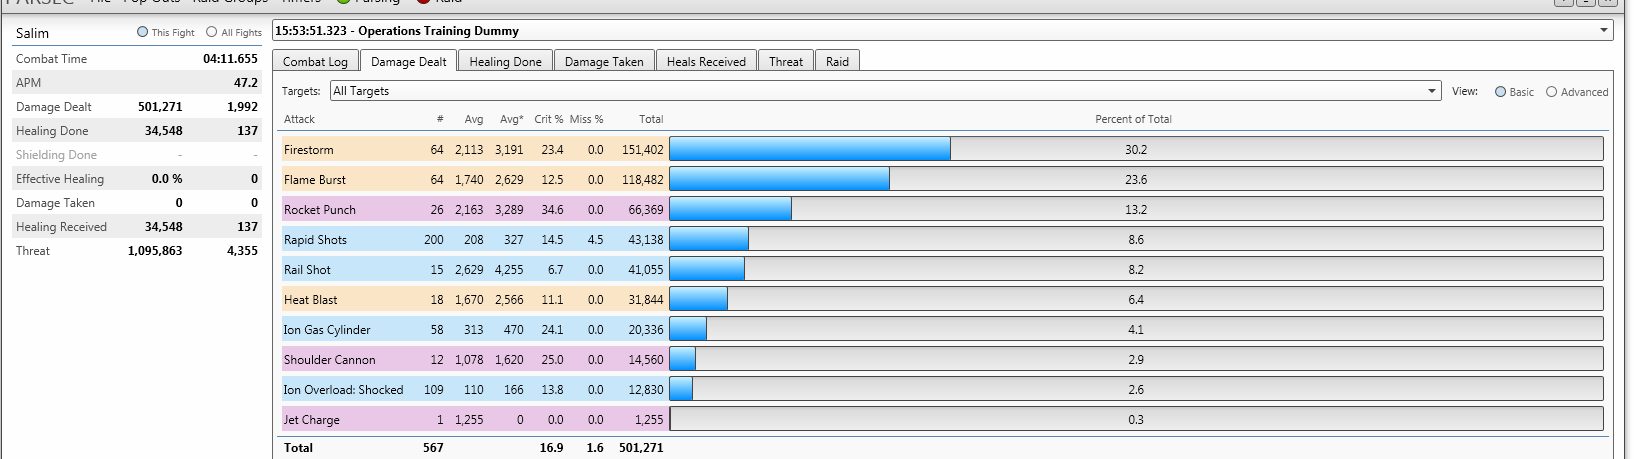
Highest Possible DPS Rotation
Has Explosive Surge (Flame Sweep) as your filler Level 32 & 40 talent: Increases Explosive Surge by 15% + 10% crit chance. With 25% Explosive Surge utility its a superior option. (Kwerty Shoutout)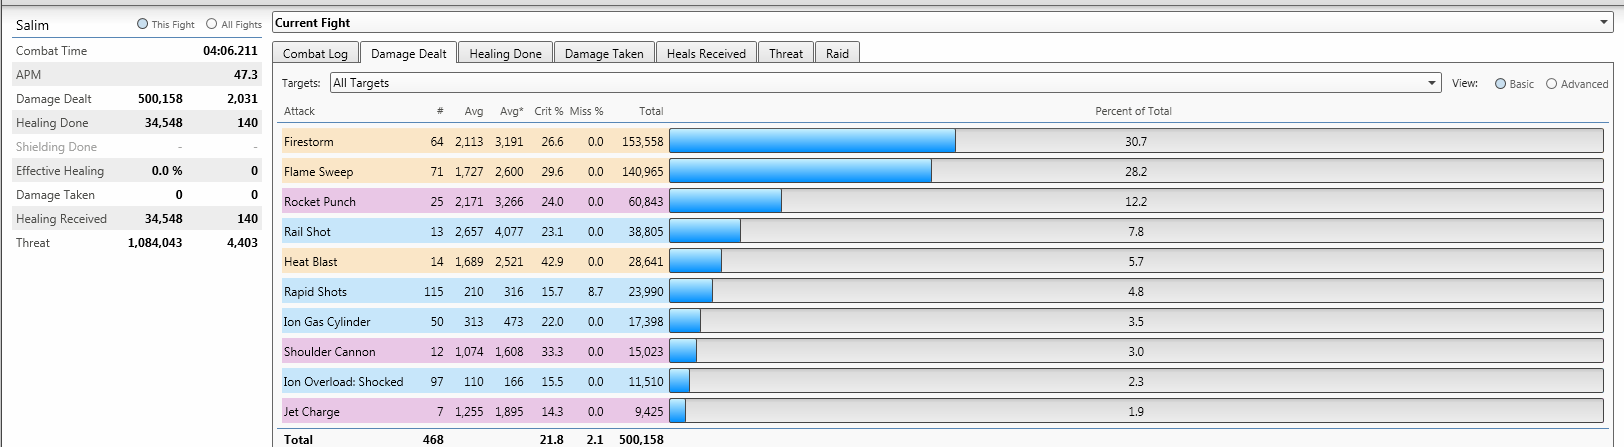 This requires a you to use the utility Sharp Satchel which in turn makes you lose a utility.
Personally I still use Ion Pulse (Flame Burst) because I like having the reduced hold the line cooldown and passive movespeed. It is down to preference and the DPS difference is 6-10 seconds faster on a 500k dummy TTK wise. This is assuming single target. If not single target Explosive Surge is 100% the go to ability.
This requires a you to use the utility Sharp Satchel which in turn makes you lose a utility.
Personally I still use Ion Pulse (Flame Burst) because I like having the reduced hold the line cooldown and passive movespeed. It is down to preference and the DPS difference is 6-10 seconds faster on a 500k dummy TTK wise. This is assuming single target. If not single target Explosive Surge is 100% the go to ability.
AoE Rotation & ability priorities:
If possible you want to start with storm to get Static Surge ( free two Explosive Surge), and leap in and start with Ion Storm into Mortar Volley followed by Explosive Surge x2 into a AoE taunt. You’ll basically Explosive Surge until you need to Recharge Cells / Pulse Engine procs / adds die.
Cooldowns Usage
I’m of the belief of using cooldowns proactively is the best way to maximize the efficiency of them. I’ll often pop them when I know damage spikes are incoming to reduce damage. I feel that it’s next to pointless to pop a cooldown when you are in survival mode (<30%) because the chances of dying are much higher using a cool down in advance of extreme danger to reduce the incoming damage load.
To see how I use cool downs in encounters see the playlist
Tanking is rather simplistic and often people are scared to tank when in my opinion it’s the easiest of the three roles. Tanking is perceived as difficult because if/when you mess up it’ll lead to a wipe and people think if you can’t hold threat/aggro you aren’t a good tank. The number one thing that I see new tanks doing is holding onto taunts as if they were money. Please taunt away in this game, especially with the new four piece bonus which basically allows you to taunt and multiply your threat off cooldown.
The next mistake I see tanks do is taunt without proper threat. Please do your highest threat abilities before taunting. Leading with a taunt will 9/10 lead to you losing threat to a adequate DPS within seconds.
Know the encounters like a book. The more you know about the incoming damage profiles and abilities you’ll be hit with, the more knowledge you can use. In particular you should know which cooldowns are most effective in each situation so you don’t waste them. This doesn’t exactly apply to Shield Specialist as we are limited on the “cheese” but for example knowing all the abilities you can Force Shroud or Saber Reflect is valuable information.
Examples
Reflective Armor – When close and personal is triggered will deal “X” to attackers in 10 meters
Working as intended

Saber Reflect
Working as intended

Force Shroud
( HIGUYS shrouds stacks 10-20 and takes no damage)
It’s the small things you do while raiding that makes encounters easier and less of a struggle. The more knowledge you have as a tank, the easier you make it for your raid.
Stuff I suggest you start to think about/use
Experience and preference triumphs anything you’ll read and or be told. I’m arrogant and stubborn I can tell you everything about encounters. That doesn’t mean I’m the best. You’re not a DPS where the highest number obtained makes your rotation correct on a dummy. Tanking is touch and feel and the more experience you gain the easier it becomes.
I’m Milas, I’m the best, kidding no really I am the best. I’m the GM of <Zorz>, I like raiding and doing hard content. I’ve been doing “progression” raiding since 1.2 and still enjoy every minute of it. I’ve always dabbled in tanking just never did it fully until I started raiding with <EDE> on the toon Faker. One day madness sorcs will rise again and you’ll see me in a kill video near you on it. Until then you can found me in the comment section below, @ http://zorzz.enjin.com/ or on twitter @jdotter707.
In closing I’d like to thank Dulfy for hosting my guide and the following people.
Shout out to Toggle, Thiol, Carl, Freaky, and Smugglin for teaching/molding me into the tank I am today.
Shout out to my healers Sorvali and Raulos can you please get good numbers?
Shout out to everyone in Zorz for putting up with me on a weekly basis.


 SWTOR 3.0 Mercenary DPS Guide by Marisi and Fascinate
 SWTOR 3.0 Scoundrel Sawbones Healing Guide by OrderkenSWTOR 3.0 Lightning Sorcerer DPS Guide by KTap
 SWTOR 3.0 Deception Assassin DPS Guide by Artorias
 SWTOR 3.0 Deception Assassin DPS Guide by Evolixe