SWTOR 3.0 Virulence Sniper DPS Guide by Yolo of Harbinger.
Contents
My name is Yolo/Snickerr/Hashtag. I play on The Harbinger for the most part and do all of my raiding in Zorz. As far as we’ve been a guild, we have accomplished a world first in all content available to us (Gate Crasher, Deposer of the Dread Master, Dread Master, The Revanchist, etc.) I have been “maining” a Sniper since NiM Dread Fortress and have been enjoying every minute of it. I try to play as many different classes & specs as possible during all progression content to better myself as a player. I have been a subscriber since launch, enjoy end game raiding, & stream as much as I can! (You can catch me live @ www.twitch.tv/snickerr)
When 3.0 launched, many Specifications, or Disciplines, have altered a few rotations. Virulence has remained very similar to how Lethality pre 3.0 played. One great thing about this Discipline in particular is there is a few debatable & efficient ways to play the class, which I love!
“Virulence: Some Agents prefer a less direct method of eliminating a target, such as administering poison. Lethal toxins and all-consuming microbes are the domain of the walking biohazard known as the Virulence Sniper, who inflicts lethal shots and lobs of corrosive grenades from a safe distance where they can witness the results of their handiwork.” –Virulence Lore 3.0
“With 3.0’s new Discipline system, you will be optimized to full capacity. Pre 3.0, you had to level and buy skills in order to become a viable Sniper. This is no longer the case post 3.0. The difference is that you no longer need to purchase skills with credits. Instead, you are given a set amount of basic Sniper skills to start. This means abilities like Series of Shots, Orbital Strike, Suppressive Fire, and Shield Probe are automatically given to you once you commit to an advanced class (in this case, Snipers).” – Shulk 2014
I will cover 5 areas: DPS: Survivability, Raid Viability, Rotation Difficulty, & Utility. Scores are rated from 1-10 followed by a brief explanation (1 being the worst & 10 being the best. For Rotation, 1 is the easiest and 10 is hardest).
DPS: 9/10
We are not the bottom of the barrel anymore ladies & gentlemen! Although we are not the highest parsing class in the game, we still do great numbers being a 35 meter ranged class (which gives us greater uptime on most boss fights).
Survivability: 7/10
To live a Sniper must remain in cover. We have a wide variety of defensive cooldowns to work with such as Shield Probe, Evasion, Covered Escape, Entrench, & Diversion. Shield Probe is used to mitigate moderate damage while Evasion (while in cover) would mitigate massive spikes. One of my favorite things about this class is being able to use Covered Escape at the perfect second to mitigate a high damaging ability 100% (think NiM Dread Guards).
Raid Viability: 9/10
Snipers have always been desired in main raid groups and this tier of content should be no different. With abilities like Diversion, Covered Escape, & especially Ballistic Shield, Snipers are perhaps the best ranged DPS to take in most raid scenarios.
Rotation Difficulty: 3/10 (2 Cull Rotation) & 7/10 (3 Cull Rotation)
2 Cull: For any existing Lethality Sniper the 2 Cull rotation is virtually the same thing, but with tighter energy management if you have the new 6 piece. Very straight forward rotation with very little deviation from the set rotation until you start to dip on energy.
3 Cull: Trying to master and perform with this rotation at the hardest difficulty while is raids is definitely fun, but a little trickier to pull off than the standard 2 Cull rotation. If you can do this however, the juice is worth the squeeze.
Courtesy of Shulk
 Energy Tanks: Increases maximum energy by 10.This is great that every Discipline now get this as it helps the resource management a ton.
 Steady Shots: Increases the damage dealt by Snipe, Lethal Shot, Series of Shots, and Penetrating Blasts by 5%.Increases our skills across all specs. In this case for Virulence, Lethal Shots & Series of Shots.
 Hold Position: While in cover, ranged defense is increased by 20%, you cannot be leaped to or pulled, and you are immune to interrupts and ability activation pushback. In addition, Evasion reduces the damage you take from Force and Tech attacks by 75% while in cover.Some very nice changes to this for 3.0. Very good to note that to obtain the 75% reduction from Evasion you do need to be in cover.
 Imperial Targeting: Increases the range of Overload Shot, Flash Bang, and Distraction to 30 meters, and additionally increases the range of all rifle, probe, and dart attacks by 5 meters. In addition, Corrosive Dart marks its target for 45 seconds. Marked targets take 5% more damage from ranged weapon attacks.This passive makes the Sniper unique. You have 5 extra meter range compared to other classes (35 over 30). On top of all this, Corrosive Dart is now a huge ability for this class. It was important for it to be up at all times whenever possible, but now it is a raid utility providing 5% damage increase from ranged attacks.
 Spotter: Upon entering cover, your stealth detection level begins to increase gradually, reaching up to 30 additional levels of stealth detection over the following 30 seconds. This effect ends when you leave cover.This is virtually useless in a PvE environment, but for PvP is where it shines (being able to spot all those sneaky Operative & Assassins).
Laze Target: Increased the critical hit chance of your next Ambush, Explosive Probe, or Cull by 100%. Lasts 20 seconds. (Cooldown: 1 minute)This is one of the main offensives for your rotation. In the case for Virulence, this makes your next Cull’s full weapon damage critically hit by 100%.
Spotter: Upon entering cover, your stealth detection level begins to increase gradually, reaching up to 30 additional levels of stealth detection over the following 30 seconds. This effect ends when you leave cover.This is virtually useless in a PvE environment, but for PvP is where it shines (being able to spot all those sneaky Operative & Assassins).
Laze Target: Increased the critical hit chance of your next Ambush, Explosive Probe, or Cull by 100%. Lasts 20 seconds. (Cooldown: 1 minute)This is one of the main offensives for your rotation. In the case for Virulence, this makes your next Cull’s full weapon damage critically hit by 100%.
 Target Acquired: Increases ranged and tech accuracy by 30% and armor penetration by 15% for 10 seconds.Another great offensive cooldown. I personally use it in conjunction with2-3x Lethal Shots + Takedown.
 Adrenaline Probe: Summons a probe that helps you recover 50 energy over 3 seconds.A resource gain cooldown that lets you gradually gain back 50 energy over time. Very good cooldown in a couple of scenarios:a.) Rotation complications that cause energy problemsb.) Burn phases in raid fights
 Shield Probe: Summons a probe that projects a shield around the Agent, absorbing a moderate amount of incoming damage for 10 seconds. Does not break stealth. (Cooldown: 30 seconds)This defensive cooldown is great for mitigating small to moderate incoming damage, regardless of any damage type. Only use this when you can predict miniscule damage, and be very efficient with it.
 Evasion: Increases your chance to dodge melee and ranged attacks by 200% for 3 seconds. Does not break stealth. (Cooldown: 1 minute)With Hold Position, Evasion gains the benefit of mitigating Force and tech attacks by 75%. Therefore, it is imperative that you use it only for massive incoming damage as well as staying in cover for maximum potential.
 Ballistic Shield: Deploys a ballistic shield that spans 10 meters around you and reducing the damage taken by allies that remain inside by 20%. Lasts 20 seconds. (Cooldown: 3 minutes// 2 minutes 30 seconds if specced into Deployed Shields)Your raid wide cooldown for your operations group. A very situational, but powerful defensive. You would ideally save this for burn phases where damage gradually takes a toll on your group, and making healers’ lives easier.
 Entrench: Entrenches you into cover, becoming immune to all controlling effects. Only grants protection while in cover. Lasts 23 seconds (With Portable Bunker) (Cooldown: 1 minute // 45 seconds if specced into Pillbox Sniper)Entrench is your jack-of-all-trades cooldown with a myriad of utilities to support it. Immune to crowd control, movement-impairing effects, and physics, this cooldown is one of the best defensives a Sniper can have. There are plenty of utilities to list from:a.) Seek Cover: When Entrench ends or you leave cover while Entrench in active, you gain Seek Cover, which increases your movement speed by 50% and grants immunity to movement impairing effects. Lasts 6 seconds.b.) Pillbox Sniper: Reduces the cooldown of Entrench by 15 seconds and Cover Pulse knocks targets back an additional 4 meters.c.) Siege Bunker: Reduces all area effect damage taken by 60% while Entrench is active.
 Countermeasures: Activates countermeasures, instantly lowering threat by a moderate amount.Your main threat dropping ability. You would want to use it immediately after you perform your MAX DPS Opening Rotation or if you somehow pull threat from your tanks. Really, don’t be a hero and expect to pull threat from tanks. Use it immediately.
 Cover Pulse: Detonates an emergency charge that knocks all nearby targets back several meters and immobilizes them for 5 seconds. Damage dealt after 2 seconds ends the effect prematurely. Only usable in cover. (Cooldown: 30 seconds)This is your CC defensive in case you want to escape from all NPCs bunching up on you. Very useful for knocking players and NPCs out of the edge into their own timely deaths.
 Flash Bang: Detonates a flash bang that blinds the target for 8 seconds. Damage causes this effect to end prematurely. (Cooldown: 1 minute)Your other CC ability that stuns the target for many moons (unless you damage it of course).
Debilitate: Deals X energy damage and stuns the target for 4 secondsYour “hard” CC stun ability (“Hard” means a stun that persists through damage). In certain PvE situations, this is useful. In PvP, this is one of your core CC abilities you want to save this for burning your opponents in ranked.
Flash Bang: Detonates a flash bang that blinds the target for 8 seconds. Damage causes this effect to end prematurely. (Cooldown: 1 minute)Your other CC ability that stuns the target for many moons (unless you damage it of course).
Debilitate: Deals X energy damage and stuns the target for 4 secondsYour “hard” CC stun ability (“Hard” means a stun that persists through damage). In certain PvE situations, this is useful. In PvP, this is one of your core CC abilities you want to save this for burning your opponents in ranked.
 Leg Shot: Fires a shot that deals X weapon damage and immobilizes the target for 5 seconds. Direct damage dealt after 2 seconds ends the effect prematurely.Often times, you want to use this to keep NPCs in place to prevent incoming damage or activating mechanics. This has more better use in PvP.
 Covered Escape: Roll forward 18 meters, purging movement slowing effects and landing crouched behind cover. While rolling, your chance to dodge attacks is increased by 100%.Your anti-mechanic ability which allows you to be invulnerable in a short window of rolling. This has the best of both worlds, both PvE and PvP.
 Diversion: Reduces the accuracy by 45% and exposes from cover up to 8 targets within 8 meters for 8 seconds. Cannot be used on Operation bosses.Diversion has been buffed to become an AoE utility skill, so this is a welcomed change. In certain raid fights with adds, this is a valued cooldown you need to save. In ranked, you should also save this to prevent incoming burn damage from other opponents.
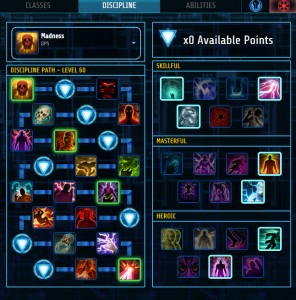
I have broken down these following utilities into PvE and PvP. I am not an expert PvP Sniper whatsoever, so any further input would be great! Do also note that my rating should not affect the way a player proceeds with the utility tree, but rather consider their choices in PvE and PvP situations.
Skillful
Masterful
Heroic
Key Abilities
 Corrosive Grenade (Level 10): Hurls a corrosive grenade that spews acid in a 5-meter radius on impact, dealing X internal damage over 24 seconds to up to 8 targets.One of the 2 main DoT’s in your rotation. I personally prioritize this ability after Corrosive Dart because applying a Corrosive Dart to a target first followed by a Corrosive Grenade spreads both DoT’s to enemies within 4 meters of the afflicted target.
 Cull (Level 26): Fires a volley of bolts at the target, dealing X weapon damage and spending 6 energy each second. When you deal damage with Cull, each of your poison effects on the target also deal damage.(Cooldown: 9 seconds)This ability truly defines a Virulence Sniper. Our entire rotation, and overall damage, are based off this ability. You only want to use this when you have your 2 DoTs on the target as well as using it off cooldown to maximize your DPS.
 Weakening Blast (Level 41): Deals X weapon damage for the next 10 seconds causing the target to take X additional weapon damage whenever it takes damage from your Cull or a poison effect.(Cooldown: 18 seconds)This has changed as you may be able to tell. Weakening Blast is best used off CD and if possible used before your next Cull. At the same time, you do not want to delay this or Cull to maximize DPS. With the Weakening Blast debuff applied to the target you want to get as many Lethal Shots as possible without destroying your energy.
 Lethal Shot (Level 57): Shoots a target for X weapon damage and X internal poison damage.This is the replacement for Sniper from old Lethality, but better. The main reason I said above to prioritize Lethal Shot into Weakening Blast is because the Weakening Blast buff the internal poison damage Lethal Shot does. Using Lethal Shot outside of Weakening Blast will do less damage, but if you have spare energy it will do a lot more than a Rifle Shot or Corrosive Mine.
Key Talents
 Corrosive Dispersion (Level 12): Corrosive Grenade spreads your Corrosive Dart to the targets it damages, as long as it damages at least one target already affected by your Corrosive Dart.Finally, DoT spreading! Unfortunately this is only a 4 meter radius, but if there are 4+ targets this is great to take advantage of.
 Lethal Dose (Level 16): Increases the critical chance of all periodic effects by 10%.This is a lot better than it seems. As a Virulence Sniper, your DoTs critically hitting is your source of energy regeneration once level 28.
 Lethal Purpose (Level 28): Reduces the cooldown of Adrenaline Probe by 15 seconds. In addition, critical hits with poison effects restores 2 energy.Need I say more? All energy regeneration talents are amazing.
 Corrosive Microbes (Level 32): Corrosive Dart has a 15% chance to tick twice when it inflicts damage. In addition, Corrosive Grenade makes its targets assailable for 45 seconds. Assailable targets take 7% more damage from elemental and internal damage.This is one of our Raid debuffs we can apply on a target which will help all others hitting the same target that also are dealing elemental & internal damage. Of course, Double Corrosive Dart ticks are nice.
 Hew (Level 36): Increases the damage dealt by Snipe, Lethal Shot, Series of Shots, and Cull by 5%. Additionally, when Corrosive Grenade and Corrosive Dart end they are replaced by a lingering version for 5 seconds that will only deal damage when Cull deals damage.This ability right here is the reason the 3 Cull rotation exists. Your 3rd Cull will be channeling while the lingering versions of the DoTs are applied and still dealing the same amount of damage.
 Devouring Microbes (Level 48): Increases the damage dealt by poison effects by 15% on targets below 30% of max health. In addition, if a target dies with Weakening Blast, it finishes the cooldown of Weakening Blast.This is your execute range damge increase. Something new added with 3.0 is the finished cooldown of Weakening Blast which is one of my favorite add-ons as far as quality of life is concerned.
 Lethal Takedown (Level 52): Damage dealt by Cull has an 80% chance to trigger Lethal Takedown, which finished the cooldown of Takedown and makes your next Takedown usable on a target with any health level.This has been in the rotation since Lethality Sniper and it is still RNG based. Rarely do I not get a Takedown proc from Cull, but when it happens I cry a little inside.
 Corrosive Mine (Level 59):Increases the duration of your Ballistic Shield by 5 seconds. In addition, when you activate Covered Escape, you detonate a Corrosive Mine that deals X internal damage to all nearby enemies over the duration. Targets that remain within are additionally slowed by 70% for the duration. Lasts 8 seconds. Does not affect sleeping or incapacitated targets.A 5 second longer Ballistic Shield is something often overlooked and why I love this Discipline so much. Having your Raid Utility last 5 seconds longer than all of the other Disciplines is huge. Corrosive Mine is something I rarely use in raids, unless there are lots of adds stacked. I personally use is mostly for parsing as it does greater damage than Rifle Shot and costs 0 energy, but it is great for multiple targets to deal damage.
Here’s my current BiS 198 Sniper as of 1/6/2015
Resurrected Gear Set
1.) Accuracy:
2.) Surge:
3.) Critical:
4.) Alacrity:
5.) Augments:
Set Pieces: Sniper 6-Set Bonus
Revanite Set
1.) Accuracy
2.) Surge
3.) Critical
4.) Alacrity
Update 3/10/2015 – I am currently running 120 Alacrity (1 Enhancement) and I have obtained my best resulting parses using this.
5.) Augments
Set Pieces: Sniper 6-Set Bonus
Relics:
1.) Revanite Relic of Focused Retribution (RECOMMENDED)
2.) Revanite Relic of Serendipitous Assault (RECOMMENDED)
3.) Revanite Relic of Bounless Ages (In case you need it for burstier fights)
To start, there’s 2 things we should go over: The 2 Cull and 3 Cull rotations. I will go over both as I personally use both for various reasons/fights and that they are both viable. Let’s start off with the 2 Cull.
Just as it sounds, your rotation is based of using Cull 2 times and then refreshing your dots. This is how Lethality pre-3.0 played except we have a new ability – Lethal Shot. Because of this, we pretty much have a set rotation here which goes a little something like:
Parsing Opener
Precast Orbital + Laze Target > (Wait 2 Seconds) Corrosive Dart > Corrosive Grenade > Weakening Blast > Adrenal + Cull > Lethal Shot > Lethal Shot > Lethal Shot > Takedown + Target Acquired > Cull > Takedown > Corrosive Dart > Corrosive Grenade > Weakening Blast > Cull > Lethal Shot + Adrenaline Probe > Series of Shots > Takedown > Cull > Takedown

Please note that depending on your dot crits you may be in situations where you’ll have to use Adrenaline Probe earlier or later in the rotation.
General Rotation
Corrosive Dart > Corrosive Grenade > Weakening Blast > Cull > Lethal Shot > Series of Shots > Takedown > Cull > Takedown

That’s the general rotation to follow when on boss fights/parsing, but because this does drain through your energy where ever there is a Takedown and you’re out of abilities to regenerate your energy (Target Acquired & Adrenaline Probe) you’ll want to replace Takedown with a Rifle Shot, so the more realistic rotation will look a little like:
Energy Management Rotation
Corrosive Dart > Corrosive Grenade > Weakening Blast > Cull > Lethal Shot > Series of Shots > Filler (Rifle Shot, Roll, or Takedown) > Cull > Filler (Rifle Shot, Roll, or Takedown)

Depending on how low you’re dipping on energy (a good rule of thumb is to not go below 60 unless you have Adrenaline Probe up) you’ll want to replace a TD with a RS, sometimes in each TD window. If you are parsing, it is better to use Roll over Rifle Shot as it does 2 thing for you:
a) Does slightly more damage compared to Rifle Shot
b) When using the Utility “Snap Shot” Roll takes you out of cover and puts you back in, giving you the Snap Shot buff to make your next Lethal Shot be instant as opposed to a 1.5s channel (Buff lasts 10 seconds).
This is something completely new to all you “Lethality Snipers” and it definitely makes the spec a little more interesting. Just like it sounds, it’s based around using 3 Culls within the same dot’s time window. We are now able to do this because of “Hew” in discipline tree. This rotation is based off of a priority system of abilities you want to use at certain times while also having to worry about energy management. The priority looks something like this:
What does this translate to on a dummy? Well, here’s the opener:
Parsing Opener
Precast Orbital + Laze Target> (Wait 2 seconds) Corrosive Dart > Corrosive Grenade > Weakening Blast > Adrenal + Cull > Lethal Shot > Lethal Shot > Lethal Shot > Takedown + Target Acquired > Cull > Series of Shots > Takedown > Weakening Blast > Cull > Corrosive Dart > Corrosive Grenade > Lethal Shot > Takedown + Adrenaline Probe > Cull

Again like the 2 Cull rotation opener, you may have to use your Adrenaline Probe earlier in the rotation if you don’t get enough dot crits.
General Rotation
Corrosive Dart > Corrosive Grenade > Weakening Blast > Cull > Lethal Shot > Lethal Shot > Filler (Roll or Rifle Shot) > Takedown > Cull >Series of Shots >Takedown>Weakening Blast> Cull > Corrosive Dart > Corrosive Grenade >Filler (Lethal Shot, Rifle Shot, or Roll) >Takedown >Cull

This rotation can vary a little bit as Weakening Blast can move its placement in the rotation, but if you follow the priority system above, everything will fall into place.
Of course, you’re going to want to use your high energy abilities when you have Target Acquired and Adrenaline Probe up, but be conservative when they are on CD as it can be very tricky to burn through you energy without the old Sniper 4pc Set Bonus (1/2 cost Takedown).
This is (for the most part) my opening rotation. Your main source of getting any energy back is have your CG or CD ticks crit. Seeing as this is RNG based, your opener and overall rotation can vary and you have a few points where you can use fillers. A general priority system of abilities to use would be as many Lethal Shot’s, as energy permit, under Weakening Blast without delaying Cull, using Takedown as much as possible, & using Series of Shots outside of your Weakening Blast windows.
Data & Averages: Highest Parse so far

3 Cull Rotation Example Video
Here I will talk about how I think Virulence plays on each of the new boss encounters of The Ravagers and Temple of Sacrifice. For use of this guide I will mainly be referring to Hard Mode. Before we get started I will list what Proficiencies I use on each fight and I will explain in more details below.
Ravagers: Sparky – Marksmanship, Bulo – Virulence, Torque – Marksmanship, Blaster/Master – Virulence, Coratanni – Virulence.
Temple: Malaphar – Virulence, Sword Squadron – Virulence, Underlurker – Marksmanship, Revanite Commanders – Marksmanship, Revan – Virulence.
Ravagers
Sparky – Virulence is about on an even playing field on this fight with all the Sniper specs. The benefits you have here is if your job is to deal with the doggies (please don’t kill Deshy or Jwizzix’Xthor!) you can have both of your dots still ticking on the boss. Also, if the adds are stacks the dot spreading works well for increased damage.
Rating: 8/10
Bulo – Once again, lots and lots of movement. Virulence is great as your dots are still on the target if you need to stop and worry about mechanics. Not much more to be said here as it’s just a single target boss fight from a DPS perspective.
Rating: 8/10
Torque – I personally don’t run Virulence on this fight for a few reasons. The main one being dot spreading. During this fight, you must be very very cautious about what and where you are DPSing and to not kill the FIX4-U droid. Even the slightest dot spread from your Corrosive Grenade will destroy the little guy. It is definitely doable with Virulence, but it makes you play a lot more cautiously then Marksmanship for example.
Rating: 3/10
Blaster/Master – Yet another fight which involves a lot of movement only this time there are 2 bosses that can have the benefit of your dots. Due to the extreme mobility of this fight, Virulence is a great choice. You will be running and rolling through Twinkies so might as well have your dots tick on the move!
Rating: 9/10
Coratanni – What a surprise, such movement much wow. See a pattern here? Same reasons as before Virulence shines. However, Marksmanship can also be a nice choice for this fight & I see no issue running either. The main benefit for Virulence is if in Phase 1 you are a “floater” you’re possibly going to be moving quite a bit on top of having to click if that is your job. Phase 2 it is great as well, but I can’t get into that..yet.
Rating: 8/10
Temple of Sacrifice
Malaphar–Any spec is fine. Virulence is nice because it does good damage, but so does all of the other Sniper proficiencies. Simple Tank and spank.
Rating: 7/10
Sword Squadron – Very mobile fight so this is a great spec to play. Even though you swap from Walkers 1 and 2 often, the rotation doesn’t really vary. As long as you spec into all of your important defensives in the Utilities, any spec can play perfectly fine.
Rating: 8/10
Underlurker – Lots and lots of target swapping. One of the main reasons I run Marksmanship as opposed to Virulence for this encounter. Don’t get me wrong, you can run Virulence, but depending on how adds are focused the raid would have to cater to you to deal optimal damage. A good benefit of Virulence is your dots ticking on the boss while you are behind the rock & getting knocked back, but that is the only real benefit.
Rating: 4/10
Revanite Commanders – Even more target swapping. I personally play Marksmanship for this fight due to have a stronger Suppressive Fire as well as being able to target swap easier. Virulence does have its advantages however. If adds are stacked, you can dot spread to them, but they’ll most likely die within seconds. Because of this I rate it..
Rating: 3/10
Revan – So many things happening it may be hard to keep up. Virulence overall allows more mobility to deal with mechanics. Running either the 2 or 3 Cull rotation is viable for this fight. During the Machine Core phase you can sit in Entrench while dots are ticking on the core while looking at the circles.
Rating: 10/10
Below is a Revan HM Virulence Sniper POV
I would like to thank Dulfy for hosting my guide.
I would also like thank all of my friends across SW:TOR, mainly my guildies in Zorz, for tolerating me in and outside of raids.
I strive to be the best player possible in all classes and roles. Any advice you guys have for me including questions or concerns please post below!
I end with this: “I wanna be the very best,
Like no one ever was.
To catch them is my real test,
To train them is my cause.
I will travel across the land,
Searching far and wide.
Each Pokémon to understand
The power that’s inside
Pokémon, (gotta catch them all) its you and me
I know its my destiny
Pokémon, oh, you’re my best friend
In a world we must defend
Pokémon, (gotta catch them all) a heart so true
Our courage will pull us through
You teach me and I’ll teach you
(Po-ké-mon) Gotta catch ‘em all”


 SWTOR 3.0 Madness Sorcerer Guide by Milas
 SWTOR 3.0 Sharpshooter Gunslinger Guide by Shulk
 SWTOR 3.0 Mercenary Bodyguard Healing Guide by Orderken
 SWTOR Bounty Contact Week event Overview
 SWTOR Relics of the Gree achievement guide