SWTOR 3.0 Operative DPS guide written by Raulos.
Contents
Although it will take some time to see how the overall class balance ends up, Operative DPS is probably slightly weaker now relative to the other classes, although it plays somewhat similar to its previous iterations across both Disciplines. The most difficult part of Operative DPS in 3.0 is that ranged classes and/or Bounty Hunters are particularly strong for all fights, and almost every other melee DPS brings a bit better utility. Off healing is objectively weaker for Operatives than in 2.x, while stealth rez is just as relevant. However it is slightly harder to stealth rez in the average 3.0 fight, in my view. While Operative DPS will be viable, only very strong players will easily keep up with other classes on difficult fights in Hardmode/Nightmare. However, I find it still very rewarding to play.
Also, while Operative DPS have always been used to limited AOE, long time players of Operative DPS will have to get used to the slight reduction in moveset. Explosive Probe and Orbital Strike are no longer available for any Disciplines and Hidden Strike has been rolled into Backstab/Lethal Strike. There are a few more Discipline specific changes that will be described shortly.
The biggest change in some sense is that Tactical Advantage (TA) no longer gives any damage or healing bonus to Operatives. So not only should you feel free to use up all of your TA stacks, but you should be encouraged to, when possible, as the optimal choice of filler. This reduces some of the skill in holding a TA stack at all times, but may increase skill in that it opens a few opportunities for more energy intensive choices in the rotation since you do not need to always Rifle Shot (basic attack) just to hold onto 1 TA. Rifle Shot instead is used purely for energy management. While the total number of TAs will always be limited by Shiv/Veiled Strike and Backstab (from stealth), it could be advantageous to use all of the TAs upfront, leaving fewer for the next block in the rotation. It depends if you have to target swap, or reapply DoTs, etc.
Also Operatives now have Tactical Superiority which provides a 10% flat Critical Rating bonus to the entire raid for 10 seconds. While this is arguably not the best of the offensive raid bonuses, at least it’s something. In addition, since it only costs one TA (and 0 energy!), it is a very minor DPS loss so use freely. I even use it in some parses by simply using Stim Boost to gain an extra TA in the opener.
While there are strong indications that Concealment is slightly weaker sustained single target DPS than Lethality in 3.0, Concealment is viable on most fights in Hardmode, although I frequently recommend Lethality since any target switching is less important than overall DPS in at least half of the fights. Concealment remains one of the premier burst specs and has better control with skills like Volatile Substance, a version of Hidden Strike that can be used on cooldown. Also, Acid Blade has been removed as an active ability from Concealment and made into a passive. This has the bonus of simplifying the use of Acid Blade (since you can no longer pre-load it before phases to conserve energy, and generally don’t have to think about it at all). At the same time, Hidden Strike is now Backstab (when used from stealth), so there is no concern about how to time Hidden Strike in order to be able to afford it.
Note that Veiled Strike now replaces Shiv, offering slightly more damage. Apart from this, Concealment’s new move in 3.0 is Volatile Substance, although it can be viewed as a replacement to Explosive Probe which has been removed for all Operatives. Volatile Substance is placed on a target and remains for a number of seconds until triggered by a DoT tick (Acid Blade or Corrosive Dart). This move is particularly useful because it also counts a periodic effect itself, which allows you to use the TA regrant from the Tactical Opportunity talent without Acid Blade or Corrosive Dart at all. While you will most likely aim to have either Acid Blade or Corrosive Dart on the target, full uptime on Corrosive Dart while using Volatile Substance on cooldown is very difficult on energy. This gives you a way to continue using 2 Lacerations every other Veiled Strike no matter what happens.
One of the major downsides to Concealment is that the strict 4m range with little AOE is punishing on some fights, since most other classes have either more range options, more AOE, or both. However, Concealment still has essentially everything that made it fun and useful before, it is just a bit weaker in relative terms compared to the other options available in 3.0.
The biggest difference for Lethality in 3.0 is that it is now a completely viable Discipline DPS wise and in full 198 gear, I expect it to be competitive with other high-end DoT specs like Pyrotech Powertech and Annihilation Marauder. Whereas in 2.x, Lethality Operative was one of the weakest specs, this is simply no longer the case. The primary proc, Fatality, which makes the next Corrosive Assault (formerly Cull) regrant TA and cost no energy, now is guaranteed from Shiv once every 10 seconds. Period. That major source of RNG is gone which makes for a much more consistent rotation and higher DPS overall. However, energy regen from DoT crits is still one source of RNG and slightly affects the rotation.
Lethality did not get a new move in 3.0, but rather one of the “replacement” moves. Lethal Strike replaces Backstab and not only functions in the exact same way for the same cost, but provides higher damage which comes in the form of some kinetic damage and internal damage regardless of stealth. This is in opposition to Backstab which is only kinetic damage unless used from stealth. Lethal Strike can also be used from any direction unlike Backstab, which makes Lethality entirely independent of position. In other words, Concealment is the only positional Discipline for Operative DPS now.
The only other major changes are that both DoTs are 24 seconds, which is a refreshingly long duration, as well as the changes to Toxic Blast (formerly Weakening Blast). Like for the Virulence Sniper’s Weakening Blast, Toxic Blast no longer consists of stacks on the target which are consumed by DoTs or Corrosive Assault. Instead, Toxic Blast provides a 10 second debuff on the target in which any additional DoTs or Corrosive Assaults on the target will proc extra weapon damage. In addition, Toxic Blast now grants a TA, making it a very effective replacement for Shiv if Fatality’s internal cooldown has not expired.
The consistent Fatality proc, together with the reduced cost of Lethal Strike, which is also a slightly more important filler than in 2.x, makes energy management extremely generous in this Discipline. In a very good parse, you will find that you hardly have to use Rifle Shot at all.
Compared to some other classes, the best PvE Operative DPS utilities change very little from fight to fight. The bolded utilities indicate those which I believe have primary preference.
Skillful
Masterful
Heroic
Skillful utilities: Nanotech Suit is a must. Chem-resistant Inlays is also nice for survivability. Imperial Weaponry is not that useful since Carbine Burst is hard to use and AOE is not a big source of damage for Operatives, but in certain cases, such as on Revanite Commanders or ToS trash, you might find it powerful. Otherwise, I usually prefer either Hit and Run or Infiltrator for movement speed bonuses. I tend to find Hit and Run slightly better since I prefer more movement speed for a shorter duration rather than a small amount of increase all the time, especially since I have Exfiltrate for movement if I am away from any targets.
Masterful utilities: Both Endorphin Rush and Advanced Cloaking are essential for maximum DPS. In very limited scenarios, I could see taking Med Shield instead.
Heroic utilities: Generally I find Revitalizers and Augmented Shields to be the superior option, although like many others, I’m not much of a fan of using Stim Boost as a defensive cooldown since it is a somewhat important offensive one as well. However, in a pinch, or for fights with large predictable hits, Stim Boost is still excellent for being a lot more survivable. If you’re a Concealment Operative, this is slightly less important since it would only be used for general defensive capacity in a burn situation; Concealment Operatives have Exfiltrate for any predictable damage. Note Escape Plan could also be an acceptable choice, but the reduction on Shield Probe cooldown is the only truly useful PvE aspect, so I’d rather have stronger defensives than a slightly more frequent one. Note that while Evasive Imperative is very good (and I might take it for some fights), it requires a lot of consistent damage, as well as an actual use for Evasion, in order to be useful.
The old set bonuses for Operative are not that great, so I recommend that you upgrade as soon as possible to the full new 6 piece.
Old 2 piece (+15% crit bonus to Shiv): While Lethality Operatives can still use the critical bonus to Shiv, Shiv is a relatively low amount of damage for that Discipline. For 192 gear, Lethality Operatives could easily justify keeping this. However, 198 gear not only gives a significant stat upgrade but the 6 piece bonus is not too bad, so I recommend upgrading by then. On the other hand, Concealment Operatives use Veiled Strike, not Shiv, so they do not benefit at all, and should upgrade immediately without question.
Old 4 piece (+5 energy): Operatives can still benefit from a bonus like this for energy management, especially in Concealment. However, this is useless in Lethality, which does not need it. In addition, -2 energy off Backstab/Lethal Strike from the new 4 piece is a much stronger benefit in my opinion, so there’s no reason to keep the old 4 piece.
 Veiled Strike (VS): Generates a stack of Tactical Advantage and deals a modest amount of damage. The total damage is slightly less than Laceration and a moderate amount lower than Backstab. The main purpose of this move is generate TAs so that you can spend them on Laceration. 6 second cooldown, replaces Shiv and costs 15 energy.
 Laceration (L): Laceration is your primary, powerful filler attack. No cooldown, costs a TA and 10 energy but regrants 2.
 Backstab (BS): Backstab is a strong ability that does a slightly more damage compared to Laceration when Collateral Strike from Laceration and the Acid Blade DoT from Backstab are factored in. However, the most important aspect of Backstab is the 30% armor penetration buff provided which lasts for 15 seconds. Note the cooldown is slightly less than the duration of this buff, so while you want to try to use Backstab consistently on cooldown, you can technically let it slide up to two extra GCDs. 12 second cooldown, costs 10 energy (8 with new 4 piece Enforcer’s set bonus).
 Volatile Substance (Vol): Volatile Substance can be placed on a target and left on for up to 15 seconds. Upon periodic damage on the target, it explodes for massive damage (buffed by +35% surge and +5% damage bonus). This move counts as a periodic effect for TA regrant from Laceration. It can be viewed either a replacement to Explosive Probe or a frontloaded, slightly more powerful version of Corrosive Dart. Note it is available every 18 seconds like Corrosive Dart so this is a reasonable comparison. 18 second cooldown, costs 15 energy.
 Crippling Slice (CS): Essentially a stronger version of your basic attack that can only be used from melee range (4m), Crippling Slice has a relatively short cooldown so it can be rotated in for Rifle Shot every 2 or 3 times. 15 second cooldown, 0 energy.
 Rifle Shot (RS): Heat management is rather tight in Concealment when it is played aggressively so use Rifle Shot whenever you need to recover energy and/or all your key moves with cooldowns (Veiled Strike, Backstab, Volatile Substance) are not available. No cooldown, 0 energy.
 Overload Shot (OS): Extremely situational for Concealment players in PvE, Overload Shot consumes 15 energy but can be used at 10 meters. This provides a viable ranged alternative to Rifle Shot that does significantly more damage. It can also be used in place of Backstab if you have a good amount of energy but cannot get behind the target for whatever reason. Use sparingly, but use it. No cooldown, 15 energy.
Stim Boost (SB): Grants an extra TA and more importantly in 3.0, an Alacrity boost of 10% for 10 seconds. It’s essentially your own personal version of the Merc alacrity buff on a much shorter CD. Yes, a flat 20% alacrity boost when combined with that in a raid! This can be specced via Heroic utility to additionally provide healing and damage reduction for the duration. 2 minute cooldown.
Overload Shot (OS): Extremely situational for Concealment players in PvE, Overload Shot consumes 15 energy but can be used at 10 meters. This provides a viable ranged alternative to Rifle Shot that does significantly more damage. It can also be used in place of Backstab if you have a good amount of energy but cannot get behind the target for whatever reason. Use sparingly, but use it. No cooldown, 15 energy.
Stim Boost (SB): Grants an extra TA and more importantly in 3.0, an Alacrity boost of 10% for 10 seconds. It’s essentially your own personal version of the Merc alacrity buff on a much shorter CD. Yes, a flat 20% alacrity boost when combined with that in a raid! This can be specced via Heroic utility to additionally provide healing and damage reduction for the duration. 2 minute cooldown.
 Adrenaline Probe (AP): Regrants 50 energy over 3 seconds (ideally 65 with the Masterful utility). You should attempt to stop using your basic attack and play aggressively shortly before this comes off cooldown so that you use as much energy as possible to push your DPS higher. 2 minute cooldown.
 Cloaking Screen: Immediately forces you to exit combat and drastically increases your stealth level for 10 seconds. This should be used almost exactly on cooldown in order to maximize DPS (use right before Backstab/Lethal Strike which have significantly increased damage when used from stealth). 2 minute cooldown (1 minute 30 seconds with Masterful talent).
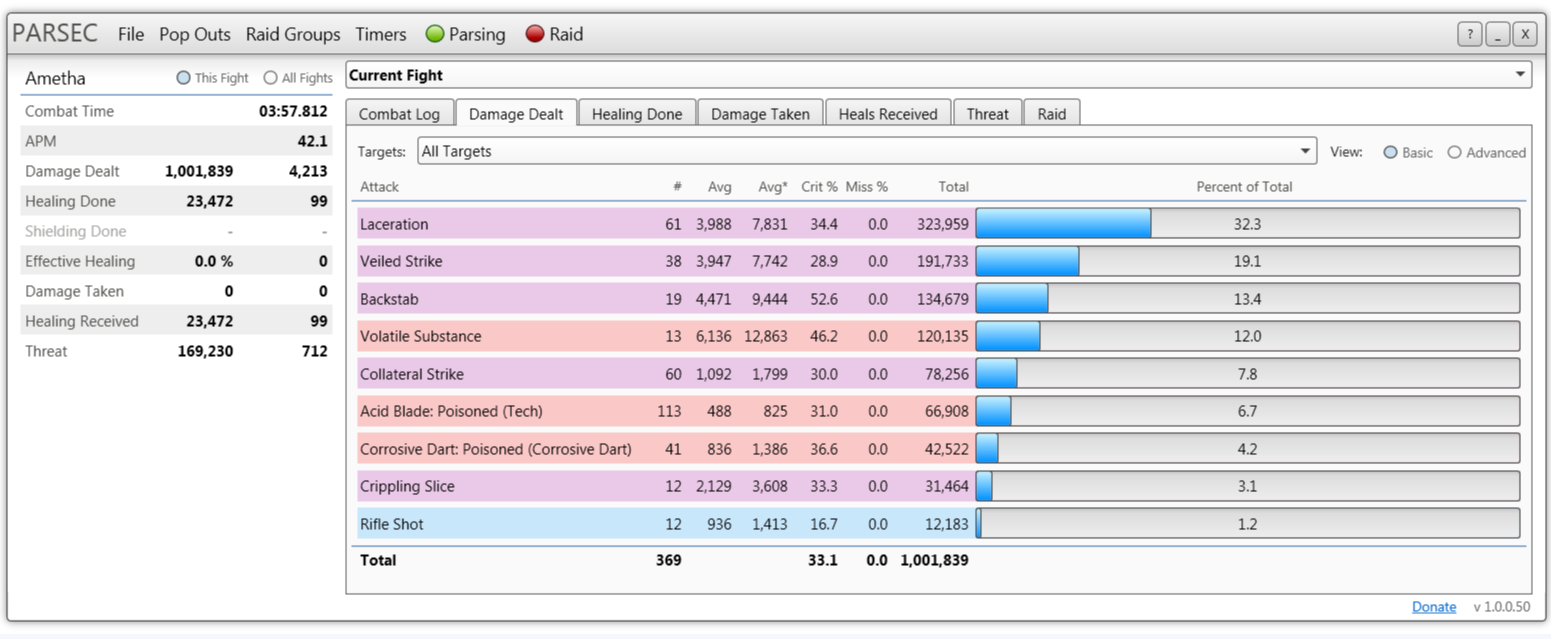
As the unbearable torrent of your knife attacks bears down on the enemy, you move forward with a certain quickness in your step, anticipating your next move. You stealth out of combat, one hand around your knife, moving around behind him and lashing out with a terrific Hidden Strike. The combined effect of your Corrosive Dart and Acid Blade now tick away at him, pressing the assault even in between rapid knife strikes. The worst is yet to come. Reaching into your pocket, you inject Volatile Substance into your opponent’s bloodstream with your wrist device. He squirms with discomfort, and you take advantage of the opportunity to Lacerate him. Then your Volatile Substance reacts with your poisons and he explodes. Yeah, that’s burst.
In Concealment, the priority is still to maximize Laceration hits, especially since you grant extra damage from Collateral Strike every single Laceration. This is accomplished by using Veiled Strike and Cloaking Screen + Backstab as often as possible to generate TAs, as well as spending all TAs in order to not cap out. After that, your priorities are to use Volatile Substance on cooldown (for massive damage given +35% surge and high base power), maintain the Acid Blade buff for +30% armor penetration, and to finally use Corrosive Dart if you have the spare energy.
Opener
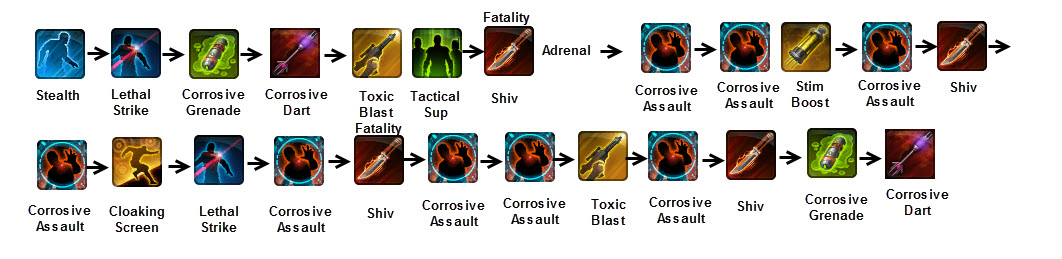
Attack Adrenal + BS -> Vol -> VS + Tactical Superiority -> L -> L + Stim Boost -> L -> VS ->
L -> Cloaking Screen + BS -> L -> VS -> CD -> L -> L -> Vol -> VS -> BS -> CS -> L -> VS ->
L -> L -> CD -> VS

General
Some people like to think of Concealment in terms of a bunch of fixed block possibilities which you rotate between. It’s possible to analyze the spec this way but I prefer to think in 6 second generic blocks, and within that, work from a priority system. This is superior for a real raid too since it gives you more flexibility. You don’t panic if your Backstab isn’t in, say, the 2nd of the three filler slots every single time. Feel free to work out a particular fixed rotation for maximizing dummy parses (e.g. minimizing any conflict between Veiled Strike, Backstab, and Volatile Substance) since this spec has no RNG.
The generic 6 second block is motivated based on the status of Veiled Strike as you primary TA generator and its 6 second cooldown.
VS -> Filler -> Filler -> Filler
This is repeated over and over, leaving us merely with the choice of Filler. I use this priority system:
Note that if you end up at 2 TAs, do not just hit Veiled Strike. Always extend your window to include a fourth “Filler”, and make that filler Laceration. This does happen very easily and I don’t worry about it; this is a minor error at best. However, hopefully you are not somehow at 2 TAs with your Laceration TA regrant also available. That is a significant error since it causes Veiled Strike to be delayed by 2 GCDs since you must include both a fourth AND a fifth “Filler”, which will both be Laceration.
Cloaking Screen
There is one more thing to talk about which is how to use Cloaking Screen to stealth out and gain the damage boost from a stealthed Backstab. Unlike Hidden Strike from 2.x, the energy cost of performing this manuever is absolutely zero compared to your normal rotation. Therefore, it isn’t hard to do, but there are two things to be wary of:
1) Make sure you spend all your TAs on Laceration in the window before this is due to occur, so that you can use Cloaking Screen + Backstab and then a Veiled Strike. You don’t want to start delaying Veiled Strike just because you gained a TA from a stealthed Backstab and then capped out with 2 TAs. Otherwise, you’re losing some of the potential DPS gain from the extra TA.
2) If Cloaking Screen is 1 GCD away when Backstab is available, I like to delay Backstab to use it immediately with Cloaking Screen and thus get Cloaking Screen on cooldown earlier. Definitely do not delay Backstab more than this since it’s a very minor benefit. If you are uncomfortable doing this, it’s not at all terrible to just wait another 12 seconds for your next Backstab.
Stim Boost
The best use of Stim Boost is as follows: run down your TAs to 0 in prior windows, and then do something like Veiled Strike + Stim Boost to reset to 2 TAs. This gives you plenty of time to make sure you’re at 1 TA by your next Veiled Strike. If you use Stim Boost only a GCD before Veiled Strike, and you realize you need to use, say, Volatile Substance, you’re going to delay Veiled Strike without question.
Stim Boost can also be thought of dynamically in terms of Lacerations. In such case, it should be used either for a third Laceration in a window (Laceration -> Laceration + Stim Boost -> Laceration) with two Lacerations or more commonly, a second Laceration in a window with a single Laceration (Filler -> Laceration + Stim Boost -> Laceration). Be wary not to try to use it if you have a window with both Backstab and Volatile Substance, since this forces you to delay Veiled Strike.
Adrenaline Probe
Adrenaline Probe usage is very simple in this spec. It’s not hard at all to run your energy down below 60 and there is no RNG factored in. So when you see 10-15 seconds left before Adrenaline Probe, stop using Rifle Shot, and possibly abandon Crippling Slice as well, favoring Corrosive Dart and more Lacerations instead. Use Adrenaline Probe at around 35 energy for maximum benefit. Recall the extra 15 energy from the Masterful utility is restored immediately, followed by 50 energy over 3 seconds. So if used immediately when the GCD is triggered, you will regain 40 energy by the time you activate your next ability. Approximately 75 energy is sufficient for any move you wish to use in Concealment without dipping back below 60.
Concealment is a very good spec for target swapping, but it’s still important to review the practice of it. Where possible, you ought to swap targets on Backstab, so that you can immediately benefit from the Acid Blade. 3.0 gives us a new possibility, however. If you swap on Volatile Substance, you add a significant amount of burst and Laceration will now regrant TA under Volatile, not only Acid Blade and Corrosive Dart. So this gives you a lot you can do after putting on Volatile, and usually Backstab will follow only a few GCDs later to detonate it. If neither of these is immediately available, consider if the target swapping is urgent. If it is, swap anyway and make the best of it, continuing to use TAs on Laceration between Veiled Strikes and wait for Backstab or Volatile, at which point you may want to swap back to your main target, or continue on your new target using those moves. If it’s not urgent, you can just wait until you have Backstab or Volatile available.
A bit more theory: if you just used Backstab a GCD or two ago, and Volatile Substance is available, you can actually open with Corrosive Dart -> Volatile Substance on your new target, then continue your rotation, most likely with something like Crippling Slice -> Laceration -> Veiled Strike -> Laceration -> Laceration. Since Corrosive Dart + Volatile Substance is an expensive combination, you have to be careful with this one and make sure you will at least get some uptime on your new target.
If you choose to play Concealment in a raid, Shadow Operative Elite is an excellent talent. It mitigates all incoming damage for 1.5 seconds after using Exfiltrate. Remember every time you do this that it costs you a GCD to Exfiltrate so it will slightly lower your DPS, but this talent is one of the primary reasons to play Concealment other than the high burst and target swapping capacity. Here is a list of some places that you might consider using it:
I don’t have any real gear yet for my Operative in 3.0 so take the overall parse number with a grain of salt. I’ll update this section if I can when I get a full amount of 192 or 198 gear for DPS. My current gear is old set bonuses (which are virtually useless) with all 186s and 198 offhand. The highest amount of your damage should always be Laceration, followed by almost all of the rest of your abilities at 10-20% a piece. One thing to pay attention to in particular is how many Rifle Shots used in relation to Crippling Slices. Very good parses will have a high ratio of Crippling Slice to Rifle Shot. My ratio is 1:1 in this parse which is definitely worse than it ought to be, however I used this parse since everything else fell out mostly correctly and the corresponding video was a good representation of the spec overall.
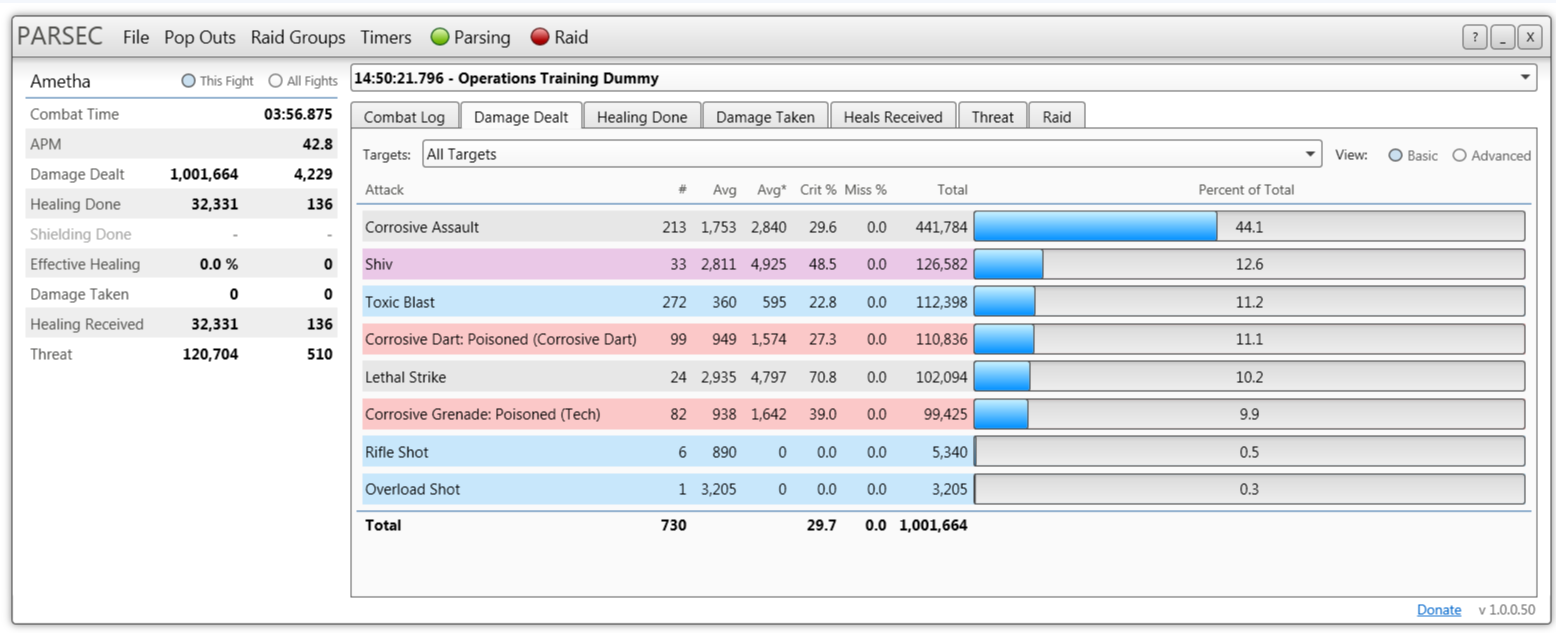
Note at the time of writing this guide, Ruffian Scoundrel is bugged to hit for 5 ticks of Sanguinary Shot (Toxic Blast) per Brutal Shots (Corrosive Assault), as opposed to the likely correct value of 3 ticks that the Operative receives. This has been reported to Bioware and will either be patched to bring the Ruffian down or bring Lethality up. Hopefully it will be the latter, since buffing Lethality like that will bring its single target DPS closer in line with where it should be. Until then, Concealment and Lethality do virtually identical damage for Operatives.
Lethality has undergone a number of changes including:
 Shiv (S): Generates a stack of Tactical Advantage and deals a modest amount of damage. The total damage is significantly less than Corrosive Assault and Lethal Strike. The main purpose of this move is generate TAs so that you can spend them on Corrosive Assault. In addition, every 10 seconds you can use it to proc Fatality, which causes your next Corrosive Assault to immediately regrant a TA and cost no energy. This significantly helps DPS by essentially providing more TAs and aiding greatly with energy management. 6 second cooldown and costs 15 energy.
 Corrosive Assault (CA): This is your primary TA spender and filler in the Lethality rotation. It deals a moderate amount weapon damage, plus additional internal damage hits for each poison on the target. This means that if both Corrosive Dart and Corrosive Grenade are up, this move will deal three separate hits to the target for a combined large amount of damage. No cooldown, costs 15 energy (0 with Fatality) and 1 TA.
 Toxic Blast (TB): Toxic Blast grants a TA and puts a 10 second debuff on the target which causes all periodic damage effects (Corrosive Dart, Corrosive Grenade, and Corrosive Assault) to tick for extra damage when used. Note this does not actually buff those moves but counts as a different category of damage (Toxic Blast damage). So this can be thought of as its own DoT. Note this works a little different from Weakening Blast in Rise of the Hutt Cartel. 15 second cooldown, costs 0 energy.
 Lethal Strike (LS): Deals a large amount of damage split between kinetic and internal damage, with more damage if performed from stealth. Additionally, it triggers Cut Down, a talent which buffs all damage from your Corrosive Dart and Corrosive Grenade for 20% on all targets for 6 seconds. Replaces Backstab, 12 second cooldown and costs 10 heat (8 with 4 piece Enforcer’s set bonus).
 Corrosive Dart (CD): The stronger of the two primary DoTs, Corrosive Dart is single target only and more expensive than its cousin Corrosive Grenade. However, in Lethality spec it has a 6 second longer duration. Corrosive Dart can also be spread by Carbine Burst to multiple targets. No cooldown, 24s duration, 15 energy. No cooldown, 24s duration, costs 15 heat.
 Corrosive Grenade (CG): The weaker of the primary dots, Corrosive Grenade not only applies the assailable debuff but also functions as a 5 meter AOE. No cooldown, 24s duration, costs 10 heat.
 Rifle Shot (RS): Heat management is fairly easy in Lethality since the Fatality proc offers a free Corrosive Assault every 10 seconds, 2 energy is regranted for every dot crit, Lethal Strike has a very low cost with the set bonus, and Toxic Blast still costs 0 energy and additionally grants a TA. However, you will still need to occasionally fill with Rifle Shot if there is nothing to do but you cannot afford Overload Shot (see below). No cooldown and 0 energy.
Overload Shot (OS): Since Lethality does not have a new filler move like Crippling Slice, this is the main energy-consuming higher damage alternative to your basic attack (Rifle Shot), although it only has a 10 meter range. Use this whenever Lethal Strike is not available as filler, but you have plenty of energy (>80 energy). No cooldown, 15 energy.
Stim Boost (SB): Grants an extra TA and more importantly in 3.0, an Alacrity boost of 10% for 10 seconds. It’s essentially your own personal version of the Merc alacrity buff on a much shorter CD. Yes, a flat 20% alacrity boost when combined with that in a raid! This can be specced via Heroic utility to additionally provide healing and damage reduction for the duration. Also, this ability regrants 10 energy in Lethality spec so it should be used roughly when at 85 energy or below together with an energy-consuming ability (typically Corrosive Assault). 2 minute cooldown.
Adrenaline Probe (AP): Regrants 50 energy over 3 seconds (ideally 65 with the Masterful utility). In Lethality, this has a reduced cooldown by 15 seconds. You should attempt to stop using your basic attack and play aggressively shortly before this comes off cooldown so that you use as much energy as possible to push your DPS higher. 1 minute 45 second cooldown.
Cloaking Screen: Immediately forces you to exit combat and drastically increases your stealth level for 10 seconds. This should be used almost exactly on cooldown in order to maximize DPS (use right before Backstab/Lethal Strike which have significantly increased damage when used from stealth). 2 minute cooldown (1 minute 30 seconds with Masterful talent).
Rifle Shot (RS): Heat management is fairly easy in Lethality since the Fatality proc offers a free Corrosive Assault every 10 seconds, 2 energy is regranted for every dot crit, Lethal Strike has a very low cost with the set bonus, and Toxic Blast still costs 0 energy and additionally grants a TA. However, you will still need to occasionally fill with Rifle Shot if there is nothing to do but you cannot afford Overload Shot (see below). No cooldown and 0 energy.
Overload Shot (OS): Since Lethality does not have a new filler move like Crippling Slice, this is the main energy-consuming higher damage alternative to your basic attack (Rifle Shot), although it only has a 10 meter range. Use this whenever Lethal Strike is not available as filler, but you have plenty of energy (>80 energy). No cooldown, 15 energy.
Stim Boost (SB): Grants an extra TA and more importantly in 3.0, an Alacrity boost of 10% for 10 seconds. It’s essentially your own personal version of the Merc alacrity buff on a much shorter CD. Yes, a flat 20% alacrity boost when combined with that in a raid! This can be specced via Heroic utility to additionally provide healing and damage reduction for the duration. Also, this ability regrants 10 energy in Lethality spec so it should be used roughly when at 85 energy or below together with an energy-consuming ability (typically Corrosive Assault). 2 minute cooldown.
Adrenaline Probe (AP): Regrants 50 energy over 3 seconds (ideally 65 with the Masterful utility). In Lethality, this has a reduced cooldown by 15 seconds. You should attempt to stop using your basic attack and play aggressively shortly before this comes off cooldown so that you use as much energy as possible to push your DPS higher. 1 minute 45 second cooldown.
Cloaking Screen: Immediately forces you to exit combat and drastically increases your stealth level for 10 seconds. This should be used almost exactly on cooldown in order to maximize DPS (use right before Backstab/Lethal Strike which have significantly increased damage when used from stealth). 2 minute cooldown (1 minute 30 seconds with Masterful talent).
At first the enemy laughs. You’re barely dealing 2000 DPS. The Advanced Prototype Powertech next to you has already pulled aggro from the main tank. You’re not just at the bottom of the DPS board, some of the tanks and healers may be beating you too. But then your multiple poisons, now lingering, eat away at your opponent, slowly suffocating him as his life drains away. Your blade connects, first once, then again, and all of your poisons begin to cripple him further. Your Toxic Blast begins to tick away now too, essentially doubling the impact of your poisons for the next ten seconds. Just when the magnitude of this barrage is setting in, you unleash multiple Corrosive Assaults, dealing massive burst damage for each of your poisons on the target. Now you’re in business. Sound fun? Read on.
In order to do maximum damage in Lethality, your goal is to maintain both primary DoTs (Corrosive Dart and Corrosive Grenade) and use Toxic Blast on cooldown to add an extra poison from your DoT and Corrosive Assault ticks. Spend TAs with Corrosive Assault whenever possible, pushing as many as possible in when Toxic Blast is up on the target. You want to ensure that you waste as little time as possible doing anything but Corrosive Assault when Toxic Blast is active. Also, you need to ensure you work in Shiv at least every 10 seconds to gain a free Corrosive Assault and TA regrant. Every other Shiv is guaranteed to gain you this bonus since Shiv is on a 6 second cooldown. Lethal Strike, Overload Shot, and Rifle Shot are fillers which depend on your current energy.
Opener
One difficulty with Lethality is that there is simply more TA generating ability than you can possibly use up given that you need be reapplying your dots. The following is the standard opener and is the best compromise. Note you can skip using Tactical Superiority after the first TB and go right into Attack Adrenal + CA. However, you have plenty of TAs and you miss out on some of the 5% tech damage boost (Susceptible) until you do your first Shiv, so this is not highly recommended.
Full standard opener:
Stealth + LS -> CG -> CD -> TB + Tactical Superiority -> Shiv (Fatality) + Attack Adrenal ->
CA -> CA + Stim Boost -> CA -> Shiv -> CA + Cloaking Screen -> LS -> CA ->
Shiv (Fatality) -> CA -> CA -> TB -> CA -> Shiv -> CG -> CD
This achieves the maximum number of Corrosive Assaults under Toxic Blast, Corrosive Grenade, and Corrosive Dart which in general is the strategy for maximum DPS in this Discipline. We could work in Lethal Strike on CD or always enforce Shiv on CD (note I delay Shiv by 1-2 GCDs several times in this opener). However, this turns out to be suboptimal, especially in the opener.
From here your first goal is to use up any remaining energy and hit Adrenaline Probe (ideally not right at the same time as you use up a Fatality proc, but you may not have much of a choice). At some point (depending on your RNG with DoT crits), you should be able to push your energy down to around 30 and do this, especially if you work in an Overload Shot or two. When I did this opener it took me awhile to use Adrenaline Probe because I had the old 4 piece DPS set bonus (+5 maximum energy). This is one reason that old set bonus is very unnecessary is that it makes it difficult to even run out your energy in the first minute of a parse!
General
Lethality is best explained via a general priority system on single target. This system is taken directly from KeyboardNinja’s guide on the SWTOR forums and cannot really be improved upon in my opinion.
1) Both DoTs. (If not ticking or about to expire and nothing better is up)
2) Toxic Blast (<if <2 TA)
3) Stealthed Lethal Strike. (If >80 energy and <2 TA)
4) Shiv. (<if <2 TA)
5) Corrosive Assault. (If required to drain TA before Toxic Blast or Shiv)
6) Corrosive Assault. (If Fatality and <80 energy)
7) Lethal Strike. (If >80 energy)
8) Corrosive Assault.
9) Both DoTs. (If < 3 seconds on duration, 0 TA, and >95 energy)
10) Overload Shot. (If 0 TA and >90 energy and Toxic Blast coming off CD)
11) Overload Shot (If 0 TA and >95 energy)
12) Rifle Shot.
Note a few things: there is no case for Toxic Blast at 2 TA since you should always get to 1 TA before using Toxic Blast. Do not waste TAs since this fundamentally wastes Corrosive Assault which is your most damaging move by far. It’s painful, yes, but it’s better to delay Toxic Blast. The same goes for Stealthed Lethal Strike. Don’t do it from 2 TAs!
To maximize DPS, you need to manage TA stacks as well as possible. This is almost all that you should be thinking about when selecting your next move. Know in advance when your Shiv and Toxic Blast are coming off cooldown (and also your Cloaking Screen + Lethal Strike), since these moves generate TAs. Don’t be tempted to squeeze in a random Lethal Strike if you’re sitting at 1 TA and Shiv/Toxic Blast are both coming off CD next GCD. In such case, use Corrosive Assault to get to 0 TA stacks, then use Toxic Blast, then use Shiv, then Corrosive Assault away.
So in other words high DPS = using up TAs as possible during the fight. Remember there’s no benefit to sitting at 1 TA anymore! In particular, if Toxic Blast is on the target, I will use as many TA’s on Corrosive Assault as possible. If Toxic Blast will only last 1 more GCD on the target, I’ll even delay Shiv by a GCD if I have a spare TA in order to gain as many Toxic Blast ticks as possible. If Toxic Blast is not on the target and also you do not have Fatality for a free Corrosive Assault, you can be slightly more conservative with Corrosive Assault, since that is a good way to bleed energy. In general, if at 80 energy or less, save your energy on full cost Corrosive Assaults for the next time Toxic Blast is up on the target.
Now for some other general comments, which I’ve organized into sections:
DoT Order
It really doesn’t matter, but I like to use Corrosive Grenade first. Note that Corrosive Grenade before Corrosive Dart has the advantage of frontloading your damage debuff (Assailable). Many Lethality players are simply used to this order from past experience so if you are comfortable the other way around, feel free. This might be worth experimenting with more in the future.
Clipping DoTs
Don’t clip your DoTs. It’s tempting to do so since you want to be focused on maximizing Toxic Blast and Corrosive Assault, but it’s possible to play this spec without clipping. However:
I do take advantage of the fact that Corrosive Grenade ticks immediately. So if I refresh Corrosive Grenade after the second to last tick (3 seconds from expiry), it is only the slightest of DPS loss. Sometimes this is the best choice of filler, rather than waiting until exactly when Grenade expires, and then realizing you have 3 other things you need to do, such as refreshing your other DoT and using up TAs. In short, you don’t want to end up refreshing too many DoTs at the same time as you need to be putting a powerful move on cooldown like Toxic Blast. This is a strategy that was valid in Lethality in 2.x and continues to be important.
Other than this case, however, it is very inadvisable to clip DoTs since you flat out lose damage from doing so if you are maintaining your rotation correctly.
Cut Down
Lethal Strike grants a personal buff called Cut Down. The Cut Down 20% boost to both Corrosive Dart and Corrosive Grenade is a nice bonus. Unfortunately, it only buffs two ticks of each DoT and the gain isn’t enough to justify moving Lethal Strike up in the priority order. It is worth keeping in mind that it is more important in the execute phase, however, so consider using Lethal Strike slightly more < 30%. Here’s the theory for that:
Since your DoTs are 15% more powerful in execute range, it is more important to work in Lethal Strike during execute, since the 20% bonus from Cut Down applies as a multiplicative factor. For instance, my base Corrosive Grenade does around 850. With either execute or Cut Down, it does around 1000 damage. However, with both, it does not just 1150 damage, but around 1250 damage. Also the crits you can get in execute phase are massive: in my current, mostly 186 gear, I have seen Corrosive Dart and Corrosive Grenade hits of up to 2400, and over 2500 with an Attack Adrenal. Recall my base Corrosive Grenade is only around 850!
The lone other exception may be in AOE scenarios where you have your DoTs ticking on 3-4+ targets. In such case, it may be worth using Lethal Strike over an extra Corrosive Assault, since Lethal Strike does good damage inherently, but your DoTs on all targets will be buffed.
Energy Management
Your primary energy management tools are the Fatality proc (your next Corrosive Assault is free instead of 15 energy and regrants the TA that it spends) and Toxic Blast (important to use on CD, grants a TA, but also free). Use these liberally. You should be getting a new Fatality proc every 12-13.5 seconds depending on whether Shiv has to be delayed by a GCD. Toxic Blast should be always used on CD every 15 seconds.
You regain 2 energy every time a DoT crits. So running higher crit in your gear helps energy management, but at some point, you don’t need better energy management (and thus Power in your gear benefits you more, as explained in the Gearing section).
Outside of these, you will probably need to use your basic attack (Rifle Shot) an average of around twice per minute. If you are using it more often than this, you should work on your rotation.
Overload Shot is an excellent replacement for Rifle Shot, but it is as expensive as a regular Corrosive Assault (15 energy) and you almost always have something better to do (reapplying DoTs, using up all TAs on Corrosive Assault, etc.) So you will likely only use Overload Shot a few times in a parse, if at all. Practice the spec without Overload Shot until you are very comfortable, and then incorporate it in place of a Rifle Shot or three. Crits on Overload Shot will definitely benefit your DPS so this is worth working on.
Stim Boost is also available as needed for +10 energy boost. See below.
Stim Boost
The short story: use Stim Boost on cooldown from 0 TAs.
The long story: In practice, within about 10 seconds of Stim Boost becoming available is fine, since it’s hard to get it precisely on cooldown. TA generation is extremely plentiful in Lethality so it can be difficult to work in Stim Boost naturally without delaying it much. Stim Boost is on a 30 second shorter cooldown so it is available every minute and a half, which is quite often. One particularly good time is if Tactical Superiority comes off cooldown, since this provides a good way to burn that extra TA. Pay attention well in advance (15 seconds) of Stim Boost becoming available so that you can try to get to 0 TAs when Stim Boost is available, and then use Shiv or Toxic Blast and start spending TAs again.
The alacrity gain from Stim Boost should not affect your rotation.
One nice bonus of Stim Boost in Lethality is that it grants 10 energy. So if you really plan ahead well, you can sit barely on 60 energy as you pop Stim Boost, meaning you’re sitting at approximately a comfortable 80 energy around when you execute your next move, assuming Stim Boost is used after the previous move, just as the GCD activates.
Adrenaline Probe
The short story: use Adrenaline Probe on cooldown from about 35 energy.
The long story: It can actually be quite difficult to use Adrenaline Probe in this Discipline because you have some RNG with your energy management and you also have fairly substantial energy swings depending on how your Fatality proc (and in particular, the moment you consume it) aligns with Toxic Blast, which costs 0 energy. When you’re around 15 to 20 seconds away from using Adrenaline Probe, stop using your basic attack entirely. Since you are pressing as hard as possible and there is very little room for fillers in general in Lethality, there’s simply not much more you can do. As soon as you reach approximately 35 energy, pop Adrenaline Probe and continue your rotation. In practice, you can actually go slightly lower than this on energy (by around 5-10 energy) if you have a Fatality proc and/or Toxic Blast available to prevent falling back below 60 energy while Adrenaline Probe regenerates your pool, but I find 30-40 energy is the sweet spot. Never use Adrenaline Probe above 40 energy because this is a flat out DPS loss.
Lethality is not very good at target swapping so your raid leader should keep you on main boss whenever possible. If you really need to target swap in a fight you should consider playing Concealment. However, if you absolutely must target swap in Lethality, the ideal moment is 2-3 GCDs before Toxic Blast becomes available again and with your next Shiv guaranteed to proc Fatality. Toxic Blast will grant you a 10 second window of extra damage on your new target, and since it costs 0 energy, it helps your energy management which will offset some of the costs of reapplying DoTs. You want to swap just before Toxic Blast actually becomes available so that you do not delay Toxic Blast while applying DoTs.
Also look for opportunities to DoT spread: it may be possible to Carbine Burst the primary target and new target(s) at the same time, spreading your Corrosive Dart and dealing some AOE damage. Do this if there are at least 3 distinct targets in your Carbine Burst, otherwise do not bother since it costs you energy and a TA. If you have just used Toxic Blast on the primary target and you cannot afford to wait for it again, then you should just apply DoTs to your new target and use Corrosive Assault as many times as possible. Fill with Lethal Strike, Overload Shot, and Rifle Shot as usual. By the time you do this, Toxic Blast should be up, at which point you can use that to target swap \emph{back} to the primary target.
Note for adds that will be up 12 seconds or less, you may as well not bother at all with this procedure since the DoT damage will be utterly wasted and you will probably not even get a full Toxic Blast off. What you can do alternatively is help your raid group by pushing all your direct damage on to the new target. If there are multiple adds, Corrosive Grenade and Thermal Grenade, then use Carbine Burst once or twice. If there is only one add, use Shiv, Lethal Strike, and Overload Shot, tab back to primary target and use your Corrosive Assaults, and then Shiv again on the secondary target.
Some of the details of this will depend on how urgent it is to kill an add. Note that if it is very urgent you may just have to spam whatever is available (again skipping Toxic Blast if uptime is < 12 seconds). This is sort of a waste but can be done in a pinch.
Quickening is one of the best off-heals in the game so you should know how to use it. Quickening makes your next Kolto Infusion after using Exfiltrate activate instantly with no energy or TA cost. The internal cooldown on this effect is 10 seconds. This is as powerful as the Sage/Sorcerer ability to bubble people, but even better since you don’t even have to worry about conflicting with the healer, and it has the potential to do better than a bubble with crits.
The best time to use Quickening is when rolling between targets if you do not have to use GCDs to reapply DoTs. Even if you do, you should consider using it if the raid is severely low on health and/or your healers are not very strong. It will lower your DPS since it costs a GCD, but you should be willing to sacrifice a little DPS sometimes in a pinch. Remember though that the raid sometimes gets lower on HP, even with good healers, so don’t waste GCDs in a panic off-healing. Only use when it’s crucial or if you have a spare GCD where you’re not within 10 meters of your primary target.
Quickening is also a good way to self-heal if separated from your healers.
I don’t have any real gear yet for my Operative in 3.0 so take the overall parse number with a grain of salt. I’ll update this section if I can when I get a full amount of 192 or 198 gear for DPS.My current gear is old set bonuses (which are virtually useless) with all 186s and 198 offhand.
Notice how much damage comes from Corrosive Assault, followed by Toxic Blast (ignore my high Shiv amount – this comes from old 15% crit set bonus). Your regular DoT ticks only do a modest amount in comparison, so try to think of your DoTs as a means to an end (high damage from Corrosive Assault -> Toxic Blast -> Lethal Strike). Note again that Ruffian Scoundrel will get considerably more Sanguinary Shot (Toxic Blast) ticks than a Lethality Operative. Also, the balance of things is slightly off without the new set bonuses since I can afford to use very few overall basic attacks with 105 total energy, but I have to use Lethal Strike a bit differently since it is more expensive than it ought to be.
In any case: the priority for the parse is to maintain your two DoTs, then maximize Corrosive Assault under Toxic Blast while using Lethal Strike as frequently as possible as high-damage filler. Lethal Strike does not contribute more total DPS than your various other moves like Shiv and your two primary DoTs due to its longer cooldown, but recall that it still has excellent damage per energy (DPE) and buffs your other DoTs via the Cut Down talent.
Note: Generally, Lethality is recommended for extensive single target burns since it has arguably higher sustained DPS when played well. It also has a range and positional advantage over Concealment. However, Concealment is fairly strong at target swapping and has a slightly easier rotation to resume if distracted or interrupted.
The Ravagers
Temple of Sacrifice
This guide wouldn’t be complete without very helpful discussions with Thrax (Drop It Like It’s Hoth) and KeyboardNinja (Aisthesis), who helped with perspective on Concealment and Lethality, respectively. In addition, KBN has an excellent guide on Lethality DPS hosted on the SWTOR forums which I have borrowed several major ideas from. Also a special mention to Kesmet and Invinc/Carl, who both originally helped me with Operative DPS in the 2.x content.
I’m Raulos and I’m currently one of the main healers in Zorz, a world progression guild which has achieved most world first clears since the beginning of Dread Fortress Nightmare. In spite of this, I have been playing Operative extensively since prior to 2.0 and I have solid knowledge of all three Disciplines in 3.0. In previous gear cycles, I have held the #1 parses at both Concealment and Lethality at different points in time. I have also cleared all previous NiM operations as an Operative DPS.
Please direct any comments or further questions to my forum account (Saenth), or post in the comments below. Thank you!


 SWTOR 3.0 Madness Sorcerer Guide by Milas
 SWTOR 3.0 Marksmanship Sniper Guide by Shulk
 SWTOR 3.0 Lightning Sorcerer DPS Guide by KTap
 SWTOR 3.0 Scoundrel Sawbones Healing Guide by Orderken
 SWTOR 3.1 Darkness Assassin Tanking Guide by Aelanis