SWTOR 3.0 Madness Sorcerer DPS Guide by Milas of Harbinger.
Contents
- 1 Intro to Madness Sorcerer
- 1.1 Ratings
- 1.2 Utilities
- 1.3 New Stuff to Madness in 3.0
- 1.4 New Passives & Abilities to pay attention to
- 1.5 Gearing & Stat Priority
- 2 Abilities and Rotation
- 2.1 Main Abilities
- 2.2 Ideal Opener
- 2.3 Ability Priority
- 2.4 AoE Rotation
- 3 Sample Parse & Video
- 4 Madness in Ops/FPs & You
- 4.1 Operation/Flashpoint Utility and Defensive Cooldowns (from Ktap)
- 4.2 Videos of Madness Sorcs in Operations
- 4.3 Self and Off healing
- 4.4 Spreading Dots
- 4.5 Closing Thoughts
- 5 About the Author
Intro to Madness Sorcerer
We got our time as king in the 2.8 patch. Bioware has since came out and said clipping was never intended and the 3.0 iteration of Madness is new and frustrating as it needs missing DPS to make it competitive with lighting. With all this said its in a extremely good place PvP wise. The discipline plays nearly identical to how it played before the expansion it just has two new abilities and a lot less spamming of Force Lighting.
Ratings
- Sustained DPS: 5 (Lowest parsing spec)
- AoE Damage: 8 (Dots spreading to multiple targets)
- Group Utility: 10 (Self healing, bubble, pull, class buff, raid heal)
- Burst: 5
- Rotation Difficulty: 5 (7-8 for getting most out of 2 piece window)
- RNG dependence: No
- Execute bonus: Dots increased by 15% under 30%
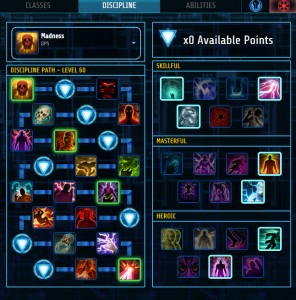
Utilities
-
-
Used on AoE fights
-
-
Used in general or fights with periodic AoE
-
-
Revanite Commanders
-
-
Coratanni
Skillful – Force Suffusion + Empty Body + Tempest Mastery + Sith Defiance
- Force Suffusion – Free group heal use when group stacked and low on HP.
- Tempest Mastery – Not nearly as good in madness but still good AoE damage.
- Empty Body – Healers healing you more
- Sith Defiance – Free 3% DR as Force Storm isn’t apart of our single target rotation.
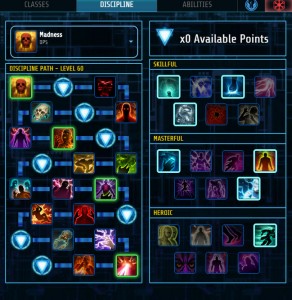
Masterful – Suppression + Dark Resilience + Electric Bindings + Backlash + Corrupted Flesh
- Suppression – Great DCD for reducing incoming damage you can’t avoid
- Dark Resilience – Increases your free off the GCD heal
- Electric Bindings – Only real use is on Revanite Commanders KB root for all nearby enemies
- Backlash – Only real use on Revanite Commanders stuns nearby enemies when Static Barrier erupts
- Corrupted Flesh – Decreases amount of periodic damage you take by 15%
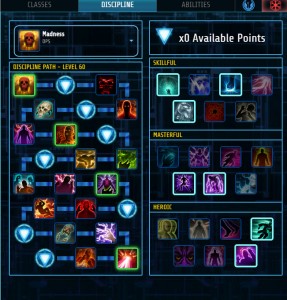
Heroic – Corrupted Barrier + Force Haste + Force Mobility + Shapeless Spirit
- Corrupted Barrier – Free heal when you use Static Barrier or Force Barrier. At 50k HP ticks for 1130 per second.
- Force Haste – Decreases CD of Force Speed and Force Barrier by 5 and 30 thirty
- Force Mobility – Use Force Leech while moving ( Main rotation ability)
- Shapeless Spirit – Used for fights like NM Brontes. Receive 30% less damage while stunned
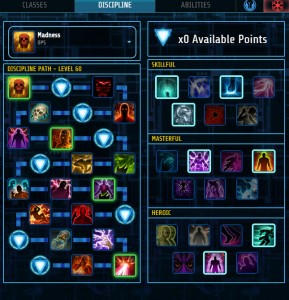
New Stuff to Madness in 3.0
- Wrath – Damage increase down from 35% to 25% on four stack Wrath with LS, CD, Demolish
- Creeping Terror – No longer has a CD
- Pestilence – Spreads your CT/Affliction to targets you hit under AFF/CT. Overwhelm: Increases area attacks by 10 seconds for 45 seconds.
- Disintegration – Force Leech and Lighting Strike crit chance increased by 5%
- Lighting Burns – LS no longer has a 60% chance to apply was moved to Force Leech. FL % still remains same.
- Force Leech – New ability that hits the target and heals for 50% of the damage dealt.
- Creeping Death – No longer grants surge bonus when dots crit. Now increases dot damage under 30% by 15%.
- Parasitism – Increases life stolen by DF & Force Leech by 100%. Also causes AFF/CT to steal life and heal you for 25% of life stolen.
- Lighting Barrage – Decreases Force lighting channel by 33% but reduces damage from FL by 25%.
- Demolish – New Ability replaces Crushing Darkness does same thing just more damage and applies Vulnerable: Increases damage by force attacks by 5% for 45 seconds.
- Devour – Force leech does 25% more damage to targets affected by your affliction. Each tick of Deathmark restores two force
New Passives & Abilities to pay attention to
- Force Leech – New ability that hits the target and heals for 50% of the damage dealt.
- Demolish – New Ability replaces Crushing Darkness does same thing just more damage and applies Vulnerable: Increases damage by force attacks by 5% for 45 seconds.
- Lighting Barrage – Decreases Force lighting channel by 33% but reduces damage from FL by 25%.
- Creeping Death – No longer grants surge bonus when dots crit. Now increases dot damage under 30% by 15%.
- Lighting Burns – LS no longer has a 60% chance to apply was moved to Force Leech. FL % still remains same.
- Pestilence – Spreads your CT/Affliction to targets you hit under AFF/CT. Overwhelm: Increases area attacks by 10 seconds for 45 seconds.
- Devour – Force leech does 25% more damage to targets affected by your affliction. Each tick of death mark restores two force
These passives abilities make up what is the 3.0 Madness sorcerer. Some of them saw heavy nerfs others are new and give you additional damage. When playing keep these in the back of your mind when analyzing logs and damage output.
Gearing & Stat Priority
Accuracy (assuming you have 1% companion bonus. If you don’t, get it!) – Personally I think that anything above 109.64% Force accuracy is sufficient.
What I would personally recommend based on gear level:
- 186 gear (Dread Master) – 7 Accuracy pieces (~109.57% Accuracy) (add one augment to go over cap)
- 192 gear (Resurrected) – 6 Accuracy pieces + 1 Accuracy augment (~109.61% Accuracy) (add one more augment to go over cap)
- 198 gear (Revanite) – 6 Accuracy pieces (~109.63% Accuracy) (add one augment to go over cap)
Crit – With the loss of our Surge talent in 3.0 there is little reason to run an abundance of crit. I’ve never fully test crit from 100-500 range, I prefer more static results, and like to run as little crit as possible. When Mikey had the #1 parse from 2.8 with 328 crit I had the #2 parse which was about 30dps behind his with 120 crit. I’d recommended little to no crit in the range of 80-140. When I get around to gearing my sorc I will test with zero crit and update from there.
Power – Stack this everywhere you can, I’d even if I wasn’t poor and didn’t have access to free Willpower augments would of tested with these.
Surge – As you get two free critical hits every minute and thirty you want to be close to 70% (333 is 68.24% )
Alacrity – All of my testing was done above the 300 alacrity mark as it speeds up your rotation, dot appliance and the amount of Lighting Strikes you can use. Mikey’s parses use roughly the same amount.
Augments – I’m using Willpower augments as they grant nearly 2% free crit and I run little crit (120), so I treat it as a free stat gain over static ability damage gain. Will test this at a future date.
Relics – Serendipitous Assault and Focused Retribution.
Set Bonus – Run the new two piece and old four piece. The static alacrity gain you get from the old set bonus is great and the new six piece is rather mediocre in madness. In the parse comparison below you see Mikey using 22 Lighting Strikes and I used 29 which isn’t better than a 5% alacrity gain.
* The old set bonus is bugged/broken on Republic side*
Abilities and Rotation
Main Abilities
- Death Field
- Affliction
- Creeping Terror
- Demolish
- Force Leech
- Force Lighting
- Lighting Strike
Can be used on move if above on CD or can’t use
Ideal Opener
* Unlimited Power used near 30% at first appliance of dots at or near 30%*
* Affliction now hits on ability usage*
Hard cast Demolish –> Offensive CDs ( Polarity Shift, Adrenal,Recklessness) –> Affliction –> Creeping Terror –> Death Field –> Force Leech –> Force Lighting –> Lighting Strike –> Force Lighting ( sit on wrath proc Demolish off CD < 2 seconds) –> Force Lighting ( Clip as soon as demolish off CD)

Ability Priority
- Dots ( Affliction, Creeping Terror, Demolish (When you have four wrath stacks)
- Death Field
- Force Lighting ( only if not sitting on four wrath stacks)
- Force Leech
- Lighting Strike
While I want to do a advanced rotation time wise (30-45 seconds into rotation) its nearly impossible to do as the alacrity gains and DoT timers don’t line up. Best cast for highest DPS is to plan out your next two-three GCD’s and see when/where you need to refresh dots, keep Wrath stacks, and are free to use Force Lightning
AoE Rotation
- Dots applied
- Death Field (spreads)
- Force Storm
Sample Parse & Video

Here are four parses, two from Vierge and one each from Mikey and I. As you can see the vast majority of our damage still comes Force Lighting. Most of the parse read similar to one from 2.8, however the main difference are the number of Lighting Strikes with the change in clipping and the addition of Force Leech.
I couldn’t load Mikey’s/Vierge’s parse into star parse ( think because its not from my combat log folder) for better comparison on the sub 30% burn.


As you can see its a big gain in overall DPS.
Video
Madness in Ops/FPs & You
Operation/Flashpoint Utility and Defensive Cooldowns (from Ktap)
- Unlimited power – Group/operation wide buff, increasing all main stats by 10% for 10 seconds. I recommend using it on your opener. This is assuming mechanics allow for it, your tanks can hold aggro, and you won’t need it for a burn phase within the next 5 minutes.
- Force Speed – Use when necessary, whether it’s for the speed boost or for the instant Lightning Bolts.
- Cloud Mind – Aggro drop, use when necessary to reduce threat or to reduce damage taken with the Suppression Utility.
- Expunge – Use to get rid of cleansable debuffs that should be cleansed. Can be used on other people in your group if necessary.
- Electrocute – 4 second hard stun, can be useful in Flashpoints and against some trash in operations.
- Force Storm – Can slow or even stun enemies caught in it, useful in Flashpoints and some trash in operations.
- Reanimation – Use to revive necessary dead players in your group. You should be reviving teammates, not the healers (coordinate with other revive capable dps so you’re not all trying to revive someone at the same time). Reanimate wisely – if there’s 2 or more people dead, revive the more necessary teammate (normally tank or healer).
- Extrication – Friendly pull, use when necessary to save somebody from mechanics (they are stuck in a corner, dying in fire/acid, they need to be where you are, etc). Can also be used to lower someone’s threat amount (shouldn’t be necessary).
- Unnatural Preservation – A free, powerful, instant self heal that is off the gcd (global cooldown). There is no reason not to use this is you’re below 80% life and there’s no current downtime in the fight.
- Resurgence – An instant heal and an over time heal in one. This is on the gcd so use sparingly during combat, but if there’s downtime, feel free to use this in combination with Dark Heal to help the healers out.
- Dark Heal – An expensive casted heal. Should only be used during downtime or when absolutely necessary (healers are dead or extremely hard pressed).
- Overload – The knockback is very situational, and mostly useless for ops, but the heal while using Force Suffusion is definitely a nice utility for some fights. Whether it’s during combat or during downtime, this can really help healers who are hard pressed. It’s capable of being an instant 3k+ heal (with crit) on everybody it hits (up to 8 people including you), which is insane for a dps. It is on the gcd as well, so only use when necessary (or during downtime).
- Unbreakable Will – Use when necessary to get rid of movement impairing effects or stuns that can be broken.
- Consumption – Should never be necessary, but if you’re extremely low on force, it can be used to get a quick boost to your force pool.
- Force Barrier – Use when necessary to avoid damage, whether it’s a giant hit at full health, or if you’re going to die if you get hit again. If you’re confident enough to do the fight without needing Force Barrier for protection, it can be used to avoid mechanics and increase dps (example: ignoring a knockback and getting back to dpsing sooner). Can also be used to heal yourself using the Corrupted Barrier utility.
- Static Barrier – Use when necessary. For instance, if you get a giant grenade (or some similar unavoidable damage) on you and it’s about to blow up. Also, if there’s no sorc healer, or they’re otherwise occupied, I try and bubble people who are going to take similar unavoidable damage (only for big hitting things like grenades/bombs/etc, not something that’s going to not hit very hard). You can also bubble your tank(s) if they are dying and there’s no sorc healer in the group. Can also be used to heal yourself using the Corrupted Barrier utility.
We do not have issues with our force pool (under normal circumstances), so don’t be afraid to bubble everybody in your group if there’s sufficient downtime and your force pool permits. This is assuming that there is no sorc healer who uses more powerful Static Barriers.
These utilities can make or break a fight, and it’s up to you to decide what to use and when to use them as the fight dictates. They are all situational. Good luck!
Videos of Madness Sorcs in Operations
Madness played in SM Ravagers & Temple of Sacrifice
Self and Off healing
Over a 1 million HP parse, madness Sorcs are seeing about 780-820 in self healing which in a operation is a ton. We are nearly self sufficient in keeping ourselves healthy. With our built in healing we also have:
- Unnatural Preservation – Off GCD generally use at or below 80%
- Static Barrier – Absorbs around 7-8k as a DPS and is a DCD on the GCD. With no sorc healer in the group bubble tanks when they get low, your healers will love you. This ability is one of my favorite abilities as a DPS sorc. Also the utility heals you for 2% based off of total HP. My Hp is 51k and that is 1131 per tick.
- Resurgence – Small heal with a HoT. Use on the move or when you can’t be stationary and someone needs some healing.
- Dark Heal – Medium heal use when healing is looking dim or you are out of range and there is down time.
- Overload (utility required) – Raid heal for phases where raid is bunched. Amazing on HM Sword Squadron when pull in happens.
- Corrupted Barrier (utility) – Receive healing on Static Barrier and Force Barrier
Why I enjoy playing a DPS Sorcerer so much is that it has so many things it can use to help healers and the raid. I’m generally raiding without a Sorcerer healer and the bubbles are so helpful.
Spreading Dots
Pestilence – Spreads your CT/Affliction to targets you hit under AFF/CT. Overwhelm: Increases area attacks by 10 seconds for 45 seconds.
This passive is godlike on encounters that have adds. I can only imagine the DPS gain in Phase two of NM Council if this was in the game prior to 3.0. No longer will you have to tab dot targets on top of each other you’ll just be required to use Deathfield.
Of the new operations fights this will shine are
- Sparky
- Torque
- Blaster & Master ( If small droid tanked near big droid)
- Coratanni (If Pearl tanked near, enrage buff is smaller than DF radius)
- Malaphar
- Walkers (targeting droid)
- Underlurker (DF can hit two adds + boss)
- Revanite Commanders
Closing Thoughts
The Discipline is fine rotation and viability wise. The damage currently is not competitive enough to warrant its use over Lighting or Telekinetics. When Bioware does get around to addressing the damage concerns the discipline will be amazing in operations.
About the Author
I’m Milas, I’m the best, kidding no really I am the best. I’m the GM of <Zorz>, I like raiding and doing hard content. I was a sorcerer main until 3.0 when I swapped to tanking. I’ve been one of the few or the only sorc/sage that played Madness in progression content at a world pace level ( NM Styrak, and NM Brontes) before it was OP FOTM in 2.8. One day madness sorcs will rise again and you’ll see me in a kill video near you on it. Until then you can found me in the comment section below, @ http://zorzz.enjin.com/ or on twitter @jdotter707.
In closing I’d like to thank Dulfy for hosting my guide.
Special Shutout to Buff/Sarent (sorry) please view this link
http://gyazo.com/1903cc01dfbbc9cbe578ad1eec615996
Shout out to everyone in Zorz for putting up with me on a weekly basis.


 SWTOR 3.1 Darkness Assassin Tanking Guide by Aelanis
 SWTOR 3.0 Seer Sage Healing Guide by Orderken
 SWTOR 3.0 Infiltration Shadow DPS Guide by Evolixe
 SWTOR Relics of the Gree achievement guide
 SWTOR 3.0 Defense Guardian Tanking Guide by Artorias