

SWTOR 3.0 Sentinel Watchman DPS guide written by Oofalong of The Shadowlands. This guide is adapted from Oofalong’s Annihilation Marauder/Watchman Sentinel Compendium.
Contents
Quick Gear Recommendations
I do not have proven recommendations for gear in 3.0 as I have not been able to test as much as I need to. Still, as a starting point I am comfortable recommending:
Expect further refinement on gear recommendations.
Purpose
This compendium is meant to help you understand how to play and gear your Watchman Sentinel for elder game PvE. The recommendations presented here are derived from the model I built, which is also available as a Google Spreadsheet: here. (Please note: while the model is theoretically accurate I do not have much 192/198 gear at this point so I have not been able to validate all of the assumptions.)
I have created this as a publicly available google doc as that is the easiest for me to maintain. This information may appear on other sites, more often than not the site has my permission to use this guide. I will attempt to answer questions about this guide via the SWTOR forums or my Reddit Post. Alternatively, you can email me at [email protected] or PM me via SWTOR Forums, Enjin or Reddit where my username is oofalong.
Philosophy
My approach to theorycrafting combines modeling expected results based on relevant factors then analyzing actual results to ensure my model and hypotheses are accurate. Or, doing spreadsheet math and checking the combat logs to make sure it is right.
Thus, for all of my conclusions and recommendations I can, and will if asked, explain the math and mechanics behind it. Where I cannot prove something, I may still offer my opinion and I will try to be clear when this occurs. I do not pretend to know everything, and when someone has a different perspective I attempt to understand their point of view and either incorporate it into my recommendation or dismiss it with data/facts.
There are lots of potentially valid theories to optimize a Watchman Sentinel. However, I believe there is only one – or a very limited number of – truly optimized specs, gear, etc. I aim to identify the most optimal, yet also identify and quantify sub-optimal options.
Discipline Overview
Overall, Watchman is one of the best sustained single target DPS builds in SWTOR. The SWTOR Devs have stated they intend for it to be the highest sustained damage spec for Sentinels. In addition, the build offers high survivability due to a passive proc self-heal. A properly spec’ed and built character will do ~45% of their damage as DoTs. Marauders deal bleed (internal) damage while Watchmen deal burn (elemental) damage. This spec is melee exclusive and suffers from poor burst damage although 3.0 gave it formidable area-of-effect (AoE) potential. Also, it is a very mobile class as nearly everything is an instant ability.
About Watchman in 3.0
Shadow of Revan (3.0) introduced numerous changes to the spec and play style of Watchman. The spec now centers on consistent, but restrained, play compared to the dynamic adjustments required in 2.X. For instance, neither Cauterize nor Force Melt have a cooldown; however, incorrect use of either can leave you very resource starved. Also resource generation is more limited and more of our GCDs are spent using resource neutral abilities. These factors combine to make the spec play very differently than 2.X. Some will prefer the changes while others will long for the return of 2.X features.
Relevant Global Changes
New & Changed Abilities
Every attack had their damage coefficients adjusted slightly, and in most cases the net effect was less than ±5% in expected damage. Below I have outlined the exceptions to this:
Resource Regeneration
Only three of our abilities provide Focus:
While we generate ~70% of our resource from using these abilities, we have two opportunities to generate resource through procs. In total, these procs should generate ~10 total resource in each rotation. The two procs are:
Both were changed to 4s lockouts in 3.0. Plus, the success rate of Plasma Blades has been reduced to 20%, and we have less melee hits compared to 2.X. This culminates in very limited resource generation although it is enough assuming you follow the prescribed rotation.
Disciplines vs Skill Tree
For the most part, the Watchman discipline has access to every ability/talent we had via our respective skill tree. Some – Focused Slash – have become a passive talent available to all Sentinel. Some appear as direct replacements in the Discipline path such as Juyo Mastery and Merciless Zeal. Some have been merged with other talents, like the reduced Force Leap’s reduced CD from Blurred Speed being combined with Close Quarters. And, some are available as Utility talents now like Defensive Forms and Watchguard.
While each Discipline talent is listed in the table below, I do want to highlight a few.
Utility Talents
At level 60 you will be able to invest in seven of these talents. I have highlighted the talents that will generally be the most worthwhile for PvE although you can’t take them all. Thus, you will need to adjust them based on each fight’s required mechanics and/or damage profile. I think the only two that are always beneficial are Defensive Forms and Contemplation (although you can spec out of this after building 30 stacks of Centering).
Skillful
Utility Description Comments Jedi Enforcer Increases the damage dealt by Rebuke by 15% and increases its duration by 4 seconds. This is one of the many buffs to Rebuke. Debilitation Master Strike immobilizes the target for the duration of the ability. This is one of many abilities that immobilizes/slows your target, which has little to no effect in PvE. Jedi Crusader While Rebuke is active, it generates 1 Focus whenever you are attacked. This effect cannot occur more than once every 3 seconds. This is one of the many buffs to Rebuke. Defiance You generate 4 Focus when stunned, immobilized, put to sleep, or knocked around. This has situational benefits. Defensive Forms You build 2 Centering when attacked. This effect cannot occur more than once every 1.5 seconds. Additionally, the effect of your lightsaber forms are improved while they are active: Shii-Cho Form: Further increases damage reduction by 2%. Juyo Form: Increases internal and elemental damage reduction by 5%. Ataru Form: Increases your movement speed by 15%. This is always beneficial. Trailblazer Cyclone Slash deals 25% more damage. While this sounds great for clearing trash mobs, the cost of the ability still makes this fairly unattractive for this Discipline. Stagger Increases the duration of Force Leap’s immobilize effect by 1 second. This is one of many abilities that immobilizes/slows your target, which has little to no effect in PvE.Masterful
Utility Description Comments Incisor Force Leap, Force Melt, Clashing Blast, and Zealous Leap snare their target, reducing its movement speed by 50% for 6 seconds. This is one of many abilities that immobilizes/slows your target, which has little to no effect in PvE. Jedi Promulgator Each use of Strike, Zealous Strike, and Leg Slash reduces the active cooldown of Rebuke by 3 seconds. This is one of the many buffs to Rebuke. Defensive Roll Reduces damage taken from area effects by 30%. This has situational benefits, but many of the fights in the current Operations have AoE damage making this pretty useful. Watchguard Reduces the cooldown of Pacify by 15 seconds and Force Kick by 2 seconds. This has little to no effect in PvE. Pulse Reduces the cooldown of Force Stasis by 15 seconds. This is one of many abilities that immobilizes/slows your target, which has little to no effect in PvE. Displacement Increases the range of Pacify by 6 meters and allows Rebuke to be used while stunned. This has little to no effect in PvE. Force Fade Increases the duration of Force Camouflage by 2 seconds and further increases the movement speed bonus of Force Camouflage by 20%. This has situational benefits as it increases the utility of Force Camouflage as a gap closer.Heroic
Fleetfooted When Transcendence is applied or refreshed, it purges movement-impairing effects. Additionally, the movement speed bonus of Transcendence is increased by 30%. This has situational benefits. Expunging Camouflage Force Camouflage removes all cleansable effects when activated. This has many situational benefits. Force Aegis Increases the duration of Guarded by the Force by 2 seconds. While this is obviously beneficial any boss strat that relies on Guarded by the Force is flawed. Just Pursuit Leg Slash consumes 2 less Focus. In addition, using Leg Slash against a target already slowed by your Leg Slash immobilizes that target for 3 seconds. This immobilizing effect cannot be applied to the same target more than once every 10 seconds. This is one of many abilities that immobilizes/slows your target, which has little to no effect in PvE. Enduring Reduces the cooldown of Guarded by the Force by 30 seconds. While this is obviously beneficial any boss strat that relies on Guarded by the Force is flawed. Zealous Ward Getting attacked while Saber Ward is active heals you for 3% of your maximum health. This effect cannot occur more than once every 1.5 seconds. This has situational benefits. Contemplation Reduces the cooldown of Awe by 15 seconds. In addition, you build up to 30 Centering over the course of using Introspection. This effect cannot occur more than once every 30 seconds. Being able to pre-stack Centering before a boss fight is a welcome addition to the Discipline. You can also spec out of this once you have built your stacks.We now have a rigid and static rotation; it is also not very comparable to our 2.X rotation. Personally, I reorganized all of my keybinds and retrained myself to avoid falling into the comfortable routine of 2.X play.
There are 11 essential abilities which you will use on a regular basis. Our core abilities based on total damage done per activation are:
In order to achieve our steady-state rotation we need to reduce the CD of Merciless Slash with two uses of the ability thanks to Accelerating Victory. Thus, our opener spans 24s/16 GCDs. Unlike many classes we will not be doing our peak damage during this opener as we have to build stacks of Merciless and Juyo plus we need to get to the 6s CD for Merciless Slash.
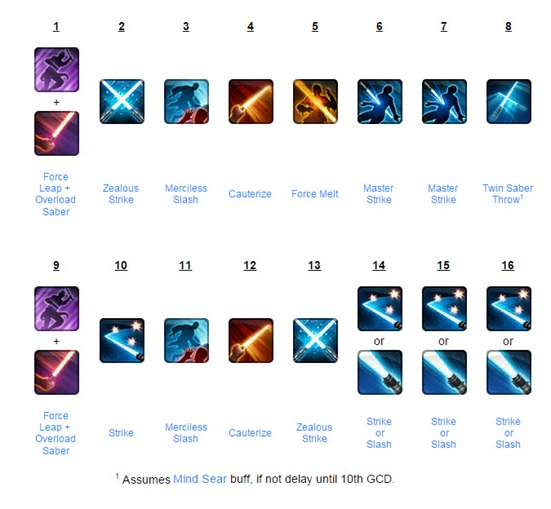
All of our core abilities have a cooldown (CD) of 6s (4 GCDs) or some multiple of this. Thus, we can create two similar 18s/12 GCD cycles. These are designed such that you can repeat them indefinitely. At most, there is one GCD where you will have a choice. In other words, we now have a very rigid and repeatable rotation. Immediately below I have outlined the rotation, and further below I have offered some comments on the rotation. Please note this picks up right at the end of our Opening Rot
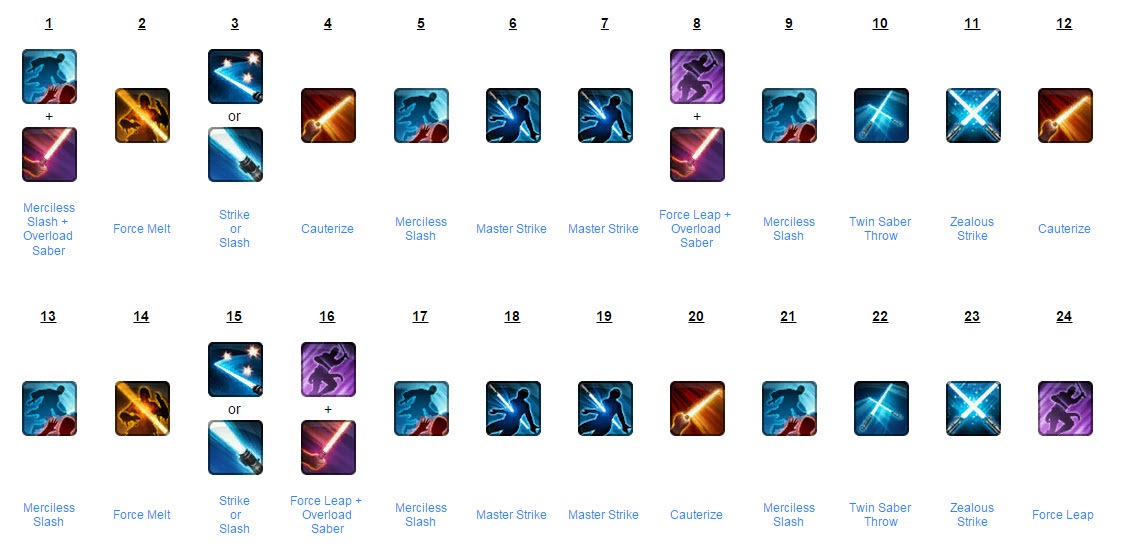
Once your target falls below 30% you gain access to Dispatch; however, given our constrained GCDs and resource there is only one spot in each 18s/12 GCD cycle where we may be able to use it. The third GCD of each cycle allows us to replace Slash with Dispatch resource permitting. Given the reduced damage of Dispatch we do not benefit much from this ability anyway.
We don’t have an AoE rotation per se, and depending on the health of the targets we need to determine how many DoTs to spread via Force Sweep. For weaker mobs just spread Cauterize, and for bigger mobs you will want to spread will want to also spread Force Melt.
Our primary stat is Strength. Our damaging abilities – specifically the Damage Bonus – all benefit from more Strength. Each point of Strength contributes 0.20 to Damage Bonus. Plus, Strength also contributes to our Critical Chance or Crit %. Strength may come from hilts, armorings, mods, augments, earpieces and implants.
We also have a less important primary stat. Willpower. Willpower affects our Force Damage Bonus and our Force Critical Chance the same as Strength. Your character will naturally have some Willpower, and this can be increased by finding datacrons. However, none of your gear should have Willpower on it.
The secondary stats are everything else. There are effectively two different stat pools for us to consider. The relevant secondary stats for Marauders | Sentinels color coded by stat pool are:
I need to do more analysis and research to understand how to optimally allocate these Secondary stats although getting at or above 758 Accuracy is a must.
The stat allocation on the various modifications are actually pretty simple even if it seems like a lot of choice:
The augment debate became more complicated in 3.0. For one you will probably want to devote some of your augments slots to Accuracy Rating. My preliminary math indicates that Overkill (Power) Augments are superior to Might (Strength) Augments now. This confirms my gut feeling as we previously valued the Strength’s incremental Critical Chance due to the 30% free Surge on our DoTs, but this has been reduced to 5% now.
It also appears as if using some Alacrity Augments in place of Overkill Augments will be a DPS gain.
In any event, I plan on doing more research and analysis here.
You will want equip the best Serendipitous Assault and Focused Retribution relics you have access to. Review this analysis for specifics on relics.
The new purple stims provide an eight hour boost to your Strength and Power, which is superior in duration and benefit compared to the blue ones.
Adrenals provide a short term – 15s – increase to your DPS. For maximal effectiveness use an adrenal with the Weaponsmaster buff and hopefully Inspiration. If you use your adrenal just before Merciless Slash, you should be able to get three uses of this ability with the adrenal buff. This is explained in more detail later.
Set bonus were broadly redesigned in 3.0. There are now seven qualifying slots: Head, Chest, Bracers, Gloves, Belt, Legs and Boots. And, there are now benefits for 2, 4 and 6 pieces. As before they are cumulative such that if you have the 4-piece bonus you also have the 2-piece bonus.
3.0 Weaponmaster & Challenger Set Bonus
2.0 Weaponmaster & Challenger Set Bonus
Obviously, the 3.0 4-piece bonus is inferior to the 2.0 4-piece bonus ignoring the Strength difference. Plus, the 2.0 2-piece is very strong. Generally speaking, you won’t want to break your old 4-piece Set Bonus until you have the pieces for the new 4-piece Set Bonus. Also, if you have the old 4-piece Set Bonus tier 186 keep it intact until you get at least the new 192 6-piece bonus.
A Brief History of Set Bonuses
From Launch till 1.2 set bonuses were tied to the armor shells. This was pretty limiting for a number of reasons; it also meant that every elder game player looked exactly the same. However, this did allow you to equip a PvP armor shell and insert PvE armorings granting you the PvP set bonus but with PvE optimized stats.
With the release of new gear in 1.2, the new PvE gear set bonus was tied to the Campaign armorings while the new PvP gear set bonus was tied to War Hero armorings. This allowed people to better customize their appearance. This also gave Sentinels access to the set bonus of Guardians.
From 1.2 to 1.6, you could mix and match shells and armorings to achieve whatever set bonus you wanted. However, in 1.6 they eliminated all set bonus PvP shells meaning that the PvP set bonus was exclusively available via PvP armorings that sacrificed Strength and Endurance for Expertise.
In 2.0, there are identical set bonuses derived from two different sets of armor – Weaponmasters and Challengers. Further, all set bonuses became tied to the armoring, and any set bonus that was on the shell will be transferred to armoring if you extract it.
Now in 3.0, there are all new set bonuses although still called the same thing – Weaponmasters and Challengers – and the available pieces have expended to 6. Also, PvE and PvP gear now have the same set bonus although the pieces do not mix to grant the bonus. For example, 3x PvE and 3x PvP do not combine to create one 6 piece Set Bonus.
Each DPS spec now applies two damage buffs to targets it hits. There are a total of 7 different buffs. Our two buffs are:
In addition to these we will benefit greatly from:
You must be in Juyo Form. Once you enable this form you stay in it until you disable it. For a properly spec Sentinel, Juyo form does many things. First off, it increases attack damage by 1% up to 6 stacks with the Inexhaustible Zeal. Further, each stack of Juyo Form increases the critical chance of our DoTs by 2% up to 12% via Juyo Mastery. Using Zen when in Juyo Form makes our next six DoT critically hit automatically. In short, if you are not in Juyo Form as a Watchman Sentinel you are doing something wrong.
A melee attack’s critical chance is a function of Critical Rating and Strength; a force attack’s critical chance is a function of the same plus Willpower. Each of these inputs contribute based a different exponential equation, which means the diminishing marginal rate of return varies. Said another way, there is no such thing as a Crit % DR. You should not think about a target crit %; instead you should target a certain critical rating as well as Strength total.
Everyone has a base 5% critical chance and the Smuggler class buff grants another 5%. You can also earn a 1% legacy-wide critical chance boost by reaching max affection with Sergeant Rusk or a ranged DPS companion on any of the other characters in your legacy. This provides an effective base 11% critical chance. Plus, we can add additional critical chance from Strength of at least 8%. This gives us a total melee crit chance of almost 20% with 0 crit rating.
Anytime we activate an ability that spends Focus we will build 4 stacks of Centering. Plus, any time we kill something we build Centering. And, Defensive Forms will grant us 2 Centering when we are attacked. Once we have 30 stacks of Centering we can use a few different abilities. The exact number of Zen uses varies fight to fight. For instance, practicing on the training dummy, we must use eight Focus consuming abilities to build 30 stacks of Centering. The most commonly used ability with 30 stacks will be Zen, which causes our next 6 burns to automatically critically hit. Plus, each of these 6 ticks will also heal your 4 person group for 1% of their max health. Zen will always increase our DPS, and well-timed use of it can dramatically increase our DPS.
I think there are worthwhile mechanics to understand even if you don’t want to do your own theorycrafting.
The melee attack formula is:
Main Hand Damage* + Damage Bonus* + Standard Damage* + Off Hand Damage
* These three attack components combine for one entry in your combat log.
The ability’s tooltip will state if it attacks with both hands. There are two one-handed melee attacks Force Charge | Force Leap and Deadly Throw | Dispatch.
The force attack formula is:
Force Damage Bonus + Standard Damage
Let me briefly explain how each of these components is calculated:
Read this and this to learn about modeling damage; the necessary inputs are here.
Each release or patch may include changes to class abilities. This is done to balance game play across all classes and roles. Since the game’s release there have been a number of impactful changes to Watchman Sentinels.
3.0 Shadow of Revan (Dec 1, 2014)
2.8 Spoils of War (10 June 2014)
2.5 Galactic Starfighter Early Access (10 December 2013)
2.0 Rise of the Hutt Cartel (11 April 2013)
1.6 Ancient Hypergate (11 December 2012)
1.5 HK-51 Activated Start of Free-to-Play (11 November 2012)
1.4 Terror From Beyond (9 September 2012)
1.2 Legacy (12 April 2012
1.1.2 Rise of the Rakghouls (7 February 2012)


 SWTOR Festival of Splendor Event Guide
 SWTOR THORN Rakghoul Resurgence event guide
 SWTOR 3.0 Mercenary Bodyguard Healing Guide by Orderken
 SWTOR 3.0 Telekinetics Sage DPS Guide by KTap
 SWTOR 3.0 Seer Sage Healing Guide by Orderken