Windstorm can be a difficult map for players setting tracks on it for the first time and even for veterans since it is a very complex map with many different potential routes. Windstorm features urban areas, hilly areas, areas with many choke points, a few flanking routes, and steep drop offs that could destroy you if you aren’t careful. The amount of landscape changes are not always apparent at first glance but they are very important to where you will end up going and how well your team fares on Windstorm.
This Windstorm map strategy guide will help you learn routes, specific areas to setup in, and general tactics for both teams in standard battles. Team 1(Green) and Team 2(Red) are color coded for the respective sides and there are a few shapes around the map that signify certain actions. A colored line indicates a potential route to take to start a match to get to a colored area to position yourself in. The red and green areas shown are where most tanks will position themselves within the first minute of the match since they are key positions. Yellow areas are places where you will want to be careful heading into to start the match since they either provide little cover or will be highly contested. Around the edge of the map there are red/green outlined boxes that give vague positions for SPGs and start with “1” and each number thereafter is a location you should move to as the match progresses. Keep in mind that moving up from “1” to “2” and so forth you should have enough allies in front of you to prevent enemies from seeing you.
All images you see here were created with MapTactic which is a great World of Tanks tool for creating strategies for clan wars, team battles, and eSports.
http:///
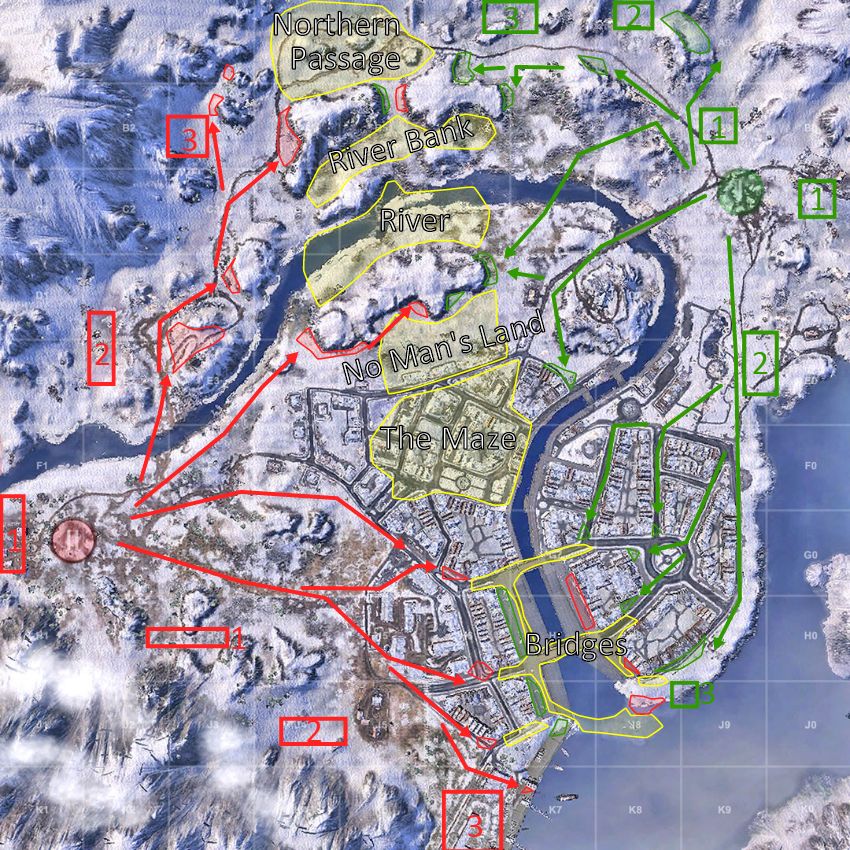
Since Windstorm has many different terrain types it is important to know how your team will perform before heading to a specific area. If you head to the wrong area with the wrong tank you will almost always be destroyed or not be very useful to your team. The northern part of Windstorm has the most uneven/hilly terrain on the map anywhere north of the River from the F1 to C7. The areas up here work well for tanks with good gun depression, mobile tanks for flanking, and also tanks with great frontal armor. It is not wise to head up here in a slow tank or a very large tank since it is easier to be in a light/medium in this area. Heavier tanks do work but only if they are able to move around well(so no Maus’) to prevent themselves from being swarmed or left behind.
In the center of the map around No Man’s Land there are limited spots to setup but these spots are capable of helping both the northern area and also south of this area. Since there is not a lot of cover it is great for tanks with a lot of armor on their frontal turret/hull. Medium tanks are also great here as long as they have good gun depression since they can hide enough to avoid most damage. If your tank has poor armor, poor mobility, or is very large(again no Maus’!) then it is not wise to go here.
Moving further down is “The Maze” and the town sections around the “Bridges” area. This part of the map is very flat and has many corners with great cover from SPGs. These areas work well for large/slower tanks, tanks with poor armor, and anything in general. Since there are a lot of corners tanks that can side-scrape well will dominate here along with tanks with great frontal armor. At the same time tanks with poor armor can peek in and out of cover to get shots off while enemies reload or flank enemies to limit the amount of damage they take.
Overall Windstorm is split into the Northern Passage/No Man’s Land areas and then The Maze/Bridges area with each area catering towards a specific style of play. It is important to at least prevent the enemy from breaking through one area since it will mean you are easily flanked and your base falls. If you are in a tank not tailored to a specific area but your team neglects it then you can always setup in an area closer to your starting point so that you can get support quicker if need be.
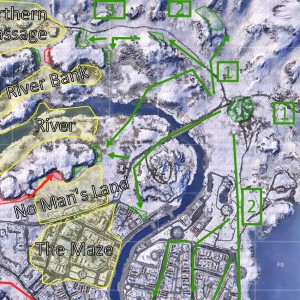
For team 1 the Northern Passage is at a slight disadvantage since team 2 has a great overlook in A3/B3 and moving up can be difficult without having good frontal armor. Setting up initially in A6 will prevent enemies from easily being able to flank you and keep the option of moving into the River Bank area available. If your flank is equal in strength or is stronger than moving up the A line to the A4 corner should be easy enough before outside enemies can assist this flank. Keep in mind that this area isn’t needed to win the overall battle, usually just holding up to A5/A6 is sufficient as long as the rest of your team is doing well and enemies aren’t hitting your tanks in D6.
This area is less protected than the Northern Passage since team 2 has very good firing lanes into it from No Man’s Land and the D3/E3 hill. If there are not a lot of enemies overlooking the area you can sneak through and flank either north or south very well. It is important to have decent gun depression and also some sort of good frontal protection in case you get into trouble. Usually this area is best taken after the few minutes play out since early on if you move through here enemy tanks can easily tear you to shreds.
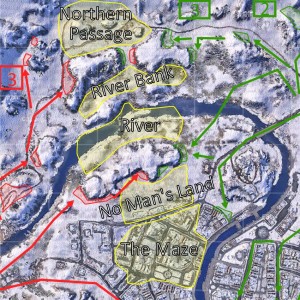
No Man’s Land is a very wide open field with decent cover from shots coming from the north but not from artillery and tanks located west of your tank. Carefully advancing here is important and while it might be tempting to push hard at the start if you do not see anything you will be surrounded very quickly. Avoid moving past the dividing rock located in D6 that splits the teams apart since after that rock you will be taking a lot of fire. Later on in the match this can be a good area to move through quickly but be careful for enemies sitting back near the team 2 base waiting for you to move across this wide open area.
The Maze area is often overlooked in most matches and isn’t utilized that much except in close games late in the match. For team 1 this area is harder to get into since you either need to come in from D6 or across a bridge from the east. The bridges and the D6 entrance opens up your side armor to the enemy but usually I find quickly heading in from D6(from the north) is safer. This area can be good for taking shots into No Man’s Land and also hitting enemy tanks further south near the Bridges area. Like others area it might be tempting to push far west if you see no enemies but all you are doing is surrounding yourself on all sides by hostile tanks early on in the match.
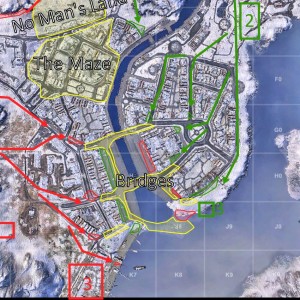
The Bridges area on Windstorm all comes down to covering the three possible crossing points down in this area. Both sides have corners to position themselves on but rarely are all three covered properly and the southern water crossing is usually the easiest to cross early on. If you are crossing using this southern most route then make sure you have gun depression and a strong turret to fight your way out on the other side. The green areas on the enemy side are great places for a fast heavy or medium tank to dart across to pin the enemy in before the enemy heavy tanks/tank destroyers make it to this area.
If the enemy has the advantage and is starting to push across then it is usually best if your team starts to fallback further north. If you stay in the starting positions close to the channel then you will not be able to cover all of the flanking options the enemy has. Move back to the traffic circle to centralize your guns and to help cover each other easier.
Typically SPGs on Windstorm stick near the base even if the match is taking very long due to the layout of the map. For team 1 SPGs are usually located in the northeast corner and moving out of this area comes down to which flank is stronger and if the match is taking a long time. If your northern flank is strong then setting up in B8 and then heading along the A line west will give you better shots into the enemy base and southern town area. If your northern flank is falling then your only choice if to head down the J line towards the town. This greatly limits your ability to hit most of the map but does allow you to fire into your base if the enemy is capturing it. If you continue to move down into J8/J9 you open up move of the map except for your base. Heading south in artillery from this side isn’t ideal but it is better to move down here and stay alive then stay in your base if it will be overrun early on.
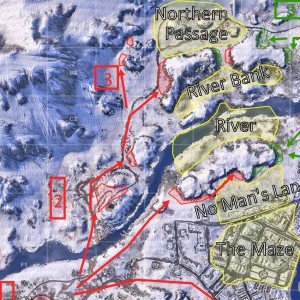
The Northern Passage plays very similar for team 2 when compared with team 1 except for the advantage this team gets with the A3/B3 hill. This area is good for light tanks and mediums to get to early on to spot any enemies pushing up the A line and to get fire on them early. Team 1 has the advantage up to the edge of A6 since the elevated cover is slightly tilted south(making it harder for enemies to hit you). After getting to A6 if you choose to push you have the choice of continuing if there is limited enemies of turning south the help take out enemies south of you.
The River Bank and River areas play virtually identical to team 1 except for the added D3/E3 hill that overlooks it. While team 1 does have a few hills to position on they aren’t that useful compared to team 2’s hill where 1-2 tanks can have great shots into these areas. Both areas are great for flanking after the initial few minutes but early on it is not wise to push to far into them.
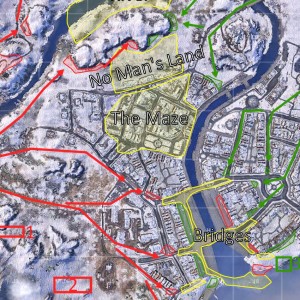
The main difference with these two areas on team 2 is that The Maze is much easier to get to since you have a ton of cover from this side. This is a more viable area for heavier tanks than the other side using this area since it is safer to get into. From here you can take shots into No Man’s Land if you head into the northern section of The Maze or if you push towards the river you have great shots into any enemies trying to cross the Bridges area(or unlucky SPGs).
Compared against team 1 this side of Windstorm has less cover and good positions for the town area around the “Bridges” area. It is easier for enemies to hit you while it is more difficult for you to side-scrape and fire at them safely. While it is harder to prevent the enemies from pushing across there are less routes once they cross to attack you which makes it slightly easier to defend(but in no way a piece of cake). It is also easier for this side to send lights/mediums/fast heavy tanks across to the enemy side to pin the enemy. The key for team 2 is to not allow the enemy to start to push across the crossings since once that happens it is easy to get pushed back, however if you get across the river first then you gain the upper hand since your poor positions don’t harm you as much.
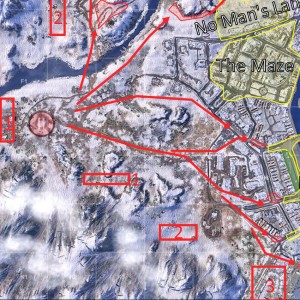
This side of Windstorm has more positions for artillery than team 1 since there is much more land to work with. Setting up in the south area of the map will give you better angles to hit enemies from the H line south in the town and also better angles on hitting enemies in the No Man’s Land area. Choosing to stick along the western edge of the map in the 1-3 lines you will have good shots into the G line in the southern town and so-so shots elsewhere on Windstorm.
Starting at the H3 location you can easily push to the second and third area if your team has a strong footing in the southern part of Windstorm. Just keep in mind that in the third area enemies can spot you if you are not careful if they are still across the river. Personally I prefer setting up in the south on team 2 since it provides great shots early on and is easier to get to. If you choose to start in G1 you have the option of moving north if your team falls in the south part of the map. Usually your shots moving north will not improve, but like team 1 this route is simply to keep you alive if the enemy is advancing towards your base.
 Weak Spot Guide: M6 - World of Tanks Guru
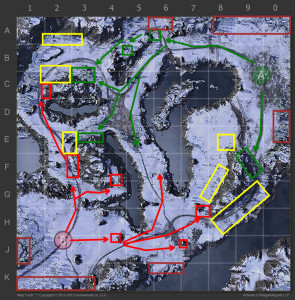 Map Strategy: Arctic Region - World of Tanks
 Weak Spot Guide: VK 4502 (P) Ausf. B - World of Tanks Guru
 Weak Spot Guide: Tiger I - World of Tanks Guru
 Map Strategy: Serene Coast - World of Tanks Guru