Arctic Region is the only completely winter/snow covered map in the game(others only have snow here and there). The map itself has a blend of safe arty cover defensive locations which allow tanks to duel it out but to get to these locations and/or advance from them you are exposing your flanks. There are only a few main routes to each base and attacking either the northwest/southeast defensive locations requires playing intelligent and securing both routes to assault the defenders.
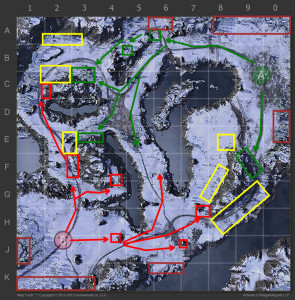
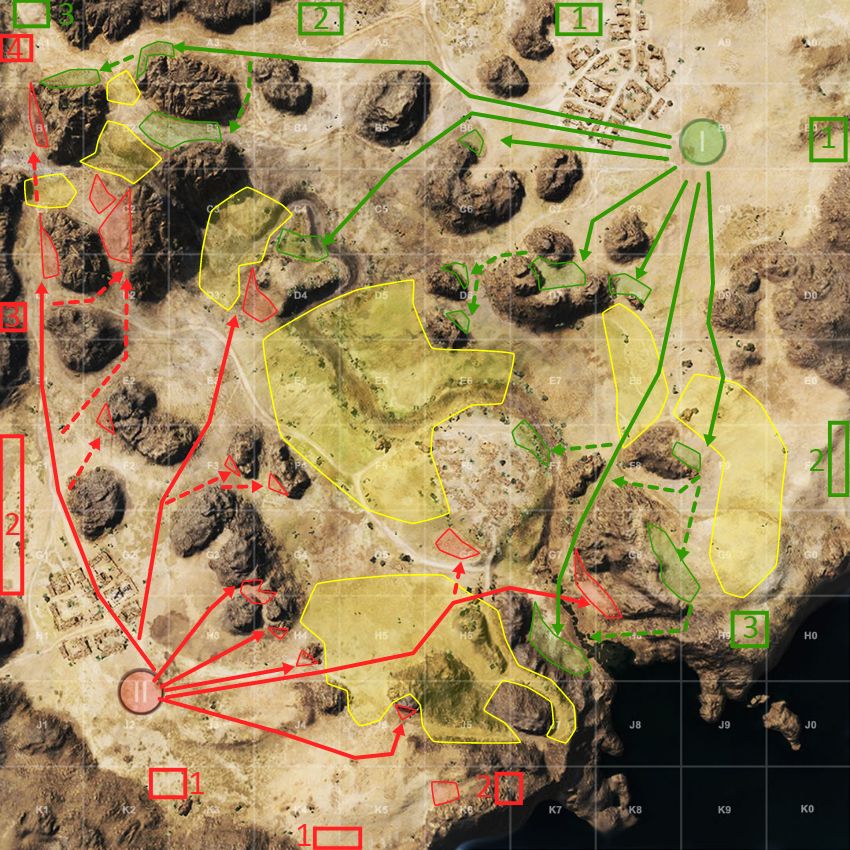
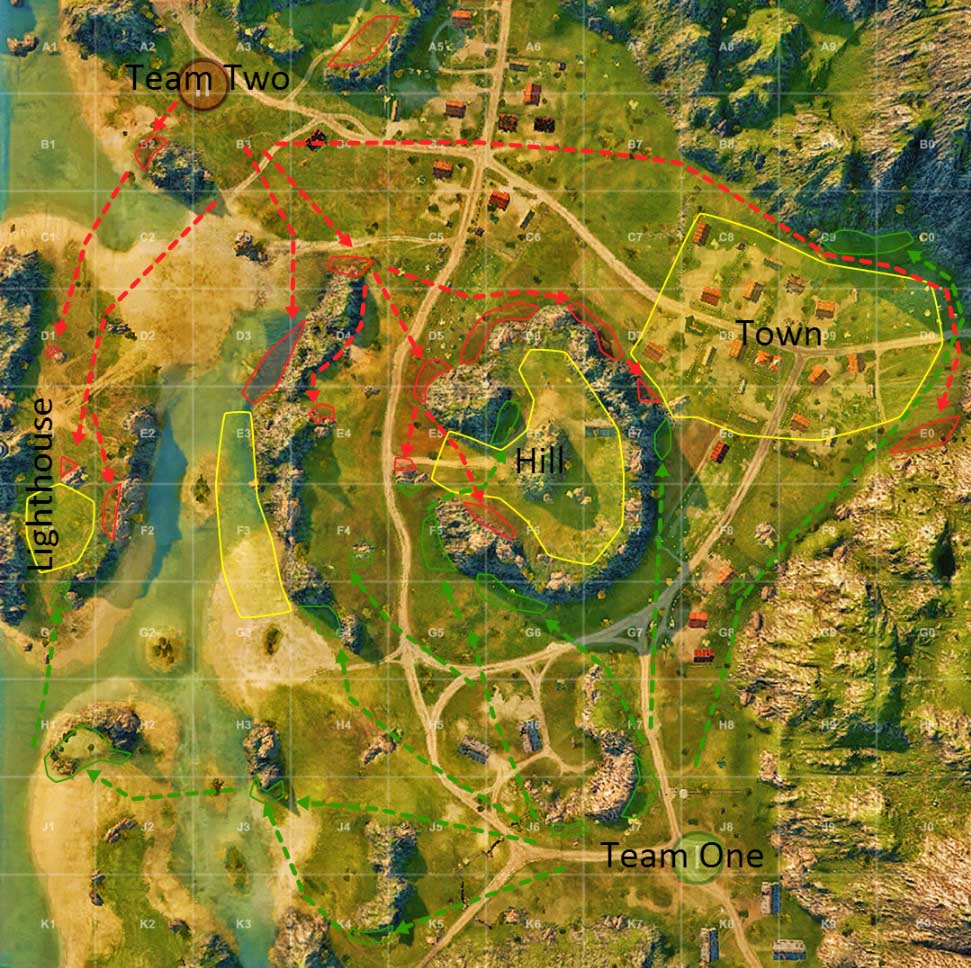
The red routes are initial routes/locations used for side two on the map while the green routes/locations are for side one. Yellow refers to “shared” locations that are typically engagement areas which are fought over by both teams. Solid routes are initial routes taken from the spawn to the front lines.
This map you see below was drawn up using MapTactic which is a very easy to use tool for making strategies for World of Tank maps. It works directly in your browser and has no cost to use it.
Looking at the map you will notice there are only two main passages into each base splitting the map into north and south. The map design makes the southern part easier to defend for both sides but difficult to advance through the open field areas if defenders are still present. On the northern part side 2(B) has more defensive locations than side 1 but both sides are best played aggressively since this part of the map rewards attacking.
Many players who head north from this side stop in B4/A5 area and stop. While stopping here is alright for a TD or tank looking to stay hidden and support both the north/F8 area it is not ideal to stop the main force. There is little safe arty cover here and you can be hit from multiple directions.
Pushing quickly through to C3 and engaging their tanks heading up the 1/2 line will stop them from getting a strong foothold up there. Faster tanks(or heavies with balls) can follow the route to E3. This area can engage enemies in the yellow outline there and also hit the C2 area where the enemies are stuck against your team’s other forces. Keep in mind this area can be hit from the F8 area and you will not be able to spot people there without backing up the E4.
Playing both the northern and central passages quickly and aggressively will have the enemies on their heels.
Defending the southern passage can be very easy or a lost cause. Setting up in F8/F9 at the top of the slope and watching the G9 bend is best for defenders. Your team should also have a few set up in E9 on that corner to prevent enemies from flanking you and/or spotting your SPGs in base.
A small force of tank can easily hold off a larger attacking force if set up on top of the slope. If your team pushed down into G9 and around the bend you will be at a disadvantage and be torn to shreds. Letting the enemy rush into your defense and then picking off the stragglers is the best way to go.
The only reason to push first is if your team decides to send 8+ tanks down here in which case you either take your chances pushing or wind up being surrounded in the end anyway.
I use this term loosely since the F9 is technically base defense but there are also the sniper locations in A6 and to an extent B4/B5. From these locations you can hit the E8/F8 areas and also prevent tanks from running through the B6 passage. Only 1-2 tanks should position here with good camouflage and accurate guns.
Scouting on this side leaves you with a few options. You can head to the C3 ridge and drive up it(entrance on the north side of C3 ridge) and spot into F2/G2/H1. Another spot is to go to E3 and play hide and seek and prevent their forces from making it to C2 uncontested.
One other more daring option is to head down the 5 line which is best left until later in the match. This is due to the F4 location being able to hit you along with the southern tanks. If you can make it to G5/G6 there are a small group of boulders to set up in.
SPG set up is pretty straight forward in the base with the A line or 0 line as options. The A line allows you to hit more areas but is more vulnerable than the D0/E0 locations. My favorite thing to do is to pre aim to E2/D1 and smack a tank with my first shot when a scout lights them up. It can drastically turn the tide of the northern fight.
The A5/A6 location is an alternate SPG location if the southern defense is not that strong. it will provide shots into both bases and also allow you to hit the backside of H7/H8.
Like side 1 this side requires the northern forces to play somewhat aggressively at the start or they will be in a bad situation. Making to C2 will allow your team to prevent the enemy from using the E3 location against you to pin your forces in F2. This side since it does not have as much SPG cover will need to push over to B4 before the slower heavy tanks of the enemy team make it that far preferably.
If the C2 force is pinned down then darting through the D/E line and flanking behind C3 can work wonders if you like to take chances.
The southern route of this side requires your team to push further than side 1 but provides a good amount of cover. Setting up in H7 and into H8 will provide cover from SPGs and allow you to hit any enemies pushing around the G9 corner. I would recommend not attacking F9 around the bend and instead focus on winning the E8 corner to force their hand.
The J7 rock is also a decent location for 1 tank that is not to large.
Side 2 has better base defense locations that provide cover and decent firing lines. The G4 location allows TDs and snipers to shoot into A5 and also E8/E9. The rocks located in H4/J4 are good “fall back” locations if a flank falls but as not useful to set up in initially.
Scouting on this side of the map is a bit more dangerous than the other side. As a scout you can chose the very popular but shortsighted suicide scouting of E8 which might light up SPGs. Moving up the 5/6 lines through the middle is slightly safer from this side and E5 provides decent cover…however making it out alive after getting there can be difficult.
One great spot is in E3/F3 on the ridge which small tanks can set up in at the start and spot anything from B5 west. Just remember to pull back if seen(sixth sense really helps here).
Much like side 1 there are two locations in base to set up in which provide various areas to aim at. Pre-aiming to B4/C4/D4 will allow you to hit people rushing. The K6 location is a bit more vulnerable and should only be used if the northern passage is being lost.
 World of Tanks Guide - M5 Stuart
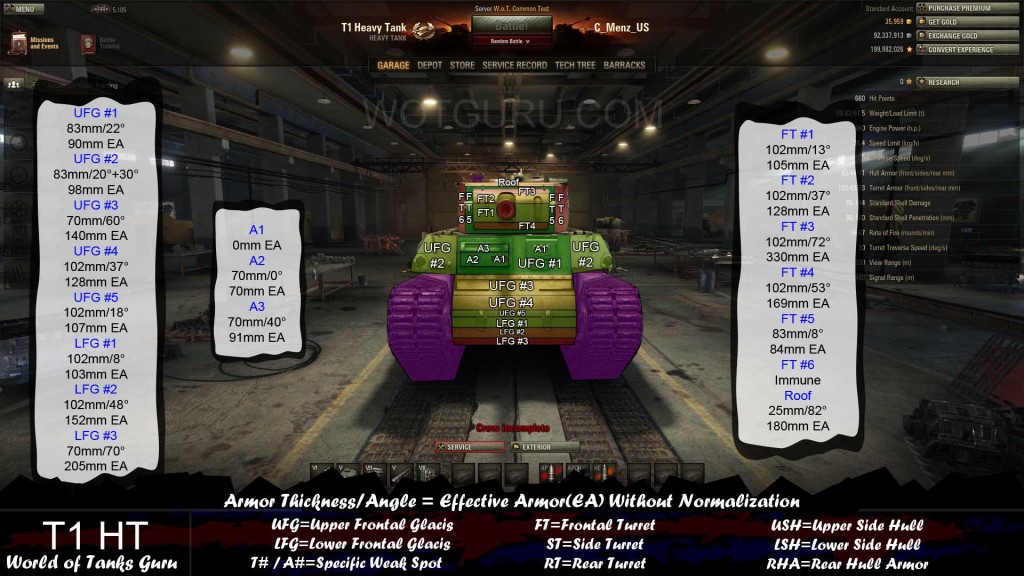 Weak Spot Guide: T1 Heavy Tank - World of Tanks Guru
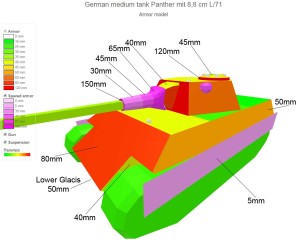 Tank Guide: Panther Mit 8.8 cm L/71 - World of Tanks Guru
 World of Tanks Guide - T1 Cunningham
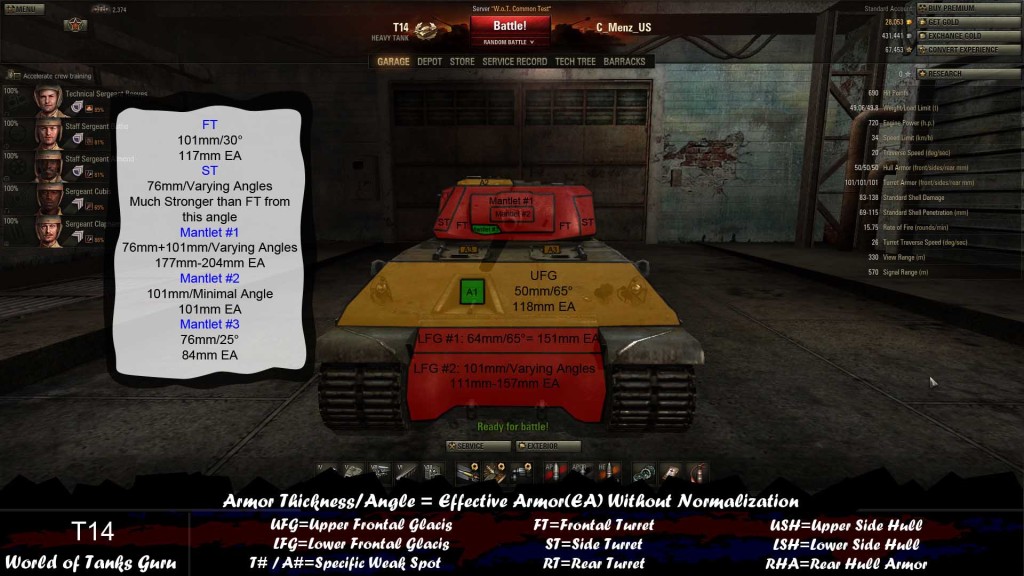 Weak Spots Guide: T14 - World of Tanks Guru