Airfield is a rather small map that caters not only to standard tanks but also to long range tanks/spgs. This is because Airfield is essentially split in two and down the center of the map are defined engagement areas that slow down the pace of the fight in most matches. This can be both good and bad for your team since Airfield usually ends up favoring the team that gets the first good punch in since it can easily snowball due to the small map size.
Usually most of the fighting occurs in the D6/E6 area and also around the beach/hill. Both areas are highly contested and also provide various flanking/over-watch locations which further complicates things. The A/B line is almost all mountains and although it looks tempting for a fast tank it is pointless to actually move above the D line aside from near the edges of the map. Overall Airfield is a map that rewards a team that can organize quickly to either dismantle an enemy push or to deal a quick blow usually in the D/E lines.
This map strategy will break down Airfield according to both teams and specific areas. Routes, tactics to use, and locations to go to will be gone over below. This guide was created using MapTactic.
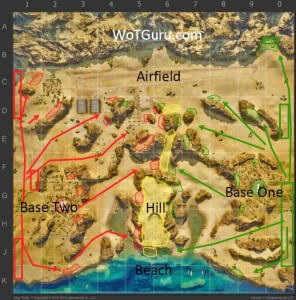
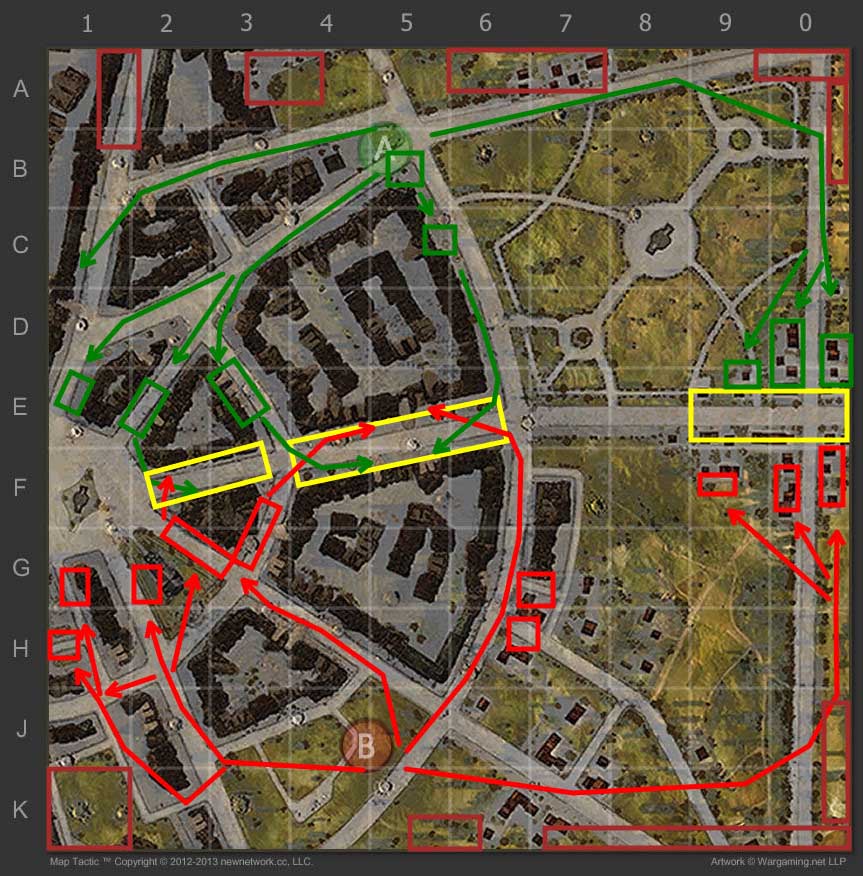
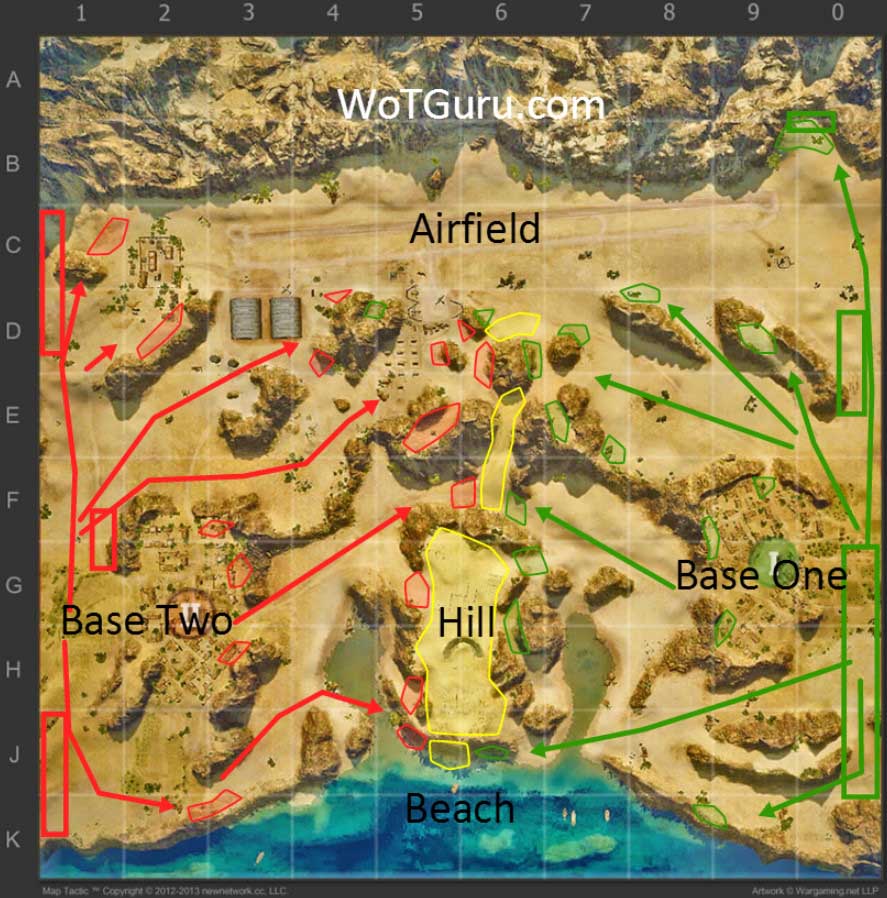 Looking at this full overview of Airfield you will notice that both sides have an equal footing and play very similarly with no distinct advantage for either side. The engagement areas(outlined in yellow) are located in the 5/6 lines and split the map in half which allows your team’s SPGs/support tanks to have some breathing room. While Airfield does come down to brute force in the grand scheme of things your SPGs and support tanks near the edge of the map/base can greatly change the tide of the battle if set up properly. At the same time if your team doesn’t have enough tanks in the center of the map to hold the enemy back then your team will quickly fall as a result.
If you are in a heavy tank/tank destroyer you should be in the front line period, unless you have very poor armor in which case setting up near the edge of the map to provide support fire works. Medium and light tanks should focus on the Hill area/E6/F6 area and also the northern spots on the edges of the map. Mobile tanks are great on this map later on in the match but in the beginning if you push across the dividing line you will die and you will die fast. SPGs have a choice of either staying in the south near the base or heading north along the edge of the map. Both areas provide great shots into the northern section of the map if you are either in the J/K area or B/C area. Avoid staying near the center since it limits your shot chances.
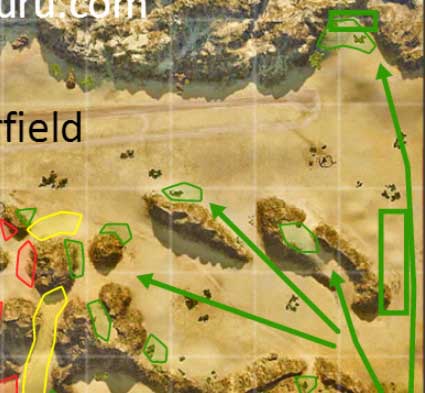
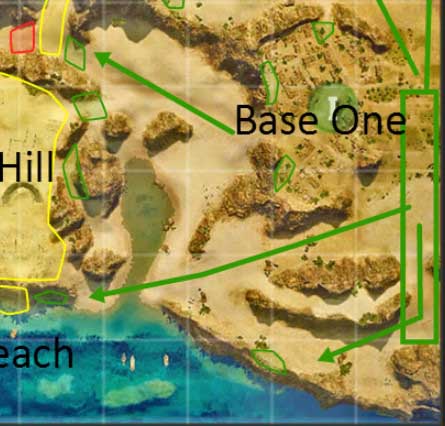
The northeast section of the map is where team one(green) starts close to and the bulk of the forces should be heading to the D7/E7 locations. Always have at least 1(no more than 2) support tanks in the B0 area at the top of this area. The two rocky outcrops sitting back from the front lines are less important and usually don’t provide as much of a tactical advantage as you might think. Either move up into the D7/E7 areas(on the left side of the area above) or far north to support.
Its important to stay in cover unless you have either great armor of help following. The enemy will be on the other side of those rocks dividing the map and it boils down to thinking smart and knowing when/where to peek out and get a shot off. B0 is great for hiding behind the shrubs located up there(sit far behind them to keep you from being spotted) since you can fire into the yellow area outlined in D6 and pick apart any enemies.
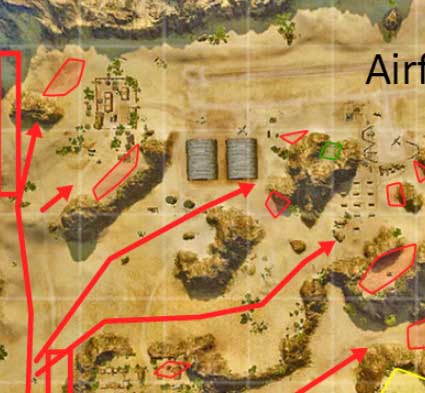
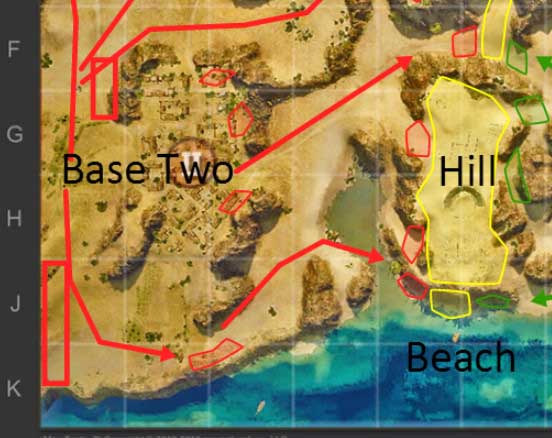
Much like the northeast section for team one the northwest section for team two pictured above here follows the same basic plan.
In C0 you have an over-watch point that if you stay far enough back can fire into enemy tanks advancing through the open area. However, it is slightly less effective than the B0 location due to the angle, thus it isn’t as important to exploit. Located on the ridge beneath it(to the left of the two warehouses) is a ridge that provides great shots across the entire northern area unlike team one’s rocky outcrops. The downside being that they only work if the enemy is either kept on their side of the map. This means that in no case should there be more than 3 tanks here and if there are your team will crumble.
Unlike the other team you also have locations located on the right side of the warehouses which also provide good shots at enemies pushing across the 6 line. While they aren’t very useful unless the enemy is advancing they do provide good spots for lower tier tanks and/or tanks with poor armor to pop out, fire, and then return to cover. And finally the locations on the right of this image above point out some of the locations for the forward tanks to set up.
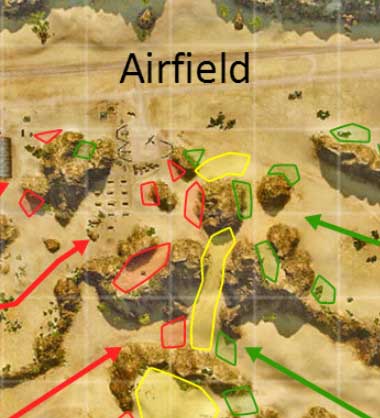
This view provides a close up of the center area in the north of the map. As you can see both teams have an equal footing and that the fighting is very close. Keep in mind that there is also the flanking route that connects to the center hill area and if that area isn’t guarded you can find yourself outnumbered/flanked very quickly.
The southern section of the map plays a bit differently than the northern section and the southeastern part of Airfield is the side where team one starts. First you have the base area with a ridge surrounding it and a lot of small destructible houses around the flag. For the most part you shouldn’t stick by the base unless if you are a SPG or the south is left unguarded(and thus you staying back makes more sense then dying further out alone). The beach area along the water is great for tanks with good frontal armor since both sides have support locations located further back to support the beach. Pushing here is hit or miss since it counts on you getting through the center area fast since SPGs can hit you here and also you need numbers on your enemies.
The hill located in the center is best for light tanks, mediums, and/or tanks with good gun depression. It isn’t a good idea to push onto the hill and stay there early on in the match since there is limited cover to protect yourself. For the most part the hill can usually be ignored if no enemies are on it and you should rather focus on the F6 location to push the crossover point to the north. This area is protected a bit better from outside shots and the incline is less meaning that more tanks with lower gun depression can do well here. Above all it gives a good flanking option to help out the northern area if need be.
Overall the southern/hill section doesn’t require as many tanks since it is easier to defend and even if enemies get through your team can easily recover by putting tanks along the E7 ridge and the base to stop their push. Usually lower tier tanks or light/mediums should patrol this area and leave the north to the heavy hitters.
Like the southeast the southwest plays almost identical for team two. Use the same tactics and strategy as above since both sides are almost mirror images of each other. The only significant difference is that on this side in J4 if any enemies get south of those two rocks they have decent cover compared to enemies pushing on the other side. In the end it doesn’t prove that valuable since they are stuck there but it does provide a different approach to defending since it can draw out an engagement.
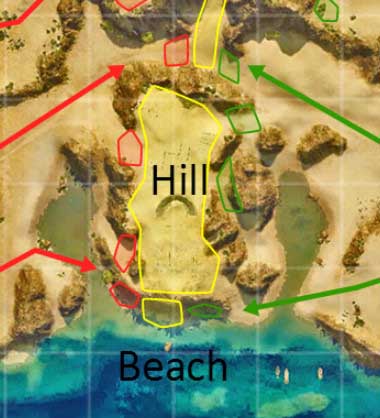
This provides a better view of the hill/beach area in the center of the map. Just like other parts of Airfield the center most area(in yellow) is neutral ground that is fought over. In this area you should expect to be shot at and staying in these areas will likely get you killed. Early on in the match it is best to pop in/out of these areas but as the match progresses these areas tend to become less dangerous since enemies will have given up looking at the hill for a cheap kill.
Since Airfield is small SPGs primarily stick to the edge of the map. Positioning boils down to how fast your SPG is and where you want to fire. For both sides if you set up towards the southern part of the map you have good shots into E6 where enemy tanks will set up thinking they are safe and also for hitting the southern part of the map. You give up however good shots into the F line, D line, and are open to enemies that potentially take the south very fast and spot you from the hill.
By setting up in the center(F1 for side two, D0 for side one) you have “ok” shots across the entire map but don’t expect to hit enemies if they are huddled up in the green areas next to the yellow engagement areas. This middle ground is good for hitting enemies trying to sit back further from the fight and any enemy pushes. And lastly are the northern most positions to set up which are my favorite. This is because they are used less often by most players and also that they give you a different angle enemies are not expecting SPG shells to come from. By setting up here you can hit any spots from the F line north very well and also any enemies near the bases. However, you give up shots in the center by the hill and beach.
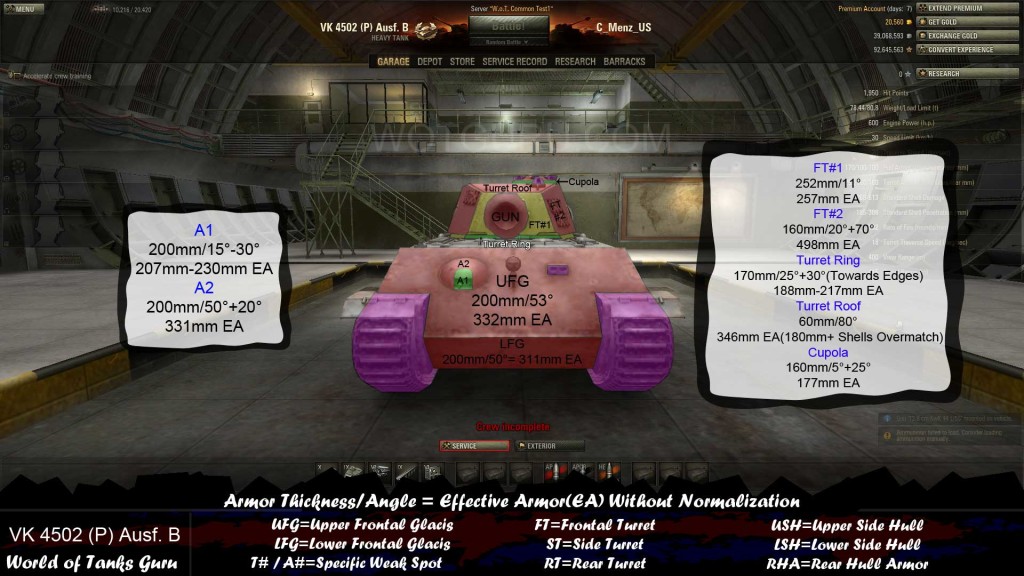 Weak Spot Guide: VK 4502 (P) Ausf. B - World of Tanks Guru
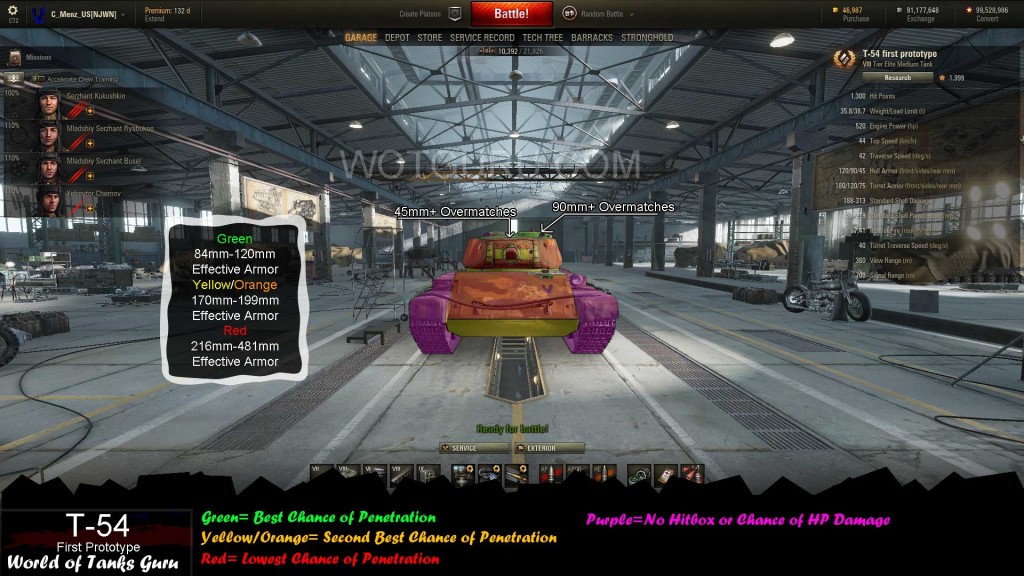 Weak Spot Guide: T-54 First Prototype - World of Tanks Guru
 Map Strategy: Mines - World of Tanks Guru
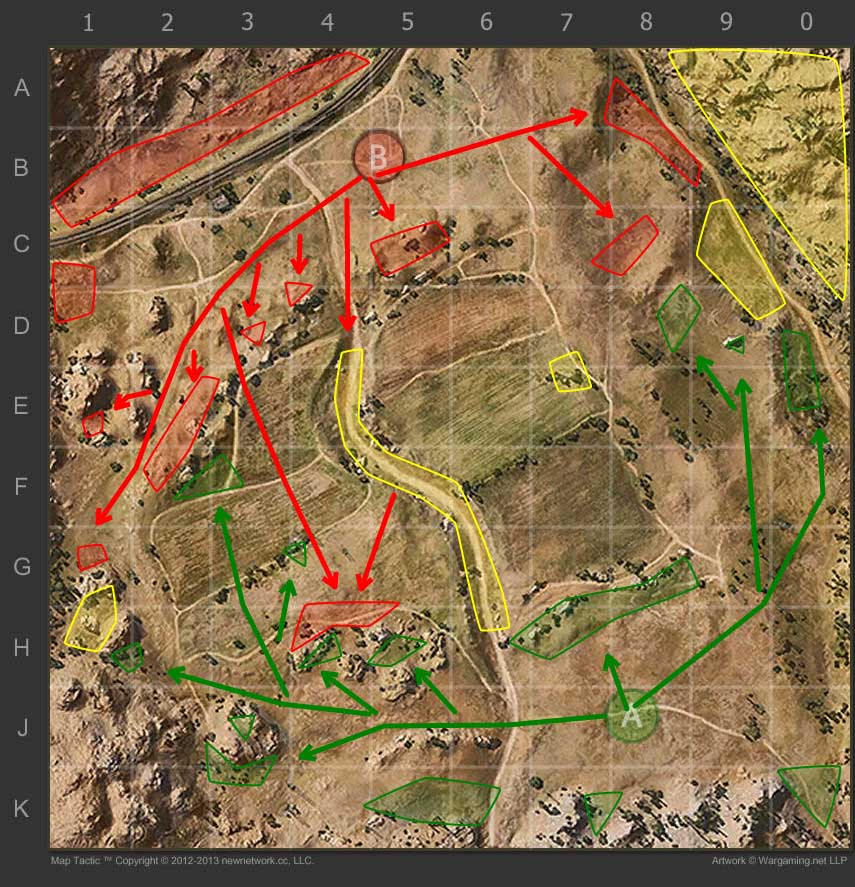 Map Strategy: Steppes - World of Tanks Guru
 Weak Spot Guide: FV215b - World of Tanks Guru