**This weak spot guide is outdated and the values on it are not correct. However, the general areas(color coded sections) still represent the strengths/weaknesses of the Super Pershing’s armor. So for now until I get around to updating it please disregard the values**
The T26E4 “Super Pershing” is a very interesting tank since although it is a medium tank it sports some nasty armor(frontally) that is very deceiving. If you go by the color indicators on your aiming circle it might be green since the outer layer of spaced armor is either 38mm on the frontal hull, 88mm over the mantlet, and 38mm on the turret sides however the combined armor is much greater. The T26E4 is a stock M26 Pershing for the hull and turret which overall isn’t that protected as it’s hull is only 102mm/76mm/51mm. The stock turret is also only 114mm(mantlet)/102mm(frontal turret)/76mm/76mm which is also not that great protection wise.
The T26E4 Super Pershing however adds two 38mm spaced armor plates onto the upper and lower glacis on the front of the tank. The turret also receives a 88mm plate over the front of the turret along with 38mm spaced armor plates covering the front portions of the side turret armor. This drastically increases the frontal armor of the hull and turret but leaves the sides/rear open to easy damage. Keep this in mind while fighting a Super Pershing since even though this guide will show you several useful weak spots it still might be a better option to pullback and flank at a later time.
The index at the bottom of each picture describes a few abbreviations used and also the format in which the armor details are described in. Effective Armor (EA) refers to the overall effectiveness of the armor without normalization(HEAT and HE shells) while Armor Against AP Shells (AP) refers to the overall effectiveness of the armor with normalization(AP and APCR Shells). The armor values are presented in three different scenarios for the angled view of the tank.15° frontal(75° side), 25° frontal(65° side), 35° frontal(55° side), and 45° frontal(45° side). For this guide also I am using “A#” for hull weak spots and “T#” for turret weak spots since there are much more than the usual tank.
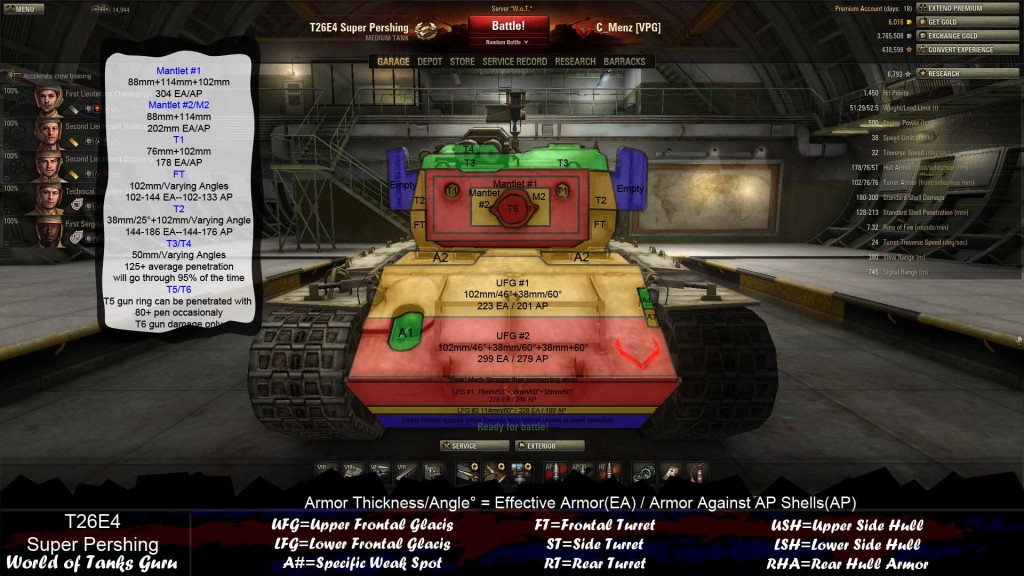
 The smaller picture below the normal frontal view shows the top of the turret and how the two large pistons on top are not part of the hit box. Frontally the T25E4 is a tough nut to crack when you are at mid to long range since it’s weak spots are rather tiny. At close range however the top of the turret and hull weak spots are easy to hit. Keep in mind that the LFG#2 location becomes “empty” when you are within 50m and can only be used if at a lower elevation or over 100m away.
UFG #1
The upper frontal glacis #1 consists of the 102mm/46° hull armor and one additional 38mm/60° spaced armor plate. This gives this area 223mm EA/201mm AP armor values.
UFG #2
The upper frontal glacis #2 is much tougher than the previous location with 102mm/46°+38mm/60°+38mm/60° armor which comes out to an impressive 299mm EA/279mm AP.
Beak
This portion of the frontal armor is much tougher than the surrounding armor and should be avoided.
LFG #1
Lower frontal glacis #1 is only marginally weaker than the toughest glacis plate. It consists of 76mm/53° hull armor with two additional 38mm/60° spaced armor plates giving it 278mm EA/246mm AP armor values.
LFG #2
At the very bottom of the lower frontal glacis the two spaced armor plates come into contact with the hull armor and form a small location that is 114mm/60° which while strong is weaker than the surrounding armor. It still has 228mm EA/199 AP and can only be used at mid to long range since as you get closer the area vanishes at close range due to the angle.
A1
The machine gun in the hull has less than 110mm of effective armor and can be easily damage.
A2
The sights on the hull can be damaged for module/crew damage but on level ground cannot be penetrated for damage due to the auto-bounce angle on the hull armor. If you are elevated above the SP slightly you can shoot down here for easy penetrating hits.
A3/A4
This small cut out near the headlight is somewhat tricky but still is a viable weak spot at close ranges. The A3 location is the 102mm hull armor and one 38mm spaced armor plate while the A4 area above it is only the 102mm hull armor.
Mantlet #1/Mantlet #2
The mantlet portion on the Super Pershing is very impressive as it consists of an outer 88mm plate with the 114mm mantlet and the 102mm frontal turret armor for the mantlet #1 location. However closer to the gun there is only the 88mm outer plate and the 114mm mantlet armor protecting this location as there is 0mm of armor behind the mantlet.
T1
This area of the mantler is 76mm+102mm which makes is rather weak but given it’s small size is very difficult to utilize.
FT/T2
The frontal turret armor is only 102mm and the outer portions covered by the spaced armor have a 38mm/25° plate added on top of them. I don’t recommend shooting here unless you can negate some of the angle as the angle is very steep towards the edges of the turret when facing forward. Aiming as closer as you can to the mantlet without hitting it works as well.
T3/T4
The top portion of the turret armor is only 50mm thick and has various angles on it making it hover around 120mm of effective armor.. The commander’s hatch up here is also very weak and capable of being damaged by any gun with over 120mm of penetration.
T5/T6
While the area “T5” can be penetrated and HP damage done it is very iffy and cannot be relied upon. If the ring around the gun is hit it is possible to do damage though. T6(the gun) only does module damage to the gun. Due to the randomness of these locations I listed them as red.
The smaller picture below the normal frontal view shows the top of the turret and how the two large pistons on top are not part of the hit box. Frontally the T25E4 is a tough nut to crack when you are at mid to long range since it’s weak spots are rather tiny. At close range however the top of the turret and hull weak spots are easy to hit. Keep in mind that the LFG#2 location becomes “empty” when you are within 50m and can only be used if at a lower elevation or over 100m away.
UFG #1
The upper frontal glacis #1 consists of the 102mm/46° hull armor and one additional 38mm/60° spaced armor plate. This gives this area 223mm EA/201mm AP armor values.
UFG #2
The upper frontal glacis #2 is much tougher than the previous location with 102mm/46°+38mm/60°+38mm/60° armor which comes out to an impressive 299mm EA/279mm AP.
Beak
This portion of the frontal armor is much tougher than the surrounding armor and should be avoided.
LFG #1
Lower frontal glacis #1 is only marginally weaker than the toughest glacis plate. It consists of 76mm/53° hull armor with two additional 38mm/60° spaced armor plates giving it 278mm EA/246mm AP armor values.
LFG #2
At the very bottom of the lower frontal glacis the two spaced armor plates come into contact with the hull armor and form a small location that is 114mm/60° which while strong is weaker than the surrounding armor. It still has 228mm EA/199 AP and can only be used at mid to long range since as you get closer the area vanishes at close range due to the angle.
A1
The machine gun in the hull has less than 110mm of effective armor and can be easily damage.
A2
The sights on the hull can be damaged for module/crew damage but on level ground cannot be penetrated for damage due to the auto-bounce angle on the hull armor. If you are elevated above the SP slightly you can shoot down here for easy penetrating hits.
A3/A4
This small cut out near the headlight is somewhat tricky but still is a viable weak spot at close ranges. The A3 location is the 102mm hull armor and one 38mm spaced armor plate while the A4 area above it is only the 102mm hull armor.
Mantlet #1/Mantlet #2
The mantlet portion on the Super Pershing is very impressive as it consists of an outer 88mm plate with the 114mm mantlet and the 102mm frontal turret armor for the mantlet #1 location. However closer to the gun there is only the 88mm outer plate and the 114mm mantlet armor protecting this location as there is 0mm of armor behind the mantlet.
T1
This area of the mantler is 76mm+102mm which makes is rather weak but given it’s small size is very difficult to utilize.
FT/T2
The frontal turret armor is only 102mm and the outer portions covered by the spaced armor have a 38mm/25° plate added on top of them. I don’t recommend shooting here unless you can negate some of the angle as the angle is very steep towards the edges of the turret when facing forward. Aiming as closer as you can to the mantlet without hitting it works as well.
T3/T4
The top portion of the turret armor is only 50mm thick and has various angles on it making it hover around 120mm of effective armor.. The commander’s hatch up here is also very weak and capable of being damaged by any gun with over 120mm of penetration.
T5/T6
While the area “T5” can be penetrated and HP damage done it is very iffy and cannot be relied upon. If the ring around the gun is hit it is possible to do damage though. T6(the gun) only does module damage to the gun. Due to the randomness of these locations I listed them as red.
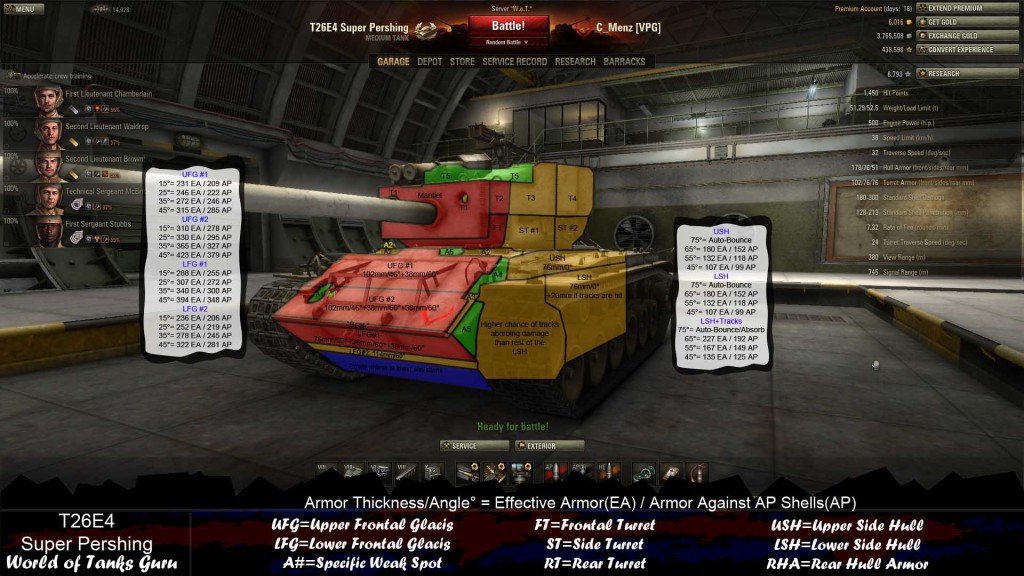 Once the Super Pershing angles you will want to avoid the frontal armor completely. Stick to the top of the turret and side hull armor for the most part.
UFG #1
This area from the front was a viable weak spot for a lot of tanks facing the SP. However with additional angles it becomes very tough.
15°= 231 EA / 209 AP
25°= 246 EA / 222 AP
35°= 272 EA / 246 AP
45°= 315 EA / 285 AP
UFG #2
Avoid this area at all costs.
15°= 310 EA / 278 AP
25°= 330 EA / 295 AP
35°= 365 EA / 327 AP
45°= 423 EA / 379 AP
LFG #1
Same as the UFG #2…Avoid shooting here
15°= 288 EA / 255 AP
25°= 307 EA / 272 AP
35°= 340 EA / 300 AP
45°= 394 EA / 348 AP
LFG #2
Only shoot here as a last resort since the side hull or top turret sections are usually better options
15°= 236 EA / 206 AP
25°= 252 EA / 219 AP
35°= 278 EA / 245 AP
45°= 322 EA / 281 AP
USH
With the upper side hull only being 76mm/0° it is rather weak once it drops below the 70° auto-bounce angle.
75°= Auto-Bounce
65°= 180 EA / 152 AP
55°= 132 EA / 118 AP
45°= 107 EA / 99 AP
LSH
Much like the USH this area is weak but the high possibility of the tracks being hit makes it much tougher to damage than the armor above.
75°= Auto-Bounce
65°= 180 EA / 152 AP
55°= 132 EA / 118 AP
45°= 107 EA / 99 AP
LSH+Tracks
75°=Auto-Bounce/Absorb
65°= 227 EA / 192 AP
55°= 167 EA / 149 AP
45°= 135 EA / 125 AP
A1/A2
Both the machine gun in the hull(A1) and the sights remain from the frontal view and can be used although depending on the angle may be very difficult to hit.
A3
This portion near the headlight is now more visible as the Super Pershing angles and consists of the 102mm/46° hull armor and one 38mm/60° spaced armor plate making it as strong as the UFG #1.
A4/A5
Both the A4 and A5 areas only consist of the 102mm hull armor and are very easy to damage if you avoid shooting the area around them.
A6
This portion just below the turret becomes very flat as the Super Pershing angles and is easily damaged by guns with 140mm+ average penetration.
Mantlet/T1
Avoid shooting the mantlet if the turret is angled in anyway.
FT/T2
As the turret angles these areas become much tougher due to their thickness and should be avoided.
ST #1/ST #2
The side turret armor on the Super Pershing is only 76mm thick with slight angles meaning that if you can hit them they resemble the armor values found on the USH listed above.
T3/T4
T3 and T4 consist of the 76mm side armor along with an additional 38mm of spaced armor. This still is rather weak if the angle is not to steep.
T5
The top of the turret still remains a prime weak spot even with additional angles added.
Once the Super Pershing angles you will want to avoid the frontal armor completely. Stick to the top of the turret and side hull armor for the most part.
UFG #1
This area from the front was a viable weak spot for a lot of tanks facing the SP. However with additional angles it becomes very tough.
15°= 231 EA / 209 AP
25°= 246 EA / 222 AP
35°= 272 EA / 246 AP
45°= 315 EA / 285 AP
UFG #2
Avoid this area at all costs.
15°= 310 EA / 278 AP
25°= 330 EA / 295 AP
35°= 365 EA / 327 AP
45°= 423 EA / 379 AP
LFG #1
Same as the UFG #2…Avoid shooting here
15°= 288 EA / 255 AP
25°= 307 EA / 272 AP
35°= 340 EA / 300 AP
45°= 394 EA / 348 AP
LFG #2
Only shoot here as a last resort since the side hull or top turret sections are usually better options
15°= 236 EA / 206 AP
25°= 252 EA / 219 AP
35°= 278 EA / 245 AP
45°= 322 EA / 281 AP
USH
With the upper side hull only being 76mm/0° it is rather weak once it drops below the 70° auto-bounce angle.
75°= Auto-Bounce
65°= 180 EA / 152 AP
55°= 132 EA / 118 AP
45°= 107 EA / 99 AP
LSH
Much like the USH this area is weak but the high possibility of the tracks being hit makes it much tougher to damage than the armor above.
75°= Auto-Bounce
65°= 180 EA / 152 AP
55°= 132 EA / 118 AP
45°= 107 EA / 99 AP
LSH+Tracks
75°=Auto-Bounce/Absorb
65°= 227 EA / 192 AP
55°= 167 EA / 149 AP
45°= 135 EA / 125 AP
A1/A2
Both the machine gun in the hull(A1) and the sights remain from the frontal view and can be used although depending on the angle may be very difficult to hit.
A3
This portion near the headlight is now more visible as the Super Pershing angles and consists of the 102mm/46° hull armor and one 38mm/60° spaced armor plate making it as strong as the UFG #1.
A4/A5
Both the A4 and A5 areas only consist of the 102mm hull armor and are very easy to damage if you avoid shooting the area around them.
A6
This portion just below the turret becomes very flat as the Super Pershing angles and is easily damaged by guns with 140mm+ average penetration.
Mantlet/T1
Avoid shooting the mantlet if the turret is angled in anyway.
FT/T2
As the turret angles these areas become much tougher due to their thickness and should be avoided.
ST #1/ST #2
The side turret armor on the Super Pershing is only 76mm thick with slight angles meaning that if you can hit them they resemble the armor values found on the USH listed above.
T3/T4
T3 and T4 consist of the 76mm side armor along with an additional 38mm of spaced armor. This still is rather weak if the angle is not to steep.
T5
The top of the turret still remains a prime weak spot even with additional angles added.
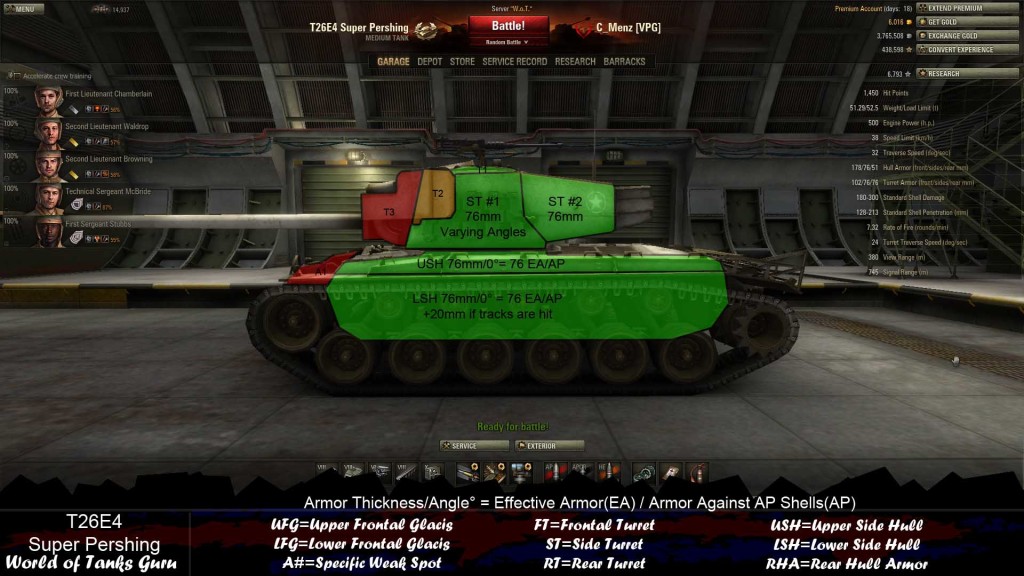 The horror is over! Once the side armor is exposed the T26E4 Super Pershing is extremely vulnerable. As long as you aim the frontal portions of armor still visible from the side you will be alright.
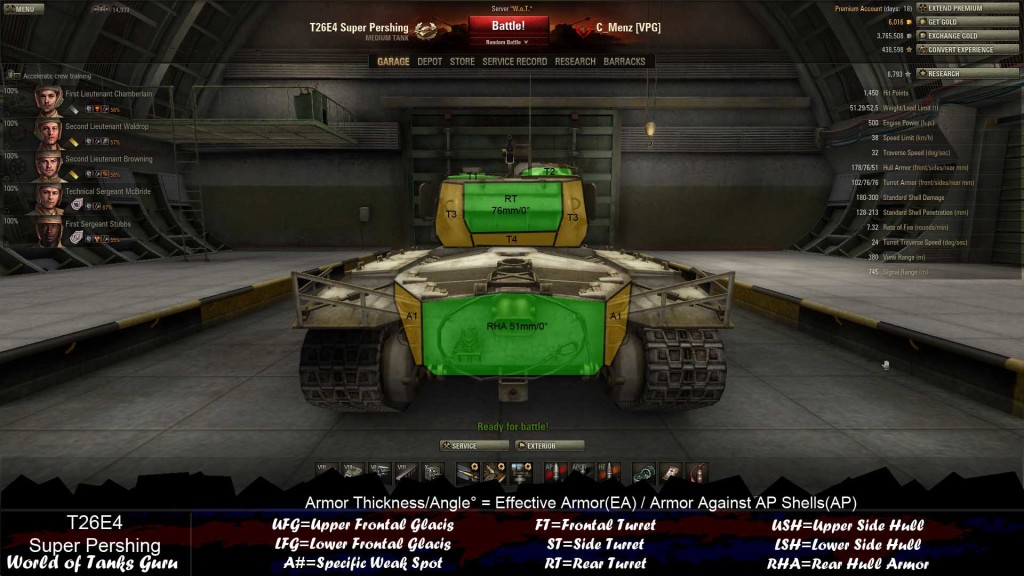 Much like the side of the T26E4 Super Pershing the rear of the tank is not very difficult to deal with. The only issues are if you have low penetration and hit the yellow/oranges areas shown here as the angles there can cause bounces. Other than that fire away!


 Weak Spots Guide: Type 59 - World of Tanks Guru
 World of Tanks Guide - Churchill I
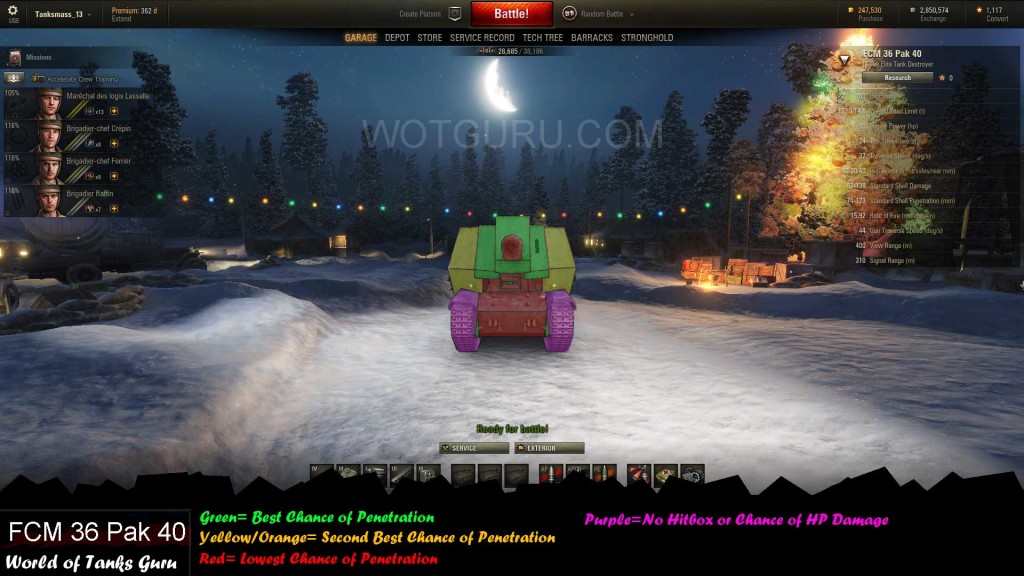
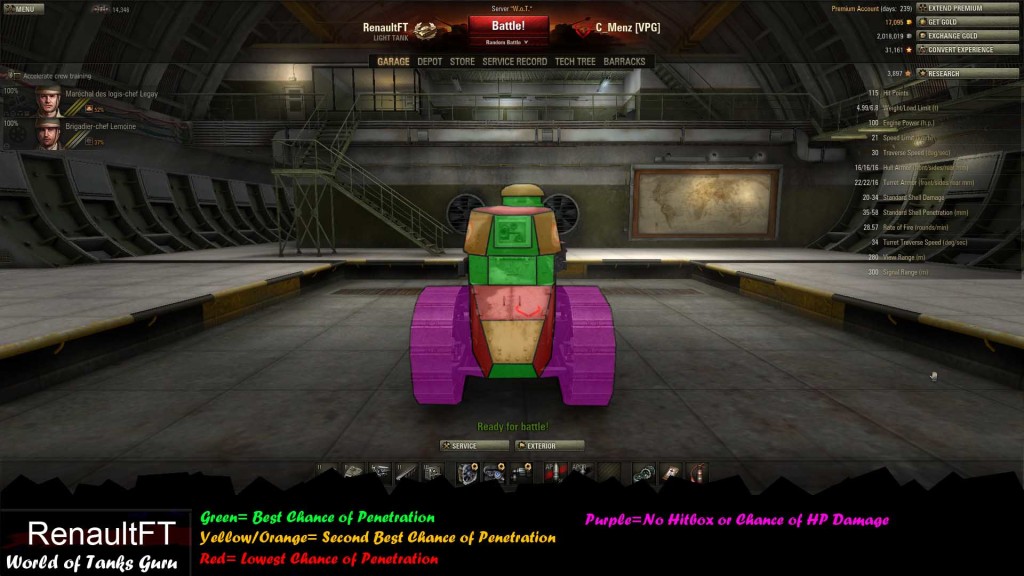 Weak Spot Guide: Renault FT
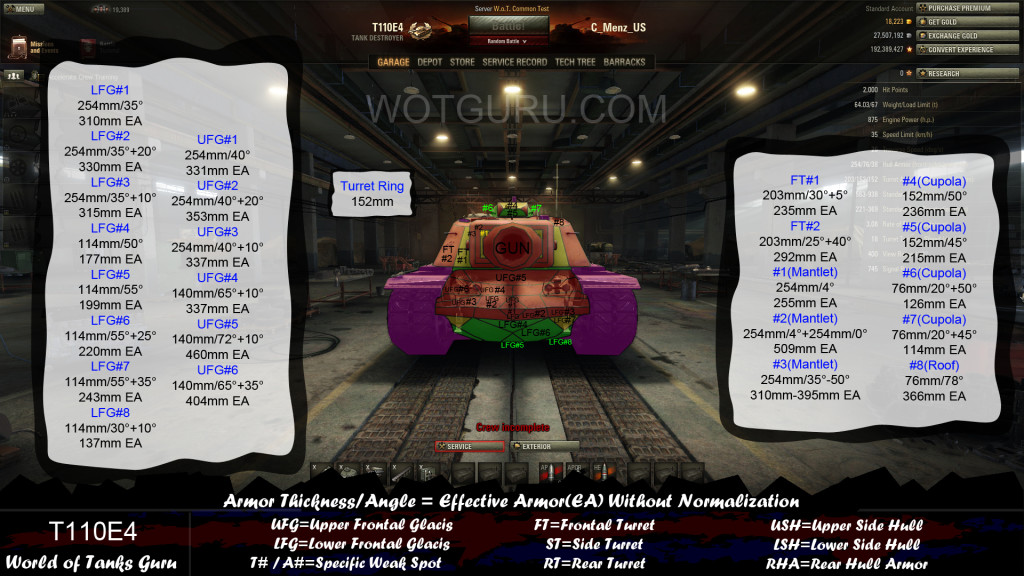 Weak Spot Guide: T110E4 - World of Tanks Guru
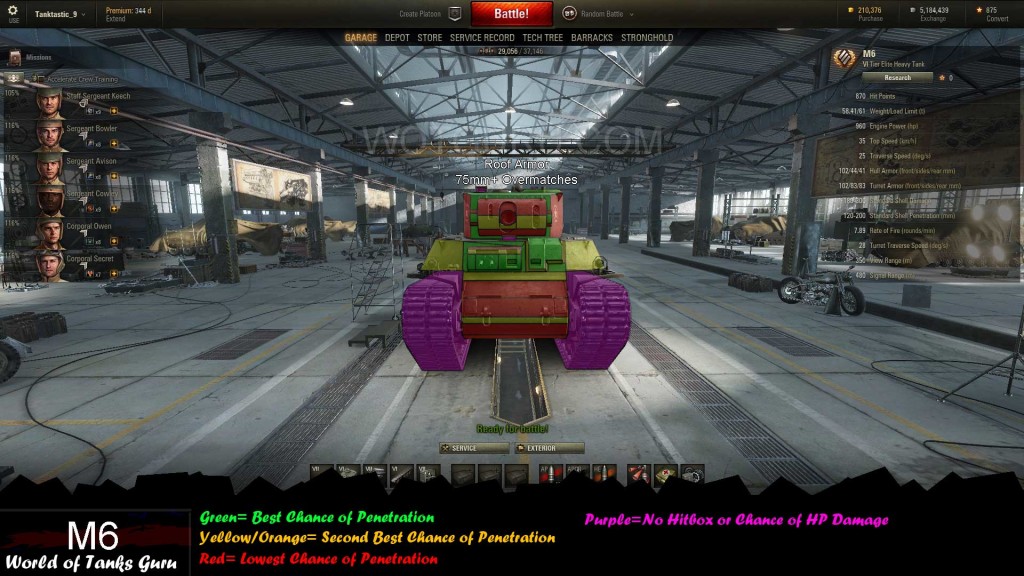 Weak Spot Guide: M6 - World of Tanks Guru