The tier 10 American tank destroyer T110E4 might not share the same overwhelming armor that it’s counterpart T110E3 has, but it does have quite a bit of armor that can prove to be difficult to penetrate from the front. While the T110E3, T110E4, and T110E5 all share the same “egg shell” shaped hull the angles on the hull differ slightly from tank to tank making their armor schemes differ slightly.
The index at the bottom of each picture describes a few abbreviations used and also the format in which the armor details are described in. Effective Armor (EA) refers to the overall effectiveness of the armor without normalization. I apologize for the small font size for some areas but due to the nature of taking screenshots and not being able to zoom in on some areas(without having a ton of individual pictures) I did my best to fit them into one frontal view. The UFG(Upper Frontal Glacis) sections are below the turret, LFG(Lower Frontal Glacis) is below the UFG, and the numbered areas are found on the turret/cupola areas of the T110E4.
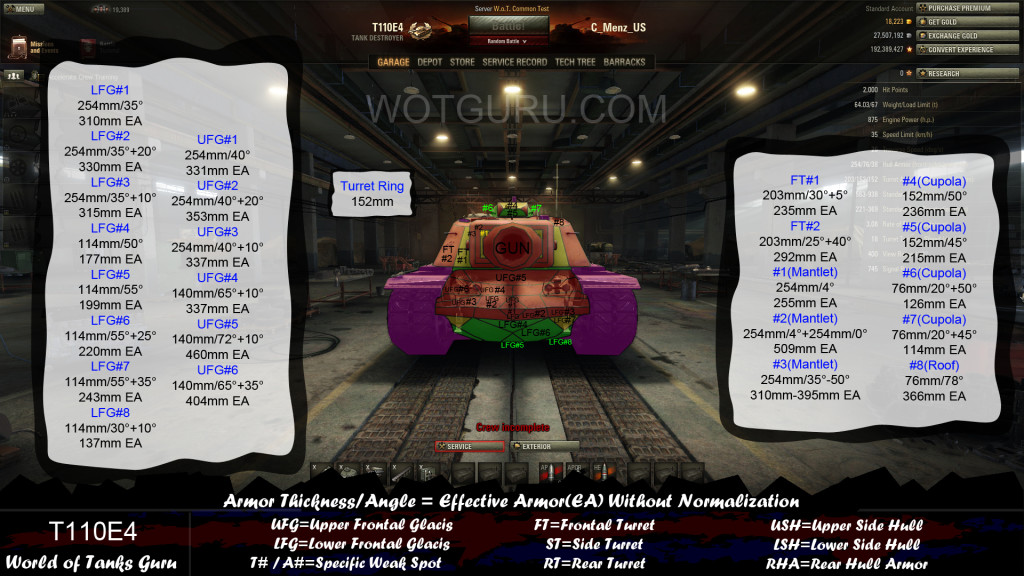
Frontally the T110E4 has a considerable amount of armor if you do not aim well and hit the stronger portions of it’s armor. Like other T110 series tanks it’s lower glacis is a prime weak spot that for the most part is very weak for most tanks that are facing the T110E4. Unlike the T110E4 the armor actually gets a touch stronger the closer to the tracks you go and instead you should shoot at the part towards the center of the lower glacis. The upper glacis should be avoided at all costs unless you are firing down into it to negate that high angle.
Just below the turret is a turret ring that is weak since it is only 152mm and shells can get “trapped” and hit it since the turret and hull leave a decent gap between the two. The turret itself is dominated by a very large mantlet that makes it look very difficult to penetrate, however if you know where to aim you can go through it with most tier 10 tanks. Avoid hitting the gun but in the area #1 on the mantlet it is simply a flat piece of 254mm armor but do not stray close to the edges where it is immune to anything thrown at it in areas #2/#3. The actual frontal turret area is weakest near the mantlet and gets stronger towards the edges due to the increased angled.
The top of the turret has a weaker cupola than the T110E3 by a significant margin. Avoid hitting the small red areas that are highly angled between the sections listed on the cupola and you should be fine damaging this area of the T110E4. Finally comes the roof armor in area #8 which is 76mm thick making it unable to be over matched by pretty much all guns in the game and due to the high angle it is very strong.
For now there are no views of the side/rear/angled since I wanted to get the finished frontal view out quickly. However, you can use the views available for the T110E3 since they are very similar aside from the turret on the T110E4 is different than the superstructure of the T110E3. The T110E4’s turret sides are not very strong since they are not angled well and shouldn’t pose an issue unless you are in a tier 8 tank at times.

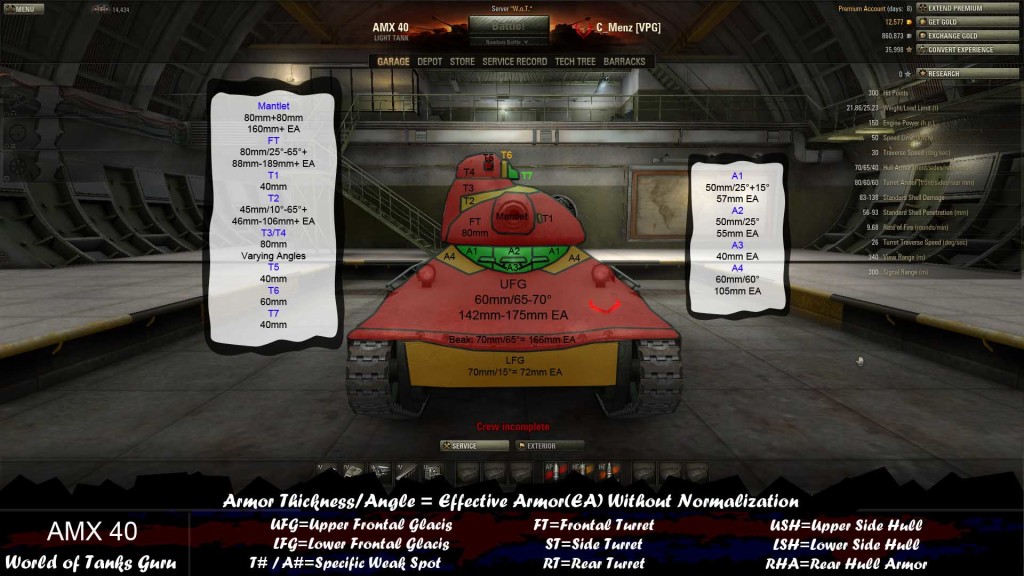 Weak Spot Guide: AMX 40 - World of Tanks GuruWeak Spot Guide: IS - World of Tanks Guru
 Map Strategy: Prokhorovka - World of Tanks Guru
 Weak Spot Guide: T95 - World of Tanks Guru
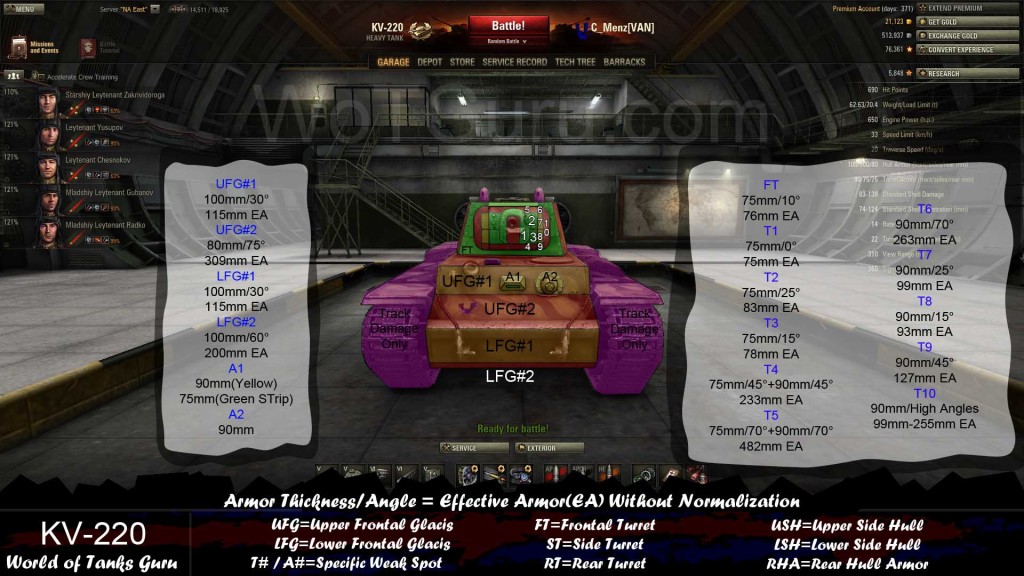 Weak Spot Guide: KV-220 - World of Tanks Guru