The IS-4’s armor at first glance seems like it is listed incorrectly in-game since the frontal armor is actually thinner than the side armor. While this might be the case the frontal armor is still very difficult to deal with and a good IS-4 driver will know how to properly angle their tank to make damaging them very difficult if you don’t know where to shoot. Against tier 10 tanks the IS-4 might be slightly lacking(especially against premium rounds) but it’s armor is above average around the entire tank making it the Russian “Maus” of the end tier tanks.
The index at the bottom of each picture describes a few abbreviations used and also the format in which the armor details are described in. Effective Armor (EA) refers to the overall effectiveness of the armor without normalization.
The armor values are presented in three different scenarios for the angled view of the tank.15° frontal(75° side), 25° frontal(65° side), 35° frontal(55° side), and 45° frontal(45° side).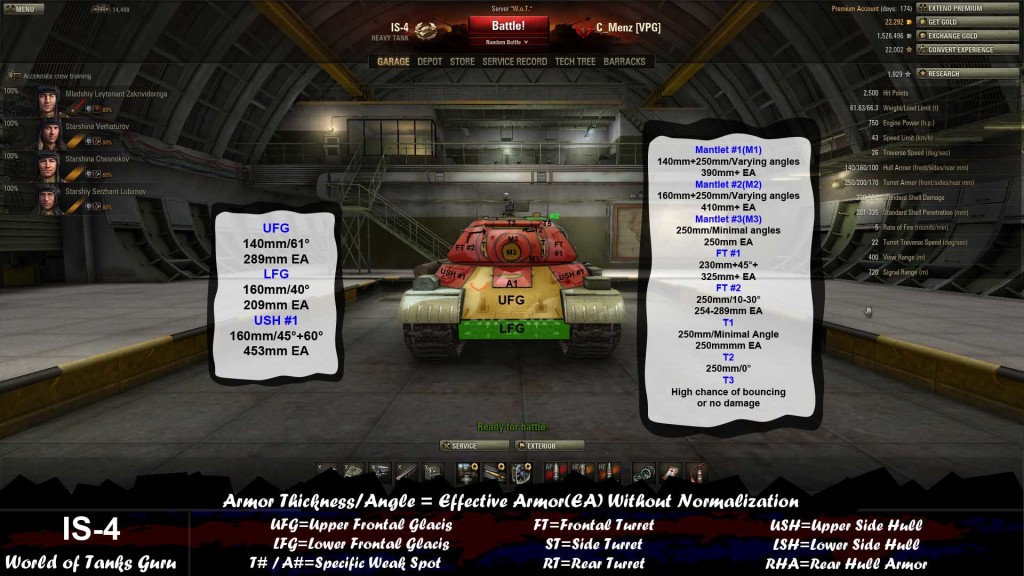
Frontally the IS-4 is no slouch when it comes to armor. While it’s upper frontal glacis(UFG) can be damaged by T10 tanks(especially at close range) it still provides adequate protection. The lower frontal glacis(LFG) however is the main weak spot at 30m+ but at far distances can be difficult to hit.
UFG
The upper frontal glacis on the IS-4 is 140mm thick at 61° making it 289 EA / 250 AP. This gives it great protection against T9 and lower tanks and can bounce T10 rounds on occasion if they are using standard rounds. At close range(sub 30m) you start to negate the angle on the UFG and it becomes easier to damage.
LFG
The lower frontal glacis is thicker than the UFG at 160mm but is only at 40°. This drops it’s effective armor to 209mm and it’s armor against AP rounds to 195mm. The main issue with hitting this at mid range is that it is not that large of a target so make sure you aim well. At close range(sub 30m) the angle starts to increase the closer you get and actually becomes stronger than the UFG.
USH #1
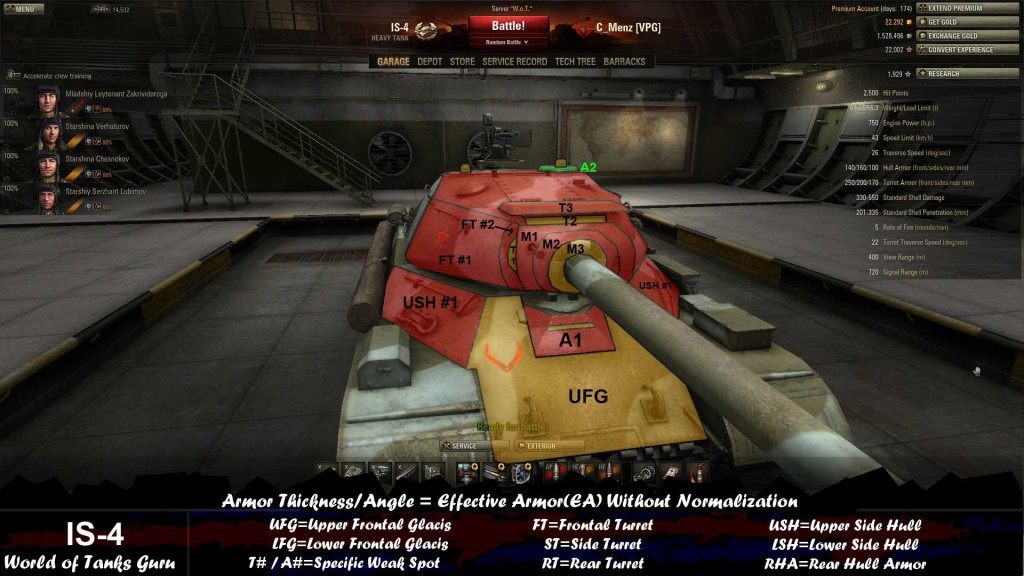
The “cheeks” of the IS-4 or as I will call it the USH #1(upper side hull) is the strongest part of the hull when facing head on. This area is 160mm and has both a 45° angle vertically and a 60° angle horizontally. The 45° angle does slowly turn into 40° further towards the sides. Head on the armor values are 453 EA / 394 AP making it almost impossible to damage.
A1
The old driver’s slit is now covered up with an armor plate. The 0 armor driver’s slit is still located behind it(and is very small) and is not worth trying to aim for it. The armor plate here is 200mm thick with additional 140mm UFG armor behind it. Just avoid shooting here since it is no longer worth it.
Mantlet #1/#2/#3
The mantlet area of the IS-4 is extremely tough and should be avoided. Here are the values for each area however.. Mantlet #1 consists of the 250mm turret face along with a 140mm thick mantlet plate on top. Mantlet #2 gets even more difficult with the 250mm turret face plus a 160mm mantlet plate on top. The disk surrounding the gun only consists of a 250mm mantlet plate with 0 armor behind it making it the “weakest” but is only damageable if you do not hit the gun.
FT #1/#2
Frontal turret #1 consists of the 250mm frontal armor and is sloped at 45° and above. This gives this area 325+ EA / 300+ AP and is tough to damage. Frontal turret #2 surrounding the mantlet is also 250mm thick but is only at 10°-30° making it slightly weaker at 254-289 EA / 251-276 AP.
T1/T2/T3
T1 is located in the FT #2 area just outside the mantlet located in the center of the turret. This area is 250mm but has minimal angles on it making it closer to 250 EA/AP than FT #2. T2 is just above the mantlet but below the roof armor and is 250mm at 0°.
T3 is not in the hitbox and has no armor value. However shooting here you will be hitting the roof armor behind it which is 50mm. At long range your shells will bounce off due to the very high angle(or if your tank is shorter than the IS-4. At close range however in a tall tank like a E-100 you can aim down and shoot into this spot and do damage.
A2
The commander’s hatch on the IS-4 is protected by 140mm of armor. Avoid hitting the sights!
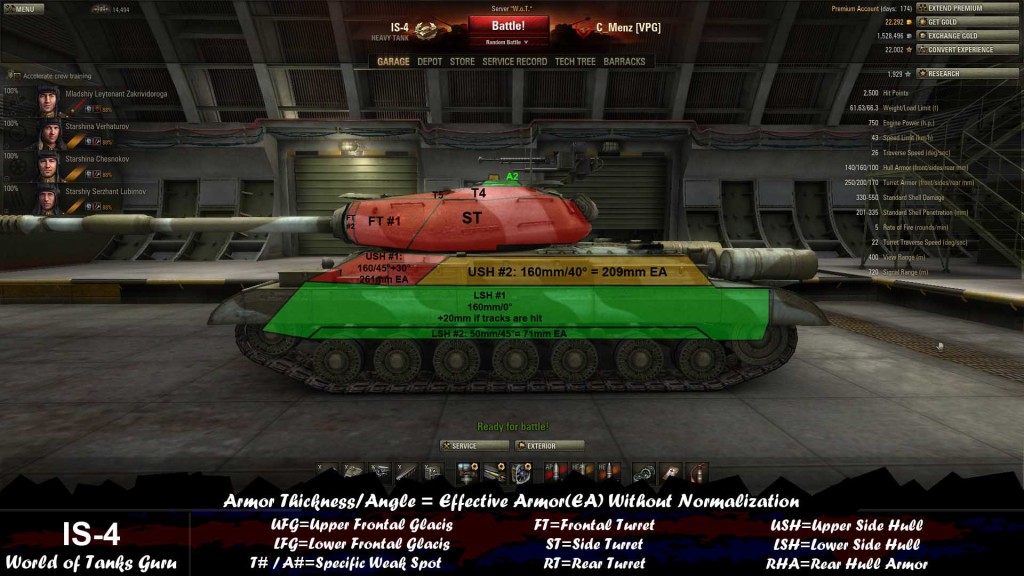
While weaker than the frontal armor the IS-4 sides still pose a challenge to a lot of tanks facing it.
USH #1
Much like the frontal view this area is very tough to damage compared to the rest of the side armor. It is 160mm at 45°+30° making it 261 EA / 241 AP.
USH #2
The remaining part of the upper side hull is still 160mm but only has a 40° angle on it. This makes it 209 EA / 195 AP.
LSH #1
The lower side hull unlike a lot of other tanks still retains the USH’s thickness at 160mm. It however has no angle on it making it much weaker. If the tracks are hit they add 20mm of armor.
LSH #2
At the very bottom of the lower side hull there is a 50mm section of armor at 45° running along most of the bottom. This area is extremely vulnerable at 71 EA / 65 AP(+20mm if tracks are hit) and can be used if you aim well enough. Shorter tanks up close can exploit this if you are having trouble penning the rest of the side armor.
FT #1 /FT #2/ ST
The FT section is still visible from the side and should be avoided. Both sections are 250mm minimal with added angles on them making it very tough to damage. The ST armor is slightly easier at 200mm thick with small angles added onto it but still is tough for sub 240mm pen guns.
T5/T6/A2
T5 is a 75mm section of the roof armor at a very steep angle. Shooting here is not advised unless you are firing down upon it. T6 shares the 140mm armor value of the A2 commander’s hatch. The angle here is between 40°-60° which gives it a great deal of protection. Taller tanks can use this spot however shooting down into it to assure that they do not miss the A2 hatch.
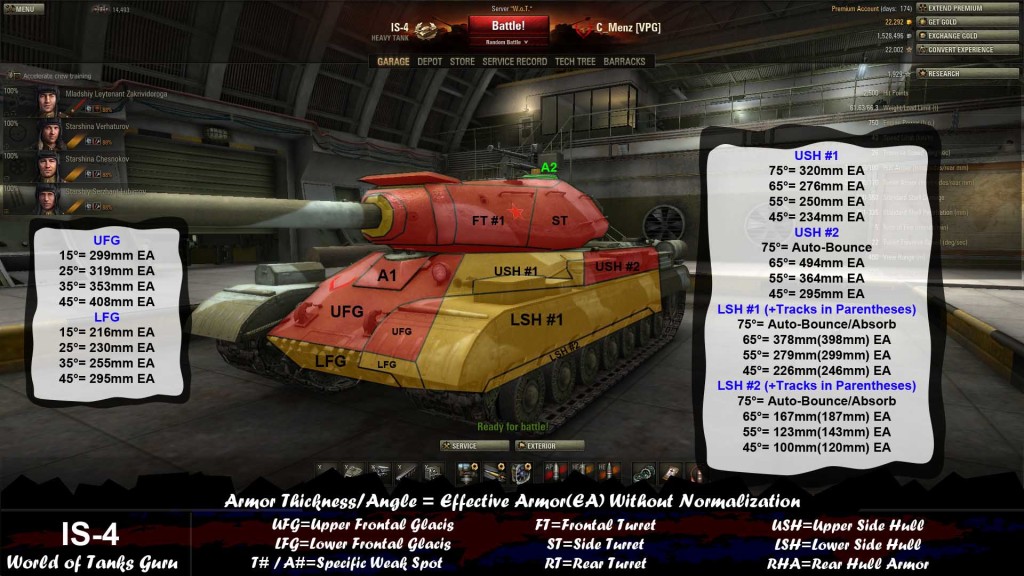
An angled IS-4 can be a very tough opponent to deal with and especially for lower tiered tanks. Just remember to aim at the flattest available armor and if you still aren’t penetrating then run away! Specific armor values can be found in the image above.
UFG/LFG/A1
Once a IS-4 angles the entire frontal section becomes very difficult to damage or immune to incoming fire. The UFG and A1 area become it’s strongest point. The LFG as a weak spot is still there for high penetrating guns but becomes immune against lower tiered tanks.
USH #1/USH #2
As the IS-4 angles the USH #1 actually becomes weaker and becomes the easiest weak spot to hit since the LFG’s armor values rise. The USH #2 however remains very difficult to damage and should be avoided.
LSH #1/LSH #2
The LSH #1 area should be avoided unless the angle drops to 45° or below. The increased risk of hitting the tracks causes a lot of shells to be eaten up for 0 damage. LSH #2 still remains very weak but is very difficult to damage due to it’s size.
Turret
Sea the frontal or side views for specific armor values concerning the turret.
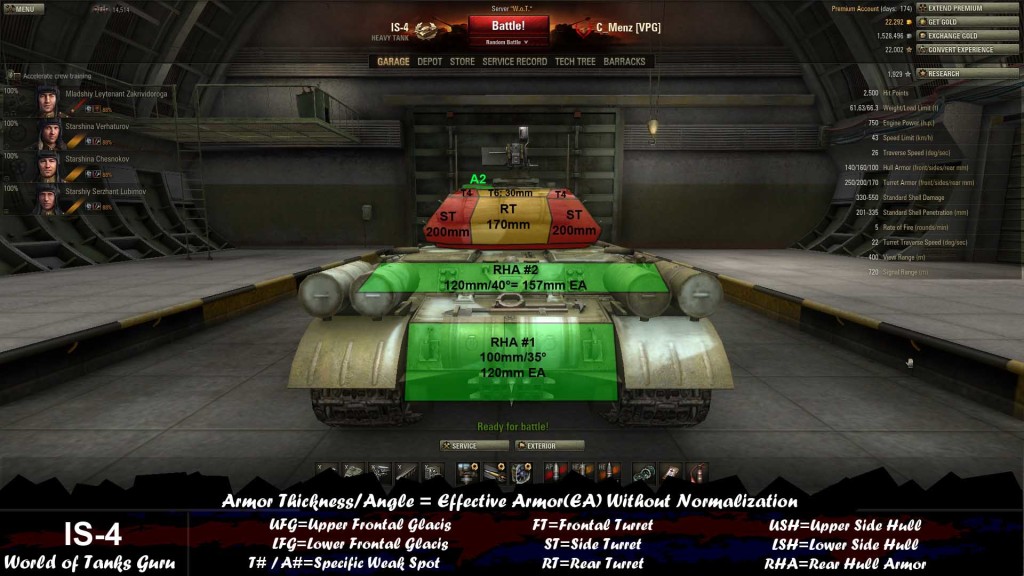
The rear of the IS-4 is well protected against lower tier tanks on both the hull and turret. Head on however the RHA #1 is the best option for lower tier tanks/scouts. For higher tier tanks you only need to worry about hitting the outer edges of the rear turret armor.


 Weak Spot Guide: BT-SV - World of Tanks Guru
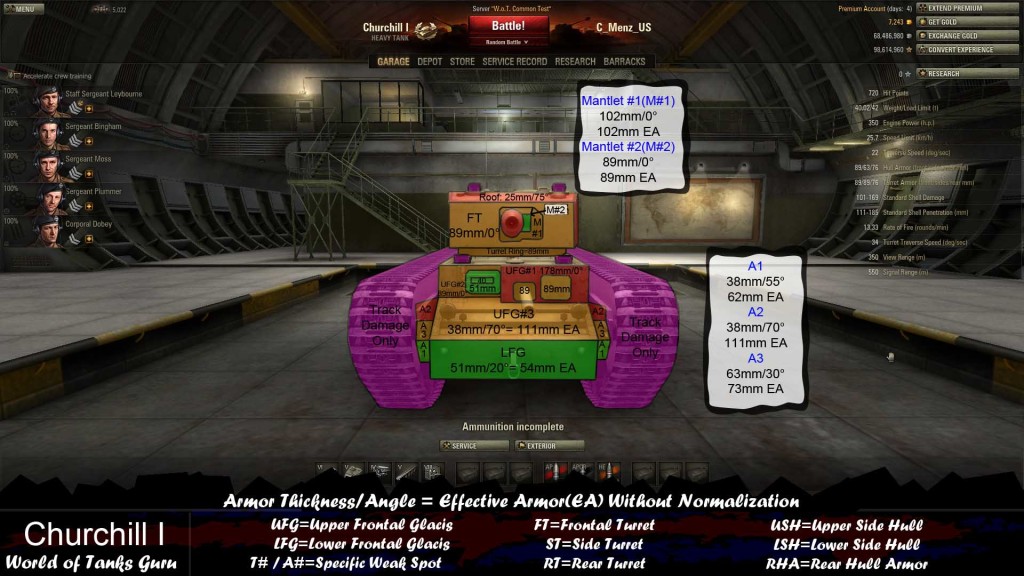 Weak Spot Guide: Churchill I - World of Tanks
 World of Tanks Guide - 59-16
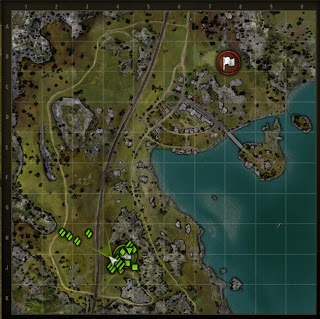 Map Strategy: Serene Coast - World of Tanks Guru
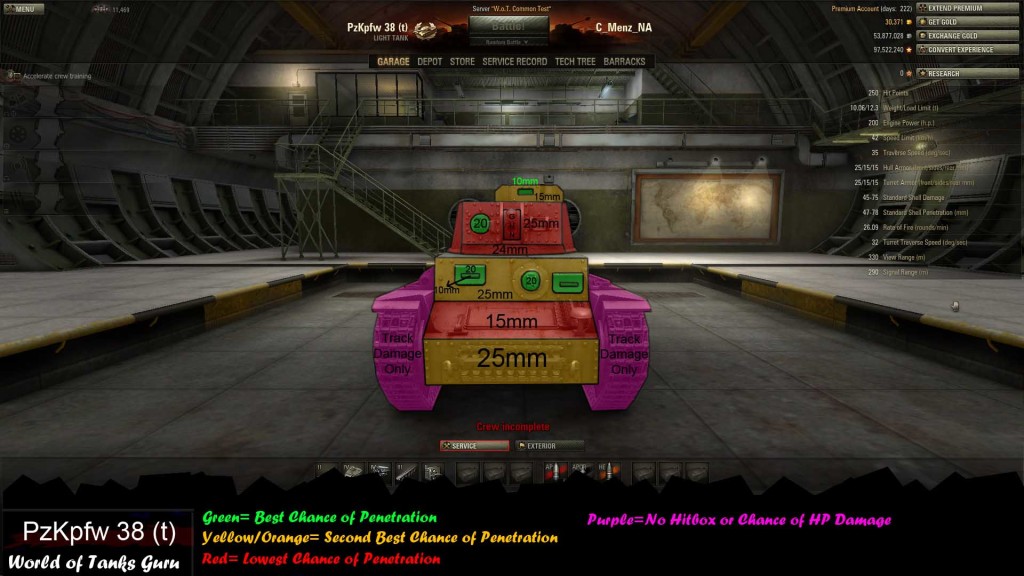 Weak Spot Guide: PzKpfw 38 (t) - World of Tanks