If the step-by-step walkthrough isn’t enough, you can also watch this walkthrough video for the first part of the game:
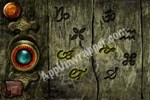
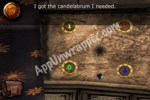
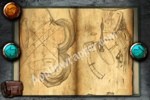
1. Notice the symbols on the wall when the lightning flashes:
Demo:

Full game:

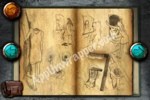
If you wait a bit, the game should also show you the symbols as a clue in your journal:
Demo:

Full game:

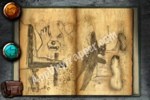
2. Tap on the door and highlight the symbols you saw on the wall. The doorknob will turn blue if you got it right, and the door will unlock.
Demo:
Full game:

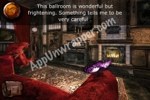
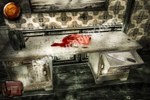
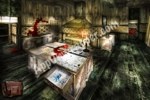
3. Tap the knob to open the door and enter the manor. After a bit, the lights will go and and you get hit in the head. You wake up in a room with an electric chair:
4. Take the stuffed bear from the chair:


5. Go back one screen and tap on the framed photo on the left.
Demo: Take the coin with the skull on it.
Full game: The coin is stuck. Turn the candleholder to loosen the coin and then take it.


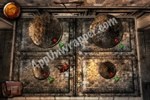
6. Go back a screen and tap on the tile puzzle on the wall. Swap the tiles to solve it:


7. Go back to the electric chair and use the coin to pry open the seat, revealing a key. Take the key.
8. Use the key on the cabinet below the bookshelves and you’ll get a red rod.
9. Put the bear back in the electric chair.
10. Put the rod in the slot on the combination lock on the wall and it becomes a lever. Enter the combination from the tile puzzle and pull the lever. The chair will slide over.

11. Open the floorboard and exit. You escaped the first room! This is the end of the demo, but continue on with the walkthrough for the full game.
If you liked this game, try these other games at AppUnwrapper.com.
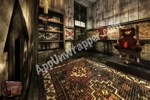
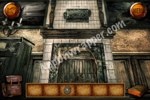
12. This room is mostly dark. You need to find a light source. There are some candles to the left. Tap on them and then pull the lever to turn on the lights.

13. Look on the wall to see a newspaper clipping. Take it, then read it in your journal.
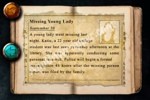
14. Inspect the piece of paper on the wall to get another clue:


15. Zoom out to see the whole room.

16. Tap on the couch to the left. Look under it to find a key. Take it.

17. Go back. Look at the painting above the couch:

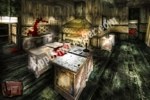
18. Go back and open the small red curtain on the right side of the room. Go through it to enter the “ballroom”:
19. Tap on the piano and take the newspaper clipping. It will go into your journal:
20. Tap on the painting with the hand if you want to see a cool effect:

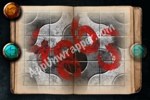
21. Tap on the planets to the left to get to the dining room. Solve the roses puzzle here by comparing it to the flower drawing from earlier. You’ll get a key:


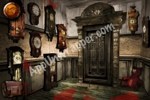
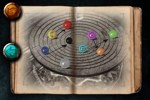
22. Look at the Space Map to get it placed in your journal:


23. Leave that room and go back to the room with the staircase. Use the new key you found (looks like a three-leaf clover) to open the armoire to the right and get a gas mask.

24. Next, you need to enter the kitchen, which is to the left of the staircase. There’s a gas leak, so before entering, tap the gas mask. You’ll now be wearing it:

I made a video for the stove puzzle, but it took me a while. I hope it still helps!
25. Tap on the stove. You need to turn the dials to match the red dots to the green arrows.

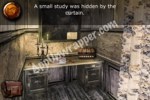
26. The gas will clear out, so you can explore the room. Take the axe.
27.Tap on the table to the back and open the drawer to get a knife.

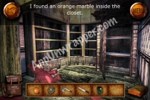
28. Go back and enter the small room on the left side of the kitchen to find the stuffed bear and a locked closet. Take the wooden carafe from the top of the shelf and use the key to open the closet. Take the orange marble from inside.

29. Go back to the room with the staircase and use the axe to cut through the wooden planks blocking the stairway. You can now go upstairs.

30. Tap on the skull painting on the stairs. Put the skull coin in the slot to the right of it and a key will appear in the skull’s mouth. Take it and then take the coin back.

31. Go upstairs.

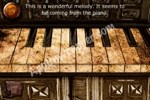
32. Take the door to the left to find a room full of clocks. Open the closet door and take the 3kg weight from inside.

33. Go back out and take the right-hand door. Take the newspaper clipping.

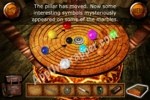
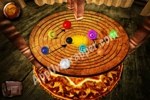
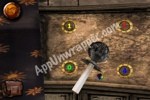
34. Tap on the wooden device in the room ahead with the moons and stars. You’ll see some marbles on a round surface, with nine rings. You can swap the colored marbles by tapping on one and then another. Place the orange marble on the table and then organize the marbles based on the space map in your journal. Some symbols will appear and you’ll be able to take a porcelain flower.


35. Tap on the unlit candle to see this:
36. Go back out to the hallway. Use the key you have to unlock the middle door and enter the bedroom.

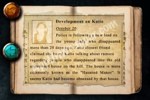
37. Move the right curtain to reveal a hidden study.

38. Take the newspaper clipping:
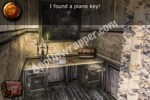
39. Open the right drawer and take the piano key.
40. Leave the study and open the door to the bathroom. There is a puzzle here on the wall. Use the clue from the marbles to solve it and place the porcelain flower in the center. Tap on it and it will turn into a compass with four colors (this will be used with the candle puzzle we encountered before).


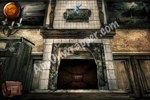
41. Fill your carafe up with water from the sink.

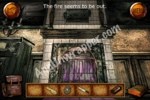
42. Leave the bathroom and go back downstairs. Go to the room that’s behind the red curtain. Pour the water from the carafe into the fireplace and the fire will turn purple.
43. Place the piano key in the empty slot on the piano.

44. Use the knife to slash open the chair that’s fallen over. Take the piece of the painting and place it in the painting from the main room, above the couch. You’ll get a clue for the piano sequence:


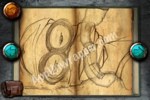
45. Go to the piano and match the colors from the painting to the keys on the piano. The first red in the sequence should be the far-right key and the second red in the sequence should be the far-left key. Otherwise it won’t work. Here is the letter sequence without the last one (blue, or E).

46. If you got the sequence right, a small door will open on the piano, revealing a clock gear. Take it.


47. Open up the clock face to the left of the piano. Place the gear with the others and move them around like so:
48. Notice the “7kg” written at the bottom. Since there’s a 4kg weight on the clock, you need the 3kg from the clock room upstairs. If you don’t have it yet, get it. Then put it on the clock.

49. The pendulum is missing. Use the skull coin instead. The door near the clock will open.

50. Go through the door and you’ll find yourself in the first room you started in.
51. Go back upstairs to the bedroom. Pull the lever above the fireplace and the fire will go out, leaving purple ash in its place. Take some.
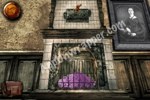

52. Go down to the other fireplace and pour the purple ash on the fire to put it out.
53. Go back upstairs to this room and notice the numbers on the blackboard:

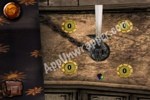
54. Match the colors around the candlestick to the colors on the compass. Match the numbers to those on the blackboard. You change colors by tapping the little colored button below the candlestick. You change the numbers by tapping on the candlestick base. To lock in a color/number, tap a number so the number is colored, not the background. If the background is colored, it will change when you tap the button or candlestick. Once you get it right, take the candlestick.
55. Go down to the original room you started in. Place the candlestick on the other side of the painting and use both hands to turn both candlesticks, revealing another clue:


56. Go back upstairs to the study and unlock the chest using the clue. Take the ice key from inside.


57. Go back to the kitchen and use the key to open the locked drawer. Take the iron cross. Place it in the slot above TW fireplace and turn it to open a secret passageway.
58. Enter the passage and you’ll encounter a bug puzzle. Match TW colors to the bugs you’ve seen throughout the manor.


59. Another door will open. Continue through it.


60. Tap on the red spot on the floor and you’ll see some reflective tiles. You need to tap the reflective ones quickly. They will shrink in size, and the red tile will open up, revealing a broken fuse. Fix the fuse.


61. Zoom out and tap on the square at the back of the room. It’s a fuse box. Open it and match the colors at the top to the wires connected to the lightbulbs at the bottom.


62. The door will open. Go through.

63. Take the newspaper clipping from the desk:

64. Read through the book on the desk, paying close attention to the pages with numbers on them:
65. Tap on the circuit box and enter the numbers from the book. Two things are still missing before it can work.

66. Tap on the heater. Take the orange dial from its side.

67. Unscrew the lightbulb hanging from the ceiling.

68. Put the bulb on top of the circuit box and the dial on the front. Turn the dial to “ON” and pull the lever to electrocute the bear.


Congratulations! Watch the ending…or is it?


***Looking for the Haunted Manor 2: The Horror Behind the Mystery: Walkthrough?***
If you liked this game, try these other games at AppUnwrapper.com. You might also like “In Fear I Trust.”


 Picture IQ Answers for Puzzle Level 51-100
 Talking Ginger 2 Cheats & Hack for Snacks & Jigsaw Puzzles - AppGameCheats.com
 100 Pics Resolutions Answers Levels 1-100
 TouchTone puzzle walkthrough - solutions for Samir Jilani levels 30 to 53 (iPad)
 12 hints and tips for getting started in Angry Birds Epic