
Saints Row IV is the next installment in the crazy-fun sandbox series. This time the leader of the popular Thirds Street Saints gang takes over as the president of the Unites States and faces an alien invasion led by the power-hungry warlord Zinyak. Gameplay underwent serious modifications in comparison to previous installments, giving the player the ability to control various super powers and a multitude of other, no less insane stuff.
This Saints Row IV game guide offers a complete walkthrough of the main campaign and accompanying side quests, as well as thorough descriptions of all gameplay elements.
Contents:
The guide uses the following color codes:
Bartek "Snek" Duk ()
Considering the insane possibilities character customization gives you, stores are one of the most interesting and fun aspects of Saints Row IV.
There are three clothing stores in the game: Planet Zin, Nobody Loves Me and Let's Pretend. In each of them, you can find a fair amount of clothes and costumes to buy and dress your character.
You can also visit a garage and customize your vehicle: you can change it for a different model, tune its engine, reinforce its body or enhance its tires.
There are also tattoo parlors where you can paint every part of your character's body.
And if you don't like your starting character's appearance, you can choose to have a plastic surgery and modify any aspect of your character's body, or even change their sex.
And of course, there is the weapon store known as Friendly Fire. You can buy and customize your weapons there.
New super power elements are unlocked as you go through the game. Each super power also has a special upgrade which are bough for Data Clusters.
In total, there are around 1400 Data Clusters in the game, so you shouldn't have any trouble collecting them.
Super Sprint - gives you the ability to move very fast. All vehicles are automatically thrown away the moment you run into them.
Super Jump - allows you to perform a very big leap. Upgrade it to be able to, among other things, glide in air.
Death From Above - you'll be able to freeze mid-air and hit the ground, inflicting damage and throwing back all enemies within range.
Force Shield - creates a shield each time you activate Super Spring or are gliding in air, protecting you against incoming projectiles.
Each active super power has 3 elements that differ in properties.
Blast - throwing a projectile. The projectile effect depends on the element you're currently using. These are:
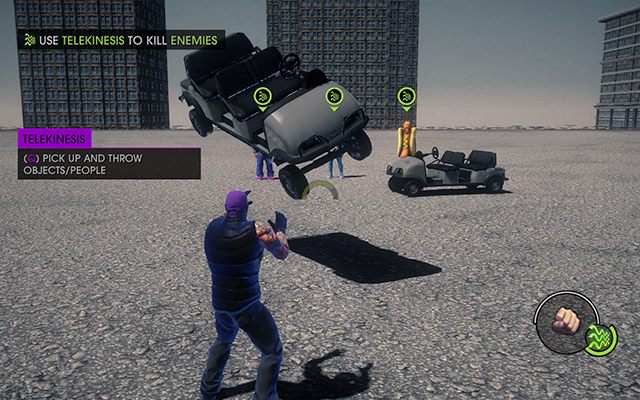
Telekinesis - the basic element is simply telekinesis. You pick up vehicles or humans and throw them in the desired direction. Available elements:
Stomp - a heavy stamp on the ground. The force of it throws nearby enemies back and inflicts damage. Stomp elements are:
Buff - enhances your weapon's bullets. It also gives your character a halo which causes damage depending on the chosen element. These are:
Phone - use it to call one of your homies or order a car from a garage.
Cache - use this menu to select revenues from the various resources you own, for example the taken over stores.
Extras - view your statistics and add codes.
Gateways are gates through which you can reach The Ship or access the menu with your wardrobe, garage or gang customization. New Gateways are unlocked upon progressing through the main campaign or as a reward for completing certain side quests.
 Gateway map icon
Main quests rewarded by a Getaway are: The Escape, Ghost In The Machine, Back By Popular Demand, Emergency Situation.
As for side quests, all Kinzie side quests are rewarded with a Getaway. Simply get to the Gateship and talk to her to commence them.
Activities in Saints Row IV are aplenty and each is divided into three difficulty levels: Easy, Medium and Hard. Rewards for completed Activities are also linked to your scores: Bronze will get you the least, Silver medium, and Gold the most.
 Blazin Activity map icon
Blazin is a race against time in which the key element is using Super Sprint. Follow the arrows that point the right direction and avoid fire which consumes time needed to complete the race. Don't forget to grab the green orbs scattered along the track - they speed you up, so make sure not to miss them.
 Fraud Activity map icon
Fraud is an Activity returning from the previous Saints Row installments. Your goal is to collect as much insurance money as you can by throwing yourself under the wheels of various vehicles. Simply run straight at a moving vehicle and press LMB to turn your character's body into a ragdoll. You can control your character mid-air, which is quite helpful if you want to inflict more damage, for instance by steering them into another car.
Tank Mayhem Activity map iconIn Tank Mayhem, you sit behind the wheels of a tank and run rampage across the city. Shoot at anything that moves to create the biggest chaos possible. The minimap will also show you targets in red - destroy them to receive more points. The tank has two weapons - click LMB to fire a rocket launcher, and RMB to shoot a laser.
 UFO Mayhem Activity map icon|
The goal of UFO Mayhem is the similar to Tank Mayhem, but here you control a flying machine. Using a laser rifle under LMB and a rocket launcher under RMB, destroy everything in your path. You can also switch to a quick flying mode by pressing F, but you won't be able to shoot at the same time.
 Telekinesis Mayhem Activity map icon
Another type of Mayhem, this time enabling you to use the Telekinesis super power. There will be orbs around you - pick them up with Telekinesis and throw them at anything there is. The more damage you deal, the more points you get.
 Mayhem Activity map icon
This Mayhem bestows you with a rocket launcher, which you load by pressing LMB. The goal is the same as any other Mayhem - destroy everything that moves to get the best score.
 Speeding Rift, Platforming Rift and Telekinesis Rift icon map
Speeding Rift - you're on a track and have to avoid obstacles and collect orbs. The more orbs you collect, the more the Burst bar charges up - activate it to boost your speed and become able to run through obstacles.
Platforming Rift - jump over platforms until you reach the finish line. To get the highest score, land in the middle of the platform, or as close to it as possible.
Telekinesis Rift - use Telekinesis to throw orbs at the circles. The color of the orbs have to match the color of the circles. Your position often changes, so be on your guard because you'll have to move.
 Mech Suit Mayhem map icon
This Mayhem puts you in control the robot that you first got a taste of in the "Zero Cool" mission. Use the available weapons to destroy everything you can.
 Prof. Genki's M.O.M map icon
A Telekinesis-based Activity. You will have differently colored hoops to throw various types of objects through.
Blue - throw cars;
Green - throw people;
Pink - throw cats' heads, usually found in the area around.
New hoops locations will keep opening up, so be on your guard and move when needed.
 Fight Club map icon
Fight Club will have you pitted against several types of enemies, who will keep getting stronger with each consecutive round. In the last round, you'll fight a Boss - killing him successfully ends the Activity. The quicker you finish it, the greater the rewards.
Virus Injection map iconIn Virus Injection, waves of enemies will be coming at you. The task is simple - kill anything that has a red marker on the map.
 Virus Collection map icon
Eliminate the indicated target. Having arrived at the star-marked location, the minimap will display several targets marked in white. One of them is the one you need to kill, so shoot everyone until you find the real one.
 Flashpoint map icon
Flashpoints are special areas that you need to take over. They're defended by aliens, so each time you'll have to get rid of them first. Sometimes, after eliminating all the aliens, a Warden will appear too.
 Hotspot map icon
Hotspots are areas indicated on a map with a red protective barrier. Inside the barrier, there is a main generator that you need to destroy. To deactivate the barrier, first you'll have to destroy all remaining generators. Usually, there are between 2 and 3 generators somewhere in the vicinity. They're all marked with a yellow triangle.
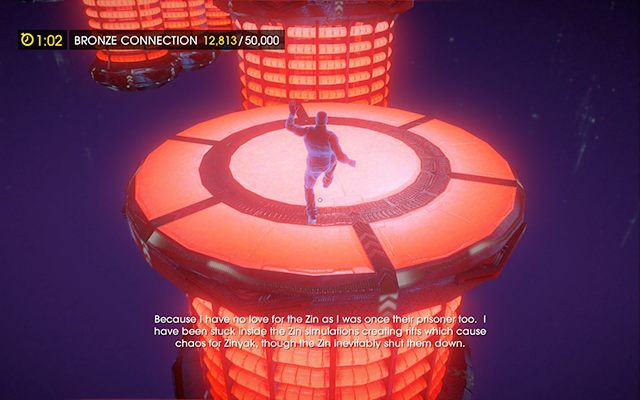
 Tower map icon
The task here is to climb the Tower. Use the platforms and activate Warp Points on the way.
The Ship is in area where you can talk to the members of your crew, or even romance them. It's also where you start most of the side quests missions.
To get to The Ship, cross one of the Gateways. As you go through the campaign, you'll unlock more and more of them.
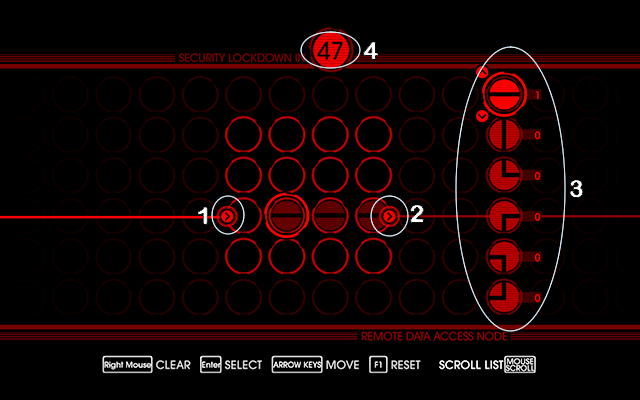
After completing "The Escape", all stores will be locked. To be able to use them again, you're going to need to hack them. Stand in front of a store and press E to open the hacking panel.
The task is simple - you need to draw a line from point A [1] to point B [2]. On the right, you have available parts [3] from which you need to draw it. Keep in mind that there's a time limit [4]; if you can't hack the store before the time runs out, hacking will become unavailable for a while, and aliens will show up on the location.
To take over a district, complete every activity within it - even hacking every store. You can view your progress in the top right corner of the screen after hovering the mouse cursor over the district.
Before you proceed to the walkthrough, there's some things that you should know about it.
Each main mission has markers indicating locations that you need to go to or perform an action in. There're referred to as "star" or "hand".
 Star and Hand
Saints Row IV has many minor encounters, which are pointless to describe step-by-step, especially since not all of them look the same. You can, however, use some general tips.
When fighting, try to stay mobile at all times so as to avoid incoming missiles. If your health bar drops too low, collect health pickups which are often dropped by killed enemies.
Using super powers is of utmost importance - they will very often save the day and help speed up eliminating enemies.
There are no specified weapons that you should be using at all times. If your enemies get too close, use a shotgun. If you prefer ranged combat, use a sniper rifle or an assault rifle, or even an SMG. If you're facing a group of enemies, and they're close to each other - use the grenade launcher.
If you want to lose aliens chasing you, catch up with a yellow orb that's usually somewhere nearby (look for it on the minimap). The orb's pretty fast, but if you use Super Sprint when you're just behind it, you won't lose stamina, so catching it shouldn't be any trouble.
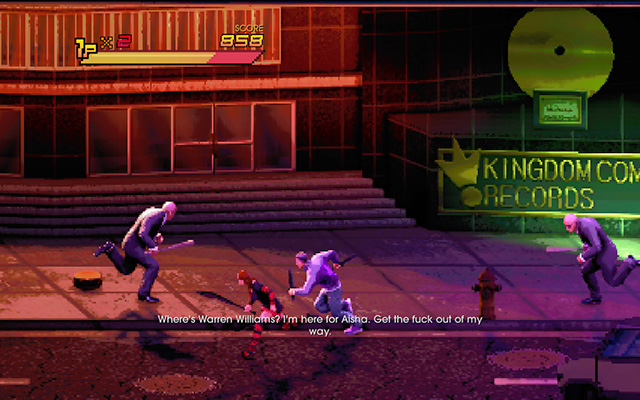
The first mission will have you stopping terrorists from launching a nuclear bomb. After the introductory cutscene, you'll find yourself in a underground base.
Follow Asha until you reach the first enemy. He'll have his back towards you and you'll have to dispatch him quietly.
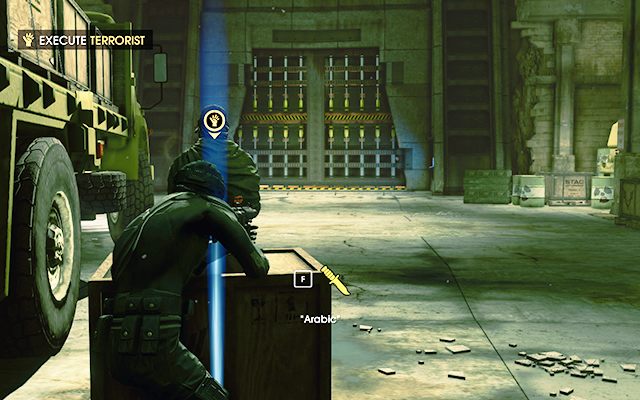 Before execution
Approach him and press F (default) to perform an execution. Another enemy will appear afterwards, but this time use the shotgun to shoot him (it takes one shot to the head or several elsewhere to kill an opponent). To get a better aim, you can crouch by pressing CTRL, or zoom-in the camera with the right mouse button (RMB). When it's done, Asha will get to the door in front, so wait until she opens it and proceed to the next room.
 Eliminating the first enemies
Inside, there will be a larger group to get rid of. Use the assault rifle for that. Shoot the exploding barrels to eliminate the enemies quicker.
Follow the marker again, killing whoever gets in your way, until there is an explosion. The damage caused by it will block the path ahead, but Keith will open the door behind you. Go through and dispatch another wave of enemies, then make your way to the room on the left.
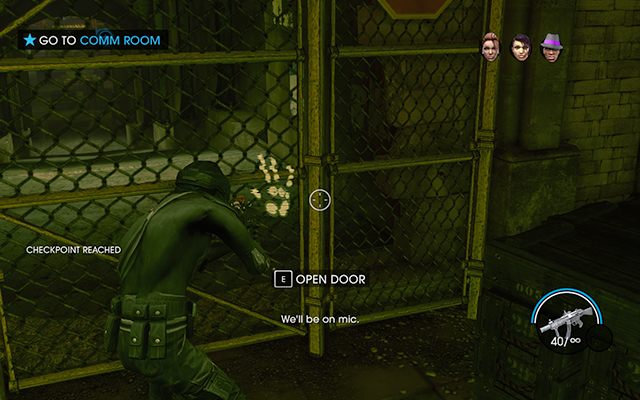 Opening the door
Approach the locked door and press E (default) to open it. Keep running towards the marker until you reach a room with several new enemies. Kill them with the assault rifle and use the stairs to get to the platform.
When you approach the closed door, you and Keith will take positions on the opposite sides. When you're ready, press E to force the door open and go inside. The room has four new enemies - for a few seconds, the game will go into a slow motion mode. Try to aim for the heads and kill the enemies with single shots.
Afterwards, approach the only door in the room until a you trigger a cutscene in which one of the terrorists pins you down to the ground. Don't worry, Asha will take care of it and you'll be up in no time. Chase after your target. Hold SHIFT to sprint.
A few moments later, a QTE (Quick Time Event) sequence will start. Follow the on-screen prompts. If a button is flashing, you need to press it repeatedly.
Once the QTE ends, you're going to need to deactivate the nuclear bomb, which had already been launched. Follow the marker and jump on the rocket.
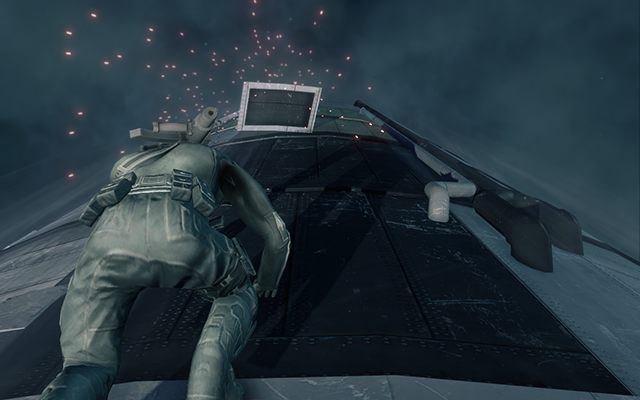 Climbing the nuclear bomb
This will trigger another QTE, but you'll also have to climb the rocket by pressing W. Same as before, follow the prompts until the sequence ends. The bomb will still detonate, but its radius will be much smaller and it won't cause any major damage - while you will safely land in the president's office.
Rewards:
First, you can choose your character's appearance. There are 7 default appearances at the beginning, but later you'll be able to change it in an advanced menu. Character appearance is only a cosmetic issue which doesn't have any effect on the gameplay.
Once you're done, press Start Game to proceed to the next mission.
After the cutscene, go down the hallway. On the way, three NPCs will approach you, asking you to make a decision.
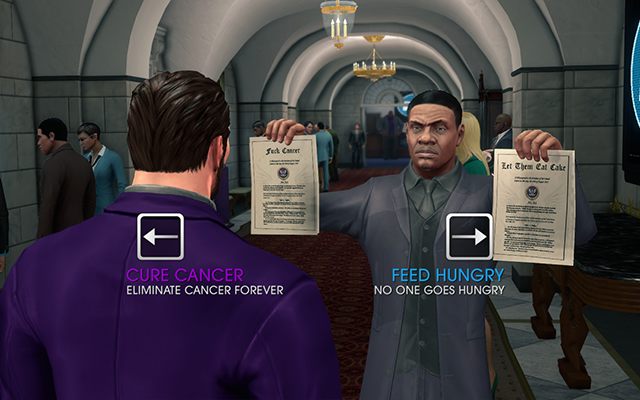 Curing cancer or feeding the hungry?
Making a decision does not affect the gameplay!
Afterwards, follow the star until you trigger a cutscene. At this point, the alien invasion takes place, and their first target is the White House - in which you are currently residing.
Once the cutscene ends, press Space to get back on your feet. You'll have a pistol in your hand, but to fight the aliens back, you're going to need a bigger caliber weapon. Shooting the enemies, follow the star until you reach the president's office.
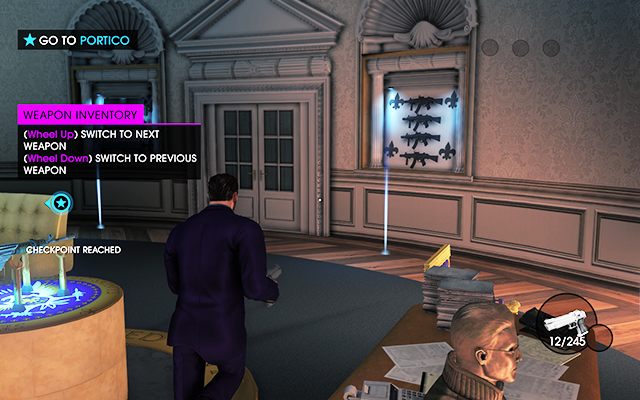 The president's private armory
Once there, there will be a short cutscene showing you opening lockers with various types of weapons. Pick any you like. When you're ready, follow the star again and keep eliminating enemies. If you encounter a cluster of them, use the rocket launcher to dispatch them quicker.
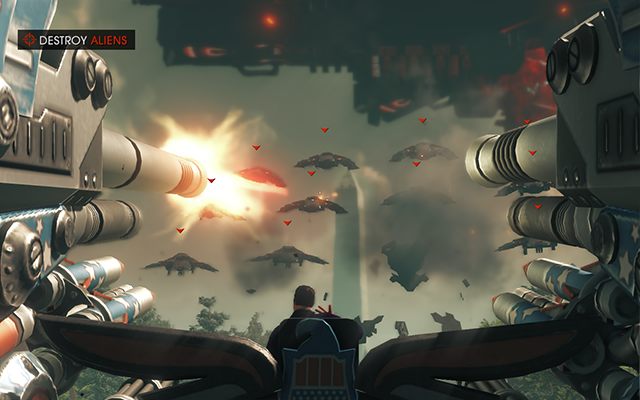 The aliens have messed with the wrong president
Keep going forward until you find a way outside. You'll mount a special cannon to use against invading spaceships. Hold LMB (left mouse button) to attack. In a while, a larger ship with a larger health bar will appear. Shoot it until another cutscene triggers.
Afterwards, you'll find yourself inside the alien spaceship, together with Zinyak. After a short exchange of fists and words, a QTE sequence will start. Follow the prompts to steer the mission towards the end.
Rewards:
None
You'll find yourself in an unfamiliar house. Go down into the kitchen, as the star indicates, and take a sit at the table. Press LMB as it appears on-screen, and eat the delicious pancakes your wife has made for you. Afterwards, go outside to pick up the newspaper marked with a hand. Follow the marker outside the house towards the paper, then press LMB repeatedly to pick it up. This is when the sheriff appears and asks you to join him on a ride. Approach the car and sit behind the wheel.
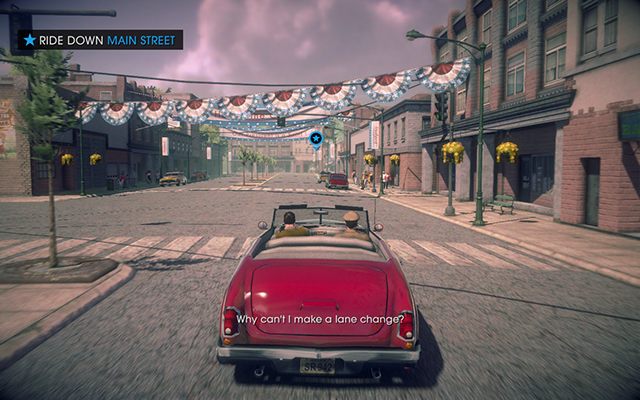 Back to the past
You won't be able to drive around the city freely because the game will automatically steer you back on the path, so just drive ahead towards the star. When you reach your destination, leave the car and approach one of the civilians to take a picture, then enter the cafeteria and watch a cutscene. First, you'll be attacked by the patrons inside, then you'll run back and jump into the car.
Hurry and drive away from this place, then wait until Kinzie contacts you. She'll tell you none of this is real, being only a projection. She'll need some time to get you out, so in the meantime go to the park - the star that showed up during the conversation will show you the way.
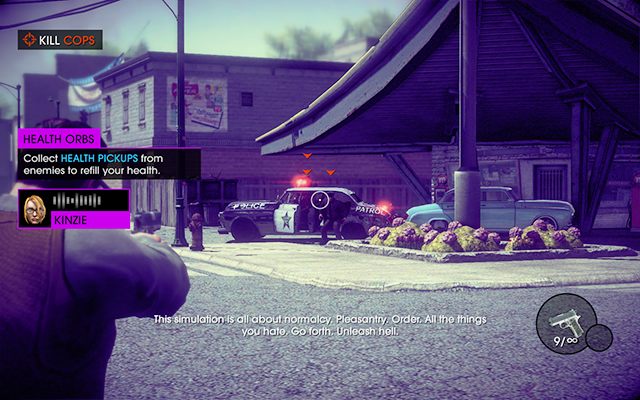 The police will never learn
Once there, you're going need to make some "noise". You'll be given a pistol with unlimited ammo, and then cops will start showing up. Keep eliminating them until Kinzie sends you a package with a rocket launcher - pick it up. You now need to make damage worth of ten thousand dollars. Using the rocket launcher, shoot everything in sight - you'll get the most points for taking down cars.
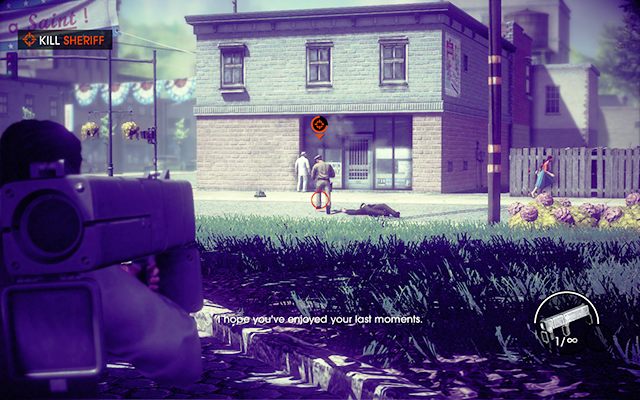 Straight at the sheriff
Once enough damage is done, the sheriff will make his appearance. He's quite agile, moves pretty fast and can jump very high. Keep a safe distance and shoot either directly at him, or at the ground below his feet (using the rocket launcher). After a few shots, he should drop dead and trigger another cutscene.
You'll be transferred to Steelport, the city known from Saints Row: The Third, but it's only another virtual simulation created by Zinyak, who is holding you captive.
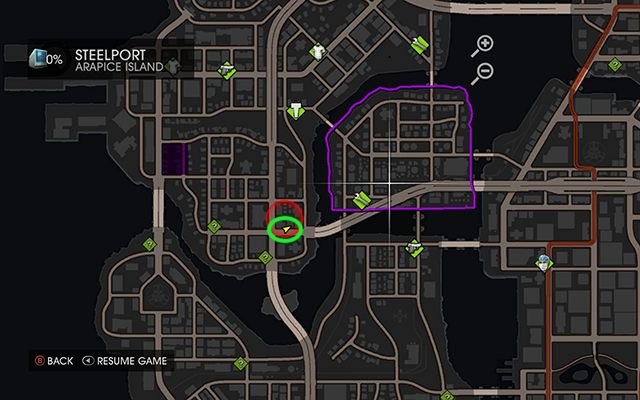
Find yourself a weapon - best by visiting the Friendly Fire store. Enter the HUB (press Tab), open the map and set the GPS (press the right mouse button) on the only store presently available. Get into one of the cars parked nearby by pressing E and make your way along the green path marked on the minimap.
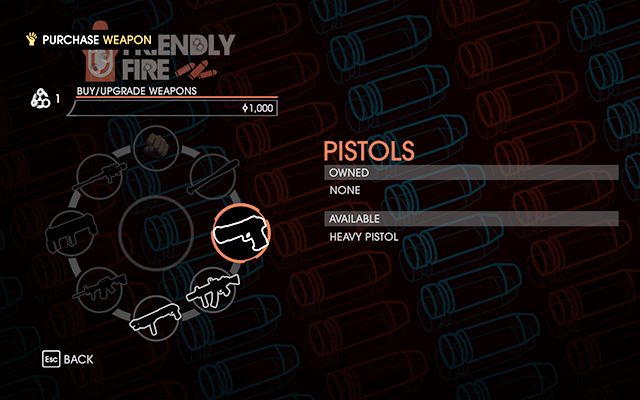 Friendly Fire
Once you've reached your destination, enter the store and press E to start shopping. Select Buy/Upgrade to view the list of available weapons. For starters, buy every weapon in its kind, then upgrade them as you wish.
When you leave the store, a bunch of policemen will be waiting for you. Use your new guns to dispatch them, then get into the car.
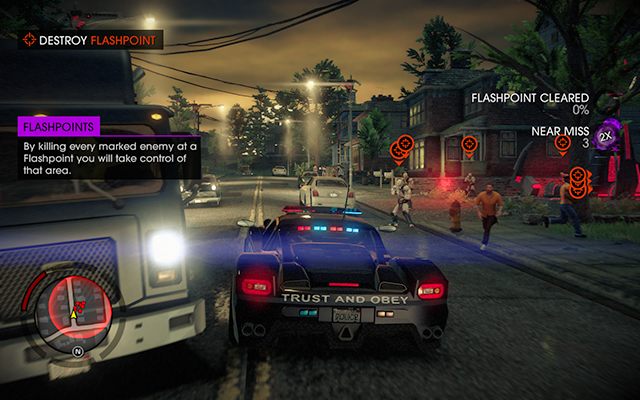 Taking over a Flashpoint
Your next goal is to clear a Flashpoint covered by the aliens. Use your car to drive there and once again use your new merchandise to clear the area.
Now it's time to head for the hideout set up by Kinzie, so get back to your car and make your way towards the star. Once there, it will turn out that the hideout has been cleared and there's nothing left of it, so drive back outside - and another mission ends.
Rewards:
You need to collect four Data Clusters. They're marked with stars, so get in the car and head for the first one.
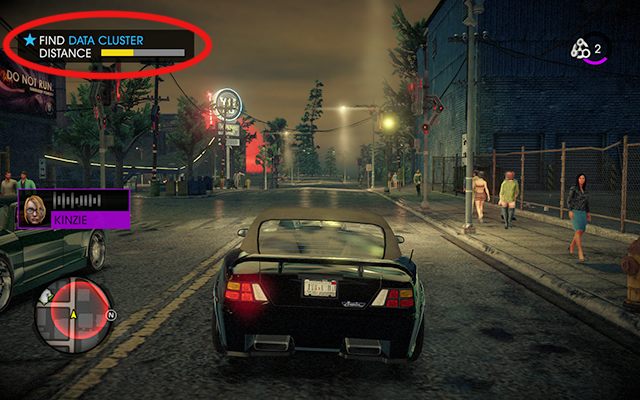
When you reach your destination, you'll see a bar in the upper left corner (see screenshot). The closer you are to a Data Cluster, the more the bar fills in yellow. Keep driving in every direction until you notice the bar filling up, then drive further that way. When the bar fills up almost completely, you should be able to the Data Cluster shining in blue. Repeat with the other three.
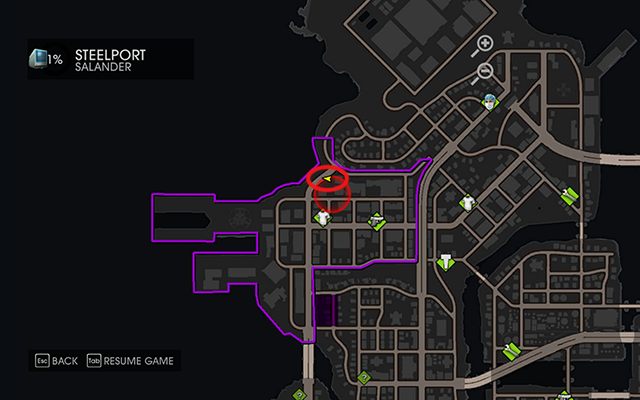
If, however, you still can't find them, check the below map for exact locations:
First:
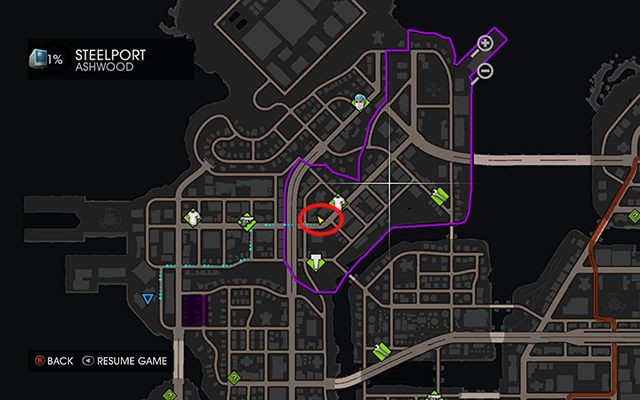
Second:
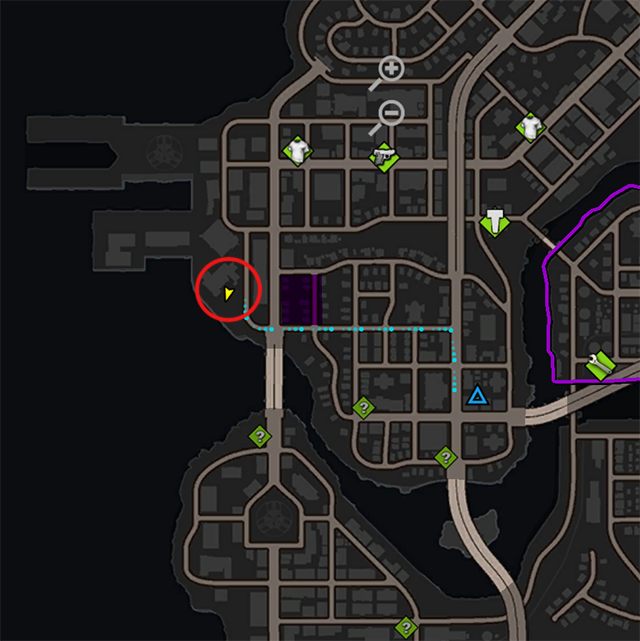
Third:
Once you find all three, it's time for the final one. Drive to where the star points and check how the bar fills up.
Fourth:
Now it's time to active two first super powers. In the HUB, select Powers. Activate Super Sprint and Super Jump, and resume the game. You'll be transferred into a training simulation to learn how to use the newly unlocked abilities.
You'll find yourself on a rooftop with the goal to get to the rooftop of the building above. To perform a Super Jump, hold and release Space (default). While in mid-air, control the character by the WASD keys (default), and land in the designated spot.
Next, you'll need to get even higher, but this time you can't jump high enough to reach the rooftop on your own, so you're going to have to bounce off the wall. To do it, simply jump on the wall and when you touch it, press Space again to bounce off it. Repeat until you reach the top.
The last stage of the training simulation consists of jumping over from one building to another. To increase the range of the jump, try doing it while using Super Sprint.
When the training simulation is over, it's time for a race.
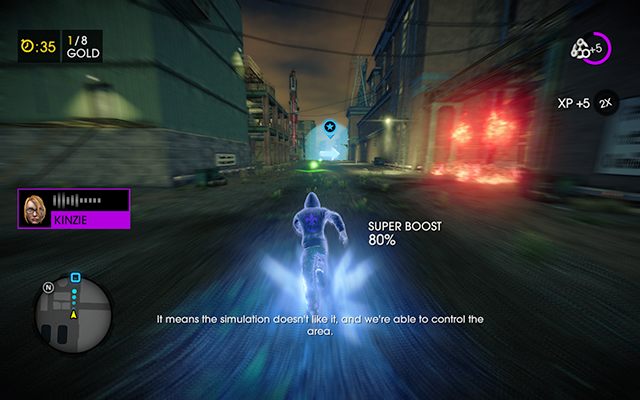 Blazin
While in Super Sprint, follow the stars. Collect green orbs which boost your speed and avoid fire which takes the time needed to finish the race. You'll often see green arrows pointing up, which means you need to use Super Jump.
You'll be rewarded depending on how fast you managed to finish the race. Gold is the best reward, Silver the middle, and Bronze the smaller.
The race is the last stage of this mission.
Rewards:
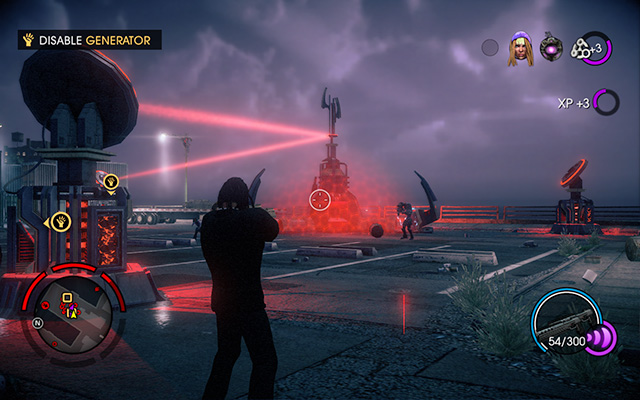
This mission will teach you how to get rid of Hotspots scattered around the map. Hotspots are locations surrounded by an uncrossable barrier. To deactivate the barrier, destroy generators.
Go to where the star indicates. There will be two generators, each marked with a hand. Run to the first one (there's no order) and shoot every alien around it. Approach it and press E to destroy it. Do the same with the other one and the barrier will vanish, giving you access to the main generator. Same as before - dispatch the aliens and destroy it by pressing E.
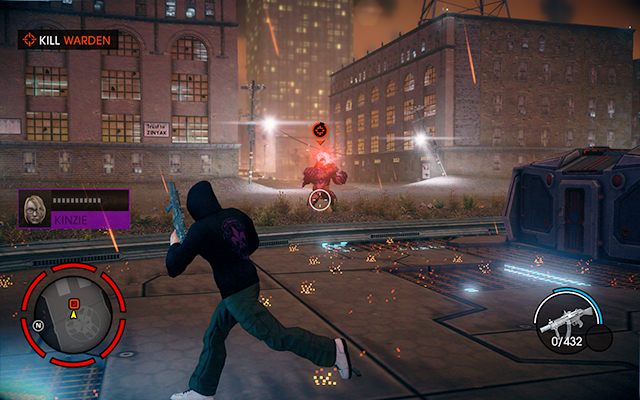 First Warden encounter
Once the generator is gone, one of the stronger enemies makes his appearance - the Warden. Don't get too close because he'll hit you hard and throw you back pretty far. Use Super Sprint or Super Jump to dodge his ranged attacks, too.
When his health bar reaches zero, a QTE sequence will be triggered. First, press LMB to jump on his body and suck his energy out. A new bar will show up at the bottom of the screen - press the on-screen buttons repeatedly until the bar fills up in purple completely. If you're successful, you'll receive a new super power and get transferred into another training simulation.
You'll learn how to use Blast Freeze, a handy combat super power.
To use Blast Freeze, select it first by pressing F1. Kinzie will give you some enemies for testing. Aim at the opponent and press Q. The opponent will be frozen for a few seconds, making your shots deal twice as much damage. Blast Freeze also has a radius, so you can easily freeze several enemies at once.
Keep eliminating enemies until a spaceship arrives. Don't worry, Blast Freeze is useful against vehicles as well, especially the air ones - freezing them damages their flying properties, and when they fall, they often explode.
Next, there will be a wall with a Data Cluster embedded in it. Blast Freeze enables you to recover Clusters from such walls as well.
The last enemy will be the Warden, which you had just battled. This time, he'll have a shield preventing any damage from reaching him. Luckily, another useful thing about Blast Freeze is that it can get rid of the Warden's shield, and freeze him in the process. The shield regenerates, though, so you're going to have blast him a few times in order to kill him permanently.
Once the Warden is dead, the mission ends.
Rewards:
In this mission, you're going to finally leave the training simulation. Get to where the star indicates, then attempt to reach the door on the rooftop twice. All your efforts will be for nothing, though, because it turns out these are not the door you're supposed to walk through. A cutscene follows.
Afterwards, you'll find yourself in the middle of the alien spaceship. You'll be naked and a little muddled, so your movements will be a bit sluggish. Keep going forward until you find a door where a QTE sequence starts. Press only the right mouse button to kill the alien who attacked you, and take his weapons.
 Escape
Now that you have means of defending yourself, keep going forward and eliminate all aliens you come across on the way. After a while you'll get to a bridge - once you reach the other side, more aliens will appear. There's going to be a lot of them, so find a good spot and shoot them until a cutscene triggers.
Afterwards, you'll take control of the spaceship. Flying it is simple and intuitive - use the WASD keys to steer it in the desired direction, and the mouse to lean forward or sideways, or to dive. Keep flying ahead, avoiding obstacles - the game will perform the more dangerous turns for you, so don't worry about losing your way. Enemy ships will keep attacking you, but luckily your vehicle is equipped in weapons, so you can shoot them down.
After a while, you'll fly into a corridor which is going to keep getting tighter. Steer the ship into the widest spots, and you'll fly outside shortly.
Rewards:
This mission will teach you how to take over stores. Make your way to the Planet Zin clothing store (marked with a star), stand in front of it, and press E - you'll open the hacking panel.
![To hack a store, you need to connect point A [1] with point B [2] - #6 - Breaking The Law - Walkthrough - Saints Row IV - Game Guide and Walkthrough](https://game.lhg100.com/Article/UploadFiles/201512/2015121709291430.jpg)
To hack a store, you need to connect point A [1] with point B [2]. At your disposal, there are several lines [3] from which you need to form a path connecting the two points. There's also a time limit [4] - it you can't do it before time runs out, you won't be able to perform another hacking for a while, and the police will appear on the scene.
In this case, use the only available options to make a straight line connecting the points. The police will show up then, but they'll turn into aliens. Shoot them until the portals appear. New aliens will keep coming from them, so destroy the portals first. Try using one of the rocket launchers for that.
A yellow orb will appear afterwards - once you destroy it, the aliens will stop chasing you. The orb moves, and quite fast at that, so use Super Sprint to catch up to it, and when you do, press E to destroy it.
Rewards:
It's now time to familiarize yourself with a new type of Activity, Platforming Rift.
Reach the spot indicated with a star and press E to proceed to the Rift.
Platforming Rift is all about dexterity. You need to jump from one platform to another until the finish line, and score as much points as possible - all under a time limit.
 Platforming Rift
To get the best score, try landing as close to the middle of a platform as possible. Similar to other activities, your rewards depend on the score.
Once the Rift ends, so does the mission.
Rewards:
Get to where the star indicates and you'll be once again transferred to the training simulation.
You'll learn another Blast, Fire. To select it, press F1 twice. Several aliens will show up, giving you the opportunity to test the new skill.
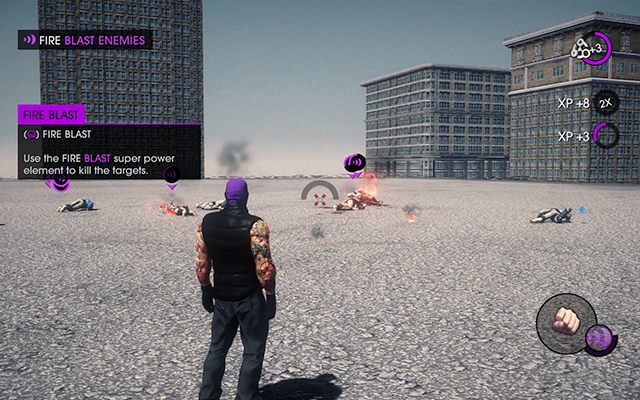 Something's burning...
Fire Blast comes in handy to knock down several enemies as once. They'll catch fire as well, preventing them from attacking and giving you the window to finish them off any way you like. The Fire Blast's impact affects enemies in close range, but it can be enhanced through later modifications. It's also very useful against vehicles - one blast is usually enough to destroy any target.
Once all enemies have been eliminated, the training simulation will come to an end, and so will the mission.
Rewards:
Get to the where the star indicates and kill all aliens there. Pick up the Bounce Rifle from the crate marked with a hand. Four CID robots will then appear. You need to take one of them, so pick the third one from the left - the rest will break upon attempts to pick them up.
Now, make your way to another star-marked spot. You're going to need to defend the CID for a while (the bar in the upper right corner will tell you how much time is left until Kinzie hacks it). Aliens will keep coming, so you keep killing them - Fire Blast or the rocket launcher work best here. Once the bar fills up, a timer showing one hour will appear - don't worry, your character will notice that an hour is a bit too long. You're going to need to find a place with more energy.
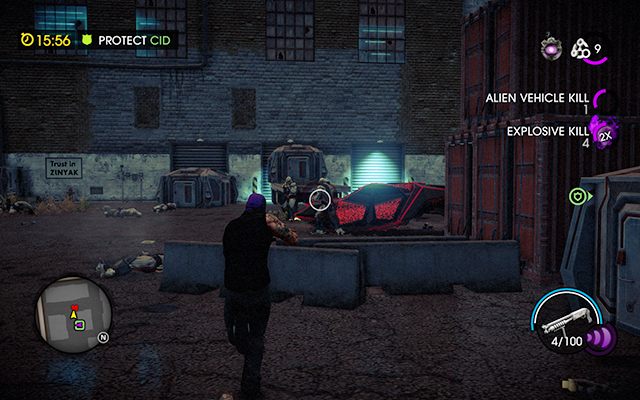 Protecting the CID
Make your way to the next location marked with a star. Kill all enemies you find there, then approach the panel marked with a hand and press E. This will trigger another timer - this time set on 17 minutes. New aliens will start showing up, so keep shooting them relentlessly. Use either Fire Blast or the rocket launcher to destroy their vehicles.
After a while you're going to have to speed up the downloading process, and for that purpose a new hand-marked location, with another panel, will show up. Make your way there at once, clear the area and activate the panel. A second location will open, so repeat the process - get to the hand, dispatch enemies, activate the panel.
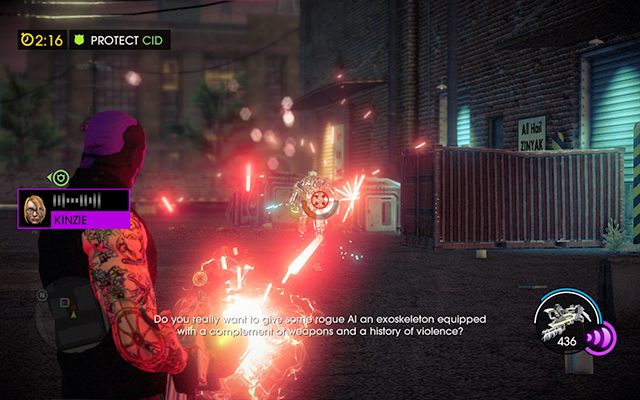 Series straight into the tin-man
That's when the CID starts overheating from the overflow of data. You have one minute to get back to it. Do it without delay and use Blast Freeze to cool it down.
Afterwards, the last timer, this time a 3-minutes ones, appears. As you protect the CID, you'll be pitted against a new type of enemy - robots resembling the ones from the Terminator movie series. Waiting for the countdown to reach zero, use your super powers and weapons to destroy them.
Another battle with a Warden is ahead of you now. Same as before, use the super powers to get rid of the shield, then unload everything you have on him. To destroy the shield, you can also use Fire Blast.
Once he's defeated, a familiar QTE sequence will have you suck his energy out again. Follow the on-screen prompts to fill the bar in purple.
 Testing Telekinesis
You'll find yourself in the training simulation again to allow you to test your new ability - Telekinesis.
At first, there will be 3 people in front of you. Point your mouse to each of them and press Q to lift them up in air with Telekinesis, then Q again to throw them.
Next, you'll be lifting cars. Use Telekinesis to throw them at the 3 people.
And finally, another Warden shows up, and you'll learn how to deal damage - namely by throwing vehicles at him. Use the available cars to kill him, and the simulation, together with the mission, will end.
Rewards:
Get to the star and begin a new mission in which you'll learn about another Activity, Prof. Genki's M.O.M.
This Activity uses Telekinesis also. Several differently colored hoops will appear in front of you, and your task is to throw specific objects through them.
Through the pink hoop, throw cats' heads usually found somewhere nearby.
Through the blue hoop, throw any types of vehicles.
Through the green hoop, throw people.
As many others, the Activity is also timed. The locations change, too, so keep up with the scenery.
Once the Activity concludes, so does the mission.
Rewards:
Get to the star and start the mission. You'll be transferred into a cybernetic simulation and find yourself behind the wheels of a tank. The camera will switch to an isometric view. Destroy enemy tanks.
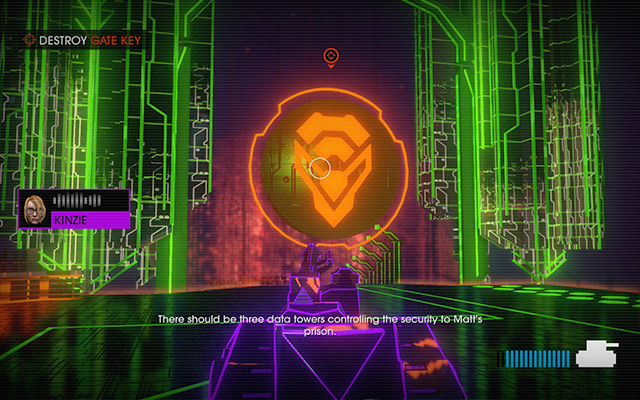
In a while, the camera will switch back to the third-person view, and you'll have to move around the grid and destroy towers. See the screenshot for reference.
Follow the only available path, destroying both enemy tanks and aliens on the way. Sometimes, there will also be barricades, but you can blast them as well.
After reaching the last tower, Zinyak will put a force field around it and you won't be able to inflict it any damage. A new batch of enemies will also arrive, so occupy yourself with eliminating them until your tank is destroyed. At this point, a motorcycle will appear (hand-marked) so don't waste your time and get on it.
Now, simply keep moving until you reach the end of the track, avoiding damage and obstacles. The large green arrows will point you in the right direction.
After a while, you'll be transferred into a room with two doors. Choose the blue one on the left to trigger and minigame in which you'll have to answer some questions.
To each question, there is only one correct answer, but if you chose a wrong one, you won't fail. You can try your luck or use the answers below:
Approach The Computer -> I Am A Slave -> Fly Towards The Purple Star -> Enter The Purple Star -> Drink The Wine -> Wake Up -> Make 2 Martini Glasses Out Of Coconuts -> Offer The Architect A Drink -> Your Mom's A Slave -> I'm Sorry -> I Said I'm Sorry -> I Want To Rescue Matt Miller -> And Who's That? -> Then Where's Matt? -> Let's Do This -> I Know You Can Beat Him, Matt! -> Punch Killbane -> Punch Killbane Again ->Time To Go, Matt -> Answer The Phone
After that, the mission ends.
Rewards:
Enter The Ship through one of the Gateways, then go talk to Kinzie; her location is marked with a star.
After the cutscene, you'll be controlling a robot and your task will be to rescue Matt. Follow the star, eliminating whatever enemies show up on the way. You'll get to a spot where you'll have to reach a platform. Press Space to get in air, and use F to reduce distance to earth. On the right, there will also be two bars - blue indicates your robot's resistance, white indicates the energy consumed for flying. Destroy blue crates scattered around the ship and collect the devices that were inside them - they will regenerate your health.
Some doors will be blocking your path, so press SHIFT to perform a dash and blast through them.
Keep following the star, dispatching enemies on the way. You'll reach a corridor with two platforms separated by empty space. Fly above to reach them.
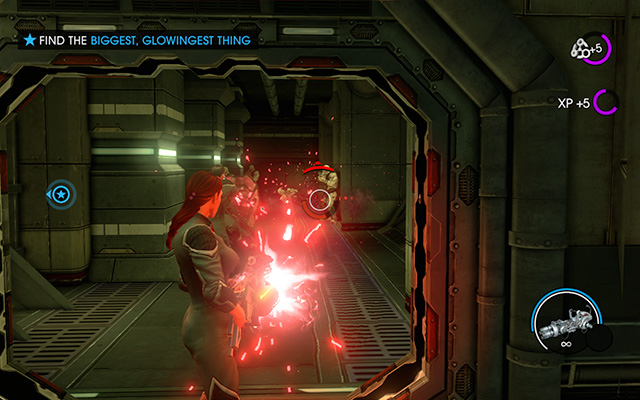
Keep moving forward until you find Matt. You'll enter the next room. As Matt looks for parts to upgrade your robot, you'll have to defend him against incoming aliens.
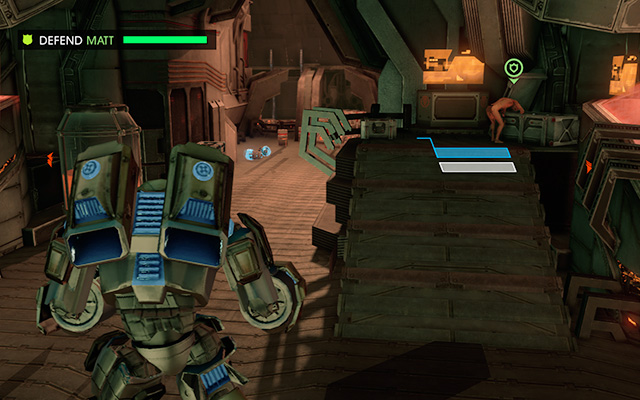 Naked matt looking for robot parts
Stay close to Matt and dispatch those aliens that get too near. This way you'll have control over what's happening around Matt and the aliens won't be able to harm him. Once Matt stops looking for parts, eliminate the rest of the enemies, and you'll receive a new weapon.
Try it out on the new wave of aliens. Hold LMB to shoot in series. You can zoom while holding RMB.
Move on to the next room and follow the star. You'll reach a platform where Kinzie is going to escort you, but getting there will take her some time. Once again, you'll need to defend Matt against the aliens. Use the newly acquired weapon, but when your health bar drops too close to zero, look for blue crates to regenerate. After a while, your weapon will stop working, so you're going to have kill the aliens the old-fashioned way. It won't take long, though, because Kinzie is just around the corner. Once she arrives, run to the ship and get inside.
You'll take control over the ship's gun. Shoot the aliens' ships as they attempt to destroy you. A little later, a bigger enemy will show up, but you can ignore it - it has a shield that's going to protect it against your fire.
A few minutes later, you'll find yourself right in front of the entrance, but so will the bigger ship. Its shield protects it from your fire, but there are two columns on its sides that you need to destroy. They have a red target marker on them, so just shoot until they explode. You ship will safely fly through the gate, ending the mission with it.
Rewards:
After the last mission, you'll find yourself on The Ship. Get to the marker and press E to start the mission. You'll be transferred straight into the simulation, and another Warden will pop up. He'll have a new super power - a stomp that shakes the ground. Avoid them by using Super Jump, and kill him the well-known way - first, destroy the shield with a super power (either Freeze Blast of Fire Blast), then shoot him with any weapon.
After a while, a QTE sequence will be triggered, so follow the prompts until the bar fills up in purple. Once the battle is over, you'll receive a new super power and find yourself back in the training simulation.
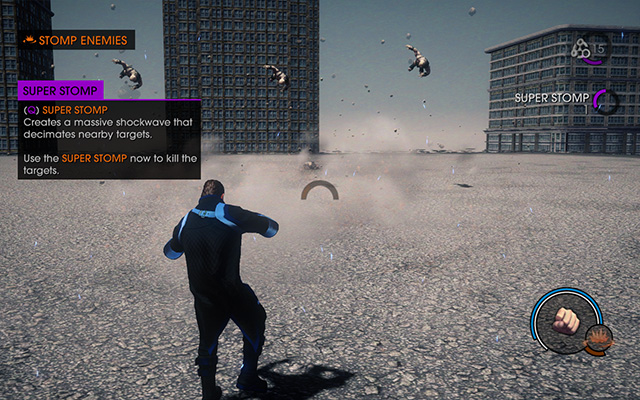 You can say Super Stomp teaches how to fly...
The new super power is called Super Stomp, and to perform it, press F3. It works similar to what Warden has been using just earlier, throwing back everything around, both aliens and vehicles, and inflicting some damage. Using it, eliminate all enemies.
Warden will show up last and you'll learn that you can also use Super Stomp to get rid of his shield. Do so and finish him off afterwards, ending the mission.
Rewards:
You'll now have the opportunity to test Super Stomp in a newly unlocked Activity - Fight Club.
Fight Club is divided into several rounds - each one will have you pitted against different types of opponents, and in the last one, you'll fight the boss. The faster you reach the last round and defeat the boss, the greater will be your rewards.
Keep your eye on the battle ring so as not to miss new items that will keep appearing around you; you can use Telekinesis to throw them at your opponents. It's especially useful against the on-fire enemies, because they'll burn you if you get too close, rendering you unable to fight or move for a few moments. You can buy an Upgrade, though, that will prevent you from catching fire.
Once the Activity ends, so does the mission.
Rewards:
Get to the star-marked location and begin the mission.
You'll find yourself on board the plane from the first mission in Saints Row The Third. You won't have access to your super powers, and your only means of defense is going to be a handgun. Use it to kill the enemies there. Follow the star going from one room to another, all the while keeping an eye out for more enemies. After a while, you'll reach a room in which a cutscene will trigger.
Afterwards, resume following the star. On the way, though, there'll be holes in the floor - if you fall into any of them, the game will automatically transfer you back to the beginning. Jump over them by pressing Space. Don't forget - you can't use Super Jump, so be careful.
Keep moving forward until you reach the club. Shaundi and her crazy boyfriend who had taken her hostage will be waiting for you downstairs. Use the taser to electrify him first, then kill him with the handgun.
 An awkward situation...
Shortly, there will be more guns to choose from, so pick up whatever tickles your fancy to kill him. Unfortunately, conventional weapons won't be enough to send him to the ground, so a new weapon will fall into your hangs, a Disintegrator. You'll find it in a hand-marked crate. Pick it up and start shooting Shaundi's boyfriend's clones.
Once they're all dead and the cutscene plays, the mission comes to an end.
Rewards:
First, get to the star-marked location and press F to start the mission.
You'll be transferred to a villa where you'll see Pierce fighting a man dressed as a can (and from now on, these types of enemies will be referred to a "cans"). When you kill him, more will run out. You're going to need better weapons, so get upstairs to a crate with and SMG (marked with a hand). Collect more weapons from more crates from other rooms, killing more cans as you go.
A few minutes later, you're going to need to run outside to pick up a rocket launcher left by the swimming pool. That's when Paul, a giant can, shows up. As you unload the launcher on him, look for covers each time you see him attack (he will either punch a blow with his fists or shoot a laser from his eyes). Crates with rocket launcher ammo will keep appearing around you, so pick them up and don't stop firing at Paul. You'll have to fend off some regular cans as well.
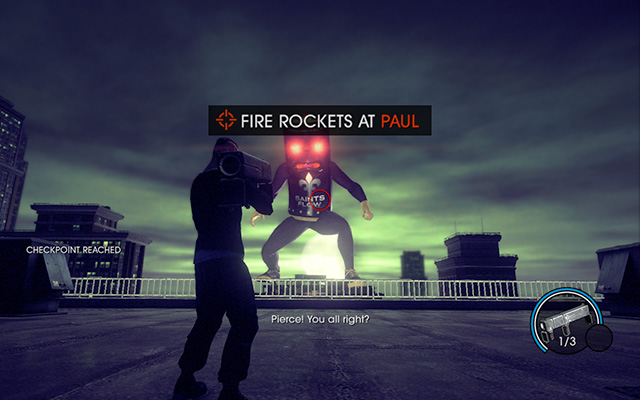 A less than even odds
Several shots later, Paul will drop unconscious. At this point, Pierce will fly in a helicopter to get you, so get in. You'll fly to an island with a giant statue which you're going to have to control to kill Paul for good. Run to where the star points, and once you're in control, simply keep pressing LMB to finish Paul off. He'll drop to the ground again, with an exclamation mark above his head. Approach him and press E to get rid of permanently.
Rewards:
Go to the star-marked location and begin the mission.
You'll be transferred into a simulation that mirrors the old Stilwater. Start moving forward; after a while, you'll be attacked by gang members. Kill them using just your fists and keep moving towards the church. Another wave of enemies will come at you just in front of the entrance, so dispatch them and walk inside. There are three places to check out inside the church, and the stars will lead you right to meeting Ben King. After a short conversation, more gang members will start showing up, but now you'll have some decent weapons to fight them off with.
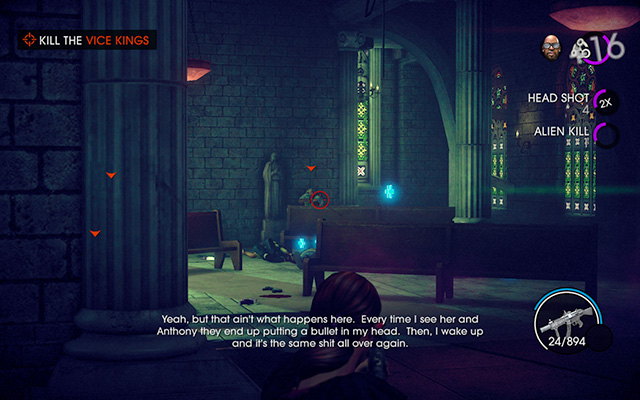 The shootout in the church
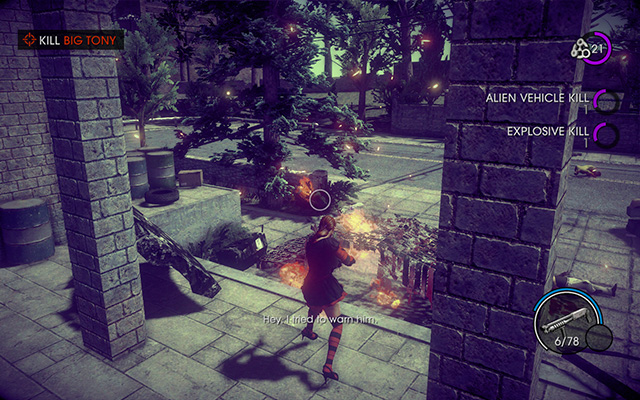
In a while, you'll step outside where more gangsters will keep trying to kill you. Kinzie will send you a hand-marked rocket launcher. Pick it up and shoot the incoming enemy cars. Several seconds later you'll realize that Ben King is no longer with you, but has been wounded somewhere on the way. Follow the purple marker and all kill the gangsters you find close. Remember that you only have 30 seconds to rescue Ben King, otherwise the mission fails - so don't waste time.
Afterwards, a stronger enemy shows his face - Tony. Use the rocket launcher to destroy the car he's in. If you run out of rockets, simply get close to the car and shoot Tony with a shotgun.
 "Are you okay?"
Once the kill is done, keep following the star until you find yourself up against Tanya. First, kill the remaining gang member, then proceed to taking care of her. Same as before, use the rocket launcher if you have ammo - if not, stand as close to Tanya as possible and shoot her with the shotgun.
Same as you, Tanya can also use Telekinesis, so try to avoid the object she tries throwing at you.
Once Tanya is dead, the mission ends.
Rewards:
As always - get to the star-marked mission location to begin.
After the cutscene, follow the hallway until you get to a locked door. Wait a moment for Asha to open it, then go inside. Shoot the lamps indicated by a red marker. Destroy them one by one as you go.
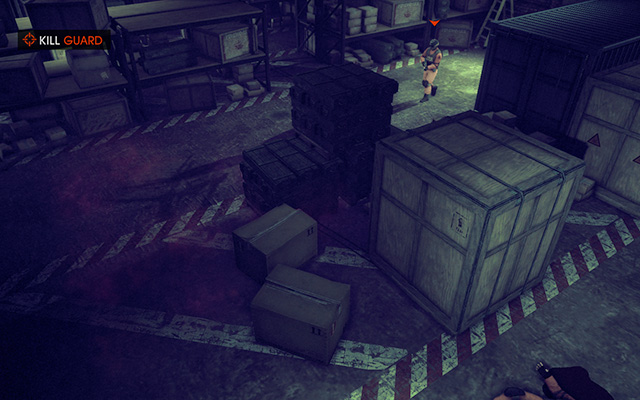
On the way, you'll run into several guards - remember to destroy the lights first, the guards later. You can kill them with a shot to the head or by standing behind them and pressing F to perform an execution.
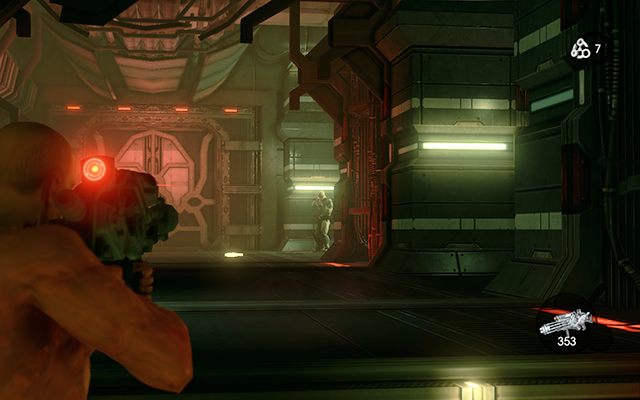
Eventually, you'll reach a room in which you'll hide in a box. Keep moving forward and killing the guards (by execution, so stay behind them). Once all are dealt with, proceed to the next room. You'll find yourself in a hallway protected by quite a lot of lasers. There's no way is around it, so use the air duct (hand-marked).
 I've this somewhere before...
Once the cutscene ends, start moving forward, then kill every guard that runs in front you. When it's clear, enter the next room. It's a huge place resembling a server room.
A while later, there will be new waves of guards to eliminate. When you do, Evil You will show up.
During the battle with Evil You, try to avoid the fire of guards and robots. Trying to shoot them will only slow down the fight. You need to keep moving, but don't forget to take cover - otherwise Evil You will shoot you down with a sniper rifle.
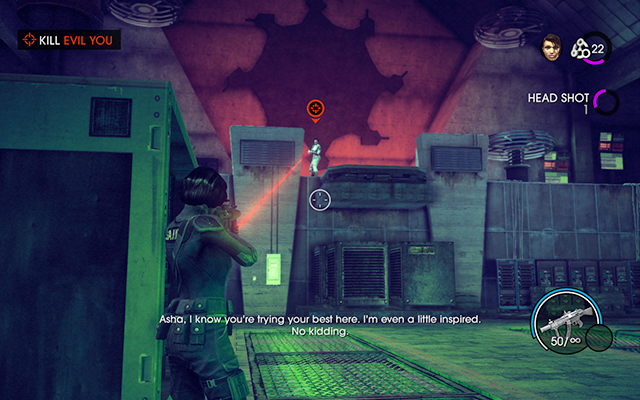 Fighting yourself
Evil You will be able to regenerate thanks to the generators repeatedly powering up. Destroy them as soon as they switch on - it's very important.
If your health bar drops too low, just kill one of the guards for a health pickup.
It's also possible that Asha sustains too much damage and you'll only have a minute to save her, so keep your eyes open.
After killing Evil You, a cutscene will end the mission.
Rewards:
Simple: enter the simulation and listen to what Kinzie has to say.
After you talk to CID, go to the star-marked location. Once there, use Telekinesis to throw CID into air.
A new star-marked location will show up, so get on your way. You're going to have destroy the transmitter - a few shots with any weapon will suffice. There'll be heaps of enemies too, but ignore them; they'll just keep coming.
Next, CID will pinpoint the desired location and you're going to have to throw it in air again. Do so and move to the next location with transmitters (star-marked). Destroy both of them and move out.
 So colorfully!
The next transmitters are protected by a barrier - again, throw CID across the barrier using Telekinesis; the barrier is just above the platform (star). While CID is busy deactivating the barriers, you're going to have to defend it. Once the barriers are gone, destroy all transmitters and get your move on to the next location.
Once there, repeat the process - throw CID across the barrier for it to deactivate it, then defend it against enemy fire. This is when a new type of enemy shows up - Marauder. If you try shooting straight at him, you'll inflict only minor damage, but luckily, he has a weak spot. There's a panel on his back that shines in green. That's your target.
Once he's dead, the barrier on the transmitter deactivates - destroy it and move out.
In the next location, you'll see huge amounts of clones. You need to catch them using Telekinesis and throw them into the star-marked portal. When you do, another clone will jump out of the portal. Before you try throwing him back, deal some damage first. Two other clones will jump out afterwards - repeat the process.
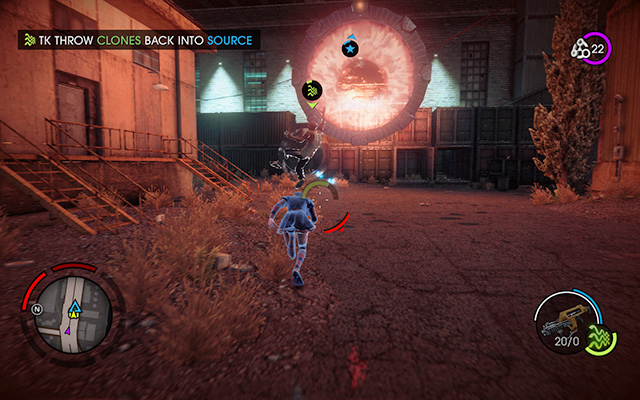 And into the portal you go.
At this point, Kinzie will give you the location of a Warden. Get there and kill him the usual way. Absorb his power during the QTE sequence and you'll be transferred to another training simulation which will teach the use of a new super power - Buff.
Fire Buff gives you the power to temporarily add a fire effect to your bullets. Every time you shoot an enemy, they will catch fire. The other thing about Fire Buff is that when it's active, all enemies that try to get close to you will catch fire too.
Follow the instructions and eliminate enemies until a Warden makes his appearance. You'll now learn that Fire Buff is also effective against his shield. Use the super power to destroy it and finish the Warden off to end the mission.
Rewards:
You begin the mission on The Ship. After a cutscene, you'll be transferred into another simulation, the old sidescroller style. Move to the right and eliminate the approaching enemies. To collect weapons lying on the ground or food that replenishes your health, simply approach them.
This mission stage is very simple and doesn't require a detailed walkthrough. Move right, eliminate enemies and reach the end.
In the next stage, you'll be transferred back to the alien mother ship and get in control of the robot. Follow the star and get rid of the enemies.
After a while, you'll reach a hallway you remember from the "Zero Cool" mission. Fly on the first platform and kill all aliens. Marauders will show up again - destroy them by shooting the green spot on their backs. You can also just evade them and follow the star to reach the next room.
 Back to the classics
Once there, your objectives will turn into "Kill Everything". A bar will appear in the top right corner, which you're going to need to fill in red by killing all aliens that show up in the area. The room has several floors, so gliding is important.
Destroy blue crates and collect gear that drops out of them to replenish your health, and shoot the red barrels once enemies are close to them. The explosion will drop them dead much quicker.
Once the bar fills up in red, the star-marked door will open. Go through them and proceed forward, eliminating whatever aliens remained. A cutscene will announce the end of the mission.
Rewards:
Go to the star-marked location to be transferred into the training simulation.
You'll learn how to use the Death From Above super power. First, go into air using Super Jump and press RMB. You'll freeze mid-air and will be in control of crosshairs.
Use the crosshairs to point the target. You'll deal area damage and throw back enemies within range.
Kill the approaching aliens the same way, and the mission will end shortly.
Rewards:
XP
Meet with your crew in the warehouse (the star-marked location). A short cutscene will introduce you right into the next shootout. The warehouse will be attacked by aliens - keep them off until the tanks arrive. When they do, pick up the rocket launcher and shred them to pieces (they will be three, all with a red target-marker).
Once the tanks are gone, you'll need to get to the roof. Use the main door to leave the warehouse and take the stairs on the right. As you go, dispatch whatever aliens come in your way, then get to the helicopter.
Flying the helicopter isn't difficult. SHIFT - lift off; CTRL - descend; WASD - directions; SPACE + WASD - quick turn.
Naturally, LMB and RMB correspond to weapons, which are the usual machine gun and rocket launcher. Get into air and destroy everything the minimap has marked in red. Soon, two Saints will get to a car which you're going to have to protect. Follow it slowly, destroying all alien cars in pursuit. UFO ships will keep appearing also, so be on your guard.
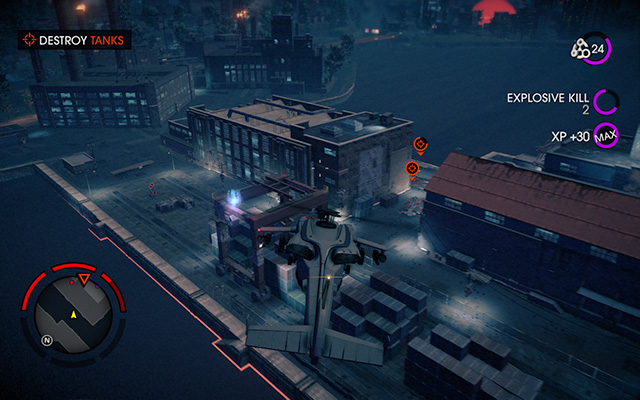 Almost Airwolf
Several minutes later, the car will stop and you'll have to do reckon. Approach the star-marked location to destroy the tanks dispatched there. Afterwards, follow the car again, all the time defending it from enemy fire.
All good things eventually come to an end, which means your helicopter will crash. You and your crew will land on the roof of the building where Genki's game show takes place. Go inside through the only door available and you'll find yourself in the main room shortly.
Grab one of the guns attached to the grid and start killing aliens running towards the arena. Genki himself will show up too, so kill him without regret.
Once Kinzie stops hacking, move to the reward room. You'll find a car there, so get in and use the rocket launcher - with infinite ammo - to fight back new aliens. When needed, destroy road blockades.
A while later, a cutscene will play and you'll be transferred back to The Ship.
Approach Kinzie, who is still trapped inside the simulation. Aliens will start storming the room, so kill them, then go down where there's more of them.
When the area is clear, follow the star. Talk to CID and proceed forward. Rescue Shaundi from aliens, then check the device hanging on the wall. These are bombs which you need to take with you.
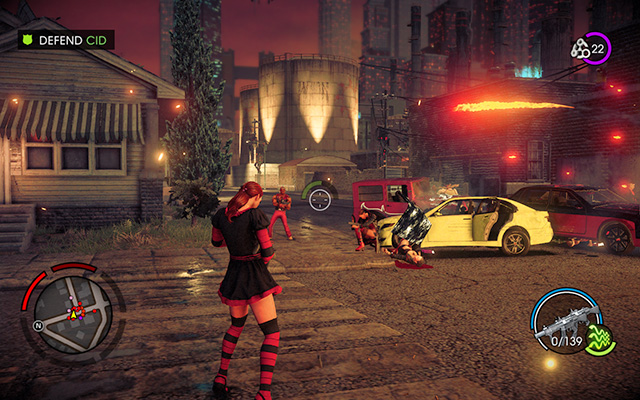
 I don't think they have any chances...
Now, follow the star, dispatching aliens on the way. There are two hand-marked places where you need to set the bombs. Once you set the last one, run after the star, holding SHIFT to sprint.
When you're in the clear, the mission will end.
Short and simple - get to The Ship and talk to Matt.
Rewards:
None
Enter the simulation and go the where the star points. When the cutscene ends, you'll be attacked both by civilians and aliens. Kill them, then enter the building which Keith has escaped from. You'll find a Marauder inside, so do what you always do - approach it from behind and shoot the green panel. Get rid of the rest of the aliens and robots, then move to the second floor. Dispatch the enemies there to trigger another cutscene.
You'll find yourself in an alley, so proceed forward. After the cutscene, run into the building next to you and fight your way all the way up to the roof.
 A little too many...
On the roof, you'll see several dozen CIDs circling around the barrier - you're going to have to get rid of them. A solid number of aliens will concentrate their fire at you, so pick a good spot to hide and start eliminating the CIDs.
When it's done, get to the upper roof and destroy the hand-marked satellite dish. The first stage of the mission ends right after the cutscene.
Rewards:
Now, meet with CID in the star-marked warehouse. CID will start going crazy, so just follow him. It'll find a rabbit drawing on the wall. Approach it and press E. A gate will appear - go through it and once again you'll find yourself in the 50s.
Kinzie will be right next to you. To approach her, you're going to have step on the flowers she had just planted. It will turn out she's not the real Kinzie, so get in the car parked by the curb and drive off.
You'll notice that several cops have taken Kinzie with them - chase after them, trying to hit them with your vehicle. After a while, they'll stop and get out, so do the same and show them the might of your fists. Unfortunately, this will not be the real Kinzie too.
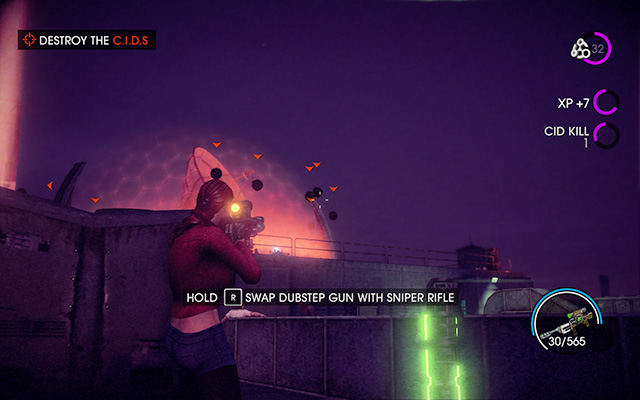
Stand in front of the town hall and listen to what Cyrus has to say. After a while, you're going to have to destroy 4 loudspeakers lying around the area. Approach the first one and press E to re-wire it. After that, Matt will send you a Dubstep Gun in a crate.
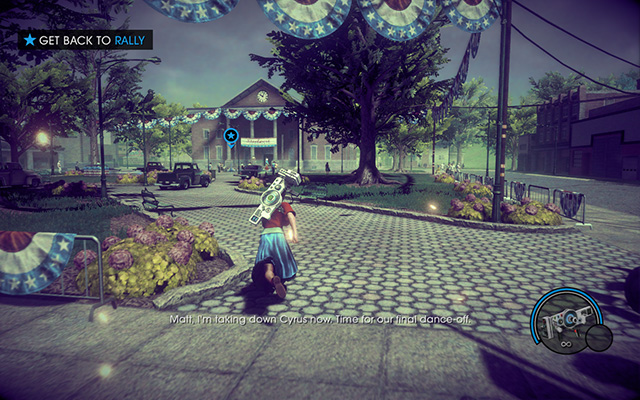 Dubstep conquering
Now go and re-wire the remaining loudspeakers. Watch out, because each time you do it, vans trying to kill you will show up. Avoid or destroy them using the Dubstep Gun.
After re-wiring all the loudspeakers, go back in front of the town hall and approach the star-marked spot. A short cutscene later Cyrus will invite you for a fight.
Your Dubstep Gun will receive new, stronger ammunition - a song, actually. Take down both Cyrus and the police that will also try to end you. Once the battle is over, approach Kinzie and the mission will end shortly.
Rewards:
Meet with Gat in the simulation, then make your way to the military base marked with a star. A large bunch of aliens will appear there, and you'll be busy opening lockers with your Telekinesis. There are several of them, so keep looking until you find the CPU.
When you do, move out to the next location. There will be three generators to destroy and items to pick up after them. The generators are hand-marked, so just shoot them one by one.
Once you've collected all the items, Gat's helicopter will start going down. Move to the next star-marked location where you'll be attacked by a new wave of aliens. Kill them all to let Shaundi land. Dispatch Marauders the usual way - by shooting the green panel on their backs.
When Shaundi lands, get into the helicopter to end the first stage.
Rewards:
Now, meet with CID; Fun Shaundi will also be there. Your goal is to find an energy source. Go to the first one (star). You'll notice that a new bar appears in the top right corner. The closer you are to the energy source, the more the bar is going to fill up. The first one is just behind the tall building. Go there, dispatch all aliens and take the source. Simply approach the device and press E.
Make your way to the next location. First, you're going to have to destroy the protective barrier around the second source. Start by clearing the area of the alien presence, then destroy the generator and pick up the source.
Move to the third location. Repeat the process - kill all aliens and destroy all generators. It will turn out, however, that the energy source had blown up. Don't worry, in a minute CID will find another location to draw the energy source from.
 A little technology and you can get lost
Follow the star until you see several new generators. The ones that are the closest to the building need to be destroyed by approaching them and pressing E, the rest you can take down with weapons. Don't forget about the aliens.
Once the area is clear, destroy the two remaining generators. You'll learn that the energy source in hidden inside the tank - so you're going to have to take the tank with you.
Get inside and make your way to the star-marked location. You need to hurry, though, because if you can't get there in time, the tank will explode. Check the counter in the top right corner.
Reach the designated spot to end the mission.
Rewards:
Talk to Kinzie on the The Ship to start the mission. Make sure you have everything you need, especially ammo. Select Accept and watch a short cutscene.
Now you need to pick your team. The first one will help you transport the key, the second destroy the simulation, and the third get to Zinyak.
Choose the team that suits you the most and move out. Enter the simulation to begin the last mission.
You'll find yourself on the back of a truck, holding a rocket launcher. Use it to destroy your tail. Soon, the truck will be halted. You're going to have use Telekinesis to pick up the key and take it to the star-marked portal. You'll find CID there to open the door for you. Leave the key in a safe location, preferably by the stairs, and go protect CID against aliens. Marauders will also make their appearance, so do what you always do - shoot the green panel at their backs.
After a while, CID will open the door - pick up the key, go inside and into the portal.
You'll be transferred to a huge place where you need to protect the key. First, activate three devices marked with the Super Stomp icon. Get to them and use the super power to power them up.
 Quite a lot of space
Follow the key, eliminating the aliens on the platforms. In a moment, the key will be locked within a shield, so you need to destroy the generators that supply it with power. They're hand-marked - get to them, kill all aliens around them, destroy them.
Continue defending the key and dispatching aliens. Your last task will be to destroy the three weird-looking towers. Use one of your weapons for that - the towers are pretty fragile, so you shouldn't have any problems. Watch out for two Wardens that are going to show up, though you may as well ignore them.
Once the key is in place, the first stage concludes.
You'll be back on The Ship. Select the second team and enter the simulation again.
You need to get to the first portal, which is marked with a star. Once there, kill 10 aliens, then defend the portal for one minute. To take down the UFOs, use either Freeze or Fire Blast - they'll do the job much quicker.
When you're successful, it's time to proceed to the next portal. This time you're going to have to defend it for a minute and a half. Use the same tactics - Freeze/Fire Blast against the UFOs and other types of vehicles. The area is pretty small, so the shotgun, the best short-range weapon, would be the best choice here.
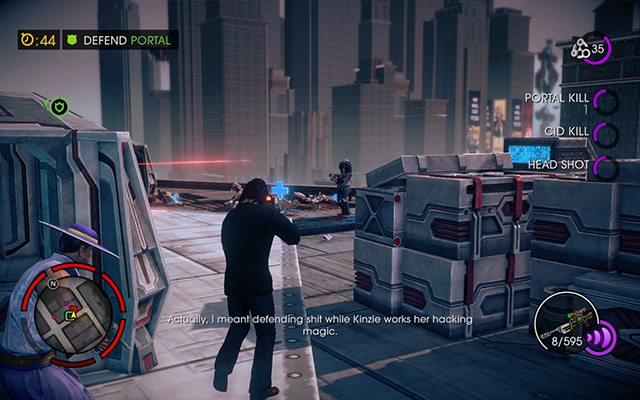 Just like a slaughterhouse
Afterwards, make your way to the third portal. You'll be on your own now, tasked with defending the last portal for two minutes. When the time comes, a star will point you to where you need to jump. Watch a short cutscene in which Paul from "The Boss Goes To Washington" jumps out of the portal.
Since the entire simulation is falling apart, it's time to run. Get to the first star-marked Gateway. Remember that this stage is timed, so make haste. Upon reaching the Gateway it will turn out that it's closed. Fly to the next one, unfortunately closed too. Luckily, the third one is real this time, do run to it and watch as everything around your breaks.
You and your last team will be transferred to the alien mother ship. Your goal is to reach the armory, so get to it, clearing the path as you go. The armory door will be locked. One of your homies will take care of the panels, and you need to defend them in the meantime. Take cover behind some crates and shoot the approaching aliens.
When the door finally opens, go inside and put on the Power Armor.
A while later, you'll start falling down a long hallway. Don't touch the walls or the laser beams; dodge them using the WASD keys. When eventually you stop, go through the only available door and dispatch all aliens inside. Afterwards, proceed to destroying the red-marked devices and go back to the main room when you're done.
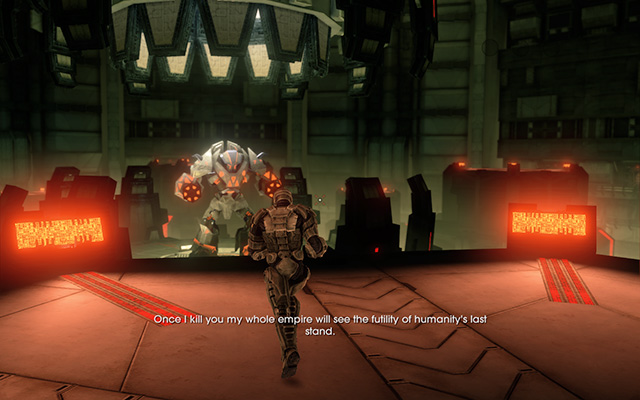
 I'm flying 'cause I want to...
You'll start falling again. Dodge the rubble, and quite a lot of it. Turn left towards the end to fly into the tunnel leading straight to Zinyak. Time for the final showdown.
Watch a short cutscene and get ready for the battle. Zinyak has jumped inside a giant robot. Use the only available weapon with unlimited ammo. Jump between platforms to dodge Zinyak's bullets and keep shooting your own. You can also take position at the very bottom of the room, where you'll be protected against missiles and have enough space to fire .
Soon, Zinyak will activate a shield around himself, and at the same time aliens and dozens of CIDs will swarm into the room. Catch them with Telekinesis and throw them at Zinyak's shield.
 The final showdown
Once Zinyak's health drops low enough, generators sustaining his shield will appear. For a moment, wait in a spot that protects you from attacks. This way aliens will focus all of their attention on your crew, giving you the opportunity to destroy the generators - hurry up, though, because they may quickly turn their attention back to you.
When all three generators are gone, Zinyak's shield will drop. Finish him off until the last QTE sequence is triggered. Follow the on-screen prompts.
Zinyak's rule has just come to an end and the Saints are once again victorious. Sit back and enjoy the last cutscene.
Congratulations! You have just completed the main campaign of Saints Row IV!
Rewards:
There are two different endings in Saints Row IV. Both are dependent on the Loyalty Missions.
If you failed to complete any Loyalty Mission prior to starting Punch The Shark, at the end of the game there will be an additional cutscene in which the leader of the Saints proposes taking over a new planet to rebuild the human civilization.
If you completed all Loyalty Missions, you will be given another ending in which Zinyak's former assistant informs the Saints that the Zins had invented time travel. As you may be guessing, the Saints decide to travel back in time and stop Zinyak from destroying planet Earth.
The first side mission involves purchasing some new clothes. Go to one of the available stores and spend your money on whatever you like.
Rewards:
XP
Chose any car and drive to a garage to customize it according to your whims.
Rewards:
XP
This mission will teach you the rules of one of the Gameplay Activities - Tower. Jump from platform to platform until you reach the top. On the way, there will be Warp Points to activate - otherwise the activation at the top won't be possible. Towers are also a good way to collect Data Clusters, since usually there's quite a lot of them there.
Rewards:
XP
Another tutorial Activity, this time for Fraud. The task is to extort insurance money by throwing yourself under moving cars. Run in front of such vehicles and press LMB to turn your character's body into a ragdoll. Using the WASD keys while in mid-air, land your character in a desired spot. Keep landing them on new cars, throwing yourself even higher in the air.
Rewards:
Tank Mayhem, another Activity, will be introduced to you here. You're sitting behind the wheels of a tank and your task us to create the biggest chaos possible. Destroy everything that moves - cars, people, even gas stations.
Rewards:
Talk to Kinzie on The Ship to start the mission.
Get to the star-marked location and initiate the Virus Injection Activity. To complete it, kill all enemies as they come.
Get to the star-marked store and hack it.
Same as previously - hack the indicated store.
The minimap will display a white-marked target - get to it and eliminate it.
Complete the Mayhem Activity on foot. Use the given weapon to create as much chaos as possible.
Take over the Flashpoint by killing all aliens within the area.
Another shot at Virus Injections. Kill all enemies that show up around you.
To conclude the mission, report back to Kinzie on The Ship.
Rewards:
Kinzie will send you to hack several stores. Move from one to the other.
Get to the star-marked location and initiate the Virus Injection Activity. Keep eliminating the enemies until it's over.
To complete the mission, go back to The Ship and talk to Kinzie.
Rewards:
To start the mission, go to The Ship and talk to Keith (his location is star-marked).
The first stage of the mission requires completing one Activity - Blazin'. It's a race that you've completed during one of the first main campaign missions. Follow the arrows, collect orbs to acquire speed-ups, and avoid fire.
Rewards:
Complete another Activity - Mayhem. This time, your tool of destructions is a Black Hole Gun. The weapon creates a black hole that sucks in everything in the area. The effect lasts only for a few seconds, so you're going to have to shoot quite frequently. You can, of course, shoot several black holes at once, so you shouldn't have a problem with dealing damage. The best place for black holes is where a lot of cars are gathered.
Rewards:
Another task involves taking over a Flashpoint, one of Gameplay Activities. Go to where the star indicates and get rid of aliens stationed there.
Rewards:
Next, ascend the Tower. Same as before, jump from one platform to another until you reach the top, activating Warp Points on the way.
Rewards:
A new location indicated in blue will be displayed on the map. Go there to eliminate an alien that has taken the form of a regular human. The map will show you four targets marked in white - only one of them is real (and much more resilient), so take them all out one by one until you find and kill the right one.
Rewards:
To complete the mission, go back on The Ship and talk to Keith.
Rewards:
To begin the mission, talk to Matt on the The Ship. His location is star-marked.
This stage is simple and you should be familiar with it. Make your way to the star-marked Flashpoint and kill all aliens.
Get to the star-marked Friendly Fire store and hack it. You can read about hacking in "Gameplay Elements - Hacking Stores" section.
Finish the Virus Collection Activity. Make your way to the star and destroy several cars marked in white on the minimap. Steal any of them, then drive to the designated location.
Report back to Matt on The Ship to complete the mission.
Rewards:
The first Activity to complete here is Platforming Rift. Make your way to the star and begin.
Platforming Rift is about jumping on platforms. The closer to the middle you land, the more points you get.
Get to the star-marked Flashpoint and kill all aliens to take it over.
Another well-known Activity, Blazin'. Complete it to proceed to the next stage.
To conclude the quest, go back to The Ship and talk to Matt.
Rewards:
Drive to the star-marked Hotspot and destroy it. First, take care of the three generators, then proceed to the primary one. The Activity has already been featured in previous quests, so you shouldn't have any problems with it.
The next Activity is Virus Injection. Get to the spot and kill the aliens as they show up.
Hack the mechanic's shop, Rim Jobs. You can read about hacking in "Gameplay Elements - Hacking Stores" section.
Another Flashpoint. Kill all aliens in the area to take it over.
To finish the quest, go back to The Ship and talk to Matt.
Rewards:
To start the mission, go to The Ship and talk to Gat.
Time to get rid of another Hotspot. Make your way to it (star-marked) and as usual, destroy the first three generators. When they're gone, the primary generator will show up. Go down to it, dispatch the aliens around and destroy it.
Another approach at the Virus Injection Activity. Kill all enemies as they come until the end of the stage.
Time for another Flashpoint. You know the deal - kill all aliens to take it over.
You'll now be sitting behind the wheels of a tank in Tank Mayhem. Destroy everything that moves to get the best score. Use LMB to launch a rocket, and RMB to shoot a laser.
Another Flashpoint. Do the usual and kill all aliens in the area.
To finish the quest, go back to The Ship and talk to Gat.
Rewards:
Take control over the robot in Mech Suit Mayhem. As in any other Mayhem, destroy everything that moves to score the most points.
Time to take over another Flashpoint. Go there and kill all aliens.
Another Activity challenge before you is Security Deletion. The minimap will display a target in white. Get to him and do the kill.
Once again, you're going to have to complete the Virus Injection Activity. Kill all enemies as they come.
And another Mayhem, this time inside a UFO. Use the ship to run rampage on the streets below. The more points you score, the better the rewards.
Finish the quest by going to The Ship and talking to Gat.
Rewards:
Once again, Virus Injection, so you know what to do - kill all enemies as they come.
Another Flashpoint to take over. Go there and clear the area.
You'll be back behind the controls of the robot. As in any other Mayhem, destroy everything that moves to get the best score.
The minimap will display a target in white - Mareo. Get to him and do the kill. You may want to use Blast Freeze when he's still in the car, then destroy the car.
Go back to The Ship and talk to Gat to finish the mission.
Rewards:
To start the mission, go to The ship and talk to Ben King.
Go to the star-marked location and destroy three generators to unlock access to the primary one, then destroy it too. Don't forget to eliminate the aliens in the area.
Get to the Flashpoint and kill aliens there to take it over.
Go to the star-marked store and hack it.
Another Virus Injection Activity. Kill all enemies as they come to complete it.
Go back to The Ship and talk to Ben King to finish the mission.
Initialize the Virus Injection Activity and kill all enemies. When you're done, you'll be automatically transferred into the next stage.
The minimap will display several targets in white. One of them is real, so kill them all one by one.
Go to the Flashpoint and eliminate all aliens to take it over.
Initialize Virus Injection again and kill all enemies.
Talk to Ben King on The Ship to end the mission.
Rewards:
Initialize the Virus Injection Activity. To complete it, kill all enemies as they come.
Take over the Flashpoint by dispatching all enemies in the area.
Complete the regular Mayhem. You'll be give an alien gun and the Super Stomp super power. Use the combination of both to inflict as much damage as possible.
Complete the Fight Club Activity. The Buff super power is recommended after the first round, allowing you to defend yourself and eliminate enemies much quicker.
Go to The Ship and talk to Ben to end the mission.
Rewards:
Talk to Fun Shaundi on The Ship to start the mission.
Complete the Blazin' Activity to proceed to the next stage. You should be already familiar with the rules.
Eliminate all aliens to take over the Flashpoint.
Complete the Speeding Rift Activity. Collect orbs on the way to replenish the energy and press E to activate it. You won't need to evade obstacles anymore, and your speed will increase.
Hack the marked store.
To end the mission, report back to Fun Shaundi on The Ship.
Meet Pierce on The Ship and talk to him to start the mission.
The first stage involves taking over a Flashpoint. Go there and clear the area.
Now it's time to complete the Fraud Activity. Use Super Jump to jump in air and enter the ragdoll mode to steer. Once you're close to the ground, try to hit a car to throw you back in air and let you score more points.
Take over another Flashpoint.
Go back to The Ship and talk to Pierce to end the mission.
Rewards:
Meet Asha on The Ship and talk to her to start the mission.
Complete the Blazin' Activity. The rules should be familiar by now - collect the green orbs and avoid fire to get to the finish line as fast as possible.
Take over the Flashpoint by clearing the area of the alien presence.
Initialize the Virus Injection Activity and kill all approaching enemies.
You should also be familiar with shutting down the Hotspots. Destroy all generators to deactivate the barrier around the primary generator, and destroy it too.
Report back to Asha on The Ship to complete the mission.
Rewards:
Meet CID on The Ship and talk to it to start the mission.
Complete Prof. Genkis's M.O.M. Activity. You should know the rules from previous missions - throw the correct objects through colored hoops and move to the next locations. The faster you are, the better the results.
Another Virus Injection Activity. Once again, kill all approaching enemies as they come.
Eliminate all aliens in the area to take over a Flashpoint.
Complete Blazin' again. Collect the green orbs and avoid fire to get to the finish line as fast as possible.
Talk to CID to complete the mission.
Rewards:
Meet Shaundi on The Ship and talk to her to start the mission.
Time for another Mayhem. You will be given several weapons and the Super Stomp super power at your disposal. Use the combination of both to inflict as much damage as possible.
Complete another Blazin' Activity - collect the green orbs and avoid fire.
Get to the Flashpoint and take it over by killing all aliens in the area.
You'll be transferred into another Fight Club Activity. The first round should go easy on you, but in the second you'll be pitted against Genki Girls who are going to "spam" you with super powers. Use Telekinesis to throw the orbs scattered around the arena at them. The third round shouldn't give you any trouble too - stand in the green circle, activate Freeze Buff and kill the approaching enemies. The last round is the boss fight - focus solely on him, ignoring the remaining enemies.
The last Activity in this mission - the minimap will display three targets with white markers. One of them is real, and is usually much more resilient than the rest. Find and kill him.
To complete the mission, go back to The Ship and talk to Shaundi.
Rewards:
Meet Matt in the star-marked location. He'll transfer you to a simulation he himself designed, where your super powers aren't available.
You'll find yourself in a casino. Shortly afterwards, you're going to have kill hordes of zombies. There's nothing to it; they can only harm you when they're close, so just move around and shoot with whatever weapons you have on you.
A few minutes later, Nyteblade will show up, and you'll have to leave the casino. Get in the car parked by the curb (star-marked) and follow him. You'll stop on the way several times to dispatch the enemies attacking you.
When you reach the destination, it will turn out that Zinyak has got his hands on the simulation and Nyteblade will start attacking you. Kill him to let Matt absorb his powers.
The mission ends.
Rewards:
Meet the two versions of Shaundi in the designated location, then follow the star. Kill all dealers first, then their leader, and pick up the drugs he dropped. As it turns out, they're fake, so proceed to the next location.
Repeat the process - kill all dealers and their leader, then pick up the drugs. This time, they'll work, giving both Shaundis super powers, and slightly enhancing your own. After a while, the Shaundis will start chasing each other, so just follow them until you reach the roof.
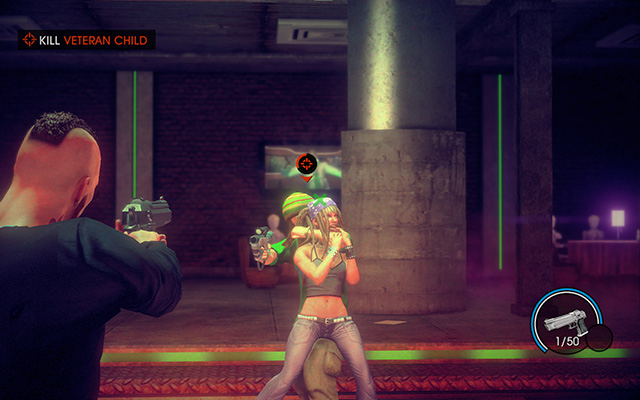
Jump down and get into battle with DJVC (Veteran Child). Kill the first wave of his fans. The second wave will consist of DJVC's clones - each time you kill one, the other will become stronger.
The last wave will have a shield similar in effect to the ones Wardens use. Use your super powers to destroy them, the kill the DJCV's clones with available weapons. Once they're all down, approach the real DJVC and press E to finish him off. Both Shaundis will receive super powers and the mission will end.
Rewards:
Meet Pierce in the star-marked location, and after a short cutscene, get in the car next to you and drive off.
When you get to the place, you'll need to destroy all of the monster trucks. Use the rocket launcher or Telekinesis to throw them in water.
When you're done, go back to the car and proceed to next location. There, you'll need to search the hand-marked crates and dispatch whatever enemies come at you. Unfortunately, none of the crates hold what you're looking for, but another one will appear shortly. Luckily, this one is real.
A while later, a star-marked car will show up, and you're going to have to tail it. Get in any available car and follow it.
You'll get to an airport where you'll be pitted against Maero. The battle isn't hard - simply destroy his shield the same way you deal with Wardens.
Once Maero is dead, the mission is over.
Rewards:
Meet Ben King and after a short cutscene, you'll find yourself on board a helicopter. Ben will give you a ride to the first location, where you're going to have to absorb the virus from one of the enemies. Kill them all first, and then the last one will get a hand. Approach him and press E.
Repeat the process with two other targets. When you're done, make your way to the star-marked strip club. Approach the guy at the end of the first room (hand) and sign up for a dance. When you get on the stage, a QTE sequence will trigger. Follow the prompts and just dance.
Afterwards, go outside - that's when Tanya shows up. Chase after her on rooftops until you eventually stop on one of them. Use your super powers to get rid of her shield, and attack relentlessly. When her health bar is hallway through, she'll start running again.
Keep going after her until she stops again and now kill her using the same tactics as before. When she drops to the ground, approach her and press E to throw her in the park. Go there yourself to trigger the mission ending cutscene.
Rewards:
Meet Asha. It will turn out that you're going to have escort a journalist, but without any super powers. Get in the star-marked car and make your way to the target destination. When you stop by the Planet Zin store, the journalist will go inside. Follow her.
There will be one person inside that looks suspicious. You can decide whether to shoot or not, but there's no threat, so it's not relevant. After a while, go back to the car and drive off.
When you reach another location, leave the car and run to where the star points. You'll be given a sniper rifle, perfect for killing the snipers that will start showing up on the rooftops. Click RMB to aim and one by one, get rid of them all. Afterwards, jump down and go back to the car. Asha will be driving this time, letting you kill all enemies chasing after you.
You'll stop soon, so leave the car again and dispatch all enemies you find in the area. It's going to take several minutes until Asha is able to call for another car. Once it's there, get in and proceed to next location.
This is where you'll meet the final opponent - Professor Genki. After you start shooting, he'll acquire super powers, rendering himself invulnerable to your attacks. Wait a moment until Matt gives you your super powers back. When he does, kill Genki the well-known Warden way - use the super powers to destroy the shield first, then unload your regular weapons on him.
Once he's dead, the mission is over.
Rewards:
Meet Gat in the star-marked location and you'll be both transferred to Super Genki Bowl television game show.
Pick up all the weapons from the shelves and proceed into the battle. You won't have access to your super powers for the duration of the first stage, so just use the regular weapons instead.
There's nothing to explain - eliminate everything that moves and keep going forward. Remember there's a time limit, so if you don't want to fail the mission, you better hurry up. Sometimes, you'll see paintings with different captions appearing on them. Shoot every one except the one that says "Non-ethical".
Once you score enough points, you'll see an "Exit" sign and will be able to leave.
Time for the second stage. You can use your super powers again (except Super Jump and Super Sprint), so things should get easier. Repeat the same process - keep going forward and eliminate the enemies on the way. There will also be Genki Girls here - they're more powerful than regular opponents, so be on your guard.
The last stage is shorter, but with a boss at the end. It's a character familiar from Saints Row The Third. Fight him as you would fight any other Warden - using the super powers to get rid of the shield, then finishing him off with firepower. When his health is diminished enough, Gat will jump him, ending the mission.
Rewards:
Meet Kinzie in the star-marked location, then make your way to the military base in which Cyrus is residing.
Get in the tank and use it to destroy the red-marked vehicles. Cyrus will then appear in a jet, so destroy it too.
Now it's time for the real play. Get rid of his shield and attack. After dealing him some slight damage, he'll disappear and summon a group of his minions. Dispatch them and go back to Cyrus. Repeat until his health drops to zero. Kinzie will take care of the rest and the mission will end.
Rewards:
Below are maps with locations of all collectibles in the game. There are three types of collectibles to find: Zinyak Statues, Audio Logs and Text Adventures.
 A Zinyak Statue
Zinyak Statues are usually found inside buildings or towers, so look around for them in the locations indicated on the map below.
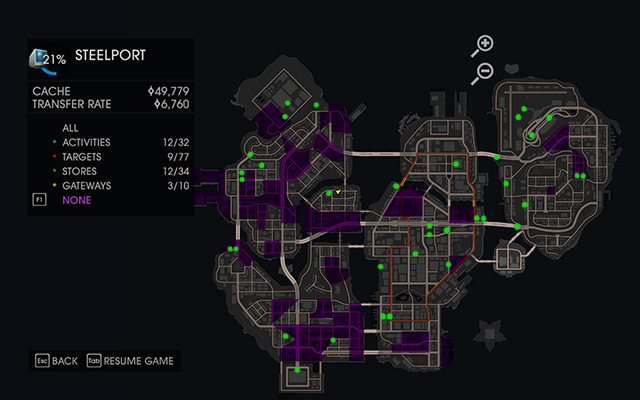
 Text Adventure
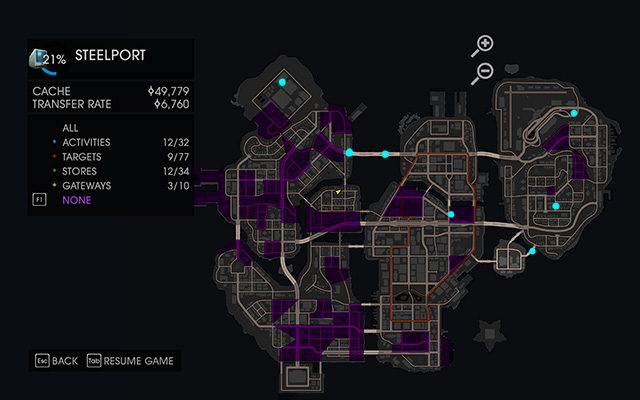
 Audio Log
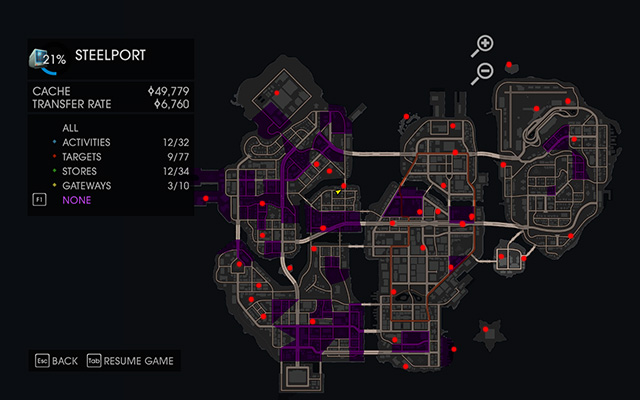
Complete One Other Challenge - complete at least one challenge. Rewards: Abduct-O Maniac (weapon), 1.500 cache, XP;
Complete Six Other Challenges - complete six other challenges. Rewards: bonus XP, 1.500 cache, XP;
Complete All Other Challenges - complete all challenges. Rewards: 15.000 cache, XP;
Blazin' Silver Medals - earn all Blazin' silver medals. Rewards: Damage - Fire 4, 1.500 cache, XP;
Blazin' Gold Medals - earn all Blazin' gold medals. Rewards: Golden Weapon Costumes, 1.500 cache, XP;
Genki's M.O.M Silver Medals - earn all Prof. Genki's M.O.M silver medals. Rewards: Telekinesis - Catch, 1.500 cache, XP;
Genki's M.O.M Gold Medals - earn all Prof. Genki's M.O.M. gold medals. Rewards: Genki Weapon Costumes, 1.500 cache, XP;
Insurance Fraud Silver Medals - earn all Fraud silver medals. Rewards: Explosions - No Ragdoll, 1.500 cache, XP;
Insurance Fraud Gold Medals - earn all Fraud gold medals. Rewards: Immovable Object, 1.500 cache, XP;
On-Foot Mayhem Silver Medals - earn all Mayhem (on foot) silver medals. Rewards: Gateway Cache Ammo, 1.500 cache, XP;
On-Foot Mayhem Gold Medals - earn all Mayhem (on foot) gold medals. Rewards: Gateway Cache Ammo 2, 1.500 cache, XP;
Super-Powered Fight Club Silver Medals - earn all Fight Club silver medals. Rewards: Homie - Genki Backup, 1.500 cache, XP;
Super-Powered Fight Club Gold Medals - earn all Fight Club gold medals. Rewards: Buff - Passive Aggressive, 1.500 cache, XP;
Vehicular Mayhem Silver Medals - earn all Mayhem (vehicular) silver medals. Rewards: Vehicle - Monster Trucks, 1.500 cache, XP;
Vehicular Mayhem Gold Medals - earn all Mayhem (vehicular) gold medals. Rewards: Vehicle - Saints Xor, 1.500 cache, XP;
Platforming Rift Silver Medals - earn all Platforming Rift silver medals. Rewards: Gateway Cache Ammo 2, 1.500 cache, XP;
Platforming Rift Gold Medals - earn Platforming Rift gold medals. Rewards: Glide - Distance, 1.500 cache, XP;
Speed Rift Silver Medals - earn all Speed Rift silver medals. Rewards: Telekinesis - Power Up, 1.500 cache, XP;
Speed Rift Gold Medals - earn all Speed Rift gold medals. Rewards: Sprint - Haste, 1.500 cache, XP;
TK Rift Silver Medals - earn all TK Rift silver medals. Rewards: Jump - Distance, 1.500 cache, XP;
TK Rift Gold Medals - earn all TK Rift gold medals. Rewards: Telekinesis - Power Up 2, 1.500 cache, XP;
Death From Above Kills - kill 100 aliens using Death From Above super power. Rewards: 1.500 cache, XP;
The easiest way to do it is to draw as much alien attention to yourself as possible. In the open world is usually enough to kill several civilians for the aliens to start showing up. When they do, use Death From Above to kill them.
Distance Super Sprinted - run a total of 25 miles using Super Sprint super power. Rewards: 1.500 cache, XP;
Superpowered Beatdowns - kill 10 aliens using only your fists. Rewards: 1.500 cache, XP;
Super Jump Air Time - be in air for a total of 1800 seconds after using Super Jump. Rewards: 1.500 cache, XP;
You can make it easier for you if you upgrade Super Jump to gliding. Climb the highest building in the city, then jump off of it and start gliding until you touch the ground. Completing the challenge shouldn't be a problem then.
Telekinetic Catches - catch 30 objects thrown by a Warden using Telekinesis. Rewards: 1.500 cache, XP;
The most difficult thing about this challenge is locating a Warden. You can find them during missions in which they make an appearance. Instead of attacking head on, just throw back the objects he's hurling at you for a while, until the challenge is completed. If, however, you've already completed all the missions, taking over Flashpoints is the way to go. In some of them, once you've killed all the aliens, a Warden will sometimes show up.
Telekinesis Kills - kill 30 aliens using Telekinesis super power. Rewards: 1.500 cache, XP;
Throw People With Telekinesis - throw 100 people (pedestrians) using Telekinesis super power. Rewards: 1.500 cache, XP;
Vehicles Super-Kicked - destroy 10 vehicles using super-kick after every Super Jump landing. Rewards: 1.500 cache, XP


 Smite Game Guide & Walkthrough
 Saints Row: Gat out of Hell Game Guide & Walkthrough
 SOMA Game Guide & Walkthrough
 Star Wars: The Force Unleashed II Game Guide & Walkthrough
 Secret Files 3: The Archimedes Code Game Guide & Walkthrough