
Welcome to the guide to Mass Effect. Here you will find walkthrough of all game: primary mission as well as side quests (or optional assignments if you prefer). When a specific quest could be completed in few different ways, I tried to describe all of them: some add to the Paragon points, the other to Renegade. A lot of attention is also paid to the exploration of the space. I marked minerals and other collectibles which could be found on specific planets.
Finishing Mass Effect once is not enough to reveal all secrets of the game. I encourage you to experiment, test various characters, pursuing different romances and find out personally who has better life - paragon or renegade.
Metatron
Before you start playing and immerse yourself in the world of Mass Effect, I propose to familiarize with some tips and comment for the beginning.
I won't suggest you to choose a specific class, because you travel most of the time with the squad, so what your character can't do could be complemented with talents of its members. It's best to choose one of the basic classes though, which are specialized in one of skill area: combat, tech or biotic. Only them can achieve a true mastery in a specific field. Mixed classes are more versatile but they lack good progress possibilities.
When you spend points to upgrade talents, remember to concentrate on chosen specialization rather than divide them evenly. It will help you to quickly develop a strong character. The same goes for the other members of the squad. It's better to make three specialist in different skills than three generally developed ones.
Here's a list of all classes and skills available for them:
Soldier
Talent
Ability
Assault rifles
Overkill
Assault training
Adrenaline burst
Combat armor
Shield boost
First aid
First aid
Fitness
Immunity
Pistols
Marksman
Shotguns
Carnage
Sniper rifles
Assassination
Charm
Store discount
Intimidation
Motivated buyer
Spectre Training
Unity
Soldier
-
Shock Trooper (after completing assignment 13.11.1.1. Rogue VI)
-
Commando (after completing assignment 13.11.1.1. Rogue VI)
-
Engineer
Talent
Ability
Basic armor
Shield boost
Damping
Damping
Decrypting
Sabotage
First aid
First aid
Electronics
Overload
Medicine
Neural shock
Pistols
Marksman
Hacking
Hacking SI
Charm
Store discount
Intimidation
Motivated buyer
Spectre Training
Unity
Engineer
-
Agent (after completing assignment 13.11.1.1. Rogue VI)
-
Medic (after completing assignment 13.11.1.1. Rogue VI)
-
Adept
Talent
Ability
Barrier
Barrier
Basic armor
Shield boost
Lift
Lift
Pistols
Marksman
Singularity
Singularity
Stasis
Stasis
Throw
Throw
Warp
Warp
Charm
Store discount
Intimidation
Motivated buyer
Spectre Training
Unity
Adept
-
Bastion (after completing assignment 13.11.1.1. Rogue VI)
-
Nemesis (after completing assignment 13.11.1.1. Rogue VI)
-
Infiltrator
Talent
Ability
Damping
Damping
Decrypting
Sabotage
Electronics
Overload
First aid
First aid
Fitness
Immunity
Pistols
Marksman
Sniper rifles
Assassination
Tactical armor
Shield boost
Charm
Store discount
Intimidation
Motivated buyer
Spectre Training
Unity
Infiltrator
-
Commando (after completing assignment 13.11.1.1. Rogue VI)
-
Operative (after completing assignment 13.11.1.1. Rogue VI)
-
Sentinel
Talent
Ability
Barrier
Barrier
Decrypting
Sabotage
Electronics
Overload
First aid
First aid
Lift
Lift
Medicine
Neural shock
Stasis
Stasis
Throw
Throw
Charm
Store discount
Intimidation
Motivated buyer
Spectre Training
Unity
Sentinel
-
Bastion (after completing assignment 13.11.1.1. Rogue VI)
-
Medic (after completing assignment 13.11.1.1. Rogue VI)
-
Vanguard
Talent
Ability
Assault training
Adrenaline burst
Barrier
Barrier
Lift
Lift
Pistols
Marksman
Shotguns
Carnage
Tactical armor
Shield boost
Throw
Throw
Warp
Warp
Charm
Store discount
Intimidation
Motivated buyer
Spectre Training
Unity
Vanguard
-
Shock Trooper (after completing assignment 13.11.1.1. Rogue VI)
-
Nemesis (after completing assignment 13.11.1.1. Rogue VI)
-
If you choose to play an adept - class with great potential, you should take with you Ashley - very good soldier and Tali, who specializes in tech skills. As soldier, you should cooperate with Tali and Liara, who is biotic. As engineer on the other hand, use the help of Ashley and Liara. This way during the combat you can not only use (directly or indirectly) a wide range of weapons, but also biotic and tech skills. It will make you prepared practically for everything.
When exploring new places, it's good to check all objects which will catch Shepard eye (they are marked with blue circle). Some of them will unlock new information in encyclopedia, which apart from gaining knowledge will give you experience points. This way you could also find containers and lockers with various useful things.
Hint 1! After finishing the game once, you can play again with your character on the same experience level and with the same equipment as when you was finishing Mass Effect for the first time. This is the only way to achieve 60 level (achievement). But it isn't as easy as it may seems - the game adjusts difficulty according to our advancement so combats become really challenging.
Hint 2! Alternative, but no less interesting idea is to finish the game second time but with completely new character. In Mass Effect, after gaining achievement for using given skill many times or killing specific amount of enemies with one type of weapon, you could create character with additional talent (the one related to the achievement). This way nothing stands in the way of becoming an adept who can use assault rifles for example.
Mass Effect is not Star Wars: Knights of the Old Republic. You can't stand neither on the side of good nor evil. You play as human and your goal is always the same, regardless of being paragon or renegade. The difference is paragon cares about other and is dedicated to make sacrifices in the name of greater good and renegade is uncompromising, aim for the win at any cost and show no consideration for others. It doesn't mean he's evil though.
When speaking with other characters, remember: choice of dialogue lines is made this way, that paragon statements are situated up on the conversation wheel while the renegade ones are situated down. When you want to go deeper into a specific subject, choose statements on the left side of the conversation wheel, when you want on the other hand to end talking with your interlocutor, choose the ones on the right. This division is characteristic for most conversations, although there are few exceptions. You shouldn't settle into a groove by picking blindly upper right statements expecting to gain paragon points or lower right to gain renegade points. The way you talk is less important that the way you complete quests. It happens that you could choose paragon statements to finish a mission in a renegade way and vice versa.
It's worthwhile getting points of paragon or renegade, because you will receive a lot of bonuses:
Paragon points
Renegade points
Hint 1! Apart from gaining an achievement, 75% of paragon or renegade points will give you an access to additional quest:
Paragon - 13.7.2.1. Besieged Base
Renegade - 13.7.5.1. The Negotiation
Hint 2! The choice of Shepard pre-service history determines the initial value of paragon/renegade points:
History
Alignment Bonus
Earthborn
++ Renegade
Spacer
++ Paragon
Colonist
+ Paragon, + Renegade
Ruthless
++ Renegade
War Hero
++ Paragon
Sole Survivor
+ Paragon, + Renegade
It seems that paragon should be a war hero born in space and renegade a ruthless guy/gal of Earth origin.
Hint! Choosing pre-service history in Mass Effect doesn't end in morality points. Your past accomplishments has effect on the way you are perceived now. There are also few quests related to your background. You'll find them in the chapter 14.
One of the most important talents are related to persuasion. These are charm and intimidate. There's no point investing in both, because their effect is similar. The difference is how Shepard brings other characters round.
Chosen talent should be improved as fast as possible. It's best to concentrate at the beginning on its development and prioritize it while gaining next experience levels. This way you could get a lot of additional experience and morality points. It happens sometimes that only thanks to persuasion you could avoid unnecessary bloodshed. Remember also, that completing a quest using charm/intimidate is usually rewarded better than doing it in a different way.
Statements which use persuasion are very easy to recognize. The charm ones are blue, the intimidate ones are red. Usually to get to use them, you must first choose statements situated on the left of the conversation wheel.
Charm/intimidate at maximum level is required to alter major game plot direction, which will unlock an achievement (Charismatic).
Charm/intimidate at higher level brings also additional, material gains - with the first you get discounts at shops, with the second you could sell your objects at better price.
Hint! If you choose to play this same character twice, as paragon and as renegade, it's good to spend persuasion points in a different way each time. Invest in charm first and at two third of game begin to develop intimidate. Use charm to the end of the game, but slowly improve intimidate. This way when you start the game the second time, intimidate will be developed and could be maximized. Remember, that with every experience level amount of points to spend on skills decreases. That's why advancing character while playing second time is really time-consuming and demanding.
Decryption/Electronics
These talents are almost that important as charm/intimidate. You should develop them as soon as possible so you could open locks and containers and decrypt information hidden in terminals. Without them you couldn't complete or even get certain quests.
Hint! You don't have to improve Shepard's decryption/electronics as long as you take with you character who could handle security at high difficulty level (e.g. Tali).
First Aid
Like in case of decryption/electronic, you should always have in your squad someone who has first aid at high level so he could cure all its members (this talent is used when you press Y to use med-kit).
Spectre Training
You will get an ability to develop this talent at one of the crucial plot moments. It is very important because it grants the unity skill that lets you revive your squad members if they are injured in combat.
Specialization
Side quests are not required to finish the game, but I suggest to complete at least one of them (13.11.1.1. Rogue VI). It will grant you possibility to choose a subspecialization. You could get this quest after gaining 20 experience level. Talent, which comes with the specialization, will let you generally build up your character.
Hint! Talents described above are useful to all characters, regardless of chosen class or morality. Development of the others depends on your idea for Shepard and on what combat style you prefer.
There's no limit to the weight of carried equipment, but there's a limit to its amount (150). While it isn't much problem at the beginning, later you have to watch out for not to be forced to leave or turn into omni-gel useful parts of your equipment. I propose to exchange them to more advanced ones systematically. Older, worse objects could be disposed in two ways: sold or disassemble to turn into omni-gel. Every object give the same amount of omni-gel, so it's better to sell more expensive equipment and disassemble cheaper ones. This way you won't run of money and omni-gel alike.
While your character gain new experience levels, you can get more advanced equipment. Objects found at the beginning of the game have little value and it's not worth keeping them in inventory in order to sell. Turn them into omni-gel instead, which will be useful later.
Hint 1! It pays to sell objects found approximately after 20 experience level.
Hint 2! Really valuable objects are not possible to get until 50 experience level. Try to complete side quests and gain as much experience points as you could and you will be able to achieve it near the end of the game. This way you could use solid equipment with lot of slots for upgrades.
As for weapon upgrades, I suggest to change tactics a bit. Remember, that some ammunition types are better against specific opponents, so you should be prepared to fight humans and aliens as well as synthetic geths. During combat, you can freely change weaponry configuration, so there's no problem with switching ammo types. In general, it's always good to have within reach upgrades which results in major injuries of synthetics beings, of organics beings and which let you go through the shields.
As for armor: before you get better one, which lets to mount more than one upgrade, you should mount upgrades that cure you automatically. This way your health will be constantly regenerated, not only during the combat.
Remember, that shops' assortment changes in course of the game. It goes by leaps: after gaining 18 experience level, after unlocking achievement Rich (accumulate 1,000,000 credits) and after gaining 50 experience level. It's not hard to guess that after the last change you could buy the best equipment: powerful and tough armors with strong shields as well as precise and deadly weapon.
Every part of the equipment which will you find or buy while exploring Mass Effect universe is produced by one of the corporations-manufacturers. If you want to buy objects produced by different manufacturers and not have to leave Normandy, you must buy license to merchandises of specific corporation. This way you could shop at deck dealer.
Sometimes you won't have another chance to trade with given merchant, so it's better to buy right away all licenses you will see.
Here's a table with all manufacturers, licenses prices and place of purchase. Remember, that the prices don't include discount given by persuasion.
Manufacturer
Cost
Where to buy
Aldrin Labs
100
C-Soc Academy shop - Citadel
Elanus Risk Control
100
Lower Markets - Citadel (Morlan), Salarian Camp - Vimir (Commandor Rentola)
Elkoss Combine
100
Upper Markets - Citadel (Expat), Emporium - Citadel (Delin), Port Hanshan - Noveria (Opold)
Hahne-Kedar
Free
Armory - Normandy
Sirta Foundation
100
Emporium - Citadel (Delin), Rift Station - Noveria (Petozi), Commandor Rentola - Normandy after rescuing him from Virmire
Ariake Technologies
6250
C-Soc Academy shop - Citadel, Commandor Rentola - Normandy after rescuing him from Virmire
Armali Council
6250
Salarian Camp - Vimire (Commandor Rentola)
Devlon Industries
6250
Emporium - Citadel (Delin)
Haliat Armory
6250
Zhu's Hope - Feros (Ledra)
Rosenkov Materials
6250
Port Hanshan - Noveria (Opold)
Armax Arsenal
30000
Upper Markets - Citadel (Expat).
Geth Armory
30000
Lower Markets - Citadel (Morlan).
Kassa Fabrication
30000
C-Soc Academy shop - Citadel, Rift Station - Noveria (Petozi)
Serrice Council
30000
Emporium - Citadel (Delin), Commandor Rentola - Normandy after rescuing him from Virmire
Spectre Gear
-
C-Soc Academy shop - Citadel, Armory - Normandy (after unlocking achievement Rich)
During the combat remember, that Shepard companions aren't too smart, so you should control their actions by commanding them to take cover, attack specific targets or move in given direction. Especially useful is command to take cover: your companions seek for nearest obstacle, hide behind it and shoot at enemies.
If you play as adept, avoid to come to the front. Instead stay at the back and attack enemies using biotics (e.g. singularity - talent especially powerful against whole group of opponents when appropriately advanced). You could send your companions at the front then. For this same reason, if you have an adept in you squad, you shouldn't send them at the front. Unfortunately, you can't give commands individually, so adept would run forward with the other member of the squad and expose himself to attacks. On the other hand, character trained to direct combat will be wasted staying at the back. This is why the best solution is to create Shepard-adept or soldier.
While fighting in Mako remember, that its armor is not very reliable while the distance to the target is short. It's way better to play sniper then. When you perceive enemies, switch to turret view, zoom and eliminate them one by one. In case of bigger vehicles, use the cannon. It's also useful to get rid of the covers. Missiles fired by armatures and colossi can be avoided just by jumping over them.
Difficulty level can be changed during all the game, but remember that if you want to gain achievement for finishing it on insanity or hardcore level, you can't do it even once.
Changing difficulty level effects in different strength, endurance and cunning of your enemies. On easy they aren't very challenging, on normal they are way weaker than us and only bosses could be a problem. On veteran and hardcore combats are much harder, while insanity level is really challenging even for experiences gamers and you shouldn't try it without well-suited, balanced and equipped in best weapons and armors (level X) squad, which you created while finishing the game earlier. On this level regular opponents have abilities equal to yours, minor bosses are way stronger and major ones will be a problem even for the best gamers.
Hint! This walkthrough is based on normal difficulty level.
Writing this guide, I noted which characters commission which quests. Some assignments however are given randomly, after arriving in certain cluster of while riding the elevator for example. In these cases I wrote in quest description how I got it. I can't guarantee though that you will get it in this same moment. It all depends on order of quest that you will choose.
I suggest to save the game quite often. Admittedly Mass Effect have auto-save system, but don't rely on it too much, because you could be moved back a lot after getting killed and that's something you surely would want to avoid.
And a little technical remark at the end. Colored words in the text are supposed to be treated as references. Blue send to individual chapters and quests, while orange to specific spots on the map. Green is reserved for hints, various useful information.

LEGEND (Map P):
1. Bridge - Joker
2. Communication Room - Nihlus, Adamson
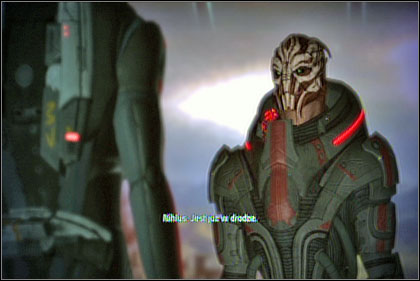
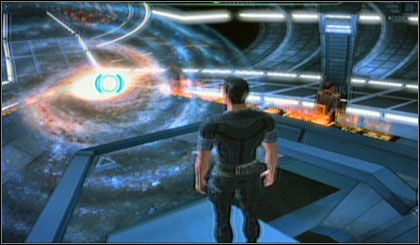
Game starts on the board of spaceship Normandy. After talking with Joker (P-1), you will be called by captain. Go to the communication room at the rear of the ship (P-2). You can speak with navigator Pressly and Jenkins along the way. After getting to comm. room speak with Nihilus. Anderson will enter a bit later. You will get your first assignment. After a cut-scene you'll land on a planet.
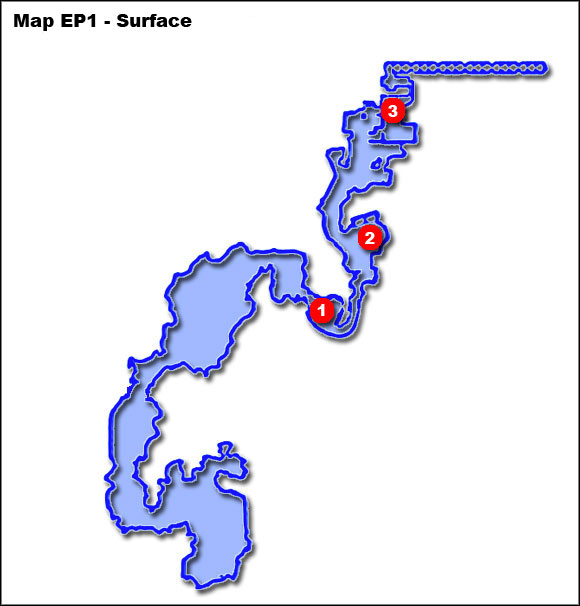
LEGEND (Map EP1):
1. Dig site
2. Camp
3. Train station
Before going further, enter the squad data and spend talent points. You can also take a while to get to know controls. Then go along the path.
Hint! It's good to spend first points on charm/intimidate. They will be helpful while completing quests on Eden Prime.
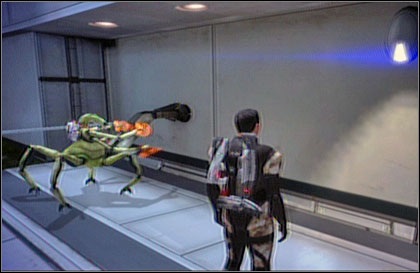
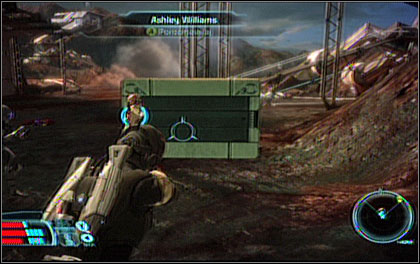
Soon Jenkins will be killed by geths. Eliminate them and examine Jenkins body. Continue north. You will meet Ashley who will join your squad. Continue further along the path.
You will see how geths treat captured humans. Kill the enemies and enter the dig site (EP1-1), then clear the area. It seems that the beacon you were looking for was moved away. Go northeast to the research camp (EP1-2).
After a short fight decrypt lock to the nearest cargo bin. Enter it and speak with the survivors. It looks like you need to go north to the train station. Kill all enemies there and break into cargo bin situated nearby.
You'll meet three farmers inside. While talking to a man named Cole you'll be able to use your persuasion talent (charm/intimidate) for the first time. This way you'll learn about weapons-smuggling ring and hear the name of man who was their contact at the spaceport. Receiving this information will gain you experience and morality points.
Enter the train station then and examine the turian body. Soon you'll meet Powell who managed to survive the attack. Talk with him to find out what happened.
Hint! If you talked with Cole about Powell before, you can now question him about his connection with the smugglers. It will let you use your charm/intimidation talent again and gain more experience and morality points (and a little material bonus as well).
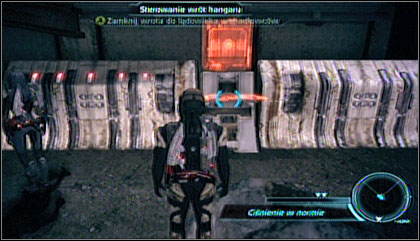
Now you just need to get to the train station control panel (EP1-3). There's a lot of covers along the way so you shouldn't have much problem with eliminating all enemies. Activate the train controls.

LEGEND (Map EP2):
1. Final train station, demolition charge
2. Demolition charge
3. Demolition charge
4. Prothean beacon
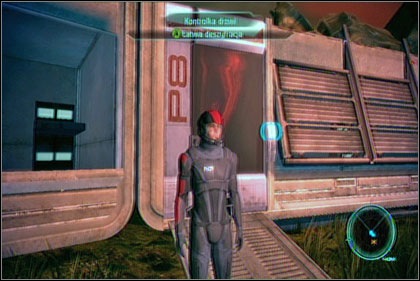
You have few minutes to eliminate geths and disarm four demolition charges. First disarm the nearest charge (EP2-1), kill enemies at the end of the walkway and then disarm the rest.
Turn behind the building and shoot down at the enemies. After clearing the area, search all containers and boxes to take the equipment. Then examine the prothean beacon (EP2-4).
You'll wake up on the board of Normandy. Talk with doctor Chakwas and captain Anderson and leave the medical bay. You can chat with Ashley along the way. Go upstairs on the higher level and enter the bridge to talk with Joker.
After landing and few conversations you'll retake control over Shepard. At this moment you can choose already whether to pursue the main plot or take the additional assignments. From now on I won't suggest you any order of completing missions. I will concentrate on what you can do while being in given location instead. Remember though, that access to some rooms can be gained only after visiting council in the Citadel tower. The best way to explore Citadel is to concentrate on mission 3.1. Expose Saren and completing side quests after that.
Hint! To travel quickly, use rapid transit points. You just need to use an orange terminal and choose the destination.
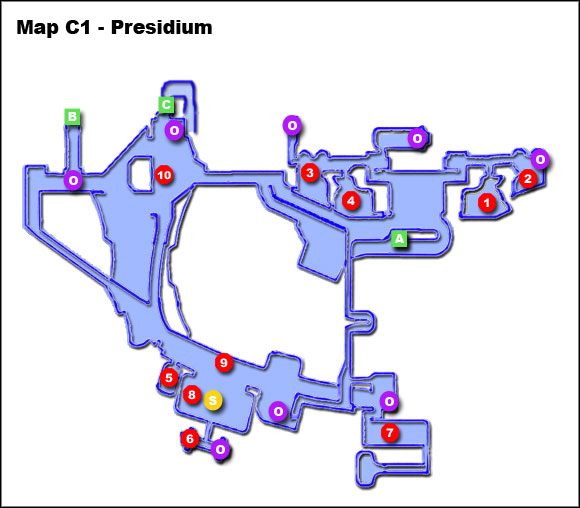
LEGEND (Map C1):
1. Ambassador Udina Office
2. Volus and Elcor Offices
3. Embassy Lounge
4. C-Sec HQ
5. Bank
6. Rogue AI
7. Consort Chambers
8. Emporium
9. Helena Blake
10. Hanar Preacher and C-Sec Officer
A. To C-Sec Academy
B. To Citadel Tower
C. To Wards
S. Shop
O. Keeper
LEGEND (Map C2):
1. Council Meeting Place
2. Chorban
3. Garoth
4. Admiral Kahoku
A. To Presidium
O. Keeper
LEGEND (Map C3):
1. Chellicka Office
2. Waiting Room
3. C-Sec Academy Atrium
A. To Presidium
B. To Docks
C. To Lower Ward
O. Keeper
S. Shop
LEGEND (Map C4 and Map C5):
1. Casino
2. Rita
3. Schells
4. Hacked terminal
A. To Presidium
B. Access to Wards
C. To Upper Ward
O. Keeper
LEGEND (Map C6):
1. Chora's Den
2. Fist's Office
3. Lower Markets
A. To C-Sec Academy
B. To Upper Ward
C. To Upper Markets
D. To Upper Ward
S. Shop
O. Keeper
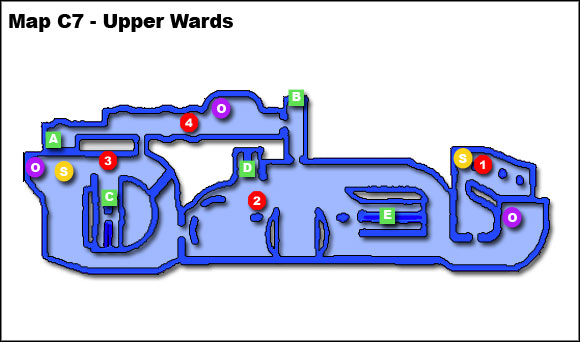
LEGEND (Map C7):
1. Medical Clinic
2. Emily Wong
3. Conrad Verner
4. Alleyway
A. To Lower Ward
B. To Presidium
C. To Lower Markets
D. To Flux
E. To C-Sec Academy
S. Shop
O Keeper
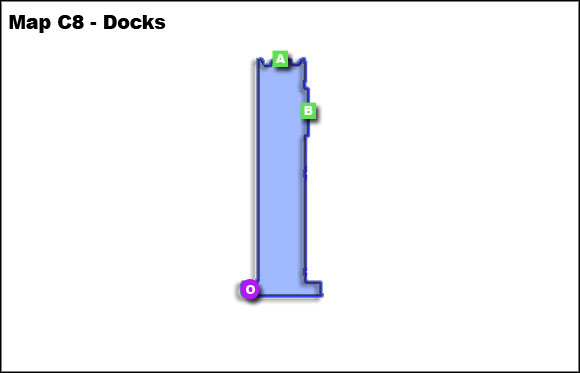
LEGEND (Map C8):
A. To C-Sec Academy
B. To Normandy
O. Keeper
Head to the Tower (C1-B). Get into elevator and go upside. You'll meet Garrus along the way. Talk with him, then with captain Anderson. Go with him to meet the council. Unfortunately, it won't go as you intended and you need to provide proofs to convince members of the council.
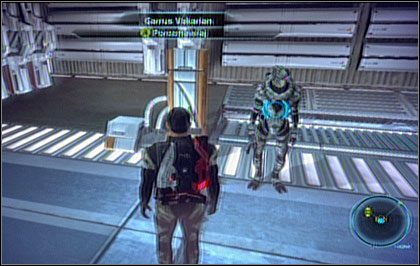
After the meeting you can find Garrus and try to convince him to join you (3.2. Garrus).
Hint! At this point you gain access to the Wards (C5-C7).
When Garrus will join your squad (3.2. Garrus), you'll find out than Fist, thug hired by Saren, and mysterious quarian, who has some information about geths, are supposed to meet. Of course you need to find Fist and wring everything he knows of him. According to Garrus, you'll find him in Chora's Den. Before you go there, take the opportunity to gain another ally, Wrex (3.3. Wrex).
Fist's thugs will be waiting for you in the bar (C6-1). Eliminate them and head to the room inside (C6-2). Two storehouse workers will be waiting for you behind the doors. You can kill them or use charm/intimidation to make them run away - your choice. Then you'll meet Fist himself. He'll be hiding behind the desk and he'll activate two turrets. You can easily put them down using overload.
Now you can question Fist. You'll find out that he set a trap for quarian and she'll be soon dead unless you hurry. You have four minutes to save her.
Hint! In this place you can also find optic disk which will be required to complete mission 3.9. Reporter's Request. If you haven't spoken to her yet, picking it up is tantamount to taking this mission.
Return to Chora's Den main room (C6-1) and eliminate the enemies. Then head fast to the alleyway in Upper Ward (C7-4), kill all opponents and speak with Tali.
You'll be moved to the ambassador Udina office (C1-1). Thanks to Tali, things will change for better. You now have proof which will make council to be more favorable for you. Tali will ask whether she could join your squad. Say yes and you'll gain a great technician.
Meet with the council again. Before entering the Tower (C1-B), speak with captain Anderson and go inside with him. After examining the evidences, members of the council will change their mind about Saren. You will get a new function and your mission will be to catch ex-Spectre.

Before going on the mission, you'll need to meet ambassador Udina at the docks (C8). You'll be told that captain Anderson handed you over command of Normandy. We'll also learn about three trails which may lead you to Saren. The first one is in Artemis Tau, the second on Feros and the third on Noveria. Which order you'll choose, it's up to you.
The whereabouts of Garrus should be known by Harkin, but he's suspended and spends all day in Chora's Den (C6-1).
After getting there you'll be attacked by hired thugs. Eliminate them and go inside. You'll witness a scene in which you'll see krogan Wrex for the first time. Find Harkin and talk with him. You'll learn a few things about Anderson's past and Garrus whereabouts. You'll find him in Upper Ward, in medical clinic (C7-1).
You must eliminate enemies there and talk with Garrus, who helped you with that. The thugs were hired by Fist, who stays at Chora's Den (C6-1) and is Saren's henchman. Before you go there (together as a team now), Garrus proposes to ask another ally to join your squad - Wrex (3.3. Wrex).
While speaking with Garrus in the medical clinic (3.2. Garrus), you'll learn that krogan battle master Wrex has a score to settle with Fist. It seems you can gain another ally. He's now being questioned in C-Sec Academy (C3-3). You'll find him there. Speak with him and he'll gladly join you.
Near ambassador Udina office (C1-1), you'll find volus and elcorian office (C1-2). Go inside and talk with Xeltan. He's troubled because of Sha'ira.
Her chamber (C1-7) is situated near the Presidium financial district. By the entrance stands Nelyna. Talk to her trying to make an appointment with Sha'ira. After the conversation, the consort herself will contact acolyte and grants the permission for you to enter. It looks like Sha'ira has an assignment for you (3.5. Asari Consort). Only after completing it she will speak with you again.
After meeting with general and making him change his mind (3.5. Asari Consort), he'll propose you an assignment. When you'll take it, you'll receive an evidence which will make Xeltan's day. You just need to return back to his office (C1-2) and show him the object.
After speaking with Sha'ira (3.4. Xeltan's Complaint), you'll get an assignment to convince general Septimus not to spread rumors about her. Septimus is in Nora's Den (C6-1). You could ask acolyte Nelyna about him; she stands near the entrance to consort chamber (C1-7).
General Septimus sits in the corner of Chora's Den (C6-1). He won't be eager to change his mind easily, but few matter-of-fact arguments (or charm/intimidation talent) will work. After convincing him to stop being cross, he'll propose us a little job (3.4. Xeltan's Complaint).
To finish this mission, you just need to speak with Sha'ira who stays in her chamber (C1-7).
In C-Sec Headquarters (C1-4), on the table near the executor's Pallin desk, stands a console. After hacking into it you'll find a message from Alliance Command about a group of biotic cultists led by a former Alliance soldier. It is situated in the Century system in the Hawking Eta cluster.
It looks like their seat is on Presrop (13.8.1.1).
After talking with the council (3.1. Expose Saren), go downstairs. You'll perceive an alien tampering with one of the keepers. Talk with him (his name is Chorban) and agree to help him (C2-2). He'll give you a small scanner which should be used to examine all keepers in Citadel (21). Their positions are marked on maps with symbol "O".
On the Upper Markets you'll be accosted by a man named Conrad Verner (C7-3), who is your fan. He'll ask for your autograph. The rest of this quest could be done later, when you'll land on Citadel again.
On the Upper Ward some woman will be shouting at you (C7-2). It's Emily Wong, reporter. She'll ask for your help with finding evidences of corruption in Citadel.
After defeating Fist (3.1. Expose Saren), you'll find in his office (C6-2) an optical disc. It stores data which may be useful for Ms. Wong. Go to the Upper Ward and give the disc to the reporter (C7-2). During the conversation you can also offer her further cooperation and promise to give an interview after finishing the investigation.
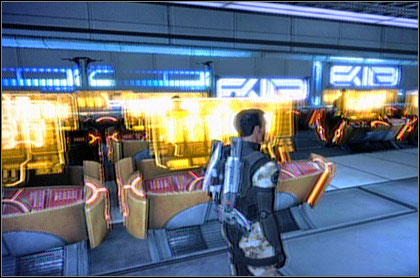
At the back of the Flux casino there are gambling machines (C4-1). At the end of the room there is one which seems suspicious. After examining it you'll find out that it has been reprogrammed in order to transfer money to someone's account. Activate signal tracking - it comes from the Wards access corridor (C5-4).
Go there and examine the terminal (C5-4) to learn that money is being transferred from Presidium financial district. The signal will lead you to the bank (C1-5). There you'll find out that the source is situated behind Emporium (C1-6).
That's a rogue AI who's transfering the money. It threatens to activate autodestruction which will destroy everyone in the room. When you'll want to finish the conversation, countdown will begin. Your task is to guess the abort sequence. You can use trial and error method. Remember, that after each error the sequence resets. The right pick is marked by green color, the wrong one by red. If you're lazy, here's the right combination: YXYAXAA.
Another way to get rid of the AI is to destroy the terminal, but it will gain you less experience points.
At the bar in club Flux you'll meet waitress named Rita (C4-2). She's unhappy about her sister Jenna working as secret C-Sec informant in Chora's Den (C6-1). If her employers found out about her activity, they would surely kill her. Rita will ask you to talk sense into Jenna.
Jenna stands behind the bar in Chora's Den (C6-1). Talk to her just to find out that she don't want to hear preaching.
On your way out you'll meet Chellick who will whisper in your ear some interesting information. If you want to help, meet him at the C-Sec Academy.
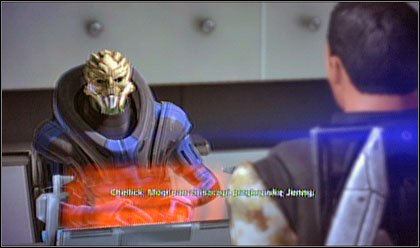
Go to the C-Sec Academy (C3-1) and talk with Chellick. You'll learn that Jenna is working on a serious case and if you want to save her from danger, you'll have to play agent yourself. You could try to persuade Chellick (charm/intimidation), that he doesn't need Jenna or take the assignment.
If you choose the latter possibility, you must pass yourself as buyer and get weapon from the trader named Jax on the Lower Markets (C6-3).
Buy the weapon and bring it to Chellick (C3-1). This way Jenna could still work and the mission is completed.
Examine the ambassador's Udina computer (C1-1) to receive an assignment about some unusual energy readings detected in the Argos Rho cluster (system Hydra). Go there and check it by yourself (13.1.2.1.).
After rescuing Tali and leaving the embassy (3.1. Expose Saren), you'll be accosted by Samesh Batia. His wife was killed on Eden Prime and the Alliance doesn't want to return him her body. He'll ask you to convince Mr. Bosker, who is in charge of this case, to let him bury his wife appropriately. Bosker is in embassy lounge (C1-3).
You can use charm/intimidation to convince him to return the body. There's also another way to complete this assignment. After speaking with Bosker, you can tell Samesh why Alliance needs body of his wife. If you uses charm, he'll understand it. It's good to have Ashley in your squad then.
While visiting Flux once again (after finishing 3.11. Rita's sister) you'll witness a scene: security guards throws Schells out of the club. Talk with him (C4-3) to find out that he's working on developing a device that can be used to cheat at Quasar. He'll ask you to help him by using the device to win five more games for him. You can take the device and win several times at the casino (C4-1) (but no more than seven or else the owner will become suspicious and throw you out). Then give the device back to Schells. This way you'll gain some renegade points. If you want to play as paragon, take the device as well, but speak with the owner (C4-1) and give it to him.
In the C-Sec waiting room (C3-2) you'll overhear an interesting conversation. When it will be over, you can talk with Jahleed to learn the details. This way you'll get another assignment. You need to find out whether Chorban is in fact after Jahleed. You should speak with Chorban who is on the lower markets (C6-3).
It will turn out that this is the same alien who asked you to scan the keepers. If you took assignment 3.7. Scan the Keepers earlier, he'll tell you that Jahleed is needed to analyze data which you'll collect. If you decide to help, you'll have to return to Jahleed and tell him about everything. When he'll find out that he has more accomplices, he'll decide to forget a grudge against Chorban.
If you didn't speak with Chorban before (3.7. Scan the Keepers), you must be ready to fight. Only after killing his bodyguards you could learn the truth.
Hint! If you didn't scan all keepers to this moment (3.7. Scan the Keepers), you can still do it, but you'll gain renegade points. Paragons should resign or finish the assignment earlier.
After gaining Spectre status (3.1. Expose Saren), while riding the elevator you'll hear a radio Messager about a survey team missed in Hades Gamma luster. You should find out what happened with them (13.7.1.1).
After gaining Spectre status (3.1. Expose Saren), in front of the entrance to Emporium (C1-8) you'll meet Helena Blake (C1-9). She'll ask you to help removing two fellow leaders of a galactic crime syndicate. They both stay in their well-guarded seats on distant planets (13.6.1.1, 13.7.3.1.). After killing them, you should go to Blake's hideout (13.9.1.1.).
Hint! If you play as paragon, you should refuse her. Blake will give you coordinates nevertheless and you will gain some morality points.
A hanar evangelist is arguing with a C-Sec Officer on the Presidium near the elevator to the Wards access corridor (C1-10). Talk with them to find out that the alien is a prophet who tries to disseminate his beliefs in public without permission. Your task is simple: you need to convince hanar or officer to stop arguing. Use charm/intimidation here.
After rescuing Tali (3.1. Expose Saren), go to the medical clinic (C7-1) again just to find out that dr. Michel is being blackmailed. Offer her your help. You need to go to the lower markets and speak with trader named Morlan (C6-S).
When you'll tell him that you're here because of dr. Michel, hired krogan will appear. You can use charm/intimidation to convince him to stop bother her or fight him. The latter possibility won't give you any paragon/renegade points though.

Return to dr. Michel (C7-1) and tell her that she doesn't need to worry any more. You can also ask her about Banes (the krogan mentioned his name). Dr. Michel will tell you that he took some military assignment. Captain Anderson knows the details (you can find him at the docks), but he'll send you to admiral Kahoku (C2-4). He'll give you another assignment (3.20. Missing marines). If you're not interested in Banes story, you can go to Kahoku right away; the effect will be the same.
After gaining Spectre status (3.1. Expose Saren), you'll meet admiral Kahoku in the Tower (C2-4). He sent a recon team to the system where Banes was found to scout the region. This team has gone missing and Kahoku needs your help to find them. You should seek in Artemis Tau cluster, Sparta system (13.3.4.1.).
After completing the assignment return to admiral to give him information about his soldiers.
Hint! This quest will let you take Cerberus (13.16.3.1.) assignment.
After gaining Spectre status (3.1. Expose Saren), you'll meet man named Garoth in the Tower (C2-3). If asked, he'll inform you that his brother has gone missing in the Horse Head Nebula Strenuus system, planet Xawin (13.9.3.1). Offer him your help.
After completing the assignment return to Garoth to give him information about his brother.
After convincing the council of Saren's guilt (3.1. Expose Saren), while riding the elevator you'll learn that Chairman Burns has been kidnapped by biotic extremists. Head to the Farinata system in the Hades Gamma cluster and search for the MSV Ontario (13.7.4.1).
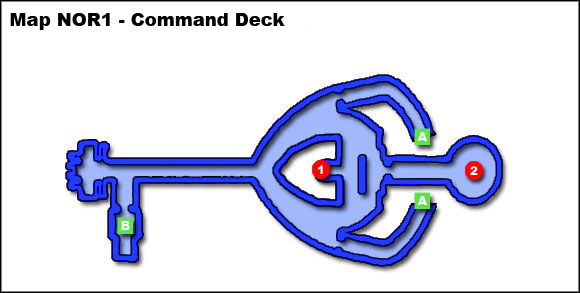
LEGEND (Map NOR1):
1. Galaxy Map
2. Comm Room
A. To the Quarters
B. Airlock [exit]
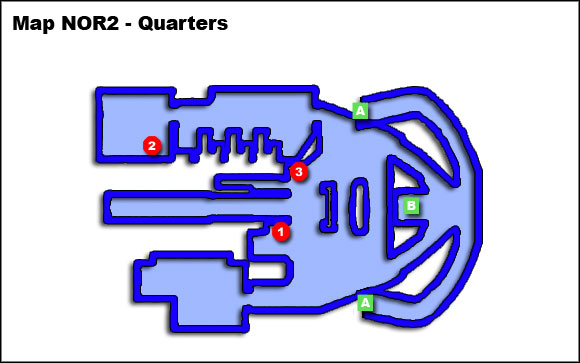
LEGEND (Map NOR2):
1. Kaidan
2. Liara (after quest 5.1. Surface)
3. Shepard's Locker
A. To the Commands Deck
B. To the Engineering
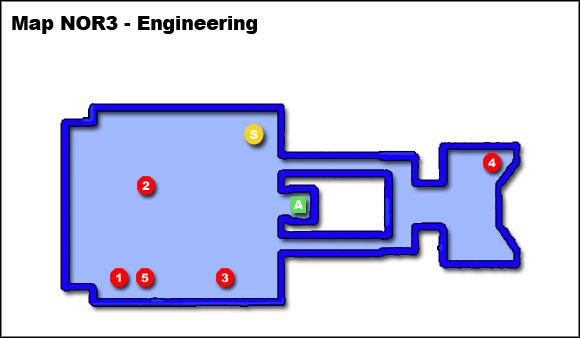
LEGEND (NOR3):
1. Ashley
2. Garrus
3. Wrex
4. Tali
5. Squad Lockers
A. To the Quarters
After assuming leadership over Normandy (3.1. Expose Saren), the ship will be your basic mean of transport. When you return to it from each planet included in main plot, it's good to look around to get to know your companions better or even romance with some of them. You just need to talk a lot with this special person and treat her nicely.
Hint! Playing as a man, you choose between Ashley (NOR3-1) and Liara (NOR2-2). Playing as a woman, you choose between Liara (NOR2-2) and Kaidan (NOR2-1).
During your space travels, you can also help some of your companions: Garrus, Wrex and Tali. Turian and Krogan will tell you about their problems themselves (you just need to talk with them a lot and treat them good). Quest related to quarian will become available for you after completing Geth Activities assignment. Description of every companion-related mission could be found in chapter 13. Uncharted world. These are specific references:
Besides that, it's good to take look at Shepard's locker (NOR2-3) from time to time to find out whether some useful object appeared.
During your missions, you'll have a few opportunities to gain new licences for your deck dealer (NOR3-S). His assortment will change and extend in course of the game. That's why you should talk with him often - maybe you'll find some interesting equipment?
On the lower deck you'll find your squad lockers (NOR3-5). Thanks to them, you have access to everyone's equipment and you can prepare them for action before landing on given planet.
The most important place on Normandy is galaxy map (NOR1-1) on which you chooses your destination.
It is one of the main plot missions which you get after completing 3.1. Expose Saren. The other are 6. Feros and 7. Noveria. You can do them in any order but I suggest to start from Therum, because it will allow you to complete your squad. Before landing remember that your companions should have biotic and technic skills as well as combat ones, so choose them carefully.
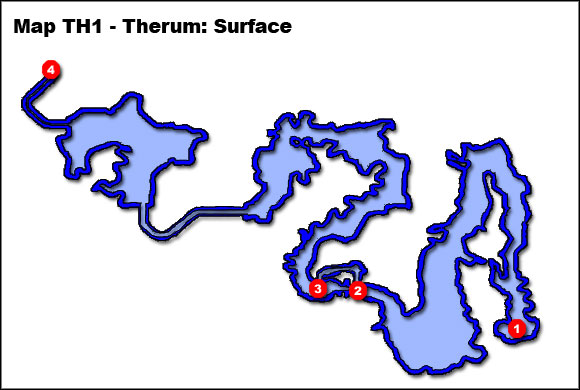
LEGEND (Map TH1):
1. Insertion point
2. Fork
3. Refinery
4. Ruins
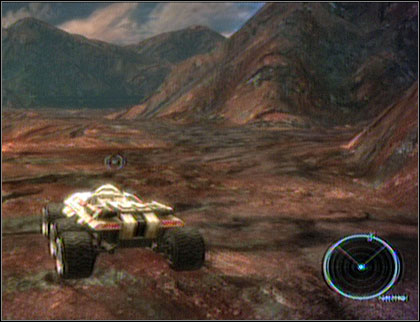
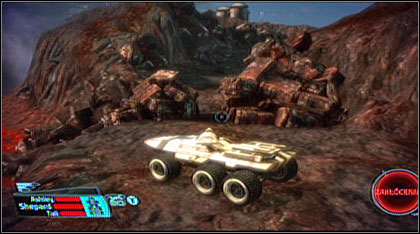
You'll land in spot (1). Your goal is to enter the ruins (4). You'll ride in Mako all the way. It's good to get used to controlling it then. Watch out for the lava.
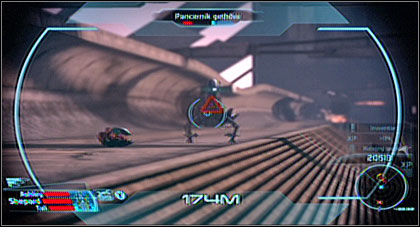
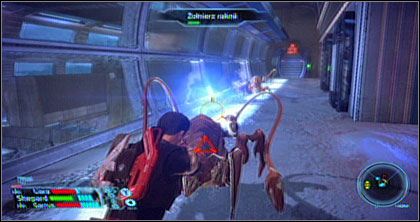
At some point a geth dropship will deposit a pair of geth armatures in your path. Keep your distance, look forward and when you'll see enemy position (marked by blue light when shooting), switch to the turret view. Zoom, aim and shoot using machine gun and cannon. When you'll see a missile coming at you, just jump to avoid it. It takes some practice, but in spite of appearances is quite easy. Alternatively you can stand broadsite to the enemy and avoid missiles riding forward or backward. After eliminating the armatures, stay alert and get rid of other enemies from the distance.
Eventually, you'll get to the fork (TH1-2) near the refinery (TH1-3). Turn north and reach the complex eliminating enemies along the way.
Leave Mako and head to the building near the north gate. Kill the geth inside and use button to open the gate.
Return to Mako and ride through open gate. Eliminate the enemies along the way; they shouldn't be much problem. Remember to keep the distance.
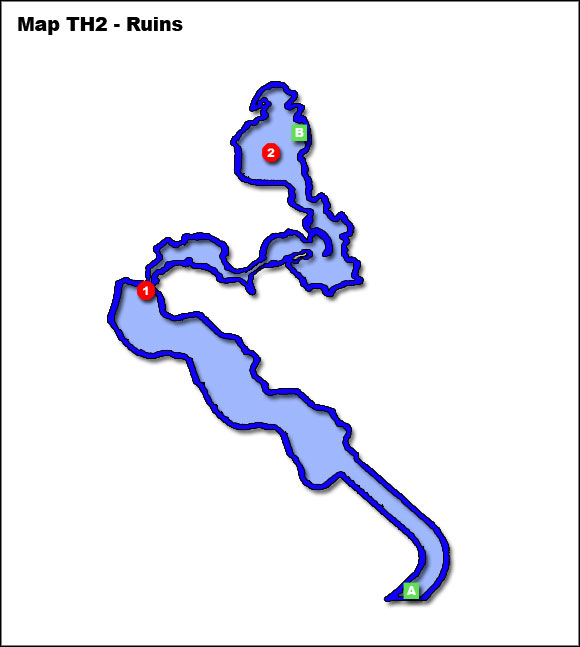
LEGEND (Map TH2):
1. End of Mako route
2. Ambush
A. To the Therum surface
B. To the Ruins
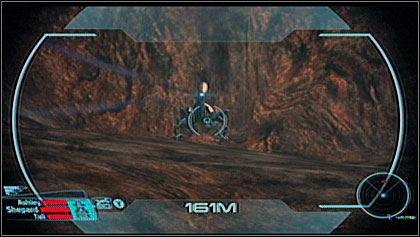
Your Mako trip will quite quickly come to an end, because you'll get to a narrow pass between the rocks. You'll need to walk on foot. It's good to check at this moment whether you spent all experience points (singularity talent will be especially useful) and equipped your squad in best weapon available, because you'll have a hard time soon.
Wandering between points TH2-1 and TH2-2, fight with the enemies and remember to use covers.
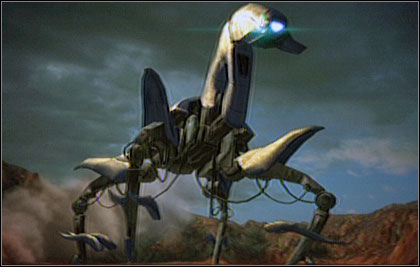
In spot TH2-2 there will be an unpleasant surprise waiting for you. You'll be attacked by the geth troop with an armature as most dangerous opponent. His one shot could kill you, so look for cover as soon as possible. It's good to use green boxes standing nearby. Shoot from behind them and avoid armature missiles.
I suggest to clear the area from other geths first and then get rid of the armature. While fighting with geths, you should use biotics - especially throw. For armature, use technic talents along with shooting.
Hint! When the shield of one of the squad members will run down, it's good to reactivate it using shield boost ability.
After the fight, enter the ruins (TH2-B).
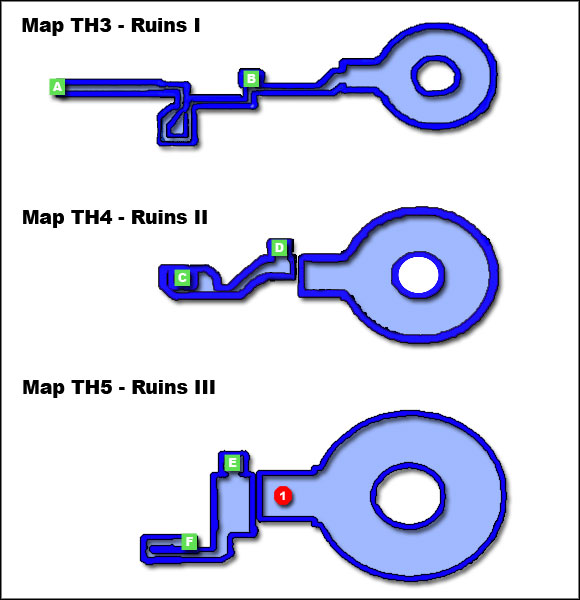
LEGEND (Maps TH3, TH4 and TH5):
1. Liara T'Soni
A. Entrance to the Ruins
B. To the Ruins II
C. To the Ruins I
D. To the Ruins III
E. To the Ruins II
F. To the Ruins IV
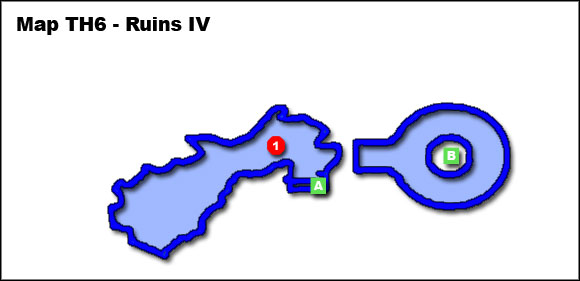
LEGEND (Map TH6):
1. Mining laser controls
A. To the Ruins IV
B. To the Ruins IV (from the Prothean Tower)

After entering the ruins (TH3-A), continue the tunnel to the end. Eliminate geths (you need to act quickly, because there aren't many covers there) and get into the elevator (TH3-B). After getting out, eliminate flying geth assault drones (remember, that they are resistant to biotics but susceptible to tech powers). Then take another elevator down (TH4-D). Step off down the broken walkway and then turn toward the blue field to find Liara.
She'll be trapped in a Prothean force field (TH5-1). To free her, you'll need to get to the switch which is behind the barrier. Keep descending the ramps until you reach the bottom of the mine (TH6) where you will find more shock troopers and snipers. Eliminate them.
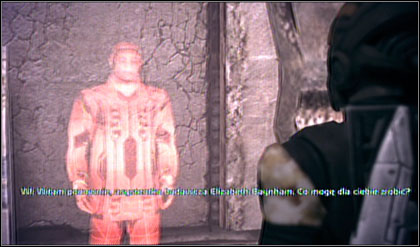
At the bottom you can take some objects from the containers. Activate the mining laser (TH6-1) through trial and error method using the correct sequence (right switch - green color, wrong switch - red color). Here's the right sequence: AXBY.
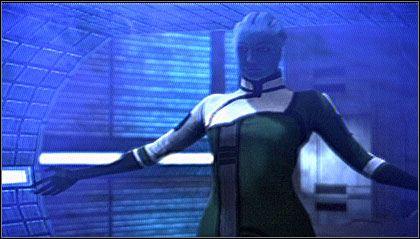
Go trough the hole, make sure your squad is well equipped and ride the elevator up. Free Liara. After a short talk you'll learn that you should leave the mining area as soon as possible. In order to do it, you'll need to use the elevator in the tower. There you'll encounter the krogan Liara told you about as well as group of geths.

You can't talk your way out of a fight, so you must defeat the krogan battlemaster along with his geth soldiers. Remember to keep distance from the krogan, because he's deadly dangerous infighting. Find the nearest cover instead, eliminate the geths and then concentrate on the toughest opponent. Be careful not to be hit by biotic attack which will knock you down. To eliminate the krogan, use all talents and abilities of your squad. You can also order your subordinates to approach the enemy. He'll concentrate on them and you'll be able to attack him easily.
A moment later you'll be already safe on Normandy. After crew meeting, during which Liara will speak her mind about prothean extermination, you'll be able to contact the council and report on the mission. Then you may talk with the members of your squad, buy something from the deck dealer and choose another destination.
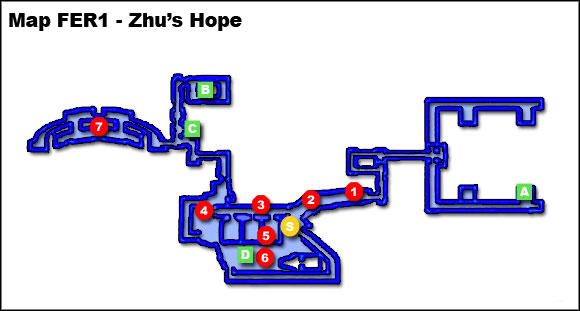
LEGEND (Map FER1):
1. Macha Doyle
2. May O'Connell
3. Davin Reynolds
4. Fai Dan
5. Terminal
6. Freight crane controls
7. Tower
A. To the Normandy
B. To the tunnels
C. To the Prothean Skyway
D. To the Thorian Lair
S. Shop
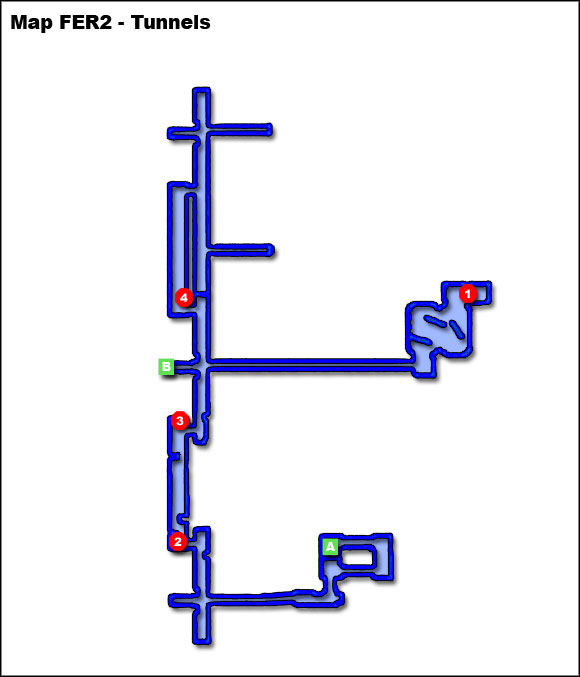
LEGEND (Map FER2):
1. Geth transmitter
2. Water valve 1
3. Water valve 2
4. Water valve 3
A. To Zhu's Hope
B. To the collapsed bridge
LEGEND (Map FER3):
1. Fuel compartment (Power cells)
A. To the tunnels
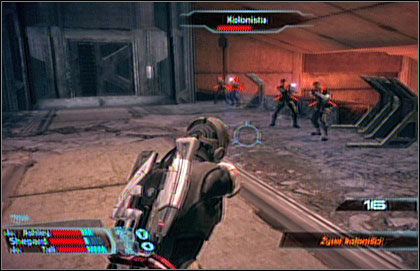
Right after landing talk with David al Talaqani. He will send you to the colonists boss, Fai Dan (FER1-4). A moment later you'll be attacked by geths. They'll be coming through an entrance nearby, so it's good to crouch and shoot from behind the cover. Battle though the enemies and up the stairs to reach the Zhu's Hope colony. Geth will be disrupting your radar. The fastest way to eliminate the ones running on the walls is to use biotics.

Fai Dan (FER1-4) will ask you to help lighting the geths. Hide behind the stone block and eliminate the first wave of enemies. Then slowly proceed toward the tower (FER1-7). After repulsing the attack, come back to Fai Dan and inform him about it.
He'll tell you that information about what geths are seeking on Feros could be most probably found at ExoGeni facility, on the other side of the prothean skyway (6.2. Skyway). You can go there immediately or help the colonists first. Fai Dan will tell you about their problems.

After completing mission 6.1.1. Geth Attack Fai Dan will ask you one more favor. He'd like someone to get rid of the geths in the tunnels and deactivate the transmitter, which is used to coordinate their actions.
Hint! Along with this assignment, you can also complete assignments 6.1.3, 6.1.4 and 6.1.5.
Go north and enter the tunnels (FER1-B). Continue toward the transmitter (FER2-1) eliminating geths along the way. You must kill krogan mercenaries at the place. Keep your distance and don't let them attack you in close combat.
After the fight, destroy the transmitter (FER2-1).
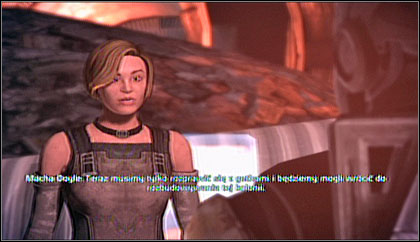
Macha Doyle (FER1-1) will ask you to restore the water supply to the Zhu's Hope. You need to venture down to the tunnels and open the valves to allow water to flow.
Hint 1! Along with this assignment, you can also complete assignments 6.1.2, 6.1.4 and 6.1.5.
Hint 2! This assignment could be also completed without talking with Doyle. You just need to open the valves and inform her about it then.
Go north and enter the tunnels (FER1-B). Proceed along the main passageway opening three valves one by one (FER2-2, FER2-3, FER2-4). After restoring the water supply, return to Doyle (FER1-1) and inform her about it.
David Reynolds (FER1-3) has a problem. He needs to complete the colonists' diet in varren meat, but ruthless animal leader makes the hunt deadly dangerous. Your task is to kill it.
Hint 1! Along with this assignment, you can also complete assignments 6.1.2, 6.1.3 and 6.1.5.
Hint 2! This assignment could be also completed without talking with Reynolds. You just need to kill the varrens and inform him about it then.
Go north and enter the tunnels (FER1-B). Then, using the passage in western wall (FER2-B), head to the collapsed bridge (FER3). Varrens will attack you there. Killing them is easy unless you remember not to stop for long in one place. After eliminating the alpha animal, you just need to inform Reynolds (FER1-3) about it.
Hint! After killing warrens, it's good to take the power cell from the damaged vehicle (FER3-1). In other case, you'll need to come back for it to complete assignment 6.1.4.
May O'Connell (FER1-2) will ask you to find a new energy source.
Hint 1! Along with this assignment, you can also complete assignments 6.1.2, 6.1.3 and 6.1.4.
Hint 2! This assignment could be also completed without talking with O'Connell. You just need to take the cell and give it to her.
Go to the same place where you fought with the varrens (FER3).
Hint 3! If you didn't complete mission 6.1.4 earlier, you'll need to kill them now.
Take the power cell from the damaged vehicle (FER3-1)and give it to O'Connell.

Head inside the freighter at the Zhu's Hope colony and access the terminal (FER1-5). You will receive a message informing you of several supply shipments that have been diverted to the Voyager cluster. The case is worth investigating (13.16.1.1).
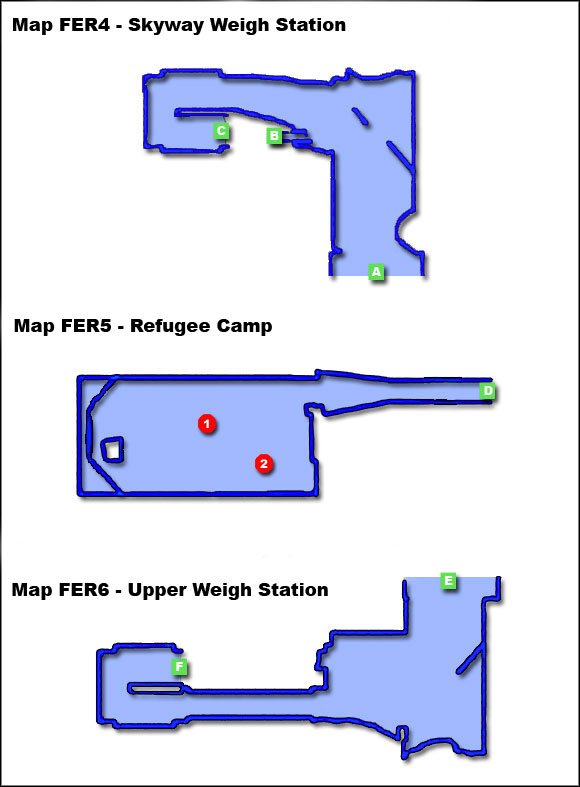
LEGEND (Maps FER4, FER5 and FER6):
1. Juliana Baynham
2. Gavin Hossle
A. Skyway toward Zhu's Hope
B. To the Refugee Camp
C. To the Upper Weigh Station
D. To the Skyway Weigh Station
E. Skyway toward ExoGeni facility
F. To the Upper Weigh Station
You can reach ExoGeni only through the skyway. Ride the elevator from Zhu's Hope (FER1-C). You'll need to help colonists up there. After dealing with the danger, get into Mako and proceed along the way.
Continue forward eliminating enemies (watch out for the armatures). You should already know that the best method is to fight from the distance, but be careful not to fall down a chasm while jumping.
Halfway you'll reach skyway weigh station (FER4). Get off the Mako and go through a narrow passage (FER4-B). You'll get to the refugee camp. Talk with Juliana Baynham (FER5-1) to learn about geth attack. She will also ask you to find her daughter.
Hint! You can also talk with Gavin Hossle to get another assignment (6.2.1).
Get back to Mako and ride to the upper level (FER4-C).
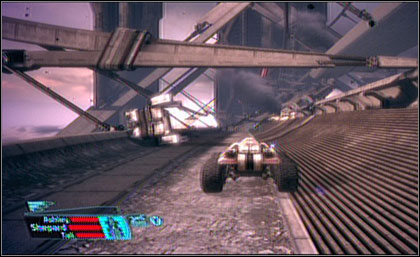
Ride along the skyway (FER6-E) eliminating enemies along the way just like a while before. Soon you'll reach ExoGeni facility.
In the refugee camp you'll find Gavin Hossle who will tell you that he's in need of some data that's still at the ExoGeni facility. To recover it, you'll need to find his console and record the data on the disc. It's good to do it while completing mission 6.3. ExoGeni. After clearing east side of upper level from the enemies, find the console and recover the data. Then return to the camp and give the disc to Hossle (FER8-4).

LEGEND (Map FER7):
1. Armature
2. Force Field
3. Glowing Orb
4. VI Console
A. To the Skyway
B. To the ExoGeni Refuse (oneway passage!)
C. To the ExoGeni Upper Level -> (FER8-A)
D. To the ExoGeni Refuse
E. To the ExoGeni Upper Level -> (FER8-B)
LEGEND (Maps FER8 and FER9):
1. ExoGeni Terminal
2. Server Node
3. Shuttle Bay Door Controls
4. Gavin Hossle's Console
5. Lizbeth Baynham
A. To the ExoGeni Main Level -> (FER7-C)
B. To the ExoGeni Main Level -> (FER7-E)
C. To the ExoGeni Main Level -> (FER7-D)
D. Entrance from the ExoGeni Main Level -> (FER7-B)
Leave Mako and continue on foot. You'll see a door on the north. It leads to the room with armature (FER7-1). It won't attack you though unless you grab the loot in the crate. If you want to get it, it's good to eliminate it first. Back to the corridor and start fighting but don't lean too much. Robot will awake and attack you. Avoid his plasma attack at any cost. After eliminating it, you could take the loot and turn back.
Soon you'll reach an energy field (FER7-2) which is blocking the way, but jump down to the corridor leading to the refuse (FER7-B).
You'll find Lizbeth Baynham there. Talk with her to find out that the field is powered by geth spaceship which is situated near the building. The only way to deactivate it is to cut off the connection between them. It will not only give you a way back, but you'll also learn what geths are looking for in the ExoGeni facility. You can also tell Lizbeth that her mother is alive. She will decide to help you and give you pass card, which will allow you access to the facility.
After the conversation, varrens will attack you. Stay in motion and killing them shouldn't be much problem. It's good to use telekinesis (throw, lift) to get rid of them quickly.
After killing the varrens, go up the stairs (FER9-C) to return to the ExoGeni main level. At the top of the steps there will a krogan commander trying to obtain restricted information from a VI interface. He will become alerted to your presence and attack. He'll be a tough opponent, so use your most powerful attacks to eliminate him quickly. After the fight, thanks to Lizbeth pass card, you can talk with VI. It will tell you about Thorian abilities and other things. Then deactivate the field and come back to the Zhu's Hope.
Continue along the corridor. There will be a few geth shock troopers to fight, after which you can examine the strange glowing orb (FER7-3) they seemed to be praying to. If you manage to stay unnoticed, you can also eliminate them from the distance (e.g. using sniper rifle).
Go upstairs (FER7-C) to the upper level and clear the area from the enemies.
Now you'll be able to learn new information from terminals (FER8-1, FER8-2) there. It will allow you to get two another assignments (6.3.2. Geth activity and 6.3.3. Investigate samples). Activate the console on the western wall. You'll need to hit the sweet spot by setting the internal pressure to be between 31 and 34 pounds per square inch. You can do this by activating a number of smaller controls which each provide a fixed amount of pressure. Activate first, third and fourth switch from the left side (like on the picture). This will sever the power, taking care of the problem with the energy shields.
Now you can use the stairs (FER7-E) to get to the eastern side of ExoGeni upper level. There you'll find Gavin's console. You can recover the data from it in order to complete assignment 6.2.2. Data recovery.
Get to the ExoGeni mail level and head to the exit. Force field (FER7-2) isn't blocking the entrance anymore, so you can come back to Mako easily.
You'll meet Lizbeth along the way. She'll tell you where to look for Thorian and then join you. Talking with her can gain you some paragon/renegade points.
Decrypting the geth terminal on the ExoGeni upper level will let you learn about increased geth activity in Armstrong Nebula (13.2.1.1.). It looks serious and can be beginning of a war.
On the upper level of the ExoGeni facility you'll find a terminal (FER8-1) that can be accessed for information on some suspicious ExoGeni activity in the Maroon Sea cluster (system Vostok, planet Nodacrux) (13.12.3.1). The case is worth investigating.
A terminal (FER8-2) on the ExoGeni upper level will inform you about a connection between ExoGeni and Cerberus. You'll need to investigate the Matano system (Maroon Sea cluster) (13.12.2.1) to learn more about this partnership.
You need to ride all the skyway again. There will be even more enemies along the way.
At the weigh station Lizbeth will get out of Mako and run toward refugee camp (FER5). Do the same thing. You'll witness an unpleasant scene. Ethan Jeong will be threatening the colonists and you need to stop him. You can use charm/intimidate to gain some paragon/renegade points or just kill him.

Juliana will ask you not to kill colonists possessed by Thorian. She will give you a special grenade upgrade which contains a nerve agent that should pacify the colonists safely. Install it (unless you don't care about them) and get back to the Mako.
You can also give Gavin (FER5-2) disc with recovered data to complete assignment 6.2.2.
Get back to the skyway. After eliminating the enemies waiting for you there, reach Zhu's Hope.
Before entering the garage, first of Thorian monsters will attack you. After killing it you must decide whether your companions should shoot everything that moves or don't kill colonists. If you want to get some paragon points (exactly two for each saved colonist), you should choose the latter. The other is recommended for renegades (two points as well for each killed colonist).

If you don't care about colonists, you won't have much problem with eliminating all enemies. Killing only Thorian monsters and sparing humans will be more difficult. That's why I'll concentrate on this solution.
After getting inside, more enemies will attack you. You can kill them all, because there won't be any colonists among them. You can use rifles, which have a lot of kick - useful while fighting with enemies charging at you.
You will find first colonists possessed by Thorian at the end of the room, hidden behind small covers. Throw a grenade exactly between them to save them all.
Hint! Colonists don't have a lot of fire power, so you can expose yourself for their shots to better aim while throwing grenade.
After defeating colonists, you can use the elevator to get onto the main level of Zhu's Hope. Your goal now is freight crane controls (FER1-6). You'll come across more Thorian clones and possessed colonists along the way.
Fighting in the colony centre will be the most difficult. First you should separate clones from colonists. After defeating them you can save humans. Use grenades. If you run out of them, you can also neutralize colonists by walking to them and blowing them directly.
After the fight use the console (FER1-6) and go through the open entrance (FER1-D).
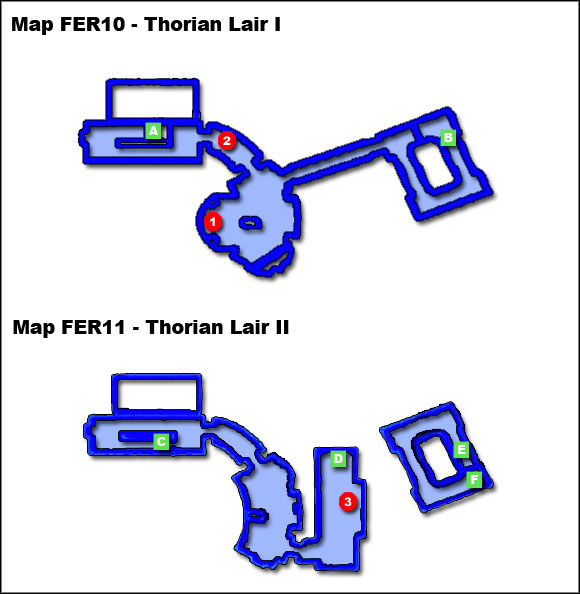
LEGEND (Maps FER10 and FER11):
1. Thorian
2. Thorian Neural Node
3. Thorian Neural Node
A. To the Thorian Lair II ->(FER11-C)
B. To the Thorian Lair II -> (FER11-E)
C. To the Thorian Lair I -> (FER10-A)
D. To the Thorian Lair III -> (FER12-D)
E. To the Thorian Lair I -> (FER10-B)
F. To the Zhu's Hope
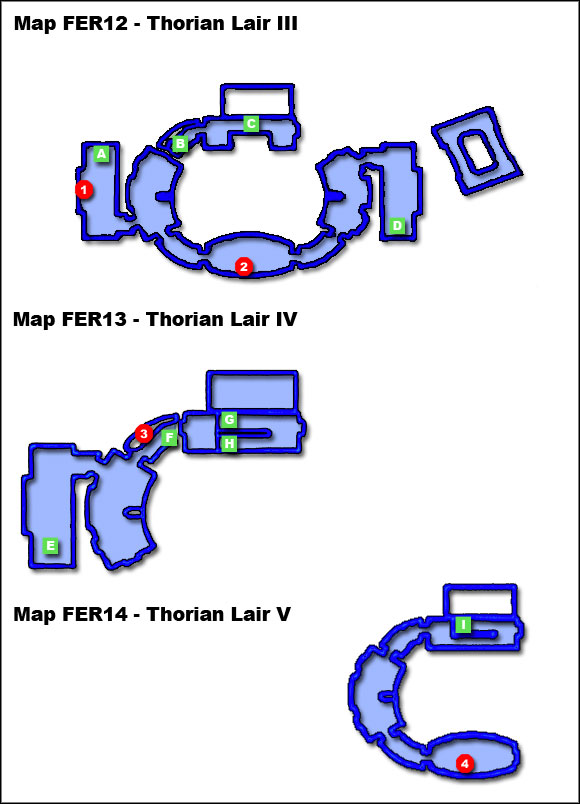
LEGEND (Maps FER12, FER13 and FER14):
1. Thorian Neural Node
2. Thorian Neural Node
3. Thorian Neural Node
4. Thorian Neural Node
A. To the Thorian Lair IV -> (FER13-E)
B. To the Thorian Lair IV -> (FER13 F)
C. To the Thorian Lair IV -> (FER13-G)
D. To the Thorian Lair III -> (FER11-D)
E. To the Thorian Lair III -> (FER12-A)
F. To the Thorian Lair III -> (FER12-B)
G. To the Thorian Lair III -> (FER12-C)
H. To the Thorian Lair V -> (FER14-I)
I. To the Thorian Lair IV -> (FER13-H)
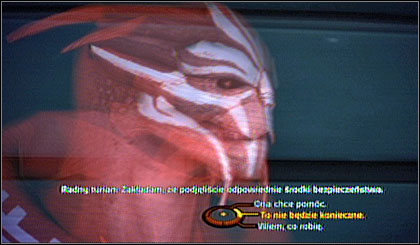
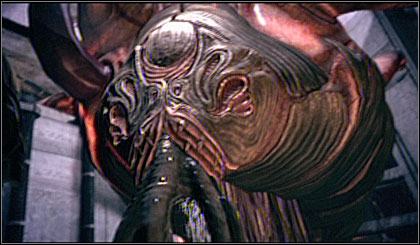
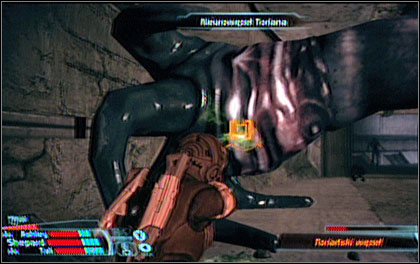
After getting to Thorian Lair go down to see your opponent in all its glory (FER10-1). The monster will create asari clone who will tell you about what Saren has been after and then attack you.
You will have to fight not only with asari clone, but also with other opponents created by Thorian. Only asari is real danger though. Other clones act like zombie and their only strength is that they outnumber you. It's good to eliminate asari first and the rest later.
Go west to get to the passage to the upper level. You'll notice Thorian neural node (FER10-2) along the way, one of sensible spots of its body. Destroy it and keep going.
Meanwhile Thorian will create another reception comitee: again asari and zombie-likes enemies. Eliminate the asari first and then the others - just like a while before.
Hint! While fighting with them, it's good to use rifles and talent "throw". If you stand in right place, you can throw enemies down a chasm (from the Thorian side) to quickly clear the area.
After the fight destroy another Thorian neural node (FER11-3) and continue up. Your task is to destroy all six nodes which are situated on five levels of the lair. There are four mores left then (FER12- 1, FER12- 2, FER13- 3, FER14- 4). Each time Thorian will create the same set of enemies.
Hint! While working your way up, you'll perceive huddled enemies who seem to be asleep. You can't hurt them in this state but remember that they will awake when you destroy the nodes. That's why you need to keep your eye on them all the time. Otherwise you might end being crushed by many enemies at once.
After destroying the last node, the fight will be over. Talk with real asari to learn some interesting information about Saren, Matriarch Benezia and prothean message. At the end, you can choose whether to kill or spare asari. Killing her will give you renegade points, but sparing her won't give you paragon points.

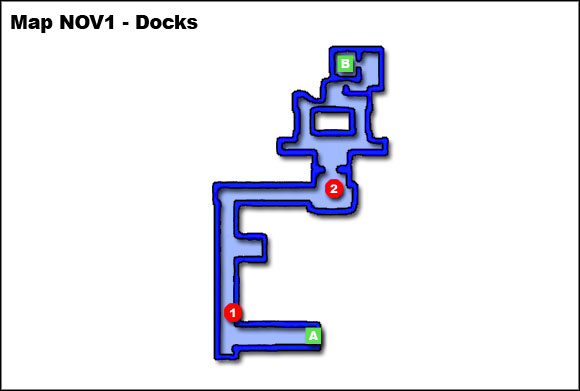
LEGEND (Map NOV1):
1. Opold's Package (after accepting 7.1.2. Smuggling)
2. Maeko Matsuo
A. To Normandy
B. Elevator to Port Hanshan
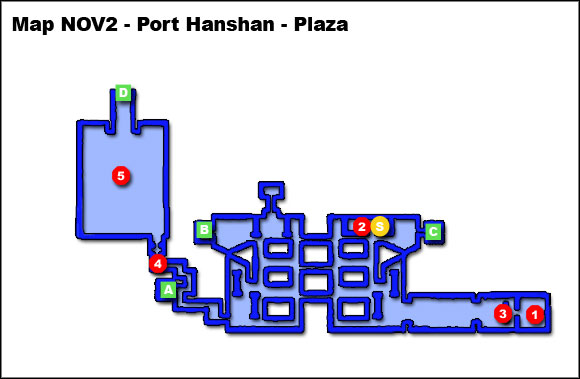
LEGEND (Map NOV2):
1. Anoleis
2. Opold
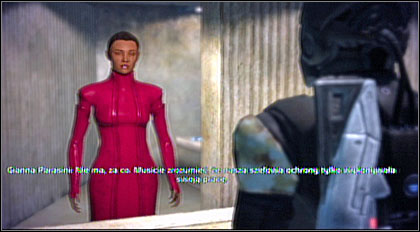
3. Gianna Parasini
4. ERCS Guard
5. Garage
S. Shop (= Opold)
A. To Synthetic Insights
B. To Mezzanine
C. To the Docks
D. To the surface
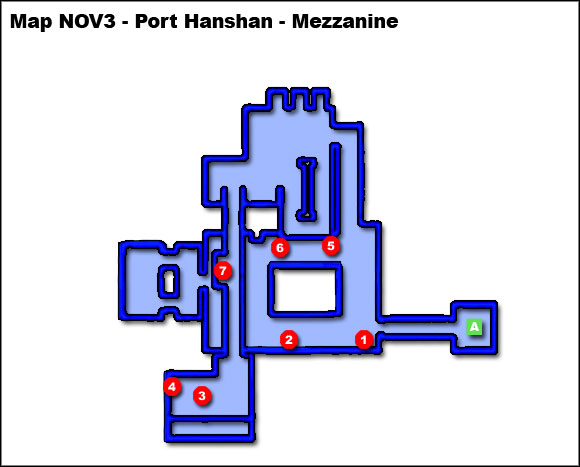
LEGEND (Map NOV3):
1. Mallena Calis
2. Lorik Qui'in
3. Terminal
4. Security Control Unit
5. Gianna Parasini (after gaining Lorik's evidences - 7.1.1. Leave Port Hanshan)
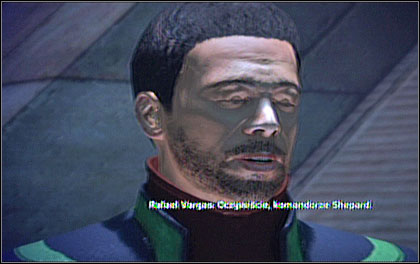
6. Rafael Vargas
7. Inamorda
A. To Port Hanshan
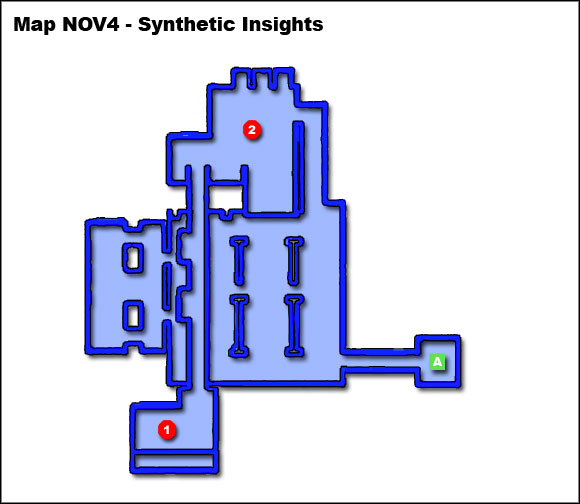
LEGENDA (Map NOV4):
1. Lorik's computer
2. Kaira Stirling (after gaining Lorik's evidences)
A. To Port Hanshan
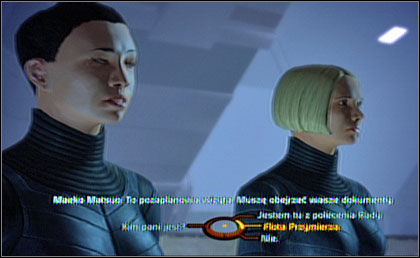
Yet before landing it will become clear, that the authorities of the colony won't be favourably inclined toward you. As soon as you'll leave Normandy (it's good to take Liara) and head to the elevator (NOV1-B), you'll be stopped by the patrol commanded by Maeko Matsuo. Situation will become unpleasant but you can work it out using charm/intimidate.
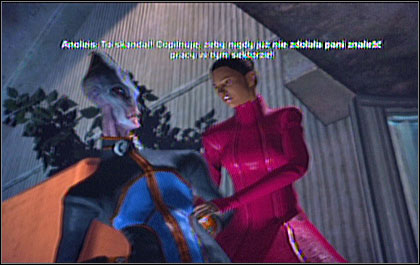
Soon you'll be accosted by Gianna Parasini, the assistant to administrator of the port, Anoleis. She'll tell you about current situation on Noveria and about Matriarch Benezia, who went to the Peak 15 research facility. You won't be able to leave the port now though because of bad weather. To meet Benezia, you'll have to get a special pass. You need to speak with Anoleis about it.
At this moment, you can come back to the docks to speak with Maeko Matsuo (NOV1-2) and gain some paragon/renegade points or use the elevator (NOV1- B) to get to the Port Hanshan market already.
Head to the Anoleis office (NOV2-1) in the south-western part of the plaza. You can talk with Gianna (NOV2-3) before entering inside to learn more about the situation. At the end of the conversation, ask for a permission to talk with Anoleis and enter his office.
He won't be very nice. It will become clear, that you will have to get the pass by yourself.
Hint! How you'll get the pass permitting to leave the port, it's your call. You can choose between three methods. One of them is connected with additional assignment (7.1.2) and two require dealing with Lorik Qui'in's case (7.1.1). First method is the fastest one but will give you least paragon/renegade points. The other require more time but will give you more morality and experience points. That's why I'll describe them in the first place. Those of you, who want to reach Peak 15 as soon as possible, should jump to the next paragraph.
After leaving Anoleis office, Gianna will accost you. She'll tell you that you can get the pass from Lorik Qui'in who can be found in the nearby bar NOV3-2). Use the elevator (NOV2-B) in front of the entrance to the docks to get there.
At the exit, you'll be accosted by Mallena Callis (NOV3-1). She'll ask you to help her with an industrial espionage (7.1.3). If you refuse, you won't have another opportunity to get this assignment - asari will be gone.
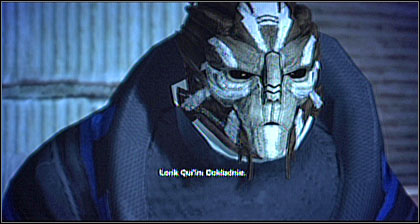
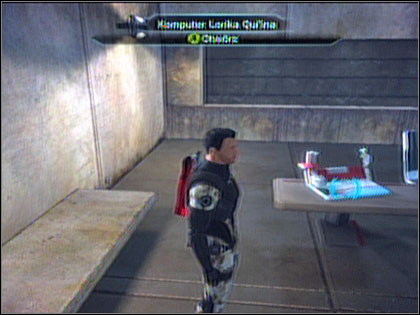
Find Lorik (NOV3-2) and speak with him. He'll tell you that that Anoleis has closed his Synthetic Insights office because Qui'in has evidence of the administrator's corruption. Anoleis has bribed the guards and they are in the office now searching for this evidence. Qui'in will offer you a deal: recover the evidence against Anoleis, and he will in turn provide you with the pass you need. He will also give you card to activate the elevator leading to corporate offices.
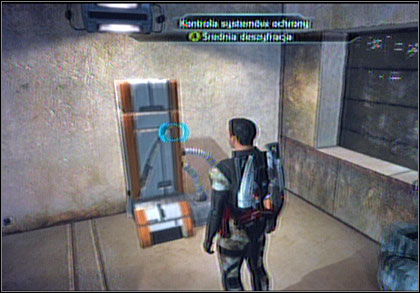
Before coming back to the main level, it's good to go up to the room with the Synthetics Insights security control unit (NOV3-4). If you manage to decrypt it, infiltration of the office will be easier.
You'll see a terminal (NOV3-3) there. Access it to get another assignment (7.1.4.).
Go back to the plaza, enter the passage on the south-west side and get into the elevator (NOV2-A).
Right after leaving it, you'll encounter the guards hired by Anoleis. You can use charm/intimidation to convince them not to attack you and get some paragon/renegade points this way.
The rest of guards needs to be eliminated. Combine shooting, biotics and technics to kill them quickly.
Head to Lorik's office and copy the data from his computer (NOV4-1). Halfway back (NOV4-2) you'll be accosted by Kaira Stirling and some guards. You can't talk your way out of the fight. Find the nearest cover and concentrate on eliminating Kaira, since she's the toughest opponent. Then kill the others.
Hint! Before entering the elevator (NOV4-A), it's good to browse through the offices. You'll find some useful equipment, especially in the room on the north (you'll need to break the code locks).
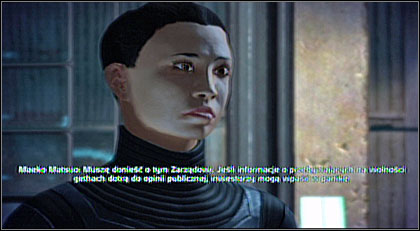
After leaving the elevator, Gianna will invite you to join her for a drink and then quickly walk away. You'll find her in Mezzanine (NOV3-5). She'll tell you about her real identity and ask you to convince Lorik to testify against Anoleis. You can refuse, just give the data to Lorik (NOV3-2) and take the pass. You can also do something else to get some paragon/renegade points.
If you play as paragon, agree to Gianna's offer and use charm to convince Lorik (NOV3-2) to testify. Then head back to Gianna's office (NOV2-3) and inform her about it.
If you play as renegade, agree to her offer as well but use intimidation to convince Lorik. Then go to Anoleis (NOV2-1) and tell him about Gianna's real identity. Don't give him evidence from Lorik though. Watch the scene and then take the pass from ambassador's body.
Regardless of which method you chose to get the pass, head to the garage (NOV2-5). Show the pass to the guard (NOV2-4) before entering.
Before getting in Mako, you'll need to eliminate geths which are here as Benezia's freight. After the fight, you can also speak with Maeko or just get in Mako and leave.
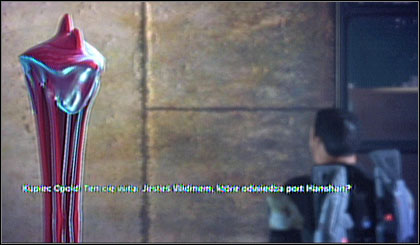
Completing this assignment will let you get out the port in the quickest way. It will be given to you by trader named Opold (NOV2-2). He'll ask you to smuggle through customs an illegal package. If your persuasion level is high, you'll learn that the package is for krogan named Inamorda. Opold will also tell you that the package doesn't contain anything dangerous. If you agree to help him, he'll tell you where to find it. It is in the docks, near the entrance leading to Normandy (NOV1-1).
From this moment, you can choose from few possible ways to complete this assignment:
Hint! If you decide to keep the package for yourself or take it back from Anoleis, you can come back to Opold (NOV2-2) and sell it to him as your own. If you're experienced enough, this way you can earn most credits.
When you'll enter Mezzanine for the first time, you'll be accosted by Mallena Calis (NOV3-1). She'll ask you to distract his attention so she could break into his personal network.
If you refuse, Mallena will go away and you will gain some paragon points.
If you agree to help her, walk to Vargas (NOV3-6) and passing yourself as Alliance representative (which is not true), pretend to be interested in his stuff. Your task is to prolong the conversation to the moment when Mallena's device will beep. In order to do it, use charm/intimidation lines whenever you can.
Come back to Mallena and inform her about completing the assignment. She'll give you 500 credits in reward (or 750, if you bargain).
You can also complete this assignment in a different way: agree to help Mallena and tell Vargas that he's being watched. Then come back to Mallena and admit telling Vargas the truth. She'll decide to take off and you'll gain some paragon points.
Choosing to warn Vargas, you can also gain renegade points. Lie to Mallena about completing the assignment. She'll give you 500 credits in reward (or 750, if you bargain).
On the Mezzanine upper level, in the room with Synthetic Insights security control, you'll find a terminal (NOV3-3). If you manage to decrypt it, you'll learn about a doctor in the Newton system (Kepler Verge cluster) who is apparently now in danger because his connection to a certain organization has come to light. It's worth investigating (13.10.2.1).
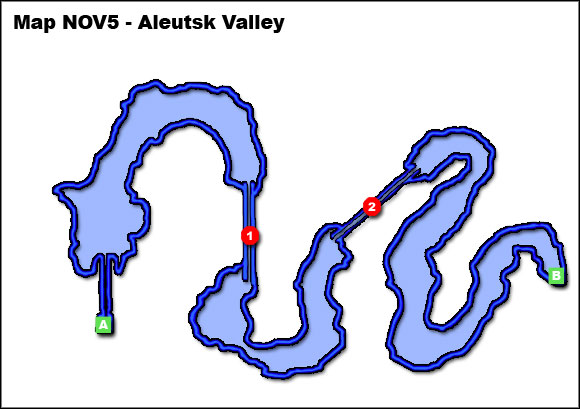
LEGEND (Map NOV5):
1. Tunnel
2. Tunnel
A. To Porth Hanshan
B. To Peak 15
Road to Peak 15 is similar to the one on Therum but the weather is worse and enemies numerically superior.
Hint! During the ride remember, that atmosphere allows you to get outside Mako only for a moment, so don't wander off and watch the bar in the lower right corner of the screen.
Soon you'll see a destroyed vehicle. If you want, you can get out and take the loot from the container nearby.
Keep riding. Soon you'll perceive a turret defending access to the tunnel (NOV5-1). Don't come closer; eliminate it from the distance instead. Do the same with geths near the entrance to the tunnel.

The tunnel is full of enemies. Go slowly and clear the area piece by piece.
Near the exit, you'll see more geths and an armature - destroy it in the first place, then the others.

Before you'll reach another tunnel (NOV5-2), you'll have to eliminate another geth post. This time tunnel will be clear. Right behind it there will be a turret though, so you need to destroy it as soon as possible.
After leaving second tunnel soon you'll reach a road along the chasm. On the other side, in the distance, you'll notice a defence turret (you need to zoom the view), which will shoot at you, so destroy it from the distance.
Near the right turn there will be another turret. Destroy it before coming closer.
Near the entrance to the Peak 15 building (NOV5-B), there will be the last turret. After destroying it, come closer and leave Mako. Go inside.
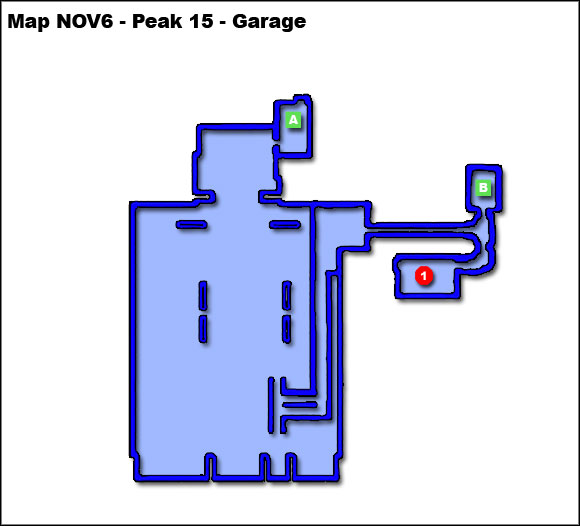
LEGEND (Map NOV6):
1. Security
A. To the surface
B. To Administration
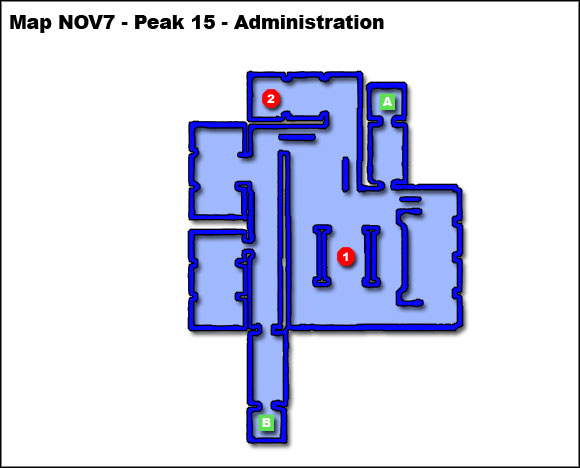
LEGEND (Map NOV7):
1. Cafeteria
2. Terminal
A. To the garage
B. To Mira Core
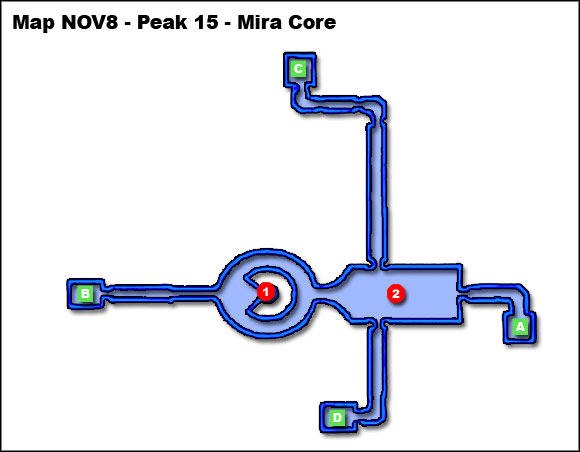
LEGEND (Map NOV8):
1. Memory Core Access
2. The place of Rahni attack
A. To Administration
B. To the roof
C. To the reactor core
D. To the tram station
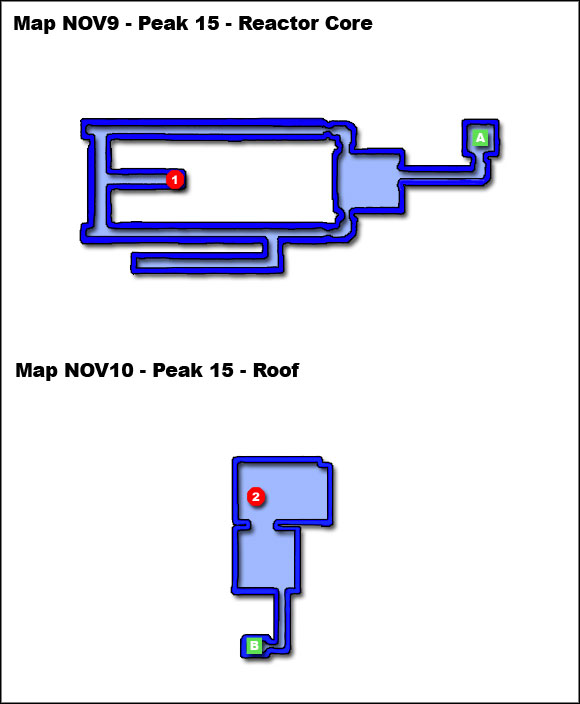
LEGEND (Maps NOV9 and NOV10):
1. Fuel lines
2. Landlines
A. To Mira Core
B. To Mira Core
In the garage you'll need to fight with a powerful juggernaut and some other geths. Destroy the repair probe first. It's also good to clear the nearby terrace so you won't be exposed to shooting from above. There will be a lot of exploding containers in the garage. You can use them to deal with the rest of enemies.
After the fight go upstairs and head to the elevator (NOV6-B). Before going up though, visit security room (NOV6-1) to take some useful equipment.
Meanwhile you'll hear message about systems breakdown. Your task is to restore them. You'll have also to eliminate some enemies, so prepare yourself and your companions before going up.
The geths will attack first, on the administration level near the cafeteria. Then you'll encounter more terrifying creatures, smaller and bigger ones alike. The first aren't too strong, but they act like kamikaze - run at you and explode releasing poison gas. It's best to eliminate them from the distance. The latter are more dangerous; you should avoid direct contact with them as well.
After the fight go south toward the elevator leading to Mira core (NOV7-B). You can search the rooms along the way to find some equipment, but watch out for the enemies, who jump off the sewers.
When you'll leave the elevator, you'll be attacked again by little, deadly opponents. Kill them and go to the main room (NOV8-2). You'll notice a terminal, but even after activation most of door will remain locked. You'll need to restart the system manually.
Go west to the memory core access (NOV8-1) - VI system controlling the station. Enter the elevator in the middle to descend into the core. Here, to restore the VI you can either spend 100 omni-gel, or solve the classic Tower of Hanoi puzzle. Either way, you'll be able to speak with Mira after that.
If you choose the latter possibility, you'll need to move each of the four blocks in the first column (labeled X) to another column (either Y or B), noting that only the top block in each column can be moved.
When you finish, the VI system will be restored and you will be able to restore the other systems.
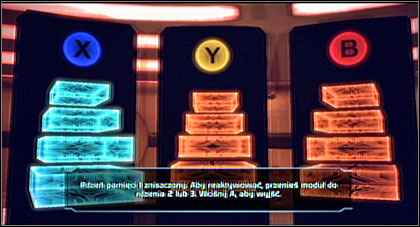
The puzzle is not difficult. There are lot of solutions. Here's one of them:
1. X -> Y
2. X -> B
3. Y -> B
4. X -> Y
5. B -> X
6. B -> Y
7. X -> Y
8. X -> B
9. Y -> B
10. Y -> X
11. B -> X
12. Y -> B
13. X -> Y
14. X -> B
15. Y -> B
After restoring the systems, talk with Mira. If you tell her about your function, you'll gain access to most of information. You'll learn that Matriarch Benezia used the tram but it is now turned off. You'll need to reconnect the landlines and restore the communication (on the roof) to turn it on again.
Hint! While completing this task, you can be attacked by enemies in the main hall (NOV8-2). Be prepared.
Come back to the hall and go through the north door. Continue along the corridor to the elevator (NOV8-C) and ride down to the reactor.
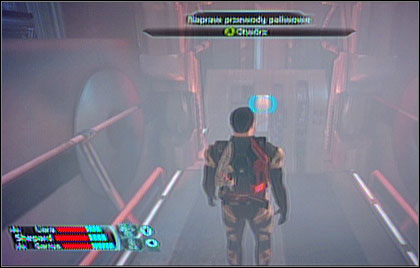
There will be some geths waiting for you there, but eliminating them shouldn't be much problem. After clearing the area, repair the landlines (NOV9-1).
Explore the area searching for useful equipment and ride the elevator (NOV9-A) back to Mira core level.
Head west this time. Go through the door and ride the elevator (NOV8-B) to the roof. Kill the enemies using grenades and biotics (there will be a lot of them). Remember not to let them come closer to you and your companions.
After the fight, activate the fuel line controls (NOV10-2). This will turn on the tram.
Come back to Mira core level and use south door to ride the elevator (NOV8-D) to the tram station.
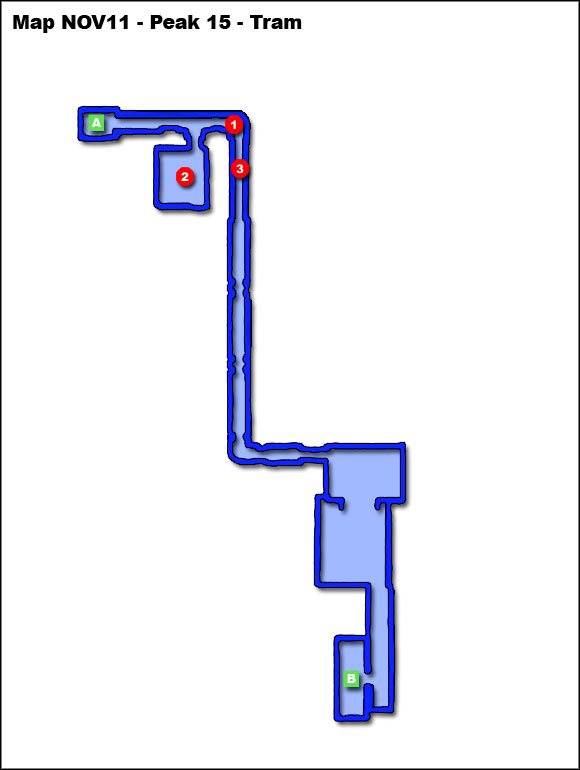
LEGEND (Map NOV11):
1. Door control
2. Computer terminal
3. Decon chamber
A. To Mira Core
B. To the Rift Station lower level
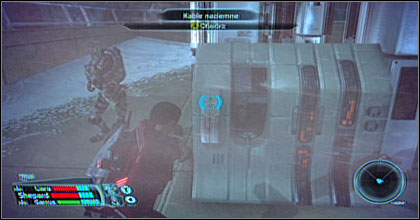
In the elevator you'll hear a message that the decon chamber is contaminated and you won't have access to the tram station because of that. It looks like you'll need to find a way to clear it.
Enter the security room (NOV11-2) and use Mira terminal to find out how to get rid of the "contamination". You will have three possibilities:
If you didn't clear the chamber before entering, you'll need to eliminate enemies inside.
Then head south to the tram station (NOV11-B) and use it to get to the Rift Station.
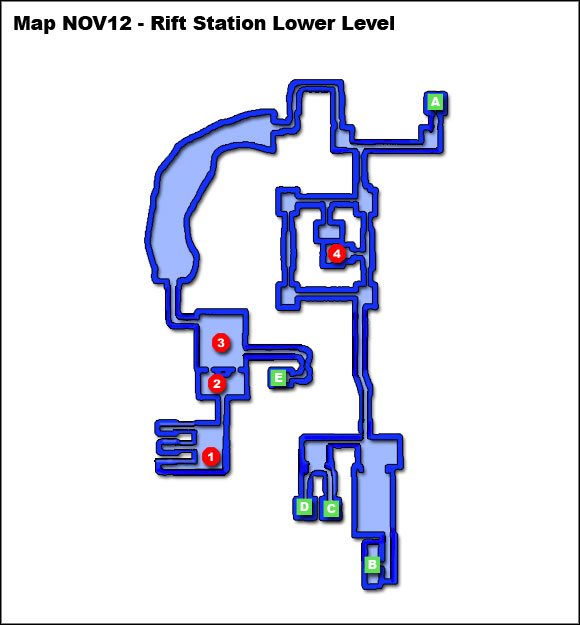
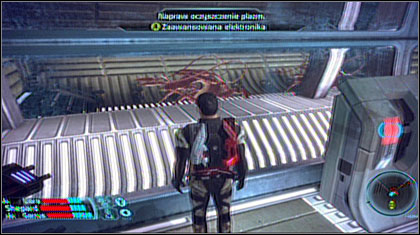
LEGEND (Map NOV12):
1. Quarantine Lab
2. ERCS Guard
3. Han Olar
4. Matriarch Benezia
A. To the Rift Station Main Level -> (NOV13-C)
B. To the Tram Station
C. To the Hot Labs
D. To the Rift Station Main Level -> (NOV13-A)
E. To the Rift Station Main Level -> (NOV13-B)
LEGENDA (Map NOV13):
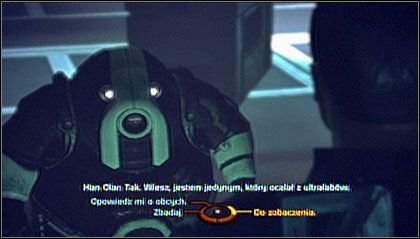
1. Captain Ventralis
2. Alestia Iallis
3. Dr Palon
4. Security
5. Guards barracks
S. Shop
A. To the Rift Station Lower Level -> (NOV12-D)
B. To the Rift Station Lower Level -> (NOV12-E)
C. To the Rift Station Lower Level -> (NOV12-A)
D. To Dr Zev Cohen
After getting out the tram head north until you reach two pair of doors. The one leading north will be closed, so go west. Soon you'll reach another pair of doors. Choose the one leading to the higher level (NOV12-D). This way you'll get to the Rift Station.
After leaving the elevator you'll soon meet captain Vantralis (NOV13-1). Talk with him to learn about the station and use persuasion to get information about security systems. Offer him your help. He'll give you activation card to the hot labs (NOV12-C). After the conversation, the post will be attacked by enemies. Get rid of them and continue further.
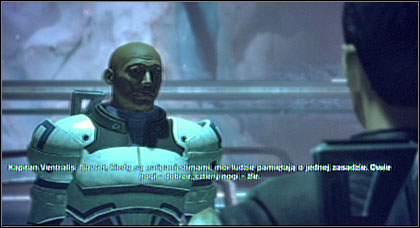
Head to the central room where you'll find the survivors. There you'll meet Alestia Iallis, medic (NOV13-2), dr. Palon (NOV13-3)and trader Petozi (NOV13-S). It's good to talk with all of them to learn more about the situation.
Dr. Paleon (NOV13-3) will tell you that you should speak with dr. Cohen and Han Olar who is the only survivor from the accident at the lab.
Hint 1! It's good to visit security barracks (NOV13-5) to find some useful equipment.
Hint 2! You can pass over actions described in the next part of this paragraph and break to the secured part of the complex (NOV13-4) through the door on the north-west. Ride the elevator (NOV13-C) to get to Benezia. This action will be against Ventralis so you'll need to fight the guards inside. This solution won't give you this many points as granting doctor Cohen request. It's also not recommended if you play as paragon. If you decide to do it though, after getting out the elevator head to the lab at the south. There, you'll find Benezia (more in 7.4.2. Mother Benezia).
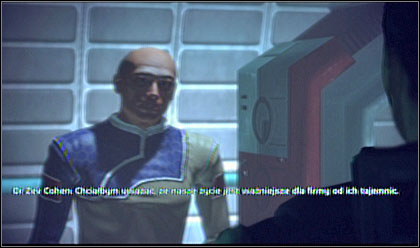
Head to the quarantine lab (NOV13-D) to talk with dr. Cohen. Use charm/intimidation to learn the truth about the accident. It looks like poisoned scientists can be saved only by the cure. Unfortunately, the lab with doctor's equipment and notes is quarantined and Ventralis won't let anyone there. Maybe you'll manage to convince him?
Come back to Ventralis (NOV13-1) and persuade him to let you in the lab. He'll eventually agree and tell the guard in the quarantined area about it.
Use the elevator on the west (NOV13-B) to get to the lower level. Talk with Han Olar (NOV12-3) there to learn the truth about origin of the creatures you fought before. These are rachni, race considered to be extinct.
Talk with the guardian (NOV12-2). Soon you'll be able to get inside the lab (NOV12-1).
You'll find containers and notes needed to prepare the cure there. Press the appropriate buttons so that the meter falls between the first indicator and the second (X, Y, X, A).
Right after finishing you'll be attacked. Look for a cover and eliminate the enemies. Remember, that biotics doesn't work well against asari.
Leave the lab and talk again with Han Olar (NOV12-3). Ask him about the access to the maintenance tunnel to find out that dr. Cohen has the key to it.
Come back to the main level and go to the quarantine lab (NOV13-D). Give the cure to dr. Cohen and ask him to give you the pass to the maintenance tunnel; he'll agree.
Go to the lower level (NOV13-B) and then to Han Olar (NOV12-3). Use the key to open the door on the north west.
Your destination is the lab (NOV12-4). You'll need to fight rachnii along the way, but they shouldn't be much problem for you.
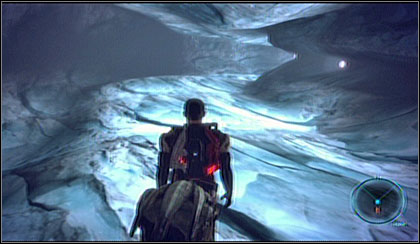
Benezia will be in the lab. After a short talk you'll need to fight her. She will be hidden behind a barrier, so there will be no point attacking her directly. Concentrate on the commandors sent by asari and defeat the first wave of enemies.

Benezia will call another unit. You'll notice that it takes some power from her. This time there will be not only asari but also geth snipers. Try not to come closer to the containers with explosives during the fight. If the enemies come near them though, shoot them.
Matriarch will call the last reinforcement. It will be the most numerous, so be careful.
Soon you'll be able to speak with weakened Benezia. She'll tell you among others about Saren and his powerful ship Sovereign. Then you'll have to fight her again.
This time matriarch won't be protected by the barrier, so she'll be exposed to your attacks. Use the force of all squad to finish her quickly. Then clear the area from other attackers.
Soon Benezia will be dead, but you'll gain opportunity to speak with the rachnii queen. She'll ask you to kill rachnii in the hot labs and tell you about tragic history of her species. If you kill her, you'll get renegade points. If you save her life, you'll get paragon points.
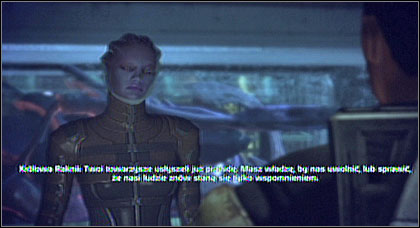
Hint! At this moment, you can return to the tram (NOV12-B) and end the mission or grant the queen request and head to the hot labs (NOV12-C).
In the hot labs you'll meet Jaroslaw Tatarkowski, who will tell you about what corporation planned to do with rachnii and why they didn't succeed. He'll also give you information about neutron purge system installed on Peak 15 in case of situation like this. You'll need to activate it to get rid of all rachnii in the complex.
Before you agree to do what he proposes, you'll have some time to check your equipment and cure the squad. Do it; you won't have possibility to do it later.

When you'll be ready, Tatarkowski will tell you about the activation code, but he'll be killed by rachnii before giving it to you. Eliminate the creature and take the codes from the body. Go to the next room and turn on Mira terminal. Tell her to activate the neuron purge system.
You'll have two minutes to get back to the elevator and ride to the upper level, but first you'll need to handle rachnii (there will be a lot of them).
There will be no time to kill them all, so shoot few in front to clear the way a bit. Then run toward the elevator, curing the squad along the way if necessary.
Now you just need to get to the tram (NOV12-B) and leave Noveria.
Assignments described in this chapter are not part of the main plot mission. If you want to complete them though, it's good to return to the Citadel after finishing your tasks on Therum (5), Feros (6) or Noveria (7).
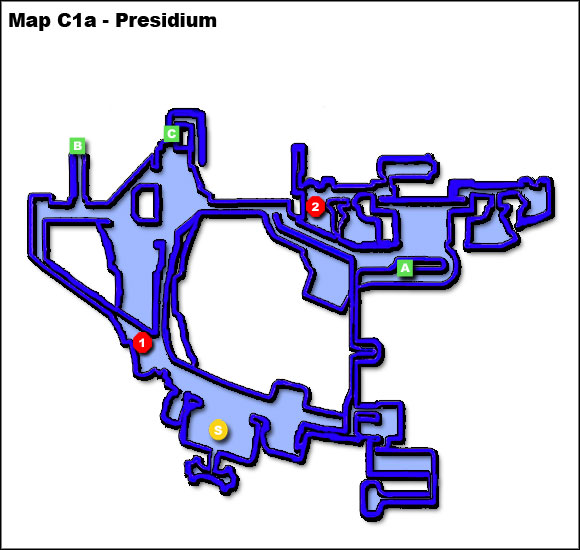
LEGEND (Map C1a):
1. Michael and Rebekah Petrovsky
2. Nassana
A. To C-Sec Academy
B. To the Tower
C. To the Wards
D. To C-Sec Academy
S. Shop
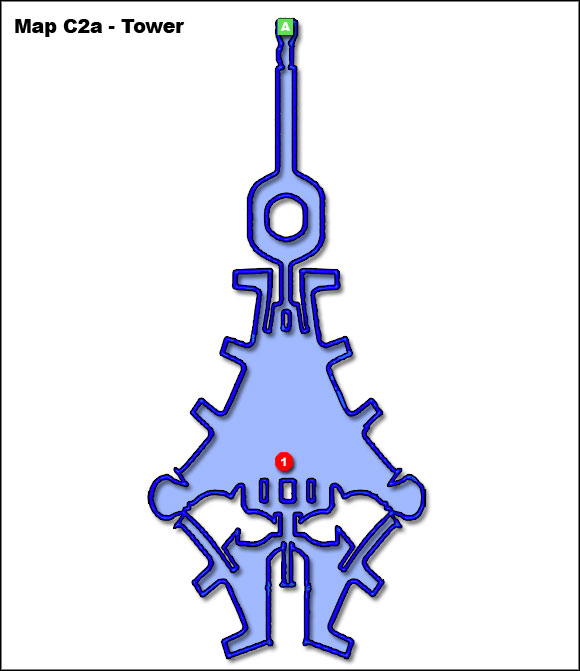
LEGEND (Map C2a):
1. Emily Wong
A. To the Presidium
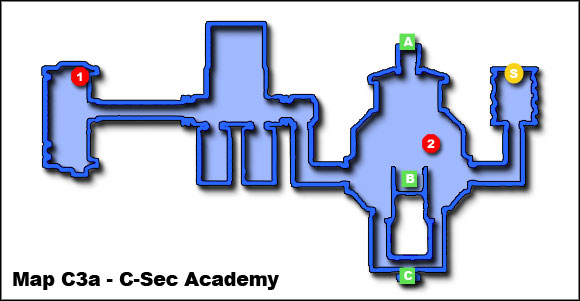
LEGEND (Map C3a):
1. Inconspicuous Location
2. Al-Jilani
A. To the Presidium
B. To the Docks
C. To the Lower Wards
S. Shop
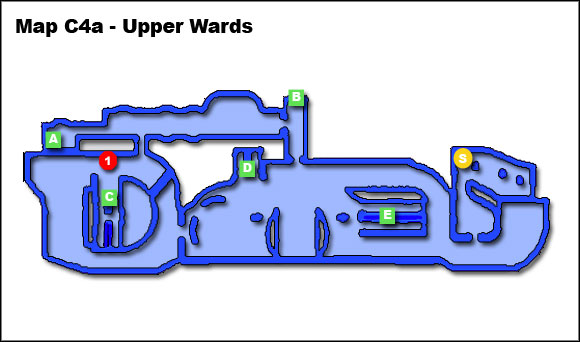
LEGENDA (Map C4a):
1. Conrad Verner
A. To the Lower Wards
B. To the Presidium
C. To the Lower Markets
D. To Flux
E. To C-Sec Academy
S. Shop

Right after leasing Normandy, you'll be accosted by rear admiral Mikhailovich who wishes to inspect the vessel. He won't be very pleased. Whether he'll change his mind, it's up to you. Use persuasion to make it happen.
At the C-Sec Academy, near the elevator to the docks, you'll meet reporter Al-Jilani (C3a-2). If you agree to give an interview, the conversation won't be easy. She will be inquisitively try to discret you and get information from you at the same time.
Your task is to answer that way, so A-Jilani won't learn too much but the conversation won't end too quickly. Use charm/intimidation whenever you can. If not, you'll be presented in an unfavourable light. When she'll ask about Saren, give an evasive reply.
After the interview, when you'll return to Normandy and use the galaxy map, admiral Hackett will contact you and tell how you came out.
In the southern part of Presidium, you'll witness an argument (C1a-1). The man will want his sister-in-law to have gene therapy for her unborn child to help prevent a certain heart condition. She will be worried about the risks of such a procedure, and won't want to do anything that could harm the child. The father of the child is dead, so the decision rest with the widow.
On who's side you'll stand, it's your call. Use charm/intimidation to persuade your opponent and gain some paragon/renegade points.
After completing one main mission planet, you will receive a transmission from an asari diplomat who will ask you to meet her. She will be in the embassy lounge (C1a-2). She will tell you that her sister Dahlia has been kidnapped, and that she wants you to go rescue her.
The pirate base lies in Artemis Tau cluster, system Macedonia, planet Sharijla (13.3.3.1.).
After returning from the planet, go to Nassana. She will propose you a reward for completing the assignment. If you use persuasion, you'll get license to buy weapon upgrades made in asari labs.
If you completef assignment 3.9. Reporter's request before, after returning to the Citadel, meet Emily Wong (C3a-1) in the tower. The reporter is again on track of some suspicious case. She'll ask you to find evidence, that traffic control operators are overworked. You'll need to plant a bug in some inconspicuous place.
If you agree to help her, go to the room on east side of C-Sec Academy. There you'll notice a spot where you can plant the bug (C3a-1). Come back to Emily then and take the reward. During the conversation, you can take a stance on the case and gain some paragon/renegade points.
Hint! You can also complete this assignment without planting the bug. After taking it, talk again with Emily and convince her that it's not a good solution (paragon points) or lie, that the bug doesn't work.
In the Upper Wards, you'll meet again Conrad, your fan (C4a-1). This time he'll ask for a photo of you. You can agree or refuse; it won't influence his attitude towards you.
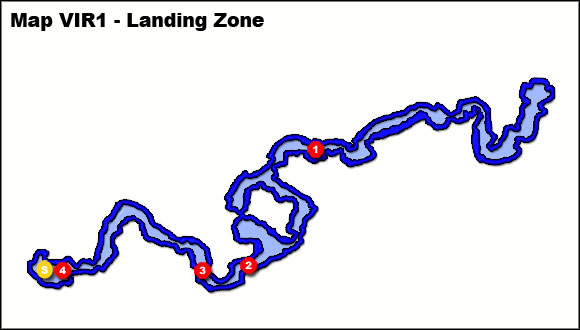
LEGEND (Map VIR1):
1. Gatehouse 1
2. Gatehouse 2
3. Gatehouse 3
4. Salarian Camp
S. Shop
After landing, you'll need to get through terrains near Saren's base. You'll encounter many geths along the way. Luckily, you'll be in Mako most of the time. You'll need a squad with balanced abilities and skills, with weapon upgraded this way, it will have bonus against shields and synthetic enemies though.
Your first task is to get to the salarian camp (VIR1-4). You'll need to do one more thing along the way - turn off the anti-defense tower to let Normandy land. Switch will be in the second gatehouse (VIR1-2).
Near the landing place you'll encounter some drones - your first enemy, and then some more. Eliminate them from the distance.
Soon you'll reach first gatehouse. Use turret and cannon to get rid of geths guarding it. Then leave the vehicle and go up to eliminate the rest. Come back to Mako and get through the gate.
You'll notice a geth colossi - bigger version of armature. His shots are more dangerous, but slower, so you shouldn't have much problem with avoiding them. Once the machine will be down, you'll be able to choose one of two paths. Both lead in this same place, where another colossi with some armatures will be waiting for you. I suggest to pick the north path, so you can flank the geths which will be staying near the second post.
With the second gatehouse (VIR1-2) do the same as with the first. First use Mako to clear the area in front of the building. Then go upstairs and eliminate the rest. Use the switches to turn off the anti-defense turrets and open the gate. Then continue further.
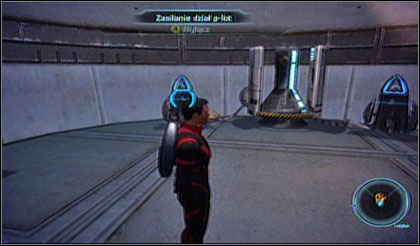
Before you'll reach salarian camp, you'll need to get through once more post. Use the same method as with the others.
Enter the camp and speak to captain Kirrahe, the leader of the salarian infiltration team. You'll learn about experiments performing in a base nearby. Wrex will be particularly upset about them. He will walk away from the camp. Before going further, you should speak with him (9.1.2. Wrex and the Genophage).
Hint! After dealing with Wrex, it's good to take the opportunity to buy some useful stuff (VIR1-S) before the mission.
When Wrex will find out what experiments are being performed at the Saren's base, he won't want to let you destroy it. He will walk away from the camp; your task will be to talk with him.
Hint! Be careful and choose your lines wisely. The conversation may end with Wrex death!
You'll need to convince krogan, that there's no other way. You can do it only when you completed assignment 13.1.1.1. Wrex: Family armor before. If not, you'll have to use charm/intimidation (at level eight or higher) to persuade him.
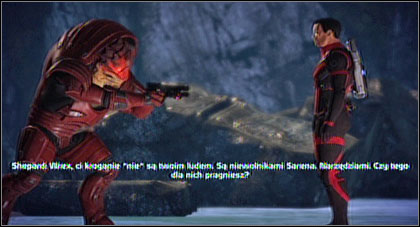
You can also shoot Wrex or tell Ashley to do it. Both way, you'll gain a lot of renegade points.
Other lines will lead to situation when your ally will kill Wrex from behind. At this moment, morality points bonus will depend on the tone in which you'll comment Wrex death. It won't be as big as if you manage to convince him though.
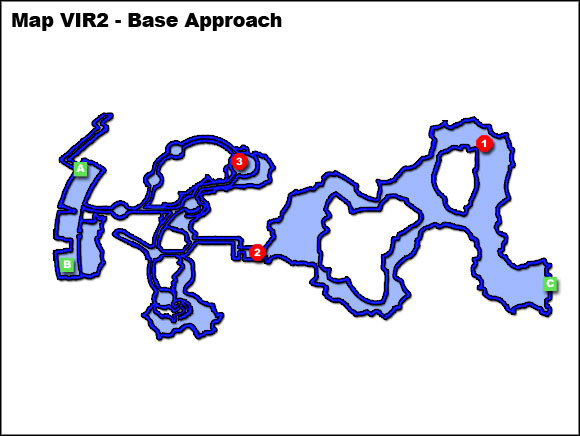
LEGEND (Map VIR2):
1. Triangulation Tower
2. Satellite Uplink Tower
3. Refueling Platform
A. To the base entry -> (VIR3-A)
B. To the Detainment Level -> (VIR4-C)
C. To the Landing Zone
When you'll be ready to continue further, captain Kirrahe will tell you about his plan of destroying the base. He and his men will attack from the front and your task will be to infiltrate it and deactivate anti-aircraft systems. It will let Normandy land there and provide the bomb to end Saren's activity on Virmire.
Hint! Before you go, Kirrahe will ask you to reinforce his unit with one of your companions. You can choose between Ashley and Kaidan. I propose to leave captain this person, who you didn't plan to take to the base anyway.
Now you can choose between going straight to the enemy territory (VIR2-A or VIR2-B) killing geths along the way and take a detour to support Kirrahe's unit by disrupting the base security systems (9.2.1. Assisting Kirrahe's Team).
While approaching the base, you'll have four possibilities to support Kirrahe. First, you can use triangulation tower (VIR2-1) to disrupt geth communication (you will find it at the north east). Eliminate the guards, go upstairs and use the terminal.
The next step is to cut off the communication for good. To do it, you'll need to destroy the satellite (VIR2-2). It can be found at the top of the uplink tower guarded by a group of geths and hired krogan. After clearing the area, shoot the satellite until it explodes.
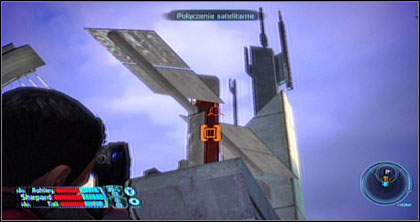
Your next task is to destroy five drones guarding the nearby refueling platform (VIR2-3). Then you can get inside the base. If you use the north entrance (VIR2-A), you'll come across a security terminal (VIR3-1)l. It can be used to deactivate the alarm system.
Hint! You can also use the console to redirect the geth forces in Kirrahe direction to make your stay in the base somehow easier. Captain will be killed though and you will gain some renegade points.
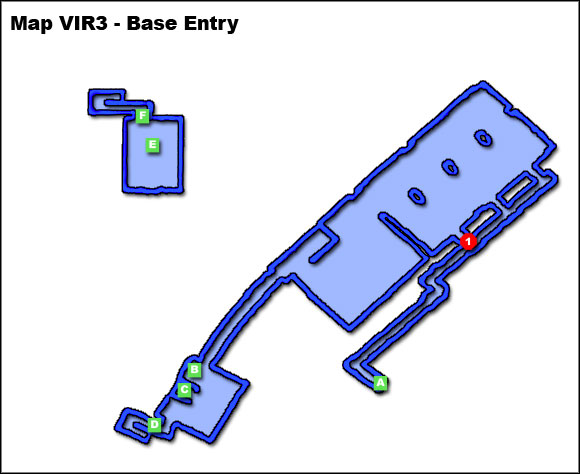
LEGEND (Map VIR3):
1. Security Console
A. To the base entry
B. To the Detainment Level -> (VIR4-A)
C. To the Labs -> (VIR5-A)
D. To the Labs -> (VIR5-B)
E. To the Detainment Level -> (VIR4-B)
F. To the Labs -> (VIR5-C)
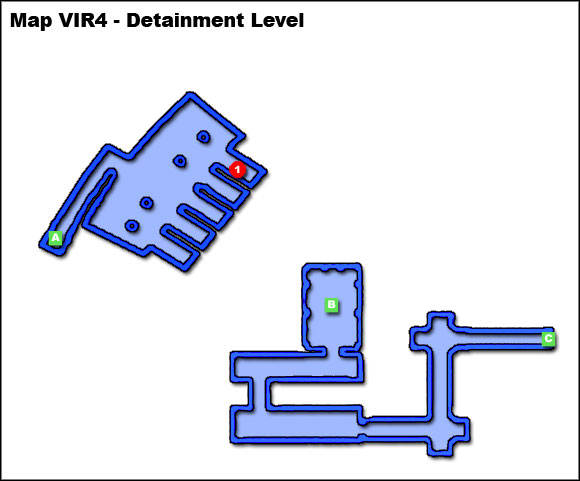
LEGEND (Map VIR4):
1. Salarian Prisoner
A. To the base entry -> (VIR3-B)
B. To the base entry -> (VIR3-E)
C. Out of the base -> (VIR2-B)
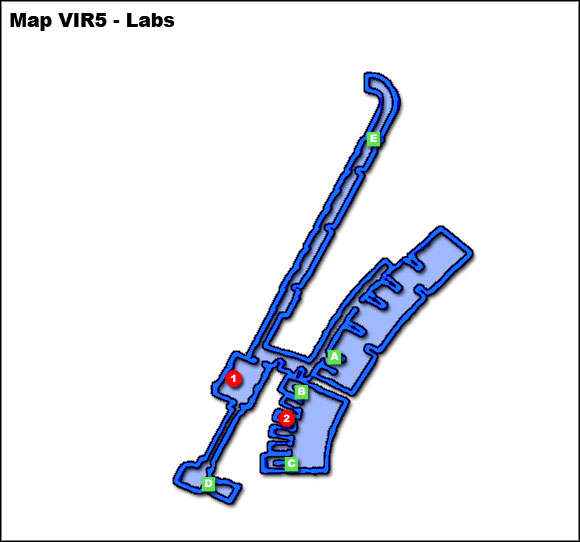
LEGEND (Map VIR5):
1. Rana Thanoptis
2. Salarian Prisoner
A. To the base entry -> (VIR3-C)
B. To the base entry -> (VIR3-D)
C. To the base entry -> (VIR3-F)
D. To the Communication Tower
E. To the base main level
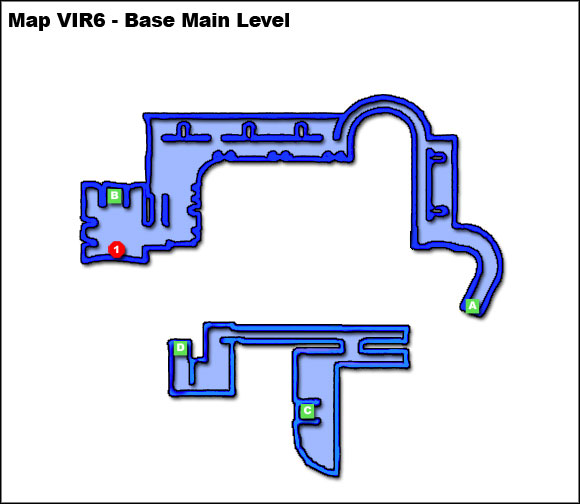
LEGEND (Map VIR6):
1. Turret Control
A. To the Labs
B. To the Krogan Breeding Grounds -> (VIR7-A)
C. To the Krogan Breeding Grounds -> (VIR7-B)
D. To the Communication Tower
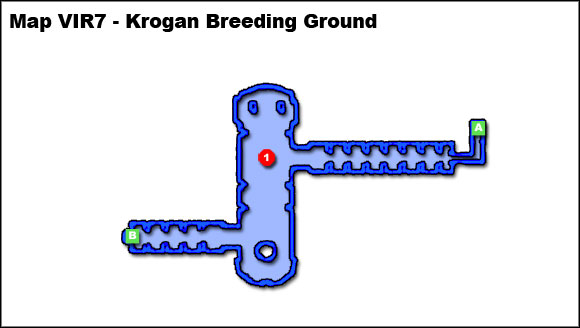
LEGEND (Map VIR7):
1. Landing Site
A. To the base main level -> (VIR6-B)
B. To the base main level -> (VIR6-C)
You can enter the base in two ways. First (VIR2-A) will allow you to get to the security control and complete assignment 9.2.1. Assisting Kirrahe's Team. Your road will be longer, but you'll be able to gain some experience and morality points. Going through the other entrance (VIR2-B) will let you to avoid some encounters and get into the labs. I propose to choose the first option to get more points.
After getting inside, you'll see the security control. Use it to support Kirrahe unit (9.2.1. Assisting Kirrahe's Team) and unlock the door leading further into the base.
In the main room you'll need to fight geths and indoctrinated salarians. Then head to the security room. There you'll encounter more salarians.
I propose to choose the way leading to the detainment level (VIR3-B) first. In one of the cells you'll see a salarian with whom you'll be able to talk. He will tell you about the indoctrination. If you want to gain some paragon points, let him out, if you play as renegade, leave him there. This same goes for the other prisoners.
Come back this same way and get through another passageway (VIR3-D) to reach the labs with more cells. One of salarians will also ask you to free him. Notice though, that this way you'll let already indoctrinated prisoners out as well. Your companions will object. If you agree to let them out, you'll gain paragon points but you'll have to fight them. They won't be very dangerous.
Hint! Second exit from the room (VIR5-C) will lead you to the passageway which you would use if you chose alternative way to enter the base.
Come back the same way you got here and use the elevator (VIR3-C). It will take you to the labs main level. Here you'll need to fight a krogan, group of zombie and asari.
After leaving the room, you'll find yourself on a bridge. Geths lifted it and you'll must lower it again to pass through. Go back and search for a switch.
Go south and enter the security office. You'll meet Rana Thanoptis there. She will ask you to spare her and offer that she'll open the door to Saren's private lab. She'll tell you also about indoctrination and Sovereign. If you kill her, you'll gain many renegade points. Saving her won't bring you any paragon points though.
Use the elevator activated by Rana (VIR5-D). You'll reach the communications tower. You'll find prothean beacon there. Activate it using nearby terminal. This will give you another vision.
Then go upstairs to the communication panel. You will have a conversation with rather unexpected guest who will make you see some things from different perspective. When the conversation will be over, the interface will explode.
A moment later Joker will contact you and ask you to hurry. It will be just about time to complete your task - deactivate anti-aircraft turret.
Go back to the labs and run toward the lifted bridge. It will lower so you can pass through. You'll need to fight many geths and krogan along the way.
Fight your way through the base main level. You'll need to reach the turret control (VIR6-1) and use it to let Normandy land.
After deactivating the turret, you'll be attacked by two groups of geth. Get rid of them and use nearby elevator (VIR6-B) to get to the krogan breeding ground. The place where you need to set up the bomb (VIR7-1) will be near. Before you'll reach it, you'll have to fight some geths.
About that time captain Kirrahe group will manage to deactivate the second turret. Normandy will land and deliver its special cargo.
Unfortunately geths will be so numerous that getting to Kirrahe will be slightly impossible. You need to relieve them.
Hint! At this point you'll have to choose your companions. Ashley and Kaidan will be busy (one is with Kirrahe, the other will stay to set up the bomb). It's important to complete well balanced and equipped quad.
Go through the west gate and head to the elevator which will take you to the base main level (VIR7-B). Before you'll reach it, you'll need to get rid of some geths and krogans. After clearing the area ride down.
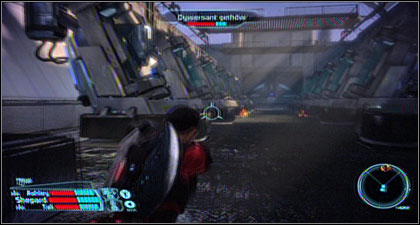
On your way to the second turret (VIR6-D) you'll see a transporter with geths. You won't be able to save the unit in tower and some back to the bomb on time.
Hint! You will face a difficult choice. Ashley's and Kaidan's lives will depend on you. Only one of them can leave Virmire. It's your call. After making the choice, you'll have to comment it to gain some paragon/renegade points.
If you choose to save the person who stayed with the bomb, you'll have to turn back and get to the landing site (VIR7-1). If you choose to save the person who is in Kirrahe unit, continue to the second turret (VIR6-D).
Regardless of your choice, you'll encounter many geths. Among them will be prime, the strongest type of geth soldiers. Concentrate on him first during the fight for he will be very dangerous for your squad.
Then Saren himself will arrive. Talk with him to learn about his motives and (optionally) try to win him over to your side which won't be successful but will give you some morality points.
Eventually you'll have to fight him. First find a cover and change squad weapon to injury organic creatures. During the fight, use all of your talents: offensive and defensive. Control the state of shield and your squad's health and react if necessary (shield boost, medi-gel).
After the fight you'll see from the orbit big explosion which will completely destroy Saren's base.
On Normandy you'll meet your team. Liara will again try to get the information from Shepard's head. She'll manage to localize Saren's destination - planet Ilos (11).
During holoconference with the council tell what you learned about ex-spectre. Alas, they will be still ignoring reapers and Sovereign itself.
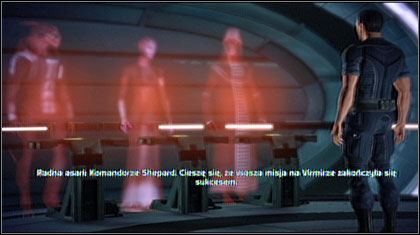
When you'll try to use the galaxy map, you'll receive the message to arrive at the Citadel immediately.
Hint 1! Before meeting the council, I suggest to complete assignments from chapter 13. Uncharted world. You won't be able to come back to Citadel and some of them require speaking with its residents.
Hint 2! If you helped captain Kirrahe unit (9.2.1. Assisting Kirrahe's Team), you'll be able to speak with him in Normandy engineering. You'll also meet a trader there so it's good to buy or/and sell some stuff. Remember, that after landing in Citadel captain and his men will leave the ship.

LEGEND (Map C1b):
1. Conrad Verner
2. Charles Saracino
A. To the Lower Wards
B. To the Presidium
C. To the Lower Markets
D. To Flux
E. To C-Sec Academy
S. Shop
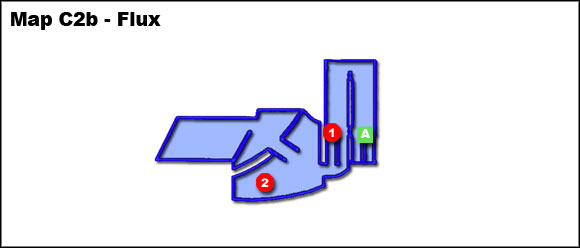
LEGEND (Map C2b):
1. Negotiator
2. Captain Anderson
A. To the Upper Wards
Right after the landing you'll find yourself in council chambers. Unfortunately, things will turn wrong. You'll be grounded on Citadel. Noone will want to believe you while Saren is closer and closer to discover prothean mystery.
Return to Normandy. The person with whom you wanted to romance (if there is one of course) will try to comfort you but the conversation will be stopped by Joker's message - captain Anderson will ask you to meet him in Flux.
Leave Normandy and head to the club. Use terminal in C-Sec Academy to get there quickly.
Captain (C2b-2) will propose you quite risky cooperation. He will turn off Normandy blockade so you can depart before station staff realize it.
You will be able to choose whether Anderson will break into system from ambassador Udina office or from citadel control. As a matter of fact, your choice won't make much difference. One way or another, you can depart and the only difference is in the cutscene you'll see.
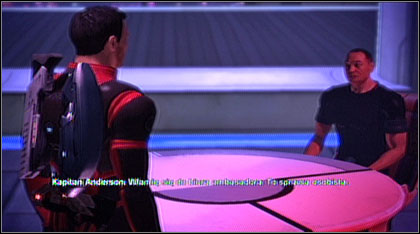
Hint! During the conversation, captain will ask you whether you're ready to leave the Citadel. If you didn't complete some assignments here, now is the last chance to do it. All Citadel assignment which you didn't complete before (chapters 3 and 8) will be available. There will be also some more - you'll find description in next paragraphes.
After the talk return to Normandy and leave the port.
In the Upper Wards talk with Charles Saracino (C1b-2). He'll ask you to support his xenophobic political faction.
If you explain him that humans are only one of many races and they shouldn't be favoured over the others, you'll gain paragon points. If you agree with him, you'll gain renegade points. You can just refuse (no morality points) or say goodbye and walk away (you can talk with him again before leaving the Citadel).
Near the entrance to Flux talk with Elias Keeler (C2b-1). He's Alliance negotiator who is before an important meeting. He wants to stimulate himself to be on top on his game, but he can't buy more stimulant, because his monthly limit is over.
If your persuasion skill is high, you can end this assignment now, telling him that he's addicted. If you convince him not to rely on stimulants, you'll gain paragon/renegade points, depending on using charm/intimidation.
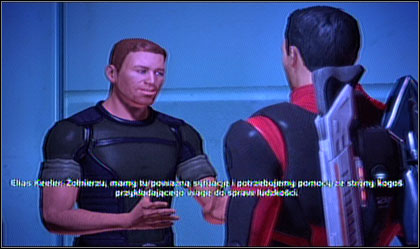
If you can't (or won't want) to use persuasion, you'll have to buy him the drug.
Go to dr. Michel's clinic (C1b-S) and ask her to show you her goods. You can buy the stimulant Elias asked for (paragon points), or a depressant which should have the opposite effect (renegade points). Return to Elias and give him either drug to complete the assignment. He will pay you for it.
Your fan (C1b-1) will accost you for the third time, again in the Upper Wards. This time he'll ask you to help him become spectre. You need to get this idea out of his head. You can do it (optionally) using charm/intimidation to gain some paragon/renegade points.
Hint 1! If you managed to establish a love affair with one of your companions, this will be the time to have a little tete-a-tete with him/her.
Hint 2! On Ilos you will be fighting mostly with geths so it's good to equip your squad in weapons and upgrades against synthetic creatures.
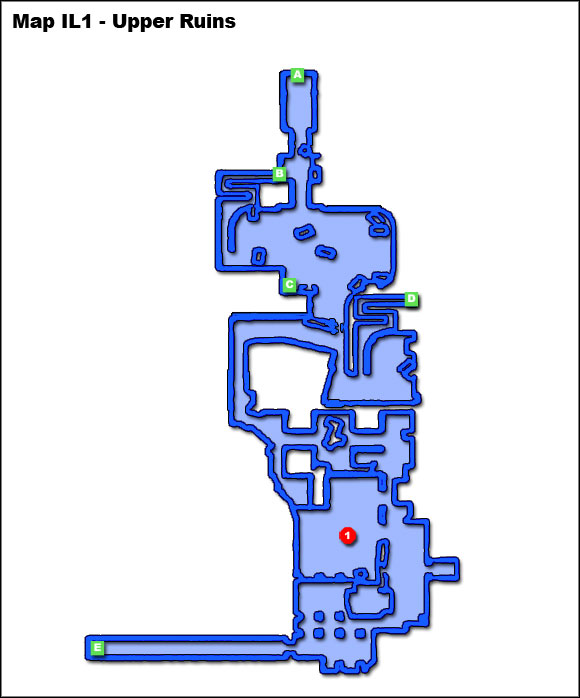
LEGEND (Map IL1):
1. Courtyard
A. Archive Door
B. To the Lower Ruins -> (IL2-A)
C. To the Security Station -> (IL3-B)
D. To the Lower Ruins -> (IL2-B)
E. To the Security Station -> (IL3-A)
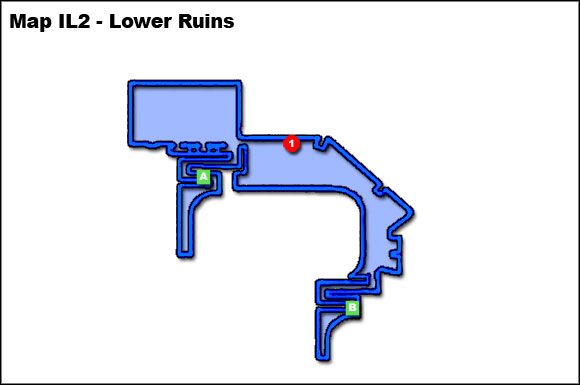
LEGEND (Map IL2):
1. Armature Control
A. To the Upper Ruins -> (IL1-B)
B. To the Upper Ruins -> (IL1-D)
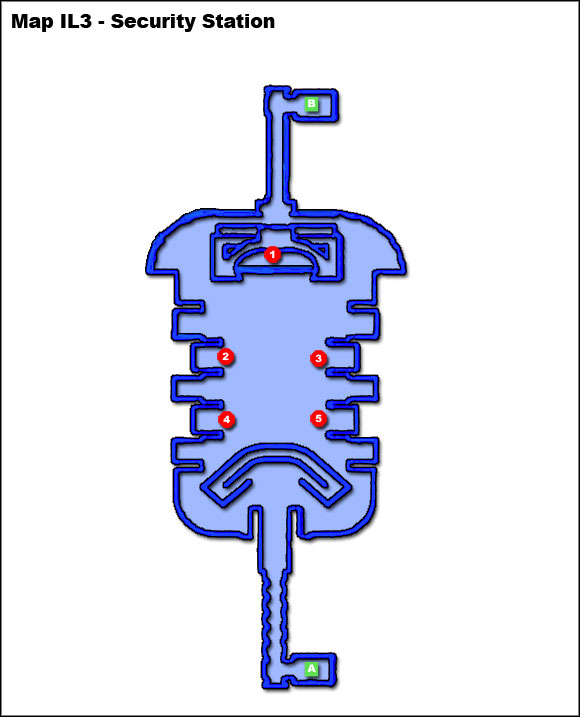
LEGEND (Map IL3):
1. Security Panel
2. Armature Repair Station
3. Armature Repair Station
4. Armature Repair Station
5. Armature Repair Station
A. To the Upper Ruins -> (IL1-E)
B. To the Upper Ruins -> (IL1-C)
After landing and chasing Saren for a while, you'll be forced to stop and find some way to get inside - he will block the door leading into the ruins (IL1-A).
Stay in Mako and use it to clear the area. Then leave it and continuing slowly from cover to cover eliminating geths in front of you.
Soon two armatures will stand in your way. You may try to destroy them hiding behind a cover, using overload and sabotage, shooting and avoiding big electronic shots.
Easier way is to use nearby passageway (IL1-B) to the lower level. Here you will have to fight as well, but with regular geths only.
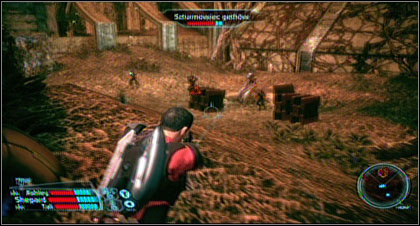
Hint! You can use console (IL2-1) found along the way to deactivate armatures on the higher level. You'll need to have someone with high decrypting skills.
Use the south passageway (IL2-B) to return to the higher level. This way you can evade the armatures.
There will be open terrain in front of you with more geths. Avoid exit from the north. It's better to take cover using way along the wall. There will be snipers shooting from above (balcony on the southeast side of the room), co be careful. You can use pillars as a cover.
Use the elevator (IL1-E) to get to the security station. At the end of it, there will be door to security panel - your destination (IL3-1). Before you'll get there, you'll need to fight with enemies, including geth prime. Concentrate on it first.
Then (optionally) continue further using consoles to reprogram and activate armatures (IL3-2,3,4,5) which will give you good support.
It's also good to force your way to the north and get up the security building. You'll have good view to the whole room and the walls will be good cover.
After the fight use the panel (IL3-1) to open door blocked by Saren and hear some message in prothean language. You won't be able to get a lot out of it though.
Take the elevator (IL3-B) on the north to get near Mako. Ride further.
Continue along the corridor. There will be some geths there, but eliminating them shouldn't be difficult for you.
Soon you'll reach big energy barrier blocking further way. Leave Mako and go through nearby door. Continue along the corridor and take the elevator up. It will take to a room with prothean terminal. Use to contact Vigil, ancient VI controlling complex on Ilos. During long conversation you'll learn a lot about history of protheans, reapers, Canal and Citadel.
After the conversation, VI will give you a copy of a special data file that must be uploaded into the Citadel's master control unit to give you control of the station.
Return to Mako. The barrier will be gone, so continue further. You'll encounter some geths along the way, so be careful, watch the radar and eliminate them from the distance. Soon you'll reach the beacon.
Passage will be open and you'll have 30 seconds to get there. There will be several colossi along the way, but you won't have time to fight them. Just ride and don't bother with vehicle damage - it won't be necessary soon.
LEGEND (Map C1c):
A. Elevator to the Tower
LEGEND (Map C2c):
1. Defense Turret
2. Defense Turret
3. Defense Turret
A. To the Maintenance Shaft
B. To the Exterior Defence Grid
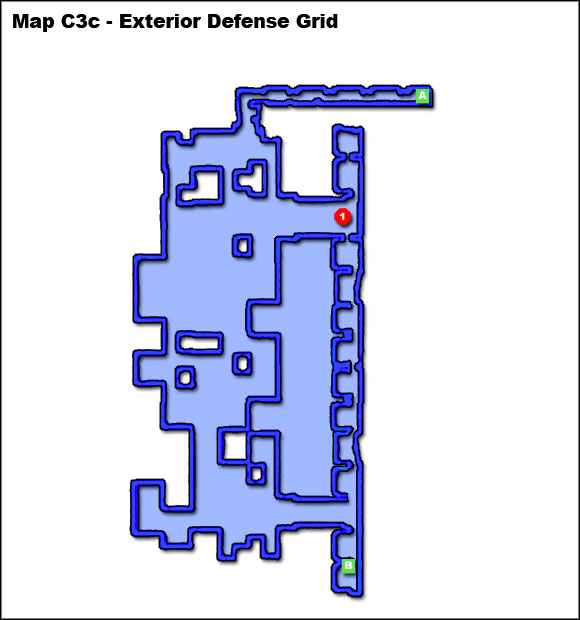
LEGEND (Map C3c):
1. Entrance to the Maintenance Shaft
A. To the Exhaust Plain
B. To the Tower
After landing leave Mako and go meet Saren and Sovereign. You'll be in Presidium. Head to the tower. Get rid of the zombies and take the elevator (C1c-A).
Unfortunately, it will stop halfway. You'll need to get outside and go along the maintenance shaft. Soon you'll be attacked by geths. Continue slowly, taking cover in small alcoves and eliminating enemies little by little. Then krogan warrior will appear - concentrate on him.
At the end of the shaft, you'll need to get pass a field with energy shields. Take some time to destroy them before going further. On the left side there will be few geths, so watch out while going up.
Continue to reach the exhaust plain. Move slowly to southeast. Soon you'll see dropship deploying geth soldiers. Before going further, you'll have to destroy it. To do it, you'll need to activate three defense turrets in the area (C2c-1,2,3). Then get rid of the survivors and go southwest (C2c-B).
You'll get to another shaft. Be careful, as you'll have to fight krogan warriors and geth juggernauts. Try to keep distance and use singularity, throw and lift.
You'll need to get through the area with many turrets and geths soldiers. Concentrate on the first. You can destroy them staying hidden in terrain holes.
The other way is to get to the shaft on the east (C3c-1). There will be krogan warriors with the hetman so it won't be easy either.
After the fight go southeast and use the hatch (C3c-B) to enter the tower.
Saren will be by the control panel at the far side of the tower. Before you'll get to him, you'll have to eliminate some geths, but they shouldn't be much problem for you.
While talking with Saren you can use persuasion to avoid the fight. If not, you'll have to fight him. It will be similar as on Virmire, but he will be tougher.
Hint! It's good to equip your squad with weapons and upgrades against organic enemies.
After dealing with Saren, head over to the control panel and use Vigil's files to regain control of the Citadel.
This way you'll open the communication channel and connect with Normandy. You'll have to make a hard choice: bring in the Alliance fleet to save the council at the cost of many human lives, or hold them back until they can attack Sovereign directly.
Hint! Your decision will affect the ending and gain you many paragon (saving the council) or renegade (sacrifice the council) points.
Soon you'll encounter Sovereign incarnation. This time you won't be able to talk - he will attack you immediately. He will be very fast so you can have problems with hitting him. It's good to use biotic talents, like lift to neutralize him for a moment and hit him with all you got. If everyone in your squad has lift talent, you'll be able to keep him up for most of the time.
This way you'll finish Mass Effect. The final scene will depend on your choice before fighting Sovereign. Regardless of the council's fate, at the end of the conversation, you'll have to make one last choice. I leave it up to you.

In this chapter you'll find the list of all planets, that could be explored in Mass Effect. They are systematized according to clusters and systems.
There are four types of planets:
Sometimes you'll also find hidden places (e.g. asteroids). They can be spotted on galaxy map, while watching some clusters. They are shown as short flashes of light. If you see a flashing point, you can move the cursor on it and examine what have you found. In the list below this type of objects are marked with an annotation.
Hint! While completing assignments on explorable planets (third type), you'll be able to explore buildings on it. After visiting some of them you'll notice that they have been all built according to few projects. They are not complicated and mostly contain two-three rooms connected with corridor. That's why I decided not to spoil this guide by unnecessary maps of them.
Planet
Explorable
Surveyable
Collectibles
Carbon asteroid (hidden)
no
yes
Prothean data disc
Patashi
no
yes
Rare earths
Sylsalto
no
no
-
Tuntau
yes
no
Heavy metals, light metals, asari writings
Vebinok
no
yes
Light metals
Planet Tuntau
1. Heavy metal
2. Crashed probe
3. Light metal
4. Asari writings
5. Pirate base (Wrex: Family armor)
If you use all opportunity to talk with Wrex on Normandy after completing missions on two of three planets related to the main plot (5. Therum, 6. Feros, 7. Noveria), krogan will tell you about a missing family armor.
It can be found on planet Tuntau, in pirate base on southwest (Tuntau - 5). Eliminate the guards outside and inside. After clearing the area, go upstairs, to the back room to find the armor (and few useful objects as well).
Planet
Explorable
Surveyable
Collectibles
Metgos
yes
no
Rare earths, heavy metals, turian insignias
Canrum
no
yes
Turian insignias
Syba
no
yes
Gas deposit
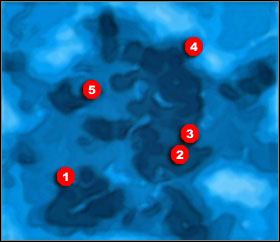
Planet Metgos
1. Heavy metal
2. Signal - trap (Distress call)
3. Rare earths
4. Turian insignias
5. Crashed probe
2 hazard level
On Citadel, in ambassador Udina Office, decrypt the terminal to get a message about distress call from Hydra system.
After landing on Metgos, head toward the signal (Metgos - 2). It will turn out to be a geth ambush. Stay in Mako and eliminate first armatures and then infantry. After killing them all, the assignment will be completed.
Planet
Explorable
Surveyable
Collectibles
Depot (Depot Sigma-23)
yes
no
-
Wuo
no
no
-
Slekon
no
no
-
Sharblu
no
no
-
Vectra
no
no
-
Camaron
no
no
-
While completing assignment 13.14.1.1. Listening Post Theta, you'll find a terminal with data about localization of facility delivering cargo with rachnii. It can be found in Gorgon system.
In the main hold there will be some rachnii. Clear the area gradually, otherwise you'll risk being surrounded.
After the fight head to the room on the northeast of the station. Read the data in terminal to find out who was responsible for sending rachnii across the galaxy.
Arm the nearby demolition charge. You'll have a limited amount of time to get out the facility and come back to Normandy. There will be more rachnii, but there will be no time to fight them. Get through them and run to the exit.
Planet
Explorable
Surveyable
Collectibles
Junthor
no
yes
Asari writings
Rayingri
yes
no
Rare earths (x2), light metals, League medallion
Antirumgon
no
yes
Light metals
Pressha
no
no
-
Sogelrus
no
no
-
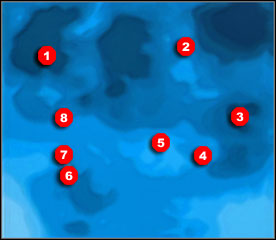
Planet Rayingri
1. Scavenger corpses
2. Light metals
3. Crashed probe
4. Rare earths
5. Overrun research outpost (Geth activity)
6. League medallion
7. Rare earths
8. Abandoned scavenger camp
Hint! This assignment will be available after completing mission on one of three main plot planets (5. Therum, 6. Feros, 7. Noveria). You can get it in three ways: by examining terminal on Feros, by examining terminal on Virmire or just by entering any system in Armstrong Nebula.
First you'll learn only that in this region an increased geth activity was noted. It looks like preparation to an invasion and is worth investigating.
This assignment consists of five parts. First you need to eliminate geths on planets Rayingri, Casbin, Maji and Antibaar (in any order). After eliminating four outposts, you'll get information about main geth base on Solcrum (13.2.2.1.). Clear it to complete this task.
On Rayingri head to overrun research outpost (Rayingri - 5). Park Mako near the entrance and get inside.
There will be some zombies there and then geths. After clearing the building, get outside just to encounter another group of enemies. You can eliminate them right away (more experience points) or after getting in Mako and using turret.
The first outpost will be captured, there's three more. I suggest to choose the one on Casbin first (13.2.3.1.).
Hint! This system unlocks after completing assignment 13.2.1.1. Geth activity.
Planet
Explorable
Surveyable
Collectibles
Benda
no
yes
League medallion
Zaherux
no
yes
Light metals
Solcrum
yes
no
Light metals, rare earths (x2), asari writings
Notanban
no
no
-
Rocky asteroid (hidden)
no
yes
Rare earths
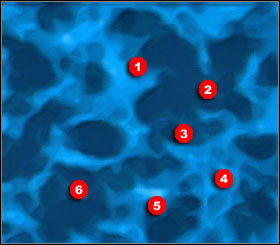
Planet Solcrum
1. Rare earths
2. Rare earths
3. Geth base
4. Light metals
5. Crashed probe
6. Asari writings
1 hazard level
Hint! This task is only a part of assignment which takes place on few planets. Basic information can be found in 13.2.1.1.
Geths have chosen Solcrum as operation centre while preparing for invasion. Their base (Solcrum - 3) is strongly protected. It is guarded by two colossi from outside and tough troopers inside.
Eliminate the colossi from the distance, jumping above their shots. Inside start the fight hiding behind the door and move forward little by little, using covers along the way. When the last enemy will fall, you'll get information about strange presentation on the screen.
At this moment you can come back to Normandy, but you can also go to the room on south and use the terminal there. This way you'll get data useful not only to the Alliance, but also for quarians. It's good to talk about them with Tali.
Planet
Explorable
Surveyable
Collectibles
Casbin
yes
no
Rare earths (x2), heavy metals, salarian ID
Matar
no
yes
Asari writings
Treagir
no
yes
Light metals
Pomal
no
no
-
Thesaca
no
no
-
Planet Casbin
1. Anomlous signal (geth trap)
2. Heavy metals
3. Geth outpost (Geth activity)
4. Rare earths
5. Salarian ID
6. Engine debris
Hint! This task is only a part of assignment which takes place on few planets. Basic information can be found in 13.2.1.1.
This time you don't have to leave Mako to eliminate the geths. Ride near their base (Casbin - 3) and shoot from the distance to get rid of most enemies. Then come closer and finish the survivors.
Once they are will be defeated, a geth dropship will come in and begin depositing geth shock troopers in the center of the outpost. Concentrate on destroying the ship first and geths later.
The second outpost will be captured, there's two more. I suggest to choose the one on Antibaar as next (13.2.4.1.).
Planet
Explorable
Surveyable
Collectibles
Carbonaceus asteroid (hidden)
no
yes
League medallion
Antibaar
yes
no
Light metals (x2), heavy metals, prothean data disc
Patamalrus
no
yes
Heavy metals
Thegeuse
no
yes
Heavy metals
Hunsalra
no
no
-
Mawinor
no
no
-
Solmalron
no
no
-
Planet Antibaar
1. Geth outpost (Geth activity)
2. Crashed probe
3. Light metals
4. Heavy metals
5. Prothean data disc
6. Light metals
Hint! This task is only a part of assignment which takes place on few planets. Basic information can be found in 13.2.1.1.
Dealing with the geth outpost (Antibaar - 1) on this planet doesn't require getting out of Mako. It will be strongly guarded though, so it's better to eliminate snipers and rocket troopers from the distance. Paradoxically, colossi won't be very dangerous - it takes a long time for it to shoot and its shots are easy to jump above. That's why it's good to leave him for later. When the outpost will be cleared out, reinforcements will begin arriving, but you shouldn't have much problem dealing with them.
This way there will be only one outpost left - Maji (13.2.5.1.).
Planet
Explorable
Surveyable
Collectibles
Maji
yes
no
Rare earths, light metals (x2), turian insignias
Pregel
no
yes
Turian insignias
Almos
no
no
-
Planet Maji
1. Geth outpost (Geth activity)
2. Light metals
3. Light metals
4. Crashed probe
5. Odd skull
6. Turian insignias
7. Rare earths
Hint! This task is only a part of assignment which takes place on few planets. Basic information can be found in 13.2.1.1.
Geth outpost on Maji is guarded by turrets system. That's why you'll need to eliminate them first. It won't be difficult, because you'll be able to see flashes of shots from the distance.
Then you'll have to deal with geths guarding the outpost itself. Don't come very close though, because after eliminating them, a colossi lying by the base will activate. Only after eliminating it, the assignment will be completed.
This will be the last geth outpost. After clearing it you'll be able to go to Socrum where the main base is situated.
Planet
Explorable
Surveyable
Collectibles
Proteus
no
yes
Gas deposit
Circe
no
yes
Gas deposit
Faros
no
yes
Turian insignias
Nausicaa
no
no
-
Salamis
no
no
-
Planet
Explorable
Surveyable
Collectibles
Metallic asteroid (hidden)
no
yes
Heavy metals
Therum
yes
no
-
Carbonaceus asteroid (hidden)
no
yes
League medallion
Archanes
no
yes
Gas deposit
Armeni
no
no
-
Phaistos
no
no
-
Zakros
no
no
-
Hint! Planet Therum is related to the main plot (5. Therum).
Planet
Explorable
Surveyable
Collectibles
Sharjila
yes
no
Rare earths (x2), light metals, asari writings
Porolan
no
yes
Asari writings
Metallic asteroid (hidden)
no
yes
Light metals
Fargeluse
no
yes
Gas deposit
Patavig
no
no
-
Planet Sharjila
1. Rare earths
2. Stronghold (Asari diplomacy)
3. Crashed probe
4. Light metals
5. Rare earths
6. Asari writings
1 hazard level
This assignment will be given to you by ambassador Nassana. You will meet her on Citadel (8.4. Asari diplomacy). Your task will be to rescue her kidnapped sister.
Kidnappers can be found in the stronghold (Sharjila - 2) on planet Sharijla. Before you'll enter it, you'll need to eliminate the guards (the most easy way is to use Mako weapons). Then get inside and kill pirates along with their leader.
After clearing the area go through the door on west and then upstairs. In the back room you'll find computer using which you'll learn the truth about Nassana sister. After coming back to Citadel, speak with Nassana to tell her about it (8.4. Asari diplomacy).
Planet
Explorable
Surveyable
Collectibles
Asteroid cluster (hidden)
no
yes
Prothean data disc
Edolus
yes
no
Rare earths, light metals, heavy metals, salarian ID
Ontamalca
no
yes
Gas deposit
Alsages
no
yes
Rare earths
Altaaya
no
no
-
Tremanre
no
no
-
Planet Edolus
1. Distress signal (Missing marines)
2. Salarian ID
3. Crashed probe
4. Light metals
5. Heavy metals
6. Rare earths
This assignment will be given to you by admiral Kahoku in Citadel (3.20. Missing marines).
Head to Edolus in the Sparta system to begin the search for the recon team. You'll find out that the rescue signal is being sent by distress beacon (Edolus - 1). As soon as you'll come closer to it, a tresher maw will attack you.
Get into Mako and move aside. Keep shooting him in the head and jump when he'll attack you. Once it will be defeated, you can check on the bodies of Kahoku's men, who were doubtless lured to the thresher nest by the distress beacon. Return to Admiral Kahoku on the Citadel to give him the bad news (3.20.).
Planet
Explorable
Surveyable
Collectibles
Syided
no
yes
League medallion
Eletania
yes
no
Heavy metals (x2)
Zatorus
no
yes
Heavy metals
Xathorron
no
no
-
Planet Eletania
1. Crashed probe
2. Downed recon probe (Lost module)
3. Heavy metals
4. Mysterious orb
5. Heavy metals
6,8,9. Space monkeys (Lost module)
7. Entrance to the mine (Lost module)
1 hazard level
You'll get this assignment after entering Attic Beta cluster. Admiral Hackett will ask you to help getting back recon probe downed by geths above Eletania planet.
After landing you'll find the drone (Eletania - 2) without problem, but data module will be stolen by some strange monkey creature.
To find the thief, you'll have to search space monkey colonies on the planet (Eletania 6-9). As paragon, you can check every animal. As renegade, you can first kill them and check later.
Searching on surface won't give any results. You'll need to check the mine near one of the colonies (Eletania - 7).
While inside, go to the northeast side of the complex and search monkey in the corner. It will drop the module.
On your way back, you'll be attacked by geths. After eliminating them, return to Normandy to complete the assignment.
Planet
Explorable
Surveyable
Collectibles
Feros
yes
no
-
Sharring
no
yes
Prothean data disc
Quana
no
yes
Light metals
Logan
no
no
-
Sytau
no
no
-
Hint! Planet Feros is related to the main plot (6. Feros).
Planet
Explorable
Surveyable
Collectibles
Eden Prime
yes
no
-
Arcadia
no
no
-
Nirvana
no
no
-
Xanadu
no
no
-
Zion
no
no
-
Hint! Planet Eden Prome is related to the main plot (2. Eden Prime).
Hint! This system will become available after getting assignment 3.17. Hostile takeover.
Planet
Explorable
Surveyable
Collectibles
Paravin
no
yes
Asari writings
Mavigon
yes
no
Heavy metals, light metals, salarian ID
Patatanlis
no
yes
Light metals
Farcrothu
no
no
-
Huningto
no
no
-
Planet Mavigon
1. Light metals
2. Heavy metals, salarian ID, Syndicate hideout (Hostile takeover)
3. Engine debris
2 hazard level
Hint! Task described below is only a part of assignment which takes place on few planets. The rest can be found in paragraphes 13.7.3.1. and 13.9.1.1.
Assignment will be given to you by Helena Blake in the Citadel (3.17.). Your task is to eliminate two bosses of criminal syndicate. One of them is on Mavigon in well guarded base.
After landing prepare to fight humans and krogans (biotics, ammunition against organic creatures) and head to the base (Mavigon - 2).
Eliminate the turrets from the distance, then park near the door and enter the base. There will be eight opponents waiting for you there. Stay near the entrance to avoid being surrounded. Among enemies there will be the boss itself. After killing him your task on Mavigon will be finished.
Now it's time to pay a visit to another criminal boss. He can be found on planet Klensal (13.7.3.1.).
Planet
Explorable
Surveyable
Collectibles
MSV Worthington
yes
no
-
Parag
no
yes
Light metals
Altanorch
no
yes
League medallion
Antiroprus
no
no
-
After entering Ming system, your scanners will read a signal of freighter MSV Worthington. You won't be able to contact its crew so you'll need to check it out by yourself.
In the cargo you'll find a lot of explosives which will explode whenever you'll walk close to them. That's why you'll have to destroy them from the distance before moving further.
In the crew area, in the east side of the freight, you'll find three rooms. The one on north is medical room with a man on life support and a terminal. Listen to its messages and go to the other rooms to learn other messages and find out about tragic story of the crew.
After hearing the last message, you'll be attacked by a woman. She will be strong in biotics, so be careful.
Then you can return to medical room and decide whether to deactivate life support system or not. After that return to Normandy.
Planet
Explorable
Surveyable
Collectibles
Edmos
no
yes
Gas deposit
Ploba
no
yes
Asari writings
Trebin
yes
no
Rare earths (x2), turian insignias
Vemal
no
yes
Rare earths
Ageko
no
no
-
Hunidor
no
no
-
Planet Trebin
1. Transmitter tower
2. Excavation site
3. Research base (Missing survey team)
4. Rare earths
5. Turian wreckage
6. Rare earths
7. Crashed probe
This assignment will activate after hearing a specific message while riding the elevator in the Citadel (3.16. Missing survey team).
After landing on planet Trebin head to the research base (Trebin - 3). It will be abandoned, but in one of the structures you'll find a message about some strange find unearthed by the scientists.
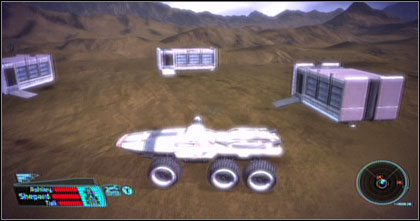
Go to the excavation site (Trebin - 2) and enter inside. You'll be attacked by zombie. It's good to use biotics (e.g. throw, singularity) while fighting with them. When the last one of them will die, the assignment will be completed.
Hint! This system unlocks after gaining 80% of paragon or renegade points.
Planet
Explorable
Surveyable
Collectibles
Zarayter
no
yes
Heavy metals
Chohe
yes
no
Heavy metals, rare earths, asari writings
Faringor
no
yes
Rare earths
Treyarmus
no
no
-
Xamarri
no
no
-
Planet Chohe
1. Rare earths
2. Asari writings, abandoned outpost
3. Science base (Besieged base)
4. Heavy metals
5. Tresher maw
6. Engine debris
Hint! This assignment will be available after gaining 75% paragon points.
The Alliance admiral will contact you and ask you to rescue the base from the biotics, who keep hostages there.
After landing on Chohe, head to the science base (Chohe - 3) and enter inside. You'll be attacked by a group of biotics. There are hostages among them, so watch out who you shoot. Avoid attacks like singularity, throw and grenades, because they can be harmful for the innocent ones as well.
After killing all kidnappers, you'll get a message varying on how many civilians you saved. Come back to Normandy to report the Alliance about completing the assignment.
This system unlocks after getting assignment 3.17. Hostile takeover.
Planet
Explorable
Surveyable
Collectibles
Nearrum
no
yes
Light metals
Klensal
yes
no
Heavy metals, light metals, League medallion
Metallic asteroid (hidden)
no
yes
Light metals
Raysha
no
yes
Turian insignias
Gremar
no
no
-
Jartar
no
no
-
Planet Klensal
1. Light metals
2. League medallion
3. Crashed escape pod
4. Escape pod
5. Heavy metals
6. Syndicate hideout (Hostile takeover)
Hint! Task described below is only a part of assignment which takes place on few planets. The rest can be found in paragraphes 13.6.1.1. and 13.9.1.1.
Assignment will be given to you by Helena Blake in the Citadel (3.17.). Your task is to eliminate two bosses of criminal syndicate. One of them is on Klensal in well guarded base.
After landing prepare to fight humans and krogans (biotics, ammunition against organic creatures) and head to the base (Klensal - 6).
Eliminate the snipers in towers and mercenaries from the distance. There will be eight opponents waiting for you inside. Stay near the entrance to avoid being surrounded. Among enemies there will be the boss itself. After killing him your task on Klensal will be finished.
If you didn't do it before, pay the visit to another criminal boss, this time on Mavigon (13.6.1.1.). After eliminating them both, go to meet Helena Blake (13.9.1.1.).
Planet
Explorable
Surveyable
Collectibles
Rocky asteroid (hidden)
No
yes
Light metals
MSV Ontario
Yes
no
-
Juntauma
No
yes
Prothean data disc
Nepneu
No
yes
Rare earths
Tunshagon
No
no
-
You'll get this assignment by hearing specific message while riding the elevator in the Citadel (3.22.).
Your task is to rescue chairman Burns from the extremists on freighter MSV Ontario. In your squad you should have companions with good biotic skills because you'll need to fight biotics too.
There will be six opponents in the cargo. You'll have three minutes to reach the hostage before he is executed. Head to the far side of the freighter when the main hold is clear of enemies. You'll find the leader there. You can persuade him to surrender. If not, be ready to fight. But watch out - Burns can be killed during the fight!
If you rescue him, the assignment will be completed.
Hint! This system unlocks after gaining 80% paragon or renegade points.
Planet
Explorable
Surveyable
Collectibles
Mingito
no
yes
Rare earths
Clocloris
no
yes
Rare earths
Nonuel
yes
no
Rare earths, light metals, asari writings, League medallion
Maldla
no
no
-
Veyaria
no
no
-
Planet Nonuel
1. Trasher maw
2. Light metals
3. Warlords outpost (The Negotiation)
4. Rare earths
5. League medallion, asari writings
6. Crashed probe
1 hazard level
Hint! This assignment unlocks after gaining 75% renegade points.
Admiral Hackett will contact you and ask to help negotiating with a man named Darrius.
After landing on planet Nonuel, head to warlords outpost (Nonuel - 3). Inside you'll see Darrius standing on the balcony on the east side of the room. Walk toward him and start the talk. The only way to avoid a fight with his guards is to remain polite and give him everything he will ask for. Otherwise, the negotiations will break down and you'll be forced to fight Darrius and the guards (it's best to move near the wall to avoid being surrounded). When the negotiations will be completed, secure an exit and report back to Hackett to complete the assignment.
Planet
Explorable
Surveyable
Collectibles
Presrop
yes
no
Rare earths, heavy metals, turian insignias
Metallic asteroid (hidden)
no
yes
Heavy metals
Canctra
no
yes
Light metals
Tharopto
no
yes
League medallion
Klendagon
no
no
-
Tamahera
no
no
-
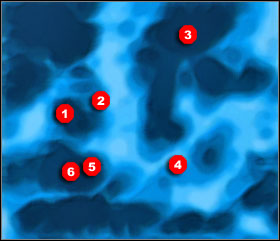
Planet Presrop
1. Crashed probe
2. Turian insignias
3. Tresher maw
4. Rare earths
5. Heavy metals
6. Biotic compound (Major Kyle)
You'll get this assignment by hacking into one of terminals in the Citadel.
The source of strange message that you read is on planet Presrop. You'll get this information from admiral Hackett who will contact you after you enter Century system. He'll tell you also about the Alliance representatives sent there who haven't return yet. Your task is to get to know about what is happening.
After landing on Presrop head to the biotics compound (Presrop - 6). It will consist of two buildings: mercenaries base and research facility. The second one will be closed for now - you'll need to open the door remotely from the base.
Walk to the door of the base and ask for Kyle. Use persuasion to get to him peacefully or just force your way killing everyone inside and using the switch in the room on the south.
Otherwise enter the facility and talk with major Kyle. He will tell you what he has done to the Alliance representatives. You can use persuasion to convince him to surrender. If not, you'll have to kill all his supporters.
Hint! If you attack biotics in mercenaries base, you won't be able to speak with Kyle.
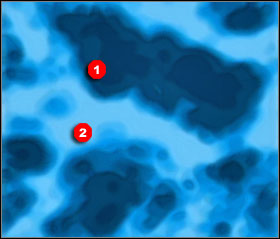
Hint! This system unlocks after killing first two bosses in assignment 3.17. Hostile takeover.
Planet
Explorable
Surveyable
Collectibles
Maganlis
no
yes
Turian insignias
Therumion
no
yes
Rare earths
Amaranthine
yes
no
Heavy metals, rare earths (x2), turian insignias
Wentania
no
no
-
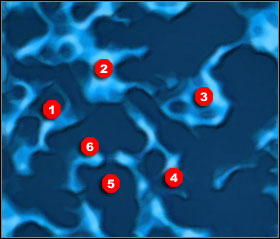
Planet Amaranthine
1. Escape pod
2. Heavy metals
3. Rare earths
4. Rare earths
5. Helena Blake's base (Hostile takeover)
6. Turian insignias
Hint! Task described below is the last part of assignment which takes place on few planets. The rest can be found in paragraphes 13.6.1.1. and 13.7.3.1.
After eliminating two syndicate bosses you'll need to meet Helena Blake.
She can be found in her base on planet Amaranthine (Amaranthine - 5). You can persuade her using charm/intimidation to resign from the function of syndicate boss. If not, you'll have to fight.
If you choose to fight, you'll have to kill not only her, but also her mercenaries. Helena will use a shield to separate you from the main room. You'll need to destroy it first and then eliminate them all to complete the assignment.
Planet
Explorable
Surveyable
Collectibles
Noveria
yes
no
-
Veles
no
yes
Asari writings
Morana
no
no
-
Svarog
no
no
-
Planet Noveria is related to the main plot (7. Noveria).
Planet
Explorable
Surveyable
Collectibles
Yunthorl
no
yes
League medallion
Antitarra
no
yes
Gas deposit
MSV Majesty (hidden)
no
yes
-
Xawin
yes
no
Heavy metals (x2), light metals, turian insignias
Thesalgon
no
no
-
Trelyn
no
no
-

Planet Xawin
1. Privateer base (Privateers)
2. Heavy metals
3. Geth beacon
4. Light metals
5. Abandoned camp
6. Heavy metals
7. Wrecked vehicle
8. Turian insignias
9. Crashed probe
1 hazard level
You'll get this assignment from Garoth in the Citadel (3.21). After entering Stenuus system, you'll find the vessel MSV Majesty. By examining it you'll discover signals leading to planet Xawin.
After landing on Xawin head to the privateer base (Xawin - 1). Eliminate the turrets and snipers from the distance and ride near the entrance to the building. Inside you'll need to fight some humans and krogans. Watch out for the snipers shooting you from the second floor.
After killing all enemies go upstairs to the room at the end of the terrace. There you'll learn what happened to Garoth's brother. Take his notepad and go back to Normandy.
Now you just need to come back to the Citadel and inform Garoth about his brother fate (3.21).
This system unlocks after getting assignment 3.19. Doctor Michel.
Planet
Explorable
Surveyable
Collectibles
MSV Fedele (hidden)
Yes
no
-
Rocky asteroid (hidden)
No
yes
Heavy metals
Clobaka
No
no
-
Clugon
No
no
-
Matol
No
no
-
Tungen
No
no
-
If you talk with Garrus many times on Normandy, after completing two of three main plot missions (5. Therum, 6. Feros, 7. Noveria), he will tell you about a cruel scientist who escaped the justice. If you agree to help your companion, he'll tell you where you can find him.
The deck of MSV Fedele will be filled with zombies, so keep your distance (it's good to use biotics and grenades). After the fight enter the room on the south. Doctor Saleon will be there.
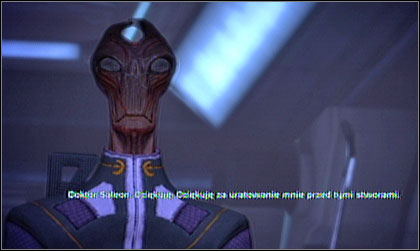
Regardless of the conversation, you'll have to fight him. He won't pose any threat to you. After killing him talk with Garrus and then return to Normandy.
Planet
Explorable
Surveyable
Collectibles
Ontarom
yes
no
Heavy metals (x2), turian insignias
Klencory
no
yes
Asari writings
Juncro
no
yes
Gas deposit
Sesmose
no
no
-
Planet Ontarom
1. Turian insignias
2. Crashed probe
3. Underground facility (Dead scientists)
4. Heavy metals
5. Heavy metals
You'll get this assignment by hacking into terminal on Noveria (7.1.4). After entering Newton system, admiral Hackett will contact you and tell about a doctor who is apparently now in danger because his connection to a certain organization has come to light.
After landing on Ontarom head to the underground facility (Ontarom - 3). Eliminate its guards from the distance and enter inside. Here you'll have to fight as well.
After eliminating the enemies enter the room on the west of the station. There you'll find a soldier threatening to kill the doctor you were looking for.
Hint! If your hero was on Akuze (Sole Survivor background), he'll be recognized. It won't affect much the conversation though.
The fastest way to convince the soldier to put down the gun is to use charm/intimidation. If you want the scientist dead you can encourage the soldier to shoot him or offer to do it yourself. If the soldier kill his hostage, a moment after he will kill himself. If you do it, he'll survive.
Hint! This system unlocks after you gain 20 experience level.
Planet
Explorable
Surveyable
Collectibles
Luna
yes
no
-
Earth
no
no
-
Jupiter
no
no
-
Mars
no
no
-
Mercury
no
no
-
Neptun
no
no
-
Pluto
no
no
-
Saturn
no
no
-
Uranus
no
no
-
Venus
no
no
-
Luna
1. Crashed probe
2. Alliance training ground (Rogue VI)
Hint! Among all "uncharted world" assignments, completing this one is the most useful and recommended, because it will give you a choice of specialization class.
You'll get this assignment after gaining 20 experience level. Admiral Hackett will contact you and ask for help with taking control over rogue VI.
After landing head to the Alliance training ground (Luna - 2). Destroy the turrets from the distance and ride closer. The complex consists of three buildings. You have to visit each of them and shut off VI conduits inside them. The order is not important.
Hint! Before entering the buildings, it's good to equip weapons with anti-toxic upgrades.
Station 1. Inside you'll encounter several drones (mostly assault ones). Use technical talents to destroy them (e.g. overload, hacking). Continue further until you'll reach the fork. In each room there will be four VI conduits to destroy.
Remember not to come very close to the object; the explosion may injure you. When you'll destroy the first conduit, VI will start releasing toxic gas so you need to destroy the rest as fast as possible. When the last will explode, first station will be cleared.
Station 2. This building is constructed like the previous one. Fight the drones. Be careful - there will be some rocket ones as well.
After the fight head south to two rooms with VI conduits. After destroying one of them, the other will become covered behind the shield. You'll have to destroy it first. After eliminating all conduits, the second station will be cleared.
Station 3. This building is also constructed like the previous ones. There will be shields inside which you'll have to destroy in order to move further. This time the drones will be more dangerous.
After clearing the main room, you'll have to destroy eight last conduits. All will be covered behind the shields. When you'll destroy the first one, more drones will appear, so be ready to fight.
After clearing third station, you'll be able to choose Shepard specialization.
Hint! This cluster unlocks after completing main plot mission on Feros.
Planet
Explorable
Surveyable
Collectibles
MSV Cornucopia (hidden)
yes
no
-
Clotanca
no
yes
Heavy metals
Farnuri
no
yes
Heavy metals
Antida
no
yes
Turian insignias
Almarux
no
no
-
You'll get this assignment after entering Kaspian system. On the galaxy map you'll see freighter MSV Cornucopia. Its crew won't answer, so it's good to check what happened.
Inside you'll have to fight few groups of zombies in the cargo. At first, your radar won't detect them, so don't be surprised.
After the fight head to the cockpit to read information in the computer. You'll learn about the fate of the crew. Then come back to Normandy.
Planet
Explorable
Surveyable
Collectibles
Chasca
yes
no
Rare earths, heavy metals, light metals, prothean data disc
Metallic asteroid (hidden)
no
yes
Heavy metals
Rocky asteroid (hidden)
no
yes
Prothean data disc
Supay
no
yes
Light metals
Apo
no
no
-
Illapa
no
no
-
Inti
no
no
-
Planet Chasca
1. Rare earths
2. Heavy metals
3. Prothean data disc
4. Light metals
5. Civilian structure
6. Crashed probe (Colony of the dead)
7. Civilian structure (Colony of the dead)
8. Science facility (Colony of the dead)
You'll get this assignment after hacking into terminal in ExoGeni facility on Feros (6.3.4. Investigate samples).
In order to complete this assignment, you'll have to examine three complexes on planet Chasca: two civilian structures (Chasca - 5, Chasca - 7) and one science facility Chasca - 8). I propose to head to civilian structures first.
Outside and inside them you'll find a group of zombies. After eliminating them go to the other structure and repeat the same.
Science facility is guarded, but you won't have much problem with getting rid of the "security". Inside go to the room on the south west and read the information about the crew from the terminal. Then come back to Normandy.
Planet
Explorable
Surveyable
Collectibles
Nodacrux
yes
no
Heavy metals, light metals, turian insignias
Mettalic asteroid (hidden)
no
yes
Heavy metals
Pataiton
no
yes
Asari writings
Alko
no
no
-
Clomarthu
no
no
-
Planet Nodacrux
1. Thorian creeper surface outpost
2. Turian insignias
3. Engine debris
4. Science facility (ExoGeni facility)
5. Light metals
6. Heavy metals
You'll get this assignment after hacking the terminal on the west side of upper level of ExoGeni facility on Feros.
After landing on Nodacrux head to the science facility (Nodacux - 4). Before entering it though, you'll have to eliminate Thorian creepers outside and inside it. Fight them using the same tactic as with zombies: don't let them come too close and use area attacks.
In the southeast room you'll meet few ExoGeni scientists. During the conversation you'll learn why there were Thorian creepers on Nodacrux. Doctor Ross will want to bribe you so you let them free and keep the secret. Whether to agree, or to kill them - it's your call. The first solution won't give you any morality points.

This cluster unlocks after completing main plot missions on Feros (6), Therum (5), Noveria (7) and Virmire (9).
Planet
Explorable
Surveyable
Collectibles
Ilos
yes
no
-
Agetoton
no
no
-
Zafe
no
no
-
Planet Ilos is related to the main plot (10. Ilos).
This cluster unlocks after completing main plot mission on one of these three planets: Feros (6), Therum (5) and Noveria (7).
Planet
Explorable
Surveyable
Collectibles
Virmire
yes
no
-
Cloroplon
no
no
-
Jarfor
no
no
-
Nemata
no
no
-
Prescyla
no
no
-
Planet Virmire is related to the main plot (9. Virmire).
This cluster unlocks after completing main plot mission on Noveria (7).
Planet
Explorable
Surveyable
Collectibles
Altahe
yes
no
Rare earths, heavy metals, asari writings
Carbonaceus asteroid (hidden)
no
yes
Turian insignias
Grosalgen
no
yes
Light metals
Farthorl
no
no
-
Imaneya
no
no
-

Planet Altahe
1. Rare earths
2. Escape pod
3. Heavy metals
4. Asari writings
5. Listening post (Listening post Theta).
Hint! This assignment can be done only after completing mission on Noveria (7).
You'll get this assignment by entering Acheron system or by talking with lt. Durand while completing assignment 13.14.2.1. Listening post Alpha.
Prepare your squad to fight rachnii. After landing on Altahe head to the listening post (Altahe - 5).
There will be some rachnii outside it. Eliminate them without leaving Mako. The rest of opponents will spew from nearby holes. After killing them enter the building. You'll encounter more rachnii.
In the room on the south west you'll find the terminal. Access it to learn the coordinates of place from where rachnii shipments were sent.
Hint! If you didn't complete assignment 13.14.2.1. Listening post Alpha before, you'll hear the call for help sent by lt. Durand.
Planet
Explorable
Surveyable
Collectibles
Nepmos
yes
no
Light metals, heavy metals, rare earths, League medallion
Quaji
no
yes
Light metals
Wermani
no
yes
Prothean data disc
Chofen
no
no
-
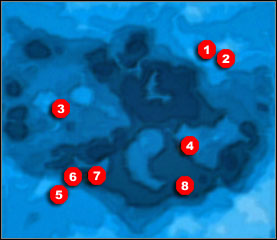
Planet Nepmos
1. Abandoned mining camp
2. Rare earths
3. League medallion
4. Heavy metal
5. Crashed probe
6. Rachnii infested mine (Listening post Alfa)
7. Light metal
8. Listening post (Listening post Alfa)
Hint! This assignment can be done only after completing mission on Noveria (7).
You'll get this mission after entering Ereb system or by receiving the call on Altahe (13.14.1.1. Listening post Theta).
Land on Nepmos and head to the listening post (Nepmos - 8). You'll find a group of Alliance soldiers pinned down by legions of rachnii. Your task is to help them defend themselves.
Hint! You can make it easier by hooking up Mako's power supply to nearby generator. This way you'll reactivate the turrets.
After dealing with third wave of enemies you can talk with lt. Durand to learn the coordinates of second listening post and to activate assignment 13.14.1.1. Listening post Theta.
Your next task will be to clear nearby mine infested by rachnii. Go there (Nepmos - 6) and enter inside. You'll be attacked by rachnii. It's best to retreat to the entrance and eliminate the enemies gradually (there will be a lot of them).
Then you'll have to kill two powerful and strong rachnii warriors, each supported by four soldiers. You'll find them in rooms on the north and the north east of the mine. After clearing the mine, assignment will be completed.
Planet
Explorable
Surveyable
Collectibles
Citadel
yes
no
-
Planet Citadel is related to the main plot (3. Citadel).
Planet
Explorable
Surveyable
Collectibles
Agebinium
yes
no
Rare earths, light metals (x2), turian insignias
Sonedma
no
yes
Rare earths
Sybin
no
yes
Turian insignias
Tremar
no
yes
Gas deposit
Demeuca
no
no
-
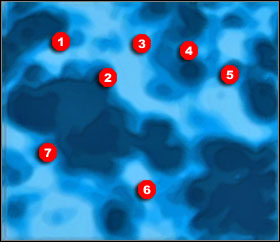
Planet Agebinium
1. Light metals
2. Alliance homing beacon, mine (Espionage probe)
3. Engine debris, mercenary camp (Espionage probe)
4. Turian insignias
5. Turian wreckage
6. Rare earths
7. Light metals
Hint! Before starting this assignment, it's good to make sure you have 300 omni-gel.
You'll get this assignment by hacking into terminal in freighter at Zhu's Hope on Feros (6.1.6.).
After entering Amazon system, admiral Hackett will contact you and ask to recover a nuclear bomb mounted in probe which landed on Agebinium.
After landing on the planet, head toward Alliance homing beacon. You'll reach an old mine (Agebinium - 2). There will be no one inside. When you'll enter the last room on north, you'll hear an explosion. You'll realize that's a trap.
You'll see a hologram of a man who will tell you about a plan to destroy first human spectre. Your only hope is to disarm the bomb in front of you. To do it, you'll have to enter a long sequence of button presses three times or give 100 omni-gel each time.
After disarming the bomb, seek for an alternative way out of the mine. You'll find it on the east side of complex.
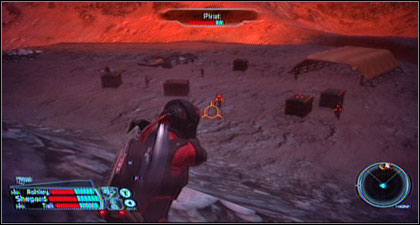
You'll get out north of mercenaries camp (Agebinium - 3). They set up a trap. You can eliminate them from the distance using sniper rifle or come closer and fight the regular way. If you want to maximize your chances to win though, come back to the entrance of the mine (Agebinium - 2), get in Mako and attack the camp using its weapons.
Planet
Explorable
Surveyable
Collectibles
Nepheron
yes
no
Rare earths, light metals, heavy metals, salarian ID
Ontaheter
no
yes
Rare earths
Gromar
no
yes
League medallion
Clojiia
no
no
-
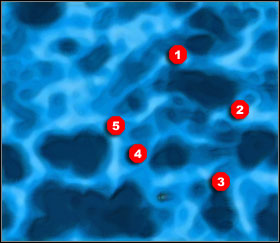
Planet Nepheron
1. Rare earths
2. Heavy metals
3. Light metals
4. Underground facility (Hades' dogs)
5. Salarian ID
You'll get this assignment after completing 13.16.3.1. Cerberus. Head to Nepheron to deal with the criminal syndicate once and for all.
Head to the Cerberus underground facility (Nepheron - 4). There will be some agents outside and inside it. After killing them go to the room on the south east. There you'll find the terminal with data needed to complete this assignment.
When you'll come back to Normandy, a representative of the Shadow Broker, galaxy-famous Mafioso will contact you. He'll propose you money for information from Cerberus computer. If you refuse taking the proposal as a betrayal, you'll gain paragon points. If you just refuse, you won't gain any morality points. If you ask about the benefit and agree to take the money, you'll get them and renegade points as well.
Planet
Explorable
Surveyable
Collectibles
Binthu
yes
no
Heavy metals, rare earths, prothean data disc
Dregir
no
yes
Light metals
Alrumter
no
yes
Prothean data disc
Patajiri
no
no
Rare earths
Renshato
no
no
-
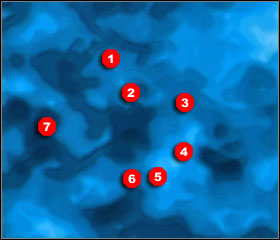
Planet Binthu
1. Research facility 1 (Cerberus)
2. Heavy metals
3. Research facility 2 (Cerberus)
4. Rare earths
5. Prothean data disc
6. Research facility 3 (Cerberus)
7. Escape pod
You'll get this assignment after completing 3.20. Missing marines. Admiral Kahoku will contact you and give you location of Cerberus base. You probably heard of it before, if you competed some of "uncharted world" assignments.
Your task is to clear three research facilities (Binthu - 1, Binthu - 3, Binthu - 6). Each time you'll have to act the same way: first eliminate the defence turrets from the distance and enter inside. Then go around an energy barrier and kill the agents. Finally, deactivate the barrier using one of consoles and kill the enemies inside.
In the last facility, behind the barrier you'll find Kahoku body. It will start the assignment Hades' dogs.
In this chapter you'll find the description of assignments available after choosing specific Shepard's background. They all take place on the Citadel and it's best to complete them during second of third visit there (you have to complete at least one of main plot missions: Feros, Therum or Noveria).
You'll find a man named Finch in the lower wards. He'll remind you of your past and threaten to reveal the secret of you being a member of a gang unless you'll help him rescue his friend from C-Sec.
Head to Chora's Den to talk with turian guard. It looks that Finch's friend was caught at murder's attempt. You can use charm/intimidation to persuade the guard to release him (renegade points). If not, Finch will show up and threaten to destroy your reputation. You can use charm/intimidation to calm him down. If not, he'll want money for keeping your secret unrevealed. You can pay him, try to persuade him again or just shoot him. Each possibility will end the assignment.
While riding the elevator in the Citadel, you'll hear a message from lt. Girard. He'll ask you to come back to Normandy. A woman from Shepard's native planet threatens to kill herself.
Girard will give you the sedative and ask you to talk with her. She can be found near the entrance to Normandy. Your task is to approach her without causing too much stress. Talk to her constantly using persuasion. When you will be close enough you can give her the sedative or applicate it yourself. Return to Girard when you are done to complete the assignment.
In the passageway between Presidium and wards (Wards access map) you'll meet a man named Zabaleta who claims to be friend of Shepard's mother. He'll ask you to give him 20 credits.
Come back to Normandy communication room and talk with your mother. She'll confirm she know Zabaleta and ask you to convince him to go to the veterans affairs office.
Come back to Zabaleta and talk with him again. You can use persuasion to convince him to go there. If not, give him the money (no morality bonus), give him the money for food (paragon points) or just leave him with nothing (renegade points).
While exploring uncharted worlds, you can collect natural resources as well as historical remains. Given collecting mission will activate after finding first collection element.
Hint! To complete each mission, you don't have to collect every object from a given collection. There are more of them than the missions require.
Below you'll find locations of every objects. Some of them can be found by scanning planets, the other require landing and searching for them.
Location (Cluster - System - Planet)
How to get
Horse Head Nebula- Strenuus - Yunthorl
Survey
Artemis Tau - Knossos - Carbonaceous Asteroid
Survey
Hades Gamma - Plutus - Nonuel
Land
Hades Gamma - Dis - Klensal
Land
Attican Beta- Hercules - Syided
Survey
Voyager - Columbia - Gromar
Survey
Hawking Eta - Century - Theropto
Survey
Armstrong Nebula - Tereshkova - Carbonaceous Asteroid
Survey
Armstrong Nebula- Grissom - Benda
Survey
Armstrong Nebula- Gagarin - Rayingri
Land
Gemini Sigma - Ming - Altanorch
Survey
Styx Theta - Erebus - Nepmos
Land
Location (Cluster - System - Planet)
How to get
Artemis Tau - Sparta - Edolus
Land
Gemini Sigma - Han - Mavigon
Land
Voyager - Columbia - Nepheron
Land
Armstrong Nebula - Hong - Casbin
Land
Location (Cluster - System - Planet)
How to get
Horse Head Nebula- Strenuus - Xawin
Land
Artemis Tau - Athens - Faros
Survey
Hades Gamma - Antaeus - Trebin
Land
Voyager - Amazon - Agebinium
Land
Voyager - Amazon - Sybin
Survey
Hawking Eta - Century - Presrop
Land
Kepler Verge- Newton - Ontarom
Land
Armstrong Nebula - Vamshi - Pregel
Survey
Armstrong Nebula - Vamshi - Maji
Land
Styx Theta - Archeron - Carbonaceous Asteroid
Survey
Hades Gamma - Dis - Raysha
Survey
Horse Head Nebula- Fortuna - Malganlis
Survey
Horse Head Nebula- Fortuna - Amaranthine
Land
Argos Rho - Hydra - Metgos
Land
Argos Rho - Hydra - Canrum
Survey
Maroon Sea- Caspian - Antida
Survey
Maroon Sea- Vostok - Nodacrux
Land
Location (Cluster - System - Planet)
How to get
Horse Head Nebula- Fortuna - Therumlon
Survey
Artemis Tau - Sparta - Alsages
Survey
Hades Gamma - Cacus - Chohe
Land
Hades Gamma - Antaeus - Trebin (x2)
Land
Maroon Sea- Matano - Chasca
Land
Horse Head Nebula- Fortuna - Amaranthine (x2)
Land
Artemis Tau - Macedon - Sharijla
Land
Hades Gamma - Plutus - Mingito
Survey
Hades Gamma - Antaeus - Vemal
Survey
Styx Theta - Erebus - Nepmos
Land
Voyager - Yangtze - Binthu
Land
Hawking Eta - Century - Presrop
Land
Armstrong Nebula - Hong - Kasbin
Land
Armstrong Nebula - Grissom - Solcrum (x2)
Land
Artemis Tau - Macedon - Sharijla
Land
Hades Gamma - Farinata - Nepneu
Survey
Argos Rho - Hydra - Metgos
Land
Voyager - Yangtze - Patajiri
Survey
Voyager - Columbia - Nepheron
Land
Armstrong Nebula- Gagarin - Rayingri (x2)
Land
Armstrong Nebula- Vamshi - Maji
Land
Artemis Tau - Sparta - Edolus
Land
Hades Gamma - Cacus - Faringor
Survey
Voyager - Amazon - Sonedma
Survey
Armstrong Nebula- Grissom - Rocky Asteroid
Survey
Hades Gamma - Plutus - Clocrolis
Survey
Hades Gamma - Plutus - Nonuel
Land
Styx Theta - Acheron - Altahe
Land
Argos Rho - Phoenix - Patashi
Survey
Voyager - Amazon - Agebinium
Land
Voyager - Columbia - Ontaheter
Survey
Armstrong Nebula - Hong - Kasbin
Land
Location (Cluster - System - Planet)
How to get
Artemis Tau - Sparta - Edolus
Land
Hades Gamma - Dis - Metallic Asteroid
Survey
Argos Rho - Phoenix - Tuntau
Land
Armstrong Nebula- Hong - Treagir
Survey
Armstrong Nebula - Tereshkova - Antibaar
Land
Artemis Tau - Macedon - Sharjila
Land
Hades Gamma - Farinata - Rocky Asteroid
Survey
Styx Theta - Acheron - Grosalgen
Survey
Voyager - Amazon - Agebinium
Land
Maroon Sea - Matano - Supay
Survey
Armstrong Nebula - Tereshkova - Antibaar
Land
Armstrong Nebula - Grissom - Solcrum
Land
Armstrong Nebula- Vamshi - Maji
Land
Artemis Tau - Macedon - Metallic Asteroid
Survey
Gemini Sigma - Ming - Parag
Survey
Hades Gamma - Plutus - Nonuel
Land
Hades Gamma - Dis - Nearrum
Survey
Styx Theta - Erebus - Nepmos
Land
Armstrong Nebula - Gagarin - Rayingri
Land
Gemini Sigma - Han - Patatanlis
Survey
Hades Gamma - Dis - Klensal
Land
Voyager - Yangtze - Dregir
Survey
Voyager - Amazon - Agebinium
Land
Voyager - Columbia - Nepheron
Land
Maroon Sea - Matano - Chasca
Land
Armstrong Nebula - Grissom - Zaherux
Survey
Armstrong Nebula - Vamshi - Maji
Land
Horse Head Nebula - Strenuus - Xawin
Land
Gemini Sigma - Han - Mavigon
Land
Argos Rho - Phoenix - Vebinok
Survey
Attican Beta- Thesus - Quana
Survey
Hawking Eta - Century - Canctra
Survey
Maroon Sea - Vostok - Nodacrux
Land
Armstrong Nebula - Gagarin - Antirumgon
Survey
Location (Cluster - System - Planet)
How to get
Armstrong Nebula - Tereshkova - Antibaar
Land
Armstrong Nebula - Tereshkova - Thegeuse
Survey
Horse Head Nebula - Strenuus - Xawin
Land
Artemis Tau - Sparta - Edolus
Land
Styx Theta - Erebus - Nepmos
Land
Attican Beta - Hercules - Eletania
Land
Voyager - Yangtze - Binthu
Land
Hawking Eta - Century - Metallic Asteroid
Survey
Maroon Sea - Vostok - Metallic Asteroid
Survey
Maroon Sea - Matano - Chasca
Land
Kepler Verge - Newton - Ontarom
Land
Artemis Tau - Knossos - Metallic Asteroid
Survey
Hades Gamma - Dis - Klensal
Land
Styx Theta - Erebus - Quaji
Survey
Voyager - Columbia - Nepheron
Land
Maroon Sea- Matano - Metallic Asteroid
Survey
Kepler Verge- Hershel - Rocky Asteroid
Survey
Gemini Sigma - Han - Mavigon
Land
Styx Theta - Acheron - Altahe
Land
Attican Beta - Hercules - Eletania
Land
Attican Beta - Hercules - Zatorus
Survey
Hawking Eta - Century - Presrop
Land
Maroon Sea - Caspian - Farnuri
Survey
Maroon Sea- Vostok - Nodacrux
Land
Kepler Verge - Newton - Ontarom
Land
Armstrong Nebula - Hong - Kasbin
Land
Horse Head Nebula - Fortuna - Amaranthine
Land
Horse Head Nebula - Strenuus - Xawin
Land
Maroon Sea - Caspian - Clotanca
Survey
Armstrong Nebula- Tereshkova - Patamalrus
Survey
Hades Gamma - Cacus - Zayarter
Survey
Hades Gamma - Cacus - Chohe
Land
Argos Rho - Hydra - Metgos
Land
Argos Rho - Phoenix- Tuntau
Land
Location (Cluster - System - Planet)
How to get
Horse Head Nebula- Strenuus - Antitarra
Survey
Artemis Tau - Athens - Circe
Survey
Argos Rho - Hydra - Syba
Survey
Artemis Tau - Sparta - Ontamalca
Survey
Hades Gamma - Antaeus - Edmos
Survey
Kepler Verge - Newton - Juncro
Survey
Artemis Tau - Knossos - Archanes
Survey
Voyager - Amazon - Tremar
Survey
Artemis Tau - Athens - Proteus
Survey
Artemis Tau - Macedon - Fargeluse
Survey
Location (Cluster - System - Planet)
How to get
Artemis Tau - Sparta - Asteroids Cluster
Survey
Hades Gamma - Farinata - Juntauma
Survey
Styx Theta - Erebus - Wermani
Survey
Argos Rho - Phoenix - Asteroid
Survey
Attican Beta- Tezeusz - Sharring
Survey
Voyager - Yangtze - Binthu
Land
Voyager - Yangtze - Alumter
Survey
Maroon Sea - Matano - Chasca
Land
Maroon Sea - Matano - Rocky Asteroid
Survey
Armstrong Nebula - Tereshkova - Antibaar
Land
Location (Cluster - System - Planet)
How to get
Horse Head Nebula - Pax - Veles
Survey
Artemis Tau - Macedon - Sharijla
Land
Artemis Tau - Macedon - Porolan
Survey
Kepler Verge - Newton - Klencory
Survey
Armstrong Nebula - Hong - Matar
Survey
Armstrong Nebula - Grissom - Solcrum
Land
Armstrong Nebula - Gagarin - Junthor
Survey
Hades Gamma - Plutus - Nonuel
Land
Hades Gamma - Cacus - Chohe
Land
Hades Gamma - Antaeus - Ploba
Survey
Gemini Sigma - Han - Paravin
Survey
Styx Theta - Archeron - Altahe
Land
Argos Rho - Phoenix - Tuntau
Land
Maroon Sea - Vostok - Pataiton
Survey
Name
Requirements
Rewards
Gamerscore points
Medal of Honor
Finish Mass Effect.
Unlock Hardcore and levels 51-60.
100
Medal of Heroism
Finish Feros.
-
25
Distinguished Service Medal
Finish Eden Prime.
-
25
Council Legion of Merit
Finish Virmir.
-
25
Honorarium of Corporate Service
Finish Noveria.
-
25
Pistol Expert
150 Pistol Kills.
+25% Marksmanship duration
10
Throw Mastery
Use Throw 75 times.
Bonus Talent: Throw.
15
Overlord Specialist
Use Shield Overload 75 times.
Bonus Talent: Electronics.
15
Scholar
Find all primary Alien codex entries.
-
25
Tactician
Total shield damage > health damage.
+10% shields
25
Medal of Exploration
Land on an uncharted world.
-
50
Dog of War
150 organic kills.
+10% health
25
Geth Hunter
250 synthetic kills.
+10% shields
25
Paragon
75% Paragon.
-
15
Paramour
Complete a romantic subplot.
-
10
Spectre Inductee
Become a Spectre.
-
15
Charismatic
Save Wrex/cause Saren's suicide.
-
10
Search and Rescue
Rescue Liara.
-
10
Long Service Medal
Finish Mass Effect twice.
+5% weapon damage
25
Distinguished Combat Medal
Finish Mass Effect on Hardcore.
Unlock Insanity and gamer picture.
25
Medal of Valor
Finish Mass Effect on Insanity.
Unlock gamer picture.
50
Shotgun Expert
150 Shotgun Kills.
Bonus Talent: Shotguns.
15
Assault Rifle Expert
150 Assault Rifle Kills.
Bonus Talent: Assault Rifles.
15
Sniper Expert
150 Sniper Rifle Kills.
Bonus Talent: Sniper Rifles.
15
Lift Mastery
Use Lift 75 times.
Bonus Talent: Lift.
15
Warp Mastery
Use Warp 75 times.
Bonus Talent: Warp.
15
Singularity Mastery
Use Singularity 75 times.
Bonus Talent: Singularity.
15
Barrier Mastery
Use Barrier 75 times.
Bonus Talent: Barrier.
15
Stasis Mastery
Use Stasis 75 times.
Bonus Talent: Stasis.
15
Damping Specialist
Use Damping Field 75 times.
Bonus Talent: Damping Field.
15
AI Hacking Specialist
Hack 75 synthetic enemies.
Bonus Talent: Hacking.
15
Sabotage Specialist
Use Sabotage 75 times.
Bonus Talent: Decryption.
15
First Aid Specialist
Use medi-gel 150 times.
Bonus Talent: First Aid.
15
Neural Shock Specialist
Use Neural Shock 75 times.
Bonus Talent: Medicine.
15
Completionist
Finish majority of all quests.
+5% experience rewards.
25
Rich
Earn 1,000,000 Credits.
Unlock Spectre gear.
25
Soldier Ally
Finish majority of game with Ashley.
+10% damage protection.
20
Sentinal Ally
Finish majority of game with Kaidan.
-10% Lift and Throw cooldown.
20
Krogan Ally
Finish majority of game with Wrex.
+10% health regeneration per minute.
20
Turian Ally
Finish majority of game with Garrus.
-10% Damping and Overload cooldown.
20
Quarian Ally
Finish majority of game with Tali.
-10% Sabotage and Hacking cooldown.
20
Asari Ally
Finish majority of game with Liara.
-10% Stasis and Barrier cooldown.
20
Power Gamer
Get to level 50.
+10% experience rewards.
20
Extreme Power Gamer
Get to level 60.
+5% experience rewards.
50
Renegade
75% Renegade.
-
15


 Might & Magic: Duel of Champions Game Guide & Walkthrough
 Might & Magic: Heroes VI - Danse Macabre Game Guide & WalkthroughMiddle-earth: Shadow of Mordor Game Guide & Walkthrough
 Minecraft: Story Mode: A Telltale Games Series Game Guide & Walkthrough
 Men of War: Vietnam Game Guide & Walkthrough