Welcome in the game guide for Battlefield 2142: Northern Strike, the first official booster pack. In this article, you will find an exact description of everything that this expansion pack adds to the game, starting from three map analyses and presentation of ten brand new unlocks, and ending with a test of two added vehicles.
If you are looking for information referring to game's rules and hints about how to use firearms, what should a soldier do on a battlefield and so on, check the game guide for Battlefield 2142.
This article is just a one big analysis of everything that Northern Strike gives, written for new players, so they will know what to expect of the war seen on the screen.
Have fun. I hope you'll like the new, completely arctic climate.
Synonymous phrases and definitions used in this game guide:
Assault Lines is the new game mode that Battlefield 2142: Northern Strike delivers to fans of the BF franchise. Each of the three additional maps work in this new mode. I must say that it reminds the Conquest Assault, seen in the earlier BF games. First of all, let us remind also it's definition:
Conquest Assault - one of the sides defends itself, the second one attacks. Attackers must take every flags, this will decrease enemy's ticket amount. Defenders have to control at least half of the spawn points and they have no uncapturable flag. Attackers have at least one such flag and start with more tickets than the defenders.
Assault Lines mode change one little thing - the main flag of the defenders can be captured by the attackers only if all other spawn points have been taken before.
A symbol of padlock appears near the main flag on the minimap. If it is locked, the control point cannot be captured. Analogically, when the padlock is unlocked, taking control of the spawn is possible.
 The padlock is locked, so the flag cannot be captured.
On the next three pages you will find descriptions and analyses of the new maps, added by the booster pack. Just like in the earlier games, there is no universal way to win the battle in Northern Strike. Like in the real life :) Descriptions below are rather bunches of tips which, when followed, brings the team closer to victory.
Just like in the BF2142, every single map has at least to versions - for 16 and for 32 players. Some of the battlefields has additional versions, for 64 and 48 players. That last type mentioned has been prepared specially for the Titan mode. In this game guide, you will find analyses only for these 64 and 48 players versions, because smaller maps differ from the others in the amount of heavy machinery and capturable flags. Strategy doesn't change at all.
Circles with ciphers marks main bases of both teams. Details about such places are in the analyses of particular maps. Markers referring to these circles in the text - [Roman cipher].
Green circles and areas marks special places, for example key flags and other strategically important points like narrow passages. Controlling these places results in fast overrunning the enemy and the final total victory. Details about particular significant spaces are in the analyses.
Pink circles with ciphers mark vantage points, which may be used not only by snipers, but also by engineers equipped with anti-tank rocket launchers. Marker in the analysis' text is [cipher].
Each map has been analyzed and tested with regard to:
Always pay attention to the terrain's map and make conclusions - which kit would be the best and where reinforcements are needed. This will get your team closer to victory.
Also, remember that there are Commanders' installations in the main bases of both sides, which can be easily blown up by opponent Recon soldiers equipped with a few RDX DemoPaks. Defend your own base or you will lose additional Commander's support. Oh, and don't forget to visit the enemy's base!
Map name: Bridge at Remagen
Location: Remagen, Germany
Game mode: Conquest: Assault Lines
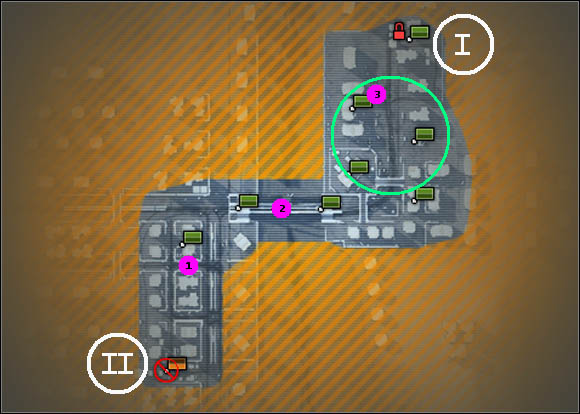
Map description: We are fighting in the city called Remagen, placed over the Rhine river. Although the terrain is urbanised, there are some open areas, ideal for snipers and engineers armed with rocket launchers. As we can see on the map above, the battlefield is divided into two parts by the frozen river. It is possible to get on the ice from the damaged parts of the bridge located in the central part of the map. Roads here are quite wide (except that bridge, where two Hachimotos would have some problems with passing), so travelling by heavy machinery doesn't cause troubles. The terrain is almost entirely flat. The infantry may be a bit angry, because of lack of vehicles, which makes it march all the time. Some flags are quite difficult to access with heavy machinery; driver has to focus on manoeuvring instead of fighting enemies.
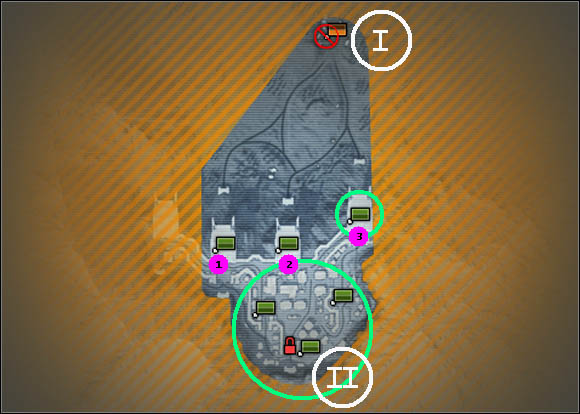
Analysis: Big green circle in the east is the biggest open area on the map. Vehicles and small infantry groups can be spotted there, so Recon soldiers and mechanics with heavy weaponry almost all the time have a job to do over there. [1] is a complex of structures, built on some kind of small hills. However, snipers from both teams sometimes find there a few targets. Goliath can be spotted in that region too. [2] is the bridge where Engineers' (with rocket launchers and mines, of course) activity is quite high. Vehicles using the bridge cannot manoeuvre freely, so they're easy targets. The last important point is [3], where a stationary anti-vehicle cannon Rosch Mk-S8 has been installed. This one is unique, as its operator sees the whole open area nearby. Teams has their bases in points [I] and [II]. In there, they have battlewalkers, APCs, Goliath and Hachimotos at their disposal. And fight hard for the flags placed at the ends of the bridge, because they give additional walkers.
Strategy for EU: The team starts in a strategically bad position. In order to take control of the first flag on our way, a well-supported Goliath should be sent into the battle. Moreover, search for the gaps in the enemy's defence and use them to get on the eastern side of the map. Control points over there gives the team additional support, as the battlewalkers coming from the PAC base can be stopped and destroyed even before they reach the bridge. The worst thing that could happen during the battle is when EU controls the west bank of the river and PAC controls the east bank. In such situation, the fight takes place on the bridge, which is easily defendable for the opponents and extremely hard and exhausting for us. If the team manages to hold some flags in the east, it will be possible to get to the bridge defenders and shoot them in their backs.
Strategy for PAC: Use the geometry of the terrain to fight the EU. There are many hideouts in the west, prepared specially for snipers and mechanics shooting at enemy infantry and Goliath. Moreover, I advise you to deploy mines on the bridge, so unauthorised people won't get to the flags located in the east. However, if the enemy manages to get there, the PAC forces will have to kill themselves to waste all the opponents in the east. Pay attention to flags at the ends of the bridge - controlling them gives the team additional heavy support and weakens the EU at the same time.
Titan mode:
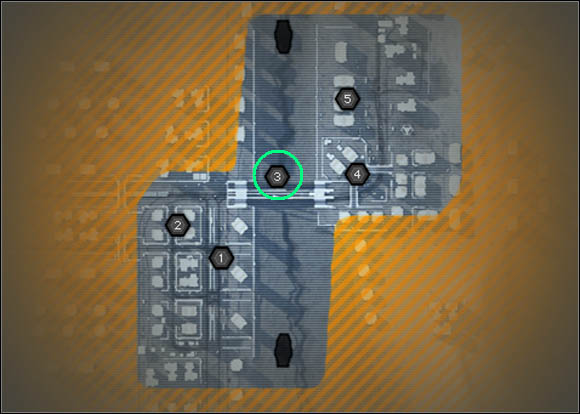
Struggles in the Titan mode differs in only one thing - some of the fights take place on the ice, because of a missile silo (marked with a green circle) standing on the ice and Titans hovering right above the Rhine. And better leave the Titans in their starting position.
Map name: Liberation of Leipzig
Location: Leipzig, Germany
Game mode: Conquest: Assault Lines
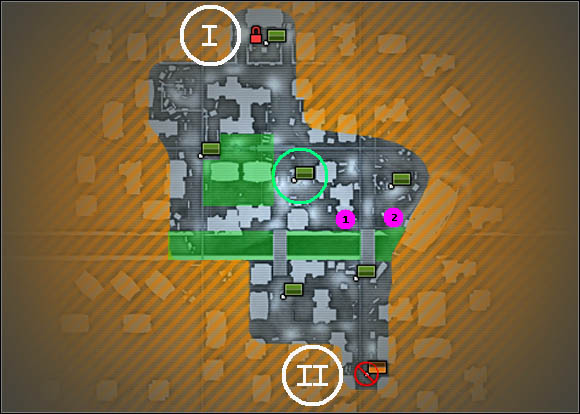
Map description: A typical urban map, generally flat, with a few wide streets and lots of hiding places and small passages, which may be used by the infantry, especially Engineers preparing for launching an anti-armor rocket at enemy battlewalkers or Goliath. In the central part of the battlefield, we could see some interesting vantage points for snipers, however this type of fights is a rare thing right there. The map is divided by a frozen river, with two huge bridges right above. Teams are struggling almost everywhere in the city, but I must say that in fights near the river's bed, snipers and mechanics aiming at enemy vehicles located on the other side of the ice take participation nearly every time. The majority of flags is situated next to main roads, so soldiers defending them are able to see the enemy from a distance.
Analysis: Green circle in the middle of the map marks a significantly important flag, because it is possible to perform strikes on other spawns from that point. That is why fights in this region are more embittered than anywhere else. Green polygon in the western part of the map is a terrain dominated by infantry, which not only use this region as a kind of small battlefield, but also as a passage between the central and western flags. The river's bed, marked with green, is a great route for Hachimotos. That is quite strange, but players rarely look for enemies in the bed, so crews of these PAC vehicles can feel relatively safe. Places [1] and [2] are vantage points for both snipers and mechanics. Unfortunately, there are no similar (and as good as) points on the other, southern side of the river. Teams have their main bases in [I] and [II]. Battlewalkers, Goliath and Hachimotos respawning there will greatly assist soldiers in achieving their goals.
Strategy for EU: There are two PAC flags on our way. It is important to break through the first defence line, as it will allow our infantry to get to the northern part of the map and take some outposts. This will weaken the PAC army, because from now EU forces will be able to respawn in many different places and attack enemy soldiers from many directions at once. Goliath should take care of that first defence line, but it must be assisted by the battlewalker and some infantry. Be aware of the fact that fights at the eastern bridge are more embittered. However, these can be stopped by taking the eastern flag. If the enemy will appear to be persistent, expect a hard struggle at the central control point. Sending a Goliath in there will surely increase the chance of taking it, but don't think this will do the job in 100%. The team has to assist the vehicle, just as usual. We may talk about a great success if the team will be able to take control - even unstable - over some of the spawns in the central part of the map and to defend southern flags effectively at the same time.
Strategy for PAC: It is always a tough nut to crack for the PAC. First of all, somebody has to take the battlewalker and get it to the south in order to defend flags placed in there. It is a very difficult task, but persistent defence will surely retard the moment when EU manages to cross the river. There is always a risk that some single soldiers will get unseen to the northern part of the map, but I think that a Hachimoto patrolling the area would be enough to take care of this problem. When the whole enemy army gets to the north, prepare for the worst. Hope God will be merciful for PAC, because the enemy will not. EU forces won't stop attacking until they take control over the whole city. However, Assaults' (because they heal) and Engineers' (because they blow up the Goliath) teamwork should do the trick and stop the enemy. Mechanics can also deploy mines, but it is highly dangerous; you never know when you'll take a bullet to the butt, head or something else.
Map name: Port Bavaria
Location: German part of the Alps
Game mode: Conquest: Assault Lines
Map description: We're fighting in a Titan resupply station built on a slope of a mountain. The map is divided into two parts too. The first one is a small forest in the north, and the second is a military base in the south. Struggles take place only in the second part, just because of the flags that are in there. The base has a specific layout, that allows the infantry to move unnoticed between the buildings and containers. There are also some wide roads, so there is no problem with moving in a heavy vehicle. There are some Titan docks in the northern part of the complex. They have been designed for infantry fights only. Apart from the slope, the map is quite flat. There are only some faults near the borders of base.
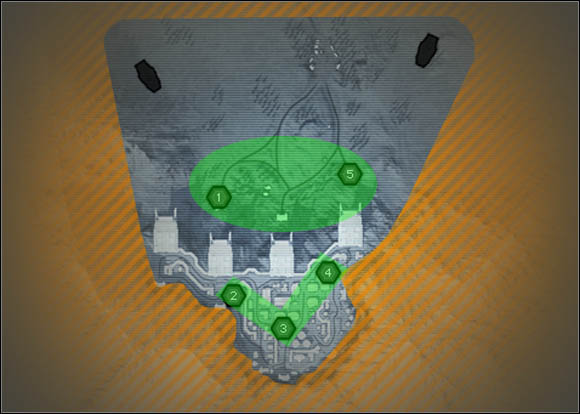
Analysis: Huge green circle in the south marks the military base, where the abilities of using heavy machinery are quite satisfactory, but the fight itself is a bit chaotic. Small green circle in the eastern part of the map marks the most important Titan dock, as it is a spawn point for the Goliath. At the entrances to each dock, there are points [1], [2] and [3]. They have one common feature - fights in there are often at a deadlock. This is a real tug-of-war situation - none of the teams grow so strong to overrun the enemy quickly and move the battle to other part of the map. That is why - among others, of course - soldiers use there weapons that require precision - assault/sniper rifles and rocket launchers. EU starts in its base [I], but Europeans abandon it after capturing one of the Titan docks. That's because there are only APCs at their base, so it is impossible to drive into the enemy Port Bavaria. PAC has its main flag in point [II]. Hachimotos and battlewalkers respawning there will surely help in defending some of the control points in the complex.
Strategy for EU: The beginning looks always the same - the whole team must get into the APCs, drive near the Titan docks, launch the assault pods and land inside the enemy's base. I advise to attack the eastern dock, as it is Goliath's spawn point. Controlling it will greatly help in assaulting other flags. Infantry should go and attack other Titan docks. This will prevent the enemy from respawning in the northern part of the base. Moreover, these flags give additional heavy machinery (extra battlewalker). Every single vehicle should take care of the control points that are situated in heart of the complex. The enemy has battlewalkers at his disposal, so I advise you to send a Goliath with a pack of Engineers to the battle. The opponent will probably try to get unnoticed to the docks and capture flags that are there. I would be a nice (and nasty) idea to leave there some anti-personnel mines. Most of the battle is just walking or driving from one lost flag to another in order to get them back, so if the team will have good intelligence (Commander - do your job!) and the soldiers will react fast, the victory is almost certain.
Strategy for PAC: Your first objective is to defend the docks. EU needs them more than anything else, as they let them to send reinforcements more quickly. Moreover, the eastern dock gives them the Goliath, so EU forces will probably throw there everything they have. At the beginning, vehicles will be completely useless; only infantry counts. Dock's construction gives PAC incredible advantage, which with the usage of mines and grenades, should stop the EU there for good. Commander has to scan the battlefield all the time and pinpoint enemy soldiers trying to attack flags inside the compound. If EU forces will try to do so, a Hachimoto should do the job really well. If the enemy will manage to capture the docks and move the battle to the southern part, use battlewalkers in the fight. Their task is to stop enemy walkers and Goliath on their way to the flags. Small groups of infantry may go the docks without being noticed, but beware of the EU APM mines!
Titan mode:
The fight in the Titan mode looks a bit different. Above all, we've got here some silos in the northern part of the map. Green ellipse marks the region of APC and infantry fights - these are the only types of units struggling there. I have to add that infantry I mentioned is more like single soldiers airdropping there. About fights in the south: they're quite similar to these in Assault Lines mode. Only "similar", because we may use here air transport vehicles. I advise to fly over the green polygon marked on the map above. This will let the crew to fall inside assault pods and land right next to silos. Better don't move the Titans, they shouldn't be exposed.
In this chapter you will descriptions and analyses of both new vehicles added by the Booster Pack. They have been checked with respect to weaponry, number of seats, use in the battle and other additional conveniences. Both advantages and disadvantages of vehicles have been mentioned. There are also pictures of the new machines and information about which side uses specific vehicles.
Analyses are divided into two parts. The first one is a general description of features, good and bad points of a machine. Bold texts are extremely important information.
The second part shows how much energy a vehicle lose after an anti-armor attack. Bold texts marks the highest values. I hope this will make the analyses clear.
Vehicle description:
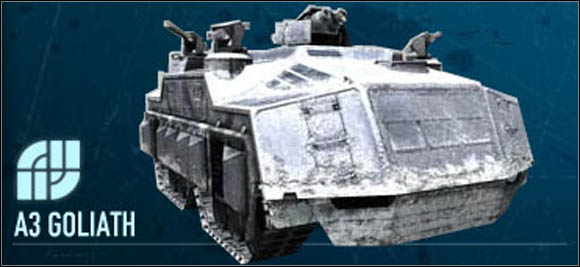
A3 Goliath is a real fortress. It has five seats. The first passenger is the driver. Moreover, he uses a Motion Mine launcher and a special cannon, which is quite good at eliminating single soldiers, but against vehicles (even these light ones) it's pretty useless. The rest of the crew has anti-personnel machine guns, placed at each corner of the machine.
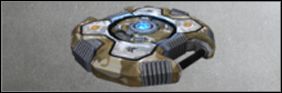
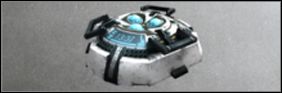
Goliath is a driving spawn point, it heals and resupplies friendly soldiers standing nearby. It also repairs itself. The ability of regenerating is given by special cells placed on the vehicle's armor. I must add that these cells cannot be repaired once they're destroyed. The more cell the Goliath has, the faster it repairs itself.
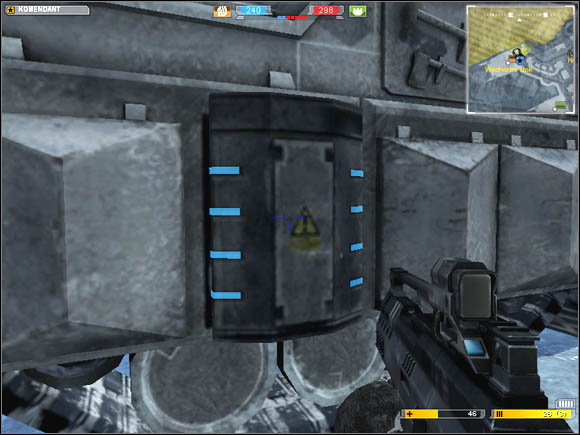 Goliath's regenerative cell.
Goliath can be repaired with a traditional Engineer's HOFF-3000, but that kind of operation takes ages.
The Goliath's main disadvantage is its speed, or should I say - the lack of speed. However, if the infantry supports the vehicle by killing enemy soldiers carrying anti-armor weapons, the Goliath can drive right into the heart of the battle.
Goliath can be used only in the Assault Lines mode, so we won't see it in the Titan mode.
Anti-armor weapons' effectiveness
It doesn't really matter where we hit the Goliath (excluding the cells, of course), as the shot always takes away the same amount of energy.
In this chapter you will descriptions and analyses of both new vehicles added by the Booster Pack. They have been checked with respect to weaponry, number of seats, use in the battle and other additional conveniences. Both advantages and disadvantages of vehicles have been mentioned. There are also pictures of the new machines and information about which side uses specific vehicles.
Analyses are divided into two parts. The first one is a general description of features, good and bad points of a machine. Bold texts are extremely important information.
The second part shows how much energy a vehicle lose after an anti-armor attack. Bold texts marks the highest values. I hope this will make the analyses clear.
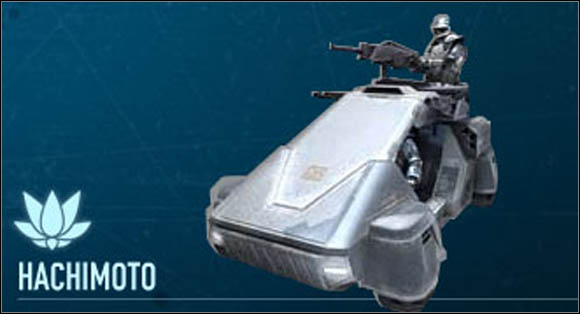
Vehicle description:
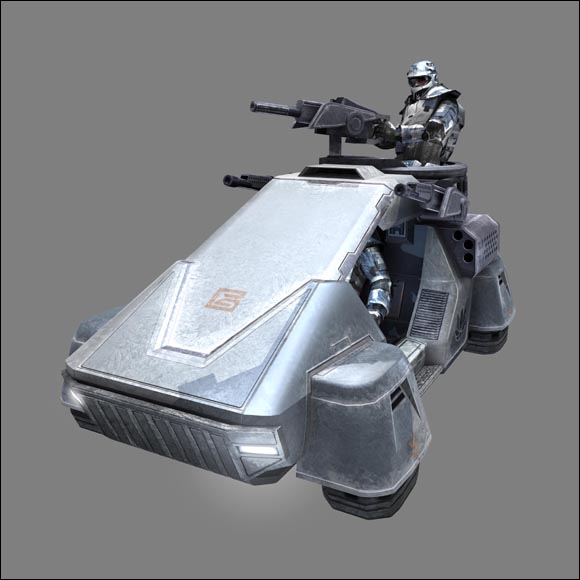
Hachimoto is the fastest vehicle in the game. It hovers over the ground, and it moves similarly to Nekomata tank known from BF2142. It has two seats. The first one is occupied by the driver, who not only drives, but also kill enemy infantry with his anti-personnel guns, which work just like these installed in PAC battlewalkers Bogatyr. The second member of the crew has much better and dangerous weapons - an awesome grenade launcher (it has a few barrels, so works like a minigun! Yeah! Infantry is helpless against this!) and a bit less awesome guided anti-armor rocket launcher, similar to the one that is installed in gunships.
Hachimoto is undoubtedly the fastest vehicle in the game. Just like recon vehicles, it has an additional boost too. The machine is so fast, because people projecting it removed (or put light) armor. That is why the driver and the gunner are exposed and they can be killed even with a traditional firearm. Hachimoto itself turns into pieces after one accurate shot from almost any anti-armor weapon. A good driver should use the speed of his vehicle to get out of troubles.
Anti-armor weapons' effectiveness
It doesn't really matter where we hit the Hachimoto, as the shot always takes away the same amount of energy.
DS-22 Sniper Decoy
This device jams the enemy UAV within a radius of sixty meters. It is reusable, but it can be easily destroyed even with a firearm.
TL-S1C Camo Upgrade
Thanks to this device, IT-33 Active Camouflage can now work twenty-eight seconds longer.
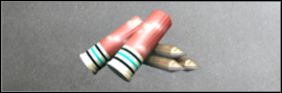
Advanced magazine
Enlarges the clips in Herzog shotgun and rocket-grenade launcher. It also enlarges the maximum amount of extra clips.

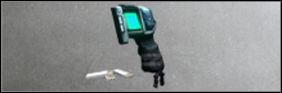
CM3-N Radar Grenade
This little baby scans the terrain in a radius of 25 meters in order to find enemy infantry. It shows opponents on the minimap and explodes 5 seconds after the throw.

MMB-5
This device works like a magnet for Motion Mines deployed in a radius of 20 meters. After the mine comes to this tool, it explodes. MMB-5 can also destroy other explosives, but only when it has a direct contact with them.

SMG Clip Expansion
Enlarges clips in Engineer's SMG (35 extra bullets for EU and 40 for PAC).

IDS-1
Shows on the minimap the location of enemy infantry in a radius of 40 meters. It sticks to walls and vehicles.
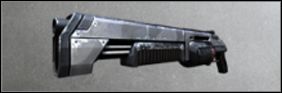
Clark 12 RDX
This shotgun fires small explosive charges, which sticks to vehicles. Be aware of the fact that you may easily run out of ammo.
SL-RPU
This thing shortens the spawn time of Squad Members using this device during the combat.

SAM-1b Shock Absorber Boot
Reduces the damage inflicted by a fall. Moreover, it shortens the regeneration time after sprint.
Rule number 1 - make sure that the crew is complete
Goliath can perform its role on the battlefield properly only when it has a full crew (that is five soldiers). Each of them observes another part of vehicle's surroundings, so if one of the Goliath's seats is unoccupied, the enemy may use it to get closer to the machine and damage it or its regenerative cells with a rocket launcher or RDX DemoPak.
If you, while being the driver, notice that someone is missing, don't go fighting, but wait until some occupies the seat or respawns in the vehicle.
Rule number 2 - be careful while fighting against battlewalkers
Although the driver has a Motion Mine launcher, he should be extremely careful while fighting against other armored vehicles (especially battlewalkers), as those mines aren't very powerful and the launcher itself takes some time to reload. First of all, move backwards and try to find a safe place in order to let the gunners rest for a moment and to make enemy walker's job more difficult at the same time. As we know, battlewalker's anti-armor bombs work properly only at medium range, so a Goliath which is falling back is not an easy target. If you have an opportunity, find some shelter.
Moreover, be aware of the fact that the enemy driver may run away in order to avoid mines. After that, he may attack from another direction.
Rule number 3 - don't worry about the friendly infantry walking around
Soldiers coming to Goliath in order to heal and receive additional ammunition are, in fact, not a problem to the driver. The vehicle is really slow, so there is a minimum risk of running over a teammate. Do not worry and forget about any extra manoeuvres. Focus on the fight.
Rule number 4 - defend the regenerative cell placed near your gun
If you are an operator of one of the Goliath's guns, IT IS YOUR DUTY to PROTECT the regenerative cell that is placed next to or under your gun. Without the cells, the Goliath cannot repair itself, so defending it is extremely important. I might add that these cells can't be repaired once they're destroyed.
The rule is simple - aim at the enemies carrying rocket launchers first, then to the other ones.
Rule number 1 - speed is life
Hachimoto is one of the lightest vehicle in the whole Battlefield franchise and that means it hasn't got an armor. The driver can be killed with even one accurate shot from one the sides, gunner too. The only way to avoid the certain death in the hell of battle is to move fast. Extra boost, working just as the one installed in recon vehicles, will help in getting the crew out of troubles. Slow down only when the gunner will find some infantry to annihilate.
 As we can see, the crewmembers can be killed even with a firearm. Be VERY careful.
Rule number 2 - do not fight alone
Hachimoto with a driver only is practically useless. In order to with effectively, the driver as to use the grenade launcher and that equals slowing down or even stopping the vehicle. I think I needn't tell you how it may end...?
Rule number 3 - infantry is your main target, not vehicles
Although the Hachimoto has a rocket launcher installed, the vehicle is an anti-personnel, not anti-armor weapon. Fighting against battlewalkers, APCs or Goliaths is completely wrong. Better use the Hachimoto's speed and get out the enemy vehicle's field of view.
The grenade launcher - this must be the main vehicle's weapon. The power of a grenade is similar to the one that an APC grenade has. The launcher needs less than a second to cover a nearby area with flames. Use it to survive and to get your team closer to victory.

 Broken Sword: The Angel of Death Game Guide & Walkthrough
 Battlefield 2142 Game Guide & Walkthrough
 Battlefield Hardline Game Guide & Walkthrough
 Bioshock 2 Game Guide & Walkthrough
 Battlefield 4 Game Guide & Walkthrough