Princess Isabella: A Witch's Curse Walkthrough, Guide, & Tips
Princess Isabella: A Witch’s Curse Walkthrough
Welcome to the Princess Isabella: A Witch’s Curse Walkthrough!
Help Princess Isabella lift the evil curse that has been placed on her castle! Solve perplexing puzzles and save her friends!
Whether you use this document as a reference when things get difficult or as a road map to get you from beginning to end, we’re pretty sure you’ll find what you’re looking for here.
This document features a handy General Tips & Information section, as well as the complete Princess Isabella: A Witch’s Curse game walkthrough, with annotated screenshots from actual gameplay!
Remember to visit the Big Fish Games Forums if you find you need more help. Have fun!We hope you find this information useful as you play your way through the game. Use the walkthrough menu below to quickly jump to whatever stage of the game you need help with.
This walkthrough was created by Margie B.
WALKTHROUGH MENU
- INTRODUCTION
- CHAPTER ONE
- CHAPTER TWO
- CHAPTER THREE
- CHAPTER FOUR
- CHAPTER FIVE
- CHAPTER SIX
- CHAPTER SEVEN
- CHAPTER EIGHT
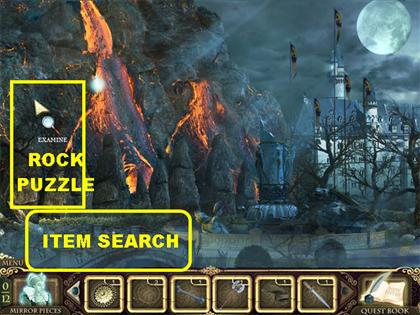
INTRODUCTION
INVENTORY ITEMS

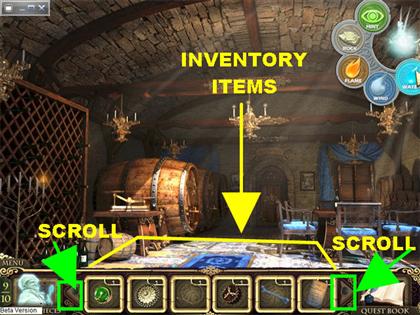
- You will pick up several objects along the way which will be useful in solving puzzles or entering a locked location.
- As soon as you pick up an item of value it will automatically go into your inventory box located at the bottom of the screen.
- Your inventory box can hold many items. Once the inventory goes over six items, you can use the arrows on each end to scroll through your items.
- When you see a gold puzzle piece appear over an item it means that you can use an inventory item in that section.
- Some inventory items may stay in your inventory for most of the game. You may not use some items until the very end.
- Once you’re completely done with an inventory item, it will disappear.
ABILITIES
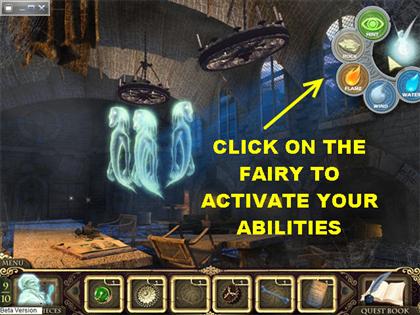
- There are 4 types of abilities in the game, fire, water, rock and wind. To use any of these abilities you have to click on the fairy in the top right side of the scene.
- Some of the abilities will be unlocked as you progress through the game.
- Click on the fairy, choose the ability you want to use and then click on the item in which you would like to use the ability on.
- An ability will automatically attach itself to your cursor once you select it.
- You can stop ability by clicking on your mouse when you see the “stop ability” words written next to the fairy.
- Rock Ability – The rock ability lets you break items like vases and bottles. The vases and bottles have items needed for your inventory. Make sure that after you break each item that you pick up whatever is inside.
- Fire Ability – With the fire ability you will be able to set things on fire. You can also use it to attack some of the evil items in a scene.
- Wind Ability – The wind ability allows you blow away dusty areas in the game.
- Water Ability – The water ability allows you to water plants. When you water the plants and they bloom, click inside of them to find an inventory item.
HINTS & SKIPS
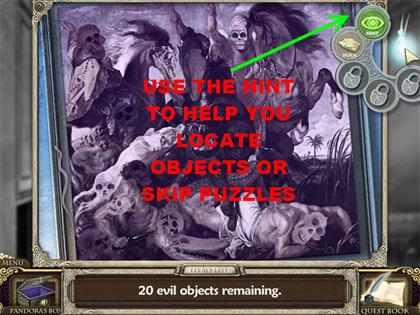
- If you need a hint, mouse-over the fairy in the top right side of the scene and you will see several options depending on what you’ve unlocked. The hint option will be available right away.
- Click on the hint and the fairy will fly over to show you the location of an item.
- After you use a hint you have to wait for it to recharge before you can use it again.
- The hint button turns into a skip button when you are in the middle of a puzzle. It also needs to recharge before you can use it. You will not be able to use regular hints while you are doing a puzzle.
MIRROR PUZZLES
- You will have to collect several mirror pieces throughout the game and assemble them once you have a complete set available.
- You can collect the mirror pieces even if the room has not been cleared of evil spirits.
- The mirror pieces you collect for each person will be noted at all times in the lower left corner of the scene.
- After you find all the mirror pieces for a particular staff member the game will ask you if you want to go to the mirror room right away. If you choose yes, you will go to the mirror room. If you choose no, you will stay in your current location.
- If you do decide to go to the mirror room right after the game warps you there, you can warp back to the last location you visited.
- Simply click on a mirror in the grand hall and you will get a closer view.
- The mirror puzzles will float around the scene and will contain moving images within the mirror pieces.
- You can rotate pieces by right-clicking on them.
- You can left-click to put a piece into place.
- A piece will lock into place when it is placed in the right spot.
WALKTHROUGH
- Please keep in mind that there are many ways to navigate this game. The walkthrough shows you the shortest possible way.
- The majority of the solutions for the puzzles will be the same for everyone. In rare instances where the solution is not the same, we will make a note of it in the walkthrough.
- In the scenes in which you need to find a list of items, we will only highlight the items that are used for inventory on the screenshots.
- If you need to reset a puzzle so you can follow the directions in the walkthrough, exit out of the puzzle and it should reset itself by the time you go back.
CHAPTER ONE
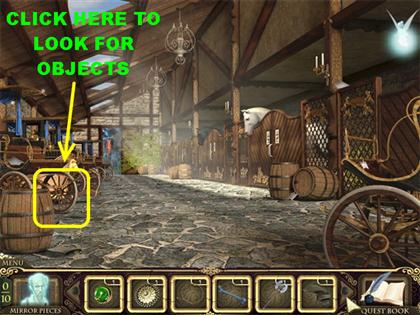
GREEN MARBLE, GEARS, PIANO KEY AND CLAWS – COURTYARD /MAIN FLOOR
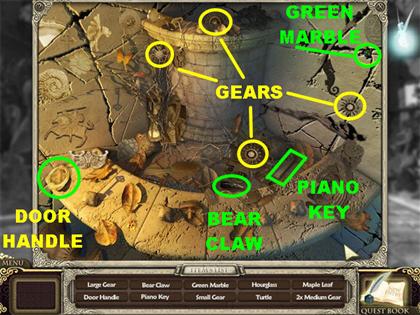
- Click on the sparkly spot that is on the left side of the scene and you will get a closer view.
- Look for the items listed at the bottom of the screen.
- One medium gear is located on the right side.
- The second medium gear is on the right side of the wall.
- The large gear is in the top center of the scene.
- The small gear is on the top left side.
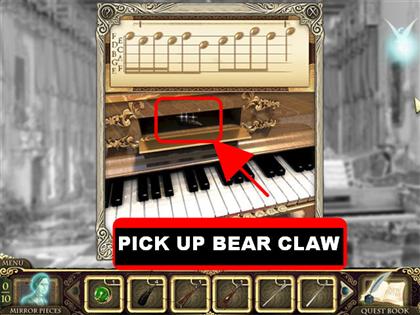
- The bear claw is on the lower center of the fountain.
- The piano key is on the lower right side of the fountain.
- You will find the green marble inside a crack on the upper right side of the wall.
- The door handle is on the lower left side of the scene.
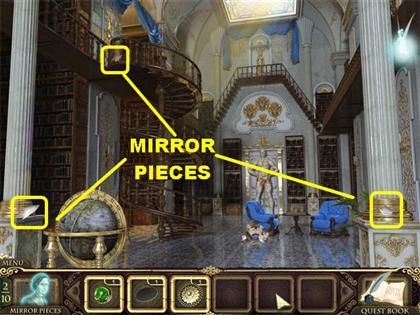
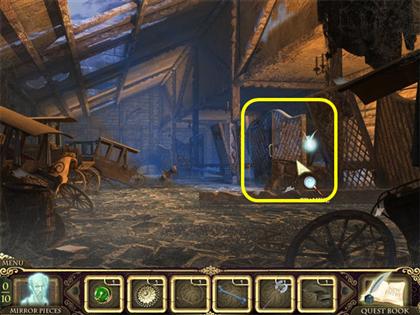
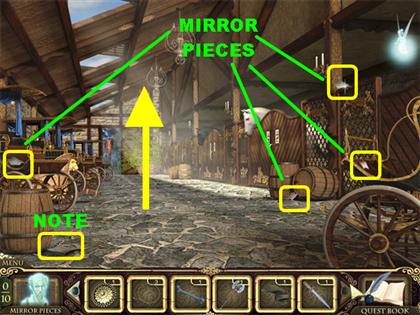
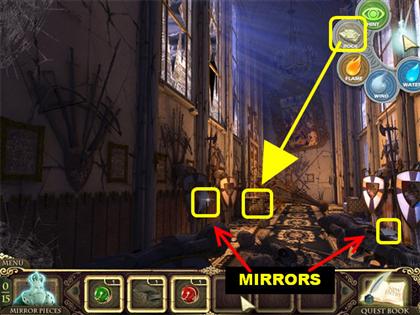
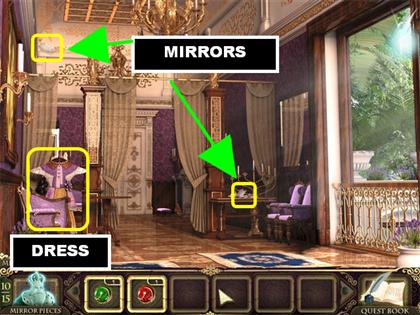
3 MIRROR PIECES – MAIN ENTRANCE/ MAIN FLOOR

- The first mirror piece is on the lower left side, at the bottom of the giant lion statue.
- The second mirror piece is on the base of the lion statue on the left side of the door.
- The third mirror piece is on the lower right side, close to the lion statue on the right side of the door.
- Click on the window in the upper left side for a closer view. You will catch a quick glimpse of the witch spying on you.
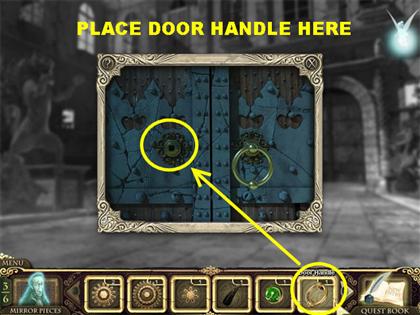
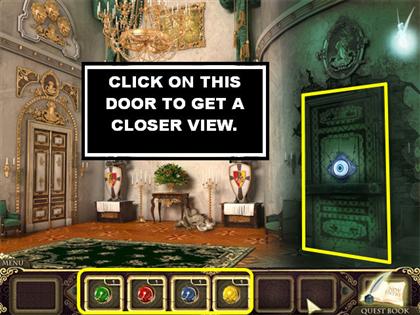
- Click on the front door to get a closer view.
- Place the door handle on the left side of the door and this area will be clear. Go through the door.
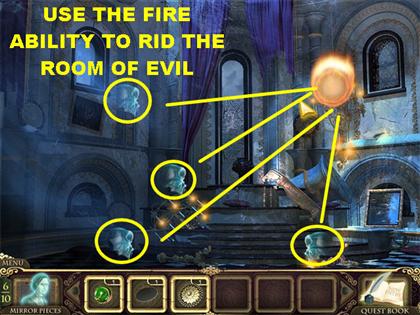
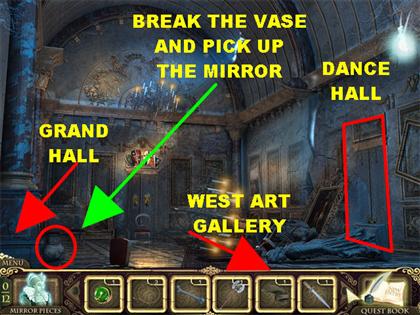
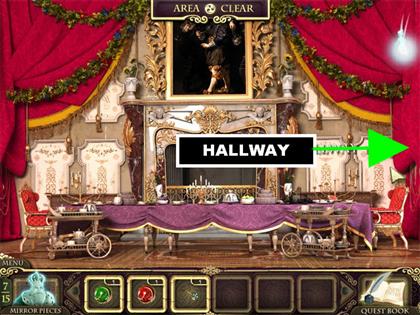
REMOVE ALL THE EVIL – GRAND HALL/ MAIN FLOOR
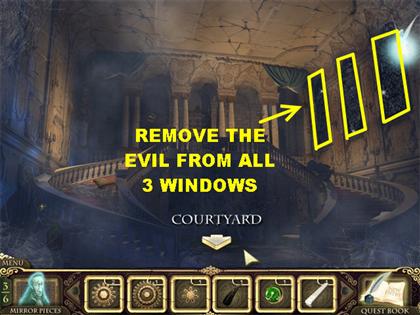
- In this scene you have to remove all the evil in the room.
- Click on all three windows on the right side of the scene to get a closer view.
- Click on all the skulls, gargoyles and snakes you see in the scene. Once all the evil has been removed, the window will open and light will shine in.
- Open all 3 windows to clear the room of evil.
- Please look at the next 3 screenshots for the location of all the evil items. The green squiggly lines represent the snakes in the scene.
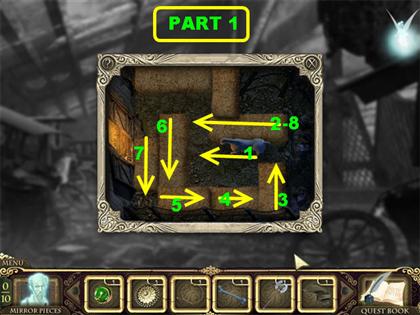
LEFT WINDOW EVIL REMOVAL
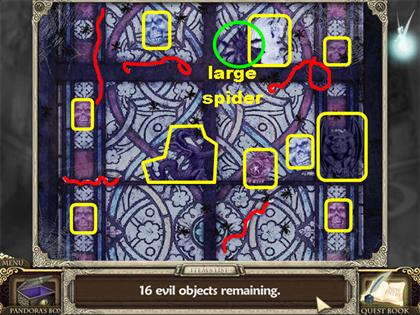
- Click on the large spider that moves around the scene in order to completely remove the evil. The screenshot shows you the location of the spider at the time the screenshot was taken.
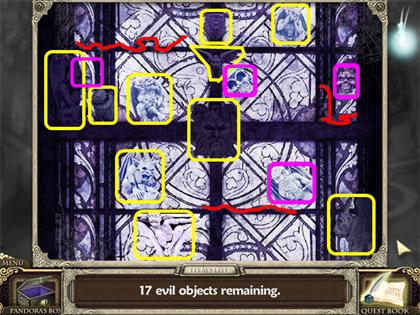
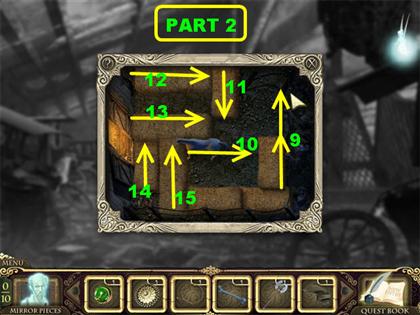
MIDDLE WINDOW EVIL REMOVAL
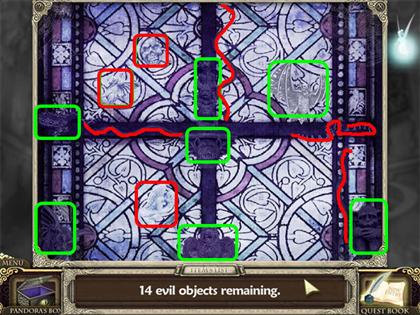
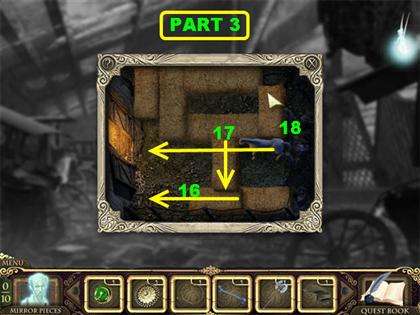
RIGHT WINDOW EVIL REMOVAL
3 MIRROR PIECES – GRAND HALL/ MAIN FLOOR

- The room will be transformed back to its original glory.
- Pick up the mirror piece that is at the bottom of the right banister.
- Pick up the mirror piece that is on the lower left side of the scene.
- Pick up the other mirror piece on the banister on the left.
- Click on the note located on the left steps.
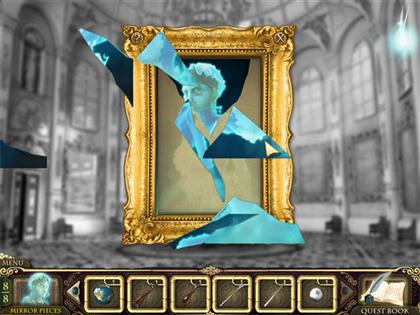
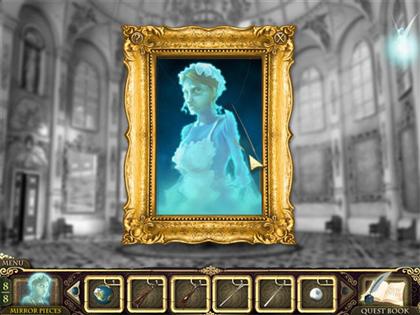
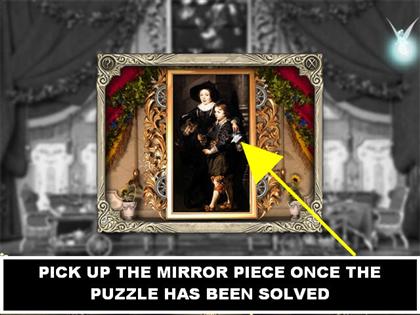
PAINTING PUZZLE
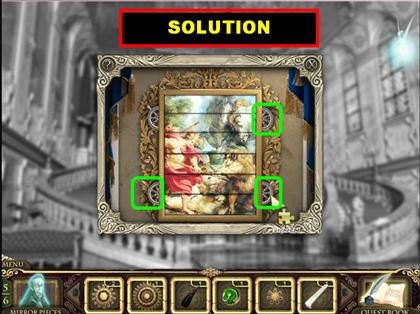
- Click on the painting on the top left side of the scene and you will encounter a puzzle.
- Your goal is to click on the wheels on the side of the puzzle until you see only the good side of the painting.
- There are 4 wheels on this puzzle, click on them in the following order to complete the image.LOWER LEFT
LOWER RIGHT 2X
UPPER RIGHT
- After the painting has been fixed, the gears will appear in the room.
2 GEARS – GRAND HALL/ MAIN FLOOR
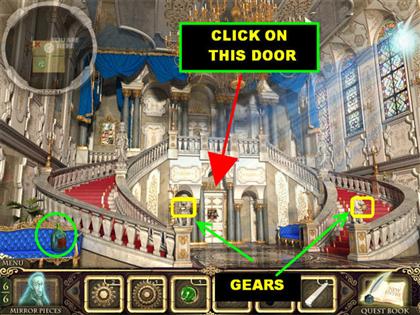
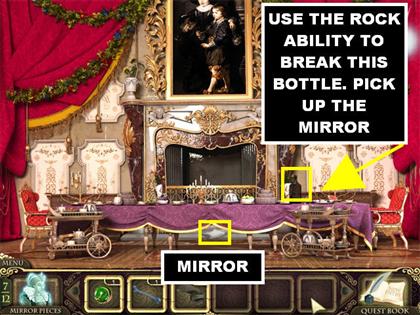
- There is a green bottle on the lower left side of the scene, you can’t break it open right now but you will come back to it later.
- Pick up the medium gear on the lower center of the scene, close to the lion that is by the door.
- Pick up the small gear located on the steps on the right.
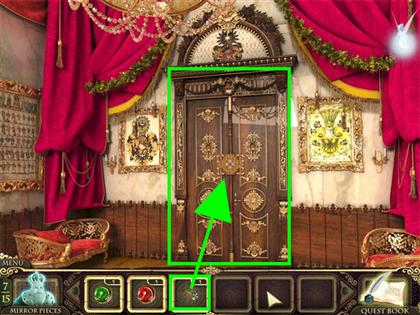
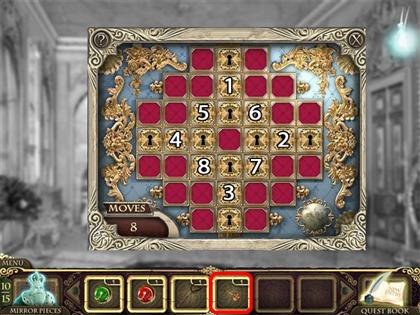
DOOR LOCK- GRAND HALL/ MAIN FLOOR
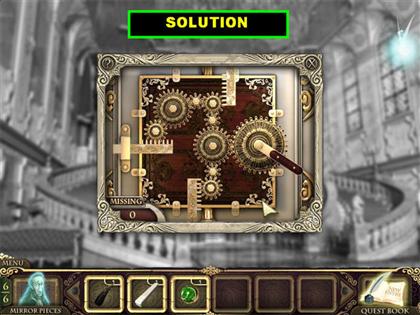
- Click on the door at the bottom of the scene to open up a puzzle.
- Your goal in this puzzle is to put the gears from inventory in the right place.
- Please look at the screenshot for the solution.
- Once all the gears are in place, click on the handle so the gears can turn.
CHAPTER TWO
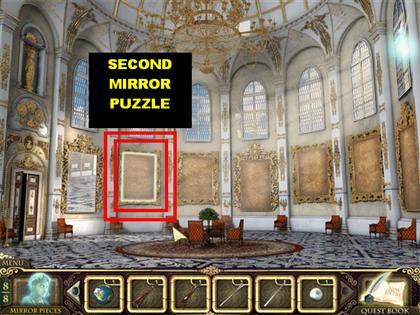
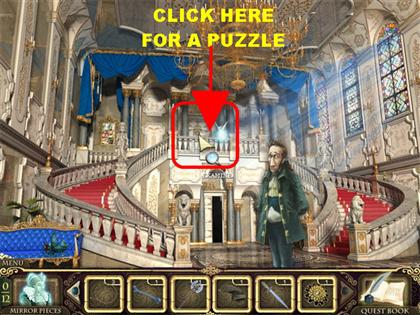
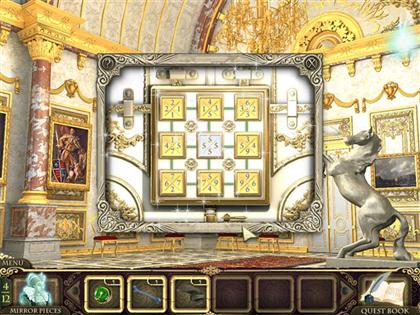
FIRST MIRROR PUZZLE – HALL OF REFLECTION/ MAIN FLOOR
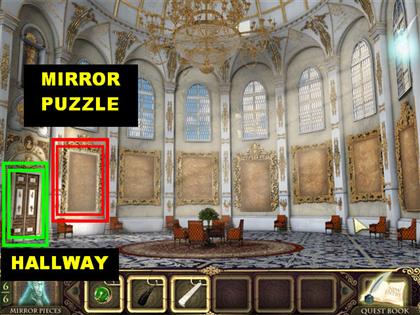
- When you first enter the scene the fairy explains to you that the witch has hidden everyone in the mirrors and has shattered the pieces, scattering them around the castle. You have to find the pieces so you can release everyone.
- Click on the mirror that is close to the door for a closer view.

- The puzzle pieces will float around the scene and will contain moving images within the mirror pieces.
- You can rotate pieces by right-clicking on them.
- You can left-click to put a piece into place.
- A piece will lock into place when it is placed in the right spot.
- Once all the pieces have been assembled correctly, the servant will open the door up for you. He tells you that he will be at the main entrance if you need him.
GAIN ROCK ABILITY & MERCURY PLANET – HALLWAY/ MAIN FLOOR
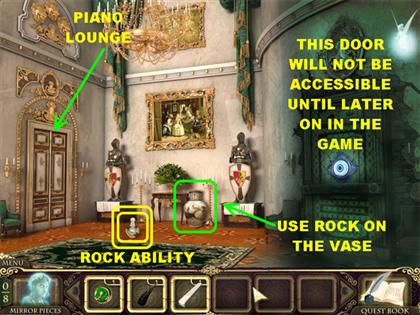
- There are 2 doors in this room; the one on the right will not be accessible until much later in the game, do not worry about it for now.
- The door on the left gives you access to the Piano Lounge.
- Pick up the bottle in the center of the floor and you will now have the rock ability in your power.
- The rock ability gives you the ability to smash anything that is breakable. These breakable items will contain valuable items for your journey.

- Click on the fairy in the upper right corner and a small menu opens up. Clicking on the rock automatically attaches it to your cursor.
- Click on the vase and the rock will break it. The vase contains the planet Mercury, click on it and it will go into your inventory.
- Let’s go back to the Grand Hall so you can use the rock ability again.
- Place your cursor at the bottom of the next 2 scenes in order to return to the Grand Hall.
GUN STOCK 1 – GRAND HALL/ MAIN FLOOR
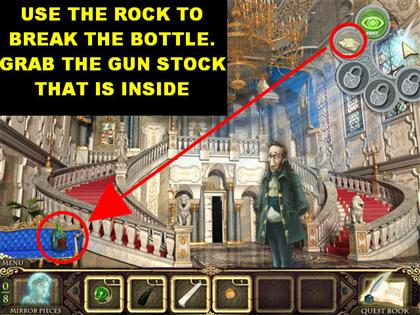
- Click on the fairy, select the rock and then click on the green bottle on the couch.
- Once you smash the green bottle, click on the gun stock and it will be added to your inventory.
- Let’s go back to our last location.
- Click on the door at the bottom of the scene to go to the Hall of Reflection.
- Click on the door on the left to return to the Hallway.
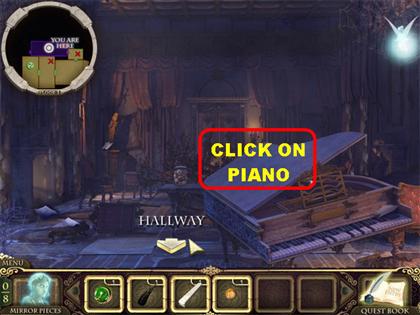
- Click on the door on the left to enter the Piano Lounge.
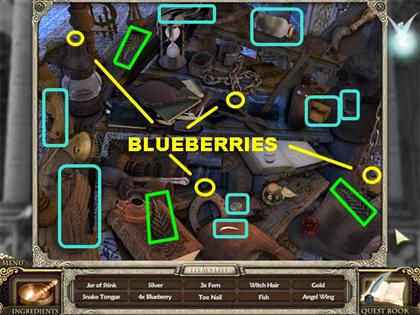
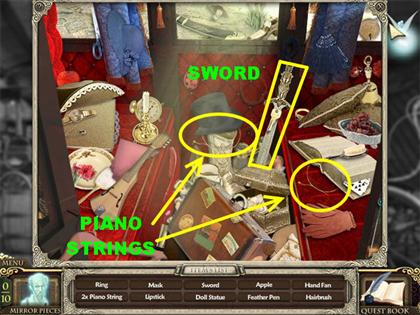
PIANO LIST – PIANO LOUNGE/ MAIN FLOOR
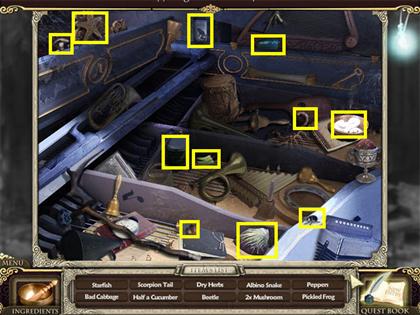
- Click on the sparkly piano and you will be asked to find the items on the list.
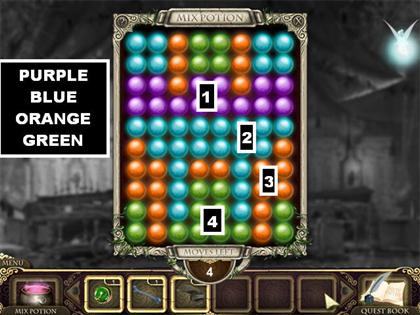
MIX POTION PUZZLE
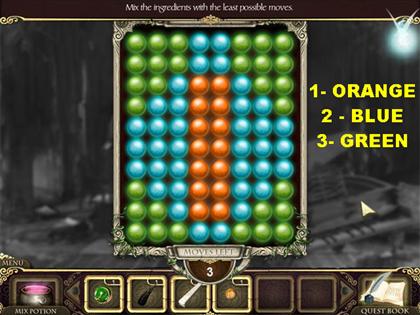
- Once you’re done with the items on the list you will be asked to mix the ingredients with the least possible moves.
- Your goal in this puzzle is to eliminate all the colored balls in 3 moves.
- Click on the balls in the following order:ORANGE
BLUE
GREEN
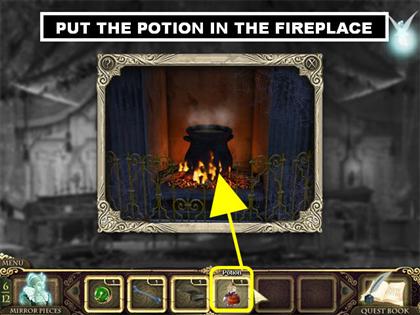
USE POTION
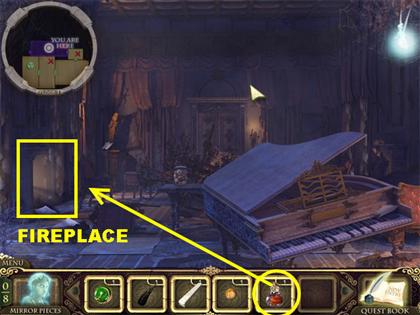
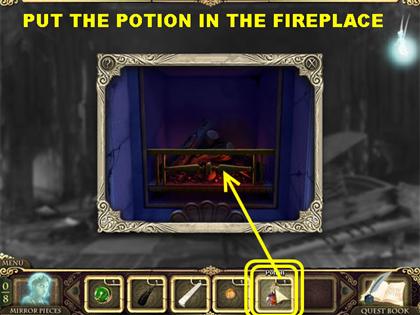
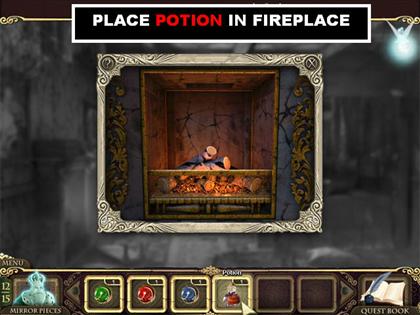
- Once the potion is complete, click on the fireplace and you will get a closer view.
- Throw the potion into the fireplace and the room will be cured.
3 MIRROR PIECES & PLANET VENUS – PIANO LOUNGE/ MAIN FLOOR
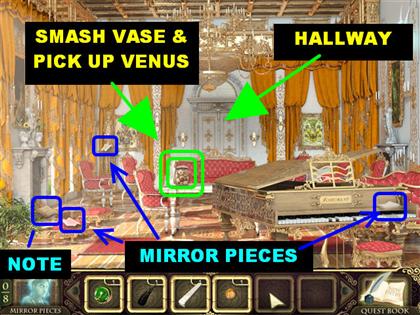
- Pick up the mirror piece on the lower left side of the ground.
- Pick up the mirror piece on the left side of the scene, by the back wall.
- Pick up the mirror piece on the right side of the piano keys.
- Click on the note that is in front of the fireplace.
- Smash the vase in the center of the room with the rock ability from the fairy and you will find the planet Venus inside.
- Go the hallway by clicking on the back door.
MIRROR PIECE & PIANO KEY – HALLWAY/ MAIN FLOOR
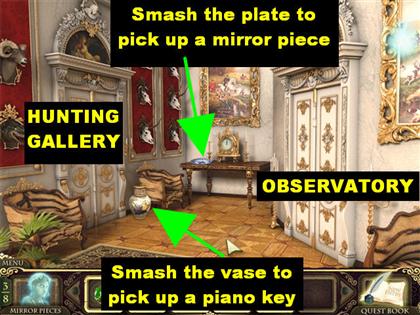
- There are 2 doors in this room, on the right you have the Observatory and on the left you have the Hunting Gallery.
- Use the rock ability on the blue plate on the table and you will find a mirror piece.
- Use the rock ability on the vase on the floor and you will find the second piano key for your inventory.
- This area is now clear. Go to the door on the right so you can enter the Observatory.
CONSTELLATION BOOK – OBSERVATORY/ MAIN FLOOR
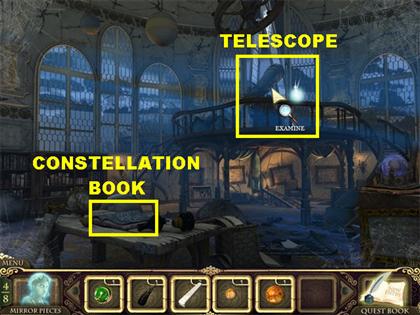
- Pick up the constellation book on the table on the lower left side of the scene.
- Click on the telescope on the top side of the scene and a puzzle will appear.
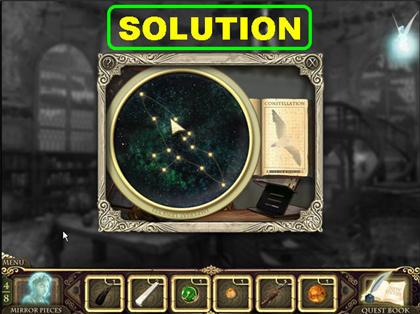
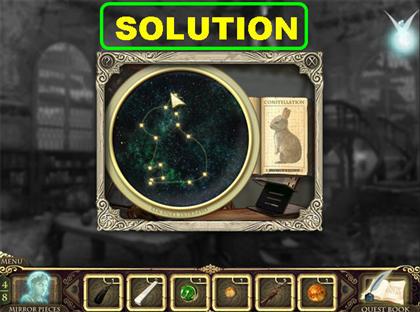
CONSTELLATION PUZZLE
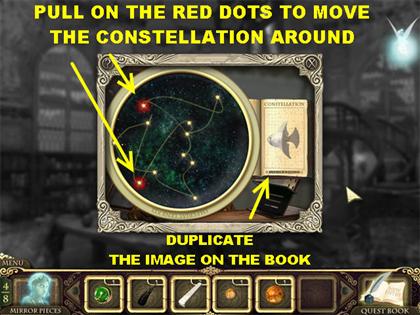
- Place the constellation book in the sphere of the pop-up window.
- Your goal is to duplicate the image of the constellation on the right side of the scene by pulling on the red dots that are inside the sphere.
- When a red dot has been pulled in the right spot, it will turn white and cannot be moved.
- Please look at the next set of screenshots for the solution.
FISH CONSTELLATION
BIRD CONSTELLATION
RABBIT CONSTELLATION
- Once the constellations have been solved the room will be clear of all evil.
2 MIRROR PIECES & PLANET MARS – OBSERVATORY / MAIN FLOOR
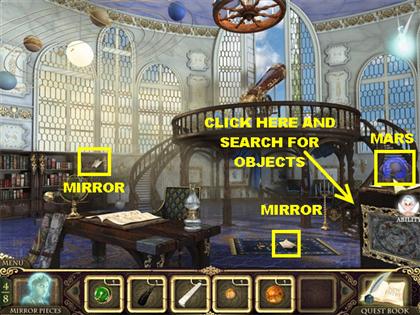
- Pick up the mirror piece on the rug.
- Pick up the other mirror piece on the bookcase.
- Use your rock ability on the blue sphere on the right side of the scene. Click on the planet Mars that is inside.
2 GUN STOCKS & PLANET EARTH – OBSERVATORY/ MAIN FLOOR
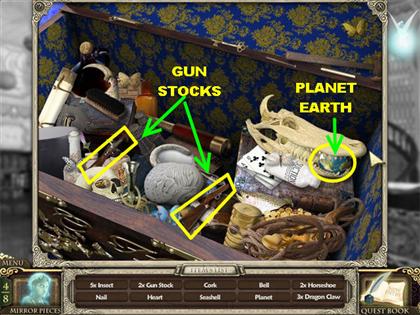
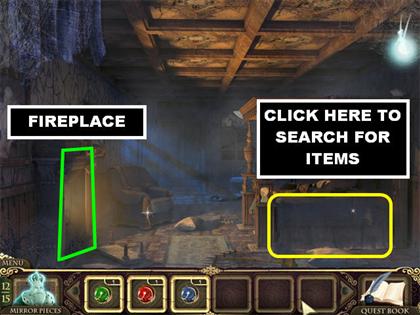
- Click on the sparkly spot in the lower right side of the room and you will be asked to find a list of items.
- Pick up the planet Earth on the right side of the scene.
- The first gun stock is on the lower left side.
- The second gun stock is on the lower center of the scene.
- Exit out of that room and go back to the hallway. Enter the hunting room by going through the door on the left.
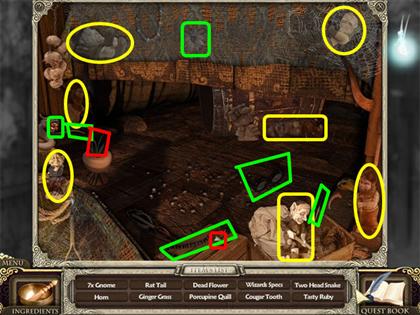
2 BEAR CLAWS, PIANO KEY, PLUTO & 2 BARRELS – HUNTING GALLERY/ MAIN FLOOR

- Click on the sparkly spot in the lower right side of the scene and look for the items on the list.
- The first bear claw is on the upper left side.
- The second bear claw is in the lower center of the fireplace.
- The piano key is on the lower left side.
- Pick up planet Pluto on the lower right side.
- The first gun barrel is on the lower right side of the scene.
- The second gun barrel is on the lower left side.
2 MIRROR PIECES – HUNTING GALLERY/ MAIN FLOOR
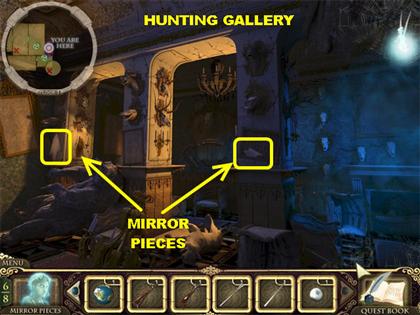
- Pick up the mirror piece on the arch located on the right.
- Pick up the other mirror piece on the arch to the left.
- Depending on the path you took in the game, these will be the last 2 pieces for your second mirror.
- The game will ask you if you want to be taken to the Mirror Room right away, choose yes if you want the game to take you there.
- You will have the choice to be taken directly back to the Hunting Gallery once you’ve completed the mirror.
- Choose no and you will stay at the Hunting Gallery, you can go to the mirror room when you feel like it.
- For the purposes of this guide, we will go to the Mirror Room now.
SECOND MIRROR PUZZLE (GUN BARREL PIECE) – HALL OF REFLECTION/ MAIN FLOOR

- Put together the puzzle and the servant will give you one the barrel pieces.
- For the purposes of this guide, we will choose to automatically warp back to the Hunting Gallery right now.
CHAPTER THREE
LEARN SONG – HUNTING GALLERY/MAIN FLOOR
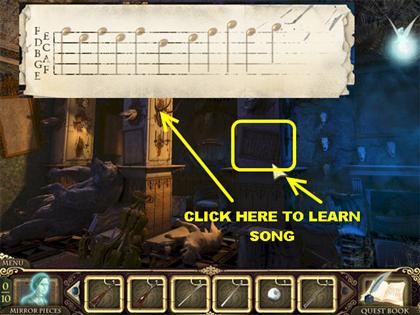
- Click on the musical notes that are written on the paper on the arch and you will learn your first song.
- Go to the Hallway by placing your cursor at the bottom of the screen.
- Enter the door on the right to go the Observatory.
BEAR CLAW & PLACE PLANETS – OBSERVATORY/ MAIN FLOOR
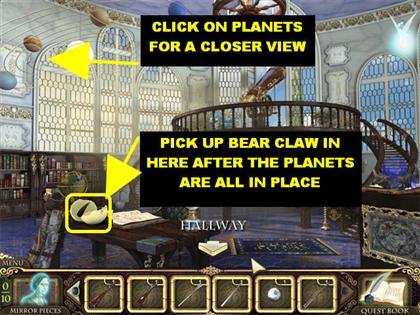
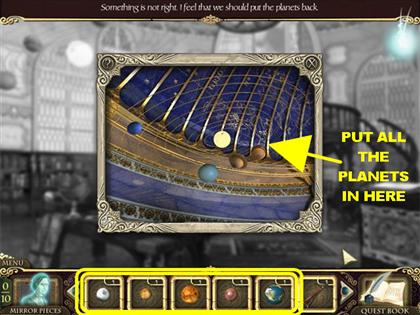
- Click on the upper left side of the scene for a closer view of the planets.
- Grab the planet Mars, Venus, Earth, Mercury and Pluto from inventory and place them in the pop- up window.
- The egg on the table will crack open, grab the bear claw that is inside of it.
- This room is now clear.
- Go back to the Piano Lounge by going to the Hallway first and then clicking at the bottom of the scene. Enter the door on the left to go into the Piano Lounge.
PLACE PIANO KEYS – PIANO LOUNGE/FIRST FLOOR
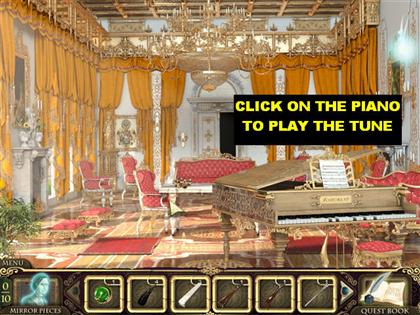
- Click on the piano and you will get a closer view.
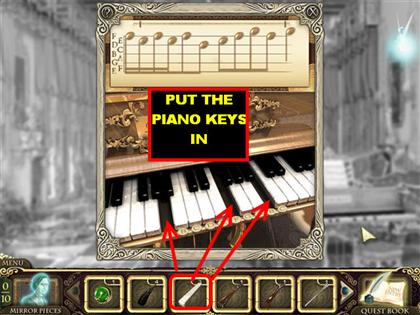
- Place the 3 piano keys from inventory onto the empty spaces that are in between the keys.
- Keep in mind that in order for the piano to accept the keys you have the click the keys onto the empty spaces.
PLAY TUNE & 1 BEAR CLAW – PIANO LOUNGE/MAIN FLOOR
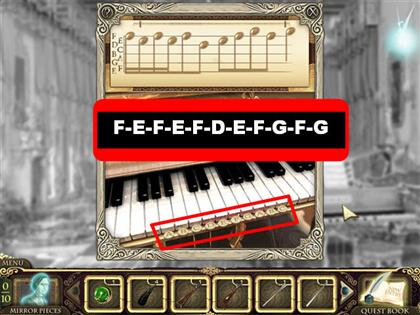
- Your goal in this puzzle is to reproduce the musical sounds you see on top of the scene by clicking on the correct piano keys.
- When you click on a note successfully, it will turn black on the page.
- When you click on an incorrect note, the keys will turn gold and reset themselves, which means you will have to start the sequence all over again.
- The keys are numbered A through G with the ABC keys repeating at the end. The second set of ABC’s will be labeled as “A2″, “B2″ and “C2″.
- With that in mind please click on the keys in the following order to solve the puzzle:F, E, F, E, F, D, E, F, G, F, G
- Pick up the bear claw that appears inside the piano and the room will be cleared.
- Go back to the Hunting Gallery.
PLACE BEAR CLAWS – HUNTING GALLERY/ MAIN FLOOR
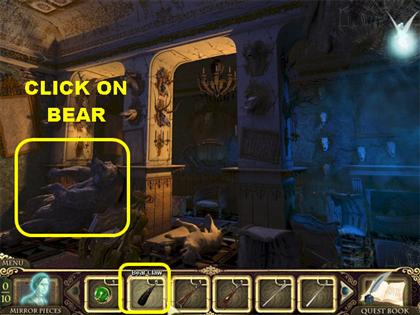
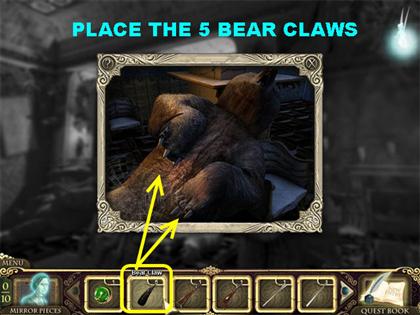
- Click on the bear on the left side of the scene and you will see a closer view.
- Place the 5 bear claws from inventory on the bear’s paws and the room will be cleared of evil.
GUN RACK PUZZLE (PLACE STOCKS AND BARRELS) – HUNTING ROOM/ MAIN FLOOR
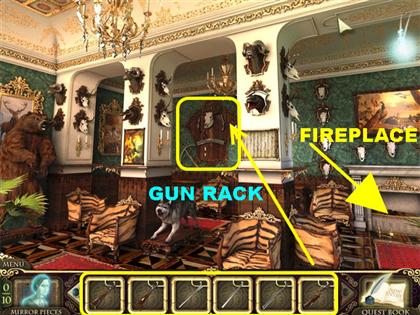
- Click on the gun rack on the back wall for a closer view.
- Your goal is to place the gun barrels and the gun stocks into their appropriate spots.
- You will notice a faint silhouette which shows where the pieces belong. Match the pieces with the silhouettes to complete this puzzle.
- One gun should already be assembled on the right side of the gun rack.
- Place the rest of the pieces according to the picture in the screenshot. Once this puzzle is complete the room will be cleared.
- Enter the next scene by clicking on the fireplace on the right side of the room.
RID THE ROOM OF EVIL – TEA ROOM/ MAIN FLOOR
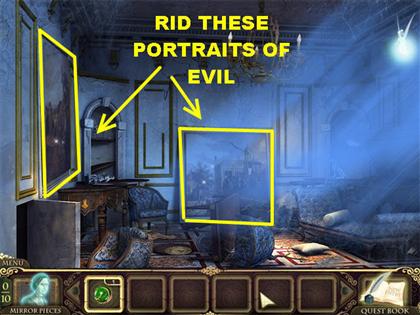
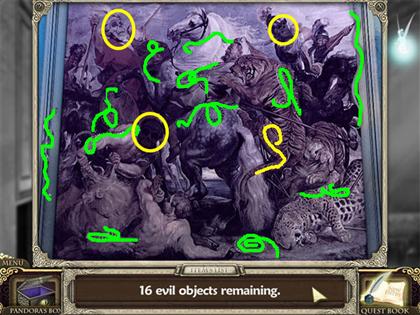
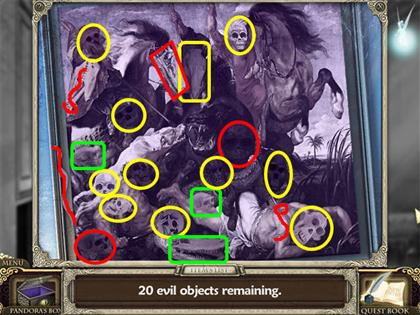
- Your first task in this room is to rid the room of evil. There are 2 portraits in the room, click on them and eliminate all the evil items off the paintings.
RID LEFT PAINTING OF EVIL
RID BACK WALL PAINTING OF EVIL
- Once all the paintings are rid of evil, the room will transform back to its natural state.
3 MIRROR PIECES – TEA ROOM/ MAIN FLOOR
- Pick up the mirror piece on the lower right side of the scene.
- Pick up the mirror piece on the upper right side of the scene.
- Use your rock ability on the plate on the table and you will find another mirror piece.
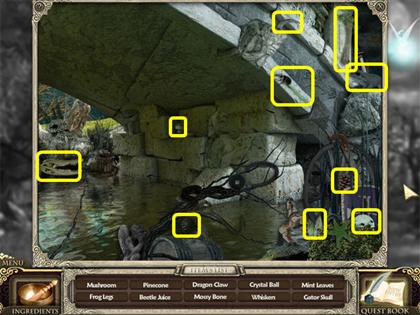
- Click on the sparkly spot in the lower left side and search for the list of items.
GRAMOPHONE TURN TABLE & CALENDAR GEAR – TEA ROOM/ MAIN FLOOR
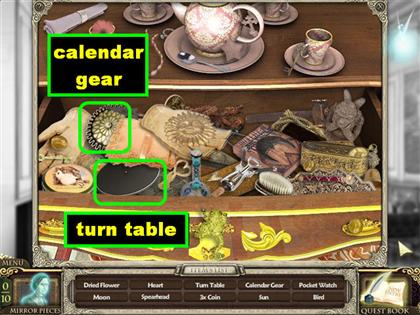
- The calendar gear is on the left side of the open drawer.
- The gramophone turn table is on the left side of the open drawer.
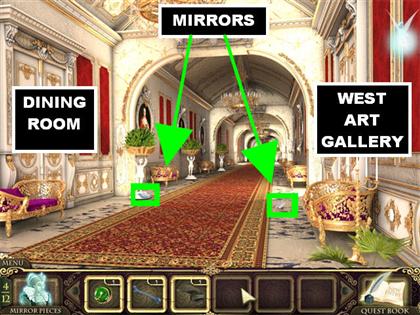
- Click on the right side of the scene and you will be taken to the Hallway.
1 MIRROR PIECE – HALLWAY/ MAIN FLOOR
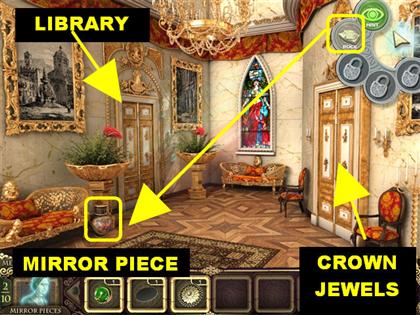
- There are 2 doors in the Hallway. The one on the left leads to the Grand Library and the one on the right leads to the Crown Jewels.
- Use the rock ability to crack open the vase in the lower left side of the scene and pick up a mirror piece.
- This area is now clear.
- Go to the Grand Library by clicking on the door on the left.
GRAND LIBRARY/ MAIN HALL
- Click on the sparkly spot on the steps and look for the items on the list.
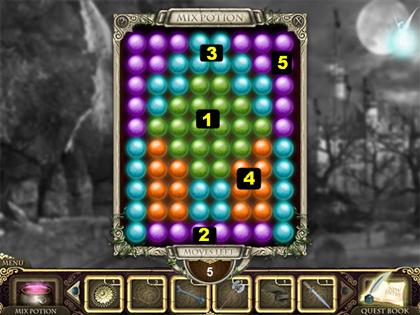
MIX POTION PUZZLE
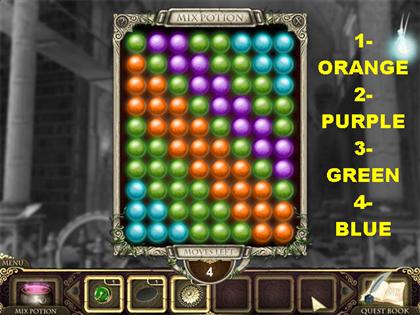
- Once you’re done with the items on the list you will be asked to mix the ingredients with the least possible moves.
- Your goal in this puzzle is to eliminate all the colored balls in 4 moves.
- Click on the balls in the following order:ORANGE
PURPLE
GREEN
BLUE
- The potion jar will go into your inventory.
GAIN FIRE ABILITY & RID THE ROOM OF EVIL – LIBRARY/ MAIN HALL
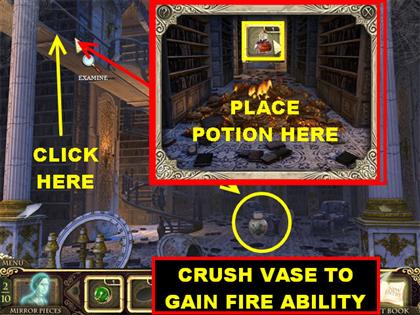
- Use your rock ability to crush the vase in the center of the floor and pick up the fire ability.
- With the fire ability you will be able to set things on fire. You can also use it to attack some of the foes in a scene since they are weak to fire attacks.
- Click on the spot in the upper left side of the scene for a closer view of the books on fire.
- Place the potion from inventory on the books and the room will be cleared of evil.
3 MIRROR PIECES – LIBRARY/MAIN FLOOR
- The mirror piece is in the lower right side of the scene.
- The mirror piece is on the top left side of the scene.
- The mirror piece is on the lower left side.
- Leave the Grand Library by clicking at the bottom of the scene. Go to the Crown Jewel by clicking on the door on the right of the hallway.
RID THE ROOM OF EVIL – CROWN JEWELS/ MAIN FLOOR
- When you enter the scene you will see several skulls running loose in the scene.
- Use your fire ability on each of the skulls to get rid of the evil in the room.
GAIN WIND ABILITY & 3 MIRROR PIECES – CROWN JEWELS/ MAIN FLOOR
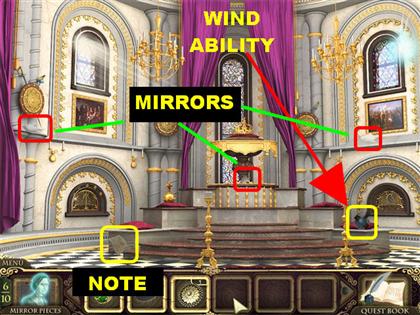
- Pick up the jar on the right side of the room to gain the wind ability.
- The wind ability allows you blow away dusty areas in the game.
- Pick up the note on the lower left side of the scene.
- The mirror piece is on the right side of the scene, on top of the mantle.
- The mirror piece is in the center of the scene, at the base of the table that is holding the crown.
- The mirror piece is on the left side of the scene, below the round shield.
- Let’s warp back to the mirror room for now.
CHAPTER FOUR
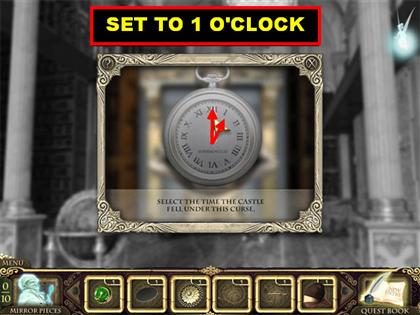
SERVANT 3 MIRROR PUZZLE (CASTLE CURSED AT 1:00)
- Put the servant puzzle back together according to the screenshot and the servant will tell you that the castle was cursed at 1:00. You will need that information for when you talk to the statue.
- Let’s warp back to the Crown Jewels.
DUSTY CROWN PUZZLE – CROWN JEWELS/ MAIN FLOOR
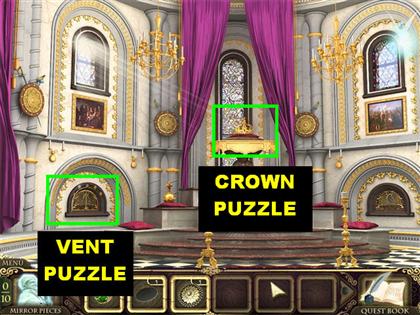
- Click on the crown in the center of the room for a closer view.
- Use your wind ability to clean off the dust that is on the crown.
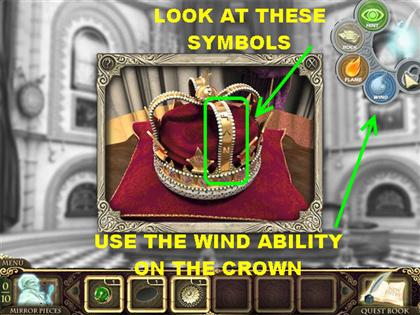
- Look at the symbols that are noted on the crown, they look like a sideways “F”, an upside down “V” and the letter “N”.
- Get out of that pop-up window and go to the fireplace on the lower left side of the scene.
VENT PUZZLE – CROWN ROOM/ MAIN FLOOR
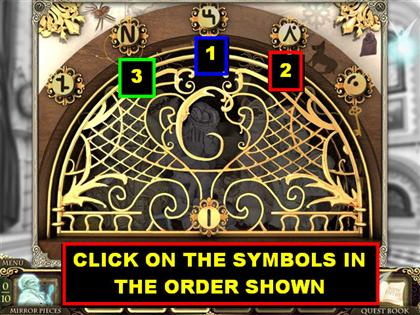
- Click on the symbols in the order in which you saw them appear on the crown after it was dusted off.
- I will number the symbols on top of the vent from 1 through 5, from left to right. Please click on the symbols in the following order so you can open the vent.3 (SIDEWAYS “F”)
4 (UPSIDE DOWN “V”)
2 (LETTER “N”)
- Look for the items on the list.
PIANO STRING & GRAMOPHONE NEEDLE
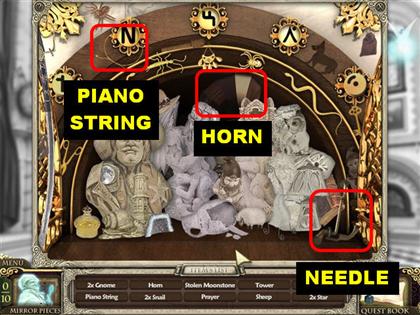
- Pick up the gramophone needle on the lower right side.
- Pick up the gramophone horn in the upper center of the scene.
- Pick up the piano string on the top left side of the scene, it is wrapped around the “N” symbol on top of the scene.
- This room is now clear. Go back to the Grand Library.
STATUE PUZZLE – LIBRARY/ MAIN FLOOR
- Click on the statue and it will ask you a series of questions. You have to answer four correct questions in order for the statue to let you in the door.
- Question 1:”WHAT LARGE BIRD HANGS OVER THE HUNTER’S FIREPLACE?”
- Answer 1: PEACOCK
- Question 2: “HOW MANY LIONS CAN YOU SEE GUARDING THE ENTRANCE TO THE CASTLE?”
- Answer 2: FIVE
- Question 3:”WHAT PLANET IS 5TH FROM THE SUN?”
- Answer 3: JUPITER
- Question 4: “SELECT THE TIME THE CASTLE FELL UNDER THIS CURSE”
- Answer 4: SET THE CLOCK TO 1:00
- The statue will now let you in the door.
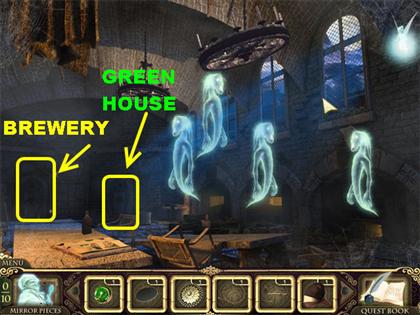
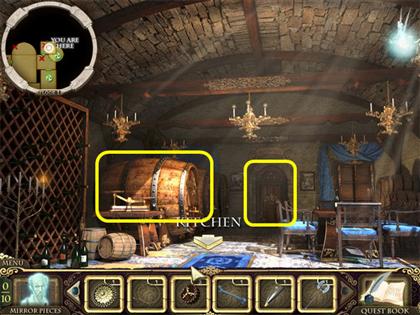
KITCHEN/ MAIN FLOOR
- There are several possibilities that you can take in this room.
- The door on the right in the back of the room will take you to the Greenhouse.
- The door on the left in the back of the room will take you to the Cellar.
- Let’s go into the Greenhouse for now.
SNAPPING IVY – GREENHOUSE/ MAIN FLOOR
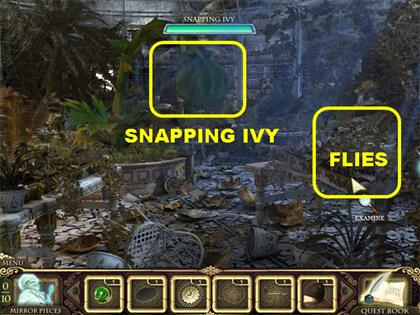
- Click in the lower right side of the scene to find a bunch of flies.
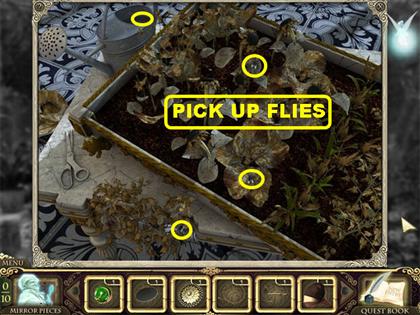
- Collect the 10 flies that are in the scene and they will go into inventory. The 10 flies may not appear all at once.
- Exit out of that scene and go back to main scene.
- Grab flies from inventory and drop them in front of the snapping ivy. The snapping ivy will open its mouth and begin eating flies.
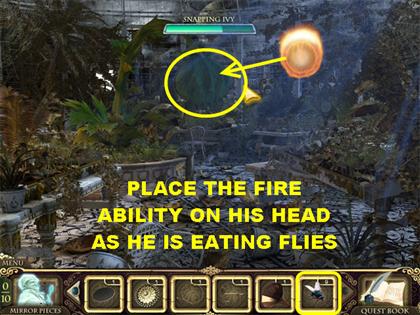
- As the snapping ivy is eating the flies, use your fire ability to lower his tolerance. Click the fire ability on his head and the meter will decrease.
- After you’ve lowered his tolerance three times, the snapping ivy will disappear.
- If you run out of flies, you can pick up some more but only after all 10 flies have been consumed by the ivy.
- The room will now be rid of evil once this puzzle is complete.
GAIN WATER ABILITY, TRIANGLE DIAL, BONE & 4 MIRROR PIECES – GREENROOM/MAIN FLOOR
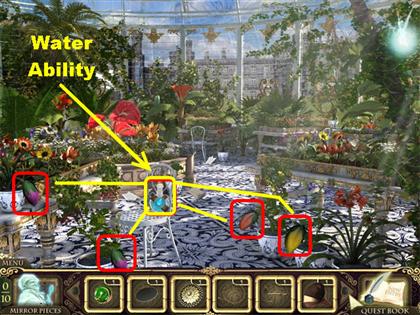
- Click on the blue bottle on the chair to gain the water ability.
- The water ability allows you to water plants. When you water the plants and they bloom, you will find inventory items inside of them.
- There are 4 closed flowers in the lower part of the scene. Place the water ability on each of those flowers and you will find the items listed below.
- The yellow flower in the lower right corner has a triangle dial.
- The purple flower in the lower left corner is holding a bone.
- The red flower in the lower right corner is holding a mirror piece.
- The purple flower on top of the table, in the lower left side is holding another mirror piece, pick it up.
- Pick up the mirror piece on the floor, in the back of the scene.
- Pick up the mirror piece on the lower left side of the floor, it is behind the white chair.
- Pick up the note in the center of the floor and read what it says.
- This area is now clear.
- Go back to the Kitchen and then enter the Cellar through the door on the left.
3 MIRROR PIECES – CELLAR/ MAIN FLOOR
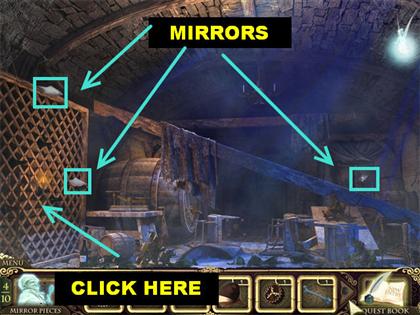
- Pick up the mirror piece in the top left side.
- Grab the mirror piece on the right side of the scene, on the back wall.
- Pick up the mirror piece on the wine rack located on the left side of the scene.
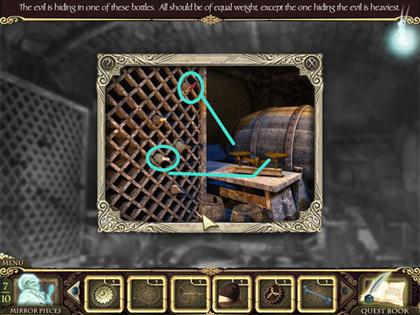
WINE BOTTLE BALANCE MINI –GAME
- Click on the wine rack in the lower left side of the scene.
- Grab the wine bottle with the red neck on top of the wine rack and place it on the scales.
- Click on the wine bottle at the bottom of the wine rack and place it on the scales.
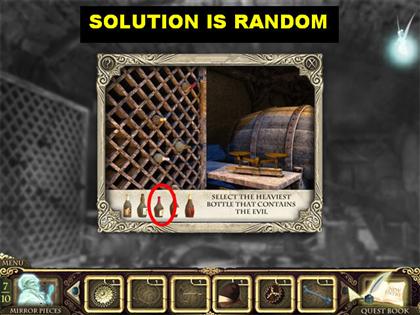
- You will now see a set of bottles at the bottom. Your goal is to select the bottle that contains the evil.
- Select the second bottle and all the evil will be removed.
- The solution to this puzzle is random; I’ve encountered several solutions while playing.
- Go back to the tea room.
GHOSTLY GRUEL – KITCHEN/ MAIN FLOOR

- Click on the open book in the lower left side of the scene.
- Your goal is to find the recipe that will appeal to the ghost. Once you find it, you have to rip it out of the page.
- Click on the arrow at the bottom of the page so you can turn the page.
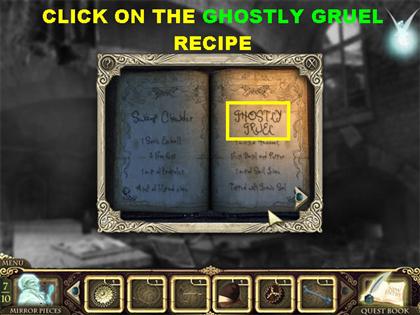
- Look for the recipe on the right side of the book called the “ghostly gruel “and click on it.
- Click on the sparkly spot in the back of the room and place the recipe at the bottom of the widow.
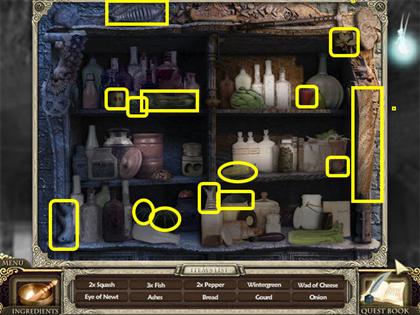
- Look for the items on the list.
MIX POTION – KITCHEN/ MAIN HALL
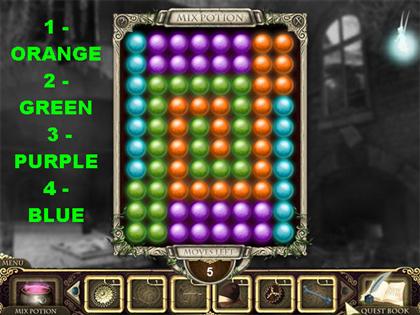
- Once you’re done with the items on the list you will be asked to mix the ingredients with the least possible moves.
- Your goal in this puzzle is to eliminate all the colored balls in 5 moves or less.
- Click on the balls in the following order:ORANGE
GREEN
PURPLE
BLUE
GET RID OF THE EVIL IN THE KITCHEN
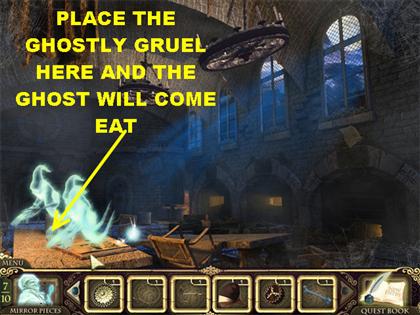
- Once you’re done mixing the potion the ghostly gruel will go into your inventory.
- Place the ghostly gruel on the table that is on the left side of the room.
- Once the ghostly gruel is firmly in place, all the ghosts will gather and start eating. The evil in the room will disappear once they are done eating.
3 MIRROR PIECES – KITCHEN/ MAIN FLOOR
- Pick up the note that is on the top right side of the scene.
- Use the rock ability to smash the brown bottle that is on the lower left side of the scene. Pick up the mirror piece that is inside of the bottle.
- Use the rock ability on the chandelier on the right and pick up the mirror piece that falls on the table below.
- Use the rock ability on the chandelier on the left and pick up the mirror piece that falls on the table.
- Warp back to the mirror room.
SERVANT 4 MIRROR PUZZLE (TRIANGULAR DIAL) – HALL OF REFLECTION/ MAIN FLOOR
- At the end of this puzzle the fourth servant gives you a triangular dial which will be used in the cellar.
- Let’s warp back to the kitchen.
CHAPTER FIVE
KEG VALVE, RECORD & TRIANGLE DIAL – KITCHEN/ MAIN FLOOR
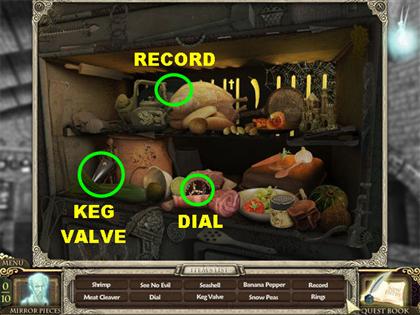
- Click on the sparkly fireplace and look for the items on the list.
- The dial is on the lower left side.
- The keg valve is on the lower left side.
- The record is on the upper left side, partially hidden by the turkey.
- The room is now clear.
- Let’s head back to the tea room. Place your cursor downwards 3 times to reach the tea room.
GRAMOPHONE ASSEMBLY & NEW SONG – TEA ROOM/ MAIN FLOOR
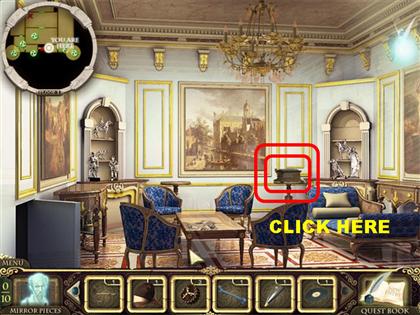
- Click on the gramophone in the back of the room.
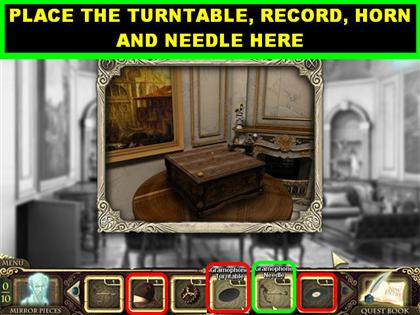
- Place the turntable, the record, the gramophone horn and the needle on the gramophone.
- The room is now clear.
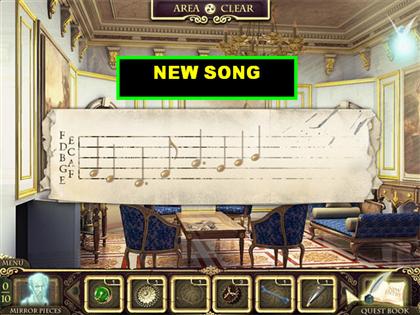
- You will hear a new song after the gramophone has been assembled.
- Let’s go back to the Grand Library.
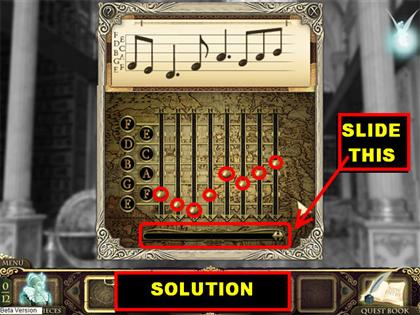
GLOBE SONG (PICK UP AXE) – LIBRARY/ MAIN HALL
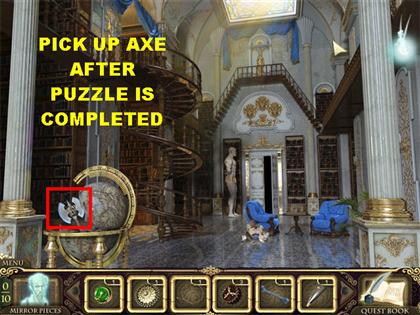
- Click on the globe for a closer view.
- Your goal is to reproduce the musical notes shown above by clicking on the right buttons.
- Place the buttons according to the image on the screenshot. When a button is in the right place, the note will turn black on the page.
- After everything is in place, slide the arrows located at the bottom of the puzzle.
- If it’s correct, the globe will spin open. Grab the axe that is inside.
- The room is now clear.
- Let’s head back to the Cellar. Go into the Kitchen and from there enter the Cellar in the back of the room.
KEG VALVE PLACEMENT & PICK UP CLEANING RAG – CELLAR/ MAIN FLOOR
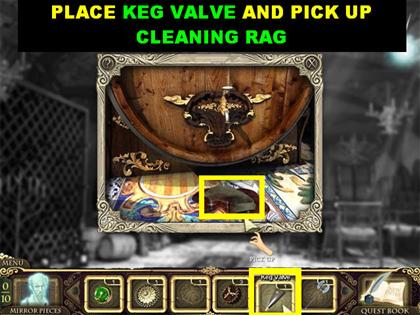
- Click on the keg on the left for a closer view.
- Place the keg valve on the keg and then click on the valve.
- Pick up the cleaning rag that appears in the scene.
- Click on the back door for a closer view.
DOOR LOCK – CELLAR/ MAIN FLOOR
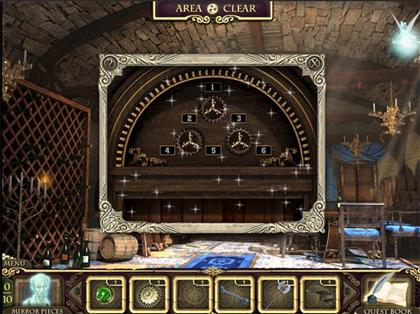
- Place the three triangular dials from inventory onto the lock.
- Your goal is to move the numbers around until they are in numerical order. The number one has to be on top and the number six in the lower right corner.
- The intersecting numbers can be switched from dial to dial.
- Go through the door after it opens.
PUT HORSE BACK INTO STABLES- STABLES/ MAIN FLOOR
- Click on the right fence for a closer view.
- Your goal is to move the bales of hay so the horse can enter the stables.
- Please look at the screenshot for the solution. Follow the order and the direction of the arrows to complete the puzzle.
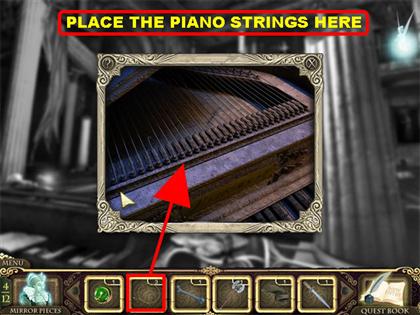
2 PIANO STRINGS & SWORD – STABLES/ MAIN FLOOR
- Click on the left side of the scene for a closer view.
- The piano string is on the right side of the scene, below the open book.
- The other piano string is in the back of the scene, below the top hat.
- The sword is on the right side of the scene.
4 MIRROR PIECES – STABLE/ MAIN FLOOR
- Pick up the mirror piece on the top right side.
- Pick up the other mirror piece on the lower right side.
- Grab the mirror piece in front of the barrels on the right.
- Pick up the mirror piece on the lower left side.
- Pick up the note in the lower left side.
- Access the garden walkway by placing your cursor in the back of the scene.
GARDEN WALKWAY/ MAIN FLOOR

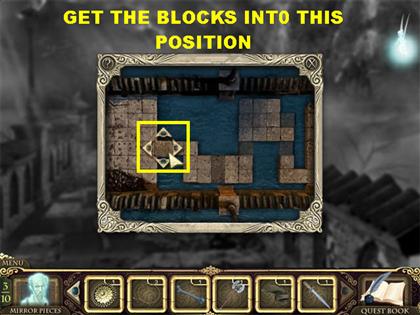
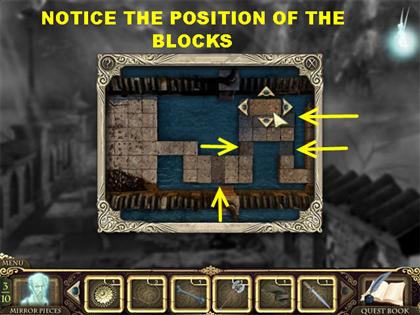
- Click the hook on the left side of the scene to get a closer view.
- Your goal is to fill in the path with blocks.
- The rocks can be hard to navigate but if you place the arrows in the right place you will be able to move them.
- Each time you fill in an empty space the block goes back to the starting point. You have to move it around several times before it will fall back on the path.
- Click on the stone and the arrows will show the directions in which you are able to go.
- You will have access to the Garden Fountain location after you complete the path.
3 MIRROR PIECES – GARDEN WALKWAY/ MAIN FLOOR
- Pick up the mirror piece on the right side of the scene.
- Pick up the mirror piece on the left side of the walkway.
- Pick up the mirror piece on the far end of the walkway.
- Go to the Garden Fountain by clicking in the back of the doorway.
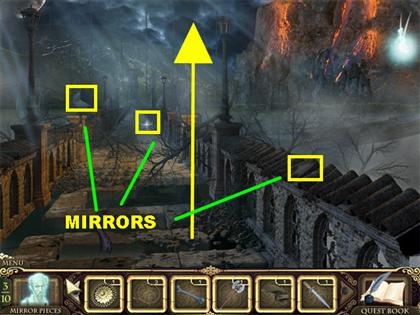
3 MIRROR PIECES – GARDEN FOUNTAIN/ MAIN FLOOR
- Pick up the mirror piece in the lower left side.
- Pick up the mirror piece in the lower right side.
- Pick up the other mirror piece in the lower right corner.
- Warp back to the mirror room.
SERVANT 5 MIRROR PUZZLE (NOVEMBER 18TH)
- After the mirror is assembled, the servant tells you about the date of November 18th. He also mentions that the date has something to do with opening the top door.
- Let’s warp back to the Garden Fountain.
CHAPTER SIX
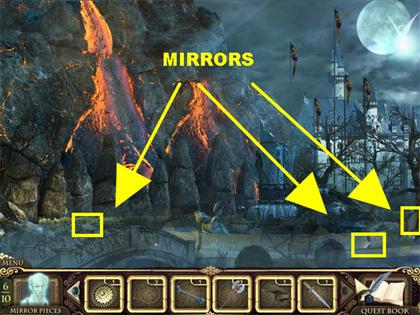
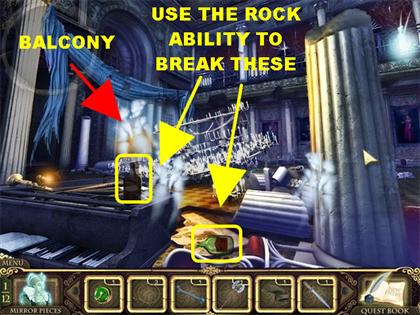
ROCK WALL – GARDEN FOUNTAIN/ MAIN FLOOR
- Click the top left side of the mountain for a closer view.
- Use the rock ability to uncover all the items that are hidden below the surface.
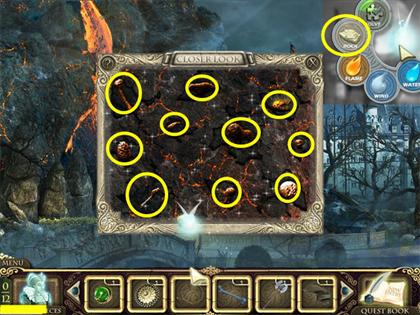
- Please look at the screenshot for all the locations you need to hit with the rock.
- Only click on the areas in which you see the ability icon appear, otherwise, you will not uncover the items needed.
- After all the items have been found, click on the lower left side to search for items.
MIX POTION
- Once you’re done with the items on the list you will be asked to mix the ingredients with the least possible moves.
- Your goal in this puzzle is to eliminate all the colored balls in 5 moves.
- Click on the balls in the following order:GREEN
PURPLE (BOTTOM ROW ONLY)
BLUE
ORANGE
PURPLE
- A potion will go into your inventory.
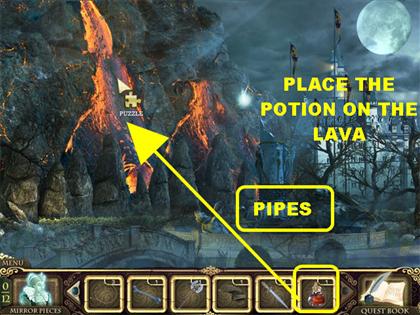
- Place the potion on the lava to rid the area of evil.
FOUNTAIN PIPE PUZZLE

- Click on the bottom of the fountain for a closer view.
- Your goal is to arrange the pipes so they are connected on all 4 areas.
- Click on the pipes and they will rotate.
- Please look at the screenshot for the solution.
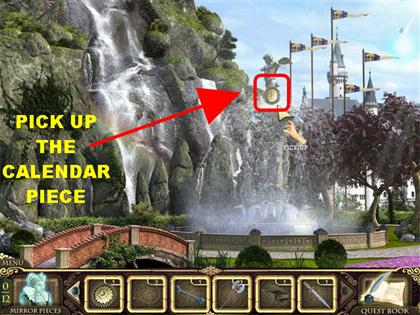
- Click on the calendar piece that appears after the water starts flowing from the fountain.
- The area is clear, go back to the Grand Hall.
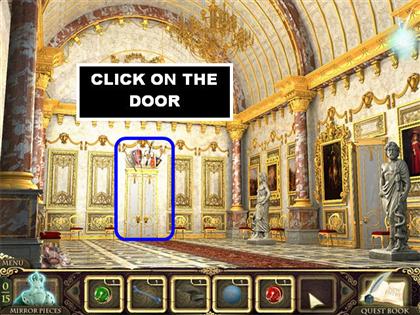
GRAND HALL/ MAIN FLOOR
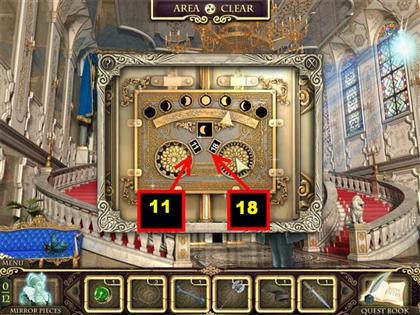
- Click on the door above the stairs for a closer view.
- Put the 2 calendar pieces in the empty slots.
- Move the calendar dials until the left one says 11 and the right one says 18.
- Go inside the door.
MIRROR PIECE – EAST ART GALLERY/ SECOND FLOOR
- Use the rock ability to break the vase in the lower left corner and collect the mirror piece.
- There are 3 locations you can access from this Hall.
- The door on the right leads you to the Dance Hall.
- The lower right corner gives you access to West Art Gallery. This spot can be tricky to see so make sure that you look for it carefully.
- The lower left corner gives you access back to the Grand Hall.
- For now, let’s go to the Dance Hall.
2 MIRROR PIECES – DANCE HALL/ SECOND FLOOR
- In this room you can access the balcony on the left side of the room.
- Use your rock ability to break the green bottle in the lower center, pick up the mirror piece inside.
- Use your rock ability to break open the bottle on top of the piano, pick up the mirror piece that is inside.
- Go to the balcony by clicking on the left side of the room.
2 MIRROR PIECES, BERRIES & BIRDS – BALCONY/SECOND FLOOR
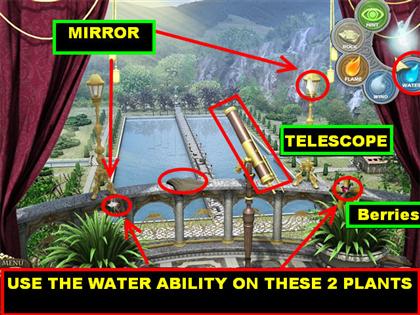
- Pick up the note on the railing of the balcony.
- Place the water ability on the plants in the lower left and right corners.
- Pick up the berries in the flower in the lower right corner.
- Pick up the mirror piece in the flower in the lower left corner.
- Grab the mirror piece on the right lamppost.
- Click on the telescope for a closer view.
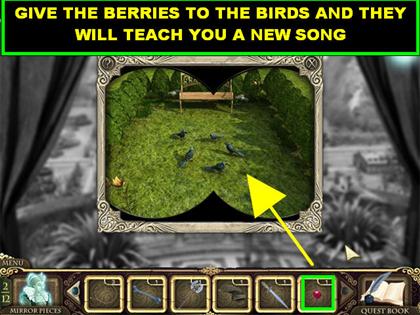
- Place the berries on the birds in the scene and they will sing a song for you.
- The area is now clear.
- Go back to the Dance Hall.
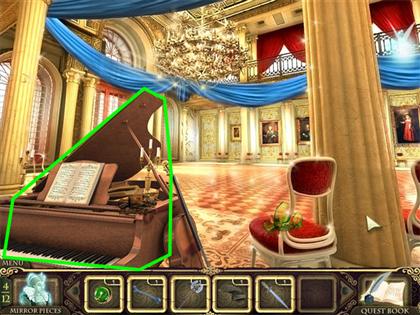
FIX PIANO – DANCE HALL/ SECOND FLOOR
- Click on the piano for a closer view. Place the 3 piano strings in the piano and the piano will be fixed.
- Click on the piano for a closer view one more time..
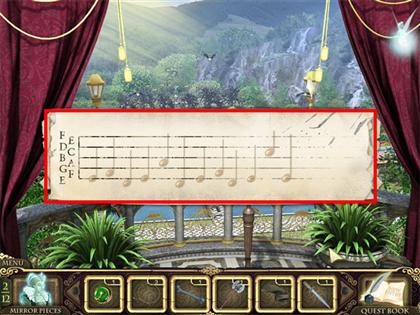
- Your goal in this puzzle is to reproduce the musical sounds you see on top of the scene by clicking on the correct piano keys.
- When you click on a note successfully, it will turn black on the page.
- When you click on an incorrect note, the keys will turn gold and reset themselves, which means you will have to start the sequence all over again.
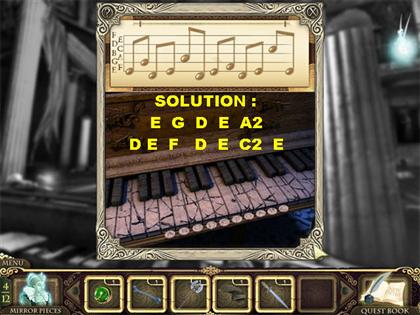
- The keys are numbered A through G with the ABC keys repeating at the end. The second set of ABC’s will be labeled as “A2″, “B2″ and “C2″.
- With that in mind please click on the keys in the following order to solve the puzzle:E, G, D, E, A2, D, E, F, D, E, C2, E
- The room will be rid of evil as soon as the piano stops playing.
PIKE & HALBERD – DANCE HALL. SECOND FLOOR
- Click on the piano again to look for the items on the list.
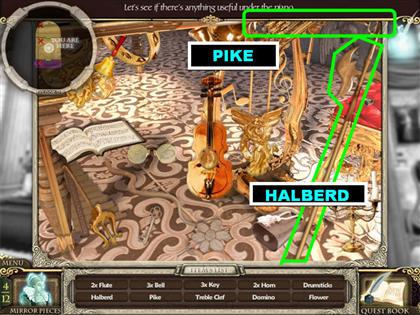
- The pike is located in the upper right edge of the scene.
- The halberd is located on the right side.
- The area is now clear. Go to the East Art Gallery.
SHIELD PUZZLE – EAST ART GALLERY/ SECOND FLOOR
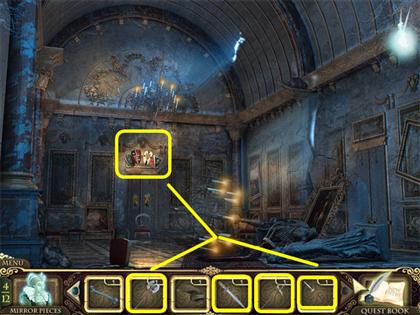
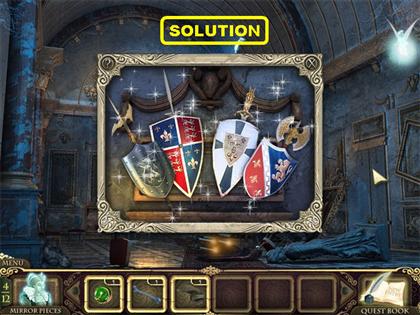
- Click on the shields above the door for a closer view.
- Your goal is to match the weapons with the right shields.
- Place the weapons in this order, from left to right:HALBERD
PIKE
SWORD
AXE
- You can also look at the screenshot for the solution.
- The room has been rid of evil.
- There is nothing else you can do here at the moment. Go to the West Art Gallery by clicking on the lower right side of the scene.
2 MIRROR PIECES – WEST ART GALLERY/ SECOND FLOOR
- Pick up the mirror piece in the top right side of the scene.
- Pick up the mirror piece on top of the door.
- Click on the door for a closer view.
DOOR PUZZLE LOCK
- Your goal is to arrange the blocks so the numbers on each side match the numbers on the side of the adjacent blocks.
- Click on 2 blocks and they will swap places.
- Correct connections will have a green line attached to their boxes.
- Incorrect connections will have a red line attached to their boxes.
- Please look at the screenshot for the solution.
- This area is now clear. Enter the Hallway.
MIRROR PIECE – HALLWAY/ SECOND FLOOR
- Pick up the mirror piece on the lower right side.
- Pick up the mirror piece on the left, at the base of the statue.
- This area is now clear.
- Click on the left door to access the Dining Room.
DINING ROOM/ SECOND FLOOR
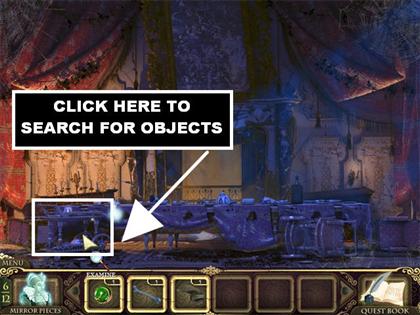
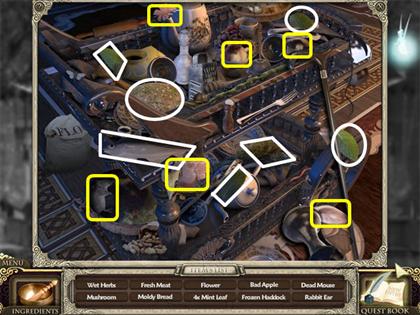
- Click on the sparkly spot on the left and search for the items on the list.
MIX POTIONS – DINING ROOM/SECOND FLOOR
- Once you’re done with the items on the list you will be asked to mix the ingredients with the least possible moves.
- Your goal in this puzzle is to eliminate all the colored balls in 4 moves.
- Click on the balls in the following order:PURPLE
BLUE
ORANGE
GREEN
- A potion will go into inventory after the puzzle has been solved.
RID THE DINING ROOM OF EVIL
- Click on the fireplace for a closer view.
- Place the potion in the fireplace and the room will be rid of evil.
PICTURE PUZZLE – 1 MIRROR PIECE
- Click on the picture above the fireplace for a closer view.
- Your goal is to flip the pieces with the switches to return the painting to its natural state.
- Click on the wheels in the following order:TOP LEFT 1X
LOWER LEFT 1X
LOWER RIGHT 1X
TOP RIGHT 1X
TOP LEFT 1X
- Click on the mirror piece that appears on the portrait.
- The room is now rid of evil.
2 MIRROR PIECES – DINIG ROOM/ SECOND FLOOR
- Pick up the mirror piece in the lower center of the scene.
- Use the rock ability to break the bottle on the right side of the table. Pick up the piece of the mirror.
- Warp back to the mirror room.
YOUR MOTHER MIRROR PUZZLE (DOG’S BALL)
- After the puzzle has been solved your mother gives you a dog’s ball.
- Warp back to the dining room.
CHAPTER SEVEN
CANDLE PUZZLE & RED MARBLE- DINING ROOM/ SECOND FLOOR
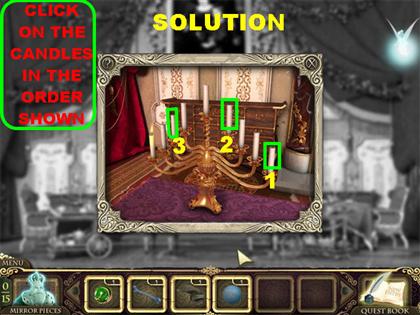
- Click on the candle puzzle for a closer view.
- Your goal is to click on the candles until all the candles are lit.
- I will number the candles 1 through 9, from left to right, click on them in the following order:NINE
SIX
THREE
- You can also look at the screenshot for the solution.

- Click on the red marble that appears on top of the candle holder.
- This area is now clear. Go back to East Art Gallery.
EAST ART GALLERY/ SECOND FLOOR
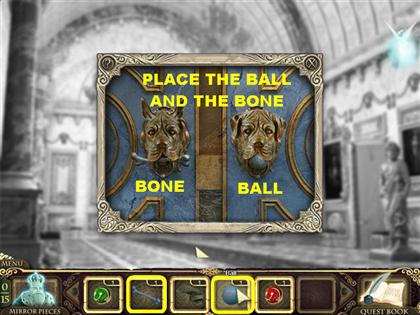
- Click on the door with the shields to get a closer view.
- Give the bone to the dog on the left.
- Give the ball to the dog on the right. Enter the Hallway.
HALLWAY/ SECOND FLOOR
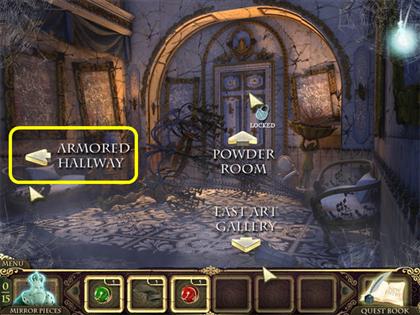
- The door in the back leads to the Powder Room.
- If you point downwards you will go back to the East Art Gallery.
- Pointing to the left will take you to the Armored Hallway.
- There is nothing left to do here at this moment. Let’s go to the Armored Hallway.
3 MIRROR PIECES – ARMORED HALLWAY/ SECOND FLOOR
- Pick up the mirror piece on the first left shield.
- Pick up the mirror piece on the lower right side of the scene.
- Use your rock ability on the vase in far left side and pick up the mirror piece inside.
- Go to the royal bedroom by click on the door in the back.
RID THE ROYAL BEDROOM OF EVIL/SECOND FLOOR

- Click under the bed for a closer view.
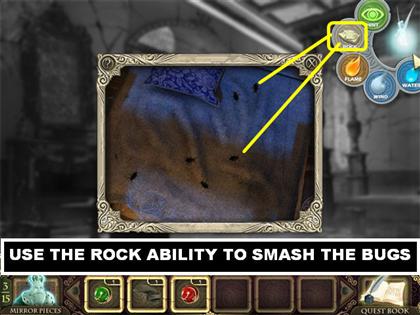
- Use your rock ability to smash the bugs under the bed.
- You have to be very precise when you click on the bugs or you will not be able to eliminate them.
- Once all the bugs have been smashed the room will be free of evil.
2 MIRROR PIECES & CHEST – ROYAL BEDROOM/ SECOND FLOOR
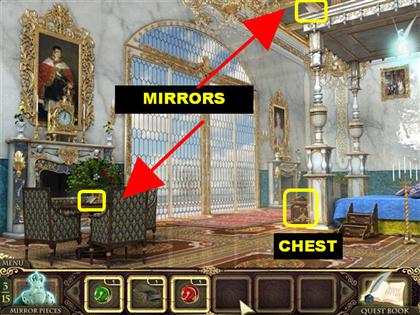
- Pick up the mirror piece on the table.
- Pick up the mirror piece in the top right side.
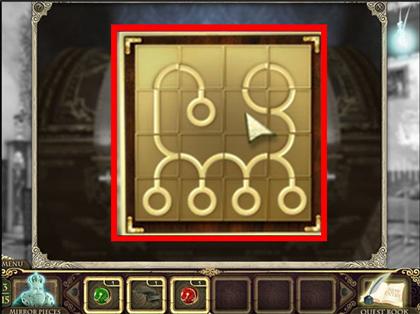
- Click on the glowing chest by the bed for a closer view.
- Your goal is to rotate the pieces until they form the image shown in the screenshot.
- Once the puzzle has been completed you will be asked to search for a list of items.
CROSSBOW – ROYAL BEDROOM/ SECOND FLOOR
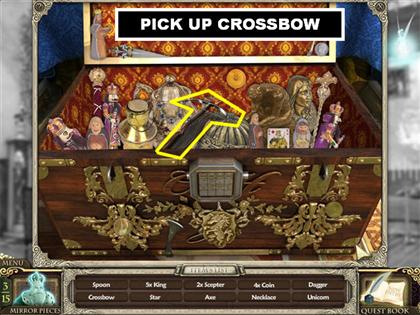
- The crossbow is in the center of the chest.
- The area is now clear.
- Go back to the Armored Hallway.
SHOOT THE EVIL – ARMORED HALLWAY/SECOND FLOOR
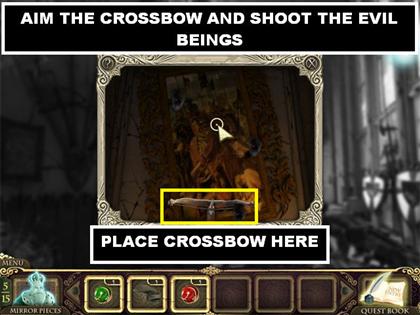
- Click on the portrait on the back wall for a closer view.
- Take the crossbow and place it on the scene.
- Shoot the evil beings as they run across the screen.
- Once all the evil beings have been eliminated the room will be free of evil.
OIL & LARGE GEAR – ARMORED HALLWAY/SECOND FLOOR

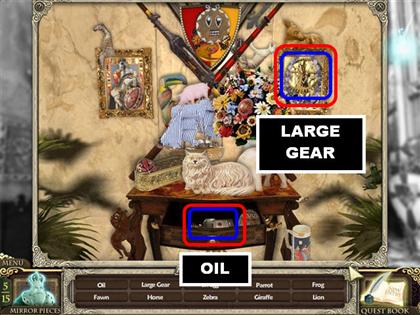
- Click on the sparkly area on the back wall for a closer view.
- Search for the items on the list. Click on the drawer to open it.
- The oil is inside the open drawer.
- The large gear is on the portrait on the right.
HELMET PUZZLE & CLOCK FACE – ARMORED HALL/SECOND FLOOR
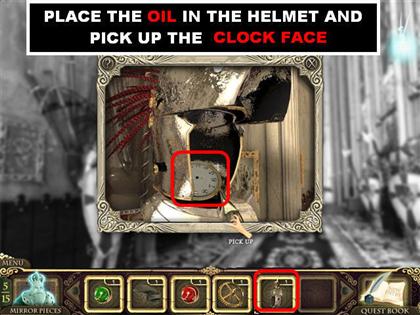
- Click on the knight in the middle left side for a closer view.
- Place the oil bottle on the helmet to loosen it up.
- Pick up the clock face that appears inside the helmet.
- This room is now clear.
- Go back to the Hallway and enter the Powder Room.
DUSTING RAG USAGE – POWDER ROOM/SECOND FLOOR
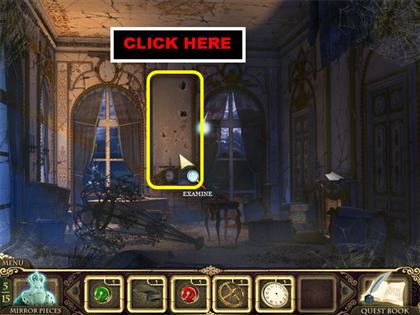
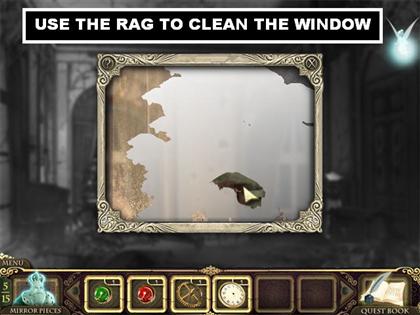
- Click on the large mirror on the back wall for a closer view.
- Drag the cleaning rag all over the mirror until it is clear.
- Once the mirror has been cleaned properly the room will be rid of evil.
2 MIRROR PIECES – MAKEUP ROOM/SECOND FLOOR
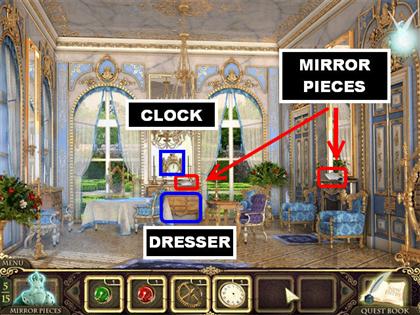
- The mirror piece is on top of the dresser.
- The mirror piece is below the mirror on the right.
- Click on the glowing dresser for a closer view and look for the items on the list.
CLOCK HANDS & GEARS – MAKEUP ROOM/ SECOND FLOOR
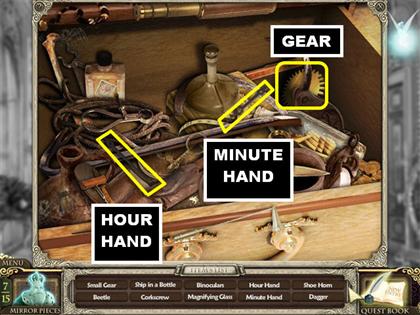
- The small clock gear is on the upper right corner.
- The minute hand is on the upper right side.
- The hour hand is on the left side.
CLOCK PUZZLE – POWDER ROOM/SECOND FLOOR
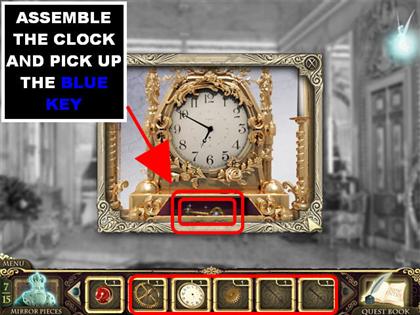
- Click on the clock on top of the dresser for a closer view.
- Place the following items into the clock in this order:SMALL CLOCK GEAR
LARGE CLOCK GEAR
CLOCK FACE
SMALL CLOCK HAND
LARGE CLOCK HAND
- Pick up the blue key that appears below the clock.
GO TO HALLWAY NEXT TO DINING ROOM
- You have to go back to the Hallway that is next to the Dining Room.
- Go to the Hallway by clicking the door close to the window.
- Go to East Art Gallery by clicking at the bottom of the screen.
- Go to West Art Gallery by clicking in the lower right corner.
- Go through the door in West Art Gallery to enter the Hallway.
- Go through the door on the left to enter the Dining Room.
- Place your cursor on the top right side of the scene to go to the next Hallway.
BLUE LOCK PUZZLE – HALLWAY/SECOND FLOOR
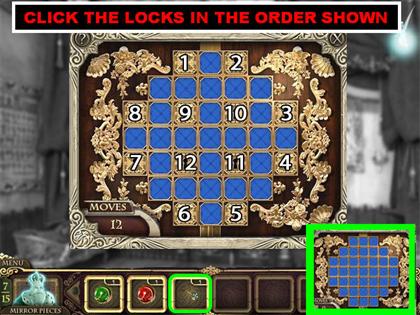
- Click on the door for a closer view.
- Your goal is to press the blue key onto the buttons until there are no locks left. You have to accomplish this goal in 12 moves.
- Start with the locks on the edges and work your way in.
- Each lock you click on affects other locks.
- Please look at the screenshot and click on the locks with the blue key in the order shown.
- Go through the door once it opens.
CHAPTER EIGHT
NET, PAINTING PIECE & UNSCRAMBLE THE PICTURE – OFFICE/ SECOND FLOOR
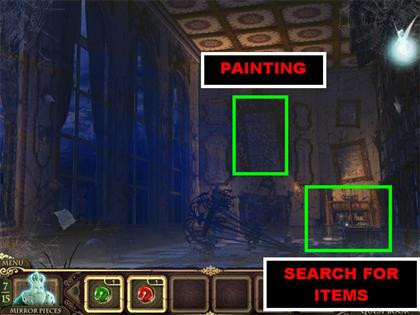
- Click on the sparkly area in the lower right corner to search for items.
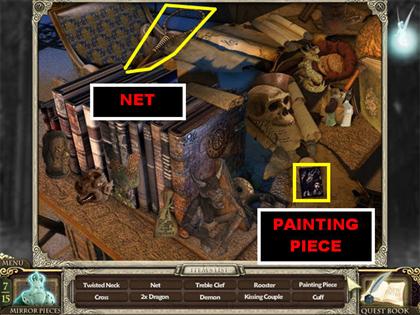
- The painting piece is in the lower right side. You will use this piece for another puzzle in the room.
- Pick up the net in the upper left side of the scene.
- Click on the painting on the back wall for a closer view.
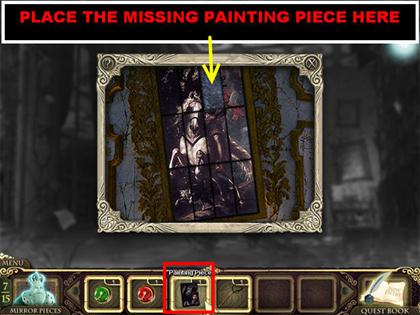
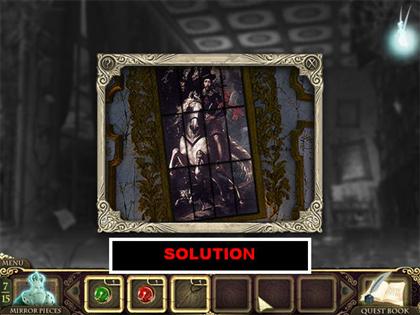
- Your goal is to unscramble the picture and place the missing pieces once you’re done.
- Click on any 2 pieces and they will swap places.
- Please look at the screenshot for the correct assembly of the picture.
- The room will be cleared of evil after the puzzle has been solved.
3 MIRROR PIECES – OFFICE/SECOND FLOOR
- Pick up the note in the lower left corner.
- Pick up the mirror piece on the top right side.
- Pick up the mirror piece on the top left side.
- Use your rock ability to smash the boat on the right side of the back wall and pick up the mirror piece inside.
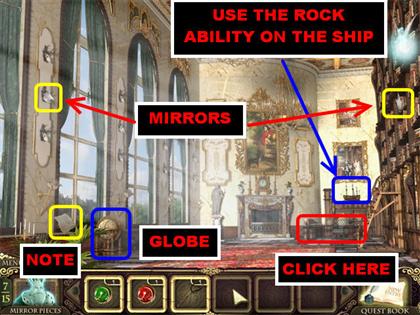
OPEN GLOBE & OBTAIN RED KEY – OFFICE/SECOND FLOOR
- Click on the table against the back wall for a closer view.
- Click on the book on the left that reveals the gold jigsaw piece when you hover your mouse over it.
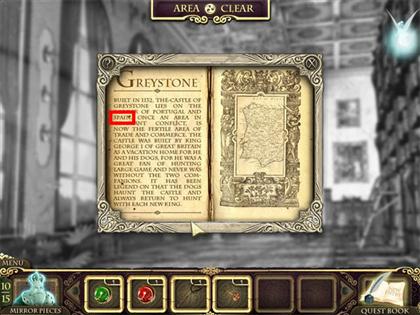
- The fairy asks you if you can find Spain on the globe.
- A map and a passage about Greystone will appear when you click on the book.
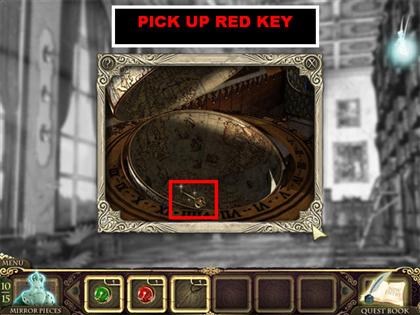
- Click on the globe for a closer view.
- Spin the globe around until it opens up.
- Grab the red key that appears inside.
- This area is clear.
- Go back to the Powder Room.
RED LOCK PUZZLE – POWDER ROOM/SECOND FLOOR
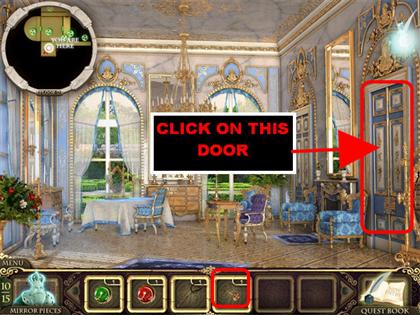
- Click on the door on the right for a closer view.
- Use the red key to open the locks in the puzzle.
- Your goal is to press the red key onto the buttons until there are no locks left. You have to accomplish this goal in 8 moves.
- Each lock you click on affects other locks.
- Please look at the screenshot and click on the locks with the blue key in the order shown.
- Go through the door once it opens.
- Once the puzzle has been solved the area will be clear, enter the dressing room.
FIREFLIES – DRESSING ROOM/SECOND FLOOR
- Click on the window on the right for a closer view.
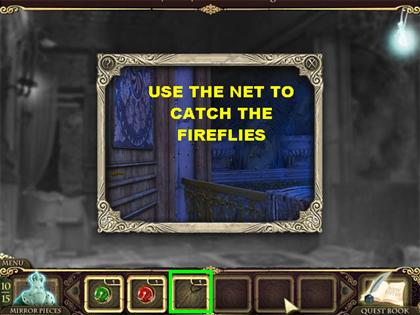
- Grab the net and move it around the fireflies very quickly so you can catch them.
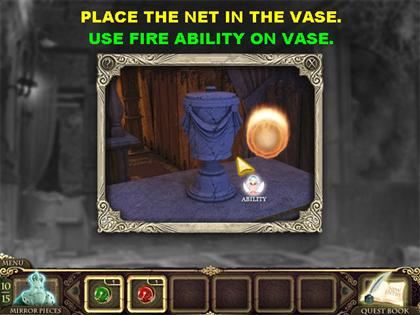
- Click on the vase for a closer view.
- Place the fireflies in the vase and the lid will automatically close.
- Use the fire ability to burn the vase and the evilness of the room will be destroyed.
2 MIRROR PIECES – DRESSING ROOM/ SECOND FLOOR
- Pick up the mirror piece that is on the table on the right.
- Grab the mirror piece in the upper left side.
- Click on the dress for a closer view.
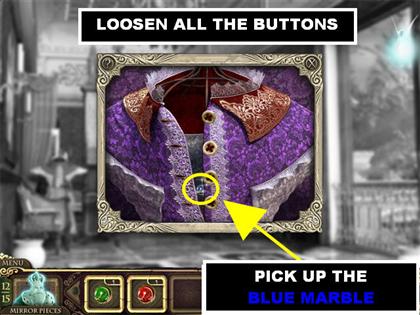
BLUE MARBLE – DRESSING ROOM/ SECOND FLOOR
- Your goal is to loosen all 4 buttons on the dress so you can reveal what is inside.
- Slide the top button down with your mouse. When it gets below the button hole, slide it all the way up until the button disappears.
- Once the button has been moved successfully that button will open up.
- Repeat the same process until all buttons are undone.
- Pick up the blue marble that appears inside the dress.
- The area is now clear. Go into Your Bedroom.
GET RID OF THE EVIL – YOUR BEDROOM/SECOND FLOOR
- Click under the bed for a closer view.
- Find all the items on the list.
MIX POTION

- Once you’re done with the items on the list you will be asked to mix the ingredients with the least possible moves.
- Your goal in this puzzle is to eliminate all the colored balls in 5 moves or less.
- Click on the balls in the following order:ORANGE
GREEN
BLUE
WHITE
PURPLE
- A potion will go into your inventory after the puzzle has been solved.
GET RID OF EVIL – YOUR BEDROOM/SECOND FLOOR
- Click on the fireplace for a closer view.
- Throw the potion into the fireplace to rid the room of evil spirits.
3 MIRROR PIECES & BALLERINA – MY BEDROOM/SECOND FLOOR
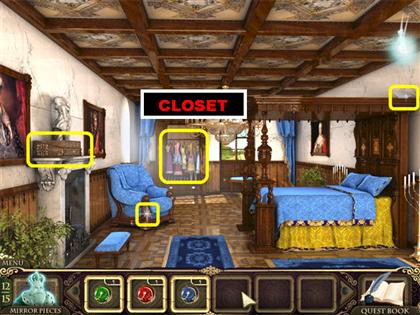
- Pick up the mirror on the upper right side of the scene.
- Grab the mirror piece on the mantle above the fireplace.
- Pick up the mirror piece on the side of the blue chair.
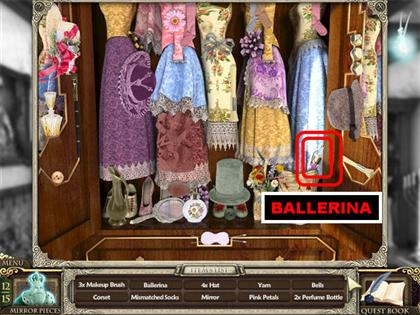
- Click on the closet for a closer view and search for the items on the list.
- The ballerina is in the lower right side.
MY BEDROOM/SECOND FLOOR
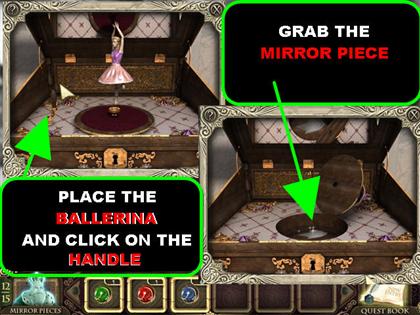
- Click on the music box above the fireplace for a closer view.
- Click on the lock of the music box to open it.
- Place the ballerina inside the music box.
- Drag the handle around until the ballerina starts to spin.
- Once the drawer opens, pick up the last piece of the mirror.
- Warp back to the mirror room.
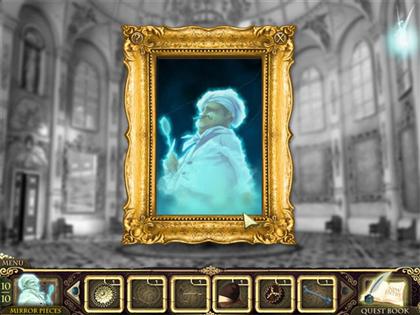
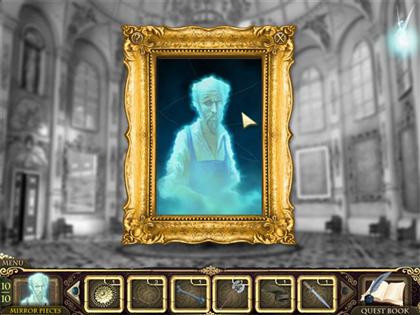
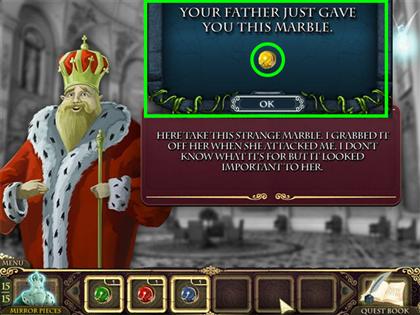
YOUR FATHER MIRROR PUZZLE (YELLOW MARBLE) – MIRROR ROOM
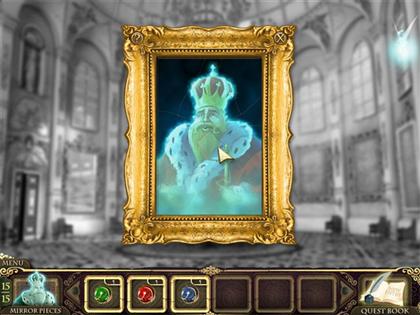
- Put the mirror back together and the King will give you the yellow marble.
- Go the Hallway located on the left side of the room.
USE MARBLES – HALLWAY/FIRST FLOOR
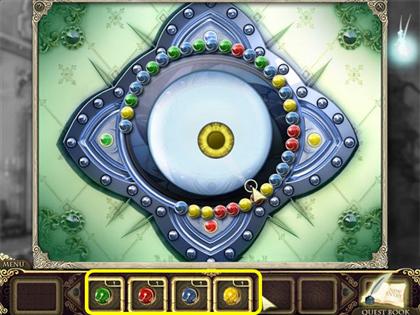
- Click the door on the right for a closer view.
- Place all 4 marbles on the puzzle.
- This part of the puzzle is like most marble shooter games. Use the small circle to aim your shooter at the balls in the playing field.
- You can only eliminate a group of colors when you shoot the matching color to a group of 2 or more marbles.
- Once the puzzle is complete the area will be clear. Go through the door.
SPELL CASTING DUEL – WITCH’S LAIR/ FIRST FLOOR
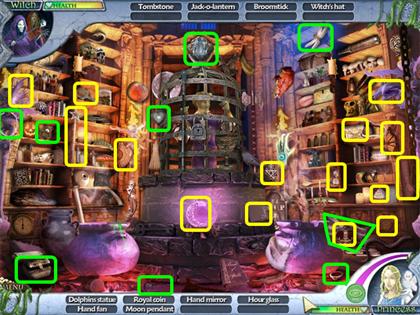
- Your goal is to find all the objects on your list before the witch finds all of hers.
- There are 2 sets of lists in this scene, one on top and one at the bottom. The list at the bottom shows you the items you need to look for.
- Once you find all the items on your list, you will decrease some of the witch’s health. By the same token each time the witch clears one of her lists it will decrease some of your health.
- If the witch defeats your power first you will be sent back into the Hallway. You can enter the witch’s lair again to try the puzzle one more time.
- If you need to use a hint, click on the green eye icon in the lower right side of the scene.
- The screenshot shows you the location of the majority of the items you will be asked to search for.
- Watch the ending scene after you defeat the witch!

 Amaranthine Voyage: The Orb of Purity Walkthrough, Guide, & Tips
 Kellie Stanford: Turn of Fate Walkthrough, Guide, & Tips
 Youda Legend: The Golden Bird of Paradise Walkthrough, Guide, & Tips
 Twilight Phenomena: Strange Menagerie Walkthrough, Guide, & Tips
 Tiger Eye: The Sacrifice Walkthrough, Guide, & Tips