Angela Young 2: Escape the Dreamscape Walkthrough, Guide, & Tips
Angela Young 2: Escape the Dreamscape Walkthrough

Welcome to the Angela Young 2: Escape the Dreamscape Walkthrough!
Help Angela escape from the treacherous Dreamscape and find her missing cat, Felix! Navigate a maze of puzzles and find your home!
Whether you use this document as a reference when things get difficult or as a road map to get you from beginning to end, we’re pretty sure you’ll find what you’re looking for here.
This document begins with a few handy tips before delving into the complete Angela Young 2: Escape the Dreamscape game walkthrough, with annotated screenshots from actual gameplay!
We hope you find this information useful as you play your way through the game. Use the walkthrough menu below to quickly jump to whatever stage of the game you need help with.
Remember to visit the Big Fish Games Forums if you find you need more help. Have fun!
This walkthrough was created by Chie.
WALKTHROUGH MENU
- General Tips
- Levels 1 – 5
- Levels 6 – 10
- Levels 11 – 15
- Levels 16 – 20
- Levels 21 – 25
- Levels 26 – 30
- Levels 31 – 35
- Levels 36 – 38
General Tips
- From the main menu, you can adjust a variety of settings, like music and sound volume, screen size, and system cursor from the option menu. Also, during the game the option menu button is in the upper left corner of the screen.
- You can replay any level of the game in the “Episodes” section of the main menu.
- You can check what your current task is by clicking the question mark button in the bottom left corner during the game.
- When you click the hint button beside the question button, it will show the location of one of the hidden objects. When the hint button fills up you can use it again.
- The list of hidden objects you will be looking for are in the navigation bar below the scene.
- This game is slightly randomized, so some things may be in a different order when you play, but the basic solutions will be the same.
- In the images, all of the possible hidden objects are circled; but, when you play, one object from this list may be missing.
- When you mouse over something that can be used later in a puzzle, you will see sparkles around your cursor.
- There are a few places where you can take one of multiple paths; this does not change the game, only the order of the scenes.
Level 1
The Room of a Frozen Lock

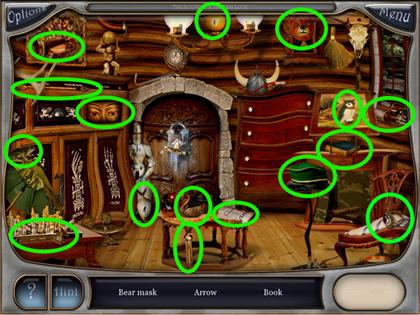
- Find the 15 hidden objects in green circles in the image.
- There are 16 possible hidden objects in this scene; each time one will be randomly left out.
- You can look for only three hidden objects at the same time.
- Below the scene there is a list of the names of the objects you can find. You cannot find an object until it is on this list.
- Refer to the image for the locations of all the objects.
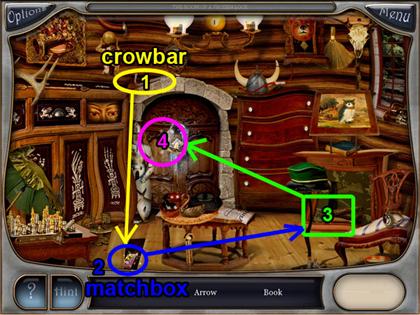
- Find the crowbar above the frame of the center door. After finding the crowbar, it will go into the inventory box in the right corner of the UI.
- Click the crowbar and drag it to the floor in the bottom left corner of the screen. When you put your cursor over this area, the floor will be highlighted.
- Get the matchbox from under the floor boards, and drag it to the fire place in the bottom right corner of the screen.
- The room will become warm, and the lock in the center door will be unfrozen. Click the key to open the door.
- Refer to the image for the solution.
Level 2
The Attic
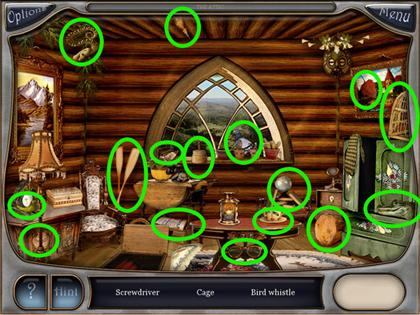
- Find the 15 hidden objects in green circles in the image.
- There are 16 possible hidden objects in this scene, each time one will be randomly left out.
- You can search for three hidden objects at the same time.
- Refer to the image for the locations of all the objects.
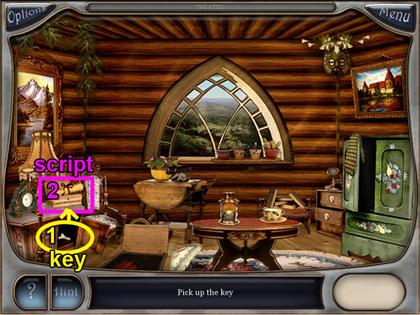
- Click the wooden cupboard in the bottom left corner. You will find a key once it is opened.
- Click the key in your inventory and use it to open the white box on top of the cupboard where you found the key.
- Get the manuscript from the white box. The manuscript will tell you where to go next.
- Refer to the image for the solution.
Level 3
The Path of Angela
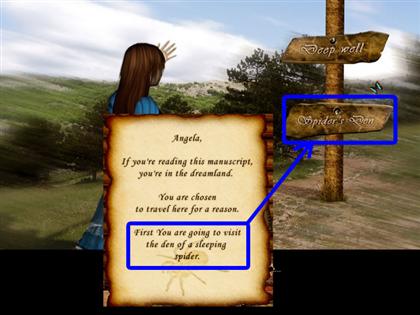
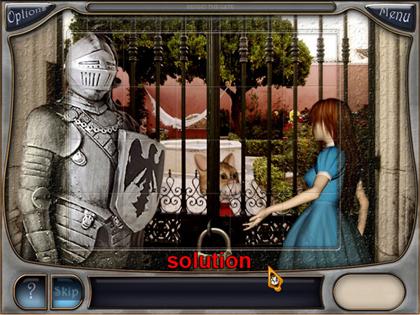
- Pick the SPIDER’S DEN as was written in the manuscript you found in the last room.
- Picking the BOTTOMLESS WELL sign will make you do the bottomless well mini-game first.
- Refer to the image for the solution.
The Room of a Sleeping Spider
- Find the 15 objects that are the same shape as the silhouettes in the item list.
- There are 16 possible hidden objects in this scene, each time one will be randomly left out.
- You can only search for four hidden objects at the same time.
- Refer to the image for all the hidden object locations.
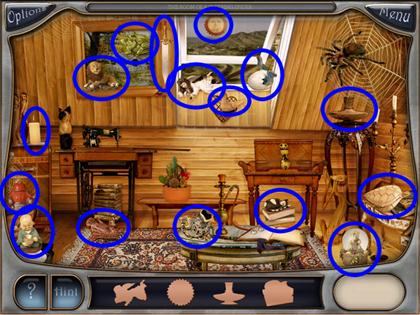
Level 4
The Room of a Sleeping Spider

- Find the 15 hidden objects in blue circles in the image.
- There are 16 possible hidden objects in this scene, each time one will be randomly left out.
- You can only search for three hidden objects at the same time, written below the scene.
- Refer to the image for the solution.
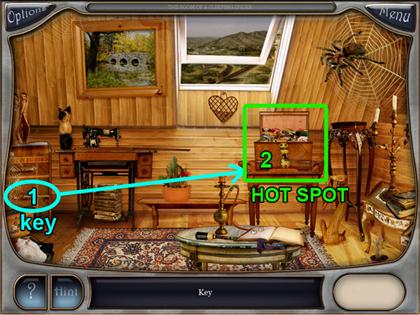
- After finding the hidden objects, there will be a key on the left side of the screen behind the small spider web.
- Use the key on the box under the large spider. You will then find another hotspot.
- Refer to the image for the solution.
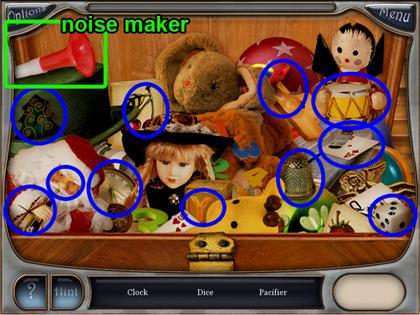
- Find the 10 hidden objects in blue circles in the image.
- There are 11 possible hidden objects in this scene; each time one will be randomly left out.
- You can only search for three hidden objects at the same time, listed below the scene.
- Pick up the noise maker in the upper left corner.
- Refer to the image for the solution.
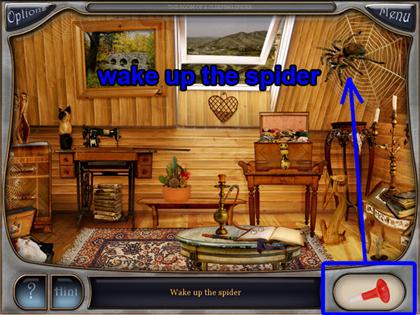
- Select the noise maker in your inventory by clicking on its picture.
- Click the big spider in the upper right corner to wake it up.
- Refer to the image for the solution.
Level 5
Mini-Game 1: Bottomless Well
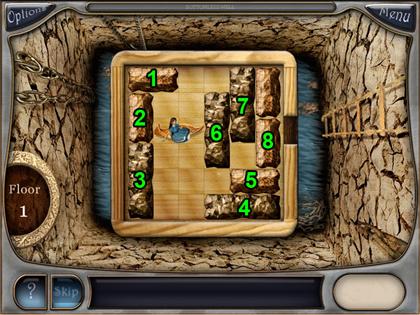

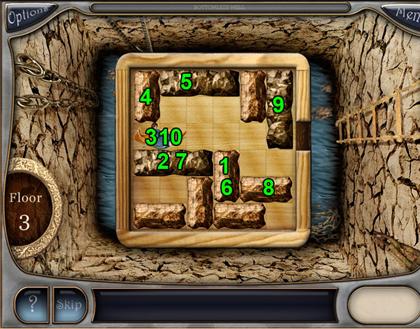
- The object of this game is to move the picture of the girl on the boat out the hole on the right hand side of the board.
- The boat and all of the stones can only move in one direction, vertically or horizontally.
- Clicking a puzzle piece will move it all the way to one side or the other.
- Refer to the image for the solution; the order that you must click is written on the puzzle pieces.
- Some stones will need to be clicked multiple times, especially in the second puzzle. If there are two consecutive numbers, click the stone twice.
Level 6
Abandoned Fountain
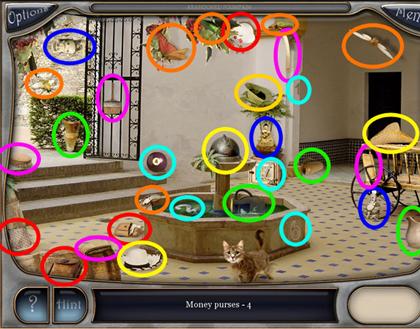
- The types of items you need to find might be in a different order when you play the game.
- Find the four money purses that are in red circles in the image.
- Find the three Buddhas that are in blue circles in the image.
- Find the four pitchers that are in green circles in the image.
- Find the five brushes that are in purple circles in the image.
- Find the five digits that are in light blue circles in the image.
- Find the six insects that are in orange circles in the image.
- Find the four hats that are in yellow circles in the image.
- Refer to the image for the locations.
Level 7
Abandoned Fountain
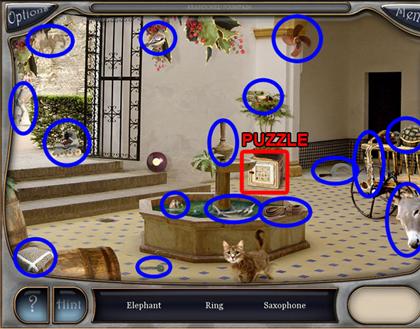
- Find the 15 hidden objects in blue circles in the image.
- There are 16 possible hidden objects in this scene, each time one will be randomly left out.
- You can search for three hidden objects at the same time, noted in the list of words below the scene.
- After finding all the 15 hidden objects, click the box behind the fountain to start the next puzzle.
- Refer to the image for the solution.
Mini-Game 2: Tile Puzzle
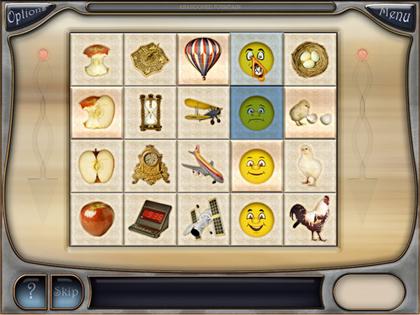
- Put the images in the right sequences.
- There is one image that you cannot move in three of the four sets of images. This gives you a hint at which row to put the pictures in and which direction they go.
- The sequences start from the top and move to the bottom. The objects in the row becoming more whole, newer, happier, or aging into adulthood.
- Refer to the image for the solution.
Abandoned Fountain
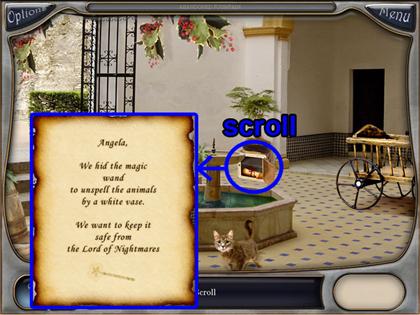
- Collect the scroll from the box behind the fountain.
- Refer to the image for the location.
Level 8
The Area of a White Vase
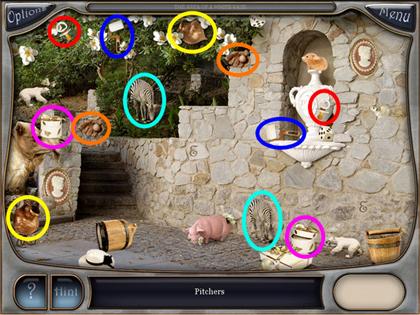
- The types of items you need to find might be in a different order when you play the game.
- Find two roll brushes circled in blue in the image.
- Find two zebras circled in green in the image.
- Find two pacifiers circled in red in the image.
- Find two round boxes circled in purple in the image.
- Find two baseball gloves circled in orange n the image.
- Find two pitchers circled in yellow in the image.
- Refer to the image for the locations of the objects.
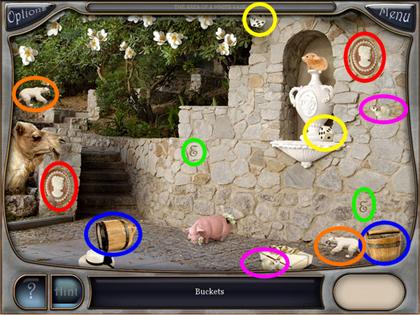
- Find two buckets circled in blue in the image.
- Find two letters circled in green in the image.
- Find two cameo broaches circled in red in the image.
- Find two mice circled in purple in the image.
- Find two polar bears circled in orange in the image.
- Find two dice circled in yellow in the image.
- Refer to the image for the locations of the objects.
Level 9
The Area of a White Vase
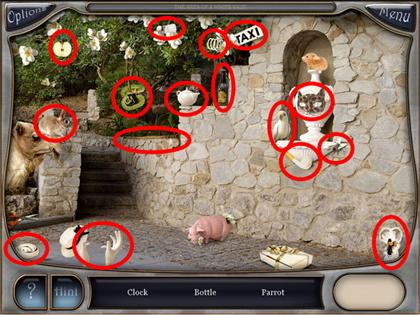
- Find the 15 hidden objects in red circles in the image.
- There are 16 possible hidden objects in this scene; each time one will be randomly left out.
- You can only search for three hidden objects at a time, listed below the scene.
- Refer to the image for the solution.
- After finding all the hidden objects, pick up the scissors in the bottom left corner of the screen.
- Select the scissors from your inventory and click the white box in the bottom right corner of the screen.
- Collect the cookies, and give them to the mouse on top of the big white vase.
- Refer to the image for the solution.
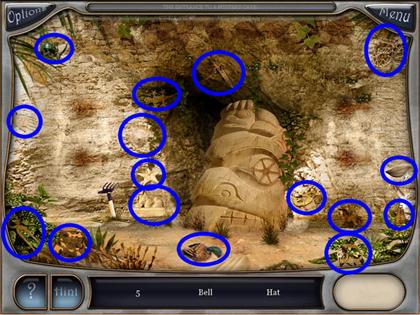
Level 10
The Entrance to a Mystery Cave
- Find the 15 objects that are the same shapes as the silhouettes in the item list.
- There are 16 possible hidden objects in this scene; each time one will be randomly left out.
- You can search for four hidden objects at the same time.
- Refer to the image for the solution.
Level 11
The Entrance to a Mystery Cave
- Find the 15 hidden objects in blue circles in the image.
- There are 16 possible hidden objects in this scene; each time one will be randomly left out.
- You can search for three hidden objects at the same time, listed below the scene.
- Refer to the image for the solution.
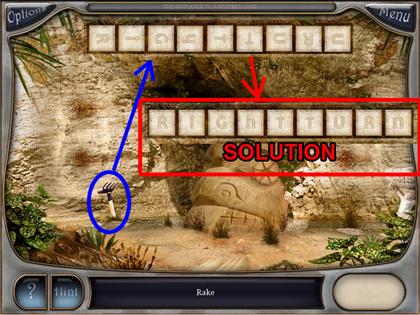
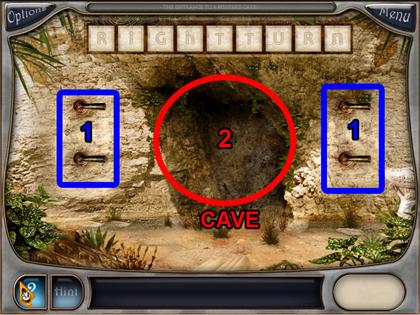
- Pick up the rake on the left side of the screen.
- Click the rake in your inventory and use it on the rock in the upper side of the screen. The letter puzzle will then appear.
- Click each letter until they are in the right position. After fixing the tiles, you can read that it says “RiGhTTURN.”
- Four levers will appear after solving the puzzle. Turn all the levers until they are pointing towards the right.
- Click the cave to finish this episode.
- Refer to the image for the solution.
Level 12
Mystery Cave
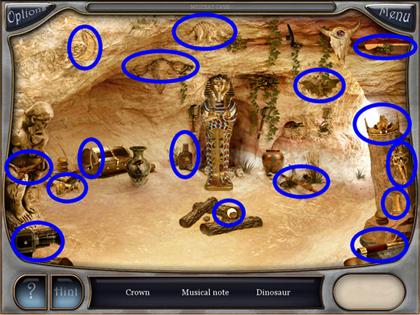
- Find the 15 objects that are the same shapes as the silhouettes in the item list.
- There are 16 possible hidden objects in this scene; each time one will be randomly left out.
- Refer to the image for the solution.

- Take the amulet in the upper right corner.
- Click the amulet in your inventory and drag it to the mummy in the center of the screen.
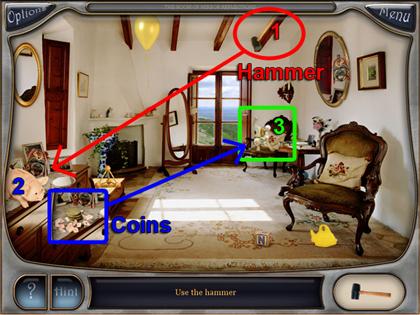
- Pick up the hammer above the mummy.
- Click the hammer in your inventory and drag it to the vase on the left side of the mummy. This will crack open the vase.
- Pick up the lighter in the cracked vase.
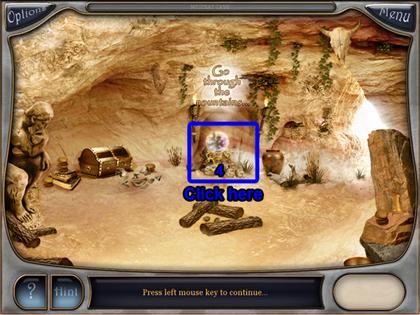
- Click the lighter in your inventory and drag it to the torches that are in front of the cave, in the middle of the screen. A crystal ball will then appear in the cave.
- Click the crystal ball, and the words “Go through the mountains…” will appear.
- Click the crystal ball again to complete this level.
- Refer to the image for the solution.
Level 13
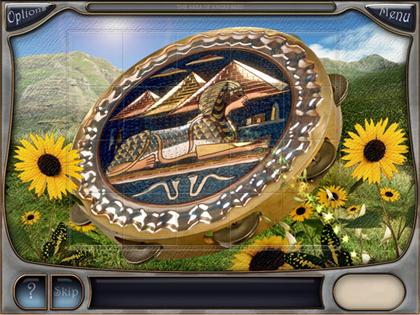
Mini-Game 3: Pattern of the Rings
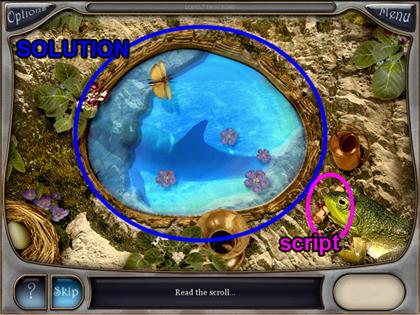
- Restore the pattern by rotating the rings.
- Click the scroll in the bottom right corner of the screen, in the frog’s mouth, for the next manuscript clue.
- Refer to the image for the solution.
Level 14
Lord of Nightmare’s Safe
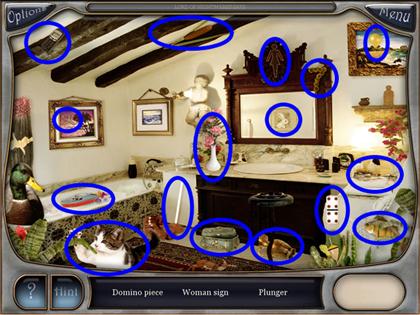
- Find the 15 objects in blue circles in the image.
- There are 16 possible hidden objects in this scene, each time one will be randomly left out.
- Refer to the image for the solution.
- Click the picture frame beside the center mirror in the screen. Then, unlock the safe that is uncovered.
- Click the safe to start the puzzle.
- Refer to the image for the solution.
Mini-Game 4: Three Tiles
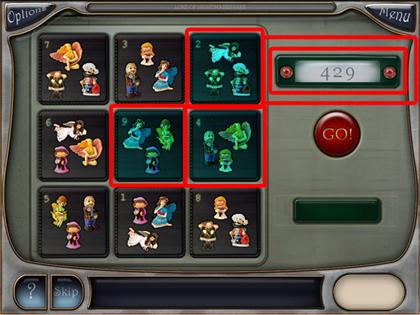
- Pick three squares that contain all nine images. The images should not repeat.
- Click the number 4 tile in the middle of right side. Next, click the number 2 tile in the upper right corner. Lastly, click the number 9 tile in the center of the tiles.
- After selecting all three tiles, click the “GO!” button below the number plate.
- The tiles will be randomly in different places, but the answer is always 4, 2, 9.
- Refer to the image for the solution.
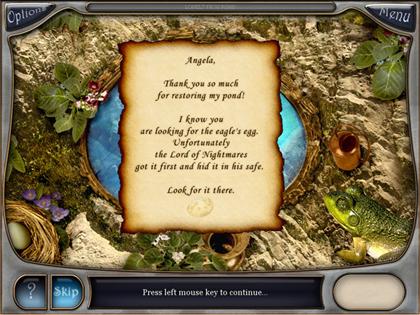
Lord of Nightmare’s Safe
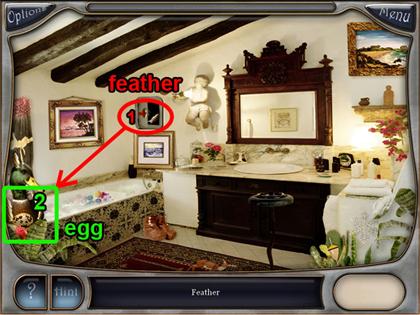
- Take the feather from the safe.
- Click the feather in your inventory and drag it to the duck in the bottom left corner of the screen. An egg will appear.
- Collect the egg from the duck.
- Refer to the image for the solution.
Level 15
The Area of Angry Bees
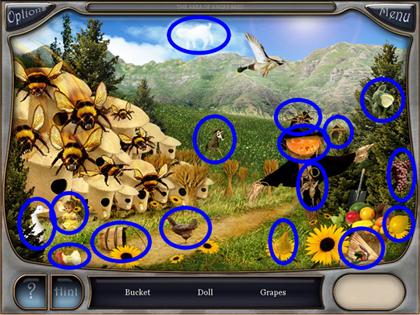
- Find the 15 hidden objects in the blue circles in the image.
- There are 16 possible hidden objects in this scene, each time one will be randomly left out.
- Refer to the image for the locations of the objects.
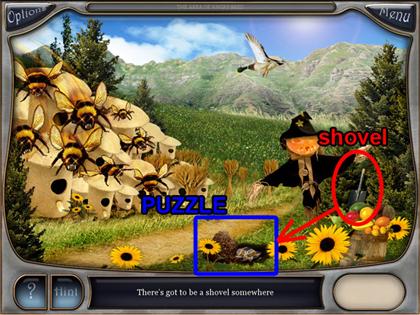
- Pick up the shovel in the bottom right corner of the screen, behind the fruit basket.
- Click the shovel in your inventory and drag it to the ground between the sunflowers.
- Refer to the image for the solution.
Mini-Game 5: Swapping Tiles
- Put together the picture by swapping the pieces.
- Click on one piece and then another to swap their locations.
- After finishing the picture you will get a drum (tambourine) in your inventory.
- Refer to the image for the completed puzzle.
The Area of Angry Bees
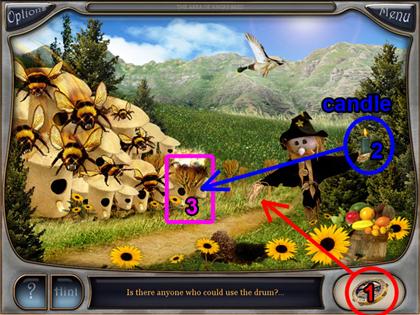
- Click the drum in your inventory and drag it to the scarecrow’s right hand.
- A candle will appear in the scarecrow’s left hand; collect it.
- Click the candle in the inventory, and drag it to the straw in the middle of the screen.
- Refer to the image for the solution.
Level 16
The Path of Angela
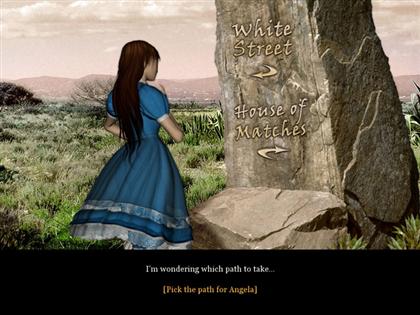
- Pick one of the paths. You can choose either “White Street” or “House Of Matches.”
- In this walk through, “White Street” was chosen first.
White Street

- The types of items you need to find might be in a different order when you play the game.
- Find the two scrolls circled in green in the image.
- Find the two head sculptures circled in red in the image.
- Find the two necklaces circled in blue in the image.
- Find the two cars circled in purple in the image.
- Find the two note sheets circled in orange in the image.
- Find the two picture frames circled in light blue in the image.
- Refer to the image for the solution.
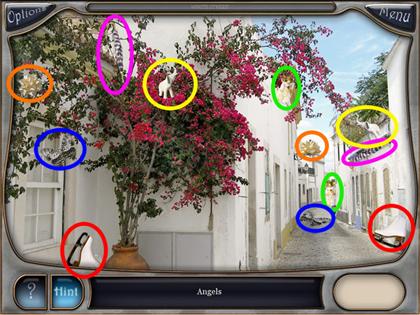
- Find the two angels circled in green in the image.
- Find the two skates circled in red in the image.
- Find the two butterflies circled in blue in the image.
- Find the two umbrellas circled in purple in the image.
- Find the two gift package bows circled in orange in the image.
- Find the two elephants circled in yellow in the image.
- Refer to the image for the solution.
Level 17
White Street
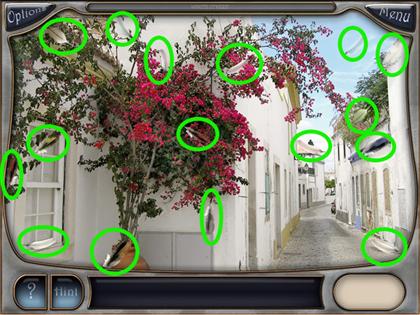
- Find the 16 feathers circled in green in the image.
- Refer to the image for the solution.
Level 18
Mini-Game 6: The Room of Scattered Matches
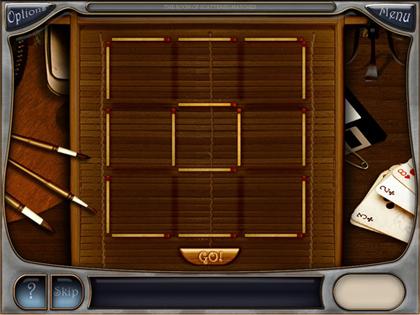
- Click eight matches to leave two different squares.
- Refer to the image for the solution.
Level 19
The Room of Astrology
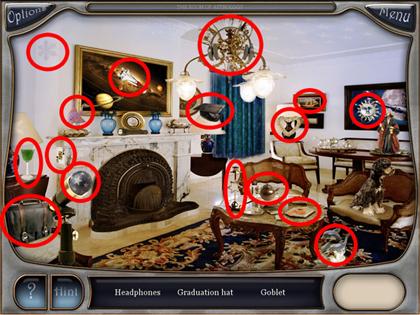
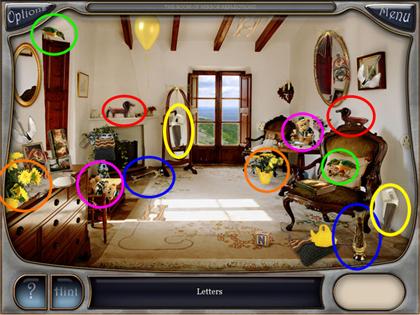
- Find the 15 hidden objects in the red circles in the image.
- There are 16 possible hidden objects in this scene; each time one will be randomly left out.
- Refer to the image for the locations of the objects.

- Click the fireplace in the middle of the screen.
- Pick up the flashlight on top of the fireplace.
- Click the flashlight in your inventory and drag it to the fireplace.
- The script will then appear in the fire place; click it to start the puzzle.
- Refer to the image for the solution.
Mini-Game 7: Zodiac Signs
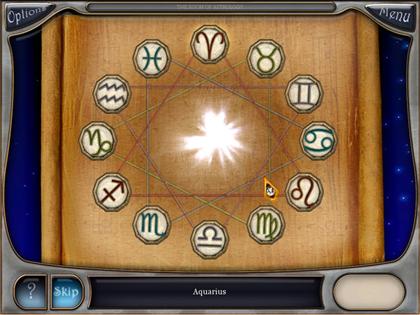
- Click the zodiac signs in the right sequence.
- The script will appear for the next manuscript clue.
- Refer to the image for the solution.
The Room of Astrology
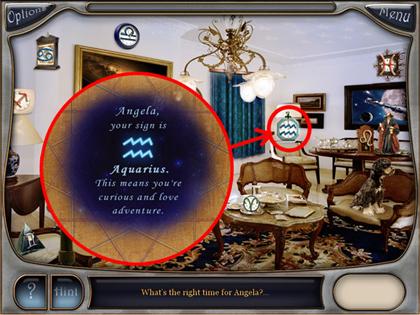
- Click the Aquarius sign in the right side of the screen because of the script from your last puzzle.
- Refer to the image for the locations of the Aquarius sign.
Level 20
Mystery Kitchen
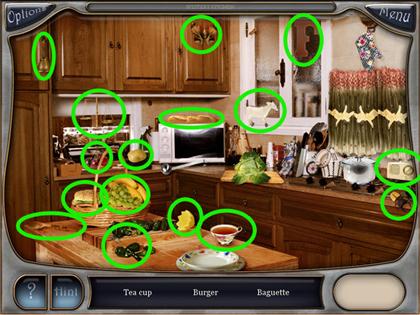
- Find the 15 hidden objects in the green circles in the image.
- There are 16 possible hidden objects in this scene, each time one will be randomly left out.
- Refer to the image for the locations of the objects.
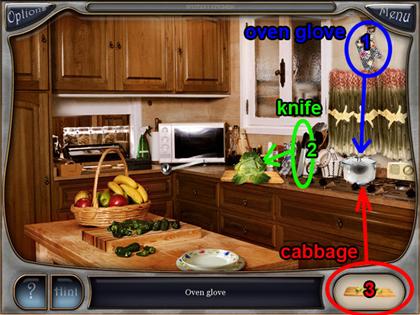
- Pick up the oven glove in the upper right corner of the screen.
- Click the oven glove in your inventory, and drag to the pod’s lid on top of the stove.
- Pick up the knife beside the pod.
- Click the knife in your inventory, and drag to the cabbage beside the knife.
- Click the cabbage in your inventory, and drag to the pod.
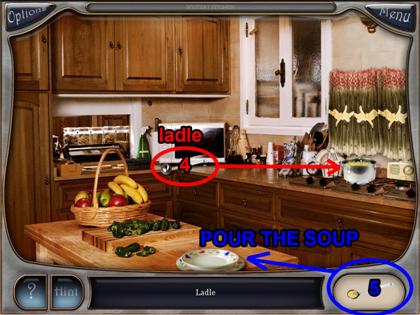
- Pick up the ladle beside the cabbage.
- Click the ladle in your inventory, and drag to the pod. The ladle will then scoop the soup from the pod.
- Click the ladle with the scoop of soup, and drag it to the soup bowl in the bottom of the screen.
- Refer to the image for the solution.
Level 21
Lonely Bench
- The types of items you need to find might be in a different order when you play the game.
- Find the two clusters of grapes in green in the image.
- Find the two handprints circled in red in the image.
- Find the two rats circled in blue in the image.
- Find the two planes circled in purple in the image.
- Find the two money purses circled in orange in the image.
- Find the two butterflies circled in light blue in the image.
- Find the two birds circled in yellow in the image.
- Refer to the image for the solution.
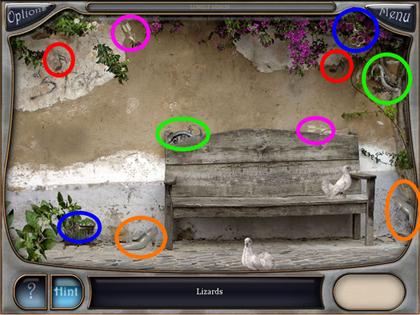
- Find the two lizards circled in green in the image.
- Find the two musical notes circled in red in the image.
- Find the two keys circled in blue in the image.
- Find the two arrows circled in purple in the image.
- Find the two shoes circled in orange in the image.
- Refer to the image for the solution.
Level 22
Lonely Bench
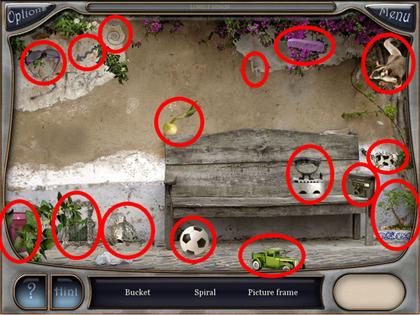
- Find the 15 hidden objects in the green circles in the image.
- There are 16 possible hidden objects in this scene; each time one will be randomly left out.
- Refer to the image for the locations of the objects.
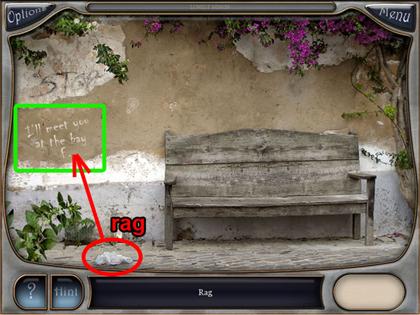
- Pick up the rag in the bottom left corner of the screen.
- Click the rag in your inventory and drag it to the wall in the left side of the screen.
- Refer to the image for the solution.
Level 23
The Bay

- Find the 15 objects that are the same shape as the silhouettes in the item list.
- There are 16 possible hidden objects in this scene; each time one will be randomly left out.
- You can only search for four hidden objects at the same time.
- Refer to the image for all the hidden object locations.
Level 24
Lonely Bench

- Find the 15 hidden objects in the red circles in the image.
- There are 16 possible hidden objects in this scene; each time one will be randomly left out.
- Refer to the image for the locations of the objects.
Level 25
The Room Of Mirror Reflections
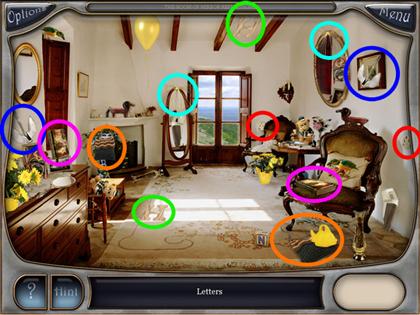
- The types of items you need to find might be in a different order when you play the game.
- Find the two letters circled in green in the image.
- Find the two sockets circled in red in the image.
- Find the two anchors circled in blue in the image.
- Find the two books circled in purple in the image.
- Find the two purses circled in orange in the image.
- Find the two butterfly bows circled in light blue in the image.
- Refer to the image for the locations of the items.
- Find the two birds circled in green in the image.
- Find the two ram statues circled in red in the image.
- Find the two vases circled in blue in the image.
- Find the two toy bears circled in purple in the image.
- Find the two flowers circled in orange in the image.
- Find the two vacuums circled in yellow in the image.
- Refer to the image for the locations of the items.
Level 26
The Room of Mirror Reflections
- Find the 15 hidden objects in the purple circles in the image.
- There are 16 possible hidden objects in this scene; each time one will be randomly left out.
- You can only search for three hidden objects at the same time, listed below the scene.
- Refer to the image for all the hidden object locations.
- Pick up the hammer in the top right corner of the screen.
- Click the hammer in your inventory and use it on the piggy bank on the left side of the screen.
- Take the coins from the broken piggy bank and put them in the hands on the statue in the far chair.
- Refer to the image for the solution.
Level 27
To Build a Bridge
- The types of items you need to find might be in a different order when you play the game.
- Find the two wings circled in green in the image.
- Find the two artichokes circled in red in the image.
- Find the two roses circled in blue in the image.
- Find the two wolf outlines circled in purple in the image.
- Find the two mushrooms circled in orange in the image.
- Find the two wire spools circled in light blue in the image.
- Find the two buffalo circled in yellow in the image.
- Refer to the image for the locations of the items.
- Find the two water taps circled in green in the image.
- Find the two watering cans circled in red in the image.
- Find the two feathers circled in blue in the image.
- Find the two sheep outlines circled in purple in the image.
- Find the two zucchinis circled in orange in the image.
- Refer to the image for the locations of the items.
Level 28
To Build a Bridge
- Find the 15 hidden objects in the red circles in the image.
- There are 16 possible hidden objects in this scene; each time one will be randomly left out.
- You can only search for three hidden objects at the same time, listed below the scene.
- Refer to the image for all the hidden object locations.
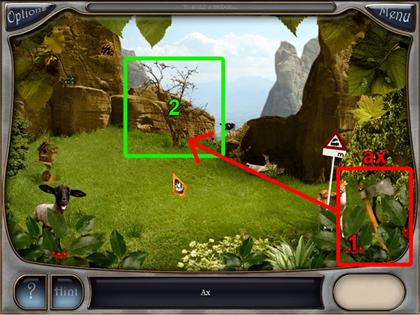
- Pick up the ax in the bottom right corner of the screen.
- Click the ax in your inventory and use it on the tree in the middle of the scene. This will give you the wood you need to build a bridge.
- Refer to the image for the solution.
Level 29
The Path of Angela
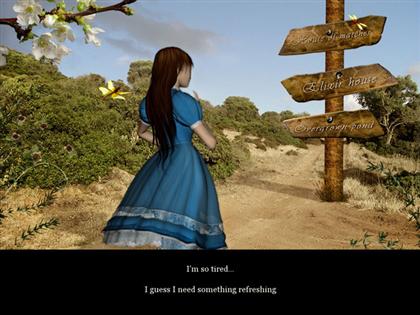
- Angela wants “something refreshing,” click anywhere to continue to the “Elixir House.”
The Room of a Hidden Power
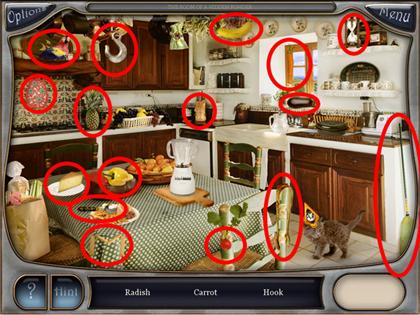
- Find the 15 hidden objects in the red circles in the image.
- There are 16 possible hidden objects in this scene; each time one will be randomly left out.
- You can only search for three hidden objects at the same time, listed below the scene.
- Refer to the image for all the hidden object locations.
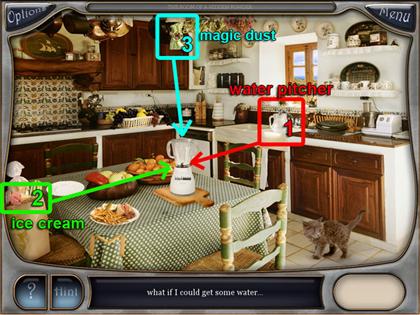
- Click on the water pitcher near the sink to fill it up with water. Then click it again to add it to your inventory.
- Click the water pitcher in your inventory and use it with the blender in the middle of the screen.
- Pick up the ice cream on the left of the screen and add it to the blender.
- Pick up the bag of magic dust from the top of the screen and add it to the blender.
- Refer to the image for the solution.
Level 30
Mini-Game 8: The Room of Scattered Matches
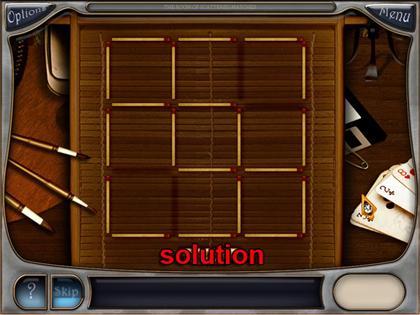
- Click to remove four matches from the grid.
- The final solution must have three small squares, two medium squares, and one large square.
- Refer to the image for the solution.
Level 31
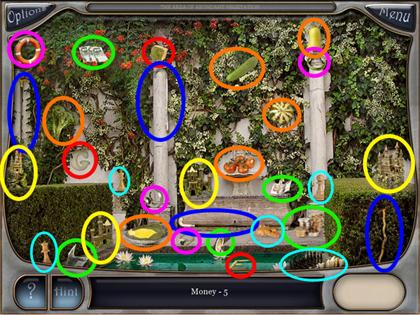
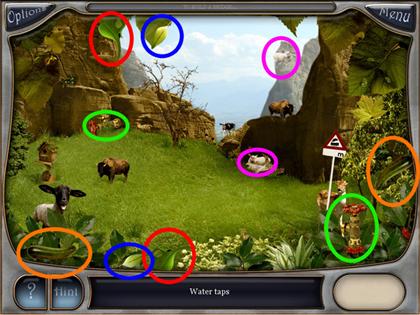
The Area of Abundant Vegetation
- The types of items you need to find might be in a different order when you play the game.
- In this scene the objects do not match each other.
- Find the five types of money circled in green in the image.
- Find the three letters circled in red in the image.
- Find the four canes circled in blue in the image.
- Find the four rings circled in purple in the image.
- Find the six vegetables circled in orange in the image.
- Find the five chess pieces circled in light blue in the image.
- Find the four castles circled in yellow in the image.
- Refer to the image for the locations of the items.
Level 32
The Area of Abundant Vegetation

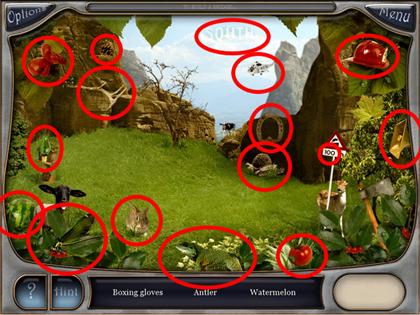
- Find the 16 frogs in the red circles in the image.
- Refer to the image for all the hidden object locations.
Level 33
Mini-game 9: Rotating Tiles
- Rotate the pieces of the puzzle until the correct picture is formed.
- Clicking a square will rotate it clockwise. The squares do not lock into place until the entire image is correct.
- Refer to the image for the completed puzzle.
Level 34
The Area of The Everlasting Tree
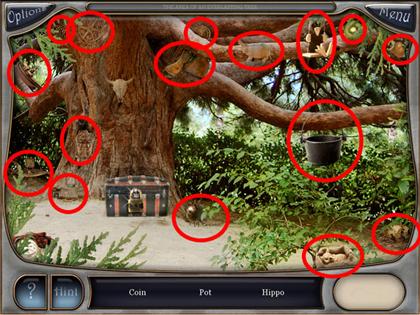
- Find the 15 hidden objects in the red circles in the image.
- There are 16 possible hidden objects in this scene; each time one will be randomly left out.
- You can only search for three hidden objects at the same time, listed below the scene.
- Refer to the image for all the hidden object locations.
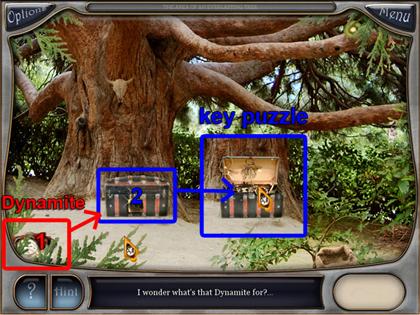
- Pick up the dynamite in the bottom left corner of the screen.
- Click the dynamite in your inventory and use it on the chest in the middle of the screen. Click on the keys inside the chest to start the next mini-game.
- Refer to the image for the solution.
Level 35
Mini-game 10: The Room of Eleven Keys
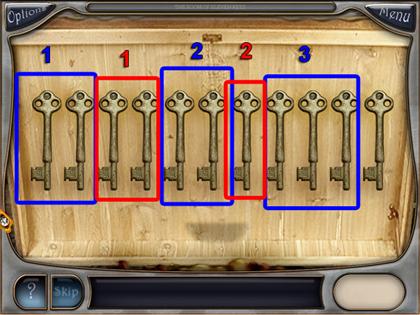
- The object of the game is to not take the last key. Each turn you can take 1-3 keys, and then your opponent will take 1-3.
- On your first turn, take two keys.
- On your second turn take all the keys but five. If your opponent takes two on his turn, you take two. If he takes three, you take one. If he takes one, you take three.
- On your last turn take all the keys but one, winning the game.
- Refer to the image for a possible game; your moves in blue, your opponent’s in red.
Level 36
The House of Sunny Weather
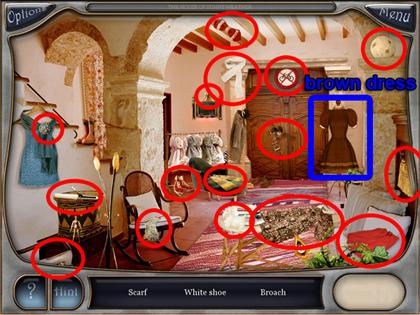
- Find the 15 hidden objects in the red circles in the image.
- There are 16 possible hidden objects in this scene, each time one will be randomly left out.
- You can only search for three hidden objects at the same time, listed below the scene.
- Pick up the brown dress to the right of the door.
- Angela will appear, click the brown dress in your inventory and use it on her.
- Refer to the image for the hidden object locations and the solution.
Level 37
The House of Sunny Weather
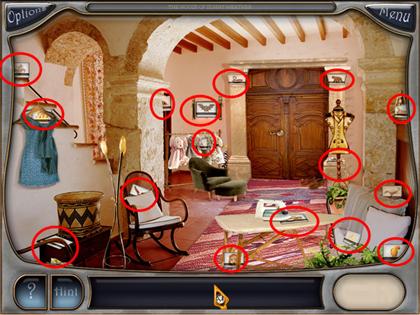
- Find the 16 hidden cards in the red circles in the image.
- Refer to the image for all the hidden object locations.
Mini-Game 11: Memory Card Game
- Flip over two at a time to reveal the pictures on the back.
- Matched cards will be removed from the board.
- There is one card without a match. Match all the other cards until it is the only one left.
- For an easier time finding matches, start from one of the corners and work your way across looking for matches.
- After completing the game you will get a card in your inventory.
- The card you get will always be the scorpion card.
The House of Sunny Weather
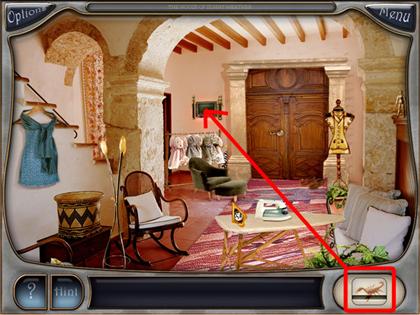
- Click the card in your inventory and use it on the screen to the left of the door.
- This will open the door and let you solve the last puzzle.
- Refer to the image for the solution.
Level 38
Mini-Game 12: Swapping Tiles
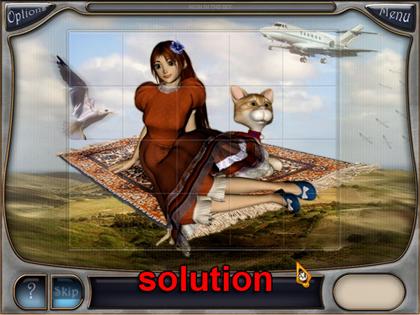
- Put together the picture by swapping the pieces.
- Click on one piece and then another to swap their locations.
- After finishing the picture you will get to watch the final cut scene of the game.
- Refer to the image for the completed puzzle.
- CONGRATULATIONS! YOU FINISHED THE GAME!


 White Haven Mysteries Walkthrough, Guide, & Tips
 Maestro: Dark Talent Walkthrough, Guide, & Tips
 Escape from Frankenstein's Castle Walkthrough, Guide, & Tips
 Maestro: Notes of Life Walkthrough, Guide, & Tips
 The Dark Hills of Cherai: the Regal Scepter Walkthrough, Guide, & Tips