Hide & Secret 3: Pharaoh’s Quest Walkthrough, Guide, & Tips
Hide & Secret 3: Pharaoh’s Quest Walkthrough
Welcome to the Hide & Secret 3: Pharaoh’s Quest Walkthrough!
Help reunite two ancient lovers by returning stolen artifacts to their graves! Travel all over the world to find the treasures.
Whether you use this document as a reference when things get difficult or as a road map to get you from beginning to end, we’re pretty sure you’ll find what you’re looking for here.
This document features helpful tips as well as the complete Hide & Secret 3: Pharaoh’s Quest game walkthrough, with annotated screenshots from actual gameplay!
We hope you find this information useful as you play your way through the game. Use the walkthrough menu below to quickly jump to whatever stage of the game you need help with.
Remember to visit the Big Fish Games Forums if you find you need more help. Have fun!
This walkthrough was created by Robin.
WALKTHROUGH MENU
- General Tips
- Chapter 1: Introduction to Egypt
- Chapter 2: Passport Hall and Travel to China!
- Chapter 3: Travel to Italy
- Chapter 4: The Camel in Egypt
- Chapter 5: The Vizier’s Ghost
- Chapter 6: Climbing the Great Pyramid
- Chapter 7: The Dome in the City
- Chapter 8: The Seer
- Chapter 9: Opening the Rosetta Stone Chest
- Chapter 10: Opening the Temple of the Sun
- Chapter 11: The Statue of Horus
- Chapter 12: Travel to Mexico
- Chapter 13: The Crystal and the Obelisk
- Chapter 14: Opening the Great Pyramid
- Chapter 15: The Roman Warrior
- Chapter 16: Travel to France
- Chapter 17: First Trip to England
- Chapter 18: The Jeep and the 1st Trip to the Oasis
- Chapter 19: The Vizier’s Ghost
- Chapter 20: The Pharaoh’s Flame
- Chapter 21: Opening the Queen’s Tomb
- Chapter 22: The Canopic Jars
- Chapter 23: The Courtyard of the Obelisk
- Chapter 24: The Crook and the Flail
- Chapter 25: The Nose of the Sphinx
- Chapter 26: The Heart Scarab
- Chapter 27: Completing the Scroll
- Chapter 28: The Gold Death Mask
General Tips
- Hide and Secret 3: Pharaoh’s Quest is the third title in the Hidden Object Adventure game. Your goal is to find the missing magic artifacts and use them to reunite the spirit of the Pharaoh and his Queen.
- There is no timer, and there appears to be no penalty for wrong clicks.
General Tips for Hidden Object Scenes
- A few of the items that you collect in Hidden Object scenes can be used elsewhere in the game. The game refers to these as Handy Items.
- Each Hidden Object scene always has the same items in the same positions, but the Find List may appear in a different sequence. If you leave a scene and restart, this can be a little confusing until you figure it out.
- When you finish a Hidden Object scene, you need to click on the exit arrow that points down to exit.
- Some Hidden Object scenes will open again a second time in the game after you complete tasks in other areas. So whenever you return to a location, look for the sparkles. You may need to revisit an area you did previously to get new items.
General Tips for Handy Items (Using Items from your inventory)
- In addition to the Handy Items you can find in Hidden Object scenes, you may be awarded a Handy Item for completing a mini-game.

- Some characters will give you a Handy Item after you complete a task for them.
- Quite often after you use a Handy Item in a scene, a new item will appear somewhere nearby. It will usually sparkle blue to remind you to pick it up.
- All of your Handy Items are stored in your backpack in the lower right. You can scroll through these by using the arrows on the left and right of backpack.
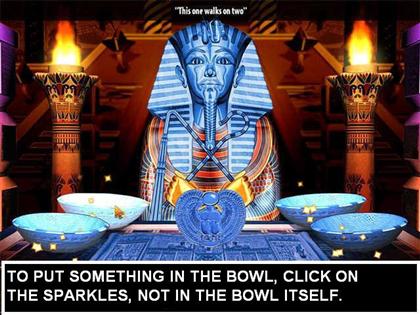
- When you are going to use a Handy Item in a scene, you first click on it in your inventory, then click on the sparkles near where you want to use it. It will only count if you click on the sparkles, even if visually it looks like it should go slightly off of that point.
General Tips for Traveling from Scene to Scene
- In each scene if you move your cursor slowly around, you will find from 1 to 4 yellow arrows which are exit points to other scenes. An exit arrow can point up, down, left, or right.
- Sometimes the Up arrow is off to one side or another, usually associated with a building there.
- Some exits are locked until you do other things in the game. The exit arrows will not appear unless you can use the exit. So each time you revisit a scene, scan again to see if new exit arrows have opened.
- You will need to revisit some of the locations in the game many times. One location requires as many as 9 visits, depending on the order in which you do things.
- If you get stuck and can’t think of what to do next, but don’t want to look at the walkthrough, try going back to the plane first. Click on the plane and look at the country tiles—are there any green numbers? If so, you have new tasks to do there.
- If you’re still stuck, but there are no green numbers on the country tiles, again go to the plane. Starting from there, just work your way down the river, checking each location on each side.
- There are two active locations on the left side of The City: the Market and the Dome. The sparkles for the Dome look like they belong to the Market, and since the Dome is only available sometimes during the game, this can be confusing.
General Tips for Passport Hall and Countries other than Egypt
- After you repair the airplane, you will be able to use it to fly to other countries once you find the passport for that country.
- Each country other than Egypt has two picture tiles, and each picture tile has the number “1” and the number “2” on it.
- If the number on the country tile is green, there is something for you to do there.
- If the number on the country tile is red, you have completed that task.
- If the number on the country tile is white, you can visit the scene, but you will have to come back again later when it is green to perform a task.
General Tips for the In-game Hint System
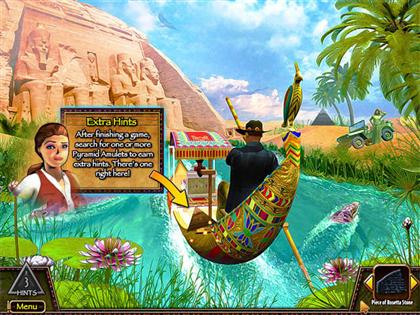
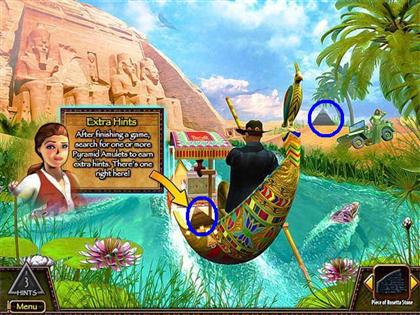
- Throughout the game you will spot small pyramids. Click on these to get extra hints added to your hint counter.
- If an area sparkles gold, you can click there. You may be able to exit to a new scene, get a zoom scene, or use a Handy Item on that spot.
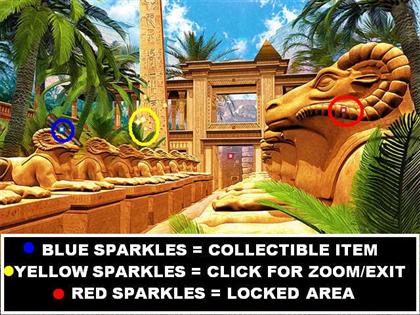
- If an item sparkles blue, you can pick it up.
- If an area sparkles red, you will be able to look more closely at it later in the game, but it is currently locked.
- If your cursor changes to a magnifying glass, click again to look more closely at that area.
- To leave a zoom scene, find the exit arrow that points down.
General Tips for Mini-games
- You can skip a mini-game once the skip pyramid is fully charged.
- If you are doing a jigsaw puzzle mini-game, a piece will lock into place once it is in the right position.
- If you are doing a jigsaw puzzle mini-game, you can connect pieces together even if they are not in locked position.
- If you are doing a rows and columns mini-game, the pieces do NOT lock into place when they are in correct position.
Walkthrough
- Your Find List may be in a different order, but the objects should be the same as in the screenshots.
- The Handy Item is marked with a double frame.
- There are 5 river stops in Egypt. We have named them based on what you see on the left side of the screen: the Plane, the Row of Statues, the Camel, the Sphinx, and the Last River Stop.
- “Downriver” is the direction going away from the plane towards the Last River Stop.
- “Upriver” is the direction going back towards the plane.
Chapter 1: Introduction to Egypt
- In this chapter you will visit all five of the river stops in Egypt and get a feel for the country.
- Some locations will be locked, but you will get a good introduction to the area you will explore throughout the game.
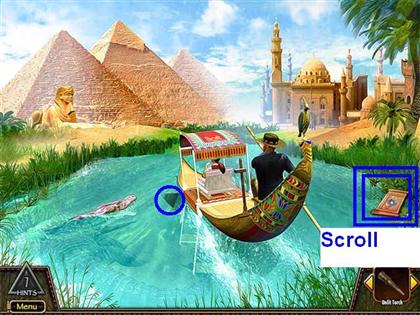
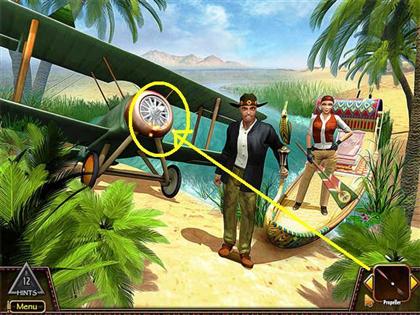
The Plane River Stop
- A Hidden Object scene is open. Collect all the items on the Find List. The Handy Item is the Boat Oar.
- Click on the Boat Oar in inventory, then click on the woman.
- Find the exit arrow that points up. Click on it to row downriver.
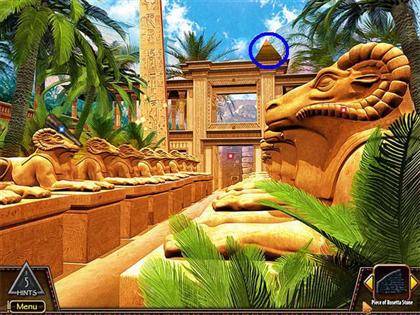
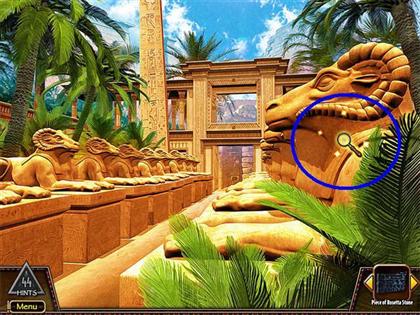
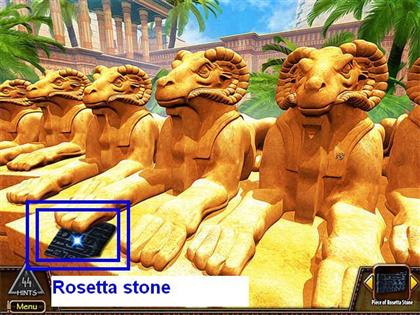
Row of Statues River Stop
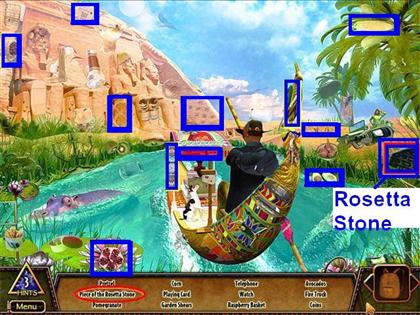
- A Hidden Object scene is open. Collect all the items on the Find List. The Handy Item is a piece of the Rosetta Stone.
- Collect two hint pyramids, one in the boat, and one by the jeep driver.
- Find the exit arrow that points left and click on it.
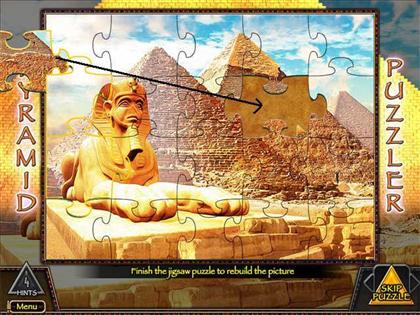
In Front of the Temple of the Sun
- This will open a jigsaw puzzle mini-game.
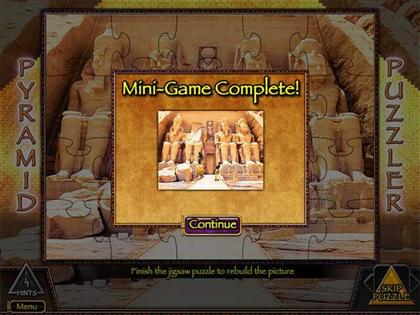
- Examine the statue and find that there is a missing piece of the statue.
- That is all you can do here at this time.
- Find the exit arrow that points down and click it.
Row of Statues River Stop
- Find the exit arrow that points right and click on it.
Jeep Driver
- Talk to the jeep driver. He needs help fixing the jeep.
- Find the exit arrow that points down and click on it.
Row of Statues River Stop
- Find the exit arrow that points up and click on it.
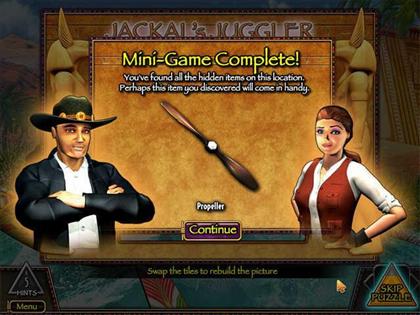
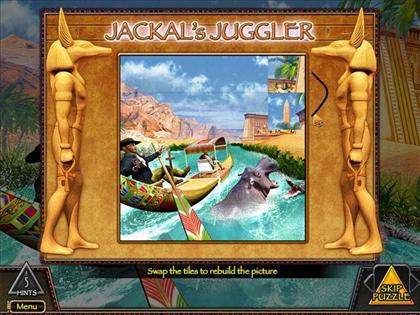
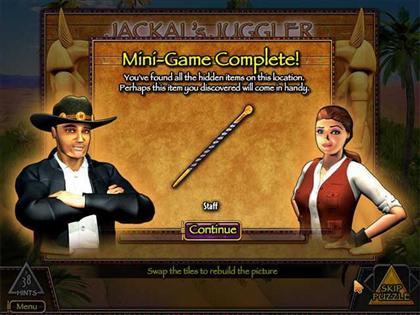
Camel River Stop
- This will open a tile swap mini-game.
- You will receive the Propeller, which you can use later to fix the plane at the first river stop.

- Find the exit arrow that points left and click on it.
Camel Driver
- Talk to the camel driver. He needs help because his camel has a thorn in her hoof.
- Find the exit arrow that points down and click on it.
Camel River Stop
- Find the exit arrow that points right and click on it.
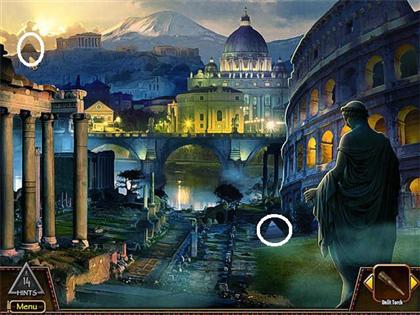
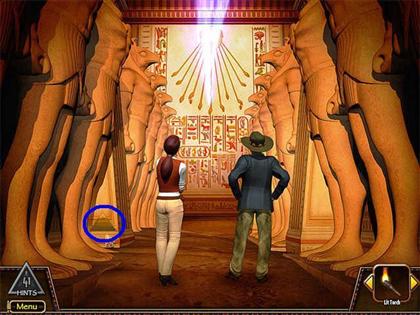
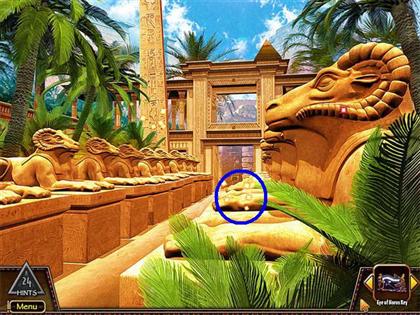
Courtyard of the Obelisk
- Look carefully around the scene.
- Notice a brown object with a blue sparkle. That is an Unlit Torch. Collect it.
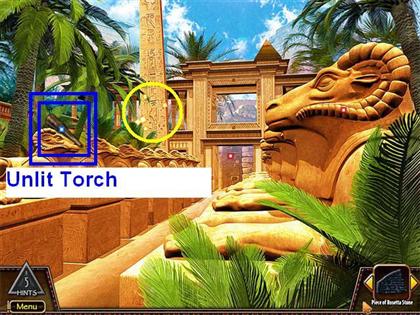
- You will notice two areas with red sparkles. They are locked for now.
- The obelisk has gold sparkles. Click on it to look closer.
Base of the Obelisk
- This will open a row and column mini-game.
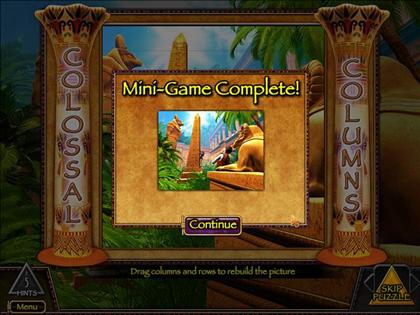
- Collect the hint pyramid near the base of the obelisk.
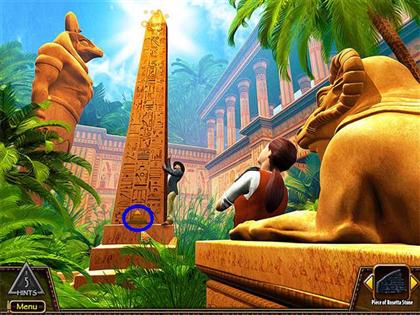
- Look at the top of the obelisk. It is missing a crystal.
- Find the exit arrow that points down and click on it.
Courtyard of the Obelisk
- Collect the hint pyramid on top of the archway.
- Find the exit arrow that points down and click on it.
Camel River Stop
- Find the exit arrow that points up and click on it.
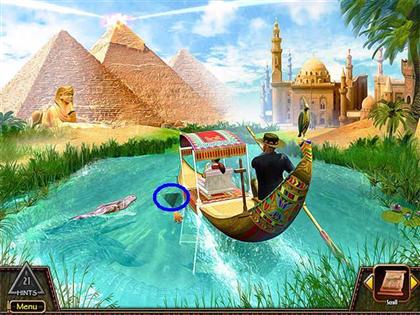
Sphinx River Stop
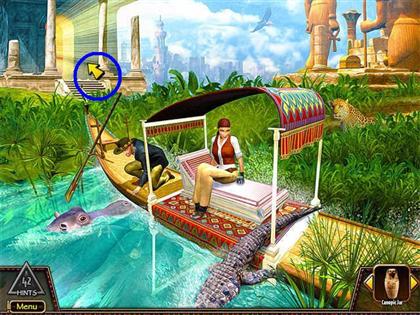
- Collect the scroll piece with the blue blinking light that is floating to the right of the boat.
- Collect the hint pyramid in the water to the left of the boat.
- Find the exit arrow that points left and click on it.
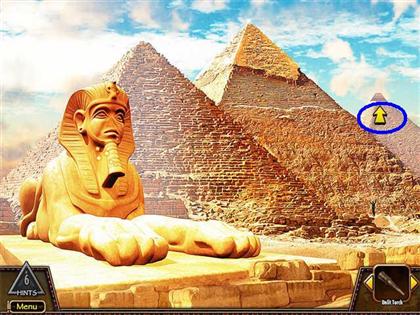
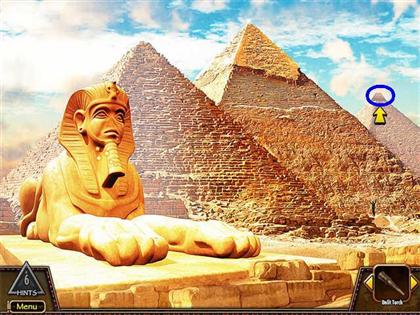
Sphinx
- This will open a jigsaw puzzle mini-game.
- Examine the Sphinx. It will not let you enter until its nose is restored.
- Look over towards the right of the scene and you will see a small figure at the base of the Great Pyramid.
- Move your cursor in that area until you get a exit arrow that points up. Click on it.
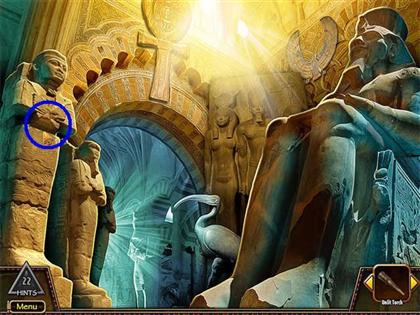
Base of the Great Pyramid
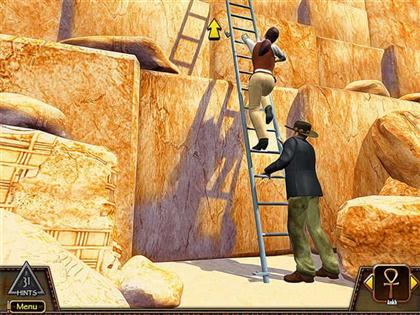
- Talk to the guard. He needs help to get up to his post.
- Look to the left of the scene and collect the Italy passport.
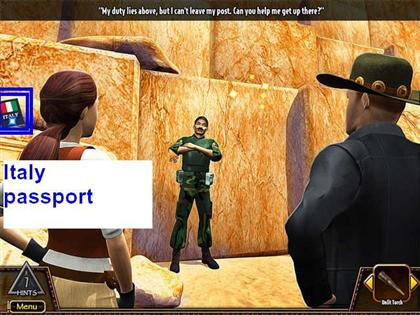
- Find the exit arrow that points down and click on it.
Sphinx
- Collect the hint pyramid on top of the far right pyramid.
- Find the exit arrow that points down and click on it.
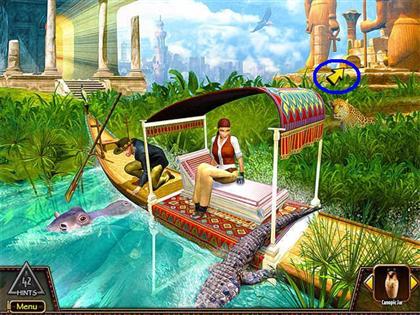
Sphinx River Stop
- Find the exit arrow that points right and click on it.
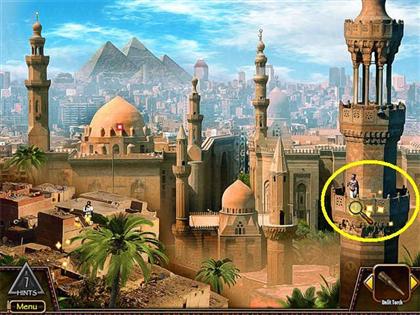
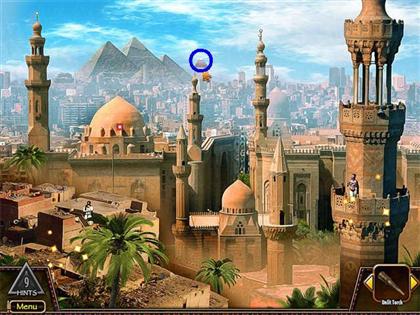
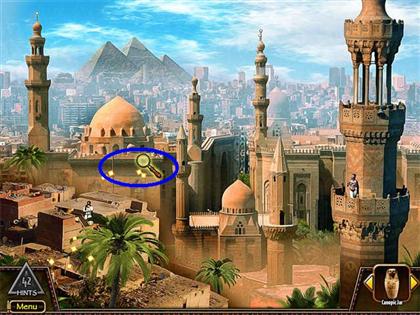
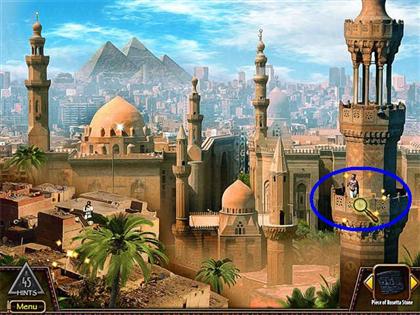
The City
- A Hidden Object scene is open. Collect all the items on the Find List. The Handy Item is the China Passport.
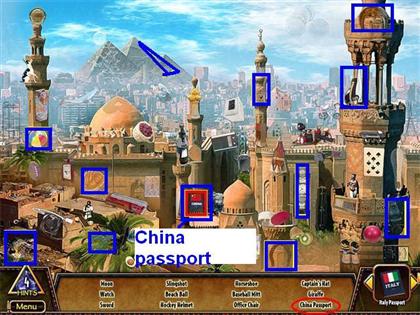
- Look around the city.
- There is an area with gold sparkles on the left. That is the Market.
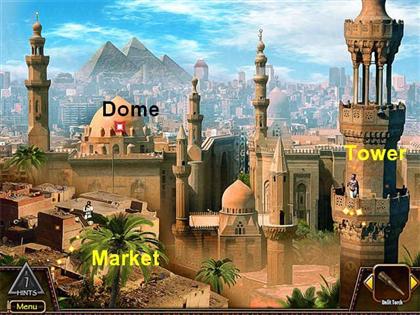
- There is a Tower with gold sparkles on the right.
- And there is a domed building behind the Market that is still locked, but marked with a red sparkle.
- Click on the Market.
The Market
- A jigsaw puzzle mini-game is open.
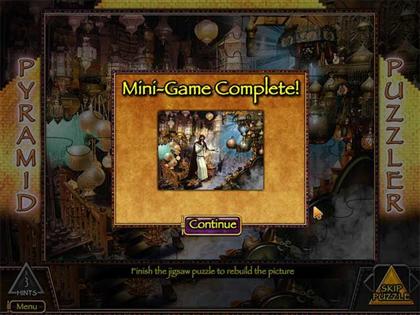
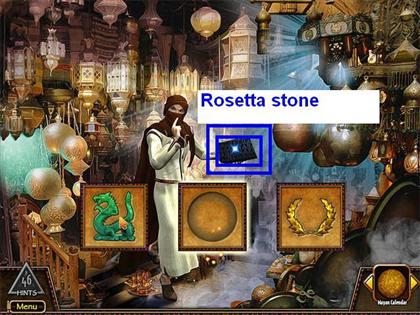
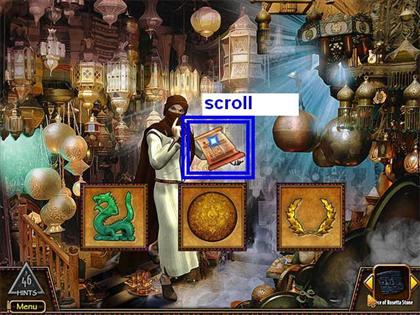
- The merchant will show you the outlines of 3 different treasures he would like to buy. You will find these later in the game.
- Find the exit arrow that points down and click on it.
The City
- The dome is still locked, so click on the sparkles on the right to enter the Tower.
Inside the Tower
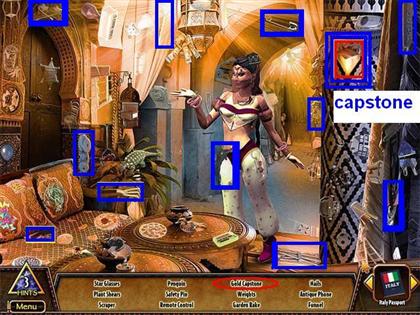
- A hidden object scene is open. Collect the items on the Find List. The Handy Item is the Gold Capstone.
- Talk to the harem girl. She will tell you she can assemble the Staff of the Sun.
- Collect the two hint pyramids.
- Find the exit arrow that points down and click on it.
The City
- Collect the hint pyramid from the back center.
- Find the exit arrow that points down and click on it.
- Continue downriver to the Last River Stop.
Last River Stop
- A pair of pliers in the boat by the woman’s feet has a blue sparkle. Collect it.

- Find the exit arrow that points left and click on it.
Inside the Seer’s Temple
- Talk to the Seer. He wants visions from ancient times.
- Take the piece of scroll from your inventory and put it on the table in front of him. That is all you can do here now.

- Find the exit arrow that points down and click on it.
Last River Stop
- There are two hint pyramids on the boat.
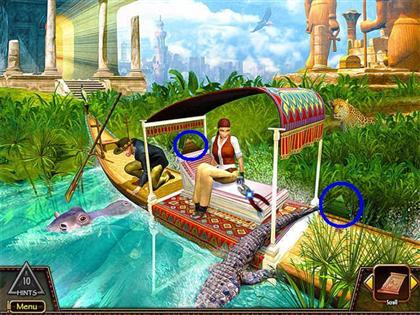
- There is a brown one just to the left of the woman.
- There is a green one just to the right of the end of the crocodile’s tail.
- Find the exit arrow that points right and click on it to go examine the chest.
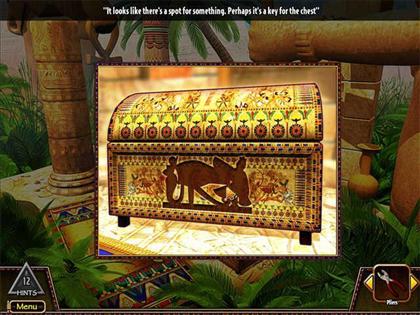
The Rosetta Stone Chest
- Examine the chest. It is locked, and you don’t have the key.
- Find the exit arrow that points down and click on it.
Last River Stop
- We’ve made it all the way downriver and done most of what we can do in Egypt for now. We have an airplane propeller and 2 passports. Let’s go travelling!
- Find the exit arrow that points down and click on it.
- Continue upriver all the way to the plane.
Chapter 2: Passport Hall and Travel to China!
- In this Chapter you will learn how to use Passport Hall to travel to countries other than Egypt, and explore two locations in China.
Plane River Stop – Use Propeller
- Click on the propeller in your inventory, then click on the plane to fix the plane.
- The plane is still sparkling so click on it.
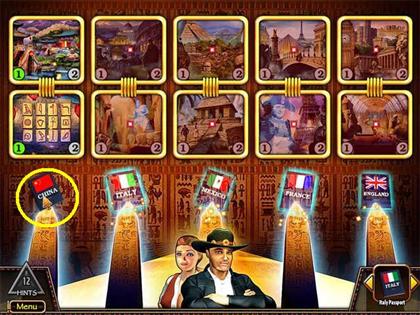
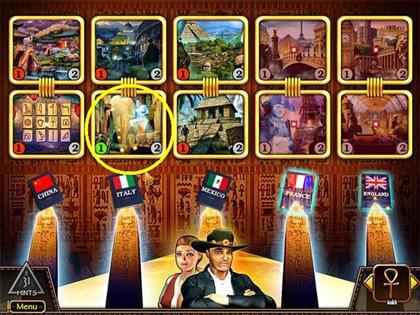
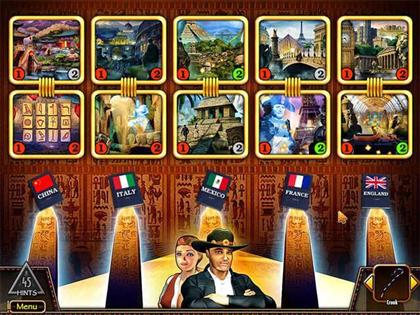
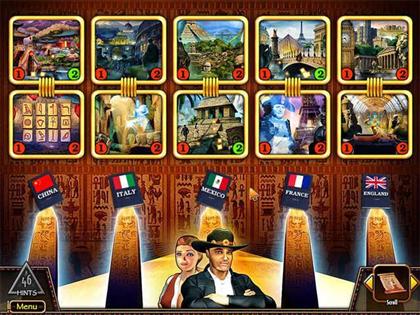
Passport Hall
- Welcome to Passport Hall! This is where you can visit countries other than Egypt.
- In this room there are two picture tiles per country, a top and a bottom.
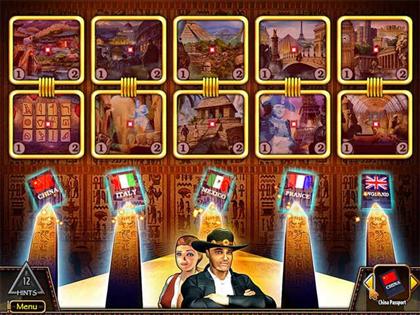
- Each picture tile has two numbers on it, “1” and “2.”
- To unlock a country, you must place its passport on the obelisk with the matching image.
- Right now you only have two passports. You will find more as the game continues.
- If a number on a picture tile is green, that means you have a task to do there.
- To return to Egypt, use the exit arrow that points down.
- Let’s get started!
Use the China Passport
- Take the China Passport from your inventory and put it on the obelisk on the far left.
- Notice how the “1” on both picture tiles for China is now green.
- Click on the top China tile.
China: Top Tile
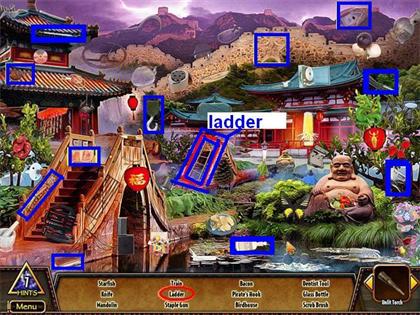
- A Hidden Object scene is open. Collect all the items on the Find List. The Handy Item is the Ladder.
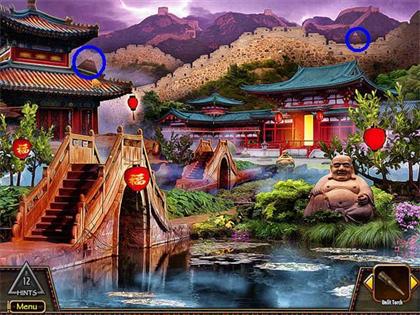
- Collect the hint pyramid from the top right of the pagoda and from the hillside high on the right side of the scene.
- Find the exit arrow that points down and click on it.
Passport Hall
- Notice that the “1 on the top picture tile for China is now red. This means you have completed everything for that task.
- Click on the bottom picture tile for China.
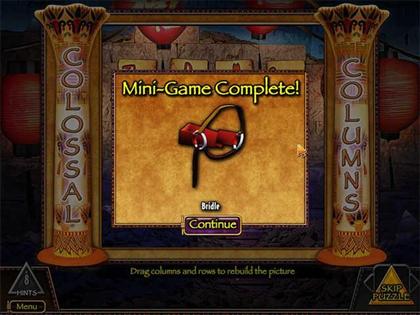
China: Bottom Tile
- This opens a row and column puzzle.
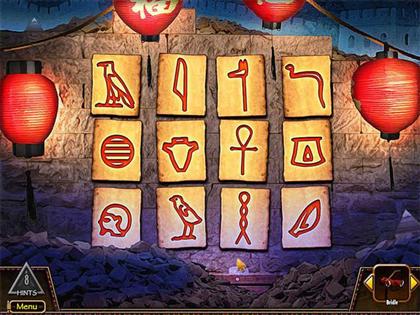
- You will receive the Bridle.
- Collect the hint pyramids from the upper left and the lower right.
- Find the exit arrow that points down and click on it.
Chapter 3: Travel to Italy
Passport Hall – Use the Italy Passport
- Take the Italy Passport from your inventory and put it on the next obelisk.
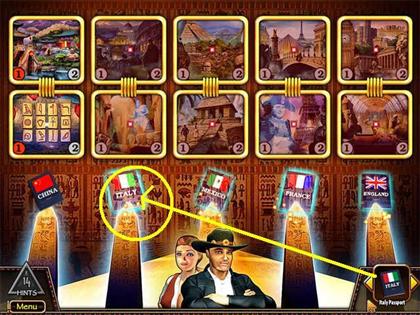
- Notice how the “1” on each of the Italy tiles turns green.
- Click on the top picture tile for Italy.
Italy: Top Tile
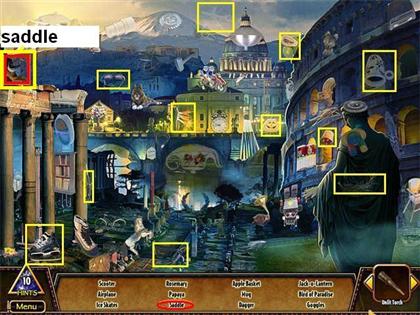
- A Hidden Object scene is open. Collect all the items on the Find List. The Handy Item is the Saddle.
- Collect the hint pyramid from the top left of the scene and from the right side just to the left of the base of the Coliseum.
- Find the exit arrow that points down and click on it.
Passport Hall
- Notice that the “1 on the top picture tile for Italy is now red. This means you have completed everything for that task.
- Click on the bottom picture tile for Italy.
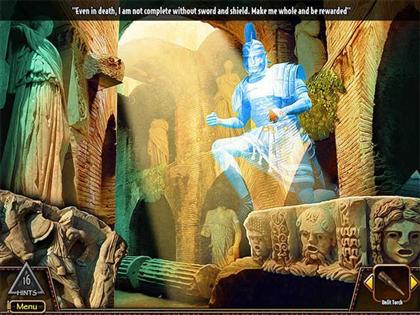
Italy: Bottom Tile
- Talk to the Roman Soldier statue. He wants a sword and a shield.
- Find the exit arrow that points down and click on it.
Passport Hall
- This is all you can do here now.
- Find the exit arrow that points down and click on it to return to Egypt.
Chapter 4: The Camel in Egypt
- We collected several Handy Items in our travels to China and Italy.
- Let’s start by going back and helping the camel with a thorn in its hoof.
The Plane River Stop
- Find the exit arrow that points up and click on it.
- Go downriver to the Camel stop.
Camel River Stop
- Find the exit arrow that points left and click on it.
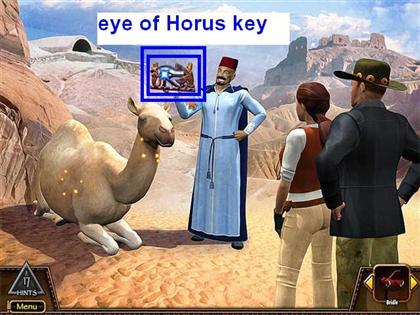
Camel Driver – Use Pliers
- Use the pliers from your inventory to remove the thorn from the camel’s hoof.
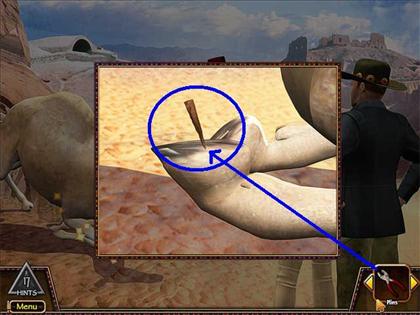
- When you finish, the Camel Driver will be holding out the Eye of Horus key. Take it (you will be able to use it on the Rosetta Stone chest later).
- Talk to the Camel Driver. He offers you use of the camel if you have riding equipment.
Use Bridle and Saddle
- What a coincidence! Two of the Handy Items you collected in the last Chapter just happen to be riding equipment for a camel!
- Use the Bridle and the Saddle on the Camel.
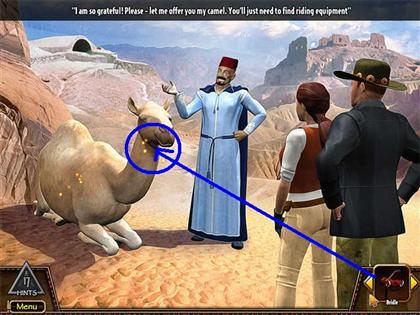
- This will unlock access to the Queen’s Tomb on the left and the Vizier’s Ghost on the right.
- Find the exit arrow that points left and click on it.
Outside The Queen’s Tomb
- This will open a jigsaw puzzle mini-game.
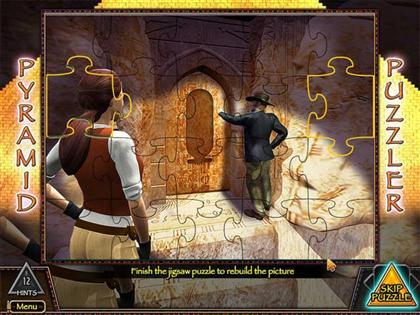
- You will receive a second piece of the Rosetta Stone.
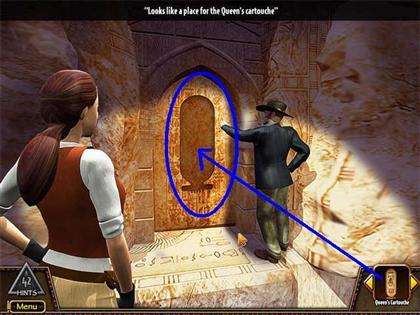
- Examine the tomb door. There is a place for the Queen’s Cartouche.
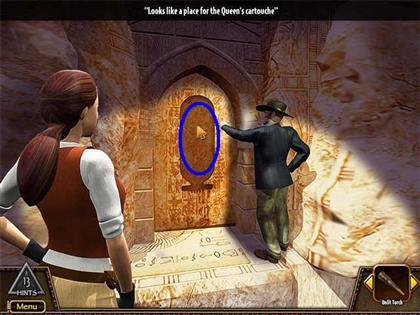
- Collect the hint pyramid from the center top of the scene.
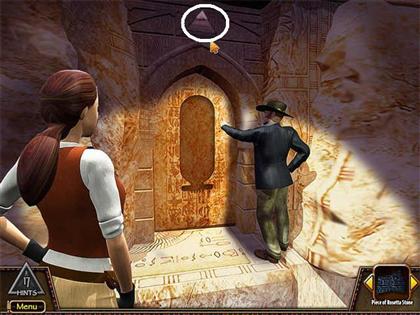
- Find the exit arrow that points down and click on it.
Chapter 5: The Vizier’s Ghost
- Those are interesting looking ruins up to the right. Since we still have use of the camel, let’s go check them out.
Camel Driver
- Find the exit arrow that points right and click on it.
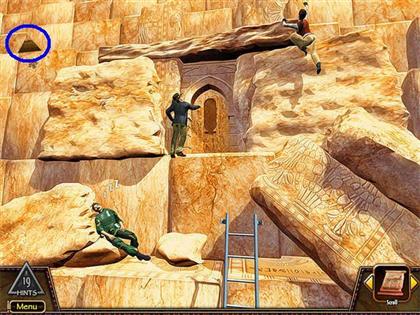
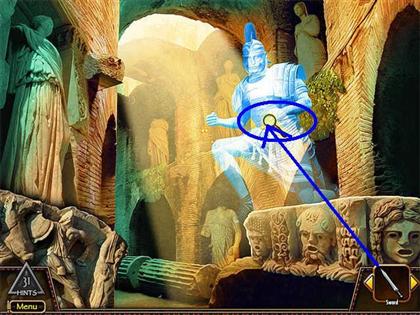
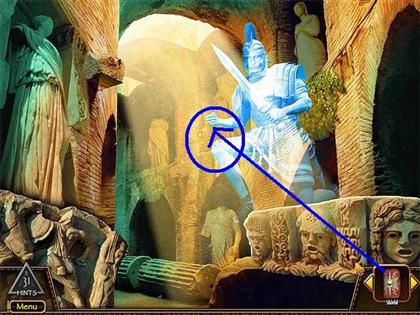
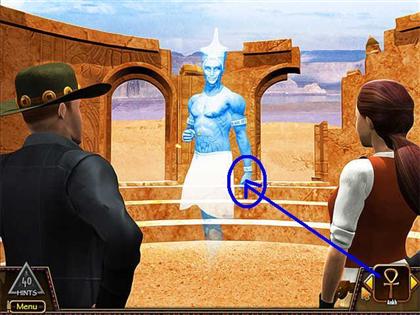
In the Ruins
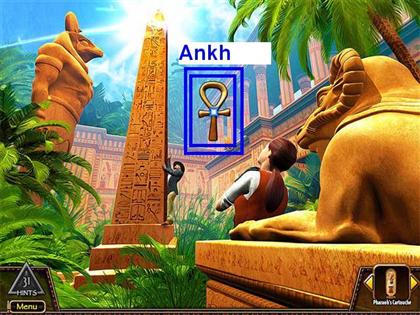
- Talk to the Vizier’s Ghost. He wants the scepter and the ankh.
- Collect the hint pyramid from the upper right.

- Find the exit arrow that points down and click on it.
Camel Driver
- Take the hint pyramid from the upper left.
- Find the exit arrow that points down and click on it.
Camel River Stop
- Find the exit arrow that points up and click on it.
Chapter 6: Climbing the Great Pyramid
- What to do next? Well, we have a Ladder as a Handy Item. Let’s go visit the Guard at the Great Pyramid and help him out.
Sphinx River Stop
- Find the exit arrow that points left and click on it.
The Sphinx
- Find the exit arrow that points up (near the small figure on the right) and click on it to go see the guard.
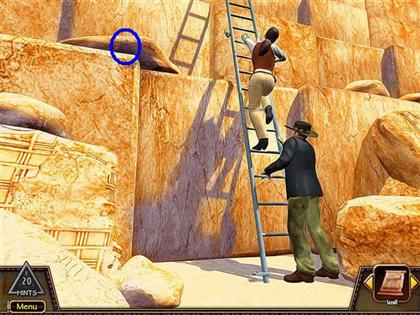
Base of the Great Pyramid – Use Ladder
- Give the ladder to the Guard. You will have to put it where the sparkles are, above his head to the right.
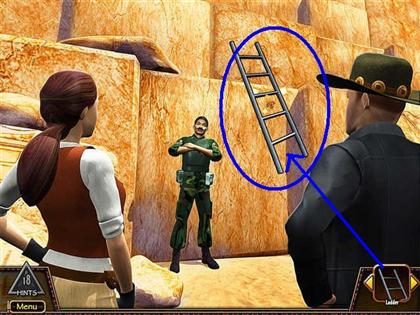
- Find the exit arrow that points up and click on it.
Middle of the Great Pyramid
- Examine the center door. You need the Pharaoh’s Cartouche.
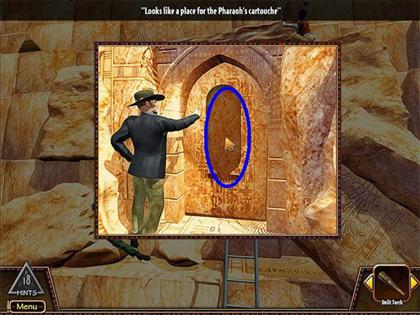
- Find the exit arrow that points up and click on it.
Top of the Great Pyramid
- Collect the scroll piece on the left of the scene.
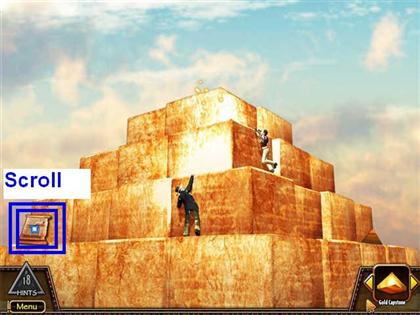
Use Gold Capstone
- Take the Gold Capstone from inventory and use it on the sparkles at the very top of the Great Pyramid. Just don’t ask how they’ve been carrying that around with them!
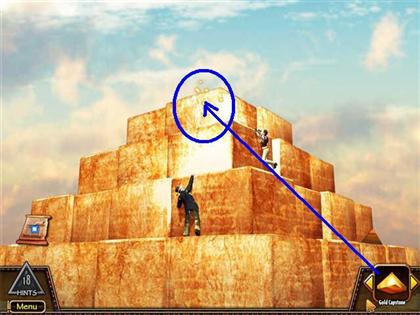
- Notice two beams of light shooting off of the capstone. These will unlock places elsewhere in Egypt. You’ll be able to see them in the sky as you travel along the river.
- Find the exit arrow that points down and click on it.
Middle of the Great Pyramid
- Collect the small hint pyramid on the left.
- Find the exit arrow that points down and click on it.
Base of the Great Pyramid
- Collect the small hint pyramid on the left.
- Find the exit arrow that points down and click on it.
- Return to the River.
Chapter 7: The Dome in the City
- The mysterious beams of light from the Great Pyramid have unlocked several activities in Egypt. Let’s follow one to the City on the right river bank.
Sphinx River Stop
- If you haven’t already, collect the hint pyramid just to the left of the boat.
- Find the exit arrow that points right and click on it.
The City
- The Dome has unlocked! Click on it to enter.
The Dome
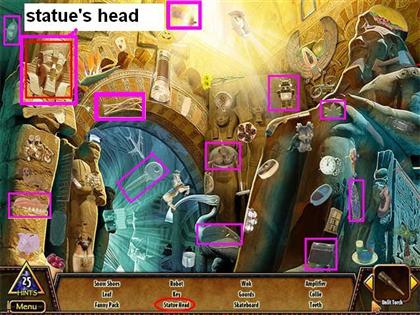
- A Hidden Object scene is open. Collect all the objects on the Find List. The Handy Item is the Statue’s Head.
- Collect the hint pyramid from the upper left.
- Find the exit arrow that points down and click on it.
The City
- Find the exit arrow that points down and click on it.
The Sphinx River Stop
- Find the exit arrow that points up and click on it.
Chapter 8: The Seer
- We have a few items in our inventory. Let’s go visit the Seer and give him the piece of the scroll.
The Last River Stop
- Find the exit arrow that points left and click on it.
Inside the Seer’s Temple
- Put the 2nd scroll on the table in front of the Seer. That is all you can do here now. It looks like the Seer won’t have much to say until we find all five pieces.
- Find the exit arrow that points down and click on it.
Chapter 9: Opening the Rosetta Stone Chest
- Now let’s see what’s in the chest!
The Last River Stop
- Find the exit arrow that points right and click on it.
Rosetta Stone Chest – Use Eye of Horus Key
- Click on the chest once to open the zoom scene.
- Take the Eye of Horus Key from your inventory and use it unlock the chest.
- Empty, what a disappointment!
- Click on the chest again to open the zoom scene of the empty chest.
- Put the two pieces of the Rosetta Stone from your inventory into your chest.
- Find the exit arrow that points down and click on it.
Chapter 10: Opening the Temple of the Sun
- They probably don’t feel like lugging that statue head around for too much longer. Let’s head upriver to the Row of Statues River Stop outside the Temple of the Sun.
Last River Stop
- Find the exit arrow that points down and click on it.
- Continue upriver for two more stops until you come to the Row of Statues River stop.
- (Note: you will see a beam of light heading towards the obelisk as you pass it, but don’t bother stopping—there’s nothing more you can do there yet.)
Row of Statues River Stop
- Find the exit arrow that points left and click on it.
Outside the Temple of the Sun – Use the Statue’s Head
- Put the Statue’s Head on the statue.
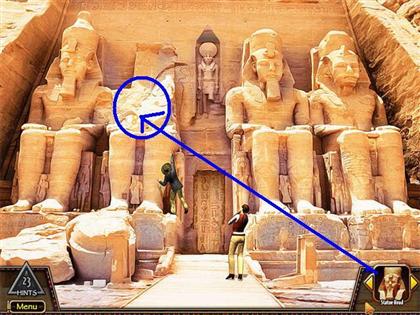
- The door will open.
- Enter the Temple of the Sun.
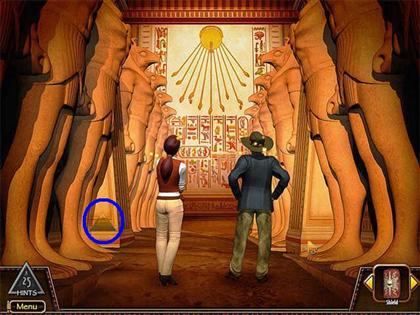
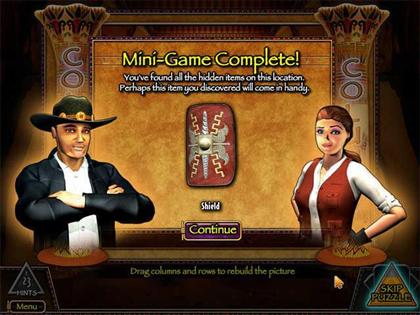
Inside the Temple of the Sun
- A rows and columns mini-game will start.
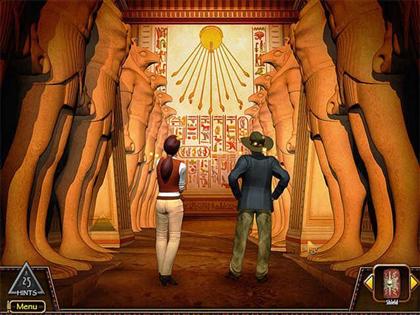
- You will receive the Shield you need for the Roman Warrior.
- At this point you can examine the interior of the temple, but you can’t actually make any progress here yet. Just take the hint pyramid from the lower left.
- Find the down exit arrow and click on it.
Outside the Temple of the Sun
- Collect the hint pyramid from above the statue above the doorway.
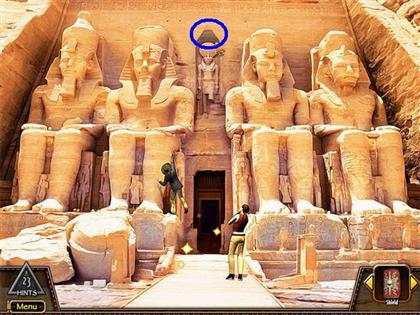
- Find the down exit arrow and click it.
Row of Statues River Stop
- Find the up exit arrow and click it.
Chapter 11: The Statue of Horus
- Opening the Temple of the Sun has unlocked some more locations. Now let’s check out the Obelisk.
Camel River Stop
- Find the exit arrow that points right and click it.
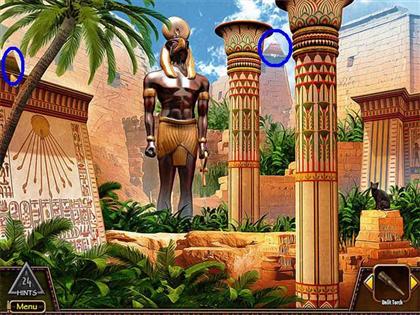
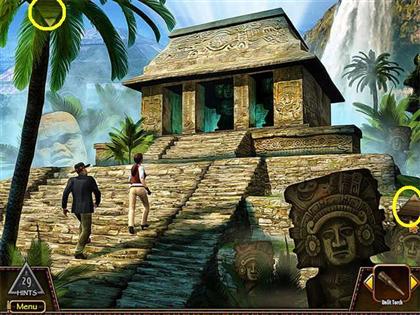
Courtyard of the Obelisk
- Now there are two areas that sparkle—the Obelisk on the left, and the archway towards the back.
- The sparkles for the archway look like they’re on the statue’s foot on the right.
- Click on the sparkles on the right.
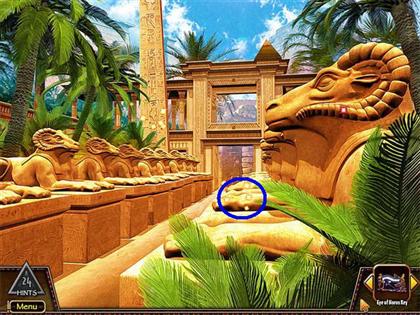
Statue of Horus
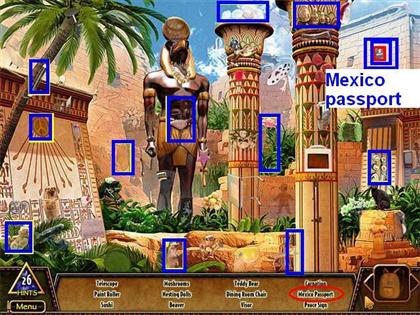
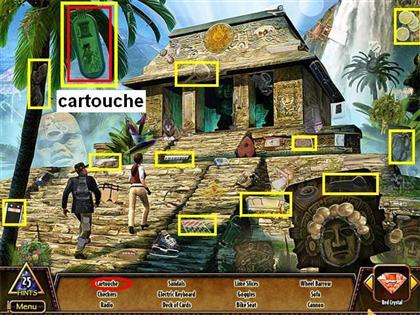
- A Hidden Object scene is open. Collect the items on the Find List. The Handy Item is the Mexico Passport.
- Collect the hint pyramid in the upper left and the one just to the right of the top of the center column.
- Find the exit arrow that points down and click on it.
Courtyard of the Obelisk
- Find the exit arrow that points down and click on it.
Chapter 12: Travel to Mexico
- A new passport means a new country to explore!
- Back to Passport Hall so we can visit Mexico.
Camel River Stop
- Now go all the way back upriver using the center bottom exit arrows until you come to the Plane River Stop.
- Click on the plane to enter Passport Hall.
Passport Hall – Use the Mexico Passport
- Take the Mexico Passport from your inventory and put it on the next obelisk.
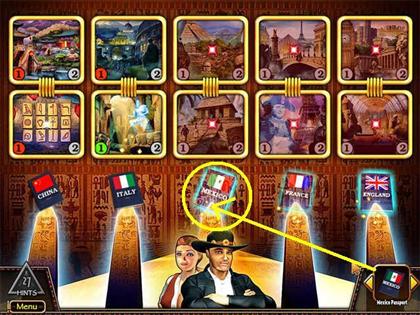
- Notice how the “1” on each of the Mexico tiles turns green.
- Click on the top picture tile for Mexico.
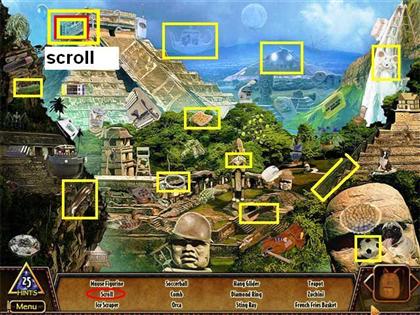
Mexico: Top Tile
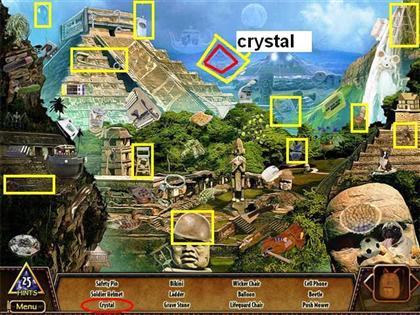
- A Hidden Object scene is open. Collect all the items on the Find List. The Handy Item is the Red Crystal (although it looks clear in the scene) you will use on top of the Obelisk later.
- Collect the hint pyramid from the top of the small tower left of center and from the top of the plateau on the back right.
- Find the exit arrow that points down and click on it.
Passport Hall
- Notice that the “1 on the top picture tile for Mexico is now red. This means you have completed everything for that task.
- Click on the bottom picture tile for Mexico.
Mexico: Bottom Tile
- A Hidden Object scene is open. Collect all the items on the Find List. The Handy Item is the Pharaoh’s Cartouche you will use later.
- Collect the upside down green hint pyramid from the top of the tree on the left and the brown hint pyramid from the lower right.
- Find the exit arrow that points down and click on it.
Passport Hall
- This is all you can do here now.
- Find the exit arrow that points down and click on it to return to Egypt.
Chapter 13: The Crystal and the Obelisk
- This red crystal looks important. And heavy! Let’s go try it on the Obelisk.
- Go downriver .until you come to the Camel River stop.
Camel River Stop
- Find the exit arrow that points right and click on it.
Courtyard of the Obelisk
- Click on the sparkles on the Obelisk.
Obelisk – Use the Red Crystal
- Take the Red Crystal from your inventory and place it on top of the Obelisk where the sparkles are.
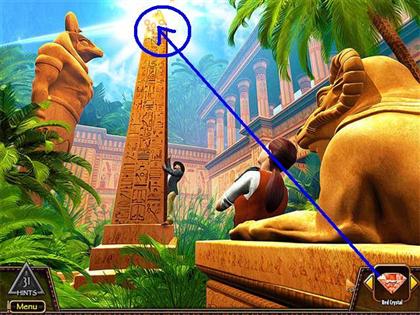
- The Ankh for the Vizier’s Ghost will appear to the right of the Obelisk. Collect it.
- Find the exit arrow that points down and click it.
The Courtyard of the Obelisk
- Find the exit arrow that points down and click it.
The Camel River Stop
- Find the exit arrow that points up and click it.
Chapter 14: Opening the Great Pyramid
- We have the Pharaoh’s Cartouche! There was a place for it in the middle of the Great Pyramid. Can we get the door to open? What will we find inside?
The Sphinx River Stop
- Find the exit arrow that points left and click on it.
The Sphinx
- Find the exit arrow that points up and click it.
The Base of the Great Pyramid
- Find the exit arrow that points up and click it.
Middle of the Great Pyramid – Use the Pharaoh’s Cartouche
- Click on the doorway to open the zoom scene.
- Take the Pharaoh’s Cartouche from your inventory and place it on the door.
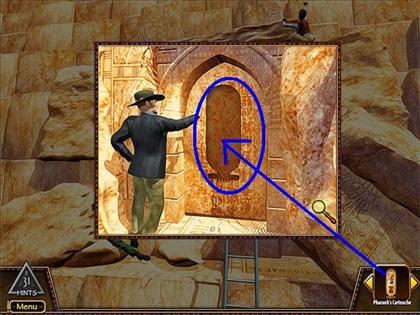
- The door will open.
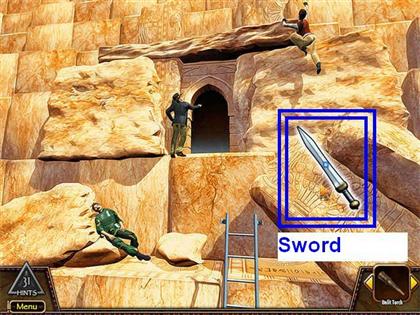
- The sword will appear to the right of the doorway. Collect it. You will give this to the Roman Warrior later.
Inside the Great Pyramid
- Find out that the place is under a curse. You need “the Pharaoh’s Flame,” whatever that is.
- Return all the way to the river.
Chapter 15: The Roman Warrior
The Sphinx River Stop
- There are several possibilities for what to do next, but since we now have both the Shield and the Sword in our inventory and we know where those go, let’s go all the way back upriver to the Plane River Stop.
- Find the exit arrow that points down and click on it.
- Continue upriver to the Plane River Stop.
The Plane River Stop
Passport Hall
- Click on the bottom tile for Italy.
Italy: Bottom Tile – Use the Sword
- Take the sword from your inventory and give it to the Roman Warrior.
- The France Passport will appear on the right.
Use the Shield
- Now take the shield from your inventory and give it to the Roman Warrior.
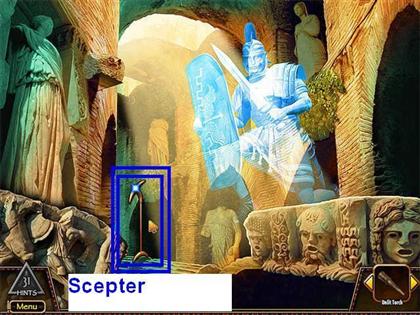
- The Pharaoh’s Scepter you will give to the Vizier’s ghost later will appear on the left.
- Find the exit arrow that points down and click on it.
Chapter 16: Travel to France
- Another passport, another country! Viva la France!
Passport Hall – Use the France Passport
- Take the France Passport from your inventory and put it on the next obelisk.
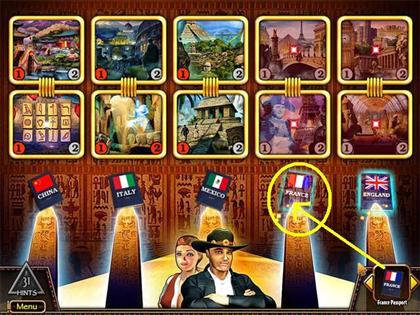
- Notice how the “1” on each of the France tiles turns green.
- Click on the top picture tile for France.
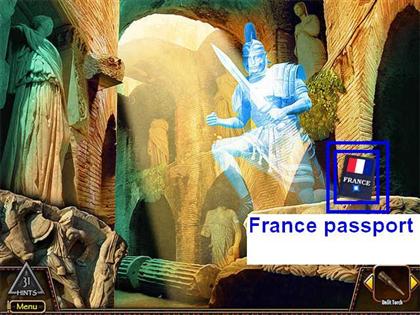
France: Top Tile
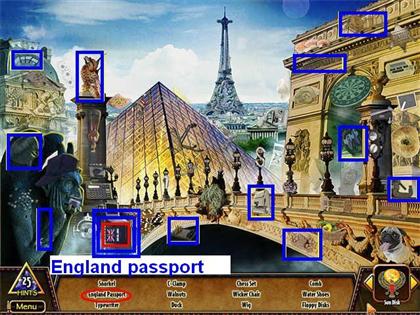
- A Hidden Object scene is open. Collect all the items on the Find List. The Handy Item is the England Passport.
- Collect the hint pyramid from the upper left and from on top of the railing on the lower right.
- Find the exit arrow that points down and click on it.
Passport Hall
- Notice that the “1” on the top picture tile for France is now red. This means you have completed everything for that task.
- Click on the bottom picture tile for France.
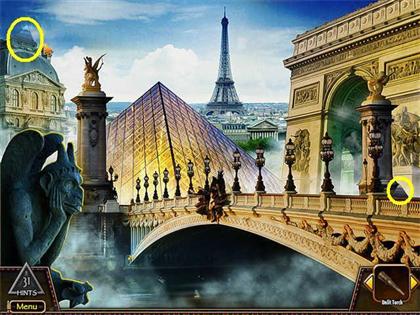
France: Bottom Tile
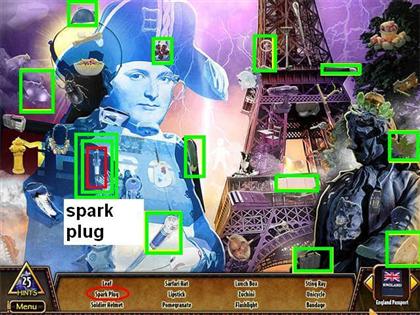
- A Hidden Object scene is open. Collect all the items on the Find List. The Handy Item is the spark plug you will use later to help the jeep driver.
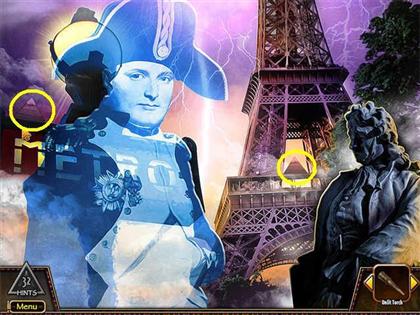
- Collect one hint pyramid from the upper left above the “M” in the metro sign and the other hint pyramid from the center of the Eiffel Tower.
- Find the exit arrow that points down and click on it.
Chapter 17: First Trip to England
- Only one more country to visit, and now we have the passport. England, here we come!
Passport Hall – Use the England Passport
- Take the England Passport from your inventory and put it on the next obelisk.
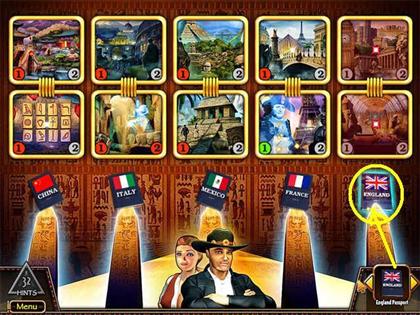
- Notice how the “1” on each of the England tiles turns green.
- Click on the top picture tile for England.
England: Top Tile
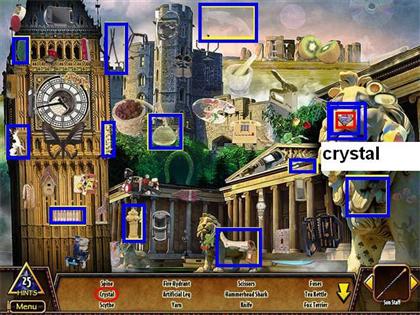
- A Hidden Object scene is open. Collect all the items on the Find List. The Handy Item is a Purple Crystal you will use later in the game.
- Collect a purple hint pyramid from the top of the castle just to the left of Stonehenge and a green hint pyramid from just below that same castle in the center of the scene.
- Find the exit arrow that points down and click on it.
Passport Hall
- Notice that the “1” on the top picture tile for England is now red. This means you have completed everything for that task.
- Click on the bottom picture tile for England.
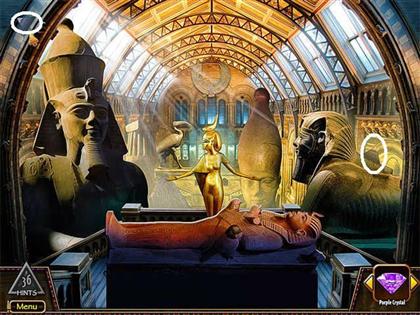
England: Bottom Tile

- A Hidden Object scene is open. Collect all the items on the Find List. The Handy Item is another piece of the Rosetta Stone.
- Collect a hint pyramid from the top left and another from the back of the sarcophagus on the lower right.
- Find the exit arrow that points down and click on it.
Passport Hall
- This is all you can do here now.
- Find the exit arrow that points down and click on it to return to Egypt.
Chapter 18: The Jeep and the 1st Trip to the Oasis
- Who would have thought we’d find a spark plug in France? Still, we know where there’s a broken down jeep, so let’s see if it fits.
The Plane River Stop
- Find the exit arrow that points up and click on it.
The Row of Statues River Stop
- Find the exit arrow that points right and click on it.
The Jeep Driver – Use Spark Plug
- Take the spark plug from your inventory and use it to fix the jeep. This will unlock the exit to the Oasis.
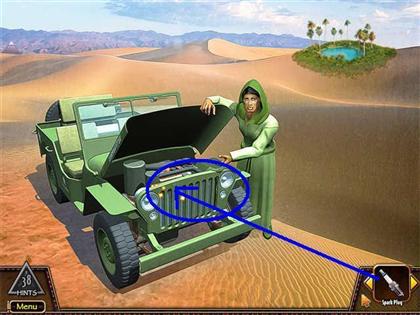
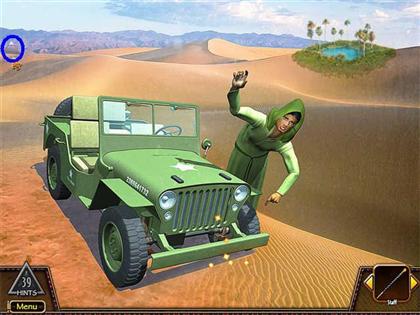
- Find the exit arrow that points up and click on it.
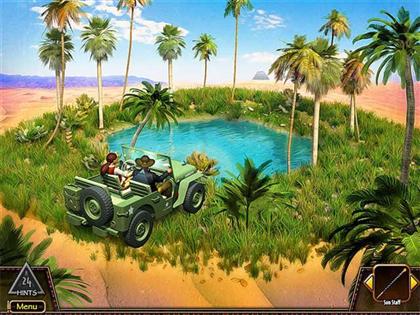
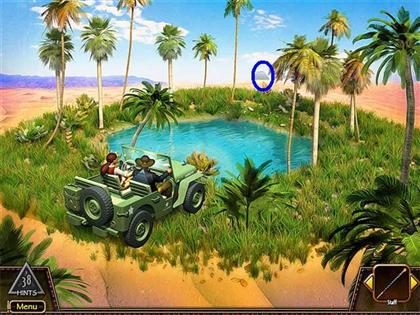
The Oasis
- A swap tiles puzzle will be open.
- You will receive part of the Sun Staff. (Remember the Harem Girl in the City tower said she could put that back together if you find all the pieces.)
- Collect the hint pyramid at the back of the scene.
- Find the exit arrow that points down and click on it.
The Jeep Driver
- Talk to the Jeep Driver. He will tell you he has a flat tire, but you can’t do anything about that yet.
- Collect the hint pyramid from the left of the scene.
- Find the exit arrow that points down and click on it.
- Travel downriver to the Camel River Stop.
Chapter 19: The Vizier’s Ghost
- We have the Ankh and the Scepter, so it’s time to visit the Vizier’s Ghost.
Camel River Stop
- Find the exit arrow that points left and click on it.
Camel Driver
- Find the exit arrow that points right and click on it.
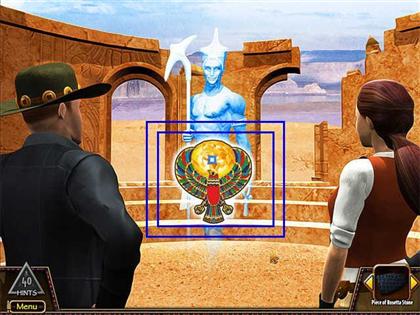
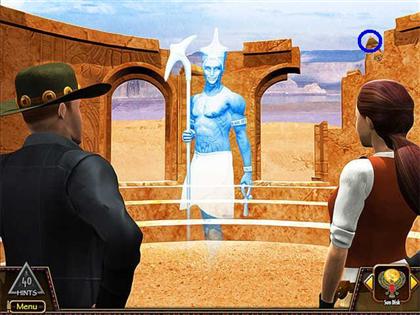
Vizier’s Ghost – Use the Ankh and the Scepter
- Take the Ankh and the Scepter from your inventory and give them to the Vizier’s Ghost.
- The Sun Disk will appear. Take it.
- If you have not yet collected the hint pyramid from the upper right, take it now.
- Find the exit arrow that points down and click it.
- Return to the River.
Chapter 20: The Pharaoh’s Flame
- Now you have the parts you need for the Sun Staff, so it’s time to go back to the City.
Camel River Stop
- Find the exit arrow that points up and click it.
Sphinx River Stop
- Find the exit arrow that points right and click it.
The City
- Click on the sparkles on the right to enter the Tower.

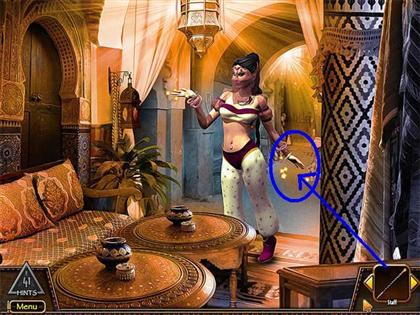
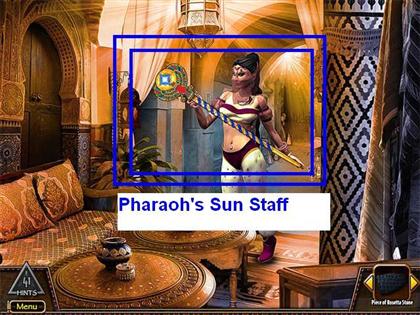
Inside the Tower – Use Sun Staff and Sun Disk
- Give the Harem Girl the Sun Staff and the Sun Disk from your inventory and she will combine them into Pharaoh’s Staff.
- Find the exit arrow that points down and click it.
- Return to the River.
The Sphinx River Stop
- Go upriver until you come to the Row of Statues River Stop.
- Find the exit arrow that points left and click on it.
Outside the Temple of the Sun
- Enter the Temple of the Sun.
Inside Temple of the Sun – Use Unlit Torch and Sun Staff
- Take the unlit torch from your inventory and give it to the man.
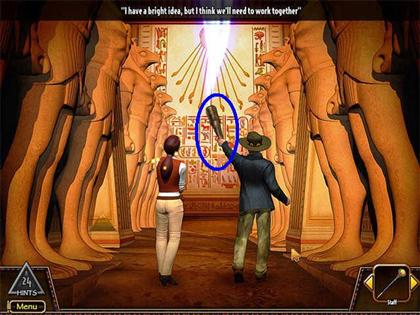
- Take the Staff from your inventory and give it to the woman.
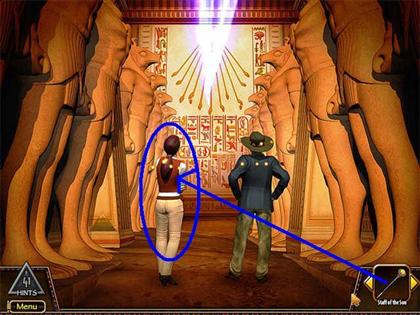
- Sunlight will bounce off the Sun Shield on the end of the staff and light the torch.
- Take the lit torch.
- Take the hint pyramid from the lower left.
- Now you have Pharaoh’s Flame. Back to the Great Pyramid!
- Find the exit arrow that points down and click on it.
Row of Statues River Stop
- Find the exit arrow that points up and click on it.
- Head downriver until you come to the Sphinx River Stop.
Sphinx River Stop
- Find the exit arrow that points left and click on it.
Sphinx
- Find the exit arrow that points up by the Great Pyramid and click on it.
Base of the Great Pyramid
- Find the exit arrow that points up and click on it.
Middle of the Great Pyramid
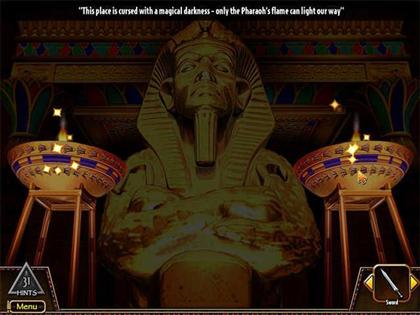
Inside the Great Pyramid
- Time to lift the cursed darkness!
Use the Lit Torch
- Take the lit torch from your inventory and click on either set of sparkles.
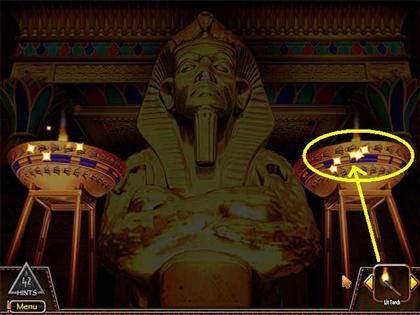
- The bowl lamps will light.
- Click on the gold statue.
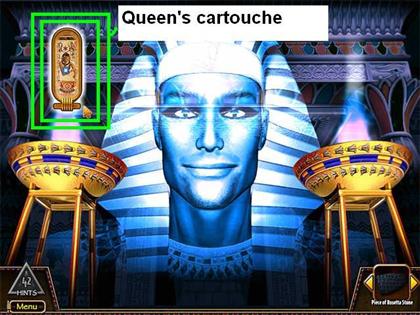
- The Pharaoh’s spirit will appear, smiling.
- The Queen’s Cartouche will also appear to the left of the spirit. Take it. You will need this to open the Queen’s Tomb by the Camel Driver.
- Find the exit arrow that points down and click on it.
Chapter 21: Opening the Queen’s Tomb
- We have the Queen’s Cartouche for the door of the Queen’s Tomb. Let’s see what it contains!
Sphinx River Stop
- Find the exit arrow that points down and click on it.
Camel River Stop
- Find the exit arrow that points left and click on it.
Camel Driver
- The Queen’s Tomb is sparkling.
- Find the exit arrow that points left and click on it.
Outside the Queen’s Tomb – Use the Queen’s Cartouche
- Take the Queen’s Cartouche from your inventory and use it on the door.
- The door will open.
- Also, a scroll will appear to the left of the door. Take it.

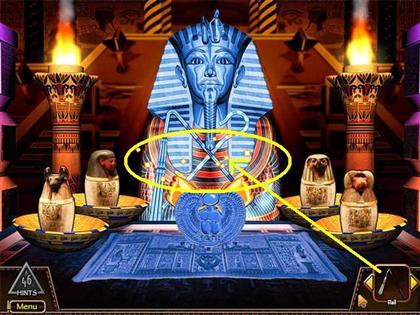
Inside the Queen’s Tomb
- Although this is supposed to be the Queen’s Tomb, the artwork shows a statue of the Pharaoh again. Just go with it.
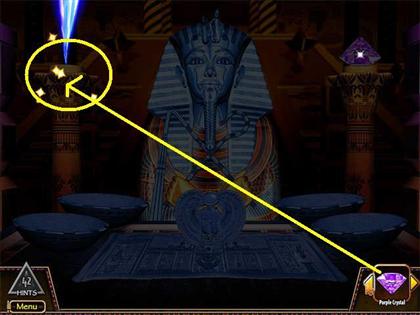
Use the Purple Crystal
- Click on the gold sparkles on the left. It will remind you of the Red Crystal on top of the Obelisk that you placed earlier.
- Take the Purple Crystal from your inventory and put it on the left where the sparkles are.
- The room will light up.
- To proceed in this room, you have to collect several different objects: a Crook, a Flail, a Disk, 4 Canopic Jars, and the completed 5-part scroll. You can see the outlines in blue around the statue.
- We will come back when we have more items.
- Find the down exit arrow and click on it.
Outside the Queen’s Tomb
- Find the down exit arrow and click on it.
Camel Driver
- Just for fun, look towards the ruins on the right and you will now be able to see the Vizier’s Ghost standing there. You don’t need to go back there, though.
- Find the down exit arrow and click on it.
Chapter 22: The Canopic Jars
- There were four dishes in the Queen’s Tomb and traditionally mummies were buried with four Canopic jars. You may remember seeing one by the base of the Statue of Horus, so let’s look there first.
Camel River Stop
- Although it’s not obvious until you start revisiting locations, opening the Queen’s Tomb has unlocked several areas so that you can begin collecting all those items you’ll need.
- Find the exit arrow that points right and click on it.
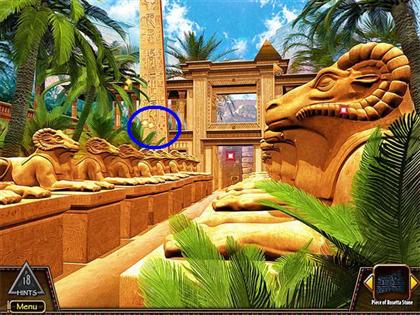
Courtyard of the Obelisk
- Once again, there are sparkles to show that the far archway with the Statue of Horus has something important.
- And once again, the sparkles look like they are on the foot of the right statue instead of on the archway.
- Click on the sparkles on the right.
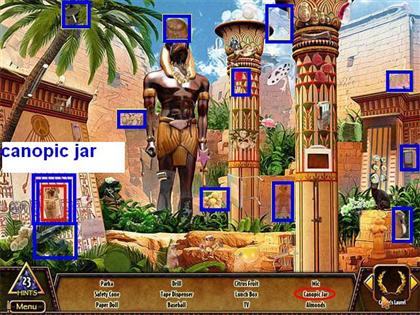
Statue of Horus
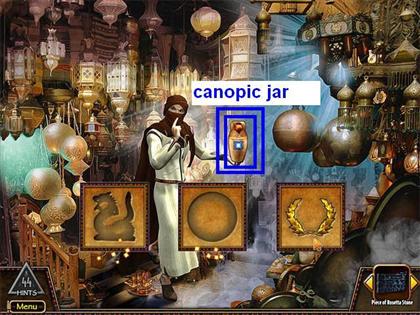
- A Hidden Object scene is open. Collect all the items on the Find List. The Handy Item is the Falcon Canopic Jar. This one will match the clue “soars through the air.”
- Find the exit arrow that points down and click on it.
Courtyard of the Obelisk
- The other area by the statues is still locked with a red sparkle.
- Find the exit arrow that points down and click on it.
Camel River Stop
- Find the exit arrow that points up and click on it.
Sphinx River Stop
- Find the exit arrow that points right and click on it.
The City
- It can be hard to tell because the sparkles from the Market and the sparkles from the Dome run together, but the Dome is sparkling again.
- Click on the Dome to enter it.
Inside the Dome
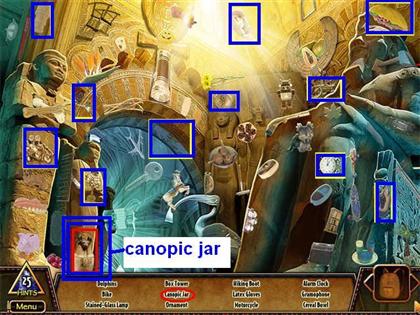
- A Hidden Object scene is open. Collect all the items on the Find List. The Handy Item is the Jackal Canopic Jar. This one will match the clue “runs on four.”
- Find the exit arrow that points down and click on it.
The City
- Although the Market is sparkling, there is nothing to do there until we’ve collected the objects the merchant wants.
- Find the exit arrow that points down and click on it.
The Sphinx River Stop
- We could go deliver the scroll or the Rosetta Stone, but since we need more pieces of each we’ll wait.
- Let’s go back to Passport Hall and see if anything unlocked when we opened the Queen’s Tomb. We still need two more Canopic Jars.
- Find the exit arrow that points down and click on it.
- Continue upriver all the way back to the plane.
The Plane River Stop
- Click on the plane to enter Passport Hall.
Passport Hall
- Yes! Several of the numbers have turned green, showing we have tasks to do there.
- Let’s start with the bottom tile for China, on the far left.
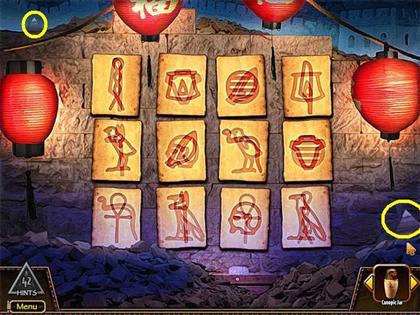
China: Bottom Hall
- A jigsaw puzzle mini-game will open.
- The symbols on the pieces in the center change, perhaps to represent the row and column puzzle we did before. However, there aren’t that many pieces altogether, so just work the outside edge pieces first and you shouldn’t have too much trouble figuring out where the 4 inner ones go.
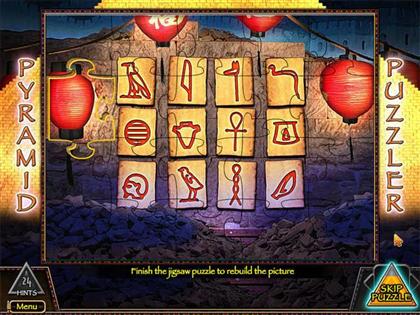
- You will receive the Canopic Jar with a human face. This will fit the clue “walks on two.”
- Collect the two hint pyramids.
- Find the exit arrow that points down and click on it.
Passport Hall
- Click on the top tile for Italy.
Italy: Top Tile
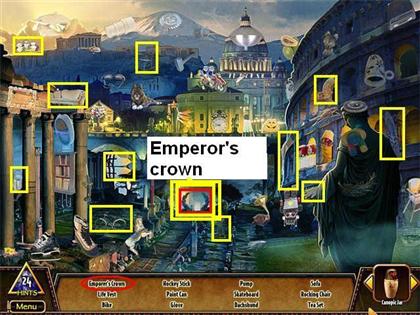
- A Hidden Object scene will be open. Collect all the items on the Find List. The Handy Item is the Emperor’s Crown (gold laurel wreath labeled Caesar’s Wreath in your inventory) that you will give to the Merchant in the City later.
- Find the exit arrow that points down and click on it.
Passport Hall
- Click on the top tile for England.
England: Top Tile
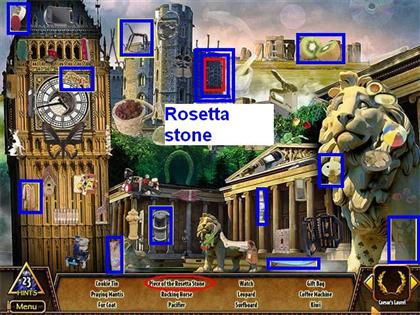
- A Hidden Object scene will be open. Collect all the items on the Find List. The Handy Item is another piece of the Rosetta Stone.
- Find the exit arrow that points down and click on it.
Passport Hall
- This is all you can do here now.
- Find the exit arrow that points down and click on it to return to Egypt.
The Plane River Stop
- Find the exit arrow that points up and click on it.
- Go downriver until you come to the Sphinx River Stop.
Sphinx River Stop
- Find the exit arrow that points right and click on it.
The City
- Click on the sparkles on the Market to enter it.
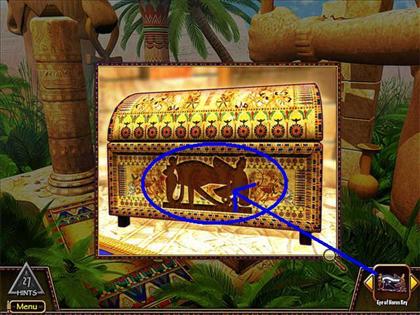
The Market – Use Caesar’s Wreath
- Place Caesar’s Wreath into the outline that matches it.
- The 4th Canopic Jar will appear. Collect it. This one has the head of a baboon, and will match the clue “swings through the trees.”
- Find the down exit arrow and click on it.
The City
- There is nothing more to do here at this time.
- Find the down exit arrow and click on it.
The Sphinx River Stop
- At this point, we recommend going one more stop downriver and delivering the scroll and Rosetta Stone pieces, just to clear your inventory.
- Find the exit arrow that points up and click on it.
Last River Stop
- Go to the left and put the scroll piece on the table.
- Come back to the River
- Go to the right and put the Rosetta Stone pieces in the chest.
- Come back to the River.
- Find the exit arrow that points down and click on it.
- Go upriver until you come to the Camel River Stop.
Camel River Stop
- Find the exit arrow that points left and click on it.
Camel Driver
- The Queen’s Tomb is sparkling.
- Find the exit arrow that points left and click on it.
- Find the exit arrow that points left and click on it.
Outside The Queen’s Tomb
Inside the Queen’s Tomb – Use Canopic Jars
- Now it is time to place the 4 Canopic Jars.
- As you click on the sparkles by each dish, you will get the clue for that dish.
- Then take the correct jar from your inventory, and click on the sparkles again.
- You have to click on the sparkles to get the jar to stick.
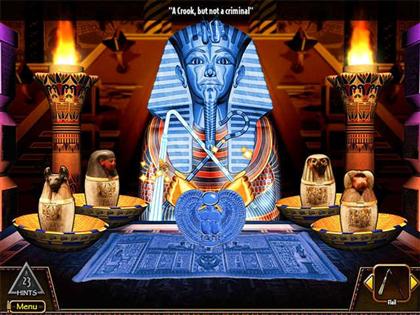
- Solution:Walks on two = Human
Runs on four = Jackal
Soars through the air = Falcon
Swings through the Trees = Baboon
- Once you have placed all 4 jars, that is all you can do here, but more places will be unlocked elsewhere.
- Find the exit arrow that points down and click on it.
- Return to the River.
Chapter 23: The Courtyard of the Obelisk
- Where to go next? It’s not obvious, but placing the 4 Canopic Jars has influenced the Courtyard of the Obelisk.
Camel River Stop
- Find the exit arrow that points right and click on it.
Courtyard of the Obelisk
- At last! The sparkles on the right side have been unlocked.
- Click on the sparkles.
- You will get a close-up view of the row of statues with another piece of the Rosetta Stone. Collect it.
Camel River Stop
- Find the exit arrow that points up and click on it.
Chapter 24: The Crook and the Flail
- Now we need to collect the Crook and the Flail for the Queen’s Tomb.
Sphinx River Stop
- Find the exit arrow that points right and click on it.
The City
- The Tower on the right is sparkling again.
- Click on the right sparkles to enter the Tower.
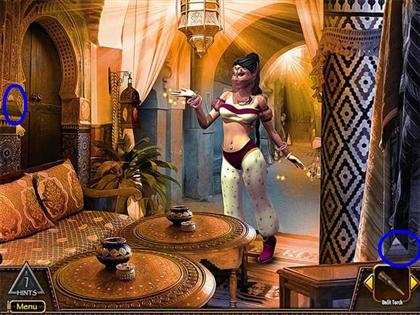
The Tower
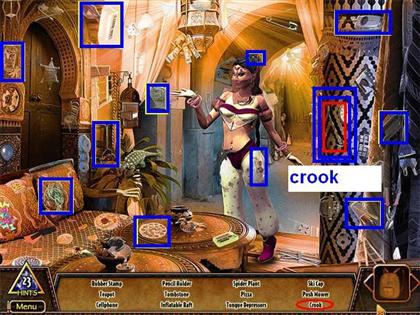
- A Hidden Object scene will be open. Collect all the items on the Find List. The Handy Item is the Crook for the Queen’s Tomb.
- Find the exit arrow that points down and click on it.
The City
- Although the Market is sparkling, there is nothing more we can do there until we collect more objects for the Merchant.
- Find the exit arrow that points down and click on it.
The Sphinx River Stop
- Now let’s go back to Passport Hall and see if placing the Canopic Jars unlocked anything there.
- Find the exit arrow that points down and click on it.
- Continue upriver until you come to The Plane River Stop.
The Plane River Stop
- Click on the plane to enter Passport Hall.
Passport Hall
- Several more numbers have turned green.
- Click on the top picture tile for Mexico.
Mexico: Bottom Tile
- A Hidden Object scene is open. Collect all the items on the Find List. The Handy Item is another piece of the scroll.
- Find the exit arrow that points down and click on it.
Passport Hall
- Click on the bottom picture tile for France.
France: Bottom Tile
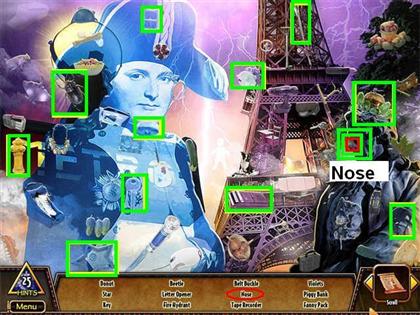
- A Hidden Object scene is open. Collect all the items on the Find List. The Handy Item is the nose of the Sphinx.
- Find the exit arrow that points down and click on it.
Passport Hall
- Click on the bottom picture tile for England.
England: Bottom Tile
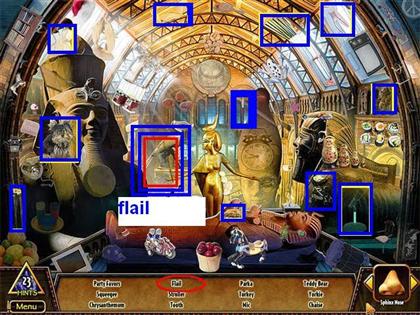
- A Hidden Object scene is open. Collect all the items on the Find List. The Handy Item is the Flail for the Queen’s Tomb.
- Find the exit arrow that points down and click on it.
Passport Hall
- This is all you can do here now.
- Find the exit arrow that points down and click on it to return to Egypt.
The Plane River Stop
- Find the exit arrow that points up and click on it.
- Go downriver until you come to the Camel River Stop.
Camel River Stop
- Find the exit arrow that points left and click on it.
Camel Driver
- The Queen’s Tomb is sparkling.
- Find the exit arrow that points left and click on it.
Outside The Queen’s Tomb
Inside the Queen’s Tomb – Use Crook and Flail
- Take the Crook and the Flail from your inventory and place them on the statue.
- This will unlock the clue to the next object, the Scarab.
- Find the down exit arrow and click on it.
- Go all the way back to the River.
The Camel River Stop
- Find the exit arrow that points up and click on it.
Chapter 25: The Nose of the Sphinx
- We have the Nose of the Sphinx in inventory, might as well see if it fits.
The Sphinx River Stop
- Find the exit arrow that points left and click on it.
The Sphinx – Use the Nose of the Sphinx
- Click on the Sphinx to open a zoom scene.
- Take the nose from your inventory and place it on the face.
- Now the Sphinx will sparkle.
- Click on the sparkles.
The Sphinx Close Up
- Some object goes here, but we don’t know what yet.
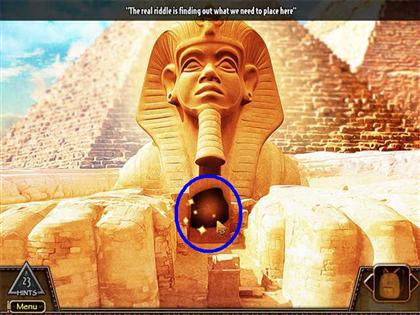
- Collect the hint pyramid from the top of the Sphinx.
- Find the down exit arrow and click on it.
- Go back to the River.
- Now go all the way upriver to the Plane River Stop.
Chapter 26: The Heart Scarab
- The next object needed for the Queen’s Tomb is the Heart Scarab. Since we’re not sure where to look next, let’s check Passport Hall to see if any new numbers have unlocked.
The Plane River Stop
- Click on the plane to enter Passport Hall.
Passport Hall
- The last set of numbers has turned green.
- Click on the top picture tile for China.
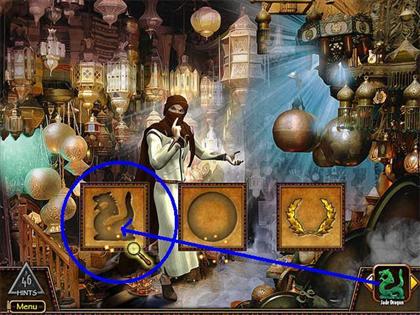
China: Top Tile
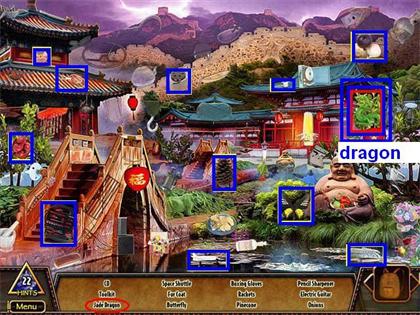
- A Hidden Object scene is open. Collect all the items on the Find List. The Handy Item is the Jade Dragon for the Merchant in the City.
- Find the exit arrow that points down and click on it.
Passport Hall
- Click on the bottom picture tile for Mexico.
Mexico: Bottom Tile
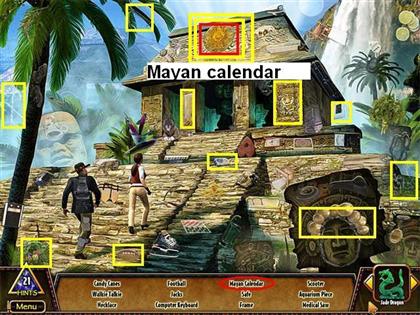
- A Hidden Object scene is open. Collect all the items on the Find List. The Handy Item is the Mayan Calendar for the Merchant in the City.
- Find the exit arrow that points down and click on it.
Passport Hall
- Click on the top picture tile for France.
France: Top Tile
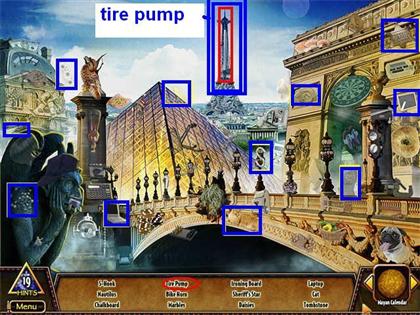
- A Hidden Object scene is open. Collect all the items on the Find List. The Handy Item is the tire pump for the Jeep Driver.
- Find the exit arrow that points down and click on it.
Passport Hall
- This completes all the tasks in Passport Hall.
- Find the exit arrow that points down and click on it to return to Egypt.
The Plane River Stop
- Find the exit arrow that points up and click on it.
The Row of Statues River Stop
- Find the exit arrow that points right and click on it.
The Jeep Driver – Use Tire Pump
- Take the Tire Pump from inventory and use it on the jeep.
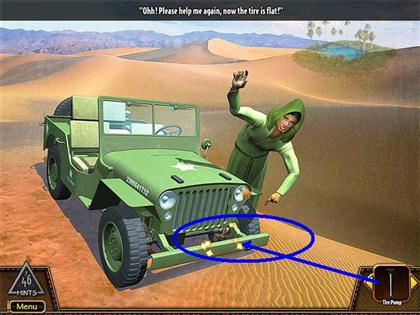
- This will unlock the Oasis again.
- Find the exit arrow that points up and click on it.
The Oasis
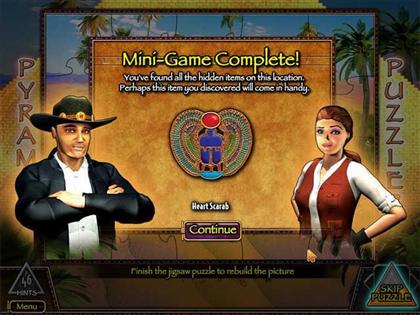
- This will open a jigsaw puzzle mini-game.
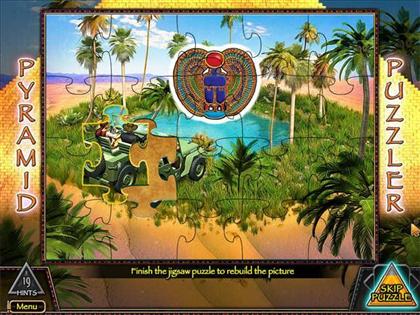
- You will receive the Heart Scarab for the Queen’s Tomb.
- Find the exit arrow that points down and click on it.
- Return all the way to the River.
Chapter 27: Completing the Scroll
- We also need the Book of the Dead for the Queen’s Tomb. We have two items for the Merchant, so let’s see what he’ll give us for them.
Row of Statues River Stop
- Find the exit arrow that points up and click on it.
- Continue downriver to the Sphinx River Stop.
Sphinx River Stop
- Find the exit arrow that points right and click on it.
The City
- The Market is sparkling. Click on it.

The Market – Use the Dragon
- Take the Jade Dragon from your inventory and place it in its outline.
- The last piece of the Rosetta Stone will appear. Take it.
Use the Mayan Calendar
- Take the Mayan Calendar from your inventory and place it in its outline.
- The last piece of the scroll will appear. Take it.
- Find the exit arrow that points down and click on it.
The City
- You have completed all of the tasks here.
- Find the exit arrow that points down and click on it.
The Sphinx River Stop
- Find the exit arrow that points up and click on it.
The Last River Stop
- Find the exit arrow that points left and click on it.
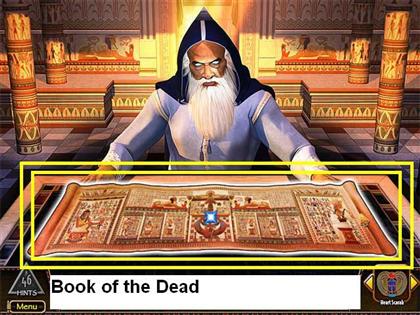
The Seer’s Temple – Use Scroll Pieces
- Take any remaining pieces of the Scroll from your inventory and place it on the table in front of the Seer. There will be 5 pieces in all.
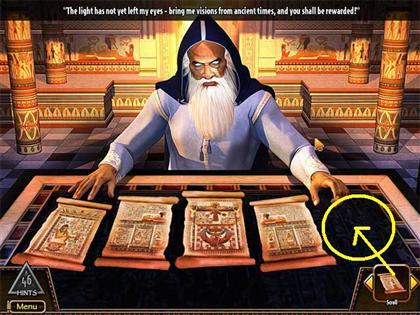
- The Seer will fit the 5 pieces together to form the Book of the Dead. Collect it.
- Find the exit arrow that points down and click on it.
The Last River Stop
- Find the exit arrow that points right and click on it.
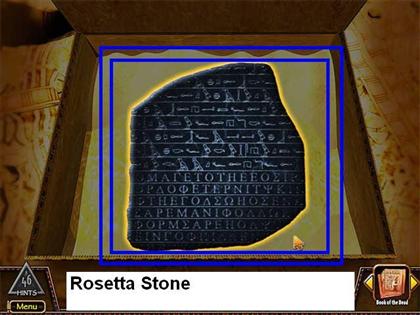
The Rosetta Stone Chest – Use Rosetta Stone Pieces
- Take any remaining pieces of the Rosetta Stone from your inventory and place them into the zoom scene for the chest. There will be 6 pieces in all.
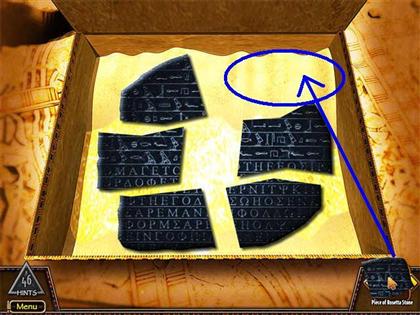
- The pieces will fit together automatically to form the Rosetta Stone. Collect it.
- Find the exit arrow that points down and click on it.
The Last River Stop
- It is time to go to the Queen’s Tomb and place the remaining items.
- Find the exit arrow that points down and click on it.
- Go all the way upriver to the Camel River Stop.
Camel River Stop
- Find the exit arrow that points left and click on it.
The Camel Driver
- The Queen’s Tomb is sparkling.
- Find the exit arrow that points left and click on it.
Outside The Queen’s Tomb
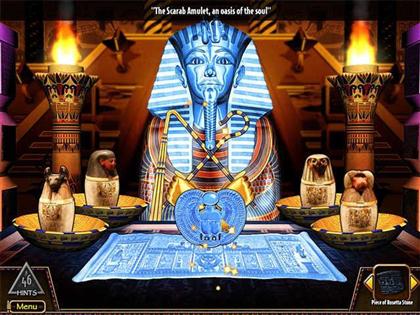
Inside the Queen’s Tomb – Use Scarab
- Take the Scarab from your inventory and put it in place.
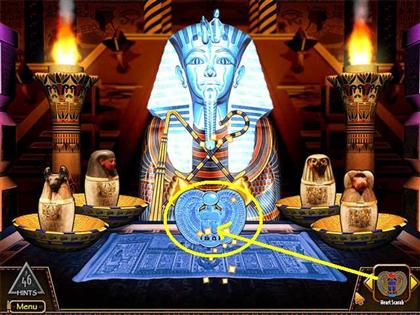
Use the Book of the Dead
- Take the Book of the Dead from your inventory and put it in place.
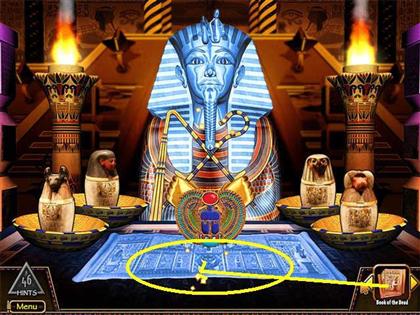
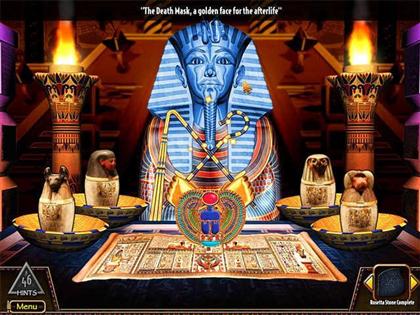
- This reveals the final clue: you need to find the gold Death Mask.
- Find the exit arrow that points down and click on it.
- Go all the way back to the River.
Chapter 28: The Gold Death Mask
- We’re getting close. We only need one more item for the Queen’s Tomb: the Gold Death Mask.
The Camel River Stop
- We have one object left: the Rosetta Stone. And we know of one place that needs an object: the Sphinx. Let’s go try it!
- Find the exit arrow that points up and click on it.
- Continue downriver to the Sphinx River Stop.
Sphinx River Stop
- Find the exit arrow that points left and click on it.
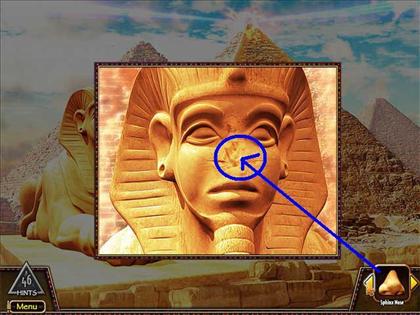
The Sphinx
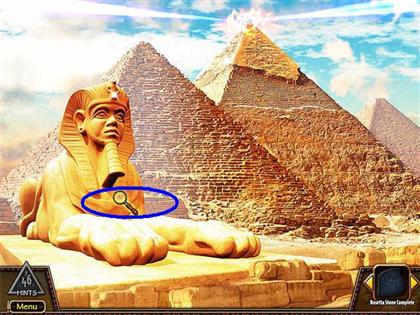
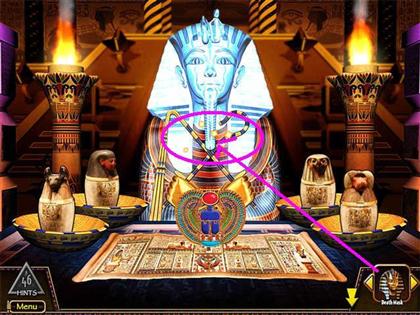
Sphinx Close-up – Use the Rosetta Stone
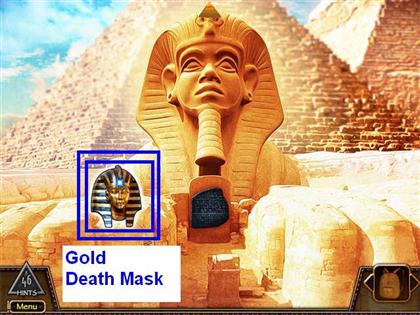
- Take the Rosetta Stone from your inventory and place it on the Sphinx. It fits!
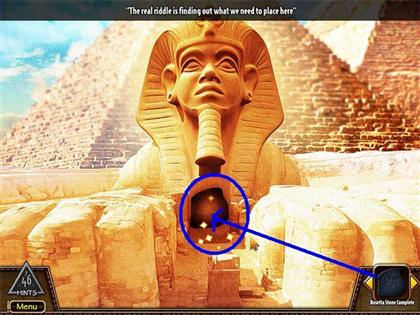
- The Gold Death Mask will appear to the left of the Rosetta Stone. Collect it.
- Find the exit arrow that points down and click on it.
- Go all the way back to the River.
The Sphinx River Stop
- Find the exit arrow that points down and click on it.
- Go back upriver to the Camel River Stop.
The Camel River Stop
- Find the exit arrow that points left and click on it.
The Camel Driver
- The Queen’s Tomb is sparkling.
- Find the exit arrow that points left and click on it.
The Queen’s Tomb
Inside the Queen’s Tomb – Use the Gold Mask
- Take the Death Mask from your inventory and put it in place.
- Watch the ending scene.
- This completes the game!

 Samantha Swift: Mystery from Atlantis Walkthrough, Guide, & Tips
 Grim Tales: The Vengeance Walkthrough, Guide, & Tips
 Governor of Poker Texas Tycoon Tips & Tricks, Guide, & Tips
 Spirit of Revenge: Elizabeth's Secret Walkthrough, Guide, & Tips
 Mystery Age: The Dark Priests Walkthrough, Guide, & Tips