Steppes 2.0(since it has been reworked) plays very similar to the old Steppes players are used to but brings with it some major changes. The map now has a bit more artillery cover in some of the more open sections of the map and also some rock formations have been altered to boost/takeaway some cover depending on which side you spawn at.
The red routes are initial routes/locations used for side two on the map while the green routes/locations are for side one. Yellow refers to “shared” locations that are typically engagement areas which are fought over by both teams. Solid routes are initial routes taken from the spawn to the front lines.
This map you see below was drawn up using MapTactic which is a very easy to use tool for making strategies for World of Tank maps. It works directly in your browser and has no cost to use it.
http://maptactic.com/
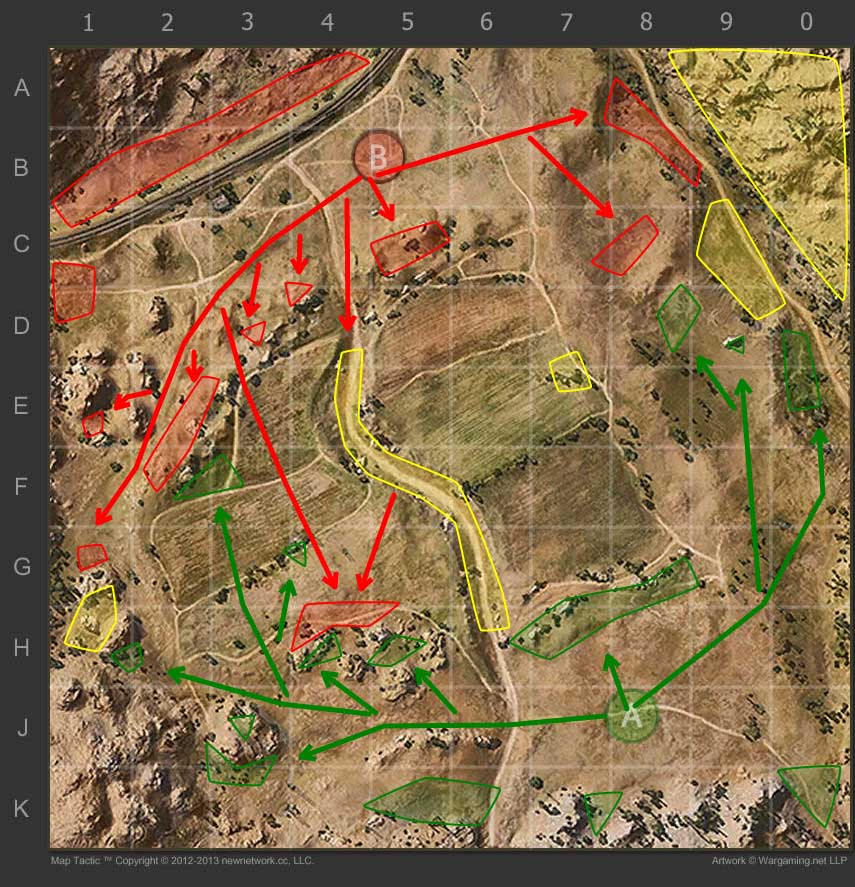
For slower tanks and/or tank destroyers setting up at the start of the map on the base ridge will provide some quick shots on scouts trying to come through the 6 and 7 lines. After that it is better to start moving to the flank you are needed or to plug a hole in the line instead of being useless in the base.
The east flank provides limited cover from artillery but plays a pivotal role in the match since it promotes aggressive play. A team can easily overwhelm and grab this flank and have an open route to the opposing team’s base. Typically you only want to go down here if you are in a fast tank(40 km/h+) if there is 3 or more arty. Heavy tanks do have some cover in D9 and D0 along the rocks/ridge but you are never truly safe.
For scouts or high camouflage tank darting out to E7 can provide some good spots for your team. The downside is you can be easily pinned down or killed if your team doesn’t support you in time.
In H4/H5 there are many rocks available for cover and also firing lanes to shoot into enemy positions/into H1. This area is a good spot for those slower tanks migrating from the base ridge who also want to make sure nobody scoots across the middle of the map uncontested.
J3 is both a useful defensible location and also a place that can sink your team. Setting up in J3 allows you to hit tanks that secure H1 and also in F2 however at the cost of being pinned down in a corner. If your team is fighting for H1 it is better to get into the fight than to hide and let them be overrun. On the other hand if this flank is ignored by your team J3 allows you to defend with lesser numbers against a greater force.
This small section of the map typically is the most fought over since tanks from both sides funnel into G1/H1. The green area in H1 provides cover but will result in being surrounded. Moving into the yellow area you will be a bit more vulnerable to artillery and enemies but closer to securing the west flank.
This area promotes heavy tank/CQB play since it is a very small section of the map. Having the heavy tanks advance into H1 and then bringing a second force from a different direction is encouraged.
This area does very well in the encounter set up for this map but also works for standard mode. A fast tank can zip over to here and fire back in G1. Keep in mind that enemies are just on the other side of the ridge/rocks and you will need to move around to keep them from firing at you. Your team is able to support you very easily and the main downside is if the opposing team has tanks in G5 which can easily kill you.
Taking this route at the start of the match rarely works and will most likely see you die very quickly without accomplishing much. If you wait 3-5 minutes and then advance you will find it much easier to advance and catch the enemy off guard.
There is plenty of artillery cover and also LOS cover since the road is lower than the surrounding fields. Be wary of potential tanks dropping in via the fields on both sides if one of your team’s flanks falls.
Scouting on the map is typically the non-passive type since there is very limited bush spots but a ton of wide open hilly terrain. Doing a quick loop through the 6/7/8/ line field will thwart enemy scouting runs. After that you can stick to scouting the middle of the map for your team until your artillery is somewhat safe.
Once that is accomplished pulling back and going full speed ahead through the hole in enemy defenses will see you break into their base area. Going for arty is smart if there is 3 or more but otherwise staying alive will draw their attention to you. Don’t hesitate to turn back into the E3/C6 areas into somewhat safety if they pull tanks back into the base since you are helping your team gain map control by taking tanks off of the front lines.
Being a very open map the best initial spots for artillery is the furthest location from the enemy. Starting off you have the K5, K7, and K0 areas which should be chosen depending on where the bulk of your team heads. After your team has control of a flank(starting to advance past E/F) start to head down the edge of the map behind them. This saves you from the other weaker flank falling while keeping you near support if you should need it.
Like side 1 there is a defensible base ridge you can set up on initially to take out anyone trying to scout/advance through the fields.
For side 2 the east flank has a bit more cover and plays closer to the base than side 1. C8 and B8/B9 areas provide a decent amount of cover against artillery and tank fire. You will get over here first so setting up, taking a few quick shots, and then accessing if you should push or not is much easier from this side.
Defend if you run into a larger/similar size force or push if you have the numbers in your favor.
The E7 rocks provide a good scouting spot for any small light tanks but like side 1 it is difficult to escape once you are seen here.
Side 2 has a much larger ridge on the eastern flank that provides a lot more defensive spots to set up in. Your team only needs a few people in the E2/D3/D4 spots and more in F2 facing south.
The large rock in E1 is a great place for a tank destroyer to set up in to fire into H1 or for any other tank to defend if your team doesn’t make it over to G1 in time.
Like side 1 the red location in G1 is semi safe(a bit less safe than side 1 from arty though) and provides a good staging point to head south. It is harder to advance into the yellow area from this side if you wait so being more aggressive pays off.
Pushing over to the forward position will tie up the enemy team’s defenders and also provide some shots into H1. Your team can support you and also draws some attention off of H1.
Like side 1 it is best to wait a few minutes before heading down the central passage.
Doing a quick run starting in D6 over to D8 then to C8 will spot any enemy tanks advancing up the 9/0 lines. Inform your arty to pre aim over here to nab some easy experience/credits. After that you will want to spot the middle of the map and then pick a hole in the enemy defensive to push through into their base.
The section behind the railroad is a well known area but is large enough to move around in. This is a great spot since it provides LOS cover from tanks that get into your base. Alternatively you can set up in D1. Like side 1 it is recommended to follow behind your strong flank to prevent yourself from being left behind.

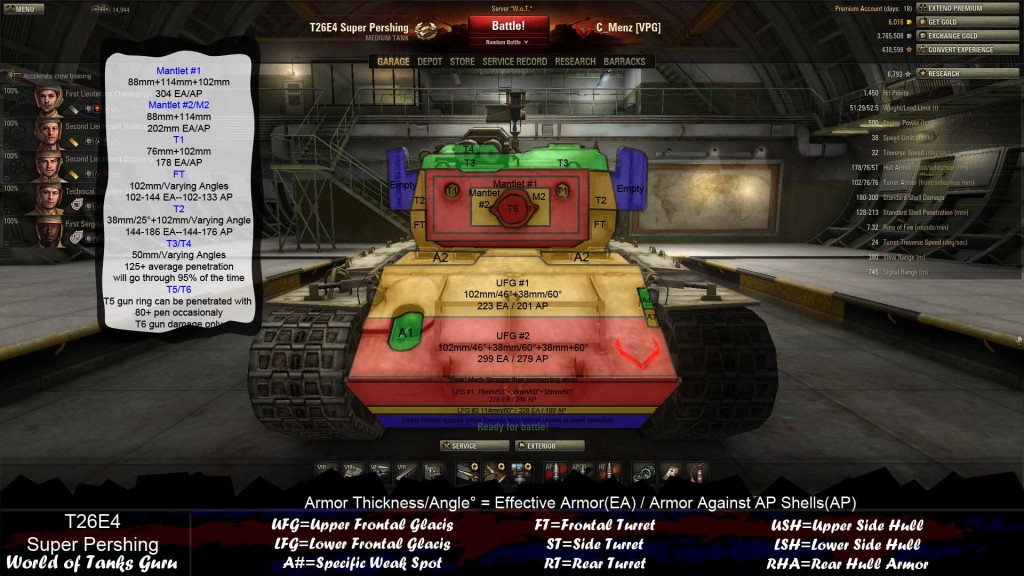 Weak Spot Guide: T26E4 SuperPershing - World of Tanks Guru
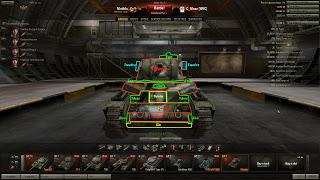 Weak Spot Guide: Matilda - World of Tanks Guru
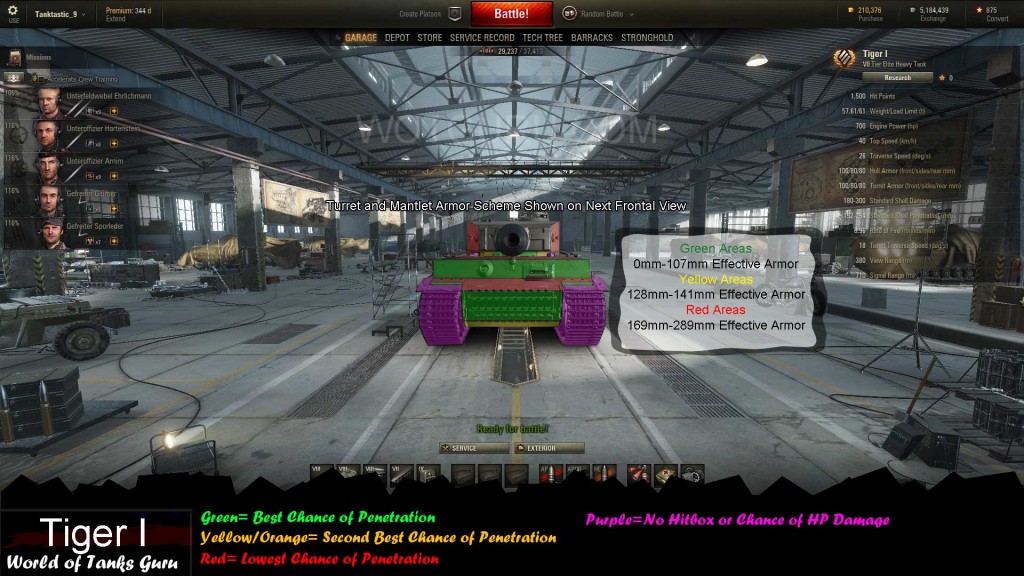 Weak Spot Guide: Tiger I - World of Tanks Guru
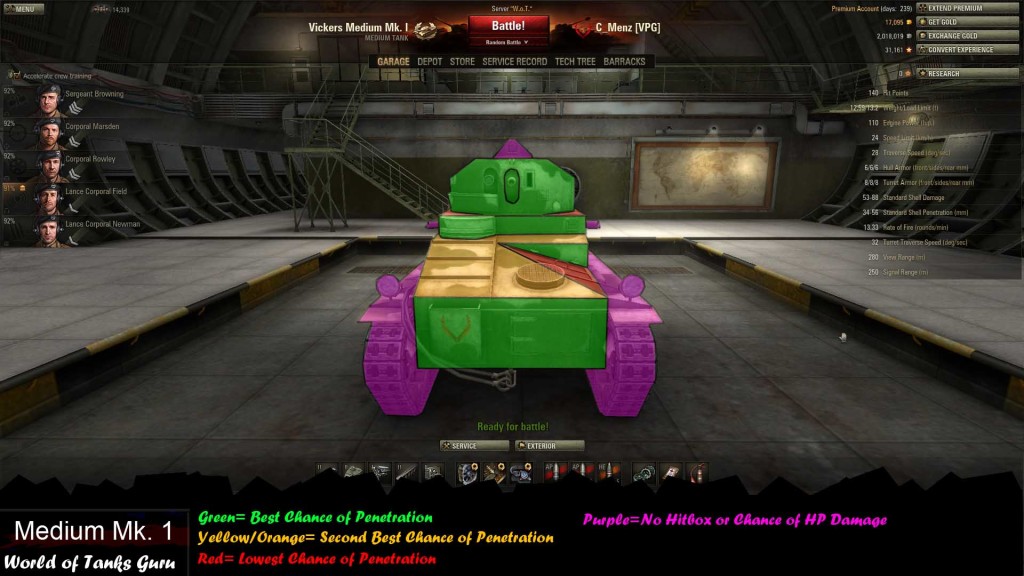 Weak Spot Guide: Vickers Medium MK 1
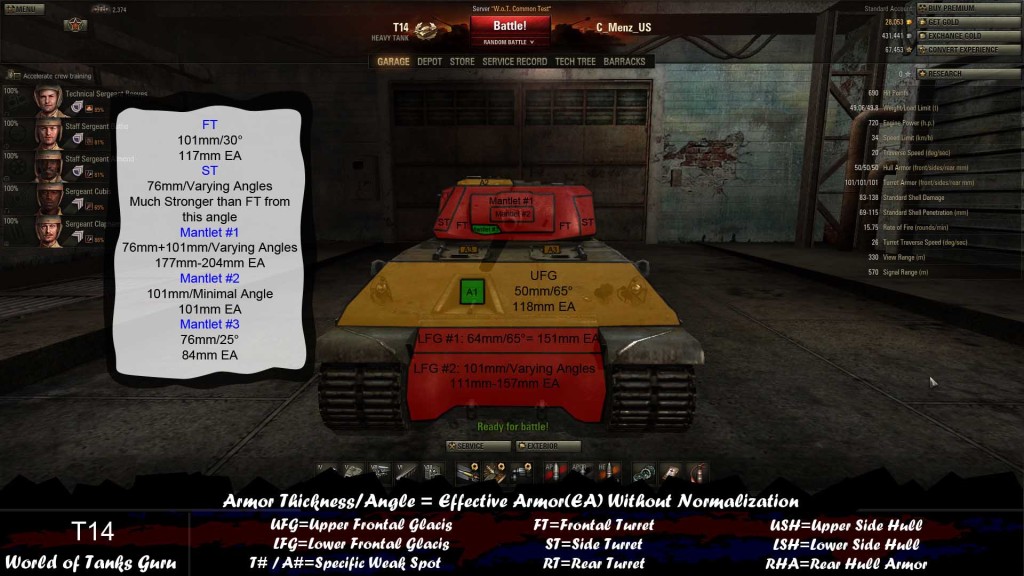 Weak Spots Guide: T14 - World of Tanks Guru