The tier 5 premium tank Matilda might not look very tough at first glance but for tier 3-5 tanks it can be a real challenge when brawling with one. Why? First off its overall listed armor is 75/70/55 for the hull and 75/75/75 for the turret. For a tier 5 medium tank this is very good and actually plays more like a heavy tank. It’s frontal armor has a unique layout with different angles, thicknesses, and no “go-to” weak spot clearly visible. It’s sides are a little more straight forward however slap on that spaced armor covering most of the sides and it becomes a formidable wall that will frustrate most players.
This guide is focused more towards tier 5 and lower tanks as guns with less than 110mm penetration require very precise aim to damage the Matilda regularly. Guns above 110mm penetration can go through the Matilda’s armor with relative ease if you avoid the highly sloped parts and bad angles.
Due to the complexity of the Matilda’s armor for a medium tank it leads many players who do not understand where to shoot to complain about people buying gold and premium tanks being “over powered” or “easy mode”. While this is unavoidable since World of Tanks is a free to play online war game it can be minimized by learning those sneaky spots to shoot the Matilda and avoid those heavily armored sections.
Green= Best chance of penetrating
Yellow= Second best chance of penetrating
Red= Worse chance of penetrating
Turquoise = No hit box
Frontal View
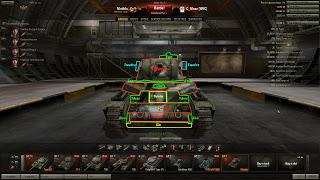
Frontally the Matilda is very tough for a medium tank as it’s frontal armor is 75mm thick in many places, heavily angled in others, and even thicker than 75mm on the overlapping part on the lower hull. With no clear weak spots it can be difficult for tier 3-5 tanks to damage.
Area One:
Driver’s view port can be damaged by any tank facing the Matilda regularly. However the majority of penetrating hits will either kill the driver or do 0 damage. Very good for crippling the Matilda mobility wise even further than it already is but not the best spot to shoot if you need to do damage to HP.
Area Two:
Commander’s hatch is easy to hit out to 150m and can be penetrated by any tank facing the Matilda normally.
Area Three:
Note: This location is 75mm thick…However it is not angled and therefore much easier to penetrate than many of the other spots on the frontal hull. I do not suggest shooting here with a gun with less than 85mm of penetration since the 75mm is only if your shell hits it at no angle.
Area Four:
Turret ring can be hit at close range doing damage and also allowing pretty much any tank to circle the Matilda and kill it without it being able to catch up to it.
Area Five:
These small indents are thinner than the surrounding armor and can be damaged by guns with more than 90mm of penetration with ease.
Area Six:
Lower hull is very small, slightly angled, and hard to damage from guns with less than 90mm of penetration. Armor above this location is also much thicker and leads to many just-missed shots bouncing.
Area Seven:
Looking at this part of the 75mm “flat” piece of armor it appears to have additional armor. I did a few tests and while it does not add a ton of additional armor it did bounce more shots than the green areas on both sides.
Area Eight:
This part of the lower hull is much thicker than 75mm and roughly provides 100-110mm of effective armor. Bounces the 7,5cm KwK 40 L/48 on the PZ 3/4.
Area Nine:
Heavily angled part of the frontal hull bounces all shots from tier 5 tanks and lower the vast majority of the time. Higher tiers might be able to penetrate however there is no use since the 75mm flat plate above this area is easier to penetrate and also hit.
Area Ten:
This area of the frontal armor is angled making it hard to penetrate and bounces tier 5 and lower guns easily.
Area Eleven:
Frontal turret armor is 75mm with decent angles on it and also additional mantlet armor around the gun.
Area Twelve:
The “ammo boxes” on the turret and also the smoke grenade launchers have no hit box and do not take damage unless you hit the turret behind them. From this view your shots will simply pass right through them.
Angled View
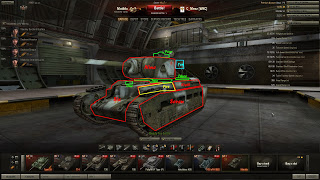
An angled Matilda is many new player’s worse nightmare since it can be very difficult to damage as the weak spots are very small. Guns with over 110mm of penetration can simply cut through the “corner” like butter but lower pen guns found on tier 3,4, and stock tier 5’s will even have trouble going through the “corner” areas.
Area One:
Driver’s view port is still able to be damage easily from this angle. Just remember there is a high chance for a 0 damage hit.
Area Two:
Turret ring and a small piece of flat armor that is easily damaged by any tank facing the Matilda normally.
Area Three:
This small piece that is raised above the other parts of the rear of the tank is easily damaged and also does engine damage. Shoot here if you have a highly accurate gun or are in close range and have a low pen gun.
Area Four:
Commander’s hatch is still visible from the angle and is easily damaged. This is the only true “go-to” weak spot at any angle while facing a Matilda.
Area Five:
Flattest part of the hull armor that depending on the angle can be difficult to penetrate or very easy to penetrate. When pointing directly at you and being “flat” it is roughly 80mm of effective armor but when angled away that number rises quickly.
Area Six:
The frontal armor that already was difficult to penetrate becomes that much harder. Do not aim here unless you have no other option or the Matilda is only slightly angled and you have a high penetrating gun.
Area Seven:
Side armor is 70mm thick and this area is also covered by spaced armor making it that much more difficult to damage.
Area Eight:
70mm of armor at an extreme angle becomes difficult for any tank normally facing a Matilda to damage.
Area Nine:
Turret armor is 75mm all around with slight angles(mantlet adds additional armor) making it tricky to damage unless you can get a clear shot to land at a good angle.
Area Ten:
The boxes hanging off of the side/back of the turret have no hit box and you will only do damage if you hit the turret behind them.
Side View
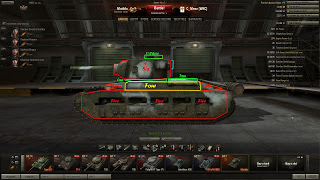
Usually tanks are easy to damage from the side(especially non-heavy tanks) but the Matilda is a bit different due to it’s uniform overall armor thickness(75/70/50 for hull) and spaced armor.
Area One:
Turret ring and the armor in this area is easily damaged by any tank facing the Matilda under normal MM(no platoons).
Area Two:
This raised section is easier to damage than the armor just below it and does engine damage. Good for those lower tiers who might not be able to damage the slightly harder armor just below.
Area Three:
Trusty commander’s hatch!
Area Four:
Side armor is 70mm thick with a slight angle on it. This makes it difficult for most tier 3 tanks and some tier 4 tanks to damage on a regular basis.
Area Five:
The side 70mm armor that was hard to penetrate by lower tiers now just got that much harder with additional spaced armor! Even for tier 5’s it can be difficult to damage here, and those squares that look like there isn’t any additional armor I have found aren’t any easier to get through than the surrounding spaced armor.
Area Six:
Side turret armor is 75mm with slight angles. If you have a 85mm+ pen gun and can hit it square on then go ahead. If not ignore.
Area Seven:
The only angled parts of the side armor and thus harder to penetrate. Avoid shooting here.
Rear View
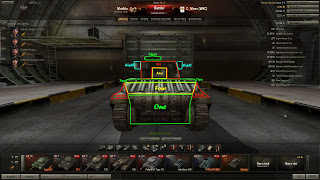
The rear of the Matilda is easy to deal with aside from some tier 3 tanks with very low pen(since the armor is 55mm thick). There are still some things to keep in mind though hit box and angle wise.
Area One:
Rear armor is only 55mm thick, no angle, and causes engine damage when damaged.
Area Two:
The upper part of the “top” of the rear of the Matilda is easy to damage and causes engine or turret ring damage depending on the location you shoot.
Area Three:
Commander’s hatch!
Area Four:
This part of the rear is easy to penetrate for tier 4(non-stock) and higher tanks however tier 3 and stock tier 4 tanks will bounce a good amount of the time.
Area Five:
Rear of the turret is 75mm thick but this area is much weaker and easily damaged.
Area Six:
75mm thick rear turret armor with some angles on it as you get towards the sides.
Area Seven:
Angled portions of the rear armor causes a lot of avoidable bounces….just simply do not aim here.
Area Eight:
Both boxes hanging off the turret have no hit boxes and cannot be damaged unless there is a portion of the turret behind them.
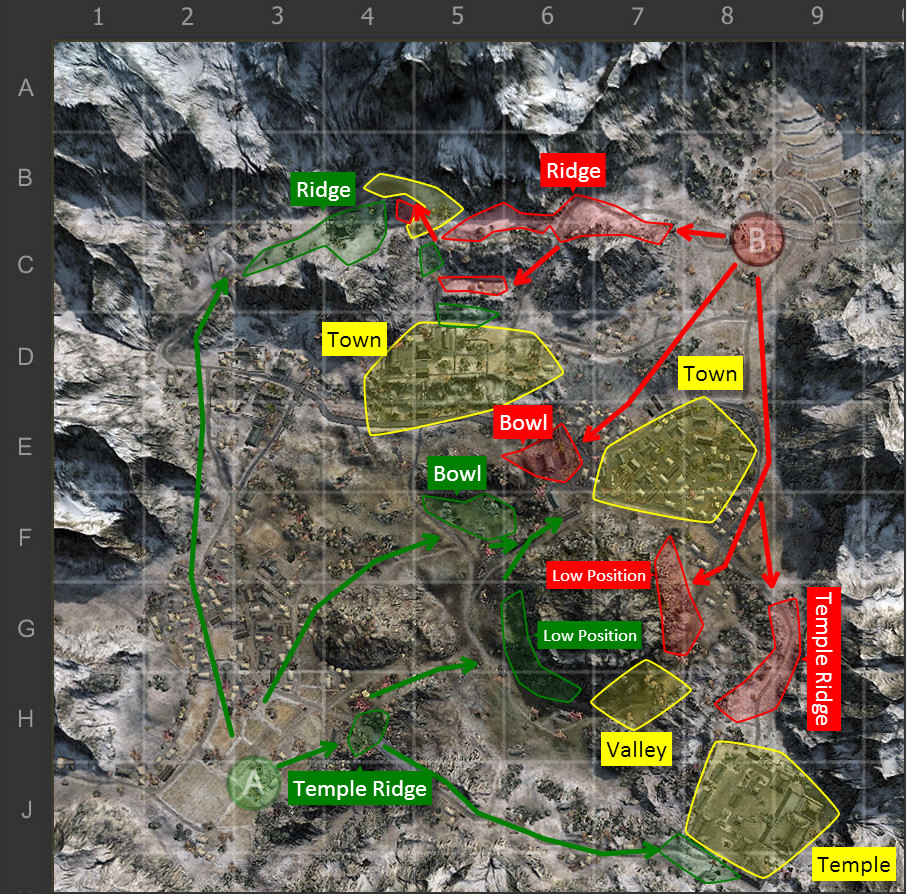 Map Strategy: Sacred Valley - World of Tanks Guru
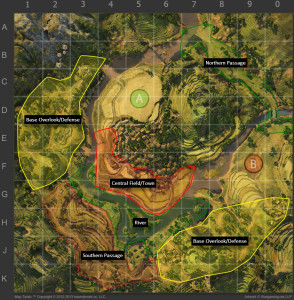 Map Strategy: Pearl River - World of Tanks Guru
 Tank Guide: M26 Pershing - World of Tanks Guru
 World of Tanks Guide - M5 Stuart
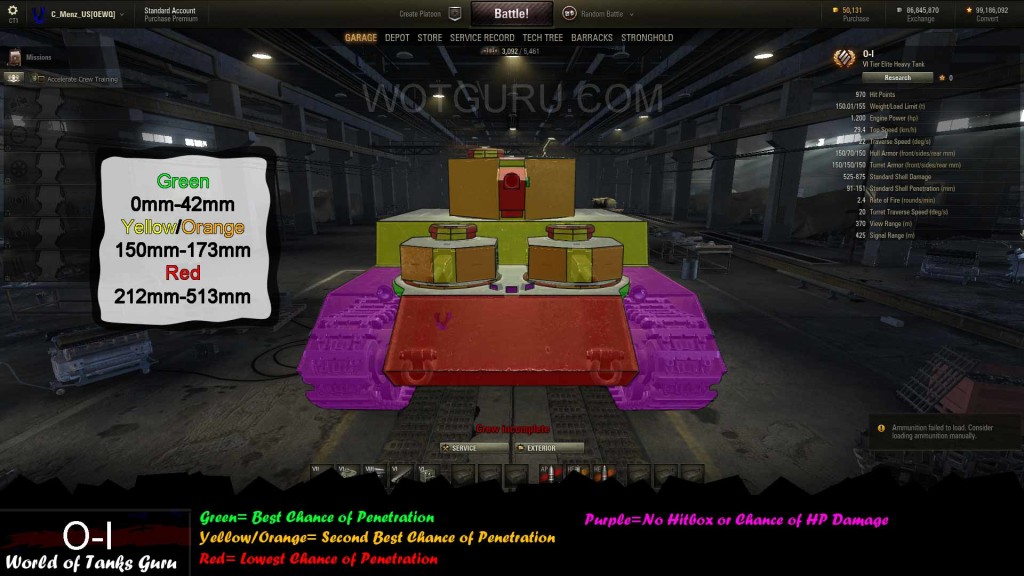 Weak Spot Guide: O-I - World of Tanks Guru