Map Strategy: Port - World of Tanks Guru
Port is a very unique map when compared to the other maps in World of Tanks. It is very confusing to know where to go the first few times playing this map as it doesn’t have many clearly defined choke points. The southern base starts out in the “Port area” that has many large buildings and good cover while also being spaced apart enough to not to be cramped. The northern base starts out in the “Shipping/Railway area” that also has a lot of cover in the form of buildings and also is surrounded in a wall of scattered train cars. Below I’ll touch on some key areas of the map.
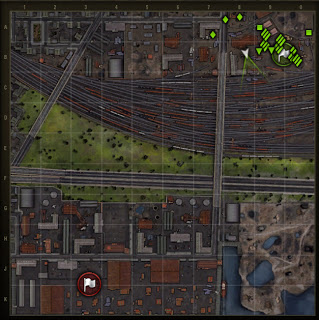
“Junkyard” G9-K9
The south eastern corner of the map stands out if compared to the other parts of the map. While it looks rather unimportant it is a key point for either side if they want to advance. This area has a lot of dips and hills and is great for medium/light tanks. Tanks advancing from the north need it to flank defenders sitting along the 7 line in the southern city while the southern team advancing north needs it to push past the F line without being flanked.
7-Line Bridge
This raised bridge provides a route(albeit very exposed) across the railroad tracks and into either side’s more protected city. It is not advised for northern forces to push across here(especially heavy tanks) as they can be fired upon from the west and also have no cover at the end of the bridge once they get across. For tanks advancing from the south it does provide a good tactical point if there are many tanks defending the railroad around E9 granted your team controls the land west of the bridge or else you will be torn apart.
Railroad and Train Area
This area spans across the entire map with the thickest part being on the east and slowly tapering off as it heads west. Spotting can be difficult while weaving through this area and while the trains do provide some cover they can be shot under by most tanks besides Maus’ etc. so they are not very good cover. Very good for attacking and pushing through but very poor for a dug in defense.
Central “Hill”
Well I call it a hill anyway… But while the green open area spanning horizontally across the center of the map is lacking cover it is much lower on the southern side than the north and thus can hide advancing tanks. Especially true for the F8-0 area tanks pushing north can advance up to the railroad relatively safe if the enemy is playing more defensive since they are hidden behind the terrain difference.
B1/B2 “Funnel”
The western part of the northern city is much more closed off than the southern city. The main route for northern forces advancing south if they do not exit the city from B3 or more further east is through a small gap on the B1/B2 line. While this is a good defensive point for them it also makes it very difficult to push through if the South is aggressive and pins them into the corner of the map.
North West Bridge
Another bridge that provides a flanking route for either side. It is very exposed and should not be used by heavy or slow tanks. It is key however if the northern side is pinned in the top corner as it skirts around them. I find that using it to head south isn’t as useful though since once you are up there you are stuck and usually there are people sitting back along the edge of the southern city.
Below are some replays of Port

 Weak Spot Guide: IS-7 - World of Tanks Guru
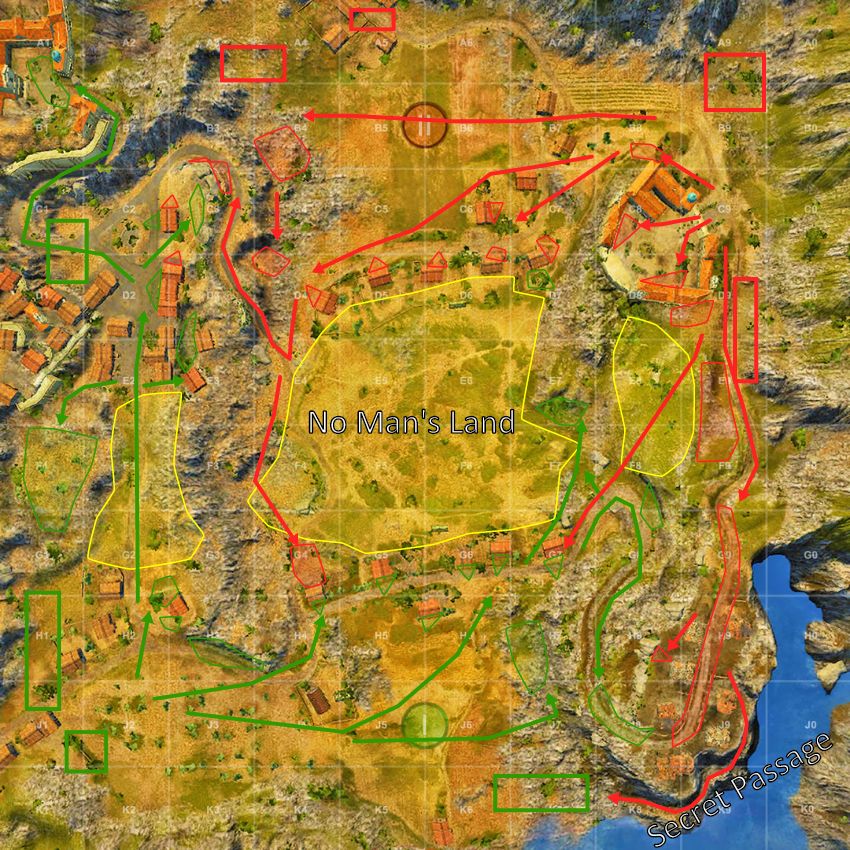 Map Strategy: Province - World of Tanks Guru
 Map Strategy: Ruinberg - World of Tanks
 World of Tanks Guide - 59-16
 Weak Spot Guide: KV-3 - World of Tanks Guru