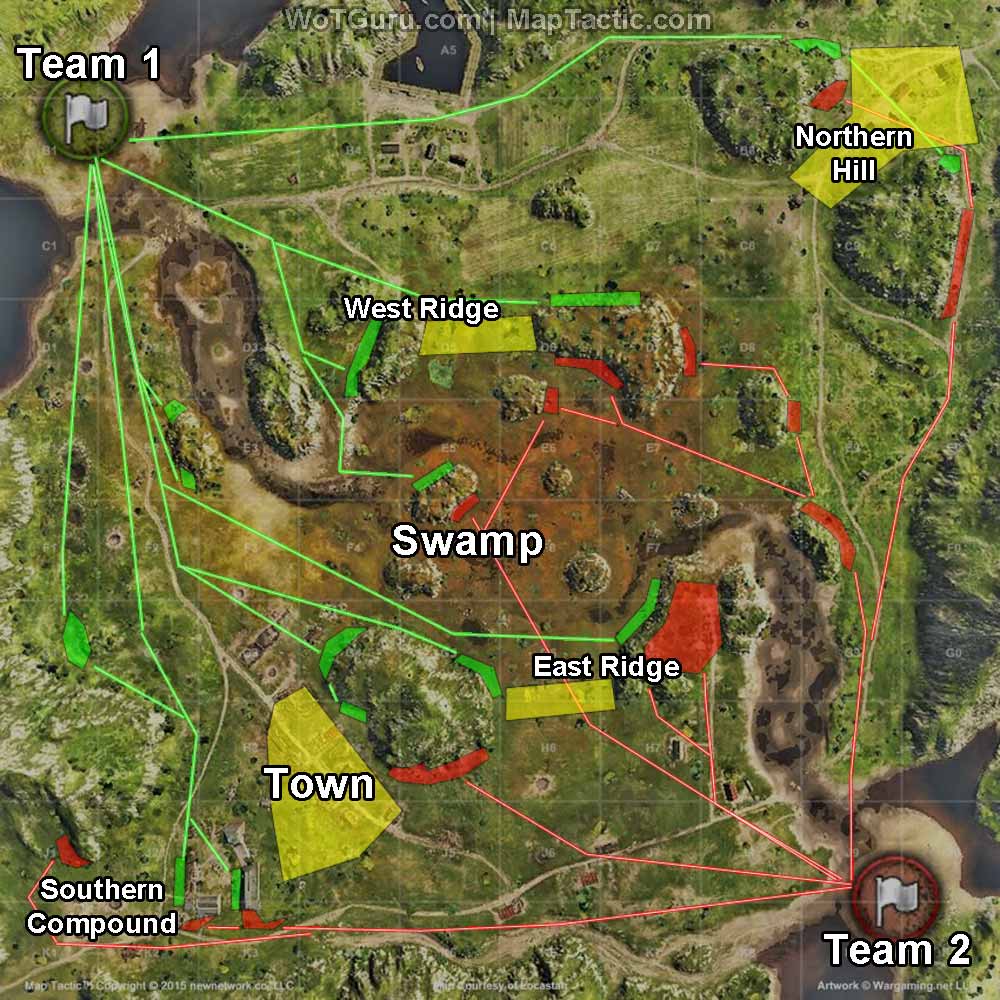
Fjords is a very difficult map to decide where you should head to at the beginning of the match and where to move after that. Fjords is “split” into 3 main areas which require specific tanks to exploit. The Northern area of the map for both sides is great for medium tanks since they are able to get the quickly and move around since there is not always a lot of cover in these locations. The central area of the map is great for both medium tanks and heavy tanks since it provides some cover and the option to either head north or south. The southern area of the map is best for slower tanks or tank destroyers since it has limited options in terms of flanking and provides the most hard cover.
The red routes are initial routes/locations used for side two on the map while the green routes/locations are for side one. Yellow refers to “shared” locations that are typically engagement areas which are fought over by both teams. Solid routes are initial routes taken from the spawn to the front lines.
This map you see below was drawn up using MapTactic which is a very easy to use tool for making strategies for World of Tank maps. It works directly in your browser and has no cost to use it.
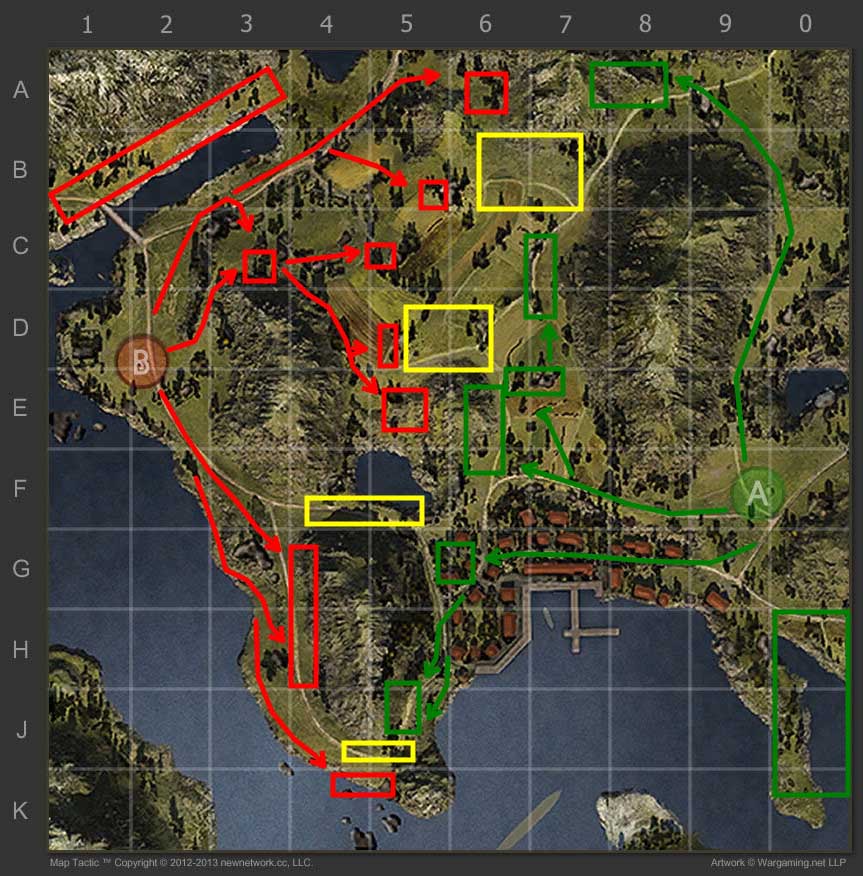
Side 1 has more cover in the northern(A7/A8) and middle(E7/E8) sections of the map compared to side 2. On the downside it has a bit less cover in the south(H5/J5) beneath the town since SPGs can hit the backside of the mountain from A5/6.
Mobile tanks(lights and mediums) are best for heading up to the A7/A8 area of the map since the route is uphill. From this location you can fire down into the 5 line defense areas without being spotted and then have the option of pushing in A6 as the battle progresses.
Central Passage The E6/E7 area of the map is great for just about any tank since it provides a decent amount of SPG cover and gives a good defensive position against enemies advancing through the field. You can also set up in F6 and fire down the 6 line into F3 at the start of the match to hit side 2 tanks heading south. This location allows you to support both the north and the south.
The town provides the most cover for side 1 but does not provide many firing lanes unless the enemy has already pushed into the town. The G6 area allows you to fire up into E5 but at the cost of some cover since you can be hit by both their forces and their SPGs in the north. In J5 forces will want to set up to defend against enemies looking to push around the bend which will potentially spot your artillery and threatens the E6 area. Keep in mind that any enemy SPGs in A5/6 can hit the backside of this location.
If you advance around the bend into J4 stick along the water as it will limit enemy fire due to it being lower and allows the initial 1-2 tanks to draw attention while your allies behind you can get good shots on the enemy.
Most SPGs set up in H0/J0 locations which give good shots on the J4/J5 locations along with some shots into the northern field. More mobile SPGs can set up in A8 if they are feeling a bit daring and will have shots into D5/E5 and G3/G4.
Side 2 has less hard cover than side 1 in the northern/middle part of the map but gains better cover in the south. Side 2 rewards aggressive and smart play since it is required due to less cover.
The A6 of the map is great for mobile tanks capable of getting there to prevent enemies pushing through it at the start. You can take a few shots into E5 from here but will want to re-position afterwards since SPGs can hit here easily. SPGS can also set up in A5/A6 and hit enemies in J5 who think they are safe easily.
B5/C5 also provide rocks and small bushes to set up behind capable of hiding 1-2 tanks each.
D5 and E5 are the keys to winning from Side 2. Most heavy tanks that are not slugs(under 30 km/h) can make it to E5 rather easily. Mediums can make it here without being seen as well. Drive here at the start of the match following the routes and set up in E5 looking south. Any enemies driving down to J5 will be showing their rear’s to you and you will rack up easy damage. The main downside of this location is being hit from A8 if you are not careful.
If you stay tucked towards the bottom of the red outline here along the rocks youll be safe from most SPG fire(not T92s) and A8 will have limited shots on you. If you are a large tank simply face your frontal armor to A8 and you’ll bounce most shots due to the 300m+ distance between you and them.
Later on in the match you can choose to wrap around into E6 through the field or take a less known route. Driving through E4/F4 along the left side of the lake is simply and quick. This route can be used either going north or south but is exposed to enemy fire in F6. The right side of the lake in F5 can be made by non-heavy tanks and is safe from any enemy fire allows you to exit in semi-safety.
G4 and H4 provides immunity from SPG fire and is great for slower tanks. You will only need to worry about tanks advancing through J4/J5 if your team has a presence in E5. When driving down here beware of crossing to close to F4 since you can be spotted at the start of the map and hit by both tanks and SPGs. It is safe to take the route closest to the water.
Later on in the match advancing south of the mountain in J4/5 is the most dangerous since SPGs are usually zeroed in here and enemies are watching. It is sometimes best to go through the F line if your team is doing well in the field.

 Map Strategy: Swamp - World of Tanks Guru
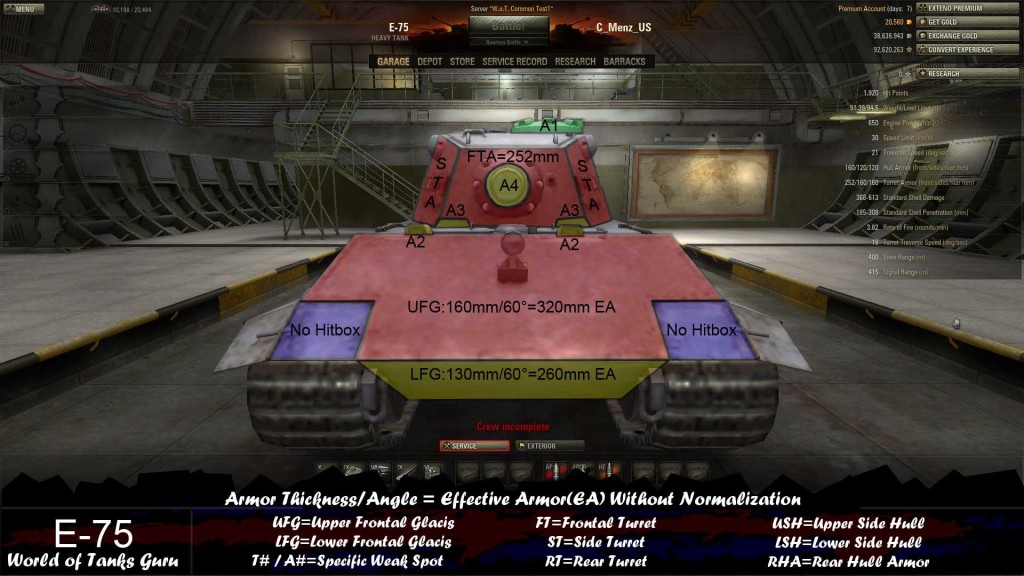 Weak Spot Guide: E-75 - World of Tanks Guru
 Weak Spot Guide: Type 5 Heavy - World of Tanks Guru
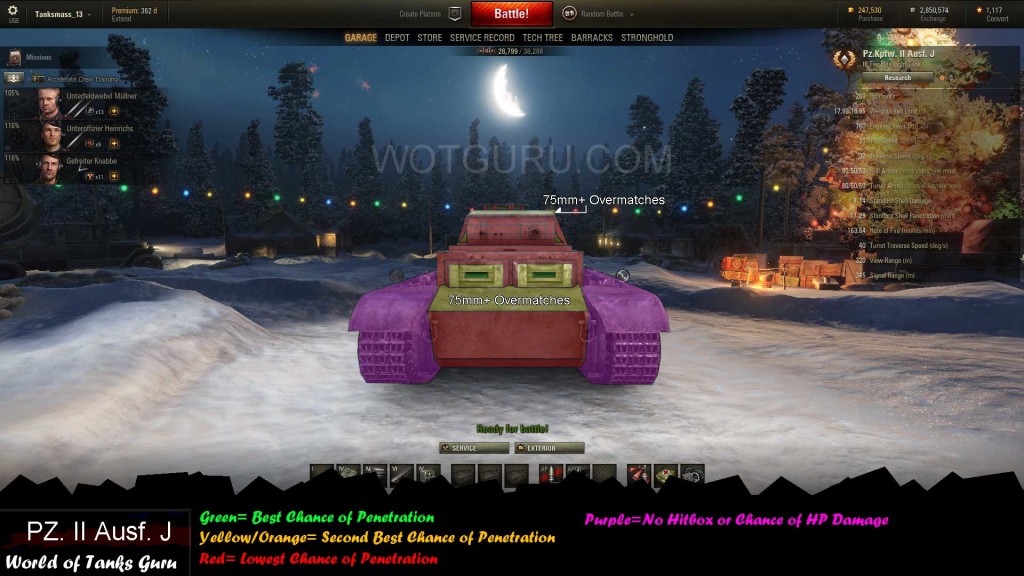 Weak Spot Guide: Pz.Kpfw. II Ausf. J - World of Tanks Guru
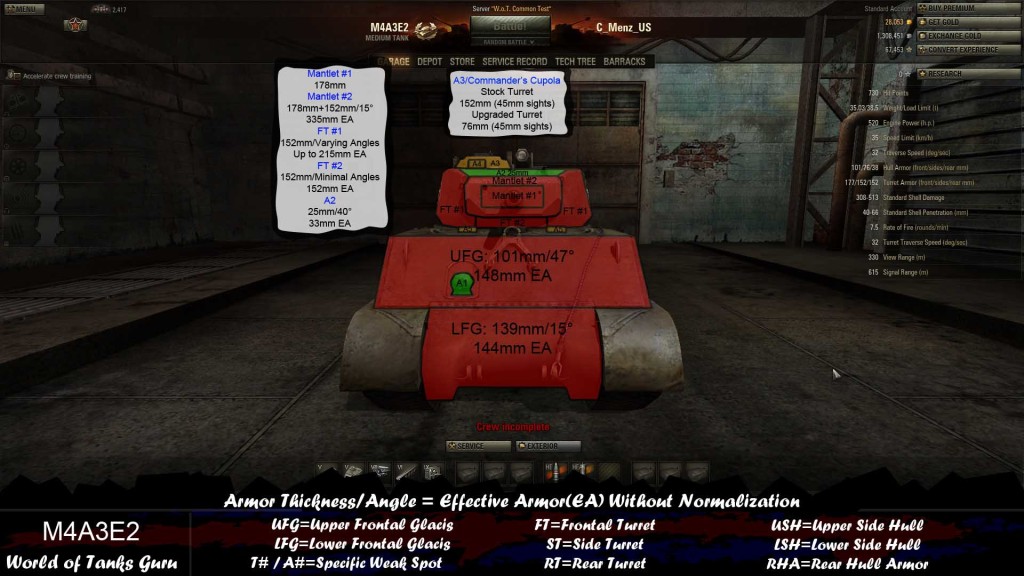 Weak Spots Guide: M4A3E2 - World of Tanks Guru