The British tier 5 tank destroyer is quite the formidable foe in terms of armor. At tier 5 it easily beats the majority of tanks at tier 5, 6, and 7 for the listed armor values. We all know listed values do not mean a tank as excellent armor but in this case the AT 2 does have a very good overall scheme and the weak spots are not to glaring to ruin the tank’s armor. And yes I know I have 102mm listed for the sides/rear compared to the 101 listed in the listed armor values. This is simply because it is 101.6mm and I round all decimal numbers.
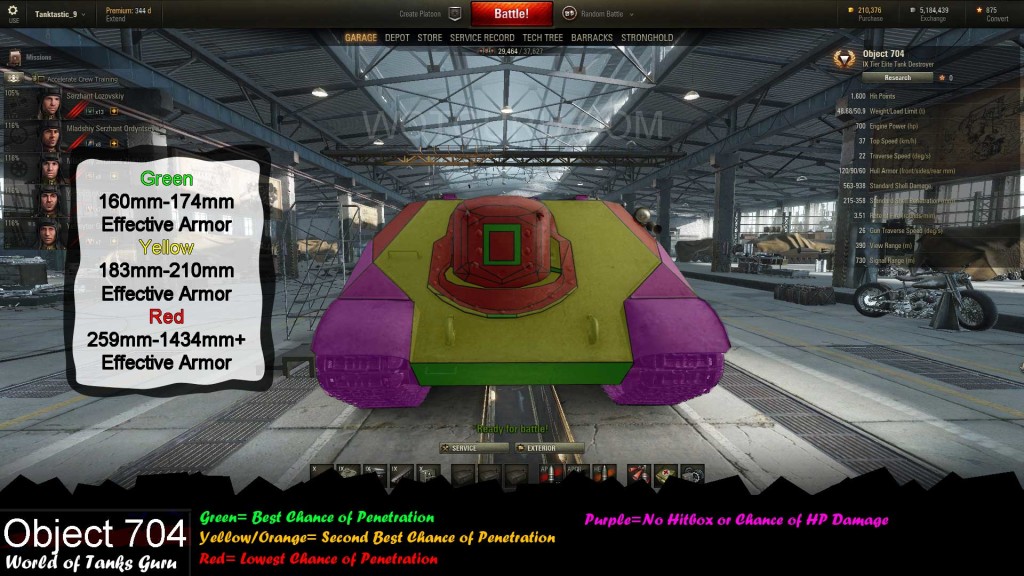
The index at the bottom of each picture describes a few abbreviations used and also the format in which the armor details are described in. Effective Armor (EA) refers to the overall effectiveness of the armor without normalization(HEAT and HE shells) while Armor Against AP Shells (AP) refers to the overall effectiveness of the armor with normalization(AP and APCR Shells).
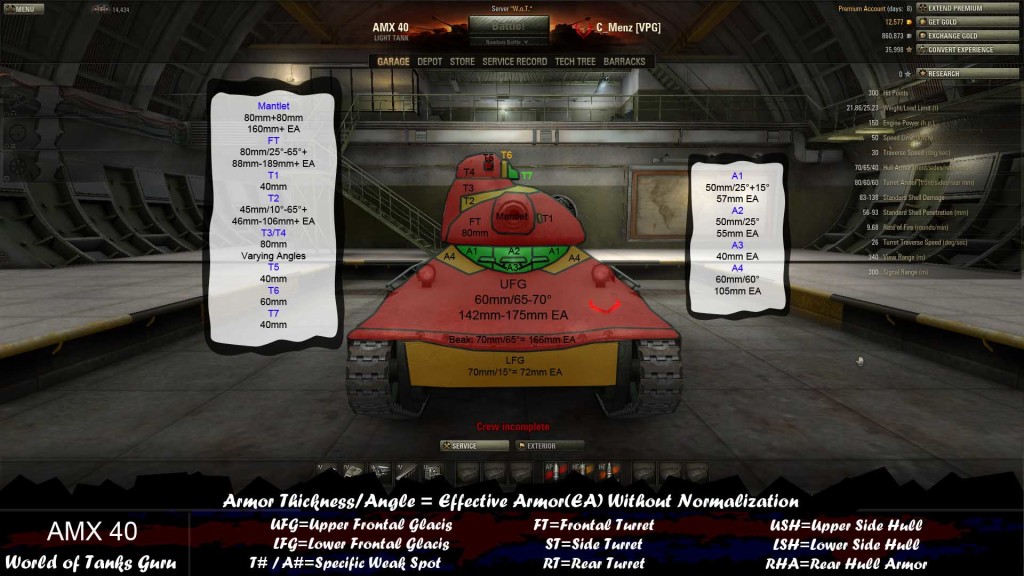
The armor values are presented in three different scenarios for the angled view of the tank.15° frontal(75° side), 25° frontal(65° side), 35° frontal(55° side), and 45° frontal(45° side). “T#” refers to the turret armor while “A#” refers to specific hull locations. The purple areas are spaced armor locations with no HP values tied to them and also sights that only do module/crew damage.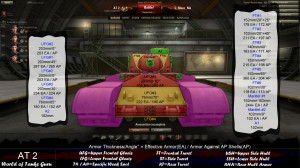 Frontally the AT 2 is a difficult opponent for most tanks under tier 7. Tier 7’s can penetrate most of it’s armor head on but for the tier 3-6 tanks that face the AT 2 it will be difficult unless you know where to shoot. The UFG#3 and LFG#4 areas are much thinner than the rest of of the frontal hull armor but are either small/angled making them difficult to hit. At over 100m the UFG#3 area is very strong but as you get closer you can shoot down into it, thus negating a lot of the slope making it weak. The opposite goes for the LFG#4 which gets stronger the closer you get to it.
Unlike a lot of tanks the main weak spots are not on the hull but on the turret(casemate in this case). The commanders hatch and mantlet area around the gun are the two easiest hit. The small boxes on the hull below the turret are not visible(covered by useless boxes) but as also weak and the two “flaps” on both sides of the casemate are weak but can be difficult to hit.
Frontally the AT 2 is a difficult opponent for most tanks under tier 7. Tier 7’s can penetrate most of it’s armor head on but for the tier 3-6 tanks that face the AT 2 it will be difficult unless you know where to shoot. The UFG#3 and LFG#4 areas are much thinner than the rest of of the frontal hull armor but are either small/angled making them difficult to hit. At over 100m the UFG#3 area is very strong but as you get closer you can shoot down into it, thus negating a lot of the slope making it weak. The opposite goes for the LFG#4 which gets stronger the closer you get to it.
Unlike a lot of tanks the main weak spots are not on the hull but on the turret(casemate in this case). The commanders hatch and mantlet area around the gun are the two easiest hit. The small boxes on the hull below the turret are not visible(covered by useless boxes) but as also weak and the two “flaps” on both sides of the casemate are weak but can be difficult to hit.
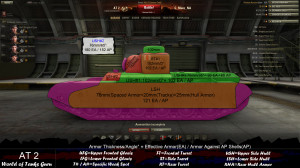 From the side the armor values become much more manageable for most tanks. The weakest sections are the upper hull from the middle of the tank towards the rear as well as the commander’s hatch. The lower side hull armor is thinner as far as the hull armor is concerned but is covered by tracks and spaced armor. Avoid shooting the sloped section towards the front of the tank as well as the frontal casemate armor around the gun.
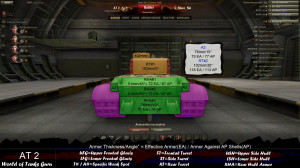 The only sections to avoid on the rear of the AT 2 are the sloped sections around the edges of the casemate. The rest of the rear armor is not protected very well and can be damaged by pretty much any tank facing the AT 2 normally.
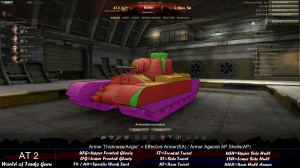
The AT 2 is very simply to deal with when it angles which is why this guide won’t have a fully detailed angled view. As the AT 2 angles you simply shoot at the frontal track wheel between the frontal hull and the side spaced armor. Hitting here will only see you hit the track armor(20mm) and the hull armor(25mm) and you will cut through easily if the angle is 70° or lower. The two green sections of the casemate are also viable but are slightly stronger due to the 102mm thickness. If the AT 2 only angles between 5°-25° then you will want to stick to the frontal weak spots, if it is heavily angled then swap over to the frontal track wheel/side weak spots.
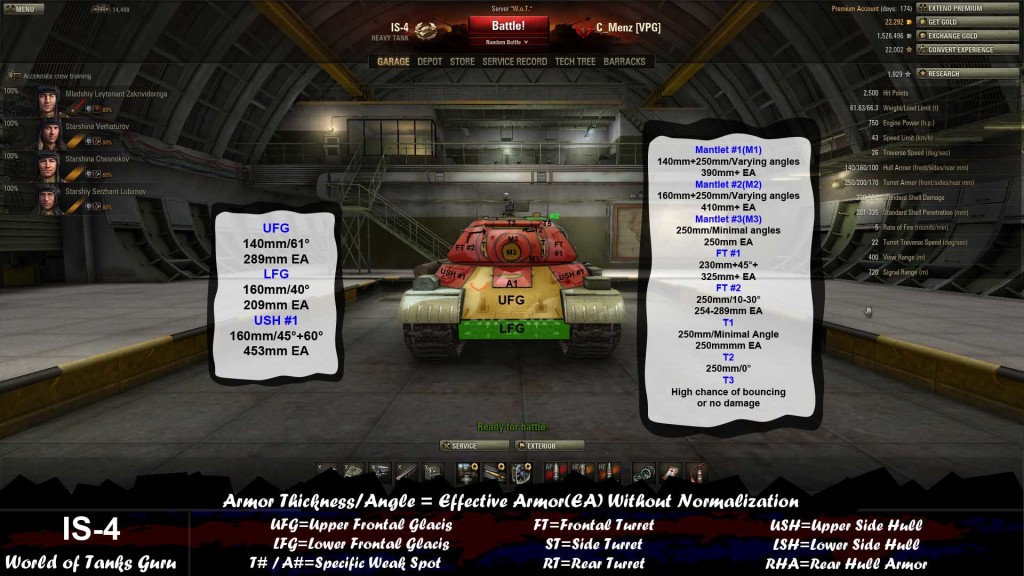 Weak Spots Guide IS-4
 World of Tanks Guide - Churchill I
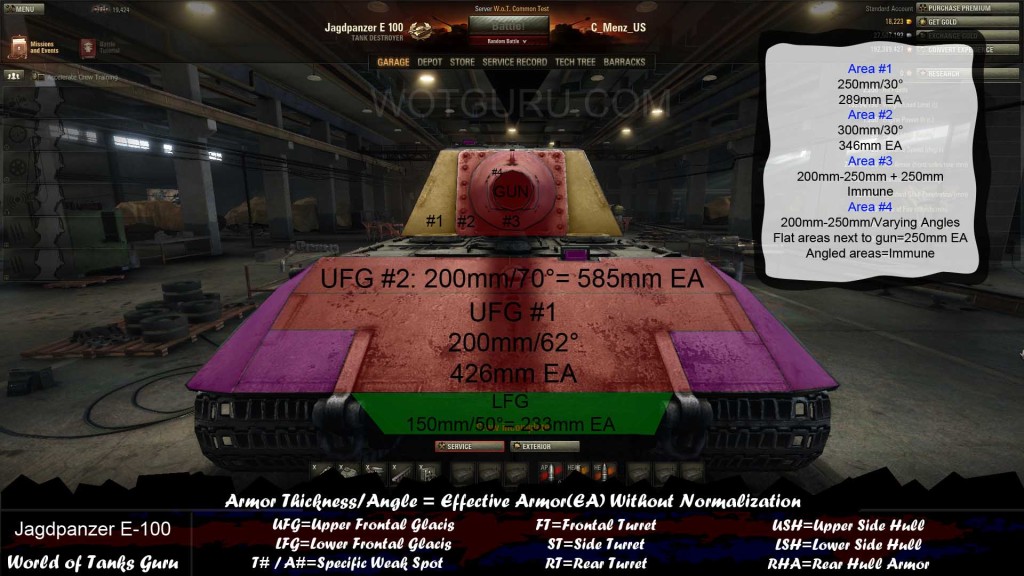 Weak Spot Guide: Jagdpanzer E-100 - World of Tanks Guru
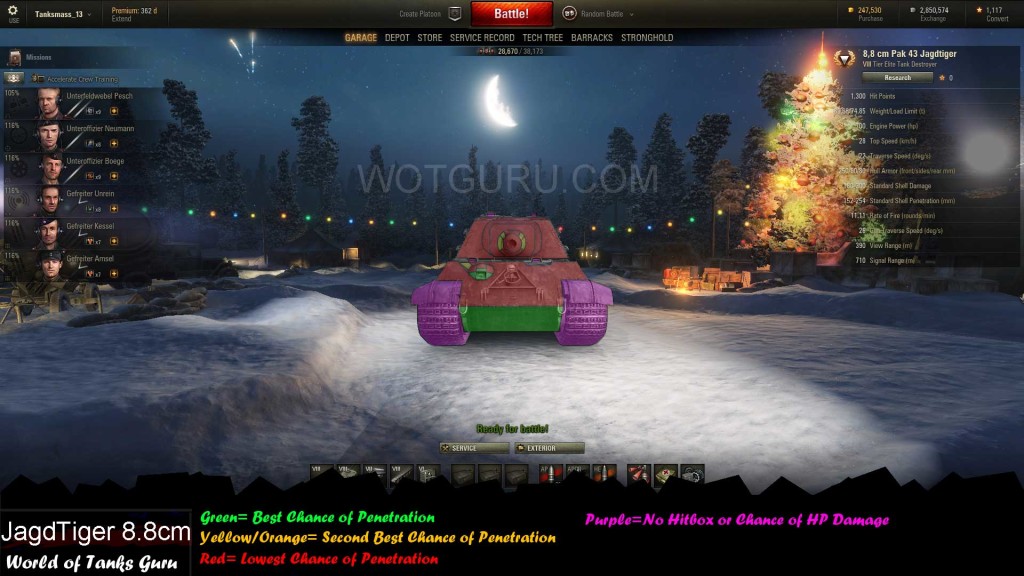 Weak Spot Guide: Jagdtiger 8.8 cm Pak 43 - World of Tanks GuruMap Strategy: Province - World of Tanks Guru