1. Tap on the house to begin. Open the mailbox and read the letter. Then look at the maps and get the padlock key. Use the key to unlock the padlock on the door.
2. The door still won’t open. Keep tapping on the doorknob until it blows off. Then go back a screen and pick it up from the floor. Put it back in the door and use it to open the door.
3. Enter the house. Pick up the knife from the small table. Pick up the puzzle piece from the floor, another from the fireplace, the moth from the picture frame, and the coin from the floor.
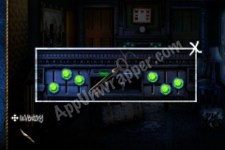
4. There’s a puzzle above the fireplace. You need to move all the knobs so they all turn green, like so, to get the skeleton key:
5. Tap on the door to the right to enter the dining room. Pick up the coin from under the chair. Pick up the moth from the wall to the right. Pick up the puzzle piece from the chair.
6. Go back a screen and take the left door. Pick up a match next to the oil lamp. Use the match on the lamp to light it so the room lights up.
7. Tap on the quilt on the wall to zoom in on it. There’s a bump on it. Use the knife to cut away at it and get another skeleton key.
8. Get the puzzle piece from the little shelf. Get the moth from one of the drawers to the left. There are another two puzzle pieces in this room.
9. Use the skeleton key you just found to open the door to the right and enter the next room.
10. Pick up the coin from the floor and the puzzle piece from the shelf. There’s another puzzle piece in the container to the left. There’s also a moth in the lightbulb.
11. Remove the painting on the wall to reveal a safe.
12. Use the other skeleton key on the right-hand door and enter the next room. Take the puzzle piece from the doorframe. Take another puzzle piece from the door itself. Pick up the wrench from the counter.
If you liked this game, try some of these other escape games and walkthroughs on AppUnwrapper.com.
13. Pick up the flashlight from the floor. It will go into the upright corner of your screen. Just tap it to turn it on or off.
14. Go back one screen and enter the left-hand door. Pick up the dirty rag and the bottle of turpentine.
15. Go downstairs. Pick up the fuse and put it in the fuse box. Then flip the switch on the fuse box. Go back one screen and turn on the lights. Then go back downstairs.
16. Pick up the flower pot and the two puzzle pieces in the wall.
17. Tap the left side of the screen to enter another room. Get the puzzle piece from the barrel, another from the wooden plank, and two more from the walls. Get the moth from the wall.
18. Go back all the way to the beginning (the living room). Tap on the glowing area behind the left chair to access a hallway with two more doors.
Enter the blue room and pick up the round blue gem from the bowl by the window. Open the jewelry box on the table and get a decorative egg. Pick up three puzzle pieces.
Go back out and enter the yellow door. Pick up the pry bar. Take note of this chart and the puzzle in this room:

Go back to the living room. Tap on the left side of the screen to access a stairway. Take the two puzzle pieces and the moth from the walls. Peel away the wallpaper on the left wall to see this clue:

19. Go up the stairs. Take the puzzle piece from the floor and the two from the walls. Take the coin from under the table. Tap the monkey and he’ll hold up a red gemstone. Take it.
20. Open the right door and enter the bathroom. Pick up the two puzzle pieces from the wall and one from the tub. Pick up the moth on the left. Pick up the stethescope.
21. Leave the bathroom and enter the room to the right of it, the bedroom. Take the moth from behind the toy on the bed. Pick up the mechanical device from the table.
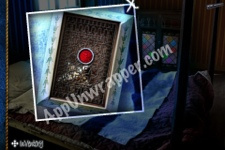
22. Leave that room and take the door to the left. Pick up the coin and the moth. You need to solve the puzzle on the bed. The key to solving this puzzle is on the wall in this room:

Use the diagram as a guide and tap the numbered diamonds in order. If you see two numbers on a piece, it means you’ll be tapping it more than once in the sequence. Once you solve it, the box will open, revealing a red gem:
23. Go back to the room with the safe. Use the stethoscope on the safe, then turn the dial slowly to the right until you hear a loud “click”, then the same to the left, and again to the right. If you do it correctly, you’ll hear a noise like the safe opening and the stethoscope will disappear. Open the safe to get a monocle and a heart gemstone:

24. Go through the door to the room with a broken door, then head outside. Pick up five puzzle pieces here. Tap on the building to the right.
25. Pick up four puzzle pieces here. Tap on the smaller building to the right (near the “back” button). Pick up two puzzle pieces and enter the building. Pick up the coin from the floor and the moth from the wall. There are also three puzzle pieces.
26. Pick up the pruning shears from beneath the bench. Go back outside and use the shears to cut the bush out front and get a Moonflower Seedling. Go back and enter the bigger house. Pick up the coin from the floor, the moth from the wall and three puzzle pieces.


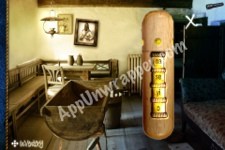
27. Go back to the first screen outside. Tap the left building. Pick up the coin and moth. There’s a puzzle here. You solve it by matching the colored hands to the rings on the clock face, like so:
The door opens. Walk through. Pick up the potting soil and the moth. Walk through the next door and pick up the coin and moth. Pick up the puzzle pieces and the bold cutters. You can use a coin on the machine to get a fortune, but not sure what those do yet:

Go back a couple of screens to the room with the clock puzzle.
28. Tap the left side of the screen. There’s a recording of bells chiming. You can play it, but not sure what it does yet. Pick up the coin. If you tap ahead, there’s an angry pack of wolves and an accordion that sounds like a bell. We’ll come back to this later.
29. Go back a couple of screens and tap to the right of the gated door. You’ll see a hole in the wall barred up by a bunch of wooden planks. Pick up the three puzzle pieces and a moth from the poster.
30. Go back one screen and take the door to the right. Pick up the moth and two puzzle pieces, then continue on ahead.
31. Pick up the coin and three puzzle pieces. Pick up the witches’ cauldron. You need a key to proceed further, so go back.
32. Go back to the original house go to the basement to the room with the bear. Remember the Tic-Tac-Toe game on the wall earlier? It’s the clue for the safe. Arrange the dials in this order, B1, A2, C3. Use the two little dots on each one as a guide to where the numbers and letters should go. You want it to look like this:

The safe will open. Take the coin and the green square gem from inside.
Go all the way upstairs again. There’s another door on the right. Pick up the puzzle piece and notice the note about Moonflower:

33. Enter the open door ahead:

Pick up the coin from the nightstand and the three puzzle pieces.
34. There are two things to take note of in this room:


Place the four gems you found in the correct shapes on the dreamcatcher, like so:

35.
More coming soon! Watch this page and feel free to ask for help in the comments section. I’ve also been editing the walkthrough as I discover more things, so don’t be afraid to ask for help or read through the walkthrough again.
If you liked this game, try some of these other escape games and walkthroughs on AppUnwrapper.com.


 Barbie Magical Fashion Tips, Cheats, & Hack for Mermaid Pack, Unicorn Pack, & Fairy Pack Unlock - AppGameCheats.com
 100 Pics H is for… Pack Levels 1-100 Answers
 How to fold - complete Tengami walkthrough and puzzle guide for iPhone and iPad (Part 1)
 Jelly Jump Cheats & Hack for Jelly Drop & Score - AppGameCheats.com
 Burger Shop Cheats, Tips, & Hack for Full Version Unlock - AppGameCheats.com