
This guide to The Elder Scrolls Online compiles knowledge that is useful to all players - both the beginners and the veterans of MMORPG's. You will learn from it such things as: where to find a job for your avatar, how to support your faction in the quest for the throne of the Empire, how to develop your hero to master a given craft, where to find the best equipment, and much, much more.
The guide details on following aspects:
Jacek "Ramzes" Winkler ()

In the Elder Scrolls Online in 10 easy steps guide, you can find the descriptions of most important activities available in the game. Each fan of the Elder Scrolls series, as well as of MMO games, can find here information that will help him, and his faction, seize the Emperor's Throne and receive the highest glory as a warrior in Tamriel. The matters discussed here are, such as, crafting, thanks to which you will be able to forge your own equipment, and dungeons, where you will be gladly going. This guide also describes the differences between the individual races and their abilities. Thanks to the chapter devoted to the hero, you will learn how gaining experience works and which of the paths is the most effective. Also proponents of MMOs will find here something for themselves, i.e. the matter of the maximum experience level and activity connected with the experience. The Elder Scrolls Online in 10 Easy Steps isn't a full game guide. It contain only description of most important aspects of the game. The Elder Scrolls Online has been developed by Zenimax company, in collaboration with Bethesda. Again, you enter the world ravaged by war, i.e. Tamriel. After the division into three main factions, a dispute over the Emperor's throne of Cyrodiil started. The game abounds in references to the previous games of the genre. The quintessence of the game is to discover the world with your friends and also fighting in Player vs. Player. The game offers a lot of activities, both for players who prefer to play solo, and the ones the prefer being a part of a group.
The Elder Scrolls Online in 10 easy steps guide includes:
A chapter devoted to everything that is connected with the player character. Its creation, development and death.
A comprehensible explanation of the upsides of playing in a team and a collection of information on guilds.
In this chapter, you will find all of the information on fighting and types of abilities that you use during fights.
This chapter has been devoted to the available factions and the races allotted to these factions. You will also learn the differences in race abilities, which will help you select your race.
Each player needs some means of transportation, which help you explore the world. From this chapter, you will learn about the matters of transportation in Elder Scrolls Online and whet are the profits, and consequences of using it.
The world in Elder Scrolls Online is huge. This chapter has been devoted to the exploration of that world. You will learn how you can profit from that.
Crafting is one of the basic concepts in Elder Scrolls Online. From this chapter, you will learn how crafting works and how to obtain the best equipment in the game.
This chapter has been devoted to the Player vs. Player mode. In here, you will find the basics, as well as the more advanced aspects of PvP.
In this chapter, you will find the description of all the classes available in the game. The differences between classes and discussing them.
A chapter devoted to the activities after you reach the maximum experience level. What you may expect after you reach this level and what the differences are, in comparison with the previous levels.
Jacek "Ramzes" Winkler ()
From this chapter, you will learn about the character creation process, what races are available, for the individual factions and the characteristics of the races in the game. You will also learn about the methods of gaining experience, because in Elder Scrolls Online your character gets promoted, not only via killing opponents, but also through exploration and completing quests. The final part of this chapter has been devoted to the consequences of your character's death and the ways to revive him.
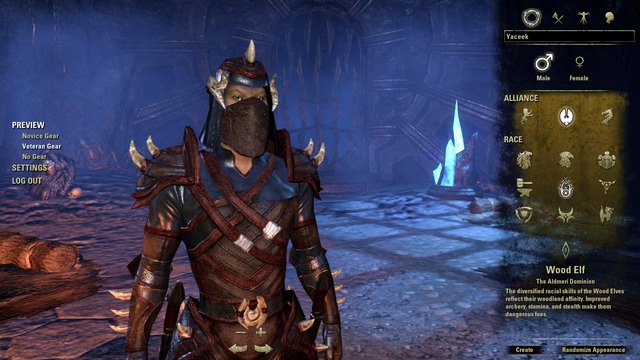 Character creation in ESO
While creating your character in Elder Scrolls Online, just like in the case of the remaining installments of the series, you are granted much freedom. You can attune your character to your own needs and playing style. The individual races have been allotted to one of the three factions in the game.
Each of the races has four classes to choose from:
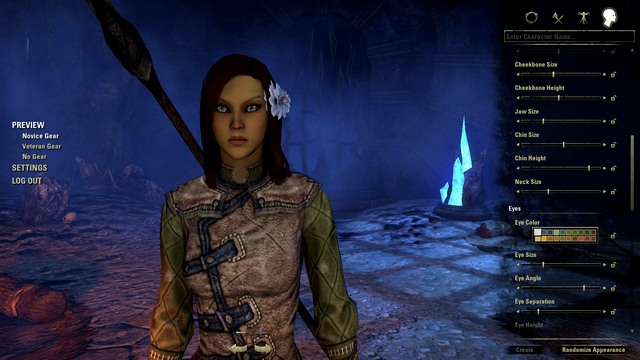 Your hero's looks
The next step is the looks of your hero. You can use the randomly generated presets, or choose your own looks that you like. There are many settings here, which will help you personalize your hero, like the posture, eye color or the nose shape. After you determine your looks, you can create your hero by pressing the Create button.
 The Interface
The interface in the Elder Scrolls Online is very lucid and intuitive. The location of the quick bar, or the compass does not obstruct navigation.
 A Quest
The main way to gain experience in Elder Scrolls Online is completing quests. For each quest that you complete, you receive a reward in the form of gold and experience. In the majority of cases, you receive additional items, as well as ability points.
The second way to gain experience is hunting. Killing monsters is not as profitable as completing quests, but this is used to raise your weapon and defense statistics.
Another way to gain experience is exploration of the world. For each area that you discover, each book that you read, or each stone that you find, you receive some experience.
The weapon and defense abilities are an additional asset in Elder Scrolls Online. Just like each game in the series, the game offers you the possibility of following your own path, when it comes to using weapons or the abilities of your character. For each quest that you complete, or the monster that you slay, your ability level rises. If the level of your abilities is high enough, you will be able to determine the path that you want to follow, with that ability. With each consecutive weapon level, you will be dealing more damage with that type of weapon. Wearing a specific type of armor, and taking damage, also increases your defensive abilities.
 Inventory
In Elder Scrolls Online, you will be finding various types of weapons or items necessary for crafting. At any point, you can sell these items to a merchant, or train your crafting skills. The space in your inventory is strictly limited so, sometimes, you will have to return to the merchant to empty it. Inventory is divided into several main categories. You can mark an item as valueless, which will help you while bartering with the merchant. To increase the space in your inventory, you need to buy a special item that is available only in the case of some of the merchants (Bag merchant). The maximum space in the inventory is determined by your level and the gold that you have. With each level (+10 slots in the inventory), it is going to cost you more and more.
Banks are a kind of chests where you can leave your loot. Such a bank can be found in each major city and, just like in the case of the inventory, you can increase the available space. For a certain amount of gold, you can buy the space that you need, from the bank manager.
The Hero's death may be fraught with consequences. After your hero dies at the faction's grounds, he will be transferred to the nearest Wayshrine and the items in his inventory will be damaged. To be able to use your items, you need to fix them at the local smithy. You can do that for a certain amount of gold and, the highest the damage, and the experience level, the more you need to pay. Sometimes, the cost of reparation may be so steep that it may be more sound an idea to buy, or craft, a new item.
Another option is to be revived in the place where your character has died. To use this option, you need to own a Soul Gem. Also in this case, your armor loses its features and you will have to repair it. If you travel in a group and you do not have the Soul Gem on you, you can ask an ally, who has such a gem, to revive you. Also in this case, your armor gets damaged.
After you die for a certain number of times, your armor the defensive properties of your armor may drop to zero. If this happens, your character will no longer be protected (just like in the case in which you wear no armor at all).
There are two options available for you, if you want to repair your equipment. One of them is the merchant in the nearest city, or village, and the second is to buy your repair set, which you can carry around and use without the necessity to teleport (or travel) to the nearest merchant. In both cases, you need gold (or loot a chest for the repair set).
This chapter has been devoted to the social options, available in Elder Scrolls Online. Among others, you will find here information on group creation or teleportation between the members of this kind of group. Also, this chapter explains the issue of guilds, which constitute a very important aspect of each MMORPG. You will learn about their greatest assets and the possibilities that they create.
 A group
The purpose of Elder Scrolls Online is, of course, exploration and discovering the world with your friends. This is why the game could not do without the system of parties and guilds. It is a typical thing for MMOs to create parties and complete quests, or participating in expeditions into dungeons, together. This system has several specific properties. In one group, there can be between 2 to 24 players, which do not necessarily need to complete the same quest. At any moment, you can look up which quest your friend is currently at and teleport to him, by using a tab in the menu. The list of players that are currently in your group, can be looked up in the upper-left corner of the screen. By accessing the Group tab, you can display the current make-up of the party, the experience level of a given player and the mission that he is currently at.
The forming of a new group is subject to the rule of opening a new, common access room, where you can set the requirements. This room may include information that is helpful while searching for a player with the appropriate experience level or class. You can also take another path and, simply, join a group created by someone else.
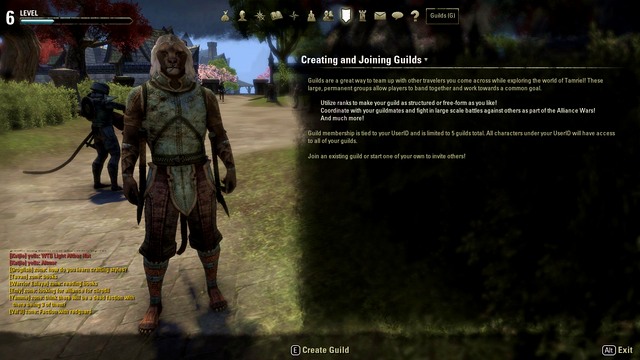 A guild
Guilds in Elder Scrolls Online are societies bigger than a group. Joining a guild is connected with common aims, which predominantly, are centered around taking over fortresses in Cyrodiil and gaining advantage over the enemy factions. A player that joins a guild allots all of his characters to that faction. From now on, all of the characters that you have created, are in the same guild and the only condition is that your characters belong to the same faction (the characters of Aldmeri Dominion cannot join a guild created for players from Daggerfall Covenant or the Ebonheart Pact, and the other way around). At any moment, you can create your own guild and invite your friends, or complete strangers from the same factions. After you create or join a guild, a separate tab will appear in the chat window, where all of the players, in a given guild, can communicate with each other, without any problems. Each player can join five different faction guilds and switching between chat tabs is performed by means of /guild1 /guild2, etc. type of commands.
In Elder Scrolls Online there is no general economy model. Instead, the developers decided to introduce auctions within guilds. Since you have access to the maximum of five guilds, at a time, the game offers you five different auctions . the effectiveness of the guild store depends on the number of players in that guild. The more players are members of a guild, the better its economy. You will be able to replace more equipment and choose from among a wider variety of items. This kind of solution requires players to join guilds. Still, the advantages that it offers are not limited to bartering.
The "Combat" chapter has been devoted to combat system, available in Elder Scrolls Online. You will find here the description of its properties and a detailed description of the system of your hero's abilities. In this chapter, you will find out which abilities are the most useful, and which ones it is worthwhile to use most frequently to develop your hero as fast as possible.
 Combat in ESO
Combat w Elder Scrolls Online is dynamic and requires agility of the player. The combat system has several main properties:
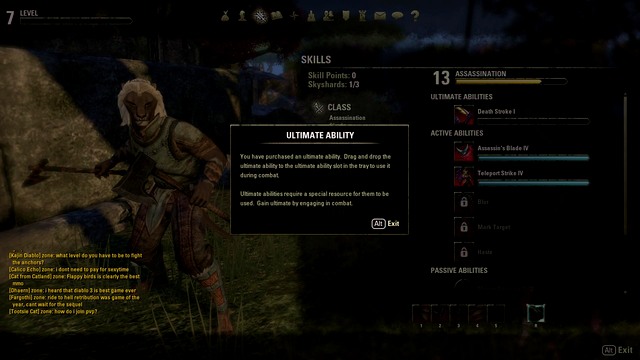 The ultimate ability
The abilities of your character are an inseparable element of the combat system. There are several classes of abilities:
In this chapter, you will find descriptions of each of the three available factions and you will learn which races are assigned to those factions. Each faction groups three playable races. Also, in this chapter, you will find descriptions of abilities of the individual races, as well as supplementary information.
Aldmeri Dominion is a faction of the Southern Tamriel, led by Queen Ayrenn. This faction groups three races:
Altmers- This race can be characterized with strong magical abilities. The Altmers are perfect at using magic of the four elements.
Ability Name
Description of the ability
Supplementary information
Destruction Talent
Increases the experience that you receive from the destruction talent tree, by 15%
Spellcharge
Increases mana regeneration, in combat, by o 3%
- This ability can be unlocked at the fifth ability level of the Altmer
- 3 ability levels (9% in total)
Gift of Magnus
Increases maximum mana by 4%
- This ability can be unlocked at the tenth ability level of the Altmer
- 3 ability levels (12% in total)
Elemental Talent
Increases damage, dealt with magic of the four elements, by 2%
- This ability can be unlocked at the 25th ability level of the Altmer
- 3 ability levels (6% in total)
Wood Elves (Bosmer) - the race of the Wood Elves can be characterized for their high agility factor. Perfect as archers.
Ability Name
Description of the ability
Supplementary information
Archery Expertise
Increases the experience, received from the tree of archery, by 15%
Vigor
Increases the regeneration of endurance, in combat, by 3%
- This ability can be unlocked at the 5 ability level of the wood elf
- 3 ability levels (9% in total)
Resist Affliction
Increases resistance to poison and illnesses by 7%. Increases maximum endurance by 1%
- This ability can be unlocked at the 10 ability level of the wood elf
- 3 ability levels (total 21 and 3% in total)
Stealthy
Increases the range of sneaking by 1 meter. Increases damage dealt, while sneaking, by 3%
- This ability can be unlocked at the 25 ability level of the wood elf
- 3 ability levels (3 meters and 9% in total)
Khajiit - A feline race. They are characteristic with their high agility, intelligence and speed factors. Perfect as rogues.
Ability Name
Description of the ability
Supplementary information
Medium Armor Expertise
Increases experience received from the medium armor tree by 15%
Robust
Increases health regeneration, in combat, by 5%
- This ability can be unlocked at the 5 ability level of the Khajiit
- 3 ability levels (15% in total)
Stealthy
Increases the range of sneaking by 1 meter. Increases damage dealt, while sneaking, by 3%
- This ability can be unlocked at the 10 ability level of the Khajiit
- 3 ability levels (3 meters and 9% in total)
Carnage
Increases the critical hit factor by 1% and critical damage by 5%
- This ability can be unlocked at the 25 ability level of the Khajiit
- 3 ability levels (3 and 15% in total)
Daggerfall Covenant is a faction that encompasses the North-Western part of Tamriel. It is led by High King Emeric. The faction includes:
Bretons - Considered to be the most competent mages all around Tamriel. Their abilities are centered, predominantly, around offensive and healing magic.
Ability Name
Description of the ability
Supplementary information
Light Armor Affinity
Increases the experience received from the light armor tree, by 15%
Gift of Magnus
Increases maximum mana by 4%
- This ability can be unlocked at the 5 ability level of the Breton
- 3 ability levels (12% in total)
Spell Resistance
Increases defense against magic by 2
- This ability can be unlocked at the 10 ability level of the Breton
- 3 ability levels (6 in total)
Magicka Mastery
Decreases mana cost of magical abilities by 1%
- This ability can be unlocked at the 25 ability level of the Breton
- 3 ability levels (3% in total)
Orcs - The brutal race of Orcs, due to their endurance and strength ratios are perfect for warriors that fight melee, as well as tanks.
Ability Name
Description of the ability
Supplementary information
Heavy Armor Expertise
Increases experience received from the tree of heavy armor by 15%
Brawny
Increases the maximum of health and endurance by 2%
- This ability can be unlocked at the 5 ability level of the Orc
- 3 ability levels (6% in total)
Robust
Increases health regeneration in combat by 5%
- This ability can be unlocked at the 10 ability level of the Orc
- 3 ability levels (15% in total)
Swift
Decreases endurance drop, while in sprint, by 4% and increases speed, while sprinting, by 3%
- This ability can be unlocked at the 25 ability level of the Orc
- 3 ability levels (12 and 9% in total)
Redguard - a race that fares well as both warriors and rogues. They are very good as Tanks (offensive and defensive).
Ability Name
Description of the ability
Supplementary information
Shield Affinity
Increases experience received from the tree of one-handed weapons and shields by 15%
Vigor
Increases regeneration of endurance, in combat, by 3%
- This ability can be unlocked at the 5 ability level of the Redguard
- 3 ability levels (9% in total)
Conditioning
Increases the maximum of endurance by 4%
- This ability can be unlocked at the 10 ability level of the Redguard
- 3 ability levels (12% in total)
Adrenaline Rush
Regenerates 1 endurance point when the player attacks the opponent in melee (the ability activates once per 3 seconds)
- This ability can be unlocked at the 25 ability level of the Redguard
- 3 ability levels (3 in total)
Ebonheart Pact Encompasses the North-Eastern areas of Tamriel. It is led by King Jorunn. This faction consists of:
Argonian - Lizard-men, who mastered the magic of restoration
Ability Name
Description of the ability
Supplementary information
Restoration Expertise
Increases experience received from the tree of restoration by 15%
Amphibious
Increases the speed of swimming by 50% and the potency of potions by 5%
- This ability can be unlocked at the 5 ability level of the Argonian
- 3 ability levels (15% in total)
Argonian Resistance
Increases maximum health by 1% and resistance to poisons and illnesses by 7
- This ability can be unlocked at the 10 ability level of the Argonian
- 3 ability levels (3% and 21 in total)
Quick To Mend
Increases the received healing by 2%
- This ability can be unlocked at the 25 ability level of the Argonian
- 3 ability levels (6% in total)
Dark Elves (Dunmer) - This race is perfect for dual-weapon fighting and magic
Ability Name
Description of the ability
Supplementary information
Ambidexterity
Increases experience received from the tree of dual weapons by 15%
Dynamic
Increases defense against magic and endurance by 2%
- This ability can be unlocked at the 5 ability level of the Dunmer
- 3 ability levels (6% in total)
Resist Flame
Increases resistance to fire by 105 and the maximum of mana by 1%
- This ability can be unlocked at the 10 ability level of the Dunmer
- 3 ability levels (3% in total)
Flame Talent
Increases the potency of magical properties of fire by 1
- This ability can be unlocked at the 25 ability level of the Dunmer
- 3 ability levels (3 in total)
Nord - The race of Nord is best as warriors that use heavy armor and two-handed weapons.
Ability Name
Description of the ability
Supplementary information
Two handed Expertise
Increases experience received from the tree of two-handed weapons by 15%
Robust
Increases health regeneration, in combat, by 5%
- This ability can be unlocked at the 5 ability level of the Nord
- 3 ability levels (15% in total)
Resist Frost
Increases resistance to cold by 10 and the maximum of health by 1%
- This ability can be unlocked at the 10 ability level of the Nord
- 3 ability levels (30 and 3% in total)
Rugged
Increases the armor factor by 2
- This ability can be unlocked at the 10 ability level of the Nord
- 3 ability levels (6 in total)
The world of Elder Scrolls Online is vast, so every player needs a means of transport. In this chapter, you will learn about their types and find out about their characteristics. The information that you find here will help you travel between the individual locations and avoid consequences connected with that.
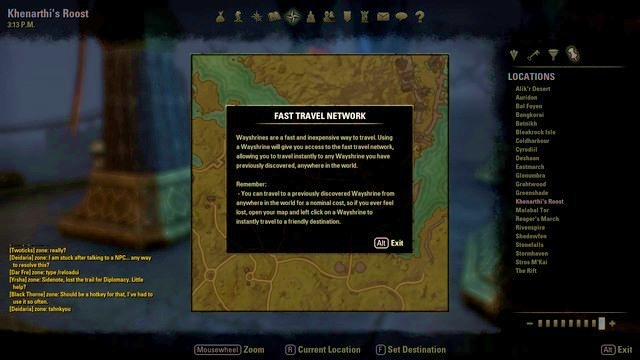 Fast travel
The main means of fast-traveling between locations is using Wayshrines. After you find one, it will be marked on your faction's general map, from which you can teleport straight to it, from any spot within that area. Depending the price to use one gets higher and higher, as you level up. If you want to teleport more than once, within a short period of time, the cost of each consecutive use will be several-fold higher. If, during your exploration, you do not find such a wayshrine and die, you will respawn next to the nearest one and the game reveals it on your map. If you play in a group and one of the party members is near the spot, where you want to go, you can use the Move To Player, which is free of charge.
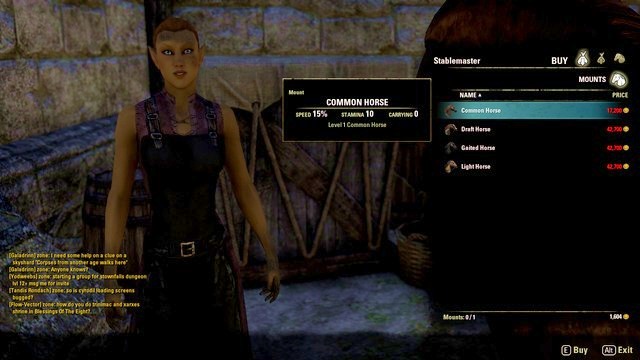 Horses- one of the means of transport
Another way to fast-travel is to ride a horse. Horses are very expensive and, to a certain point in the game, exclusive. There are two ways in which to obtain a horse. One of them is buying it for gold, from a local trader (the prices of good horses are sky-high). This is not it, because it does not suffice to only buy the horse, after which you can use it to travel around the world. Your horse also needs feeding, which imposes additional cost on you. Another way is to buy Elder Scrolls Online Imperial Edition.
You mount the horse by accessing the specific tab in your menu. You can summon it in any location of the game world. Such a horse's stamina, in gallop (in sprint), is higher than that of your character, and it regenerates faster. The more expensive horses come with faster traveling.
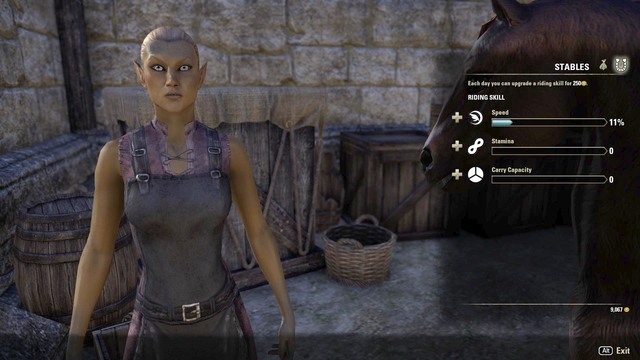 The process of upgrading the steed
Exploration is one of the inseparable elements of the game. Following the paths chosen by you can provide you with additional attractions and riches. From this chapter, you will learn how this works and how you can profit from it.
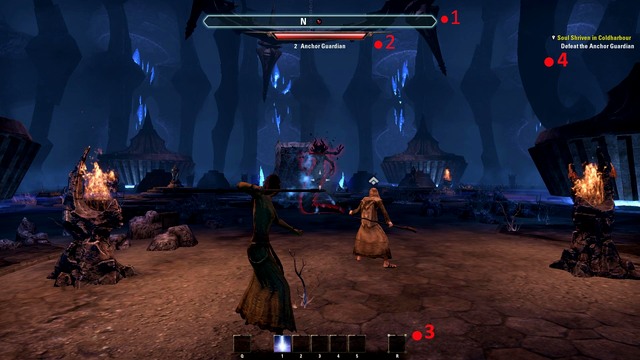
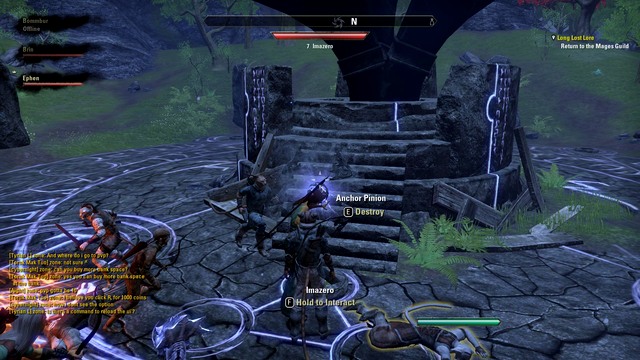
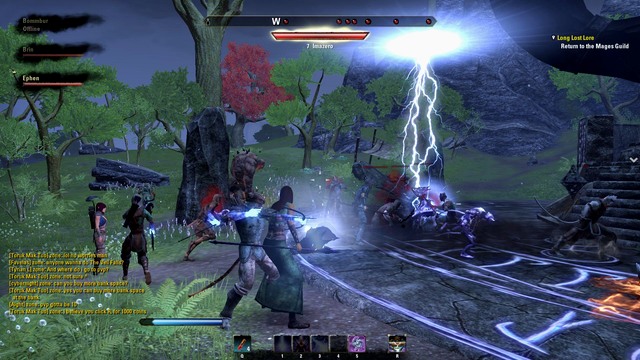
 Molag Bal's dark anchors
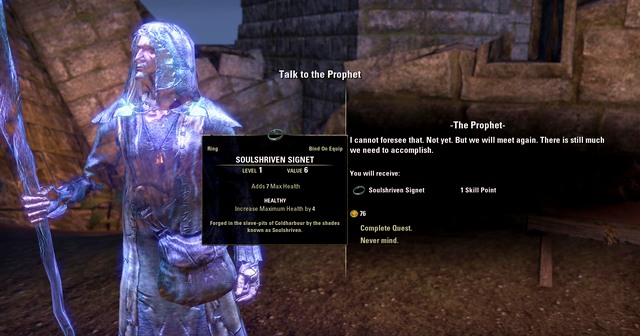
During the exploration you will be running into a group of cultists that are preparing a dark ritual. If this happens, it is a good idea to call the rest of the players, because you will e taking part in a dynamic quest. Your main goal here is to fight back the groups of monsters sent by Molag Bal to the world of the living. Unarguably, this is too difficult for you to handle all on your own, which is why it is necessary to form a part or wait for reinforcements. Each monster that you kill releases a soul, which fills the stone that holds the anchor chain in place.
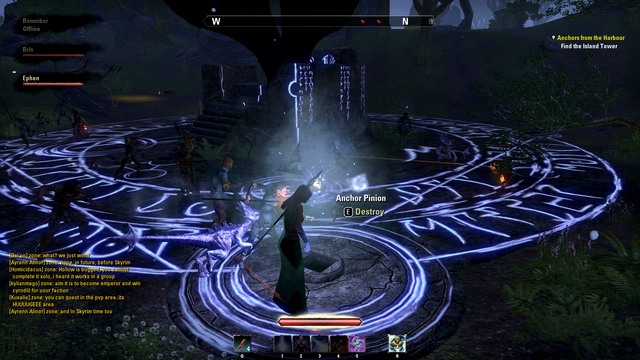 Anchor fastenings
Each player that participates in this event can destroy the crystals filled with souls. After you have destroyed all of them, the event ends in a success and you are rewarded with experience points. If you die in the course of the event, you can ask your party members to revive you, or use the soulgem. For each dynamic quest that you complete, you receive additional experience points from the fighters' guild tree.
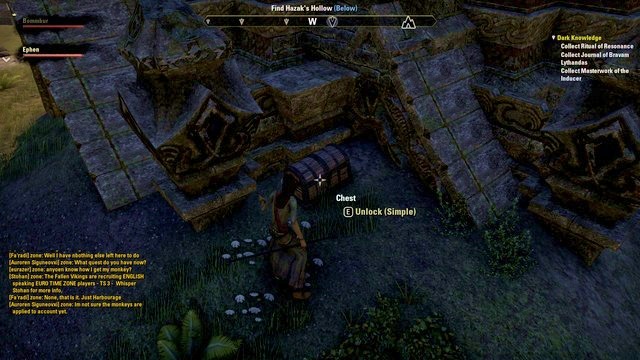 Treasure chest
You can find treasure chests all around the world. If you have a Lockpick on you, and you find such a chest, you can try to open it. The uniqueness of the treasure and the amount of gold are directly connected with the chest's difficulty level. While opening a chest, you need to fit within time limit. Also, you can attempt to force the chest open. Next to the allotted time limit, the game also displays your percentage chances of opening the chest by force.
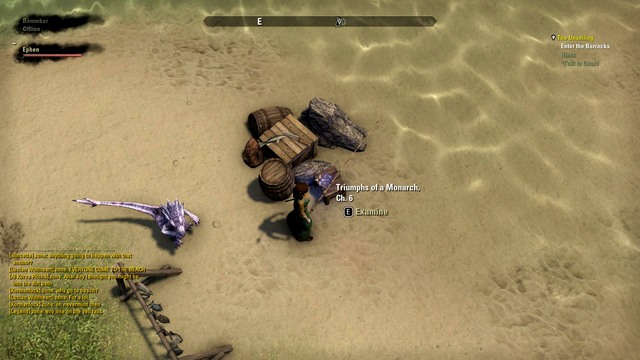 Lorebooks
In the menu, there is a tab devoted to the books that you find. For completing sets of books of a given type, you will be rewarded with experience points and skillpoints. In the tab, you can look up which books are missing from your sets. Also, this is the most important way to improve on your skills in the mages' guild's tree.
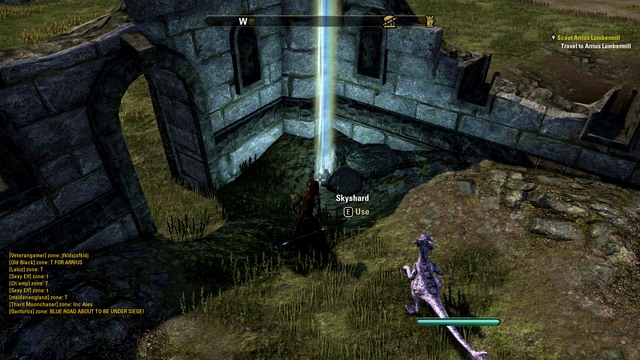 Skyshard
Skyshards are the magical shards scattered all around Tamriel. The player that finds them can absorb their power by interacting with them. The player to collect three such shards is rewarded with an additional skillpoint. You can look up your progression in collecting shards, in your menu, in the skills tab. You find the shards in the open areas of your faction location, in dungeons and in Cyrodiil itself.
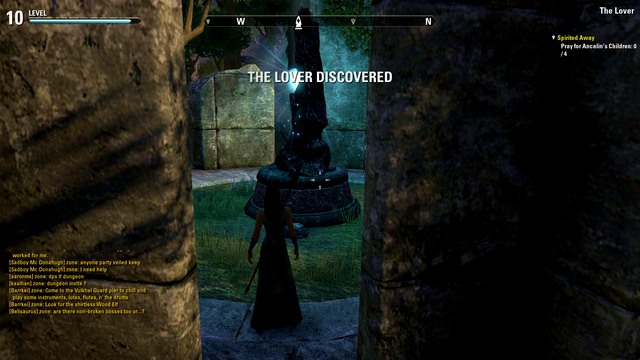 The Lover - one of the magical stones in the ESO
Mundus Stones are magical stones, whose power is available to every player that finds them. After you interact with such a stone, you absorb a special power of the matching type. For each stone that you find, apart from the power, you are rewarded with experience points. The effect of a stone can be looked up in the statistics tab.
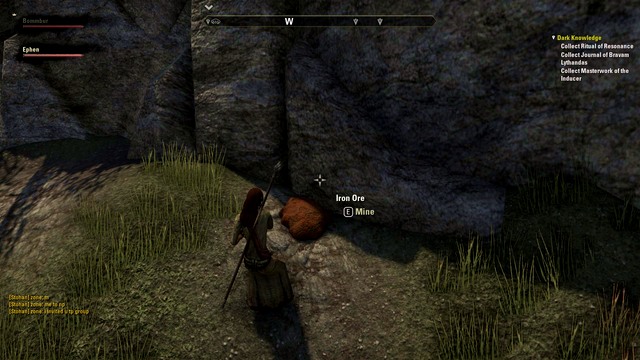 Iron ore that you need for smithery
During your explorations, you will also be finding crafting materials. You do not need any additional tools to mine for them. Some of the unique materials are highly valued, which makes them another way of earning gold in the game.
In Elder Scrolls Online dungeons are an inseparable element of the quests, group hunts and exploration. To hunt in faction dungeons, you need a group of players that will complement each other. The most typical party make-up is a tank, a mage healer and two damage dealers. With this kind of make-up, you can be sure that you will do well in any situation that you find yourself in there. The functioning of dungeons, in Elder Scrolls Online, is different than in other games of this type. After you enter an area, you cannot pick monsters one-by-one. Instead, the entire horde of monsters launches at your party, which is why it is imperative that you wield AoE abilities. Dungeons can be divided into solo (which you find while completing quests) ad group (which you discover while exploring and completing quests).
Each faction has its unique dungeons, with their own lore. There will be occasions, on which you will have to drive back a group of cultists, or fight back a dark terrifying Daedra.
A list of initial faction dungeons:
Daggerfall Covenant (Glenumbra): The name of the dungeon is Spindleclutch. The recommended experience level of the party members is 12-15. After you have cleared the first levels of the dungeons, you face a cruel Daedra - The Whisperer.
Aldmeri Dominion (Auridon): The name of the dungeon is Banished Cells. The recommended experience level of the party members is 12-15. The end boss is the powerful mage High Kinlord Rilis.
Ebonheart Pact (Stonefalls): The name of the dungeon is Fungal Grotto. The recommended experience level of the party members is 12-15. The last battle you fight in this dungeon is against the powerful spider Kra'gh the Dreugh King.
 Stealing is one of the activities available in the game
The justice system allows you to follow either the path of the thief or the murderer. Being a criminal affects your playing style and it completely changes the guards' disposition towards you. While stealing from people, you have a specific chance of success. If you fail to steal an object, you will be attacked and guards alarmed. The bounty on your head depends on the gravity of your crime. Low bounty suggests that, when you are captured, you will be stripped of all the stolen goods and fined. The amount of the fine depends on the amount of the bounty. Murder automatically raises the bounty to the red level. This means that any guard can kill you on spot. Guards are immortal, which is why the only thing that you can do, to avoid consequences, is escape. The amount of the bounty keeps dropping, on a regular basis, with time that elapses after your crime. This means that you can wait in a safety, after you commit a crime, until the bounty level drops to zero. With enough crimes committed, your bounty level reaches the maximum level. Each guard can then kill you without a single warning and he takes your gold. If you do not have enough gold to pay your fine, the guard will also take some of your equipment, which you cannot then retrieve. Gold that you deposit in bank is outside of the guards' reach.
After a successful theft, the item that you have stolen is marked in red and provided with the "stolen" note. To be able to use such items, you need to "launder" them first. Here, you can use the help of fences all around Tamriel, who launder the hot goods, for a price. If you do not want to use such items, you can sell them for a fraction of its normal price.
Crafting in Elder Scrolls Online is an inseparable element of the game. Thanks to this activity, the player is capable of creating equipment of any kind, as well as completely new items . From this chapter, you will learn how crafting works and how you can profit from it.
 Potions can be crafted with alchemy
Alchemy in Elder Scrolls Online is an optional element of the game. Using alchemy, you can brew various potions, which you can also buy for gold. If you find (or buy) the ingredients, you can go to the city and use the Alchemy Table. Toy find out which ingredients you need to combine, to brew a specific potion, you need to find the recipe, or find out what properties a given ingredient has. You can do that by reading books that are spread all around the world, or play the guinea pig and test the ingredient on yourself. Regardless of which path you take, with each tested ingredient and brewed potion, you increase your alchemy level. Thanks to the appropriate alchemy level, you will be able to brew better and more advanced potions. With this skill, you are able to brew either healing potions or lethal poisons. The key ingredient is, of course, water, which you can buy or find during your journeys.
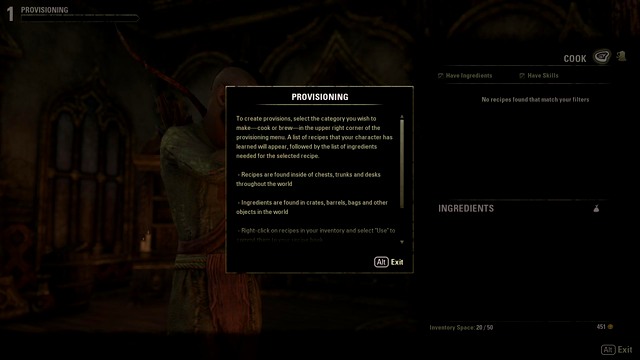 Provisioning
Thanks to Provisioning, you can craft food, which you then will be able to use, to your aid, in your journeys. To use this skill, you need several key elements. The most important one is finding the recipe and the ingredients for that meal. You can create food by a Provisioning Station. Food and beverages are useful, not only during the journeys, but also in wartime in Cyrodiil. Thanks to provisions, you can raise your health mana or endurance, whereas thanks to beverages, you can regenerate those attributes. Each recipe that you find can be entered into the book of recipes, by bringing up the inventory window and using the item. The better recipes require better ingredients, but they offer better buffs.
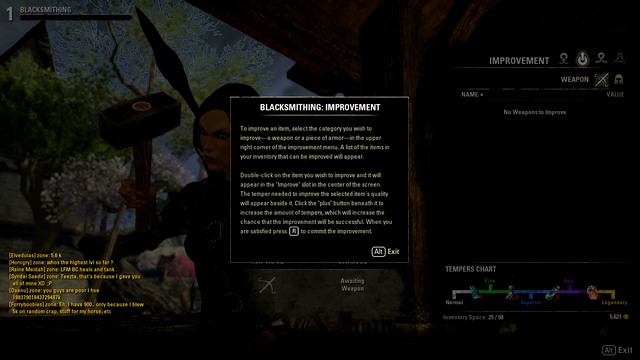 Blacksmithing
Blacksmithing offers you the opportunity to craft metal armors. To craft an armor, you first need to go to a city, where there is a blacksmithing battle and an anvil. The exception here are the tables that give you the opportunity to craft an armor that belongs to a magical set, of which there is a huge number. You find such tables by reading books or through exploration. As a rule, such tales can be found in dungeons and on the map, they are marked with the icon of fire and hammer. There are three blacksmithing options:
Creation- thanks to this option you will be able to create a weapon and an armor from the necessary ingredients. Depending on what level of item you want to create, such needs to be the level and the amount of the ingredients. To create a primitive item, you only are going to need iron. Iron ingots can be forged out of iron ores, which you can find all over the world. If you do not want to go looking for ores, you can buy ingots from the nearest blacksmith. To create an item, you need to select the material that you want to create it out of, the style that you want and the property that the item should have. For each one of the options, you need certain items, which you can buy or find on your travels. Thanks to books, which you find, you can learn completely new and more and more advanced blacksmithing techniques, thanks to which you can create better items with higher statistics.
Improvement- each item that you craft, can be improved, if only you have the special magical stone (hardener). Depending on the level of the item that you want to improve, the stone that you require will be rarer and rarer. There are several levels of improvement: Normal - white), Fine - green, Superior - blue, Epic - violet and Legendary - golden. While improving, you will get the chance of improving the item. The chance depends on how many stones, for that purpose, you have. If you are not interested in taking the risk, you can spend as many stones, so as to reach the chance of 100%. If you decide to improve an item, with a chance lower than 100%, then your item may be destroyed in the process and you will lose it irreversibly. The improved armors provide a better defense factor, where the weapon grant a higher offense factor. In both cases, improvement raises the value and the price for repairs.
Extraction - thanks to this option, you can acquire ingredients from the equipment that you have already obtained. Thanks to this, you can use the ingredients to create a new armor, or weapon, in the future. The materials that you obtain this way depend on the material that the item was crafted out of (from an iron armor, you receive the same class of ingredients). After the process, such items are destroyed and you receive the materials, and additional points to blacksmithing.
Enchanting can be performed, thanks to the Enchanting Station, which can be found in each bigger city. There are various attributes of enchanting and they range from adding fire damage, to receiving more experience. To enchant an item, you need two items: the item that you enchant and a Glyph. You can obtain glyphs by completing quest, opening chests, buying at stores and collecting runes to turn into glyphs. There are three main types of runes and, to create a glyph, you need one of each type: Essence Rune (yellow), Aspect Rune (red) and Potency Rune (blue). After you obtain such runes, you can create the magical word, from which you also learn the properties of the runes that you used, and also gain a higher enchanting level. To enchant a weapon, you need to open the inventory, select the weapon and the glyph whet you want to use. Depending on your enchantment level, you will be using more and more advanced magical words, which vest higher magical statistics in your weapon. You can also extract the runes from glyphs that you have found and learn, by this, the affixes of the words that were used to create them. You do that by selecting the Extraction option, at the Enchanting station.
Woodworking is a skill that allows you to craft bows and magical staves. To create a weapon, you need wood. You can obtain it by exploring the world and finding it, buying and by extracting it from the other weapons. Woodworking is subject to the same rules as blacksmithing. For each item that you create, you receive experience in woodworking. Just like blacksmithing, woodworking is divided into three branches:
Creation- thanks to this action, you can create a bow or a staff. Depending on which class of item you want to acquire, such level of proficiency, and as much of the material, you need. While performing this action, you can select the property (the bonus for the weapon) and style (what it is going to look like).
Improvement- This type of woodworking offers you the opportunity to improve the staves and bows that you have obtained (or crafted). To improve the items, you need special items and, depending on the level of improvement, such is the type of item that you are going to need. To obtain the highest class (Legendary) you are going to need the most expensive and the rarest, unique improvement items.
Extraction- This skill allows you to acquire materials for creating bows and staves. In exchange for destroying the weapon. The materials that you receive are determined by the class of the item that you destroyed. By extracting materials from high-end items, you obtain high-quality wood and styles.
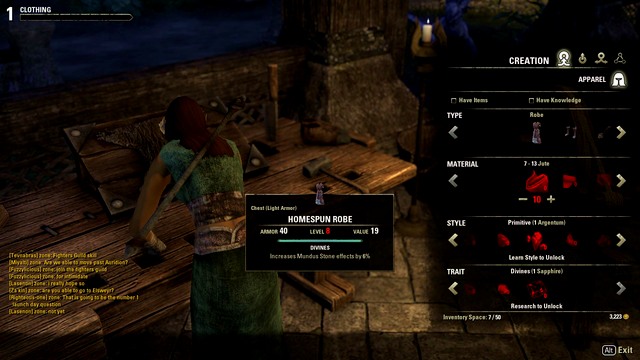 Clothing in ESO
Clothing is creating armors for mages and rogues (light and medium armors). It is subject to the same rules as blacksmithing. Clothing stations can be found in each major city, and the special ones in certain locations that you need to discover. For each armor that you create, you can choose a property and style. Just like in the case of blacksmithing and woodworking, there are three types of clothing:
Creation - Thanks to this action, you will be able to create your robes (light armor) and medium armor. In both of these cases, you are going to need materials. The quality and amount of these materials depends on what class of item you want to create (a better armor requires materials of high quality).
Improvement- Just like in the case of blacksmithing and crafting of heavy armors, you can improve your newly-made robe. To improve an item, you are going to need special, unique materials, and the chance of success is directly proportional to the amount of these materials.
Extraction- This option allows you to obtain materials from the equipment that you have already obtained, which can be later used to create the armor that suits your liking. The item that you extract the materials from is destroyed in the process. The amount of material that you obtain, depends on the level and quality of the item that you extract it from.
An inseparable element of the game is the PvP (Player vs. Player) system. The intention of the developers was to create three factions, which would compete with each other for the greatest glory on the continent of Tamriel, i.e. for the throne of the Emperor of Cyrodiil. In this chapter, you will find information on PvP matches, campaigns and how to become the Emperor.
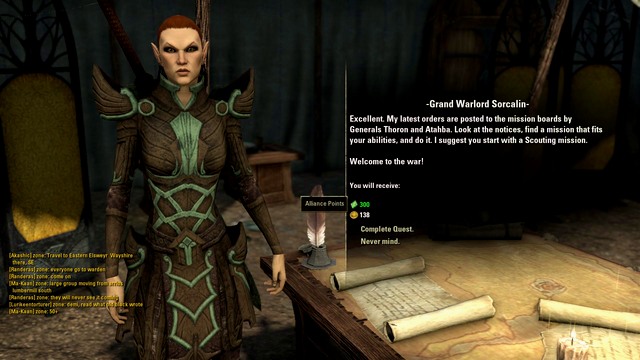 Alliance Points - the currency in Cyrodiil
To gain access to the PvP- Cyrodiil zone, your character needs to achieve at least, level 10. After you meet this requirement, you can select, from the menu, the campaign that you want to take part in. After you accept your choice, you will be transferred to the warzone, to the starting point of your faction. In Cyrodiil, there are many tasks that are connected with PvP and PvE. For completing those tasks, you are rewarded with experience, gold and a new currency accepted in Cyrodiil - Alliance Points. The Alliance Points can be exchanged for equipment, or used to support your campaign and buy catapults, or battering rams. You also obtain Alliance Points for completing a group task, like seizing of a fortress or an Elder Scroll, as well as killing a player of an enemy alliance.
Death in Cyrodiil is also different from that on the faction grounds. The player that is killed in the battlefield can be revived with the Soul Gem. If he is not revived, he can resurrect in the nearest camp. Your equipment will then not be damaged and you can return to the battlefield.
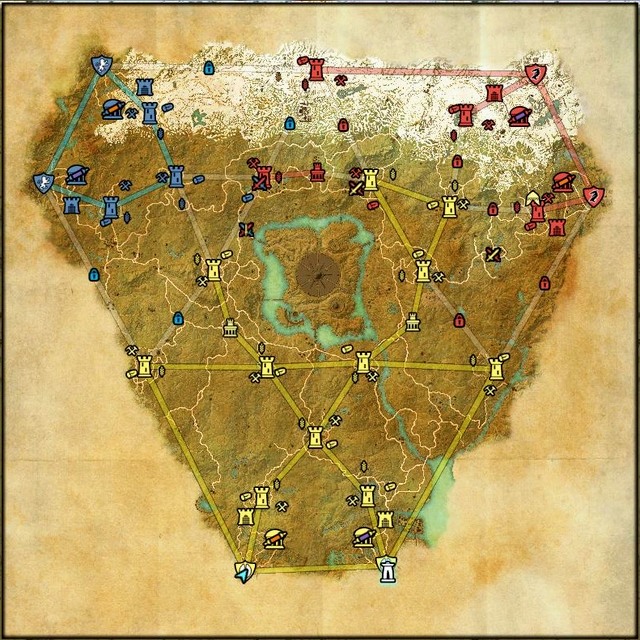 Cyrodiil
Transportation in Cyrodiil is also different from what you saw in the faction grounds. You can walk, ride on the horse or teleport, thanks to the special Transitus Shrines. To be allowed to use the shrines, you need to meet a certain requirement. Each faction, which seized a tower, can activate a safe passage between them. If this requirement has been met, there will appear a line, in your faction's color, across the map. If not, a transparent line, with a padlock in the middle, will be displayed.
 The campaign window in the menu
After reaching level 10, each player can select the campaign that he wants to join. Campaigns are dynamic quests so, you can participate them whenever you want to. After you have selected the campaign, you will be teleported to the PvP (Cyrodiil) zone, right into the middle among the three factions. Due to the differences in experience levels, all players are similar, in terms of attack and defense statistics.
The objectives during the campaigns can be divided into two types:
The Emperor is a status in Elder Scrolls Online, which every player that takes part in the PvP games, in Cyrodiil, dreams of. The abilities that the player receives are unique. You cannot obtain them in any other way and they provide great advantage during PvP. For obtaining the status of the Emperor, the player receives three main rewards:
To become the Emperor, the player needs to meet two requirements:
Elder Scrolls Online offers you to follow your own part of hero development. Still, the class pattern, which you can select depending on the playing style, remains From this chapter, you will learn about the abilities of each, and differences between them.
Dragonknight is one of the classes available in the game. The abilities of this class are versatile and it can be played under any form. Not only does Dragonknight rely on his ability to deal damage at close range (close range fighter), but also the game offers you magical skills. Since this class's task is to take on large amounts of damage, it is a good decision to wear heavy armor. Dragonknight has three paths of development which can be mixed in order to determine the best combinations of abilities:
The Nightblade class is offered to every player that prefers quick elimination of single enemies and sneaking. This is a typical rogue class, which is perfect for this kind of tasks. The preferred equipment are dual weapons (daggers) and medium armor. During silent elimination of opponents, this class receives a bonus to the dealt damage. He has a greater chance to score a critical hit and the damage, from this kind of attack, is far greater than in the case of the other classes. Nightblade has three development paths, which can be combined freely:
Sorcerer is a typical mage class in Elder Scrolls Online. His abilities focus mainly on casting buffs on allies and healing them. Sorcerer, as a magical class, uses staves and robes (light armors). While plying solo, you can focus mainly on dealing damage and casting curses on enemies, and while playing in a group, on the abilities to heal the allies. The healer class is the one that is the most needed class in a group and, without this, any expedition into the dungeons ends tragically. The Sorcerer has three main development paths:
Templar in Elder Scrolls Online is a knight that uses holy magic, which both deals damage and heals you during battle. Templar is an irreplaceable class, as regards dealing damage to groups of opponents. Its ultimate abilities can be reinforced by the other players in the group, which deals even more damage to the opponents. As a templar, you can play in a variety of ways. His array of abilities can focus on dealing, or on taking damage. Templar has three main ability trees:
In Elder Scrolls Online, as an MMO, there is the maximum experience level that you can attain. From this chapter, you learn what types of activities await you, after you have reached that level and how this relates to the issues raised previously.
 The Champion system becomes available after you have attained level 50
The Champion System unlocks automatically after you have attained veteran rank #1. After you do, you receive enlightenment and all the experience that you gain from killing monsters and completing quests is multiplied by four. After you have attained sufficient amount of experience, you can allot your first champion skill point. There are three main categories to choose from, and they differ in terms of playing style (the mage, the rogue and the warrior). Of course, there is nothing to prevent you from allotting points of the other classes over to your own, but this will equal wasting them. Each main tree has skills for each of the classes, which is why it is best to familiarize yourself with them, before you make your decision. Below, you can find a complete list of skills, their requirements and detailed descriptions:
Shadow

The name of the skill
Skill description
Elemental Expert
Increases damage from fire, ice and electricity by 1% per each point of the skill.
Elfborn
Increases critical damage from magic and it increases healing abilities by 1% per each point of the skill.
Blessed
Increases healing abilities o 1% per each point of the skill.
Spell Erosion
Ignores 1% of the opponent's defense against magic per each point of the skill.
Vengeance
Grants critical hit from magic, after three magic attacks have been blocked. This skill becomes available after you have attained 12 points of the tree.
Spell Precision
Increases chance of critical hit from magic by 12%. This skill becomes available after you have attained 30 points of the tree
Foresight
Reduces the mana cost of the next spell by 80%, after you drink any potion. This skill becomes available after you have attained 75 points of the tree.
Arcane Well
Grants a 20% of opening the arcane well, after you kill an opponent, which regenerates 1308 mana points to you and to all your allies, within the radius of 2.5m.
The Atronach
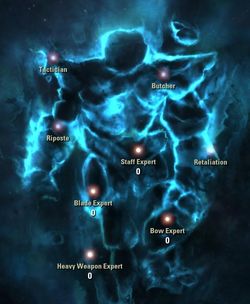
The name of the skill
Skill description
Heavy Weapon Expert
Increases damage dealt with light and strong attacks, with blunt weapons and axes, by 1%, per each point spent.
Bow Expert
Increases damage dealt with light and strong attacks, while using bows, by 1% per each point spent.
Blade Expert
Increases damage dealt with light and strong attacks, wit hone and two handed swords, by 1% per each point spent.
Staff Expert
Increases damage dealt with light and strong attacks with destruction staves (elemental) and increases healing by 1% per each point spent.
Retaliation
After each strong attack that you block, you receive a 30% bonus to damage dealt with the next attack.
This skill becomes available after you have attained 10 points of the tree.
Riposte
While blocking an attack, you reflect 1776 of damage dealt by the attacker. This effect may take place every 5 seconds. This skill becomes available after you have attained 30 points of the tree.
Butcher
Light and strong attacks deal 5% more damage, to opponents with less than 25% health points left. This skill becomes available after you have attained 75 points of the tree.
Tactician
You knock your opponents off balance, after each successful dodge from their attacks. This skill becomes available after you have attained 100 points of the tree.
The Ritual
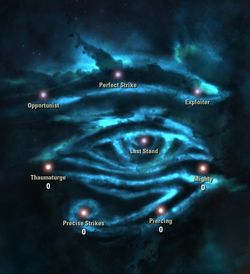
The name of the skill
Skill description
Piercing
Increases the ignored defense of the opponent, in a physical attack, by 1% pear each point of the skill.
Precise Strikes
Increases critical damage dealt by 1%, per each point of the skill.
Thaumaturge
Increases damage from poison, disease and magic, by 1% per each point spent.
Mighty
Increases damage from physical attacks by 1% per each point spent.
Opportunist
Increases damage dealt by your attack, after each spell you successfully interrupt, by 15%. This skill becomes available after you have attained 10 points of the tree.
Perfect Strike
Increases the chance of a critical hit, by 12%. This skill becomes available after you have attained 30 points of the tree.
Exploiter
Increases damage dealt to opponents that have been knocked off balance, by 10%. This skill becomes available after you have attained 75 points of the tree.
Last Stand
You receive a blessing that increases the energy inflow, by 3 points per second, if you have less than 20% of your health points. This effect can occur every 20 seconds. This skill becomes available after you have attained 120 points of the tree.
The Steed
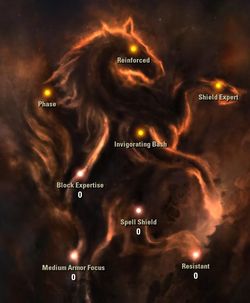
The name of the skill
Skill description
Resistant
Decreases critical damage that you receive, by 1% per each tree point that you spend.
Medium Armor Focus
Increases defense factor by 1% per each tree point that you spend, while wearing 5, or more, elements of medium armor.
Spell Shield
Increases defense against magic attacks, by 1% per each tree point that you spend.
Block Expertise
Decreases cost to block attacks (resistance/mana) by 1%, per each skill point of the tree that you spend.
Invigorating Bash
You receive a 20% chance of instantaneous regeneration of 437 health points, after hitting the opponent (shield bash or weapon shove). This skill becomes available after you have attained 10 points of the tree.
Phase
After each dodge, the statistic of the magic resistance armor rises by 510 points for 3 seconds. This skill becomes available after you have attained 30 points of the tree.
Shield Expert
It increases the statistic of the armor and defense against magic, by 75%, while wearing a shield. This skill becomes available after you have attained 75 points of the tree.
Reinforced
While blocking, you receive thorns that deal 969 damage points to the opponent, every 10 seconds. This skill becomes available after you have attained 120 points of the tree.
The Lady
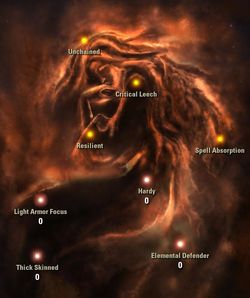
The name of the skill
Skill description
Elemental Defender
Decreases damage you take from ice, fire and electricity, by 1% per each point of the tree spent.
Thick Skinned
Decreases damage taken from DoT (damage over time) effects, by 1% per each skill point spent.
Light Armor Focus
Increases statistics of the armor, while wearing 5 or more elements of a light armor, by 1% per each tree point that you spend.
Hardy
Decreases damage taken from poisons, diseases and magic, by 1% per each skill point spent.
Spell Absorption
You instantly regenerate 2677 mana points, after you have taken damage from ice, fire, magic, earth and electricity. It regenerates mana to the amount of 30% of your maximum health level, after you have taken damage from void magic. This effect occurs every 10 seconds. This skill becomes available after you have attained 10 points of the tree.
Resilient
You regenerate 75 health points, while taking critical damage. This skill becomes available after you have attained 30 points of the tree.
Critical Leech
After a successful critical attack, you immediately regenerate 255 health points. This effect occurs once per every 5 seconds. This skill becomes available after you have attained 75 points of the tree.
Unchained
It decreases stamina cost for skills, after you shake off the effects of stunning, knocking down, staggering, by 80% for 3 seconds. This skill becomes available after you have attained 120 points of the tree.
The Lord
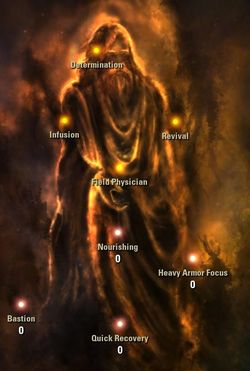
The name of the skill
Skill description
Quick Recovery
Increases the amount of healing points by 1% per each tree point spent.
Bastion
Increases the power of all the effects that absorb damage, by 1% per each point of the tree spent.
Heavy Armor Focus
Increases statistics of the armor, while wearing 5 or more elements of heavy armor, by 1% per each tree point spent.
Nourishing
Increases the number of health points that you restore with potions, by 1% per each tree point spent.
Field Physician
Decreases damage that you receive, while reviving a fallen ally, by 15%. This skill becomes available after you have attained 10 points of the tree.
Infusion
Increases the rate of regeneration of the mana pool in the ally that you have revived, by 261 points every 8 seconds. This skill becomes available after you have attained 30 points of the tree.
Revival
You absorb 7905 points of damage for 5 seconds, after the revival. This skill becomes available after you have attained 75 points of the tree.
Determination
You absorb 994 points of damage, for 15 seconds after drinking a potion. This skill becomes available after you have attained 120 points of the tree.
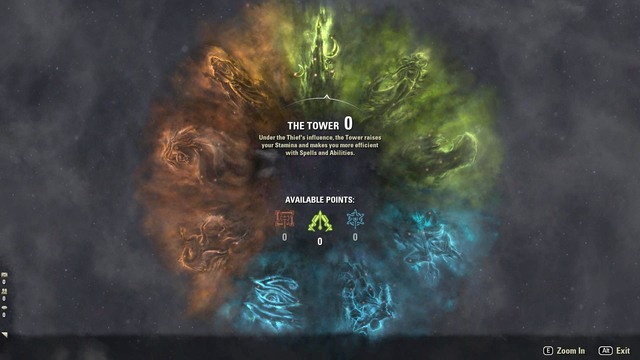
The Tower

The name of the skill
Skill description
Magician
Reduces mana cost of magic abilities, by 1% per each tree point spent.
Sprinter
Reduces the stamina cost of springing, by 1% per each tree point spent.
Bashing Focus
Reduces the stamina cost of staggering attacks, by 1% per each tree point spent.
Warlord
Reduces the stamina cost of all the skills used, by 1% per each tree point spent.
Ensnare
You receive a 33% of decreasing the opponent's speed of movement, after a successful staggering attack. This skill becomes available after you have attained 10 points of the tree.
Inspiration Boost
Increases the overall inflow of inspiration, by 20%. This skill becomes available after you have attained 30 points of the tree.
Mara's Gift
Your death regenerates the health of all the allies, by 2550 points, within the radius of 8 meters. This skill becomes available after you have attained 75 points of the tree.
War Mount
Your mount does not use up stamina outside of combat. This skill becomes available after you have attained 120 points of the tree.
The Lover
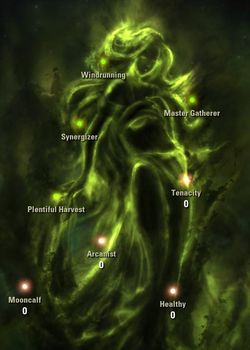
The name of the skill
Skill description
Mooncalf
Increases regeneration of stamina, by 1% per each point spent within the tree.
Healthy
Increases regeneration of health, by 1% per each point spent within the tree.
Arcanist
Increases mana regeneration by 1% per each point spent within the tree.
Tenacity
Increases regeneration of mana and stamina, during strong attacks, by 1% per each point that you spend within the tree.
Plentiful Harvest
You receive a 10% chances of doubling your harvest of natural resources. This skill becomes available after you have attained 10 points of the tree.
Synergizer
After you activate synergy, you receive a boost to two of your ultimate abilities. This skill becomes available after you have attained 30 points of the tree.
Master Gatherer
Decreases time to harvest resources, by 50%. This skill becomes available after you have attained 75 points of the tree.
Windrunning
Increases movement speed by 2%. Also, sprinting increases the rate of regeneration of health and mana, by 10%. This skill becomes available after you have attained 120 points of the tree.
The Shadow
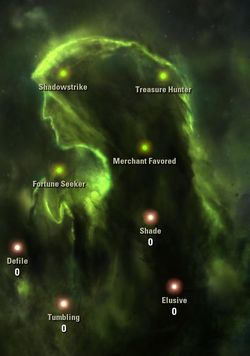
The name of the skill
Skill description
Tubmling
Decreases the cost of dodges and freeing yourself from traps, by 1% per each point spent within the tree.
Elusive
Decreases the duration of all the weakening effects (snare, fear, disorientation), by 1% per each point spent within the tree.
Defile
Increases the effectiveness of skills that decrease the healing effect, by 1% per each point spent within the tree.
Shade
Decreases stamina cost of movement, during the effect of hiding and covered, by 1%, per each point that you spend within the tree.
Fortune Seeker
Increases the amount of gold that you find in chests, by 50%. This skill becomes available after you have attained 10 points of the tree.
Merchant Favored
Decreases the cost of repairing the equipment by 10%. This skill becomes available after you have attained 30 points of the tree.
Treasure Hunter
Increases the quality of equipment that you find in chests. This skill becomes available after you have attained 75 points of the tree.
Shadowstrike
You receive a cover/hidden effect, after you kill an opponent with a strong attack, for the duration of 2.5 seconds. This skill becomes available after you have attained 120 points of the tree.
After you reach level 50, your character will be developed to a high level. The amount of heath, mana and stamina will not be used up as quickly, and the abilities of your class will surpass those of the lower-level players. You will be able to deal with situations that proved too difficult at earlier stages of the game. Your equipment will be matched to your needs and you will be sure that you are using the best, unique gear available, which will provide you with advantage in the battlefield. Also, reaching the highest level goes hand in hand with mastering your abilities. You will be no longer restricted by your current level. Finding the best combinations of abilities, together with your allies, will provide you with yet another advantage, while fighting for the Emperor's throne.
Also, attaining the highest level includes being able to craft the best equipment available in the game. At this point, you start visiting special forges, where you craft armor that fits magical and powerful sets. Also, you will be finding the more unique materials for your upgrades. Your weapons will be becoming more and more powerful. Thanks to crafting, you will be able to achieve top level in each category.
After you attain level 50, you are going to face countless adventures. In dungeons, new instances appear and these are meant for the highest level only. New instances mean new dynamic quests. New, stronger opponents will use 100% of their skills. Along with your group of allies, you will be receiving better and better equipment and, to complete them, you will have to come up with newer and more lethal combinations of abilities. Hunting in a group, at the level of 50, is more immersive and, at the same time, more demanding.
The Elder Scrolls Online is an MMO that has been released by Bethesda and Zenimax Online. In the game, you will both find the aspects of a solo play, as well as being a part of one small, or big party. The references that make their way into the game will surely satisfy all of the fans of the elder Scrolls series. This guide has been drawn up with the available classes in mind. What you can find here is mainly descriptions and hints on how to play as these classes, as well as how to determine your playing style, and take advantage of that. There are two developments paths, available for each class, which are different in what roles they play in a party. The description of the available abilities will help you learn about your character and about the style to which it is fit. Also, you can find here hints on combat, while using these particular abilities. This guide lists, also, the recommended items that your class will rely on and which are the most optimal for it. The list of the recommended items also includes the spells and abilities, optimal for your class, which max out on the statistics on which they rely.
The Elder Scrolls Online Guide- character classes includes:
Jacek "Ramzes" Winkler ()
Dragonknight is one, of four, available character classes in the game. What it resembles most, is a typical warrior - you will be spending the majority of time, among hordes of enemies, while concentrating their attacks on yourself (if you play as a tank), or by dealing AoE damage over short distance (if your character is a DPS). Of course nothing stands in your way of you making the Dragonknight fight with the bow, attack with dagger or define it as a purely support character, who boosts up the statistics of allies and casts debuffs on enemies.
Like each of the classes in the game, Dragonknight has access to three unique ability trees - Adrent Flame, Draconic Power and Earthen Heart.
Icon
Ability name
Ability description

Dragonknight Standard (ultimate)
Throws down a standard from the skies, which deals magical damage to nearby enemies and decreases the potency of their healing ability. An ally can activate the standard, which deals additional damage from magic and immobilizes enemies.

Fiery Grip
You pull the enemy towards yourself and deal damage from fire.

Searing Strike
You burn the enemy and deal damage from fire. Then, you set them on fire and deal more damage from fire, for several seconds.
Fiery Breath
With a gust of fire, you wound the enemies in front of you, deal damage from fire and set them on fire, which deals additional damage from fire, for several seconds.

Lava Whip
You deal damage from fire and, additionally, knock the enemy off balance, if they were previously stunned or immobilized.

Inferno
You initiate a halo of fire, which deals damage from fire, to all the nearby enemies. This ability consumes mana per each second that it is being active and it can be disabled at any moment.
Icon
Ability name
Ability description

Kindling
Increases damage from the burning effect.

Warmth
Damage from fire, which you deal, snare the enemy.

Searing Heat
Enhances the burning effect of the Fiery Breath, Searing Strike and Dragonknight Standard abilities

World in Flame
Enhances damage from all of your AoE fire abilities.
The Ardent Flame tree is centered around dealing damage from fire and on casting debuffs on the enemy. All of the active abilities in this tree deal damage from fire only. This is why, you need to turn your attention to passive abilities, which perfectly harmonize with them. By investing your points in passive abilities, you increase damage from fire, extend the duration of some of the abilities, and also cast the Snare effect on the enemy (explained in the "Statuses" section in this guide).
The abilities of the Ardent Flame tree, focus on dealing the greatest possible damage, which makes it a perfect choice for the players that prefer lonely fight - save some of the abilities that impose slight effects of crowd control (CC), they will not allow you to heal yourself, drag away too many opponents, nor do they offer any defensive bonuses, or preventing from supporting the party. Still, they are perfect in PvP, due to the abundance of damage from fire that they deal.
Icon
Ability name
Ability description
Dragon Leap (ultimate)
Your character jumps up and falls down to the ground, while dealing considerable damage from fire and throwing the enemies, which receive damage from it, away. This ability has a minimum range threshold - this means that you cannot activate it while aiming at the opponent within arm's reach.

Spiked Armor
Enhances your armor's resistance and reflects, back to the enemy, damage that they deal to you.

Dark Talons
You immobilize the nearby enemies for several seconds, while dealing damage from magic to them. An ally can then activate the Impale Synergy ability, to deal additional damage to the immobilized enemies.

Dragon Blood
It immediately regenerates 33% of your health, for the duration of a dozen-or-so seconds.

Reflective Scales
For several seconds, it reflects the incoming projectiles.

Inhale
You absorb health points from the nearby enemies and after 2.5 seconds, you deal damage from magic to them.
Icon
Ability name
Ability description

Iron Skin
Increases the amount of damage that you are capable of blocking.

Burning Heart
Enhances the healing ability that you receive for each ability from the Draconic Power tree, on your ability bar.

Elder Dragon
Enhances your passive health regeneration, for each ability from the Draconic Power tree, on your ability bar.

Scaled Armor
Increases your immunity to magic.
The Dragonic Power tree is meant to increase your statistics and it is every tank's dream. The active abilities (apart from the ultimate one) do not deal too much damage - they are rather centered around imposing CC effects on the enemies and help you keep their attention on yourself. The Dark Talons ability is one of the most powerful CC ones in the game - it allows toy to keep the enemies on you endlessly, which drags them away from your allies, while dealing quite decent damage.
The Spiked Armor is the ability that you are going to use most frequently, both while playing solo and in party. It offers a gigantic bonus to the armor (and after being upgraded, it reaches absurd values) and reflects damage back to the attacker which, in fact, increases damage dealt by you. Dragon Blood allows you to heal when situation is critical - with appropriate amounts of mana, you will be virtually invincible, which is also going to make your healer's job easier. Inhale, apart from healing, also allows you to deal considerable damage to nearby enemies.
Passive abilities are useful to any character that fights at close quarters. Iron Skin allows you to absorb more damage, while blocking, Scaled Armor enhances your immunity to magic, which makes for a more comfortable fight against mages. Burning Heart and Elder Dragon enhance your health regeneration and the amount of health that you receive, while healing, on condition that you have an ability, from the Dragonic Power tree, in your ability bar (which is rather obvious, considering their effectiveness).
The downside of this tree is the lower amount of damage that you are capable of dealing to enemies, especially if compared to the previous tree. Still, these abilities will often come in handy.
Icon
Ability name
Ability description

Magma Armor (ultimate)
Decreases damage that you receive, while restricting it to the value of several percents, and also deals damage from fire to the nearby enemies.

Stonefist
You throw a stone at the enemy, deal physical damage and knock them down.

Molten Weapons
The aura that increases the damage dealt by your allies, whereas you, as the caster, receive a double bonus.

Obsidian Shield
You summon a shield enclosing the nearby allies, which absorbs some of the damage. You, as the caster, receive a shield of double protection.

Petrify
You stun the enemies, over a vast area, for a long duration (more than 10 seconds!). After you receive a predetermined amount of damage (or after the time passes) the stun effect is dispelled.

Ash Cloud
You snare the nearby enemies and endow their attacks with a chance to miss.
Icon
Ability name
Ability description

Eternal Mountain
Extends the duration of all the abilities in the Earthen Heart tree.

Battle Roar
After the ultimate ability is activated, you receive some of the amount of all of your assets (Health, Magicka, Stamina; depending on the amount of the ultimate points that you use up).

Mountain's Blessing
You receive an ultimate point each time that you activate an ability from the Earthen Heart tree.

Helping Hands
You receive stamina whenever any of your abilities, from the Earthen Heart tree, touches to an ally.
The Earthen Heart mainly focuses on supporting your allies and on crowd control. The ultimate ability allows you to decrease the amount of damage that you receive, to 3% of your maximum health, per hit, which you are going to find useful, while fighting bosses that can pack a blow.
The Molten Weapons and Obsidian Shield abilities are useful while fighting both solo and in group. The former provides you with a bonus to the damage that you deal, whereas the latter imposes on them (and you) a protective shield, which you are probably find useful, whenever you need to cut down on damage that your party receives, during the enemy AoE attacks.
Stonefist allows you to stun most of the enemies (with the exception of bosses). Petrify stuns all of the nearby enemies, for a long duration, and thanks to Ash Cloud, the enemies move slower and are more likely to miss. You are going to need these three abilities especially while playing as a tanks and you attempt to keep the enemy groups at bay.
Passive abilities extend the duration of the abilities of this tree, allow you to receive additional ultimate points and regenerate resources, whenever you are using these abilities. They also regenerate stamina, if they reach an ally.
Both active and passive abilities work perfectly during group fights, because they allow you to raise the effectiveness of both your character and the allied ones. Unfortunately, this takes place at the cost of, virtually, nonexistent damage that these abilities deal.
Due to his disposition to fight over a short distance, Dragonknight is perfect as a tank, i.e. the one that gets the whipping for the entire party. What is especially useful, in this case, are the abilities from the Dragonic Power and Earthen Heart trees - Ardent Flame is centered, rather, around a solo play, if you want to deal as high damage as possible.
As a tank, your main task is to drag the attention, of the enemies, away from the rest of the party and, to do that, you need to have as large a pool of health as possible and average amounts of stamina, and magicka. Also, you should have the highest possible value of your armor and resistance to magic, thanks to which you will bring damage to a minimum. Wear heavy armor only.
The recommended race, for this task, is the Imperial, due to his race abilities, which raise sword and shield wielding abilities, which increase maximum health and stamina which, in turn, allows him to steal health by attacking. Of course, the other races are just as fit or that, but this guide assumes that you are playing as an Imperial - if you have selected any other race, ignore Imperial's passive abilities, provided in this section. Additionally, in both weapons slots, keep a sword and the shield - yes, n both of them. This has been explained below.
Icon
Ability name (after the recommended metamorphosis)

Standard of Might

Empowering Chains

Burning Embers

Engulfing Flames

Burning Talons

Deep Breath
Icon
Ability name (after the recommended metamorphosis)

Corrosive Armor

Shield Assault

Flame Lash

Ransack

Green Dragon Blood

Eruption
In addition to the above sets of abilities you should invest into the following passive abilities (from the One Hand and Shield, Imperial and Heavy Armor trees):
The first set is designed to fight a larger amount of weak enemies, where the most important thing is to deal high damage and keep them riveted to you (and also to immobilize them). In practice, all of the abilities allow you to deal AoE damage and DoT (Damage over Time) damage, which should prove its worth, while fighting cannon fodder, whereas Burning Talons allows you to keep them on you. After you get the attention of all of them, activate the Shield of Might ultimate ability, to summon the standard that deals immense damage.
The second set is designed to be used against a single, big and strong enemy. Switch to this other mode when you reach the boss, or a strong enemy surrounded by dozens of the weaker ones. Start the battle with the Shield Assault, to run up to the enemy and stun him, after which you should use the Flame Lash, to extend the CC effect on the enemy. Eruption (the improved version of Ash Cloud) allows you to slow down the enemy considerably, which decreases his chances at hitting you, whereas Ransack allows you to keep the hostile aggro, even if your allies wreak havoc and deal huge damage.
When things go awry and the boss starts dealing too massive damage, use Green Dragon Blood, which should soothe him down and allow the healer to take a lungful of breath. If this proves ineffective (or if the enemy is using an attack/attacks that deal high damage) use the Corrosive Armor ultimate ability - for a dozen-or-so seconds, you will be virtually immortal.
The tank build presented here focuses on constant dealing of damage, focus the enemy attention on yourself and on not letting yourself be killed. Unfortunately, there is no room here, for the abilities that would support your party.
Apart from choosing the appropriate abilities, you should also distribute your points properly and ensure a good selection of weapons:
Thanks to the abilities, Dragonknight is perfect for dealing high damage from fire, while remaining a tough and resistant target. Many of the active abilities (and the majority of the passive ones), used in this section, are identical with the ones described in the case of the tank build. In both cases, use the sword and the shield.
This set is perfect for gaining experience/items, because you are then capable to focus a lot of enemies on you and pulverize them, in a matter of seconds, while taking low damage in the process, because you are very well-protected.
Icon
Ability name (after the recommended metamorphosis)

Corrosive Armor

Sea of Flames

Burning Embers

Engulfing Flames

Burning Talons

Volatile Armor
Icon
Ability name (after the recommended metamorphosis)

Standard of Might

Igneous Weapons

Flame Lash

Draw Essence

Green Dragon Blood

Eruption
In addition to the above ability sets, invest in the following passive abilities (from the One Hand and Shield, Imperial and Heavy Armor trees):
This first set of abilities focuses on dealing as much damage, as possible, from fire. Start your attack with Engulfing Flames, to deal damage from fire and mark the enemies, thanks to which they will be receiving an additional 10% of damage from fire, dealt by the other abilities. Then, activate Sea of Flames, to deal damage from fire, to all the nearby enemies - additionally, each killed enemy regenerates your mana, if this ability is active.
Once you have gathered all the enemies around you, activate Volatile Armor and Burning Talons, which will increase the protective statistics of your armor, while wounding the nearby enemies, and to pin them to the ground, to prevent them from scattering. Thanks to this, you will be able to focus the damage that you deal, on the largest group possible, at one take. If you get a severe beating-to from the enemies, activate the Corrosive Armor ultimate ability, thanks to which you will decrease the damage that you receive and deal it to the enemies.
The abilities of the second set, and especially the Igneous Weapons and Green Dragon Blood serve as a support - the former increases the damage that you deal, while making your attack wound the enemy with fire. The latter will heal you and increase your health regeneration rate. Draw Essence will allow you to regenerate magicka with each blow that you land which, in combination with Sea of Flames should keep the amounts of magicka at appropriate levels. If the enemies deal too much damage to you, or if you have focused too many of them on you, use Eruption, which decreases their speed and chances to hit you.
Use this build if you want to score experience on your own, because it is designed to a solo combat. Still, you can use it in combat but, you will have to be smart, while doing that - the amount of damage that you deal, and crowd control with the Burning Talons may introduce quite a chaos in the enemy lines, which will make things more difficult for your tank.
Apart from appropriate abilities, you also need to ensure an appropriate distribution of points and a good choice of weapons:
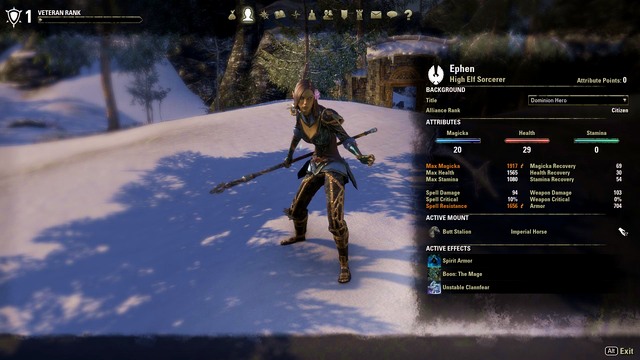 Sorcerer High Elf
Sorcerer is a typical class created for the purpose of dealing damage, controlling groups of enemies and healing both oneself, and the party. This chapter focuses on the description of the most important properties of the Sorcerer class at dealing damage. Arguably, along with the rogue, this is the most effective class, as far as dealing damage, within a short time window, is concerned. The shortcomings of this class are the main defense statistics. This is due to the fact that, to use your passive abilities effectively, you need to wear a light armor (the so called Glass Cannon). Fortunately enough, if you use the vast array of your abilities efficiently, you are capable of withstanding even the greatest of challenges (PvE and PvP).
Sorcerer, as a damage dealer, focuses mainly on offensive ability trees.
In the set connected with the first weapon, you focus mainly on the offensive abilities. It is ideal for hunting in groups, in dungeons, where you get healed after sustaining damage. The basic weapon is the magic staff of ice, fire or lightning (Destruction Staff). The first ability can be used against a single target (Crystal Fragments). It deals huge damage and, in combination with luck, you stand a chance to kill the opponent with one ability, through a critical hit. If the opponent survives, you additionally cast Weakness to Elements, which decreases their defense to elements. If the opponent is all by himself, cast Endless Fury, which will probably kill them with the explosion (20% of health). If there are several opponents, cast Lightning Splash into the middle of the group and finish them off, one by one, with the Endless Fury. After casting Liquid Lightning, an ally can activate synergy, which will cause a Nova and deal lots of damage over vast area. The Inner Light is to be initiated and it remains on, until death. Use the ultimate ability only in heavy clashes, which provides you with lots of damage, not only against bosses, but also against groups of monsters and the other PvP players.

Ability name
Ability description

1. Crystal Shard + Morph on Crystal Fragments
This ability deals a lot of damage and knocks the opponent down

2. Mages Fury + Morph on Endless Fury
This ability deals lightning damage and explodes, as soon as the opponent's health drops below 20%. Morph - regenerates Magicka when you kill an opponent with this ability.

3. Lightning Splash + Morph on Liquid Lightning
AoE that deals lightning damage. Morph on higher damage on the first hit.

4. Weakness to Elements + Morph on Elemental Drain
Buff cast on the opponent, which decreases his defense against fire, lightning and cold. Morph on replenishing Magicka, while attacking the opponent with elemental magic.

5. Magelight + Morph on Inner Light
Toggled ability - increases your chances to score a critical hit. Morph increases the chances of the occurrence of the critical hit.

R. Overload + Morph on Energy Overload
Ultimate ability. While using the heavy attack, destroys everything in its path. Morph on Magicka regeneration.
In the set with the second weapon, you will focus on playing solo so, it is a good idea to have a good healing ability on the selection bar (it is necessary to use the Restoration Staff). With this build, you are capable of handling any situation, be it a group of monsters, be it a boss. The order is similar as in the case of the first weapon and, when your health drops to a critical level, cast the Healing Springs. The monster that you summon will charge at the opponents and the entire fire will focus on it so, it is a good idea to keep an eye on its health bar. The ultimate ability draws attention not only away from you, but also away from the summon, which makes you even safer. Atronach can be healed at any moment and reflect the opponents at a distance and, if there is an ally nearby, he can activate synergy, which increases the damage dealt by the summon.

Ability name
Ability description

1. Crystal Shard + Morph on Crystal Fragments
The ability deals lots of damage and knocks down the opponent.

2. Mages Fury + Morph on Endless Fury
The ability deals damage from lightning and explodes when the opponents health drops below 20%. Morph - regenerates Magicka when you kill an opponent with this ability.

3. Grand Healing + Morph on Healing Springs
Healing ability that acts on you and on all the allies within reach. Morph on regeneration of Magicka, if the ability touches to an ally.

4. Lightning Splash + Morph on Liquid Lightning
AoE ability that deals damage from lightning. Morph on higher damage at first strike.

5. Unstable Familiar + Morph on Unstable Clannfear
Ability to summon a monster that fights on your side. Morph on increasing health of the summon.

R. Summon Storm Atronach + Morph on Greater Storm Atronach
Ultimate ability. You summon a Storm Atronach that stuns opponents within the reach of its ability and shocks with electricity, whenever they are within its reach. Morph on increasing of health and duration of the ability.
As a class, Sorcerer requires, of the player, the highest Magicka amount. It is, therefore, a good thing if you spend the point on Magicka, each time you reach a higher level. At some point, the amount will be disproportionately higher than the value of the rest of the statistics and the game will impose a penalty on you, in the form of lower amount of points awarded for Magicka (usually 15, with the penalty - 10). At such moments, it is a good idea to focus on another one. Since the sorcerer does not make too much use of Stamina-based abilities, it is a good idea to spend the points on Health, which offers you a longer life expectancy in the battlefield, thanks to which, you will partially alleviate the effect of the "Glass Cannon".
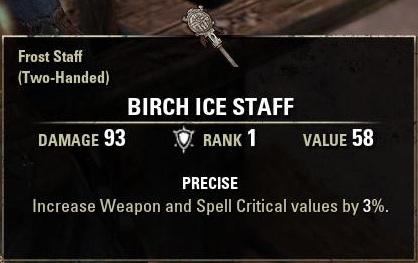
The items that you need for the game, are typical for the Sorcerer class. Of course, there is nothing standing in your way, if you want to use completely different weapons but, for this build, the ones that work best are the ones intended for mages.
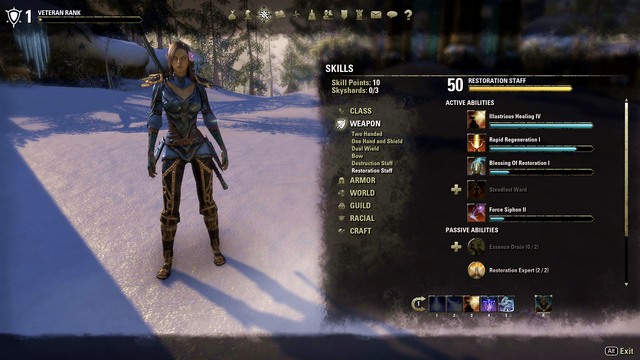
In the first build with the second weapon, it has been specified how to combine, effectively, the inflicted damage with healing of the self and the allies. This build is centered around keeping the allies alive and helping them control the groups of opponents, whether in dungeons or on PvP. To use this healer build to the utmost, you need the 50th level on the Restoration Staff tree. Then, you receive the ability that is ideal against strong opponents (bosses). Your task, as a healer, is to stay away from opponents, monitor the health bars of the party members and position yourself in the battlefield, in the way that allows your abilities to reach the allies.
Sorcerer as a healer focuses, first of all, on healing abilities, magic defense and casting debuffs on opponents (if there is enough Magicka).
IN the set with the first weapon, you first focus on healing. These abilities are indispensable for keeping the allies alive, in plight. With this build, you are capable of ensuring constant protection to your allies, whether in a dungeon, in PvP or in battlefield. Before you start the fight, you cast the Rapid regeneration buff on each ally. The second ability is getting at the back of your party, so as to have all of them in front of you, and cast a spell that heals the allies and raises their defenses Blessing of Restoration. Once the fights start, stay away from the enemy and monitor the health bar of the allies, on a regular basis. If the battle is too demanding to win it, basing on buffs only, help yourself with Healing Springs and Blessing of Restoration, which restore the health of the allies immediately. What is useful against bosses, or the more demanding opponents, is the abovementioned 50th level of the Restoration Staff tree and the Force Siphon ability, used against the opponent. This ability results in regeneration of health, whenever you deal damage to the opponent under that effect. While fighting groups of monsters, you can summon the Storm Atronach, which will stun them and focuses their attention on itself, while dragging them away from you and your allies. If, in the course of the battle, you run out of magicka, and there is still some cooldown time left before you can use the restoration potion, use Dark Conversion to regenerate Magicka.

Ability name
Ability description

1. Grand Healing + Morph on Healing Springs
Healing ability, on both you and your allies, within reach. Morph on Magicka regeneration, if the ability touches to any of the allies.

2. Regeneration + Morph on Rapid Regeneration
Buffing ability, which remains in effect over some time. Heals two of the most wounded allies. Morph on the increased frequency of healing.

3. Blessing of Protection + Morph on Blessing of Restoration
The ability cast on self and on the allies in front of you. Immediately regenerates health and raises defense. Morph on the increased reach of the ability and on regeneration of health.

4. Force Siphon + Morph on Siphon Spirit
The ability cast onto the opponent (debuff). replenishes the health of the allies that deal damage to that opponent. Morph on Magicka regeneration, while damage is being dealt.

5. Dark Exchange + Morph on Dark Conversion
The ability that trades stamina for health and magicka. Morph on lowering Stamina consumption .

R. Summon Storm Atronach + Morph on Greater Storm Atronach
The ultimate ability. Summons the Storm Atronach that stuns the opponents within the reach of the ability and shocks with electricity, whenever they stay within its reach. Morph on increased health and duration.
In the set with the second weapon, we focus on the situation in which it is not critical to heal allies. While dealing damage to the opponent, it is a good idea to have healing abilities at hand. Your role here is not to deal damage, which attracts the attention of the opponents, but rather to finish off the ones that are low on health. A good idea is to cast AoE abilities, for which using synergy is a perfect tactic (Liquid Lightning), thanks to which the fights with the more demanding creatures is faster and more effective. While fighting, you can still heal allies and cast the ultimate ability.

Ability name
Ability description

1. Mages Fury + Morph on Endless Fury
This ability deals damage from lightning and explodes, whenever the opponent's health drops below 20%. Morph - regenerates Magicka when you kill an opponent with this ability.

2. Lightning Splash + Morph on Liquid Lightning
AoE ability. Deals damage from lightning. Morph on higher damage from the first strike.

3. Grand Healing + Morph on Healing Springs
The ability that heals both you and the allies within the reach of the ability. Morph on regeneration of Magicka, if the ability touches to any of the allies.

4. Regeneration + Morph on Rapid Regeneration
Buffing ability that remains in effect for some time. Heals two of the most severely wounded allies. Morph on the increased frequency of healing.

5. Dark Exchange + Morph on Dark Conversion
The ability that trades stamina for health and magicka. Morph on decreased Stamina consumption.

R. Summon Storm Atronach + Morph on Greater Storm Atronach
Ultimate ability that summons the Storm Atronach, which stuns opponents within reach and shocks them with electricity, within its reach. Morph on increased health and the duration of the ability.
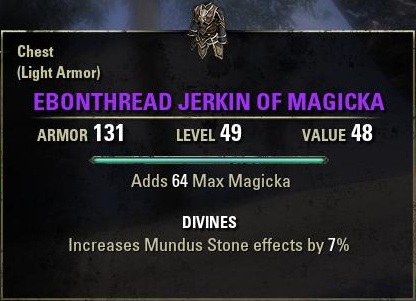
Sorcerer, as a healer, requires you to use the Restoration Staff. This build is entirely centered around healing yourself and your allies, with the possibility of dealing damage and helping your allies.
The rogue is one of the most effective classes, when it comes to dealing damage. This build has been centered around dealing ranged damage (archer). What you focus on most, in this build, is the passive ability tree and the tree of archery. Since the rogue both has magical and physical abilities, it is difficult to distribute points, among the statistics. Therefore, it is a good idea to spend as much as you need to. If your character prefers physical abilities, over the magical ones, raise the statistics of stamina. If you prefer using magic, raise magicka.
In the archer build, you focus not only on physical ranged attacks, but also on magical ones. The greatest advantage of the rogue is his high critical hit and critical damage factors so, it is a good idea to invest in the tree of passive abilities of the medium armor. If you fight against mages, it is a good idea to break their spells with the Venom Arrow ability. This, reinforced with Focused Aim, on additional damage. Then, after you pull the enemy with the Silver Leash, finish them off with the Impale ability. The ultimate ability is perfect against groups of enemies, where you can hop from one opponent onto another, where the last one takes the highest damage.

Ability name
Ability description

1. Poison Arrow + Morph on Venom Arrow
The ability deals physical damage. Morph on breaking the casting of the opponent's ability and knocking them off balance.

2. Snipe + Morph on Focused Aim
The ability deals physical damage. Morph casting a debuff, which increases damage from ranged attacks and increases the range at which the opponent can be attacked.

3. Silver Bolts + Morph on Silver Leash
The ability deals physical damage and gives a chance to kill an undead or daedric opponent. Morph on pulling the opponent and dealing just as much physical damage.

4. Assassin's Blade + Morph on Impale
The ability deals damage from magic. Opponents that are low on health receive an additional of 200% damage. Morph on using the ability at a range.

5. Strife + Morph on Swallow Soul
The ability deals damage from magic and heals for 25% on dealt damage. Morph on increasing health restoration.

R. Death Stroke + Morph on Soul Harvest
The ability deals immense damage from magic, directly proportional to the charged ability. Morph on increased regeneration of the ability, while killing opponents.
As the rogue (archer) you focus on one weapon only, i.e. the bow. Distribute the points evenly into magicka and stamina, and the passive skills that you use are connected with medium armor. Therefore, accumulate the percentage chances for a critical hit.
In this build, you focus on quick elimination of single opponents and on sneaking. This is why, it is a good idea to raise your abilities from Assassination and Shadow trees, starting with the very beginning of the game. A good choice of class here is Khajiit, due to the passive Carnage ability, which increases the factors of critical hits and critical damage. Your weapon here is dual weapon (although this build in not entirely meant for this kind of weapon). You start battle with the Reaper's Mark ability. Mark the enemy, thanks to which your attacks ignore a lot of its defense. Teleport to the marked opponent, deal damage and stun him (Ambush). After this attack, use Shadowy Disguise to vanish from the opponent's sight and launch the Surprise Attack. If the opponent is still alive, finish him off with Killer's Blade which deals huge damage.

Ability name
Ability description

1. Assassin's Blade + Morph on Killer's Blade
The ability deals damage from magic. The opponents that are low on health, additionally receive 300% of damage. Morph on the ability to heal your character when you kill the opponent with this ability.

2. Teleport Strike + Morph on Ambush
You teleport towards the opponent, stun him and deal huge damage from magic. Morph on increased damage from the next attack.

3. Shadow Cloak + Morph on Shadowy Disguise
Provides you with invisibility for several seconds. Morph on 100% critical hit, over the duration of this effect.

4. Veiled Strike + Morph on Surprise Attack
Deals damage from magic. If you are invisible, stuns the opponent for a short time. Morph on reduction of the opponent's defense, for a short period of time. .

5. Mark Target + Morph on Reaper's Mark
A buff that decreases the opponent's, and yours defense against damage from magic and physical attacks. Killing the marked opponent regenerates some health. Morph on the increased amount of the regenerated health.

R. Death Stroke + Morph on Soul Harvest
The ability deals huge damage from magic, in directly proportional to the charged amount. Morph on increased regeneration of the ability, while killing opponents.
This build is centered around magic attacks and it does not mean that you need to use light , or heavy, armor. Still, to use, the utmost, the passive ability that increases the critical hit factor, you will use medium armor. As for weapon, it is not necessarily, does this build work in the case of dual wield (dual weapons) only. You can use a sword and a shield, two daggers or even a two-handed sword.
Templar is one of the four classes available to you in the game. For those familiar with the World of Warcraft game, Templar is very similar to the Paladin. He is probably one of the most plastic and adaptable classes in the game - you can turn him into a tank (though not as good as a Dragonknight tank), a damage dealer, raining foes with pain from close up and afar, as well as a healer (who he definitely excels at). Thanks to their versatility, they are perfectly suitable to build a hybrid character - and that's what will be discussed in this guide.
This guide is focused on the description of all the abilities available to the Templar, as well as presenting a build focused on healing (with a little addition of damage and crowd control). There are plenty of ways to build a Templar (as a Tank, or a strict DPS, for instance), but (according to author) the role of tank is better fulfilled by a Dragonknight, and as far as damage goes, the Dawn's Wrath tree of Templar is a better solution, as it allows you to dish out some serious damage from a safe distance.
Like all the classes available in the game, the Templar has access to three, unique to him, skill trees - Aedric Spear, Dawn's Wrath and Restoring Light.
Icon
Ability Name
Ability Description and morph

Radial Sweep (ultimate)
You inflict AoE damage to all enemies around you.
Empowering Sweep - you gain additional armor for every enemy hit by the ability.
Crescent Sweep - you deal additional damage to all the enemies standing in front of you.

Puncturing Strikes
A series of four swift attacks, damaging several enemies in front of you. The last attack knocks back the enemy standing the closest to you.
Biting Jabs - increased chance to score a critical hit against enemies with low health.
Puncturing Sweep - your attack has a broader reach; the closest target receives 100% additional damage.

Piercing Javelin
You throw a magical spear, inflicting damage and knocking the enemy hit back.
Aurora Javelin - the farther the target hit is, the more damage it will receive.
Binding Javelin - the duration of the knock-back effect is increased..

Focused Charge
You charge at the target, inflicting magical damage and stopping their current action.
Explosive Charge - you inflict additional damage to the enemies in a close proximity to the target.
Toppling Charge - the enemy hit is stunned.

Spear Shards
An AoE attack, damaging and disorienting the target. An ally can pick up a shard, which grants both of you additional damage.
Luminous Shards - you regenerate some of your stamina and magicka when an ally picks up a shard.
Blazing Spear - surrounding enemies are inflicted with a DoT (Damage over Time) and are stunned (instead of being disoriented) when an ally picks up a shard.

Sun Shield
You summon a magic shield, which protects you from damage and damages the surrounding enemies.
Radiant Ward - the shield deals more damage upon activation.
Blazing Shield - after the shield effect comes to an end, you reflect 50% of the accumulated damage.
Icon
Ability Name
Ability Description

Piercing Spear
Increases the critical chance of all the abilities in this skill tree. Additionally, all your spear skills are more effective against blocking foes.

Spear Wall
Your blocking efficiency is increased, if you have at least one skill from this tree on your skill bar.

Burning Light
You have a chance of inflicting additional damage each time an enemy is hit with any ability of this skill tree.

Balanced Warrior
Increases the power of your weapons and your resistance to magic.
The Aedric Spear tree is focused on damaging your foes with magic (Holy and Light) - all the abilities hurt one or more targets. Additionally, some of them are crowd control abilities, stunning, knocking back or interrupting the actual action of the foe(s) hit.
The passive abilities of this skill tree mainly increase the amount of damage you're able to dish out by using the Aedric Spear active abilities, by increasing the critical chance or allowing you to hit blocking foes a lot harder. In addition, they increase the efficiency of your blocks (provided that you have at least one ability from this skill tree on your action bar), as well as your magic resistance.
Unfortunately, they provide no means to heal yourself (or your teammates) and no tanking capabilities (the crowd control effects are very situational and unreliable when the life of your companions depends on your actions), which is why this skill tree is mainly for a solo play, or when you are playing a damage-dealing role in a party. They are perfect if you want to turn your Templar into an enemy grinder, fighting at melee range.
Icon
Ability Name
Ability Description and morph

Nova (ultimate)
You inflict massive AoE damage, as well as decrease the damage of all enemy hit. An ally can activate the synergy, unleashing a second nova, dealing additional damage and stunning the enemies.
Solar Disturbance - the ability inflicts all the enemy hit with a Snare effect.
Solar Prison - an ally can activate a more powerful version of synergy, dealing greater damage.

Sun Fire
You deal instant fire damage, impose a DoT (Damage over Time) effect dealing additional fire damage, as well as a Snare effect.
Reflective Light - the ability can now affect several targets at once.
Vampire's Bane - the ability deal greater amount of Damage over Time.
Solar Flare
You deal magic damage to your enemy, and the next attack (or an ability) made against the same foe and nearby enemies will deal additional damage.
Dark Flare - all the enemies being under the effect of this ability receive decreased amount of healing.
Solar Barrage - the ability no longer requires preparation (1.5s normally - now it is instantaneous) and hurts all the enemies around you. Additionally, the ability deals slightly lower damage than before.

Backlash
The enemy struck with this ability accumulates all the damage inflicted upon him. When the ability ends, the surrounding enemies take additional damage increased by a percentage value.
Power of the Light - marked enemy receives additional damage from your weapon attacks.
Purifying Light - nearby allies are healed by a fraction of the damage.

Eclipse
Targeted ally reflects all negative, single-target spells (AoE attacks are unaffected by it) back at the caster. Each subsequent cast (reflection) has an increased magicka cost.
Total Dark - when the ability ends, the enemy will deal decreased damage for a short while.
Unstable Core - when the ability ends, the surrounding enemies receive damage.

Blinding Light
The surrounding enemies struck by this ability have a 50% chance to miss their attacks, as well as a chance to be set off balance with each missed attack.
Blinding Flames - the ability has a further reach, hitting enemies in a close proximity to those affected by the ability.
Searing Light - besides imposing all of the above effects, the enemy receives damage.
Icon
Ability Name
Ability Description

Enduring Rays
Prolongs the duration of the abilities from the Dawn's Wrath skill tree.

Prism
Each Dawn's Wrath ability activation awards you with ultimate points.
Illuminate
The enemies being under the influence of any of your Dawn's Wrath abilities deal reduced damage to you.

Restoring Spirit
Each Dawn's Wrath ability activation restores a small fraction of your health.
The Dawn's Wrath skill tree focuses on dealing damage, as well as decreasing the efficiency of the enemies struck. If all you ever wanted was to have access to abilities allowing you to dispose of enemies from afar, this skill tree is made for you.
The ability especially worth noting is the Solar Flare, although the damage of this skill alone is not that important. What is, in fact, significant, is that your next attack (or an ability), inflicted upon the same enemy (or any foe in a close proximity to him) will deal greatly increased damage, which is why you will frequently annihilate a small group of enemies with a single spell (after previously marking them with Solar Flare, of course). What you must remember, is to use your most powerful attack after marking the enemy, to maximize the effect and the damage dealt.
The second ability worth mentioning is Sun Fire, which, additionally, has two, very powerful and useful morphs (you should carefully decide which one you prefer more). It deals a lot of damage, imposing a Snare effect on a struck foe (or foes, with a proper morph), which will make all your fights a lot easier.
The ultimate offered by this skill tree, the Nova, is one of the most powerful abilities in the game. Not only that it deals gigantic damage, it also weakens the enemy for a short while. What is more, the ability is AoE, meaning that it hits multiple enemies! Additionally, an ally can activate a synergy, dealing even more damage and stunning all the enemies struck. If you use your ultimate on a foe marked with Solar Flare, there's practically no chance for him (or them, if there's a group of enemies) to survive.
Investing in the passive abilities of this skill tree is mandatory, because the benefits are not to be underestimated. Enduring Rays prolongs the duration of your abilities and Restoring Spirit allows you to restore some of the magicka used, making all your abilities more cost-efficient. The ability called Prism is particularly useful, as it bestows you with ultimate points with each and every use of your abilities - thanks to that you should be able to use your ultimate abilities constantly.
Abilities in this skill line are useful to solo players, preferring to turn their enemies into dust, as well as in a group, to safely attack from afar, when someone else is attracting the enemy's attention.
Icon
Ability Name
Ability Description and morph

Rite of Passage (ultimate)
The surrounding allies receive healing, each 0.5 second for a duration of 4 seconds. You can't move while channeling the ability.
Practiced Incantation - prolongs the duration of the ability.
Remembrance - after the effect of the ability ends, affected allies receive decreased damage for a short while.

Rushed Ceremony
You heal a nearby, wounded teammate. The ability marks an ally with the lowest percentage of health.
Breath of Life - the ability now heals a maximum of three allies - the main target (with the lowest percentage of health) receives the full healing, while the two additional targets receive 50% of that value.
Honor The Dead - the ability restores magicka to you, if you heal an ally with a low amount of health (below 20%).

Healing Ritual
You heal all your surrounding allies, as well as yourself (the self-heal effect is increased by 30%).
Lingering Ritual - after 8 seconds, all the allies affected by this ability will be additionally healed.
Ritual of Rebirth - the self-healing effect is increased (from standard 30% to 50% after morphing the skill).

Restoring Aura
If the ability is on the action bar - it increases your health and stamina regeneration by 15%.
If the ability is activated - it increases health and stamina regeneration of nearby allies by 80%.
Radiant Aura - the ability has now a wider reach.
Repentance - the ability no longer requires magicka to use, absorbing nearby corpses instead.

Cleansing Ritual
You remove a negative effect from yourself. For 12 seconds nearby allies receive healing, in a 2-second intervals. Allies can activate a synergy (called Purify), getting rid of all their negative effects and receiving additional healing.
Extended Ritual - prolongs the duration of the ability.
Purifying Ritual - decreases the ability cost and allows you to cleans more than one negative effect at once.

Rune Focus
You create a protective area, increasing your armor and magic resistance for 12 seconds. While standing in it you are immune to interruption effects.
Channeled Focus - you restore magicka while standing in the area.
Restoring Focus - you receive additional healing while standing in the area.
Icon
Ability Name
Ability Description

Mending
After using an ability from the Restoring Light tree, the affected allies receive an additional critical chance, based on their missing health points - the more they lack, the higher the bonus (to a maximum of 15%).

Focused Healing
After using an ability from the Restoring Light tree, the allies in the range of Rite of Passage, Cleansing Ritual and Rune Focus receive increased healing (15%).

Light Weaver
Prolongs the duration of Restoring Aura and decreases the cost of Healing Ritual ability. What is more, you receive additional armor and magic resistance while casting Rite of Passage.

Master Ritualist
Decreases the resurrection time by 50%. Resurrected allies respawn with more health points (50%). Additionally, you have a 50% chance to receive a soul gem after resurrecting an ally. .
The Restoring Light skill tree is exclusively focused on supporting yourself and your allies. All the abilities allow you to restore health (or regenerate stamina, in some instances) of one or more friendly targets, as well as increase the efficiency of defense (armor and magic resistance).
Healing Ritual will be your bread and butter in this skill tree. It lets you heal all the nearby allies (unfortunately, on quite a short range), healing yourself in the process as well. As always, you can upgrade (morph) this ability in two, quite different ways, although the Lingering Ritual morph is the better solution - it gives you access to an additional, delayed healing, making your job (keeping all your allies alive) a lot easier, as well as helping you conserve some magicka. There's hardly any point in investing in the other morph, as this ability already heals a decent amount of your health without it.
Rushed Ceremony is a typical "sheet anchor". In contrast to Healing Ritual, it does not need a preparation time, as it is instantaneous, and it automatically targets an ally with the lowest percentage of health, allowing you to save someone in a critical situation without much effort. The morph, you should be interested in, is the Breath of Life, allowing you to heal three targets instead of one (the two additional targets will be healed with 50% of the main target heal value), which comes in handy in a situation, when your group just received a lot of AoE damage. The second morph might have been interesting, because it refunds a significant amount of magicka cost (60%), but the ally must be at below 20% of his / her maximum health for the effect to kick-in, meaning that you can simply be too late to heal someone to get any refund, as you ally would be simply dead.
Restoring Aura passively increases your health and stamina regeneration, as well as offering a possibility to a gigantic increase of regeneration of those supplies to your allies, which is why it is beneficial to have that skill on your action bar, if you have place for it. Cleansing Ritual comes in handy while fighting those nasty enemies, which spam abilities affecting you (or your teammates) with various negative (and painfully annoying and dangerous) - but your allies will have to activate a synergy to get rid of them.
The ultimate, Rite of Passage, is a tempting ability, as it allows you to heal a great deal of health points, and, with a proper morph, additionally decrease the damage received by your allies, but it has a single, major drawback - you have to be stationary to use it, which may end up bad for you. That is precisely why it is greatly advised that you put a different ultimate ability on your action bar - but, as always, if you want, you can still use it.
The passive abilities of this skill tree increase the efficiency of your active abilities (basically allowing you to heal for greater amounts), empowers your allies and makes your resurrections more powerful. If you want to play as a healer, there's no arguing that you must invest in them.
This skill thee, given the fact that it has no offensive abilities, is mostly suitable as a secondary skill set (the first action bar would be an offensive one, like the abilities from the Dawn's Wrath skill line, and the second would be Restoring Light, giving you the ability to heal yourself in between fights), or while fighting in a group, when your sole purpose is to keep your party alive at all times.
The Templar, thanks to his Restoring Light skill line, is an ideal choice for a healer role. All the abilities, both active and passive ones, are designed to support either yourself, or your party, which, with a little bit of experience and time spent in the game, should be sufficient to allow you to keep your teammates alive and well. Your primary "ability kit" and the action bar mostly used during the fights, would be almost entirely composed of skills from the Restoring Light skill line - the only thing that you should swap out is the ultimate (for reasons mentioned in the previous section), which should be replaced by the Dawn's Wrath one, Nova.
The second action bar can be planned according to your own whim - depending on a number of conditions. You can either opt to build it in a way so you can dish out some serious damage (which will cause you to attract some unnecessary attention from the enemies, leaving you with less time to heal your teammates), or, besides healing, you want to bring your own crowd control into a fight. This section assumes the second option - healing + crowd control, but, as always, you can (and should) modify it, to suit your needs.
Additionally, if you want, you can use the abilities from the Restoration Staff skill line, which, unfortunately, require you to spend some additional skillpoints into that tree and enforce you to use a Restoration Staff as a weapon. However, Templar's abilities from the Restoring Light tree are more than enough for your role, so in this section the Restoration Staff 's abilities (active ones) are skipped.
Still, you can make a good use of the passive abilities from that skill tree, so it would be beneficial for you to develop them (all you have to do is to have at least one active ability from that skill line on your action bar and use a Restoration Staff weapon while gaining experience - you can advance through it extremely quickly while playing as a healer in a party).
As a healer, your primary task is to keep your teammates alive, while simultaneously avoiding the enemy's attacks (the rest of your party should be able to get rid of any foes pursing you). As far as stats go, you should invest the most in your magicka pool, to be able to use your spells constantly. You should also spend some points in health, so those nasty, hard-hitting enemies won't be able to decimate you in seconds. Stamina can be completely ignored, as you won't be using any skills requiring that supply - if you want, you can still add some points in it, to be able to use your dodge more often. A recommended stat distribution is as follows : Magicka 30, Health 15, Stamina 5. You can reverse the distribution between magicka and health, if you are certain that you have plenty of it (investing 30 points in Health and 15 in Magicka).
As far as armor goes, the best choice would be the cloth armor (Light Armor), because you need its passive abilities, which will boost your magicka regeneration considerably. The weapon choice, as you won't be using any ability from the Restoration Staff skill line, is purely a personal preference (like a one-handed weapon + shield, gaining a slight boost into your armor stat), but you should use a Restoration Staff weapon (at least until you develop the corresponding skill line), to gain access to its passive abilities.
The race choice is, naturally, unrestricted, but this guide assumes that you will be playing a High Elf, given his two passive, racial abilities (Spellcharge and Gift of Magnus), which boost your magicka pool (the former) and its regeneration during a fight (the latter). A Breton would be a fine choice, too, thanks to his Gift of Magnus (the same as before, increasing magicka pool) and Magicka Mastery (decreased cost of magicka-based abilities) skills.
Icon
Ability name (with a recommended morph)

Nova (ultimate) morphed into Solar Disturbance

Healing Ritual morphed into Lingering Ritual

Rushed Ceremony morphed into Breath of Life

Restoring Aura morphed into Repentance

Cleansing Ritual morphed into Purifying Ritual

Rune Focus morphed into Channeled Focus
Icon
Ability name (with a recommended morph)

Radial Sweep (ultimate) morphed into Empowering Sweep

Spear Shards morphed into Blazing Spear

Blinding Light morphed into Blinding Flames

Backlash morphed into Purifying Light

Eclipse morphed into Total Dark

Sun Fire morphed into Reflective Light
Additionally, you must invest into those passive abilities (derived from the High Elf, Templar, Restoration Staff and Light Armor skill lines):
If you want to use some offensive abilities as, invest in the below passive abilities (from the Light Armor skill line):
The first set of abilities should be obvious - it's entirely composed of abilities that support and heal (besides the ultimate, which inflict damage and weakens the enemies) yourself and your teammates. All of those abilities, as well as their purpose, was explained in the previous section, so there's no point in doing it again.
The second set of abilities are the ones giving you crowd control to some extent, which will help you get some of the pursuing foes off your tail. Blazing Shards, besides the obvious damaging part, allows your team to stun your enemies (a synergy activation is required to do so, unfortunately), which comes in handy when your team has a hard time controlling the "flow" of enemies. Blinding Light, morphed into Blinding Flames, will blind the enemies, greatly decreasing their chance to hit, Eclipse (morphed into Total Dark) will make one ally immune to single-target spells aimed at him (bouncing them off at the attacker, and, when the effect ends, weakening him) and Sun Fire (morphed into Reflective Light) will damage and Snare enemies, decreasing their move speed.
Backlash (morphed into Purifying Light) gives yet another healing at your disposal, and the ultimate, Radial Sweep (morphed into Empowering Sweep) will allow you to inflict damage on your foes, while simultaneously increasing your armor. However, you should avoid using this ultimate if you're able to - Nova (from the first set) is far better, does more damage and allows you to Snare enemies.
As you can see, this build focuses primarily on the purpose of healing, supporting and basically keeping your team in a fine shape. With the addition of crowd control abilities, it also allows you to ease your teammate's jobs, by keeping the enemies at bay. You should opt to use the first set of abilities majority of times, switching to the second one whenever your team do not require healing.
Besides abilities, you should also take care of some minor, as some would think, stuff:
Additionally, here are some tips on how to play a healer:
The answer to this question is yes. It is possible to use this build as a Ranged DPS (a role which sole purpose it to deal damage from a distance). The only difference is that you will be mostly using your second set of skills - healing abilities will come in handy to support a main healer in a party, or to heal yourself. Also, you can swap the healing abilities with those coming from the Aedric Spear tree, however, they require (at least most of them) attacking from a melee range, which will put you out in danger. Besides, the abilities from the Dawn's Wrath deal sufficient amount of damage.
The only difference to the pure healer build, is swapping out Spear Shards ability with Solar Flare (morphed into Solar Barrage). Besides team-oriented play, this build works perfectly while playing solo - you won't be the most tank target for your enemies, but you will deal so much damage, that most of your foes won't even be able to harm you. Even if something goes wrong, you can always heal yourself. In case of a solo play, use one-handed weapon + shield (and a Restoring Staff when swapping to healing set of skills) and invest most of your points in health (30-35 Health, 5 to Stamina, rest to Magicka, respectively).
Your main offensive ability will be previously mentioned Solar Barrage. Use it on an enemy, to deal some serious damage and magnify the power of the next attack (or an ability) on that same enemy (and nearby foes). Remember, that after using Solar Barrage, you should follow up with your strongest attack (your ultimate, Nova, for instance) to maximize the effect.
Before you begin your assault with your Solar Barrage (and a following attack), use your Backlash. This skill causes the enemy to accumulate received damage for a few seconds. After the effect ends, the enemy gets the stored damage, increased by a percentage value (and with a Purifying Light morph it also heals nearby allies). If you use your abilities in the right order (Backlash -> Solar Barrage - > some powerful attack), there's almost no chance that any enemy hit will survive that. Obviously, more powerful enemies (and bosses) will have no trouble getting through your combo, but it still will chunk a serious amount of their health. All you have to do is rinse and repeat, until there's no one left.
Besides those skills, don't forget to use your Sun Fire and Binding Light, which, besides the obvious damage part, offer some nifty amount of crowd control. The former will allow you to Snare your enemies, decreasing their movement speed, and the latter causes the enemies to have a 50% chance to miss their attacks - and knock them off balance if they do so.
Use the second (or the first one, if you haven't swapped anything but one skill) skill set in emergency situations - whenever your healer can't handle the situation (or is dead on the ground), when you are cut off from the rest of your teammates and your healer can't save you, or when there's simply a higher demand for healing and supporting. Similar to playing as a healer, try to lose your tail whenever the enemies start chasing you and allow your teammates to take the aggro - it will allow you to spam your skills from afar without much effort.

The Elder Scrolls Online - World Atlas game guide is s collection of detailed maps of all the locations from this enormous and complex MMO. Each map points to important areas like the hidden Skyshards (they are used to quickly travel between the Wayshrines), bosses encounters and various dungeons and caverns. The maps also tell about the locations where you can find portals called Dark Anchors used to uncover the Locales map, as well as special blacksmiths who can craft new items for the main character. Another important objects marked on our maps are Mundus Stones and their role is to strengthen your character permanently. The atlas has been divided into three main parts and they correspond with how the game's world was divided. The Daggerfall Covenant chapter contains maps of Glenumbra, Stros M'Kai, Betnikh, Stormhaven, Rivenspire, Alik'r Desert and Bangkorai. The second chapter is about the Ebonheart Pact fraction and it contains maps of Stonefalls, Bleakrock Isle, Bal Foyen, Deshaan, Shadowfen, Eastmarch and The Rift. The last part of the world atlas is about the areas occupied by the Aldmeri Dominion. This chapter contains maps of Auridion, Khenarthi's Roost, Grahtwood, Greenshade, Malabal Tor and Reaper's March. The Elder' Scrolls Online is the first MMO set in the fantasy world known from such titles as Skyrim and Oblivion. It offers vast areas to explore, many different races, interesting quests and a rich crafting mechanic among other qualities.
Jacek "Ramzes" Winkler ()
Glenumbra is the first main location assigned to Daggerfall Covenant. The province of High Rock, which is there, is surrounded by rocky areas, as well as by marshes and forests. Glenumbra is the Eastern part of the High Rock province., where there are such populous cities as Daggerfall or Camlorn. Also, you can find wilderness here, such as Hag Fen, Glenumbra Moors and the Forest of Daenia. Glenumbra, along with is capital city is being reigned by King Casimir, who is in grave danger now, due to the Bloodthorns cultists, who inhabit the Breton crypt. Apart from the major cities, you can also find minor ones here, such as Aldcroft and Crosswych. Glenumbra is assigned to players between levels 5 and 15.
The list of locations in Glenumbra.
The list of Skyshards, which you can find in this location.
Rare fish species, which you can find in Glenumbra.
The list of quest locations in Glenumbra,
The list of caves in Glenumbra.
The list of boss locations in Glenumbra.
The Stros M'Kai location is the first one available in the Daggerfall Covenant faction campaign. This is an isle situated on the Southern rim of the faction area, which belongs to the Hammerfell province. The isle has been discovered by Redguards, after they left their homeland Yokuda. Stros M'Kai is also a safe haven for sea pirates and bandits, who travel around the sea of Abecean. The isle is being governed by its self-proclaimed leader Bhosek the Bloody, who leads the Redguards staying on the isle. The climate prevalent in Stros M'Kai is warm and, in its architecture and flora, the island resembles the Middle East countries. A relatively small area for exploration makes it possible to learn about the mechanics of the game. On the island, you can find three major cities: Bthzark, Port Hunding and Saintsport. The Stros M'Kai location is meant to be played by players on levels ranging between 2 and 5.
Stros M'Kai offers three locations to explore, which are necessary for distinction.
On this island, there are three skyshards.
The list of the fish species, available on Stros M'Kai
The list of quest locations in Stros M'Kai.
Betnikh is the second location assigned to the Daggerfall Covenant faction. It is an island to the South of Glenumbry, in the High Rock province. What is characteristic for this island is the high cliffs that provide you with tremendous advantage, while defending the island. On the island, there are many arable fields and thick forests. At the beginning, Betnikh was called Betony and it was inhabited by Bretons. However, It was, later on, conquered by brute Orcs , who changed its name into Betnikh. The problem on the island are the large insects and necromancers, who exercise forbidden magic that the first one of the Redguards to be there, Kahanad al-Hegathe, learned about. Betnikh is meant to be played by players with experience level between 5 and 7.
The main locations in Betnikh, which you need for distinction.
Skyshards available in Betnikh
The list of quest locations in Betnikh.
Stormhaven is the central location assigned to the Daggerfall Covenant faction, located in the High Rock province, at the Iliac Bay. The capital city of Stormhaven is Wayrest, where the Breton High King Emeric, who reigns the entire Daggerfall Covenant faction, is based. Wayrest is also one of the strongest economies in the entire Daggerfall Covenant faction. The Stormhaven region is assigned to players at levels between 15 and 24. The below list presents markers that you will find helpful, while navigating about this huge location. Thanks to this, you will learn about the whereabouts of bosses and skyshards. It also includes quest locations and caves, where you can hunt on your own, or enter groups with your friends. Also, the region is abundant in rare fishes that you can catch.
Locations assigned to Stormhaven.
The list of Skyshards in Stormhaven.
The list of rare fishes in Stormhaven
Quest locations in Stormhaven.
The list of caves in Stormhaven.
The list of boss whereabouts in Stormhaven.
Rivenspire is the North-most location that belongs to the Daggerfall Covenant faction. Its capital city is Shornhelm, in the High Rock province, and it is governed by the High King Emeric. In Riverspire, there also is the headquarters of the Guild of Mages, which may be found interesting by future wizards. The climate prevalent in Riverspire is harsh and the lack of flora promotes carnivores, who dominated the majority of its fauna. The opponents that you are going to meet here are, among others, are Wraiths and Scamps. Because the area is surrounded by the sea, the humidity is high, which promotes fog. The lists present the locations of all the locations, as well as the available Skyshards. Also, you can find there the lists of the rare species of fishes and quest markers. The locations that you are going to visit here, also include caves and bosses. The recommended level at which you should hunt here is between 24 and 32.
Locations in Rivenspire
The list of the available Skyshards in Rivenspire
The list of rare fishes in Rivenspire
The list of quest locations in Rivenspire
The list of caves in Rivenspire
The list of boss whereabouts in Rivenspire
Alik'r Desert is, actually, one large desert, which is the Southern part of the Daggerfall Covenant faction. The abundance of ancient sand-covered ruins is a perfect terrain for exploration. It has many natural resources. The location, which is a part of the Hammerfell province, has its capital city in the economically-thriving city of Sentinel. Apart from the capital city, you will also find here some of the other cities, such as Tava's Blessing and Bergama. In Alik'r Desert, you will have to face opponents, such as Dunerippers, Giant scorpions and Harpies. The below list includes all of the locations and lists skyshards. Also, you can find here lists of rare fishes. When it comes to exploration, there are six caves in this area and, the fans of difficult duels, are awaited by bosses, whose whereabouts have been provided on the list. The recommended experience level for this location is 31-38.
Locations in Alik'r Desert.
The list of Skyshards in Alik'r Desert
The list of rare fishes in the Alik'r Desert
The list of quest locations in the Alik'r Desert
The list of caves in the Alik'r Desert
The list of boss whereabouts in the Alik'r Desert
Bangkorai is a hunting ground for players at levels 37 to 43. The location has been named after the "Bangkorai Pass". A defensive name for the area that has protected the inhabitants of the High Rock province, from the Hammerfell attacks for many years. Bangkorai is a strait between two main provinces of Hammerfell. The location is a frontline between two climate types. The Southern areas are boundless deserts and the Northern part are thick forests. The capital of Bangkorai is Evermore. In this location, you will also find some other cities, e.g. Hallin's Stand. The below list presents the locations and rare fishes that you can catch here. Also, you can find here the whereabouts of the bosses, caves and quest markings.
The list of locations in Bangkorai
The list of Skyshards in Bangkorai
The list of fishes available in Bangkorai
The list of quest locations in Bangkorai
The list of caves in Bangkorai
Locations, where there are Bosses w Bangkorai
Stonefalls is the central part of the Morrowind province. Stonefalls, is mainly covered with volcanic cliffs, but you will also find marsh and forest areas here, which is typical for Argonians. Along with the biggest city - Ebonheart - Stonefalls forms a well-developed economic land, which is governed by the Nord king Jorunn. In this location, the first group dungeon, for the Ebonheart Pact faction appears, and it is the Fungal Grotto. Apart from its capital city in Ebonheart, you can also find here other cities, such as Davon's Watch, where you will have to fight the invaders of the Daggerfall Covenant and Kragenmoor factions. The below description includes the whereabouts of Skyshards and caves. Also, you will find here the list of rare fishes and bosses. The Stonefalls location is allotted to players with experience levels between 5 and 15.
The list of locations in Stonefalls
The list of Skyshards in Stonefalls
The list of rare fishes in the Stonefall
The list of quest locations in Stonefalls.
The list of caves in Stonefalls.
Locations in Stonefalls, where you find bosses.
Bleakrock Isle is an isle in the North and it belongs to the Ebonheart Pact faction. The climate the prevails in the majority of this location is cold. The area belongs to the Skyrim province and it has several cities and villages. The main village is the Bleakrock Village. Bleakrock Isle is a secluded area so, you can try, in vain, to find any advanced economic system. You are going to encounter various opponents here. For the most part, they are wild animals, such as wolves, bears and spiders, but also you can encounter here skeletons and other undead creatures. The below list presents the whereabouts of all the Skyshards and quest markers. Also, you can find here the list of locations that you are going to visit. This location is meant to be played by players at levels 2-5.
The list of locations in Bleakrock Isle
The list of Skyshard whereabouts in Bleakrock Isle
The list of quest locations in Bleakrock Isle
Bal Foyen is a small area bordering Stonefalls, which entirely belongs to the North-Eastern part of the Morrowind province. For the most part, this area is covered with marshes and volcanic landscape, which result in large number of Argonians (lizard-men) settling there. The main Argonian dwelling in Bal Foyen is Dhalmora, located to the South. Bal Foyen has been developed for the players from the Ebonheart Pact that have reached levels 5-7. In this city, there also is a fortress, erected by Dunmers - Fort Zeren. The below list presents all of the Skyshards in Bal Foyen as well as locations that are allotted to them. Also, you can find quest markers here, which may be helpful while navigating and picking quests.
The list of locations in Bal Foyen
The list of Skyshards in Bal Foyen
The list of quests in Bal Foyen
Deshaan is a South-Eastern region of the Ebonheart Pact faction. The location is located in the Morrowind province. The Fertile and rich soils are good for cultivation, thanks to which this area is densely populated. In Deshaan, there also is the Dunmer cultural center - the Tribunal Temple. The Tribunal Temple is dedicated to the followers of Goddess Amalexia. The capital of Deshaan, as well as of the entire Ebonheart Pact faction, is Mournhold, governed by king Jorunn. In this location, you are going to fight, among others, Kagouti. Deshaan is a location for players who have reached levels between 15 and 24. On the below list, you will find locations that you can explore, as well as a list of Skyshards. You can also find lists of rare fishes, quest markers, caves and bosses here.
List of locations to explore in Deshaan.
Locations of Skyshards in Deshaan.
The list of rare fishes that you can catch in Deshaan.
Quest locations in Deshaan.
The list of caves in Deshaan.
The list of boss whereabouts in Deshaan.
Shadowfen is a region in Black Marsh, which is the South-most location in the Ebonheart Pact faction. It directly borders Morrowind. The prevalent climate are marshes and forests. Shadowfen has its history, when the imperials enslaved the Dunmer people for a long time. Due to its climate, there is dominated by the culture and population of Argonians. The main city in Shadowfen is Stormhold. The Shadowfen region is designed for players at the experience levels between 24-32. The below list names all of the locations for exploration and skyshards. Also, you can find here a list of rare fishes that you can catch here, and caves to explore. Quest Markers will help you with general navigation, and boss locations in group sojourns.
The list of locations in Shadowfen.
Locations of Skyshards in Shadowfen.
The list of rare fishes to catch in Shadowfen.
Quest locations in Shadowfen
The list of caves in Shadowfen.
The list of locations where there are bosses in Shadowfen.
Eastmarch is a region that is entirely located in the province of Skyrim. The climate is divided into two parts. In the Northern area there prevails hash and cold climate, whereas, in the South, there are forest and volcanic areas. The biggest city in Eastmarch is Windhelm, known from the previous installment of the game. A very harsh climate is unfavorable for any settlements in this area, and the majority of the opponents here are mammoths and giants. The Eastmarch region has been developed for players at levels ranging between 31 and 38. Below, you will find a list of locations and rare fishes that you can catch here. Also, you will find there descriptions of whereabouts of Skyshards, quest markers, caves and bosses.
The list of locations in Eastmarch
The list of Skyshards in Eastmarch
The list of rare fishes to catch in Eastmarch
The list of quest locations in Eastmarch
The list of caves in Eastmarch
The list of boss locations in Eastmarch.
The Rift is the North eastern region of the Skyrim Province. This region belongs to the Ebonheart Pact faction and it borders the province of Cyrodiil only. The capital city of The Rift is the harbor city of Riften, which is the most economically-developed area here, due to the fact that it borders Cyrodiil. The Northern part of the Rift is covered with snow-covered areas, whereas the South sis covered with forests. In the Rift, you will find opponents, such as wolves. Apart from the capital city of Riften, you can find here the city of Nimalten. The region of The Rift is meant for players at the levels between 37 and 43. Below, you can find a list of locations and quest markers. Also, you can find here a list of rare fishes that you can catch, caves and bosses, which you might want to fight.
The list of locations in The Rift.
The list of Skyshards in Rift.
The list of quest locations in Rift
The list of boss locations in Rift.
Auridon is the second, after Khenarthi's Roost location for the players in the Aldmeri Dominion faction. Auridon is the West-most island and it belongs to the Summerset province. The majority of population here is composed of High Elves. The island is overgrown with colorful forests and the whole is presented in a warm and pleasurable climate. In Auridon, you meet queen Ayrenn for the first time, who is endangered by a plot for her life. On the island, there are several main cities, such as Skywatch, Firsthold or Vulhel Guard. Also, in Auridon, you encounter your first bosses and dungeons. This location has been designed for players of levels between 5 and 15. Below you can find a full list of the rare fishes, caves and quest markers. Also, you can find the whereabouts of skyshards and bosses.
The list of locations in Auridon
The list of Skyshards in Auridon
The list of rare fishes in Auridon
The list of quest locations in Auridon.
The list of caves in Auridon.
The list of boss whereabouts in Auridon.
Khenarthi's Roost is a small South-most island in Tamriel. This region has been assigned to the Aldmeri Dominion faction and it is the first location for the players that begin as Elves or Khajiit. Khenarthi's Roost belongs to the province of Elsweyr. The prevalent climate on this island are high temperatures, sunshine and the sandy beaches around the island. On this island, the Kahajiit have their moon sugar plantations. This location has been designed for players at levels between 4 and 7. The below lists present The below lists present a list of locations, rare fishes and quest markers, which will help each new player in the Aldmeri Dominion to start their adventure with the game
The list of Skyshards in Khenarthi's Roost.
The list of rare fishes in Khenarthi's Roost
The list of quest locations in Khenarthi's Roost.
Grahtwood is the southern region of the Valenwood province, which belongs to the Aldmeri Dominion faction. The forests that cover the majority of the location, promote the settling of the Wood Elves (Bosmers). The capital city of the region is Elden Root, which is the most developed city of the Aldmeri Dominion faction. While ruled by Queen Ayrenn, it became a political and economic center for Valenwood. With its capital city, Grahtwood is therefore the heart of the faction. This region is meant for players at levels between 15 and 24. Below, you can find a complete list of locations to unlock distinction, the whereabouts of Skyshards that can be found here, and quest markers, that you will be searching for. Also, you can find here a list of caves and bosses, which you are going to fight.
The list of locations in Grahtwood.
The list of Skyshards in Grahtwood
The list of rare fishes to catch in Grahtwood
The list of quest locations in Grahtwood
The list of caves in Grahtwood.
The list of boss locations in Grahtwood
Greenshade is the Western side of the Valenwood province, which belongs to the Aldmeri Dominion faction. The Greenshade region is covered by thick forests and rivers. This sort of climate helps settling down and growing a larger and larger population of the Aldmeri Dominion faction. The main city in Greenshade is Marbruk, whose main religion is following the daedra prince Hircine. You can find various opponents here, such as Spriggan. The Greenshade region is ruled by Queen Ayrenn and it is meant for players of levels between 24 and 32. Below, you will find a list of locations, necessary for the titles and a list of rare fishes that you can catch. Also, you will find there locations of skyshards and quest markers, caves or bosses.
The list of locations in Greenshade
The list of Skyshards in Greenshade.
The list of rare fishes in Greenshade.
The list of quest locations in Greenshade.
The list of caves in Greenshade.
The list of boss locations in Greenshade.
Malabal Tor is a region in the Aldmeri Dominion faction, located to the North-East of the Valenwood province. Malabal Tor is covered with elven forests. The main city in Malabal Tor jest Vulkwasten, ruled by Queen Ayrenn. The main dungeon in this location is the group dungeon, Tempest Island, where hurricanes and storms wreak havoc. The main cities are Baandari Trading Post and Velyn Harbor. The characters that you encounter in Malabal Tor are, among others, Aretille, Lilanion and Munamur. This highly forested area is designed for the players in Aldmeri Dominion faction, with levels between 31 to 38. Below, you can find a complete list of locations, that you are going to visit, as well as Skyshards to find. Also, you can find here a list of bosses, quest markers and rare fishes available to catch.
The list of locations in Malabal Tor
The list of Skyshards in Malabal Tor
The list of rare fishes in Malabal Tor
Quest locations in Malabal Tor.
The list of caves in Malabal Tor.
The list of boss locations in Malabal Tor.
Reaper's March is the North-Eastern region bordering the Valenwood and Elsweyr provinces. The majority of this area comprises of plant areas and borderless grass lowlands. The main cities are Dune and Arenthia. Ruled entirely by Queen Ayrenn, it belongs to the Aldmeri Dominion faction. The cultural advantage belongs to the Khajiit and Bosmer. In Reaper's March you can also encounter a feline race that differs from the Khajiit - Senche-tiger. The region of Reaper's March is designed for the players belonging to the Aldmeri Dominion faction, at the levels of 37 to 43. Below, you can find a complete list of quest markers and rare fishes that you can catch. You can also find here the list of locations necessary for distinctions, caves, bosses and skyshard whereabouts.
The list of locations in Reaper's March
The list of Skyshards in Reaper's March.
The list of fishes in Reaper's March.
Quest locations in Reaper's March.
The list of caves in Reaper's March.
The list of boss whereabouts in Reaper's March.
The crafting system in the Elder Scrolls Online is quite developed and in contrast to most of the other MMO games, it allows a greater deal of personalization - you can create almost any item, adjusting its characteristics to suit your needs, both in the functional and visual aspect (in case of Blacksmithing, Woodworking, Clothing). For this very reason, a large group of players has some serious problems to get into it, which, in turn, causes them to cast aside the whole crafting system, depriving themselves from a major (and very rewarding, as you can read in the later parts of this section) part of game's content.
For this very reason, this guide contains the description of:
()
Without a doubt, developing a certain branch of crafting (or a few of them, if you want to spend more time doing so) will take dozens (if not hundreds) of hours of arduous gameplay, which may, at first glance, seem as a wasted time - you can get the items on your own, through a drop, quests or simply buy from someone else, right? There's a lot of truth in that, but besides creating items for your own business, you can earn insane amounts of money (virtual, in-game money, i.e. gold), making various items for other players (who lacked the motivation to get through the whole process of crafting, or they simply want to enjoy other sides of the game, like questing, partying with other people, exploring the world, or simply slaying thousands of monsters). This can be further increased by joining a guild targeted at trade (and there's plenty of them, independently of the language you are playing with / you want to speak with), or any other, "normal" guild (the requisition for items is omnipresent).
Here's some few quick tips, which may come in handy on your road to becoming a successful crafter:
1. If you are not planning on becoming a trader, but you still want to play a little with the crafting system, think about which items (either armor, or weapons) you will want to use and try to develop those branches of crafting, which permit you to create them. You want to be a mage-like character? - focus on investing your time in Woodworking (to be able to make various staff weapons) and Clothing (in order to gain access to Light Armor).
2. If you want to have anything with a certain branch of crafting (or several types of them), do so from the very beginning of your journey. Having an attitude like "I will first level up my character, then I will think about crafting" ends up the same, independently of the MMO you are playing - a painful, arduous, insanely boring and never ending series of trips in order to find items (either the stuff to deconstruct, or materials to make items from) required, in order to develop a certain branch of crafting. A complete lack of an Auction House does not help either - if you lack the required items (and you don't want to waste several hours to find them, or you simply don't know where to look), you are left with the in-game chat, or joining up a guild, but both of those solutions may end up costing you a ton of gold.
3. Don't invest in meaningless abilities from the crafting skill lines of different branches - some of them are completely useless, or you can easily handle yourself without them, and the points you save from doing so can be invested into something more beneficial. In the further parts of this guide, you will find explanation of all the skills from the crafting system, with the emphasis on which must be taken, which should be and which skills you should avoid.
4. Try to "use / loot" all the bookshelves encountered on your journey - they offer a decent amount of experience in a certain skill tree, which should speed up your work considerably. Even if you won't "hit the right tree", the one you want to develop, additional experience gained in some "useless" (at that time) tree can come in handy later on in the game. This method is extremely beneficial in case of Enchanting, because it's very hard to develop this crafting branch in a "typical" way, because of how scarce the resources are.
5. Search and loot all the containers (chests, barrels - everything that may have items hidden inside) that you stumble upon during your journey - inside, you will find hundreds, if not thousands, of items required for different branches of crafting (or simply useful to yourself). Most of all, inside, you can find (though it is an extremely rare finding) books, which will teach you how to make items in other race's styles (remember, you start with only your own race style). You can, obviously, buy those books from other players, but their prices (especially for a beginning player, with a small gold stock) are simply astronomical.
6. If you don't have a thing for collecting all the items in the game, don't waste your time searching through millions of containers to get all the crafting styles - without a visual aspect, they do not differ from the one you start with. If you, however, want to spend your time crafting the items, and later on selling them off to players, try to unlock all the styles in the game, because some players are willing to pay additional gold (and loads of it, to be exact) for you to make their items in a certain style.
Blacksmithing allows you to crate items from various types of metals - the end products are Heavy Armors and weapons for melee combat. What is interesting, Blacksmithing offers no shield crafting - all the shields in the game are made out of wood, and are able to be crafted through the Woodworking branch.
Blacksmithing, however important for every class (because majority of players tend to fight in melee range), it will come in handy especially, if you plan on making your character a tank - the possibility of creating a marvelous weapon and heavy armor is not to be underestimated. Below you will find a table describing all the abilities available to you in the Blacksmithing branch.
Icon
Name and Rank
Description of the ability
Requirements

Metalworking I
Allows you to make and use Iron Ingots.
Blacksmithing 1

Metalworking II
Allows you to make and use Steel Ingots.
Blacksmithing 5

Metalworking III
Allows you to make and use Orichalc Ingots.
Blacksmithing 10

Metalworking IV
Allows you to make and use Dwarven Ingots.
Blacksmithing 15

Metalworking V
Allows you to make and use Ebony Ingots.
Blacksmithing 20

Metalworking VI
Allows you to make and use Calcinium Ingots.
Blacksmithing 25

Metalworking VII
Allows you to make and use Galatile Ingots.
Metalworking VI

Metalworking VIII
Allows you to make and use Moonstone Ingots.
Metalworking VII

Metalworking IX
Allows you to make and use Voidstone Ingots.
Metalworking VIII

Keen Eye: Ore I
Ore in the world will be easier to spot if you come within 20 meters of it.
Blacksmithing 2

Keen Eye: Ore II
Ore in the world will be easier to spot if you come within 30 meters of it.
Blacksmithing 9

Keen Eye: Ore III
Ore in the world will be easier to spot if you come within 30 meters of it.
Blacksmithing 30

Miner Hireling I
A Miner Hireling will send you various types of ores and/or other items connected with Blacksmithing once a day. The items are delivered when you are logged out.
Blacksmithing 3

Miner Hireling II
A Miner Hireling will send you various types of ores and/or other items connected with Blacksmithing once a day. Possibility of getting more ore and better items. The items are delivered when you are logged out.
Blacksmithing 12

Miner Hireling III
A Miner Hireling will send you various types of ores and/or other items connected with Blacksmithing once a day. Higher possibility of getting more ore and better items. The items are delivered when you are logged out.
Blacksmithing 32

Metal Extraction I
Increases the chances of extracting Blacksmithing ingredients while deconstructing an item.
Blacksmithing 4
Metal Extraction II
Greatly increases the chances of extracting Blacksmithing ingredients while deconstructing an item.
Blacksmithing 22

Metal Extraction III
Maximizes the chances of extracting Blacksmithing ingredients while deconstructing an item.
Blacksmithing 32

Metallurgy I
Reduces research times by 5% and allows the research of two items at once.
Blacksmithing 8

Metallurgy II
Reduces research times by 10% and allows the research of two items at once.
Blacksmithing 18

Metallurgy III
Reduces research times by 20% and allows the research of three items at once.
Blacksmithing 28
Temper Expertise I
Increases the chances of improving an item with tempers.
Blacksmithing 10
Temper Expertise II
Greatly increases the chances of improving an item with tempers.
Blacksmithing 25
Temper Expertise III
Doubles the chances of improving an item with tempers.
Blacksmithing 40
As you can see, there's a plethora of abilities to choose from (and it's only a single branch of crafting!), which is why you should be extra careful on which of them you should spend your skill points, in order to spare some on other skill lines.
The absolutely mandatory are three of them:
An ability worth noting is the Keen Eye: Ore, which, after investing a point in it, will make the nearby (the distance is dependent on the level of the ability) ore nodes more visible (they have a slight glow), allowing you to notice them a lot easier. A single point in this ability is more than enough, if you have at least basic ability of perception and are aware of your surroundings.
If you want to keep yourself busy with Blacksmithing a little bit more seriously, you should invest in the Metal Extraction as well - the ability increases the chances of getting various Blacksmithing components, as well as Tempers (which are quite hard to find through other means) through the process of deconstructing items, and the more "free" components (and Tempers) you are able to get for your crafting branch, the better.
The last ability, Miner Hireling, can be completely omitted - getting a few units of ores (or a Temper, though it is quite rare) may be tempting, but, most of the time, it is simply reduced to a situation, when you get a small number of ore, which you can find on your own in a matter of a few minutes. If you don't have anything better to invest points into, you can think about this ability - otherwise, forget about it and never, ever think of investing anything in it.
As you have read from the previous section, in Blacksmithing there are 9 materials (metals), from which you can craft your desired items. Those metals are: Iron (available from the beginning of the game), High Iron (which is basically Steel), Orichalcum, Dwarven, Ebony, Calcinium, Galatite, Moonstone and Voidstone. Obviously, you have to spend quite a lot of time before you reach the level of expertise to be able to craft items from the highest quality materials. Nonetheless, the benefits compensate for the time spent.
The following table represent the following: metal ores, metals created after smelting the ore, as well as the range of levels, required to be able to craft something from those metals:
Metal
Ore icon
Metal icon
Range of levels
Iron


1 - 14
High Iron (Steel Ingot)


16 - 24
Orichalcum


26 - 34
Dwarven


36 - 44
Ebony


46 - 50
Calcinium


Veteran 1 - 3
Galatite


Veteran 4 - 6
Moonstone


Veteran 7 - 8
Voidstone


Veteran 9 - 10
A thing worth noting, is that in order to smelt a certain ore into a metal bar, you will need 10 units of a given ore. For every process of melting you will receive from 7 to 10 metal bars, as well as (though it's quite rare) a chance to receive one of the Tempers - the quality of a Temper increases with the subsequent tiers of metals, that is for smelting Iron you can get as much as a Honing Stone, the lowest Temper.
Besides this, there is a total of 4 Tempers available to you, which serve the purpose of upgrading the items from Blacksmithing:
Icon
Name and description of a Temper
How to obtain

Honing Stone - allows you to upgrade an item from white (Normal) to green (Fine). By default (without investing in Temper Expertise), each Honing Stone increases the chance to upgrade an item by 20%.
From a Miner Hireling and / or from the process of deconstruction of green (Fine) items.

Dwarven Oil - allows you to upgrade an item from green (Fine) to blue (Superior). By default (without investing in Temper Expertise), each Dwarven Oil increases the chance to upgrade an item by 15%.
From a Miner Hireling and / or from the process of deconstruction of blue (Superior) items.

Grain Solvent - allows you to upgrade an item from blue (Superior) to purple (Epic). By default (without investing in Temper Expertise), each Grain Solvent increases the chance to upgrade an item by 10%.
From a Miner Hireling and / or from the process of deconstruction of purple (Epic) items.

Tempering Alloy - allows you to upgrade an item from purple (Epic) to gold (Legendary). By default (without investing in Temper Expertise), each Tempering Alloy increases the chance to upgrade an item by 5%.
From a Miner Hireling and / or from the process of deconstruction of gold (Legendary) items.
It is worth sticking to one, golden rule, if it comes to Tempers - try to not use them at all while being on the lower levels of experience. The reason for this is simple - in a couple of hours (depending on your level), you will swap out most (if not all) of your equipment (you will either find it, get it as a quest reward, or simply create it on your own), and all the Tempers used in the previous, now unwanted items, will be lost forever.
It is the most important in the case of rarer Tempers (like Grain Solven and Tempering Alloy), which are much more difficult to obtain, thus being way more valuable - even if you don't want to "play" with Blacksmithing (and any other branch of crafting), you can easily sell those Tempers to other players, gaining a considerable amount of money in the process.
The main, and to some extent the easiest, way to obtain ores is to simply extract them from a node - doing so, you will get from 3 to 4 ores every time. It is the simplest, yet at the same time the most time-consuming process - to be able to make even the lowest items from Blacksmithing, you will need from several to over a dozen metal bars, meaning that if you want to create a single item, you will have to find and extract ore from at least a few nodes. Extracting ores from nodes (and smelting them into metal bars) is profitable only during the early, lower levels, when you have little to none access to items, which can be used in the deconstruction process.
A lot more efficient method is the mentioned deconstruction. After going through several levels of experience (when the enemies start to drop items made from steel), you will start to collect a simply absurd number of items. Most of them, obviously, will be way weaker than the ones you will have equipped at the time, so you will have to get rid of them, one way or the other.
It is worth doing so in the process of deconstruction, as you will earn insane amounts of experience corresponding to the branch of crafting you are deconstructing items from (which will be further explained later on). By destroying an item, you have a chance to get from 1 to 3 metal bars (according to the quality of the item), as well as a Temper, a component needed in order to craft an item in a certain style, or a material required to make an item with a given Trait.
The process of deconstruction is fairly simple - to get a desired metal bar, you must destroy an item made from that certain metal. If you want to get Steel Bars, you have to destroy items made from Steel, and so on. If you want to get a specific material required to make an item with a certain Trait (for instance, a Sapphire, required in order to make an item enhancing the effects of Mundus Stones), you will have to destroy an item with that Trait.
Below you will find a table representing the places (for all 3 fractions), in which you can find specific ore nodes:
Ore
Aldmeri Dominion
Daggerfall Covenant
Ebonheart Pact
Iron Ore
Khenarthi's Roost and Auridon
Stros M'Kai, Betnikh and Glenumbra
Bleakrock Isle, Bal Foyen and Stonefalls
High Iron Ore
Grahtwood
Stormhaven
Deshaan
Orichalc Ore
Grahtwood, Greenshade and Malabal Tor
Stormhaven, Rivenspire and Alik'r Desert
Deshaan, Shadowfen and Eastmarch
Dwarven Ore
Greenshade and Malabal Tor
Rivenspire and Alik'r Desert
Shadowfen, Eastmarch and The Rift
Ebony Ore
Reaper's March, Coldharbour and Cyrodiil
Bangkorai, Coldharbour and Cyrodiil
The Rift, Coldharbour and Cyrodil
Calcinium Ore
Cyrodiil, Stonefalls and Deshaan
Cyrodiil, Auridon and Grahtwood
Cyrodil and Glenumbra
Galatite Ore
Shadowfen, East March and The Rift
Greenshade, Malabal Tor and Reaper's March
Rivenspire, Alik'r Desert and Bangkorai
Moonstone Ore
Glenumbra and Stormhaven
Stonefalls and Deshaan
Aurodon and Grahtwood
Voidstone Ore
Rivenspire, Alik'r Desert and Bangkorai
Shadowfen, Eastmarch and The Rift
Greenshade, Malabal Tor and Reaper's March
Clothing allows you to create both Light Armor, used mainly by characters oriented around magic, as well as Medium Armor, which are a typical to characters resembling a rogue (meaning characters using a bow, as well as those who prefer to fight in melee range, but want to rely on agility, instead of hiding behind a container of heavy armor).
Clothing, because of the fact that it allows you to craft both Light and Medium Armors, uses a two, separate groups of items. To be able to make items from the Light Armor category, you will need plant fibers, collected from a specific type of plants (which is done the same as extracting ore from an ore nod), which are then processed in the same manner as ore is smelted into bars.
Medium Armor, in turn, requires you to collect Scraps of different types of leathers, which can be gained through ransacking various containers (chests, barrels, basically all the places which can hide items). The other source (which probably become your main one for a while), is to simple pick it up from the corpses of slain monsters.
Below you will find a table describing all the abilities available to you in the Clothing branch.
Icon
Name and Rank
Description of the ability
Requirements

Tailoring I
Allows you to make and use Jute and Rawhide.
Clothing 1

Tailoring II
Allows you to make and use Flax and Hide.
Clothing 5

Tailoring III
Allows you to make and use Cotton and Leather.
Clothing 10

Tailoring IV
Allows you to make and use Spidersilk and Thick Leather.
Clothing 15

Tailoring V
Allows you to make and use Ebonthread and Fell Hide.
Clothing 20

Tailoring VI
Allows you to make and use Kreshweed and Topgrain Hide.
Clothing 25

Tailoring VII
Allows you to make and use Ironthread and Iron Hide.
Tailoring VI

Tailoring VIII
Allows you to make and use Silverweave and Superb Hide.
Tailoring VII

Tailoring IX
Allows you to make and use Void Cloth and Daedra Hide.
Tailoring VIII

Keen Eye: Cloth I
Fibrous Plants in the world will be easier to spot if you come within 20 meters of them.
Clothing 2

Keen Eye: Cloth II
Fibrous Plants in the world will be easier to spot if you come within 30 meters of them.
Clothing 9

Keen Eye: Cloth III
Fibrous Plants in the world will be easier to spot if you come within 40 meters of them.
Clothing 30

Outfitter Hireling I
An Outfitter Hireling will send you various types of plant fibers, leathers and/or other items connected with Clothing once a day. The items are delivered when you are logged out.
Clothing 3

Outfitter Hireling II
An Outfitter Hireling will send you various types of plant fibers, leathers and/or other items connected with Clothing once a day. Possibility of getting more and better items. The items are delivered when you are logged out.
Clothing 12

Outfitter Hireling III
An Outfitter Hireling will send you various types of plant fibers, leathers and/or other items connected with Clothing once a day. Higher possibility of getting more and better items. The items are delivered when you are logged out.
Clothing 32

Unraveling I
Increases the chances of extracting Clothing ingredients while deconstructing an item.
Clothing 4

Unraveling II
Greatly increases the chances of extracting Clothing ingredients while deconstructing an item.
Clothing 22
Unraveling III
Maximizes the chances of extracting Clothing ingredients while deconstructing an item.
Clothing 32

Stitching I
Reduces research times by 5% and allows the research of two items at once.
Clothing 8

Stitching II
Reduces research times by 10% and allows the research of two items at once.
Clothing 18

Stitching III
Reduces research times by 20% and allows the research of three items at once.
Clothing 28

Tannin Expertise I
Increases the chances of improving an item with Tannins.
Clothing 10

Tannin Expertise II
Greatly increases the chances of improving an item with Tannins.
Clothing 25

Tannin Expertise III
Doubles the chances of improving an item with Tannins.
Clothing 40
As you can see, there's a plethora of abilities to choose from (and it's only a single branch of crafting!), which is why you should be extra careful on which of them you should spend your skill points, in order to spare some on other skill lines.
The absolutely mandatory are three of them:
An ability worth noting is the Keen Eye: Cloth, which, after investing a point in it, will make the nearby (the distance is dependent on the level of the ability) fibrous plants more visible (they have a slight glow), allowing you to notice them a lot easier. A single point in this ability is more than enough, if you have at least basic ability of perception and are aware of your surroundings.
If you want to keep yourself busy with Clothing a little bit more seriously, you should invest in the Unraveling as well - the ability increases the chances of getting various Clothing components, as well as Tannins (which are quite hard to find through other means) through the process of deconstructing items, and the more "free" components (and Tannins) you are able to get for your crafting branch, the better.
The last ability, Outfitter Hireling, can be completely omitted - getting a few units of fibers / hides (or a Tanning, though it is quite rare) may be tempting, but, most of the time, it is simply reduced to a situation, when you get a small number of fibers / hides, which you can find on your own in a matter of a few minutes. If you don't have anything better to invest points into, you can think about this ability - otherwise, forget about it.
You have read from the previous section, in Clothing (as well as in Blacksmithing and Woodworking) there are 9 materials available (9 fibers and 9 hides), from which you can create your items.
For Fibers (to create Light Armor) those are: Jute (available from the beginning of the game), Flax, Cotton, Spidersilk, Ebonthread, Kreshweed, Ironthread, Silverweave, Void Cloth.
As far as Hides go (in order to create Medium Armor) those are: Rawhide (available from the beginning of the game), Hide, Leather, Thick Leather, Fell Hide, Topgrain Hide, Iron Hide, Superb Hide, Daedra Hide.
Obviously, you have to spend quite a lot of time before you reach the level of expertise to be able to craft items from the highest quality materials. Nonetheless, the benefits compensate for the time spent.
The following table represent the following: plant fibers, fabrics created after processing them, as well as the range of levels, required to be able to craft something from those materials:
Fiber
Icon
Fabric
Icon
Range of levels
Raw Jute

Jute

1 - 14
Raw Flax

Flax

16 - 24
Raw Cotton

Cotton

26 - 34
Raw Spidersilk

Spidersilk

36 - 44
Raw Ebonthread

Ebonthread

46 - 50
Raw Kreshweed

Kresh Fiber

Veteran 1 - 3
Raw Ironweed

Ironthread

Veteran 4 - 6
Raw Silverweed

Silverweave

Veteran 7 - 8
Raw Void Bloom

Void Cloth

Veteran 9 - 10
And here's the table representing the hides:
Hide Scraps
Icon
Hide
Icon
Range of levels
Rawhide Scraps

Rawhide

1 - 14
Hide Scraps

Hide

16 - 24
Leather Scraps

Leather

26 - 34
Thich Leather Scraps

Thick Leather

36 - 44
Fell Hide Scraps

Fellhide

46 - 50
Topgrain Hide Scraps

Topgrain Hide
Veteran 1 - 3
Iron Hide Scraps

Iron Hide

Veteran 4 - 6
Superb Hide Scraps

Superb Hide

Veteran 7 - 8
Shadowhide Scraps

Shadowhide

Veteran 9 - 10
It should be noted, that in order to process a certain fiber / scrap into a fabric / hide, you will need 10 units of a given fiber / scrap - in order to create Flax, you will need 10 Raw Flax, and to create Leather, you will need 10 Leather Scraps, and so on. For every process, you will receive from 7 to 10 units of Fabric / Hide, as well as (though it's quite rare) a chance to receive one of the Tannins - the quality of a Tannin increases with the subsequent tiers of items, that is for processing Jute / Rawhide you can get as much as a Hemming.
There is a total of 4 Tannins available to you, which serve the purpose of upgrading the items from Clothing:
Icon
Name and description of a Tannin
How to obtain

Hemming - allows you to upgrade an item from white (Normal) to green (Fine). By default (without investing in Tannin Expertise), each Hemming increases the chance to upgrade an item by 20%.
From an Outfitter Hireling and / or from the process of deconstruction of green (Fine) items.

Embroidery - allows you to upgrade an item from green (Fine) to blue (Superior). By default (without investing in Tannin Expertise), each Embroidery increases the chance to upgrade an item by 15%.
From an Outfitter Hireling and / or from the process of deconstruction of blue (Superior) items.

Elegant Lining - allows you to upgrade an item from blue (Superior) to purple (Epic). By default (without investing in Tannin Expertise), each Elegant Lining increases the chance to upgrade an item by 10%.
From an Outfitter Hireling and / or from the process of deconstruction of purple (Epic) items.
Dreugh Wax - allows you to upgrade an item from purple (Epic) to gold (Legendary). By default (without investing in Tannin Expertise), each Dreugh Wax increases the chance to upgrade an item by 5%.
From an Outfitter Hireling and / or from the process of deconstruction of gold (Legendary) items.
It is worth sticking to one, golden rule, if it comes to Tannins - try to not use them at all while being on the lower levels of experience. The reason for this is simple - in a couple of hours (depending on your level), you will swap out most (if not all) of your equipment (you will either find it, get it as a quest reward, or simply create it on your own), and all the Tannins used in the previous, now unwanted items, will be lost forever.
It is the most important in the case of rarer Tannins (like Elegant Lining and Dreugh Wax), which are much more difficult to obtain, thus being way more valuable - even if you don't want to do anything with Clothing (and any other branch of crafting), you can easily sell those Tannins to other players, gaining a considerable amount of money in the process.
The main, and (at least during the early levels) the easiest, way to obtain fibers is to simply extract them from a source, which has a form of a fibrous plant - doing so, you will get from 3 to 4 fibers every time. It is the simplest, yet at the same time the most time-consuming process - to be able to make even the lowest items (Light Armor) from Clothing, you will need from several to over a dozen processed Fabrics, meaning that if you want to create a single item, you will have to find and collect fibers from at least a fibrous plants. Extracting fibers from plants (and processing them into Fabrics) is profitable only during the early, lower levels, when you have little to none access to items, which can be used in the deconstruction process.
When it comes to Hides, the process of collecting is a little different - obviously, there aren't any plants, trees or bushes from which you can collect hide scraps. To get them, you will have to get your hands dirty, by exterminating the nearby monsters. Practically all beast-like enemies from the game drops Hide Scraps (ranging from 1 to even 4) - given the fact, that you will probably murder dozens, if not hundreds of them, it is an extremely efficient way to obtain a lot of Hide Scraps. By linking the useful with the pleasant (collecting materials while gaining experience through killing mobs), you will collect them way faster than while extracting ores from nodes or collecting fibers from fibrous plants.
A lot more efficient method is the mentioned deconstruction. After going through several levels of experience (when the enemies start to drop items made from Cotton and Leather), you will start to collect an absurd quantity of items. Most of them, obviously, will be way weaker than the ones you will have equipped at the time, so you will have to get rid of them, one way or the other.
It is worth doing so in the process of deconstruction, as you will earn insane amounts of experience corresponding to the Clothing skill line (which will be further explained later on). By destroying an item, you have a chance to get from 1 to 3 (according to the quality of the item) Fibers / Hides (depending on the fact, if it's a Light or Medium Armor), as well as a Tannin, a component needed in order to craft an item in a certain style, or a material required to make an item with a given Trait.
The process of deconstruction is fairly simple - to get a desired component, you must destroy an item made from that certain material. If you want to get Spidersilk / Thick Leather, you have to destroy items made from Spidersilk / Thick Leather, and so on. If you want to get a specific material required to make an item with a certain Trait (for instance, a Sapphire, required in order to make an item enhancing the effects of Mundus Stones), you will have to destroy an item with that Trait.
Below you will find a table representing the places (for all 3 fractions), in which you can find specific fibrous plants and beasts, from which you can collect hide scraps upon slaying them:
Fiber / Hide Scrap
Aldmeri Dominion
Daggerfall Covenant
Ebonheart Pact
Raw Jute and Rawhide Scraps
Khenarthi's Roost and Auridon
Stros M'Kai, Betnikh and Glenumbra
Bleakrock Isle, Bal Foyen and Stonefalls
Raw Flax and Hide Scraps
Grahtwood
Stormhaven
Deshaan
Raw Cotton and Leather Scraps
Grahtwood, Greenshade and Malabal Tor
Stormhaven, Rivenspire and Alik'r Desert
Deshaan, Shadowfen and Eastmarch
Raw Spidersilk and Thick Leather Scraps
Greenshade and Malabal Tor
Rivenspire and Alik'r Desert
Shadowfen, Eastmarch and The Rift
Raw Ebonthread and Fell Hide Scraps
Reaper's March, Coldharbour and Cyrodiil
Bangkorai, Coldharbour and Cyrodiil
The Rift, Coldharbour and Cyrodil
Raw Kreshweed and Topgrain Hide Scraps
Cyrodiil, Stonefalls and Deshaan
Cyrodiil, Auridon and Grahtwood
Cyrodil and Glenumbra
Raw Ironweed and Iron Hide Scraps
Shadowfen, East March and The Rift
Greenshade, Malabal Tor and Reaper's March
Rivenspire, Alik'r Desert and Bangkorai
Raw Silverweed and Superb Hide Scraps
Glenumbra and Stormhaven
Stonefalls and Deshaan
Aurodon and Grahtwood
Raw Void Bloom and Shadowide Scraps
Rivenspire, Alik'r Desert and Bangkorai
Shadowfen, Eastmarch and The Rift
Greenshade, Malabal Tor and Reaper's March
Woodworking allows you to create items from various types of wood - the end products are Staffs, Shields and Bows.
Woodworking, in contrast to the previously described branches of crafting, comes in handy for almost any class in the game, independently of their tactic or their character build. Every class fighting in close range, who rely on a one-handed weapon, will need Woodworking in order to craft an appropriate shield, a great deal of characters relying on magic will use different types of Staffs, and no rogue fighting from afar can do anything without a good bow.
Below you will find a table describing all the abilities available to you in the Woodworking branch.
Icon
Name and Rank
Description of the ability
Requirements

Woodworking I
Allows you to make and use Sanded Maple.
Woodworking 1

Woodworking II
Allows you to make and use Sanded Oak.
Woodworking 5

Woodworking III
Allows you to make and use Sanded Beech.
Woodworking 10

Woodworking IV
Allows you to make and use Sanded Hickory.
Woodworking 15

Woodworking V
Allows you to make and use Sanded Yew.
Woodworking 20

Woodworking VI
Allows you to make and use Sanded Birch.
Woodworking 25

Woodworking VII
Allows you to make and use Sanded Ash.
Woodworking VI

Woodworking VIII
Allows you to make and use Sanded Mahogany
Woodworking VII

Woodworking IX
Allows you to make and use Sanded Nightwood.
Woodworking VIII
Keen Eye: Wood I
Wood in the world will be easier to spot if you come within 20 meters of it.
Woodworking 2

Keen Eye: Wood II
Wood in the world will be easier to spot if you come within 30 meters of it.
Woodworking 9

Keen Eye: Wood III
Wood in the world will be easier to spot if you come within 40 meters of it.
Woodworking 30

Lumberjack Hireling I
A Lumberjack Hireling will send you various types of woods and/or other items connected with Woodworking once a day. The items are delivered when you are logged out.
Woodworking 3

Lumberjack Hireling II
A Lumberjack Hireling will send you various types of woods and/or other items connected with Woodworking once a day. Possibility of getting more wood and better items. The items are delivered when you are logged out.
Woodworking 12

Lumberjack Hireling III
A Lumberjack Hireling will send you various types of woods and/or other items connected with Woodworking once a day. Higher possibility of getting more wood and better items. The items are delivered when you are logged out.
Woodworking 32

Wood Extraction I
Increases the chances of extracting Woodworking ingredients while deconstructing an item.
Woodworking 4

Wood Extraction II
Greatly increases the chances of extracting Woodworking ingredients while deconstructing an item.
Woodworking 22

Wood Extraction III
Maximizes the chances of extracting Woodworking ingredients while deconstructing an item.
Woodworking 32

Carpentry I
Reduces research times by 5% and allows the research of two items at once.
Woodworking 8

Carpentry II
Reduces research times by 10% and allows the research of two items at once.
Woodworking 18

Carpentry III
Reduces research times by 20% and allows the research of three items at once.
Woodworking 28

Resin Expertise I
Increases the chances of improving an item with Resins.
Woodworking 10

Resin Expertise II
Greatly increases the chances of improving an item with Resins.
Woodworking 25

Resin Expertise III
Doubles the chances of improving an item with Resins.
Woodworking 40
As you can see, there's a plethora of abilities to choose from (and it's only a single branch of crafting!), which is why you should be extra careful on which of them you should spend your skill points, in order to spare some on other skill lines.
The absolutely mandatory are three of them:
1. Woodworking (obviously all the way to the 9th level, to gain access to all the wood types available in the game)
2. Carpentry - the research times in game mount up to ridiculous levels (if you want to be able to use all the traits for a single item, you will need to spend real-time DAYS to do so!), and that is precisely why you much spend all 3 points in this ability, to greatly reduce the research time itself, as well as be able to research 3 items at once. Without this one you can simple forget about becoming a successful crafter.
3. Resin Expertise - upgrading the items is, besides the sole process of creating them, an extremely important aspect, as it allows you to drastically enhance a given item - be it the values of the item itself (the damage of the weapon), a trait or even an enhancement put on an item through the Enchanting process. By increasing the chance of a successful improvement, you basically reduce the number of Resin (will be explained later on) required in the process. That is precisely why this ability is so important. The whole process of upgrading an item will be explained later.
An ability worth noting is the Keen Eye: Wood, which, after investing a point in it, will make the nearby (the distance is dependent on the level of the ability) wood more visible (they have a slight glow), allowing you to notice them a lot easier. A single point in this ability is more than enough, if you have at least basic ability of perception and are aware of your surroundings.
If you want to make Woodworking your bread and butter, you should invest in the Wood Extraction as well - the ability increases the chances of getting various Woodworking components, as well as Resins (which are quite hard to find through other means) through the process of deconstructing items, and the more "free" components (and Resins) you are able to get for your crafting branch, the better.
The last ability, Lumberjack Hireling, can be completely omitted - getting a few units of wood (or a Resin, though it is quite rare) may be tempting, but, most of the time, it is simply reduced to a situation, when you get a small number of useless wood, which you can find on your own in a matter of a few minutes. If you don't have anything better to invest points into, you can think about this ability - otherwise, forget about it.
In Woodworking (like in the previously described branches of crafting) there is a total of 9 materials (types of wood), from which you can create your items. Those are: Sanded Maple (available from the beginning of the game), Sanded Oak, Sanded Beech, Sanded Hickory, Sanded Yew, Sanded Birch, Sanded Ash, Sanded Mahogany and Sanded Nightwood. Obviously, you have to spend quite a lot of time before you reach the level of expertise to be able to craft items from the highest quality materials. Nonetheless, the benefits compensate for the time spent.
The following table represent the following: rough wood, processed wood, as well as the range of levels, required to be able to craft something from those materials:
Wood
Wood Icon
Rough Wood Icon
Range of levels
Sanded Maple


1 - 14
Sanded Oak


16 - 24
Sanded Beech


26 - 34
Sanded Hickory


36 - 44
Sanded Yew


46 - 50
Sanded Birch


Veteran 1 - 3
Sanded Ash


Veteran 4 - 6
Sanded Mahogany


Veteran 7 - 8
Sanded Nightwood


Veteran 9 - 10
A thing worth noting, is that in order to process wood from a rough state, you will need 10 units of a given rough wood. For every process of sanding you will receive from 7 to 10 wood pieces, as well as (though it's quite rare) a chance to receive one of the Resins - the quality of a Resin increases with the subsequent tiers of wood types, that is for sanding Maple you can get as much as a Pitch.
There's a total of 4 Resin types, which serve the purpose of upgrading the items from Woodworking:
Icon
Name and description of a Resin
How to obtain

Pitch - allows you to upgrade an item from white (Normal) to green (Fine). By default (without investing in Resin Expertise), each Pitch increases the chance to upgrade an item by 20%.
From a Lumberjack Hireling and / or from the process of deconstruction of green (Fine) items.

Turpen - allows you to upgrade an item from green (Fine) to blue (Superior). By default (without investing in Resin Expertise), each Turpen increases the chance to upgrade an item by 15%.
From a Lumberjack Hireling and / or from the process of deconstruction of blue (Superior) items.

Mastic - allows you to upgrade an item from blue (Superior) to purple (Epic). By default (without investing in Resin Expertise), each Mastic increases the chance to upgrade an item by 10%.
From a Lumberjack Hireling and / or from the process of deconstruction of purple (Epic) items.

Rosin - allows you to upgrade an item from purple (Epic) to gold (Legendary). By default (without investing in Resin Expertise), each Rosin increases the chance to upgrade an item by 5%.
From a Lumberjack Hireling and / or from the process of deconstruction of gold (Legendary) items.
It is worth sticking to one, golden rule, if it comes to Resins - try to not use them at all while being on the lower levels of experience. The reason for this is simple - in a couple of hours (depending on your level), you will swap out most (if not all) of your equipment (you will either find it, get it as a quest reward, or simply create it on your own), and all the Resins used in the previous, now unwanted items, will be lost forever.
It is the most important in the case of rarer Resins (like Mastic and Rosin), which are much more difficult to obtain, thus being way more valuable - even if you won't be using them by yourself, you can sell them to other players, earning quite a bit of gold.
The main, and to some extent the easiest, way to obtain wood is to simply extract them from a source (in a same manner as you do with ore nodes and fibrous plants) - doing so, you will get from 3 to 4 pieces of rough wood every time. It is the simplest, yet at the same time the most time-consuming process - to be able to make even the lowest items from Woodworking, you will need from several to over a dozen pieces of sanded wood, meaning that if you want to create a single item, you will have to find and extract rough wood from at least a few sources. Collecting wood in this manner is profitable only during the early, lower levels, when you have little to none access to items, which can be used in the deconstruction process.
A lot more efficient method is the mentioned deconstruction. After going through several levels of experience (when the enemies start to drop items made from Beech or Hickory), you will start to collect a simply absurd number of items. Most of them, obviously, will be way weaker than the ones you will have equipped at the time, so you will have to get rid of them, one way or the other.
It is worth doing so in the process of deconstruction, as you will earn insane amounts of experience corresponding to Woodworking skill tree (which will be further explained later on). By destroying an item, you have a chance to get from 1 to 3 pieces of sanded wood (according to the quality of the item), as well as a Resin, a component needed in order to craft an item in a certain style, or a material required to make an item with a given Trait.
The sole process of deconstruction is fairly simple - to get a desired sanded wood, you must destroy an item made from that certain material. If you want to get Sanded Ash, you have to destroy items made from Sanded Ash, and so on. If you want to get a specific material required to make an item with a certain Trait (for instance, a Sapphire, required in order to make an item enhancing the effects of Mundus Stones), you will have to destroy an item with that Trait.
Below you will find a table representing the places (for all 3 fractions), in which you can find specific rough wood:
Rough Wood
Aldmeri Dominion
Daggerfall Covenant
Ebonheart Pact
Rough Maple
Khenarthi's Roost and Auridon
Stros M'Kai, Betnikh and Glenumbra
Bleakrock Isle, Bal Foyen and Stonefalls
Rough Oak
Grahtwood
Stormhaven
Deshaan
Rough Beech
Grahtwood, Greenshade and Malabal Tor
Stormhaven, Rivenspire and Alik'r Desert
Deshaan, Shadowfen and Eastmarch
Rough Hickory
Greenshade and Malabal Tor
Rivenspire and Alik'r Desert
Shadowfen, Eastmarch and The Rift
Rough Yew
Reaper's March, Coldharbour and Cyrodiil
Bangkorai, Coldharbour and Cyrodiil
The Rift, Coldharbour and Cyrodil
Rough Birch
Cyrodiil, Stonefalls and Deshaan
Cyrodiil, Auridon and Grahtwood
Cyrodil and Glenumbra
Rough Ash
Shadowfen, East March and The Rift
Greenshade, Malabal Tor and Reaper's March
Rivenspire, Alik'r Desert and Bangkorai
Rough Mahogany
Glenumbra and Stormhaven
Stonefalls and Deshaan
Aurodon and Grahtwood
Rough Nigthwood
Rivenspire, Alik'r Desert and Bangkorai
Shadowfen, Eastmarch and The Rift
Greenshade, Malabal Tor and Reaper's March
Enchanting differs greatly in comparison to the previously explained branches of crafting, which will be further explained later on. This branch of crafting allows you to create special Runes, which can be used to create Glyphs, in order to enchant an item (either armor, weapon or a piece of jewelry), giving it additional qualities (increasing health, decreasing the costs of a certain group of abilities, giving additional elemental damage to a weapon, and so on).
Enchanting is, without a doubt, profitable to all the classes - putting a Glyph on an item, which increases its statistics (making yours higher too) is not to be underestimated. Unfortunately, getting through the levels of this branch of crafting, to be able to create powerful Glyphs, requires a lot of time.
Below you will find a table describing all the abilities available to you in the Enchanting branch.
Icon
Name and Rank
Description of the ability
Requirements

Potency Improvement I
Allows the use of Jora, Porade, Jode and Notade Potency Runestones to make Glyphs of levels 1-15.
Enchanting 1

Potency Improvement II
Allows the use of Jera, Jejora, Ode and Tade Potency Runestones to make Glyphs of levels 11-25.
Enchanting 5

Potency Improvement III
Allows the use of Odra, Pojora, Jayde and Edode Potency Runestones to make Glyphs of levels 21-35.
Enchanting 10

Potency Improvement IV
Allows the use of Edora, Jaera, Pojode, and Rekude Potency Runestones to make Glyphs of levels 30-45.
Enchanting 15

Potency Improvement V
Allows the use of Pora, Denara, Hade and Idode Potency Runestones to make Glyphs from level 40-50.
Potency Improvement IV

Potency Improvement VI
Allows the use of Rera and Pode Potency Runestones to make Glyphs of Veteran Rank 1.
Potency Improvement V

Potency Improvement VII
Allows the use of Derado and Kedeko Potency Runestones to make Glyphs of Veteran Rank 3.
Potency Improvement VI

Potency Improvement VIII
Allows the use of Recura and Rede Potency Runestones to make Glyphs of Veteran Rank 6.
Potency Improvement VII

Potency Improvement IX
Allows the use of Recura and Rede Potency Runestones to make Glyphs of Veteran Rank 6.
Potency Improvement VIII

Aspect Improvement I
Allows the use of Common (white) and Standard (green) Aspect Runestones.
Enchanting 1

Aspect Improvement II
Allows the use of Superior (blue) Aspect Runestones.
Enchanting 6

Aspect Improvement III
Allows the use of Artifact (purple) Aspect Runestones.
Enchanting 16

Aspect Improvement IV
Allows the use of Legendary (gold) Aspect Runestones.
Aspect Improvement III
Keen Eye: Runestones I
Runes in the world will be easier to spot if you come within 20 meters of them.
Enchanting 2

Keen Eye: Runestones II
Runes in the world will be easier to spot if you come within 30 meters of them.
Enchanting 7
Keen Eye: Runestones III
Runes in the world will be easier to spot if you come within 40 meters of them.
Keen Eye: Runestones II

Hireling I
A Hireling will find Runestones for you once a day. The items are delivered when you are offline.
Enchanting 3

Hireling II
A Hireling will find Runestones for you once a day. There's a higher chance of delivering rarer runes. The items are delivered when you are offline.
Enchanting 12

Hireling III
A Hireling will find Runestones for you twice a day. There's a higher chance of delivering rarer runes. The items are delivered when you are offline.
Hireling II

Aspect Extraction I
Increases the chances of extracting Aspect Runestones by 5%.
Enchanting 4

Aspect Extraction II
Increases the chances of extracting Aspect Runestones by 10%.
Aspect Extraction I

Aspect Extraction III
Increases the chances of extracting Aspect Runestones by 15%.
Aspect Extraction II
As always, there's a ton of abilities to choose from. Unlike the previous branches of crafting, it is worth to use more skill points in the Enchanting skill line, because, as was previously mentioned, developing this branch of crafting is the slowest from all the available.
Again, the absolutely mandatory are three of them:
An ability worth noting is the Keen Eye: Runes, which, after investing a point in it, will make the nearby (the distance is dependent on the level of the ability) Runestones more visible (they have a slight glow), allowing you to notice them a lot easier. A single point in this ability is more than enough, if you have at least basic ability of perception and are aware of your surroundings.
The last ability, Hireling, unlike the previous branches, is totally worth investing in. Sparing 3 points in this ability will award you with a Hireling twice a day (each 12 hours after collecting the last package). Inside the package you can find extremely rare Runestones, even Aspect Runestones, which are hard to find.
To be able to create a given Glyph, you will have to use 3 types of Runes:
Below you will find a table representing the Additive Potency Runestones, their rank, as well as the range of levels required to be able to craft and use them:
Icon
Name
Title
Potency
Range of Levels

Jora
Trifling
Develop
1 - 10

Porade
Inferior
Add
5 - 15

Jera
Petty
Increase
10 - 20

Jejora
Slight
Raise
15 - 25

Odra
Minor
Gain
20 - 30

Pojora
Lesser
Supplement
25 - 35

Edora
Moderate
Boost
30 - 40

Jaera
Average
Advance
35 - 45

Pora
Strong
Augment
40 - 50

Denara
Strong
Strengthen
40 - 50

Rera
Greater
Exaggerate
Veteran 1 - 3

Derado
Greater
Empower
Veteran 3 - 5

Recura
Grand
Magnify
Veteran 5 - 8

Cura
Grand
Intensify
Veteran 8 - 10
Below you will find a table representing the Additive Potency Runestones, their rank, as well as the range of levels required to be able to craft and use them:
Icon
Name
Title
Potency
Range of Levels

Jode
Trifling
Reduce
1 - 10

Notade
Inferior
Subtract
5 - 15

Ode
Petty
Shrink
10 - 20

Tade
Slight
Decrease
15 - 25

Jayde
Minor
Deduct
20 - 30

Edode
Lesser
Lower
25 - 35

Pojode
Moderate
Diminish)
30 - 40

Rekude
Average
Weaken
35 - 45

Hade
Strong
Lessen
40 - 50

Idode
Strong
Impair
40 - 50

Pode
Greater
Remove
Veteran 1 - 3

Kedeko
Greater
Drain
Veteran 3 - 5

Rede
Grand
Deprive
Veteran 5 - 8

Kude
Grand
Negate
Veteran 8 - 10
Essence Runestones give the Glyphs the desired effect, like enchanting a weapon with a spell, allowing it to deal additional, elemental damage, giving a piece of armor additional health or stamina, or enchanting a jewelry, which will now, for instance, decrease the costs of magicka-based abilities.
Below you will find a table representing the Essence Runestones, the effect they have on the resulting Glyph, as well as an example application (all the possible combinations can be found in the next section):
Icon
Name
Effect
Sample application, together with a Potency Runestone

Dakeipa
Frost
Additive Potency Runestone + Dakeipa -> Glyph of Frost, giving a weapon additional damage from frost.
Deni
Stamina
Additive Potency Runestone + Deni -> Glyph of Absorb Stamina, giving a weapon additional, magical damage and the ability to restore Stamina.

Denima
Stamina Regeneration
Additive Potency Runestone + Denima -> Glyph of Stamina Regeneration, giving a piece of jewelry increased Stamina regeneration.

Deteri
Armor
Subtractive Potency Runestone + Deteri -> Glyph of Crushing, giving a weapon the ability to reduce the armor of the target.

Haoko
Disease
Additive Potency Runestone + Haoko -> Glyph of Foulness, giving a weapon additional damage from poison.

Jaedi
Bash
Kaderi
Shield
Subtractive Potency Runestone + Kaderi -> Glyph of Shielding, can be applied to a jewelry, to reduce the cost of shield Bash and blocking with a shield.

Kuoko
Poison
Additive Potency Runestone + Kuoko -> Glyph of Poison, giving a weapon additional damage from poison.

Lire
Physical Harm

Makderi
Spell Harm
Additive Potency Runestone + Makderi -> Glyph of Increase Magical Harm, giving a weapon additional damage from spells.

Makko
Magicka
Subtractive Potency Runestone + Makko -> Glyph of Absorb Magicka, giving a weapon additional damage from magic and the ability to regenerate magicka.

Makkoma
Magicka Regen
Additive Potency Runestone + Makkoma -> Glyph of Magicka Regen, can be applied to a jewelry to increase the regeneration of magicka.

Meip
Shock
Additive Potency Runestone + Meip -> Glyph of Shock, giving a weapon additional damage from lightning.

Oko
Health
Subtractive Potency Runestone + Oko -> Glyph of Absorb Health, giving a weapon additional damage from magic and to restore health.

Okoma
Health Regeneration
Subtractive Potency Runestone + Okoma -> Glyph of Decrease Health, giving a weapon additional, unavoidable damage.

Okori
Power
Additive Potency Runestone + Okori -> Glyph of Rage, can be applied to a weapon, to increase your Power for a few seconds.

Oru
Alchemist
Additive Potency Runestone + Oru -> Glyph of Potion Boost, can be applied to a jewelry, to increase the efficiency of potions.

Rakeipa
Silence
Additive Potency Runestone + Rakeipa -> Glyph of Flame, giving a weapon additional damage from fire.

Taderi
Physical Harm
Additive Potency Runestone + Taderi -> Glyph of Increase Physical Harm, can be applied to a jewelry, to increase weapon damage.
There are 5 Aspect Runestones in the game. They are used in a similar manner to the items used in the process of upgrading (Tannin, Temper, Resin). The only difference is that you use them in the process of production. The better the Aspect Runestone used in the creation of a Glyph, the better the quality of a final product.
Below you will find a table representing all 5 Aspect Runestones, as well as the quality of the created Glyph:
Icon
Name
Quality
Created Glyphs

Ta
Base
White (Normal) Glyphs.

Jejota
Fine
Green (Fine) Glyphs.

Denata
Superior
Blue (Superior) Glyphs.

Rekuta
Artifact
Purple (Epic) Glyphs.

Kuta
Legendary
Gold (Legendary) Glyphs.
Below you will find a number of tables, representing the possible Runestone combinations, resulting in a vast number of Glyphs available to craft. The tables are arranged according to the type of equipment they can be applied to: Weapon, Armor, Jewelry.
The Glyphs values and their duration were replaced with X and Y, because they are dependent on the quality of the Aspect Runestone used in the process of their creation - the better the Aspect Runestone, the higher those values will be.
Icon
Name
Components
Effect

Glyph of Absorb Health
Subtractive Potency Runestone + Oko
Deals X Magic damage and restores Y health.

Glyph of Absorb Magicka
Subtractive Potency Runestone + Makko
Deals X Magic damage and restores Y Magicka.

Glyph of Absorb Stamina
Subtractive Potency Runestone + Deni
Deals X Magic damage and restores Y Stamina.

Glyph of Crushing
Subtractive Potency Runestone + Deteri
Reduces the armor of enemy by X for Y seconds.
Glyph of Decrease Health
Subtractive Potency Runestone + Okoma
Deals X unavoidable damage.

Glyph of Flame
Additive Potency Runestone + Rakeipa
Deals X Fire damage.

Glyph of Foulness
Additive Potency Runestone + Haoko
Deals X Disease damage.

Glyph of Frost
Additive Potency Runestone + Dakeipa
Deals X Frost damage.

Glyph of Hardening
Additive Potency Runestone Deteri
After hitting an enemy, envelops you in a shield, absorbing X damage for Y seconds.

Glyph of Poison
Additive Potency Runestone + Kuoko
Deals X Poison damage.

Glyph of Rage
Additive Potency Runestone + Okori
Increases your Power by X for Y seconds.

Glyph of Shock
Additive Potency Runestone + Meip
Deals X Lightning damage.

Glyph of Weakening
Subtractive Potency Runestone + Okori
Upon hitting an enemy, decreases his Power by X for Y seconds.
Icon
Name
Components
Effect

Glyph of Health
Additive Potency Runestone + Oko
Increases the maximum health by X.

Glyph of Magicka
Additive Potency Runestone + Makko
Increases the maximum Magicka by X.

Glyph of Stamina
Additive Potency Runestone + Deni
Increases the maximum Stamina by X.
Icon
Name
Components
Effect

Glyph of Bashing
Additive Potency Runestone + Kaderi
Increases the damage of a Shield Bash by X.

Glyph of Crushing
Subtractive Potency Runestone + Deteri
Decreases the armor of a struck enemy by X for Y seconds.

Glyph of Decrease Physical Harm
Subtractive Potency Runestone + Taderi
Increases armor by X.

Glyph of Decrease Spell Harm
Subtractive Potency Runestone + Makderi
Increases magic resistance by X.

Glyph of Disease Resist
Subtractive Potency Runestone + Haoko
Increases disease resistance by X.

Glyph of Fire Resist
Subtractive Potency Runestone + Rakeipa
Increases fire resistance by X.

Glyph of Frost Resist
Subtractive Potency Runestone + Dekeipa
Increases frost resistance by X.

Glyph of Health Regen
Additive Potency Runestone + Okoma
Increases health regeneration by X.
Glyph of Increase Magical Harm
Additive Potency Runestone + Makderi
Adds X Magic damage.
.
Glyph of Increase Physical Harm
Additive Potency Runestone + Taderi
Adds X Weapon damage.

Glyph of Magicka Regen
Additive Potency Runestone + Makkoma
Increases Magicka regeneration by X.

Glyph of Poison Resist
Subtractive Potency Runestone + Kuoko
Increases poison resistance by X.

Glyph of Potion Boost
Additive Potency Runestone + Oru
Increases the efficiency of potions by X.

Glyph of potion Speed
Subtractive Potency Runestone + Oru
Reduce the cooldown of Potions below this item's level by X seconds.

Glyph of Reduce Feat Cost
Subtractive Potency Runestone + Denima
Decreases the costs of Stamina-based abilities.

Glyph of Reduce Spell Cost
Subtractive Potency Runestone + Makkoma
Decreases the costs of Magicka-based abilities.

Glyph of Shielding
Subtractive Potency Runestone + Kaderi
Decreases the cost of Shield Bash by X and reduces the costs of blocking with a shield by Y.

Glyph of Shock Resist
Subtractive Potency Runestone + Meip
Increases lightning resistance by X.

Glyph of Stamina Regen
Additive Potency Runestone + Denima
Increases Stamina regeneration by X.
Alchemy allows you to create various potions. Those familiar with other Elder Scrolls games will feel disappointment, because you can't prepare poison using alchemy, which can be later applied to a weapon.
Alchemy is probably the most useful of all the branches of crafting, because buying potions on your own (either from a store, or a player) costs enormous amounts of gold, while they are used in a flash. Monster on higher levels tend to drop more potions upon death, so you probably won't have to buy them yourself, but you cannot obtain all types of potions this way - and even with the enemy drop, the amount of drinks may still be insufficient.
Below you will find a table describing all the abilities available to you in the Alchemy branch.
Icon
Name and Rank
Description of the ability
Requirements

Solvent Proficiency I
Allows the Alchemist to use Natural Water to make Level 3 potions and Clear Water to make Level 10 potions
Alchemy 1

Solvent Proficiency II
Allows the Alchemist to use Pristine Water to make Level 20 potions
Solvent Proficiency I

Solvent Proficiency III
Allows the Alchemist to use Cleansed Water to make Level 30 potions
Solvent Proficiency II

Solvent Proficiency IV
Allows the Alchemist to use Filtered Water to make Level 40 potions
Solvent Proficiency III

Solvent Proficiency V
Allows the Alchemist to use Purified Water to make Veteran 1 potions
Solvent Proficiency IV

Solvent Proficiency VI
Allows the Alchemist to use Cloud Mist to make Veteran 5 potions
Solvent Proficiency V

Keen Eye: Reagents I
Reagents in the world will be easier to spot when you are 20 meters or closer
Alchemy 2

Keen Eye: Reagents II
Reagents in the world will be easier to spot when you are 30 meters or closer
Keen Eye: Reagents I
Keen Eye: Reagents III
Reagents in the world will be easier to spot when you are 40 meters or closer
Keen Eye: Reagents II

Medicinal Use I
The resulting effects after consuming a potion last 10% longer.
Alchemy 8

Medicinal Use II
The resulting effects after consuming a potion last 20% longer.
Medicinal Use I

Medicinal Use III
The resulting effects after consuming a potion last 30% longer.
Medicinal Use II

Chemistry I
Each successful crafting attempt in Alchemy produces one additional potion.
Alchemy 12

Chemistry II
Each successful crafting attempt in Alchemy produces two additional potions.
Chemistry I
Chemistry III
Each successful crafting attempt in Alchemy produces three additional potions.
Chemistry II

Laboratory Use
Allows you to use up to 3 different reagents in the process of making a potion.
Alchemy 15

Snakeblood I
Reduces the negative effects of potions by 50%.
Alchemy 23

Snakeblood II
Reduces the negative effects of potions by 80%.
Snakeblood I

Snakeblood III
Reduces the negative effects of potions by 100%.
Snakeblood II
Yet another skill three requiring you to spend a lot of skill points. In contrast to majority of the previous branches of crafting, you should invest into 5 out of 6 abilities in the Alchemy skill tree:
An ability worth noting is the Keen Eye: Reagents, which, after investing a point in it, will make the nearby (the distance is dependent on the level of the ability) alchemical reagents more visible (they have a slight glow), allowing you to notice them a lot easier. A single point in this ability is more than enough, if you have at least basic ability of perception and are aware of your surroundings.
In alchemy, to craft potions, you will need two groups of items - Solvents and Reagents.
There's a total of 7 different Solvents, and each of them define the quality of the resulting potion - the better Solvent used in the production, the more powerful the resulting potion created, and the higher level is required for you to be able to consume it. The below table describes all Solvents available in the game, with their required level:
Icon
Name
The required level

Natural Water
Required to make level 3 potions. Additionally, level 3 character is needed to consume the created potion.

Clear Water
Required to make level 10 potions. Additionally, level 10 character is needed to consume the created potion.
Pristine Water
Required to make level 20 potions. Additionally, level 20 character is needed to consume the created potion.

Cleansed Water
Required to make level 30 potions. Additionally, level 30 character is needed to consume the created potion.

Filtered Water
Required to make level 40 potions. Additionally, level 40 character is needed to consume the created potion.

Purified Water
Required to make Veteran Level potions. Additionally, Veteran Leveled character is needed to consume the created potion.

Cloud Mist
Required to make Veteran Level potions. Additionally, Veteran Leveled character is needed to consume the created potion.
There are a total of 18 alchemical Reagents available in the Alchemy, in a form of different herbs, mushrooms and plants. It is their proper combination, which define the type and properties of a created potion.
Below you will find a table, representing all the available Reagents, with a list of the effects they have on a potion (red color represents the negative effects, green is for the positive ones), as well as the place where you can find them:
Icon
Name
Effect
Place

Blessed Thistle
Restore Stamina
Increase Weapon Power
Speed
Ravage Health
Khenarthi's Roost

Blue Entoloma
Restore Health
Invisible
Lower Spell Power
Ravage Magicka
Khenarthi's Roost

Bugloss
Increase Spell Resist
Restore Health
Restore Magicka
Lower Spell Power
Khenarthi's Roost

Columbine
Restore Health
Restore Stamina
Restore Magicka
Unstoppable
Khenarthi's Roost

Corn Flower
Restore Magicka
Increase Spell Power
Detection
Ravage Health
Khenarthi's Roost

Dragonthorn
Increase Weapon Power
Restore Stamina
Weapon Critical
Lower Armor
Khenarthi's Roost

Emetic Russula
Ravage Health
Ravage Stamina
Ravage Magicka
Stun

Imp Stool
Increase Armor
Lower Weapon Power
Ravage Stamina
Lower Weapon Critical
Lady's Smock
Increase Spell Power
Restore Magicka
Spell Critical
Lower Spell Resist
Khenarthi's Roost

Luminous Rusula
Restore Health
Ravage Stamina
Lower Weapon Power
Reduce Speed
Khenarthi's Roost

Mountain Flower
Increase Armor
Restore Health
Restore Stamina
Lower Weapon Power
Khenarthi's Roost

Namira's Rot
Spell Critical
Invisible
Speed
Unstoppable

Nirnroot
Invisible
Ravage Health
Lower Weapon Critical
Lower Spell Critical
In a near vicinity of water sources.

Stinkhorn
Increase Weapon Power
Lower Armor
Ravage Health
Ravage Stamina

Violet Coprinus
Increase Spell Power
Lower Spell Resist
Ravage Health
Ravage Magicka
Khenarthi's Roost

Water Hyacinth
Restore Health
Weapon Critical
Spell Critical
Stun
Audiron

White Cap
Increase Spell Resist
Lower Spell Power
Ravage Magicka
Lower Spell Critical
Audiron

Wormwood
Weapon Critical
Detection
Unstoppable
Reduce Speed
Khenarthi's Roost
By simply finding a given Reagent, you won't be able to see its properties yet. To discover them, you have to combine and mix them with other Reagents, with similar properties - you cannot mix one Reagent contradicting the other, for instance the one increasing the weapon critical chance with the one reducing it, and so on.
By looking at the above table with all those Reagent's characteristics, you should have no problems with discovering their hidden properties. Below you can find a few examples of mixtures:
There are dozens of possible recipes, that is why there's no point in listing them here - especially because all you have to do is to mix Reagents with similar properties. All you have to remember is to not to mix Reagents contradicting each other (like was mentioned above) and try to make potions with properties that supplement each other and will be of use to you. There's no point to make a potion increasing your speed and Magicka, if you are playing a character fighting in melee range (so you won't be using the speed buff) and having little to no use of magicka, because all your skills require stamina.
Provisioning is the equivalent of a profession called Cooking, which is present in almost all today's MMO games (and not only them). It allows you to prepare food (and drinks), which, after consuming, increase a certain statistic (or a group of them) of your character for several minutes. Remember, that you can be under the influence of a single meal / drink only - you can't eat dozens of different types of food, expecting a gigantic boost to stats.
Provisioning is centered around the creation of products from two different groups:
Provisioning is perhaps the most complex of all the branches of crafting, with a close resemblance to other MMO games - it's the only branch of crafting in Elder Scrolls Online that requires you to learn a proper recipe (together with the required reagents, of course), which then allows you to create your item of interest.
The possibilities are vast, letting you create dozens and dozens of different products, some of which are bound to specific fraction you are playing. Additionally, Provisioning, because of the fact that everyone wants to have free, almost permanent stats, is probably the most profitable of the branches of crafting, which you should be especially interested in. Even if you won't be using the created eatables (which you definitely should do!), you can earn a mountain of gold by selling them to players who lacked the initiative to level up their Provisioning, or they simply were overwhelmed by the vast possibilities.
Below you will find a table describing all the abilities available to you in the Provisioning branch.
Icon
Name and Rank
Description of the ability
Requirements

Recipe Improvement I
Allows you to use the recipes up to the 19 level.
Provisioning 1

Recipe Improvement II
Allows you to use the recipes up to the 29 level.
Provisioning 20

Recipe Improvement III
Allows you to use the recipes up to the 39 level.
Provisioning 30

Recipe Improvement IV
Allows you to use the recipes up to the 49 level.
Recipe Improvement III

Recipe Improvement V
Allows you to use the recipes up to the 50 level.
Recipe Improvement IV

Recipe Improvement VI
Allows you to use the Veteran Rank recipes.
Recipe Improvement V

Recipe Quality I
Allows you to use the standard (green) recipes.
Provisioning 1

Recipe Quality II
Allows you to use the difficult (blue) recipes.
Provisioning 10

Recipe Quality III
Allows you to use the complex (purple) recipes.
Provisioning 35

Gourmand I
Adds 5 minutes to the duration of any eaten food.
Provisioning 3

Gourmand II
Adds 10 minutes to the duration of any eaten food.
Gourmand I
Gourmand III
Adds 20 minutes to the duration of any eaten food.
Gourmand II

Connoisseur I
Adds 5 minutes to the duration of any consumed drink.
Provisioning 5

Connoisseur II
Adds 10 minutes to the duration of any consumed drink.
Connoisseur I

Connoisseur III
Adds 20 minutes to the duration of any consumed drink.
Connoisseur II

Chef I
Allows you to create 1 extra serving for each food recipe made.
Provisioning 7

Chef II
Allows you to create 2 extra servings for each food recipe made.
Chef I
Chef III
Allows you to create 3 extra servings for each food recipe made.
Chef II
Brewer I
Allows you to create 1 extra serving for each drink recipe made.
Provisioning 7
Brewer II
Allows you to create 2 extra servings for each drink recipe made.
Brewer I
Brewer III
Allows you to create 3 extra servings for each drink recipe made.
Brewer II

Hireling I
After leaving the game, a Hireling will find Food or Drink ingredients for you. You can use your Hireling once every 24 hours.
Provisioning 28

Hireling II
After leaving the game, a Hireling will find Food or Drink ingredients for you. Your hireling has a higher chance of returning with Spices or Flavorings. You can use your Hireling once every 24 hours.
Hireling I

Hireling III
After leaving the game, a Hireling will find Food or Drink ingredients for you. Your hireling has a higher chance of returning with Spices or Flavorings. You can use your Hireling once every 12 hours.
Hireling II
And again, a vast number of abilities you need to invest points in. Just like with the Alchemy, it is advised that you invest your skill points in all of the abilities, if you want to create the best possible eatables, using up the least resources in the process:
Provisioning offers you a vast number of possible materials, from which you can create eatables. They are further divided into four groups:
Below you will find a table representing the list of all the primary ingredients available in the game, level required to use them, the type of a consumable they are used to produce and the faction, to which they are available:
Ingredient
Consumable type
Faction
Req. level
Shornhelm Grains
Beverage
Daggerfall Covenant
1
Capon Meat
Food
Daggerfall Covenant
1
Aged Meat
Beverage
Aldmeri Dominion
1
Pork
Food
Aldmeri Dominion
1
Snake Slime
Beverage
Ebonheart Pact
1
Goat Meat
Food
Ebonheart Pact
1
Iron Peat
Beverage
Daggerfall Covenant
5
Batttaglir Weeds
Food
Daggerfall Covenant
5
Dusk Beetle
Beverage
Aldmeri Dominion
5
Guar Egg
Food
Aldmeri Dominion
5
Snake Venom
Beverage
Ebonheart Pact
5
Kwama Egg
Food
Ebonheart Pact
5
Tangerine
Beverage
Daggerfall Covenant
10
Bear Haunch
Food
Daggerfall Covenant
10
Ripe Apple
Beverage
Aldmeri Dominion
10
Sweetmeats
Food
Aldmeri Dominion
10
Wild Honey
Beverage
Ebonheart Pact
10
Scuttie Meat
Food
Ebonheart Pact
10
Wasp Squezzings
Beverage
Daggerfall Covenant
15
Mutton Flank
Food
Daggerfall Covenant
15
Wisp Floss
Beverage
Aldmeri Dominion
15
Liver
Food
Aldmeri Dominion
15
Dragon's-Tongue Sap
Beverage
Ebonheart Pact
15
Plump Worms
Food
Ebonheart Pact
15
Dark Bile
Beverage
Daggerfall Covenant
20
Combwort
Food
Daggerfall Covenant
20
Pig's Milk
Beverage
Aldmeri Dominion
20
Goat Bits
Food
Aldmeri Dominion
20
Sujamma Berries
Beverage
Ebonheart Pact
20
Plump Rodent Toes
Food
Ebonheart Pact
20
Orc Hops
Beverage
Daggerfall Covenant
25
Venison
Food
Daggerfall Covenant
25
Glitter Rock
Beverage
Aldmeri Dominion
25
Moon Sugar
Food
Aldmeri Dominion
25
Comberry
Beverage
Ebonheart Pact
25
Plump Maggots
Food
Ebonheart Pact
25
Desert Heather
Beverage
Daggerfall Covenant
30
Horker Meat
Food
Daggerfall Covenant
30
Molasses
Beverage
Aldmeri Dominion
30
Crawdad
Food
Aldmeri Dominion
30
River Grapes
Beverage
Ebonheart Pact
30
Chaurus Meat
Food
Ebonheart Pact
30
Black Tea
Beverage
Daggerfall Covenant
35
Flank Steak
Food
Daggerfall Covenant
35
Spring Essence
Beverage
Aldmeri Dominion
35
Saltrice
Food
Aldmeri Dominion
35
Ash Millet
Beverage
Ebonheart Pact
35
Frog Legs
Food
Ebonheart Pact
35
Crystal Berry
Beverage
Global
40
Beef
Food
Global
40
Kaveh Beans
Beverage
Global
45
Shank
Food
Global
45
Mountain Berries
Beverage
Global
50
Mudcrab Meat
Food
Global
50
Bervez Fruit
Beverage
Global
5 Veteran Rank
Jazbay Grapes
Beverage
Global
5 Veteran Rank
Honey Comb
Food
Global
5 Veteran Rank
The ingredients from this group serve as the basis of all the products - they alone don't add any effect on the produced consumable, but they increase the power of the item - for instance, Capon Meat, with Meal, will increase your health by 42, where Guar Eggs with Meal will increase it by 66. The higher the level of the primary ingredient, the stronger the effects of a consumable.
They are used in all the recipes (from white to purple). A thing worth noting is that till 35 level there are 6 ingredients for every level threshold (2 available for every faction).
What it means, is that when you start using, for instance, 25 level primary ingredients (you are capable to find them and use them), there's no point in keeping the lower ones in your inventory / bank - you can just throw them away / sell them to someone. Items from this group are the easiest to acquire, meaning that they are the last valuable.
Primary ingredients can be found in all containers - barrels, chests, urns and alike.
Below you will find a list of all the secondary ingredients available in the game, the recipe level they are used in, the type of a created product and the effect you will receive after consuming them:
Ingredient
Consumable type
Required Level
Effect
Drippings
Grilled
1 - 15
Stamina Increase
Meal
Bread & Pie
1 - 15
Health Increase
Thin Broth
Soup & Stew
1 - 15
Magicka Increase
Brown Malt
Beer
1 - 15
Health Regeneration Increase
Corn Mash
Spirits
1 - 15
Stamina Regeneration Increase
Wine Grapes
Wine
1 - 15
Magicka Regeneration Increase
Cooking Fat
Grilled
20 - 25
Stamina Increase
Milled Flour
Bread & Pie
20 - 25
Health Increase
Broth
Soup & Stew
20 - 25
Magicka Increase
Amber Malt
Beer
20 - 25
Health Regeneration Increase
Wheat Mash
Spirits
20 - 25
Stamina Regeneration Increase
Grasa Grapes
Wine
20 - 25
Magicka Regeneration Increase
Suet
Grilled
30 - 35
Stamina Increase
Sifted Flour
Bread & Pie
30 - 35
Health Increase
Stock
Soup & Stew
30 - 35
Magicka Increase
Caramalt
Beer
30 - 35
Health Regeneration Increase
Oat Mash
Spirits
30 - 35
Stamina Regeneration Increase
Lado Grapes
Wine
30 - 35
Magicka Regeneration Increase
Lard
Grilled
40 - 45
Stamina Increase
Cake Flour
Bread & Pie
40 - 45
Health Increase
Jus
Soup & Stew
40 - 45
Magicka Increase
Wheat Malt
Beer
40 - 45
Health Regeneration Increase
Barley Mash
Spirits
40 - 45
Stamina Regeneration Increase
Camaralet Grapes
Wine
40 - 45
Magicka Regeneration Increase
Fatback
Grilled
50
Stamina Increase
Baker's Flour
Bread & Pie
50
Health Increase
Glace Viande
Soup & Stew
50
Magicka Increase
White Malt
Beer
50
Health Regeneration Increase
Rice Mash
Spirits
50
Stamina Regeneration Increase
Ribier Grapes
Wine
50
Magicka Regeneration Increase
Pinguis
Grilled
5 Veteran Rank
Stamina Increase
Imperial Flour
Bread & Pie
5 Veteran Rank
Health Increase
Imperial Stock
Soup & Stew
5 Veteran Rank
Magicka Increase
Imperial Mash
Beer
5 Veteran Rank
Health Regeneration Increase
Golden Malt
Spirits
5 Veteran Rank
Stamina Regeneration Increase
Emperor Grapes
Wine
5 Veteran Rank
Magicka Regeneration Increase
Ingredients from this group are used to add the first, primary effect of a consumable. Just like with the Primary Ingredients, there's no point in keeping lower level Secondary Ingredients if you can use the higher ones - when you are at 40th level, there's no point keeping all the lower levels, as you probably won't be using them anytime soon and all you will be doing would be getting rid of 18 slots in inventory / bank to keep them.
Ingredients from this group, like with the Primary ones, can be found inside containers, as well as by picking them up from a corpse of a slain enemy, or by getting them from a Hireling. You can also buy them at the Grocer.
Below you will find a table representing all the Blue Recipe Ingredients available in the game, the type of a created consumable, as well as the effect that will be added:
Ingredient
Type of consumable
Additional Effect
Salt
Grilled
Health Increase
Red Wheat
Bread & Pie
Magicka Increase
Onion
Soup & Stew
Stamina Increase
Hallertau Hops
Beer
Magicka Regeneration Increase
Snowberry
Spirits
Health Regeneration Increase
Concord Grapes
Wine
Stamina Regeneration Increase
Ingredients from this group are used to add a secondary effect to a consumable. With this, the created product can increase two different statistics, like Health and Magicka, instead of one.
Ingredients from this group are used in production of Blue and Purple recipes. To create a blue recipe, you will also need an ingredient from both the Primary and Secondary group. The created consumables get a slightly altered naming, gaining a prefix "Enriched", "Fortified", or "Invigorated", depending on the type of the end product.
The ingredients in this group are rarer and they are quite hard to find, they don't have a level range on which you can use them, meaning that they won't become useless and there's only 6 of them total, which is why it is highly advised for you to keep them for yourself, instead of throwing them out or selling. Just like the other ones, you can find them inside containers and with the help of your Hireling.
Below you will find a table representing all the Purple Recipe Ingredients available in the game, the type of a created consumable, as well as the effect that will be added:
Ingredient
Type of consumable
Garlic and Pepper
Grilled
Barley and Oats
Bread & Pie
Potato and Tomato
Soup & Stew
Hops and Saaz Hops
Beer
Juniper Berry and Canis Root
Spirits
White Grapes and Jazbay Grapes
Wine
Ingredients from this group are used to upgrade the recipe and the end product - after making a purple recipe consumable, it will increase all 3 statistics at the same time. Products in the table are grouped up because they are never used alone, only in those specific pairs.
Ingredients from this group are used only during the creation of purple recipes. To create one, you will need Primary, Secondary, Blue Recipe and two of Purple Recipe ingredients, totaling at 5 materials to make the best consumable. Created products get the prefix "Consummate".
Purple Recipe Ingredients are the rarest in the game, meaning that they are the most valuable, as they allow you to make the most powerful Provisioning products. Just like the previous group, they have no range of levels on which you can use them and there's only 12 of them, which is why you should keep them for yourself, instead of selling them away. Just like the other ones, you can find them inside containers and with the help of your Hireling.
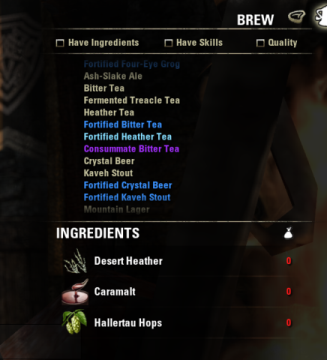 The screen represents a section of the Provisioning window
Because there amount of available products in Provisioning is so vast, there's no point in listing them here - especially because the Provisioning window is easy to understand, shows which ingredients are required and what type of item you create. Unlike other branches of crafting, you will also need a recipe to create any of them (aside from investing the skill points, obviously), which (unless you buy them from someone) are generated randomly.
Production of consumables is a fairly simple process - all you have to do is to find a proper place (Cooking Fire) and you can begin. To create the simplest (all the way to green) you will only need Primary and Secondary ingredients. You will be able to create all the recipes available in the game (besides blue and purple), but it will only have one consumable effect.
To add another one (or more), you will need to use blue (2 effects) and / or purple (3 effects) recipes, but you will need a greater amount of materials to be able to make them.
Let's look at the 5th Veteran Rank food called Sweetroll. To create it, you need two ingredients : Honey Comb (Primary) and Imperial Flour (Secondary). The created consumable (Sweetroll) will increase your maximum Health by 372 for 35minutes. You can ''upgrade" this product, using the blue version of the recipe. To the earlier ingredients (Honey Comb and Imperial Flour), you can add Salt, which will result in an Enriched Sweetroll, now increasing your Health AND Stamina by 372 for 35min upon consuming.
To further upgrade the product, you can use the purple version of the recipe and to the previous combination add Potato and Tomato (remember, Purple Ingredients are used in pairs, not alone). With this, the end product will be Consummate Sweetroll, increasing your Health, Stamina AND Magicka by 372 for 35min upon consuming.
All the products in Provisioning (as well as Beverages) work in a similar manner. As you can see, gaining a maximum level in this profession does not require you to have dozens of ingredients to create interesting consumables - creating a product that will increase all your stats requires 5 ingredients only (and with proper abilities you can increase the duration and amount of consumables created). If you need only one statistic, you have to use 2 ingredients only to create it!
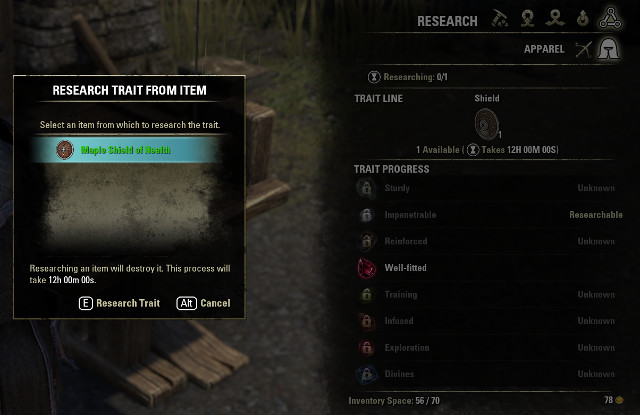 Trait discovery for Woodworking.
Traits are special properties added to a created item (or already present on a one you found), which offer a great deal of different bonuses. To gain access to them, you will have to research it first (which was explained in the previous sections, as well as in the "Elder Scrolls Online in 10 easy steps"). To make matters worse, you have to discover the traits for each and every item alone (each part and type of armor and weapon). Traits are available to Blacksmithing, Clothing and Woodworking.
To discover an interesting trait, activate the crafting station responsible for a given branch of crafting and get inside the last panel (resembling a triangle), select the item with the desired trait and start the process of discovering. Remember, that you will lose the item in the process. After it ends, you can add this specific trait to the same piece of equipment you took it from.
A thing worth noting, is that Traits and Glyphs from Enchanting do not exclude each other - you can use both of them on a single item. Below you will find a number of tables describing each trait and an item needed to be able to add it on a crafted equipment.
For weapons:
Icon
Name
Trait - description

Amethyst
Charged - increases enchantment charges.

Carnelian
Training - Increase Weapon Skill line experience with this weapon type

Chysolite
Powered - Reduces the cooldown of weapon enchantments.

Citrine
Weighted - Increase weapon attack speed

Fire Opal
Sharpened - Increase Armor and Spell Penetration by

Jade
Infused - Increase weapon enchantment effect

Ruby
Precise - Increase Weapon and Spell Critical values

Turquoise
Defending - Increases total Armor and Spell Resistance
For armor:
Icon
Name
Trait - description

Sapphire
Divines - increases Mundus Stone effects.

Garnet
Exploration - Increase exploration experience gained.

Diamond
Impenetrable - Increase resistance to Critical hits.

Bloodstone
Infused - Increase armor Enchantment effect.

Sardonyx
Reinforced - Increases armor.

Quartz
Sturdy - Chance to avoid decay when defeated.

Emerald
Training - Increase Armor Skill line experience with this armor type.

Almandine
Well-Fitted - Reduces the cost of Sprinting.
Remember, that the value of a Trait added on a weapon and / or a piece of armor differs between various quality of items. For instance, adding the Trait Reinforced (by using the Sardonyx stone) on a piece of armor, value of the trait (increase in armor and magic resistance) will look like this: 4% / 5% / 6% / 7% respectively to items with white / green / blue / purple quality.
Deconstruction of a weapon.
Leveling up crafting must be divided into a number of groups, because not all of them offer the same possibilities.
The first three (Blacksmithing, Woodworking, Clothing) offer two different approaches: creating items and deconstructing them. Unfortunately, colleting (and processing) crafting materials yields no experience into the branch of crafting. Paradoxically, you gain more experience from deconstructing, than from making stuff.
Creating items, to gain experience in a branch of crafting, is useful only on the lower levels, when you don't have access to a vast number of items which can be deconstructed. Use this process to get through the "first two levels" of crafting materials available to this three branches of crafting. Those are:
The best solution (offering the most experience with the least costs in crafting materials), during the early levels, is to create items from the worst material (Iron for Blacksmithing, Jute and Rawhide for Clothing, Maple for Woodworking), crafting it on the highest possible level.
For instance - crafting Jute Boots:
As you can see on the above comparison, to create the highest level item (with the worst material) you have to use a little more than double quantity of crafting materials, receiving over four times the experience in return. It looks the same in Blacksmithing and Woodworking.
After getting to the "third" material in those 3 branches of crafting, you can forget about crafting stuff to level up - all you have to do is to deconstruct items now.
By deconstructing items, besides gaining a lot if crafting materials (which was mentioned in previous sections), you will earn huge amounts of experience for the corresponding branch of crafting. Given the fact that from the 30th level of experience you will be literally flooded with items (most of which are useless to you), you can advance your crafting very fast.
Remember that you can deconstruct your own created items - but they yield little experience. You will gain the most from the items received as quests rewards.
In regards to Enchanting, to level it up, you will have to spend the most time, because it's hard to get all the necessary materials to be able to create Glyphs - the process of collecting runes yields no experience. You can also deconstruct already created (or picked up) Glyphs, to gain some experience and (with a bit of luck) some Runestones.
Those two branches are the easiest to advance through - you can only level them up by making items. Fortunately, it's a lot easier to find materials to make items from those branches, you need less of them for a single item (ranging from 2 to 5, unlike Blacksmithing / Clothing / Woodworking, where you need over a dozen for a single item) and both the professions level up a lot faster than all the others.

 The Chronicles of Narnia Game Guide & Walkthrough
 The Amazing Spider-Man Game Guide & Walkthrough
 The Godfather Game Guide & Walkthrough
 The Cave Game Guide & Walkthrough
 The Last of Us Game Guide & Walkthrough