A guide to Guild Wars 2 is an ideal solution for players who begin their journey with the product of ArenaNet. It contains crucial information about how to begin the game, game's mechanic and rivalry with other players. In this guide you may also find detailed maps with all important objects and heroes in the game's world.
Guide to Guild Wars 2 is a:
Slawomir Michniewski
First thing you have to do after logging to the game is a choose of the world (server). If you want to play with your friends, all of you should choose the same one. Thanks to that you'll be able to trade and help in quests. Remember that chosen world will be used by all of your characters, you can't have heroes on different servers. In case of mistake, you can change the server but, you need to pay for this.
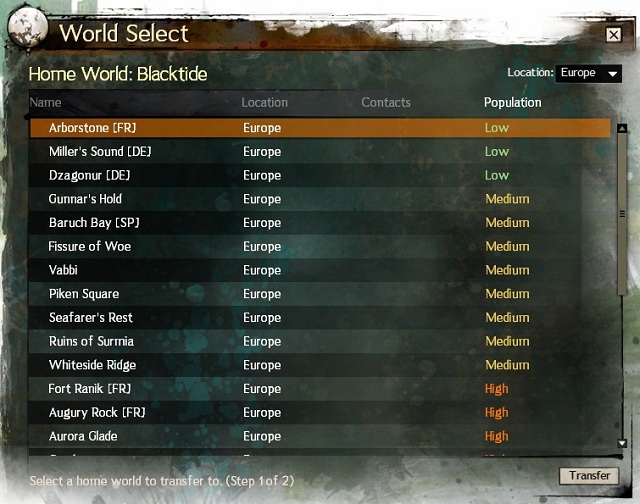
Choose of the server is one of the most crucial beginning decision.
When you chose the world, you come to the most important decision: creating your character. You have five available races: Human, Asura, Norn, Sylvari and Charr. This choice affects only availability of the storyline mission and few skills.
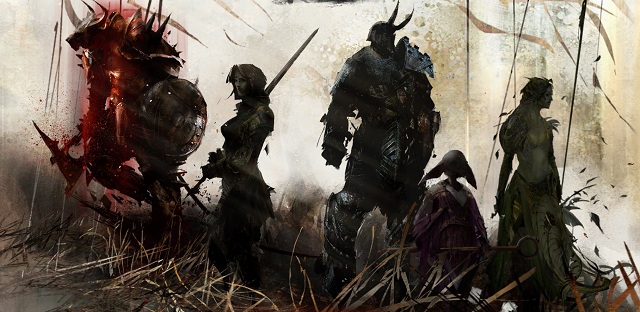
The choose of race is a matter of taste: none of them has any advantage, though they have unique skills.
The nest step is a choice of one available profession:
 Elementalist
Wizard using elements: fire, air, earth and water. He uses mostly magic distance weapon and light armor.
 Ranger
He uses traps and animals' support. They're wearing medium armors and fight both melee and on the distance.
 Warrior
His basic task is to deal huge amount of damages. To do so he uses both melee and distance weapons, covered with heavy armor.
 Necromancer
He summons, poisons, curses and bleeds out enemies. He can use magic distance weapon, daggers or axes. He wears a light armor.
 Guardian
He focuses on the defense skills. He's best in groups, but can fight alone too. He uses melee weapons and heavy armors.
 Thief
ThiefThe most mobile profession. Attacks from the shadow, uses traps, swords, daggers and distance weapon. He wears light armor.
 Engineer
In fight he sets up towers and mines, throws grenades and buff himself (and allies) with potions. He uses pistols, shotguns and medium armors.
MesmerHe uses illusions to confuse and hurt enemies. He can use various weapons and light armor.
After choosing the race, profession and the customizing physical appearance you move to the last part of character's creation: choice of the starting equipment, personality and biography. Beginning items will be used only during the few first levels, personality affects the conversation you will have with the NPCs. The biography is more important because it defines the available missions and challenges. Near to the 30th level different paths cross.
How to play with friends? After finishing the tutorial, when you have an access to your race's capitol, you need to find an Asura gate. Going through it you get to the Lion's Arch and from this place all you need is to choose the proper portal and enter the location with your friends.
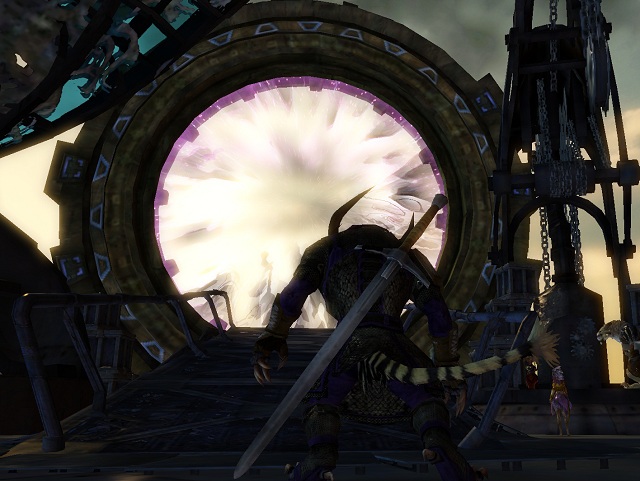
Asura Gates allow to move quickly between the cities.
The other possibility is to press H key and in the last bookmark (PvP) choose Go to the Mists. You'll get to the PvP location for the beginners and your task would be an Asura Portal on the top of the stairs. After getting there go to the gate on your left, which leads to the Lion's Arch. From this place you have to move to the group of portals by Grand Piazza and then choose a location where your friends are.
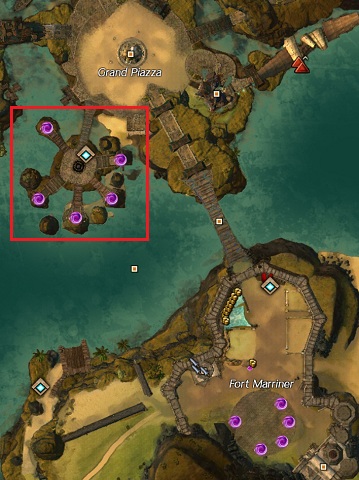
Marked portals lead to the beginning location.
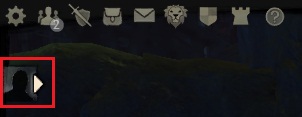
The next step which makes the communication easier is to set up a team. To do so, click on the icon on the left side of the screen, insert the name of friend's character and send an invitation. From now on you can use team's chat and complete the storyline missions in few persons.
Unfortunately, we won't be able to meet our friend any time what is connected with the overflow. When our world (server) is full, you character will be send to so called overflow map, the identical location in which you should be but with players from different servers. To check if you're on such a map you need to press B key: if the statistics of WvW don't load, it means that your server is overflow. There can be few overflow location at once so to join friends in other overflows click their icon with the RMB and then click join. Far more secure choice is to wait the queue and choose travel when it's available.
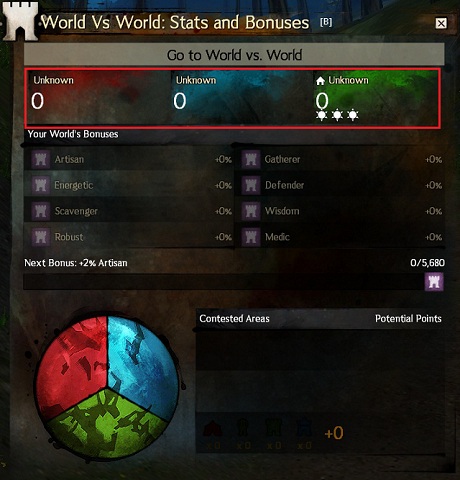 Lack of statistics about WvW means that you're in the overflow location.
On the contrary to other MMOs, you don't find typical quests offered by the NPCs in the Guild Wars 2. Instead of that, you have two types of missions: hearts, showing the area which needs our help and dynamic events.


Heart (uncompleted, completed)


Waypoint (undiscovered, discovered, blocked)


Point of interest (undiscovered, discovered)


Skill challenge (locked, unlocked)
Vista

Scout
Hearts are missions which should help you get familiar with the location. Information about them is usually displayed in the right upper corner of the screen; in rare cases you need to speak to the proper person first. Completing this quests help you discover the vicinity, enemies and meet NPCs, like merchants and guards. Quests are various, you may be asked to collect minerals, kill monsters, be a mediator in a trade between giants or help repair some machines. After completing quest you can go to the vicinity's governor and buy new items for freshly received karma.
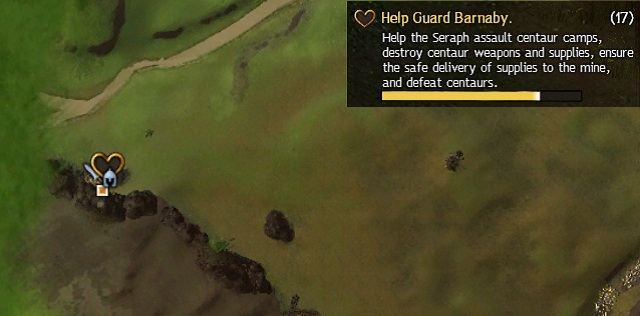
Heart with an exemplary description.
On your way you may often meet scouts marked with a spyglass. Conversation with them reveals all uncompleted missions in the vicinity. It's an easy method of finding missions and exploring the map.
The second type of missions in the Guild Wars 2, which are the core of PvE (Player versus Environment) is dynamic events. There are hundreds of them in the game, and they differ greatly: from collecting ore, through rescuing captives, ending on big invasions. The most important feature of events is their influence on the map. If the city nearby is besieged, you can help defenders or ignore it totally. If the enemies win, you not only lose access to the area, but it's possible that the next place will be attacked. In this way every event in which you take part, influences which locations will be safe and which under the enemy's reign.
Events divide on few types: collecting resources, defending (location, machines or NPCs), exterminating enemies or killing the particular character. It's not rare that the chain of events will include few activities: defending the city and counterattack ended by the duel with the enemy's champion, defeating whom opens chest full of treasures. Besides the loot, you receive, as in the case of hearts, proper amount of experience, karma and money for every event.
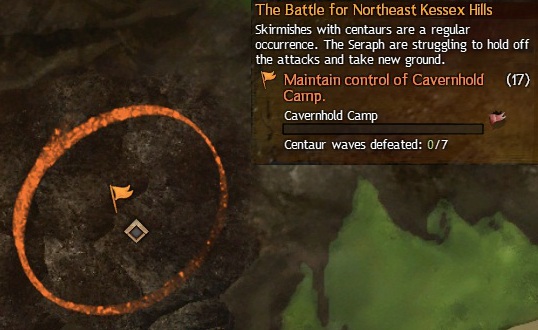 Events are marked on the map. Thanks to that every player may easily find them.
 Besides events you can find waypoints, vistas, points of interest and skill point challenge.
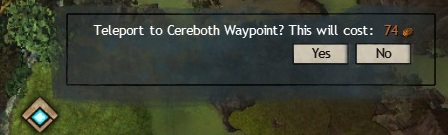
Waypoints, according to its name, help us travel. You activate them by approaching and after a small payment you can teleport to any unlocked location.
Vistas are something like puzzles, basing on finding a proper way to the view point: part of them is very easy, some requires longer journey and sometimes even defeating dozen monsters. As a reward you get a short animation showing the vicinity.
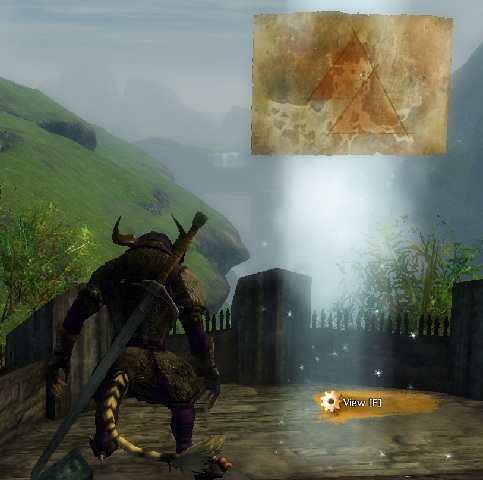 Vistas show you the vicinity, but sometimes you have to do a lot of jumping.
 Points of interest (POI) are different locations which are or were important for the Tyria's history. Their only function is increasing the level of map discovery.
Skill challenges are the last type of icons on the map. Completing them gives you additional skill point. Sometimes it's enough to get to the location and activate the point, sometimes you need to use the item you have. But part of challenges is more difficult and lies in fighting with much more powerful enemy. In such case better go to the location in a group, what improves your chances.

Completing hearts, vistas and skill challenges increases map discovery level. After filling it, you get a chest with reward. Remember that rewards for completing locations with hearts are better than for the locations without.
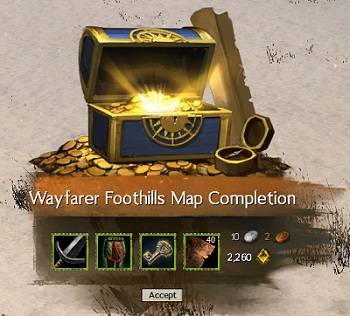 It's worth to discover a whole map, because rewards may be powerful.
Combat in Guild Wars 2 is partially similar to those from other MMOs: you aim an enemy, active skills and your character prepare spell/pistol/sword and attack. Although every player should get to know few details.
Every skill has its own range, out if which isn't effective. This distance is shown by the red underline under every available attack. It's presence mean that the enemy is impossible to hit. When there is no underline, the skill will be working.

Besides that, if you want to make a efficient attack, you have to have a clear vision: if any obstacle is on your way, it will be hit instead of the enemy. It works both ways, so you can hide behind columns for example.
Another method to avoid attacks is evading. You can use them in two ways: clicking two times on the movement key or pressing the V key. Mastering it let you avoid the most powerful attacks or escape during the PvP duels. Unfortunately, using it consumes your endurance: if the bar is full, you can avoid two attacks in a row.

If nor hiding either evading isn't working and your health is decreased to zero, your adventure isn't over. Your character will lay on the ground bit still fighting to survive. In this state you have four abilities: three depending on your class and healing. If you are able to defeat enemy, or heal yourself completely, your hero will stand up and continue the game. Otherwise you'll die. In this case you can wait for anyone help's or respawn at waypoint.
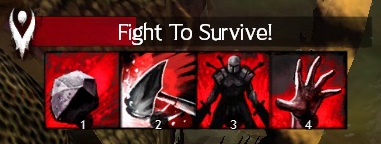 Skill bar of warrior fighting to survive.
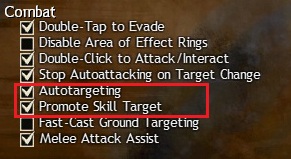
There are few options which may make your game and control over combat easier. One of them is activating the autoattack on some skills. It the enemy gets into the range of your skill, hero will be repeating the skill until enemy gets out of the range or dies. Hold CTRL and press RMB on the skill's icon to activate it.

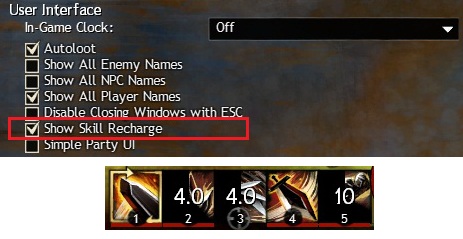
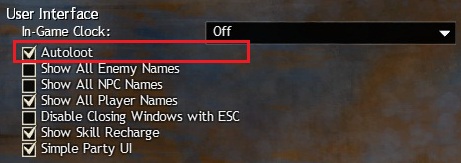
Second, very useful option, is a Show Skill Recharge. It's in the game's option. From now on you see how many seconds is needed to use the skill again.
Last two useful options are autotarget and promote skill target. First one let you cast spell without aiming an enemy, it'll hit the closest one. The second one is an expansion of the first: after hitting an enemy, it'll be automatically targeted and all skills from this moment will be aimed at him. Those options are very helpful in PvP, WvW or quickly clearing the area from monsters. The only one place where using them may be risky are the locations with huge density of enemies. In such case you should choose targets manually.
In Guild Wars 2 as in the most of MMOs you meet a developed system of crafting. First step is to find components which you can collect by available tools (axes, pickaxes and salvage kit). You can find them in most merchants' offers. During your journey you'll also find an ore and saplings: collect all materials even if you don't need them, you can always trade them. Remember that the resources are available for all players (like chests) so it's impossible to steal the loot from anyone. When you fulfill your equipment, and go to the city sell your loot, you should visit trainers and choose two professions (you can change them later without losing levels, but for a small payment) You can choose from:
 Armorsmith
 heavy armors, chests, runes
 Artificer
magic weapons, staffs, seals
 Cook
Cook cooking
 Huntsman
 bows and fire-arms
 Jeweler
 jewellery and seals
 Leatherworker
 medium armors, runes, sacs
 Tailor
 light armors, runes, sacs
 Weaponsmith
 melee weapons, shields, runes
After choosing your profession you can use the stand by your teacher and craft your first items. With the advanced schemes, your experience will be increasing what expands available recipes. On average on every 25 levels you obtain few new recipes. If you want more, you can buy them from the teacher (they cost karma) or discover using the bookmark discovery. Use the all available items and soon you discover new recipe.
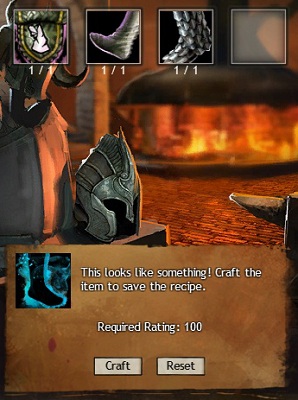 Discovery bookmark let you craft new items.
 Remember that from the production window you have an access to the bank and collections bookmark: there you can store surplus of resources.
Damage, control, support - those three factors decide about encounters in the Guild Wars 2. Mastering every of them let you fulfil the challenges and fight effectively with other players in PvP and WvW.
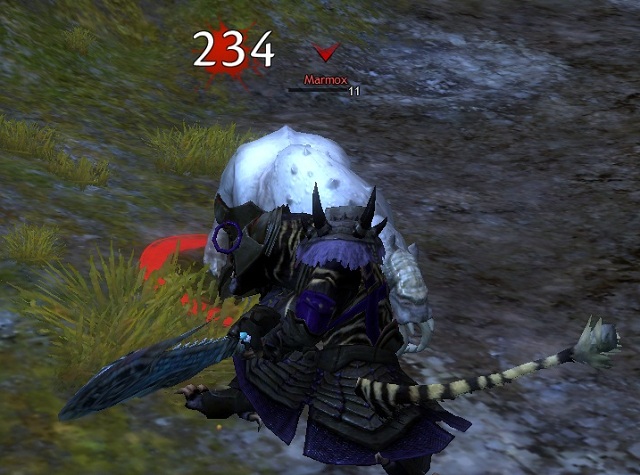
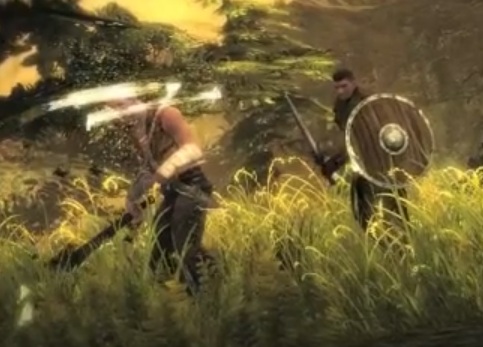 Dazed enemy won't run too far: controlling enemy's action is a base of PvP.
Damage per second is one of the most important factor of almost every MMO. Also in Guild Wars 2: all professions may attack enemies directly and every of them may become so called damage dealer, a hero concentrated only on damaging. Of course, classes differ: necromancers poison, elementalists burn and warrior bleeds enemies out. But id doesn't change the basic assumption that every hero can specialize in killing enemies.
For better eliminating enemies, you have to know what factors affect damage and how you can defend against them. Following paragraphs are dedicated only to those topic, but I recommend to read them all players, even those concentrated on control or support, because this information may help them survive.
First option of dealing damage is a direct fight, with use of some weapon. Independently of your class, every attack follows the same rules. using of your weapon's skill you begin series of calculation. The first one is: did I hit an enemy? In most cases, the target out of your range or hiding behind obstacles will avoid damage. What is more, you can evade an attack with dodge, block (skill of shields and few weapons) or blinding the enemy.
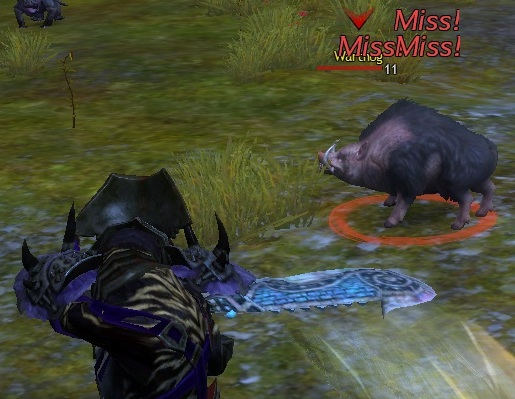 Bad positioning during the encounter may cause a miss.
 When the hit is confirmed, it's time to ask: how many damage you did? Majority of attacks will cause normal damage: your attack will be compared with enemy's armor, and the damage will be calculated and displayed. But you can affect quality of your hits. You can increase damage by investing in critical chance and critical damage (connected with precision and fury) as well as causing vulnerability. You can decrease the received damage by casting weakness on enemies and support allies with skills having protection bonus. In case of hunter and thief you can increase power of some skills by attacking from back or side, what is called a flanking. The last one method of decreasing damage is available only for computer controlled heroes: while attacking monsters with at least seven more levels, your attacks will be less effectively (an effect similar to the weakness).
Damage dealer should invest in a critical chance and damage.
The second, equally important method of causing damage is using spells applying proper effects. Poison, burning, bleeding: they may be even stronger than the normal attacks. Investing in condition damage and condition duration increases the power and time of those effects. What is more, you can improve them with another effect, vulnerability. There are also two more indirect methods of damaging enemies: confusion and retaliation. First one affects enemies: every action he makes, damages him. The second one is a bonus for allies, which makes part of the caused damage returns to the attacker.
 Enemy won't run away - he'll bleed to death.
 Besides those methods above, you can find few indirect tricks to reduce received damage. Usually, it's about immobilizing or freezing the enemy: such an opponent attacks slower and won't reach you, if he can't move (they'll be described in the next chapter). Also negative effects can be decreased or even cancelled with remove condition skills. The last and most powerful method is using a skill providing temporarily invulnerability. Such skills are very rare and have long preparing time, but they makes you untouchable for few seconds, the perfect tool when you're in a big trouble.
Below you can find a chart summing up methods of both, decreasing and increasing damage:
Decreasing damage
Increasing damage
Moving on the battlefield (range/obstacles)
Flanking
Dodge
Block
Armor
Attack
Glancing hit (weakness, 7+ more levels)
Critical hit (fury bonus)
Bonus protection
Vulnerability
Remove condition skill
Poison/burning/bleeding condition
Invulnerability
Control
Control
It's second most important, next to the damage, mechanics used in Guild Wars 2. Control of an encounter lies in manipulating over enemy's damage and temporarily eliminating him from the combat. Such effects are applied by the skills, but the more powerful effect, the less often you can use the skill.

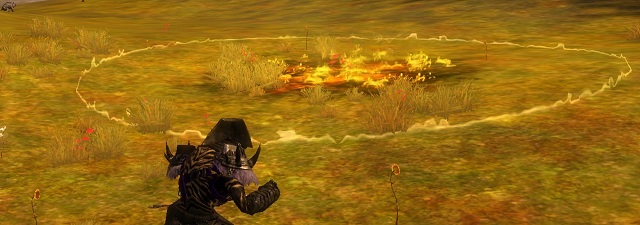
Area fire is also a control method.
Control methods can be divided on few types. First and most common one is a movement control. here you can find effects like cripple or immobilize which slow enemy down or completely stop him, but don't affect his attack; sink and float change his position in underwater combat, wards blocks the passages and, indirectly, the area skills: casting lot of area damage spells or using siege engines may force enemy to leave the particular place.
The second type is enemy's damage control. Blind, chilled, weakness, daze decrease effectiveness or frequency of opponent's attacks. Confusion and retaliation forced him to think: is it worth to lose my HP to damage enemy? What is more, skills like for example shield of absorption can block or reflect attacks.
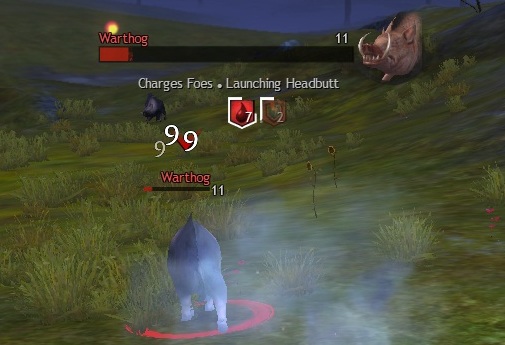
More powerful skills can control both enemy's movement and damage. Those are: fear, forcing enemy to run away, push, launch and pull, interrupting the skills and moving the enemy and also knockdown and stun which daze him (what can be leveled by the break from stun skills).
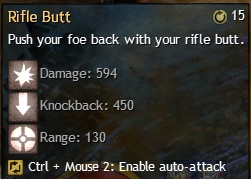 Riffle butt hit knockback your enemy.
Another type of affecting the combat method is enemy's healing control/active defense control. Poison not only damage enemy, but also decreases the effectiveness of healing spells casted on him when the weakness slows down regeneration of endurance.
There exist also an aggro control, used in the PvE. It is focusing enemies' attention on one player, what let the rest of the team fight freely. Due to the lack of strong healing spells in Guild Wars 2, heroes using this tactic should replace often.
It's last but not unimportant mechanic in the combat, which relies on cooperation of the whole team. It contains healing and buffing as well as some more active actions like blocking the enemy and intercepting his attacks. Some of the traits are also a support. E.g. the warrior's empower allies increases all allies power about 70.
There is one more support mechanic: combo, which lies on joining two different skills combo field and combo finisher to cause an additional effects.
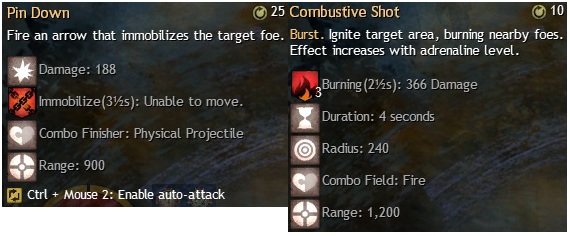 Pointing at the skill you will know if it's a field or finisher.
 Combo field is one of the area skill. This can be firewall, poison spots, fog or symbols on the ground. Form the field type depends if and what effect will be caused by the finisher: fire will burn enemies, water heals allies and dark necromancer's magic blinds enemy or drain his life.
Every finisher going through the combo field causes a combo.
Combo finishers are finishing skill. They divide on blast finisher (area effect), leap finisher (jump to attack enemy), projectile finisher (a missile flying through the combo field) and whirl finisher. Depending on what combo field and combo finisher you've used, you can achieve different effects, affecting both your hero (healing, magic armor) and enemy (burning, poison, blind).
Below you can find a table with all possible combinations:
Field
Blast
Leap
Projectile
Whirl
Dark
Area blindness
Blindness
Life stealing
Leeching bolts
Ethereal
Area chaos armor(3s)
Chaos armor(5s)
Confusion
Confusing bolts
Fire
Area might(x3)
Fire armor
Burning
Burning bolts
Ice
Area frost armor
Frost armor
Chilled
Chilling bolts
Light
Area retaliation
Retaliation
Remove condition
Cleansing bolts
Lightning
Area swiftness
Dazing strike
Vulnerability
Brutal bolts
Poison
Area weakness
Weakness
Poison
Poison bolts
Smoke
Area stealth
Stealth
Blindness
Blinding bolts
Water
Area healing
Healing
Regeneration
Healing bolts
As in the other MMOs in Guild Wars 2 you can find tens effect which may impact allies and enemies. Popular buffs and debuffs are here called boons and conditions. In many cases applying the same effect will improve its effectiveness (more damage, bigger bonus to strength) or extend its time. Below you can find a table with the most common effects in the game and short description.
Bonuses increasing a hero's effectiveness in battle or providing better protection. Can be prolonged by increasing the boon duration.
Name
Effect

Aegis
Blocks the next attack.

Fury
+20% to critical chance. Multiple increases duration..

Might
Increases power and condition damage. Multiple increases effectiveness.

Protection
- 33% to received damage. Multiple increases duration.

Regeneration
Regenerates hit points. Multiple increases duration.

Retaliation
A part of received damage is returned to the attacker. Multiple increases duration.

Stability
Resistance for: knockdown, push, pull, launch, stun, daze, float, sink, fear.

Swiftness
+33% to speed. Multiple elongates time of lasting.

Vigor
Increases regeneration of endurance. Multiple increases duration.
Negative effects which can be applied on enemies. They role is to cause damage or decrease enemy's effectiveness. Both time of lasting and power can be improved by increasing condition duration and condition damage.
Name
Effect

Bleeding
Causes damage per second. Multiple increases effectiveness.

Blind
Next attack the hero will make will be a miss.

Burning
Causes damage per second. Multiple increases duration.

Chilled
Decreases hero's speed and skill recharge about 66%. Multiple increases duration.

Confusion
Causes damage every time hero use any skill. Multiple increases effectiveness.

Crippled
-50% to hero's speed. Multiple increases duration.

Fear
Force enemy to run away.

Immobilized
Immobilize enemy and make him impossible to dodge. Multiple increases duration.

Poison
Causes damage per second. -33% to healing spells' effectiveness. Multiple increases duration.

Vulnerability
+1% to received damage. Multiple increases effectiveness.

Weakness
50% attacks are glancing hits (less damage) and -50% to endurance regeneration. Multiple increases duration.
Aim of this effect is to translocate or eliminate the enemy from the combat for a while. Some of them are included to the categories above. Below you can find only those don't belonging to any of them.
Name
Effect

Daze
Interrupts and makes impossible to use skills.

Float
Used underwater. Rises enemy up to the surface.

Knockdown
Knocks enemy down and block off using skills.

Launch
Interrupts skill and eject enemy.
Pull
Pulls enemy to you and interrupts the used skill.

Push
Pushes enemy from you and interrupts the used skill.

Sink
Used underwater. Enemy is going down to the bottom.

Stun
Interrupts, makes impossible to use skills and immobilizes enemy.
Undergrounds are optional PvE locations, which require perfectly tuned teams with powerful items as rewards and tokens which can be exchanged for an exotic weapon or armor. They're also one of the stage to craft the legendary weapon.
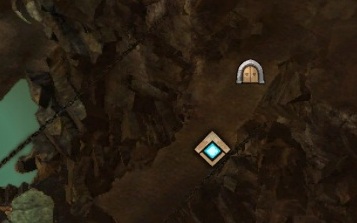 Entrances to the undergrounds lies often nearby the navigation points.
At this moment there are eight undergrounds in the game:
Undergrounds
Story mode level
Exploration mode level
Location
Ascalonian Catacombs
30
35
Phasmatis Corridor
Plains of Ashford
Caudecus's Manor
40
45
Shire of Beetletun
Queensdale
Twilight Arbor
50
55
Wychmire Swamp
Caledon Forest
Sorrow's Embrace
60
65
Tribulation Rift
Dredgehaunt Cliffs
Citadel of Flame
70
75
The Baelfire
Fireheart Rise
Honor of the Waves
76
80
Watchful Fjord
Frostgorge Sound
Crucible of Eternity
78
80
Infinite Coil Reactor
Mount Maelstrom
Arah
80
80
The Narthex
Cursed Shore
Before going on, you can choose between two game modes: story mode and exploration mode. They are briefly described in the following paragraphs.
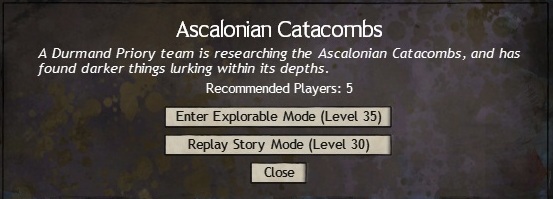
Only available mode at the first attempt to the underground. Some NPCs will join your team and tell about the history of Destiny's Edge. Difficulty level isn't high in this case and even playing with the new friends you can achieve a success. Completing the story mode unlocks an access to the exploration mode.
It's the main mode of the game, where you collect tokens and can search all, previously unavailable, parts of the dungeon. It's much more difficult than the previous one and requires better teamplay, proper skills and equipment. In this mode the team may decide which quests you should complete (there is a vote, the majority decides) and run into typical random events like cave troll attack. Thanks to the randomness of events and few available paths you can replay every underground, getting a new adventure each time.
It's worth be mentioning that monsters in the dungeon don't respawn and the new waypoints are periodically unlocked. Team members can be changed any time, and those who didn't complete the story mode may take part in the exploration mode if they're invited by the player who did.
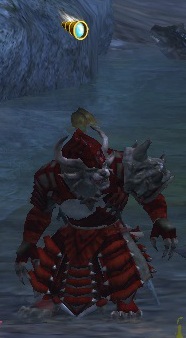
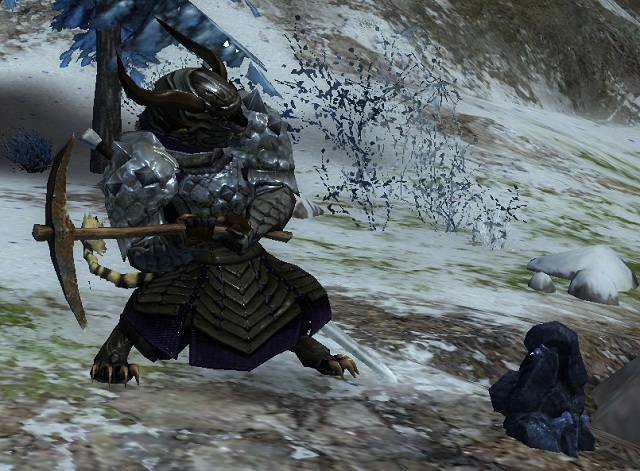
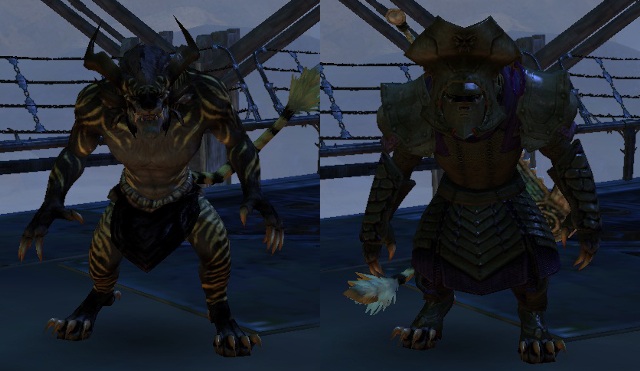
As I mentioned, the most important motivation of going to the undergrounds are rewards. During the exploration you find not only loot from defeated enemies and chests full of treasures, but also various tokens, depending on the underground you're in. They can be exchanged at traders in Lion's Arch in the Fort Mariner for rare or exotic items related to the particular dungeon. So while exploring the Citadel of Flame you get mostly equipment connected with the fire: armors with Baelfire rune or flaming swords and axes. But remember, that the weapon you can buy, won't be more powerful from the one you can craft or find in the other location, their main value is an unique appearance.
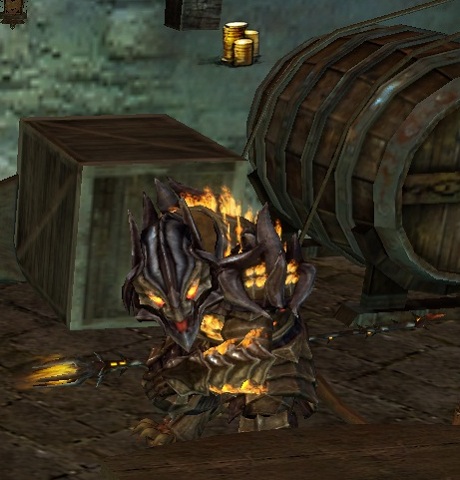 Trader wearing full armor from Citadel of Flame. For few hundreds of tokens you can get it too.
 Undergrounds are perfect for increasing your ability in fighting with the most powerful enemies in the PvE and also get tones of items for trade and dismantle. What is more, tokens encourage to complete undergrounds many times: everyone wants to look uniquely.
sPvP what stands for structured Player versus Player are duels on small arenas, similar to Quake or Counter-Strike, but using the mechanism of Guild Wars 2. To try yourself with other player press H key, choose the bookmark PvP and the option Go to the Heart of the Mists. You will be teleported to Hall of Memories, automatically equipped, obtained 80 lvl and access all skills. Thanks to that, all players have equal chances and the equipment won't decide who'll win. To begin the duel choose the arena at PvP Browser:
Winning gives you glory points which can be transferred for prettier (but not stronger) weapon or armor. If the received weapon doesn't suit you, you can change it at any merchant in the Hall of Memories.
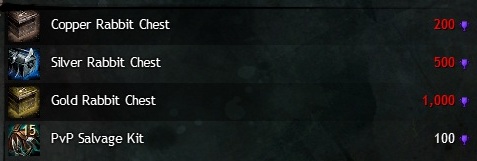 Lowest level rewards available to buy for the glory points.
Tournaments are better organized form of PvP. On the contrary to the normal encounters, here the team of five players fight. Thanks to various types of tournaments, it's a mode both for beginners and veterans. To begin a tournament you need to talk with Tournament Master.
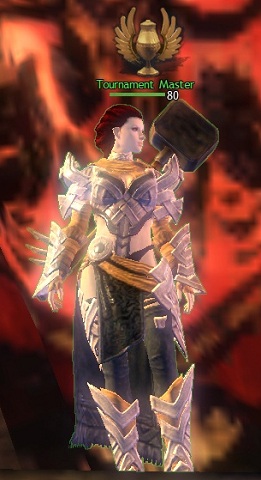 Tournament Master organizes the tournaments.
There are four types of tournaments in the game:
WvW stands for World versus World, which is a second mechanism of fighting with the living player. In this case, instead of fighting on small arenas, battles take place on a huge maps where dozens of players fight simultaneously. As in the PvP your lvl is raised to 80, but you have an access to skills you've already learned and equipment you've found. Because of that you should play in WvW after getting powerful items and skills during normal PvE missions.
To begin WvW press B key and choose Go to World vs World. You'll be transferred to the chosen map. The second option is to use the proper Asure's Gate from Lion's Arch inside the Fort Marriner.
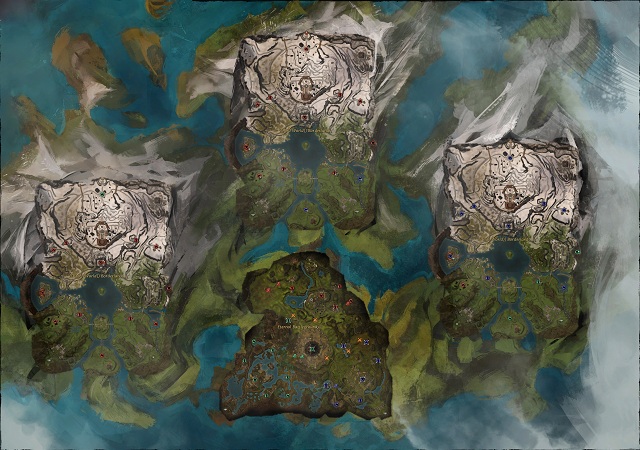
In one WvW three worlds-servers take part.
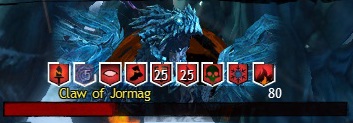
The main goal of the WvW is a victory over the two remaining worlds with which you're fighting. To do so, you have to conquer various locations: camps, towers and castles which will give you XP every fifteen minutes. After end of the battle, the world with highest XP is a winner. What is more, those XPs provide various bonuses (heath, gathering, crafting) which affect both WvW and PvE. So try to be on the winning server.
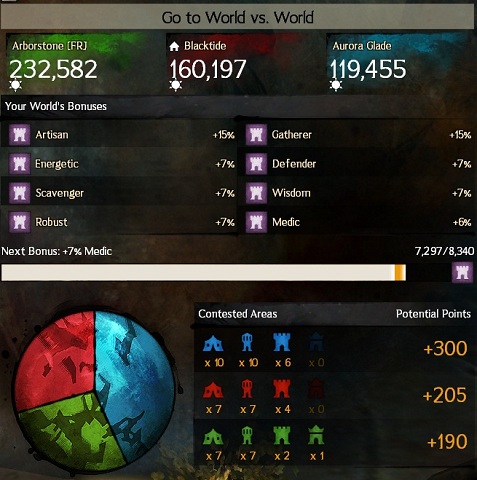 Points (gathered and possible to get) and current bonuses in PvE and WvW.
 A number of locations and their points value is like below:
Location
Resource Camp
5 points
Tower
10 points
Keep
25 points
Stonemist Castle
35 points
Borderlands
6
4
3
0
Eternal Battlegrounds
6
12
3
1
Besides that, on the map you can find neutral mercenary camp, which joins us when you complete the quest. E.g. defending Orgath Uplands (map Eternal Battlegrounds) makes the ogres join your forces.
There are smaller tasks, like escorting and attacking caravans or eliminating enemy's patrols for the smaller groups of players. Those missions are equally important to conquering castles, because lack of supplies may exclude the garrison or stop even the most powerful attack. Resources are needed for the siege engines.
Before you conquer any location, you have to defeat its defenders and get through the walls. The more important particular point is, the more difficult it will be. Below you can find a list of obstacles:
Location
Guards
Walls/Door
Lord
Inner walls
Resource Camp
X
Tower
X
X
X
Keep
X
X
X
X
Stonemist Castle
X
X
X
X
Because the walls are extremely endure you need to use siege engines to speed up the battle and get inside the fort. Defenders also have a special equipment: cannons, mortars and hot oil.
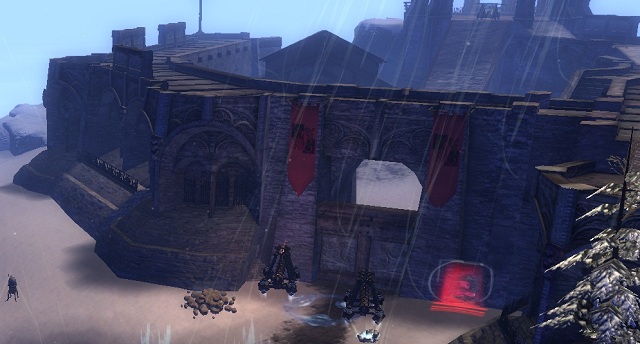
Remaining after unsuccessful attack. This time siege engines didn't help.
This are special machines used both to attack and defend castles. To build such engine, you need to buy its plan (Siege Master nearby Asure's Gate is selling them). Using the plan begins the construction. To finish it, you need a proper amount of supply. Of course, during this process the machine is vulnerable so it's necessary both to defend it and gather the supply ASAP. When the engine is constructed, everyone can use it, but the owner (the one who used plan) has a priority.
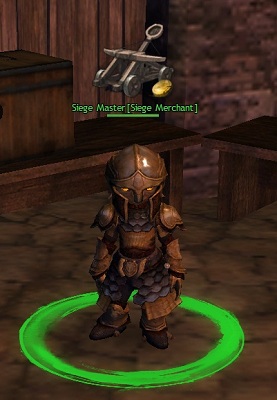 Siege Master sells siege engines plans.
For now on in the game are:
Proper use of those machines guarantee a quick victory. It's often an only option, especially while attacking towers, castles and especially the Stonemist Castle.
Every borderlands map has one Orb of Power defended by the guardian. Conquering and putting it on the Altar of Power in the castle, will give all players on the server big bonuses. Those bonuses depend on the number of Orbs of Power:
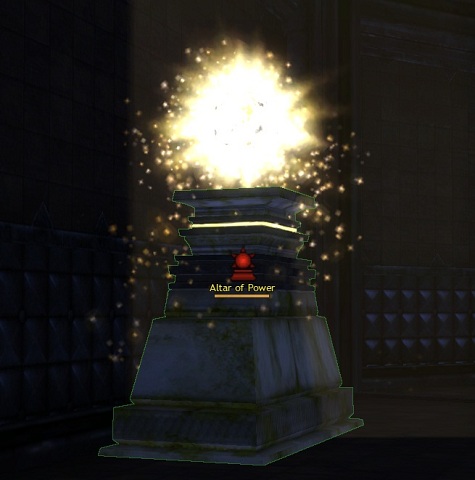 Possession of one or more Orb of Power makes the WvW much easier.
Crafting is a base of many MMOs. In Guild Wars 2 also, but here you meet a very rich and developed system, which can be useful for the player during all the game. From the very beginning you're able to create useful items and after reaching the maximum level you may craft rare or legendary equipment.
Crafting in Guild Wars 2 is similar to this from other MMOs, but it has some significant differences:
The question remains: is it worth to craft your own items instead of buying or looting them? The answer is: YES. Crafting let you not only to be self-sufficient at same level. It also gives a big amount of experience what speeds up level of your character, gives a reason to visit every piece of the world and let you help your companions. Besides, crafting has its own section in the achievements bookmark and may make you rich very easily. And what I've mentioned at the beginning: only crafting provides you with the legendary items.
Before you start crafting, you need to find proper materials. In Guild Wars 2 one rule should be applied: collect all resources you can find. You never know when you'd like to change your profession and your current materials became useless. Even if you don't plan this, you can sell additional materials via Trading Post or exchange them for what do you need.
 Collected silver will be used for few rings and amulets.
First and the simplest method of collecting materials is collecting them by yourself from the map. To do so you need tools which can be bought at almost every merchant in the game. After completing mission or killing few monsters you should have enough money to buy copper harvesting sickle, copper mining pick and copper logging axe, what let you collect materials in the beginning locations. To do so, just equip the chosen item (in inventory you have a place for each of them), go to the source of material and press F. Your hero will automatically collect one or more materials. In case of rich metal vein you can repeat it to pick up more materials.
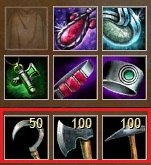 Full set of tools: sickle, mining pick and axe.
Depending on the place where you want to collect materials, you'll use different tools. Every of them has a different number of uses, so it's worth to carry a spare one.
Icon on the map
Required tool
Number of uses
Materials

 Mining pick
100
Metals, precious stones

 Logging axe
100
Wood

 Harvesting sickle
50
Plants (ingredient)
Besides that it's worth to know that your tools have different levels. The higher level, the rarer ingredients you can get. But using more expensive items on the sources with lower level doesn't give you anything. A type of tools, the materials you get thanks to them and lumps required to ingots (you can buy them also) you may find in this chart:
Level
Tool
Ore
Lump
Ingot
Log
Plank
1
Copper
 Copper
 Tin
Tin Copper
 Bronze
 Green
Green Green
Green2
Iron
 Iron
Iron SilverIron
 Silver
 Soft
Soft Soft
Soft3
Steel
 Gold
Gold Coal
Coal Steel
Steel Gold
Gold Seasoned
 Seasoned
4
Darksteel
 Platinum
 Primordium
 Platinum
 Darksteel
 Hard
Hard Hard
Hard5
Mithril
 Mithril
 Mithril
 Elder
Elder Elder
Elder6
Orichalcum
 Orichalcum
 Orichalcum
 Ancient
 Ancient
You have to also remembered that while mining ore you can sometimes get a precious stone, needed by the goldsmith. But it's rather random so, as I mentioned, you should collect all materials you meet.
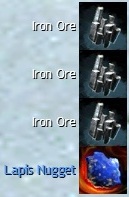 A precious stone mined while collecting the iron ore.
Collecting the plants is more time consuming. Because of big number of its species and a fact that some of them may be found in the particular regions of the world, it's hard to put them into the chart. It's more simpler to remember one rule: to get a plant, use a sickle on the similar level like mining pick and axe in the particular location. If there's a plenty of iron ore, you'll get all available crops using the iron harvesting sickle. There are some exceptions, mainly in regions with required level about 70-80. In such cases you should have a spare orichalcum sickle.
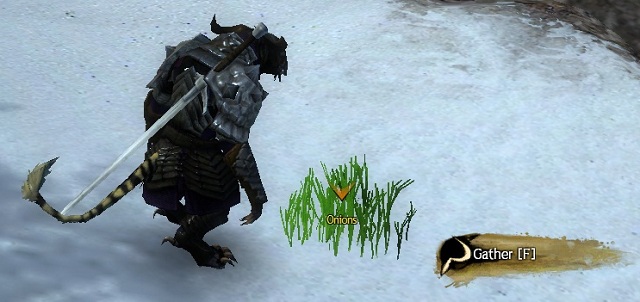
Because there is a plenty of iron, it's enough to use the iron sickle.
During travelling you may find so called farms. They contain few identical materials and respawn every 23 hours.
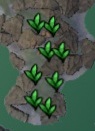 Farms are marked on the map.
The last place where you can buy cook's ingredients are merchants. In every city you can find karma vendor, who'll sell you herbs for few karma points. To get more rare items you can also visit heart vendor(available after completing the mission). Some of them offers the plants.
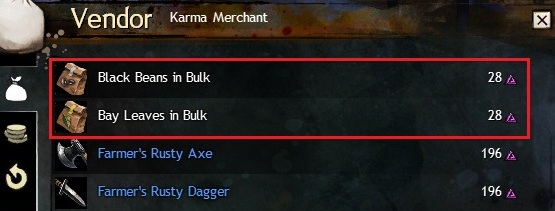 After opening the bought packs you get the ingredients needed by the cook.
Another method of getting the resources is to salvage the collected item using the salvage kit. During the fight, you'll not once loot weapons, armors, pieces of metal, skins or cloths. Some of them may be marked as Salvage Items. It means that their only destination is to be processed to a proper materials.
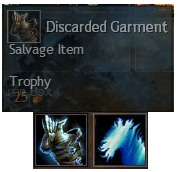 One of the items you can salvage.
 Salvaging such items always give you one, defined component. In case of skins and cloths it's the only one (besides trading) way to get them:
Level
Cloth scrap
Bolt of cloth
Spool of thread
Leather section
Leather square
1
 Jute
Jute Jute
Jute Jute
Jute Rawhide
 Rawhide
2
 Wool
Wool Wool
Wool Wool
Wool Thin
Thin Thin
Thin3
 CottonCottonCotton
 Coarse
Coarse
4
 Linen
Linen Linen
Linen Linen
Linen Rugged
 Rugged
5
 Silk
Silk Silk
Silk Silk
Silk Thick
Thick Thick
Thick6
 Gossamer
 Gossamer
 Gossamer
 Hardened
 Hardened
What is more, the salvage kit may be used on weapons, armors and jewellery. In such case you get basic ingredients which were required to craft them (ore, skin, log) and you'll have a chance to get a rare components, what depends on the quality of the set you've used. Furthermore, they allow you to regain upgrades from the item: the more expensive kit, the more often you'll succeed.
Set
Chance for a rare item
Chance for an upgrade
Crude
0%
tiny
Basic
10%
20%
Fine
15%
40%
Journeyman
20%
60%
Master
25%
80%
Black Lion
10%
100%
To dismantle an item you need to double click on the salvage set and then choose what you want to take to pieces. Ingredients appear in the inventory automatically.
 All materials above were gained by the salvage kit.
The last one method of collecting resources is to fight with enemies. Defeating monsters like harpies, minotaurs or undeads you can get a fine crafting material, one of the universal components, required to almost every item in the game. If the defeated enemy is a humanoid (pirate, bandit etc) your loot will be small sacks with one fine material inside.
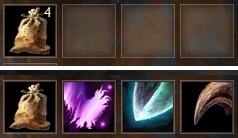 Opening the collected sacks also gives you the fine materials.
As in the case of previous materials, those of high quality can be divided on few types and levels: the stronger enemy is, the better resource you may obtain.
Level
Bones
Claws
Dust
Fangs
1
 Bone chip
 Tiny claw
 Glittering
 Tiny fang
2
 Bone shard
 Small claw
 Shimmering
 Small fang
3
 Bone
Bone Claw
Claw Radiant
 Fang
Fang4
 Heavy bone
 Sharp claw
 Luminous
 Sharp fang
5
 Large bone
 Large claw
 Incadescent
 Large fang
6
 Ancient bone
 Vicious claw
 Crystalline
 Vicious fang
Level
Scales
Totems
Venom sacs
Vials of blond
1
 Tiny scale
 Tiny totem
 Tiny venom sac
 Weak blood
2
 Small scale
 Small totem
 Small venom sac
 Thin blood
3
Scale Totem
Totem Venom sac
 Blood
Blood4
 Smooth scale
 Engraved totem
 Full venom sac
 Thick blood
5
 Large scale
 Intricate totem
 Potent venom sac
 Potent blood
6
 Armored scale
 Elaborate totemPowerful venom sac
 Powerful blood
 There is never too much of high quality resources. Almost every profession uses an enormous number of them.
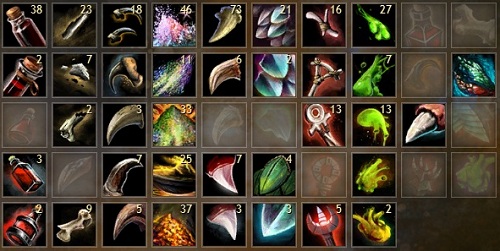
If there exist a plant farms, there are for sure the monster farms: a hardly available location where the enemies respawn faster. This places are very useful when you want to collect a big number of furs, cloths or fine crafting materials. If it's possible, try look for the farms with humanoids, the sacks will quickly fulfill your inventory.
 Place of monster's increased activity. Here you can find a lot of fine crafting materials.
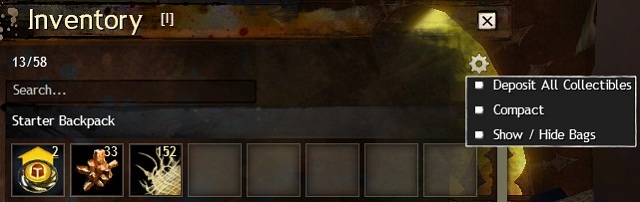
Collecting dozens of components and items you'll fulfill your inventory very quickly what will force you to return to the bank to put there the surplus resources. But you have two options to omit this travel. Clicking the RMB on the material in the inventory choose Deposit Collectible, and the item will be transferred automatically to your vault. The other possibility is to click on the rack in the corner of inventory and choose Deposit All Collectibles, what transfers all items which may be found in your collection.
To organize the mess, I recommend to dismantle all useless items immediately. This will free the space in the inventory.
And if you haven't already done this, I recommend to turn on the autoloot, what will speed up collecting the items from defeated enemies.
Before you choose both profession, consider which ones are useful for you. The list below presents usefulness of particular professions for the classes:
Your class
Very useful
Useful
Not that useful
Elementalist
artificer, tailor, jeweler
chief
leatherworker, weaponsmith, armorsmith
Hunter
leatherworker, huntsman, jeweler
chief, armorsmith
artificer, tailor, weaponsmith
Fighter
weaponsmith, armorsmith, jeweler
chief, huntsman
artificer, tailor, leatherworker
Necromancer
artificer, tailor, jeweler
chief, huntsman, armorsmith
leatherworker, weaponsmith
Guardian
artificer, weaponsmith, armorsmith, jeweler
chief
tailor, leatherworker, huntsman
Thief
leatherworker, armorsmith, jeweler
chief, huntsman
artificer, tailor, weaponsmith
Engineer
leatherworker, huntsman, jeweler
chief
artificer, tailor, weaponsmith, armorsmith
Mesmer
artificer, tailor, jeweler
chief, huntsman, armorsmith
leatherworker, weaponsmith
Legend:
The chart above shows that it's best to choose one profession crafting weapons or armors and the additional one like jeweler or chief. Choosing two profession related to crafting armors/weapons you may meet a lack of resources.
After finishing consideration, you have to craft. In every beginning location you find an area where are production posts and particular masters. To begin crafting it's enough to talk with the master and accept the choice. Then you'll be able to use the stand nearby.
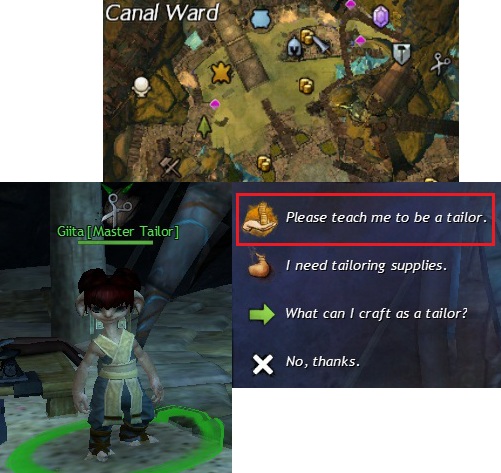 Typical location where you can find all masters, the master and the typical dialogue during choosing the profession.
 You have four options: Discovery of new recipes, Production, bank and Collections. Production is simple: check how many resources you need, take them from the collection and then choose the craft. If you want to make more than one item at once, set the number before production. If you have use all resources choose the craft all.
To product an item you have to make few things:
Choose the Production bookmark

Then the refinement
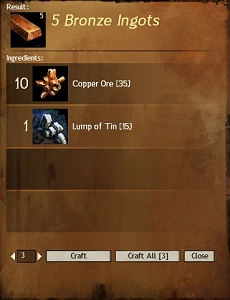
you make self-products like blades, hilts (crafting components)
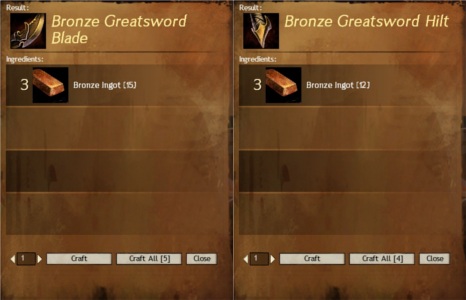
craft the final item
The method above let you craft known items, but it has one big disadvantage: it gives small amount of XP. Here, you should look at the levels of crafted items, professions and required character's level to use the item:
Item/material level
Profession level
Required character's level
1
0 - 74
5 - 20
2
75 - 149
25 - 35
3
150 - 224
40 - 50
4
225 - 299
55 - 65
5
300 - 399
70 - 80
6
400
80
As you can notice, to use the higher levels of resources you have to gain experience in your profession: the more you get them, the more powerful items you'll be able to craft. To do so, you can craft known items or use a shortcut: every 25 points on the level may be gained by performing the untreated resources. Mass making ingots from ores will level up you very quickly.
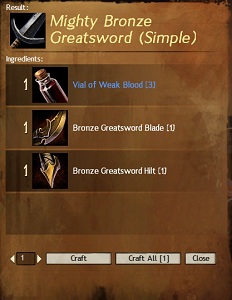
Unfortunately, after treating all basic resources the speed of gaining XP goes down. To increase it, use discovery. This is very similar to crafting: you make proper resources and change them into semi-finished item. But in this case, you need get one additional ingredient, which is an insignia. After collecting all components open the discovery bookmark. All elements which can be used to find new recipes will be displayed. Choose components until you'll get informed that you've crafted a new item.
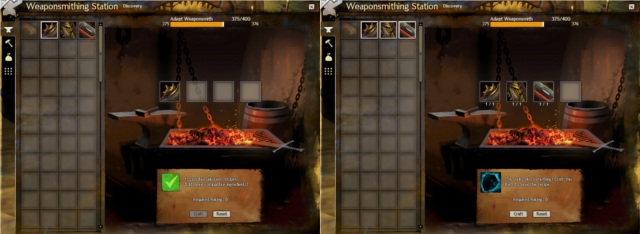
During discovering a new item. Non-usable components will be unavailable..
After choosing craft, the new recipe will be added to your list, you receive a new item and XP with the bonus for discovery. This method is a basic way to increase your profession XP after first twenty five points.
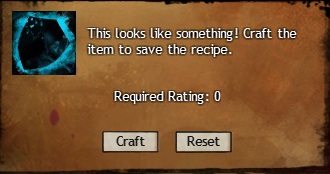 After clicking craft the chosen components will make a new item.
 It's worth mentioning, that some recipes are shared by few professions: for example iron ingots may be produced by both, armorsmith and weaponsmith. Unfortunately, to use the previously discovered recipe you have to get a required level of the particular profession. On the other hands, it has a good side: you can use the recipe again, for additional XP.
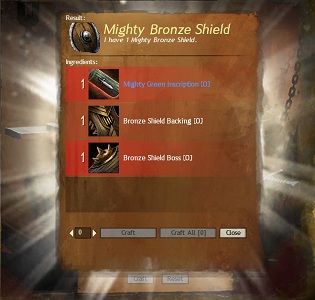 Recipe is added to your list and you can use a new item.
 Summing it up, crafting consists in:
Final product can be given to your friends, sold to other players (via trading post) or used to regain resources from it (via salvage kit). In all professions it looks identical.
Every profession has few types of items available to craft, but the base recipe is the same, only the quality of materials changes. For example, weaponsmith may craft safe boxes which increase the space in the inventory, but unavailable to open during trading with merchants. Such box is made of 10 ingots, rune of holding (you can buy from masters) and three dusts. Depending on quality of materials (iron, steel, rune and dust) you can obtain containers with various capacity (8,10, 12 or more). Generally, the recipe may be written like that:
Safe box:
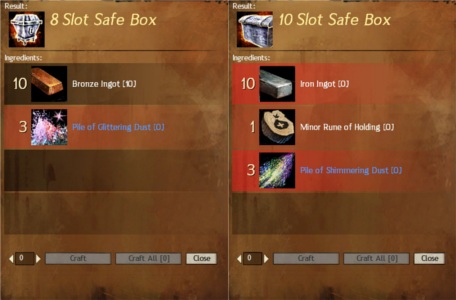 More capacious boxes required materials of better quality.
 Below you can find a list of items available to craft for every profession. Discovering all subtypes is yours, because its full list will take hundreds pages.
Armorsmith uses lot of metals, cloths and high quality items (for insignias). He crafts heavy armors.
Exemplary icon
Item type
Ingredients

Armor
2x Component
Insignia

Box
10x Ingot
Rune of holding

Safe box
10x Ingot
Rune of holding
3x Dust

Equipment box
10x Ingot
Rune of holding
3x Scale

Rune
Ingot
1-2x Rare crafting material

Rune of life
2x Bronze ingot
Bolt of jute

Armor box
Ingots
Cloth
Thread
Fine crafting material

Insignia
1-2x Cloth
0-10x Thread
3-15x Fine crafting material
Artificer uses metals, wood and high quality materials. Potions requires some plants. He makes staffs, scepters, focuses and tridents.
Exemplary icon
Item type
Ingredients

Weapon
2x Component
Insignia

Tuning crystal
6x Dust

Potion
Dust
Ingredient 1
Ingredient 2
1x Water / Blood

Sigil
Ingot
1-2x Rare crafting material

Inscription
1-2x Dowel
3-15x Fine crafting material
In case of Huntsman you need a lot of wood, metal, high quality materials and a bit of skins. He crafts harpoon guns, shortbows, longbows, pistols, rifles, torches and warhorns.
Exemplary icon
Item type
Ingredients
Weapon
2x Component
Insignia

Sigil
Ingot
1-2x Rare crafting material

Inscription
1-2x Dowel
3-15x Fine crafting material
Jeweler uses mostly metals and precious stones. He also needs a bit of high quality materials.
Exemplary icon
Type of item
Ingredients

Amulet
2x Component
Jewel

Earring
2x Component
Jewel

Ring
2x Component
Jewel

Gem transmogrification
2x Jewel
Dust
Upgrade component
1-5x Jewel
0-1x Filagree
In his work he uses mostly skins, cloths and high quality materials. He crafts medium armors.
Exemplary icon
Item type
Ingredients

Armor
2x Component
Insignia

Pack
10x Leather
Rune of holding

Invisible pack
10x Leather
Rune of holding
3x Dust

Oiled pack
10x Leather
Rune of holding
3x Bone

Rune
Leather
1-2x Rare crafting material

Rune of life
2x Leather
Bolt of jute
Armor satchel
Leather
Cloth
Thread
Fine crafting material
Insignia
1-2x Cloth
0-10x Thread
3-15x Fine crafting material
As the leatherworker, he uses skins, cloths and high quality materials. He crafts light armors.
Exemplary icon
Item type
Ingredients

Armor
2x Component
Insignia

Bag
10x Cloth
Rune of holding

Invisible bag
10x Cloth
Rune of holding
3x Dust

Craftsman's bag
10x Cloth
Rune of holding
3x Bone

Rune
Cloth
1-2x Rare crafting material

Rune of life
Leather
2x Bolt of jute

Armor satchel
Leather
Cloth
Thread
Fine crafting material

Insignia
1-2x Cloth
0-10x Thread
3-15x Fine crafting material
He needs a lot of metal, wood and high quality materials. He crafts axes, daggers, swords, greatswords, hammers, maces, shields and spears.
Exemplary icon
Item type
Ingredients

Weapon
2x Component
Insignia

Sigil
Ingot
1-2x Rare crafting material

Sharpening stone
Ingot
Dust

Inscription
1-2x Dowel
3-15x Fine crafting material

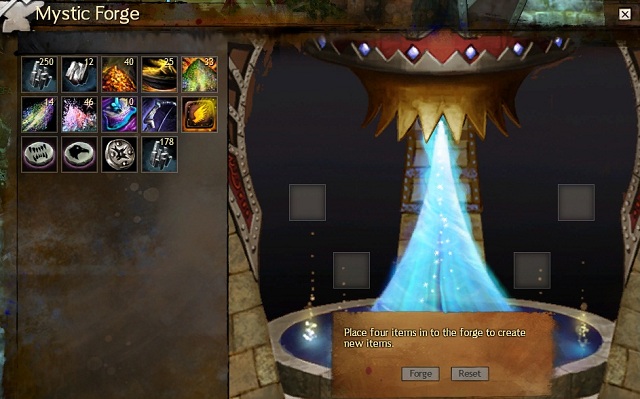
In the center of Mystic Plaza in Lion's Arch, you can find a weird construction called the Mystic Forge. Genie Zommoros, imprisoned inside, will give you items if you give him a sacrifice. Next to it is Miyani: she sells recipes for money and mystic items (required to use the forge) in return for skill points (every character has an unlimited access to them, because after reaching the 80th level, every 240 000 XP gives you one skill point).
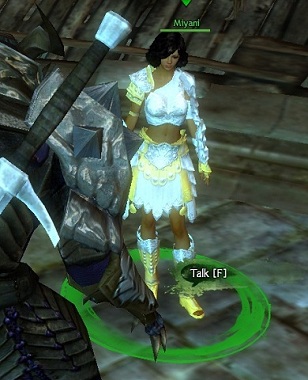 Miyani. You can buy recipes and components from her.
 Using the forge is similar to the discovery bookmark with one difference: it requires four various ingredients. Depending on your components, you may receive a random item or something according to the recipe.
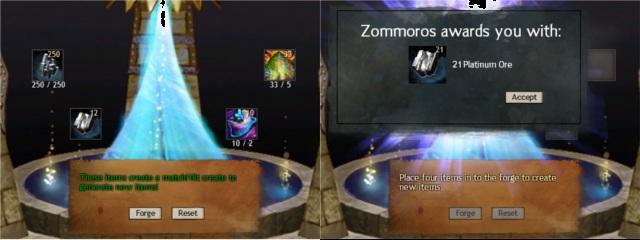
Four ingredients, one item: the secret of Mystic Forge.
Because you may combine items in hundreds way and most of combinations hasn't been discovered yet, I can't give her a full list. Nevertheless, you can find few useful fusions below:
It let you increase a level of the resource (e.g. platinum to mithril). This combination is used, when you have a surplus of common materials.
10-50x material B:
Example:
10-50x Orichalcum Ore:
 Upgrading iron to platinum.
As in the previous example, use when you want to get a better material from the worse one.
5-10x material B:
Example:
5-10x Claw:
Those containers have all armor's elements required to craft one, full set. Forge let you create proper plans, which are used by tailor, leatherworker or armorsmith.
Recipe:
It's a recipe for the exotic weapon of 80th level.
Mystic Weapon:
Legendary weapon is the most powerful available equipment with an unique look, what causes that no one will ignore such weapon. It's also one of the last and most difficult goal to achieve, both in PvE and WvW. It requires huge amounts of gold, skill and karma points and time. At the time being you can find only few legendary weapons in the game.
To craft a legendary weapon you need four components: a proper exotic precursor weapon, Gift of Fortune, Gift of Mastery and for the chosen weapon Gift of (name of the legendary weapon). Then you have to join all elements in the Mystic Forge. In theory it looks easy, but it'll take many hours to fulfill. Collecting materials to create all gifts is very time- and resource consuming.
Name
Type
Components
Precursor

The Bifrost
Staff
Gift of The Bifrost
The Legend

Bolt
Sword
Gift of Bolt
Zap

Dragon Maw/Rodgort
Torch
Gift of Dragon maw/Gift of Rodgort
Dragon Claw/Rodgort's Flame

The Dreamer
Shortbow
Gift of The Dreamer
The Lover

The Flameseeker Prophecies
Shield
Gift of The Flameseeker Prophecies
The Chosen

Frenzy
Speargun
Gift of Frenzy
Rage
Frostfang
Axe
Gift of Frostfang
Tooth of Frostfang

Howler
Warhorn
Gift of Howler
Howl

Incinerator
Dagger
Gift of Incinerator
Spark

The Juggernaut
Hammer
Gift of The Juggernaut
The Colossus

Kudzu
Longbow
Gift of Kudzu
Leaf of Kudzu

Kraitkin
Trident
Gift of Kraitkin
Venom
Maw of the Deep/Kamohoali
Spear
Gift of Maw of the Deep/ Gift of Kamohoali
Maw/Carcharias

Meteorlogicus
Scepter
Gift of Meteorlogicus
Storm

The Minstrel
Focus
Gift of The Minstrel
The Bard

The Moot
Mace
Gift of The Moot
The Energizer
The Predator
Rifle
Gift of The Predator
The Hunter

Quip
Pistol
Gift of Quip
Chaos Gun

Sunrise
Greatsword
Gift of Sunrise
Dawn

Twilight
Greatsword
Gift of Twilight
Dusk
What is more, every legendary weapon requires also Gift of Fortune and Gift of Mastery.
As for now, you have two methods to get a precursor: you can loot it or obtain in the Mystic Forge. In the second case you have to join four rare/exotic weapons of the same type (e.g. 4x staff if you want to get The Legend) with with required level 76-80 and have a luck. The weapon will have a suffix "of Rage". So in this case you obtain The Legend of Rage.
It is crafted in Mystic Forge from:
It is crafted in Mystic Forge from:
It is crafted in Mystic Forge from:
Below you can find all components required to craft every gift of...
Gift of ...
Gift of A
Gift of B
Superior Sigil of ...
Gift of The Bifrost
Energy
Color
Nullification
Gift of Bolt
Metal
Lightning
Air
Gift of Dragon maw/Gift of Rodgort
Wood
?
Fire
Gift of The Dreamer
Wood
Unicorn Statue
Purity
Gift of The Flameseeker Prophecies
Metal
History
Battle
Gift of Frenzy
Wood
Water
Rage
Gift of Frostfang
Metal
Ice
Ice
Gift of Howler
Wood
Wolf Statue
Accuracy
Gift of Incinerator
Metal
Vial of Liquid Flame
Fire
Gift of The Juggernaut
Metal
Vial of Quicksilver
Sanctuary
Gift of Kudzu
Wood
Nature
Conjuration
Gift of Kraitkin
Energy
Eel Statue
Venom
Gift of Maw of the Deep/ Gift of Kamohoali
Metal
Shark Statue
Agony
Gift of Meteorlogicus
Energy
Weather
Air
Gift of The Minstrel
Energy
Music
Energy
Gift of The Moot
Metal
Entertainment
Energy
Gift of The Predator
Wood
Stealth
Force
Gift of Quip
Wood
Entertainment
Stamina
Gift of Sunrise
Metal
Light
Strength
Gift of Twilight
Metal
Darkness
Blood
As if the Gift of A and Gift of B requires different materials, there is no sense in listing them here, especially when you can buy recipes at Miyani's. What is worth mentioning is a fact that all required lodestones you can get from killing high level elementals and exploring dungeons, while gifts of particular undergrounds may be bought from traders in Lion's Arch inside the Fort Marriner. They cost 500 tokens each.
 Recipes for particular components may be bough at Miyani's.
After gathering all four main components, it's enough to join them in the Mystic Forge and you get your desired weapon. To sum up, you'll need:
You character in the Guild Wars 2 is described by the few attributes. Every hero has nine unique statistics, available for every class, and the tenth one depending on the chosen one. Attrbiutes divide onto three groups: primary attributes, secondary attributes and profession attributes. All of above may be increased with traits, equipment or consumables.
From zero to hero, or the hero development.
There are four such statistics, two offensive and two defensive. Those are: power, precision , toughness and vitality. Every of them may be increased by the methods listed above or with the level up. At the beginning, all values are 24 and they are increased gradually to the 916 points at the 80th level.
Level
Attributes per level
2-9
4
10-19
6
20-29
8
30-39
10
40-49
12
50-59
14
60-69
16
70-79
18
80
20
Primary attributes affect mainly the damage you take and cause:
 Four primary attributes affecting your hero.
They, next to the primary attributes, define your hero, his abilities and effectiveness in combat. Here you can find three offensive and two defensive features: critical damage, condition damage, condition duration, boon duration and healing power. They can be increased only by increasing traits or equipment. Summing up:
A part of secondary attributes buffs giving the negative effects
The last one attribute depends on your profession's choice and affects related abilities. As in the case of the previous attributes, you may rise them only by spending some points.
Class
Attributes
Effect
Elementalist
Attunement recharge rate
Decreases a recharge time of attunement abilities
Hunter
Pet attribute bonus
Increases main pet's attribute about 1 for every pet attribute bonus point
Fighter
Burst damage
Increases damages of burst abilities
Necromancer
Life force pool
Increases points of life force abilities
Guardian
Virtue recharge rate
Decreases a recharge time of virtue abilities
Thief
Steal recharge rate
Decreases a recharge time of steal abilities
Engineer
Tool belt recharge rate
Decreases a recharge time of tool belt abilities
Mesmer
Shredding recharge rate
Decreases a recharge time of shredding abilities
More detailed information about abilities above and their influence you can find in the chapter dedicated to description of particular classes.
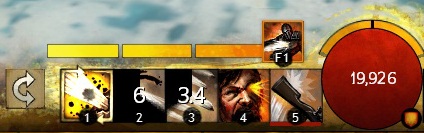
Investing your points you can increase burst damage (bar seen above).
All factors above are modified by equipment and displayed in a shortened way, called the statistics.
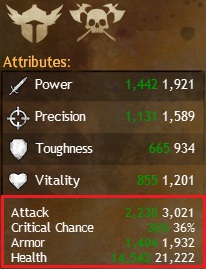 Statistics: a sum of your attributes and equipment's bonuses.
There are four the most important statistics: attack, critical chance, armor and health:
During the majority of the game those factors have no meaning, you just should apply one rule: the more, the better. But when you reach the 80th level when your equipment stops gaining power, you have to decide which statistics you need, and which aren't crucial. As in the PvP or WvW you have to decide: you'd prefer to cause more damage, be tougher or increase the power of negative effects casting on enemies? Thanks to that despite having the maximum level, you're still able to personalize your character and make him differ from other player's avatars.
 Possibilities of personalization your character are huge, so chance of meeting a clone of yours is minimal.
At the end I should mention how you can level up and what it gives you. Almost every action you make gives you XP:
When you don't care about quickly leveling, you can carelessly explore the map and complete quests. But if you want reach the maximum level very fast, you should take part in events and craft.
What is more, further levels, besides increasing the primary attributes, unlocks an access to next skills and weapons. Table below contains all necessary information:
Level
Effect
5
First utility skill unlocked. From now one you get one skill point on every level.
7
Possibility of swaping the weapon set (besides an elementalist and engineer)
10
Second utility skill unlocked.
11
Traits unlocked. From now one you get one trait point on every level.
20
Third utility skill unlocked.
30
Elite skill unlocked.
40
Unlocking a second level of traits.
60
Unlocking a third level of traits.
80
Maximum level. After every 254000 XP you get a skill point.
The last one, but very interesting mechanism related to the hero's level and its calibration. In the Guild Wars 2 the stronger heroes are usually weakened in the PvE locations, what creates new challenges for them and makes killing bosses solo unavailable. Of course, bonus attack and armor from equipment are included, so such a character is powerful, but not invulnerable. This mechanism let you enjoy even the beginning locations after reaching the 80th level.
In case of PvP and WvW your hero is automatically raised to the 80th level. It equals chances in fight between players and creates place for tournaments (PvP) or matched encounters for locations on the map (WvW).
From the eleventh level your hero starts collecting one trait point per level and finishes with seventy of them after reaching the 80th level. Traits let you influence your attributes, statistics and even skills. Knowing it deeply is very important during developing your hero, especially while exploring the most difficult locations, PvP and WvW.
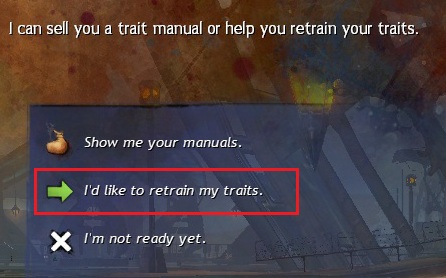
Before you start spending your trait points you have to find a trainer and bought a proper tome. You can find them in every beginning location, they're marked with a book on the map.
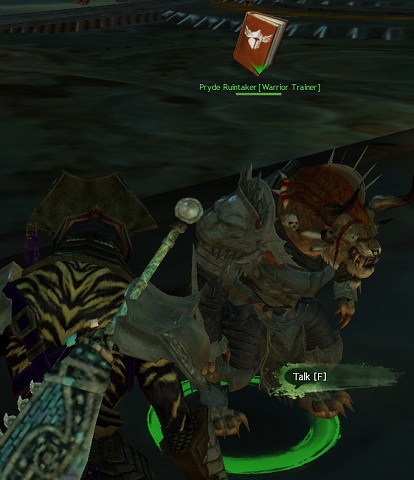 Warrior Trainer in the Black Citadel.
Depending on your level and number of available points you have to buy a proper tome:
Level
Name
Cost
Effect
11
Adept's
10 silver
You can spent 10 points
40
Master's
1 gold
You can spent 20 points
60
Grandmaster's
2 gold
You can spent 30 points
I should mention also, that you can reset spent trait points:
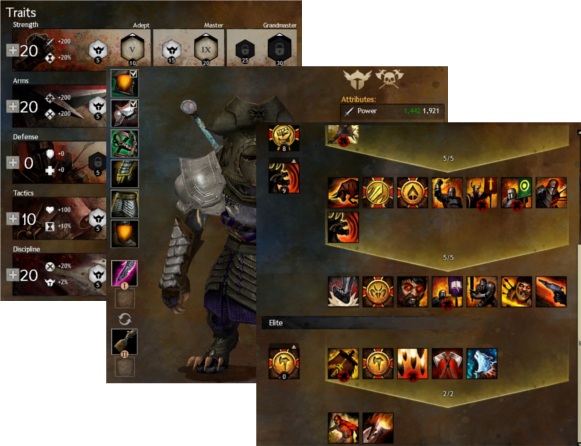
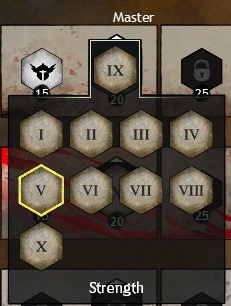
To spent your points you have to press H and choose the skills and traits bookmark and then traits. You will see a table, divided on few rows divided on four columns. First one describes the line: you can see a name, number of spent points and influence on the primary, secondary and profession attributes. The remaining three let you choose features which give you some bonuses.
 This setting upgrades warrior's greatsword fighting.
All available traits are divided on minor (there is 15 of them, unlocked at5, 15 and 25 points) and major (60 of them, 10, 20 or 30 points required). In case of the second ones you can use lower level trait instead the higher one.
 Sometimes it's good to choose another lower level trait

Skills are the basic part of the game in Guild Wars 2. Every action, like attack with sword, shield defense, firing from the pistol or more complicated like summoning companions, taunt, healing or preparing the flame thrower is an effect of use one of the hundreds available skills. Skill system defines your role on the battlefield and, connected with traits system, your whole character. The choice of skills makes your warrior with a greatsword causes monstrous damage, which the other one with the same weapon won't, but buff the team instead.
Skills can be divided onto two groups: weapon skills and slot skills. The first category contains all skills linked with used weapon. At the beginning you have an access only to the first type of attack, but according to your progress, you'll unlock more skills. It's worth mentioning that one handed weapon has three such skills while the two handed has five of them. But the one handed weapon has one big value: you can put another item into your offhand. Thanks to that you can fight with for example the set sword+shield or sword+axe. Although one handed weapons cause less damage, they have broader spectrum of available skills.
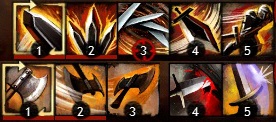 Skills for the greatsword and the set sword+axe.
 Besides that, you should know that every class has other attacks: warrior with the greatsword will be able to charge, the guardian attacks all surrounding enemies and then pull up the running ones while the mesmer uses his weapon to fire a deadly ray.
The second category of skills, slot skills, contains skills hid under the 6-0 buttons, which can be unlocked by buying them out for the skill points (gained during challenges or leveling up), from the fifth level. Those skills are: healing, utility and elite, which additionally divides on few levels. The higher level, the more powerful is an effect of the skill and the more points you need to unlock it. Those numbers looks like that:
Type
Level
Required skill points
Healing
1
free
Healing
2
1
Healing
3
3
Utility
1
1
Utility
2
3
Utility
3
6
Elite
1
10
Elite
2
30
To choose higher levels of the utility skills, you need to have five skills from the lower level; in case of elite skill, two is enough.
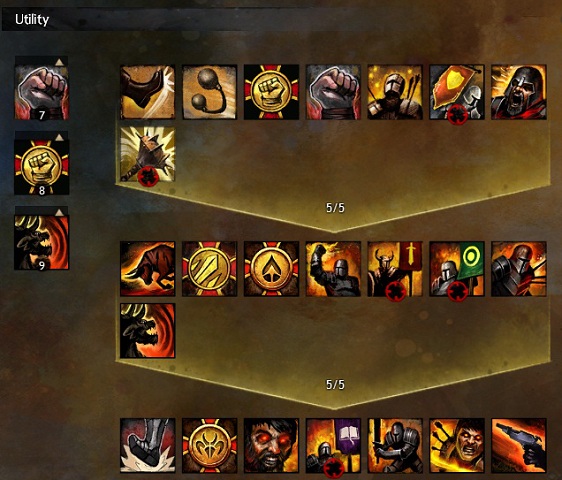
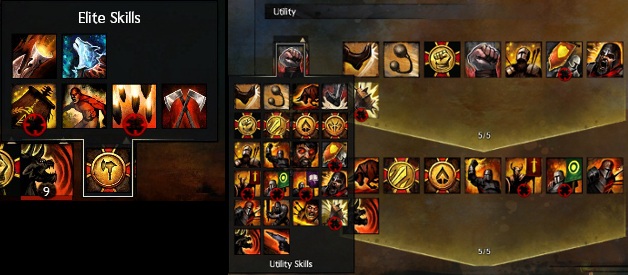
Utility skills for warrior. Elite skills have its own, smaller tree.
To use the learned skill, you have to place it on the bar. Weapon skills are chosen automatically: equip a weapon and the bar will be fulfilled. In case of slot skills you have to manually inscribed them to the particular keys. You can do it on two ways: press H, choose skills and traits, then slot skills and here the proper button/skill combination or by clicking on the small arrow on the bar.
 Two methods of setting skills: in the skill bar or character's menu.
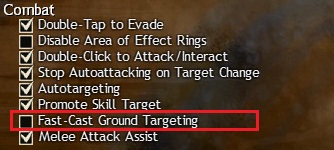
 Skill activation is clicking the particular key or choosing it by mouse click. In some cases, the skill requires second click: those are area attacks, you have to confirmed its area. Casting such skills may be improved by activating Fast-Cast Ground Targeting option, thanks to which after pressing the key, the spell will be centered on the cursor.
Skills have different charging time. Some are launched immediately, some needs few moments to get activated (charging bar is displayed), and some others are immediately, but their effect is visible after a few seconds. Actions required longer preparation can be interrupted by pushing, knocking down or stunning the character. In majority of cases you can move during attacks, only a few skills require to stay still.
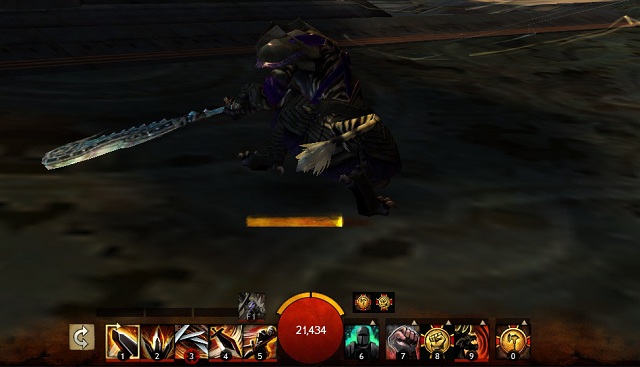
Attack's charging bar: when it's full, the hero makes the last, stronger blow.
You can see a description of every skill by moving a mouse over it: you get an information about damage, range and additional effects. In some cases you'll see few windows which means, that after using that skill, the next one will have different effect.
After using a skill, you have to wait a while to use it again. In case of weapon skills after attacking and swapping the weapon, the skill will recharge in the background (so it'll be still unavailable for a while).
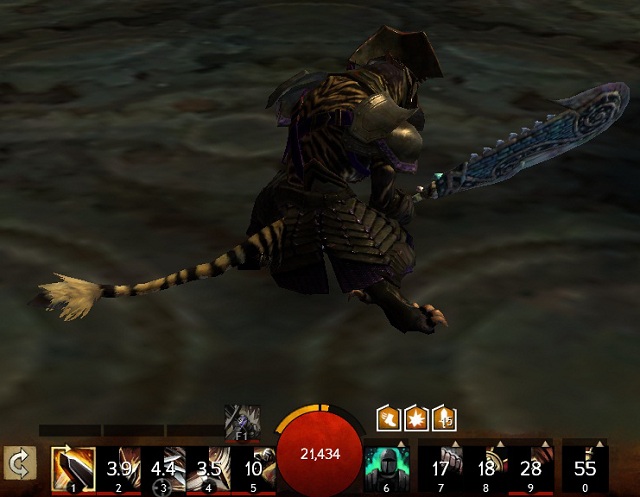
Waiting for the skills to recharge isn't the greatest thing.
When choosing the one of five available races, you choose also the racial skills, which could be unlocked in the further game. Those are the slot skills and may contain every subcategory: healing, utility and elite. They're weaker than the class' skills, so the race choice isn't crucial for the character's power. Every hero has six abilities to get:
Category
Skill
Description
Healing
 Prayer to Dwaina
Restores health.
Utility
 Prayer to Kormir
Cancels three negative effects.
Utility
 Prayer to Lyssa
Buffs hero with one positive effect and gives one negative to the enemy.
Elite
 Avatar of Melandru
Changes you into Avatar of Melandru.
Elite
 Hounds of Balthazar
Summons two Hounds of Balthazar
Elite
 Reaper of Grenth
For 15 seconds nearby enemies are poisoned and chilled .
Category
Skill
Description
Utility
 Pain Inverter
Nearby enemies are confused. You get a retaliation.
Utility
Radiation FieldNearby enemies on the particular area are poisoned and weakened.
Utility
 Technobabble
One enemy is dazed.
Elite
 Summon 7-Series Golem
Summons offensive 7-Series Golem.
Elite
 Summon D-Series Golem
Summons defensive D-Series Golem.
Elite
 Summon Power Suit
Summons an armor for you or your ally.
Category
Skill
Description
Utility
 Call Owl
Summons and owl which causes bleed.
Utility
 Call Wurm
Summons a Wurm.
Elite
 Become the Bear
You shape-shift into a bear and get a new skills.
Elite
 Become the Raven
You shape-shift into a raven and get a new skills.
Elite
 Become the Snow Leopard
You shape-shift into a snow leopard and get a new skills.
Elite
 Become the Wolf
You shape-shift into a wolf and get a new skills.
Category
Skill
Description
Healing
 Healing seed
Creates seeds which provides allies with regeneration.
Utility
 Grasping Vines
Enemy is immobilized until the vines are destroyed.
Utility
 Seed Turret
Creates a turret.
Elite
 Summon Druid Spirit
Summons Druid Spirit
Elite
 Summon Fern Mastiff
Summons Fern Mastiff
Elite
 Take Root
Immobilizes you and creates a few turrets around.
Category
Skill
Description
Utility
 Battle Roar
Allies get fury and might features.
Utility
 Hidden Pistol
You fire at enemy with simultaneous jump backward.
Utility
 Shrapnel Mine
Throws a mine which causes bleed and cripple.
Elite
 Artillery Barrage
Summons an artillery support.
Elite
 Charrzooka
You get the Charrzooka, which replace your actual weapon.
Elite
 Warband Support
Summons a few charrs.
As it was explained every class has unique skills depending on the equipped weapon. Below you can find a list of equipment available for all classes:


Axe
X, OH
X, OH
X
Dagger
X, OH
OH
X, OH
X, OH
Mace
X, OH
X
Pistol
X, OH
X, OH
OH
Scepter
X
X
X
X
Sword
X
X, OH
X
X
X, OH
Focus
OH
OH
OH
X
Shield
OH
OH
X
Torch
OH
OH
X
Warhorn
OH
OH
OH
Greatsword
X
X
X
X
Hammer
X
X
Longbow
X
X
Rifle
X
X
Shortbow
X
X
Staff
X
X
X
X
Harpoon
X
X
X
X
Spear
X
X
X
X
X
X
Trident
X
X
X
X
Legend:
X - main weapon
OH - offhand
Besides that, some characters have an additional offensive skills. For example, an engineer may use the flamethrower or grenades when thief gets new attacks combining different types of main weapons and offhands. What is more, the Guild Wars 2 offers a lot of so called environmental weapons, an equipment which you can pick up and use as a weapon. Those are both flame swords, ice bows, bazookas and the broken bottle, board or branch. Also various siege machines are included (trebuchets, cannons). During using those weapons, you get a whole new skill bar, where you don't have to learn the advanced attacks, because you know them at once. Such weapons may be more powerful than your normal one, but very often they have a limited number of uses.
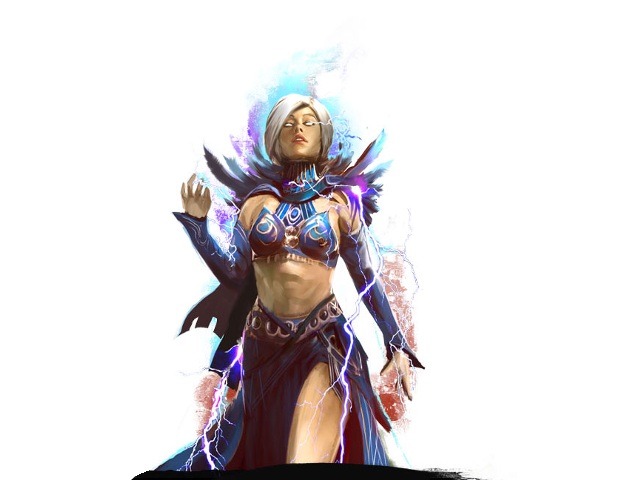
Elementalist is a hero draining its power from four elements: fire, water, air and earth. Although he hasn't an access to many weapons, he has various attacks: every weapon he uses, may derives from any available element, which multiplies four times the number of available skills. Depending on the currently used element, the use of your spells changes:
What is more, a proper choice of weapon defines if you'll be attacking single enemy or whole groups. Elementalist armed with staff will hold off an army, while using the dagger will finish off the enemy's boss quickly.
Weapon skills are additionally supported by the slot skills:
Group
Effect
Arcanes
Spells don't using the elemental magic to cause damage.
Auras
Defensive spells and buffs.
Cantrips
Spells useful for retreat.
Conjures
Spells for summoning a magic weapon.
Glyphs
Glyphs giving various bonuses.
Elementalist's value in PvE is an ability to switch quickly between different elements, what gives him new skills. He can heal himself and allies, then weak an enemy and return to using offensive spells. When you're playing single, it's worth to have a focus with you for some defensive spells. With friends you can stay with a staff and distance damage.
In PvP or WvW you have to decide about your role. Staff and fire magic allow you to fight on a distance while water magic makes you a team's support. During battles with small groups of enemies, you can use earth and air magic to control the combat by immobilizing or pushing enemies out.
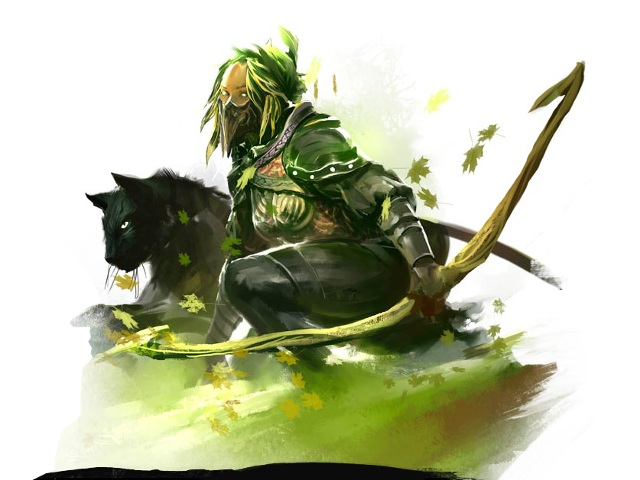
Hunter is a one of the most mobile hero in the game, who is perfect both in melee and distance. In encounters he can use pets and summoned spirits.
To get a new pet, you should just find an animal with the juvenile prefix and press F. From now one you've got a new companion. A hunter can have four pets at most, with only one active in the battle. What is more, he can decide when use one of the special pet's skill. Unfortunately, the rest is used automatically.
Hunter has also:
Group
Effect
Pet skills
Pet's skill.
Pet utility skills
Skills affecting your pets.
Spirits
Summoning of spirits.
Survival skills
Increasing your survival time.
While playing solo, hunters have to kill enemies one by one, best using bows. Thanks to that they can save life. Melee is a good choice if you want to cause maximum damage but you have to remember that you're vulnerable for the retaliation. Eventually you can use pet's help and retreat. In a group hunter has an easier task. He can both support his companion and focus on causing damage. It's very versatile hero, who is designed to appeal to every fan of elves archers.
During PvP hunters rely on causing negative effects and bleeding enemies out. They don't have the warrior's strength, but they can harass enemies from a distance. In a group hunter is perfect fitted for catching and slowing down the running enemies.
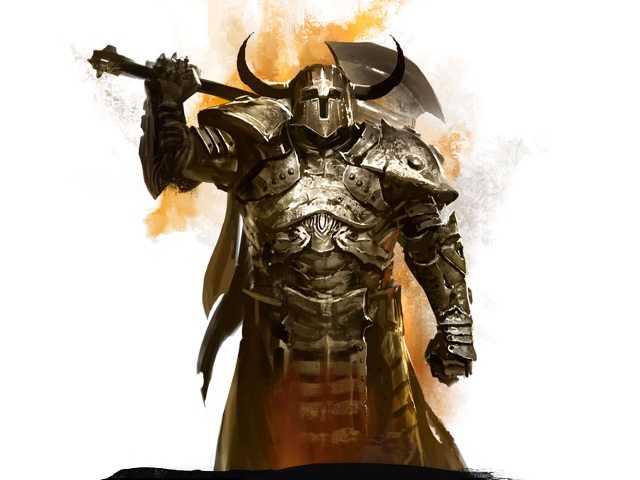
The most stereotypical class in the MMO games returns in the Guild Wars 2. As always heavy armored, he obtained a few new tricks. Main warrior's skill is ability to cumulate adrenalin during the battle. With proper traits adrenalin can improve damage or critic hit chance, or can be spend for so called burst attack, which is a one strong hit or a series of attacks which quickly eliminate enemies. Moreover, warrior has an access to supporting skills and:
Group
Effect
Banners
Creates a banner which provides bonuses. It can be used as a weapon.
Physical
Skills for moving or immobilizing enemies.
Stances
Improving offensive or defensive of a hero.
Warrior is one of the simplest heroes to control during PvE. It's enough to choose the target, make few hits and pick up a loot. Repeat until all enemies are dead. Thanks to lot of skills improving damage he can quickly finish of any opponent. In a group, he uses buffing banners and shouts. What is more, some skills make picking up the wounded companions easier.
In PvP warrior can have few roles. The easiest one is a dealing damage. Very rarely anyone can stand the whole series of warrior's blows. Besides that, you can use shouts and banners, decrease a strength of negative effects and resurrect allies faster. Moreover, well equipped warrior is mobile on the battlefield, choosing targets and immobilizing them for the rest of a team.
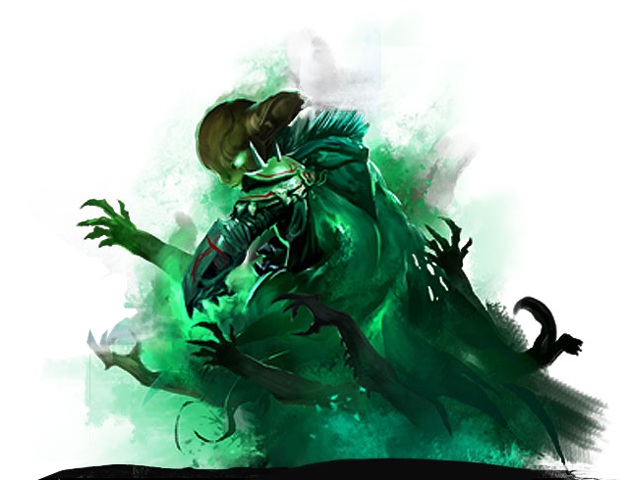
A mage summoning the undeads, poisoning enemies and causing area damage: the necromancer. Although he is wearing a light armor, he is one of the most resistant heroes in the game, who can drain enemy's life. Moreover, he has a special skill death shroud (using the unique life force), which increases his stamina and provides new attacks:
Necromancer has rather limited choice of weapon, but his attacks are usually from distance and often cause negative effects, so often changes of equipment isn't necessary. he also can use:
Group
Effect
Corruptions
Causes negative effects.
Marks
Set a magic symbols which activation causes negative effects.
Minions
Summons undeads.
Spectrals
Spells using the spectral energy.
Wells
Influencing the environment.
Although his damage isn't too big, necromancer is a perfect character to PvE. He is difficult to be killed. During playing in the group you can be sure, that the necromancer will be the last man standing and resurrecting teammates.
In PvP necromancer relies on causing negative effects and bleeding out the enemies. The longer the battle takes, the more advantage he gets. Thanks to life draining, freezing or frightening he is able to hold the defended spot even against the massive enemy forces.
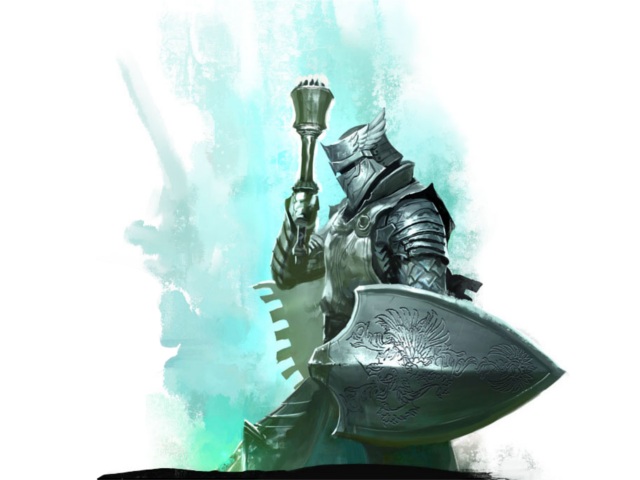
There is no MMO without a paladin. In the Guild Wars 2 his role is played by the guardian. Heavy armored, perfectly armed hero who can fight solo or support group attacks. His characteristic feature is using the virtues :
Guardian can use many weapons, from which the majority stands for the area damage while the offhand is for blocking and canceling the negative effects. Those skills are improved by:
Group
Effect
Consecrations
Blesses the earth and grants enemies on this area with various bonuses.
Meditations
Teleportations and canceling the negative effects.
Spirit weapons
Summons an enchanted weapon.
Symbols
Symbols on the ground which support you and allies.
Tomes
Summons an ancient tome which provides news skills.
Wards
Creates unbeatable barrier.
During the PvE a guardian shouldn't have bigger problems. He is very tough and in case of problems, he can use virtues and defensive skills to restore himself. He is a perfect hero for the beginners who'd like to learn the game. What is more, the more people he has in his group, the more powerful he becomes, because some of his skills affect all allies.
In PvP and WvW he can play in two ways: damage dealing or support. Usually, the more companions you have, the more you should focus on supporting. Defeating an enemy is good, but saving ten allies is better.
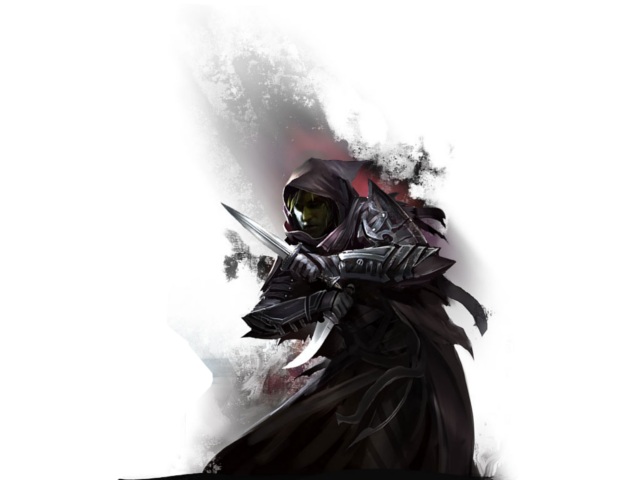
Thief is a master in shadow combat and the one of the most mobile heroes in the game. Where warrior fights face to face, thief sneaks from behind, poisons enemy and then disappear to show up at the next one.
His main values is a steal skill, which allows him to appear nearby enemy and then "steal" his ability. Using this skill you can use the new attack, but only once. What is more, the thief uses an initiative. It means that you don't have to wait for the skill to recharge, but when the run our of initiative, you're harmless.
Group
Effect
Dual wield skills
Deceptions
Stealth
Tricks
Venoms
On the contrary to the most classes which can fight enemy face to face, thief is very rattle and can't fight too long. The best move is to use the distance weapon to weaken an enemy and then quickly finish him off with the blade. If you want to play as a thief, you have to learn evading and rumbling perfectly. Unfortunately, this hero requires big in-game know-how to be well used.
In the PvP you should always attack from behind. On the contrary to many MMOs in Guild Wars 2 thief can't be permanently invisible so you have to learn how to avoid attacks and how to move on the battlefield.
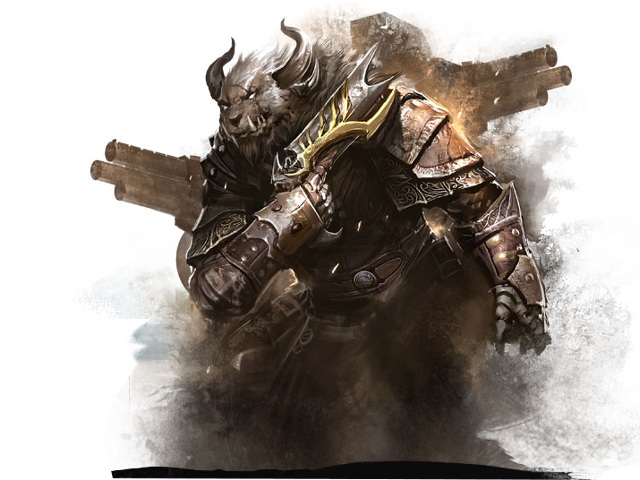
If you're looking for the versatile hero, who can fight at every distance, heal allies, damage enemies, give bonuses and cause negative effects, there is no one better than the engineer. But his greatest feature is an ability to craft his experimental equipment:
The equipment above is only a few examples from the weapons available for the engineer. Even if you don't want to use those inventions, you can fight using a pistol or rifle when the combination pistol+shield increases your endurance. Generally, engineer is a perfect support for every team, who can adjust to every situation.
Below you can find skills available for engineers:
Group
Effect
Device kits
Engineer gets a set (bombs, grenades or medical one) and obtains new attacks.
Elixirs
Elixirs cause random effects upon allies.
Gadgets
Supporting or harming gadgets.
Turret skills
Creates a turret.
Weapon kits
Engineer gets a new weapon and attacks.
In PvE engineer works brilliantly. Turrets or mines can be used as traps and flamethrower helps finish off the remaining ones. Elixirs are always good and while playing in a team sharing them with allies won't be unnoticeable.
During the PvP you can both support allies and fight on a medium distance, using the slowing and immobilizing skills to finish off enemies later with the gunfire or flamethrower. What is more, engineer has few skills improving the retreat. Use them, heal and return to harass enemy.

Master of illusions and retreats. Mesmer is one of the most difficult heroes to catch and master in the mage. During the combat he uses clones and phantasms to confuse enemies and then he weakens him and slowly drains his life. Mesmer has an access to few powerful shatter skills which let him destroy the clones for the defined effect:
Mesmer has many weapons to choose, both melee and ranged. Thanks to the big mobility and creating illusions, he is able to hurt an enemy from the distance and finish him off with the sword and then retreat to the safe place.
As every class, mesmer has an access to few skills:
Group
Effect
Clones
Creates clones.
Glamours
Creates a zone which supports allies.
Manipulations
Spells making the retreat easier.
Mantras
Strong spells which have to be prepared before use.
Phantasms
Creates phantasms who attacks enemies.
PvE requires big knowledge and orientation in the situation. While playing solo, mesmer should use the greatsword for distance damage and then change weapon to finish off the enemy. In the group your task is much simpler, it's enough to attack from the distance and creates illusions to make a chaos.
Where PvE is problematic, PvP seems to be a natural mesmer's mode. Giving and canceling statuses, confusing enemies or teleporting whole armies is a normal thing for him. Moreover, it's the hero who is hard to be eliminated thanks to it illusions and retreat skills.
As the game's name suggest, the main methods of gathering the bigger number of players are guilds. Players in such unit can not only cooperate during quests and events but also be recognizable during PvP and WvW. What is more, playing in a guild gives you influence points which can be used to improve the guild, what provides many unique bonuses.
Few clicks are required to create a guild. Press G, choose Create Guild, write your name (max 31 letters) and abbreviation (max 4 letters). After paying one silver you can start inviting friends. Joining the existing is equally simple. When you got invated, press G, the bookmark management, choose the name of the guild you want to join and click Join Guild. Last step is to represent the guild, thanks to which your successes will help develop the guild. To do so, just click on the Represent. Player may be in many guilds, but represent only one at once.
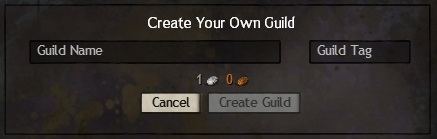 Creating new guilds is easy and quick.
There can be 500 players in one guild, spread on few servers. It's worth mentioning that influence and bonuses are available only for the world where they have been conquered: changing it, you have to collect the influence again. Maximum number of players in your guild depends on the fee you paid:
You can increase this number at Guild Registrar in every beginning location.
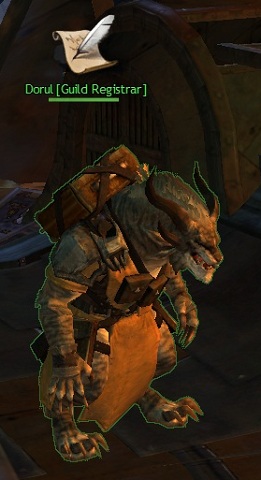
Every guild has up to 10 ranks for its members. To change it, the person with Edit Ranks (default guild leader) have to right mouse click on the icon next to the hero's name and choose a new one. After creating a guild you can choose between three ranks, Leader, Officer, Member, every with other permissions.
Permissions
Leader
Officer
Member
Edit ranks
X
Edit guild emblem
X
Claim/unclaim WvW forts
X
X
X
Queue upgrades
X
X
Modify upgrade in progress
X
X
Activate built upgrades
X
X
Admin lower ranks
X
X
Edit message of the day
X
X
Display guild emblem
X
X
Guild stash deposit
X
X
X
Guild stash withdraw
X
X
X
Treasure trove deposit
X
X
Treasure trove withdraw
X
X
New members here
X
Leader may add next ranks and permissions to them. REMARK: there is a possibility of making a second leader. Such player can lose this rank only by degrading himself.
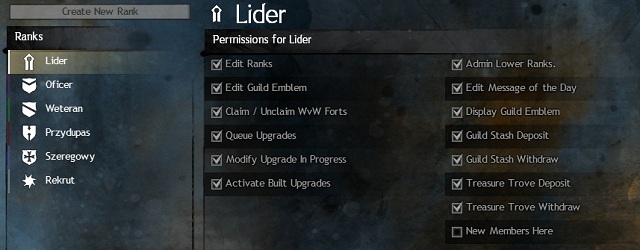
Proper set of permissions make the control over the guild easier.
Guild Stash and Treasure Trove permissions are related to the guild's treasure and his bookmark. Thanks to that, members can exchange items but they don't have an access to better items from the other stashes. to increase control over treasure, every transaction is noted down. You can have three bookmarks with different capacity to buy for influence:

List of transaction makes controlling the treasure easier.
To identify your guild among many others, you can create an unique emblem, which could be displayed on armors, weapons and flags during WvW. To do so, you have to buy a Guild Item Template upgrade from the Politics bookmark (more in the Guilds - influence) and then go to Guild Registrar to create your own symbol.
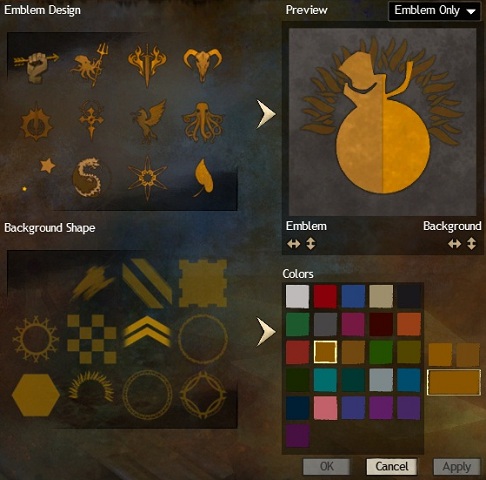 Number of option should please every malcontent.
To display the emblem you have to buy Guild Armor Contract and Guild Weapons Contract upgrades. It unlocks an access to Guild Armorer and Guild Weaponsmith, where you can buy items letting you to transmutate equipment into the one with your emblem.
Influence is a special type of points, accumulated on the guild's account used for buying various upgrades and temporal bonuses. You collect them by taking part in events, undergrounds exploration and PvP. To collect influence, you have to represent a guild. What is more, influence is gathered only for the guild's part from the same server. So playing on the Blacktide doesn't give you points from the players on Gandary. REMARK: influence gathered during the game on overflow aren't saved.

All collected influence is noted down.
Below you can find methods of acquiring the influence:
Influence
Method
2
Every player who finished the event or storyline mission (the more player, the more influence)
5
Everyone player who won PvP
10
Every player who ended exploration of undergrounds.
10
Every new member
10
Every player who was online during checking the "presence list" (once a day in a random moment, chosen by the game)
20
For two players finishing the event or storyline mission in the same moment.
10
At Guild Promoter for two silver (you can multiply it)
400
Using Letter of Commendation.
1000
Using Tome of Influence.
Gathered points may be spend for developing four branches of guild: Architecture, The Art of War, Economy and Politics. If the upgrade is cancelled during developing, the influence is returned. Points spent on speeding the production up are lost.
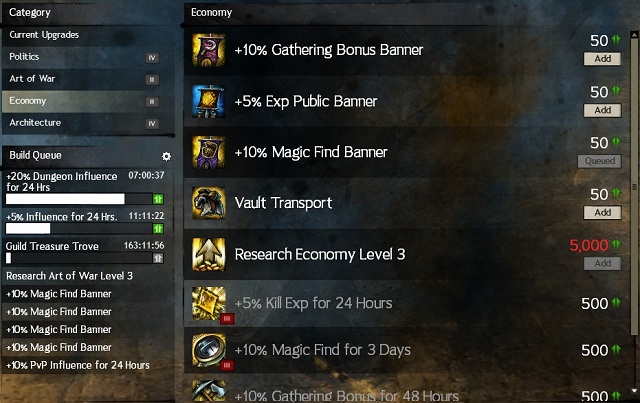
Available Economy upgrades.
This branch of upgrades increases the capacity of guild treasure and allow for making simultaneously two new upgrades.
Name
Level
Influence
Time
Description
 Research Architecture Level 1
-
500
16 hours
Architecture gets 1st level.
 Guild Workshop
1
500
48 hours
Allows to make two upgrades simultaneously.
 Research Architecture Level 2
1
1000
32 hours
Architecture gets 2nd level.
 Guild Stash
2
1000
48 hours
+50 slots in treasure.
 Research Architecture Level 3
2
5000
72 hours
Architecture gets 3rd level.
 Research Architecture Level 4
3
10000
96 hours
Architecture gets 4th level.
 Guild Treasure Trove
4
5000
168 hours
+100 slots in treasure.
 Research Architecture Level 5
4
20000
168 hours
Architecture gets 5th level.
 Deep Cave
5
10000
168 hours
+100 slots in treasure.
Bonuses during WvW.
Name
Level
Influence
Time
Description
 Research Art of War Level 1
-
500
16 hours
Art of War gets 1st level.
 +10% PvP influence for 24h
1
100
24 hours
+10% PvP influence for 24h
 Research Art of War Level 2
1
1000
24 hours
Art of War gets 2nd level.
 WvW Fort +10% Experience
 2
200
16 hours
WvW Fort +10% Experience for 12 hours.
 WvW Fort +5 Supply
2
200
16 hours
WvW Fort +5 Supply for 12 hours.
 WvW Fort +10% Magic Find
2
200
16 hours
WvW Fort +10% Magic Find for 12 hours.
 Research Art of War Level 3
2
5000
72 hours
Art of War gets 3rd level.
 WvW Fort +40 Power
3
200
36 hours
WvW Fort +40 Power for 12 hours.
 WvW Fort +40 Toughness
3
200
36 hours
WvW Fort +40 Toughness for 12 hours.
 WvW Fort +40 Vitality
3
200
36 hours
WvW Fort +40 Vitality for 12 hours.
 WvW Fort +40 Precission
3
200
24 hours
WvW Fort +40 Precission for 12 hours.
 Research Art of War Level 4
3
10000
96 hours
Art of War gets 4th level.
 WvW Fort +10% Healing
4
200
24 hours
WvW Fort +10% Healing for 12 hours.
 WvW Fort +10% Player Health
4
200
24 hours
WvW Fort +10% Player Health for 12 hours.
 Guild Catapult
4
500
24 hours
Creates a catapult which requires less supply.
 Research Art of War Level 5
4
20000
168 hours
Art of War gets 5th level.
 Guild Siege Suit
5
500
36 hours
Creates Siege Suit which requires less supply.
 WvW Fort +5% Swiftness
5
500
24 hours
WvW Fort +5% Swiftness for 12 hours.
Bonuses from here increases amount of collected items, XP and karma points.
Name
Level
Influence
Time
Description
 Research Economy Level 1
-
500
16 hours
Economy gets 1st level.
 +5% Exp Public Banner
1
50
4 hours
Summons a banner +5% XP for allies for 30 minutes.
 +10% Gathering Bonus Banner
1
50
4 hours
Summons a banner +5% rare resource gathering chance for allies for 30 minutes.
 Research Economy Level 2
1
1000
24 hours
Economy gets 2nd level.
 +10% Magic Find Banner
2
50
4 hours
Summons a banner +10% magic find for allies for 30 minutes.
 Research Economy Level 3
2
5000
72 hours
Economy gets 3rd level.
 +5% Kill Exp for 24 Hours
3
500
24 hours
+5% Kill Exp for 24 Hours.
 +10% Magic Find for 72 Hours
3
500
36 hours
+10% Magic Find for 72 Hours.
 Vault Transport
3
50
6 hours
Summons a guild's vault to your location.
 Research Economy Level 4
3
10000
96 hours
Economy gets 4th level.
 +10% Gathering Bonus for 48 Hours
4
500
32 hours
+10% Gathering Bonus for 48 Hours
 +15% Karma for 24 Hours
4
500
48 hours
+15% Karma gathering for 24 Hours
This branch upgrades emblems, armors, weapons and other useful items.
Name
Level
Influence
Time
Description
 Research Politics Level 1
-
500
16 hours
Politics gets 1st level.
 +5% Karma Banner
1
50
4 hours
Summons a banner +5% karma gathering for allies for 30 minutes.
 Guild Emblem Template
1
100
24 hours
Let you create an emblem at Guild Registrar.
 Road Marker
1
50
4 hours
Summons a marker which gives 20 second of swfitness for allies.
 Research Politics Level 2
1
1000
24 hours
Politics gets 2nd level.
 +5% Influence for 24 Hours
2
100
16 hours
+5% Influence in PvE for 24 Hours.
 Guild Armorer Contract
2
500
32 hours
Let you buy an armor with an emblem.
 Research Politics Level 3
2
5000
72 hours
Politics gets 3rd level.
 +10% Influence From Events
3
200
24 hours
+10% Influence From Events
 Contract Asuran Outsourcing
3
200
30 hours
Let you develop one upgrade without a slot.
 Guild Weapons Contract
3
1000
40 hours
Let you buy a weapon with an emblem.
 Research Politics Level 4
3
10000
96 hours
Politics gets 4th level.
 +20% Dungeon Influence for 24 Hours
4
200
36 hours
+20% Dungeon Influence for 24 Hours
 Guild Banquet
4
1000
78 hours
Creates a banquet table from which players can eat and drink. Lasts an hour.
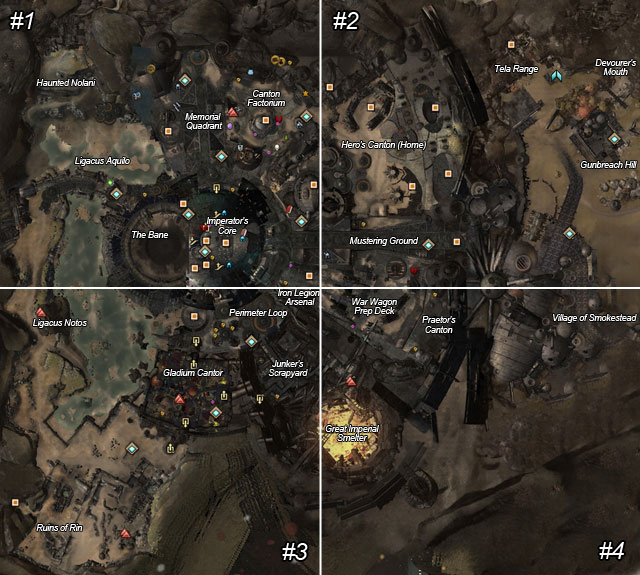
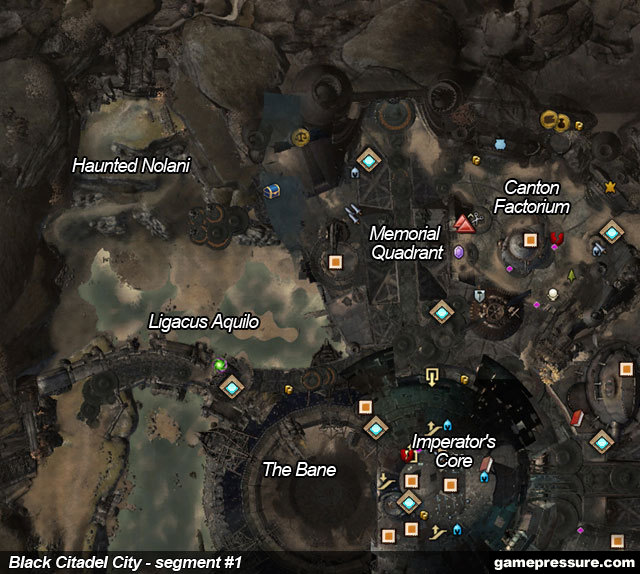
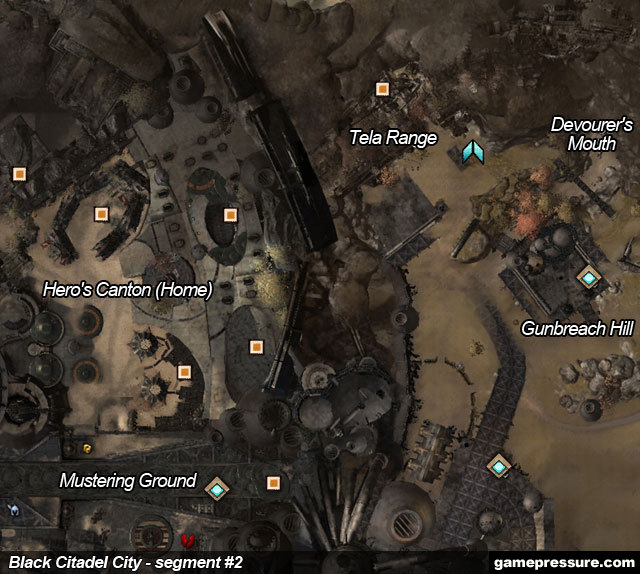
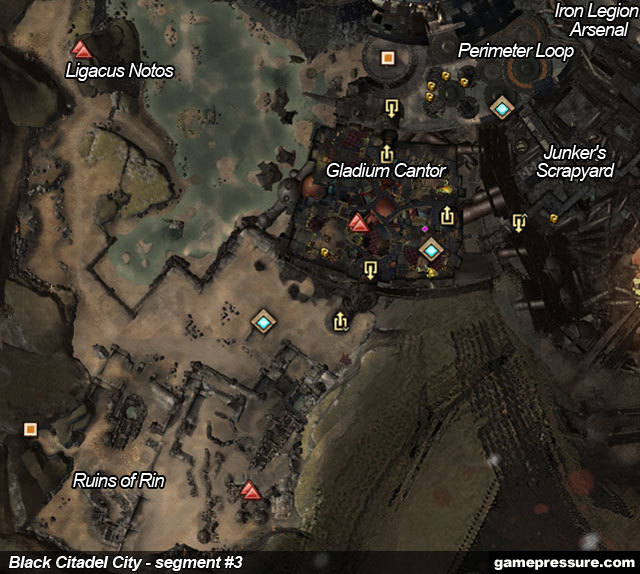
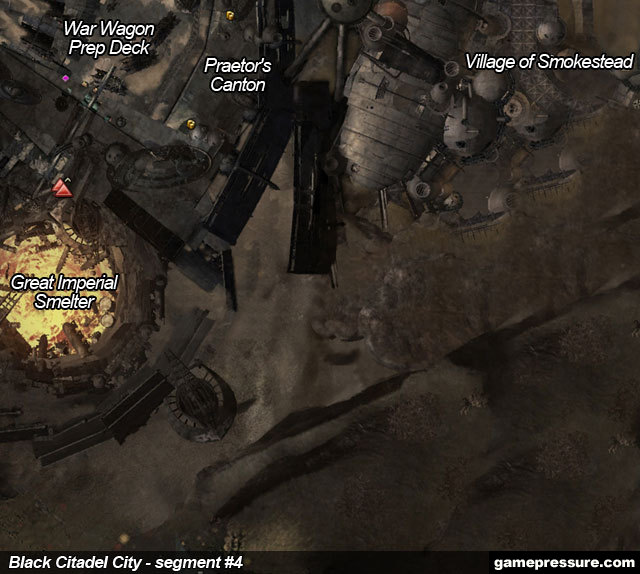

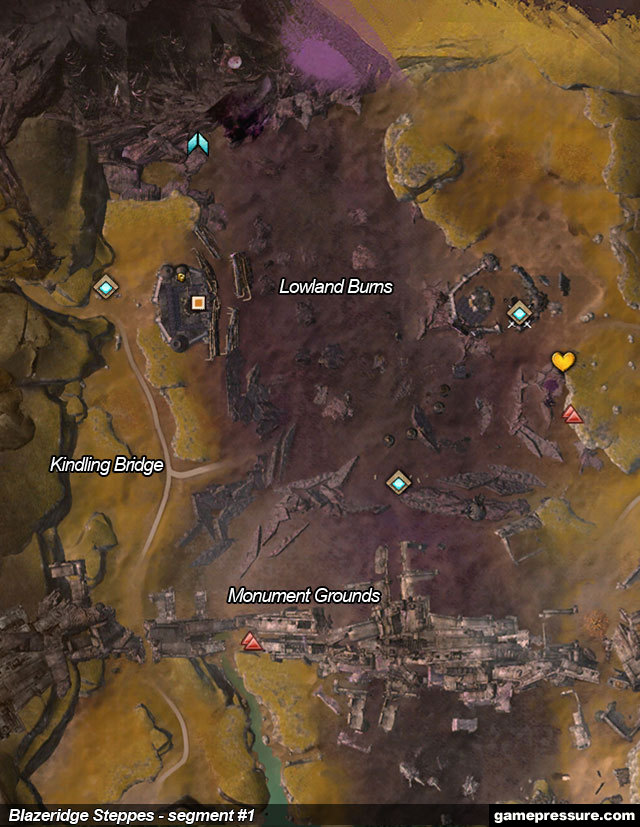
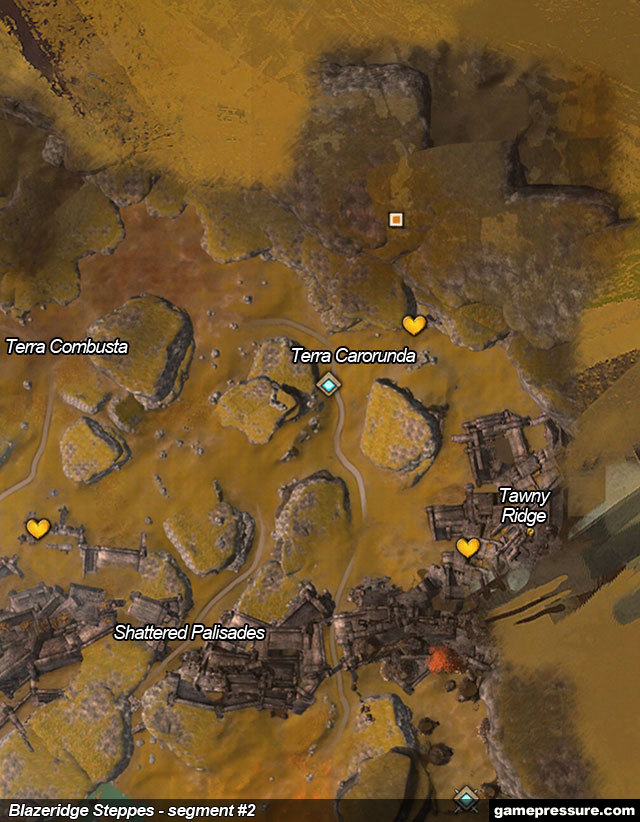
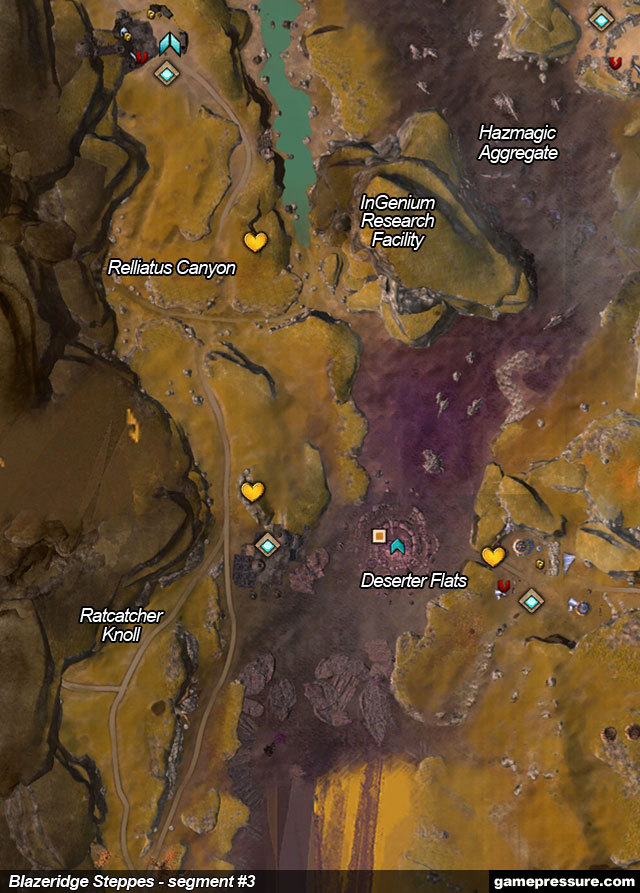
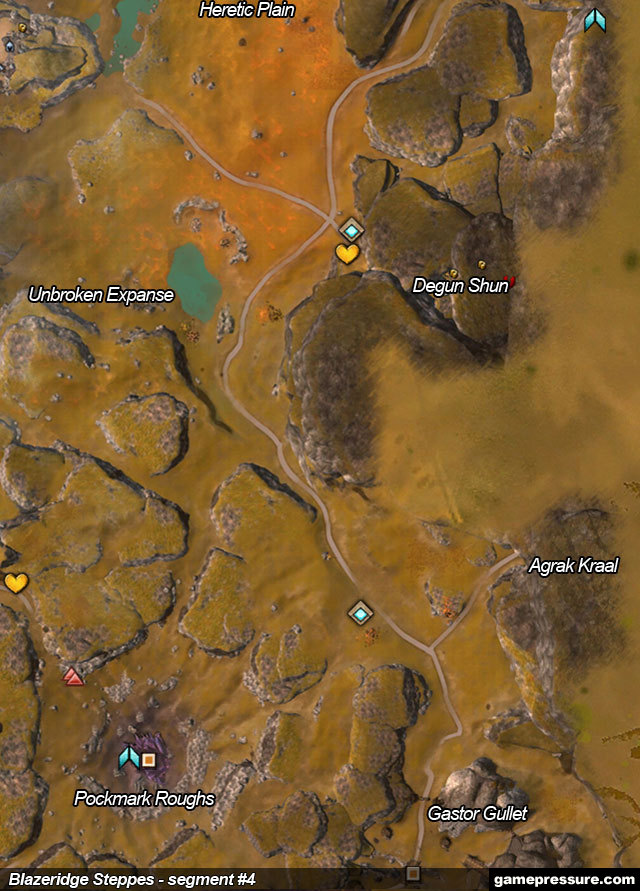
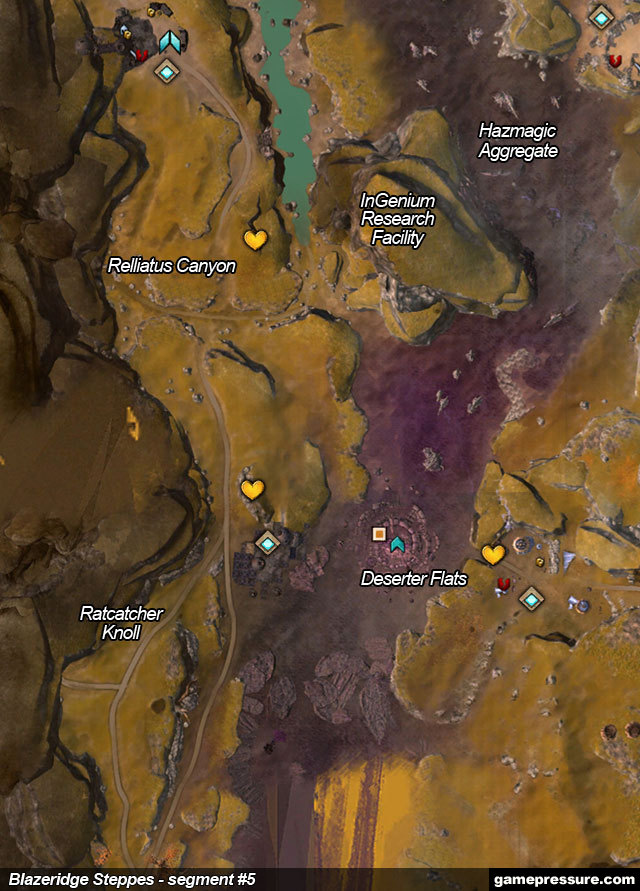
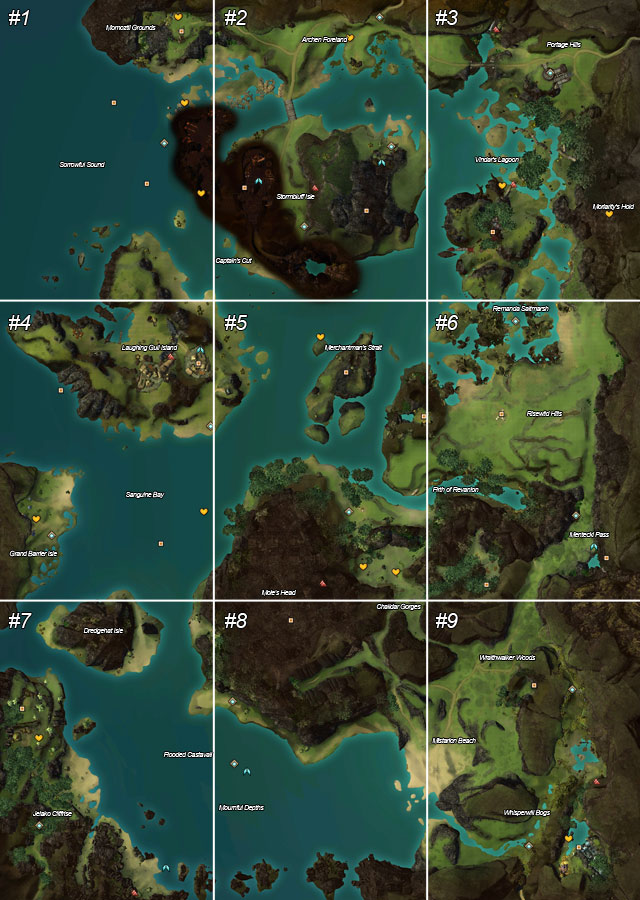
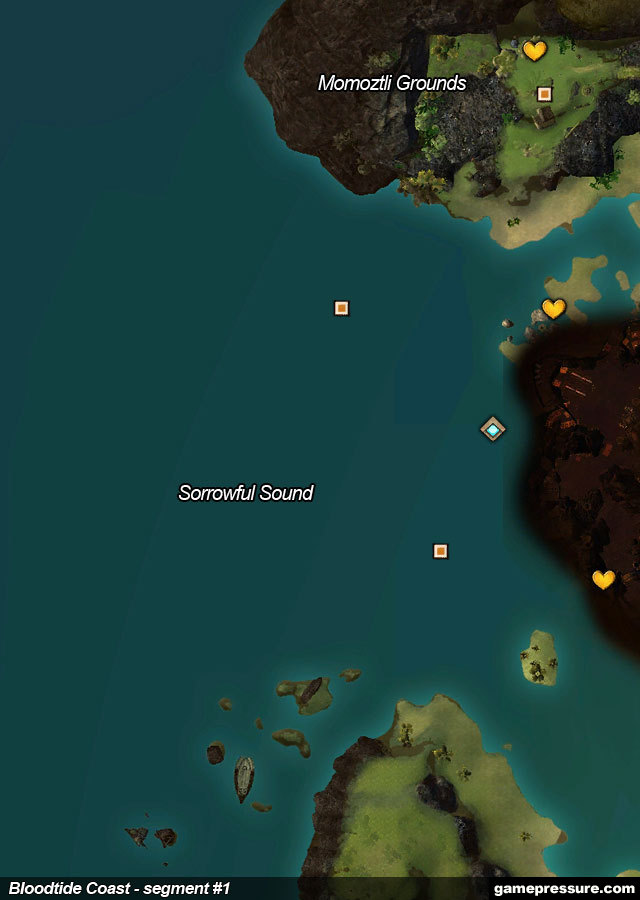
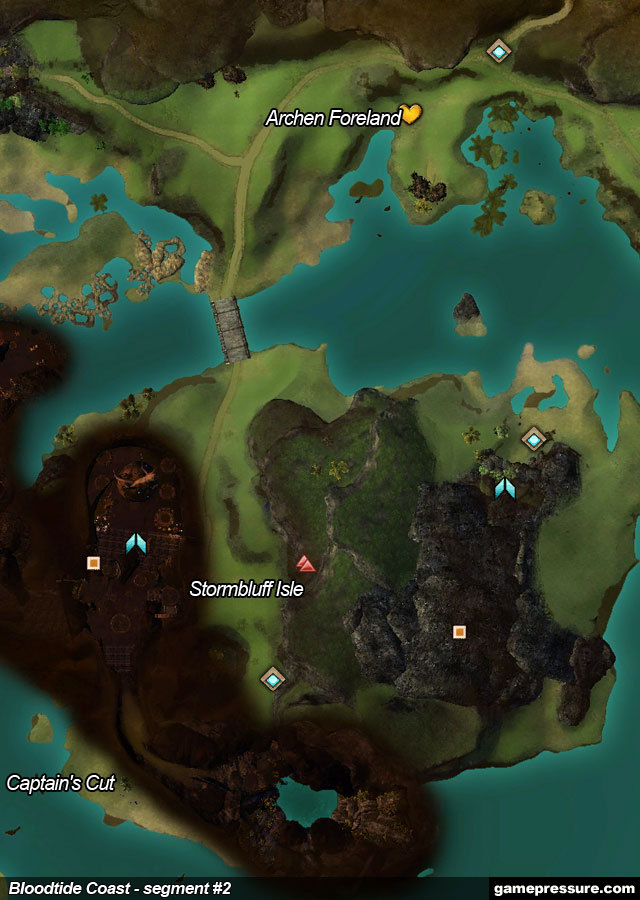

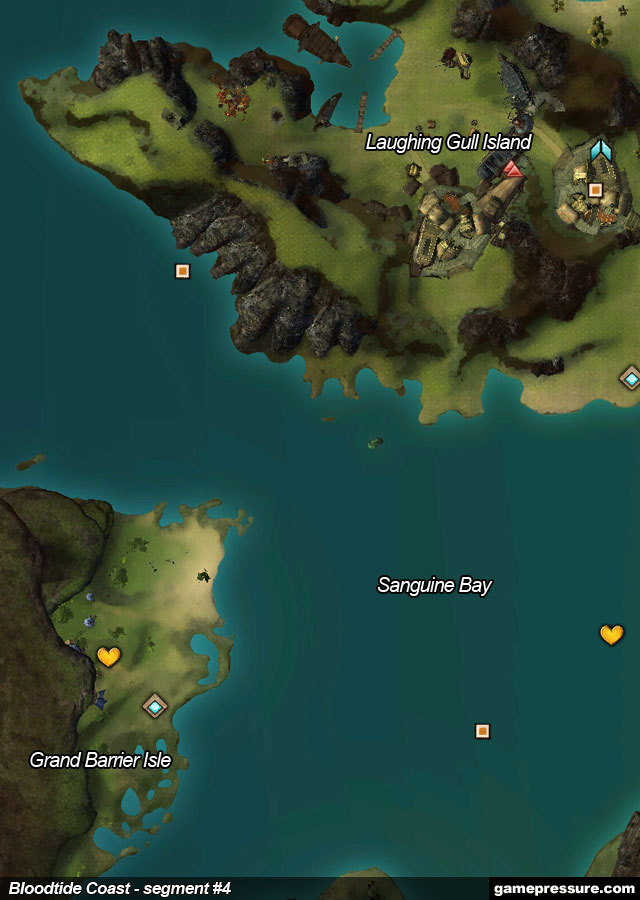


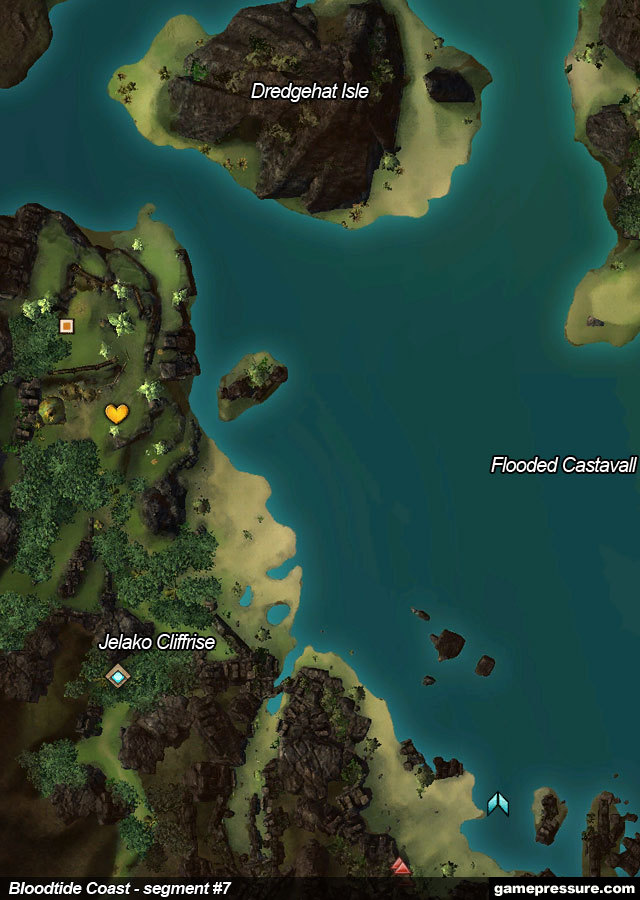

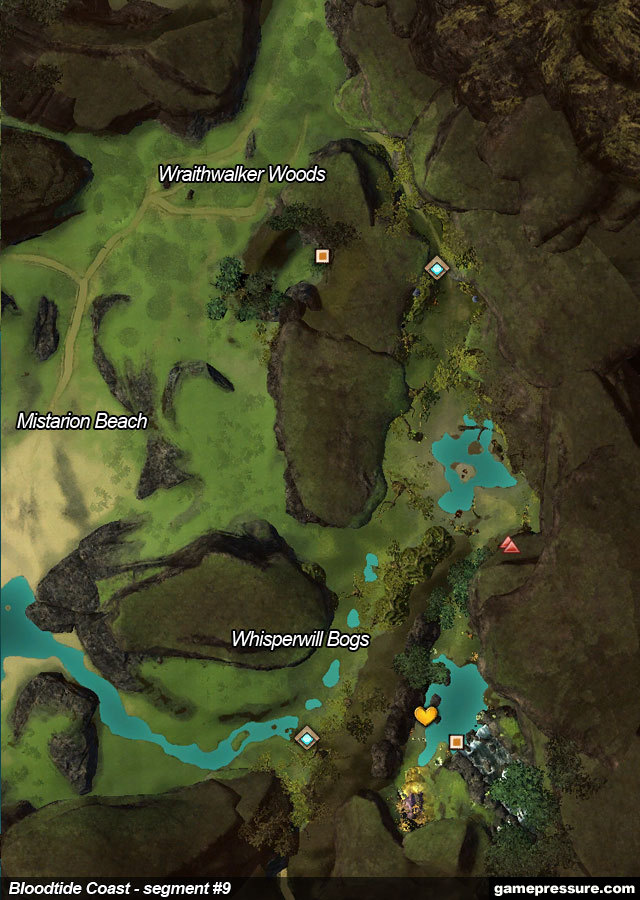
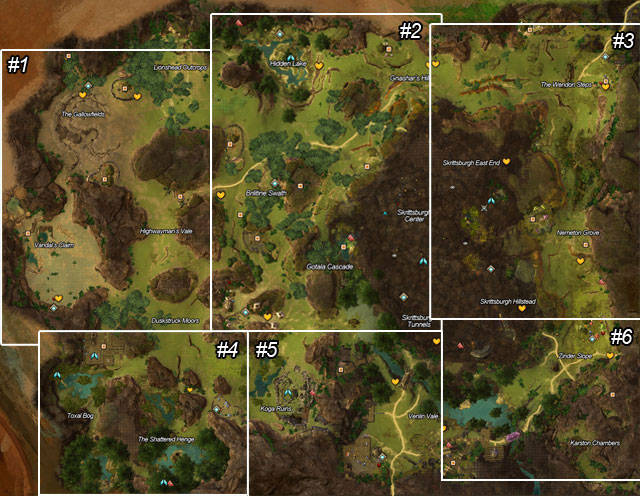
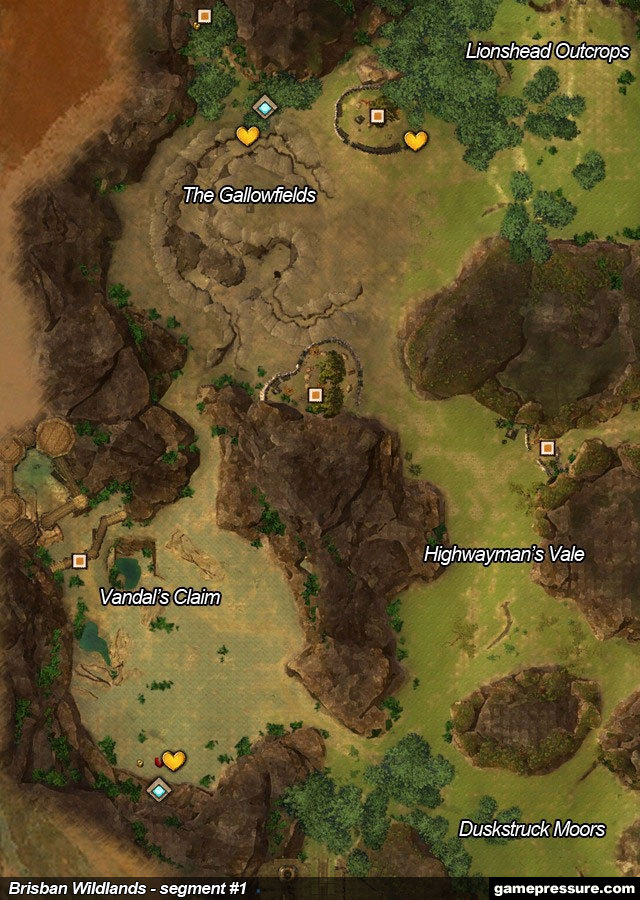
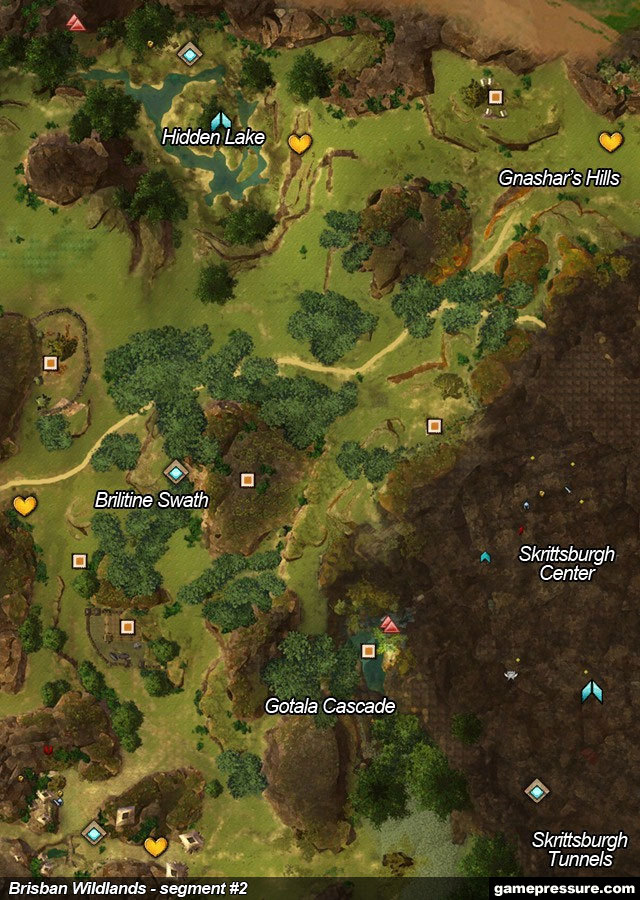
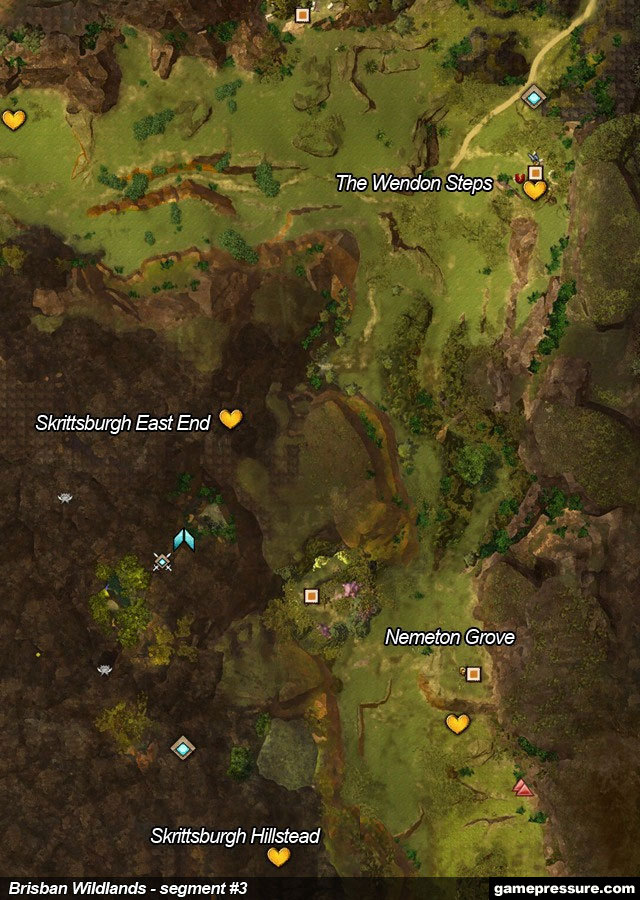
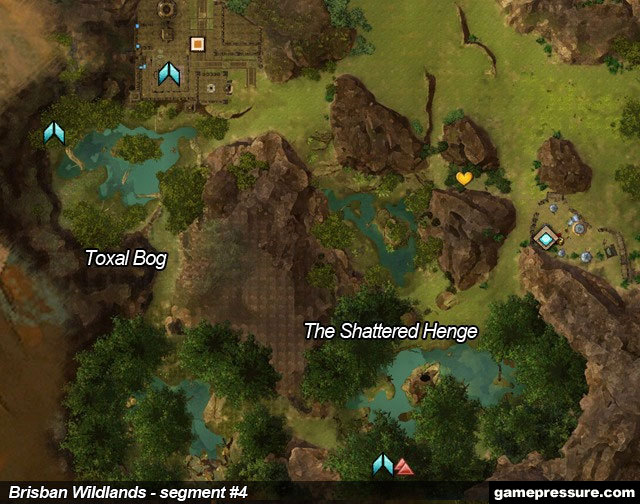
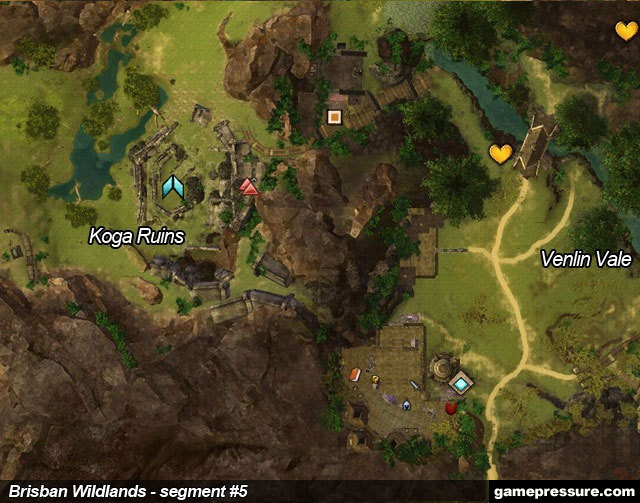
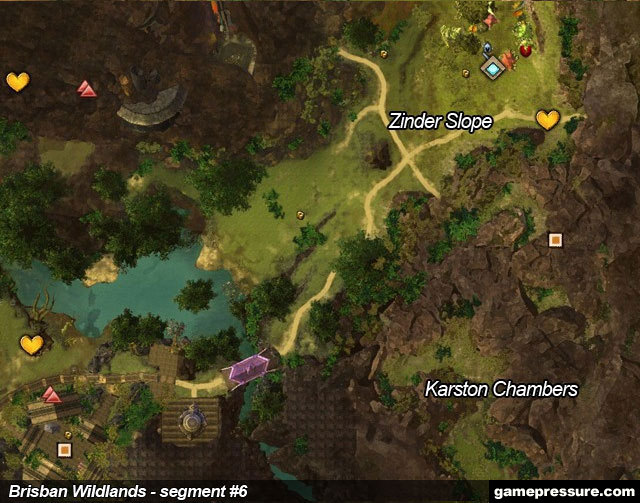
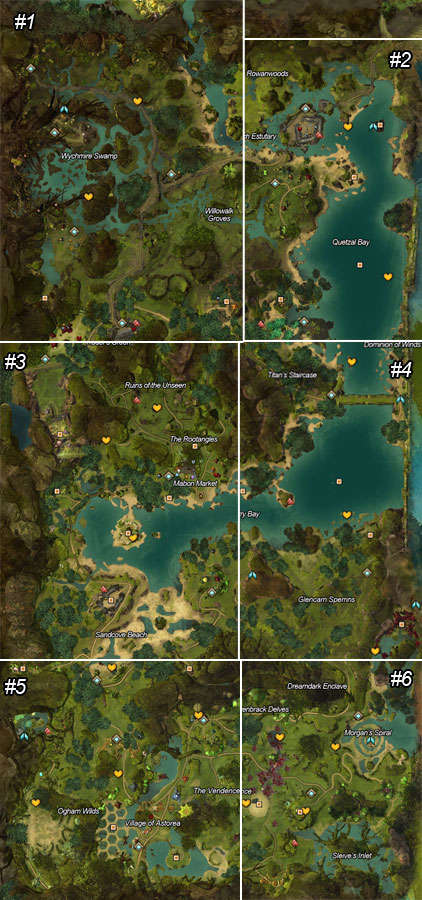
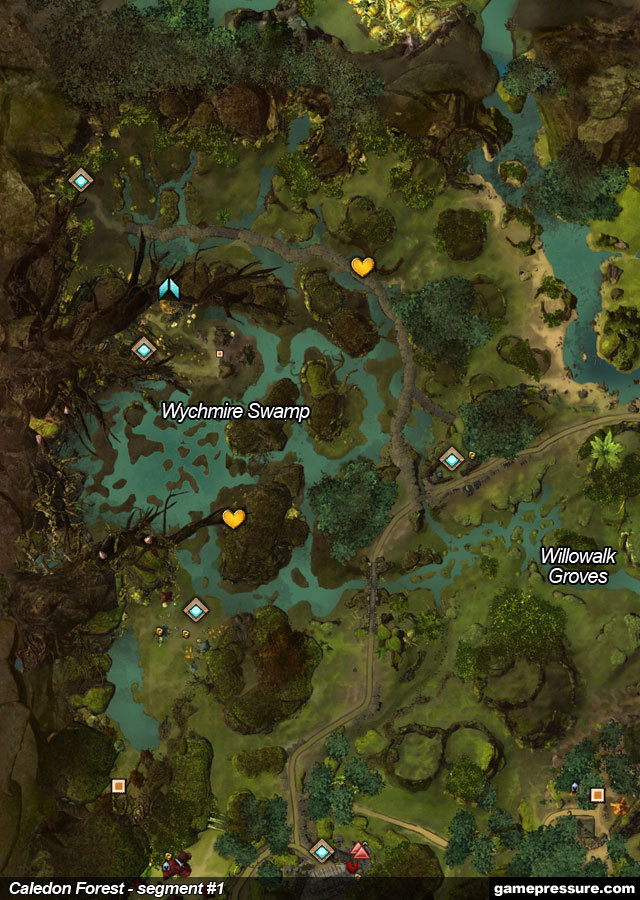
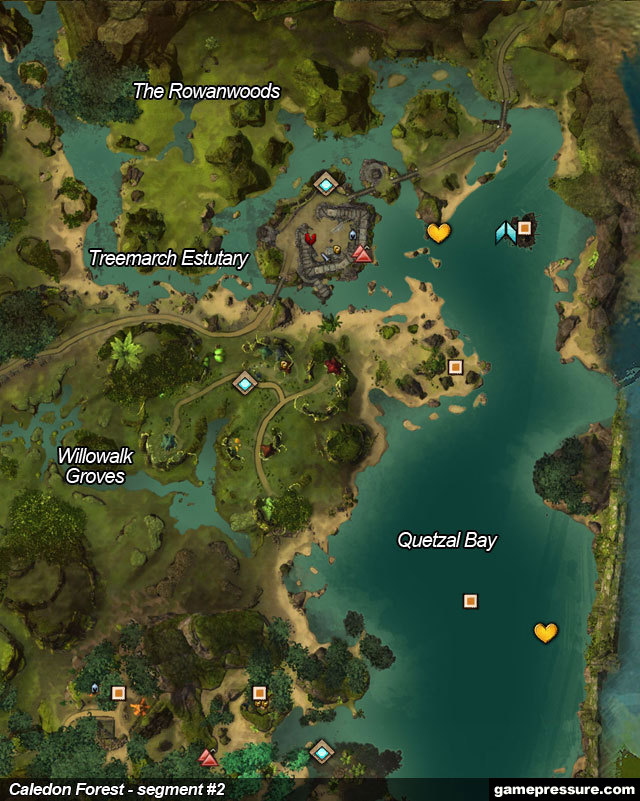
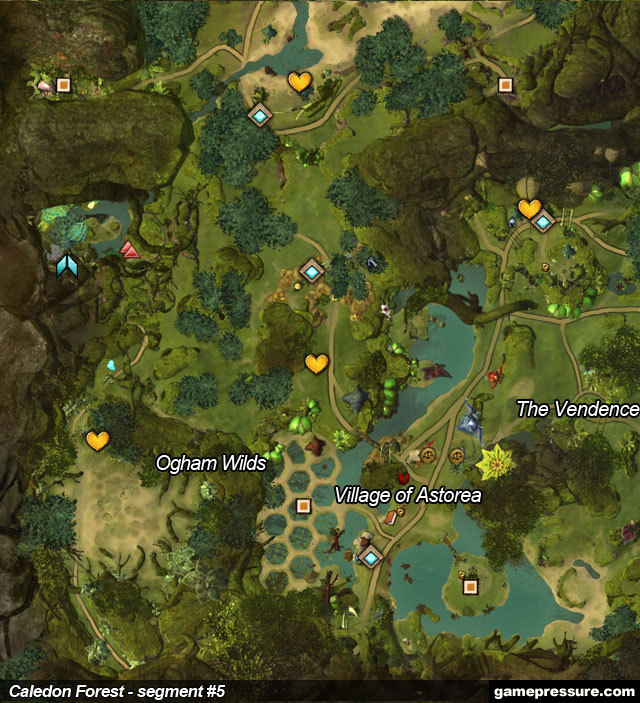
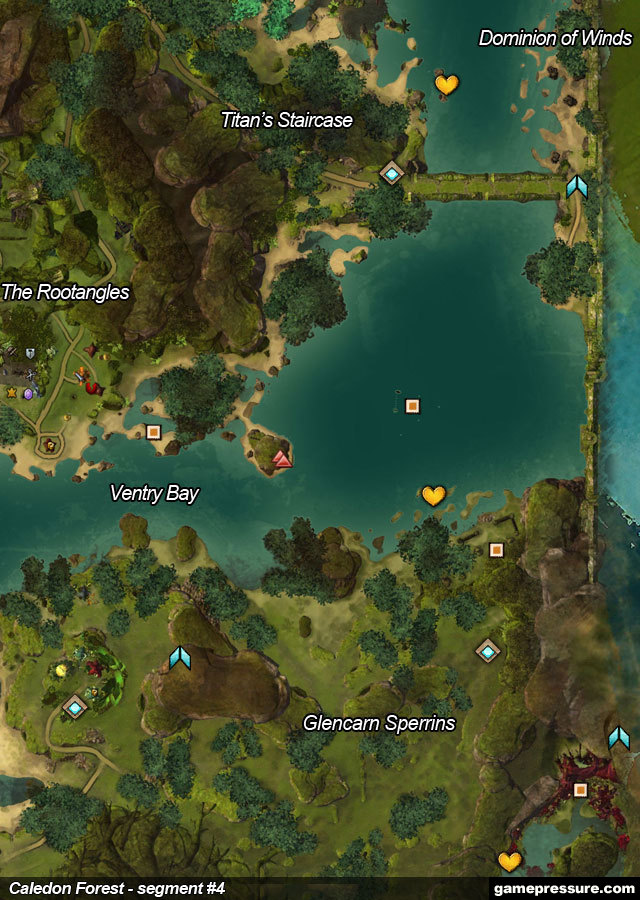
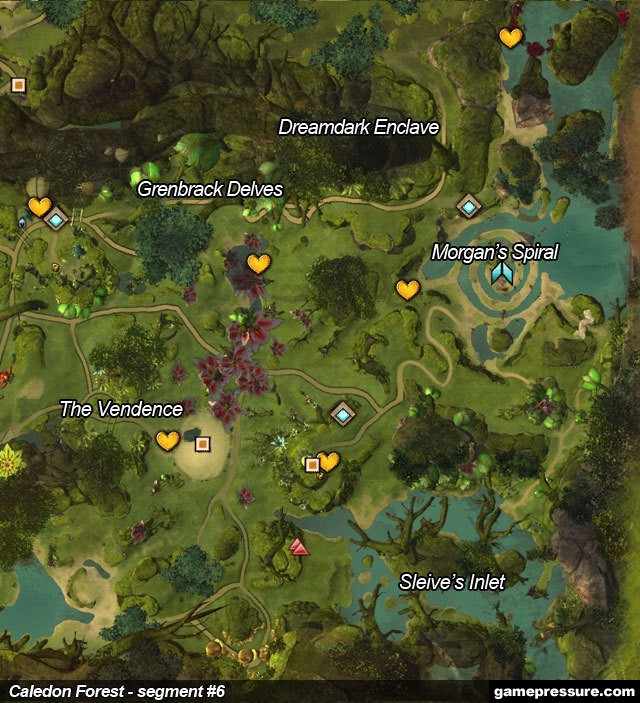
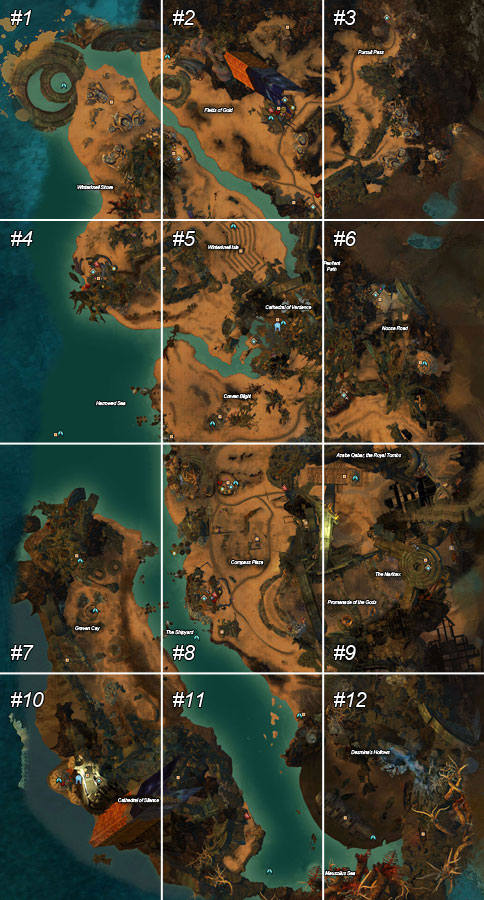
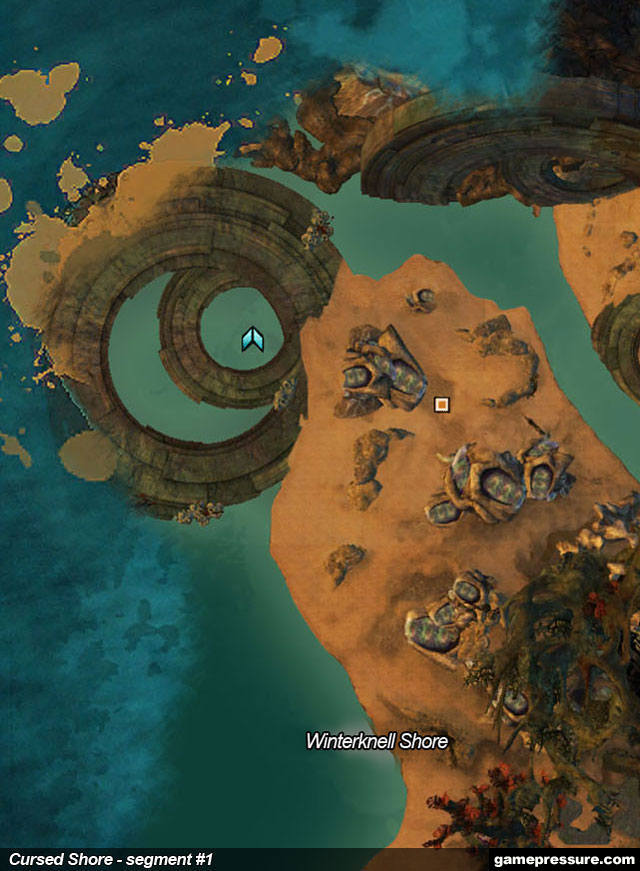
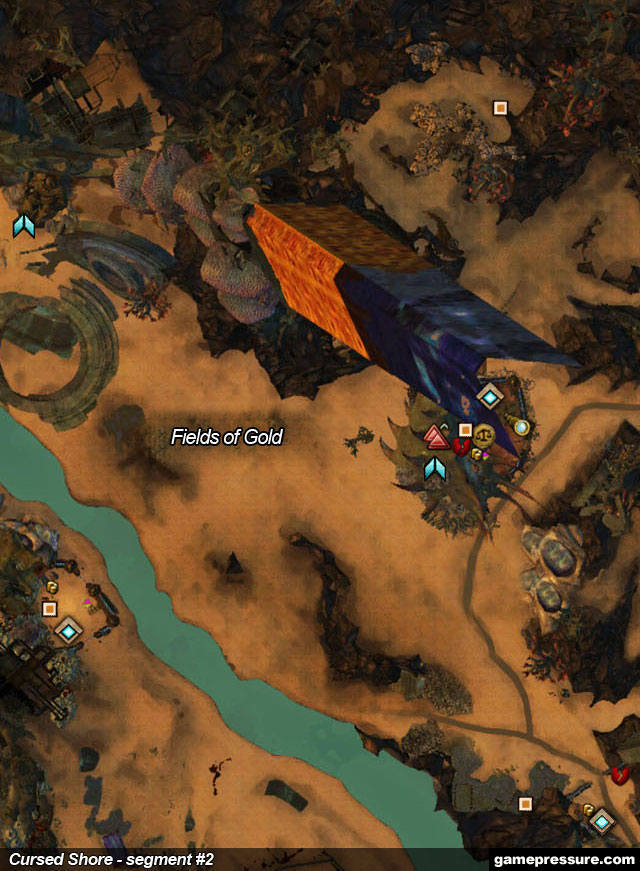
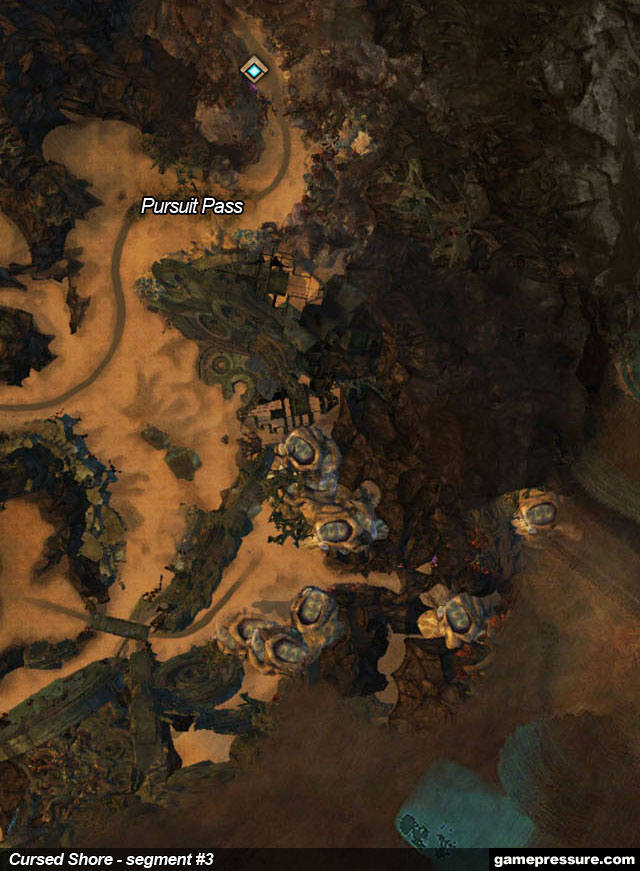
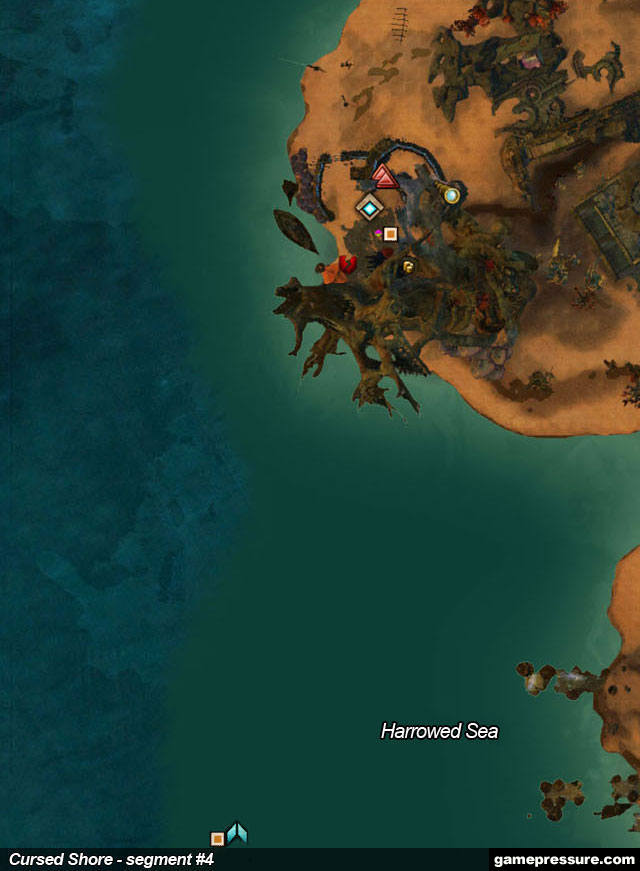
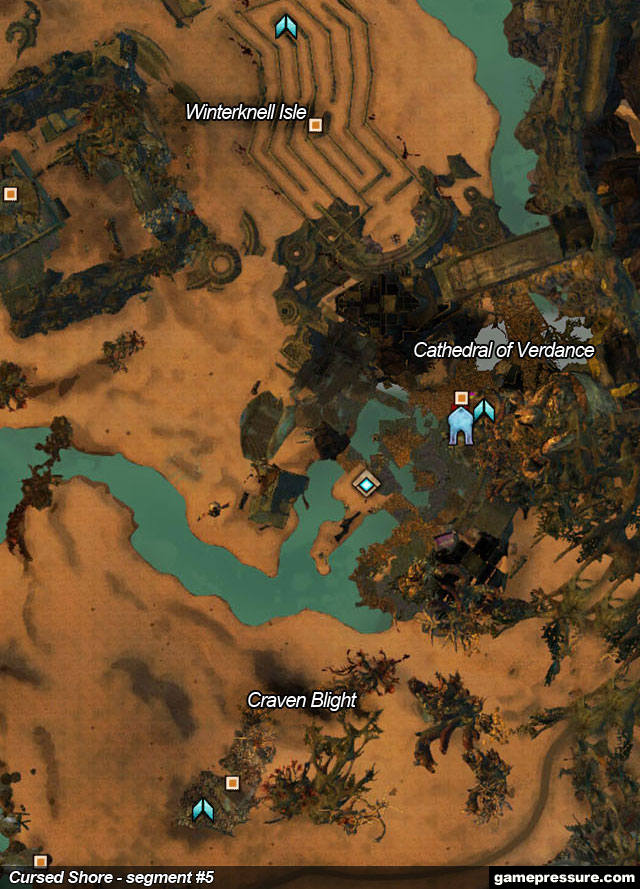
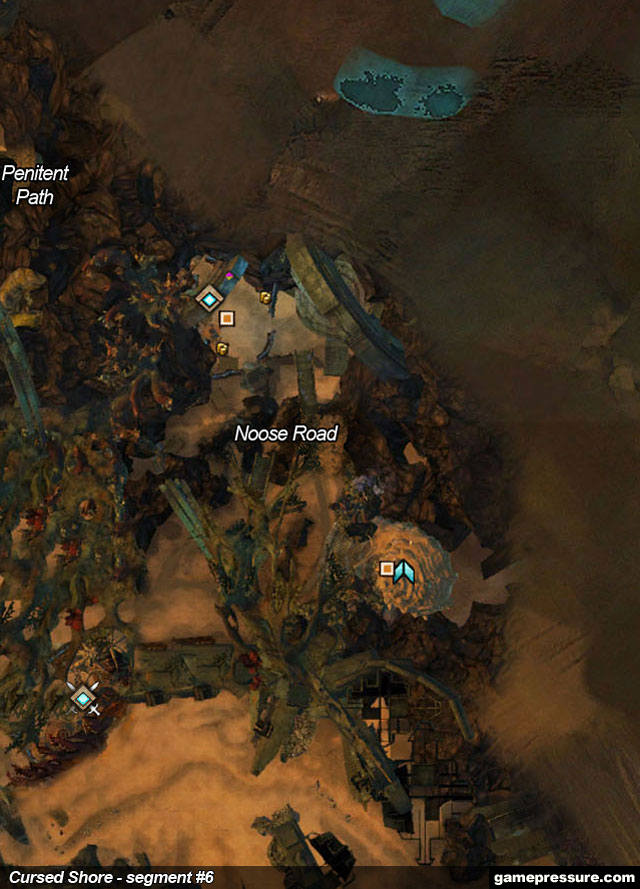
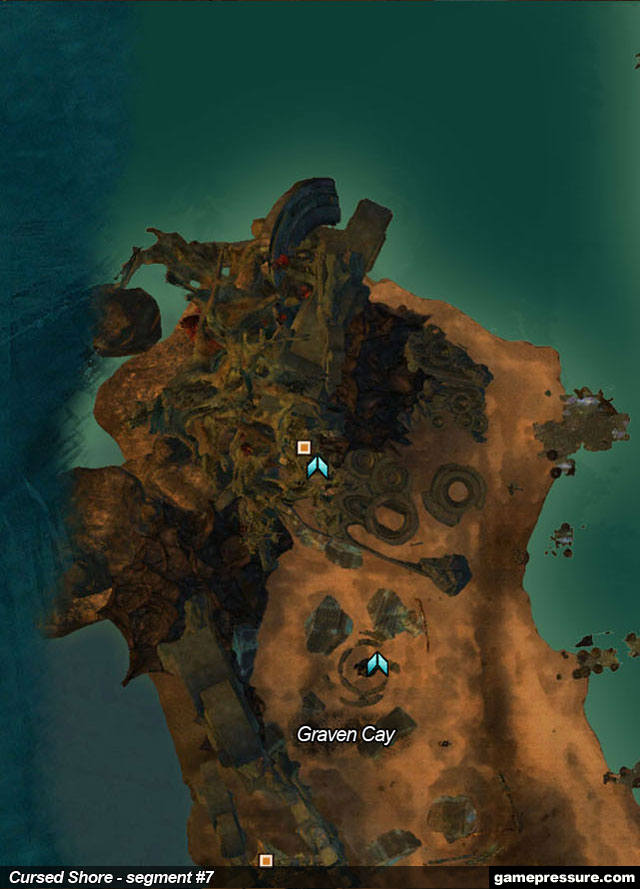
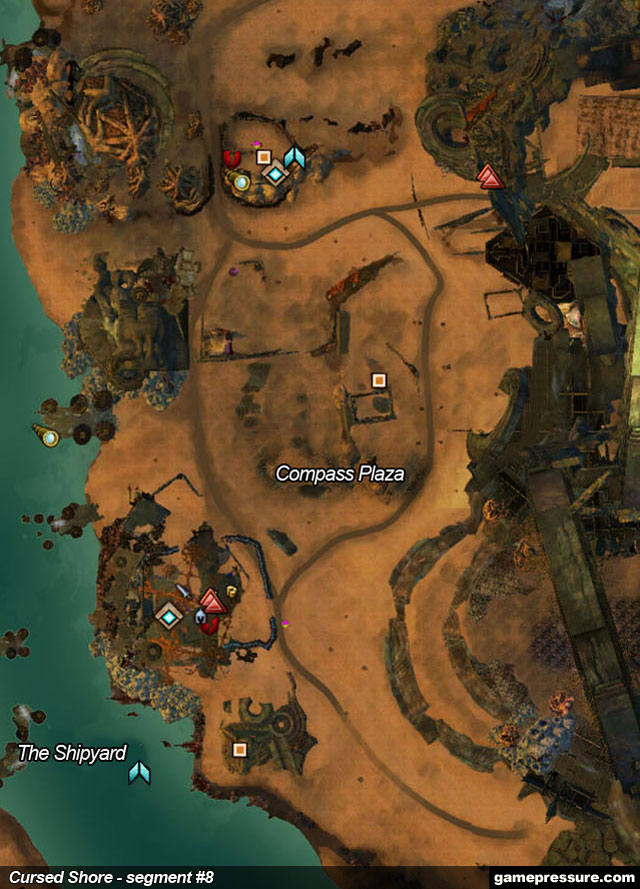
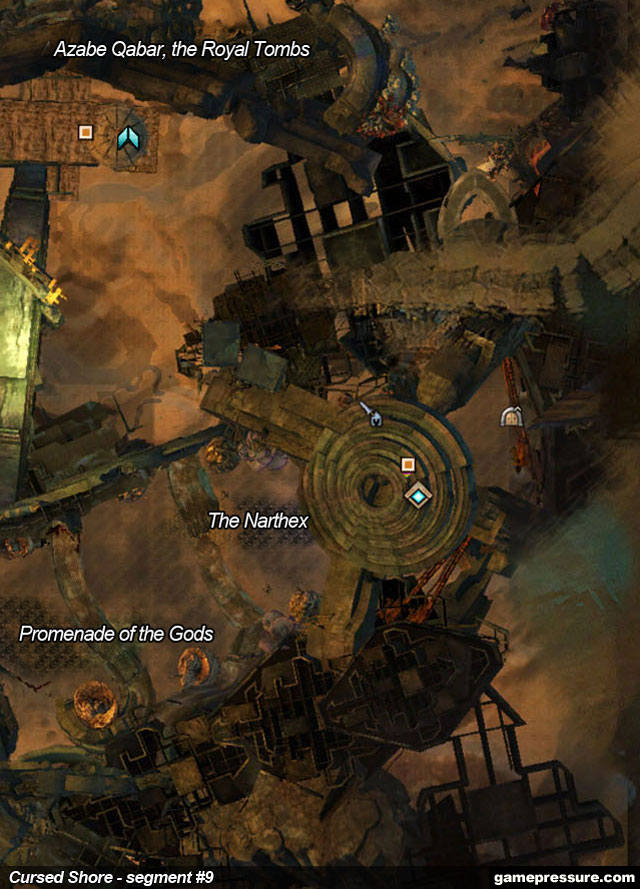
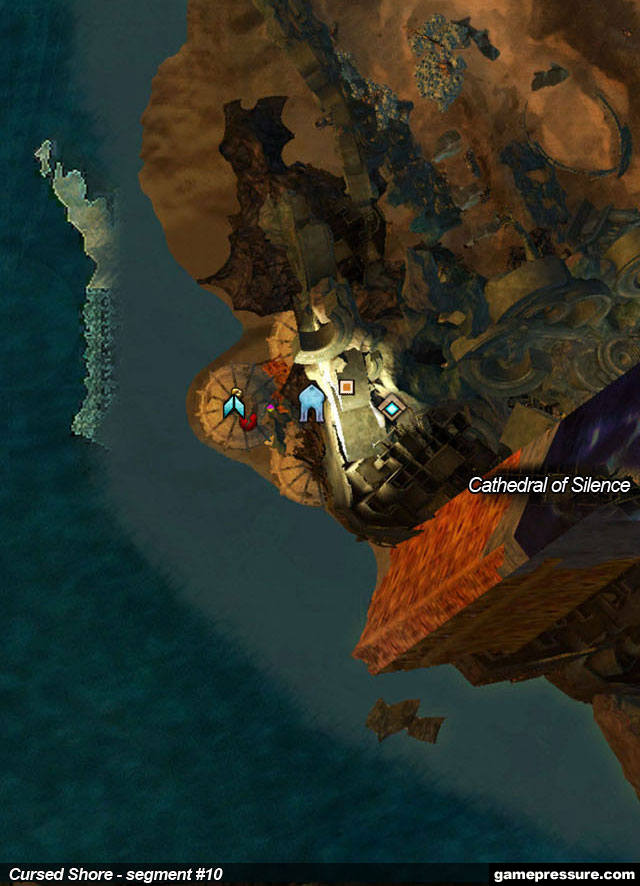
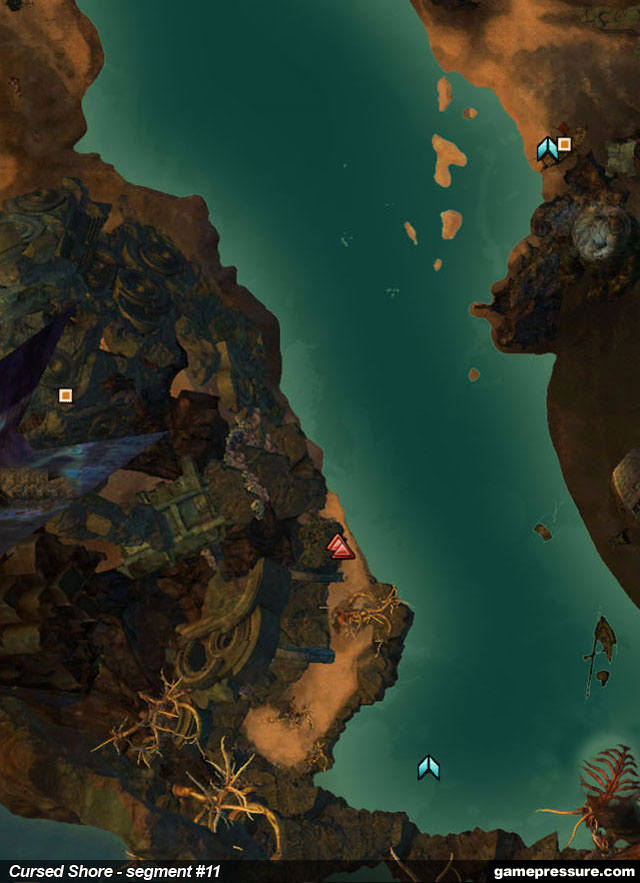
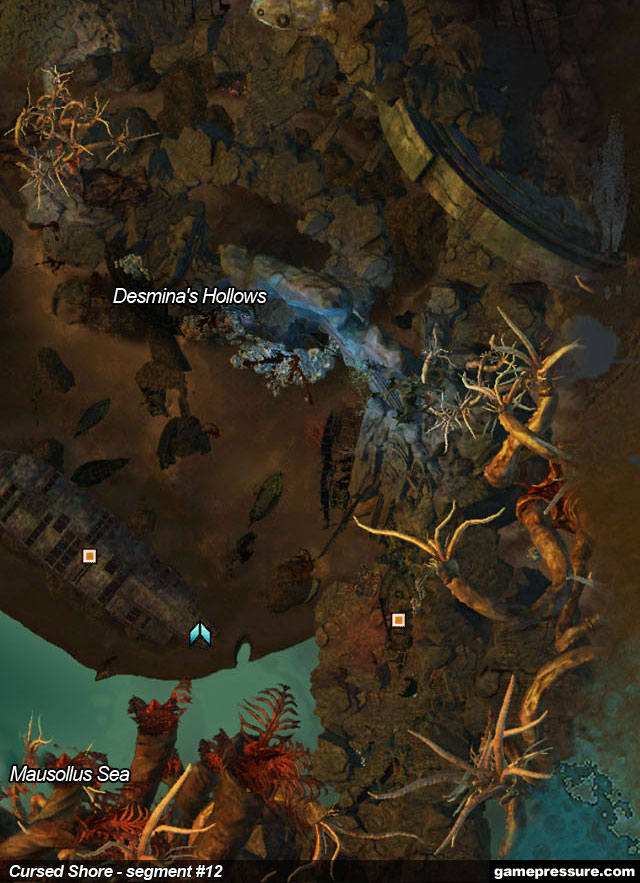
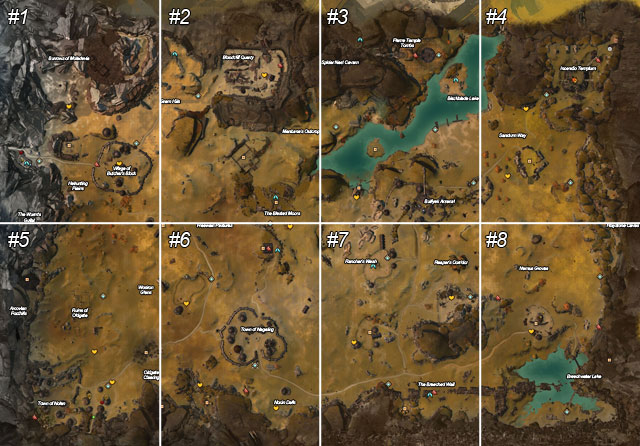
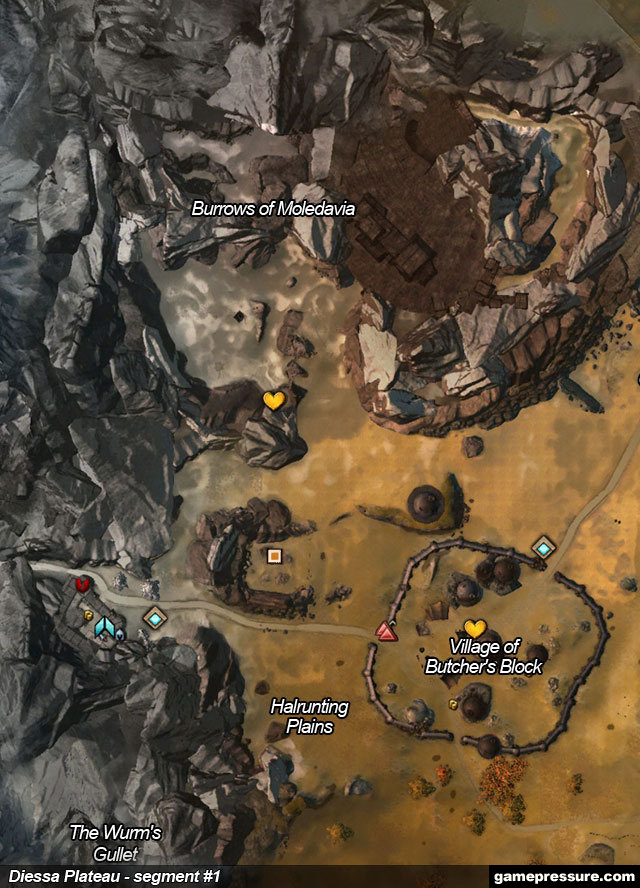
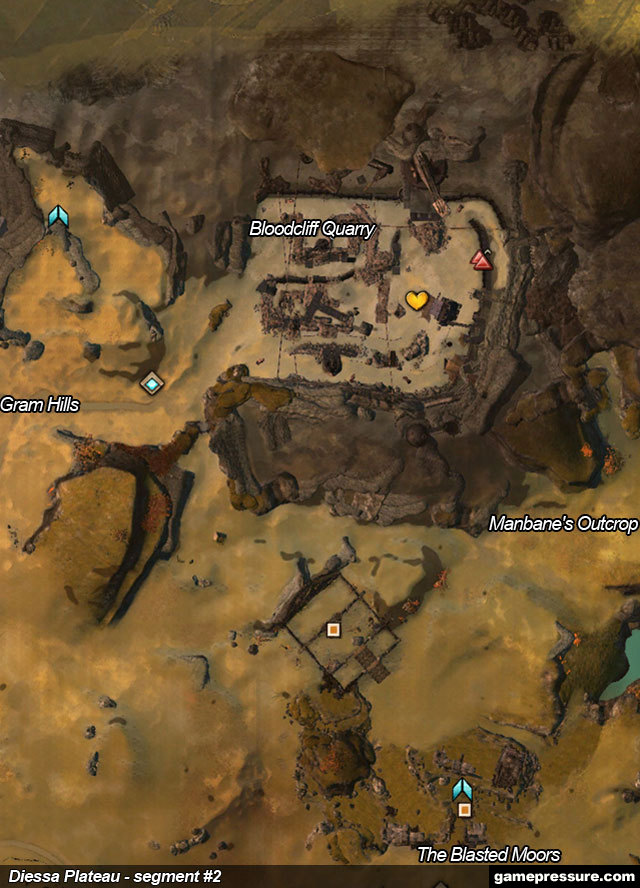
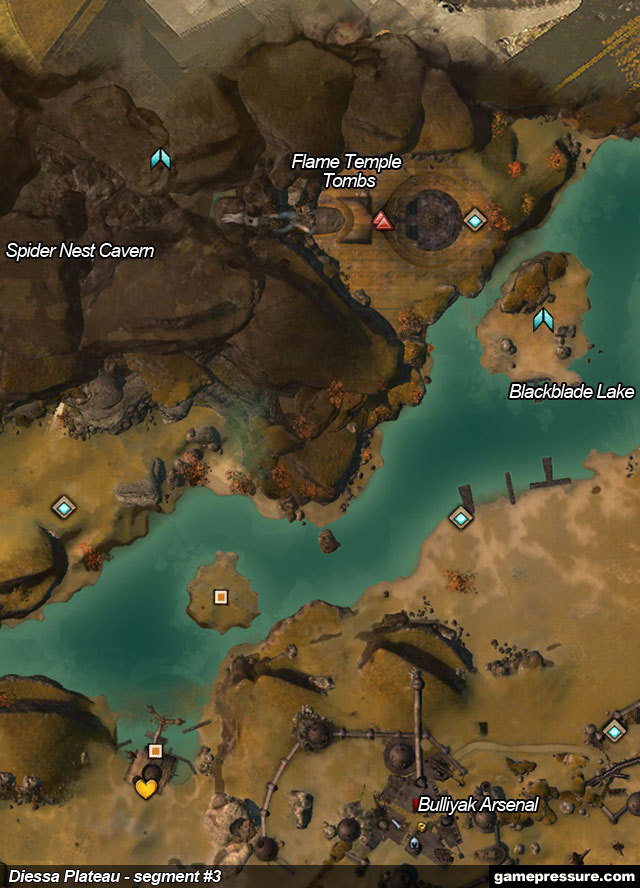
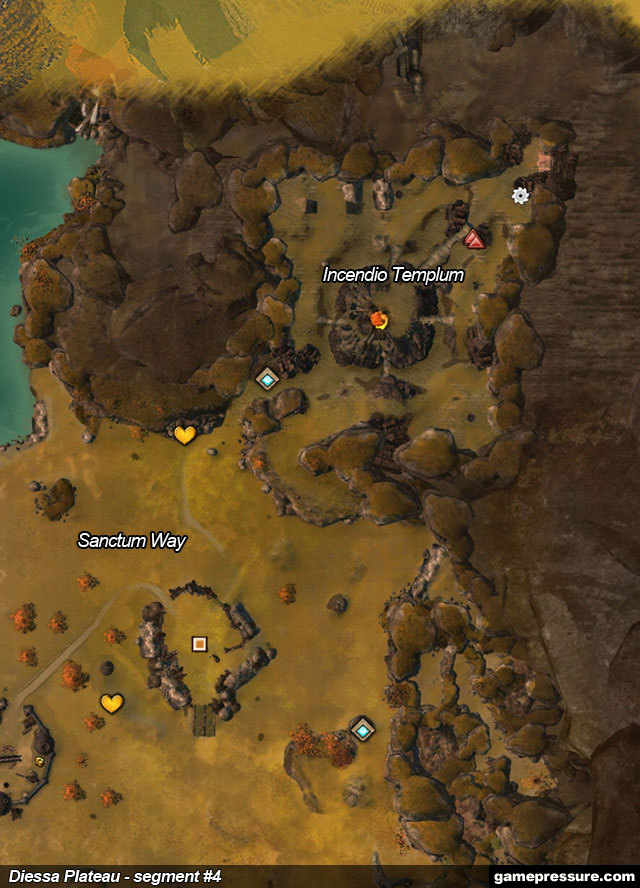
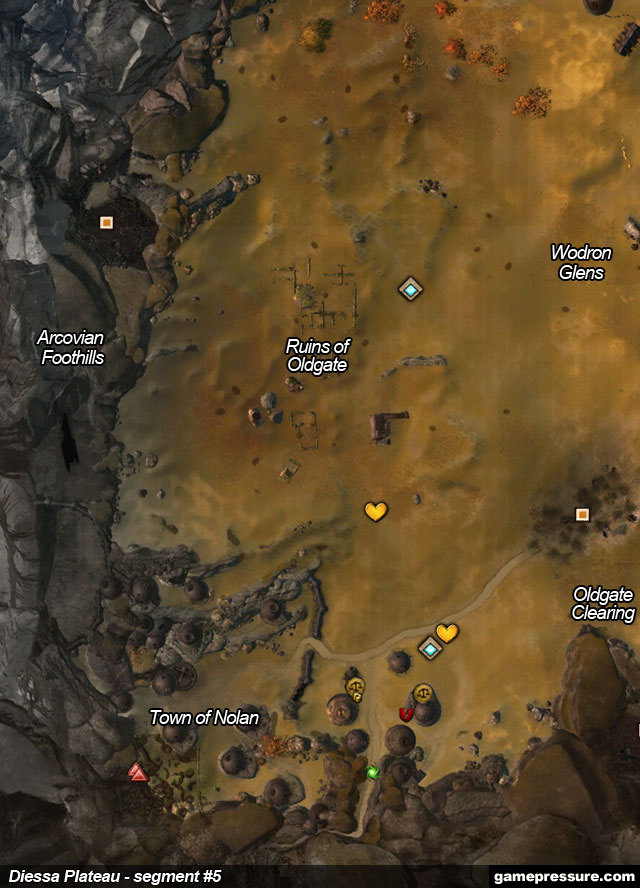
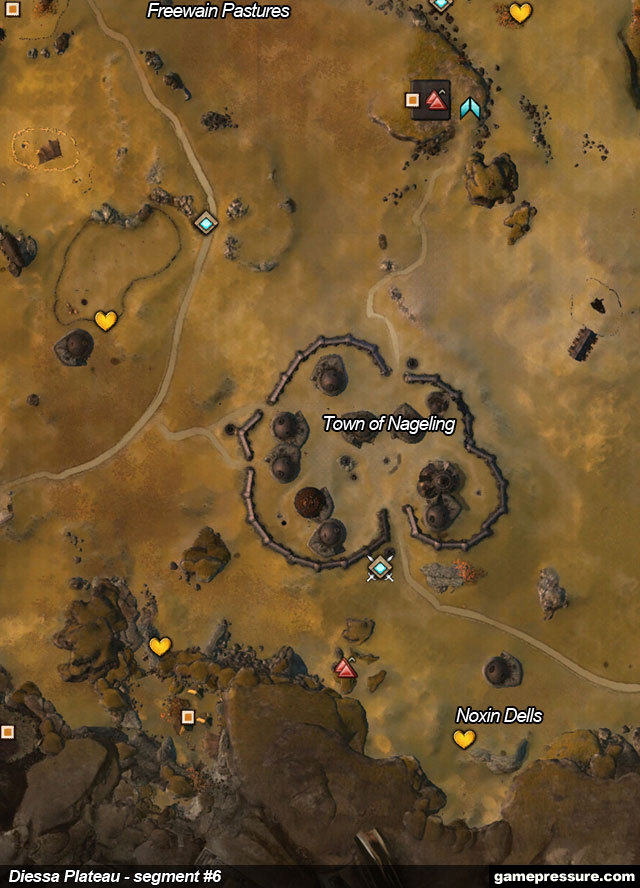
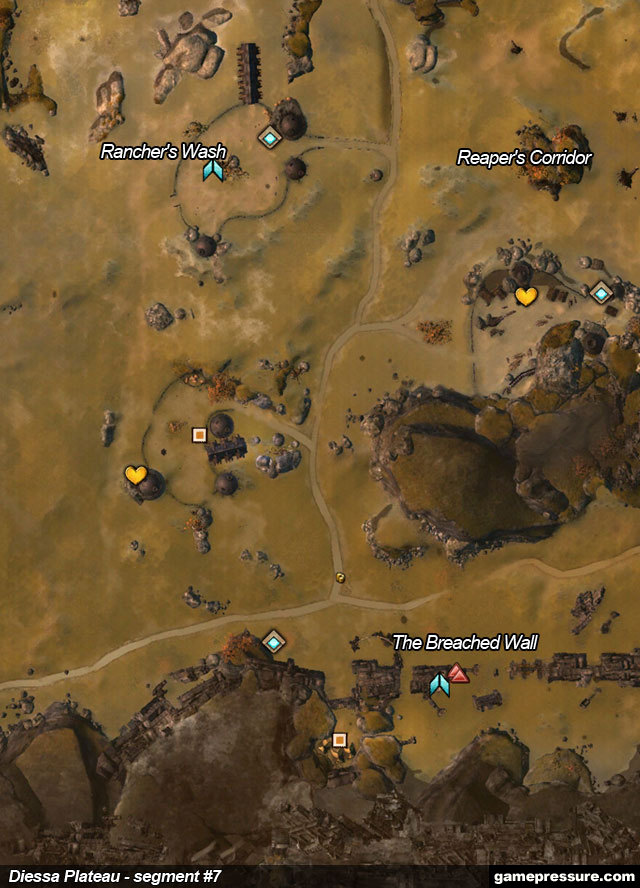


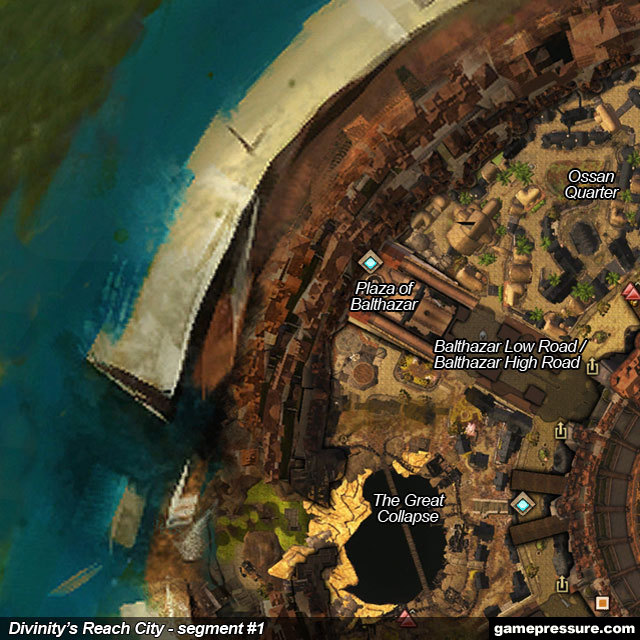
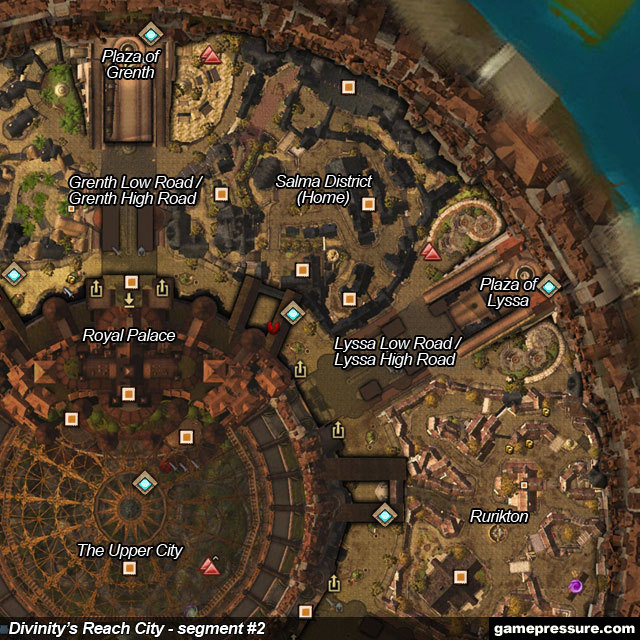
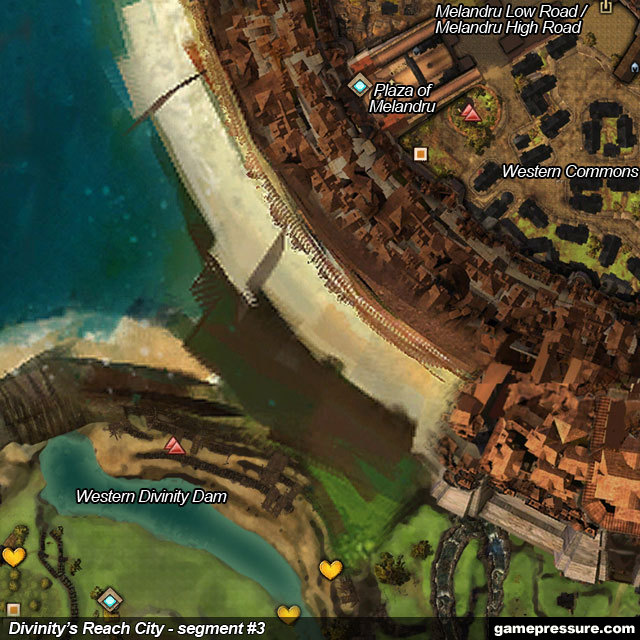
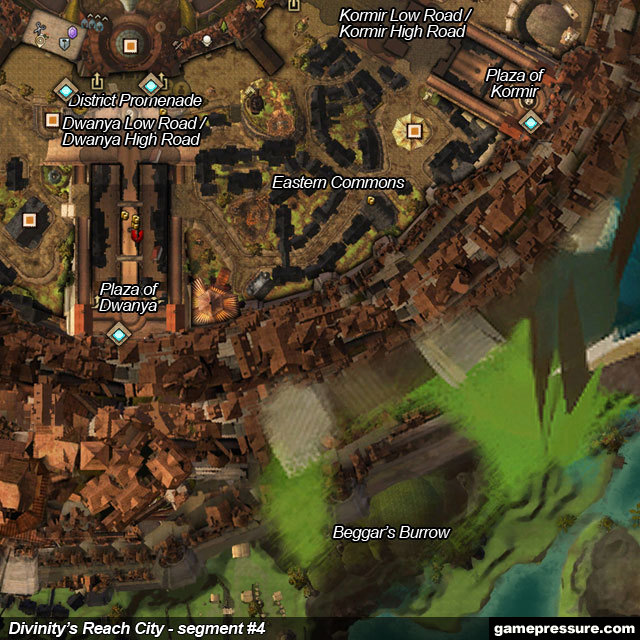
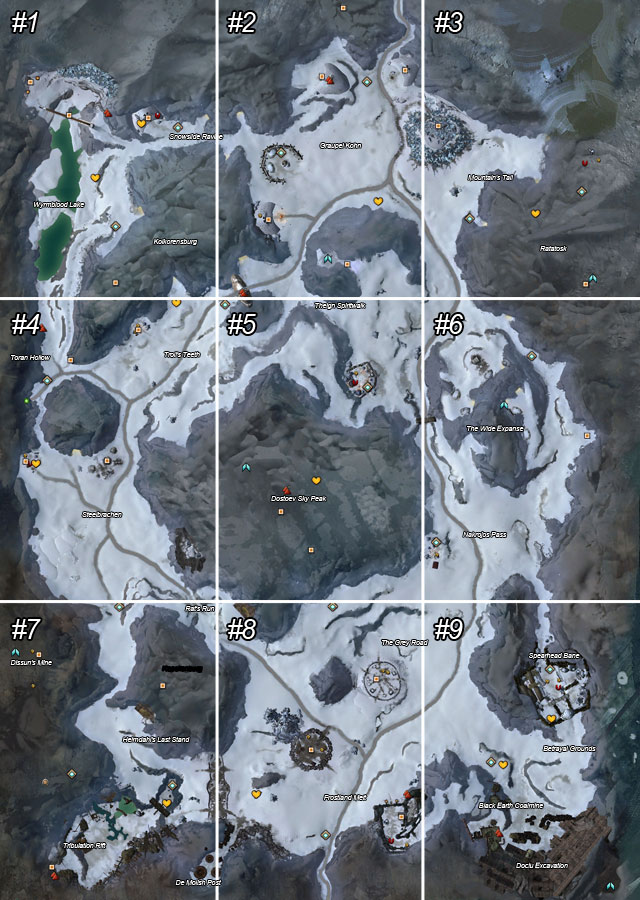
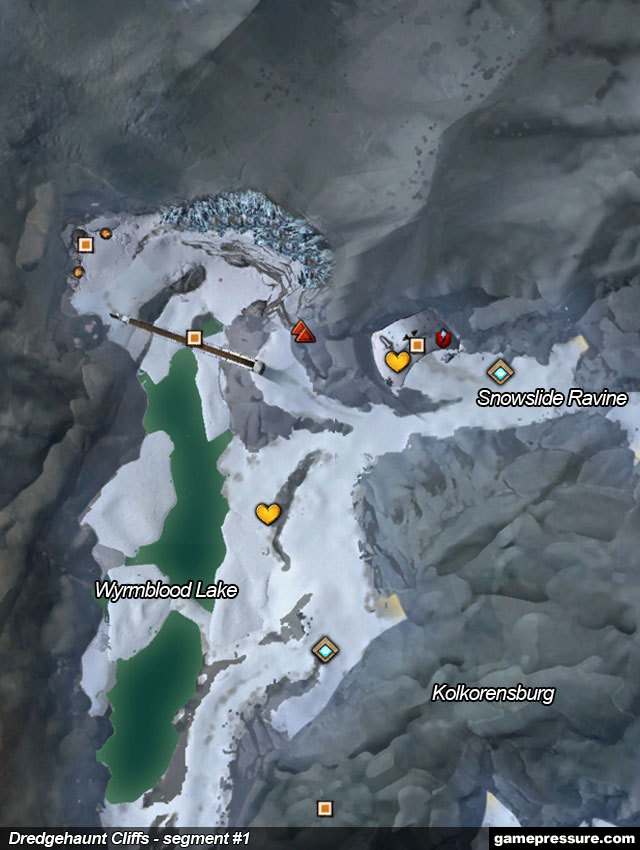
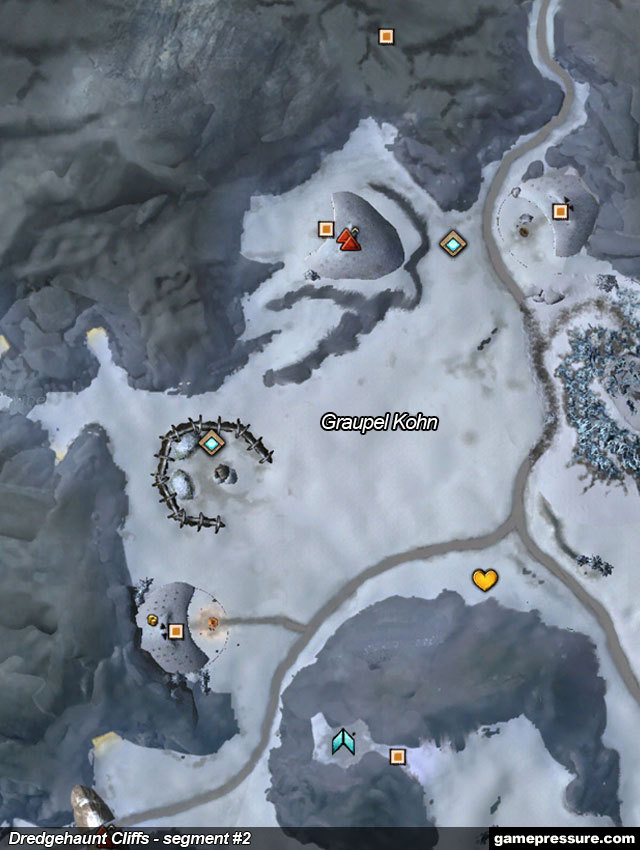
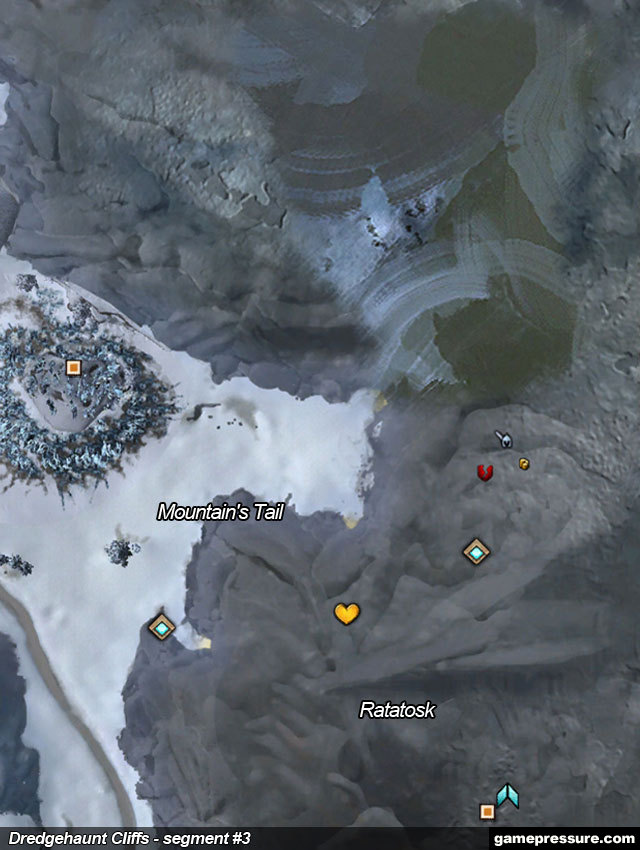
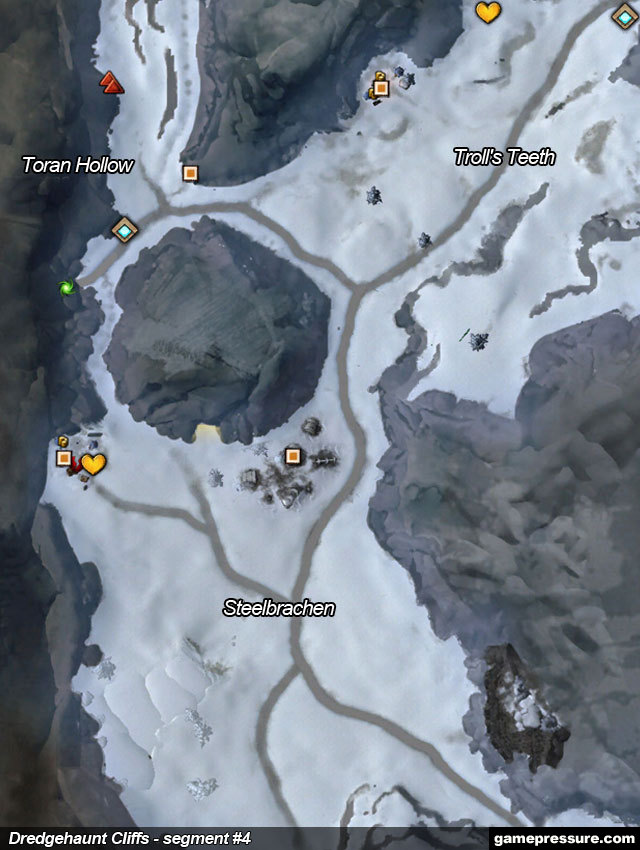
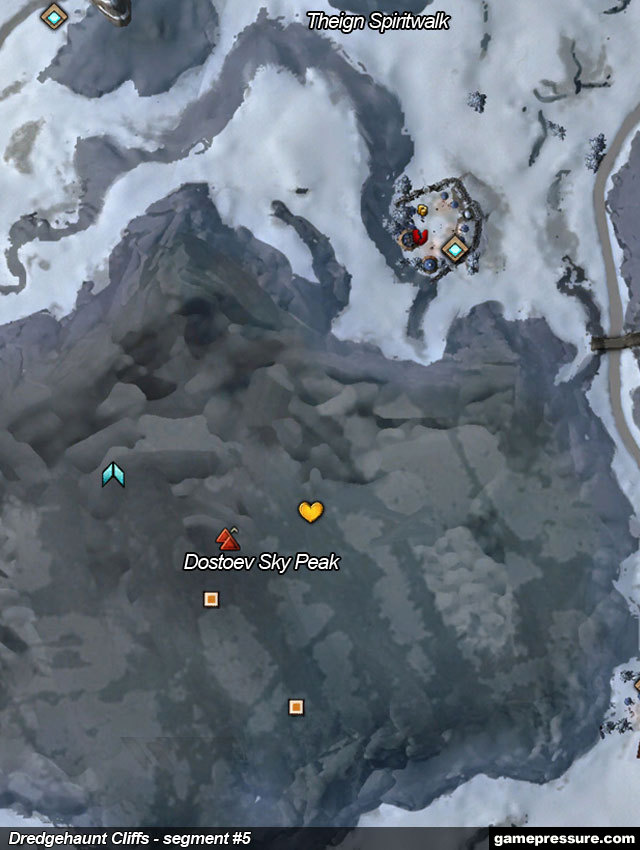
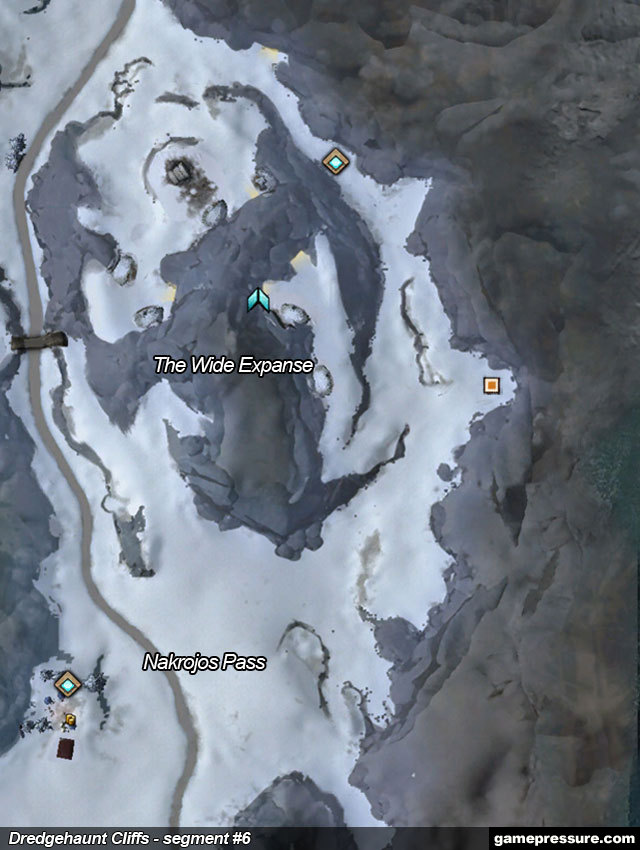
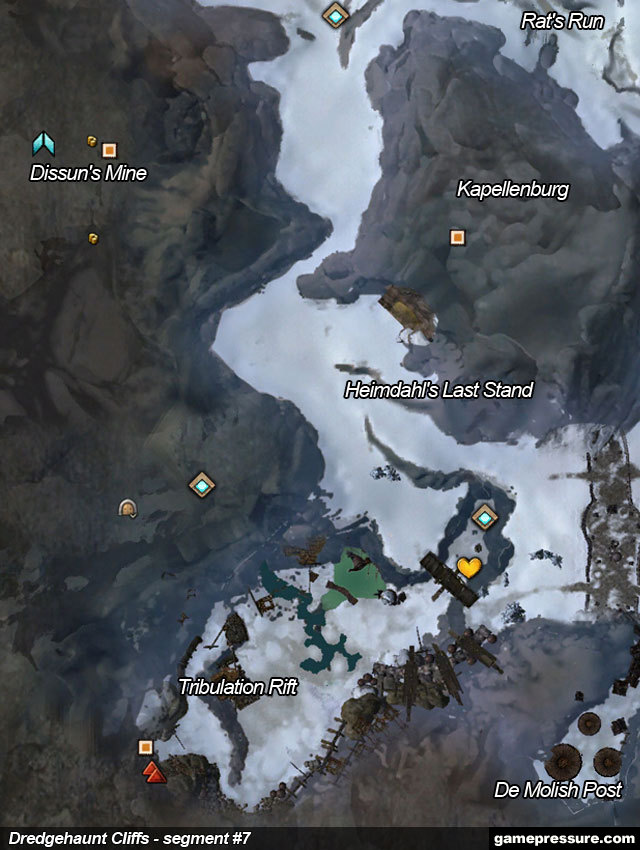
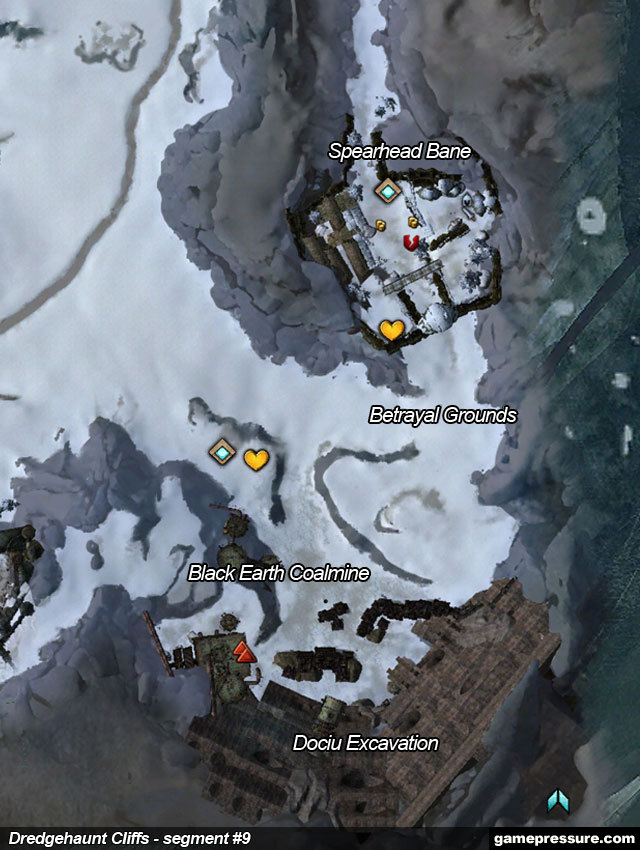
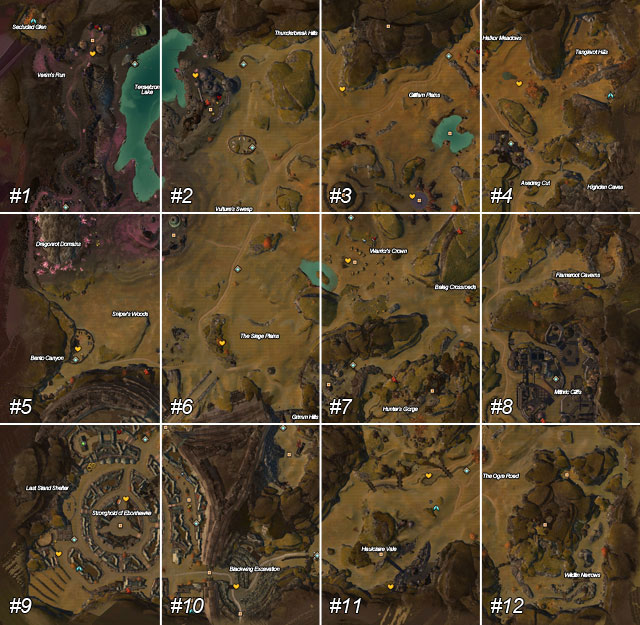
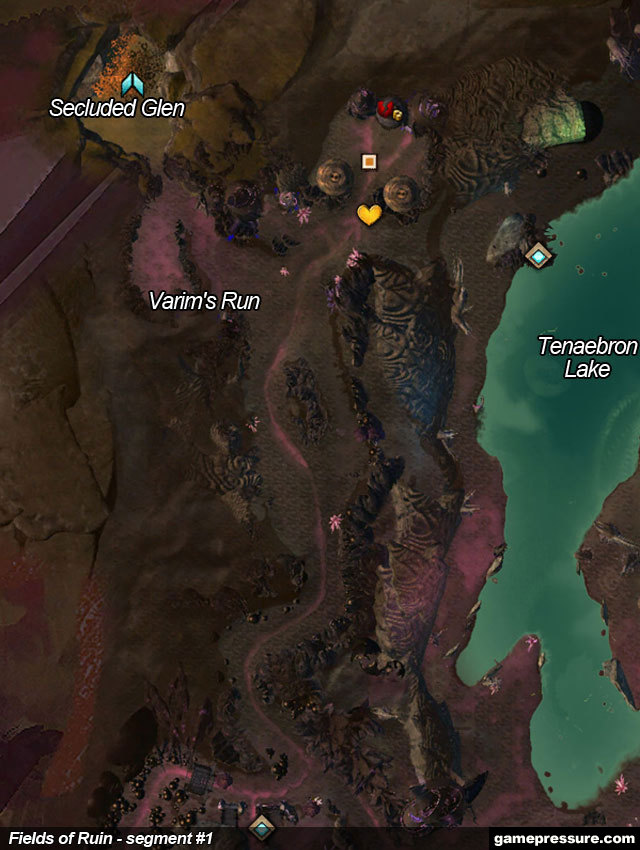
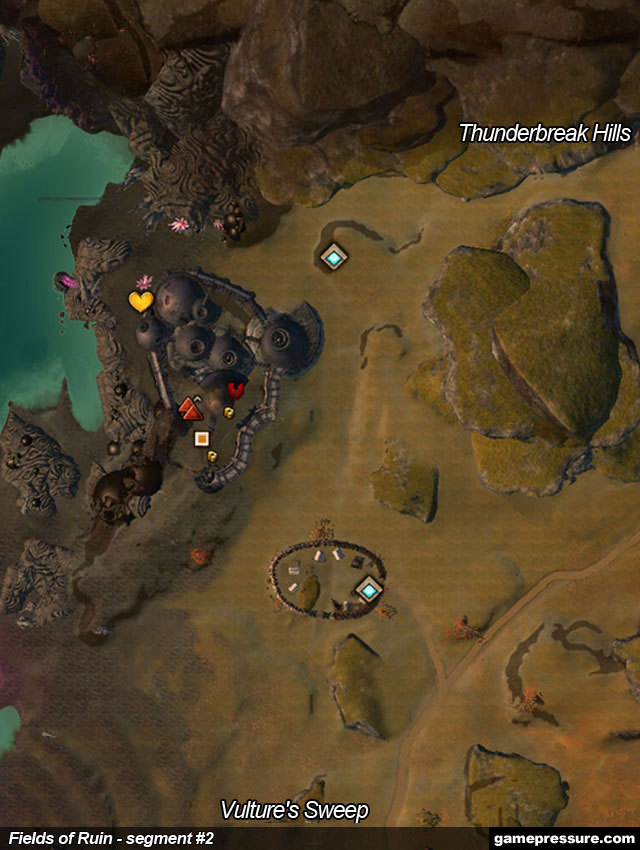
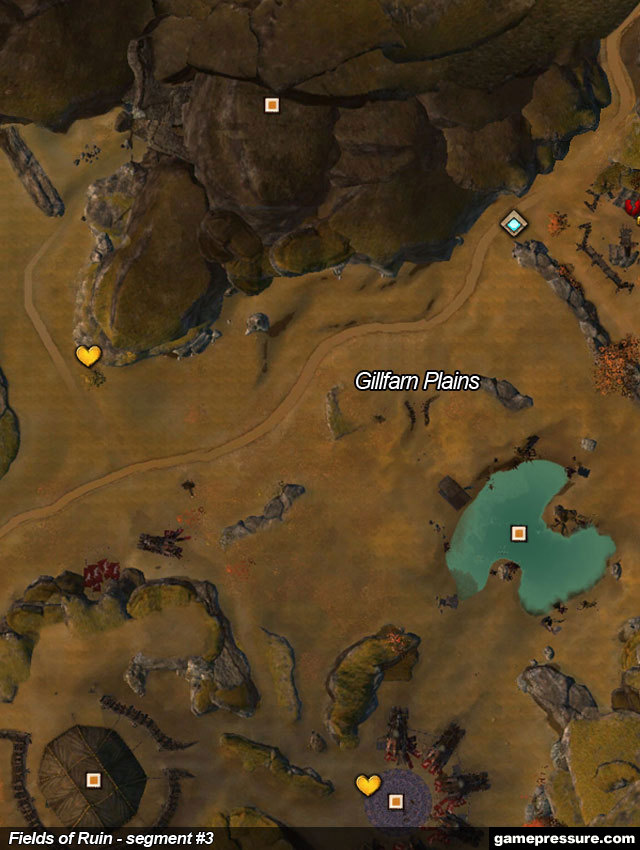
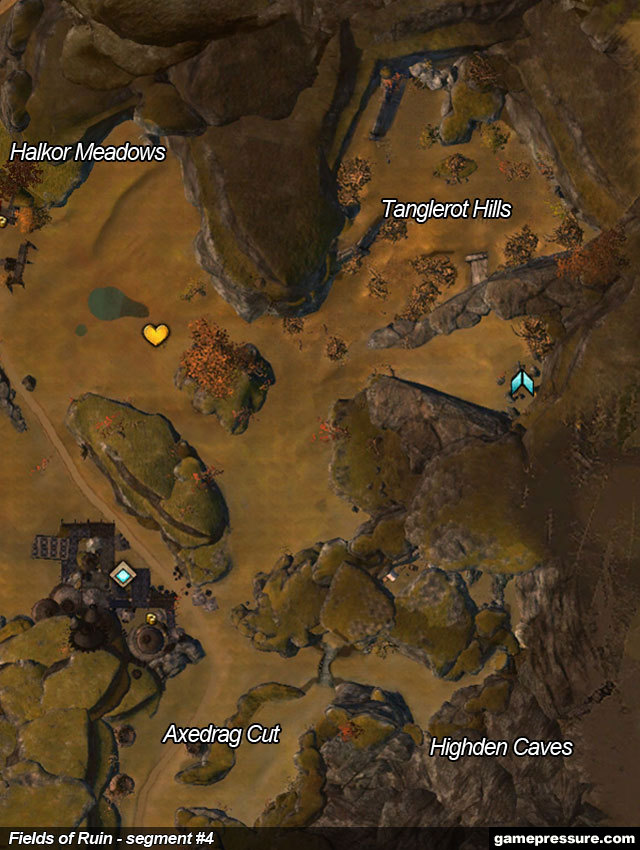
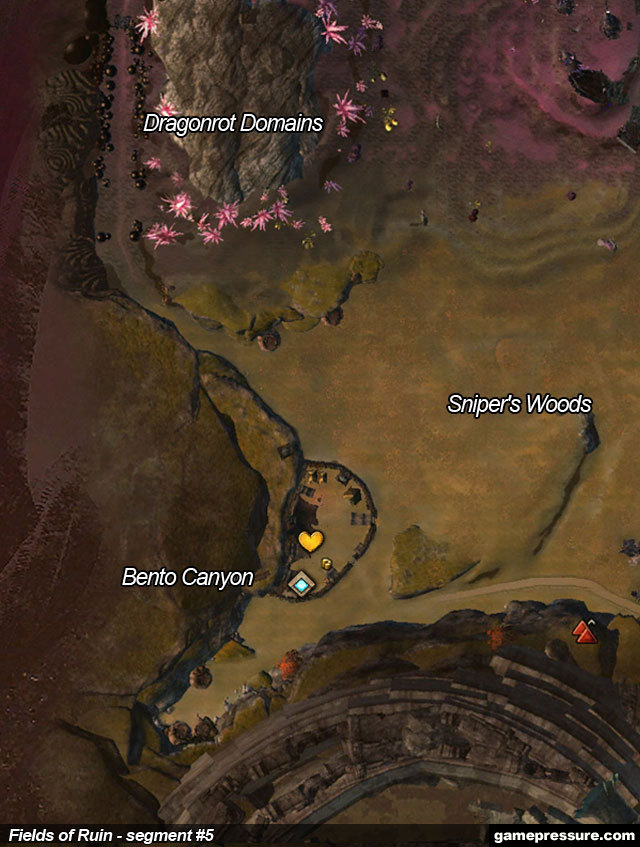
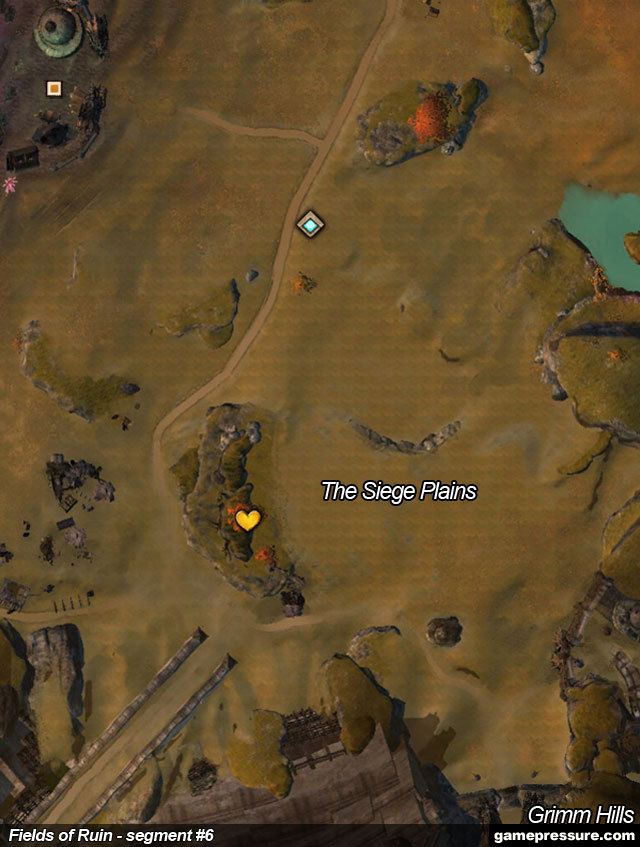
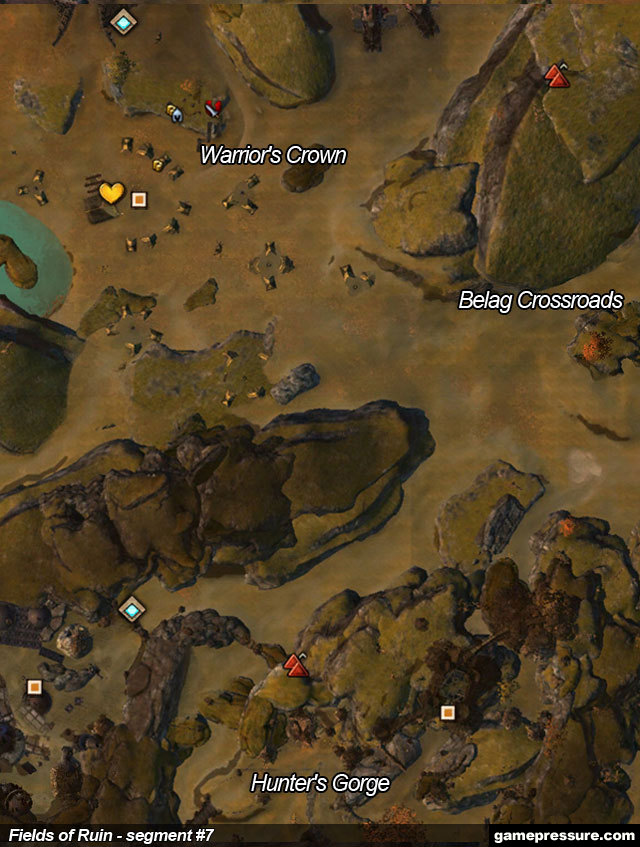
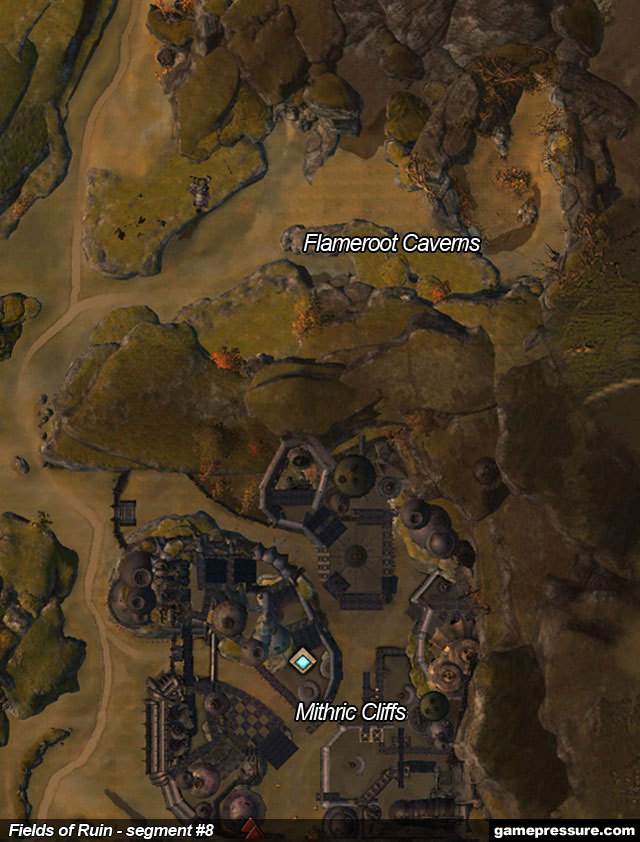
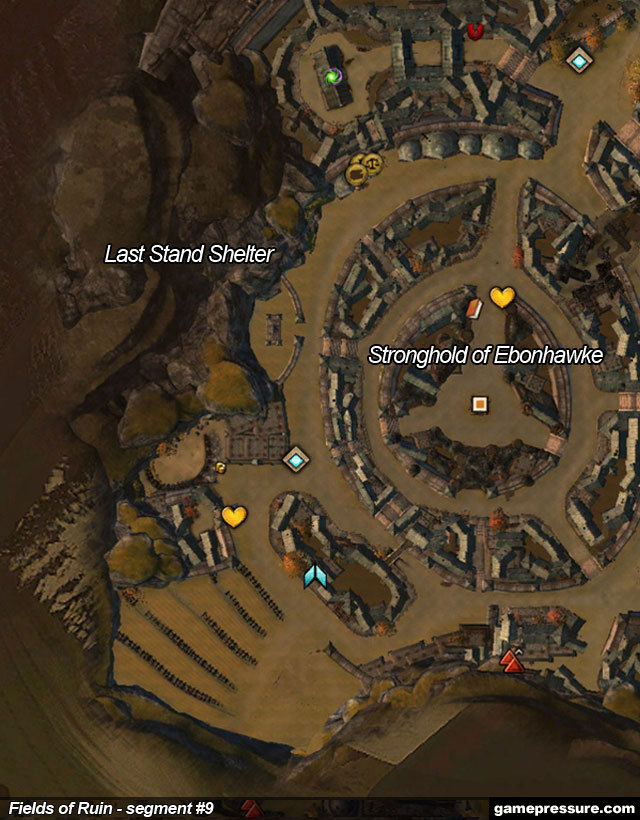
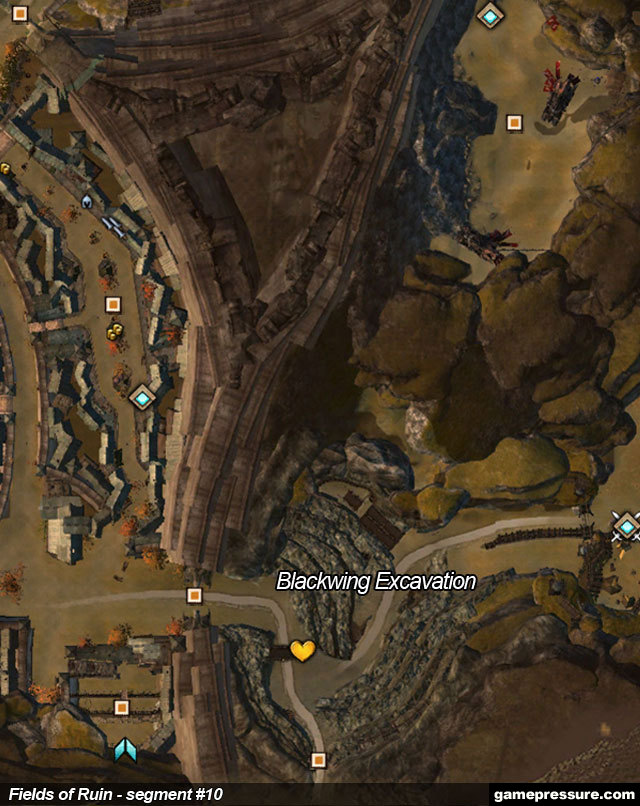
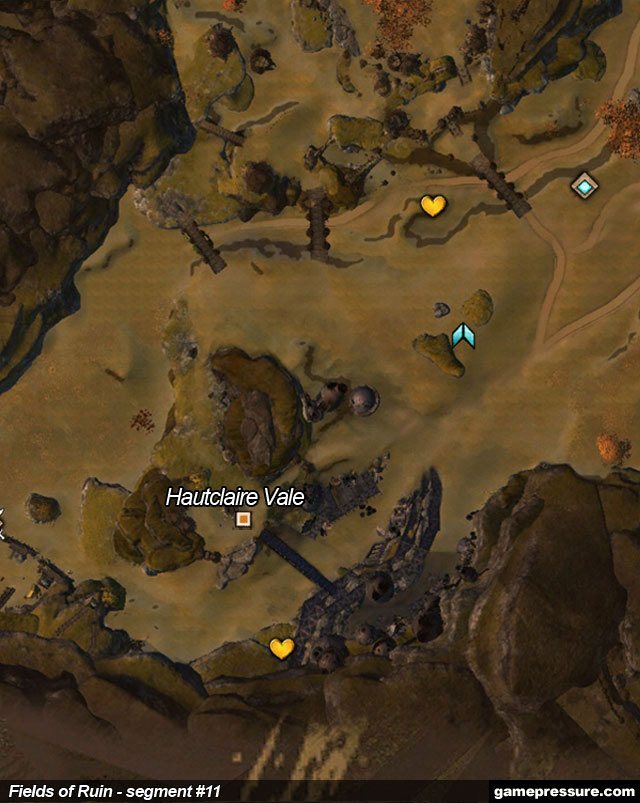
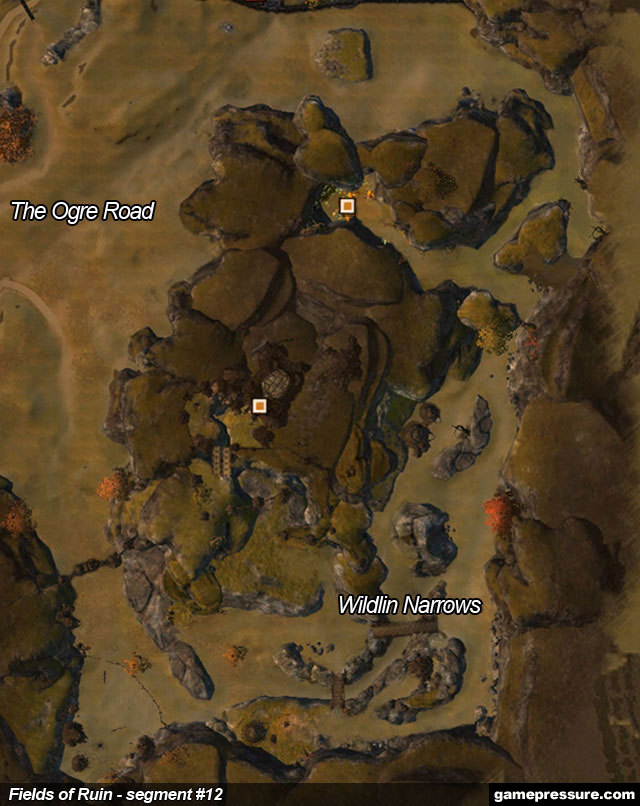

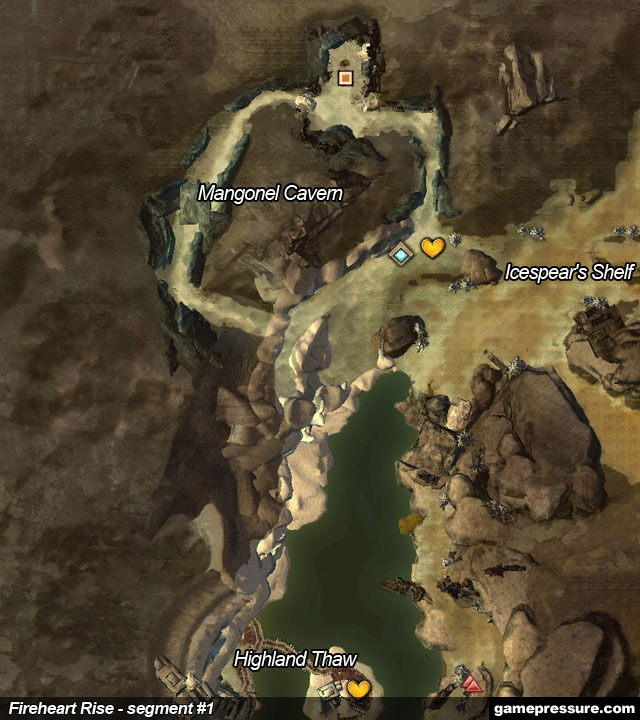
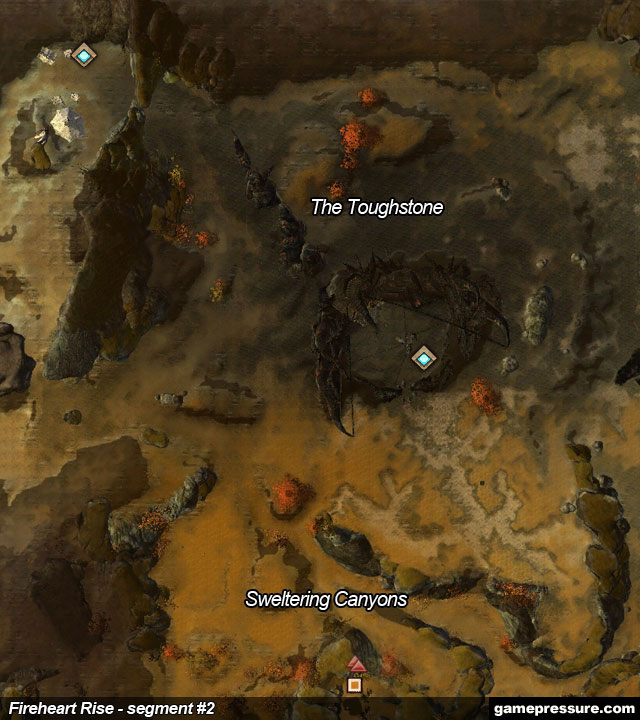
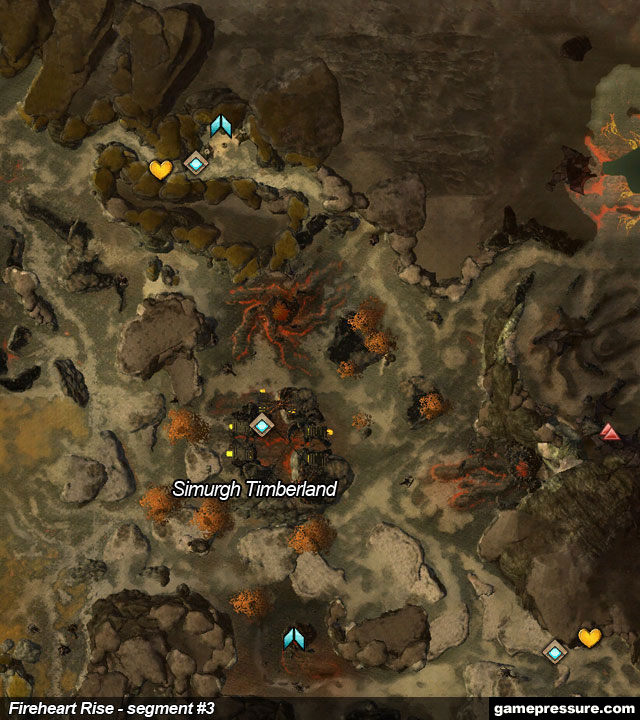
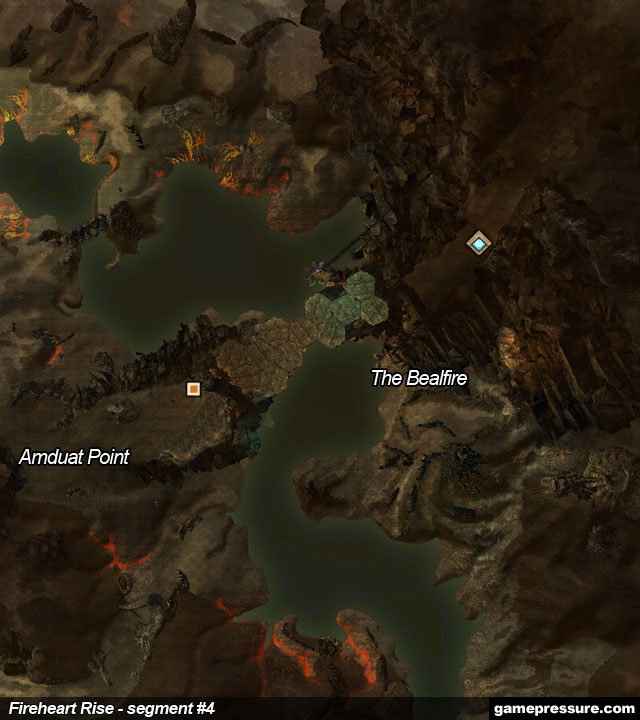
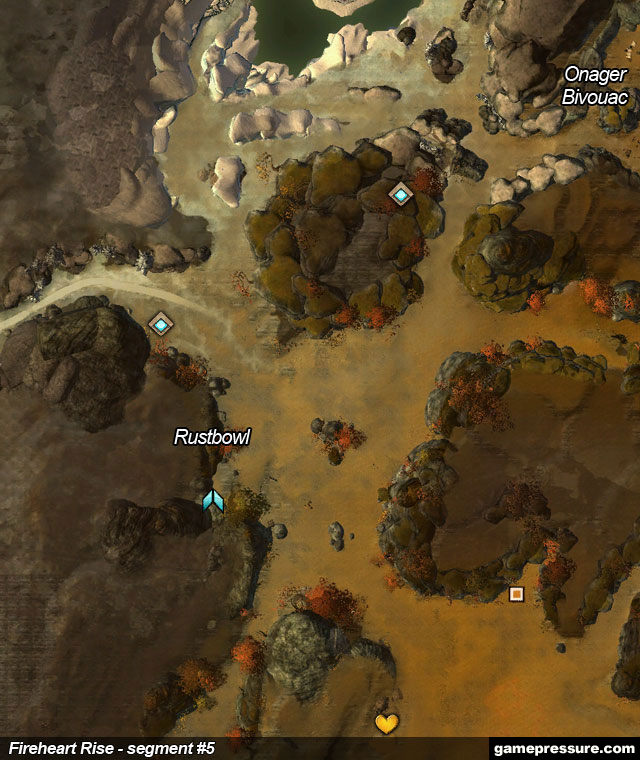
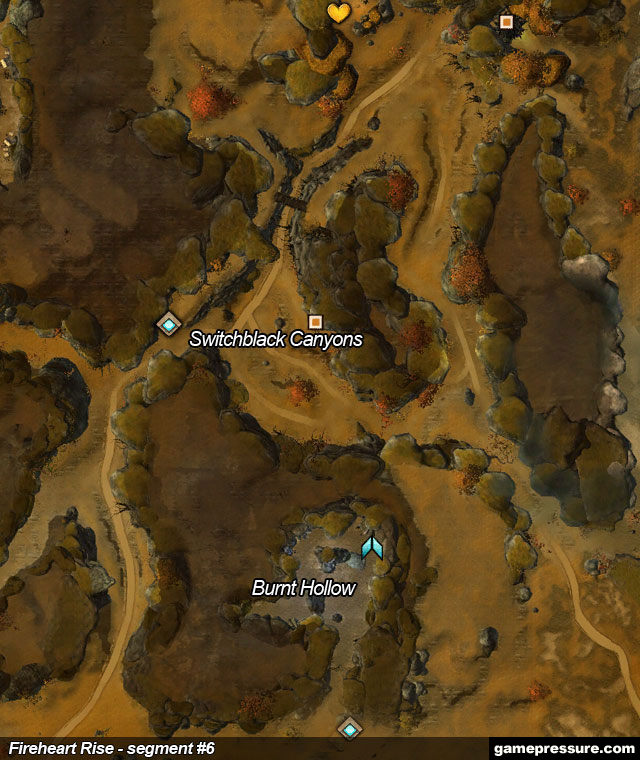
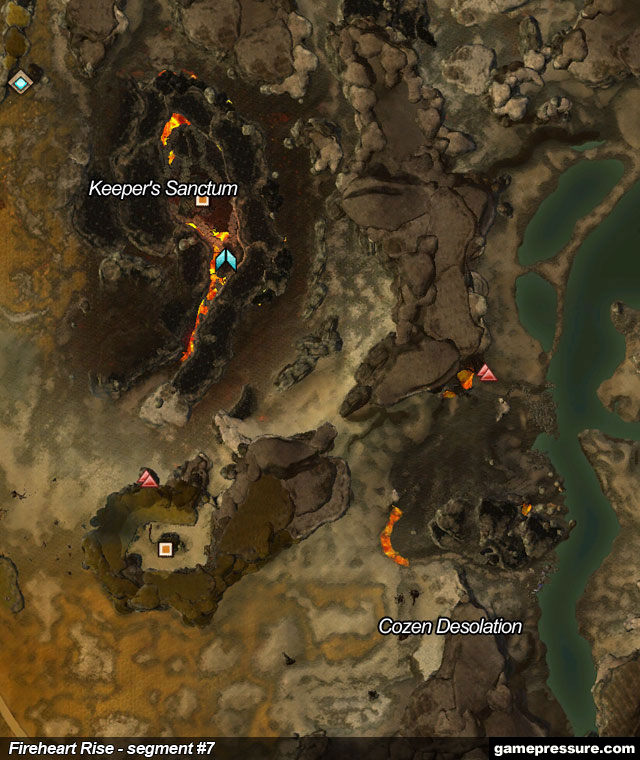
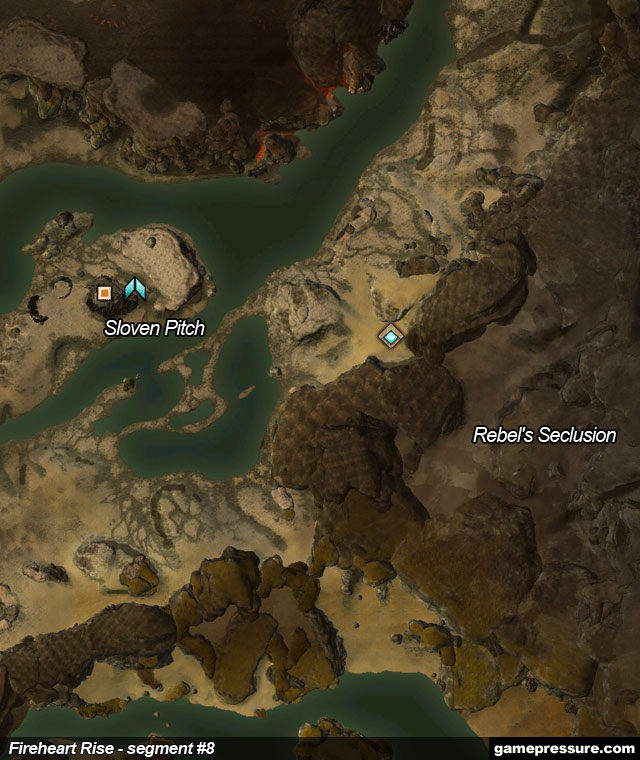
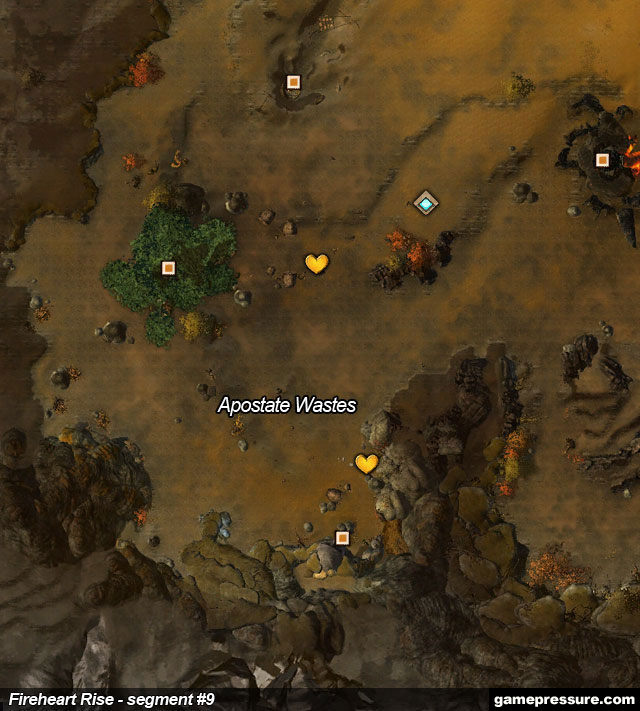
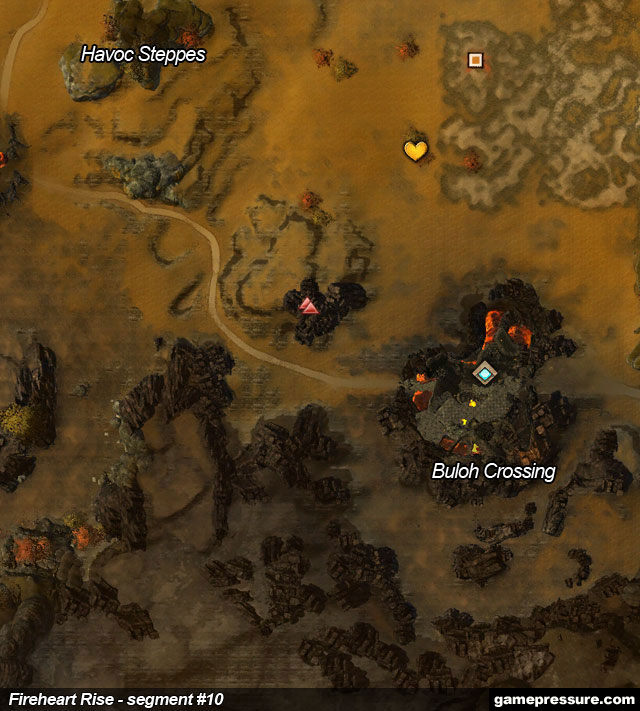
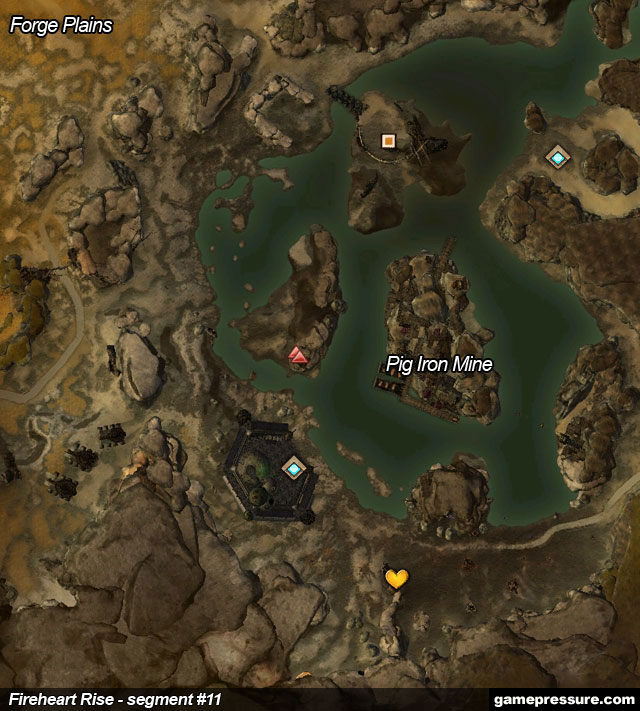
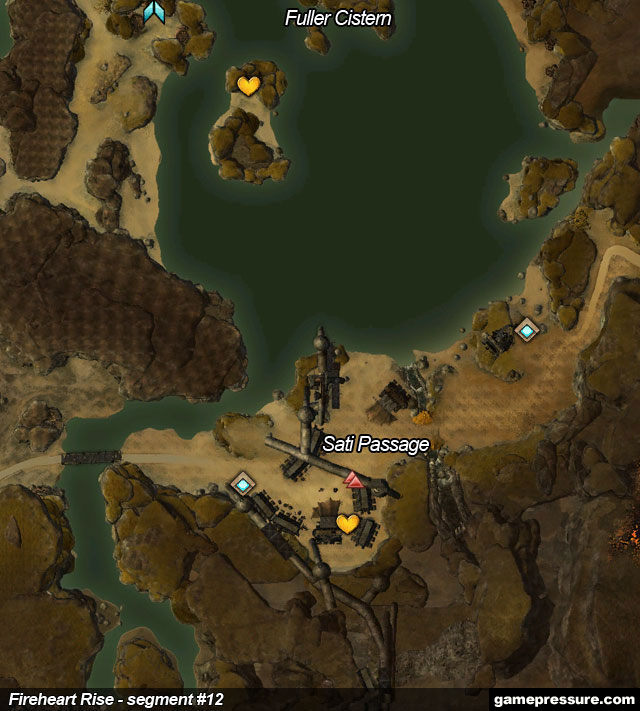

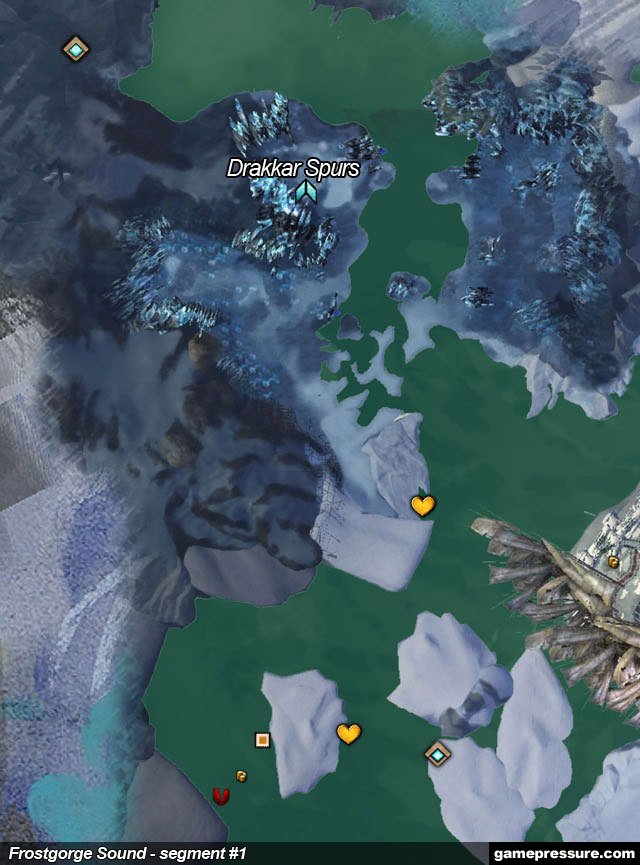
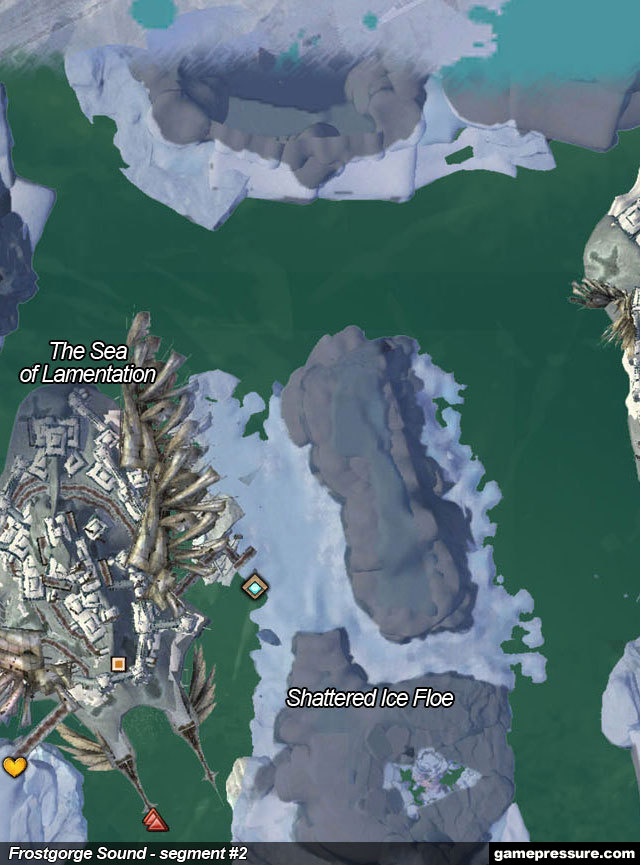
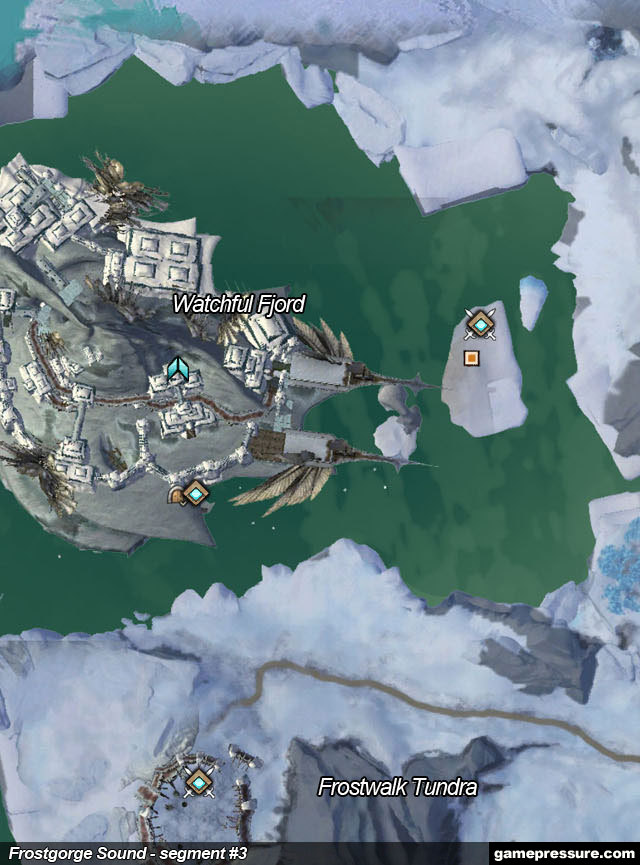
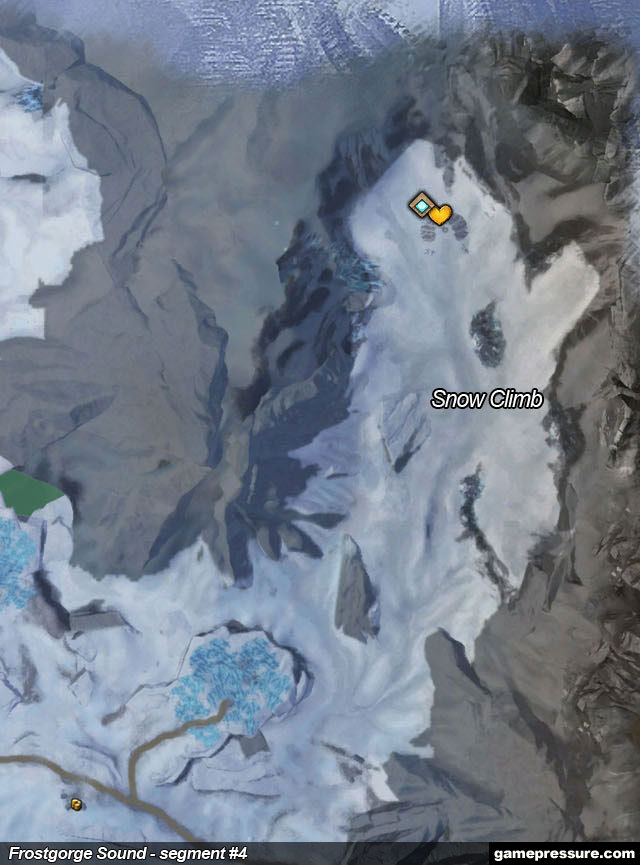
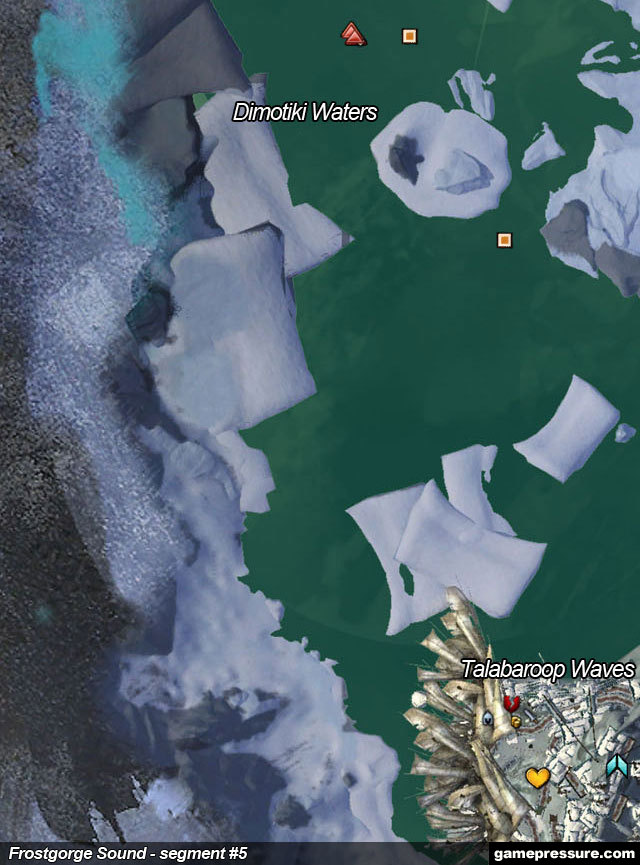
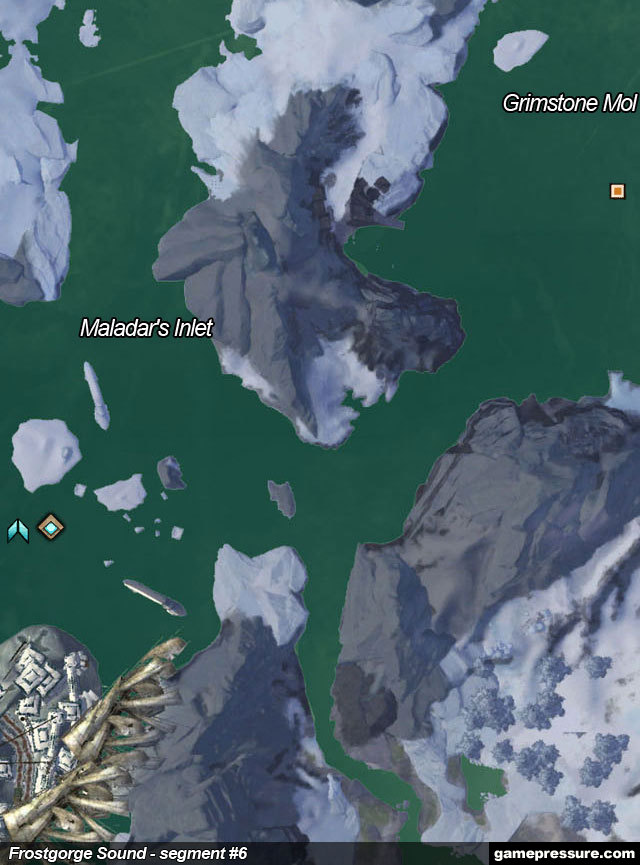
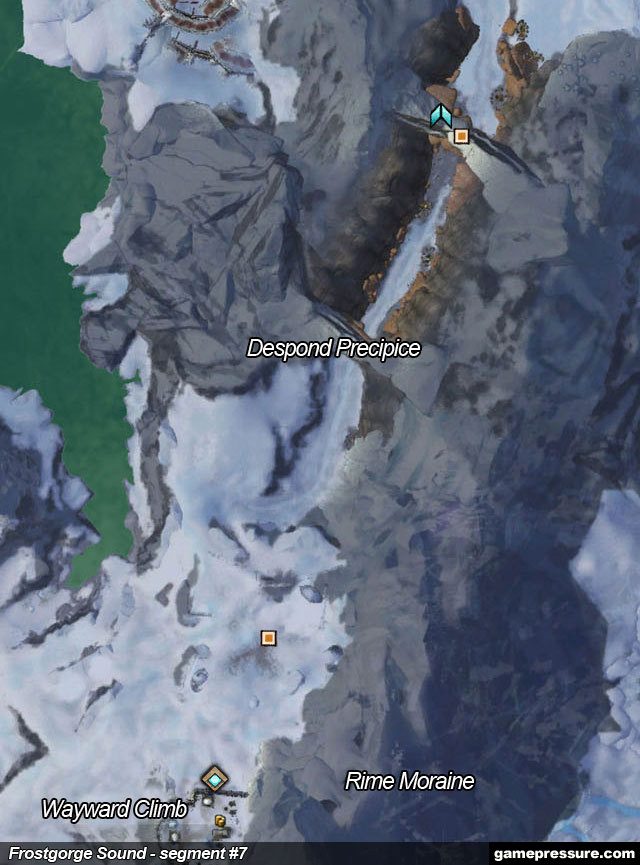
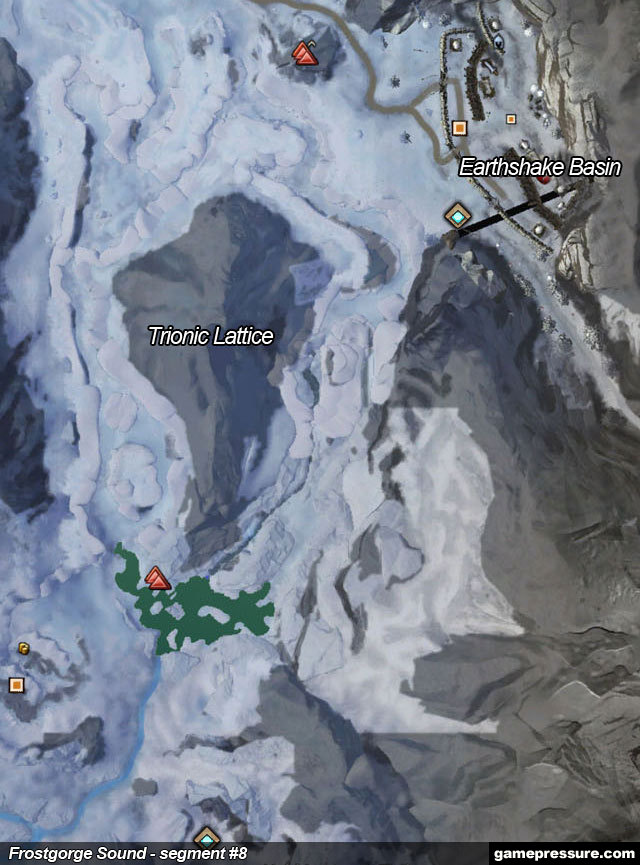
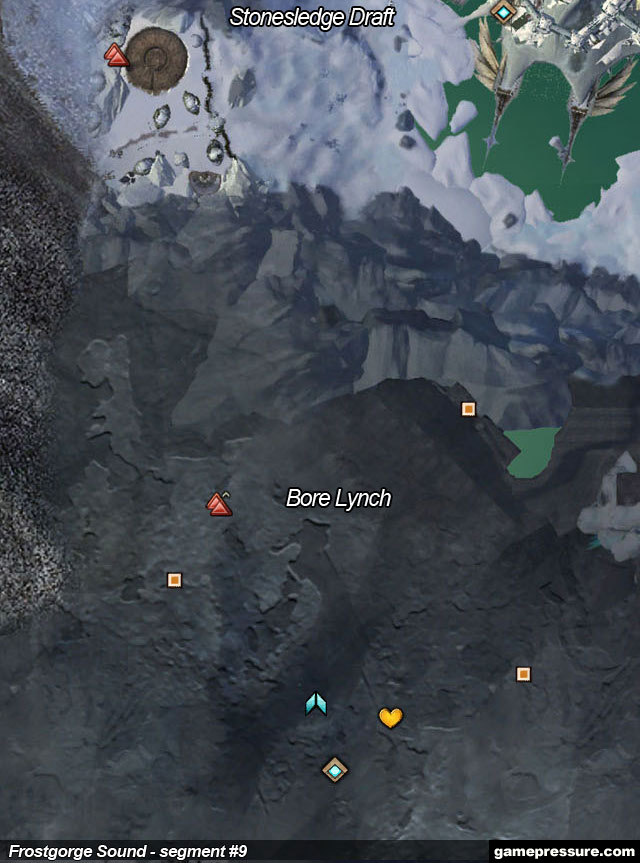

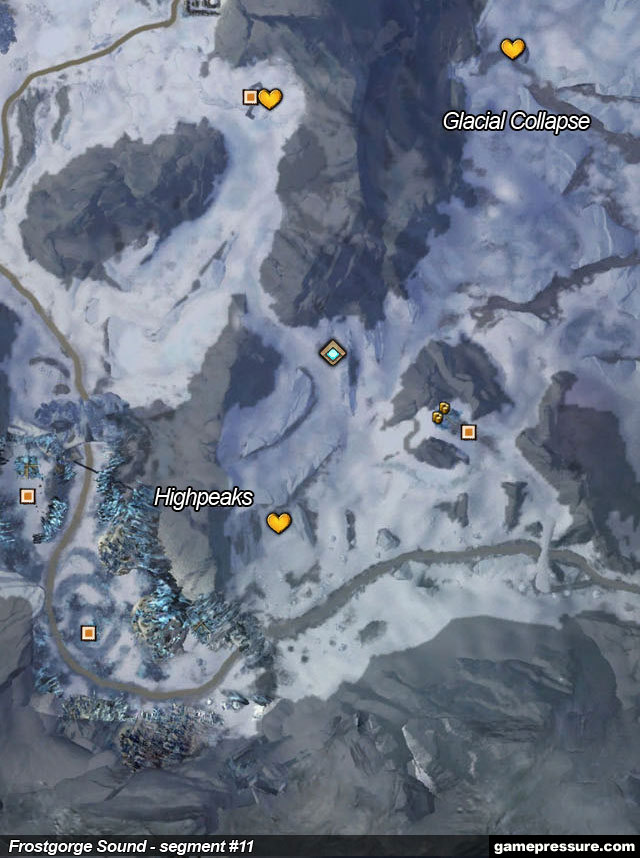
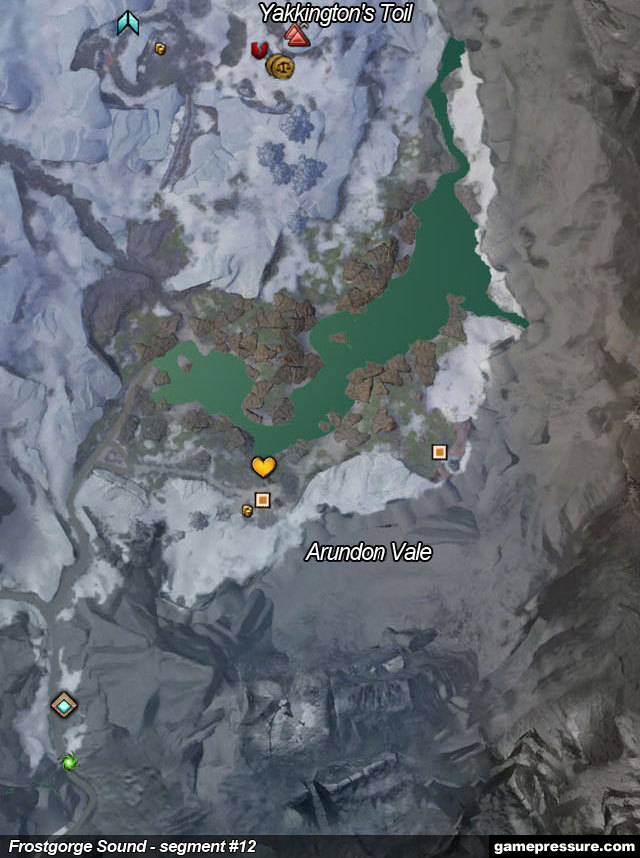
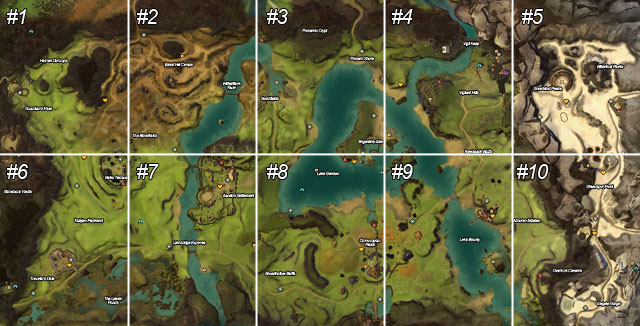
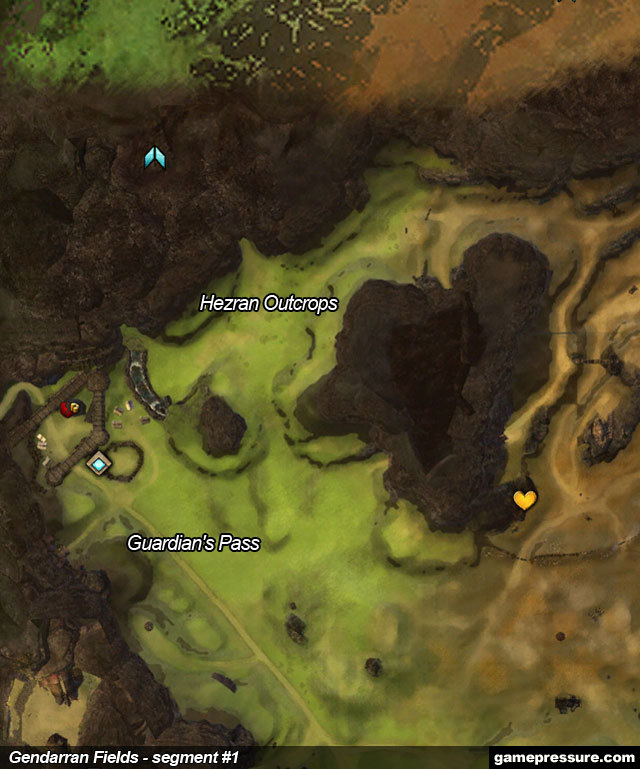
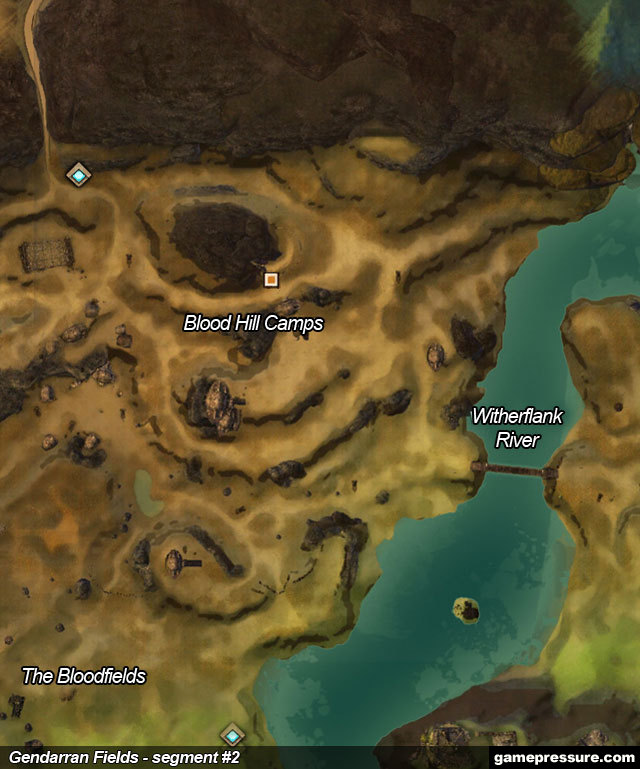
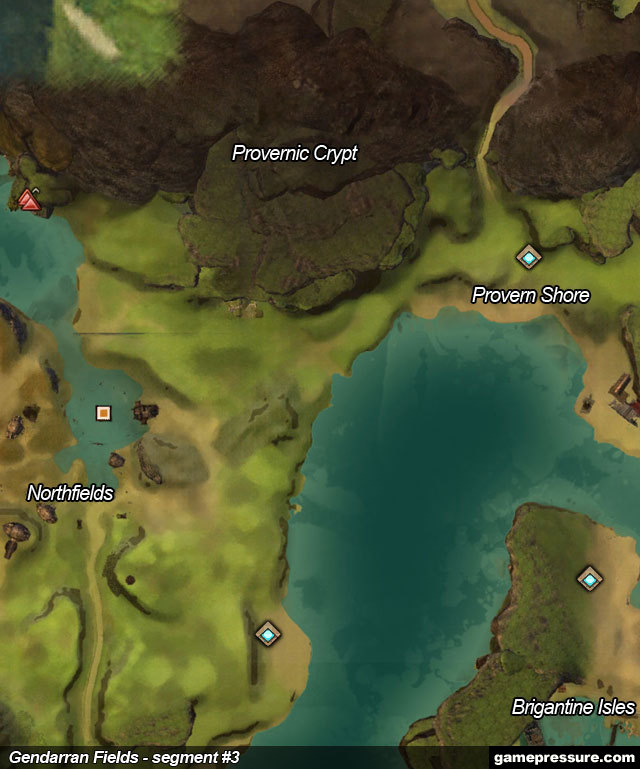
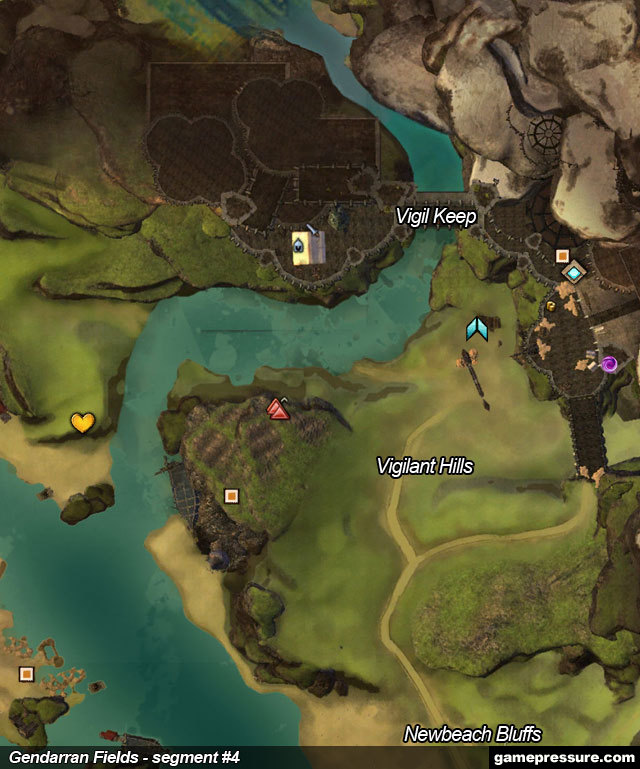
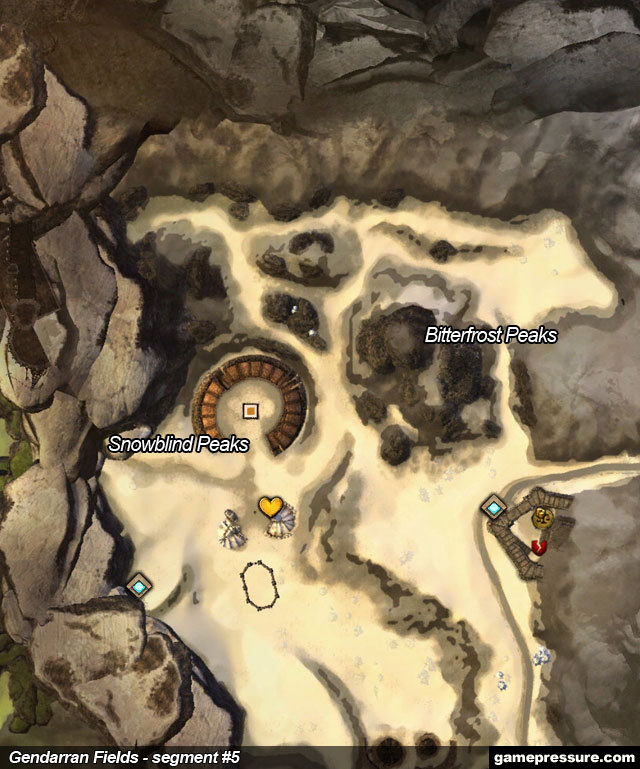
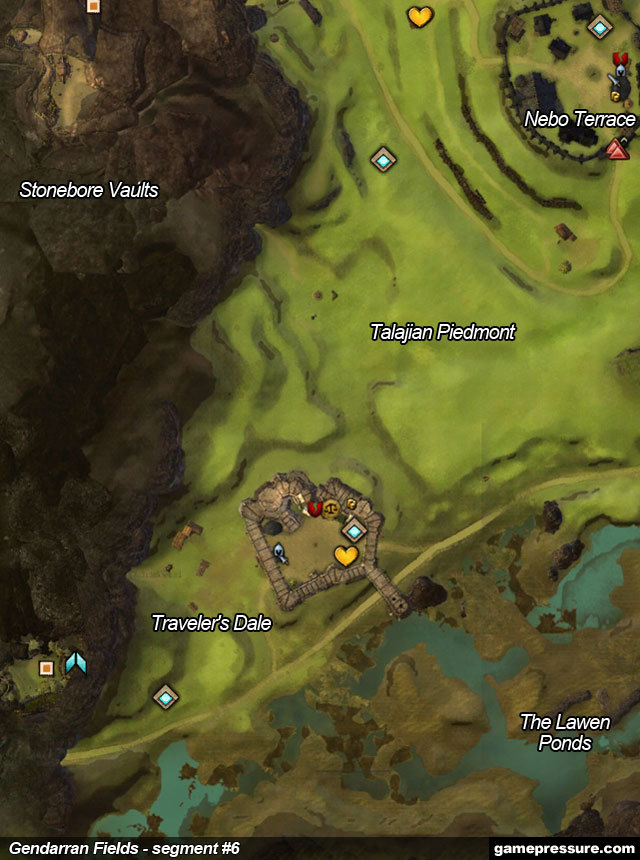
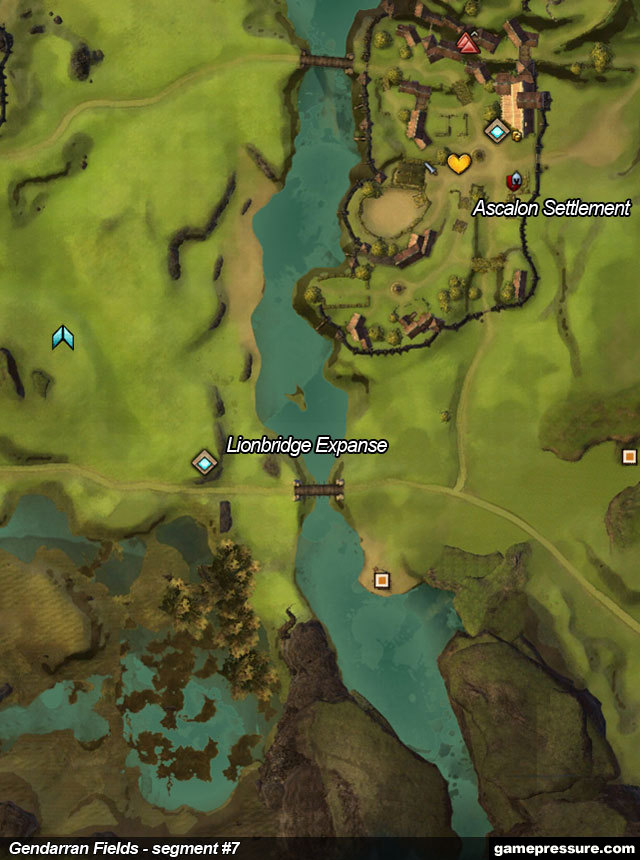
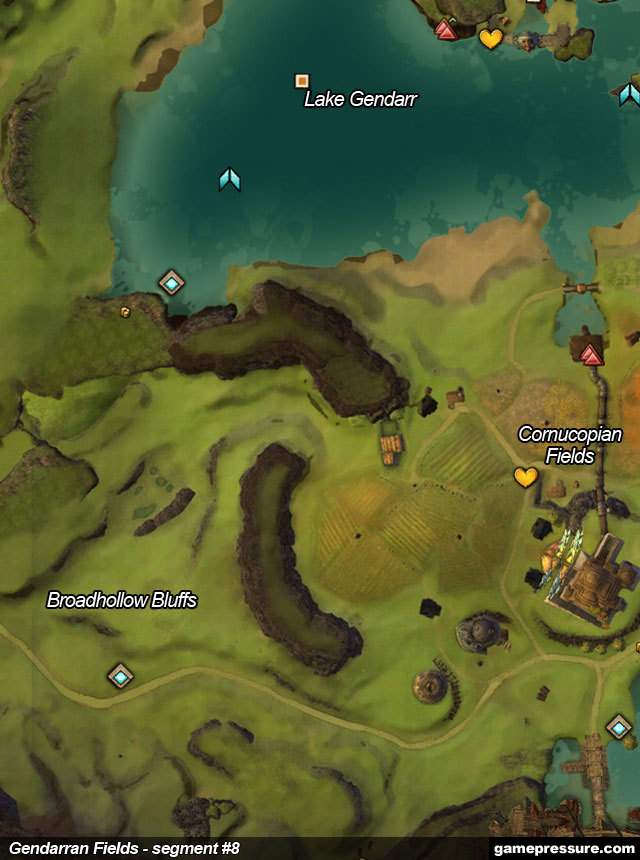
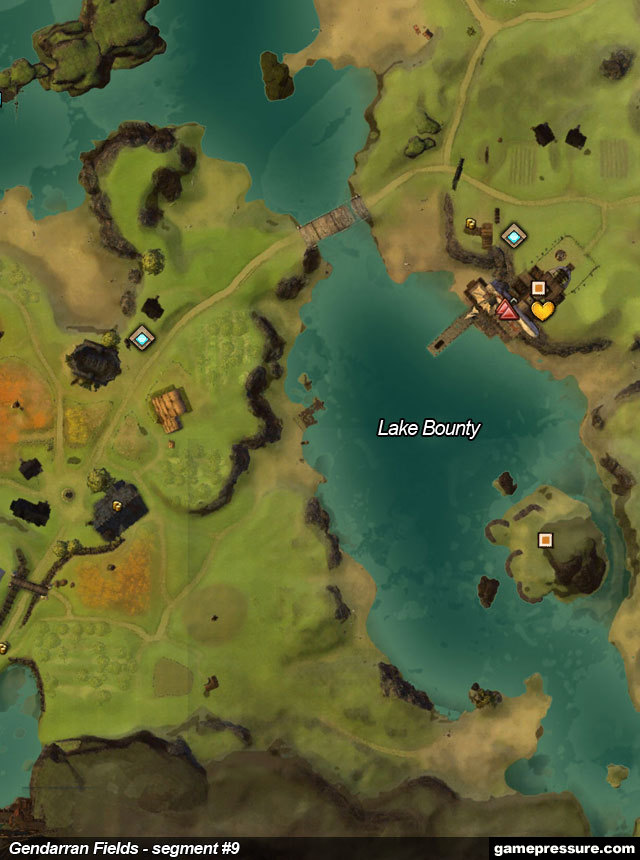
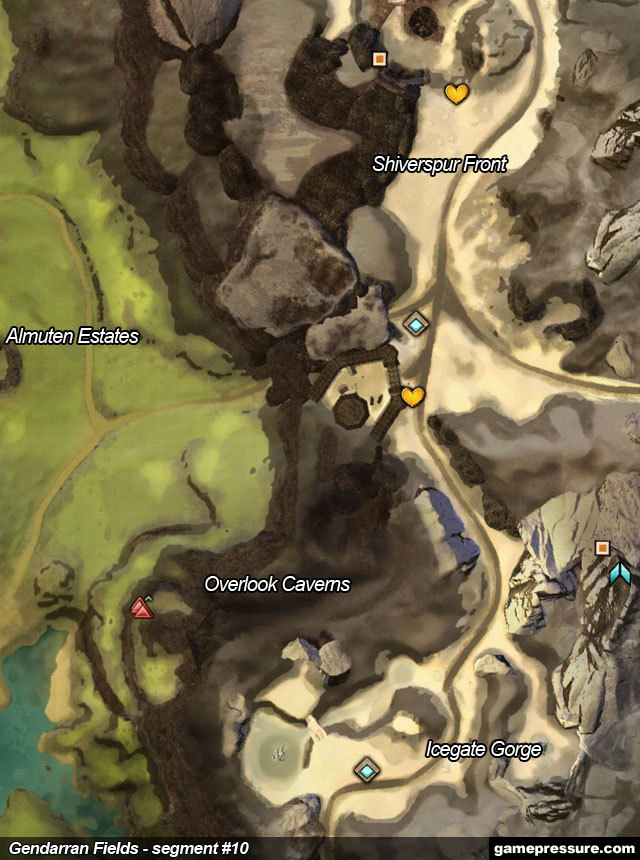
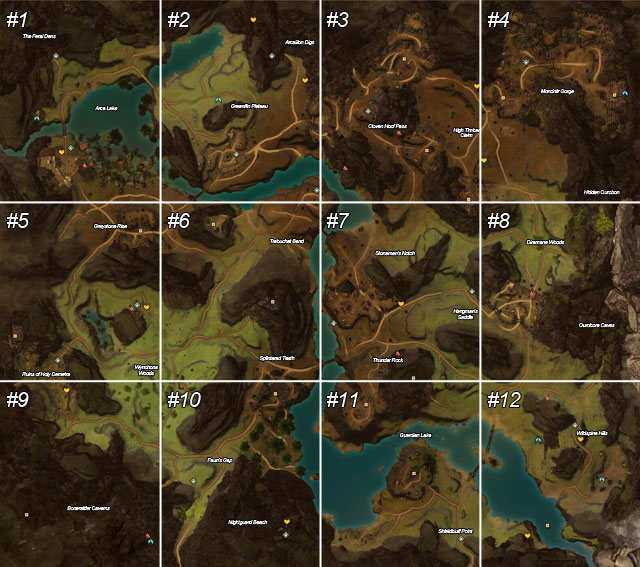

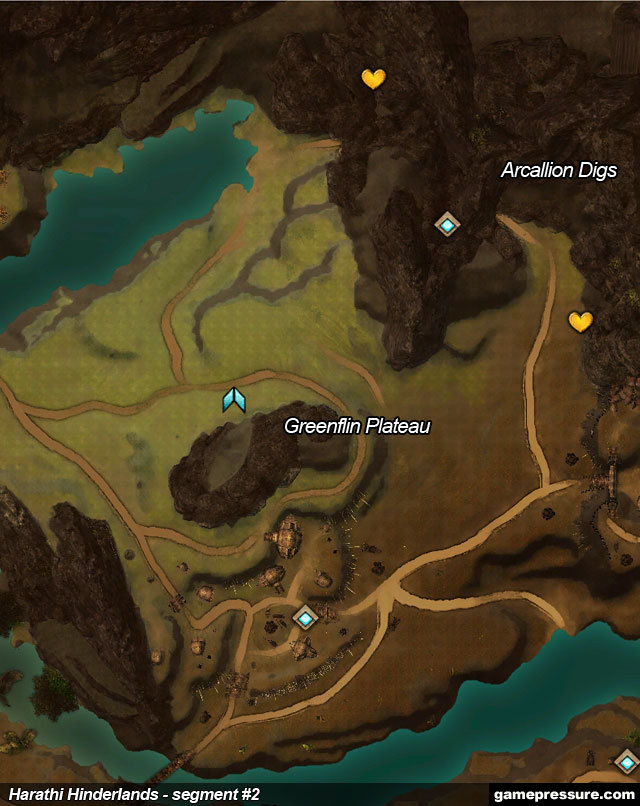
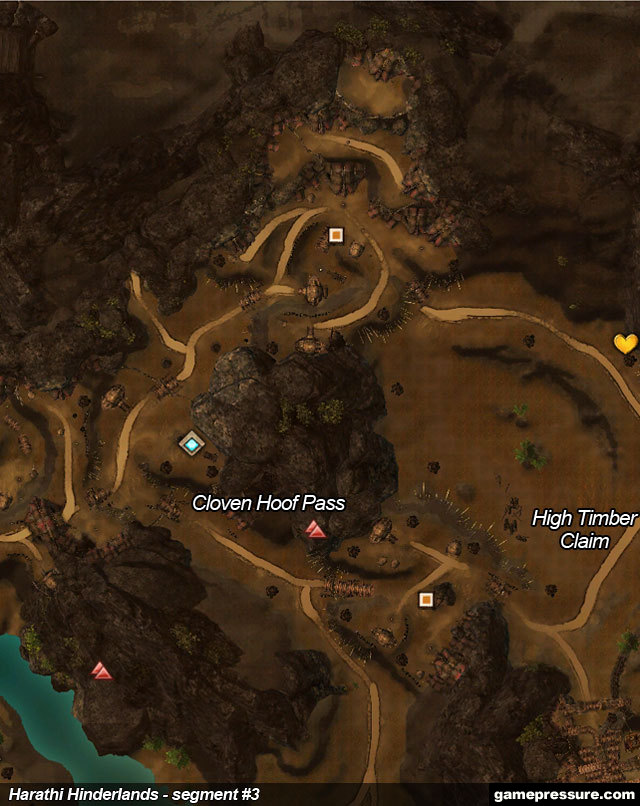
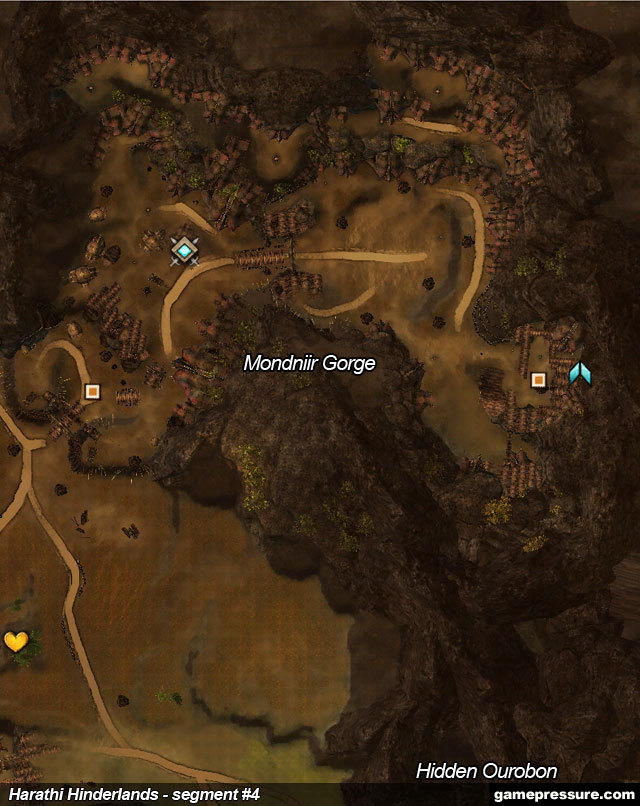
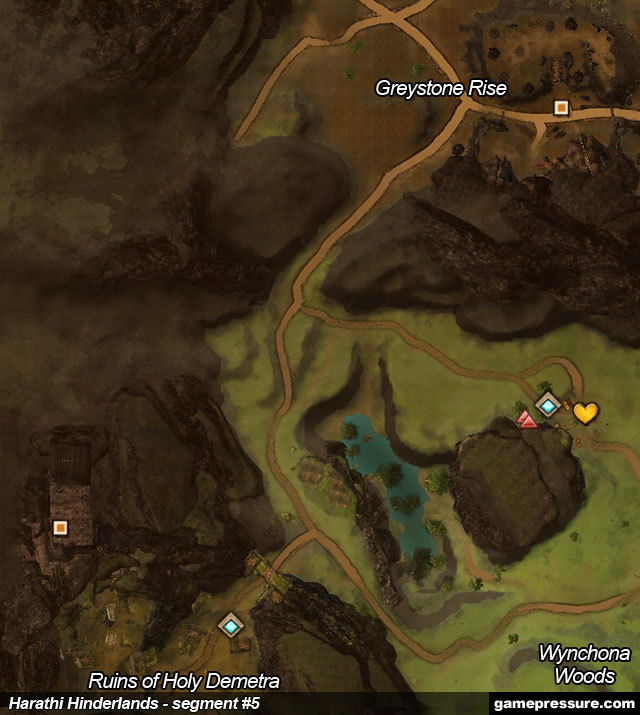
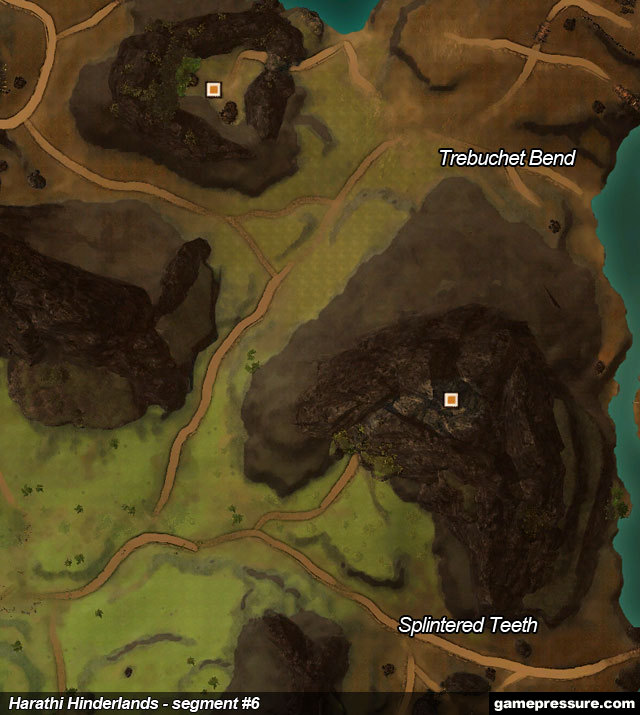
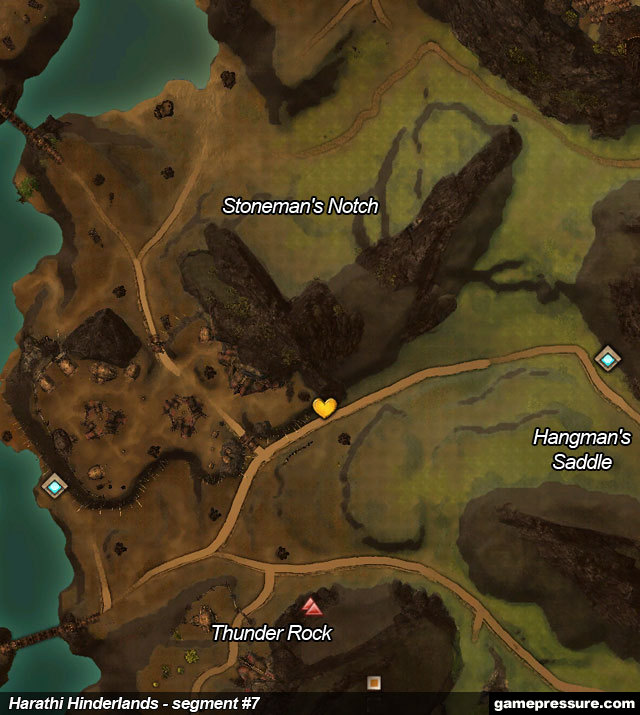
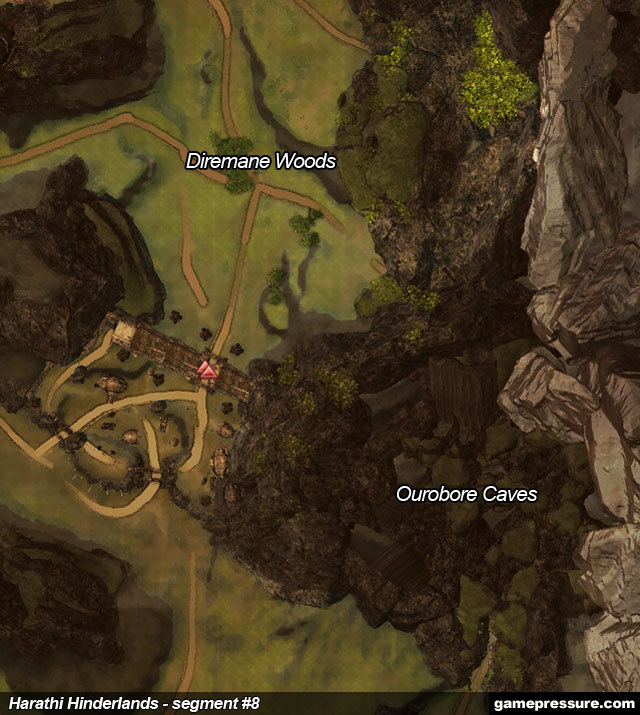
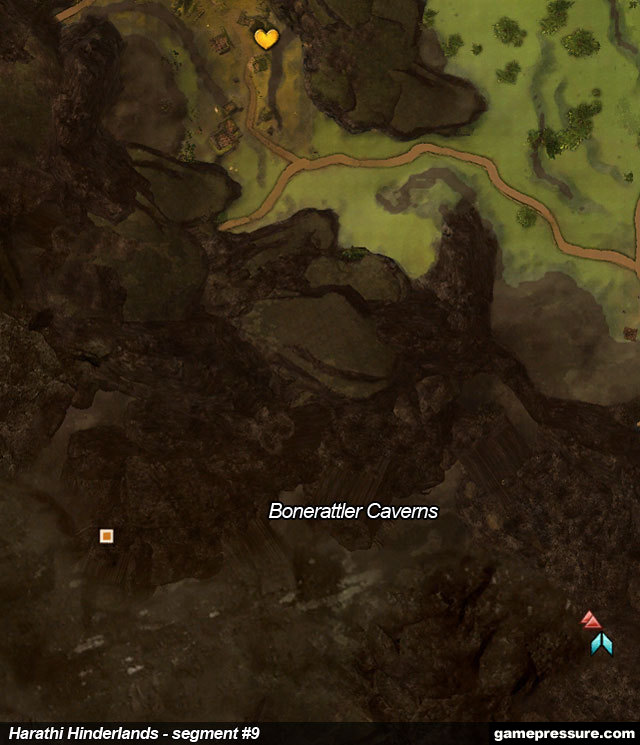
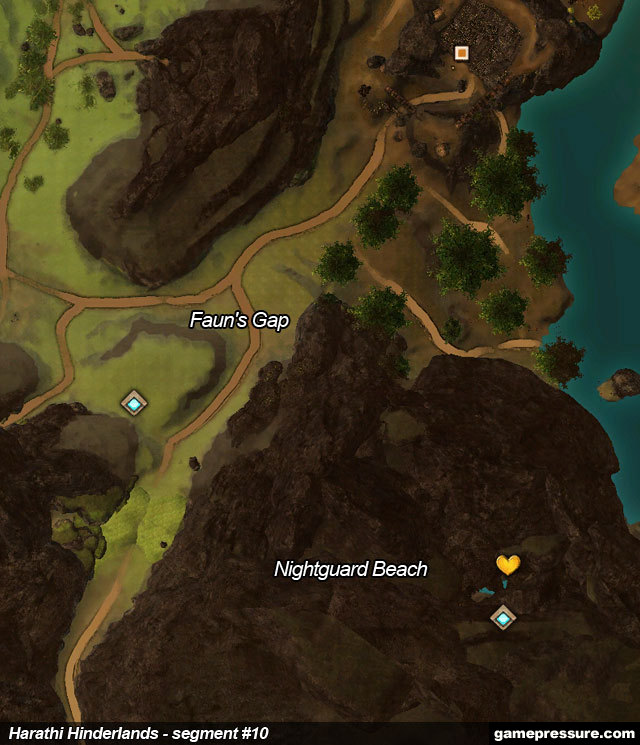
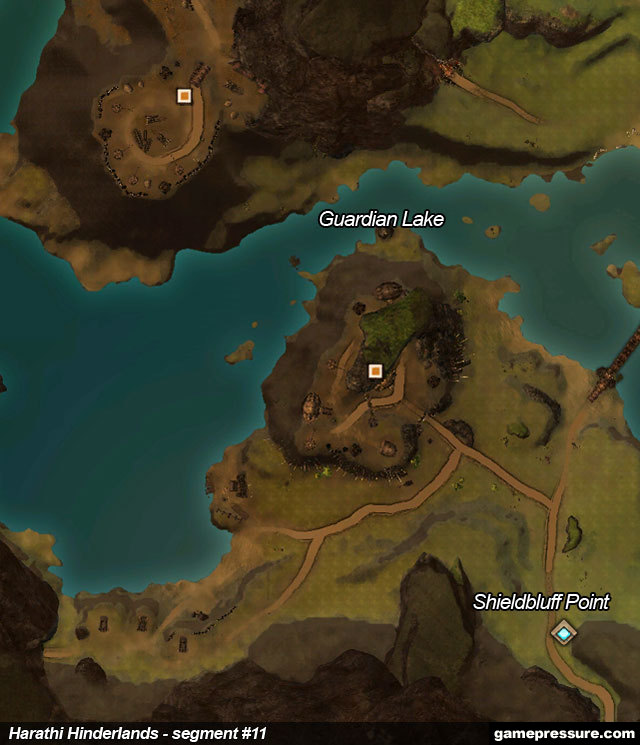
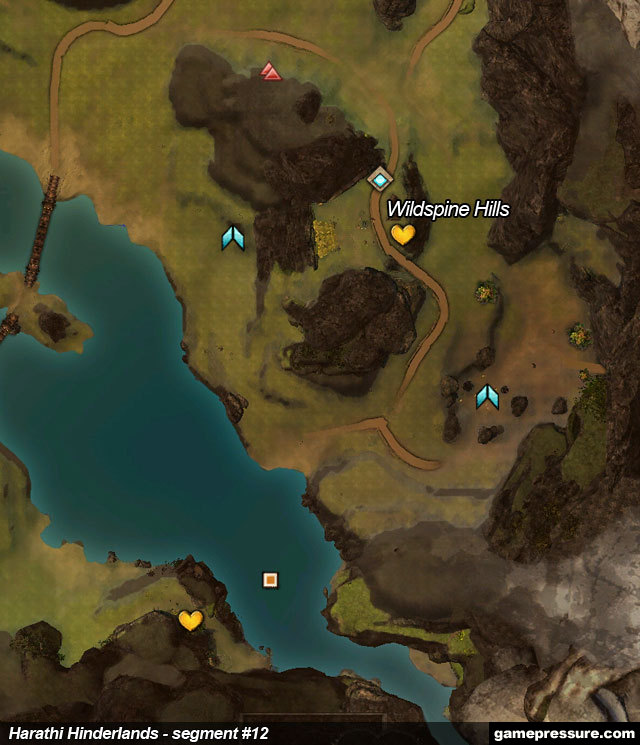
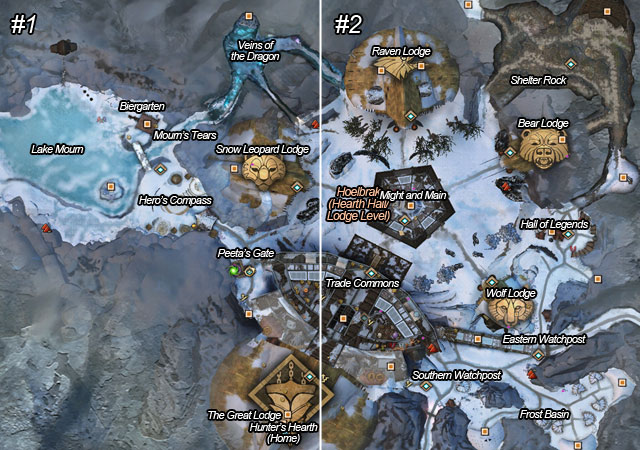
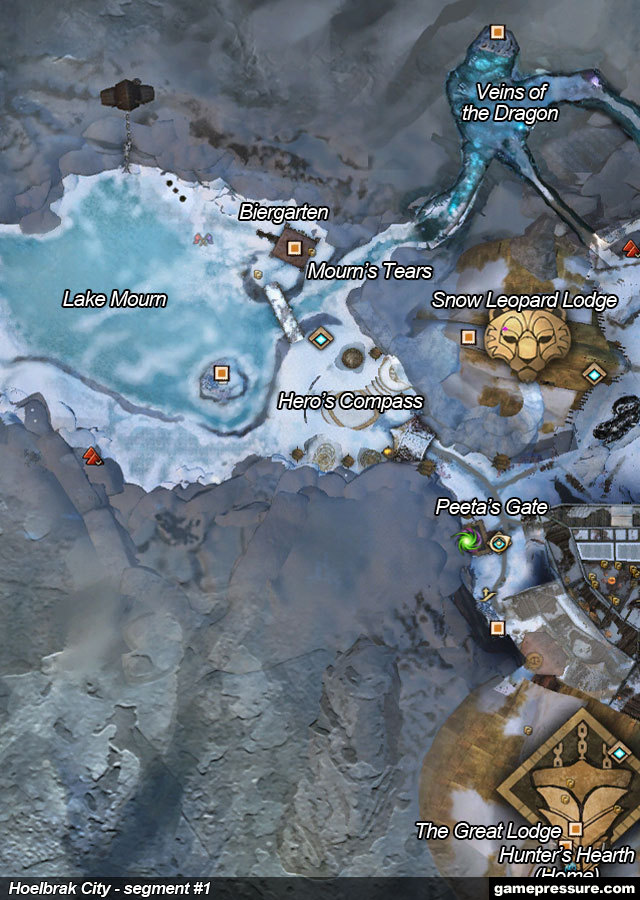

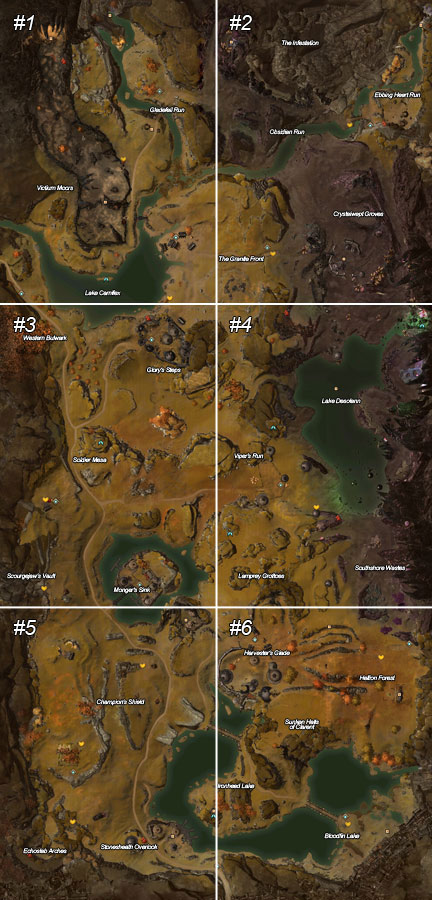
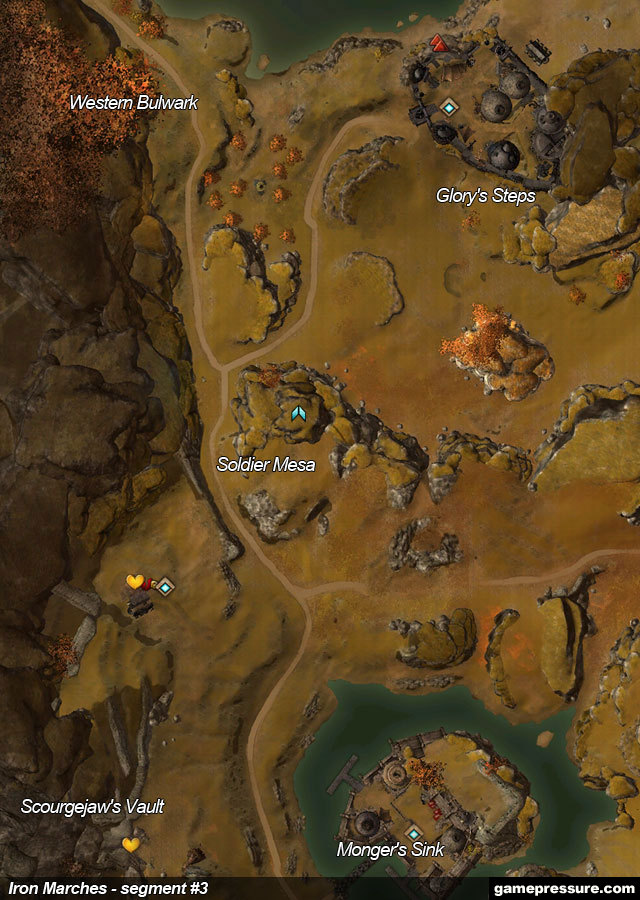
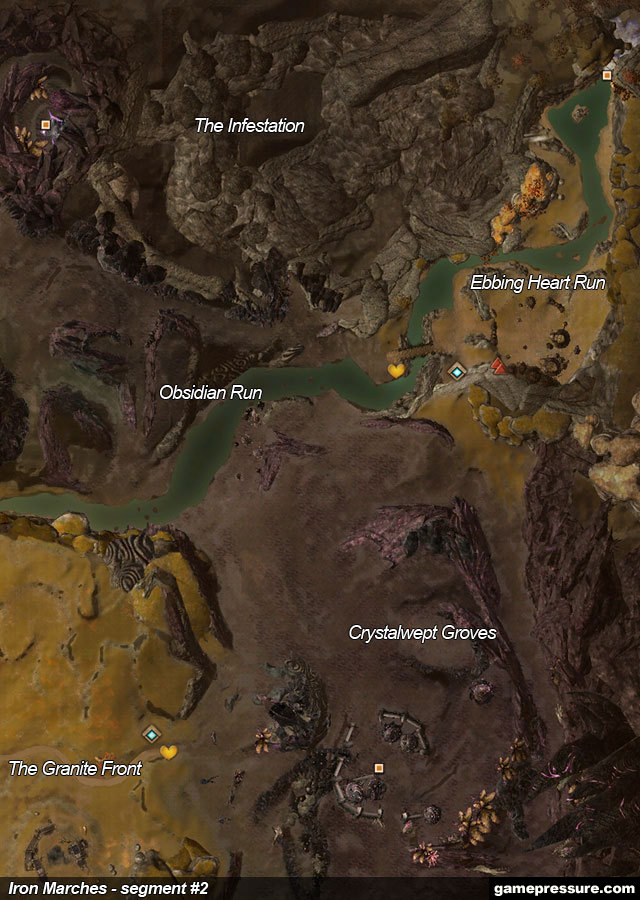
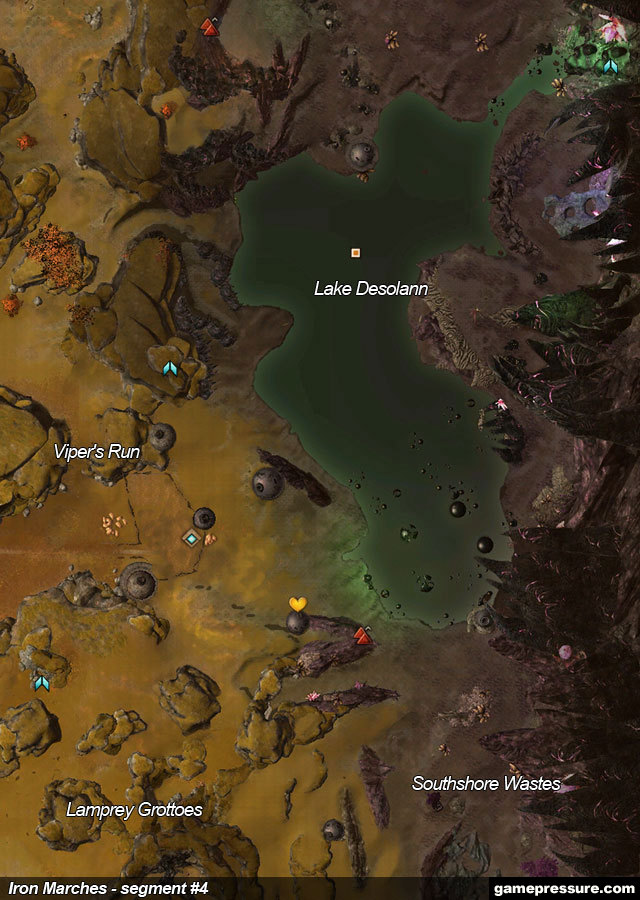
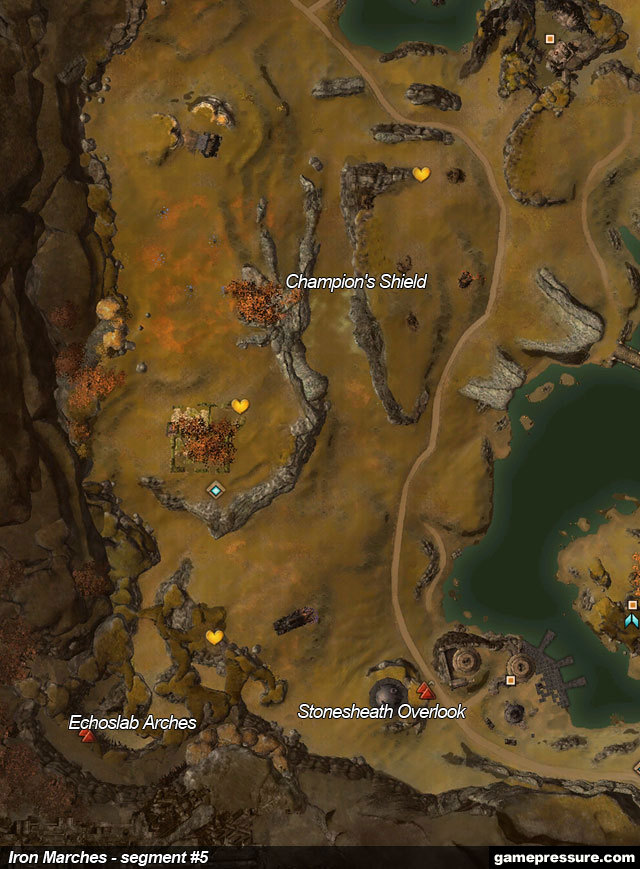
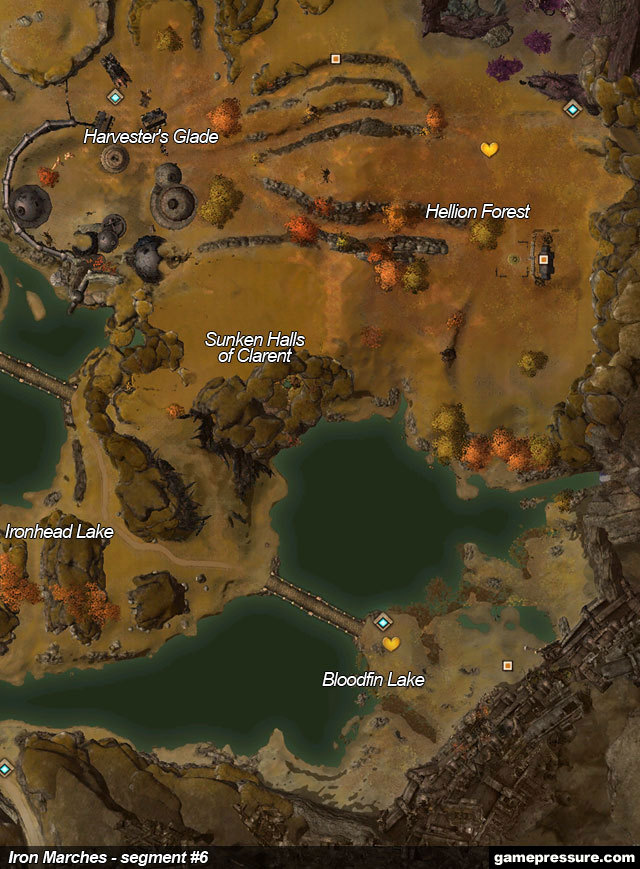
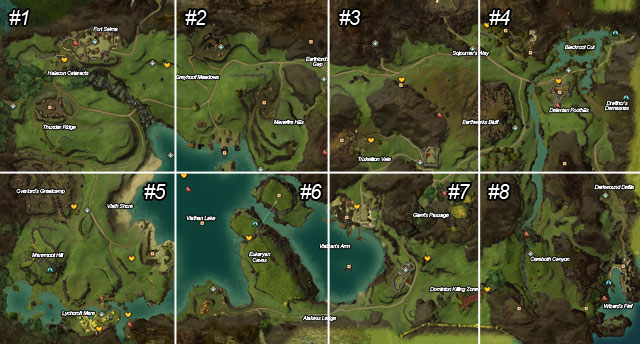
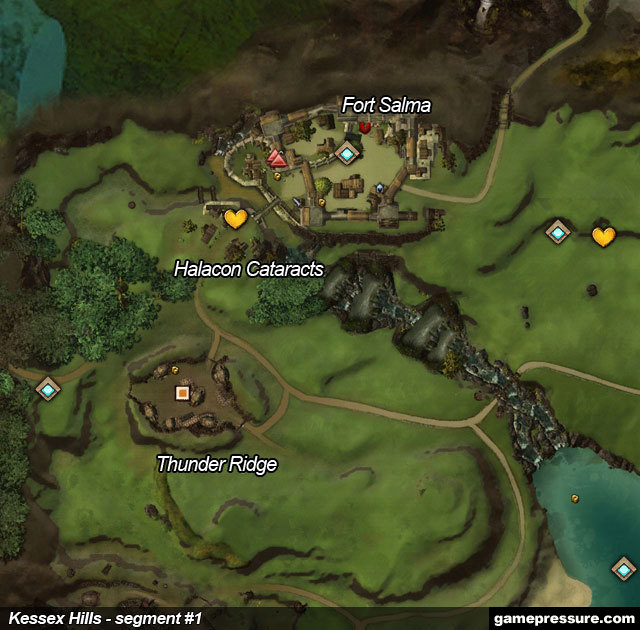
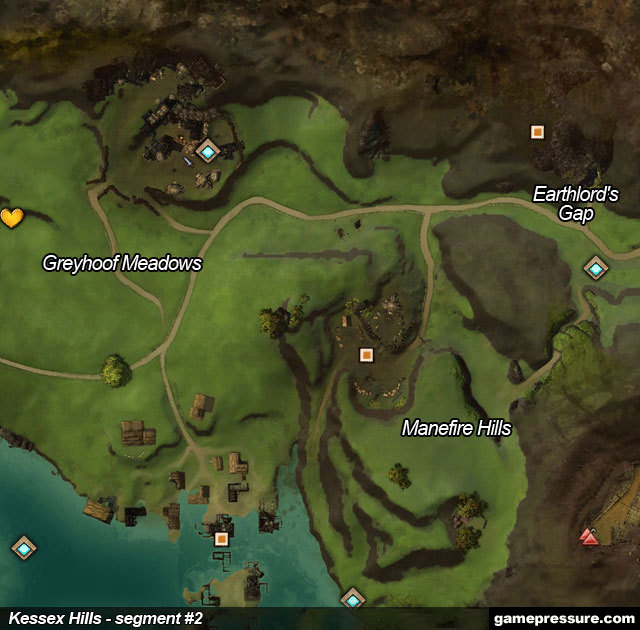
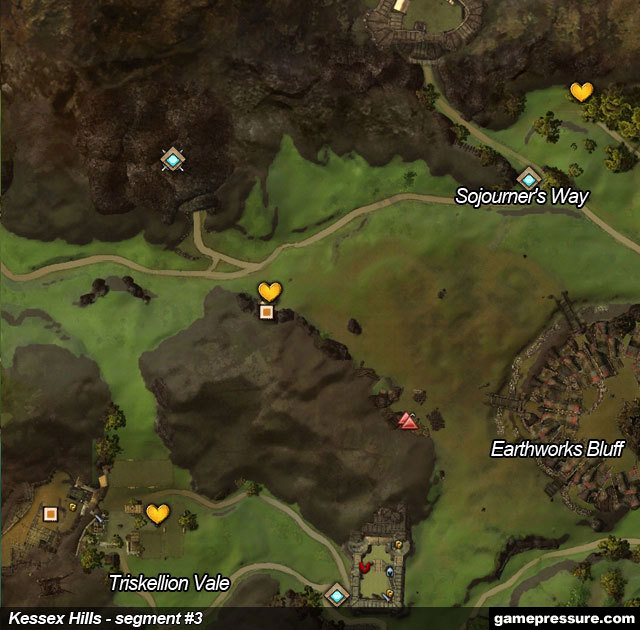
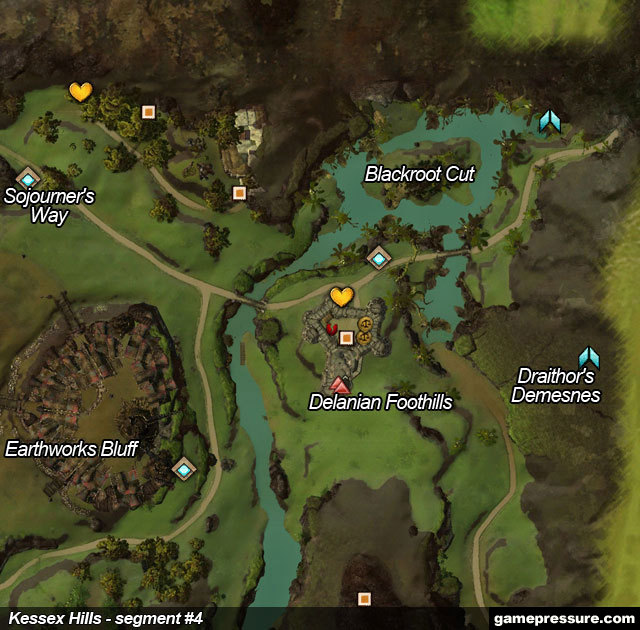
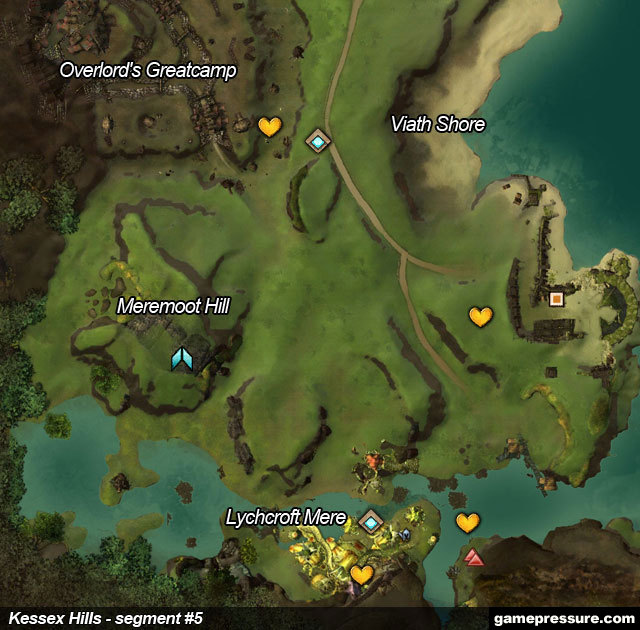
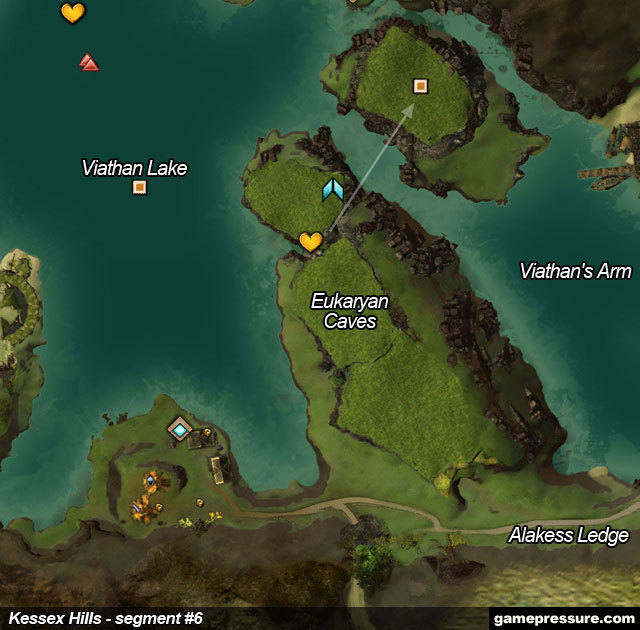

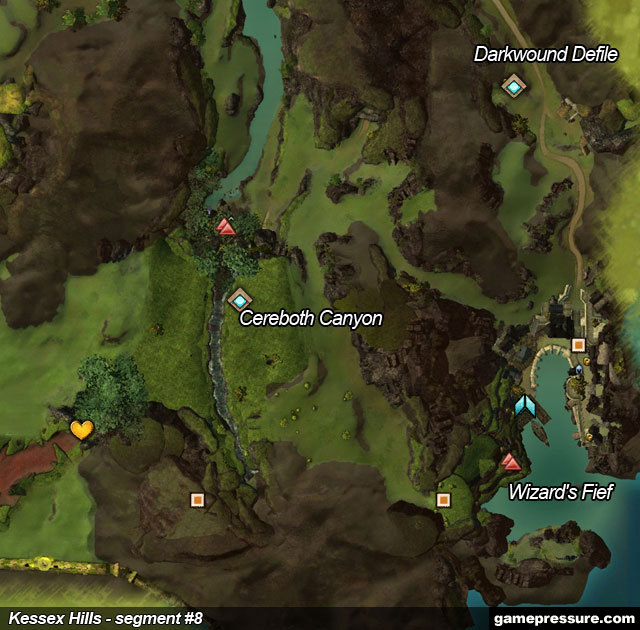
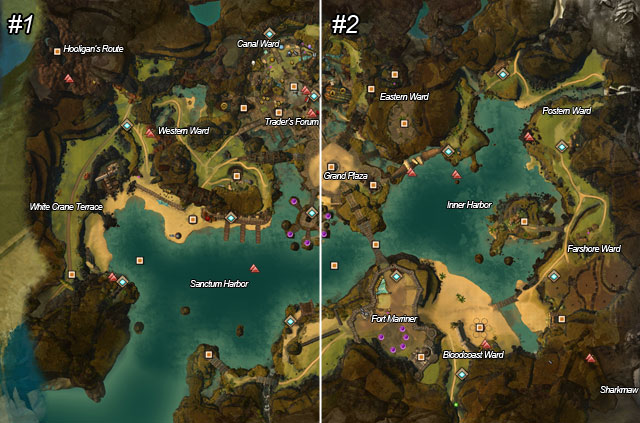
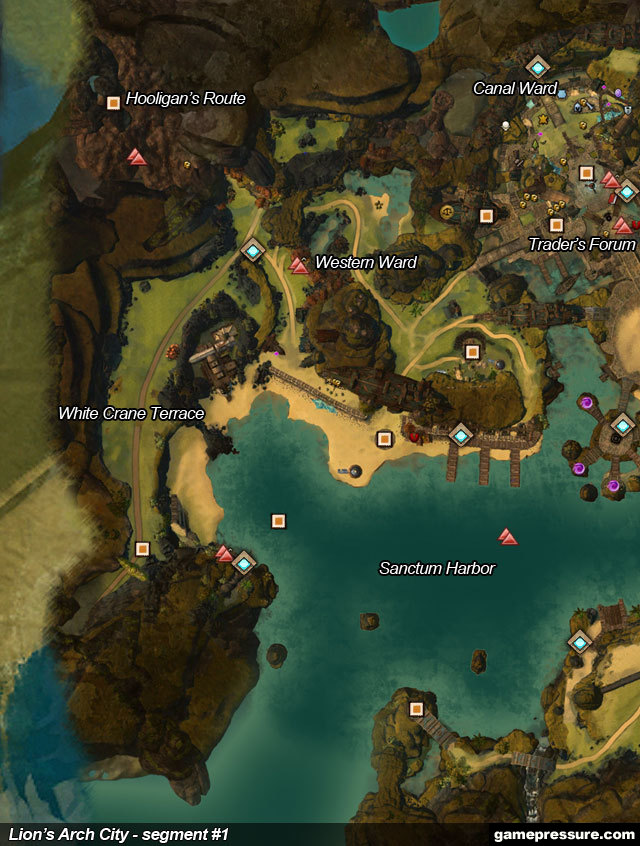
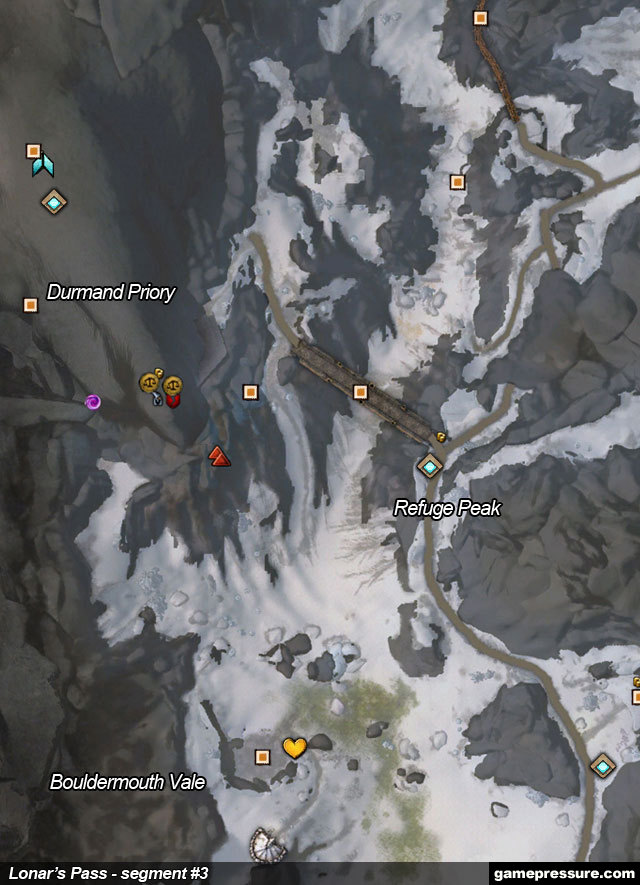
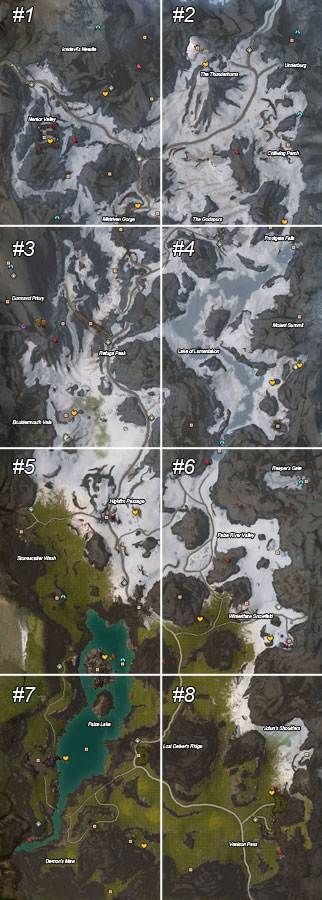
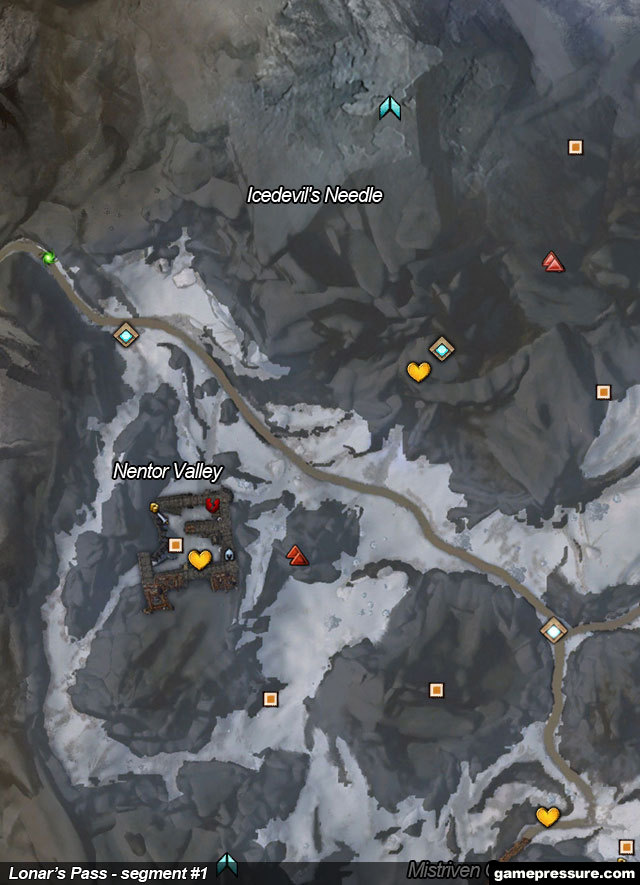
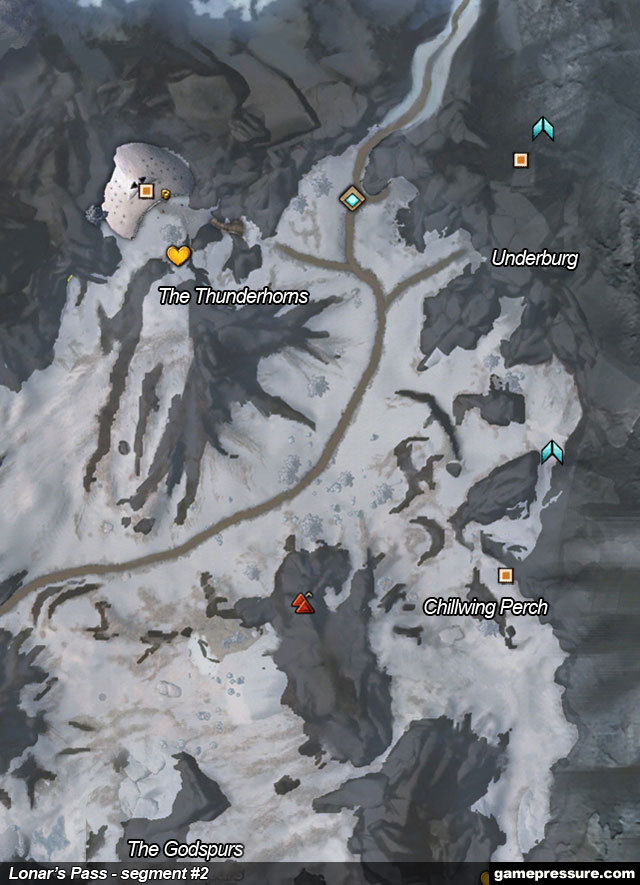
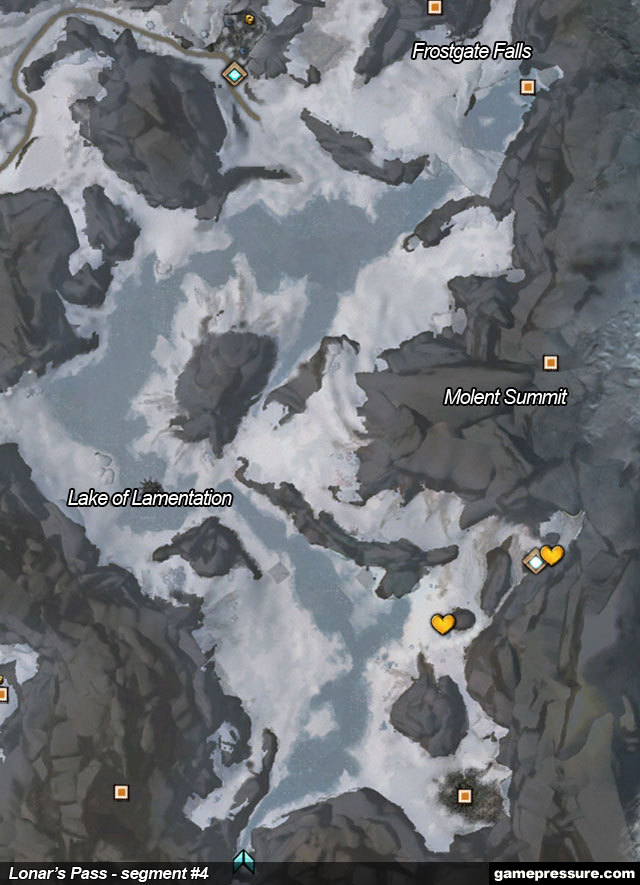
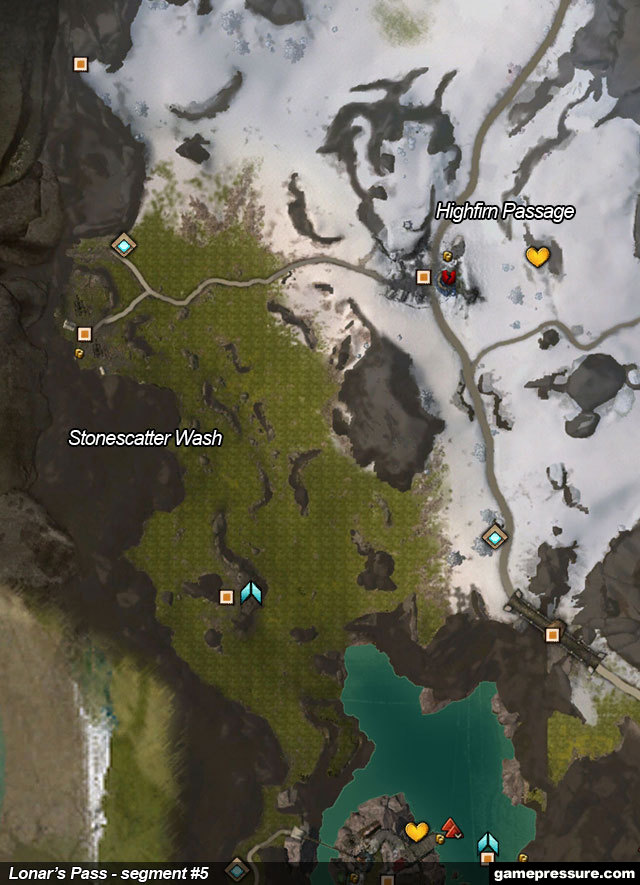
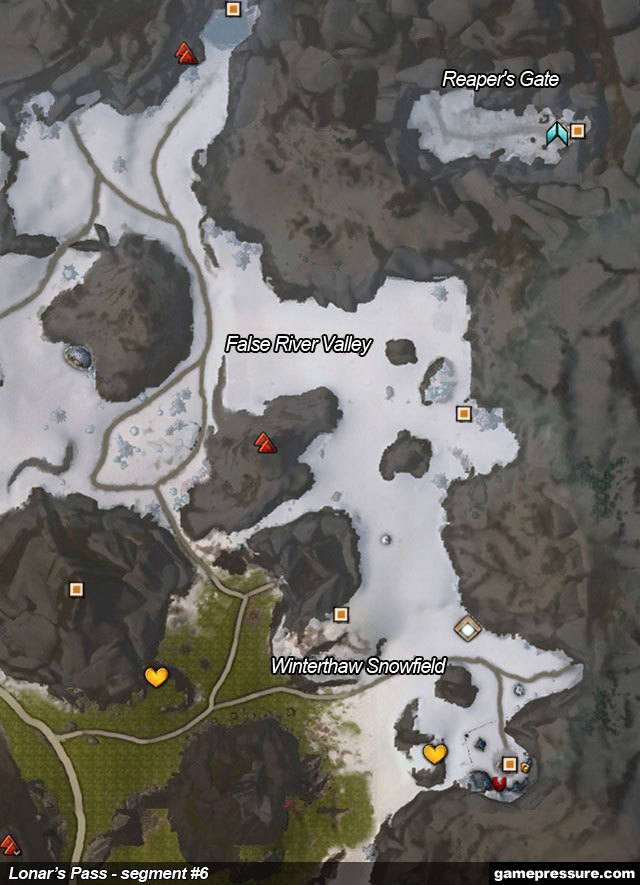
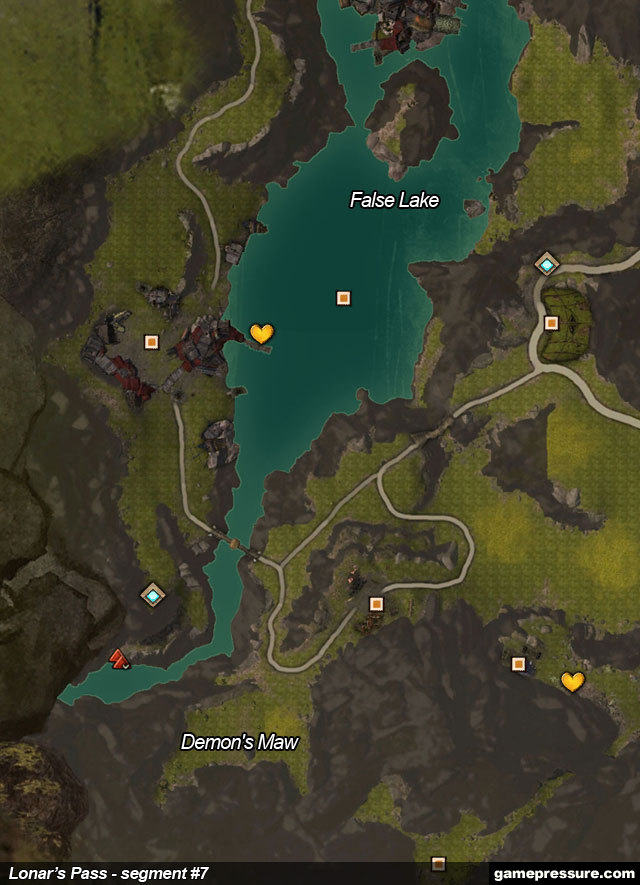
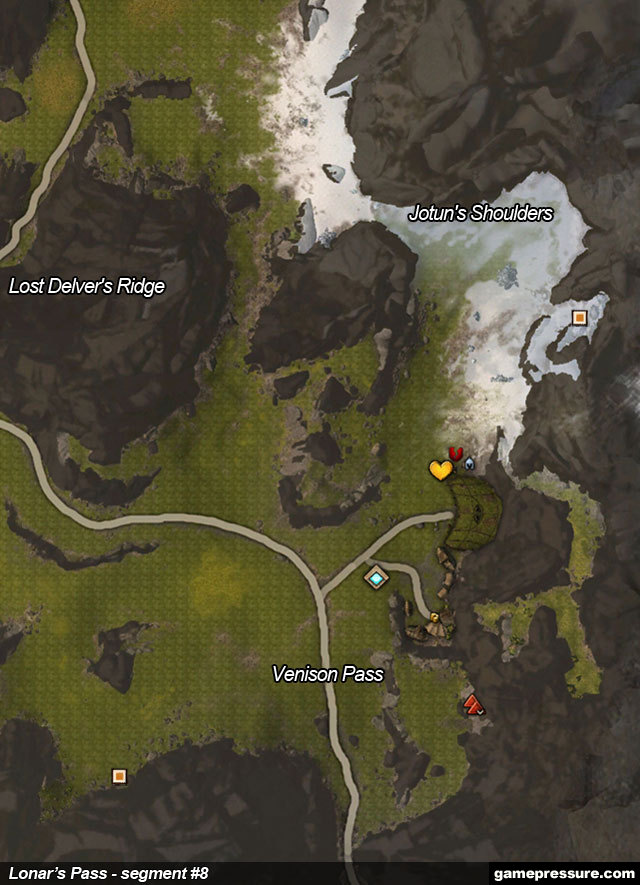
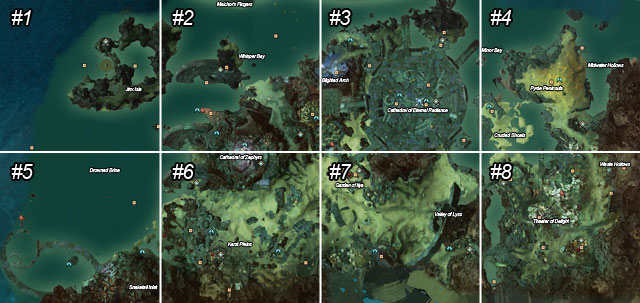

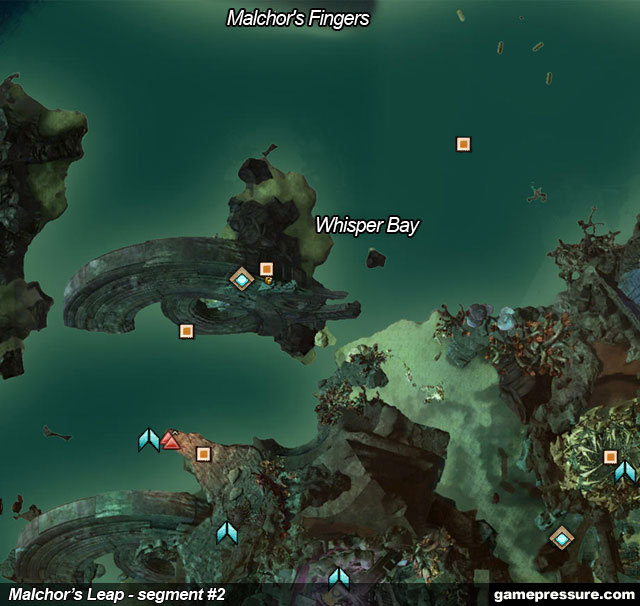
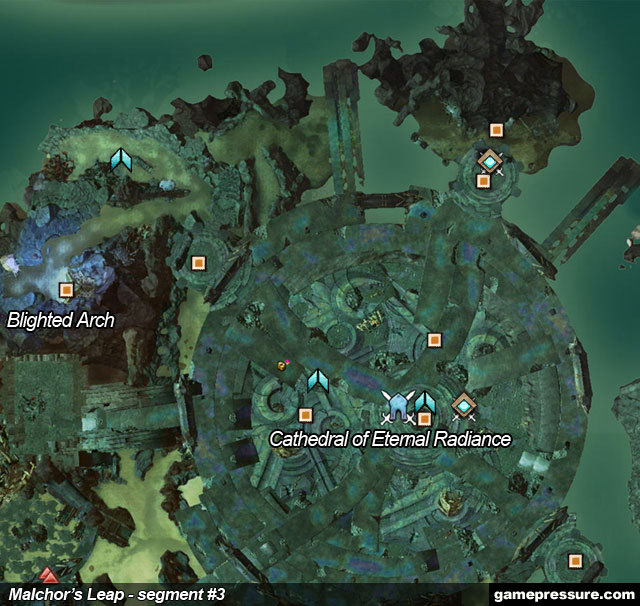
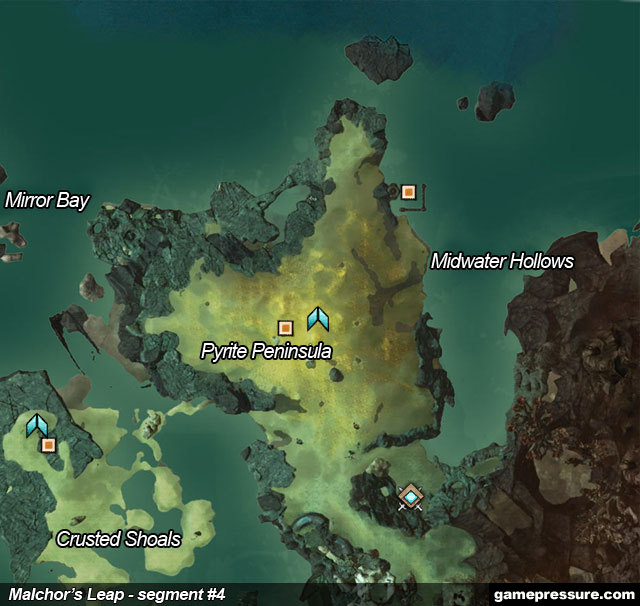
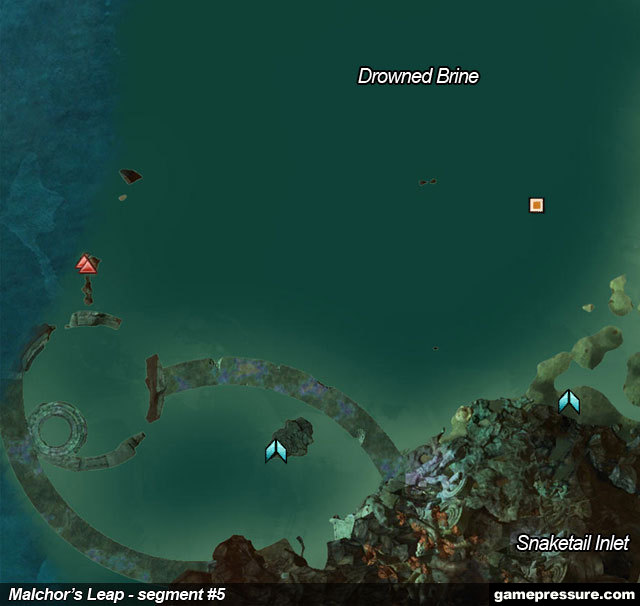
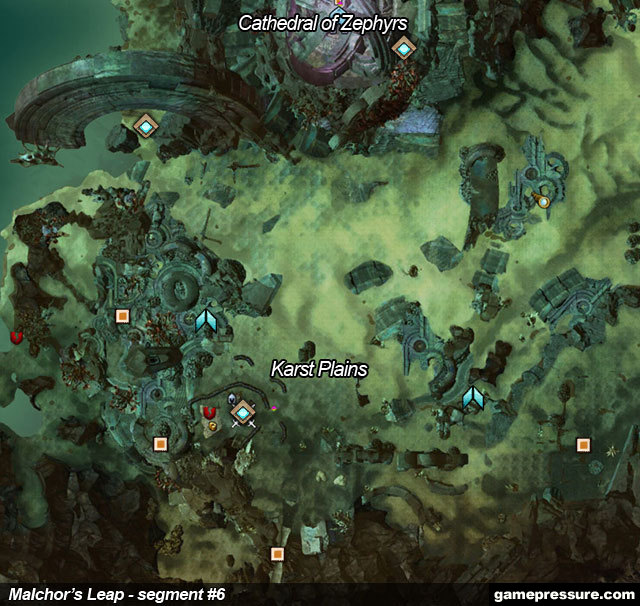
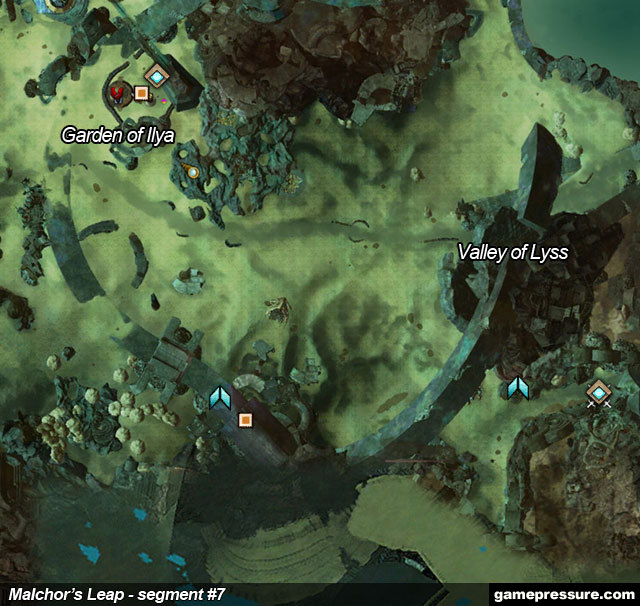
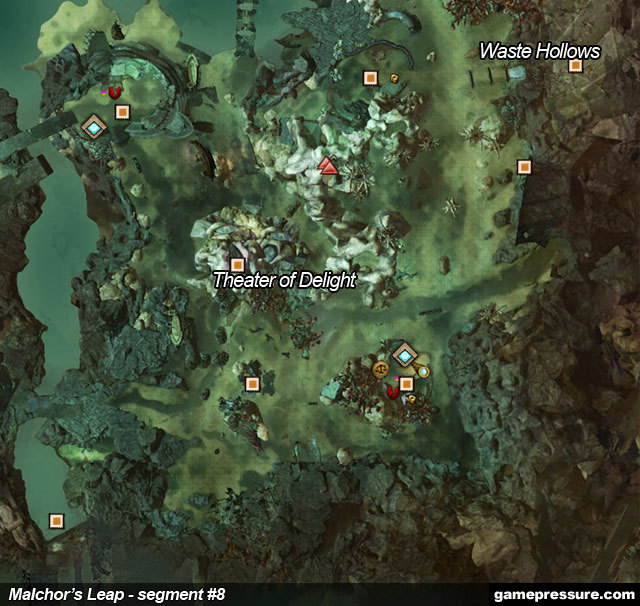
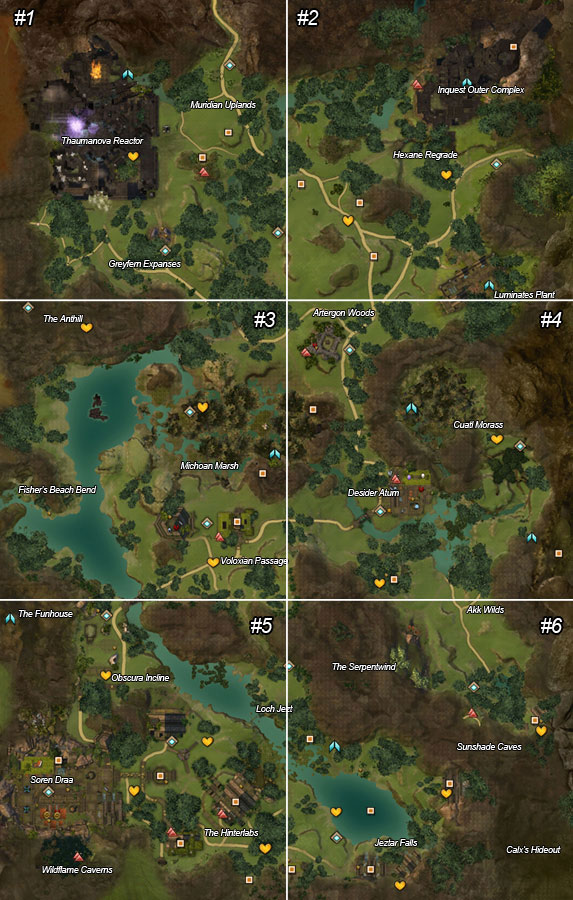
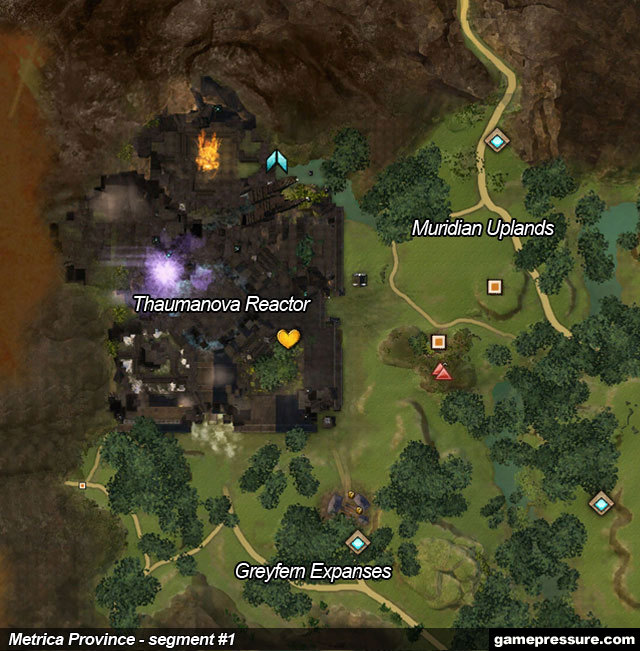
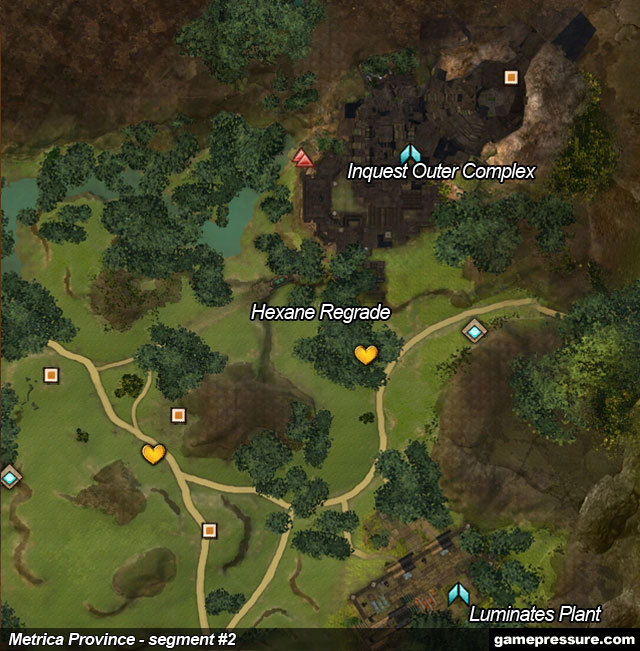
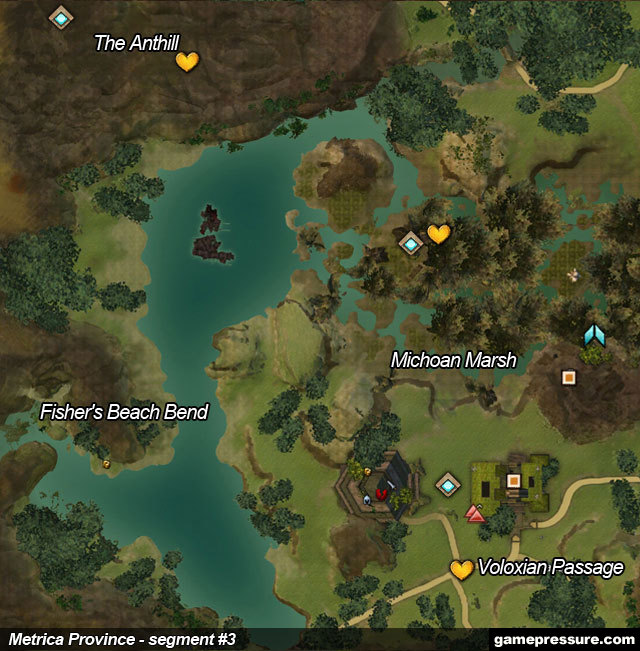
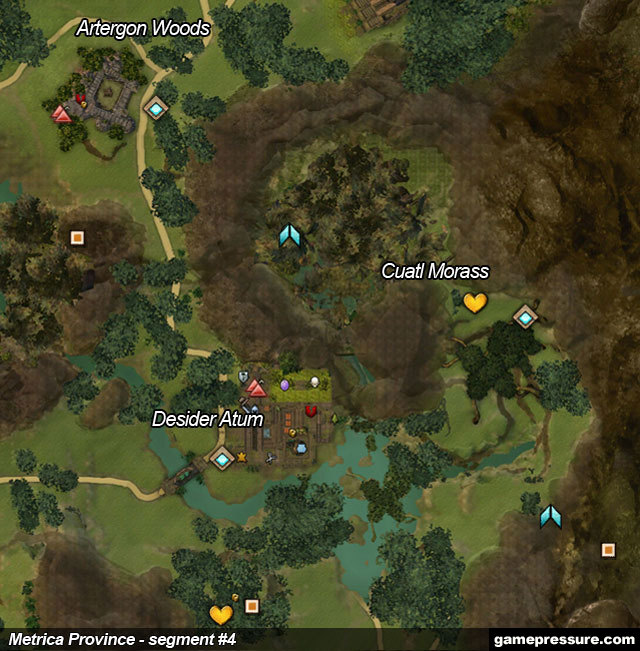
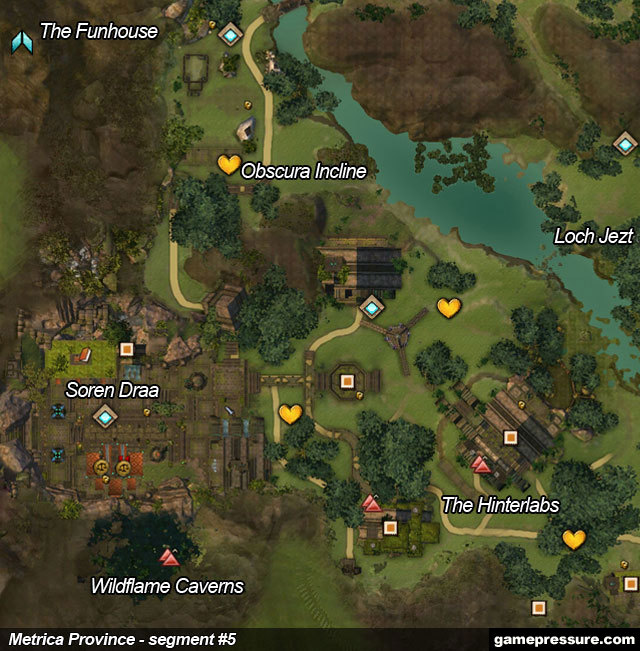
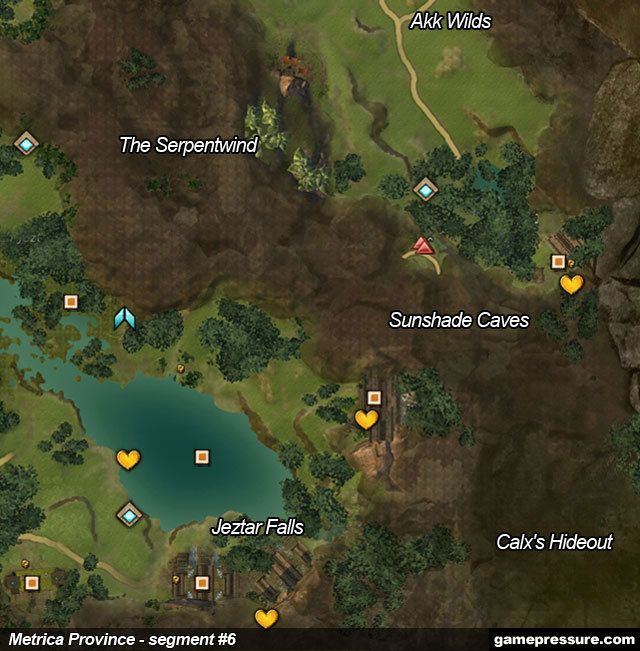
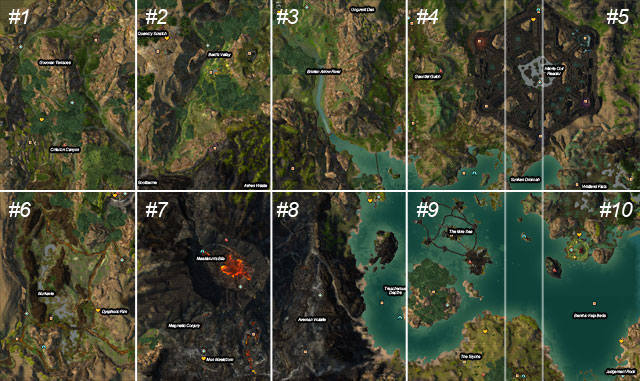
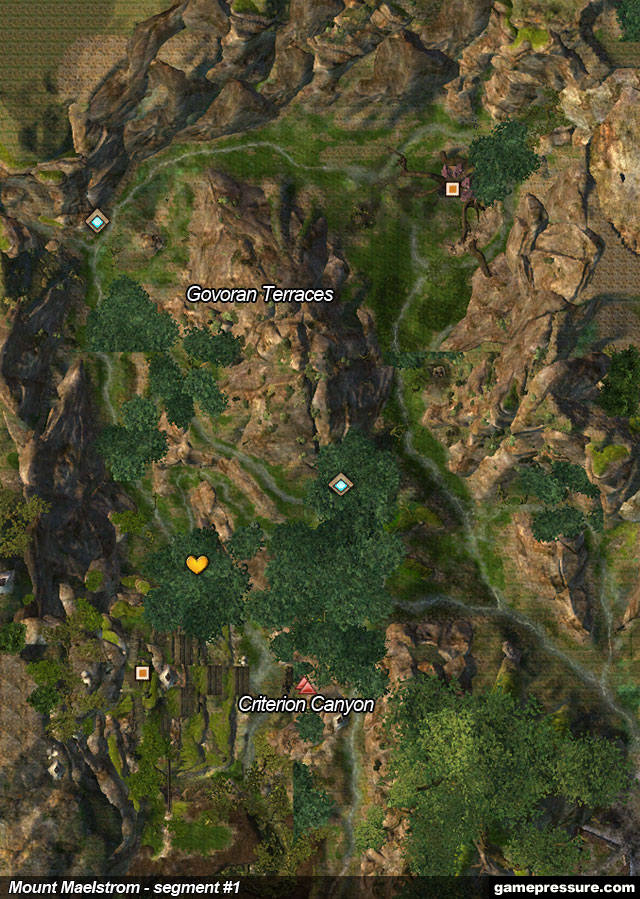
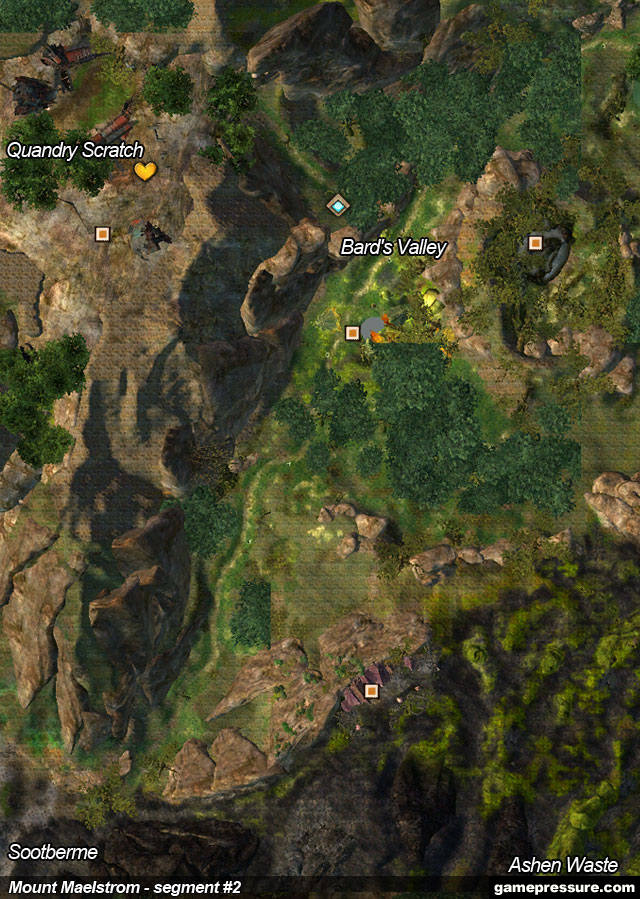
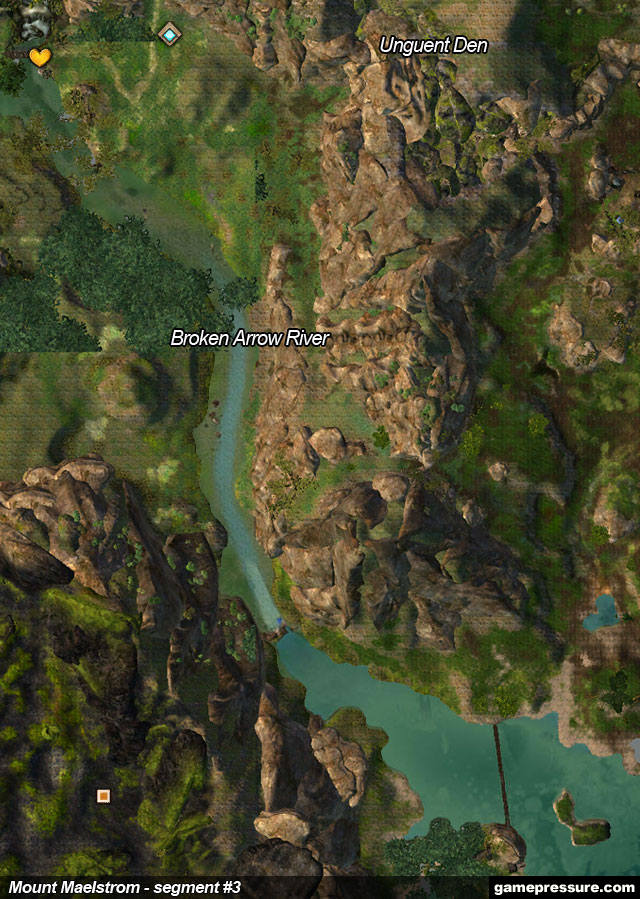
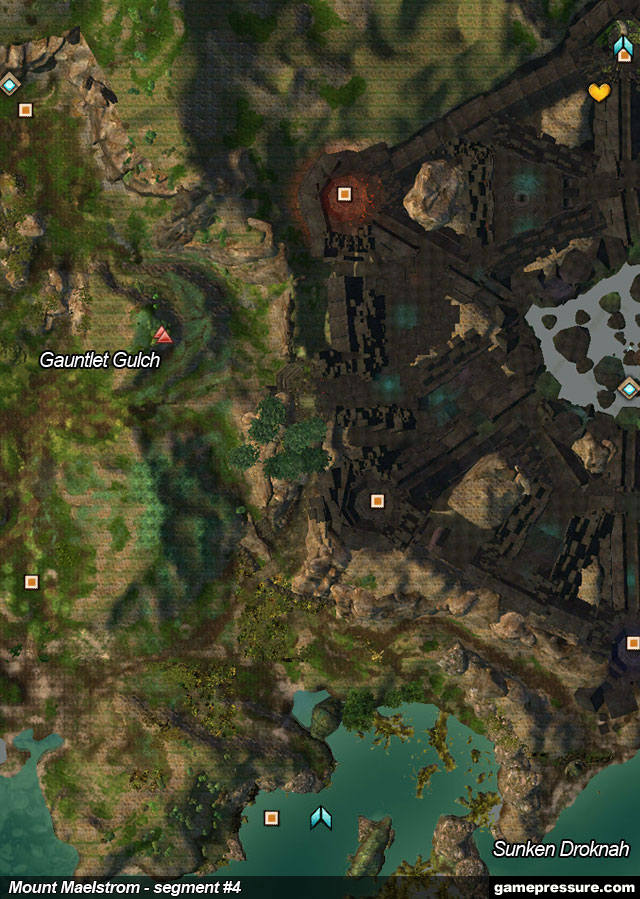
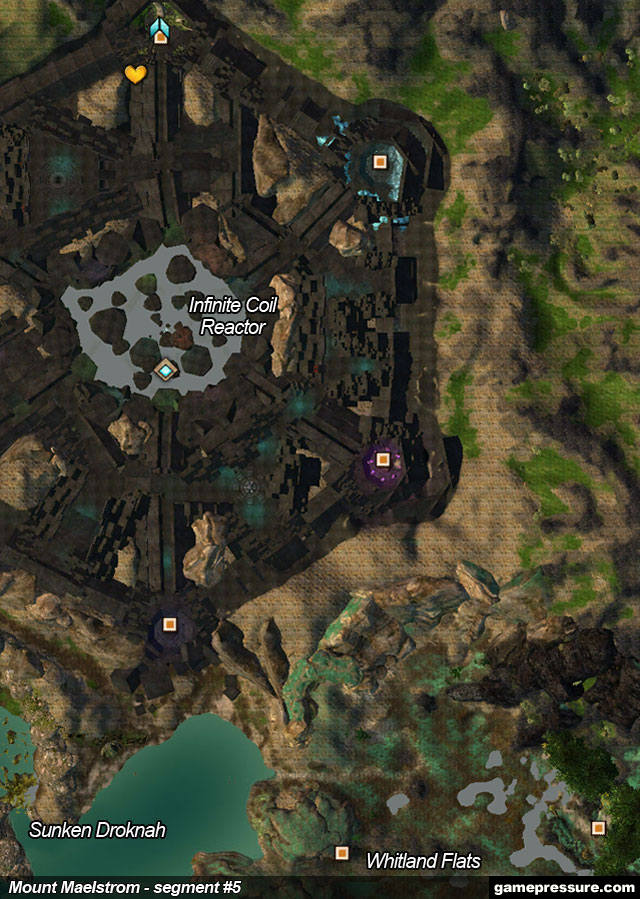
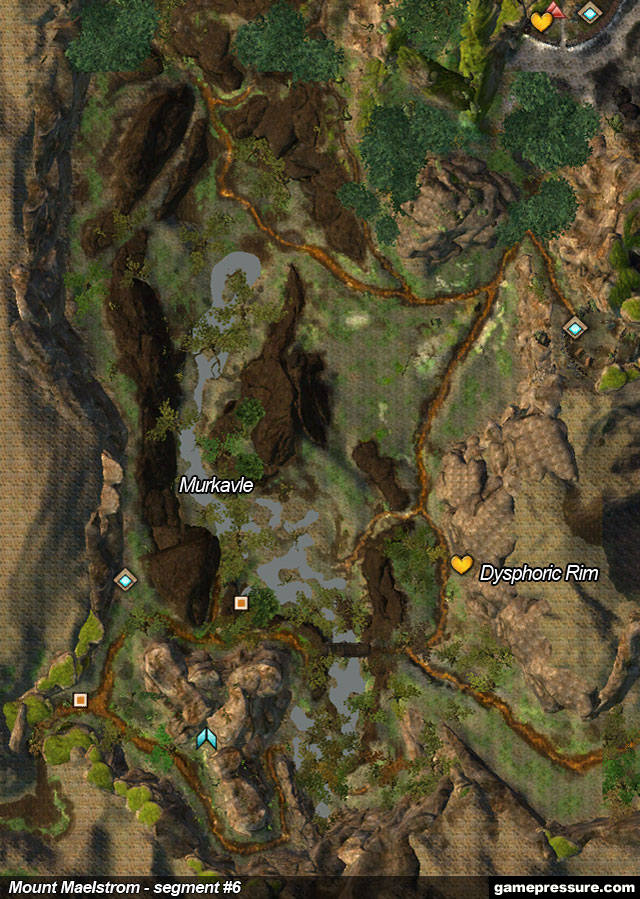

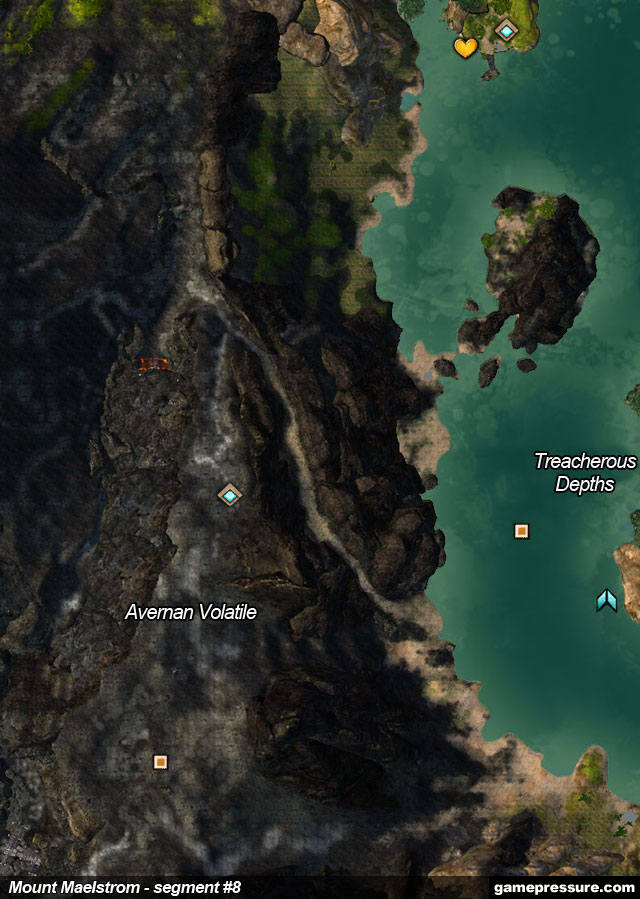
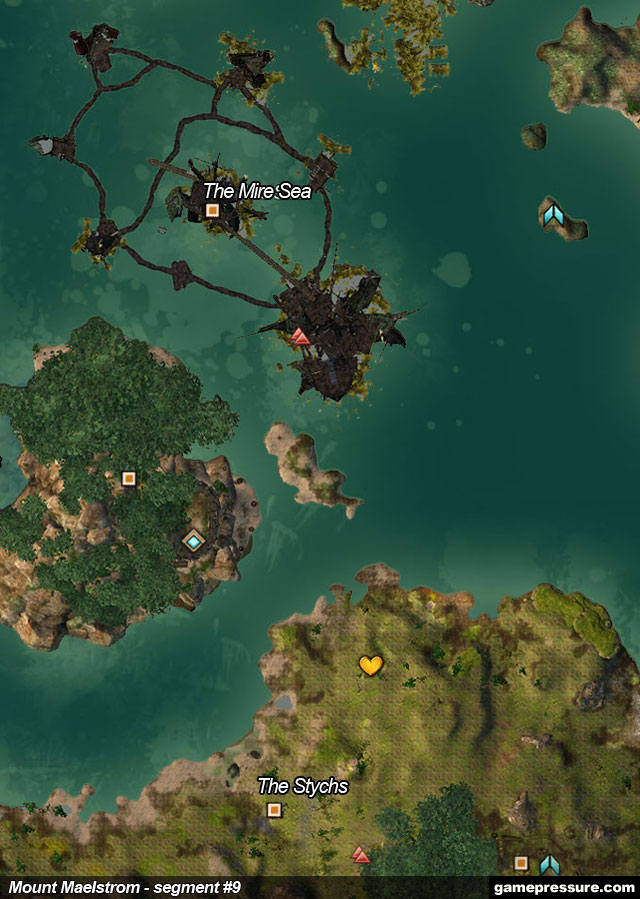
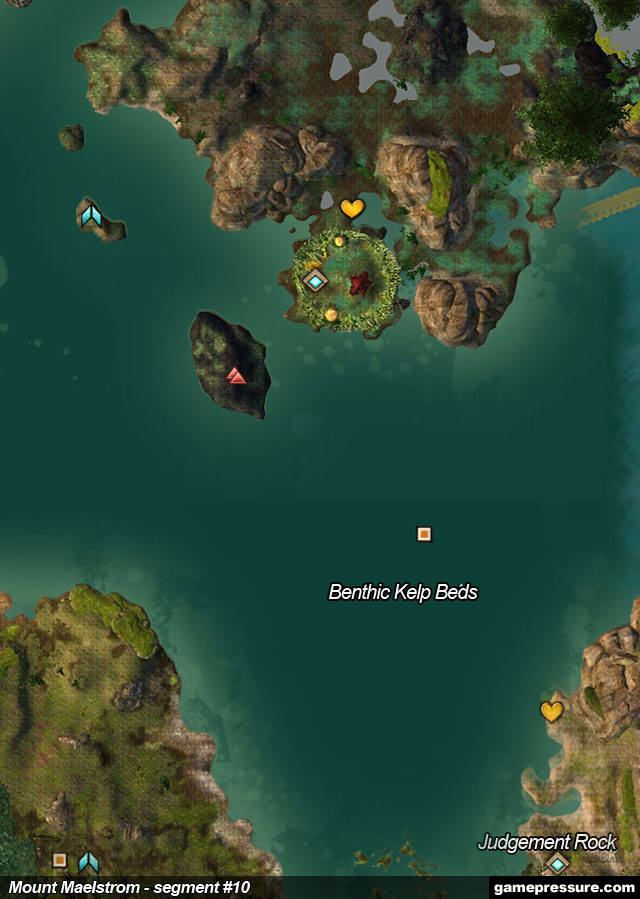
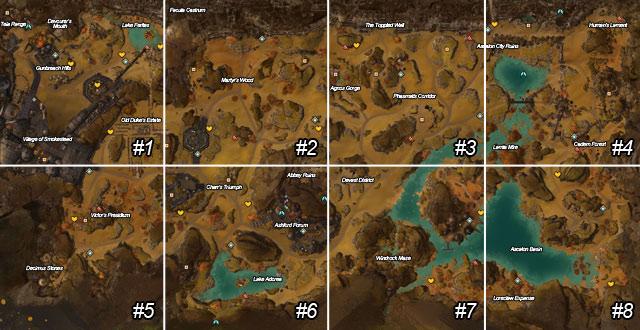
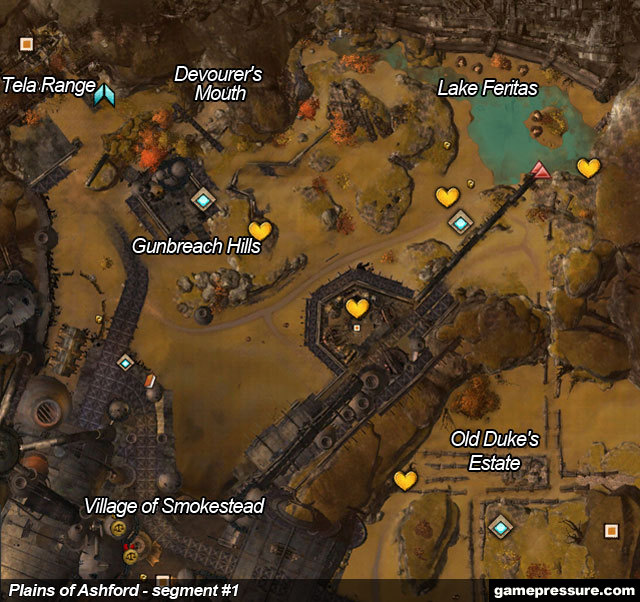
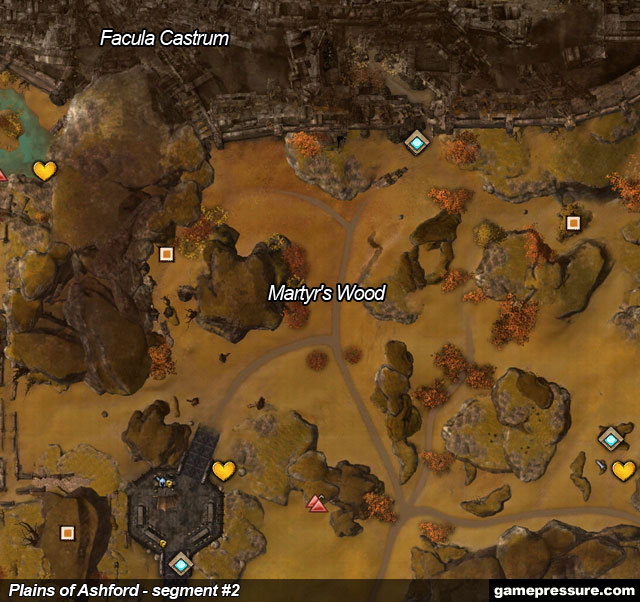
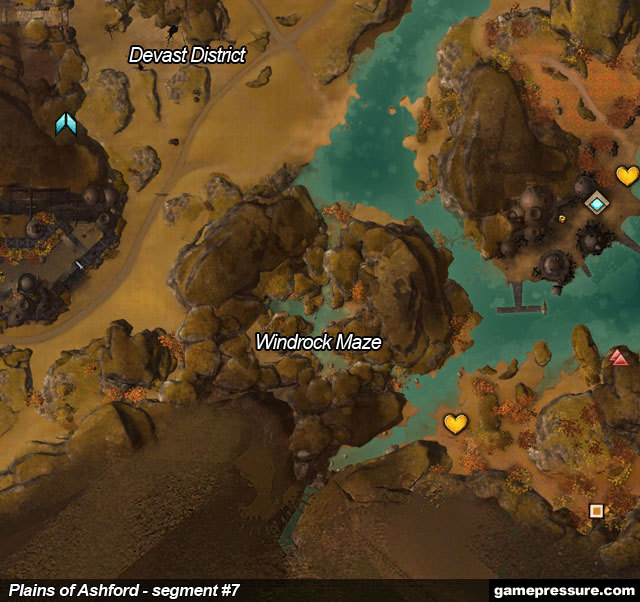
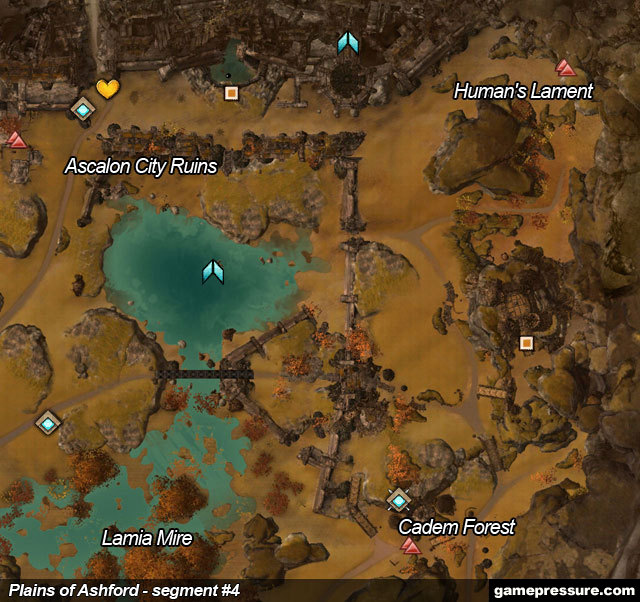
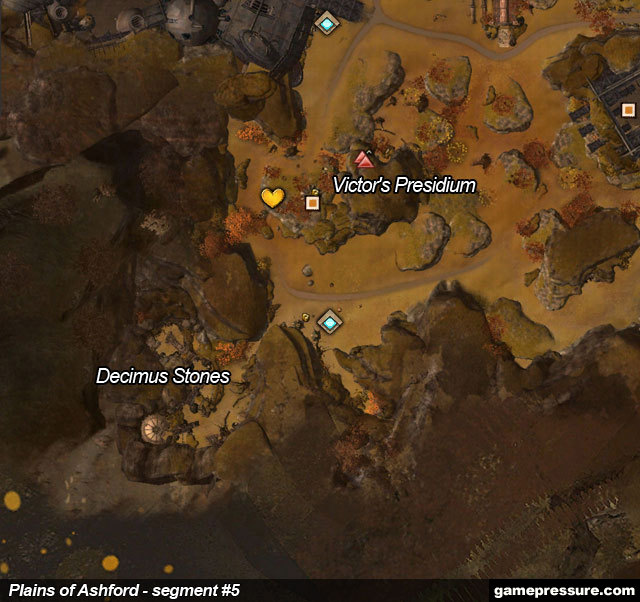
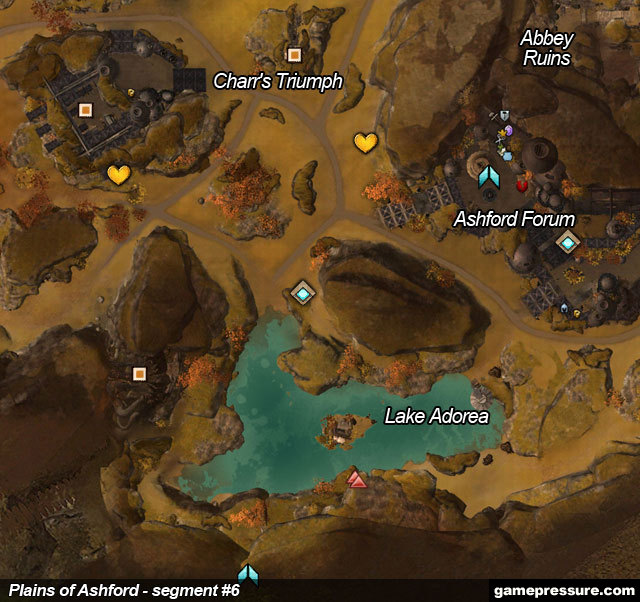
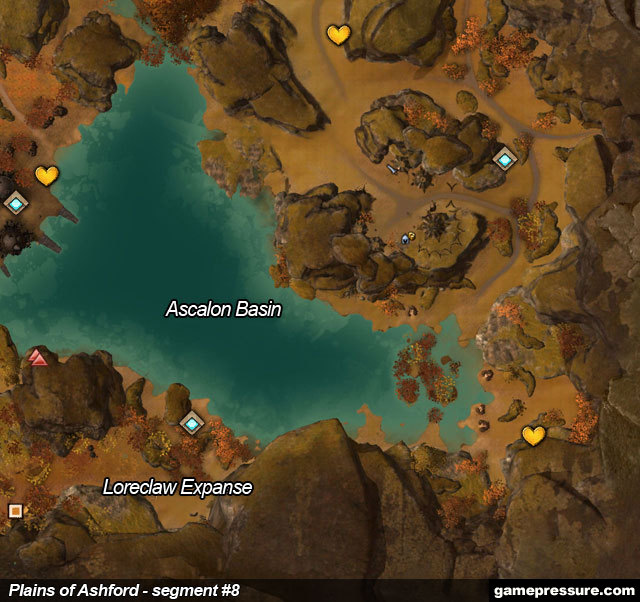
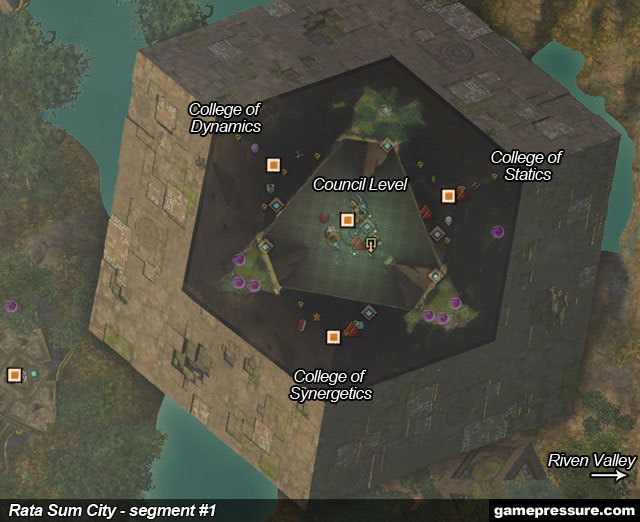
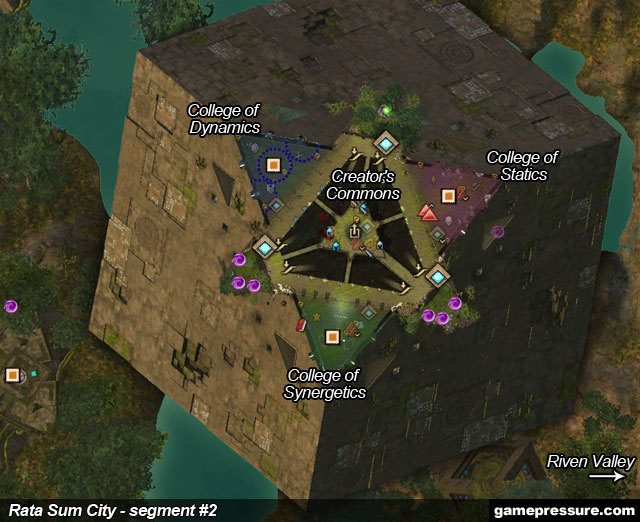
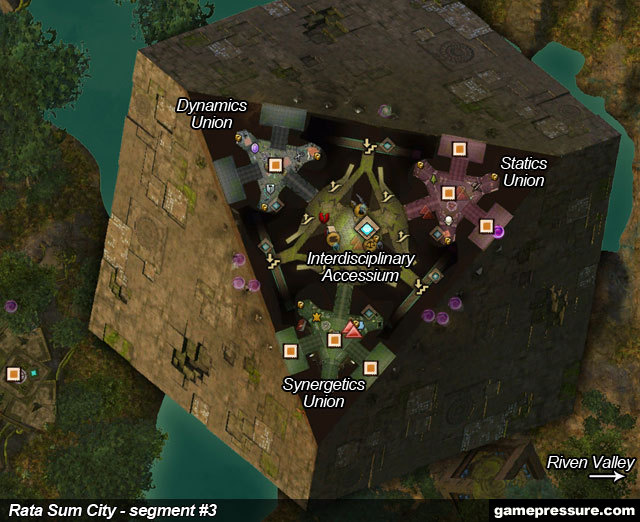
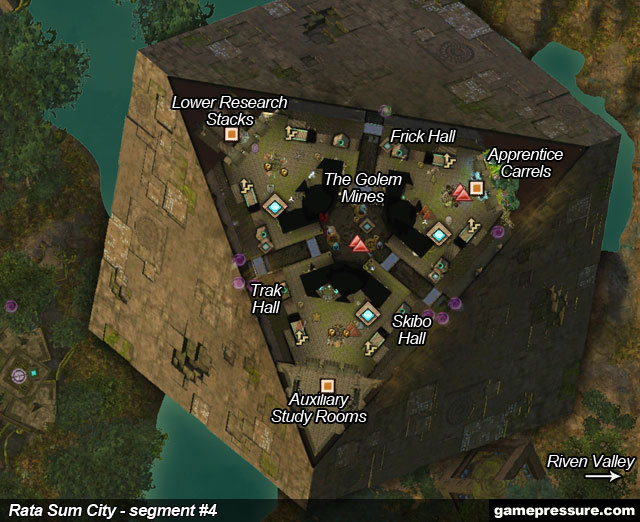
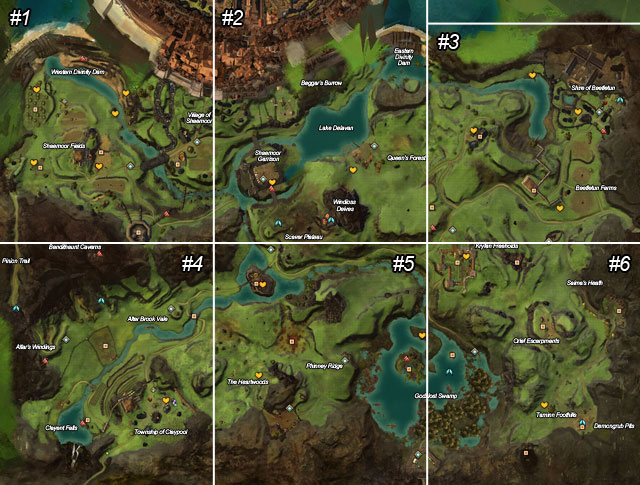
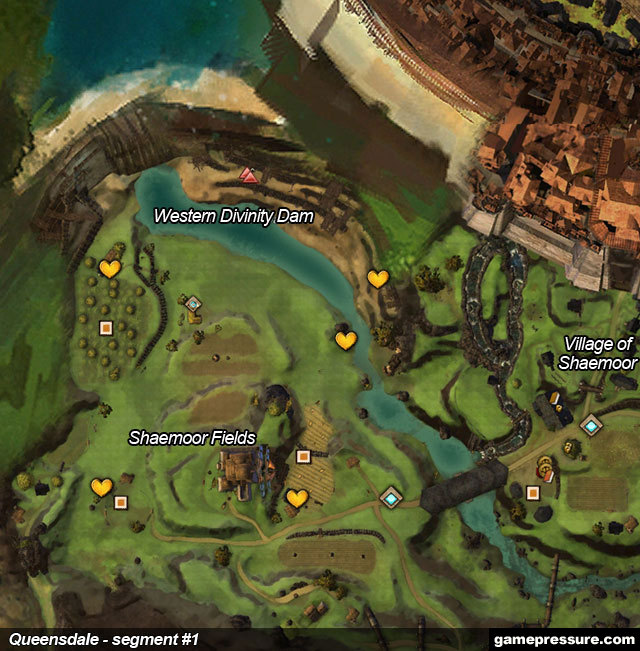
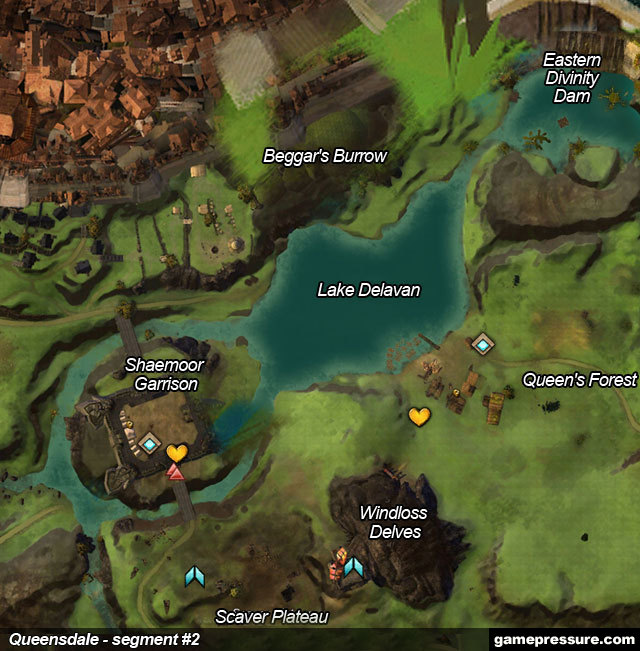
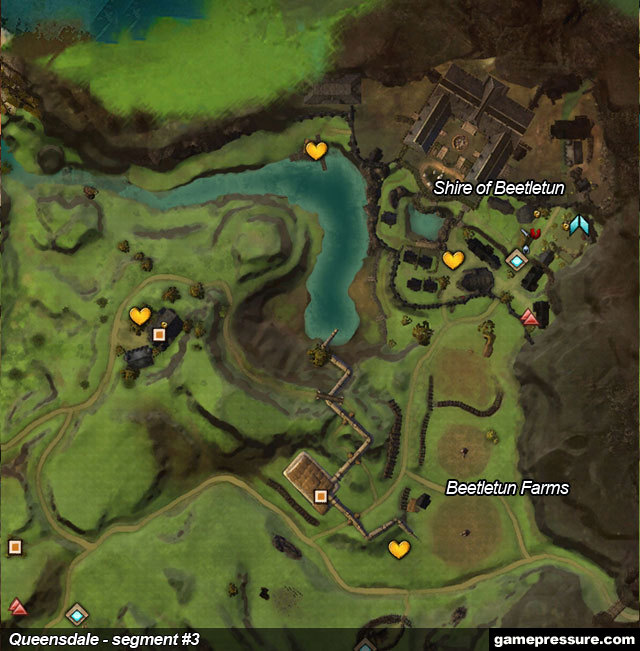
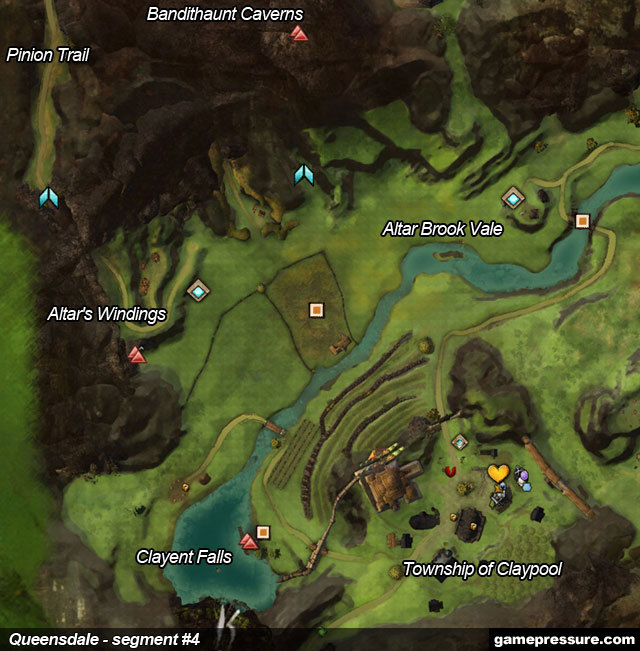
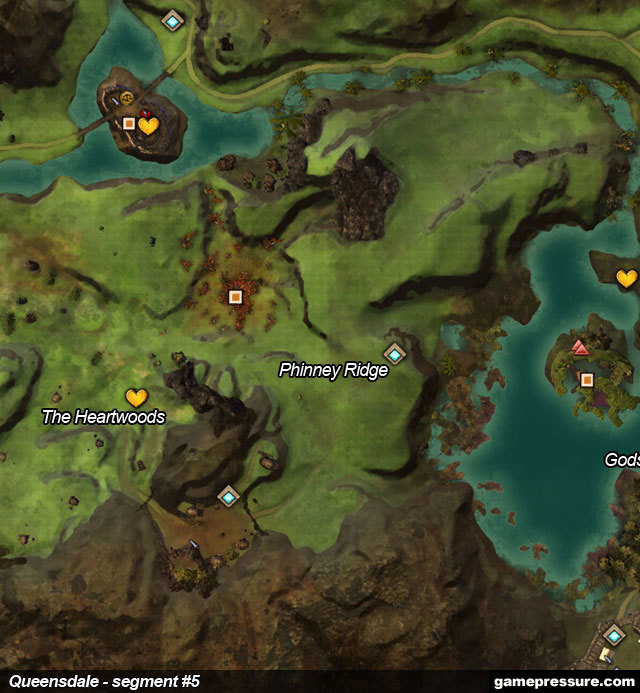
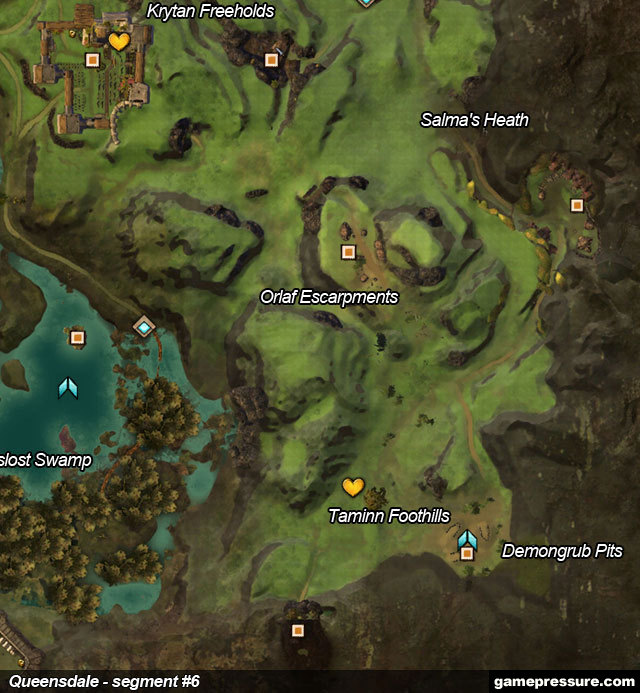
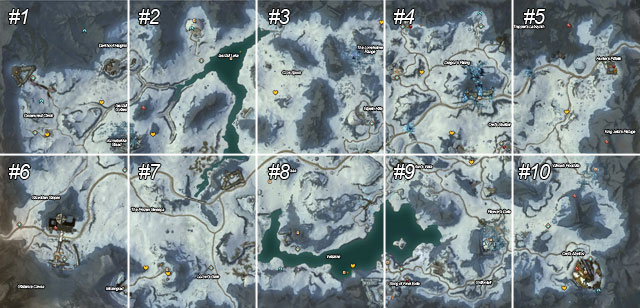
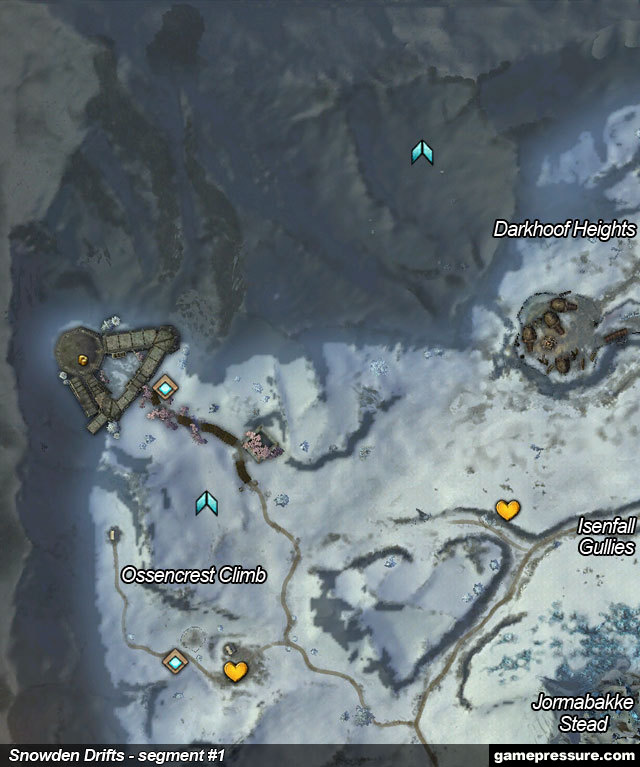
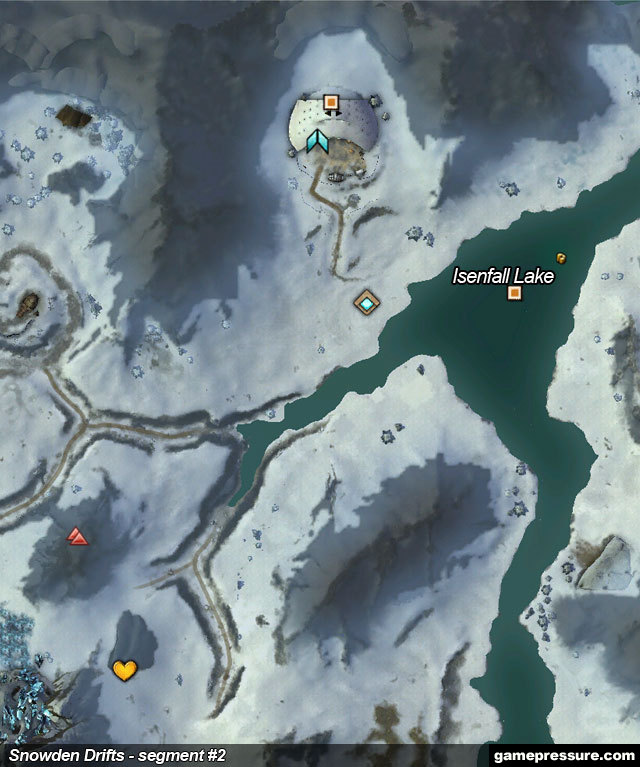
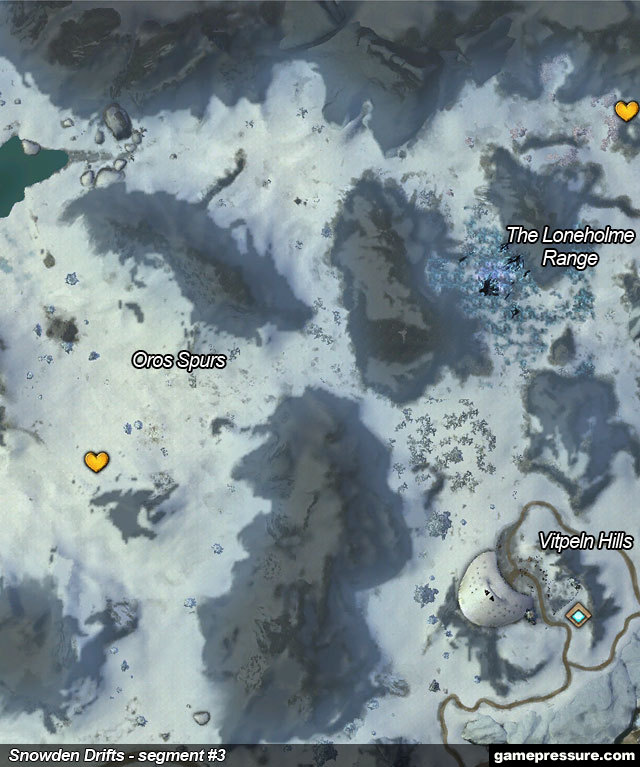
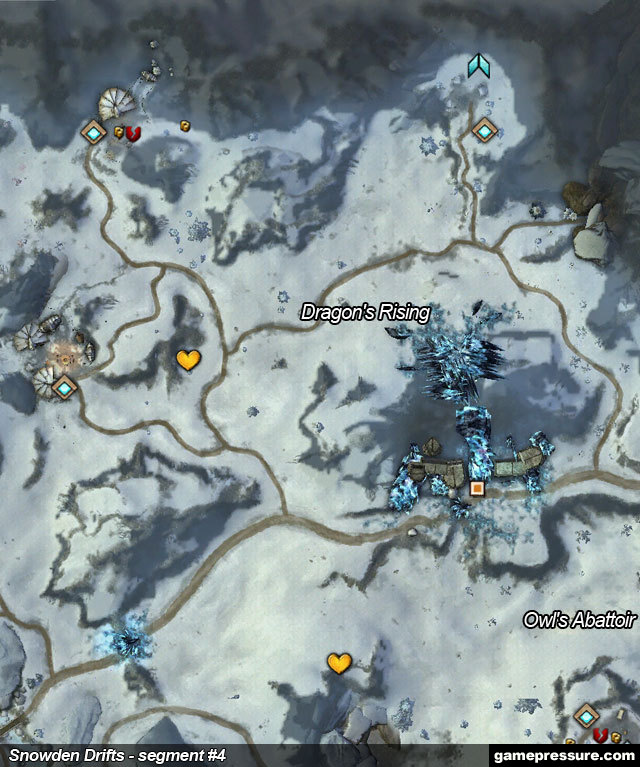
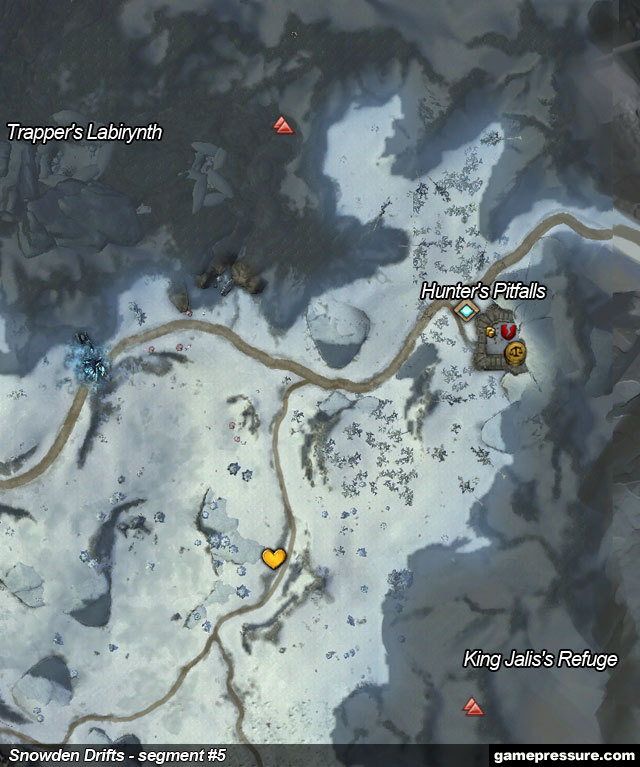
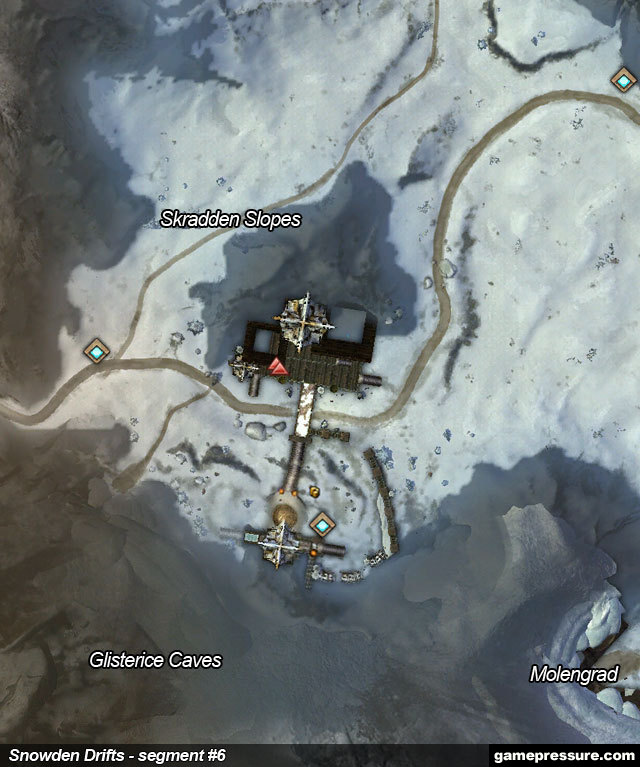
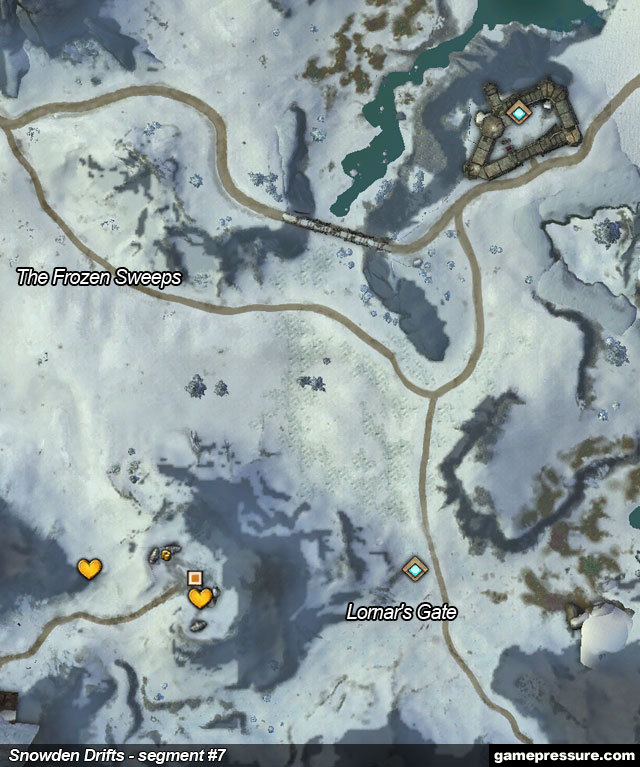
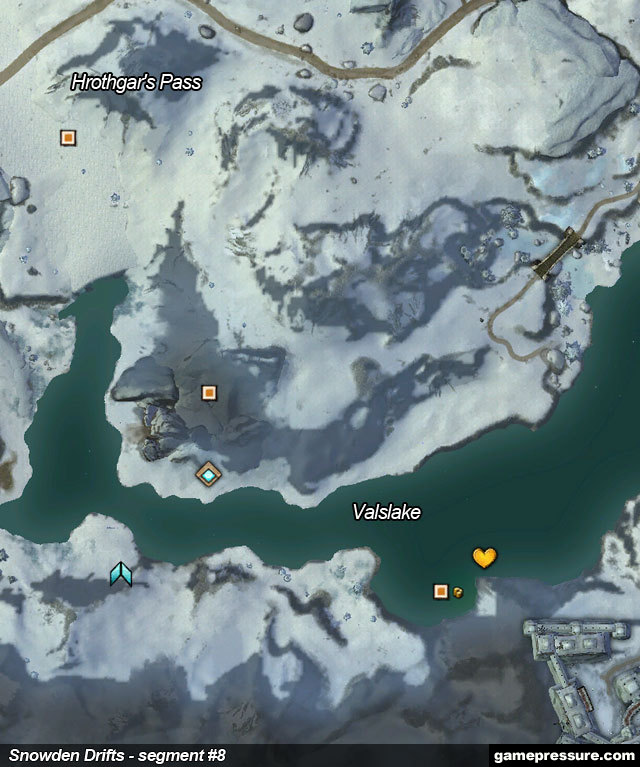
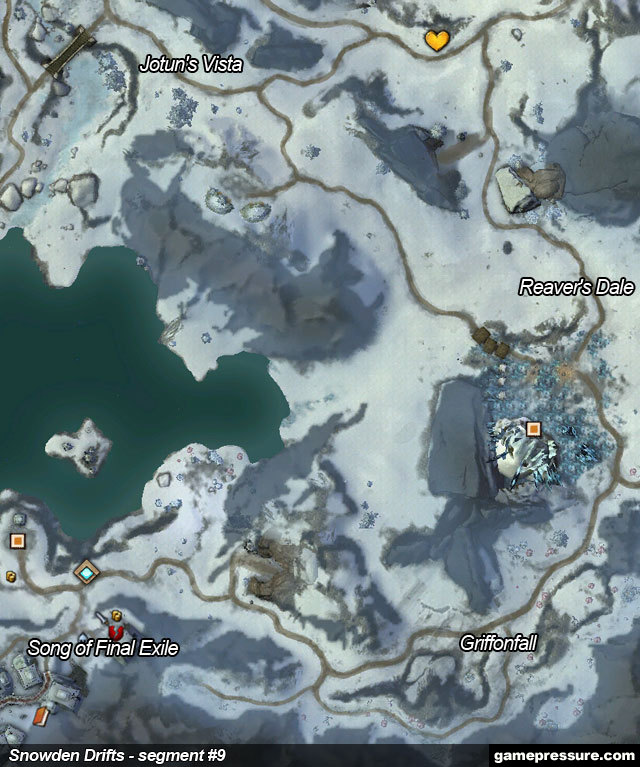
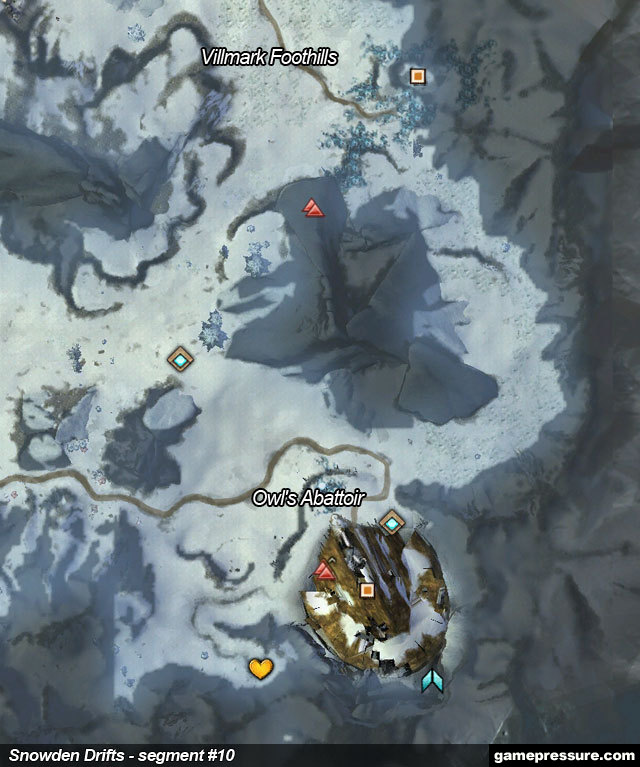
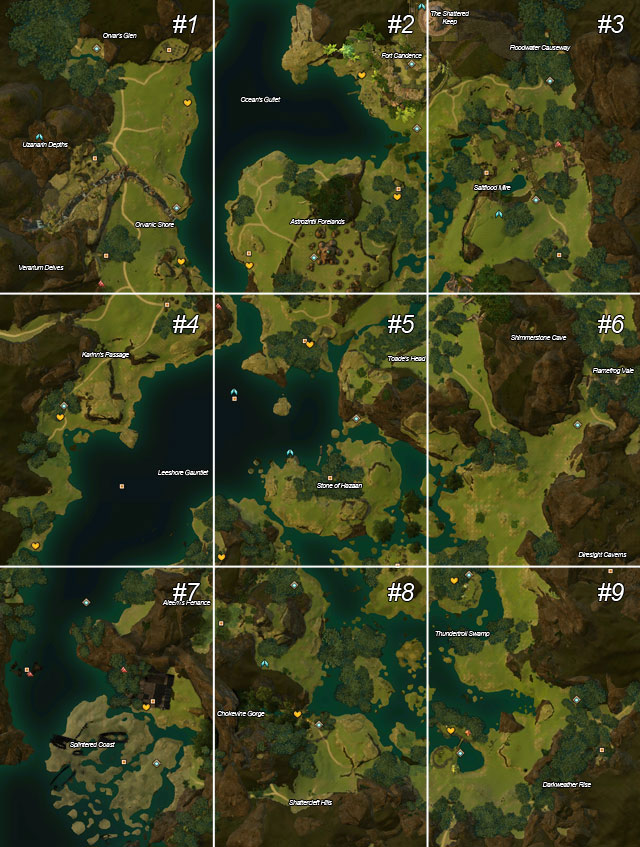
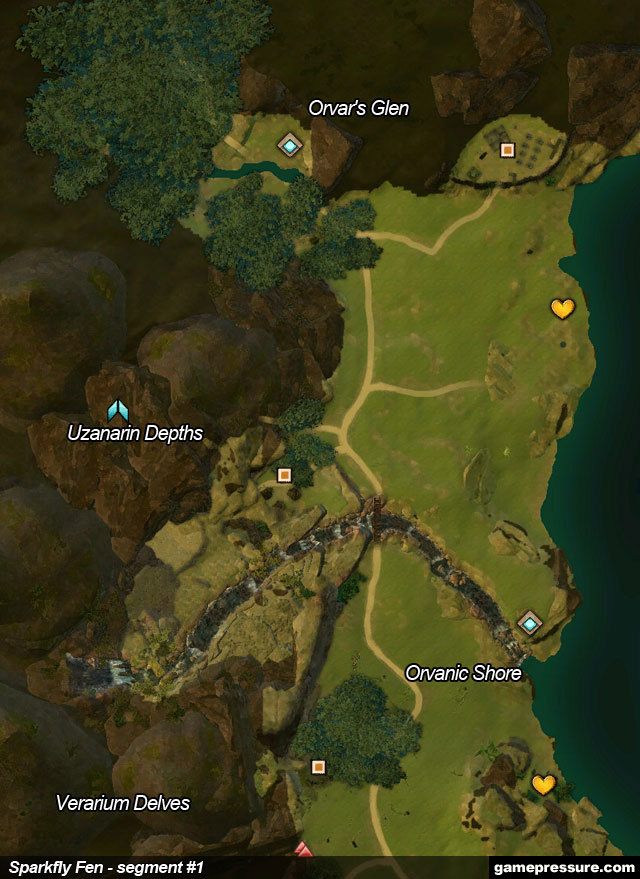
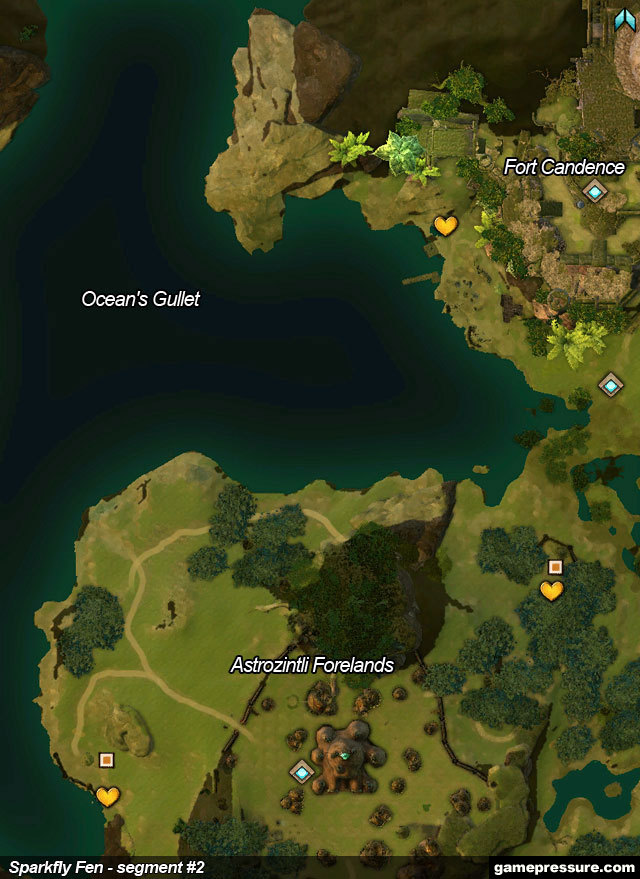
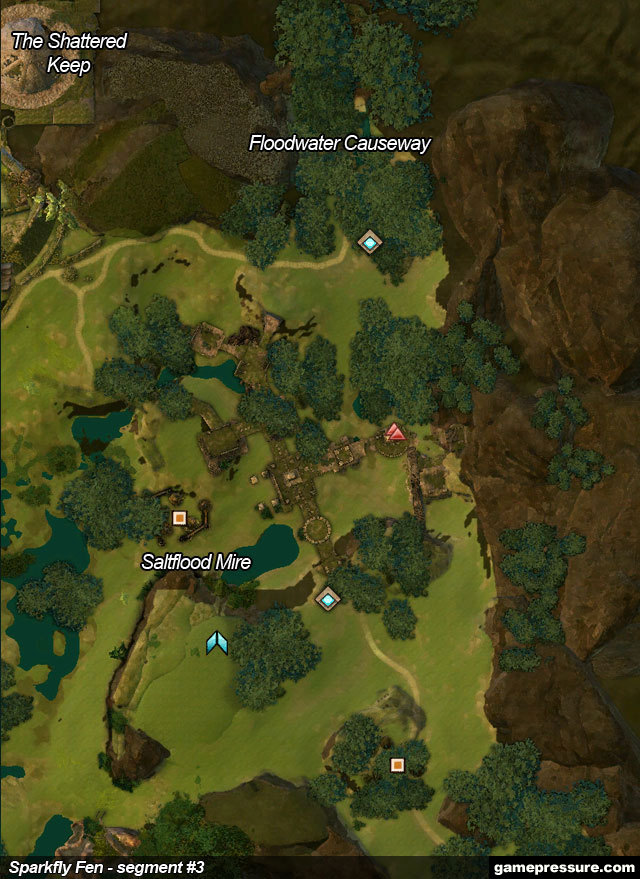
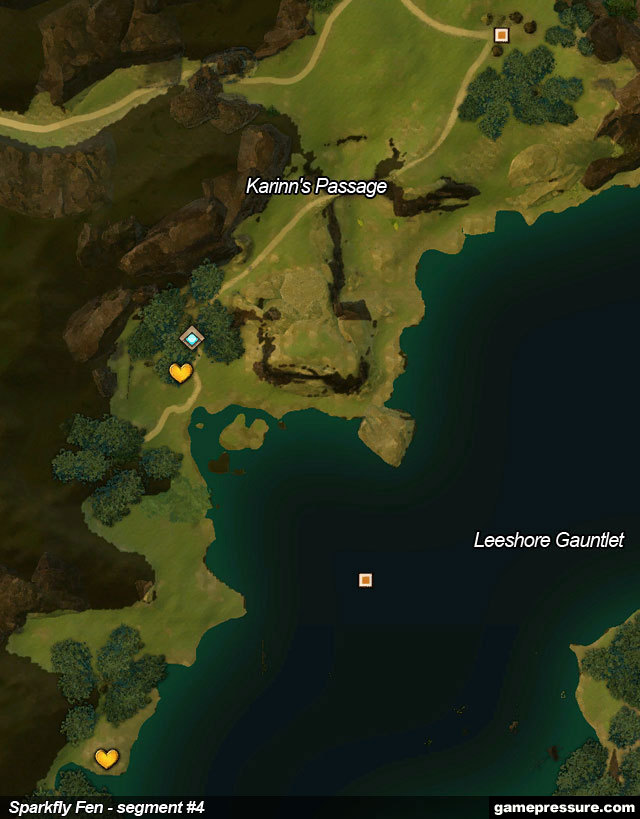
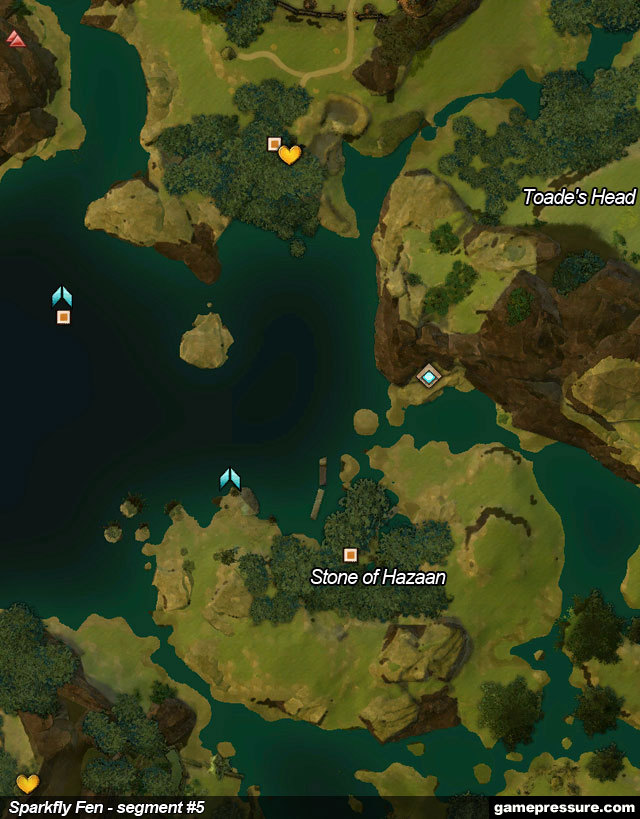
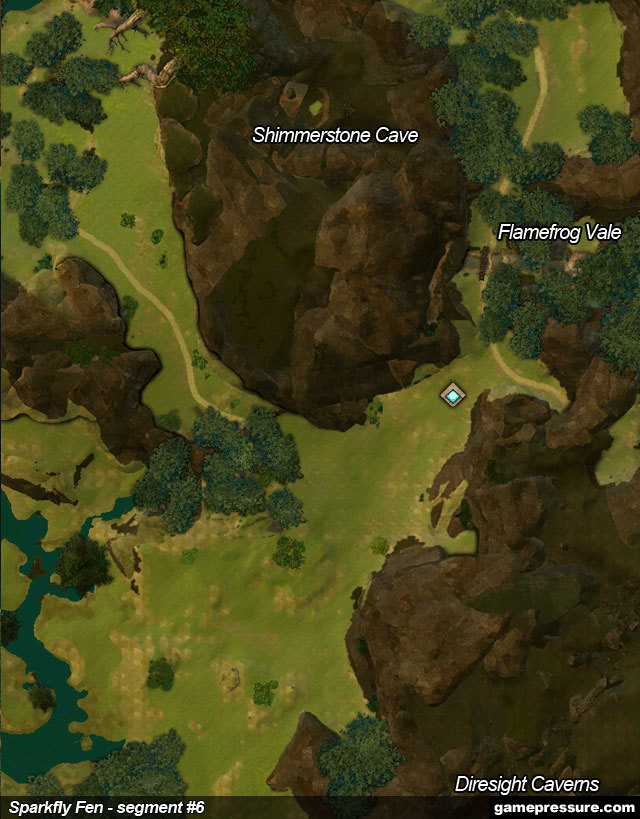
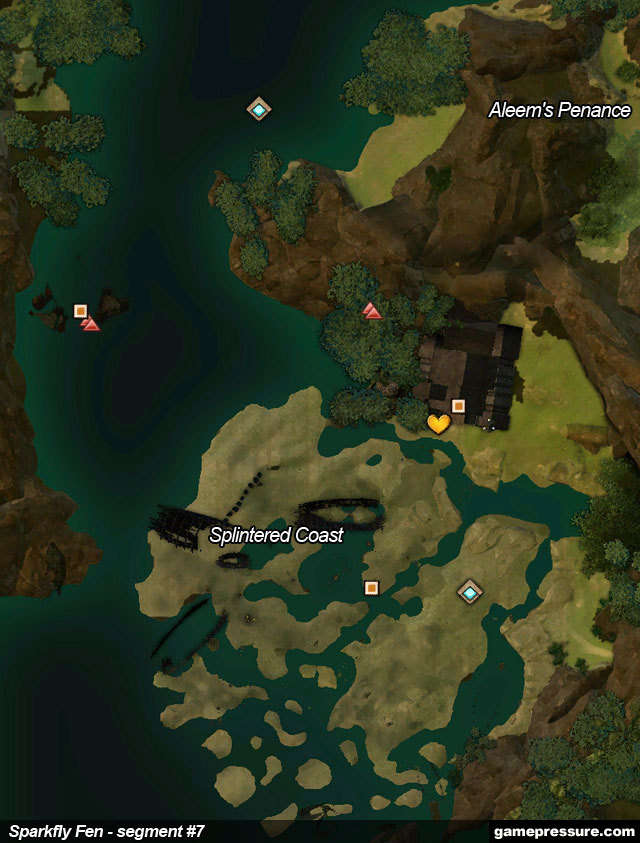
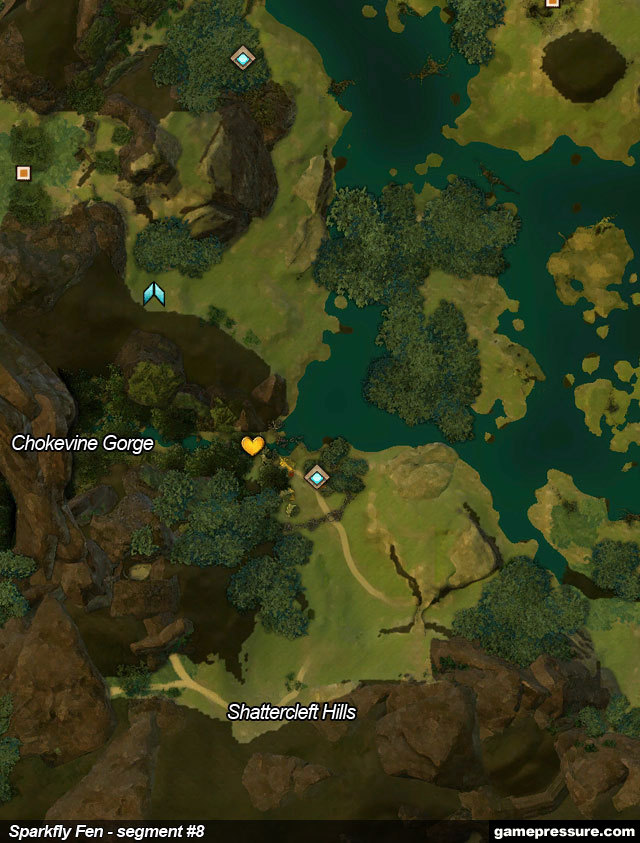
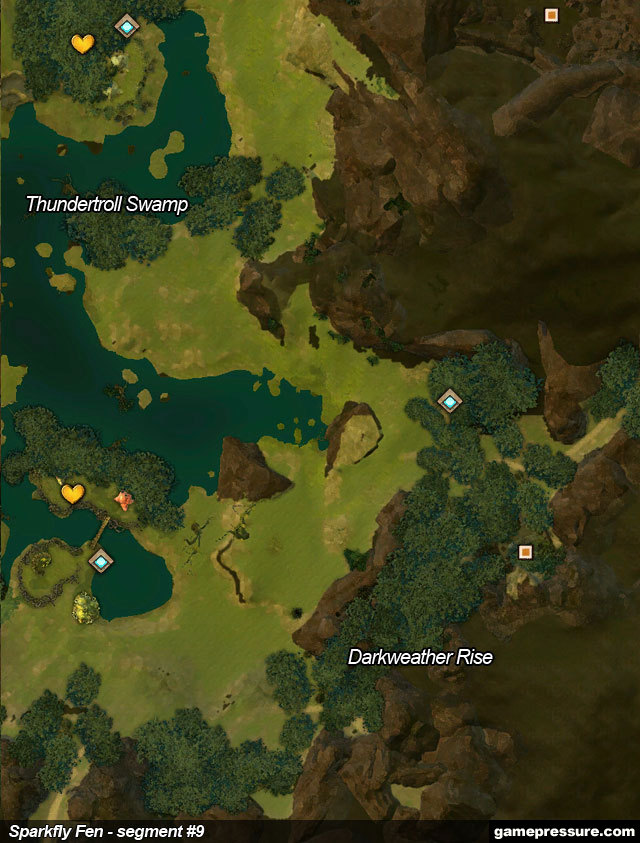

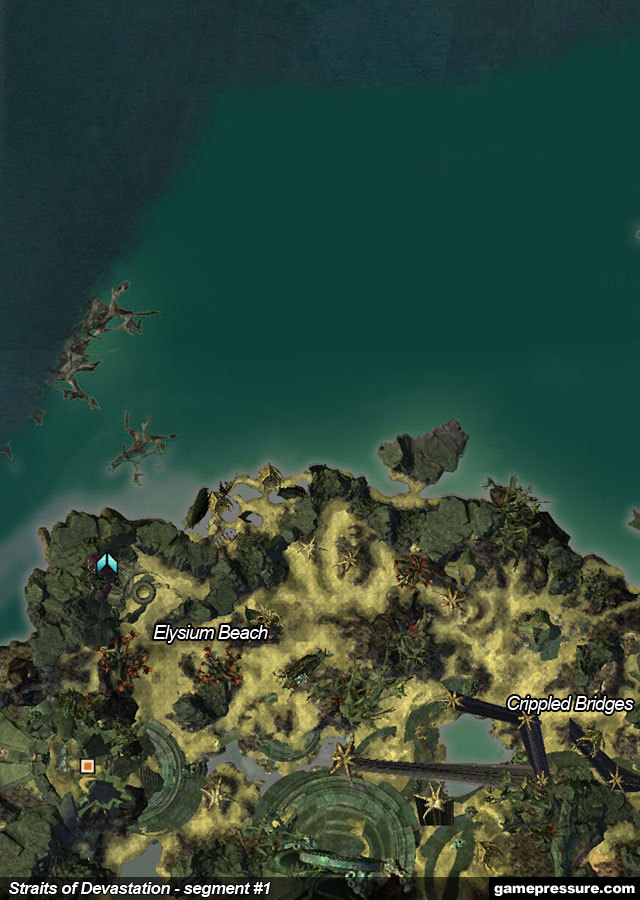
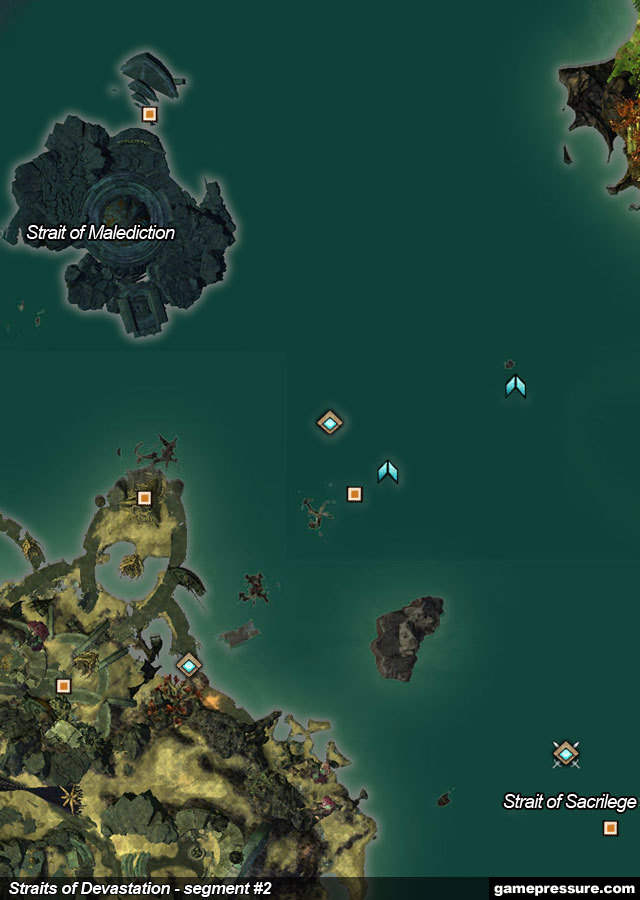
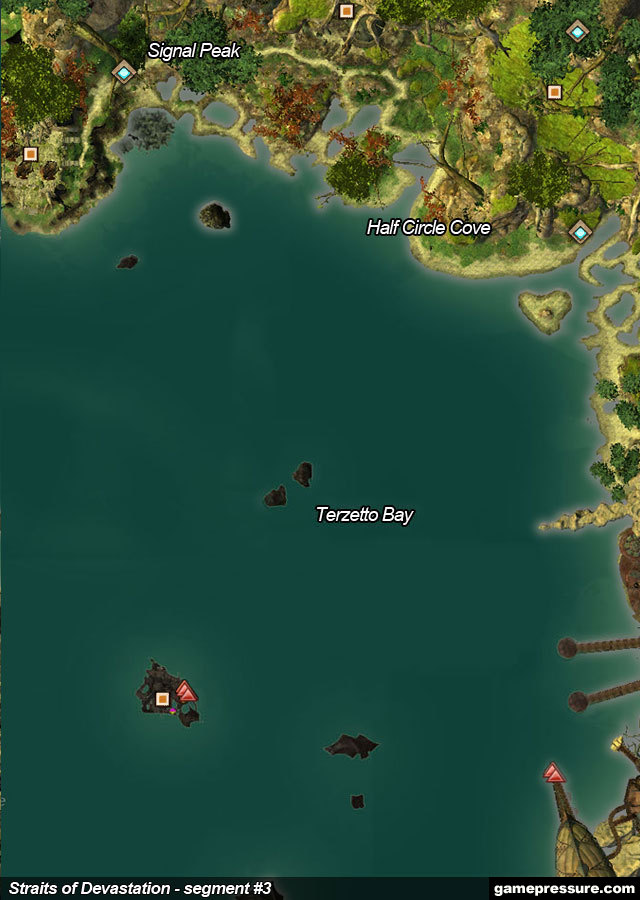
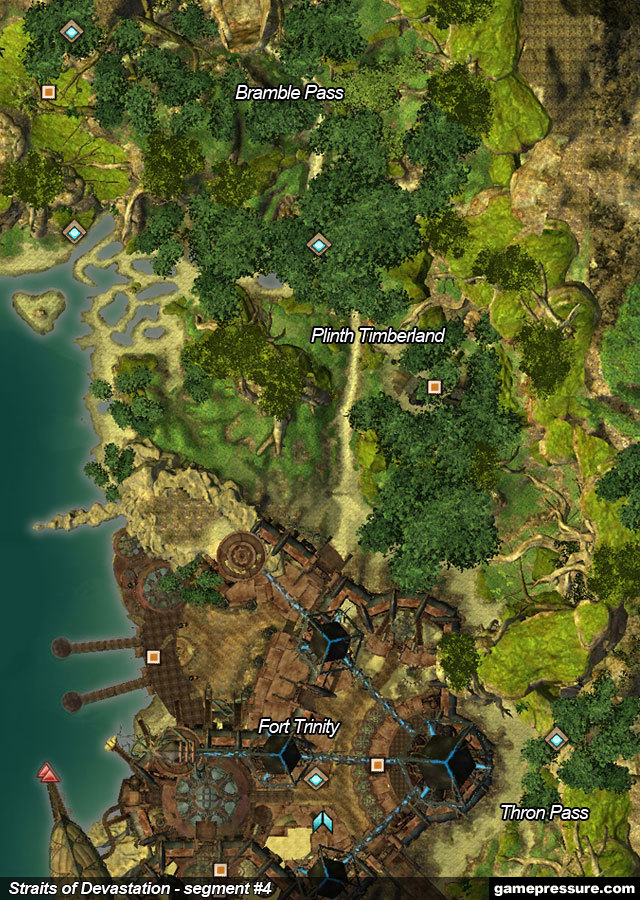
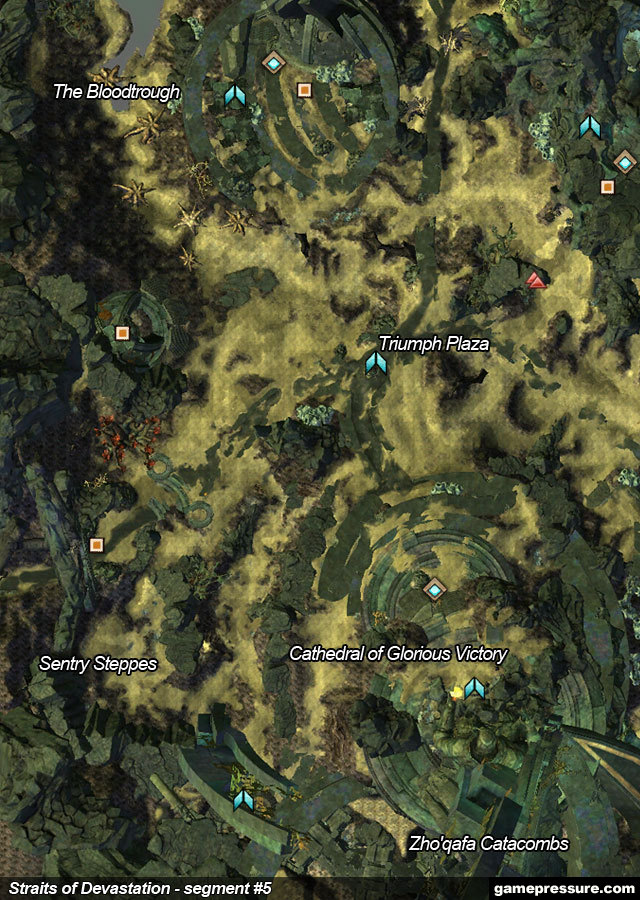
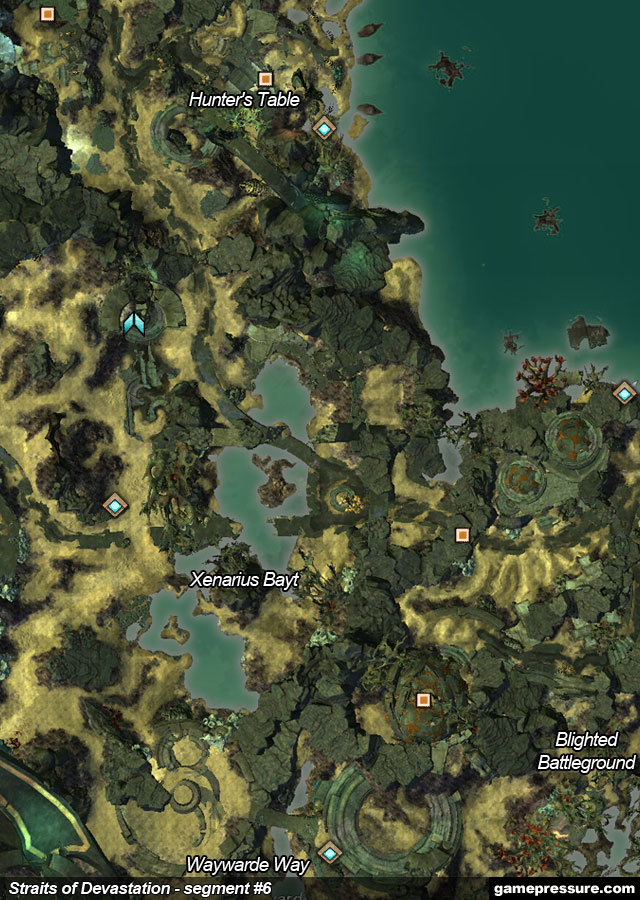
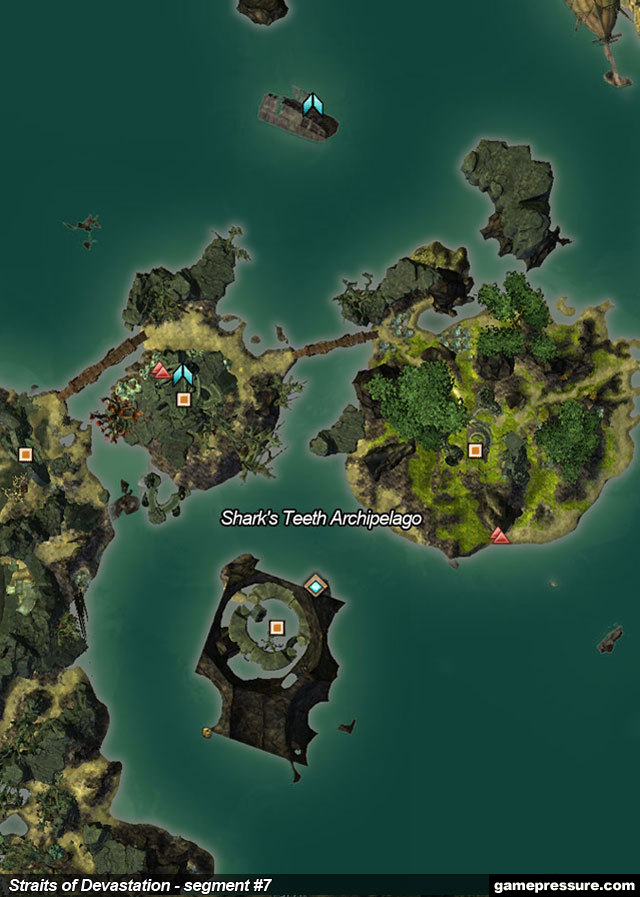
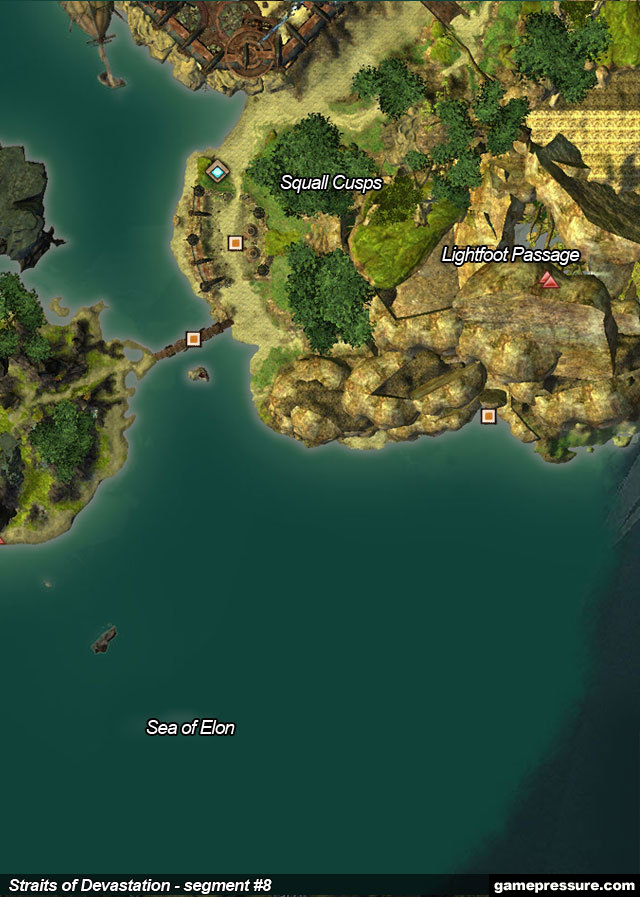
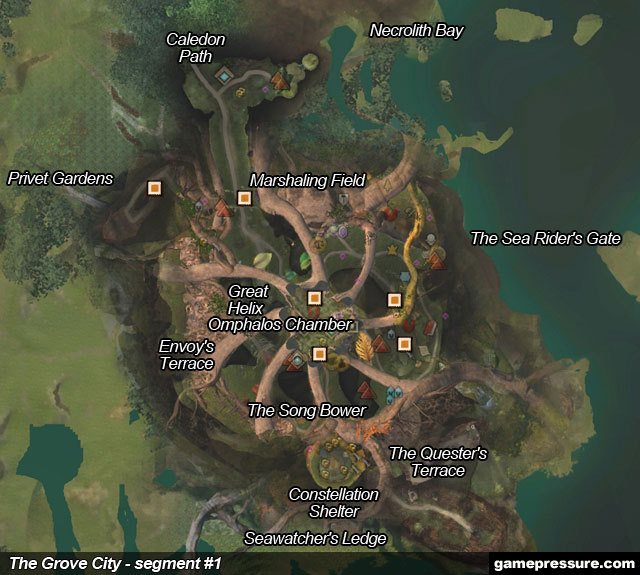
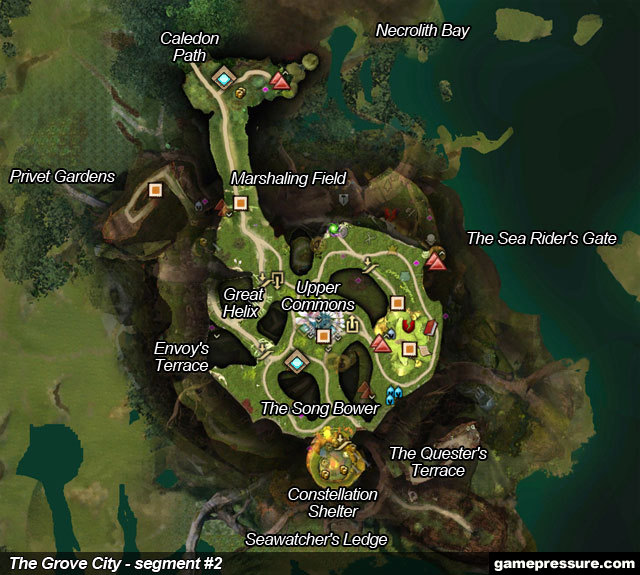
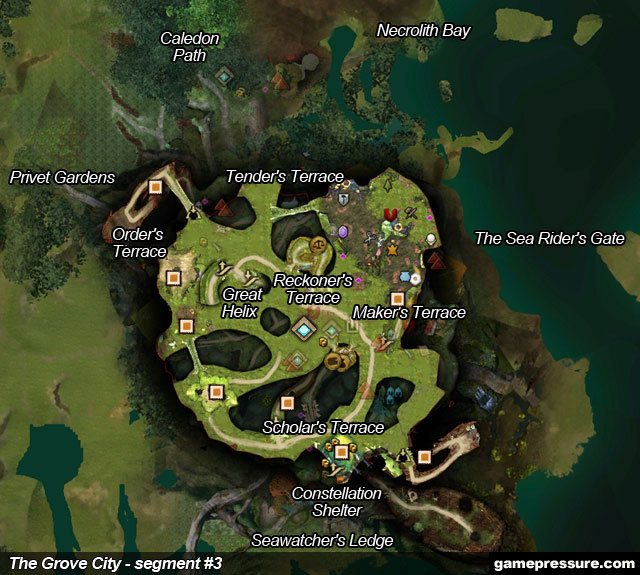
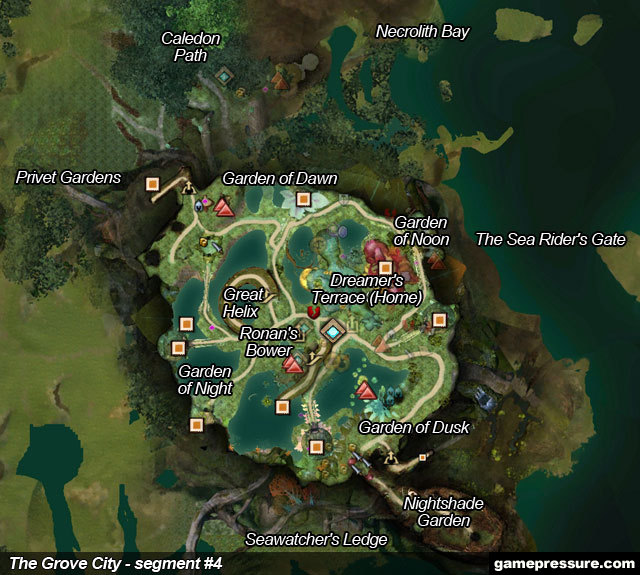
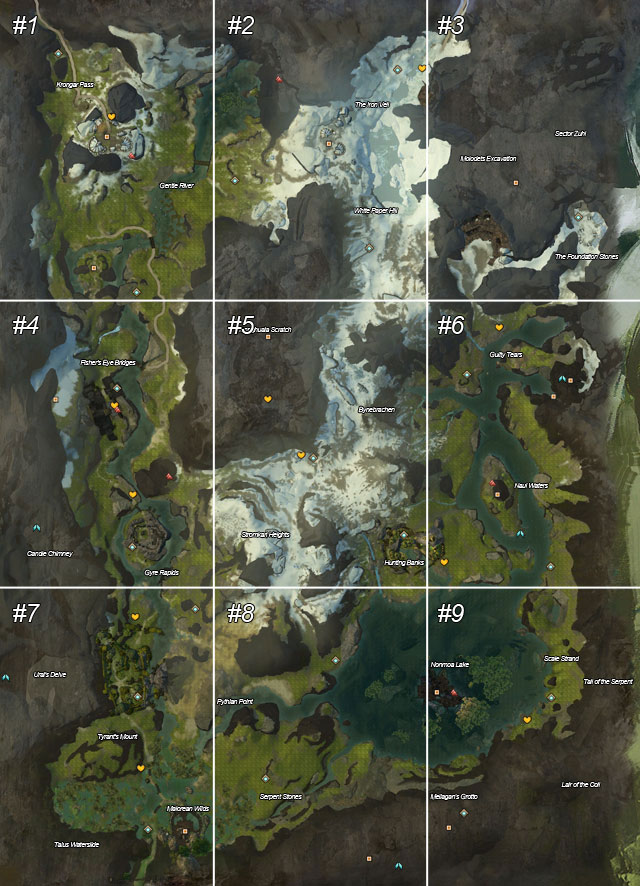
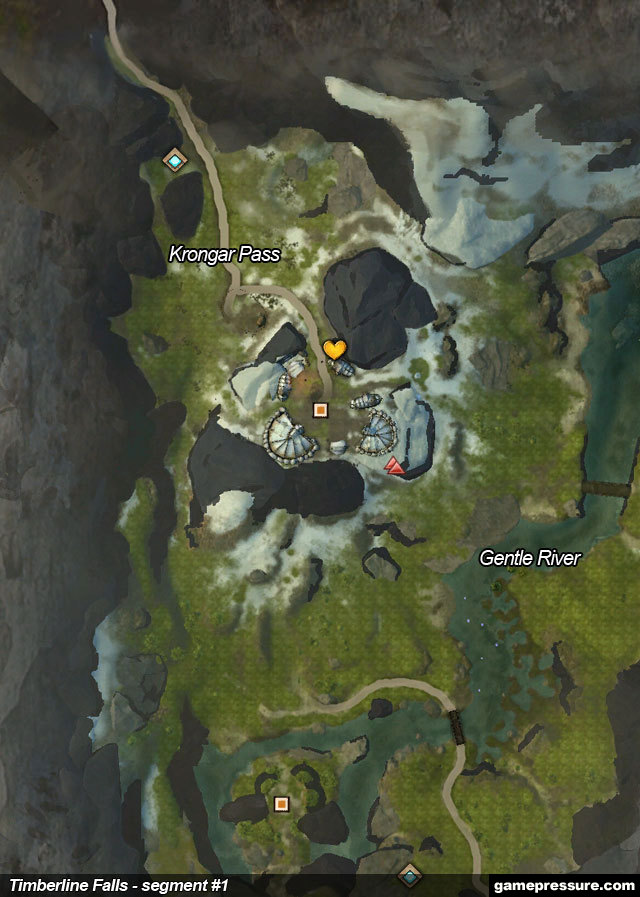
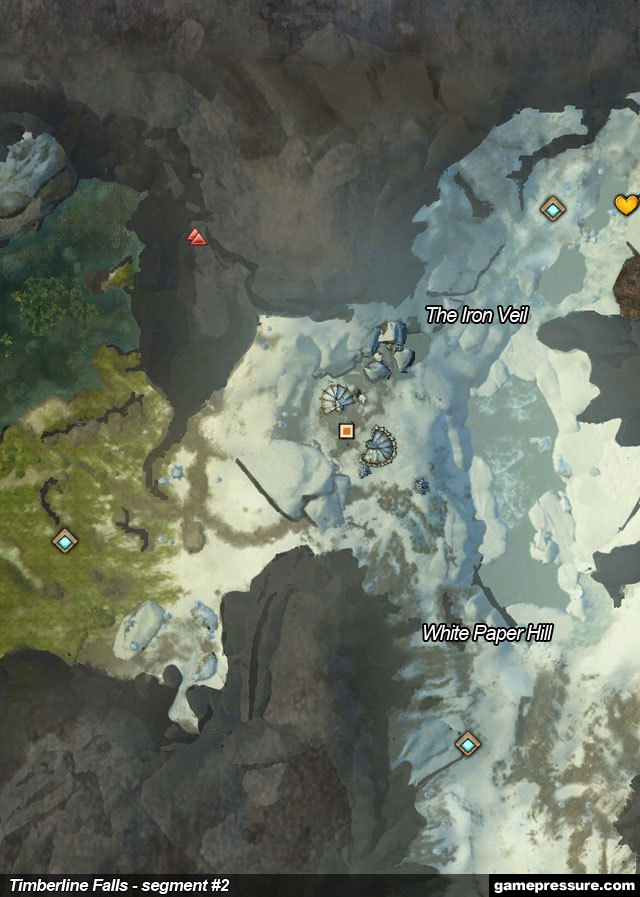
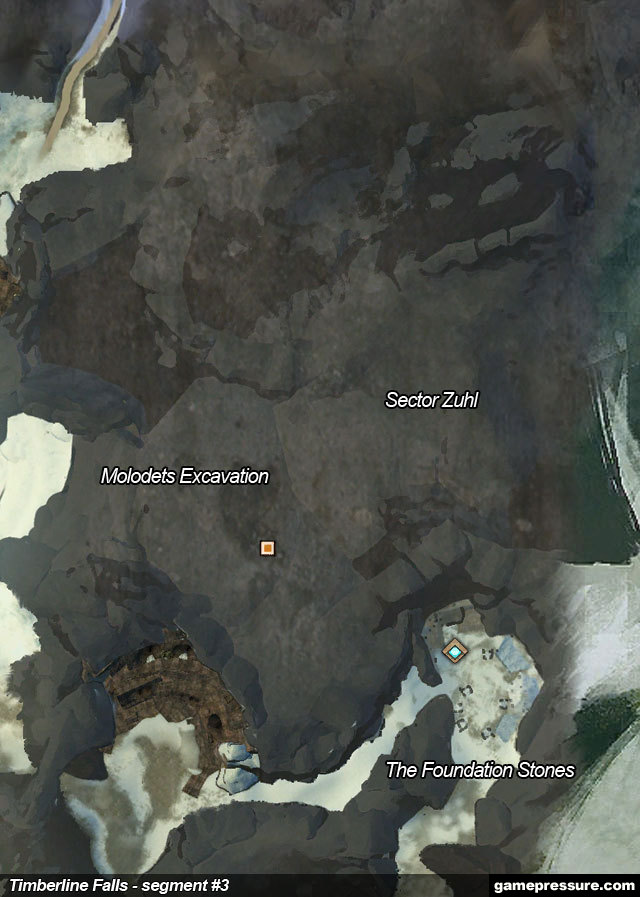
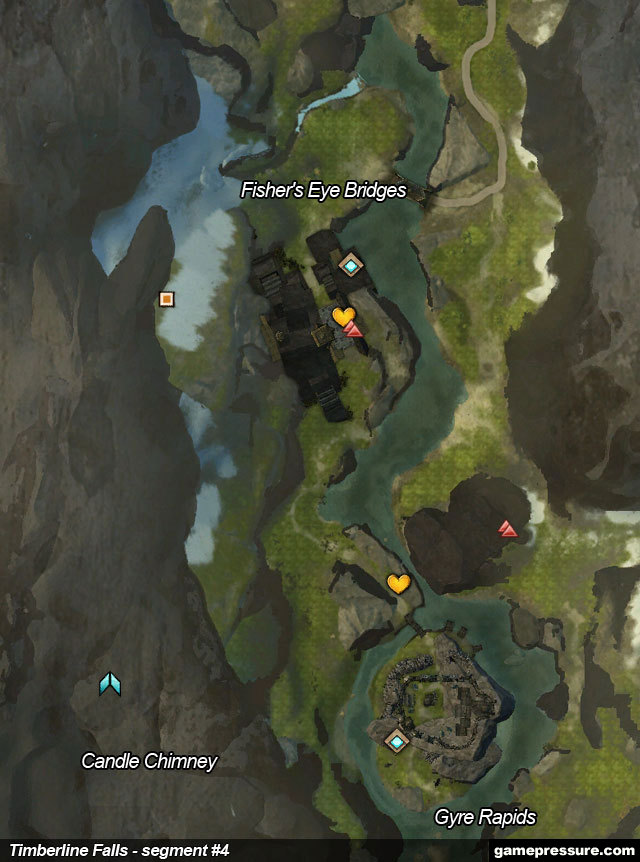

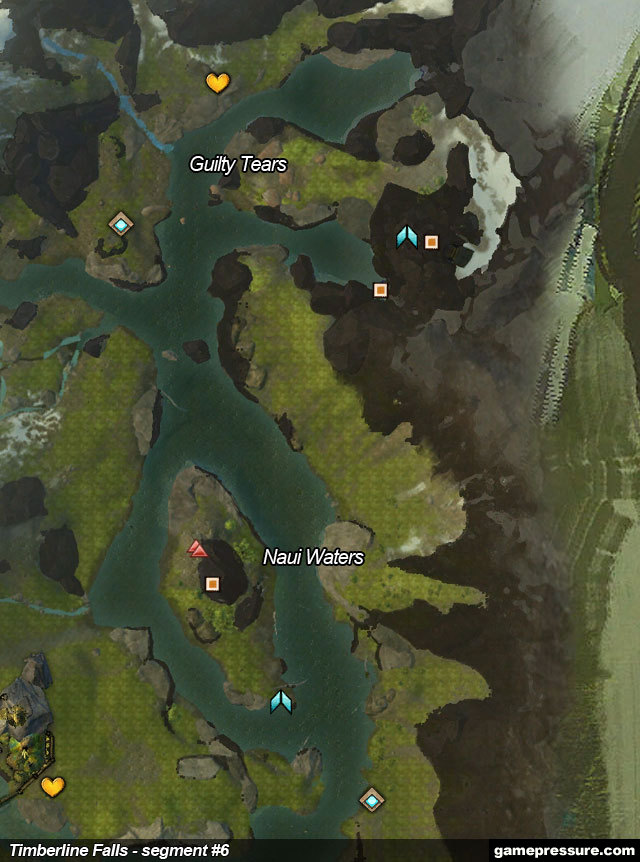
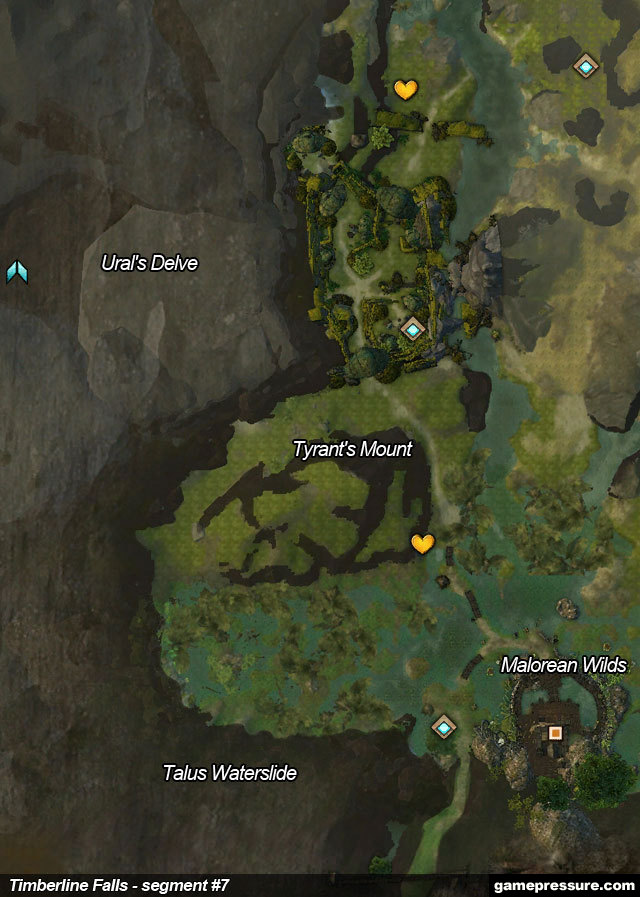

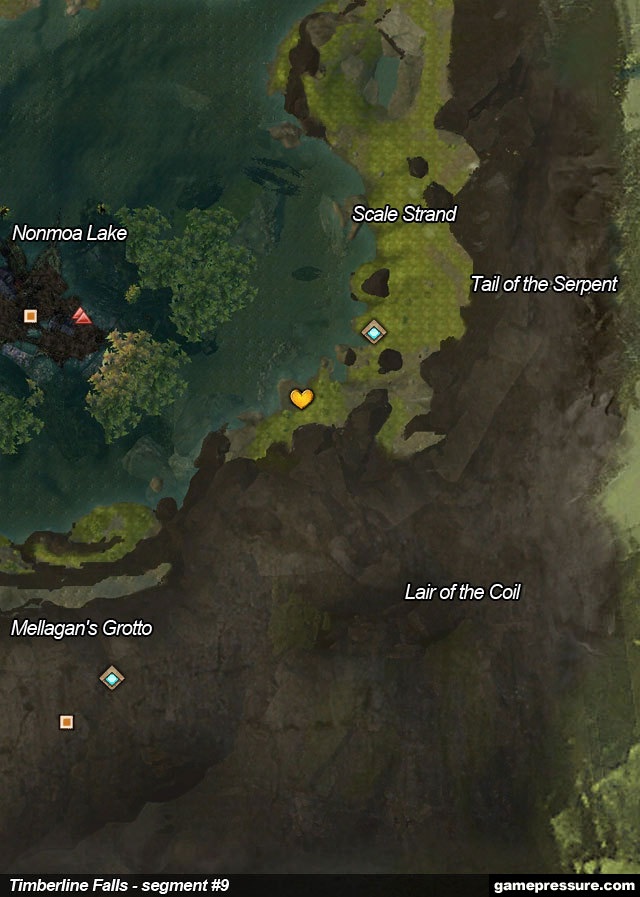
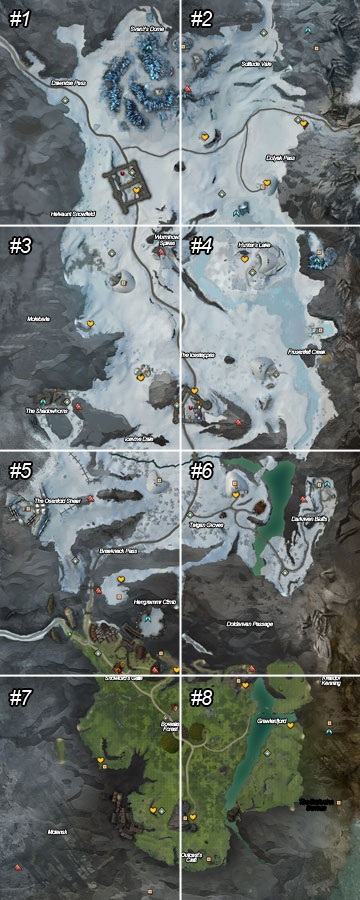
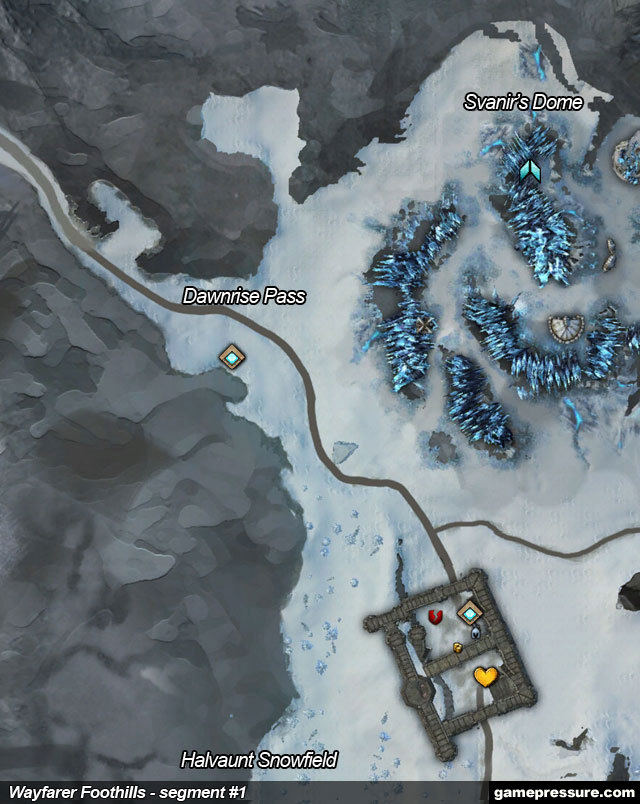
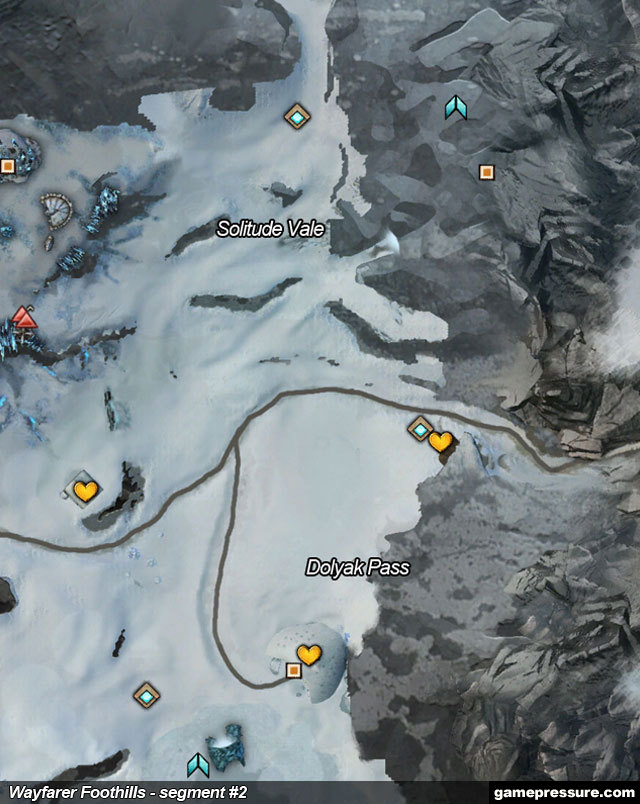
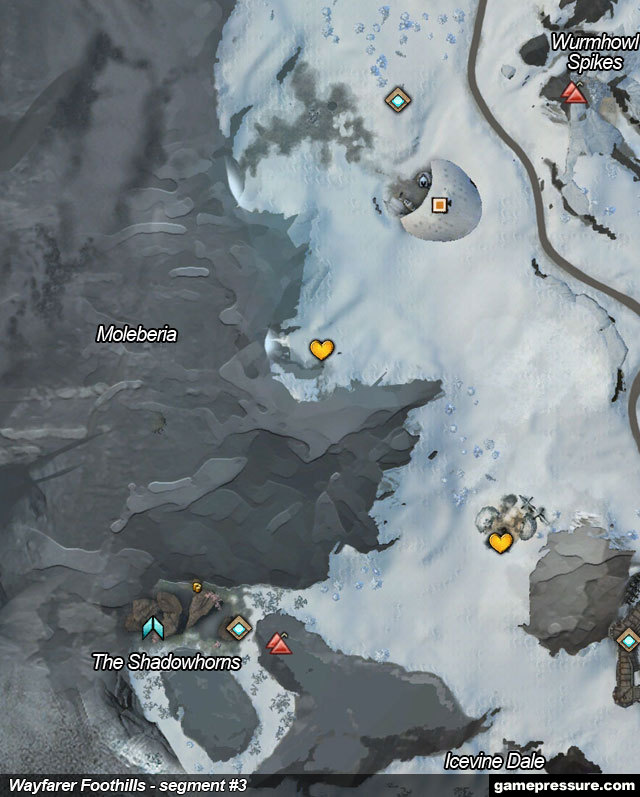
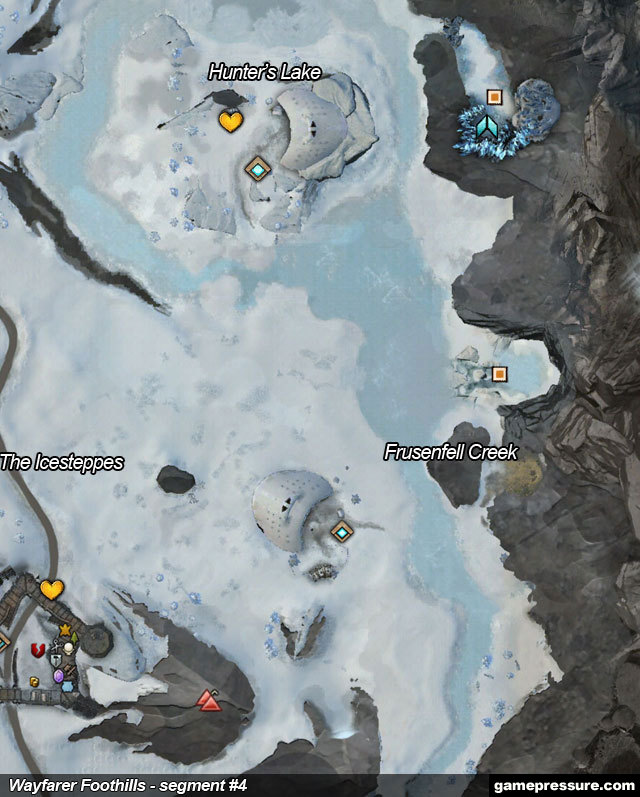
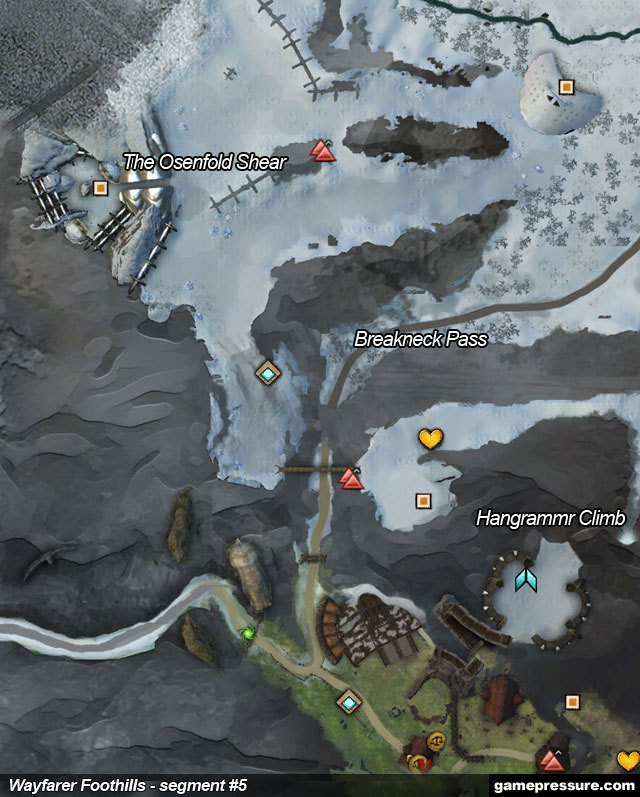
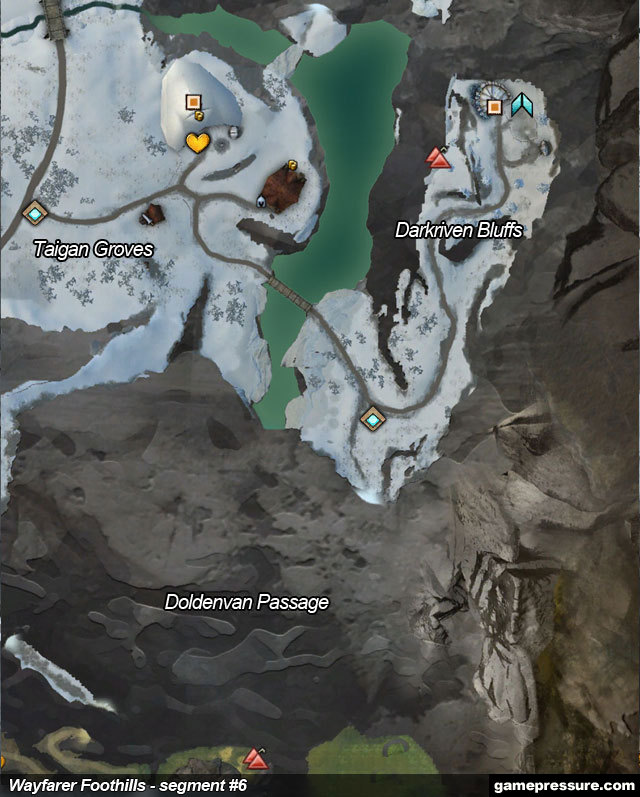

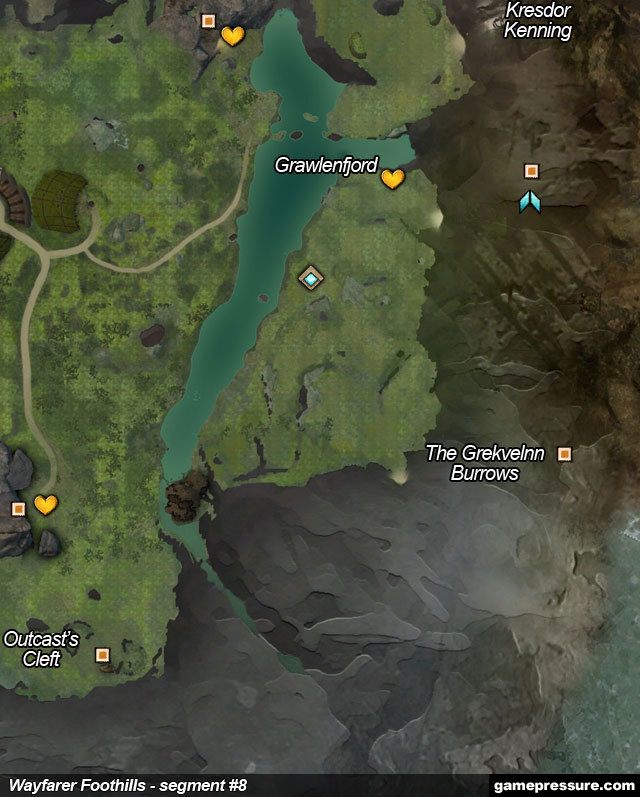

 Game of Thrones: A Telltale Games Series Game Guide & Walkthrough
 Gears of War: Judgment Game Guide & WalkthroughGears of War (PC) Game Guide & Walkthrough
 Gray Matter Game Guide & Walkthrough
 Gunpoint Game Guide & Walkthrough