
Welcome in my walkthrough for "Company of Heroes", a breath-taking Real Time Strategy game concentrating on U.S. military actions in Normandy during WW II.
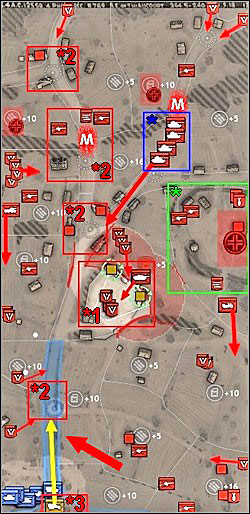
You will find here a complete solution for each of 15 missions (I've played on normal level of difficulty). I added also precise maps showing enemy positions - red icons on these maps (blue are allied units). All icons come from game and mean as below:
Primary objectives are denoted with bold red text in this document, secondary are green and additional tasks (after completing them you'll be awarded with medals) are marked blue.
Enjoy,
One Good Fellow
Here are some advices you may find useful during your gameplay:
Primary Objectives:
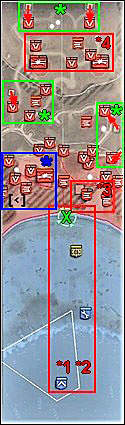
[*1] Get 25 Soldiers to the Shingle (X)
[*2] Move Engineers to the Shingle (X)
[*3] Destroy Bunker with Satchel Charge
[*4] Neutralize 88 Battery on the Ridge
Secondary Objectives:
[*] Destroy 3 Axis Small Bunkers
Additional Objectives:
[*] Clear Left Beach Exit [<] (award: "Expert Infantryman Badge")
*note: how many enemy infantry squads you will see in the area between two small bunkers on the right and two bunkers at the end of the map depends on how fast you'll destroy these bunkers with your engineers (bunkers send German reinforcements to the battlefield)
Relax, sit comfortably and watch a breath-taking movie showing the Americans landing on the Omaha Beach, D-day, June 6th, 0700hrs [1].
![[3] - Mission 1](https://game.lhg100.com/Article/UploadFiles/201512/2015121413564183.jpg) [3]
[3]![[4] - Mission 1](https://game.lhg100.com/Article/UploadFiles/201512/2015121413564163.jpg) [4]
[4]
First wave of them will be totally annihilated by German MG-42s and 88mm Flaks fire [2]. You start your game when the second wave of Tommys lands. Select first squad of allied soldiers and move them to the shingle ((X) on my map) which is located between the beach and the hill with german bunkers on it (the shingle is marked as a green line). Jump from one obstacle to another (tank traps, etc.), try to move when Krautz focus their fire somewhere else [3]. Remember: if you see a green shield near the cursor while choosing the destination for your soldiers (behind any obstacle) it means that they'll be relatively safe there, yellow shield marks not so good protection. You must get 25 soldiers to the shingle (X), it's your first of primary objectives [*1].
![[3] - Mission 1](https://game.lhg100.com/Article/UploadFiles/201512/2015121413564127.jpg) [3]
[3]![[4] - Mission 1](https://game.lhg100.com/Article/UploadFiles/201512/2015121413564111.jpg) [4]
[4]
Also you should see an american sharpshooter hiding behind the obstacle near the shingle (near right beach exit) - camouflage him by left-clicking on an icon in the lower right corner of the screen (so he'll be almost invisible for Germans) and quickly move him to the shingle (X). Unfortunately you can't verify his shooting skills yet [4]. As soon as you get 25 other soldiers to that location (the shingle), bring there also an engineer squad (it's 2nd primary objective [*2]), they should land on the beach now [5]. Remember: rush from obstacle to obstacle, avoid enemy fire.
![[5] - Mission 1](https://game.lhg100.com/Article/UploadFiles/201512/2015121413564189.jpg) [5]
[5]![[6] - Mission 1](https://game.lhg100.com/Article/UploadFiles/201512/2015121413564196.jpg) [6]
[6]
You'll see a cutscene showing the engineers breaching barbed wire on the shingle [6]. This is it - quickly select rifle squad and throw a grenade into the nearest german MG-42 position on the right (left-click on icon in the lower right corner of the screen to select grenade and left-click on target to throw it). Once again select engineers and take them closer to that big bunker on the hill then toss a satchel charge into it (do it the same way as with grenade) to destroy the bunker (it's primary objective [*3]) [7].
![[7] - Mission 1](https://game.lhg100.com/Article/UploadFiles/201512/2015121413564171.jpg) [7]
[7]![[8] - Mission 1](https://game.lhg100.com/Article/UploadFiles/201512/2015121413564154.jpg) [8]
[8]
Alright, you can finally push forward ! Again, you will see a cutscene showing American soldiers running up the hill [8] - two of them will clear the bunker you threw a satchel charge into [9].
![[9] - Mission 1](https://game.lhg100.com/Article/UploadFiles/201512/2015121413564277.jpg) [9]
[9]![[10] - Mission 1](https://game.lhg100.com/Article/UploadFiles/201512/2015121413564289.jpg) [10]
[10]
It's time to seize that hill and to destroy german 88mm Flak battery located on the ridge [*4] - this is your final primary objective. You should see a german gun to the left from a big bunker you've destroyed - kill its crew with your sniper or riflemen: shoot from the side where Germans are exposed and more vulnerable or throw a grenade [10]. Then select one of your rifle squads - it's best to choose the one with only few man left (so it has a small firepower and is less useful in gunfight) - and seize the gun by right clicking on it. Turn the gun towards the left beach exit [<] and start shooting Krautz there - kill'em all [11]. After finishing them a message will appear on the screen telling you an additional objective [*] was completed (clearing left beach exit) and you will be awarded with American "Expert Infantryman Badge". Pay attention that you can also collect German weapons lying on the ground in white circles (marked as white dots on my map), for example MG-42 light machineguns, by right-clicking on them, and replenish your human losses by clicking on a silhouette with a white cross in the lower right corner of the screen - some fresh soldiers will then join your squads.
![[11] - Mission 1](https://game.lhg100.com/Article/UploadFiles/201512/2015121413564225.jpg) [11]
[11]![[12] - Mission 1](https://game.lhg100.com/Article/UploadFiles/201512/2015121413564244.jpg) [12]
[12]
Ok, at the same time you should blow up two small bunkers on the right, near right beach exit (to the right edge of the screen) - one of them is located deeper onto the hill (inland). Act quickly because german reinforcements are running out from these bunkers from time to time. Do it with your engineers (protect 'em with rest of your soldiers), use satchel charges as usual [12]. Get your sniper (if he is still alive ;-) closer to enemy positions on the hill, place him behind the sandbags so he will be able to harass (or even take out) German gun crews [13].
![[13] - Mission 1](https://game.lhg100.com/Article/UploadFiles/201512/2015121413564232.jpg) [13]
[13]![[14] - Mission 1](https://game.lhg100.com/Article/UploadFiles/201512/2015121413564273.jpg) [14]
[14]
Simultaneously deal with one more german MG-42 and bunker located opposite to the left beach exit [<], near the left edge of the screen - you can use your camouflaged sniper to infiltrate enemy positions first. Destroy them with your gun (they should be in range), it's easiest way, or absorb enemy attention by shooting at him with one of the squads than flank him with sappers - first take out MG crew, afterwards blow up the bunker to complete secondary objective (destroying 3 Axis small bunkers [*]). Crews of two 88mm Flaks on the ridge you can patiently shoot from below (use your sniper for example) [14]. Use similar tactic (flanking) to clear trenches situated higher, infiltrate the terrain with your sharpshooter first. There are also two small bunkers at the end of the map - place some captured heavy MG-42s or rifle squads opposite to the exits from these bunkers (so Jerrys running out from them (as reinforcements) will be quickly annihilated) and demolish both bunkers with explosives [15].
![[15] - Mission 1](https://game.lhg100.com/Article/UploadFiles/201512/2015121413564227.jpg) [15]
[15]![[16] - Mission 1](https://game.lhg100.com/Article/UploadFiles/201512/2015121413564257.jpg) [16]
[16]
Finally, destroy with satchel charges two remaining and unmanned at present 88's on the ridge [*4] to put an end to this horror and to complete final objective (Neutralize 88 Battery on the Ridge) [16].
Primary Objectives:
[*1] Destroy all Anti-Aircraft Guns
[*2] Secure road
[*3] Set up Convoy Ambush & Destroy the Convoy
Secondary Objectives:
[*1] Secure munitions sector
[*2] Rescue Baker Company
Additional Objectives:
[*] Eliminate road patrols (award: Parachutist Badge)
Note: In this mission expect small german counterattacks on almost every captured by you position. In some cases you can be surprised by enemy infantry squads entering the battlefield off-map.
Watch the breathtaking movie full of lights effects and it's time to play. [1]
![[ 1] - Mission 2](https://game.lhg100.com/Article/UploadFiles/201512/2015121413564343.jpg) [ 1]
[ 1]![[2] - Mission 2](https://game.lhg100.com/Article/UploadFiles/201512/2015121413564381.jpg) [2]
[2]
Your first of primary objectives in this mission is to destroy german AA guns emplacements [*1], you should neutralize all of them but sometimes you'll have a chance to capture one of them and use it against ground targets. Send two paratroopers squads you have at your disposal at the beginning through the swamp to the first AA gun emplacement on the east - take a route marked with green circles on suitable picture [2]. Fire-up your guys by left-clicking on suitable icon in orders menu, you can also replenish their manpower by clicking on icon with white cross in the lower right corner of the screen (additional paratroopers will then join the squads).
When you reach enemy AA gun emplacement take positions behind the sandbags - from there you can patiently shoot the Krauts securing gun or kill them with grenades. Then jump closer to the enemy gun and disable it by throwing satchel charge into it. [3]
![[ 3] - Mission 2](https://game.lhg100.com/Article/UploadFiles/201512/2015121413564328.jpg) [ 3]
[ 3]![[ 4] - Mission 2](https://game.lhg100.com/Article/UploadFiles/201512/2015121413564369.jpg) [ 4]
[ 4]
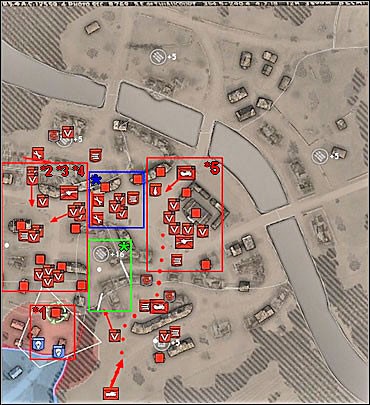
Afterwards seize nearest munitions point [*1] with one squad (it's first of secondary objectives), cover your man doing this with second. Then build an observation post on captured point. [4] When all is done here move forward, to the north.
It's time to accomplish next secondary objective [*2], to save boys from Baker Company besieged by Krauts in nearby barn (yellow square on the map). [5]
![[ 5] - Mission 2](https://game.lhg100.com/Article/UploadFiles/201512/2015121413564351.jpg) [ 5]
[ 5]![[ 6] - Mission 2](https://game.lhg100.com/Article/UploadFiles/201512/2015121413564320.jpg) [ 6]
[ 6]
When approaching this spot from the south place your soldiers behind low walls and let them shoot Jerry straight on. One of enemy squads will react by manning MG-42 standing in front of a barn, rest of them will hide behind the walls. Fire-up people you have behind the right wall and rush to the right, then take cover behind the second low wall next to the Germans. At the same time paradrop one squad as game suggests on the road to the left from a barn and hide them behind the cart or wall there. Now these two paratroopers squads can throw grenades. [6] After the fight secure nearest munitions point, collect two MG-42s, light and heavy (replenish the manpower of a squad which will take HMG). Boys from Baker Company you've saved a moment ago will join you so you will have four squads.
Send HMG team and one of your squads to the crossroad behind the barn (on the north). Two squads should go east, to the next ammo point. Quickly capture munitions point with one of them, place second opposite to the bunker you'll see there. Try to kill german officer near the bunker and all the Krauts running out from it. The officer will probably jump to the bunker - take this coward out by throwing a satchel charge into the fortification, this should kill him and stop germans from running out. Build an observation post on captured munitions point and man one of two 50mm AT guns Pak38 you will find there (big white dots on my map). You can also collect ammo box. [7] Afterwards quickly move to the crossroads [*] northwest.
![[ 7] - Mission 2](https://game.lhg100.com/Article/UploadFiles/201512/2015121413564364.jpg) [ 7]
[ 7]![[ 8] - Mission 2](https://game.lhg100.com/Article/UploadFiles/201512/2015121413564379.jpg) [ 8]
[ 8]
You can secure with one of the squads a strategic point passing by beside the road and start building an observation post on it. On the crossroad [*] you should quickly set up an ambush on german motorized convoys driving this way. Quickly set up heavy MG-42 and Pak38 gun, place some sandbags in front of them eventually, mine the road as game suggests and hide one squad behind the wreck near the road. Rest of your soldier can collect two Panzerschrecks lying on the ground nearby in white circles (small white dots on my map) and move to the west to another munitions sector - there's no sense in waiting here for german convoys with all of your forces because enemy is riding here from time to time in small convoys and your AT gun and HMG should be enough to stop them. Here, on the crossroads [*], patiently eliminate all vehicles that come from the north by the road - some motorcycles, halftracks with infantry. As I said it will be several transport columns passing by in different time intervals and when you'll finally destroy all of these road patrols (it's additional objective) you will be awarded with Parachutist Badge for that act. [8]
Munitions point to the west attack with two paratroopers squads: take a north route with one, move from the south with second. First eliminate german squad hiding near the wood, then kill one more which will appear on map from south (it's one of those unexpected counterattacks ;-). Then secure with several soldiers munitions point, build an observation post on it, at the same time covering your people with second squad looking to the west: another weak counterattack will come from that direction. [9]
![[ 9] - Mission 2](https://game.lhg100.com/Article/UploadFiles/201512/2015121413564348.jpg) [ 9]
[ 9]![[ 10] - Mission 2](https://game.lhg100.com/Article/UploadFiles/201512/2015121413564486.jpg) [ 10]
[ 10]
Let's go back to the main road now, to the strategic point you've secured with one squad. One of your primary objectives is to secure this road by capturing these strategic points along the main road [*2]. After seizing this one take one more squad (from the crossroad [*]) and move north. But first toss a grenade into nearby MG-42 position, shoot the rest of the Krauts (fire-up your soldiers before this action). Abandoned MG-42 you can occupy if you didn't destroy it. [10]
Open fire from this HMG to cover your people running forward (to the north), to another strategic point and AA gun emplacement with trenches. Hide your soldiers behind low walls you'll see there, get your MG-42 closer and eliminate all Jerrys securing AA gun and its crew. You'll see another paratrooper squad to the right from AA gun - just click this squad to control these soldiers. [11] Watch out for enemy infantry counterattacks coming up from the north, west and east - last squad of enemy soldiers enters the battlefield off-map!
![[ 11] - Mission 2](https://game.lhg100.com/Article/UploadFiles/201512/2015121413564473.jpg) [ 11]
[ 11]![[ 12] - Mission 2](https://game.lhg100.com/Article/UploadFiles/201512/2015121413564412.jpg) [ 12]
[ 12]
After the fight seize strategic point, build observation post and set up MG-42 to cover this place from the north (place HMG behind block of wood you'll see in the alleyway - right edge of the picture [12]). Don't occupy AA gun, destroy it with explosives. [12]
Now it's time to attack to the west, another munitions point/sector. Place somebody with light MG-42 or Panzerschreck behind the low wall on the left to pin down enemy MG-42 crew and eventually some german soldiers you'll see on the west. Rush with rest of your people (you should have one or two squads) across the field to the cart you'll see on it. You can run on to the field path and a hedgerow on the left and throw a grenade into enemy emplacement. Occupy munitions point behind the hedgerow with one squad, cover your people with second because some Germans will try to recapture that point (they'll come from the north, by the field path). So take cover behind the tractor on the field or sandbags around the abandoned heavy MG-42. [13]
[ 13]![[ 14] - Mission 2](https://game.lhg100.com/Article/UploadFiles/201512/2015121413564494.jpg) [ 14]
[ 14]
Now let's go back to the crossroad [*] you have placed AT gun and HMG on it with the task to eliminate all german motorized road patrols. Until now this task should be accomplished. So carefully bring that AT gun and HMG along the main road to the north-west to uncover another MG-42 emplacement and some infantry hiding behind the sandbags at the turning of the road. Open fire from your gun and HMG, you can simultaneously strike the enemy with paratrooper squad taken from munitions sector south of here (swamps). Flank germans behind the hedgerow, toss a grenade. [14] Then quickly install your HMG and AT gun on captured position, point them to the north, towards the road (you can place some additional sandbags with your paratroopers). Ah, repel german counterattack (1-2 squads) first - enemy will come from west, use sandbags as cover.
After action take the squad you have on the south (swamps) and move to the north, to another AA gun emplacement. This enemy position is well fortified - you'll see there two squads of enemy infantry, same number of MG-42s - so take one more squad from road turning. When you reach enemy hide your soldiers behind the low walls to the south and let them fire at will. It's good to equip them with some Panzerschrecks or recoilless rifles (you can do the last thing during their journey through the swamps by clicking on suitable icon in the lower right corner of the screen). Simultaneously select one more paratrooper squad you'll see north from german position (this squad is marked with yellow icon on my map) - they are closer to the enemy so they can throw satchel charge into emplacement and quickly eliminate both MG-42s and AA gun. [15] Shoot rest of the Krauts then quickly jump into captured emplacement with all of your men. Use sandbags as cover, man undamaged MG-42s and repel weak german counterattack (one squad of infantry) coming from the north. Don't forget to seize nearest strategic point and to build on it an observation post.
[ 15]![[ 16] - Mission 2](https://game.lhg100.com/Article/UploadFiles/201512/2015121413564458.jpg) [ 16]
[ 16]
Afterwards move north again. Next to the munitions point kill some infantry and mortar crew. When capturing ammo point watch out for small enemy counterattack coming off-map, from left (west). You can man abandoned mortar and start shelling (area fire) next german AA gun emplacement north from your position, near another strategic point. If you captured MG-42 earlier you can place it behind the tractor on the field to the left to cover your mortar team from north because Germans will send some infantry. [16] Send rest of your soldiers to the right, to the main road.
Now it's time to capture next strategic point by the road. Get closer with your HMG and AT gun you have on the south, on road turning. Set up HMG on the left road margin, behind the wing of crashed glider and start shooting Germans near the strategic point (MG-42 and some infantry behind the sandbags). Simultaneously attack Jerrys from left and right with your paratroopers squads - both squads taken from munitions sectors. [17]
![[ 17] - Mission 2](https://game.lhg100.com/Article/UploadFiles/201512/2015121413564482.jpg) [ 17][ 18]
[ 17][ 18]
After short fight Germans should be finished. Secure strategic point, get closer to it with your HMG and AT gun, hide behind the sandbags and repel stronger enemy counterattack: two squads of infantry coming along the road from the north and maybe one more squad approaching from north-east. [18] Remember that your paratroopers can place additional sandbags (left-click on suitable icon in the lower right corner of the screen).
To the right from this place is another strategic point. Take from the south your next HMG team, place it behind the broken glider next to the field path, point it to the north. When it's ready to fire strike with your infantry to the left to capture strategic point and to the right (block of wood). Kill Jerrys you'll see behind sandbags in the distance, run up there with paratrooper squad and eliminate german mortar section coming from the north. [19] You can man the mortar but remember about population cap - too many weapons sections and there will be no infantry squads to assault enemy positions ;-).
![[ 19] - Mission 2](https://game.lhg100.com/Article/UploadFiles/201512/2015121413564485.jpg) [ 19]
[ 19]![[ 20] - Mission 2](https://game.lhg100.com/Article/UploadFiles/201512/2015121413564548.jpg) [ 20]
[ 20]
Munitions point extremely to the east attack with infantry - send one squad from the south and north but first bring there one HMG team and place it in the crater to cover assaulting infantry. [20] Get it closer after the fight, set up near the munitions point and kill Jerrys running here from the north.
Afterwards move north to another munitions point, go along the wood (HMG team can follow paratroopers). Capture munitions point, build observation post on it. Simultaneously set up HMG so it will be able to shoot to the north and north-east (soon you'll see 1-2 german squads coming from that direction). Notice that on site of the ruin to the right you'll find some abandoned mortars and bazookas (AT weapon) - collect them if you wish, replenish the manpower of units that will do that but remember about population cap (don't worry about it if you're taking bazookas). Open fire from mortar - start shelling Germans hiding behind the trees to the north. [21]
![[ 21] - Mission 2](https://game.lhg100.com/Article/UploadFiles/201512/2015121413564519.jpg) [ 21]
[ 21]![[ 22] - Mission 2](https://game.lhg100.com/Article/UploadFiles/201512/2015121413564512.jpg) [ 22]
[ 22]
Let's go back to the left (west) edge of the map now. A mortar you have captured there should provide fire on fortified german AA gun emplacement (to the north). Till now it's possible that all the Krauts in the emplacement will be dead. If not - time to finish them. Get your HMG and AT gun you have on the road closer to enemy position, place them behind the wreck on left road margin. Simultaneously get closer with your infantry too: attack from both sides (left&right) but don't cross the road with squad approaching from the right - leave these soldiers near the road and order them to observe the north cause some Germans may come from that direction (along the road). Open fire from your HMG and AT gun, target nearest enemy AA gun emplacement. Assault german position with paratroopers coming from the left. [22] Quickly install yourself on captured emplacement (take control over AA gun if it's undamaged) and repel bigger german counterattack coming up from the north (several squads of infantry). Hence now you should act quickly because this area is in enemy mortar's range. German mortar is placed in heavily fortified position on the north - you'll see there two pillboxes with infantry inside each of them, another (the last) AA gun, AT gun and MG-42, some trenches.
Strike these Germans from the south, from munitions sector, but don't cross the main road - just take positions behind the fence along the road. Get closer all your mortars and start shelling enemy mortar hiding in a trench. When Jerry is concentrating his attention on this part of your forces attack him from left, from AA gun emplacement you've seized earlier. [23] Throw satchel charge into closest bunker, jump into trenches behind it and finish german survivors. Quickly prepare yourself to another small counterattack (1-2 squads) coming from north-west.
![[ 23] - Mission 2](https://game.lhg100.com/Article/UploadFiles/201512/2015121413564576.jpg) [ 23]
[ 23]![[ 24] - Mission 2](https://game.lhg100.com/Article/UploadFiles/201512/2015121413564534.jpg) [ 24]
[ 24]
After the battle quickly install yourself on captured position, seize the strategic point (the one before last) near the AA gun. But do not jump into the trenches with all of your forces - leave these south of the road where they are. And don't capture the last strategic point on the main road, you'll do it later! Mine the road, organize some battlestations south of it. Shortly: start preparing here [*3] an ambush for enemy motorized convoy which will be passing by soon (german vehicles will arrive from north of course). Do the same north of the road: place soldiers with Panzerschrecks in bunkers, man MG-42 and AT gun (if they're undamaged), jump into the trenches with rest of your soldiers. Take control over AA gun - even if it's undamaged first of your primary objectives (to destroy all AA guns [*1]) should be accomplished. When you're sure you're good prepared for german convoy seize last strategic point on the road to accomplish one of primary objectives (securing the road [*2]). [24] Formally the game will ask you to prepare an ambush for german convoy but you are prepared and ambush is ready! Anyway, you have additional two minutes to make eventual corrections.
After that time you'll see short cutscene showing oncoming german motorized convoy. [25]
![[ 25] - Mission 2](https://game.lhg100.com/Article/UploadFiles/201512/2015121413564583.jpg) [ 25]
[ 25]![[ 26] - Mission 2](https://game.lhg100.com/Article/UploadFiles/201512/2015121413564500.jpg) [ 26]
[ 26]
Germans will try to pass by with several motorized columns - some trucks at first, after that motorcycles and halftracks. Destroy'em all (their vehicles when out of control have a nasty habit of driving right into your soldiers and explode ;-). Kill with your HMGs enemy infantry running out of damaged vehicles, shortly: give them a hell on earth! [26] After the fight you will be informed that primary objective (to destroy the convoy [*3]) has been accomplished and you'll see a movie showing american paratroopers on the battlefield. That's it, end of mission.
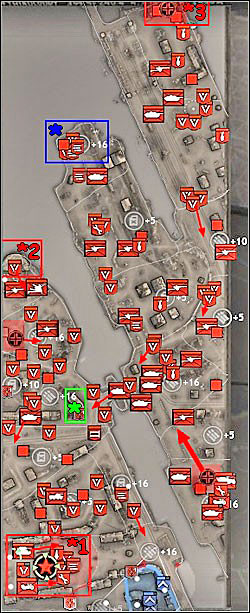
Primary Objectives:
Secondary Objectives:
Additional Objectives:
You've been ambushed when entering city of Carentan. Cafe Normandin is a building Germans are shooting at you from (they have MG-42). You should destroy this building [*1], this is your first of primary objectives. [1]
![[1] - Mission 3](https://game.lhg100.com/Article/UploadFiles/201512/2015121413564670.jpg) [1]
[1]![[2] - Mission 3](https://game.lhg100.com/Article/UploadFiles/201512/2015121413564664.jpg) [2]
[2]
At the beginning of a mission you have two squads of soldiers. Leave one squad behind the wreck they're hiding, don't touch them. Select second squad of riflemen hiding behind the ruins, fire-up these soldiers and run to the right, take a route marked with green circles on picture [2]. Then toss a satchel charge into the Cafe Normandin. When building blows up collect light MG-42 with this squad and run to the wreck you see on the road next to Cafe. Move remaining two squads (after killing enemy in Cafe Normandin you will receive one more squad) to the low wall (upper left corner of picture [2]).
From there you'll see more enemies: some of them in a building opposite, rest - outside of it. It's best to shoot them all patiently, hiding with your people behind the wreck and low walls though you can blow up nearest building. [3] Afterwards move forward.
![[3] - Mission 3](https://game.lhg100.com/Article/UploadFiles/201512/2015121413564648.jpg) [3]
[3]![[4] - Mission 3](https://game.lhg100.com/Article/UploadFiles/201512/2015121413564602.jpg) [4]
[4]
Jump with one squad of riflemen to the building occupied by Germans a moment ago, place rest of your soldiers behind the low wall to the right and another wreck in the middle. You can blow off (using explosives) Germans hiding in a building extremely to the right, fire-up your people before action. Krauts hiding opposite in two buildings and on the square between them again try to shoot patiently without destroying the houses. [4] When they're finished jump with two squads to the buildings, take a Panzerschreck lying under one of them. Leave the building occupied by the third squad and move your guys to the left, under the church you see in the distance (upper left corner of picture [4]).
Now you must clear church area [*2] - it's second of primary objectives. Your soldiers hiding in buildings should be relatively safe - they can painfully bite Germans around the church and concentrate enemy attention. Use this fact to collect a Panzerschreck with squad running to the church and throw a grenade into MG-42 position under the church, then a satchel charge into the shrine. Use nearest low wall as cover. When Jerry in church is finished quickly capture abandoned MG-42 and jump into the shrine. [5]
![[5] - Mission 3](https://game.lhg100.com/Article/UploadFiles/201512/2015121413564694.jpg) [5]
[5]![[6] - Mission 3](https://game.lhg100.com/Article/UploadFiles/201512/2015121413564685.jpg) [6]
[6]
It's time to kill Germans occupying one more building, this time opposite the church, on the other side of the square. Open fire from MG-42 you have in church now, squad with light MG-42 occupying one of the buildings should fire too. Try to eliminate Krauts with rest of your soldiers (armed with Panzerschrecks), hide them behind the obstacles on the square. [6] At last you can try to get close with one of your squads and to throw a satchel charge into the building.
When Krauts are finished jump with squad armed with light MG-42 into that house, leave the church with your heavy MG-42 and open fire at enemy AT gun Pak 38 you'll see (top of picture [7]). You should have no problem to destroy it quickly with boys armed with Panzerschrecks (eventually by throwing grenades into it) but it's best to kill the crew only and to capture abandoned gun. Do the last thing with squad that captured heavy MG-42 under the church then roll AT gun under the shrine. [7]
![[7] - Mission 3](https://game.lhg100.com/Article/UploadFiles/201512/2015121413564655.jpg) [7]
[7]![[8] - Mission 3](https://game.lhg100.com/Article/UploadFiles/201512/2015121413564652.jpg) [8]
[8]
When you've finished with enemy AT gun your next task will be to garrison the church [*3] (place heavy MG-42 back in the shrine) and to upgrade it to barracks [*4] by clicking on the building first and then on icon in the right corner of the screen. A moment later start producing in the church-barracks a sniper and a mortar section. Simultaneously quickly prepare yourself for enemy counterattack which will come from the north and east (several infantry squads): place your soldiers behind some low walls and obstacles around the church and on the square in front of it and order them to observe these two directions. Build with your people and as quick as a flash some additional sandbags eventually. Replenish their human losses at once. If you see some counterattacking Germans entering one of the buildings destroy it with AT gun you've captured. [8]
After repeling Krauts size the nearest munitions point [*] on east - it should be enough to capture it, you don't have to build an observation post on it because german mortar is shelling it with grenades and enemy sniper is shooting from the nearest building. You can collect a Panzerschreck lying in white circle near that point. Afterwards breach with your satchel charges two walls I've marked with white lines on my map that are blocking your way to the square in front of a town hall and to another munitions sector on the south. You can recruit one more HMG section and place it here to cover both passages you've done a moment ago in case of Germans trying to use them to get to your church. Quickly kill enemy sharpshooter hiding in a building. [9]
[9]![[10] - Mission 3](https://game.lhg100.com/Article/UploadFiles/201512/2015121413564722.jpg) [10]
[10]
Jump into that building with your infantry, kill enemy soldiers staying around the heavy MG-42 on the south, destroy the motorcycle and toss a grenade into MG-42 position, then quickly hide in building again. [10] When you will have a possibility to use a satchel charge again go outside and throw explosives under the nearby building from where another sniper is shooting.
Run across the square to the other side, take positions in buildings and eliminate all the Krauts guarding southern munitions point: kill MG-42 and infantry on the street, finish second squad of Germans hiding in a building opposite. [11] Capture that point. Later you will have a possibility to move from there to the town hall but your main task here will be to prepare an ambush on enemy armoured car Sdkfz 234 which will be passing by soon.
![[11] - Mission 3](https://game.lhg100.com/Article/UploadFiles/201512/2015121413564728.jpg) [11]
[11]![[12] - Mission 3](https://game.lhg100.com/Article/UploadFiles/201512/2015121413564711.jpg) [12]
[12]
In the meantime church-barracks should produced a sharpshooter and a mortar team. It's time to use this tandem. First test it in the action of seizing next munitions point situated on the north: camouflage your sniper, order him to fire only on your command (to avoid fighting with superior enemy) and take out with him german pioneers working near the barbed wires blocking your way to the north. Then use your mortar placed near the church to bombard munitions point area (there are some enemy soldiers) but first of all a building with german sniper in it. Be patient, your fire will last a little (poor accuracy). When enemy sharpshooter is dead you can get closer with one riflemen squad to blow up with satchel charge barbed wires and then jump into the building near the munitions point (don't capture it for the moment). [12]
Get closer with your sharpshooter also, hide him behind the sandbags under the building and take out MG-42 crew to the right of munitions point. Then you can leave the building with your soldiers, quickly collect abandoned MG-42 and bring it to the house. Rest of soldiers can now capture munitions point and build on it observation post. [13] Replenish the manpower of this squad near the church later.
![[13] - Mission 3](https://game.lhg100.com/Article/UploadFiles/201512/2015121413564788.jpg) [13]
[13]![[14] - Mission 3](https://game.lhg100.com/Article/UploadFiles/201512/2015121413564707.jpg) [14]
[14]
Go back with your sharpshooter to the church, then move east by the road, to the town hall, uncovering enemy positions (in buildings too). Bombard these positions with your mortar grenades, use sniper only to kill these few enemies or these important (for example MG-42 sections). But be careful - enemy motorcycle is riding here from one of the bridges from time to time: have an eye to your sniper, withdraw him quickly when in danger. But try to kill enemy mortar crew you'll see on the square in front of a town hall or destroy it with your mortar. [14]
If your sniper is dead, recruit new one. Try to score 30 sniper kills to complete additional mission objective and you'll be awarded with Army Sharpshooter Badge for that. When you've killed most of Germans west of town hall with your tandem sniper-mortar time to organize general attack on the town hall. You have to secure that building [*4], it's last of primary objectives. Move with your main forces (produce some more infantry earlier if you think that's necessary) to the east, by the road: sniper as a leading person (he's uncovering next enemy positions), rifle squads armed with Panzerschrecks and light MG-42s following him, HMG and mortar teams on end. If you captured AT gun earlier you can also roll it towards the town hall. You don't have to assault the town hall, just hide behind the obstacles (wrecks, sandbags) on the square in front of it and admire the battle. Try to get your HMGs as close as possible because they have great firepower. Start shelling (using your mortar) the town hall and the square. Watch out for enemy motorcycles coming from the north, from one of bridges. [15]
![[15] - Mission 3](https://game.lhg100.com/Article/UploadFiles/201512/2015121413564798.jpg) [15]
[15]![[16] - Mission 3](https://game.lhg100.com/Article/UploadFiles/201512/2015121413564797.jpg) [16]
[16]
Take out with sharpshooter enemy AT gun crew you'll see next to the monument and another MG-42 close to it. [16]
Finally you'll see a german armoured car Sdkfz 234 rolling in on the square. Before that the car will drive across the half of a city (I've marked its route with small red dots on my map), entering the map from the south. So you can ambush the car earlier, in southern munitions sector (as I mentioned). Destroy the car with: 1) Panzerschrecks, 2) satchel charges or 3) with your 50mm AT gun Pak38 (these two latest methods in front of a town hall rather). [17]
![[17] - Mission 3](https://game.lhg100.com/Article/UploadFiles/201512/2015121413564779.jpg) [17]
[17]![[18] - Mission 3](https://game.lhg100.com/Article/UploadFiles/201512/2015121413564704.jpg) [18]
[18]
After this action Germans should break down and start running to the north, to the bridges. Watch the movie showing an angry American shooting at them and voila - end of mission. [18] To be continued...
Primary Objectives:
Additional Objectives:
Your task is simple - you must repel German counterattack on Carentan. You've got 10 minutes to establish defensive perimeter in the town near the town hall [*1] - it's your first primary objective [1]. [The church to the west marked by me with the same number you'll be defending later.]
![[1] - Mission 4](https://game.lhg100.com/Article/UploadFiles/201512/2015121413564887.jpg) [1]
[1]![[2] - Mission 4](https://game.lhg100.com/Article/UploadFiles/201512/2015121413564817.jpg) [2]
[2]
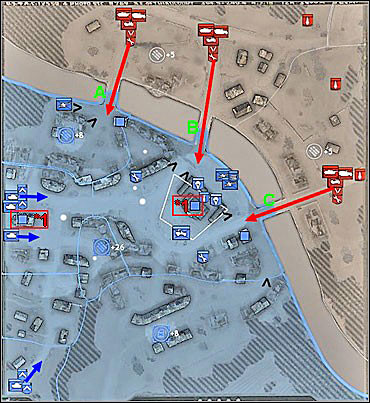
Germans will approach from grey zone (directions of their attack I've marked with red arrows on my map) and will try to cross three bridges (A, B and C) to get to yours (blue). So you should hold them on these bridges, they're the bottle-necks [2]. However, high command also ordered you to capture munitions points on the other side of the river but don't bother - without heavy equipment you have no chance to do it.
Select the Engineers you've got at your disposal and send them to the bridges. Pay attention that you have two additional squads of engineers in HQ buildings (town hall and church [*1]) - leave the buildings and send them to the bridges too. First, mine all three bridges starting from german riverbank (watch out for enemy snipers hiding in buildings on that riverbank). Later - barbwire exits from the bridges to your bank: barbed wires will slow the movement of enemy infantry but they won't stop german tanks of course. Finish your sapper job by building MG emplacements near the bridges - try to place these fortifications near the buildings or ruins so their sides will be protected by walls (MG emplacements can't shoot to the sides so they can be easily destroyed from flanks, even by infantry) [3]. (I've marked proposed spots for MG emplacements as black > on my map.)
![[3] - Mission 4](https://game.lhg100.com/Article/UploadFiles/201512/2015121413564896.jpg) [3]
[3]![[4] - Mission 4](https://game.lhg100.com/Article/UploadFiles/201512/2015121413564860.jpg) [4]
[4]
Now select your paratroopers and man two AT guns you will find on map (big white dots). Roll 'em to the spot between bridges B and C and set up there (it's not safe to arrange them together but you have no better choice). Turn them towards the exits from the bridges B and C (each gun to another exit) so they'll be able to strike from the sides enemy armor trying to cross these bridges (sides are his weakest points). When engineers have finished their work with bridges order them to place sandbags around the guns. You can also place sharpshooter or MG section (produced in barracks/HQs) behind these sandbags to observe german riverbank [4].
Go back to your paratroopers - notice that not all soldiers manned AT guns: send rest of them near HQ in town hall [*1] to replenish their manpower (to do that they must be near HQ/barracks). Then arm 'em with recoilless rifles by left-clicking on suitable icons in the lower right corner of the screen. Now they're well armed against armor and you can place them in two buildings adjacent to the town hall [*1] (behind AT guns emplacement near the river) - from there they'll be able to provide fire on bridges B and C [5].
![[ 5] - Mission 4](https://game.lhg100.com/Article/UploadFiles/201512/2015121413564826.jpg) [ 5]
[ 5]![[ 6] - Mission 4](https://game.lhg100.com/Article/UploadFiles/201512/2015121413564877.jpg) [ 6]
[ 6]
You will also find german Panzerschrecks lying on the ground in white circles (small white dots on my map) but don't collect them with your paras, leave them for sappers. When sappers did their job near the bridges pick up with two squads these AT weapons and send these engineers to the buildings, next to the square behind the town hall [*1]. Their next task will be: 1) to destroy every german vehicle which has managed to break through your line of defense near the bridges and 2) to jump from there to damaged MG emplacements near bridges and repair them if necessary [6].
Equip remaining engineers with flamethrowers (do it the same way as with recoilles rifles) and move each section to high buildings near bridges A and C - they will fry all the Krautz trying to get to your bank of a river. Also, place in these buildings sharpshooters and MG sections produced earlier in barracks [7]. Yes, it's not good to place all of them in one building (they'll all be dead if house crashes) but you have no choice in these areas. Oh, and you can save resources on one MG section because you can find an abandoned german MG-42 in spot marked as a white dot (on my map), near high building next to the bridge A - capture it with paratroopers for example, then replenish the manpower of that squad near the town hall or church [*1]. Naturally, you can produce much more units than I propose you (it's recommended ;-) and place them in all those buildings, ruins or behind sandbags you appreciate as a good cover and useful in defence.
![[ 7] - Mission 4](https://game.lhg100.com/Article/UploadFiles/201512/2015121413564837.jpg) [ 7]
[ 7]![[ 8] - Mission 4](https://game.lhg100.com/Article/UploadFiles/201512/2015121413564886.jpg) [ 8]
[ 8]
On the square behind the town hall [*1] you can set up a mortar produced earlier (however, maybe position between buildings, just behind your two AT guns between bridges B&C, would be better solution - from there mortar can commence fire on bridges B and C). Place the jeep you will find next to the church on this square too - it will be your mobile reserve: if Jerrys appear around the town hall and on the square you can welcome them suitably [8].
Probably, you will receive some command points by establishing all these defences (command points are numbers on icon next to the minimap) - spend your first two points (by clicking on this icon to open suitable menu) on "Off-Map Artillery Support", next one - on "Rapid Response" (faster deployment of infantry and heavy weapons teams). Or inversely - according as what you need first in that particular moment ... [9].
![[ 9] - Mission 4](https://game.lhg100.com/Article/UploadFiles/201512/2015121413564869.jpg) [ 9]
[ 9]![[ 10] - Mission 4](https://game.lhg100.com/Article/UploadFiles/201512/2015121413564998.jpg) [ 10]
[ 10]
In the meantime take care of your backup/fallback positions around the second HQ (in the church [*1] to the west), you will need them. First, produce a sharpshooter and MG section and place them in the church tower [10].
To summarize, your first line of defence should look like this: near the bridge A, in high building you should have a sharpshooter, MG section and engineer squad with flamethrowers (and maybe somebody with bazookas). Nearby should be MG emplacement > (one or two) made by sappers and pointed to the bridge. It's also good to place AT gun (produced earlier) to the left from the bridge (if you look at him from your riverbank) so the gun will be able to shoot Stugs from the side. Securing munition point situated neighbouring with some squads (place them in nearby building and behind sandbags you'll find there) is a wise idea too [11].
![[ 11] - Mission 4](https://game.lhg100.com/Article/UploadFiles/201512/2015121413564911.jpg) [ 11]
[ 11]![[ 12] - Mission 4](https://game.lhg100.com/Article/UploadFiles/201512/2015121413564946.jpg) [ 12]
[ 12]
Opposite to the bridge B you should have at least two MG emplacements > covered from sides by buildings' walls. Two houses on the riverside (adjacent to the town hall [*1]) should be manned with two paratroopers squads armed with recoilless rifles. On the right you see also two fortified AT guns, each of them is pointed towards the different bridge (B and C) [12].
Bridge C is guarded by a sharpshooter, MG section and sappers with flamethrowers placed in high building on the right. On the left you see two AT guns again and MG emplacement > covered from the side by building with paratroopers inside (armed with bazookas) [13].
![[ 13] - Mission 4](https://game.lhg100.com/Article/UploadFiles/201512/2015121413564965.jpg) [ 13]
[ 13]![[ 14] - Mission 4](https://game.lhg100.com/Article/UploadFiles/201512/2015121413564915.jpg) [ 14]
[ 14]
Finally (after 10 minutes) one of your soldiers will report that enemy is coming and wild fight will begin [14].
Probably you'll see on the bridges some careless Stugs (self-propelled assault guns) first - they should blew up on mines placed by your engineers. If they don't want to do that help them by shooting them with your AT guns: remember - you can order their crews to use armor-piercing shells by clicking on icons in the lower right corner (after selecting a gun). Otherwise they will use HE shells which will do almost nothing to Stugs (use HE projectiles against enemy infantry) [15].
![[ 15] - Mission 4](https://game.lhg100.com/Article/UploadFiles/201512/2015121413564901.jpg) [ 15]
[ 15]![[ 16] - Mission 4](https://game.lhg100.com/Article/UploadFiles/201512/2015121413564954.jpg) [ 16]
[ 16]
Germans will pretty fast arrive at a conclusion that bridges are mined and will send their pioneers (equivalent of your engineers) supported by more Stugs to demine. Give 'em a hell on earth with your snipers and MGs ! If necessary help yourself by shelling Germans with your own off-map arty - click on its icon (next to the command points) then on the terrain you want to bombard. Try to kill more than 200 of them (this is an additional objective [*]) and you'll be awarded for that heroic act with Bronze Star ! [16] First of all try to concentrate your attention on German vehicles, especially Stugs (leave enemy infantry for your MGs), and as soon as you see any of them entering one of the bridges, quickly select your AT gun, reload it with AP shells and order to fire at vehicle.
Enemy will be sending to your positions more and more infantry and vehicles (Stugs but also halftracks and motorcycles). Later, he will decide to bombard you with his mortars - you will recognize this moment is starting by red fumigating candles falling down here and there [17].
![[ 17] - Mission 4](https://game.lhg100.com/Article/UploadFiles/201512/2015121413564971.jpg) [ 17]
[ 17]![[ 18] - Mission 4](https://game.lhg100.com/Article/UploadFiles/201512/2015121413564963.jpg) [ 18]
[ 18]
Krautz will use mortars displaced on german riverbank - I've marked this locations on my map with red mortar icons but I'm not sure if Jerrys take same positions each time you play this mission. It's time for some digression: maybe if you will send during setup phase some of your sharpshooters to the other bank of a river (german, grey), to the areas around those spots where Germans will place mortars, maybe your snipers will be able to kill mortars crews and german mortar fire won't be so annoying. I tried this option but my snipers were killed by enemy sharpshooters hiding in buildings on german riverbank and by incoming enemy - maybe you will have more luck ... [18].
However, as soon as Germans start shelling you with mortars get your ass from there - leave bridges B and C (they're only in range), leave town hall and adjacent buildings and square, and try to get to the second HQ, in the church to the west - now you must defend it (second of primary objectives [*1]). You should have fallback positions there. Also try to relocate your AT guns or leave them behind you and let them face their fate, they could be too slow to relocate safely. You can slowdown pursuing Germans by shelling them with your own off-map arty but remember that this artillery starts firing after some seconds so if you're targeting a big and moving concentration of enemy forces take adjustment on its movement. Pay attention also that this kind of shellfire has a fair dispersion so don't waste it on shelling single vehicles [19].
![[ 19] - Mission 4](https://game.lhg100.com/Article/UploadFiles/201512/2015121413565006.jpg) [ 19]
[ 19]![[ 20] - Mission 4](https://game.lhg100.com/Article/UploadFiles/201512/2015121413565063.jpg) [ 20]
[ 20]
When the town hall is falling down your forces shouldn't be there already, at this time you should be in the church area or in buildings around the square behind the bombarded town hall (try to choose less damaged houses) [20].
During short but desperate fights near the church [*1] or on the square long-awaited allied reinforcements (yes, yours !) will finally arrive (they'll approach from directions marked on my map with blue arrows): you will receive couple of Sherman M4 medium tanks and quite a lot of infantry. With their help you should have no problem to push back importunate Jerrys [21].
![[ 21] - Mission 4](https://game.lhg100.com/Article/UploadFiles/201512/2015121413565091.jpg) [ 21]
[ 21]![[ 22] - Mission 4](https://game.lhg100.com/Article/UploadFiles/201512/2015121413565057.jpg) [ 22]
[ 22]
But you can have hard nut to crack with remaining Stugs - try to flank them with some of your tanks and bite 'em from the sides (they're more vulnerable) [22]. Or hit them hard frontally, one by one, with couple of tanks at the same time. By destroying all of them you'll complete second objective [*2] (destroy all Axis Armor in Carentan).
See short outro for the end (uff, it was hard).
Primary objectives:
[*1] Rescue Dog Company
[*2] Secure the Road
[*3] Defend Redball Express
Secondary objectives:
[*] Destroy Axis Forward Base
Additional objectives:
[*] Destroy Panzer Grouppen (award: "Distinguished Service Cross")
Note:
It's a mission with enemy often harassing you with bushfighting. Enemy uses mostly armoured vehicles, motorcycles and Pioneers. It's also a first mission when you build sizable base and destroy enemy base.
You start with three medium tanks Sherman (with 75mm gun), three armoured cars Greyhound, with a halftrack and a riflemen squad. [1] First you must rescue as fast as possible boys from Dog Company besieged by Krauts in buildings in the middle of a map [*1].
![[1] - Mission 5](https://game.lhg100.com/Article/UploadFiles/201512/2015121413565028.jpg) [1]
[1]![[2] - Mission 5](https://game.lhg100.com/Article/UploadFiles/201512/2015121413565073.jpg) [2]
[2]
Split your forces - send all three Greyhounds to the north, by left road margin (use "attack move" order) and all three Shermans to the farmyard among the buildings occupied by Dog Company. Right behind the wall you see on first picture your Greyhounds will encounter some german infantry trying to join the Krauts besieging Dog Company. They shouldn't run to far... Rifle squad you have at your disposal load to the halftrack and send it follow the Greyhounds. Disembark next to the building you've encountered first enemy nearby and enter it - hence now this building is your HQ. Produce three teams of engineers immediately. Right after entering the building with your rifle squad leave it (you've done this only to seize it) and follow the Greyhounds moving farther to the north. You can leave halftrack here as a transport mean for units produced in HQ later. [2]
A bit farther Greyhounds will encounter more enemy infantry also trying to get to the middle of a map - kill as many as you can, driving to the north constantly. Notice AT gun Pak38 standing nearby (white dot on my map) - the Germans shouldn't hit on an idea to use it against you but you can capture it with your riflemen. Then move back to the HQ with remains of this squad, replenish their manpower and go back to the north again to capture another AT gun. Roll first AT gun follow your armoured cars. If you produced in HQ first team of engineers send them to the north, capture first munitions point. Further more, at the left edge of the map, Greyhounds will encounter two squads of german infantry armed with Panzerschrecks - finish them but don't drive up too close (you can help yourself with AT gun and sappers heading to this spot). Afterwards proceed with your people to the building that stands in front of a fuel point - you see this house in the distance on picture [3]. Organize there a defensive point (Germans will start harassing you with counterattacks soon, they'll try to get to your HQ and destroy it). Greyhounds can now drive back to the HQ with a task to protect it against enemy counterattacks from southeast.
![[3] - Mission 5](https://game.lhg100.com/Article/UploadFiles/201512/2015121413565062.jpg) [3]
[3]![[4] - Mission 5](https://game.lhg100.com/Article/UploadFiles/201512/2015121413565051.jpg) [4]
[4]
For now let's see what is happening with Dog Company defending itself in spot [*1]. Your medium tanks Shermans should be in place right now - drive in on the farmyard and kill the Krauts (3 squads) besieging the buildings. A moment later you'll see three other squads of infantry and a Stug assault gun attacking through the northern gate. Try to place your tanks as you see on suitable picture [4] (one of them frontally to the gate, two on the sides) and Stug will be transformed to the wreck soon and only one Sherman will need repairs. [4] Start repairing it with engineers from Dog Company you will get under your control after pushing back all Jerrys (first primary objective - rescue Dog Company - should be accomplished at that time).
Send rifle squad (from Dog Company) with one Sherman to the east, move second tank to the west, under the building where you should organize defensive point. On the east get over with two squads of Germans near the buildings at the right edge of a map. [5] Heading to this spot you can capture munitions point and after killing Krauts here - seize the fuel point (but don't build observation posts on them, leave it for engineers). Later collect with your riflemen a Panzerschreck that should left after Jerrys, then put this squad in the building you see at the top of a picture and place your tank between the building and right (east) edge of the map. [5]
![[5] - Mission 5](https://game.lhg100.com/Article/UploadFiles/201512/2015121413565080.jpg) [5]
[5]![[6] - Mission 5](https://game.lhg100.com/Article/UploadFiles/201512/2015121413565169.jpg) [6]
[6]
Send here one team of sappers which you had to produce in HQ (they can seize strategic and fuel points near the main road and build on them observation posts if you already have enough resources). By seizing strategic points situated along the main road [*2] you secure the road which is your second of primary objectives. Repair damaged tank with these engineers then place them in building occupied by rifleman squad (first - build an observation post on nearest fuel point). Here you will also organize a defensive point (so we're slowly starting to create the whole line) because Germans will try to penetrate this way to the south (in my play they were sending motorcycles here). Generally Jerry loves to attack you along both edges of a map in this mission. [6] Oh, and the main goal of the whole journey to the east was to capture this sector to cut off southern (german) territories from the north (also german).
On the west your defensive point looks like this: in building in front of a fuel point you have a team of engineers and a rifle squad armed with Panzerschreck (this is the squad that have captured AT guns and replenished manpower in HQ). You can also capture one more AT gun situated in front of a building, near a fuel point (kill its crew before). So you'll have three AT guns Pak38 - for the moment place one of them to the left from a building to destroy every armoured vehicle enemy is sending to you by the left edge of the screen. When not wrecking vehicles destroy with this gun an observation point opposite enemy built on fuel point and kill german Pioneers trying to repair it. You can put second AT gun near the main road and point it to the north: this gun will work as a decoy for german tanks driving from time to time by the road - when enemy tank is fighting with your AT gun you can get off the side with your Sherman hiding behind the building and finish him (repair your tank with engineers). You can also use riflemen armed with Panzerschreck instead of Sherman tank: leave the building, do what you should do and go back. [7] Generally it's best to place AT guns behind buildings or hedgerows perpendicularly to the direction enemy tanks come from: when Jerry passes by he gets hit from vulnerable side - AT gun he didn't see is shooting at him. Before he'll turn his turret or even entire hull (if it is Stug) it's possible he'll get a second shot.
![[7] - Mission 5](https://game.lhg100.com/Article/UploadFiles/201512/2015121413565181.jpg) [7]
[7]![[8] - Mission 5](https://game.lhg100.com/Article/UploadFiles/201512/2015121413565124.jpg) [8]
[8]
If you're using for tank-destroying purposes your riflemen armed with a Panzerschreck you can send back Sherman tank to the farmyard where boys from Dog Company were defending themselves (from where he arrived). Germans are also sending some vehicles that way so your tank can be more useful there. Send third AT gun to the farmyard [*1] too and organize there third defensive point. Repair your tanks with engineers from Dog Company. Initially, when tanks are in not so good condition, place them on the farmyard in the same manner as AT guns - perpendicularly to the direction enemy tanks come from and behind the buildings so they'll be able to destroy german vehicles driving in by the gate and wall to the right. When you grew strong here you can take a risk of placing your tanks frontally to the directions german vehicles come from (sometimes with infantry). Destroy with tank guns an observation post built by enemy on fuel point to the north from Dog Company buildings. Put engineers to the building between your tanks, raise an observation post on farmyard's strategic point first. [8]
When an observation post on a fuel point to the west, near the right edge of a map has been destroyed by your AT gun you can capture it with your forces: roll AT gun to the left from a fuel point so the gun will still be able to observe left edge of a map. Seize fuel point with your riflemen, build an observation post. Kill Germans hiding in building near the crossroads with your tank (I didn't send him back to the farmyard in my game), then you can install own riflemen and engineers in a house you see nearer on picture [9]. Roll along the main road second AT gun, place it so it will be able to provide fire on the main crossroad in the middle of a map. If your halftrack finished transporting engineers produced in HQ all over the map you can arm it with machine gun (that will cancel its transport function) and move it closer to the frontline (its armament is priceless when annihilating enemy infantry). [9]
![[9] - Mission 5](https://game.lhg100.com/Article/UploadFiles/201512/2015121413565164.jpg) [9]
[9]![[10] - Mission 5](https://game.lhg100.com/Article/UploadFiles/201512/2015121413565143.jpg) [10]
[10]
Eliminate Germans attacking your base from southeast sectors (armoured cars and Pioneers) with your Greyhounds - strike enemy from sides and rear and you'll have no problem with him. Try to extend your base with engineers produced in HQ - I suggest to build barracks first (you will need infantry to support your tanks and for recon purposes) but you should focus on building tank factory cause tanks can give you final victory (I didn't raise a building producing weapons support teams in my game). [10] In the spare time (you won't have it a lot) you can build around your base/HQ some fortifications, MG emplacements for example.
To get off from insistent Krauts harassing your HQ it's best to capture their southeastern sectors that you already cut off from rest of german territory on the north. First zero in on this one lying near the dirt road. Attack it with your Greyhounds but avoid to drive in to the Pak38's field of fire that is hiding under the tree behind a building. Finish Germans occupying a building, help yourself with engineers armed with flamethrowers when necessary. Then jump into the building and burn AT gun crew under the tree. [11]
![[11] - Mission 5](https://game.lhg100.com/Article/UploadFiles/201512/2015121413565136.jpg) [11]
[11]![[12] - Mission 5](https://game.lhg100.com/Article/UploadFiles/201512/2015121413565151.jpg) [12]
[12]
Sector farther to the south should quickly fall into your hands, eliminate possible enemies in this area (for example halftrack Sdkfz 251) with Greyhounds attacking from various sides or engineers armed with flamethrowers. Watch out for another AT gun Germans may roll closer, destroy it in the first instance (your armoured cars should have armor plates in this fight - install them earlier by clicking on suitable icon in the lower right corner of the screen). [12]
In the meantime build in your base tank factory. Send first produced tank to help Greyhounds. Equip your tanks with better 76mm gun by clicking on suitable icon in tank factory. [13]
![[13] - Mission 5](https://game.lhg100.com/Article/UploadFiles/201512/2015121413565179.jpg) [13]
[13]![[14] - Mission 5](https://game.lhg100.com/Article/UploadFiles/201512/2015121413565100.jpg) [14]
[14]
Greyhounds and the tank can easily seize the sector situated in the lower right corner of the map - eliminate Germans hiding in the buildings with your Sherman tank, kill the crew of enemy mortar placed behind one of houses. [14] Destroy with tank gun an observation post raised on a munitions point and go back to the first frontline but leave here one armoured car (place it near the dirt road and point it to the east) because when an allied convoy called Redball Express will appear on map you will see on this road german infantry entering off-map and trying to get to the convoy and destroy it. And your Greyhound placed here won't let them to get there...
Oh, I forgot to mention that you will see on the battlefield enemy tank platoon soon (approx. 4 PzKpfw IV tanks). It's Panzer Grouppen - destroy it (it's additional objective) and you'll be awarded with Distinguished Service Cross. 76mm tank guns could be very effective against these enemy vehicles... [15]
![[15] - Mission 5](https://game.lhg100.com/Article/UploadFiles/201512/2015121413565212.jpg) [15]
[15]![[16] - Mission 5](https://game.lhg100.com/Article/UploadFiles/201512/2015121413565207.jpg) [16]
[16]
Simultaneously, when half of a map is yours, it's time to strike further. At the right (east) edge of a map, on the hill, you'll see enemy base - it produce most of units that are harassing you with attacks. Destroy this military base [*] to complete secondary objective and to make german attacks weaker. Drive in the german base through the gates (south&west). Follow your tanks with engineers (repair tasks) - sappers may concentrate on other tasks only when you discover a possibility to repair your tanks with their crews). Quickly destroy enemy AT gun near the western gate and burn with sappers one more behind the wall (inside the base), to the left. [16]
Start demolish german base - shoot the Krauts in one of houses first, then destroy remaining buildings starting from this producing enemy vehicles. Your engineers can burn something just a little now. Place other infantry squads in buildings so they can observe the gates (north&west) leading to the base and nobody will take you by surprise when demolishing. [17]
![[17] - Mission 5](https://game.lhg100.com/Article/UploadFiles/201512/2015121413565220.jpg) [17]
[17]![[18] - Mission 5](https://game.lhg100.com/Article/UploadFiles/201512/2015121413565240.jpg) [18]
[18]
Demolishing is a time-consuming operation so in the meantime capture highway crossing - drive on it with your tank (riflemen and engineers should jump to the buildings on sides to secure vehicle flanks) and eliminate enemy infantry hiding in building opposite and in front of it. Repair with engineers your tank after the fight, seize the strategic point and build an observation post on it (it's a continuation of realization "secure the road" [*2] primary objective). [18]
When it's done you'll see allied trucks appearing on the main road on the south - it's Redball Express convoy (I mentioned about it earlier) which has to travel safely to the north across the whole map. But for the moment the Redball Express will stop next to the strategic point near your HQ and will wait till you capture roads on the north. Germans will have a fancy to destroy the convoy, you must defend it [*3] - it's the last primary objective. [19]
![[19] - Mission 5](https://game.lhg100.com/Article/UploadFiles/201512/2015121413565223.jpg) [19]
[19]![[20] - Mission 5](https://game.lhg100.com/Article/UploadFiles/201512/2015121413565273.jpg) [20]
[20]
When allied vehicles halt you'll see on the dirt road to the east german infantry entering off-map (groups of enemies appear there from time to time). Their task is to destroy the convoy from the flank but if you left in that munitions sector an armoured car (as I suggested you) you should have no problem with those Krauts. [20]
At the same time strike northwest, attack another munitions sector: neutralize enemy AT gun standing there with your gun and a halftrack armed with MGs. Get closer with your tank and infantry (riflemen and engineers), seize the munitions point, start to build observation post on it, jump into the nearest building. Then (probably when you're capturing the munitions point) you should see german infantry (approx. 4 squads) entering off-map from west and heading to the nearby church. Welcome them suitably with your halftrack (real killer) and a tank. They should break down under your heavy fire soon and start running in panic to the main road near the church and to the north then - try to intercept them and kill as many as you can. [21]
![[21] - Mission 5](https://game.lhg100.com/Article/UploadFiles/201512/2015121413565295.jpg) [21]
[21]![[22] - Mission 5](https://game.lhg100.com/Article/UploadFiles/201512/2015121413565227.jpg) [22]
[22]
When you finished demolishing enemy base on the hill leave it with your Sherman tanks (recognize the terrain outside with infantry first) and proceed to the right branch of a main road. Destroy all german tanks you may still encounter, you will have your reward for that in the end. Capture roadside strategic point - it's possible you have to secure both branches of the main road to let Redball Express safely travel to the north (but in my game the convoy always chose left branch). [22]
Both roads are mined (red fields with M letter on my map), at least on sections near the tree line running across the map. So before you move further equip your tanks with mine flails by clicking on suitable icons in the lower right corner of the screen, close to the orders menu, then lower these devices (orders menu) to let them work! Repair all tanks with your engineers or by clicking on icon next to the minimap then move north by the roads. [23] You can equip your engineers with mine detectors too but there are usually MG-42s positions behind the minefields and sappers will take heavy losses when clearing them. So it's better to use tanks.
![[23] - Mission 5](https://game.lhg100.com/Article/UploadFiles/201512/2015121413565258.jpg) [23]
[23]![[24] - Mission 5](https://game.lhg100.com/Article/UploadFiles/201512/2015121413565391.jpg) [24]
[24]
Follow your tanks with engineers, order them to repair damaged vehicles. Quickly destroy enemy AT guns that may wait for you right after the tree line or farther. [24] To the left from the roads you can see some smaller enemy bases sending german reinforcements on the battlefield - try to capture these sectors as quickly as possible with your infantry following the tanks and destroy with tanks these enemy buildings. Then invert the roles - let the infantry to move ahead, recognize the terrain with your soldiers and support them with tanks when in trouble.
Seize both crossroads near the northern edge of a map, watch out for enemy infantry hiding in buildings and entering off-map (they appear at roads ends and come to you) till you capture strategic points on the roads. [25] You can run over Germans coming to you when they are pinned down - it's horrible death under the working mine flail...
![[25] - Mission 5](https://game.lhg100.com/Article/UploadFiles/201512/2015121413565399.jpg) [25]
[25]![[26] - Mission 5](https://game.lhg100.com/Article/UploadFiles/201512/2015121413565379.jpg) [26]
[26]
When strategic points on roads are yours (this completes primary objective - to secure the road [*2]) Redball Express convoy staying all the time near your HQ starts moving forward, to the north and mission ends. [26]
Primary objectives:
[*1] Secure the Town Square
[*2] Destroy Coastal Guns
[*3] Destroy Axis HQ
Secondary objectives:
[*] Upgrade Building to Barracks
Additional objectives:
[*] Destroy the Demolition Station (reward: "Soldier's Medal")
Note:
Additional objective is against the clock - if you want to complete it in the time limit you should know what forces will attack german demolition station before you will do this. There will be no time for improvisation.
You start with three incomplete rifle squads. Immediately collect Bazookas lying on the ground in white circles (white small dots on my map, some of them are ammunition and fuel supplies) but be careful because german snipers are waiting for you in buildings. Try to kill them as fast as you can with Bazookas, eventually move fast and avoid their fire, hide behind buildings' walls and capture two neighbouring munition points. When you capture this on west reinforcements will arrive on map - two Sherman tanks (one is Crocodile, with flamethrower) and an engineer team. When you have northern point in your hands you'll see a sharpshooter, mortar and HMG sections entering on map. [1]
![[1] - Mission 6](https://game.lhg100.com/Article/UploadFiles/201512/2015121413565369.jpg) [1]
[1]![[2] - Mission 6](https://game.lhg100.com/Article/UploadFiles/201512/2015121413565344.jpg) [2]
[2]
While protecting captured munitions point near the river (northern) with HMG team (some Krauts may run up from the north) send both tanks to the town hall area - you must secure the town square [*1], it's first of your primary goals. Take the shortest route with Crocodile (you can burn german sniper in one of buildings by the way), second tank should arrive at the square driving from the munitions point near the river. Burn with Sherman-Crocodile Jerrys hiding in town hall, in front of it and running out from behind the building, and when you'll see Ostwind Flakpanzer on the square destroy it from the side with your second tank. [2] After eliminating all the Krauts in this place you'll complete first of primary objectives and the town hall will become your HQ you can recruit engineers in.
One team of sappers you already have - repair with their help damaged tanks then move to the square behind the town hall and start building there a base: start with barracks, finish with tank factory. Try to arrange succeeding buildings so to contain on that square this factory, otherwise you'll have to build it in front of a town hall, in less convenient spot. [3] Produce some more infantry squads in barracks immediately, collect with them ammo/fuel supplies you see on the square behind the town hall (white dots) and move to support your tanks (they should protect roads heading to the town hall in the meantime to repel possible german counterattacks).
![[3] - Mission 6](https://game.lhg100.com/Article/UploadFiles/201512/2015121413565355.jpg) [3]
[3]![[4] - Mission 6](https://game.lhg100.com/Article/UploadFiles/201512/2015121413565339.jpg) [4]
[4]
At the same time your camouflaged sharpshooter from the munitions point near the river should move along that river to the bridge area in the middle of a map and take out german officer-artillery spotter (eliminate MG-42 crew first). [4] Don't push here your tank instead of a sniper because on the other riverbank waits usually german assault gun Stug which can badly hurt your Sherman from the side.
When recruiting of infantry squads and two teams of engineers (tanks repair tasks) is finished move north with a whole this riverbank frontage. Take a route closer to the left edge of the screen with Sherman-Crocodile, burn every enemy in sight. Engineers follow your tanks and repair their damages of course. Riflemen advance ahead and on both sides, they seize buildings cleared of enemies. If you'll encounter german armoured car don't burn it with your Crocodille (its flamethrower is useless against armored targets), destroy it from one side with second Sherman. [5]
![[5] - Mission 6](https://game.lhg100.com/Article/UploadFiles/201512/2015121413565305.jpg) [5]
[5]![[6] - Mission 6](https://game.lhg100.com/Article/UploadFiles/201512/2015121413565485.jpg) [6]
[6]
And that second tank should drive ahead the bridge. Kill enemy sniper hiding in building near the bridge (destroy that house eventually), eliminate all german squads you'll see. Your infantry moves on left hand of a Sherman and seizes the buildings or hides behind the low walls in front of them. Watch out for single enemy Stugs driving from the other riverbank across the bridge! [6]
Crocodile will encounter german Stug at last - flamethrower is useless against this vehicle too so try to destroy enemy with your infantry (they've got sticky bombs). Take positions on the street with your riflemen, hide behind some wrecks and sandbags and use these bombs by clicking on an icon in the orders menu, than - on target. If Stug doesn't want to blow up in this way move here for a moment with your tank clearing the bridge area and finish german dog. [7] Afterwards get closer with Crocodile and burn enemy infantry behind Stug's wreck.
![[7] - Mission 6](https://game.lhg100.com/Article/UploadFiles/201512/2015121413565493.jpg) [7]
[7]![[8] - Mission 6](https://game.lhg100.com/Article/UploadFiles/201512/2015121413565445.jpg) [8]
[8]
Move further to the north with your Crocodile, second Sherman tank with mortar, HMG and engineers teams should guard the bridge all the time - place sappers and HMG in building opposite to the bridge (you can also put a sniper in this house). Crocodile covering from the sides by infantry burns all enemies in sight, especially MG-42s in buildings. If the vehicle is in good condition engineers following the tank can burn something with theirs flamethrowers too. Capture with these sappers all the points you will conquer by the way and build observation post on them. [8]
Maintain special caution when you get to the first AT gun Pak38 - move back your tank if he drove too close to AT gun. It's best to bring there a mortar team and a sniper: bombard a square with Pak38 on it to clear it out from enemy infantry then kill Pak38 crew with your sharpshooter. [9]
![[9] - Mission 6](https://game.lhg100.com/Article/UploadFiles/201512/2015121413565465.jpg) [9]
[9]![[10] - Mission 6](https://game.lhg100.com/Article/UploadFiles/201512/2015121413565455.jpg) [10]
[10]
Seize captured AT gun (if in one piece) with your infantry (use smallest squad) and bring it to the bridge area to help Sherman tank wrecking every german Stug pushing to your riverbank across the bridge. You can upgrade a building opposite the bridge (in which you have placed engineers and HMG team) to the barracks to complete secondary objective [*]. Soldiers produced here later will have close to the other riverbank which you'll also have to capture soon. Leave the building with your engineers from time to time to repair Sherman fighting with Stugs. [10]
Expect heavy resistance when you reach big pillbox on the north - this bunker [*2] contains coastal guns battery which you have to destroy - it's second of primary objectives. Shell with your mortar square in the middle, burn with the Crocodile tank Krauts near the left edge of a map, then set on fire a bunker (barracks) systematically sending german reinforcements to the battlefield. [11]
![[11] - Mission 6](https://game.lhg100.com/Article/UploadFiles/201512/2015121413565481.jpg) [11][12]
[11][12]
Crews of two field guns (AT Pak 38 and AA Flak 38) you can patiently take out with your sharpshooter or flank fast with one of your infantry squads (when second is laying covering fire) and kill with rifle fire or throw grenades/shoot from a bazooka. Eventually burn this small-calibre Flak 38, don't man it with your soldiers because you can't move it later. Now it's time to take care of this coast battery in a bunker. This pillbox is also sending reinforcements to the battlefield so quickly place your Crocodile opposite to the exit and burn these Germans running out to the ash. To destroy coastal guns you must breach bunker's gate first. Engineer team has explosive charges: set them in place by clicking on suitable icon in orders menu then on gate. When gate is breached you must also place the explosives inside the bunker - do it the same way as before. [12] You can probably destroy this pillbox and coastal guns with Rangers too (you should already have a possibility of calling them on the battlefield), they also have demolition charges.
When bunker blows up together with german coastal guns battery it completes second of primary objectives and allied warships waiting on the sea can now sail up closer to the harbour. That gives you a possibility of using their naval artillery (you can call for this support by clicking an icon next to the minimap). Watch short cutscene showing a power of these naval guns. [13]
[13]![[14] - Mission 6](https://game.lhg100.com/Article/UploadFiles/201512/2015121413565439.jpg) [14]
[14]
Seize neighbouring munitions point, man AT gun Pak38, take some ammo supplies (white dot on my map) and move back with all of your men to the bridge area. You will face up there some Stugs, halftracks and infantry counterattacking across the bridge. Your tanks and captured AT guns placed frontally to the bridge should have no problem with these Krauts. Raze to the ground building on the other riverbank - you'll do that fastest by calling an off-map artillery support on that target (click on icon next to the minimap then on target to use it). [14] At the same time you can send back to the HQ your infantry squads to replenish their manpower.
Afterwards send to the other riverbank tanks with engineers, riflemen and a sniper - in that order more or less. This order depends on what enemy you see first - if you see Stugs assault guns first try to destroy them one after one with your Sherman tank armed with better 76mm gun. Team of engineers follows Sherman, they have to repair that tank when necessary. Rifle squads with sticky bombs can also be useful when fighting with enemy vehicles. However, don't penetrate that riverbank too deep because little bit farther waits for you another AT gun and a mortar - kill their crews with sharpshooter or call an arty on them. Place HMG section in small building to the left, right behind the bridge, to repel enemy infantry counterattacks. You can also roll closer your captured AT guns you have on west riverbank and turn them right. [15]
![[15] - Mission 6](https://game.lhg100.com/Article/UploadFiles/201512/2015121413565509.jpg) [15]
[15]![[16] - Mission 6](https://game.lhg100.com/Article/UploadFiles/201512/2015121413565532.jpg) [16]
[16]
Then move straight fast, to the east edge of a map - the goal of this action is to cut off southern end of that riverbank from rest of a map: Germans have on south a small base producing the vehicles they send to the bridge area. Quickly finish Germans occupying two houses near east edge of a map, take out with your sniper AT gun crew first. [16]
Place some rifle squad and a HMG section in building near that AT gun (recruit this kind of units in your base and barracks on your riverbank if necessary) - you will have to repel german counterattacks in this place too. Simultaneously move south (right) with strong forces, destroy with your Sherman tank every enemy vehicle in sight, burn enemy infantry with Crocodile tank (take out with sharpshooter next AT gun crew under the tree earlier). Help yourself with infantry squads (use their sticky bombs against german vehicles), roll closer captured Pak 38s to enlarge your firepower. Remember to use your mortar teams (area fire) and off-map artillery support - capture munitions sectors to enlarge its range. Call for Ranger squads if you need them (they're well armed with bazookas) - unfortunately they have to run from your HQ and this is a long way off. [17]
![[17] - Mission 6](https://game.lhg100.com/Article/UploadFiles/201512/2015121413565512.jpg) [17]
[17]![[18] - Mission 6](https://game.lhg100.com/Article/UploadFiles/201512/2015121413565575.jpg) [18]
[18]
Finally you'll get close to the german bunker producing vehicles on south - destroy it as fast as you can to stop it from sending more and more vehs: burn it, shell with mortar and arty (I didn't try only explosives charges ;-). Raze to the ground neighbouring building with MG-42 in it. [18] Seize nearest sector and go back north.
If you have lost any tanks produce new ones in your base on the other riverbank, do the same with your infantry but recruit new squads in barracks you've established in a house close to the bridge. Repel german infantry counterattacks (and maybe a halftrack) near the building at the right (east) edge of a map. [19]
![[19] - Mission 6](https://game.lhg100.com/Article/UploadFiles/201512/2015121413565515.jpg) [19]
[19]![[20] - Mission 6](https://game.lhg100.com/Article/UploadFiles/201512/2015121413565505.jpg) [20]
[20]
Move further to the north, destroy another AT gun and kill some soldiers (your rifle squads can finish them by taking positions behind a wall running along the street). Seize nearby building, place HMG team and some riflemen with MG in it, you can leave there also a Sherman tank (but no Crocodile) - these forces will have a task to push back german infantry coming from the north sometimes. [20]
Rest of your army (with Crocodile tank) should move to the enemy demolition station [*] - Germans blow up what they can in this port. Destroy AT guns, mortar and MG-42s positions as usual - burn them with your Crocodile, shell with mortar and off-map artillery. When you're getting close to the station watch out for enemy assault gun Stug eventually - destroy it fast with bazookas and sticky bombs (pay attention, you don't have close your Sherman tank with 76mm gun). [21]
![[21] - Mission 6](https://game.lhg100.com/Article/UploadFiles/201512/2015121413565545.jpg) [21]
[21]![[22] - Mission 6](https://game.lhg100.com/Article/UploadFiles/201512/2015121413565520.jpg) [22]
[22]
For razing to the ground enemy demolition station [*], well defended by couple of MG-42s and infantry squads, you will have not much time (about 2 minutes). You must then act very quickly and with determination. So don't stand on ceremony only use every trick in the book: get close with your Crocodile tank (enemy has no AT weapons probably), use your mortar and artillery fire. Try to place your soldiers so to let them use bazookas against the building too and as often as possible. [22] If you've destroyed the demolition station in the time limit you'll complete additional objective and receive Soldier's Medal.
Afterwards you will have only one task to accomplish - to destroy Axis HQ [*3] on the north. Move then in this direction with all of your forces, repel german attacks by the way, collect all useful weapons like Panzerschrecks and light MG-42s with your rifle squads. [23]
![[23] - Mission 6](https://game.lhg100.com/Article/UploadFiles/201512/2015121413565596.jpg) [23]
[23]![[24] - Mission 6](https://game.lhg100.com/Article/UploadFiles/201512/2015121413565699.jpg) [24]
[24]
When you see large square with big building behind it burn the Krauts outside, bombard them with your mortar grenades. Raze this big building to the ground with off-map arty. Destroy last two Stug assault guns that will probably welcome you with your Sherman tank armed with 76mm gun, help him with your riflemen armed with Bazookas/Panzerschrecks. [24]
In the distance you will see another big building - it's Axis HQ designed for demolishment. Attack from left and through the centre, watch out for enemy mortars and another AT gun. Destroy big building with naval artillery, it will end this mission. [25]
![[25] - Mission 6](https://game.lhg100.com/Article/UploadFiles/201512/2015121413565693.jpg) [25]
[25]![[26] - Mission 6](https://game.lhg100.com/Article/UploadFiles/201512/2015121413565654.jpg) [26]
[26]
Victory! Cherbourg port is ours! For Germans defending it war is over, time to fill prisoners camps with them. [26]
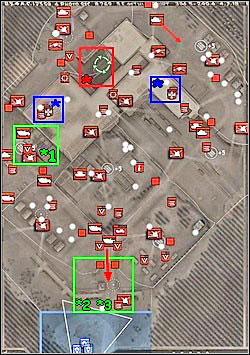
Primary objectives:
[*] Destroy V2 Launch Assembly
Secondary objectives:
[*1] Destroy Oxygen Tanks
[*2] Assault Main Entrance
[*3] Defend Main Entrance
Additional objectives:
[*] Eliminate Base Komandant (award: Air Medal)
You've got only one primary objective in this night mission - to destroy V2 launch assembly [*]. [1]
![[1] - Mission 7](https://game.lhg100.com/Article/UploadFiles/201512/2015121413565623.jpg) [1]
[1]![[2] - Mission 7](https://game.lhg100.com/Article/UploadFiles/201512/2015121413565690.jpg) [2]
[2]
You start your game on south with couple of paratroopers squads. At the start you can replenish their manpower (if you want to wait patiently till additional parachutists will land on the ground ;-). Afterwards move north, to the main entrance of german building complex. Right in front of the entrance you can hide your soldiers behind some trucks but they give rather poor protection against german bullets, these fired from MG-42 and 20mm AA gun Flak 38. So better fire-up your people and assault enemy positions - hide behind sandbags (good cover), throw grenades. [2] Man captured AA gun (if in one piece) and one of MG-42s (then replenish manpower of your squads), turn them towards enemy base because you would have to repel german infantry counterattacks. Germans run out from two watchtowers standing in the main entrance - they've got additionally MG-42s on the towers. Remember from now on: every watchtower in building complex area (I've marked them with red squares on my map) has MG-42 position on it and sends german reinforcements to the battlefield. So you should destroy both watchtowers with paratroopers' explosives to end this practice. First breach the wall you see on the left on picture [2] with one explosive charge.
Run through the hole with two paratroopers squads and take cover behind nearby trucks. Then fire-up your soldiers and quickly blow up left watchtower with explosives (throw them under it), afterwards do the same with right tower (use second squad). Now move captured MG-42s closer to the entrance (you can leave AA gun now) because Krauts still attack this area - now they are disembarking from a halftrack which transport them here. So place your MGs to make them disembarking from the vehicle repugnant. Seize the strategic point situated in the main entrance with one squad (use soldiers that manned AA gun for example) and build an observation post on it to complete secondary objective [*2] (to assault main entrance). Now you have third secondary goal - to defend it [*3]. In the lower left corner of the screen (over the minimap) you'll see the timer counting off time designed for that task, you have 10 minutes. [3]
![[3] - Mission 7](https://game.lhg100.com/Article/UploadFiles/201512/2015121413565662.jpg) [3]
[3]![[4] - Mission 7](https://game.lhg100.com/Article/UploadFiles/201512/2015121413565674.jpg) [4]
[4]
Germans aren't in a hurry to recapture the main entrance, they only send some infantry squads from time to time so you can leave there MG-42 team, one or two, and move with rest of forces to side sectors - munitions and strategic. Send one paratroopers squad to the right (east), move along the fence, behind some containers. You'll see a pile of boards (or something like that) behind the last container - it gives good protection (green shield) so take cover behind it for a moment, fire-up your soldiers and destroy the watchtower with MG-42 using satchel charges (throw them under it). Hop behind the pile once again (replenish the manpower), wait a moment, fire-up again and run to eliminate the crew of enemy AA gun. Seize the sector, build an observation post, bring there your own MG-42 to protect the trophy. [4]
Do the same in strategic sector to the left (west) from the main entrance - eliminate using grenades/satchel charges enemy AA gun and MG-42, destroy next watchtower first. Notice some weapons and ammo supplies lying here in white circles (and white dots on my map) - collect them with your soldiers to enlarge the firepower of your squads with Panzerschrecks and light MG-42s. [5] If you see enemy halftracks standing on your way destroy them quickly with captured Panzerschrecks or use the explosives charges (fire-up your people before last action).
![[5] - Mission 7](https://game.lhg100.com/Article/UploadFiles/201512/2015121413565672.jpg) [5]
[5]![[6] - Mission 7](https://game.lhg100.com/Article/UploadFiles/201512/2015121413565619.jpg) [6]
[6]
When the timer over the minimap counts off last seconds from 10 minutes you've had for defending the main entrance you'll see allied reinforcements driving up to the entrance from south - a halftrack armed with machineguns and an engineer team. Hop in with sappers to the bunker in the main entrance, they will be useful later. [6] Send a halftrack to the left (west) to help paratroopers moving further to the north along the left edge of a map from a captured a moment ago strategic sector. However, you still have to defend the main entrance as before because timer over the minimap started again and counts another few minutes - third of secondary objectives [*3] (defend the main entrance) is still uncompleted.
Meanwhile you should collect some command points - use them as you wish but I suggest to spend them on recon plane (when in air it uncovers all enemy units situated under the flight lane) and transport plane (you can paradrop some additional squads from it). But pay attention that if you want to use these aircrafts (recon, transport or fighter planes) the spot you want them to fly over must be in your operational range - enlarge the last one by seizing next sectors. And take into account that your plane may be shot down by enemy AA guns... [7]
![[7] - Mission 7](https://game.lhg100.com/Article/UploadFiles/201512/2015121413565759.jpg) [7]
[7]![[8] - Mission 7](https://game.lhg100.com/Article/UploadFiles/201512/2015121413565787.jpg) [8]
[8]
Paratroopers moving to the north along the left edge of the screen (supported by a halftrack) will finally reach oxygen tanks [*1] on the right. You should blow them up to complete first of secondary objectives. But first destroy another watchtower, neutralize MG-42 emplacement in front of a bunker and AA gun under the tanks, kill Germans also hiding there. It's best to destroy enemy tank PzKpfw IV hiding behind the bunker from the rear by sneaking along the fence you see on left. Treat him with satchel charges and Panzerschrecks. Your halftrack shouldn't has problems with german but if he has - blow Jerry up with explosives. In the top corner of picture [8] you see one more watchtower sending reinforcements to the battlefield - fire-up your paratroopers and quickly destroy the tower with satchel charge too. Then throw a grenade over the fence to disable another AA gun. Remember to replenish human loses of your squads. [8]
After all you can finally blow up oxygen tanks [*1] to complete secondary objective - place the explosives your paratroopers have (but not throwable, the other ones) by clicking on central icon in orders menu, then under the tanks. Mining will take some time because soldiers place the explosives in several places. When all is done get away for safe distance and initiate the explosion by clicking on the detonator with red text "Detonate me!" you'll see under the oxygen tanks. [9] In the distance on this picture you see also stairs leading to the roof of building complex.
![[9] - Mission 7](https://game.lhg100.com/Article/UploadFiles/201512/2015121413565753.jpg) [9]
[9]![[10] - Mission 7](https://game.lhg100.com/Article/UploadFiles/201512/2015121413565762.jpg) [10]
[10]
And on roof a concrete bunker manned with elite infantry, Knight's Cross holders, and german komandant of this base is situated, protected from outside by MG-42 emplacement. However, don't push your men there because you will lose them rapidly. You can sacrifice one squad at most to blow up this bunker with satchel charges which will provoke german komandant and his escort to escape from this fortification to another (also on roof) but it will be easier for you to kill him (additional mission objective [*]) later. [10]
At the same time (after some minutes counted off by the timer over the minimap) you'll will see at the main entrance latest allied reinforcements - an armoured car Greyhound and medium tanks Sherman. Their arrival will complete last [*3] of secondary objectives - defending of main entrance. [11]
![[11] - Mission 7](https://game.lhg100.com/Article/UploadFiles/201512/2015121413565779.jpg) [11]
[11]![[12] - Mission 7](https://game.lhg100.com/Article/UploadFiles/201512/2015121413565731.jpg) [12]
[12]
Move your fresh reinforcements to the right (west), follow them with engineers taken from a bunker in the main entrance, they'll have repair tasks. Meanwhile paratroopers near the destroyed oxygen tanks can seize munitions sector in the middle of a map and neutralize AA gun and Ostwind Flakpanzer there. When you reach eastern edge of a map with both Shermans destroy single PzKpfw IV tank first and another Ostwind Flakpanzer a moment later. Raze to the ground with tank guns the watchtower, kill all enemy infantry running out from it, destroy another AA gun behind the fence. [12] Seize the munitions point with your soldiers, repair possible damages of your tanks. Afterwards move further, turn left as the road goes.
You'll reach another watchtower and AA gun - destroy both with tanks guns. Now you must be careful - there is a 88mm Flak 36 AA/AT gun (very dangerous for your tanks) on german building complex's roof, right behind the (let's say) ramp. It's best to destroy/capture it by paradropping one squad next to it (on roof). Only when paratroopers have done their job you can move closer with your tanks to support them: kill enemy infantry near the "ramp" but first of all - destroy with both Shermans another AT gun (Pak 38) on the "ramp" and german tank which may appear on the north. [13] Afterwards move left, drive on building complex's roof with your vehicles.
![[13] - Mission 7](https://game.lhg100.com/Article/UploadFiles/201512/2015121413565745.jpg) [13]
[13]![[14] - Mission 7](https://game.lhg100.com/Article/UploadFiles/201512/2015121413565734.jpg) [14]
[14]
On the roof your soldiers should watch out for german snipers hiding on it. Order your tanks to open fire to concrete bunker to the left from a "ramp" containing german komandant of the base (he should be there if you blew up his previous hide-out). He can try to escape with his elite escort once again but this time he should ran out of his luck. By killing him you'll complete additional mission objective [*] awarded with Air Medal. [14]
Afterwards you can ride downhill with your vehicles, paratroopers should clear the roof from rest of german forces (MG-42, two AA guns Flak 38) collecting by the way weapons lying in white circles and seizing strategic point finally. [15] Then you can rejoin them with your vehicles.
![[15] - Mission 7](https://game.lhg100.com/Article/UploadFiles/201512/2015121413565744.jpg) [15]
[15]![[16] - Mission 7](https://game.lhg100.com/Article/UploadFiles/201512/2015121413565706.jpg) [16]
[16]
And these vehicles should drive to the V2 rocket launch assembly [*] which you have to destroy (it's primary goal in this mission as you remember). When driving in this direction destroy every enemy on your way (for example an armoured car), flatten to the ground another (one before last) watchtower with MG-42, kill enemy infantry running out of it. However, before you will pass by the ruins and drive on to the square in front of a launch assembly repair solidly your tanks with engineers. Simultaneously paradrop some squads to the corner of a square, at the west edge of a map, near the destroyed AA gun (you've disabled it earlier during the fight next to the oxygen tanks). They should quickly destroy the last watchtower (one squad with satchel charge) and then AT gun near the last AA gun (second squad). Only afterwards you can drive on the square with your tanks: immediately turn right just behind the gate and quickly finish the last PzKpfw IV tank hiding in the corner - open fire with both Shermans. [16]
Finish rest of Germans on the square and it's time to move right under the rocket. If you see there some more Krauts trying to defend it to the last drop of blood give them a chance to do it - I mean: kill them ( as they wish. [17] Then mine the V2 rocket with your explosives (as you did with oxygen tanks earlier).
![[17] - Mission 7](https://game.lhg100.com/Article/UploadFiles/201512/2015121413565871.jpg) [17]
[17]![[18] - Mission 7](https://game.lhg100.com/Article/UploadFiles/201512/2015121413565814.jpg) [18]
[18]
Get away for safe distance and detonate your bombs to trigger chain reaction - the whole german building complex blows up to the sky in a big and loud explosion and you can report to the HQ about completing primary objective. [18]
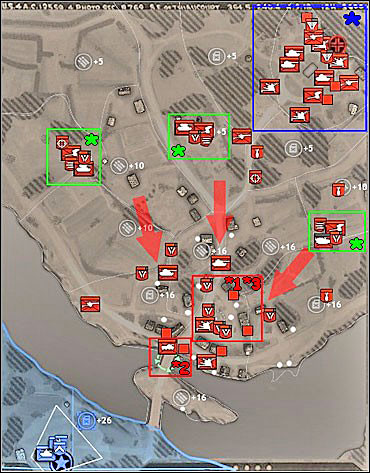
Primary objectives:
Secondary objectives:
Additional objectives:
Note: In this mission you can have hard nut to crack with enemy Nebelwerfers (rocket artillery), they have great explosive power, but firstly - they can be easily destroyed and secondly - if you decide to go from a defence to attack (as I did), they shoot inaccurately, are late with their volleys and do almost nothing to your units quickly pushing forward.
Germans blew up the bridge on the road leading to town of St. Fromond. [1]
![[1] - Mission 8](https://game.lhg100.com/Article/UploadFiles/201512/2015121413565858.jpg) [1]
[1]![[2] - Mission 8](https://game.lhg100.com/Article/UploadFiles/201512/2015121413565845.jpg) [2]
[2]
You've got mortar and engineers sections, rifle squad and a Sherman Caliope tank (with rocket launcher) at the beginning of a mission. Send all these forces to the bridge [*2] sappers need to repair - you start your game with this primary task. Simultaneously recruit one more engineer team in your base - they have to extend the base. [2]
However, don't get to close to the bridge for the moment. Seize the munitions point next to it with your rifle squad, collect some ammo supplies. Caliope tank should shell with his rockets a big building on the other riverbank, use mortar to bombard smaller one to the right: in both houses Krauts installed MG-42s. Try to neutralize both MGs but don't waste too much munitions on rockets, finish Germans with mortar rounds if it's necessary. Caliope tank has also a gun - use it against enemy AA gun located on the opposite riverbank, destroy also an armoured car (one or two) that patrols the area. Only afterwards your engineers can start to repair the bridge - select them and right-click on it. [3] Meanwhile produce some infantry squads in your base, MG team and a sniper can be useful too. Start thinking about some additional tanks too.
![[3] - Mission 8](https://game.lhg100.com/Article/UploadFiles/201512/2015121413565860.jpg) [3]
[3]![[4] - Mission 8](https://game.lhg100.com/Article/UploadFiles/201512/2015121413565861.jpg) [4]
[4]
When engineers repaired the bridge (secondary objective was completed) move across the bridge to the other riverbank with your army. Now you have a mission of seizing and securing the town of St. Fromond [*1]. Destroy with Caliope help another AA gun located near the crossroads, set up your mortar to the left from a bridge and shell with mortar rounds enemy AT gun situated further to the east. Engineer team follows with repair tasks your tank as usual. Capture the buildings on tank's flanks with your infantry. Kill all Jerrys on the square in the town but don't seize for now the strategic point! Place HMG section in one of the houses to cover the square with its fire, you can also hop in to the church tower with your sharpshooter. [4]
During the fight for St. Fromond you'll see probably two enemy tanks PzKpfw IV - you shouldn't have problems to transform them into the smoky wrecks with your Sherman Caliope repairing by engineers all the time and with your infantry armed with sticky bombs. [5] Try to seize neighbouring fuel point next to the church, this should help you to produce your tanks more effectively. You can man AA gun near the crossroads with one of your rifle squads (replenish the manpower of this unit in your base). Start collecting with your soldiers all ammo and fuel supplies you will find in the area (white dots on my map).
![[5] - Mission 8](https://game.lhg100.com/Article/UploadFiles/201512/2015121413565809.jpg) [5]
[5]![[6] - Mission 8](https://game.lhg100.com/Article/UploadFiles/201512/2015121413565920.jpg) [6]
[6]
When the town is free from enemies start organizing there a defence to repel expected german counterattacks coming from directions marked with red, transparent arrows on my map - you will have to face some PzKpfw IV tanks and infantry. But don't seize the strategic point in the middle of a square yet because german attack will then start when you're not prepared! Build MG emplacements with your engineers, you can also mine the roads leading to the town, especially northern and eastern. Try to place your tanks so to protect them from the sides with walls. [6]
However, don't exaggerate with fortifying the town: firstly - you won't stay here too long if you're going to play with my method, secondly - enemy will shell you with rocket artillery and it has a devastating effect, and thirdly - german attacks won't be so strong to build here a real fortress. You can produce some more HMG sections and place them on the edges of city square or paradrop AT gun on that square because you'll earn some commands points early in this mission: spend them on recon and fighter planes and paratroopers. Arm your tanks with better 76mm guns. When you think you're good prepared for the enemy seize the strategic point in city center (on the square) finally and build an observation post on it to complete first of primary objectives (to secure St. Fromond [*1]). When it's done you will receive next task immediately - to defend St. Fromond for 30 minutes [*3] (over the minimap you'll see the timer counting off this time). German tanks will try to rush in to the town (they will usually come individually, one by one) - you shouldn't have problems with destroying them with yours. Keep your engineers close to the Shermans to repair the vehicles when they need it. Follow german tanks drive... trucks - HMGs fire should wreck'em quickly. [7]
![[7] - Mission 8](https://game.lhg100.com/Article/UploadFiles/201512/2015121413565996.jpg) [7]
[7]![[8] - Mission 8](https://game.lhg100.com/Article/UploadFiles/201512/2015121413565916.jpg) [8]
[8]
You'll see remote controlled self-propelled Goliat mines in places where you destroyed the trucks. You can take control over the Goliat by left-clicking on it, right-click to direct it to the spot you want and detonate by clicking on an icon in the Goliat's orders menu. You will acquire several Goliats but don't waste them on blowing up to the hell stupid armoured cars or even enemy tanks, use them against more important targets! Especially that german vehicles usually shoot at them causing preignition... [8]
In the meantime use your recon plane to uncover german units on the map. You should see enemy military base with HQ located in the chateau area to the northeast [*] - it's additional goal of a mission to destroy it, after completing this task you'll be awarded with Bronze Star. [9]
![[9] - Mission 8](https://game.lhg100.com/Article/UploadFiles/201512/2015121413565954.jpg) [9]
[9]![[10] - Mission 8](https://game.lhg100.com/Article/UploadFiles/201512/2015121413565913.jpg) [10]
[10]
You've got also one secondary objective - to neutralize enemy Nebelwerfers (rocket artillery) [*] which will start shelling you in some moment for sure. There should be three Nebelwerfers emplacements on the map (I placed them in green frames on my map). Destroying them it's not so hard as you think, there are several tricks you can use: 1) you can send a fighter plane to kill the crews of Nebelwerfers [10], 2) you can paradrop some paratroopers squads to capture these guns (when planning to use both tricks above remember to seize sectors to increase operational range of your airforce), 3) you can use your sniper to reveal german positions then bombard them with Caliope's rockets, 4) you can direct the Goliat mine to the enemy emplacement and detonate it there. I recommend last two tricks (not only Nebelwerfers will blow up to the sky ;-) but I'll bet you'll try all the tricks ;-)...
And there is one more possibility of successfully walking through this mission (I suggest you to try it) - just leave the town of St. Fromond with your forces, with tanks and infantry (engineers follow the vehicles, rifle squads moves in front of them as a reconnaissance). Seize all sectors on the map one after one, focus on razing to the ground german HQ located in the chateau to the northeast, destroy enemy Nebelerfers emplacements by the way. [11]
![[11] - Mission 8](https://game.lhg100.com/Article/UploadFiles/201512/2015121413565987.jpg) [11]
[11]![[12] - Mission 8](https://game.lhg100.com/Article/UploadFiles/201512/2015121413565985.jpg) [12]
[12]
When you finally arrive at a conclusion it's a wise idea too, seize the building to the north from St. Fromond, near the cemetery (there is Nebelwerfer emplacement). Upgrade that house to the barracks - later you can recruit additional rifle squads in it when necessary or replenish human loses of these you already have and sand your troops to the fight for german base. [12]
Try to drive in to the base from several directions simultaneously, I think that northwest entrance is poorly protected. It's good to produce a Sherman-Crocodile (with flamethrower) earlier. Drive in to the german base through the main gate on the southwest. [13]
![[13] - Mission 8](https://game.lhg100.com/Article/UploadFiles/201512/2015121413565942.jpg) [13][14]
[13][14]
Drive in through the hole on the south too. [14]
Use Calliope's rockets to destroy two german buildings producing enemy units on the right, afterwards move to the chateau you see in the distance and to small house left from it. [15]
![[15] - Mission 8](https://game.lhg100.com/Article/UploadFiles/201512/2015121413565959.jpg) [15]
[15]![[16] - Mission 8](https://game.lhg100.com/Article/UploadFiles/201512/2015121413570069.jpg) [16]
[16]
Burn and destroy all around [16] you but pay attention that if you want to complete additional mission objective (to destroy Axis chateau HQ [*]) you should finish doing this before the timer over the minimap count off these 30 minute you had for defending St. Fromond [*3]! Because mission will end after that time...
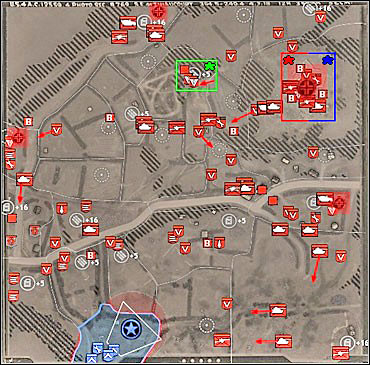
Primary Objectives:
Secondary Objectives:
Additional Objectives:
Note: in this mission you may have some problems with enemy rocket artillery shelling you when coming close to the hill. German remote controlled self-propelled Goliat mines can also be annoying - enemy Pioneers send them and detonate under your tanks. If you want to complete additional objective in the designed time limit don't move with your forces over the whole map, just concentrate on the assault along the left (west) edge of a map first, then turn north-east and capture small german base near the northern (top) edge of a map. Upgrade captured building to the barracks, bombard with all you've got hill 192 first and assault it finally from the north (do some passages in hedgerows with bulldozer if necessary).
Many of american soldiers were killed when trying to capture hill 192 [*]. [1] Now this task belongs to soldiers from Able company, to you. If you manage to do that in 50 minutes you'll be awarded with Soldiers's Medal.
![[1] - Mission 9](https://game.lhg100.com/Article/UploadFiles/201512/2015121413570006.jpg) [1]
[1]![[2] - Mission 9](https://game.lhg100.com/Article/UploadFiles/201512/2015121413570089.jpg) [2]
[2]
Produce two sections of engineers in your base to the south, first of them will have a task of extending the base. Start working on additional infantry squads also, you already have barracks. Send soldiers you have from the beginning north-west, with a task to seize two points: munitions and fuel, but one squad should move east to kill enemy AT gun crew there, near the strategic point. Then capture the gun and strategic point next to it, build OP, repel possible german infantry counterattack (afterwards you can replenish manpower of this squad in the base). Rifle squads (and one engineer team) that moved to the north-west should clear the area from enemy MG-42s and infantry (reinforce your army with riflemen produced in barracks). Neutralize MG emplacements with grenades by sneaking to them from flanks, by dirt roads, covered by hedgerows - don't rush frontally across the fields under any reason! Eliminate two MG-42s near the fuel point (left edge of a map) by attacking them from the roadside - move quickly to avoid spending too much time under the fire of two german snipers shooting from the houses. Seize munitions points, build OPs on them. Burn the bunker located near one of points using the flamethrower of your engineer team. You'll also see enemy PzKpfw IV tank behind the hedgerow - throw some sticky bomb over it if you have enough munitions. [2] You can man captured MG-42s but don't take too many because later you will have no squads to rush enemy positions. Point MGs so to repel possible counterattacks of german infantry. You're dealing with labyrinth of hedgerows so place your MGs just to cover passages in these hedgerows, Krauts can only use them if they want to come to you. When the terrain is secured this way you can run with your infantry squads to the base to replenish their human loses there.
When munitions and fuel sectors north-west are yours you should see some reinforcements arriving south: two Sherman tanks, Caliope (with rocket launcher) and Crocodile (with flamethrower and bulldozer - you can use last device to make additional passages in the hedgerows). I didn't use the bulldozer in my game for simple reason: Krauts can also use these passages made by bulldozer and you must guard them too later. Engineers in your base should build in this time some vehicle factories, especially tank depot. [3]
![[3] - Mission 9](https://game.lhg100.com/Article/UploadFiles/201512/2015121413570091.jpg) [3]
[3]![[4] - Mission 9](https://game.lhg100.com/Article/UploadFiles/201512/2015121413570055.jpg) [4]
[4]
Send Caliope tank along the left edge of a screen to the north (engineer team follows him), eliminate with his help german snipers occupying houses behind the road. Try to destroy also enemy PzKpfw IV tank which may occur in the area, seize with sappers quite good fuel point (+16) next to the buildings on the left. [4]
If heavily damaged Pz IV tank is trying to escape to the strategic sector further to the north (at the left edge of a screen) take a risk of pursuing him with your Sherman and try to finish Jerry - otherwise german Pioneers will repair Pz IV in the twinkling of an eye (game cheats). Repair your vehicle with own engineers following it. Shell with Caliope's rockets german strategic point situated near the road leading to the north. [5]
![[5] - Mission 9](https://game.lhg100.com/Article/UploadFiles/201512/2015121413570084.jpg) [5]
[5]![[6] - Mission 9](https://game.lhg100.com/Article/UploadFiles/201512/2015121413570024.jpg) [6]
[6]
Then you can drive closer and finish the survivors: enemy sniper hiding in a building (this is a small german base sending reinforcements to the battlefield), MG-42 and some infantry. Seize the strategic point, capture the house. Another german bunker is located on the road turning behind the trees - your engineers can sneak to it through the ditch running north-east along the road (the passage leading to the ditch is to the left from german building-base) and burn it. [6]
At the same time rest of your soldiers should seize munitions point (+ 16) not far away by killing the crews of enemy mortar and MG-42 (you can capture first one) and finishing some infantry patrolling around. Remember to get closer with your HMGs to support your assaulting infantry first and to protect the area captured by riflemen later.
Send east your tanks produced in the base (with 1-2 teams of engineers) to seize next fuel point (+16) in the corner of a map - the terrain there is good for vehicles, worse for infantry (poor cover). You will have to face several german tanks PzKpfw IV - wreck them with yours, repair damages of own vehicles with your engineers before you will drive forward. [7] Fuel point in a corner of a map should be protected only by one AT gun Pak 38 - no problem. Build OP on captured point with your sappers - your next tanks should be produced more effectively in effect.
![[7] - Mission 9](https://game.lhg100.com/Article/UploadFiles/201512/2015121413570030.jpg) [7]
[7]![[8] - Mission 9](https://game.lhg100.com/Article/UploadFiles/201512/2015121413570146.jpg) [8]
[8]
Then move from there to the north, in the hill 192 direction, watching out for other enemy tanks and Goliats sending by german Pioneers. [8]
Simultaneously your infantry and a Crocodile tank should conquer centre of a map - burn german MG-42 behind the low wall, bunker in a corner of a hedgerow and a mortar just behind of it (capture this weapon with your soldiers), kill enemy infantry. [9]
![[9] - Mission 9](https://game.lhg100.com/Article/UploadFiles/201512/2015121413570172.jpg) [9]
[9]![[10] - Mission 9](https://game.lhg100.com/Article/UploadFiles/201512/2015121413570117.jpg) [10]
[10]
If you coordinated good your assault you should drive (with a pretty wide front) from south/south-east into the german town situated near the road leading to the east. Burn the Krauts occupying buildings on the crossroads but don't drive on it (stay behind the hedgerow) or you will lose your tank under the fire of very dangerous 88mm AA/AT gun Flak 36 located nearby! Destroy that gun with mortar rounds or kill its crew with your sharpshooter (if you have one in the area) or rush its emplacement with your infantry and throw a grenade into it. You can capture this 88mm gun (it's commendable) because you can see two PzKpfw IV tanks near the building next to the emplacement and two more can occur on the scene driving from nearest strategic point - open fire at them from captured 88mm gun, eventually get closer with another AT gun seized in the beginning of a mission near the strategic point east of your base. [10]
Destroy with your tanks driving from the south enemy vehicles in sight, kill german soldiers with the Crocodile taken from the crossroads when he finished his job there. [11]
![[11] - Mission 9](https://game.lhg100.com/Article/UploadFiles/201512/2015121413570183.jpg) [11]
[11]![[12] - Mission 9](https://game.lhg100.com/Article/UploadFiles/201512/2015121413570134.jpg) [12]
[12]
Later burn also german halftrack (armed with flamethrower as I remember) near a building at the east edge of a map (this is another german small base). Set this house on fire and fry every Jerry trying to escape from it. [12] Seize the fuel point and two strategic ones nearby (to the north), clearing the area with your Crocodile tank. When capturing this closer to the centre of a map watch out for possible infantry counterattacks.
Drive uphill (north) from it, climbing on the hill with artillery tower on it [*] - this tower has a nice field of view and directs the fire of enemy rocket arty. Kill the crew of AT gun first, you can capture it then and point toward the tower. Try to neutralize the tower as quickly as possible - burn this structure or use tank guns and you will complete secondary mission objective. Take care of Germans (infantry and tanks) that may occur on the side. [13]
![[13] - Mission 9](https://game.lhg100.com/Article/UploadFiles/201512/2015121413570115.jpg) [13]
[13]![[14] - Mission 9](https://game.lhg100.com/Article/UploadFiles/201512/2015121413570187.jpg) [14]
[14]
When you finished with the tower turn right with your Crocodile and burn neighbouring bunker. Germans will be probably sending here their forces - some infantry squads, halftracks with flamethrowers and tanks - so it's good to set up some AT gun on the hill near the destroyed tower and turn it toward that direction. Pay attention that this area is also in enemy rocket artillery range directed straightly from the hill 192! [14]
At the same time your tanks should drive left (to the west) from a tower passing it by and turn south-west (driving downhill) to hunt down from sides or rear two PzKpfw IV tanks hiding behind the hedgerow. Destroy also a bunker below, capture with your infantry nearest strategic and munitions points. [15]
![[15] - Mission 9](https://game.lhg100.com/Article/UploadFiles/201512/2015121413570191.jpg) [15][16]
[15][16]
Afterwards move to the north to seize another fuel point and last of small german bases at once. Neutralize with your mortar/sharpshooter/infantry dangerous 88mm Flak 36 gun which has an emplacement near the road. You will get to the rest of Germans (two tanks Pz IV and a halftrack - among other things) by driving the dirt road to the main (they're crossing near the Flak gun position). Probably you can do a passage in the hedgerow to the right (east) from the main road using your Crocodile-bulldozer and take these Germans by a surprise. I think also there is another passage in the northern hedgerow you can sand your infantry through to attack Krauts from the rear. I didn't try last two options - I assaulted Jerrys frontally by the road leading from south-west. Destroy enemy tanks with yours (repairing by your engineers), you can probably use against them neutralized 88mm Flak 36 on the crossroads too. Do the same with a halftrack (even armoured car Greyhound can take him out), kill enemy infantry in a building-base. Then seize fuel point and this house - upgrade it to the barracks: you will send from it rifle squads during your assault on hill 192. [16]
But before you start your final assault on hill 192 it's wise idea to make some reconnaissance, to reveal some german positions on it. You can do that job by sneaking with your camouflaged and shooting only on your command sharpshooter or driving uphill with one of your tanks - scout around, then use your off-map artillery to knock out enemy AT guns and bunkers. Just remember to seize nearby points to increase the range of your arty. Your engineers should also have a possibility to set up some howitzers (if you earned and spent enough command points) - don't hesitate to use this weapon against Germans on hill 192. Sherman Caliope with his rocket launcher is also a good tool of artillery preparation (barrage). Shortly: shell the Krauts on hill 192 with all you've got before you attack them! [17] Especially try to destroy mentioned earlier two AT guns Pak 38 (pointed to the narrow passage south-east; so don't push your tanks that way) and two concrete bunkers.
![[17] - Mission 9](https://game.lhg100.com/Article/UploadFiles/201512/2015121413570164.jpg) [17]
[17]![[18] - Mission 9](https://game.lhg100.com/Article/UploadFiles/201512/2015121413570244.jpg) [18]
[18]
Only then you can move on the hill with infantry and tanks, taking a route from captured a moment ago small german base, along the northern edge of a map, then turn right to attack hill 192 from the north. Try to coordinate your action so to have your forces climbing up the hill just after the artillery barrage, when Germans are pinned down - start moving when artillery is still shelling their positions, but watch out for german rocket artillery barrage! Knock out with your Shermans single PzKpfw IV tank which may occur on the hill, burn with Crocodile bunkers that survived your barrage (especially this one which can pin down your infantry rushing the hill). [18]
After razing the terrain to the ground with your artillery barrage you may find no good cover for your soldiers on that hill so help them with Crocodile tank burning all in sight. [19] All the time watch out for enemy rockets (they will fall down to the last moment probably) and for Goliat mines that may get under your tanks even now - remember to keep the engineers near your tanks.
![[19] - Mission 9](https://game.lhg100.com/Article/UploadFiles/201512/2015121413570281.jpg) [19]
[19]![[20] - Mission 9](https://game.lhg100.com/Article/UploadFiles/201512/2015121413570267.jpg) [20]
[20]
To end this mission as fast as possible (Germans probably send more and more troops from the survived bunker-base) quickly seize the strategic point in the centre with one of rifle squads simultaneously placing your Crocodile tank opposite to the exit from a bunker to burn all Krauts running out from it. [20]
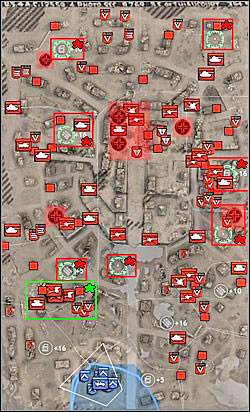
Primary objectives:
[*] Surround the Axis HQ
Secondary objectives:
[*] Destroy Nebelwerfer Battery
Additional objectives:
[*] Promote Rangers (reward: Army Ranger Badge)
Note: you do not have to capture enemy base located near the town hall to the north in this mission, to complete primary objective you must just surround Axis HQ by seizing points (strategic, munitions and fuels) around it. After capturing the last of them mission should end.
Enemy Nebelwerfers barrage only seems dangerous - if you place your soldiers as far as you can from german rocket battery they shouldn't suffer major losses. So send your people to the right to capture nearest points (strategic and fuel). Place one squad in a building near the street and upgrade this house to barracks. [1] Then recruit there two teams of engineers - one will has to extend your base: do that close to the street and german rocket barrage won't make big destructions. Second section of sappers (armed with flamethrower) send to the right (east), to help your riflemen.
![[1] - Mission 10](https://game.lhg100.com/Article/UploadFiles/201512/2015121413570291.jpg) [1]
[1]![[2] - Mission 10](https://game.lhg100.com/Article/UploadFiles/201512/2015121413570265.jpg) [2]
[2]
You can send to the left (to fuel sector +16) only your jeep - try to kill with his help german snipers hiding there in buildings. [2] Leave the Nebelwerfers battery [*] you should destroy (it's secondary objective) alone for the moment, it is well protected by couple of MG-42s and Ostwind Flakpanzer.
On the right burn with flamethrower Germans occupying the buildings, seize the points and build OPs on them. [3] Knock out with your infantry enemy PzKpfw IV tank which may occur on this flank. Secure captured terrain with MG sections produced in your base near the road. Recruit also a mortar team and send it follow the fighting infantry, sharpshooter can also be useful. Because your infantry fights without tank support temporarily, collect with your soldiers all Panzerschrecks you will find to give your people more effective weapons against the armoured targets and to deal with enemy hiding himself in buildings. Move north along the right (east) edge of a map.
![[3] - Mission 10](https://game.lhg100.com/Article/UploadFiles/201512/2015121413570222.jpg) [3]
[3]![[4] - Mission 10](https://game.lhg100.com/Article/UploadFiles/201512/2015121413570262.jpg) [4]
[4]
You should quickly earn some command points - spend them on off-map artillery support. A moment later try this arty on german Nebelwerfers battery destroying it with couple of rounds. [4] If some Nebelwerfers stood in one piece (in my game they didn't) you can probably capture these weapons with rifle squad and use them against the enemy. At this moment you'll see allied reinforcements arriving at your base from the south - two Sherman tanks, one of them with flamethrower (Crocodile) and... an ordinary one (with 75mm gun), jeep and two Rangers squads armed with bazookas. Send these forces to the left (west), capture with them neighbouring fuel and strategic sectors. Link with them an engineer team to repair your vehicles, build OPs on seized points and medic stations on captured terrain. Another mortar section can also be useful. Move with this small army to the north but take a route along the left (west) edge of a screen this time.
At the right edge of the screen eliminate with your sniper and mortar couple guns emplacements (two AT, one AA), destroy with infantry some Ostwid that may occur in the area (I'm not sure if he is arriving off-map by the road leading from the east) and perhaps one more Pz IV tank. Burn using the engineers' flamethrower Germans occupying the buildings or raze the houses to the ground with your mortar barrage. Remember to get closer with your HMGs to support fighting infantry first and then - to secure captured terrain. At that time you can give your riflemen a moment of rest by sending them back to the base to replenish their human loses. Build with your sappers medic stations on captured terrain - medics will pick up allied dead bodies, "resuscitate them" and you'll see after some time a squad of resurrected soldiers near the medic station. Passing by the strategic point (build an OP on it) you will arrive at small german base sending fresh Krauts to the battlefield. Raze it to the ground with your mortar rounds or burn it with engineers help. [5]
![[5] - Mission 10](https://game.lhg100.com/Article/UploadFiles/201512/2015121413570256.jpg) [5]
[5]![[6] - Mission 10](https://game.lhg100.com/Article/UploadFiles/201512/2015121413570320.jpg) [6]
[6]
At the left edge your Sherman tanks and Ranger squads will arrive at another small enemy base, passing by the destroyed Nebelwerfer battery. Neutralize german AT guns nearby with mortar barrage, burn the Krauts hiding in buildings with Crocodile tank, then set on fire enemy base (couple mortar rounds gives similar effect). But first, when you want to get to the enemy base, equip your Crocodile with a bulldozer to make your way through the barbed wires and tank traps. Maybe your engineers can deal with this task better because the street is also mined probably (so equip them with mine detectors first or repair the tank which drove on mines). [6] Watch out for two enemy PzKpfw IV tanks which may occur on the sides - destroy one of them with your Sherman armed with 75mm or better 76mm gun, deal with second using your elite Rangers equipped with bazookas. They must to do something because you must promote them (it's additional mission objective) by causing that at least one ranger squad will acquire three veterans shevrons (combat experience symbol over the unit). And you can do it only by permitting them to participate in the fight. So when these boys take heavy casualties don't be afraid to send them back to the base and replenish human loses there - it's better to withdraw then let the enemy kill them.
At the right edge of a map destroy with your mortar or sharpshooter next enemy AT guns emplacements. [7] The terrain here it's not good for tanks (tightly and narrowly) but if you need'em produce some in the base (with a gun, with flamethrower) and bring there. Behind the AT guns, to the left, on the square behind the building, you'll see probably one more small german base producing enemy reinforcements - destroy it with couple of mortar rounds.
![[7] - Mission 10](https://game.lhg100.com/Article/UploadFiles/201512/2015121413570312.jpg) [7]
[7]![[8] - Mission 10](https://game.lhg100.com/Article/UploadFiles/201512/2015121413570382.jpg) [8]
[8]
Moving along the left edge of a map and fighting with Germans all the time you will finally arrive at another (third) small base - burn it. [8] Afterwards turn right (to the east) and proceed to the strategic point in the upper right corner of the map, killing all enemies in sight.
You will get to the large square near that strategic point - wreck with your Sherman tanks enemy panzers on it. [9] You should have no problems because if you synchronized your moves good you're now attacking the Krauts from both directions.
![[9] - Mission 10](https://game.lhg100.com/Article/UploadFiles/201512/2015121413570356.jpg) [9]
[9]![[10] - Mission 10](https://game.lhg100.com/Article/UploadFiles/201512/2015121413570302.jpg) [10]
[10]
Burn to the ash Germans defending themselves in a building next to the strategic point, then seize that point and build an observation post on it. [10] It should finish this mission if this is the last point you had to capture.
However, I've fought with Germans yet in my game, before I captured that strategic point and surrounded them (which completes primary objective). They've got Ostwind Flakpanzer, two AT and AA guns, tank(s) and some infantry in buildings there, in their main base in the middle of a map, near the town hall. [11]
[11]![[12] - Mission 10](https://game.lhg100.com/Article/UploadFiles/201512/2015121413570329.jpg) [12]
[12]
And now, let me introduce you your next enemy - PzKpfw VI Tiger tanks. But first, in the next mission, you will have to face same or even more dangerous PzKpfw V Panther tanks. [12]
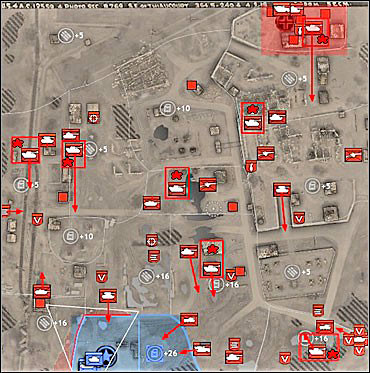
Primary objectives:
Additional objectives:
Note: in this mission you'll be fighting with many german vehicles, especially Panther tanks mentioned in mission objectives, but also PzKpfw IVs and Stug IV assault guns (you won't see heavy Tigers in this mission yet). So you should also put on tanks.
You start the game with base in which you've got tank depot and HQ producing engineers. Click on depot and invent 76mm gun for your tanks. Focus on systematical Sherman tanks production, don't invest in M10 tank destroyers - your Sherman tank with 76mm gun can do the same job. M10s have weak armor, they don't have MGs to deal with enemy infantry (and you'll see some in this mission) and no additional functions/gadgets (for example they can't use smokescreens). Ok, they're cheaper, so what... Create one section of engineers to extend your base, build weapons support depot first (snipers are best for recon purposes in this mission), and barracks later. Your HMGs will be securing the territory captured by tanks. You can place some fortifications in your base also - sandbags, MG emplacements (covering the base from east and north). It's good idea to leave here a tank too - to protect the base. [1] Recruit more sappers and send them follow the tanks driving to the battle - they have to repair vehicles, seize the points and build OPs on them. In the beginning it's best to have one team of engineers behind every tank. Oh, arm your Sherman tanks with MGs on turrets, they're good against the infantry. Capture neighbouring sectors, repel possible german counterattacks on your base - you should know what to do, it's eleventh mission already. Let's focus only on PzKpfw V Panther tanks [*] you must destroy - it's the one and only primary objective in this mission (there is no secondary goal). If you'll play carefully without losing too many of your tanks (I lost only one in my game) you'll be awarded with suitable medal for that act.
[1]![[2] - Mission 11](https://game.lhg100.com/Article/UploadFiles/201512/2015121413570465.jpg) [2]
[2]
There are seven Panther tanks you have to destroy. First of them prepared an ambush on you in the woods east of your base, near the good fuel point: I must to mention now that I have no idea if Panther's locations describing by me are the same each time you play this mission - I played this only one. [2] This german PzKpfw V tank managed to escape from me (but I did it first ;-), driving from the woods when I got closer, and later I didn't find it here, I hunted it down somewhere else (I'll write where).
Second Panther tank hid himself in the building further to the north - he will drive from his ambush when you'll get closer. [3]
![[3] - Mission 11](https://game.lhg100.com/Article/UploadFiles/201512/2015121413570406.jpg) [3]
[3]![[4] - Mission 11](https://game.lhg100.com/Article/UploadFiles/201512/2015121413570414.jpg) [4]
[4]
If you manage to catch him in the trap as you see on picture (enemy vehicle exposes his rear to my Sherman and side to M10 tank destroyer) he's dead as a doornail - minus one Panther. [4]
But not only Panthers like to hide in buildings - one Stug IV also hit on this idea. [5]
![[5] - Mission 11](https://game.lhg100.com/Article/UploadFiles/201512/2015121413570457.jpg) [5]
[5]![[6] - Mission 11](https://game.lhg100.com/Article/UploadFiles/201512/2015121413570403.jpg) [6]
[6]
You should spend your earned command points on the possibility of repairing the vehicles with their crews [6] : next to the minimap you'll see an icon - click on it if you have enough resources (200 of manpower I think) and crews of all your tanks will start repairing their vehicles for some time so you don't have to count on your engineers only.
I hunted down another PzKpfw V Panther tank near the track-way north from my base when he was driving to my base. I wrecked him from the side with my M10 Wolverine tank destroyer hiding behind the building/wall (and repairing by the engineers). Oh, pay attention that Panthers like to move with a company of one or couple PzKpfw IV tanks. [7]
![[7] - Mission 11](https://game.lhg100.com/Article/UploadFiles/201512/2015121413570416.jpg) [7]
[7]![[8] - Mission 11](https://game.lhg100.com/Article/UploadFiles/201512/2015121413570472.jpg) [8]
[8]
Next Panther was killed by me closer to the centre of a map. [8] Remember that enemy tanks usually don't stay in place but drive around, sometimes patrol the cyclical route.
One of Panthers appeared on the railway track, close to the left (west) edge of a map. He had no chances encircled by two my tanks (engineers were repairing the vehicle Jerry aimed at). [9]
![[9] - Mission 11](https://game.lhg100.com/Article/UploadFiles/201512/2015121413570428.jpg) [9]
[9]![[10] - Mission 11](https://game.lhg100.com/Article/UploadFiles/201512/2015121413570489.jpg) [10]
[10]
If the fact of facing so many german tanks besides the Panthers makes you nervous you can do something with that. For example you can send some of your tanks from your base on the south to the north (along the railway tracks), drive to the munitions sector at the northern edge of a map and turn right, on east (this route seems to me safest) and then... drive into the german base and perform some demolition there. Try to destroy what you can, especially tank factories - even one your tank is able to make gigantic devastation, especially if you take care of repairing him with engineers. You should also see another Panther tank in this enemy base. [10] Of course you can see more german vehicles there (until you destroy the factories production still goes at full speed) but you can easily evade them (AI sucks!) hiding behind the buildings and razing last ones to the ground. Oh, and kill as many german Pioneers as you can if they'll come to fix damages - in that way later there will be nobody to repair german tanks escaping from the frontline to the rear.
I hunted down other two Panther tanks in the ruins south of german base. One of them stood closer to the munitions point. [11]
![[11] - Mission 11](https://game.lhg100.com/Article/UploadFiles/201512/2015121413570554.jpg) [11]
[11]![[12] - Mission 11](https://game.lhg100.com/Article/UploadFiles/201512/2015121413570591.jpg) [12]
[12]
Second one was destroyed closer to the fuel point (I think this was the Panther tank which escaped me from the woods in the beginning of a mission). [12]
Remember about the possibility of using smokescreens by your Sherman tanks (suitable icon in the orders menu) - before smoke falls down you can change your position and surprise enemy tank from another spot. [13]
![[13] - Mission 11](https://game.lhg100.com/Article/UploadFiles/201512/2015121413570531.jpg) [13]
[13]![[14] - Mission 11](https://game.lhg100.com/Article/UploadFiles/201512/2015121413570511.jpg) [14]
[14]
A patent of playing hide-and-seek with stupid Jerry also works quite good - it's a good trick against the enemy patrolling cyclical route: hide behind the building, wait until Jerry turn back, then drive out and hit him in the rear armor. When he is turning his turret in your direction quickly drive back behind the house. A moment later repeat the procedure. [14]
You can play the same way when driving follow the enemy: get closer, shoot at his rear, reverse when he's turning the turret, a moment later start pursuing him again - it works best when pursuing slowly moving enemy vehicle (with damaged engine). [15]
![[15] - Mission 11](https://game.lhg100.com/Article/UploadFiles/201512/2015121413570577.jpg) [15]
[15]![[16] - Mission 11](https://game.lhg100.com/Article/UploadFiles/201512/2015121413570519.jpg) [16]
[16]
After eliminating all seven PzKpfw V Panther tanks [*] mission will end successfully. Well, almost - for "good bye" you will see short cutscene showing german Tiger tank killing one of Able Company officers, capt. McKay. [16] Arghhh, I hope we'll take a revenge at last...

Primary objectives:
Secondary objectives:
Additional objectives:
In this mission you have to hold hill 317 [*] for 30 minutes, you can't let it to fall into german hands. [1]
![[1] - Mission 12](https://game.lhg100.com/Article/UploadFiles/201512/2015121413570541.jpg) [1][2]
[1][2]
Previous hill owners left a system of trenches on it. Don't jump into the trenches for the moment but move downhill: create first line of defence under the hill as game suggests (the hill will be your last line of defence, your Alamo - you will withdraw to it when Germans start pushing you stronger). But first, man with your soldiers three AT guns you will find on the hill between the trenches (fourth has a crew already), marked with big white dots on my map, and two HMGs there (small white dots). Hurry up because timer over the minimap starts ticking. [2]
Move downhill with these AT guns and HMGs too, try to place them as you see on my map for example. You can leave one gun on the hill as a reserve but don't roll it to the northern edge of the trenches because that spot will be shelled with german rounds several times before Krauts start their attacks. Try to set up rest of your AT guns perpendicularly to the direction enemy vehicles will come from (you'll see infantry first), to shoot at them from the sides, but this is not always possible. Place some sandbags wherever you can, in front of your HMGs and AT guns, build OPs on points that are closest to expected directions of German assault. [3]
![[3] - Mission 12](https://game.lhg100.com/Article/UploadFiles/201512/2015121413570572.jpg) [3]
[3]![[4] - Mission 12](https://game.lhg100.com/Article/UploadFiles/201512/2015121413570660.jpg) [4]
[4]
At the same time you can sand somebody (an engineer and HMG teams for example) to the abbey [*] on east - one Ranger squad is defending themselves there, besieged by two german squads and MG-42 team. Try to rescue that Ranger patrol by flanking Krauts from behind (from the graveyard) and you will receive suitable medal for your help and these Rangers armed with bazookas will join your forces then. [4] But leave'em there when they're safe (hop in to the building again with'em), capture abandoned MG-42 that left after killed Germans and also leave it there (place behind some low wall) - Krauts will try to recapture the abbey later.
Meanwhile (more or less) you will see first Germans on the road leading from the north - some infantry squads and Pioneers. Withdraw these few Americans that spotted Germans to the HQ, there is no sense to fight with outnumbered enemy. [5] Replenish the manpower of this small unit and use it later.
![[5] - Mission 12](https://game.lhg100.com/Article/UploadFiles/201512/2015121413570625.jpg) [5]
[5]![[6] - Mission 12](https://game.lhg100.com/Article/UploadFiles/201512/2015121413570683.jpg) [6]
[6]
When Jerry starts his assault he shells the hill with his artillery several times (as I mentioned). His target: northern edge of trenches system. [6] You can roll closer (to have an eye on hill's approaches) your AT gun located further to the rear only after these barrages.
Earned command points spend on possibility of placing sandbags with your riflemen first, then - on your own off-map arty support. [7]
![[7] - Mission 12](https://game.lhg100.com/Article/UploadFiles/201512/2015121413570659.jpg) [7]
[7]![[8] - Mission 12](https://game.lhg100.com/Article/UploadFiles/201512/2015121413570637.jpg) [8]
[8]
Eliminate Germans attacking at the same time from several directions (marked with red arrows on my map) with your HMGs and AT guns fire. If you see too many enemies use against them your howitzer located on the hill, don't hesitate also to shell them with your off-map artillery if you already have this possibility. [8]
Krauts assault with few waves: they send infantry first, some motorcycles, snipers and MG-42s later, halftracks Sdkfz 251, armoured cars Sdkfz 234 and PzKpfw IV tanks at last. [9]
![[9] - Mission 12](https://game.lhg100.com/Article/UploadFiles/201512/2015121413570699.jpg) [9]
[9]![[10] - Mission 12](https://game.lhg100.com/Article/UploadFiles/201512/2015121413570613.jpg) [10]
[10]
In some moment during the fight you will receive secondary task - to defend town of Mortain located southern [*] from german attacks. However, to complete this goal one armoured car Greyhound (produced in nearby factory) and an engineer team (repair task) should be enough because Jerrys will attack from west (in time intervals) with rather small forces: two infantry squads first (one of them armed with Panzerschrecks), then a halftrack. Kill them all one by one, starting with soldiers with Panzerschrecks. [10]
In the abbey further to the north (at the left (west) edge of a map), where your rescued and left Rangers Patrol, you'll will see a gunfight too. On the abbey-yard will occur some assault gun Stug IV with company of few soldiers. Your captured MG-42 should cut enemy infantry to the pieces and Rangers armed with bazookas can deal with enemy vehicle. [11]
![[11] - Mission 12](https://game.lhg100.com/Article/UploadFiles/201512/2015121413570618.jpg) [11]
[11]![[12] - Mission 12](https://game.lhg100.com/Article/UploadFiles/201512/2015121413570608.jpg) [12]
[12]
When the enemy starts pushing harder and more and more of allied soldiers fall dead it's time to think about withdrawing to the trenches on the hill 317. Withdraw there what you still can, first of all your AT guns: you can leave HMGs behind to slow down pursuing Germans because you can produce some more later, in your weapons support depot located on the hill. So recruit more HMG sections and also infantry squads in barracks on the hill and place them in the trenches. Kill Germans running and driving uphill with all you've got, don't even hesitate to throw sticky bombs at german vehicles. [12]
Shell enemy infantry climbing up the hill 317 with your howitzer rounds and using off-map artillery. [13]
![[13] - Mission 12](https://game.lhg100.com/Article/UploadFiles/201512/2015121413570688.jpg) [13]
[13]![[14] - Mission 12](https://game.lhg100.com/Article/UploadFiles/201512/2015121413570744.jpg) [14]
[14]
Try to collect with your infantry Panzerschrecks you can see sometimes after killed Germans and use them in your fight against enemy tanks coming from several directions. [14] When timer over the minimap counts off last seconds from 30 minutes you had to defend hill 317 this mission ends successfully.
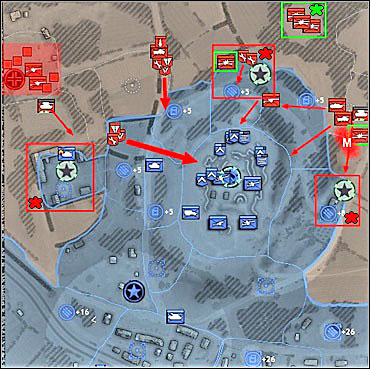
Primary objectives:
Secondary objectives:
Additional objectives:
Note: this a strange mission (other than rest) where so-called Victory Points (marked with stars in white circles on map) are more important than ordinary strategic points - you win when you capture all three [*] with your infantry (you can't build OPs on them). Even if in the beginning of a mission (you start it with forces that survived previous battle on this map) Victory Points are yours, Germans will quickly recapture them and you have to take control over them once again. When fight starts you'll see (at the top of a screen) points/numbers representing the proportion of your forces (number in blue box) and enemy (number in red box). These numbers decrease with a loss of Victory Point and with loses sustained during the fight: when you see "zero" - end of fight/mission. If you want your Silver Star you must win with over than 250 of these points on your account. Don't rely on allied units locations you see on my map - they're in places where they finished previous mission.
On an intro to this mission you'll see allied fighter planes strafing german 88mm Flak 36 AA/AT guns battery. [1]
![[1] - Mission 13](https://game.lhg100.com/Article/UploadFiles/201512/2015121413570738.jpg) [1]
[1]![[2] - Mission 13](https://game.lhg100.com/Article/UploadFiles/201512/2015121413570703.jpg) [2]
[2]
Unfortunately, it seems that the airforce screwed up the job because in a proper game battery still functions and you receive a secondary task of destroying these guns [*]. Besides the battery of 3-4 Flaks 36 on the north Krauts placed also two guns of this kind individually - I'm not sure if you must also destroy them to complete secondary objective but you can disable them with your infantry squads using the grenades (at least this at the right (east) edge of a map) but you must hurry! Area near the last Flak 36 gun is mined so don't push there any vehicle! [2]
Even if you are not able to kill the crews of these single placed Flaks 36 with your infantry, you should have a possibility to bombard them with the help of your howitzer, located on the hill 317. Do the same with Flak 36 battery situated on the north - even if your howitzer has not a range there you can fire your rounds very close. It should be good enough because the dispersion of howitzer rounds is pretty big and few salvos should neutralize german battery. [3]
![[3] - Mission 13](https://game.lhg100.com/Article/UploadFiles/201512/2015121413570731.jpg) [3]
[3]![[4] - Mission 13](https://game.lhg100.com/Article/UploadFiles/201512/2015121413570776.jpg) [4]
[4]
At the start of a mission you'll see allied reinforcements arriving at the town of Mortain - M10 tank destroyer, an ordinary Sherman with 75mm gun, Sherman Crocodile, halftrack and infantry squad. Try to produce couple engineer teams to follow every tank. Send M10 to the east, in the direction of local Victory Point (capture it with sappers): you can use the road or drive up the hill 317 - this tank destroyer will have a task to wreck every german vehicle (Stugs, armoured cars, Ostwinds, etc.) pushing towards the Victory Point or uphill. [4]
Move with ordinary Sherman tank and a halftrack (arm this one with MGs) on the hill 317, its western slope (tank can drive the road) to repel furious attacks of big amount of enemy infantry of all kinds (I marked these Krauts on my map symbolically ;-). [5] As you see Jerry attacks taking same routes as in previous mission.
![[5] - Mission 13](https://game.lhg100.com/Article/UploadFiles/201512/2015121413570763.jpg) [5]
[5]![[6] - Mission 13](https://game.lhg100.com/Article/UploadFiles/201512/2015121413570745.jpg) [6]
[6]
Remember about the possibility of shelling with your howitzer rounds Germans pushing uphill. [6]
Crocodile tank (with a flamethrower) can move to the abbey on the west to capture (with engineers help) and protect local Victory Point - as you remember there are some buildings in the abbey so if Germans will try to seize them, your Crocodile and sappers can burn them to the ash. [7]
![[7] - Mission 13](https://game.lhg100.com/Article/UploadFiles/201512/2015121413570705.jpg) [7]
[7]![[8] - Mission 13](https://game.lhg100.com/Article/UploadFiles/201512/2015121413570850.jpg) [8]
[8]
If you don't see Germans there you can try to drive with this tank to their base located south-west and start demolishing all around: burn tank factories first. [8] You can help yourself with second Sherman tank taken from the hill 317.
You will earn some command points during the game - I suggest to spend them on Armor Company, tanks are powerful force. [9]
![[9] - Mission 13](https://game.lhg100.com/Article/UploadFiles/201512/2015121413570823.jpg) [9]
[9]![[10] - Mission 13](https://game.lhg100.com/Article/UploadFiles/201512/2015121413570849.jpg) [10]
[10]
Try to capture northmost Victory Point with your Sherman tank supported by engineers. [10]
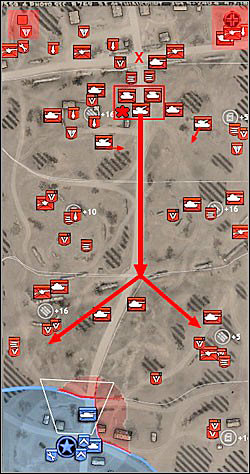
Primary objectives:
[*] Destroy Tiger Ace, capt. Shultz, fighting in PzKpfw VI Tiger tank
Additional objectives:
[*] Destroy 20 Axis Vehicles (reward: Legion of Merit)
Note: in this mission, besides Shultz's Tiger (painted black), you will have to face two other tanks of this type (painted with lighter camo) but they are easier to destroy than Shultz.
Many of allied vehicles were destroyed and many soldiers were killed by Jerry mentioned above. [1] It's time to put an end to his activity and to destroy his hellish Tiger tank with himself inside [*] - it's primary objective. Medal waits for you if you'll manage to destroy 20 other Axis vehicles.
![[1] - Mission 14](https://game.lhg100.com/Article/UploadFiles/201512/2015121413570853.jpg) [1]
[1]![[2] - Mission 14](https://game.lhg100.com/Article/UploadFiles/201512/2015121413570838.jpg) [2]
[2]
Black as Death Shultz's Tiger systematically leaves the northern crossroads X, drives in your direction (south). He has his little escort - two Ostwind Flakpanzers (they can do little damages to your tanks, they're more dangerous for your infantry), sometimes you can see PzKpfw IV tank in this escort too. Shultz takes a route across the middle of a map (along the main road), then he turns left or right (as he wants in a given moment) and attacks your forces (but in my game he never attacked my base on the south). Of course, when you get closer to the north, Tiger with his escort starts turning earlier and attacks your points/sectors captured by you a moment ago. Finally, when you're really close to the german base on the north, dumb Jerry takes position on the crossroads X and stands there as a sheriff - probably he is thinking he's undestroyable... [2]
When game starts arm your Shermans tanks (in tank depot) with better 76mm guns. Arm also Sherman you've got from the beginning with MG on turret and send right (east), together with few rifle squads to seize the fuel point. And this fuel point is poorly protected by two squads of german infantry (one armed with Panzerschrecks) - kill all Krauts by hiding your soldiers behind some low walls, get your engineers close to your tank to repair it if necessary. [3] Capture the point, build OP on it, collect a Panzerschreck that might left after killed Germans. You can send here HMG team to secure achievement - place it in nearby building.
Simultaneously produce one more Sherman tank in your factory in the base and other two sections of sappers in HQ: sappers will have a task of repairing your vehicles, especially Pershing heavy tank standing there all the time - take care of this vehicle, it's your best tank. Work also on AT guns, rifle squads (maybe you can recruit some veterans from previous mission?), etc. However, tanks are most important: unfortunately you can't produce more Pershings as I remember).
[3]![[4] - Mission 14](https://game.lhg100.com/Article/UploadFiles/201512/2015121413570884.jpg) [4]
[4]
You can eliminate Germans near the munitions point (to the north from captured a moment ago) at the right (east) edge of a map by attacking them from both sides of neighbouring hedgerow (move from left with your Pershing heavy tank taken from the base). Remember only to follow the tanks with engineers to repair damages: drive out from behind the hedgerow only a little so sappers doing repairs will stay in cover behind the trees. Use all wrecks you see in the area as a cover when assaulting with your infantry. You can move closer your HMG (also place it behind some wreck) to support your soldiers with suppressive fire. Take out AT gun with your Pershing tank first, then kill enemy infantry and MG-42 section, hunt down PzKpfw IV tank waiting nearby. [4]
Probably you'll see Shultz in his Tiger and with his escort. It's best to fight with him by putting out to him own riflemen or Sherman tank as a decoy and when Shultz starts to fire at them you can get out from the side with your heavy Pershing and hit Jerry from this vulnerable side. Or do it inversely - fight with Shultz frontally with your Pershing cause he's better armoured than the Sherman and can stand more. But pay attention to properly fast withdraw (reverse) your tank playing a decoy to repair him with your engineers. You can play with Tiger's escort (Ostwinds Flakpanzers) with your infantry armed with bazookas and sticky bombs - take cover behind some wrecks with them. After taking some hits Shultz turns back, uses the smokescreen and tries to escape - if you know already that area is relatively safe you can follow him a little with one of your tanks and hit him in the rear one more time (but he's fast ;-). [5] Notice: when placing the cursor over the Shultz's Tiger you'll see over him an info about actual condition of his armor - its decreases with hits taken and when equals zero, you know, "hasta la vista, babe!". Jerry withdraws to the crossroads X and after some time goes on a journey to the south once again (luckily german Pioneers don't repair him meanwhile).
![[5] - Mission 14](https://game.lhg100.com/Article/UploadFiles/201512/2015121413570856.jpg) [5]
[5]![[6] - Mission 14](https://game.lhg100.com/Article/UploadFiles/201512/2015121413570827.jpg) [6]
[6]
If you already produced in your base another Sherman and some infantry you should attack german position to the north (but this time move along the left (west) edge of a map). Kill Germans near the munitions point (+16), watch out for enemy AT gun behind the wall, then collect all Panzerschrecks lying on the ground. [6] Armed with them you can destroy two PzKpfw IV tanks guarding the road running across the centre of a map. Get closer your AT gun (one or two) produced in the base to finish those Panzers.
Afterwards assault Germans occupying the hill further to the north: destroy the tank which could escape there, a mortar and another AT gun (you can flank from left its position with your infantry and toss a grenade into its emplacement). Find cover for your boys behind some low walls, sandbags or wrecks of vehicles. [7]
![[7] - Mission 14](https://game.lhg100.com/Article/UploadFiles/201512/2015121413570913.jpg) [7]
[7]![[8] - Mission 14](https://game.lhg100.com/Article/UploadFiles/201512/2015121413570991.jpg) [8]
[8]
Simultaneously advance along the road in the middle (roll ahead your AT guns) and along the right (east) edge of a map. Next to another munitions point (+16) watch out for enemy AT gun hiding right, behind some wall and two Pz IV near the munitions point. Further to the north (at this edge of a map) you will encounter first Tiger at last, painted with lighter camo - he should welcome you by driving out in your direction. But even your Sherman repaired by engineers and AT guns with infantry armed with Panzerschrecks are able to destroy this heavy german tank. [8]
Just like forces moving along the left (west) edge of a map that will encounter second Tiger tank. Probably in this stage of game you will also destroy 20th Axis vehicle (summary) and additional mission objective granted with suitable medal will be completed. [9]
![[9] - Mission 14](https://game.lhg100.com/Article/UploadFiles/201512/2015121413570999.jpg) [9]
[9]![[10] - Mission 14](https://game.lhg100.com/Article/UploadFiles/201512/2015121413570973.jpg) [10]
[10]
When moving to the north along the left edge of a map you will finally get to some buildings near the crossroads X. Attack those buildings across the middle of a map with your infantry supported by Pershing heavy tank (sappers follow him) and simultaneously flank those houses from left with your medium Sherman driving close to the edge of a map - follow him close with engineers too. Knock out with this tank enemy PzKpfw IV near the building, use infantry grenades to disable quickly two mortar emplacements between the houses. Then you can move closer with your HMG sections and put them to the buildings. [10]
You're closing to the crossroads X Shultz is probably standing on with his black Tiger tank now. Situation looks surely something like this: you're attacking Germans on both flanks with Sherman medium tanks supported by infantry, across the middle (but closer to the edge of a map) you're pushing forward with your heavy tank Pershing (engineers teams follow every tank), across the middle too, but along the road leading to the north, you're rolling closer some AT guns. Now drive from sides on the road running crosswise with both of your Shermans, destroy every german medium tanks in sight first, then AT guns. Later take care of two buildings situated in both corners of a map and sending german reinforcements to the battlefield - raze them to the ground with tank guns fire and your engineers can also make a good use of their flamethrowers because your tanks should be relatively safe and shouldn't need repairs when all enemy AT guns are destroyed. [11]
![[11] - Mission 14](https://game.lhg100.com/Article/UploadFiles/201512/2015121413570950.jpg) [11]
[11]![[12] - Mission 14](https://game.lhg100.com/Article/UploadFiles/201512/2015121413570995.jpg) [12]
[12]
Simultaneously drive through the buildings area near the crossroads X with your Pershing tank, assault with infantry. [12]
Use soldiers' grenades to neutralize german mortars emplacements (and maybe one more AT gun position). Drive out on the road (near some tower) with your Pershing heavy tank but only a little to hide the engineers repairing your vehicle behind that tower. From this position shoot from the side at black Tiger of Shultz standing on the crossroads X - you can use your AT guns pushed closer to the crossroads X to absorb his attention: let him shoot at them when you're perforating his side armor with Pershing tank. [13]
![[13] - Mission 14](https://game.lhg100.com/Article/UploadFiles/201512/2015121413570983.jpg) [13]
[13]![[14] - Mission 14](https://game.lhg100.com/Article/UploadFiles/201512/2015121413570944.jpg) [14]
[14]
Finally Shultz's Tiger is destroyed [*], he's dead = primary objective completed and mission ends successfully. Soldiers from Able Company can now only inspect the wreck of german Tiger tank. [14]
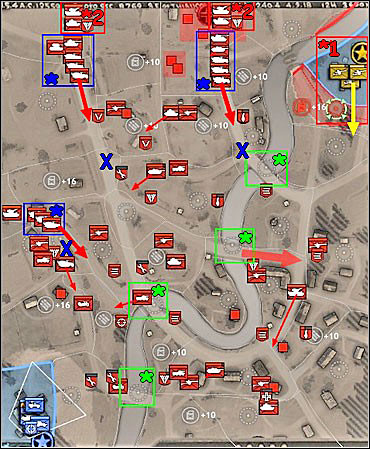
Primary objectives:
Secondary objectives:
Additional objectives:
Note: you will complete additional objective mainly by destroying german motorized convoys [*] (halftracks are often full of infantry), systematically entering off-map from north and west. Krauts move in a hurry by roads and on the crossroads they take one or another route. And if you want to guard the bridges they're driving through you must to guard almost every. So instead of guarding all of them try to ambush Jerrys farther back, on the crossroads I've marked with blue Xs on my map. It's best to use Sherman tanks armed with guns (against the vehicles) and MGs on turrets (against infantry, trucks and light armoured vehicles).
You start your game with a nice developed base - concentrate on producing Sherman tanks (arm them with better 76mm gun) and engineers teams (repair tasks) first. [1] Seize with first of sappers team or infantry squad nearest strategic point, neutralize enemy forces in the area: some Pioneers, motorcycles. Use two available snipers to scout the area and to eliminate the crews of enemy AT guns and MG-42s. You can use your jeep for the first purpose too, however in that case flank enemy AT guns (attack from their dead zones).
![[1] - Mission 15](https://game.lhg100.com/Article/UploadFiles/201512/2015121413571053.jpg) [1]
[1]![[2] - Mission 15](https://game.lhg100.com/Article/UploadFiles/201512/2015121413571020.jpg) [2]
[2]
M10 tank destroyer can hunt down first german motorized convoy coming by the road from west (meanwhile Crocodile tank can burn Germans occupying a building nearby). [2]
Then send your M10 further to the north to eliminate an enemy armoured car next to the building. Burn the crew of first AT gun or throw them a grenade. [3]
![[3] - Mission 15](https://game.lhg100.com/Article/UploadFiles/201512/2015121413571066.jpg) [3]
[3]![[4] - Mission 15](https://game.lhg100.com/Article/UploadFiles/201512/2015121413571003.jpg) [4]
[4]
Kill the crews of two AT guns with your sharpshooters, do the same with MG-42 crew. Destroy enemy tank PzKpfw IV with your M10 tank destroyer or use Sherman armed with 76mm produced in base. You can burn enemy bunkers you will reveal (you can see them on map, they are marked as small, grey squares) with your engineers if you can sneak with them from dead zones. Sappers should also seize all munitions, fuel and strategic points located in captured by you sectors (ignore points situated on bridges for the moment) - don't invest in infantry yet. [4] Your first primary task in this mission is to close the Falaise pocket by linking your own base (blue) located south-west with Canadian (yellow) situated north-east: to do that you should seize all sectors situated between them. I started from conquering of whole left riverbank to acquire sectors/resources needed during the development of an army which had to attack the opposite riverbank and the town situated there across the bridges. Canadians from north-east will move south with intention to capture the terrain (yellow arrow on my map) but they aren't good in what they do so don't count on them specially.
Try to produce three Sherman tanks as fast as you can, arm them with MGs on turrets and place on the crossroads marked with blue Xs on my map to destroy german motorized convoys systematically passing by. Engineers teams follow every tank with repair task. [5] Speaking of german convoys: they have usually some but poor protection/escort - 1) convoys entering off-map from west consist only of trucks and halfracks, 2) convoys coming from north-west direction usually have an escort of one PzKpfw IV tank or Ostwind Flakpanzer, 3) column of vehicles driving from the north is better protected with Stug IV assault gun and even a Panther tank (this convoy moves across the bridge towards the Canadian base and I really don't know what is happening with him later, maybe Canadians are destroying him...).
![[5] - Mission 15](https://game.lhg100.com/Article/UploadFiles/201512/2015121413571000.jpg) [5]
[5]![[6] - Mission 15](https://game.lhg100.com/Article/UploadFiles/201512/2015121413571049.jpg) [6]
[6]
German motorized convoys are nice targets for your airforce too: you should have possibility of using fighter planes armed with MGs and ground attack planes armed with bombs - use them by clicking on suitable icons next to the minimap. You can destroy enemy trucks even with your fighter planes, strafe with bombs columns consist of halftracks. [6]
Simultaneously try to capture the whole left riverbank. You will probably find at last german military base located on the north (two buildings are situated away from others) and sending reinforcements to the battlefield, infantry and tanks. One your Sherman with MG on turret (against the infantry), Crocodile tank (with flamethrower) and accompanying engineers should lay this base in ashes, starting from setting on fire german vehicle depots. [7]
![[7] - Mission 15](https://game.lhg100.com/Article/UploadFiles/201512/2015121413571007.jpg) [7]
[7]![[8] - Mission 15](https://game.lhg100.com/Article/UploadFiles/201512/2015121413571034.jpg) [8]
[8]
Between german and canadian base you see also damaged bridge your sappers can repair. [8] You can use this bridge later (when repaired) to get to opposite riverbank and seize two strategic points and a fuel one lying nearby the Canadian base (however the Canadians should do this earlier). Anyway, you need these two strategic points to close the Falaise pocket.
When left bank of a river is in your hands it's time to move across the bridges to the opposite riverbank and to attack Germans occupying the town south-east. Now you will need your infantry but still take care of your tanks and produce more if you're loosing them. Advance with your medium tanks Shermans equipped with mine flails (lower them earlier) first, because in some places the roads behind the bridges can be mined. Strangle german resistance on southern outskirts of the town. [9]
![[9] - Mission 15](https://game.lhg100.com/Article/UploadFiles/201512/2015121413571195.jpg) [9]
[9]![[10] - Mission 15](https://game.lhg100.com/Article/UploadFiles/201512/2015121413571196.jpg) [10]
[10]
From centre of the town may arrive dangerous PzKpfw VI Tiger - try to ambush him from side and rear with two of your tanks and soon he will be destroyed. [10] Engineers or soldiers squads following your vehicles should seize strategic points located on bridges - when you control all four [*] secondary mission objective is completed.
And when you have all four bridges [*] in your hands and strategic points/sectors situated south from Canadian base are also allied (blue), both bases (yours and Canadians) are linked and first of primary mission objectives (to close the Falaise pocket [*1]) is completed. A moment later you'll receive second task: to defeat Axis counterattack [*2]. On the edges of a map, on roads leading from the north, will appear german tanks: PzKpfw IVs, PzKpfw V Panthers and PzKpfw VI Tigers. You will see one more Tiger on west but he'll be probably destroyed by Canadians moving now all around the map (you'll see them also in your own base). German tanks will drive south - you can try to soften their tough armor with your tanks standing on the crossroads marked with Xs, but take into account that you may lose these vehicles, it's very probable. So, instead of fighting with Germans on left riverbank, withdraw your tanks behind the bridges, to the town on right riverbank and wait for the enemy there. Krauts will try to cross the river using one of the bridges (they still try to escape from the pocket, right?) - in my game they used the bridge situated in the middle of a map (marked with big red arrow on my map). Welcome them suitably by attacking mainly their sides and, if you have an opportunity, also the rear. Don't hesitate to use against them even sticky bombs of your riflemen. [11]
![[11] - Mission 15](https://game.lhg100.com/Article/UploadFiles/201512/2015121413571140.jpg) [11]
[11]![[12] - Mission 15](https://game.lhg100.com/Article/UploadFiles/201512/2015121413571111.jpg) [12]
[12]
Germans can appear in company of infantry - burn these soldiers on the bridges, destroy their hopes of escaping. After knocking out all of enemy tanks mission should finish successfully. [12] Medal of Honor waits for you if you have managed to inflict 300 casualties, mainly by destroying most of convoys [*].
Well, it's time to celebrate end of fight [13],
![[13] - Mission 15](https://game.lhg100.com/Article/UploadFiles/201512/2015121413571100.jpg) [13]
[13]![[14] - Mission 15](https://game.lhg100.com/Article/UploadFiles/201512/2015121413571181.jpg) [14]
[14]
end of the whole game "Company of Heroes" ;-P. Enjoy also your award granted by High Command for this unusual achievement. [14]

 Call of Duty 3 Game Guide & Walkthrough
 Call of Juarez: Bound in Blood Game Guide & Walkthrough
 Castlevania: Lords of Shadow 2 Game Guide & Walkthrough
 Call of Juarez: Gunslinger Game Guide & Walkthrough
 Call of Duty 2 Game Guide & Walkthrough