As soon as you start the game, you’ll witness a short scene in which the Great Deku Tree talks briefly about the forest children, known as the Kokiri, and explains his role in things. He then mentions the lone boy in the village who does not have a fairy, then we witness his nightmare…
Our hero, Link, is standing next to a drawbridge that is lowered. A white horse gallops out with a woman in a cowl and a little girl atop it. She looks so sad… =( Link then realizes an evil looking man is there on a black stallion. The man raises and hand towards Link and-GASP! That’s the end… What could it mean?
After witnessing the rather confusing nightmare (for now) you’ll then see the Deku Tree summoning one of the many fairies of the forest to go find a particular boy who will change the destiny of Hyrule forever – why, of course…
For a moment, we see through her eyes: a quick fly over the village shows you all the sights before Navi finally figures out where our hero resides. Inside, she yells at him very annoyingly (oh, don’t worry, it only gets worse) until he wakes up.
After the long movie and introduction of your obnoxious companion, we finally gain control of our hero. Move around using the Analog Stick (obviously) and make your way for the door on the other side of the pixilated room. Outside, you will see you’re childhood friend, Saria, who runs up and calls to you.
Climb down and talk to her if you wish. She simply expresses her excitement over your new fairy and urges you to continue on to see the Great Deku Tree.
A quick glance at your map reveals where you need to go. Heading to the opposite side of the village and jumping across the water reveals a slight problem. A particular Kokiri by the name of Mido is blocking the path. He considers himself a rival for Saria’s affection and is particularly put out that you’ve suddenly become favorites of the Deku Tree as well. He makes an excuse by saying he won’t let you past until you get a Sword and Shield.
Before we can continue with the game, we have to get both those items, which forces you to learn some of the basic controls of the game (good thing I suppose). We need a total of 40 Rupees (the currency in this game) in order to purchase the shield from the shop, so I suggest getting the sword first because it will make the gathering process.
~ Getting The Kokiri Sword ~
The sword is a little tricky to find. There’s a small fenced in area called the Forest Training Center, which is in the southwestern area of the village (bottom left on your map). Head up there and you’ll find a small hole in the wall next to a sign. Step up to the hole and press A to crawl in, then just hold forward until you pop out on the other side.
In this area, round the corner and gather the Blue Rupee (5), then turn around and wait for the giant boulder to pass. Quickly follow it and take the first right to find another Blue Rupee (5). Wait for the boulder again if you like or continue on if you’re quick enough. The next alcove holds a giant chest with the treasure.
To equip it, press Start and use Z and R (or left and right a bunch) until you get to the Equipment Screen, then select the sword and press A. Ahh, so much better. Work your way back to the hole and crawl back through.
Back outside in the Forest Training Center, you can check out the signs and talk to the dude with the ninja moves to learn how to use the sword. Z target a rock and try it out if you like.
Z-Target Sword Training:
~ Getting The Deku Shield ~
In order to get the shield, we’ll need 40 Rupees. It’s very easy to accumulate that much, this village is full of little secret spots, and a lot of them can be gotten repeatedly by simply entering a building and coming back out again…
9 Easy Ways To Make Money:
First of all, I suggest getting the Blue Rupee behind Mido’s House (5), then go inside and open all the chests (12), back outside, jump along the square platforms leading to the shop (5), then along the islands to the right, without falling in the water (5), enter the house here and throw the pots (6). That gives you at least 33 Rupees, getting the rest should be a piece of cake.
Head over to the Shop (northeast building). Upon approaching, a girl sitting above the doorway tells you to Z target her and talk to her with A. Nice to know you can do that. Enter the building.
Inside, talk to the shopkeeper and ignore all the other items, since we can’t use most of them and the others are free (you’ll see in a bit). Buy the Deku Shield for 40 Rupees. Equip it just like you did the Sword.
~ Seeing The Tree ~
Once you get both of the required items, make sure you have them both equipped before speaking with Mido. After downright insulting you, he lets you pass reluctantly.
Head on through. Near the end of the path, three enemies pop up, the first you’ll meet in the game. These things are pathetic, they don’t even move or attack. Simply slash them to bits and collect the Deku Sticks they drop.
At long last, head forward and talk to the Great Deku Tree. He explains that the nightmares you’ve experienced are because of the evil descending upon Hyrule. He goes on to say that he’s been cursed and that you can break this curse if you’re willing. When he’s done talking, say yes and and enter his mouth.
~ Getting The Fairy Slingshot ~
Main Room
As soon as you enter, you’ll immediately encounter another new enemy: the regular version of the Deku Baba. These things can be pretty nasty. It’s a good opportunity for you to test out your Z targeting + shield techniques. You’ll probably get a few Deku Nuts in the process. Open your Start Screen and put Deku Sticks and Deku Nuts on two of your C buttons. And if you got hurt at all by the Babas, you can slash the nearby weeds (they grow back) cause they have a chance to drop Recovery Hearts.
Make note of the web on the floor, which we can’t do anything with yet. Now it’s time to ascend the wooden tower: you can start by either climbing the ladder or heading over to the vines, which will cause Navi to rant and rave about their climbable nature. Once you get up there, work your way clockwise around the area. You’ll come to some more vines with spiders on them. Ignore them and open the large chest to find the Dungeon Map. There’s one of these in each dungeon, showing you what all of the rooms look like (Nice thing to have really).
Continue right, jumping across to the last platform and approach the door. After Navi’s done explaining, press A to go through.
First Deku Scrub Room You’ll meet another new enemy here: a Deku Scrub. You’ll have to stay back to keep it from burrowing. Simply Z target it and use your shield to reflect its shot back at it. Quickly hunt it down before it can get back in its nest-thing. Go smack it with your- hey! It gives you a clue instead. When you fall really far, hold the analog stick in the direction you’re facing to roll. Nice. It’ll leave behind some Recovery Hearts and the next door will open.
Slingshot Room Here, jump on the platform (which begins to crumble) and to the next platform (or climb up the vines if you fell). Open the large chest to find the dungeon’s treasure: the Fairy Slingshot. Are you ready to fling some fairies? In any case, this puppy uses Deku Seeds for ammo, which you will now find when you slash bushes, etc.
If you need some hearts, climb up the nearby vines to a hidden alcove where a small chest contains a Recovery Heart. When you’re ready to go, look back at the entry door. The platform we used to get here broke, so we’ll have to improvise. There’s a suspicious looking ladder directly above the door that you can Z target. (Do so and) shoot it with your new Slingshot, causing the ladder to fall down (fits like a glove). Head back to the main room.
~ Getting The Compass ~
Main Room Go back right (to where you got the Dungeon Map) and shoot the Skullwalltulas. If you don’t get them, they will attack you when you climb the vines and potentially knock you off. Climb the vines and get to the very top, then go either left or right. Once you’ve gone a pretty good distance, press A to drop down onto the platform. This is the highest level of the room.
Follow the obvious path (but watch out for the shadows!). Another new enemy will appear: a Big Skulltula. These nasty things are a little frustrating in that you can only attack their backside. They only attack you if you get close though, so you can get close enough to make them come down, then simply wait for them to show their vulnerable side (why would they do that anyway?!). Go through the door up here.
Platform/Compass Room Step on the switch in this room to make the three platforms in the floor rise temporarily. Jump along them to the opposite side of the room and open the large chest to find the Compass. There’s one of these in each dungeon as well – they show where you are on the map, which door you came from, where the chests and elevators are as well as the boss of the dungeon.
Jump down and kill the Big Skulltula on the right, then the Deku Baba in front of the vines. Once they’re both dead, climb back up the vines, then step on the switch again and use the platforms to get to the left alcove this time. The small chest contains a Recovery Heart, but of more interest, there’s a Gold Skulltula directly behind it. Kill it and touch the token to collect it. There’s 100 of these spiders throughout the world of Hyrule, and by collecting all of the tokens, you can get prizes in one of the villages.
Jump down and climb back up the vines. The door we originally came from has bars in front of it… In order to make them go away, we have to solve the puzzle. There’s two torches here, one of which is unlit. Whip out a Deku Stick with a C button and go walk by the torch so that your end gets lit. It’ll only last for a bit, so run over to the other torch and walk next to it so the end lights it. After the door opens, slash your sword to conserve your stick (otherwise it’ll burn up).
~ Breaking The Web ~
Main Room Go back out to that upper area with all the Big Skulltulas and kill one of them. After it’s gone, if you look over the edge, you’ll see the web is directly in the middle. The game isn’t very clear at this point, but you’re supposed to jump for the center of that web. If you are a little on the edge, it’ll just bounce up and down like a trampoline, cushioning your fall (climb back up if you do miss). Once you manage it, you’ll fall down into a cavern partially filled with water.
~ A Few More Tricks ~
Main Room (Low) There’s two Gold Skulltulas in this room. The first is on the vines leading back up to the previous room. Simply shoot it with your Slingshot and climb up to get the token. The second is on the grating near the switch. Shoot this one too, (it’s hard to Jump Attack it without getting hurt) and jump from the nearby platform to get the token.
Climb up on the nearby platform and step on the switch. This lights a nearby torch that burns the cobwebs that were covering it (HINT HINT). Light a Deku Stick and jump into the highest part of the water, then run to the opposite platform. If you’re fast enough, you can make it to the door that’s covered in the cobwebs and burn them up. Nice.
Second Deku Scrub Room Use your shield to reflect its attack, just like the last one. Chase it down and it’ll give you another hint. Once he runs off, slash the nearby bushes for Deku Seeds if you were low. Now, to open the next door, we have to shoot the silver eye switch above it with the Slingshot. Go on through.
Spiked Log & Water Room
 As soon as you enter, Navi will exclaim that you can dive in the water with A. Jump in the water and swim to the left side of the room where you’ll find an underwater switch. Get above it, hold down A and use the Analog Stick to maneuver towards it. This will cause the water to lower temporarily. Quickly swim back to the first platform and climb up the ramp. Wait for the little platform in the water to come to this side, jump on, and easily ride under the log of death.
Jump up on the other side once you get there, then go kill the Big Skulltula (this one should be easy). After he’s gone, get on either the left or right side the stone block. Navi will excited tell you about pushing and pulling blocks. Great. Once positioned, hold down A and push/pull it until it’s under the doorway. Get on the middle side, walk into it and press A to climb up. Get up and enter the door.
Torch Room In this room, kill the Deku Baba and Withered Deku Baba and collect the goodies they drop. There’s two unlit torches and one lit one; I think you know what to do. Once they’re both lit, go through the open door.
Larva Room
 As soon as you enter, hang back and Z target the Big Skulltula straight ahead. From this far back, he doesn’t come down and his back is to you! Shoot him with your Slingshot twice to kill him before you even enter the room >=D.
Go on forward and watch out for the three shadows that are in the center. Stepping near them causes the eggs to fall from the ceiling, which immediately hatch into a new enemy: Gohma Larva. These things are only a pain in groups, simply Z target one, get close and slash away.
There’s two cobwebs in this room, but we can only go through the far one for now. Whip out a Deku Stick and light it on the nearby torch, then run it all the way to the farthest cobweb. After it burns up, slash your sword to conserve the stick and crawl through the hole.
~ Getting To The Boss Room ~
Main Room (Low)
 Back in the lowest part of the main room, we’re now on the upper level of it. Kill the Deku Babas if you like, then push the nearby stone block off the edge so we have a major shortcut! Nice. This last cobweb in the floor we can’t just jump through like we did the last one, so we’ll have to burn it. The two torches up here are too high up for us (jerks) but the one we used earlier when we burned our very first cobweb is low enough…
Jump down near your new stone shortcut and light a Deku Stick. Quickly jump back up and get to the cobweb. At this point, you can either roll with A or swipe with it by pressing the C button again. Either way, the cobweb will burn, revealing the deepest part of the dungeon.
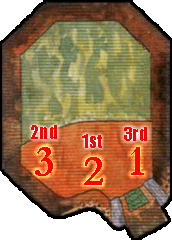 In this final area of the dungeon, we can dive for Recovery Hearts if necessary. Get up on land and reflect the Deku Nuts back at the Deku Scrubs. Each one you hit will get trapped in some kind of blue webbing, but if you stun them in the wrong order, then you’ll have to start all over again…
If you remember from earlier, one of the Deku Scrubs we tackled gave you a clue for this exact puzzle. 2, 3, 1. Get the middle one first, then the right, and finally the left.
Go snag him before he leaves, this one gives you another clue, this time about the boss in the next room. Snag some hearts if you need them, then enter the boss door.
Parasitic Armored Arachnid, Queen Gohma
At the start of the battle, use either C-up or your Slingshot to look up at the queen on the ceiling, which will begin the battle. Although she looks pretty intimidating, she’s a piece of cake.
Her main attack is to wobble towards you and then try to basically fall on top of you, which can be easily defended against using your shield or simply moving out of the way. Her other form of offense is to climb onto the ceiling and make three eggs, which will fall to the ground and hatch to become Gohma Larva after a short bit.
The Larva are easily defeated with two sword swipes or a Jump Attack, but they can be killed quickly by simply slashing each egg before they hatch.
3 Ways To Stun Her
To harm Gohma, you have to use either Deku Nuts or your Slingshot when her eye is red (right before or after either of her “attacks”). This will cause her to fall down and be vulnerable to your sword. The Slingshot is by far the most effective. Regardless which way you do it, once she’s stunned, smack the heck out of her for as long as you can.
The easiest way to defeat her is to simply wait for her to climb on the ceiling and stun her then (this stun is far longer). If you do it right, you can finish this boss off in less than a minute.
After the cool scene of her disintegrating, snag the Heart Container left in her remains, then step into the shiny light to teleport out of the dungeon. Congratulations!


 Super Mario 3D World – Power-Ups, Items, and Suits Guide
 Guide: 9 Tips for Playing Runbow
 Splatoon – Boss Guide
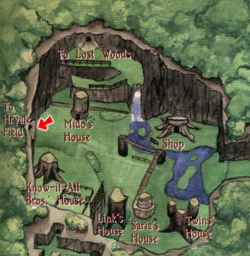 Ocarina of Time Walkthrough – Princess of Destiny –
  Watch Dogs - Burner Phones Guide