

After several weeks cleaning up Gotham, we've picked up a few things that we'll be carrying into our second run-through in our Game +. As there's very little in the way of handholding from Rocksteady, it's worth having a few pointers before going on patrol (we only twigged you could do Tip 12 on cars late on in the game). Note there's no spoilers in the tips ahead (other than what you've access to come the story's endgame in Tip 19).
1. Pick a fight
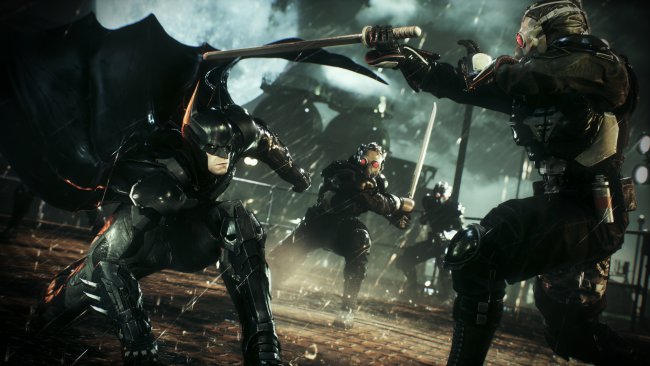
Even if you're a seasoned Arkham player, relearning your standard combat moves will take time, as Rocksteady offer zero tutorial. Your default move set is listed in a sub-menu, which is not entirely helpful. It'll be rough going for the first few hours of the story, so as soon as you can, hit the streets, pick a fight with some standard thugs and relearn the basics. You'll get creamed by the higher level squads later on otherwise.
2. War of Attrition
The openness of the sandbox can be counterproductive. Just because you see a potential threat doesn't mean you're fit to engage it. Some guard posts are protected by massive sentry guns that'll rip you to shreds in seconds, and discovering kidnapped firefighters by accident can land you in a brawl that'll kick your ass. If you haven't a gadget to counter a specific danger yet (such as disrupting taser sticks or guns, or overriding sentry bots) in a side-mission, you're best to return later.
3. Upgrade the Glide
Centre the camera on any ledge and you'll a contextual pop-up that means you can use the Batclaw, either to winch yourself to that ledge or use it as a launching platform to catapult you into the night's sky. The gadget can be upgraded multiple times to speed up the repel, with each upgrade adding an additional boost charge and flinging you even higher. As you'll spend a lot of time criss-crossing the trio of islands it's worth upgrading this as early as possible.
4. Side-Missions
Your ‘main' story arc is the top icon of your mission wheel (press right on the D-Pad), with side missions appearing around the rest of its circumference. At the game's start there'll be a handful of these, but others will unlock once certain story points are met or locations are discovered. Use the analog stick to select any and set as your main objective. Its direction will be marked on the compass at the top of your game screen, and a handy Bat signal will be beamed onto the clouds above Gotham, directly over the mission's location. Unless you're right in the middle of a story objective, you can break off your activity and go do something else. Handy if you're getting frustrated or don't have the tech to complete what you're investigating.
5. Mapping Gotham (Part 1)
Guard posts, watch towers, aerial drones and mines pepper the three islands that make up the sandbox world this time round. Their locations are added to your map if you spot them, are nearby enough to hear guards' radio chatter (for towers and outposts) or get intel on their position via semi-regular updates from Alfred (their mission icon will pulse and ‘intel' will pop up on screen).
Watch towers and aerial drones are fairly easy to spot if you get to a high vantage point; look for the tell-tale red search beams that emanate from both. Mines are buried into Gotham's streets, giving off a high-pitched beep and a flashing red light. It's best to search for these behind the wheel of the Batmobile.
6. Mapping Gotham (Part 2)
Alongside enemy occupation, there are two other multi-part missions the locations of which rely on either visual confirmation or intel.
Kidnapped firefighters are being held in secret around the sandbox (note: we found a fair few on the edges of the islands). On discovery, you'll face a large group of thugs that'll lead to a straight fight or some Invisible Predator moments.
The other mission requires your detective skills. A number of multitude bodies are ceremonially displayed on rooftops around Gotham, with their killer leaving an audio calling card. Keep an ear out for opera music blasting from speakers as you explore the city. Even when near it's hard to pinpoint the gruesome display's exact location, so stick to gliding to track them down (you'll hear nothing over the roar of the Batmobile's engine).
7. Medical Assistance
Forget brutes, swordsmen, or electro-stick carrying goons. Medics are the biggest threat of the enemy's army, able to resuscitate knocked-out comrades if given the chance. Later gadget tech can disrupt their equipment and fry the healers on use, but to begin, work out how to get to them first before engaging anyone else.
8. Hammering the Heavies
Also cause of headaches are the hulking Brutes (our name for ‘em). They'll block any straight strike, so you need to dizzy them first with a cape swipe, then deliver a pounding.
It takes upwards of 15 hits to knock them out, so your best strategy is first clear a crowd of everybody but Brutes and weaponless thugs. You can still counter other attacks mid-beat-down and if you're quick have enough time to continue the chain. So start a beat-down combo, only counter any incoming strike, and continue. If Brutes carry blades or tasers, use the disruptor (when you unlock it) to stagger them first. If you've two weapon-carrying Brutes in a group, knock out everyone else first before tackling them.
9. Rig the Bodies
A cool trick. Do a silent takedown, then spray explosive gel by the body. When squads come to check on their comrade, you can trigger an explosion and take out a few extra threats in one go. Note: certain soldier types can spot the gel and disarm it.
10. Drones and Invisibles
Explained in-game via a specific situation, but worth repeating. Use your remote hacking device on drone operators to get the operational codes for their mechanical buddies, then turn the mechanical buzzards on their own squads.
You'l encounter soldiers whose equipment hides them from your Detective mode. You can eventually disrupt this with a later gadget upgrade, but to start, keep out an eye for their radio chatter - that icon still appears in Detective mode, giving you a rough approximation to their location.
11. Batclaw Swipe
Cooler gadgets are to come, but you can't beat the reliability and ease of use in the Batclaw during combat. Tap trigger and top face button to fire it at an enemy and yank them towards you, and follow up with a clothesline to get them hitting the dirt.
12. Smarts
There is a heavier emphasis on combat in Arkham Knight, but that doesn't mean you can't bring your smarts; the old joke about Batman being unbeatable with enough prep time rings semi-true here. The odds will shift in your favour if you scout before you alert enemies to your presence. It means you can cook up strategies, work out routes through rooms (the Arkham Knight will tell his troops to rig ledges or seal grates if you start favouring high or low attacks) and which enemies to take out first (see Medical Assistance, Hammering the Heavies).
13. It's the Car
Certain heavily-armed guard posts offer seemingly impossible odds. Scout out the area: there are either well hidden gate controls you can remotely access to open the doors and call in the Batmobile (always remember you can control it remotely - some situations demand its use), or gates you can use the tank's winch on to pull apart.
14. It's the Car (Part 2)
Sticking to the streets on foot isn't advisable due to high enemy count and cars targeting you (plus why run when you can glide or drive?). However, if you do get into a brawl and you're on a road, tap the shoulder button to call in the Batmobile, which'll power slide into your attackers, frying them with an electrical charge.
15. It's the Car (Part 3)
You'll earn multi-missile barrages, EMP strikes and Drone Hacks as the Batmobile's arsenal unlocks. Each needs to be charged through successful attacks on Drones before becoming activated for use. Favour Drone Hacks, and use them on Drones that are on the edge of the battlefield: they'll turn into the first line of defence against any newly arriving attackers and give you some breathing room.
16. Surfing vehicles
You can jump on top of certain vehicles in the game. It's the only way to destroy aerial drones (and other things) or just feel like a badass taking out cars. Simply glide above either then get close to see an on-screen prompt to make the transfer. With drones you'll spray some explosive gel then automatically leap off - pan the camera to get the drone in your eye line and click the stick to set off the explosion. With cars, you'll initiate a cool cinematic before gliding off again.
17. Counter cars
Yes, not only can you block punches, but Batman's so badass he can counter cars in the game. Walk the streets and some criminals will take a chance to run you over in their car. As their rides' about to hit you'll notice a quick flash of the counter icon. Make the prompt and you'll flip over the roof, drop some explosive gel and explode the vehicle in one smooth cinematic.
18. Upgrades
As you finish missions and defeat enemies, you'll earn upgrade points. These can be spent across a number of different categories: Batsuit, Batmobile, bat-tech etc. Now, if you're like us and your combat skills are very rusty, we'd recommend strengthening your suit's resistance to melee attacks (more health ergo more hits can be taken). If you're favouring the tactical when encountering enemies, then take a look at your gadget tech, which when upgraded can negate a lot of Arkham Knight's newer threats (drones, Medics, Detective mode scramblers). if you've still a pro in taking the fight head-on, then kit out your Combat and pre-fight gadget attacks, letting you fire gadgets while you're gliding towards a brawl, incapacitating some enemies before you've even thrown a punch.
19. Riddler Challenges
Riddler Challenges and Trophies infest all three islands. They can be marked on the map either through line of sight (remember to tap up on the D-Pad when looking directly at them to add their location) or by interrogating Riddler informants wandering the streets, who are marked as default in a green hue. They'll usually part of a bigger group - knock out the rest first to be able to initiate an interrogation (though some will refuse to give up info).
Some Challenges require gadget unlocks or upgrades from later in the game to complete. There\ll be those you'll need the Batmobile for (shooting Arkham Knight crests, destroying walls, using the winch to uncover hidden doors). In certain areas you'll note a glowing green square on a wall. These are a sub-set of Challenges that require you to fire off the Batmobile's sonar pulse (up on the D-Pad) to reveal a breadcrumb trail of glowing question marks, more of which you'll need to uncover with another sonar ping as the trial goes cold. Note these marks can go up buildings and along ceilings: keep your eyes peeled. They'll lead to another glowing green square than when shot with the Batmobile's cannon, reveal a hidden room with a Riddler Trophy inside.
And as before, you'll be able to return to Gotham's streets after the ‘main' story is over to hoover up the outstanding side-missions and Riddler challenges.
Read our Batman: Arkham Knight review here.


 Batman: Arkham Origins – Costume / Skin Guide
 Darksiders II Guide: Locations of the Book of the Dead Pages
 Fallout 4 Trailer Breakdown: 13 Things You Need To Know
 Oracle of Seasons Walkthrough – Sword and Shield Maze –
  Ocarina of Time Walkthrough – Fire Temple –