Now that the Forest Temple is done, if you head back to the Temple of Time, Sheik will move out of the way and allow you to approach the Pedestal of Time, which she explains will allow you to put the Master Sword back and return to the past if you need to. This will be important later.
She’ll then teach you the Prelude of Light, one of the most useful songs in the game. It teleports you to the Temple of Time, which is near the center of Hyrule, making it a good hub for all your adventures.
After she leaves, you can go back to the past anytime you want. If you’ve been following the walkthrough, you should have just about everything you can get so far.
~ Beans ~ Now that we can go back, you can plant Magic Beans in any soft soil locations you missed. If you haven’t returned to the Magic Bean Salesman to take all his stock, now’s a good time to do so because you’re probably completely full on Rupees. If you’ve been following the walkthrough thus far, you probably already have the following beans planted. If not, now’s a good time to do it.
1. At the entrance to Dodongo’s Cavern on Death Mountain Trail. 2. Next to the Lakeside Laboratory in Lake Hylia.
~ Scarecrow’s Song ~
If you didn’t get this earlier, now’s a good time. In Lake Hylia, there’s two Scarecrow’s between the Lakeside Laboratory and the Fishing Pond. If you play your Ocarina for the one on the lower tier, you can make your own song. Make sure it’s something you’ll remember.
Next, come back here in the future and talk to the lower Scarecrow again. There are certain points in the game where Navi will fly to the middle of nowhere and turn green. These places you can either play the Song of Time to make a Time Block appear, or the Scarecrow’s Song to make Pierre (the other Scarecrow) appear so you can Hookshot to him.
~ Skulltula Rewards ~
If you’ve been following the walkthrough thus far, you should have 53 Skulltula Tokens collected. That means that all of the cursed children in the Skulltula House in Kakariko Village are cured. The prize for the fourth child is Bombachus, which we won’t even need for a long while. The fifth prize is a Heart Piece!
The father of the children takes all 100 Skulltulas to cure, and his prize is merely infinite Rupees, which doesn’t matter that late in the game. Lame. For the sake of the walkthrough and you compulsive fanatics out there, I will be getting them all. The things I do for you… *sigh*
~ Getting The Big Quiver ~
The construction that was going on in Kakariko from before is now finished, and the new building is the Shooting Gallery. It’s just like the one in Hyrule Town before.
Shooting Gallery
This mini-game is very simple. Rupees appear and you try to shoot them before they disappear. Green Rupees come from the middle, Blue Rupees on either side, and Red Rupees come two at a time from either direction. It’s always the same, only the order is different each time you play. Really, you only have to move when the Blue ones appear, the rest of the time, just aim towards the middle and time your B button well.
As long as you get most of them, the owner will let you play again for free. You can quite easily keep up this cycle until you get the prize.
It’s pretty easy really. When you’ve finally got the Big Quiver, we can finally head towards Death Mountain.
~ Dodongo’s Cavern Again ~
Our next goal is to head back to Goron City. Along the way though, we might as well get some goodies that are now available to us.
At the entrance to Dodongo’s Cavern, if you planted a Magic Bean in the soft patch of soil like I told you to, you can ride the plant up to the ledge and jump off to get a Heart Piece! Now enter the cavern.
There’s two Skulltula Tokens we can get here. The first one is a tad tricky. Take that small platform on the right that goes up to the second floor, then go through the passage way.
From here, jump down into the lower area and climb up the ladder on your right. Go across the bridge and into the next room with two Fire Keese and some Armos. Try not to wake up the latter, kill the Keese, pull the statue away from the ladder and step on the switch to open both doors. Go through the one on the left.
Our goal in this room is to get to that small alcove up high on the opposite side of the room. Because we re-entered the Cavern, these stairs aren’t blown up yet, giving us a path to reach the alcove. Stand near the vines at this door on either the left or right side and jump to the lowest step of the stairs in the middle of the room. You should easily make it. Go on up and claim your token. You can actually get this in the past after getting the Boomerang instead.
Anyway, go back to the main room and this time go through the hallway on the right side of the room.
You’ll find yourself in a skinny room with Baby Dodongos. In the middle of this area along the left wall, Navi will fly up to an alcove and turn green. Play the Scarecrow’s Song to make Pierre appear and Hookshot to him. Snag your fifty fifth token
~ The Goron Named Link ~
It’s about time we took care of the ominous cloud hanging over Death Mountain. We can’t actually enter the heart of the mountain yet because it’s so hot. Instead, take a detour to Goron City.
Once there, tightrope walk across the… ropes… that lead out to the pedestal where the Goron’s Ruby used to sit back in the day and you’ll hear a Skulltula. It’s on the opposite side of the pedestal, so you’ll have to get out on one of the ropes on either side and use your Hookshot to snag it.
 Now, you may have noticed that the town is… kinda lonely. There’s only two gorons left in the city, and one of them is rolling around on the mid level, just like before. Time your Bombs so that you can blow him up and he’ll yell at you, claiming your name is his own! After a quick chat, you’ll discover he’s the son of Darunia, the Goron chief!
He’ll then force you to make him tell two little stories. Turns out, Ganondorf awakened a terrible dragon within the Fire Temple and is going to feed all of the Gorons to the dragon. Poo. After you’ve listened to both tales, he’ll award you with the Goron’s Tunic. Yay!
He’ll open up the shop and Darunia’s room again, and inform you that there’s a secret passage way into the Crater. When you’re ready, go ahead and jump down there, go into Darunia’s Room and pull back the statue to reveal our next destination.
~ Bolero of Fire ~
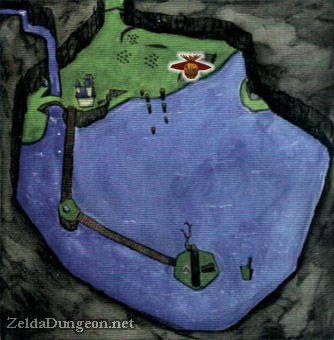
You can either come here from the top of Death Mountain or from the secret entrance in Darunia’s Room in Goron City. Either way, go to the lower area (you may have to jump there) and you’ll find a broken bridge. Use your Hookshot to get across the gap and walk along the bridge to be interrupted by Sheik, who has come to teach us, yet again, another song.
This one is called the Bolero of Fire, and it’ll take you to Death Mountain Crater whenever you like. Nifty as always. I think the song itself is rather boring, but I like the cinematic camera angles on steroids. Oooo.
~ Short Collection Before The Temple ~
After she’s finally gone, we can do a little collecting here. Play the Prelude of Light to get to the Temple of Time, put the sword back in the Pedestal and go fill up a bottle with bugs. After that, return here using the Bolero of Fire. Use the Bugs on the soft soil next to the Triforce platform to make a Gold Skulltula appear. After slaying it, make sure you plant a Magic Bean. Teleport back to the Temple of Time and return here as an adult.
Now you can ride the Magic Bean Plant up to the top of one of those giant volcano-like mountains, one of which has a Heart Piece sitting atop it.
After that, hop down and ride the plant again to take you to an alcove in the main wall of the area higher area (near the exit that leads to the top of Death Mountain). You could have technically gotten this one as a child by climbing down the wall.
After you’ve snagged the Heart Piece, you can play the Bolero of Fire to quickly get back down to where you need to be. Go straight forward and climb down the ladder to find the entrance to the Fire Temple.
~ Reunion With Darunia ~ 
As you enter the temple, run up the stairs and enter the door on your left. Just ignore the Fire Keese along the way.
Boss Room Inside, you’ll find Darunia next to the Boss Door. He’ll exclaim greetings and explain what his son already told you, as well as mention that he failed to find the “legendary hammer” and is going to tackle the dragon without it. We already know how that’ll end =( Then he enters without even having the Boss Key. Cheater!
After he disappears, you’re free to move around. Jump to the small platforms on your left, then to the little area in the corner. Step on the switch to open the nearby door and speak with the first Goron to free him. You’ll be finding several of them throughout the temple and they all have useful bits of information. This one informs you that you have to “do something” to the pillar in the ceiling of this room. We’ll get to that much later.
After he waddles off, be sure to snag the key in the chest, then return to the previous room. Now, go through the locked door on the opposite side.
~ Two Small Keys ~
Lava Cavern This next large room is filled with small islands and floating platforms in the lava. Before we can go through the door across the bridge, we need to get the Small Keys on both sides of the room. Let’s start with the left side (with the Time Block). Work your way over (don’t worry too much about the lava, it hurts you very slowly with the Goron’s Tunic on) and enter the door you find on the ledge.
Inside, release the Goron and snag the key. This one will tell you that walls make different sounds when you smack them with your sword if you can use a Bomb on it. Head back to the previous room.
Our next goal is to head across to the other side of the room, but instead, go stand on the edge of this platform, turn around, and play the Song of Time to move the Time Block down. This will open up a new door. Climb up and enter it.
Tile Room In this small room, just stay on one side of the room and use your shield to fend off the Tiles that came at you, then kill the Like Like carefully to avoid losing your tunic and shield. Snag the Skulltula Token with either your Hookshot or a jump attack (Z + A). Return to the previous room.
Lava Cavern Now, make your way to the opposite side of the room, avoiding the Fire Keese along the way. You can walk on lava for short distances without taking damage as well, so use that to your advantage. When you finally get there, you’ll find a funny looking wall in the shape of a door. Smack it with your sword if you’d like to make sure the Goron’s clue is genuine, then enter the door it reveals.
Inside, free the third Goron, who says you can use Bombs to activate switches, then snag the key. Go back to the lava room and go back to the bridge (right side). Enter the locked door to proceed.
~ Going Up ~ 
Flaming Elevator In this next room, our goal is to get up on top of the metal fencing. You can either slide down the wooden ramp and climb up, or just Hookshot it from here and climb up. Should you fall down into the lava, there’s a ramp on the side, though, you have a tendency to slip, so just wait until the fire hurts you, then use your Hookshot quickly.
Once you’ve climbed up, there’s two horizontal strips with Keese on them. Kill them and you’ll see that on the right side, there’s a block. Push this over the flaming pit below. Jump on top of the block and wait for the fire to push it up through the roof into a new room. Go through the locked door.
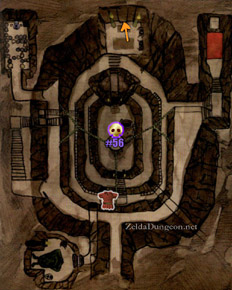
Fire Slug Room In this room, you’ll see a Goron caged up straight ahead. Unfortunately, we can’t get to him from here. Ignore him for now and climb up the ledge on your left. You’ll be confronted by a new enemy: a Torch Slug. These things are very easy, though they’ll relentlessly attack if they see you. Kill it and climb up the next ledge to vanquish his buddy.
Across the way, you’ll see a crystal switch next to a block. Jump to it and push the block off the ledge. Next, jump down and pull the block as far as you can until it’s completely covering the symbol on the floor. Climb on top of the block and use it to reach the higher tiers of the platform.
 At the very top is another piece of fencing that you can climb up, but it’s surrounded by fire. The crystal switch you saw below stops the fire for a short amount of time, but not long enough to climb all the way up. The solution is to stand on the middle tier and drop a bomb on the switch. Climb back up to the top of the platform while the bomb explodes below, giving you plenty of time to climb up the new area and enter the door.
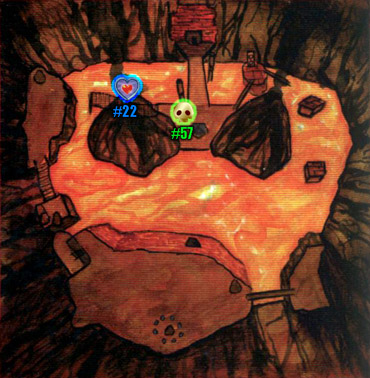
~ Boulder Maze, Lower Half ~
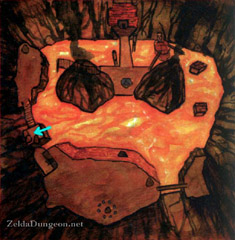
Boulder Maze (Below)
This large room is shaped like a crescent, and you’ll appear on the outer half. At the very top and bottom of the crescent is a Goron and Small Key. Near the top, right below the tip, is a locked door that leads to a small room. We’ll be going to that room last.
This entire room is filled with boulders that follow set paths that don’t always make logical sense, such as suddenly stopping and going back the other way without hitting a wall. All of the goodies in this room are along the outside wall, beneath overhangs of the ceiling (that makes them easy to pick out, huh?) so start off making your way right, following the outer wall.
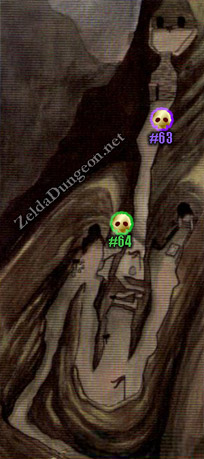
You’ll quickly come across the fourth Goron who informs you about the Door Mimics ahead which can be killed using a Bomb. Snag the Small Key and follow the wall back the way you came from. You’ll pass the face on the wall where you started, then round a corner and find a small alcove where the ceiling covers it in a triangle shape. Although the wall looks normal straight ahead, if you slash it with your sword, it’ll make a “zipt” sound. That and the fact that you can hear a Gold Skulltula behind it… Bomb it and claim the token.
Next, follow the wall again, making two rights and you’ll find another door which leads to a small, dark corridor again. Release the Goron and snag the Small Key. This one informs you that you can slash your sword or roll if you catch on fire to make it stop. Nifty.
We’re done in this room for now. Continue to follow the outer wall in a counter-clockwise direction and you’ll quickly find a locked door just waiting for you to go through.
~ Getting The Map ~ 
Narrow Bridge And Map Room In this small room, watch your step so you don’t fall down! This will take you all the way back to the lava cavern with the broken bridge… Shoot the silver eye switch above to open the door on your right. Enter it and open the large chest to find the Dungeon Map. Return to the small room and this time enter the locked door.
Flaming Wall of Death… Room… In this next room, walk along the narrow chunk of stone and jump onto the metal grating that’s suspended by the ceiling. (Why would anyone have anything like this in here anyway?!)
A wall of flame will abruptly appear behind you and slowly come towards you. If it hits you, it will knock you over and start back a little ways, giving you a chance to get on your feet. Perhaps the main annoyance of this part is the two Red Bubbles, who pop out of the lava in the “convenient” places to jump across.
Don’t feel too bad about falling in the lava, as it doesn’t hurt you immediately. You can actually intentionally jump in to avoid the Red Bubbles and walk a little ways only to jump back onto the metal grating.
Anyway, just follow it all the way to the end, climb up and go through the door.
~ Two More And A Shortcut ~ 
Boulder Maze (Above) Now that we’re on the upper half of the room, you can jump from platform to platform to get to other goodies. Do so and work your way right. You’ll see a switch on a smaller platform off to your left. You’ll have to make a “U turn” of sorts from platform to platform to get to it. When it’s activated, it’ll open a cage prison cell up high on the other side of the room.
Work your way over there and shoot the Torch Slug on the small platform with your Hookshot to stun it so you can get over there without risk of falling down and losing progress. Jump across, kill it, jump to the Goron. This one tells you to play your Ocarina when you can’t get to a certain place on the map. We’ll get to that in a moment. Anyway, the Goron will then walk on mid-air in escape. I wish I could do that… Snag the small key and head back to the middle of the room.
Now, we passed a platform that had a crack in it. You probably already did this, but go ahead and blow it up with a Bomb, then climb down the metal grating. The lengthy hallway will twist around and take you back to the green room we tackled earlier. Step on the switch here to open another prison cell and make a massive shortcut! Yippee!
Speak with the Goron, who informs you to use Bombs against the Flare Dancer we’ll encounter later on. With that in mind, snag the key and head back up the metal grating to the upper level of the Boulder Maze.
~ A Little Detour ~
If you want some money and a Gold Skulltula, do this section, or just skip ahead to the next if you don’t care. There’s some secret rooms that you can get to now that a Goron told you about a bit ago. First, go to the entrance to the Boulder Maze room up high, so you’re on top of all the platforms and the rocks.
From here, while standing next to the door and facing the room, if you turn right you’ll see a platform above you which Navi flies to. Play the Scarecrow’s Song to make Pierre appear. Hookshot to him, then turn around and Hookshot to the small elevator platform which takes you up. Go through the door.
Secret Room 1 Round the corner and climb up to find a Gold Skulltula. Snag it’s token and climb up to the next door.
Secret Room 2 In this final secret room, go forward a little ways and immediately turn left. You’ll quickly see yet another Gold Skulltula on the wall. Use your Hookshot to retrieve the token.
Now, there’s a switch nearby that douses the flames surrounding the chest on the ledge above. It only contains a gold Rupee (200). It’s not really worth it, but should you seek the challenge, you have to Hookshot to the target atop the steep ledge, then run the rest of the way, cutting it close to the edge. You should barely make it.
To get back, simply jump into the center of the pit, then let yourself fall all the way down. You’ll land in the center of the small, circular room with the narrow bridges.
~ More Fire ~
Flaming Wall of Death… Room… Whether you did the last section or not, our next objective is to get to the next locked door. You should have two Small Keys at the moment. Get to the room with the flames that appear behind you and force you to run onward. Halfway through the room, there is a ledge with a locked door along the outer wall. Get to a high point of metal grating and jump to it. Go through the door.
Go through the next small hallway.
Invisible Fire Wall Maze
This large room is shaped like a big “C” and has many skinny pillars sticking out of the ground, between which are invisible fire walls that you can only see when you get close. It’s fairly annoying, especially once you get to the rolling boulders. Also, there are fake doors in this room that will fall on you if you try to open them. You can tell if they are by the way they kind of stick out from the wall rather than being indented into it. A Bomb will easily dispose of them.
So, all that being said, make your way right, staying close to the outer wall. Kill the Fire Keese that come after you and avoid the boulder. You’ll see a door ahead on the right, but watch out for the fire in the pillars right before it. You’ll have to walk around it.
The small room simply has a large chest containing the Compass. Ya, that’s all we came this way for. Go back out and this time work your way back to the left side of the room. Don’t be fooled by the “door” across the way, that one’s fake. After you pass by the giant pillar and the two spinning faces that shoot fire, you’ll find yourself amidst another maze of invisible fire walls.
Try to stay on the inner side and just move slow. There’s no boulders on this side and the only other thing to worry about is a lone Fire Keese. When you finaly get to the locked door, use your last Small Key and go on through. =(
There’s a trapped Goron in this room, but we can’t do anything about it at the moment. You can play your Song of Time at the spot where Navi turns green to make a Time Block from the ledge above come down and give you a shortcut to the upper level, but it’s not really important right now. Go ahead and go through the next door.
Invisible Fire Wall Maze
We’re back on the other side, past the invisible wall of fire. Watch out for the Fire Keese that wants to burn your nice red hat. Now, there’s a door behind a wall of flaming death on your left. To get there, you’ll need to step on the switch across from you. There’s some invisible walls blocking the way though, so you’ll have to navigate towards the right a little and sneak around the flaming pillar with faces on it.
Wait for a gap in it’s attack and go around it. Go to the switch and check out the invisible walls ahead of you. There’s an invisible “L” shape you have to avoid at the top in the first place so you don’t run yourself stupidly into the flame. Quickly step on the switch, go left, then towards the wall.
Once you’re safely past the “flaming wall of death,” feel free to snag the goodies in the jars nearby. The door in the cubby is in fact another Door Mimic. Use a Bomb on it to reveal a hidden door behind it.
~ Getting The Hammer ~
Flare Dancer’s Room Yipes! This mini-boss is known as a Flare Dancer. It’s pretty easy if you know what to do, but can be annoyingly awkward to defeat if you wait too long.
Mini-Boss: Flare Dancer
As soon as the battle begins, this enemy will jump out of the flames and start spinning. If you don’t stop it quickly, it will shoot out flames in a radius around him. He has two types of flames: red, which simple sits there, and blue, which slowly inches its way around the room, similar to a previous Zelda title, the Adventure of Link.
The rest of the time, he’ll zip around the room like he’s skating on ice, leaving a trail of fire in his wake. He purposely tries to knock you over while doing this, and while it doesn’t do any damage, it makes it annoying to get your bearings again.
To hurt him, you have to wait for him to hold still right before he attacks. While he’s spinning around, Z target him and either throw a Bomb or use your Hookshot to temporarily rid him of his flaming body. He’ll be reduced to a black torso, which grows tiny legs and runs around the room squeaking. He’ll circle the room, then turn around when he sees you and run the other way repeatedly. Eventually, he’ll jump back into the flames.
There’s three good ways to hurt him at this point: Hookshot him back to you, circle around the room and use a Jump attack, or circle around the guy himself after he sees you, so he can’t move at all and sees you on his other side. The last method can be incredibly effective and make this battle very short if you do it right.
Eventually, he’ll take enough damage or be out long enough and jump back into the flames. If you harmed him enough, he’ll change colors, just like the Torch Slugs. Red to blue to green. It’s a nice little gauge to see how much life he has left. Overall though, disembodying him with the Hookshot then circling around and using a Jump Attack is by far the easiest and fastest way to defeat him.
After he’s dead, the flames on the platform will go out and the door you came through opens back up. Climb atop the platform and it’ll take you up a level. Go through the door.
Another Cystal Switch Room In this next small hallway, climb up the grating along the side, then place a Bomb over the edge to blow up the crystal switch like we did earlier. Climb up and again, enter the door.
Hammer Cavern This massive room is quite difficult as well as annoying. The goal is to step on the switch on the next ledge, then run along the skinny platform up to the giant chest before the fire comes back. The only problem is, if you fall off, you’ll have to work your way back up to this room all over again. Because of this, I recommend you use Farore’s Wind to create a portal at the door, which will allow you to warp back to the top if you fall down. Farore’s Wind is an optional spell, so don’t worry if you don’t have it – it’s not required.
First of all, I suggest going a long the left side and work your way all the way up to the chest, killing the Fire Keese along the way. This will make sure they don’t bother you. Jump back down and stand next to the switch. When you’re ready, make a run for it. It may take a few tries, but the prize is worth it.
Jump off to the lowest portion again and use it on that small platform on the ground with the Fire Temple’s symbol on it.
Jump down through the hole it reveals and use the Hammer to break down the totem-like statue heads blocking a door. Go on through.
~ The Last Small Key And “The Pillar” ~
“L” Shaped Room
Run forward, then turn around and kill the Keese before you do anything else. Next, smash the oddly placed pillar with your Hammer. This will cause the floor to break down into giant steps that lead down to a door.
Before you go down there however, pickup one of the nearby boxes and go down. If you broke them, just re-enter the room to make them appear again. At the bottom, place the box on top of the switch to keep the door open and go through.
Invisible Fire Wall Maze This next tiny room is pretty obvious. Smash the lone platform (I like to do so while standing on top of it) and it’ll lead back to the giant crescent shaped room we tackled earlier. Climb up onto the platform and you’ll find a rusty switch. You may have admired it earlier. Anyway, smash it with your Hammer and enter the door that has been closed for so long.
Time Block Room In this small room, play the Song of Time to move the Time Block across the way if you haven’t already. This will make another shortcut to get to the upper level as well as reveal a rusty switch across the way. Jump over there and use your Hammer on it to release the Goron below. Jump down and talk with him to learn that there’s a statue in the starting room. Be sure to snag the Small Key before you go.
Climb back up the ledge using the Time Block and go through the door.
~ Getting The Boss Key ~
Invisible Fire Wall Maze The first Goron you saved said that you needed to find a way to make the “pillar in the ceiling” come down. In this main room with all the invisible fire walls, get on top of that giant platform that goes straight through the floor and use your Hammer. Fall through the hole it reveals to be taken all the way back to the room where you first met Darunia. This will make a path to get to the Boss Room! Unfortunately, we don’t have the Boss Key yet… Leave the room.
Entrance Room Now that we’re back in the entrance room, you should be able to quickly find the statue that the Goron from a moment ago was talking about. Go down and stand on either the left or right side and pound away at it repeatedly. Go through the locked door that’s revealed.
Torch Slug Hallway This small room is filled with Fire Keese and Torch Slugs. Kill the Fire Keese first with your sword, then use your new Hammer to flip the Torch Slugs harmlessly over, leaving them defenseless. After they’ve all been defeated, go through the door.
Second Tile Room This small room has more flying Tiles and a Like Like. Kill them all and snag the Gold Skulltula, then head through the door on the left.
Second Flare Dancer Room There’s another Flare Dancer in this room. Now that we have the Megaton Hammer, this is made much easier. Simply smash the ground to remove it from its flaming body, then chase it down (or use the Hookshot) and slash it with your sword. Kill it just like you did the other one to make a small chest appear containing Bombs. Enter the next door (the one on the right)
Boss Key Hallway In this small hallway, smash the rusty switch and speak with the Goron to get a confirmation that it is indeed “Boss Time.” Open the giant chest to get the Boss Key. Leave through the last remaining door.
Entrance Room There’s nothing left to do but go tackle the boss. Head to the room where you saw Darunia and you should have the pillar shoved into the lava, making a platform for you to jump across to. If you didn’t do that, it’s up in the giant crescent shaped room with all the invisible fire walls, awaiting you to pound it with your hammer.
Anyway, before tackling the boss, if you want a Fairy in a bottle, there’s one on the ledge to the right in a jar. Enter the Boss Room.
~ Slaying The Dragon ~
As you enter the boss room, jump across to the platform onto the main one. You’ll witness a short cutscene where the platform behind you lowers into the lava, leaving you trapped here alone. The flaming pit in the center will rustle and Volvagia will pop out.
Too bad it looks like a worm…
Subterranean Lava Dragon, Volvagia
Wow, thanks Navi for that incredible advice… This worm-like oblong dragon has you trapped on a hexagon shaped platform surrounded by lava. Should you fall in, don’t worry, cause you can climb up the sides and back onto the main platform. Should the need arise, you can actually climb off to the side on purpose to avoid being attacked by any of his moves. All its attacks are somewhat awkward to avoid and they all do a great deal more damage than the other bosses you’ve faced thus far.
Volvagia has three main attacks it cycles through somewhat randomly. The first is flying up to the ceiling and bumping against it, causing flaming rocks to fall down. Generally, they fall where you were standing when he first went up to the ceiling, so going to the opposite side of the arena usually fixes that problem. In either case, run away from shadows.
The second attack is to come out of the lava and fly around the arena, trying to breathe fire at you. While this does loads of damage and knocks you over (potentially into the lava below) it’s easily avoided by simply standing next to the hole he originally comes out of; the reason being, because he doesn’t have a very tight turn radius and he’s too stupid to simply back up. Alternatively, you can run around like a chicken with your head cut off, circling the area, or just Z target him and use your shield. Standing still is easier in my opinion. =)
His third attack is to stick his head out and lean over the edge, pausing a moment before breathing fire or smacking you if you’re close enough. This is your chance to teach him a lesson. Each time he does this, run over and smack him in the head with your Hammer. This will stun him and give you the opportunity to slash away with your sword.
As he takes more damage, he’ll stall more in his appearance out of the nine lava holes, trying to trick you into running to different ones. It’s pretty easy to keep track of though, simply because he’ll have two in a row that are fake, then the third one is him. The best method is to simply stand near the middle and run towards the last one. Because lava doesn’t hurt you immediately to walk on it now, feel free to walk over the holes themselves.
After several hits, it’ll grab it’s head and scream as it goes back into the lava, only to emerge to fly around as it burns from the inside out and it’s skeleton falls to the ground disintigrating.
The triumphant music will announce the appearance of the blue teleporting light. Make sure you snag the Heart Container before you go though!
~ Temple of Light ~
You’ll witness a short cutscene in which the area surrounding Death Mountain is cleansed because the dragon is dead. Well that’s nifty. Shortly after you’ll see yourself appearing in the Chamber of Sages along with Darunia, the obvious choice for the Sage of Fire. He laments about how proud he is of you, and that you’ve become “a real man.” He’ll then give you the Fire Medallion.
~ Remaining Goodies On Death Mountain ~
Death Mountain Crater
You’ll appear back in Death Mountain Crater on the teleport pad. Now that we have the Hammer, some goodies are available to us nearby. First of all, head left, back across the bridge. You’ll have to use your Hookshot to get back to the other side (just shoot the broken part of the bridge and climb up).
Work your way as far left as you can go, you’ll eventually cross a bridge and be amongst three red boulders. Bombs don’t work on these harder ones. Use your Hammer on the two on your right, blocking the entrance.
Inside, you’ll find another Fairy Fountain. Stand on the Triforce symbol and play Zelda’s Lullaby to make the Great Fairy of Wisdom appear. This one will enhance your Magic Meter, making it twice as long. Nifty. With that in hand, work your way back to Death Mountain Trail.
The fastest way is to simply break the red boulder on your right as soon as you exit the cave and go up through the entrance to Death Mountain Crater.
Death Mountain Trail
Now that we can break the red boulders all over the place, there’s two Gold Skulltulas we can snag here real quick. Assuming you’re at the top of Death Mountain right now, the first one to get is in that valley at the top of the mountain where the flaming boulders rained down on you earlier. Now that Volvagia is dead, it won’t do that.
Anyway, play the Sun’s Song to make it night and smash the boulders to find a Gold Skulltula.
Next, go to the entrance to Goron City. Right next to it is that ledge above Dodongo’s Cavern where you threw the Bomb Flower over to open the entrance in the past. There’s a red boulder here. Once again, there’s a Gold Skulltula beneath it at night.
 The Adventure of Link Walkthrough – Hidden Palace –
  A Link to the Past Walkthrough – Turtle Rock –
  Skyward Sword Walkthrough – Thunderhead –
  Oracle of Ages Walkthrough – The Black Tower –
  A Link Between Worlds Walkthrough – Tower of Hera –