

Nothing is more infuriating than when you’re trying to make a video call, and your webcam refuses to work. This week, Kannon Yamada will explore how to diagnose webcam problems in both Windows and Skype, and how to resolve them.
I have a pretty standard computer running Windows 8. For the past few weeks, I’ve not been able to make video calls with Skype. My webcam simply refuses to work. Do you know how I can fix it?
Fixing Skype sucks. I always recommend using the infinitely better Google Hangouts or Appear.in – but if you’re a Skype die-hard, there’s some simple tips to getting it to work properly. Seriously, though, there’s lots of reasons why Hangouts beats out Skype. If you haven’t tried it, you should.
Skype – like most video chat applications – revolves around three components: The microphone, speaker, and the webcam. Whenever a user experiences problems, they need to first make sure that all three components work properly. For example, if you recently upgraded to Windows 10, audio problems abound. Skype can suffer from problems that originate from the Operating System (OS) or from Skype itself. But before you begin troubleshooting, start with a few simple fixes.

A good first step in any Skype troubleshooting scheme is to inspect all three components, first, before moving onto other options. So first, let’s start with the basics. Ask yourself three questions:
If you’ve answered “yes” to the above three questions, move onto checking whether or not Skype works, period. If you answered no to the above questions, then you have a hardware problem and might need to replace that particular piece of hardware.
Smartphone and tablet users don’t need to worry about the above three steps as their microphones, speakers, and cameras are already connected.
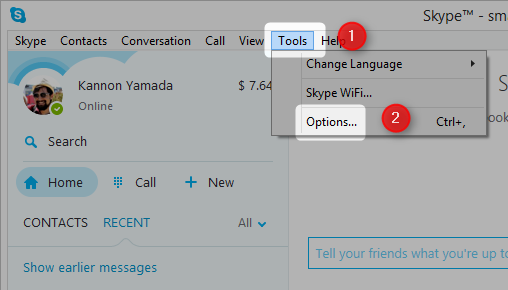
First, open Skype. Then from within the Skype interface select Tools from the tabs at the top of the screen. Then choose Options.
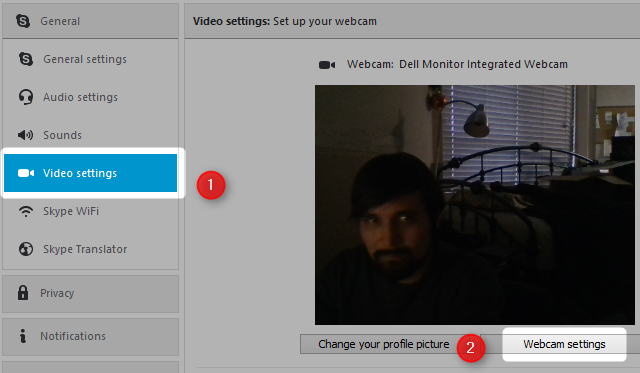
In the pane on the left, you’ll see several options. Choose Video settings. If you don’t see a video image of yourself in the right panel, then that means your camera is improperly configured or the lighting is not properly adjusted. If you do see an image of yourself, that means the camera works.
If you have more than one webcam attached to your PC, then you might need to select the correct one.
If the video image of yourself is too dim, then you might need to adjust the lighting settings. In this case, go to Webcam settings.
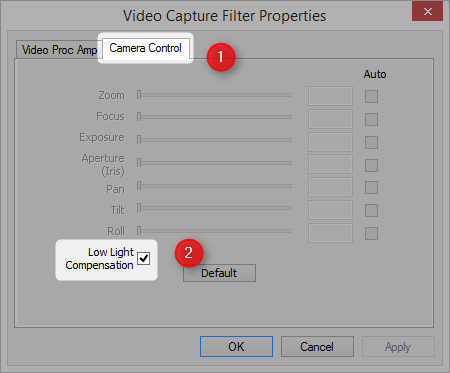
Select Camera Control in the tab at the top of the screen. Then check the box for Low Light Compensation. That should automatically brighten your webcam image up. If it does not, skip to the section below titled “Check the Webcam in Windows“.
Just in case you’re also experiencing microphone or speaker problems, in the pane on the left, you’ll see an option for Audio settings. Select Audio settings.
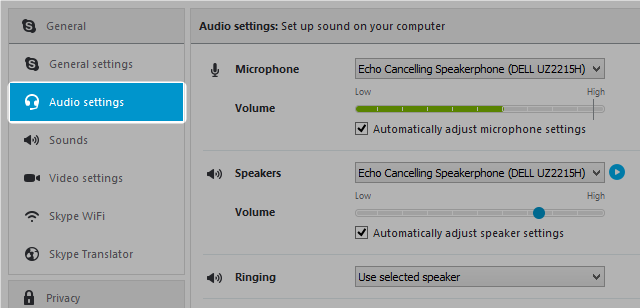
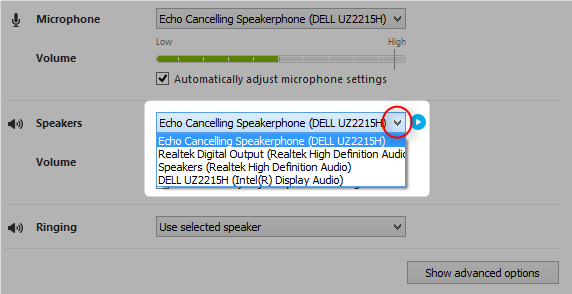
In the right pane, you’ll see all of the attached microphones and speakers. You can change the associated device by left-clicking on the downward facing arrow. This brings up the complete number of devices that are available to Skype. If the one that Skype defaults to doesn’t work, try different options until it works. For example, I can change from the Echo Cancelling Speakerphone to my Realtek Digital Output.
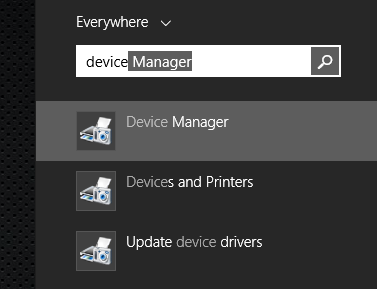
All devices rely on driver support at the OS level in order to work properly. Troubleshooting Windows can require a lot of effort. In Windows, you can check the status of your drivers in Device Manager. Just go to the Search bar (which is located from within the Start menu) and type in Device Manager. You can also access the Device Manager from the Windows Control Panel.
From within Windows Device Manager, you’ll see all the hardware that’s connected to your machine. If you notice any red, yellow, or down-point arrow icons, that means the device isn’t functioning.
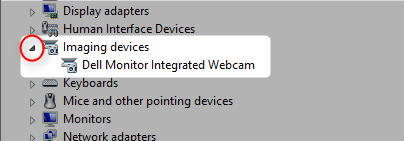
Expand the entry for Imaging devices by left-clicking on the right-pointing arrow next to the Imaging devices entry.
Note: You can also check the microphone and speakers here. The troubleshooting steps are identical, although you would go to the entry for Audio inputs and outputs AND Sound, video and game controllers instead of Imaging devices, for microphones and speakers.
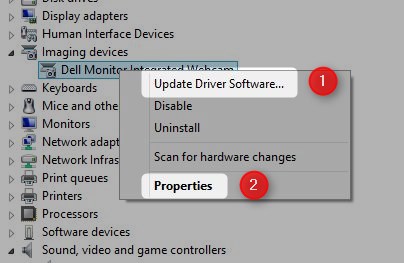
Then right-click on the device, or devices, located underneath Imaging devices. This brings up a context menu. On the context menu, choose Update Driver Software. Then choose Search automatically for updated driver software. If you’re lucky, this will fix the issue. If it does not, choose Properties from the context menu.
You have two options here. You can try to reinstall the drivers. In this case, you’d need to locate the model of your webcam and go to the manufacturer’s website for driver support.
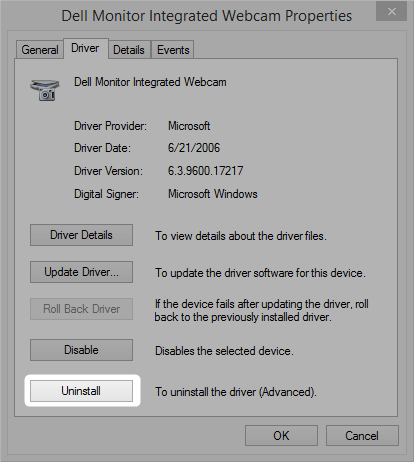
Alternatively, you can choose to uninstall the device and then restart your computer. From the Properties menu, choose Uninstall and then restart your computer.
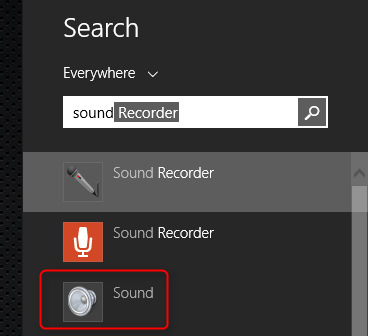
Windows won’t always automatically default to the correct device. To set the correct devices as the default, you need to go to Windows Sound. Open Windows Search and type in Sound. Then click on the Sound icon. You can also reach this through the Control Panel.
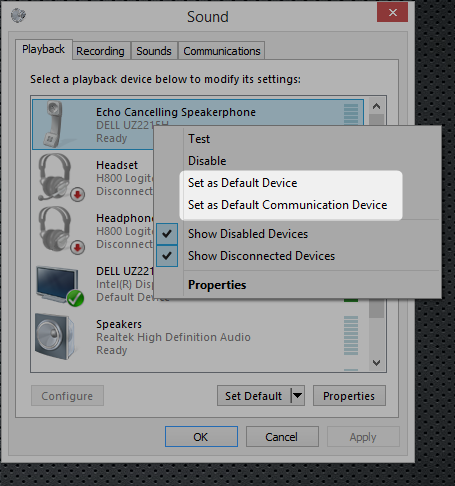
From Windows Sound, right-click on the device suffering difficulties. Then from the context menu you can either choose Set as Default Device or Set as Default Communications Device. If you set it as the Default Communications Device, it will automatically become the default whenever Skype is launched. If the device is not connected, it will display with a red icon in its lower-right side. If it’s been disabled, you’ll see a downward-pointing arrow icon. If it’s functioning properly, you’ll see a green icon.
After you’ve set the device as the default, restart the computer. Then start Skype and see if it’s working properly. If it’s not, you might have a hardware issue which requires a technician. Intermittent sound problems are a frequent sign of hardware failure.
We helped this reader. We can help you, too. Got a burning question, or a tech problem you need solved? Just click the button above! And, of course, please leave any feedback or comments in the comments below!


 The Witcher 3: Wild Hunt Location Guide: Where To Find All The Keys
 How to unlock PvP in Destiny
 A Game of Dwarves Hands-On Preview
 A Sum of Parts: This Way and That Way
 How to Sideload Apps on Windows 8 & 10